1
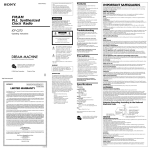
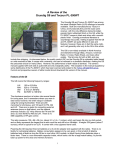
3-292-622-11(1) WARNING To reduce the risk of fire or electric shock, do not expose this apparatus to rain or moisture. FM/AM Digital Tuner To reduce the risk of fire, do not cover the ventilation of the apparatus with newspapers, tablecloths, curtains, etc. And do not place lighted candles on the apparatus. To reduce the risk of fire or electric shock, do not expose this apparatus to dripping or splashing, and do not place objects filled with liquids, such as vases, on the apparatus. Do not install the appliance in a confined space, such as a bookcase or built-in cabinet. Do not expose the batteries (battery pack or batteries installed) to excessive heat such as sunshine, fire or the like for a long time. Operating Instructions As the main plug is used to disconnect the unit from the mains, connect the unit to an easily accessible AC outlet. Should you notice an abnormality in the unit, disconnect the main plug from the AC outlet immediately. XDR-F1HD ©2008 Sony Corporation Printed in China You are cautioned that any changes or modifications not expressly approved in this manual could void your authority to operate this equipment. These following indications are located on the bottom exterior. Owner’s Record This symbol is intended to alert the user to the presence of uninsulated “dangerous voltage” within the product’s enclosure that may be of sufficient magnitude to constitute a risk of electric shock to persons. The model number and the serial number are located on the bottom. Record the serial number in the space provided below. Refer to them whenever you call upon your Sony dealer regarding this product. Model No. XDR-F1HD Serial No._________________________________ For customers who purchased this product in the USA Please register this product on line at http://www.sony.com/productregistration. Proper registration will enable us to send you periodic mailings about new products, services, and other important announcements. Registering your product will also allow us to contact you in the unlikely event that the product needs adjustment or modification. Thank you. This symbol is intended to alert the user to the presence of important operating and maintenance (servicing) instructions in the literature accompanying the appliance. INFORMATION This equipment has been tested and found to comply with the limits for a Class B digital device, pursuant to Part 15 of the FCC Rules. These limits are designed to provide reasonable protection against harmful interference in a residential installation. This equipment generates, uses and can radiate radio frequency energy and, if not installed and used in accordance with the instructions, may cause harmful interference to radio communications. However, there is no guarantee that interference will not occur in a particular installation. If this equipment does cause harmful interference to radio or television reception, which can be determined by turning the equipment off and on, the user is encouraged to try to correct the interference by one or more of the following measures: —Reorient or relocate the receiving antenna. —Increase the separation between the equipment and receiver. —Connect the equipment into an outlet on a circuit different from that to which the receiver is connected. —Consult the dealer or an experienced radio/TV technician for help. Important Safety Instructions 1) 2) 3) 4) 5) 6) 7) Read these instructions. Keep these instructions. Heed all warnings. Follow all instructions. Do not use this apparatus near water. Clean only with dry cloth. Do not block any ventilation openings. Install in accordance with the manufacturer’s instructions. 8) Do not install near any heat sources such as radiators, heat registers, stoves, or other apparatus (including amplifiers) that produce heat. 9) Do not defeat the safety purpose of the polarized or grounding-type plug. A polarized plug has two blades with one wider than the other. A grounding type plug has two blades and a third grounding prong. The wide blade or the third prong are provided for your safety. If the provided plug does not fit into your outlet, consult an electrician for replacement of the obsolete outlet. 10)Protect the power cord from being walked on or pinched particularly at plugs, convenience receptacles, and the point where they exit from the apparatus. 11)Only use attachments/accessories specified by the manufacturer. 12)Use only with the cart, stand, tripod, bracket, or table specified by the manufacturer, or sold with the apparatus. When a cart is used, use caution when moving the cart/apparatus combination to avoid injury from tip-over. 13)Unplug this apparatus during lightning storms or when unused for long periods of time. 14)Refer all servicing to qualified service personnel. Servicing is required when the apparatus has been damaged in any way, such as power-supply cord or plug is damaged, liquid has been spilled or objects have fallen into the apparatus, the apparatus has been exposed to rain or moisture, does not operate normally, or has been dropped. Connecting the system Connecting the antenna This section describes how to hook up the unit to the audio system. Be sure to turn off the power of each component before making the connections. To connect the AM loop antenna L HD Radio™ Technology Manufactured Under License From iBiquity Digital Corp. U.S. and Foreign Patents. HD Radio™ and the HD Radio logo are proprietary trademarks of iBiquity Digital Corp. What is HD Radio™ Technology? HD Radio Broadcasting was approved by the Federal Communications Commission in October 2002 as the system for digital AM and FM broadcasting in the U.S. HD Radio technology features include: –Static-free, clear radio reception. –FM Multicasting – the ability to broadcast multiple program streams over a single FM frequency. –A variety of “data services,” including text-based information – artist name, song title, etc. scrolled across your receiver display. –Digital broadcasts in the same frequencies as analog broadcasts; listeners do not need to learn a new station number and today’s stations remain at their current place on the dial. HD Radio technology is developed and licensed by iBiquity Digital Corporation and supported by the leaders of the broadcasting, consumer electronics and automotive industries. Features The shape and the length of the antenna is designed to receive AM signals. Do not dismantle or roll up the antenna. ANTENNA AM FM RESET R AUDIO OUT AUDIO OUT (Stereo pin plug) (Red) (R) AUDIO OUT (Stereo pin plug) (White) (L) 1 Remove only the loop part from the plastic stand. 2 Set up the AM loop antenna. Audio cable (Not supplied) Audio input (White) (L) Audio input (Red) (R) 3 Connect the cords to the AM antenna terminals. Cord (A) or cord (B) can be connected to either terminal. Insert the cord while pushing down the terminal clamp. Notes • Install this system so that the power cord can be unplugged from the wall socket immediately in the event of trouble. • If noise occurs, separate the unit from other components. • Noise may occur during AM reception if the unit is connected to a digital amplifier or a component equipped with a digital amplifier. A 4 B Only insert up to here. Make sure the AM loop antenna is connected firmly by pulling softly. Adjusting the AM loop antenna • Compact size HD Radio™ tuner unit. • Large LCD display to show information about the content. • Up to 20 presets for FM and AM stations. • Audio-output (Stereo: pin jack.) • Full function remote control. Find a place and an orientation that provide good reception. • Do not place the AM loop antenna near the unit or other AV equipment, as noise may result. • If you use an external polarized AM antenna, be sure to connect the ground cord to the U terminal. The supplied AM antenna cord has no polarity. Precautions Tip Adjust the direction of the AM loop antenna for best AM broadcast sound. • Play the unit on the power source specified in “Specifications”. • To disconnect the AC power cord (mains lead), pull it out by the plug, not the cord. • The unit is not disconnected from the AC power source (mains) as long as it is connected to the wall outlet, even if the unit itself has been turned off. • The nameplate, the symbol for CLASS II and the dating code are located on the bottom exterior. • Do not leave the unit in a location near a heat source such as a radiator or airduct, or in a place subject to direct sunlight, excessive dust, mechanical vibration, or shock. • Allow adequate air circulation to prevent internal heat build-up. Do not place the unit on a surface (a rug, a blanket, etc.) or near materials (a curtain) which might block the ventilation holes. • Should any solid object or liquid fall into the unit, unplug the unit and have it checked by a qualified personnel before operating it any further. • To clean the casing, use a soft cloth dampened with a mild detergent solution. • Never touch the wire of the external FM antenna during a thunderstorm. Furthermore, immediately disconnect the AC power code from the radio. If you have any questions or problems concerning your unit, please consult your nearest Sony dealer. Troubleshooting To connect the FM antenna This unit comes supplied with an FM dipole antenna. Connect an antenna that provides good reception to the FM antenna terminal. FM dipole antenna (supplied) Adjusting the FM dipole antenna Be sure to fully extend the FM dipole antenna. Attach the antenna in the shape of a T to a high position on a wall away from this unit. Tip If you have poor FM reception, use a 75 Ω coaxial cable (not supplied) to connect the unit to an outdoor FM antenna as shown below. Should any problem persist after you have made the following checks, consult your nearest Sony dealer. ANTENNA AM Only analog broadcast is received in an HD Radio reception area. • Depending on the conditions, if the incoming signal strength is too weak or unstable, the HD indicator will not flash or light up. In that case, the HD Radio broadcast will be received as an analog signal. Noise occurs. • Ensure that the unit and the antenna are not near a digital amplifier or any other components that emits noise. FM Outdoor FM antenna 4 A 5 DISPLAY BAND SCAN HD SCAN MENU TUNE TUNE PRESET ENTER PRESET Repeat step 4 to set the minute. Note If you do not set the menu within 65 seconds, the setting mode is canceled. Changing the display mode and settings When an HD Radio station is received FM To change the display mode Press DISPLAY. x The display changes as follows: AM RESET / 1 Press SLEEP on the remote commander. “SLEEP” and the digits for the sleep timer duration appear. FM SLEEP FM x x FM “ ” appears and the time indication changes to summer time. AUDIO OUT You can enjoy falling asleep to the radio using the builtin sleep timer that turns off the radio automatically after a preset duration. FM Press MENU to show the menu display. Press SELECT or to select “DST,” then press ENTER. 3 Press SELECT or to select “ON,” then press ENTER. FM Setting the sleep timer When an analog radio station is received 1 2 ANTENNA R The hour is set and the minutes start to flash. To change the display to the daylight saving time (summer time) indication SELECT L Press SELECT or until current hour appears in the display, then press ENTER. 2 If you press SLEEP while the unit is turned off, the unit is turned on. Press SLEEP repeatedly to select the desired sleep timer setting. Each press changes the setting time as follows: 60 45 30 15 OFF FM To deactivate the DST function, select “OFF” in step 3. Playing the radio –Manual tuning 1 2 3 AC power cord Press / to turn on the radio. Press BAND to select the band AM or FM. Press TUNE + or – to tune in to a desired frequency. Note The frequency cannot be input with the number buttons of the remote commander. A Field strength level indicator B Preset number* C Band D Frequency E Current time * When you tune in a station by selecting a preset number. When an analog FM broadcast that supports RBDS (Radio Broadcast Data System) is received FM –Preset tuning You can preset 20 stations each for AM and FM. AM FM x Presetting a station 1 Follow steps 1 to 3 in “Manual tuning” to tune the frequency you wish to preset. 2 Press and hold ENTER for a few seconds. SLEEP FM The display changes as follow: x FM FM B 3 Press PRESET + or – to select the preset number, then press ENTER. The frequency is stored in the selected preset number. SLEEP To preset another station, repeat these steps. 1 2 3 4 5 6 7 8 9 0 HD SCAN TUNE/ SELECT ENTER PRESET SCAN BAND MENU BRIGHT DISPLAY Note If you try to store another station in the same preset number, the previously stored station will be replaced. Tuning in to a station 1 Press / to turn on the radio. 2 Press BAND to select the band AM or FM. 3 Press PRESET + or – to select the desired preset number. Tip The preset can be selected by pressing the number button of the remote commander. Press ENTER after the preset number is selected. –Scan tuning The unit will automatically scan the selected band. In HD scan, HD Radio stations are scanned. Size AAA (R03) ×2 Preparing the remote commander Installing the batteries into the remote commander (See Fig. B) The number 5 and the PRESET + buttons have a tactile dot. Setting the clock 1 Plug in the unit. 2 Press MENU to show the menu display. When to replace the batteries With normal use, the batteries should last for about six months. When the remote commander no longer operates the unit, replace all the batteries with new ones. 3 4 The display will flash “AM 12:00.” Insert two size AAA (R03) batteries (not supplied). Notes • Do not charge dry batteries. • When you are not going to use the remote commander for a long time, remove the batteries to avoid any damage caused by leakage and corrosion. 1 2 3 Press SELECT or to select “TIME SET,” then press ENTER. The hour will start to flash in the display. 5 Press / to turn on the radio. Press BAND to select the band AM or FM. Press SCAN or HD SCAN on the unit or remote commander. Scanning of the selected band starts. When a station is received, scanning pauses for 3 seconds and then continues. When the unit tunes in to the desired station, do any of the following operations to stop scanning. –Press ENTER on the unit or remote commander. –Press SCAN or HD SCAN. If necessary, press TUNE + or – to tune in to the station more precisely. A B C D E F G Field strength level indicator Preset number* Band Station name Name of station currently tuned in. Frequency Current time Text information Text information transmitted from station. A HD indicator HD indicator Reception status Stays lit Strong HD signal, digital reception* Flashes Weak HD signal, analog reception Not displayed No HD signal, analog reception * The HD indicator flashes momentarily at first, and then stays lit. B C D E F G H I J K Field strength level indicator Preset number* Call sign Band Song title/artist name Channel number (FM only) Appears when HD Radio broadcasts multiple program. Press TUNE + or – to select a sub channel. Frequency Current time Station name Text information * When you tune in a station by selecting a preset number Note The display item differs depending on the content of a broadcast or the station. To change the display settings (BRIGHTNESS/CONTRAST) 1 2 Press MENU to show the menu display. Press SELECT or to select “BRIGHTNESS” or “CONTRAST,” then press ENTER. 3 Press SELECT or to select the setting or to adjust the level, then press ENTER. * When you tune in a station by selecting a preset number. BRIGHTNESS: The brightness of the display is selected from “HIGH,” “MIDDLE” or “LOW.” CONTRAST: The contrast of the display can be adjusted by 11 levels. Note The display item differs depending on the content of a broadcast or the station. Note If you do not set the menu within 10 seconds, the setting mode is off. Tip You can adjust “BRIGHTNESS” directly by pressing BRIGHT on the remote commander. After about 4 seconds, “SLEEP” lights in the display when the duration time is set. The unit automatically turns off when the duration time is passed. To change the sleep timer setting You can press SLEEP repeatedly to select the desired sleep timer setting even after the sleep timer has been activated. To deactivate the sleep timer Press / to turn off the unit before the setting time has elapsed, or press SLEEP repeatedly to set the sleep timer to “SLEEP OFF” in step 2. Note These operations are available only when using the remote commander. Resetting the unit The RESET button is located on the rear of the unit. Press this button with a pointed object if the radio fails to function properly. The clock settings and stations you have preset, etc., will revert to the factory preset. Using the remote commander Buttons shared on both the remote commander and the unit control the same functions. HD SCAN button The selected band is scanned, and receivable HD Radio stations are received for 3 seconds in order of frequency. SCAN button The selected band is scanned, and receivable radio stations are received for 3 seconds in order of frequency. BRIGHT button To adjust the brightness of the display. Specifications Time display 12-hour system Frequency range FM : 87.5 – 108 MHz AM : 530 – 1,710 kHz Audio output Output level 0.7 Vrms at 47 kΩ Recommended load impedance over 10 kΩ Antenna terminal 75 Ω antenna terminal for FM Antenna terminal for AM Power requirements 120 V AC, 60 Hz Dimensions Approx. 180 × 60 × 160 mm (w/h/d) (7 1/8 × 2 3/8 × 6 3/8 inches) not incl. projecting parts and controls Mass Approx. 1.1 kg (2 lb 6.8 oz) Supplied accessories Remote commander (1) FM dipole antenna (1) AM loop antenna (1) Design and specifications are subject to change without notice.