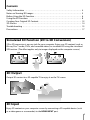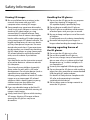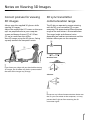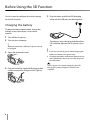
1
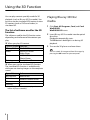
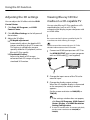
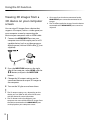
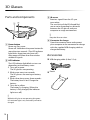
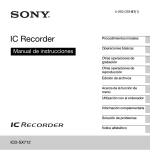
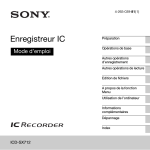
Enjoying 3D Information Guide What You Can Do with the 3D Function This VAIO computer comes with the exciting new 3D function that allows quick and easy playback of various types of 3D content. 3D Playback Enjoy a new 3D experience by playing various types of 3D content (such as Blu-ray 3D™ Disc media and 3D photos). Contents Safety Information… ………………………………………………………………… 4 Notes on Viewing 3D Images………………………………………………………… 5 Before Using the 3D Function………………………………………………………… 6 Using the 3D Function… …………………………………………………………… 8 Creating Your Original 3D Content…………………………………………………… 13 3D Glasses… ………………………………………………………………………… 14 Troubleshooting……………………………………………………………………… 15 Precautions…………………………………………………………………………… 17 Simulated 3D Function (2D to 3D Conversion) 2D to 3D conversion is an easy task for your computer. Enjoy your 2D content (such as Blu-ray Disc™ media, DVDs, and recorded videos) in simulated 3D using the simulated 3D function. (The effect applies only to images displayed on the computer screen.) 3D Output Output 3D content to a 3D-capable TV to enjoy it on the TV screen. 3D Input Enjoy 3D content on your computer screen by connecting a 3D-capable device (such as a video game or a camcorder) to the HDMI INPUT port. Safety Information Viewing 3D images Handling the 3D glasses Be sure to follow the instructions in the Do not use the 3D glasses for any purpose manuals that came with your VAIO computer when viewing 3D images. Some people may experience discomfort (such as eye strain, fatigue, or nausea) while watching 3D video images or using stereoscopic 3D-related software. Sony recommends that all viewers take regular breaks while watching 3D video images or using stereoscopic 3D-related software. The length and frequency of necessary breaks will vary from person to person. You must decide what works best. If you experience any discomfort, you should stop watching the 3D video images or using stereoscopic 3D-related software until the discomfort ends; consult a doctor if you believe necessary. You should also see the instruction manual of any other device or software used with this computer. The vision of young children (especially those under six years old) is still under development. Consult your doctor (such as a pediatrician or eye doctor) before allowing young children to watch 3D video images or use stereoscopic 3D-related software. Adults should supervise young children to ensure they follow the recommendations listed above. If you see a double image or feel the 3D effect is less pronounced while viewing 3D images, stop viewing. Always wear the 3D glasses while viewing 3D images. Viewing 3D images without wearing the 3D glasses may cause discomfort. other than viewing 3D images on 3D-capable displays specified by Sony. Do not drop or modify the 3D glasses. If the 3D glasses are broken, avoid contact of broken parts with your eyes or mouth. Be sure to keep small parts out of the reach of children. If swallowed, consult a doctor immediately. Be careful not to pinch your fingers in hinges when bending the temple frames. Warning regarding the use of the 3D glasses Do not put the 3D glasses in a fire. Do not disassemble the 3D glasses. Do not use, charge, store, or leave the 3D glasses near a fire, or in places with a high temperature, e.g., in direct sunlight, or in sun-heated cars. Use only the supplied USB charging cable. Do not charge the 3D glasses with anything other than your computer or recommended USB charging AC power adapter. For details on Sony devices compliant with 3D, refer to the operating instructions supplied with the device. Do not allow water or foreign material to enter the 3D glasses. Notes on Viewing 3D Images Correct posture for viewing 3D images 3D sync transmitter communication range Always wear the supplied 3D glasses while viewing 3D images. Adjust the angle of the LCD screen so that your eyes are perpendicular to your computer screen and keep a distance of 2.5 feet (75 cm) or more from the screen. View 3D images using the 3D glasses, facing squarely towards the computer screen. The 3D glasses operate by communicating with the 3D sync transmitter on your computer. The approximate communication range of the transmitter is illustrated below: The range (angle and distance) varies depending on ambient environment and the location where you use the computer. 90° Overhead view If you lie on your side or tilt your head while viewing 3D images, the 3D effect may be less pronounced or the color of the images may change. 50° 50° Side view 30° 30° Do not use any infrared communication device near the 3D sync transmitter on the computer, as it may prevent the 3D glasses from receiving the 3D transmitter signal. Before Using the 3D Function You first need to configure the initial settings for the 3D function. 5 Plug the other end of the USB charging cable into the USB port on the computer. Charging the battery To prevent battery deterioration, charge the battery at least once every six to twelve months. 1 2 Turn off the 3D glasses. Turn on your computer. When the computer is off, the 3D glasses cannot be charged. 3 Open the connecter cover. 4 Plug one end of the supplied USB charging cable into the connector for charge on the 3D glasses. The battery starts charging and the yellow LED indicator light on the 3D glasses turns on. If you turn on the 3D glasses while charging the battery, the battery charge will stop. Charging the battery with devices other than the ones specified by Sony may cause the 3D glasses to malfunction. The 3D glasses can also be charged by the USB charging AC power adapter AC-U501AD (not supplied). Configuring the initial settings for NVIDIA 3D Vision Selecting 3D-related software After you turn on your computer for the first time and set up Windows, the initial settings wizard for the 3D function (NVIDIA 3D Vision) appears. Click Yes to start the initial settings wizard. After the settings are complete, playback of the 3D-demo video automatically starts. To stop the playback, press the Esc key. You can quickly find and start 3D-related software you want to use from VAIO 3D Portal. Do not wear the 3D glasses until prompted to do so by the initial settings wizard for the 3D function (NVIDIA 3D Vision). Adjust the angle of the LCD screen by following the instructions in Notes on Viewing 3D images (page 5). If you have not yet completed the initial settings after the Windows setup, you can start the initial settings wizard by pressing the 3D button on the computer. 1 Click Start , All Programs, and VAIO 3D Portal to start VAIO 3D Portal. 2 3 Select the software you want to use. Read the on-screen instructions to start the software. Using the 3D Function You can play content specially made for 3D playback (such as Blu-ray 3D Disc media). You can also use the simulated 3D function to view 2D content (such as DVDs and videos) in simulated 3D. The list of software used for the 3D function The software used for the 3D function varies depending on the format of the content you play. Playing Blu-ray 3D Disc media 1 Click Start, All Programs, Corel, and Corel WinDVD BD. WinDVD BD 3D starts. 2 Insert Blu-ray 3D Disc media into the optical disc drive. Playback automatically starts. The 3D button’s backlight is on during 3D playback. 3 Turn on the 3D glasses and wear them. When you play 3D content Type of Content Software Blu-ray/DVD WinDVD BD Video NVIDIA 3D Vision Video Player Photo NVIDIA 3D Vision Photo Viewer Painting Family Paint 3D When you use the simulated 3D function The simulated 3D function is available only while you are viewing images on the computer screen. Type of Content Software Blu-ray/DVD WinDVD BD Video Windows Media Center Photo — Painting — Depending on the content you play, videos may not be displayed smoothly. You can switch 3D images to/from 2D images by pressing the 3D button on your computer. Viewing 3D photos or videos Converting 2D content to 3D 1 Start the software that supports 3D photo or video playback. 2 3 4 Start 3D photo or video playback. The simulated 3D function allows you to convert and play 2D content (such as videos) in simulated 3D just by pressing the 3D button on your computer while you are viewing 2D content on the computer screen. Turn on the 3D glasses and wear them. Press the 3D button on your computer. The 3D button’s backlight is on during 3D playback. You can switch 3D images to/from 2D images by pressing the 3D button on the computer. You can also display 3D photo images by specifying NVIDIA 3D Vision Photo Viewer from the menu on PMB VAIO Edition. When you change 3D photo images to 2D photo images, the images are displayed in 3D format, such as side by side format. You can stop 3D playback by pressing the Esc key during the playback. The quality of simulated 3D may vary depending on the original 2D source content. When using the simulated 3D function, note that the displayed image is modified from the original due to the conversion performed by the computer. 1 Start the software that supports the simulated 3D function and the type of content you want to play. 2 Start playback of the content (such as videos). 3 4 Turn on the 3D glasses and wear them. Press the 3D button on the computer. The 3D button’s backlight is on during 3D playback. You can switch 3D images to/from 2D images by pressing the 3D button on the computer. Using the 3D Function Adjusting the 3D settings You can adjust the 3D effect with the VAIO Control Center. 1 Click Start, All Programs, and VAIO Control Center. 2 Click 3D Effect Settings in the left pane of the window. 3 Adjust the 3D effect. 3D depth adjustment Automatically adjusts the depth of 3D images according to the LCD screen size. This setting is available for content specially made for 3D playback (such as Blu-ray 3D Disc media). Simulated 3D effect Adjusts the depth of 3D images converted from 2D images using the simulated 3D function. Viewing Blu-ray 3D Disc media on a 3D-capable TV You can view Blu-ray 3D Disc media on a 3Dcapable display (such as a 3D TV) by connecting the display to your computer with an HDMI cable. Be sure to use the 3D glasses specified by the TV manufacturer while viewing 3D images. See the manual that came with your 3D TV for detailed information on the 3D function. 1 Connect an HDMI input port on a 3D TV to the HDMI OUTPUT port on your computer with an HDMI cable (not supplied). 2 Change the input source of the TV to the external input. 3 Change the display output settings. When the 3D-capable display is connected to the computer, the settings window appears. Set the screen resolution to 1080(3D) or 720(3D). If the settings window does not appear, click Start, All Programs, VAIO Control Center, Display, and HDMI Resolution Setting Configuration. To view 2D content after 3D content playback, set the screen resolution to 1080(2D) or 720(2D). 10 4 Press the Windows+P keys to change the display output to only an external display. 5 Click Start, All Programs, Corel, and Corel WinDVD BD. WinDVD BD 3D starts. 6 Insert Blu-ray 3D Disc media into the optical disc drive. Playback automatically starts. 7 Turn on the 3D glasses that came with the connected display and wear them. The way to switch 3D images to 2D images differs depending on the 3D TV you are using. See the manual that came with your 3D TV for detailed information. The 3D button and its backlight on your computer are not available while 3D images are displayed on the 3D TV. If images are not displayed in 3D If images are not displayed in 3D on a 3Dcapable TV, follow these steps to display the initial settings wizard for NVIDIA 3D Vision on the TV screen and complete the initial settings. 1 Follow steps 1 to 4 in Viewing Blu-ray 3D Disc media on a 3D-capable TV (page 10) to output images from the computer to a 3D TV. 2 Right-click on the desktop and select NVIDIA Control Panel. 3 4 Click Set up stereoscopic 3D. Click the right arrow in Test stereoscopic 3D and select Run Setup Wizard. Follow the on-screen instructions to complete the initial settings. 11 Using the 3D Function Viewing 3D images from a 3D device on your computer screen You can view 3D images from a device that supports 3D output (such as a video game) on your computer screen by connecting the device to your computer with an HDMI cable. 1 Connect the HDMI INPUT port on your computer to an HDMI output port on a 3Dcapable device (such as a video game or a digital camera) with an HDMI cable (not supplied). 2 Press the INPUT/OK button on the right side of the computer, select HDMI with the / button, and press the INPUT/OK button. 3 Change the 3D output settings on the connected device to output 3D images to the computer. 4 Turn on the 3D glasses and wear them. The 3D output settings vary depending on the device you use. Refer to the manual that came with the device for more information. The 3D button and its backlight on your computer are not available while 3D images from the device connected to the HDMI INPUT port are displayed on your computer screen. 12 2D images from the device connected to the HDMI INPUT port cannot be converted to 3D images. The 3D effect applied to images from the device connected to the HDMI INPUT port cannot be adjusted. Creating Your Original 3D Content You can create your original 3D content with Family Paint 3D. 1 Click Start, All Programs, ArcSoft Family Paint, and Family Paint 3D to start Family Paint 3D. 2 Select 3D Draw in the Home window and Simple mode or Advanced mode. 3 Follow the on-screen instructions to create your original 3D content by drawing illustrations and characters or importing photos. 4 5 Turn on the 3D glasses and wear them. Click on the right side of the window. Images are not displayed in 3D while you are creating 3D content even if you press the 3D button on the computer. 13 3D Glasses Parts and components Power button Power on: Press once. Power off: Hold down the power button for more than two seconds. (The LED indicator light blinks three times and turns off.) Auto power off: More than five minutes without IR signals LED indicator The LED indicator light blinks or turns on depending on the battery status. Turns on in green: The 3D glasses are operating. Blinks once every two seconds: The 3D glasses are running on battery power. Blinks three times every three seconds: The battery level is low. Charge the battery. Turns on in yellow: The battery is charging. (When the battery is fully charged, the indicator light turns off.) While the 3D glasses are operating (the green LED indicator light is on), the battery cannot be charged. 14 IR sensor Receives signals from the 3D sync transmitter. The sensitivity of the IR (Infrared Ray) sensor varies according to a distance between the 3D glasses and your computer or usage environment. Keep the IR sensor clean. Connector for charge Open the connector cover and connect your computer to the connector for charge with the supplied USB charging cable to charge the battery. Accessories USB charging cable (4 feet/1.2 m) Pouch Troubleshooting What should I do if 3D images are not displayed or the 3D effect is less pronounced on my computer screen? When you view 3D images on your computer, make sure the 3D button’s backlight is on. When you view 3D images on your computer, press the 3D button on the computer. Make sure you are using the software that supports the content currently playing. You can check if the software supports the content in The list of software used for the 3D function (page 8). Click 3D Function and 3D Display Function Settings on the VAIO Control Center to check if the 3D function is enabled. Make sure the playback window of the software is active and displayed on the top of the screen, and press the 3D button again. Make sure there is no obstacle between the 3D sync transmitter and the 3D glasses. Make sure there is no heat or light source or infrared communication device near the 3D sync transmitter. Exposing the 3D sync transmitter to direct sunlight may cause malfunction. If you lie on your side or tilt your head while viewing 3D images, the 3D effect may be less pronounced or the color of the images may change. Charge the battery of the 3D glasses. Make sure the 3D glasses are turned on. Perceived 3D effect may vary from person to person. While you are viewing 3D images under low temperature, the 3D effect may be less pronounced. If 3D images from your computer are not displayed on a 3D-capable display (such as a 3D TV), display the initial settings wizard for NVIDIA 3D Vision on the TV screen and complete the initial settings (page 11). What should I do if 3D images do not play smoothly on my 3D TV connected to the HDMI output port? Check the HDMI output resolution settings on the computer. If the screen resolution is set to 1080(3D), 3D images may not play smoothly. Change the screen resolution to 720(3D) in Refresh Rate Setting with the VAIO Control Center, and then try again. How do I disable the 3D function? You can disable the 3D function with VAIO Control Center. Open VAIO Control Center, and click 3D Function and 3D Display Function Settings. Why does the message about NVIDIA 3D Vision in green appear on the bottom-right corner of the playback window? The message about NVIDIA 3D Vision may appear on the bottom-right corner of the playback window during playback depending on the software you are using. You can show/hide the message by pressing the Ctrl+Alt+Insert keys. 15 Troubleshooting What should I do if no images are displayed on my computer screen when I play 3D content with a device, such as a 3D Blu-ray Disc player, connected to the HDMI INPUT port? Disconnect and reconnect the HDMI cable. Check the resolution settings on the connected device. What should I do if images are not displayed in 3D on my computer screen when I play 3D content with a device connected to the HDMI INPUT port? If your computer is connected to your 3D TV through an AV amplifier, make sure the AV amplifier supports 3D playback. Check the resolution settings on the connected device. Refer to the manual that came with the connected device and check the settings. 16 Precautions About the 3D glasses The 3D glasses operate by receiving infrared rays from the 3D sync transmitter. The performance may be affected if: the 3D glasses do not face the 3D sync transmitter. there are obstacles between the 3D sync transmitter and the 3D glasses. there are other infrared communication devices or lighting equipment, residential heating equipment, etc. nearby. Do not use any 3D glasses other than the ones specified. Do not wear the 3D glasses upside down. Care and maintenance of the 3D glasses Wipe the 3D glasses gently with a soft cloth. Stubborn stains may be removed with a Replacement and additional purchase of the 3D glasses The TDG-BR250 3D glasses are available for purchase as of March 2011. (The model name may change without notice.) About the simulated 3D function The 3D effect may be less pronounced depending on the original images. When using the simulated 3D function, note that the displayed image is modified from the original due to the conversion performed by the computer. Use of the simulated 3D function to show converted 3D images from 2D images in cafes, hotels, or other establishments for commercial or public viewing purposes may infringe on the copyright holder’s right protected by the copyright law. cloth slightly moistened with a solution of mild detergent and warm water. If using a chemically pretreated cloth, be sure to follow the instructions supplied with the cloth. Never use strong solvents such as a thinner, alcohol, or benzine for cleaning. Trademarks All names of systems, products, and services are trademarks of their respective owners. In the manual, the TM or (R) marks are not specified. For trademarks not specified in this manual, refer to the trademarks section in the onscreen User Guide. 17 © 2011 Sony Corporation / Printed in China 4-297-158-11(1)