1
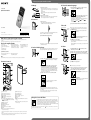
Let’s try out your new IC recorder 4. Select the menu language. 1. Charge. IC Recorder -A Select BACK/HOME - “ Settings” - “Common Settings” “Language,” and then press (play/enter). Charge the IC recorder. Slide the USB slide lever in the direction of the arrow (-A), and insert the USB connector into the USB port of a running computer (-B). Charging starts. When the battery is fully charged, the battery indicator will .” indicate “ Quick Start Guide Disconnect the IC recorder. Press or to select the language that you want to use in Make sure that the operation indicator does not light. Then refer to the help guide to remove the IC recorder safely. -B the display window, and then press (play/enter). You can select the following languages: Deutsch (German), English*, Español (Spanish), Français (French), (Korean), Italiano (Italian), Русский (Russian), (Chinese), (Thai) (Chinese), 2. Power on. Turn the power on. * Default setting Slide and hold the HOLD•POWER switch in the direction of “POWER” until the window display appears. Press and hold BACK/HOME to return to the HOME menu. 5. Record. Built-in microphones ICD-UX543F Operation indicator © 2013 Sony Corporation Printed in China To prevent unintentional operations (HOLD) Place the IC recorder so that the built-in microphones face Welcome to your new Sony IC recorder! the direction of the source to be recorded. Press STOP to stop recording. This is the Quick Start Guide, which provides you with instructions on the basic operations of the IC recorder. Please read it carefully. We hope you enjoy using your new Sony IC recorder. Check the supplied items. IC Recorder (1) Stereo headphones (1) USB connection support cable (1) Carrying pouch (1) Quick Start Guide Application Software, Sound Organizer (Installer file stored in the built-in memory so that you can install it to your computer.) Help Guide (HTML file stored in the built-in memory so it can easily be copied to your computer.) “Please Wait” appears and the display returns to the recording stop mode window. By pressing after you stop recording, you can play back the file just recorded. To release the IC recorder from the HOLD status, slide the HOLD•POWER switch towards the center. 6. Listen. 3. Set the initial settings. Press or to select “ When you insert a battery for the first time, or when the clock has not been set,“Setting Date&Time” appears, and you can set the clock. Operation indicator Optional accessories Electret condenser microphone ECM-CS3, ECM-TL3 Press REC/PAUSE. Recording starts and the operation indicator lights in red. To turn the power off, slide and hold the HOLD•POWER switch in the direction of “POWER” until “Power Off” is displayed. 4-472-204-21(1) Before you start using the IC recorder, make sure that you slide the HOLD•POWER switch towards the center to release the HOLD status. Recorded Files” from the HOME menu, and then press . Press or to select the desired folder, and then press . Press or to select the desired file, and then press . USB AC adaptor AC-UD20, AC-U501AD, AC-U50AG Playback starts and the operation indicator lights in green. Note Depending on the country or region, some of the models or optional accessories are not available. Press or to select “Next,” and then press (play/enter). “Date&Time” window appears on the display. Adjust the volume by pressing VOL –/+. Parts and controls Press STOP to stop playback. 7. Erase. Press or to change the number of the year, and then press (play/enter) to enter the number. Repeat this procedure to set month, day, hour, and minute in sequence. You can move the cursor to the previous item by pressing BACK/ HOME. When you set the minute and press (play/enter), the clock reflects the setting and the setting window for turning the beep sound on or off is displayed. Press or to select “Yes” or “No,” and then press . Once a file is erased, you cannot restore it. Select the file you want to erase when the IC recorder is in the recording stop, playback stop, or playback mode. Select OPTION - “Erase a File,” and then press . “Erase?” appears and the specified file is played back for confirmation. Select “Yes,” and then press . “Please Wait” appears in the display window and the selected file will be erased. When you finish setting the beep, the HOME menu window is displayed. Operation indicator (microphone) jack*1 Built-in microphones (stereo) (L) (headphones) jack Built-in microphones (stereo) (R) HOLD•POWER switch Display window VOL –/+ (volume –/+) button*1 REC/PAUSE (record/pause) button USB slide lever STOP button Slot lid Control button ( DPC (Digital Pitch Control), (repeat A-B), (review/fast backward), (cue/fast forward)) RESET button (The RESET button is inside the cover.) (play/enter) button*1 M2 /microSD memory card slot (The card slot is in the cover.)*2 TM BACK/HOME button T-MARK (track mark) button OPTION button Strap hole (A strap is not supplied.) Speaker USB connector compartment (The USB connector is stored inside the cover.) *1 These buttons and the jack have a tactile dot. Use it as a reference point for operations, or to identify each terminal. *2 In this Quick Start Guide, M2TM and microSD cards are generally referred to as a “memory card.” The M2TM/ microSD card slot is referred to as the “memory card slot.” If you do not press any buttons within 1 minute at initial settings, the initial setting mode is canceled and the window will return to the HOME menu window. You can set the clock setting and beep sound setting later. For details, refer to the Help Guide of the IC recorder. Using the Screen Off Timer To save battery power, the screen off timer is set to “Auto Screen Off” by default. When the screen off timer is set to “Auto Screen Off,” if no operation is attempted for approximately 30 seconds in the stop mode and for approximately 10 seconds in the recording, playback, and radio reception modes, the display turns off automatically. You can perform a button operation, however, even while the display is turned off. To turn on the display, press BACK/HOME. To disable the screen off timer, select BACK/HOME - “ and then select “No Auto Screen Off.” Settings” -“Common Settings” - “Screen Off Timer,” Using the menu About folders and files Audio files recorded by the IC recorder are stored in a folder of the IC recorder. 6 folders are constructed automatically as explained below, by default. Using the HOME menu You can display the HOME menu to use each function by pressing and holding BACK/HOME. The HOME menu allows you to select a function, search your recorded files, or change the settings on the IC recorder. When the [Sound Organizer has been installed successfully.] window appears, check [Launch Sound Organizer Now], and then click [Finish]. ”FOLDER01” - “FOLDER05”:Stored the files that are recorded by mic. When you record an FM radio broadcast, recorded files are automatically ”FM Radio”: stored in this folder. Podcast Music Recorded Files Record FM Radio Settings Return to XX* Note You may need to restart your computer after installing Sound Organizer. Note If you format the built-in memory, all data stored there will be erased. (The Help Guide and the Sound Organizer software will also be erased.) Precautions Press and hold BACK/HOME. Installing the help guide on your computer On handling Do not leave the unit in a location near heat sources, or in a place subject to direct sunlight, excessive dust or mechanical shock. Should any solid object or liquid fall into the unit, have the unit checked by qualified personnel before operating it any further. When using your IC recorder, remember to follow the precautions below in order to avoid warping the cabinet or causing the IC recorder to malfunction. Do not sit down with the IC recorder in your back pocket. Do not put your IC recorder into a bag with the headphones/earphones cord wrapped around it and subject the bag to strong impact. By installing the help guide on your computer from the built-in memory of the IC recorder, you can search for detailed operations and possible solutions when a problem occurs. If you have any questions or problems concerning your unit, please consult your nearest Sony dealer. On power Operate the unit only on 3.7 V DC with the built-in rechargeable lithium-ion battery. The HOME menu window appears. On safety Do not operate the unit while driving, cycling or operating any motorized vehicle. The HOME menu items are aligned in the following sequence. Folders Podcast Music Recorded Files Record FM Radio Settings Return to XX* * The function you are currently using is displayed in“XX.” Press or to select the function you want to use, and then press . You can select the functions listed below: Podcast You can select podcast files imported from a computer, and play them back. Music You can select music files imported from a computer, and play them back. Recorded Files You can select files recorded using the IC recorder, and play them back. You can display the recording window. To start recording, press REC/PAUSE. Record FM Radio You can display the FM radio window to listen to the FM radio or to record FM radio broadcasts. Settings You can display the Settings menu and change various settings on the IC recorder. Return to XX* Select this item to return to the window displayed before entering the Home menu. * The function you are currently using is displayed in “XX.” Press STOP to return to the window displayed before you entered the HOME menu. Using the OPTION menu You can display the OPTION menu by pressing OPTION. The OPTION menu items vary for each function of the IC recorder, and allow you to change various settings, etc. Files Utilizing Your Computer Slide the USB slide lever on the back of the IC recorder, and insert the USB connector into the USB port of a running computer. In Windows: Click [Computer] (or [My Computer]), then double-click [IC RECORDER] [FOR WINDOWS]. In Mac: Double-click [IC RECORDER] on the desktop. Install the help guide. In Windows: Double-click [Help_Guide_Installer] (or [Help_Guide_Installer.exe]). In Mac: Double-click [Help_Guide_Installer_for_mac.app]. (v10.5.8 or higher) Follow the instructions that appear on the screen to proceed with installation. After the installation completes, double-click the [Help_Guide_icdu54_zz.htm] icon in the desktop for Windows (or in Finder for Mac). The help guide is displayed. You can also view the help guide on the following Sony IC Recorder customer support home page: http://rd1.sony.net/help/icd/u54/zz/ Copying files from the IC recorder to your computer You can copy the files and folders from the IC recorder to your computer to store them. Connect the IC recorder to your computer. Copy files or folders you want to transfer to your computer. To copy a file or folder (Drag and drop) Click and hold, drag, and then drop. Select the function you want to use from the HOME menu, and then press OPTION. IC RECORDER or MEMORY CARD Your computer Disconnect the IC recorder from your computer. Press or to select the menu item for which you want to make setting, and then press (play/enter). Press or to select the setting that you want to set, and then press (play/enter). About details of the setting items with each functions, refer to the Help Guide. Press STOP to return to the window displayed before you entered the OPTION menu. Do not expose the batteries (battery pack or batteries installed) to excessive heat such as sunshine, fire or the like for a long time. Capacity (User available capacity*1*2) 4 GB (approx. 3.60 GB = 3,865,470,566 Byte) *1 A small amount of the internal memory is used for file management and therefore not available for user storage. *2 When the built-in memory is formatted with the IC recorder. Dimensions (w/h/d) (not incl. projecting parts and controls) (JEITA)*3 Approx. 36.6 mm × 101.5 mm × 10.5 mm Mass (JEITA)*3 Approx. 49 g *3 Measured value by the standard of JEITA (Japan Electronics and Information Technology Industries Association) Drag and drop the files or folders you want to copy from “IC RECORDER” or “MEMORY CARD” to the local disk on your computer. The OPTION menu items for the function you have selected are displayed. WARNING Installing Sound Organizer Install Sound Organizer on your computer. Note Sound Organizer is compatible with the Windows PC only. It is not compatible with Mac. When installing Sound Organizer, log in to an account with administrator privileges. Slide the USB slide lever on the back of the IC recorder, and insert the USB connector into the USB port of a running computer. If the IC recorder cannot be connected to a computer directly, use the supplied USB connection support cable. Make sure the IC recorder has been recognized properly. While the IC recorder is connected to the computer, “Connecting” is displayed in the display window of the IC recorder. Go to the [Start] menu, click [Computer] (or [My Computer]), and then double-click [IC RECORDER] [FOR WINDOWS]. Double-click [SoundOrganizerInstaller_V140] (or [SoundOrganizerInstaller_V140.exe]). Follow the instructions that appear on the screen. Make sure that you accept the terms of the license agreement, select [I accept the terms in the license agreement], and then click [Next]. When the [Setup Type] window appears, select [Standard] or [Custom], and then click [Next]. Follow the instructions on the screen and set the installation settings when you select [Custom]. When the [Ready to Install the Program] window appears, click [Install]. The installation starts.