1
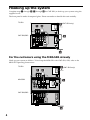
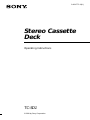
3-864-773-11(1)
Stereo Cassette
Deck
Operating Instructions
TC-SD1
©1998 by Sony Corporation
WARNING
To prevent fire or shock hazard, do not
expose the unit to rain or moisture.
To avoid electrical shock, do not open the cabinet.
Refer servicing to qualified personnel only.
Do not install the appliance in a confined space,
such as a bookcase or built-in cabinet.
IMPORTANT: Never connect two mains
leads into a single mains plug.
– For TC-SD1 –
The mains lead plug of TC-SD1 is a 2-pin type
designed to be connected only to CMT-SD1,
CMT-SD3 or MDS-SD1.
Do not connect this plug to any other system or
mains supply.
This system is equipped with the
Dolby* B-type and C-type noise
reduction system.
* Dolby noise reduction manufactured under license
from Dolby Laboratories Licensing Corporation.
“DOLBY” and the double-D symbol a are
trademarks of Dolby Laboratories Licensing
Corporation.
2
WARNING
The TC-SD1 tape deck is
designed only for the
CMT-SD1/SD3 and
MDS-SD1 component
system
Here are some of the features you can use
with this tape deck when connected with the
CMT-SD1/SD3 compact Hi-Fi component
system (see page 4).
The MDS-SD1 is also available (see page 4).
Refer to “Recording manually” (page 9) to
record from an MD to a tape, and refer to
“Recording on an MD manually” (in the
MDS-SD1 Operating Instructions) to record
from a tape to an MD.
Auto Power On/Off
The tape deck power is tied with the
CMT-SD1/SD3 component system (see page
6).
Table of Contents
Getting Started
Hooking up the system ......................... 4
Operations
Playing a tape .......................................... 6
Recording a CD ...................................... 8
Recording manually ............................... 9
Timer recording radio programmes .. 11
Additional Information
Precautions ............................................ 13
Troubleshooting ................................... 15
Specifications ......................... Back cover
EN
CD Synchro Recording
You can easily record a CD onto a tape (see
page 8).
Automatic Source Selection
You can switch from another source to the
tape deck and start playing a tape just by
pressing · or ª on the tape deck (see page
7).
Timer
You can wake up to music or record a radio
programme at a preset time. For details, refer
to “Falling asleep to music” and “Waking up
to music” in the CMT-SD1/SD3 component
system Operating Instructions, and “Timer
recording radio programmes” on page 11.
Remote Control
You can operate the tape deck using the
remote supplied with the CMT-SD1/SD3.
3
Hooking up the system
Complete steps 1 through 3 (1 through 4 for CMT-SD3) to hook up your system using the
supplied cords.
The front panel is made of tempered glass. Please remember to handle this unit carefully.
TC-SD1
1 2
3(CMT-SD3 only)
CMT-SD1/SD3
4
5
For the customers using the MDS-SD1 already
Hook up your system as follows. To hook up the MDS-SD1 with CMT-SD1/SD3, refer to the
MDS-SD1 Operating Instructions.
TC-SD1
1 2
MDS-SD1
3 (CMT-SD3 only)
4
CMT-SD1/SD3
5
4
1 Firmly connect the system cable to
the SYSTEM CONTROL jack on the
CMT-SD1/SD3.
When using the MDS-SD1, connect to
the SYSTEM CONTROL jack on the
MDS-SD1.
CThe sound signals of the CD, MD
and TUNER flow through the
CMT-SD1/SD3 (and MDS-SD1) to the
tape deck when you record onto a
tape.
D The sound signal of the tape deck
flows to the CMT-SD1/SD3 when you
play a tape.
How to insert the plugs
Insert the plugs firmly into the jacks.
SY
CO STE
NT M
RO
L
Not firmly inserted.
Insert to here.
3 For CMT-SD3, reconnect the Mains
SY
CO STE
NT M
RO
L
lead of the super woofer to the
unswitched AC OUTLET on the
TC-SD1.
4 Connect the Mains lead of the
Note
The system cable is used for exchanging signals
between the tape deck and the CMT-SD1/SD3 (or
MDS-SD1). If you do not connect the cord firmly,
the tape deck may not operate correctly.
2 Connect C to C, and
D to D
using the audio connecting cords.
Insert the plugs into jacks of the
same colour.
TC-SD1
ç
ç
D
C
CMT-SD1/SD3
TC- SD1 to the AC OUTLET on the
CMT-SD1/SD3.
When using the MDS-SD1, connect to
the AC OUTLET on the MDS-SD1.
5 Connect the Mains lead of the
CMT-SD1/SD3 to a mains after you
complete all the connections.
If there is no sound or the tape
does not record at the first
operation
Make sure the plugs are inserted into the
jacks firmly.
• If the plugs are not inserted into the C jacks
firmly, you may not be able to record the sound
of the CD, MD and TUNER onto a tape.
• If the plugs are not inserted into the D
jacks firmly, you may not be able to listen
to the sound of the tape deck.
The plugs of the audio connecting cords may
be tight. Insert the plugs at the point shown
in “How to insert the plugs” in step 2.
: signal flow
5
1
Playing a tape
You can use any type of tape, TYPE I
(normal), TYPE II (CrO2) or TYPE IV (metal),
since the tape deck automatically detects the
tape type (ATS1)).
1)
ATS: Automatic Tape Selection.
Tape deck
TAPE
TC-SD1
1/u indicator
Press 1/u on the CMT-SD1/SD3 to
turn on the CMT-SD1/SD3
component system.
The tape deck turns on automatically.
2
2
Press § on the tape deck to open the
cassette tray and insert a recorded
tape.
Press § again to close the cassette tray.
With the side you want
to play facing up
•
3
ª
3
Set DIRECTION to A to play one
side, Å to play both sides once,
and a3) to play both sides
continuously.
4
Press ·.
0/)
Press ª to play the bottom side.
The function switches to “TAPE”
automatically, then the tape starts
playing.
FUNCTION
VOL
3)
2)
10
4 ∏ π 0/)
The remote supplied
with the CMT-SD1/SD3
TAPE(
•
• •
0
DOLBY NR2)
•
•
·
ª
• • •
)
0
This tape deck is able to switch between Dolby Btype and C-type noise reduction systems.
The tape deck stops automatically after repeating
the sequence five times.
To play a tape using the
CMT-SD1/SD3 component system
Do the following operations in step 4;
1 Press FUNCTION until “TAPE” appears in
the display.
2 Press TAPE( on the remote.
To play the bottom side, press TAPE(
again on the remote.
6
Other operations
Tips
To
Press
Stop playing
π (or p*).
Pause
∏ (or P*).
Press again to resume playing.
Fast-forward
π, then ) (or )*) for the
top side.
π, then 0 (or 0*) for the
bottom side.
Rewind
π, then 0 (or 0*) for the
top side.
π, then ) (or )*) for the
bottom side.
Find the
succeeding
track (AMS**)
) (or )*) for the top side.
0 (or 0*) for the bottom
side.
Find the
0 (or 0*) for the top side.
preceding track ) (or )*) for the bottom
(AMS**)
side.
Remove the
cassette
§ on the tape deck.
Adjust the
volume
Turn VOLUME on the
CMT-SD1/SD3 (or VOL
*).
• When you press 1/u on the tape deck while the
CMT-SD1/SD3 is power on, only the tape deck
turns on/off. Press 1/u on the CMT-SD1/SD3 to
turn on the CMT-SD1/SD3 component system.
• The TAPE indicator lights up in red when a
cassette is inserted and goes off when no cassette
is inserted.
• You can switch from another source to the tape
deck just by pressing · or ª (Automatic
Source Selection).
• To start playing automatically from the beginning
of the tape after fast winding (Auto Play), press
· while holding down 0 (for the top side) or
press ª while holding down ) (for the bottom
side).
• When listening to tapes recorded in Dolby NR, set
DOLBY NR to “B” or “C”.
• Using the timer function on the CMT-SD1/SD3,
you can wake up to music at a preset time. For
details, refer to “Wake up to music” in the
CMT-SD1/SD3 component system Operating
Instructions. When you set the Wake-up timer,
DOLBY NR must be set on the tape deck.
Note
/
* Use the remote supplied with the CMT-SD1/SD3.
**The Automatic Music Sensor (AMS) feature
detects a blank space of more than four seconds
between tracks to locate tracks quickly.
The AMS feature may not work in the following
cases:
— the blank space between tracks is four seconds
or less.
— the sound source recorded on the right
channel is different from that on the left
channel as with a KARAOKE tape.
— low volume or low sound continues for a long
time.
— the TV is too close to the tape deck.
7
2
Recording a CD
— CD Synchro Recording
Press § on the tape deck to open the
cassette tray and insert a blank tape.
Press § again to close the cassette tray.
With the side you want to
record on facing up
)
4 6
•
•
10
2
ª
7π 5
3
Place a CD on the disc tray of the
CMT-SD1/SD3.
4
Set DIRECTION to A to record on
one side, Å to record on both
sides once.
5
Press REC LEVEL lightly to release,
and turn to set the recording level.
REC LEVEL position around 4 sets the
general recording level for most CDs.
To set a specific recording level for the
CD you are recording, see "Recording
Manually" on page 9.
p
6
* This tape deck is able to switch between Dolby Btype and C-type noise reduction systems.
Press 1/u on the CMT-SD1/SD3 to
turn on the CMT-SD1/SD3
component system.
The tape deck turns on automatically.
8
•
0
The remote supplied
with the CMT-SD1/SD3
1
·
ª
• •
DOLBY NR*
0
•
Tape deck
TAPE
TC-SD1
1/u indicator
• • •
The CD SYNC button lets you record from a
CD to a tape easily. You can use TYPE I
(normal), TYPE II (CrO2), or TYPE IV (metal)
tape, since the tape deck automatically
detects the tape type.
Press CD SYNC on the tape deck.
The tape deck stands by for recording
and the CMT-SD1/SD3 stands by for
playback. The indicators on the CD
SYNC, rREC, · (for the top side) and
∏ buttons light up.
If you want to record starting from the
bottom side, press ª (for the bottom
side) so the indicator on the ª button
lights up.
7
Press ∏ on the tape deck.
Recording starts.
To stop recording
Press π on the tape deck or p on the remote.
Tips
• When you press 1/u on the tape deck while the
CMT-SD1/SD3 is power on, only the tape deck
turns on/off. Press 1/u on the CMT-SD1/SD3 to
turn on the CMT-SD1/SD3 component system.
• The TAPE indicator lights up in red when a
cassette is inserted and goes off when no cassette
is inserted.
• When you want to reduce the hiss noise in lowlevel high-frequency signals, set DOLBY NR to
“B” or “C” before step 5. Switching DOLBY NR
while recording will cause the newly recorded
sound to differ in quality from the previously
recorded sound.
• If the tape reaches the end of the top side during
both sides recording, the fadeout feature prevents
the track from ending abruptly at the end of the
tape (Fade Synchro). The track is recorded again
from the beginning of the bottom side.
• The fadeout feature also works when you record
on one side only.
• When you want to record onto both tape and MD
at one time, use CD synchro recording on the tape
deck, and manual recording on the MD. You
cannot use CD synchro recording on both units
simultaneously. This tape deck's fadeout feature
(Fade Synchro) will cause a track to be recorded
twice on the MD. After recording is completed,
use the MD's editing functions to erase this extra
track.
Recording manually
With manual recording, you can record just
the songs you like from a CD, or start
recording from the middle of the tape. You
can also record a radio programme or MD.
Tape deck
TAPE
TC-SD1 1/u indicator
DOLBY NR*
45
2
ª ·
7
9π
The remote supplied with
the CMT-SD1/SD3
p
3
Notes
• You cannot listen to other sources while recording.
• When you record on both sides, be sure to start
from the top side. If you start from the bottom
side, recording stops at the end of the bottom side.
* This tape deck is able to switch between Dolby Btype and C-type noise reduction systems.
1
Press 1/u on the CMT-SD1/SD3 to
turn on the CMT-SD1/SD3
component system.
The tape deck turns on automatically.
continued
9
Recording manually (continued)
2
Press § on the tape deck to open the
cassette tray and insert a blank tape.
6
Start playback on the component
you want to record.
7
Press REC LEVEL lightly to release,
and turn to set the recording level.
Press § again to close the cassette tray.
The level indicator reads the current
recording level.
With the side you want
to record on facing up
•
10
Press FUNCTION on the
CMT-SD1/SD3 until the source you
want to record (such as “TUNER”
or “AUX*”) appears in the display.
-10
-5
a
0
+3
+6 dB
8
Once you have set the recording
level, stop playback on the source
component.
9
Press ∏ on the tape deck.
Recording starts.
When recording from CD or MD, select
the track you wish to record and pause
playback.
When recording off the radio, tune in the
preset station.
10Start playing on the source
* Select to record the audio output of the
component connected to the CMT-SD1/SD3
AUX jacks.
For details, refer to "Optional A/V
components" in the CMT-SD1/SD3 component
system Operating Instructions.
To
Press
Stop recording
π (or p on the remote)
Pause recording
∏ (or P on the remote)
4
Set DIRECTION to A to record on
one side, Å to record on both
sides once.
5
Press rREC on the tape deck.
The tape deck stands by for recording.
The indicators on the rREC and · (for
the top side) buttons light up.
If you want to record starting from the
bottom side, press ª (for the bottom
side) so the indicator on the ª button
lights up.
10
-∞
•
• •
0
3
•
•
·
ª
• • •
)
0
Adjust as the 0 (zero) indicator lights up
component.
Tips
• The TAPE indicator lights up in red when a
cassette is inserted and goes off when no cassette
is inserted.
• When you want to reduce the hiss noise in lowlevel high-frequency signals, set DOLBY NR to
“B” or “C” before step 5. Switching DOLBY NR
while recording will cause the newly recorded
sound to differ in quality from the previously
recorded sound.
• Using the timer function on the CMT-SD1/SD3,
you can record radio programmes at a preset time.
For details, refer to “Timer recording radio
programmes” on this page. When you set the
timer recording, DOLBY NR, REC LEVEL and
DIRECTION mode must be set on the tape deck.
Timer recording
radio programmes
To timer record, you must first preset the
radio station and set the clock on the
CMT-SD1/SD3 (refer to the CMT-SD1/SD3
component system Operating Instructions).
The remote supplied
with the CMT-SD1/SD3
8
2
TIMER SELECT
3~6
3~6
1
Tune in the preset radio station
(refer to the CMT-SD1/SD3
component system Operating
Instructions).
2
Press TIMER SET.
3
Press +/– repeatedly until “REC
TIMER?” appears, then press
ENTER.
The hour indication flashes.
continued
11
Timer recording radio programmes
(continued)
Press § again to close the cassette tray.
Set the time to start recording.
With the side you want to
record on facing up
Press +/– to set the hour, then press
ENTER.
The minute indication flashes.
DAILY REC SLEEP SHUFFLE PROGRAM REPEAT 1 TUNED STEREO MONO
SURR
DBFB
)
0
·
ª
•
0
Press +/– to set the minute, then press
ENTER.
The hour indication flashes again.
5
Set the time to stop recording
following the procedure in step 4.
If the stop time is same as the start time,
“OFF TIME NG!” appears and the
display returns to set the stop time. Set
the time to stop recording again.
6
Press +/– repeatedly until “TUNER
to TAPE” appears, then press
ENTER.
The start time appears, followed by the
stop time, preset number and “TAPE”,
then the original display appears.
“REC” in the display and the timer
indicator light up.
When “CONNECTION” appears
The system cable is not connected correctly.
Turn off the power, connect the components
correctly, and turn on the power again. Then
start over from step 1.
12
8
•
•
• •
kHz
MHz
•
DISC
AUTO
MANUAL PREST
Press § on the tape deck to open the
cassette tray and insert a blank tape.
• • •
4
7
10
Press 1/u on the CMT-SD1/SD3 to
turn off the system.
The tape deck is now ready for the timer
recording. The power turns on
automatically at the start time, the
recorging starts, then the power turns off
at the stop time.
To cancel timer recording
Press TIMER SET.
Precautions
To change the setting
About tempered glass
Start again from step 1.
To check the setting / To use the
timer
Press TIMER SELECT repeatedly until “REC”
appears. The start time appears, followed by
the stop time, the preset number, and
“TAPE”, then the original display appears.
Press 1/u on the CMT-SD1/SD3 to turn off
the system. The tape deck stands by for the
timer recording.
To cancel the timer
Press TIMER SELECT repeatedly until
“TIMER OFF” appears.
Tips
• This tape deck is able to switch between Dolby Btype and C-type noise reduction systems.
• The last settings are memorized. To activate
recording timer with the same settings, display
“REC” and turn off the power. It is not necessary
to set every time.
Notes
• You cannot activate wake up timer and recording
timer at the same time.
• Do not operate the system from the time the
power turns on until the playback starts (about 20
seconds).
• If the power is on about 20 seconds before the
preset time, the recording will not be made.
• The volume is reduced to minimum during
recording.
The front panel of this tape deck is made of
tempered glass, which has been known to break in
extreme circumstances.
On safety
• The unit is not disconnected from the AC power
source (mains) as long as it is connected to the
wall outlet, even if the unit itself has been turned
off.
• Unplug the tape deck from the wall outlet (mains)
if it is not to be used for an extended period of
time. To disconnect the cord (mains lead), pull it
out by the plug. Never pull the cord itself.
• Should any solid object or liquid fall into the
component, unplug the tape deck and have it
checked by qualified personnel before operating it
any further.
• The AC power cord (mains lead) must be changed
only at a qualified service shop.
On placement
• Place the tape deck in a location with adequate
ventilation to prevent heat build-up in the tape
deck.
• Do not place the unit in an inclined position.
• Do not place the unit in locations where it is:
— Extremely hot or cold
— Dusty or dirty
— Very humid
— Subject to vibration
— Subject to direct sunlight.
Before placing a cassette in the
tape deck
Take up any slack in the tape. Otherwise, the tape
may get entangled in the parts of the tape deck and
become damaged.
When using a tape longer than 90
minutes
The tape is very elastic. Do not change the tape
operations such as play, stop, and fast-winding
frequently. The tape may get entangled in the tape
deck.
continued
13
Precautions (continued)
Cleaning the tape heads
To save a tape permanently
To prevent a tape from being accidentally recorded
over, break off the cassette tab from side A or B as
illustrated.
Detector slots
Clean the tape heads after every 10 hours of use.
When the tape heads become dirty
— the sound is distorted
— there is a decrease in sound level
— the sound drops out
— the tape does not erase completely
— the tape does not record.
Be sure to clean the tape heads before you start an
important recording or after playing an old tape.
Use a separately sold dry-type or wet-type cleaning
cassette. For details, refer to the instructions of the
cleaning cassette.
Demagnetising the tape heads
Tab of side B
Tab of side A
Side A
Break off the
cassette tab
of side A
If you later want to reuse the tape for recording,
cover the broken tab with adhesive tape. However,
be careful not to cover the detector slots which allow
the tape player to automatically detect the type of
tape.
Tape type:
CrO2/METAL
Detector slots
14
NORMAL
Demagnetise the tape heads and the metal parts
that has contact with the tape after every 20 to 30
hours of use with a separately sold demagnetising
cassette. For details, refer to the instructions of the
demagnetising cassette.
Cleaning the cabinet
Use a soft cloth slightly moistened with mild
detergent solution.
Never use strong solvents, such as thinner or
benzene, since they may damage the finish.
If you have any questions or problems concerning
your tape deck, please consult your nearest Sony
dealer.
Troubleshooting
If you run into any problem using this tape
deck, use the following checklist.
First, check that the mains lead is connected
firmly and the speakers are connected
correctly and firmly.
Should any problem persist, consult your
nearest Sony dealer.
The cassette tray does not close.
•Turn on the power again, and close the
cassette tray.
The operation buttons on the tape deck do
not work.
•Press any of the operation buttons after ∏
stops flashing. (The buttons on the tape
deck do not work for about two seconds
after the tape deck turns on.)
•No cassette is inserted. Insert a cassette.
The tape does not play or record.
•There is slack in the tape. Take up any
slack in the tape.
•The heads are dirty. Clean them.
•Make sure the audio connecting cords are
connected correctly (see page 5).
Make sure the plugs have been inserted
firmly.
The tape does not record.
•No cassette is inserted.
•The tab has been removed from the
cassette. Cover the broken tab with
adhesive tape (see page 14).
•The tape has wound to the end.
The tape does not record or play, or there
is a decrease in sound level.
•The heads are dirty. Clean them.
•The record/playback heads are
magnetised. Demagnetise them.
Noise increases or the high frequencies are
erased.
•The record/playback heads are
magnetised. Demagnetise them (see page
14).
•Move the tape deck away from the TV or
VCR.
The sound is distorted.
•Set DOLBY NR to the same setting in
which the tape was recorded.
•Move the tape deck away from the TV or
VCR.
There is no sound.
•The mains lead is disconnected from the
mains.
•Make sure the audio connecting cords are
connected correctly (see page 5). Make
sure the plugs have been inserted firmly.
The remote supplied with the CMT-SD1/
SD3 does not function.
•Press FUNCTION on the CMT-SD1/SD3
repeatedly to switch the FUNCTION to
“TAPE”.
•Make sure the system cable is connected
correctly (see page 5).
•The operation buttons being used are
located on the cover of the remote control
and the cover is not completely closed.
Make sure that the cover of the remote
control is completely closed.
Automatic Source Selection does not work.
•Make sure the system cable is connected
correctly (see page 5).
The functions tied with the CMT-SD1/SD3,
such as CD Synchro Recording, do not
work.
•Make sure the system cable is connected
correctly (see page 5).
The inserted tape will not eject.
•1/u of the tape deck is OFF. Press 1/u to
turn on the tape deck, then press §.
The tape does not erase completely.
•The record/playback heads are
magnetised. Demagnetise them.
There is excessive wow or flutter, or the
sound drops out.
•The capstans in the tape deck are dirty.
Clean them using a cleaning cassette.
15
Specifications
Recording system
Frequency response
Wow and flutter
Input
Output
4-track 2-channel stereo
(DOLBY NR OFF)
30 – 14,000 Hz (±3 dB),
using Sony TYPE I
cassettes
30 – 15,000 Hz (±3 dB),
using Sony TYPE II
cassettes
30 – 15,000 Hz (±3 dB),
using Sony TYPE IV
cassettes
±0.13% W. Peak (IEC)
0.07% W. RMS (NAB)
±0.2% W. Peak (DIN)
TAPE IN (phono jacks):
impedance 47 kilohms
TAPE OUT (phono jacks):
voltage 500 mV
impedance 47 kilohms
General
Power requirements
European countries model:
220 – 230 V AC, 50/60 Hz
Other models:
220 – 240 V AC, 50/60 Hz
Power consumption
12 W
Dimensions
Approx. 190 × 91 × 315
mm (w/h/d)
incl. projecting parts and
controls
Mass
Approx. 3.2 kg
Supplied accessories:
Audio connecting cords
(2)
System cable (1)
Design and specifications are subject to change
without notice.
Sony Corporation Printed in China
16