1
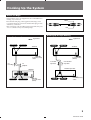
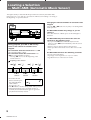
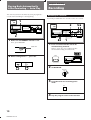
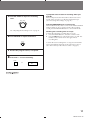
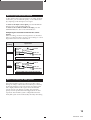
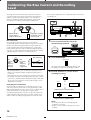
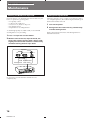
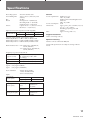
3-758-576 -21 (2) Operating Instructions TC-K615S 1994 by Sony Corporation WARNING To prevent fire or shock hazard, do not expose the unit to rain or moisture. CAUTION RISK OF ELECTRIC SHOCK DO NOT OPEN CAUTION: TO REDUCE THE RISK OF ELECTRIC SHOCK, DO NOT REMOVE COVER (OR BACK). NO USER-SERVICEABLE PARTS INSIDE. INFORMATION This equipment has been tested and found to comply with the limits for a Class B digital device, pursuant to Part 15 of the FCC Rules. These limits are designed to provide reasonable protection against harmful interference in a residential installation. This equipment generates, uses, and can radiate radio frequency energy and, if not installed and used in accordance with the instructions, may cause harmful interference to radio communications. However, there is no guarantee that interference will not occur in a particular installation. If this equipment does cause harmful interference to radio or television reception, which can be determined by turning the equipment off and on, the user is encouraged to try to correct the interference by one or more of the following measures: REFER SERVICING TO QUALIFIED SERVICE PERSONNEL. This symbol is intended to alert the user to the presence of uninsulated “dangerous voltage” within the product’s enclosure that may be of sufficient magnitude to constitute a risk of electric shock to persons. This symbol is intended to alert the user to the presence of important operating and maintenance (servicing) instructions in the literature accompanying the appliance. Owner’s Record The model and serial numbers are located on the rear of the unit. Record the serial number in the space provided below. Refer to them whenever you call upon your Sony dealer regarding this product. Model No. TC-K615S Serial No. — Reorient or relocate the receiving antenna. — Increase the separation between the equipment and receiver. — Connect the equipment into an outlet on a circuit different from that to which the receiver is connected. — Consult the dealer or an experienced radio/TV technician for help. CAUTION You are cautioned that any changes or modifications not expressly approved in this manual could void your authority to operate this equipment. NOTICE FOR CUSTOMERS IN THE UNITED KINGDOM A moulded plug complying with BS 1363 is fitted to this equipment for your safety and convenience. Should the fuse in the plug supplied need to be replaced, a 5 AMP fuse approved by ASTA or BSI to BS 1362, (i.e. marked with 2 or @ mark) must be used. If the plug supplied with this equipment has a detachable fuse cover, be sure to attach the fuse cover after you change the fuse. Never use the plug without the fuse cover. If you should lose the fuse cover, please contact your nearest Sony service station. IMPORTANT If the plug supplied is not suitable for the socket outlets in your home, it should be cut off and an appropriate plug fitted in accordance with the following instructions. The wires in this mains lead are coloured in accordance with the following code: Blue: Neutral Brown: Live As the colours of the wires in the mains lead of this apparatus may not correspond with the coloured markings identifying the terminals in your plug, proceed as follows: The wire which is coloured blue must be connected to the terminal which is marked with the letter N or coloured black. The wire which is coloured brown must be connected to the terminal which is marked with the letter L or coloured red. Do not connect either wire to the earth terminal in the plug which is marked by the letter E or by the safety earth symbol Y or coloured green or green-and-yellow. 2 K615S-21 02-06 WARNING To prevent shock hazard, do not insert the plug cut off from the mains lead into a socket outlet. This plug cannot be used and should be destroyed. Chapter 1 Getting Started Table of Contents Chapter 1 Getting Started Features .......................................................................................... 3 Precautions .................................................................................... 4 Unpacking ..................................................................................... 4 Checking the supplied accessories ...................................... 4 Notes on installation .............................................................. 4 Checking the operating voltage ........................................... 4 Hooking up the system ................................................................ 5 Before you begin ..................................................................... 5 Hooking up an amplifier ....................................................... 5 Hooking up for tape dubbing .............................................. 5 Identifying the parts on the front panel .................................... 6 Chapter 2 Playback Playing back .................................................................................. 7 Locating a selection — Multi-AMS (Automatic Music Sensor) .......................... 8 Locating a specific playback position — Memory Play .......... 9 Memorizing and locating a specific playback position .... 9 The accuracy of the linear counter ....................................... 9 Playing back automatically after rewinding — Auto Play ... 10 Chapter 3 Recording Recording ..................................................................................... 10 Recording to a cassette ........................................................ 10 Protecting a recording ......................................................... 12 Adjusting the recording level ............................................. 12 Recording FM broadcasts with the Dolby NR system .... 12 Monitoring the recorded sound ......................................... 13 What is the Dolby HX PRO system? ................................. 13 Calibrating the bias current and recording level ................... 14 Inserting a blank space during recording — Record Muting ................................................................. 15 Features For higher quality recording/playback •Dolby* HX PRO system for higher linearity in the tape’s high-range response during recording. •B, C and S type Dolby* NR systems which reduce tape noise. •Bias and recording level calibration to obtain the best recording conditions for every tape. •Three-head system (separate recording, playback and erasing heads) to allow you instant monitoring of the recorded sound during recording. •Quartz Locked Servo Control for greater stability and precision in capstan rotation. •Sapphire Capstan Base to enhance stability in motor rotation for clear sound reproduction. •Ceramic cassette holder for improved stability of tape running during playback and recording. For your convenience •Multi-AMS and Memory Play functions for easy access to specific selections. For easier operation •Easy-to-read linear counter showing the elapsed recording or playing time. * Dolby noise reduction and HX Pro headroom extension manufactured under license from Dolby Laboratories Licensing Corporation. HX Pro originated by Bang & Olufsen. “DOLBY”, the double-D symbol a and “HX PRO” are trademarks of Dolby Laboratories Licensing Corporation. Chapter 4 Additional Information Maintenance ................................................................................ 16 Cleaning the heads and tape path ..................................... 16 Demagnetizing the heads .................................................... 16 Specifications ............................................................................... 17 Troubleshooting guide .............................................................. 18 3 K615S-21 02-06 Precautions On safety •Should any solid object or liquid fall into the cabinet, unplug the unit and have it checked by qualified personnel before operating it any further. •Unplug the unit from the wall outlet (mains) if it will not be used for a long time. To disconnect the cord, pull it out by grasping the plug. Never pull the cord itself. •The unit is not disconnected from the AC power source (mains) as long as it is connected to the wall outlet, even if the unit itself has been turned off. •AC power cord must be changed only at the qualified service shop. On operation •When the unit is not used, turn the power off to conserve energy and to extend the useful life of your unit. •Because of a safety mechanism, the function buttons will not operate if the cassette holder is not completely closed, if there is no cassette in the cassette holder, or if a cassette has been incorrectly inserted into the cassette holder. On head cleaning The head and tape path should be cleaned after every ten hours of operation. Dirty heads and a dirty tape path may cause: — loss of high-frequency response — loss of sound volume — sound drop-out On cleaning the cabinet Clean the cabinet, panel and controls with a soft cloth slightly moistened with a mild detergent solution. Do not use any type of abrasive pad, scouring powder or solvents such as alcohol or benzine. If you have any questions or problems concerning your unit, please contact your nearest Sony dealer. For the customers in the U.S.A. For detailed safety precautions, see the leaflet ”IMPORTANT SAFEGUARDS”. 4 K615S-21 02-06 Unpacking Checking the Supplied Accessories Make sure that the following accessories are included with your unit. •Audio connecting cords (2) Notes on Installation •Place the unit with the front panel facing you in a location with adequate air circulation to prevent overheating of the unit. •Do not place the unit: — near heat sources such as radiators or air ducts. — in places subject to direct sunlight, excessive dust, mechanical vibration or shock. — in an inclined position. — on a rug or other soft surfaces that would block the ventilation holes on the bottom of the unit. Do not throw away the carton and the packing material They will come in handy when transporting the unit or shipping it for servicing. Checking the Operating Voltage •Operate the unit only on 120 V AC, 60Hz (U.S.A. model) or 240 V AC, 50 Hz (U.K. and Australia models). •Before connecting the unit to an AC (socket) outlet, be sure that the operating voltage of your unit is identical with that of your local power supply. Hooking Up the System Before You Begin •Turn off the power to all equipment to be connected before making any connection. •Note that the red plug of the supplied connecting cord is for right-channel (R) connection and the white plug for leftchannel (L) connection. •The connecting cords should be fully inserted into the jacks. A loose connection may cause hum pickup. White L R L R Red Hooking Up for Tape Dubbing Hooking Up an Amplifier Signal flow LINE IN LINE OUT Signal flow LINE IN LINE OUT TC-K615S TC-K615S to an AC (socket) outlet for recording to a wall outlet (mains) to another tape deck for playback Another tape deck Amplifier REC OUT TAPE INPUT to a wall outlet (mains) from another tape deck LINE IN LINE OUT to an AC (socket) outlet 5 K615S-21 02-06 Identifying the Parts on the Front Panel * Remote control sensor 1 2 34 5 6 7 89 !º !¡ !™ !£ +2 +4 +6 +8 øOFF 4 ( P REC a DOLBY NR DOLBY NR B C S FILTER TAPE TYPE I II IV SOURCE TAPE OFF B • • 6 • • • • 7 1 9 8 2 • • MEMORY REC LEVEL C COUNTER RESET BIAS 3 • REC CAL 9 HL LR 5 MEMORY • 9 0 • –4 • ØON –10 • REC LEVEL MPX FILTER dB –∞ –30 –20 S – + – + • • • POWER BALANCE • 0 10 L R EJECT MONITOR p 0 · ) PAUSE REC MUTE REC P R r CALIBRATION HEADPHONES § 0 AMS ) !• !¶ !§ !∞ !¢ For details, refer to the page number(s) indicated in parentheses. 1 2 3 4 5 6 7 8 9 0 !¡ !™ !£ !¢ !∞ !§ POWER switch Peak level meter (page 12) TAPE TYPE indicator Linear counter (page 9) MEMORY indicator COUNTER buttons RESET button (page 9) MEMORY button (pages 9 and 10) Cassette holder DOLBY NR (noise reduction) switch (pages 7 and 10) MPX FILTER button (page 12) BIAS control (pages 14 and 15) REC (recording) LEVEL control for calibration (pages 14 and 15) REC (recording) LEVEL control (pages 11 and 12) BALANCE control (page 11) HEADPHONES jack (stereo phone jack) (page 7) CALIBRATION button (pages 14 and 15) MONITOR button (page 13) 6 K615S-21 02-06 !¶ § (EJECT) button !• Tape operation buttons p (stop) button 0 (rewind) (Multi-AMS**) button · (play) button ) (fast-forward) (Multi-AMS**) button P PAUSE button R REC MUTE (record muting) button (page 15) r REC (recording) button * Remote control sensor You can remotely control this cassette deck with: — A remote commander that came with a Sony amplifier or receiver if it has the g mark and cassette deck control capability. — An optional Sony remote commander with the g mark and cassette deck control capability. ** AMS is an abbreviation for Automatic Music Sensor. Chapter 2 Playback Playing Back Follow the procedure below to play back a cassette. 4 POWER →ON Specifying the tape type is unnecessary The deck has an automatic tape type detection system. 3 To begin recording during playback While holding down the · button, press the r button. The unit immediately begins recording without stopping the tape. This function is useful when editing previously recorded material. MPX FILTER • øOFF 5 6 • 4 • ØON • REC LEVEL • • 7 3 OFF B • • • POWER • • 8 2 • • MEMORY REC LEVEL • C COUNTER RESET BIAS • DOLBY NR – + – + BALANCE • • 9 1 S 0 10 L R EJECT MONITOR p 0 · ) PAUSE REC MUTE REC P R r CALIBRATION HEADPHONES § 0 AMS ) For headphone listening Insert the headphone plug to the HEADPHONES jack. 2 Selecting TAPE mode with the MONITOR button is unnecessary The unit automatically enters TAPE mode and the TAPE indicator lights up. 1 Turn on the amplifier and select the tape function. What is the Dolby NR system? The Dolby NR (noise reduction) system reduces tape hiss noise in low-level, high-frequency signals by boosting the signals during recording and lowering them during playback. The Dolby S NR system provides the highest reduction in tape hiss noise in both low and high frequencies. 2 Insert a cassette with the side to be played facing outward. EJECT MPX ØON DO COUNTER § RESET MEMORY PAUSE REC MUTE REC P R r POWER E p · 0 ) 0 AMS ) Note The Dolby HX PRO system is effective only during recording, not during playback. 3 Set DOLBY NR to the same position that was used when the cassette was recorded. DOLBY NR OFF B C S 4 Press · to start playback. · To stop playback, press the p button. To stop playback momentarily, press the P button. To restart playback, press the P or · button. To fastwind a tape rightward, press the ) button in stop mode. To fastwind the tape leftward, press the 0 button in stop mode. 7 K615S-21 07-12 Locating a Selection — Multi-AMS (Automatic Music Sensor) Through its ability to detect the blank space between selections, the Multi-AMS function allows you to skip up to 30 selections while fast forwarding or reversing to the beginning of a specific selection. Changing the indicated number of selections to be skipped Press the 0 or ) button at any time, even during MultiAMS operation. POWER →ON • ØON øOFF 5 • REC LEVEL MPX FILTER 4 6 0 10 • • 7 3 OFF B • • • • 8 2 • • • MEMORY REC LEVEL • C COUNTER RESET BIAS • DOLBY NR – + – + • • • POWER BALANCE • 9 1 S L R EJECT MONITOR p 0 · ) PAUSE REC MUTE REC P R r CALIBRATION HEADPHONES § 0 AMS ) 0 ) During playback, press ) or 0 as many times as the number of selections to be skipped. For selections after the current one: Press ) the required number of times. For selections before the current one: Press 0 the required number of times*. * Pressing 0 once locates the beginning of the current selection. : Beginning of the selection 0 [ ] 0 Previous selection [ ] ) Current selection [ ] ) [ ] Next selection •Each time the unit detects a blank space, the indicated Multi( AMS number decreases by one. •The ( indicator flashes during Multi-AMS operation. •When the beginning of the specified selection is reached, the counter indication appears again and playback automatically restarts. 8 K615S-21 07-12 The Multi-AMS number may change as you are setting it due to the detection of blank spaces as the unit bigins to fastwind. The Multi-AMS may fail to detect the start of a selection in the following cases: •If you press the ) button immediately before the selection or the 0 button immediately after the start of the selection. •If there is noise in the space before the selection. •If the space before the selection is less than four seconds long. The Multi-AMS will treat the following as blanks: •A long pause in the music •A passage of low frequencies or very low volume •A gradual increase or decrease in volume Locating a Specific Playback Position — Memory Play Memorizing and Locating a Specific Playback Position The Memory Play function allows you to use the counter to record a specific position on a cassette for fast relocation and automatic playback later. POWER →ON Returning to the memorized position while the unit is stopped — Memory Stop If you press only the 0 button when the MEMORY indicator is on and the unit is stopped, the tape rewinds and then stops when the counter reaches 0.00. Be sure that the unit is stopped before turning the Memory Stop function on, otherwise the Multi-AMS function will operate. To turn off the Memory Play function Press the MEMORY button, so that the MEMORY indicator disappears. 21 • øOFF 5 6 • 4 • ØON • REC LEVEL MPX FILTER • • 7 3 OFF B • • • POWER • • • 8 2 • • MEMORY REC LEVEL C COUNTER RESET BIAS • DOLBY NR – + – + BALANCE • • 9 1 S 0 10 L R Note on Memory Play/Stop The tape acutually rewinds to slightly short of 0.00. EJECT MONITOR p 0 · ) PAUSE REC MUTE REC P R r CALIBRATION Do not turn off the power while using the counter Turning the power off, then on again resets the counter to 0.00. 3 1 Press MEMORY to turn on the Memory Play function. RESET HEADPHONES § 0 AMS ) MEMORY MEMORY The Accuracy of the Linear Counter Since the counter is not a digital clock, it will differ from the actual elapsed playback or recording time by a few minutes, depending on such factors as tape length and hub size. 2 Press RESET to reset the counter at the position to be memorized. The position is memorized. RESET MEMORY MEMORY 3 While holding down · , press 0 to return to the memorized position. 0 · 9 K615S-21 07-12 Chapter 3 Recording Playing Back Automatically After Rewinding — Auto Play The Auto Play function automatically starts playing back a cassette after fastwinding it to the beginning. Recording Recording to a Cassette Follow the procedure below to record a source on a cassette. 1 POWER →ON øOFF 4 5 • • ØON 6 • • 7 P R r 2 8 • POWER – + – 56 BALANCE • 9 1 S • • REC • MEMORY • • • RESET REC MUTE REC LEVEL • C COUNTER PAUSE BIAS • OFF B • • • 3 DOLBY NR 2 POWER →ON REC LEVEL MPX FILTER + 0 10 L R EJECT HEADPHONES REC LEVEL MPX FILTER ØON § øOFF 4 5 6 • ) • · • • 7 3 DOLBY NR • • • – + – BALANCE • • 9 1 S POWER 8 • • MEMORY 2 C COUNTER RESET REC LEVEL BIAS OFF B • • • 0 AMS ) • 0 • p CALIBRATION • MONITOR + 0 10 L R EJECT MONITOR p 2 0 · ) PAUSE REC MUTE REC ∏ R r CALIBRATION HEADPHONES § 0 AMS ) 1 83 1 Make sure the MEMORY indicator is off. If not, press MEMORY. 1 Insert a cassette with the side to be Goes off. 2 While holding down · , press 0 . recorded facing outward. (Refer to pages 14 to 15 to calibrate the bias current and recording level if desired.) EJECT MPX F ØON DOLB O COUNTER RESET MEMORY POWER § EJE p · 0 ) PAUSE REC MUTE REC P R r 0 AMS ) 0 · 2 Set DOLBY NR. DOLBY NR OFF B C S 3 Press r to enter the recording pause mode. REC r 4 Play the program source to be recorded. 10 K615S-21 07-12 § 5 Turn REC LEVEL to adjust the recording level. REC LEVEL 5 If playback starts instead of recording when you press r The record-protect tab for that side has been removed. To record on this cassette, cover the hole with plastic tape. (See “Protecting a Recording” on page 12.) 6 4 7 3 Selecting MONITOR mode is unnecessary The unit automatically enters source mode and the SOURCE indicator lights up. If you wish to monitor the recorded sound, press the MONITOR button to select TAPE mode. 8 2 1 9 0 10 See “Adjusting the Recording Level” on page 12. 6 Turn BALANCE to adjust the balance. Checking the recording time on a tape To check the remaining recording time on a tape: 1 Press the RESET button to reset the counter to 0.00. 2 Press the ) button to advance the tape to its end. The number on the counter shows the approximate recording time. BALANCE L To check the total recording time of a tape, first rewind the tape to its beginning, then follow the same steps as above. (See “The Accuracy of the Linear Counter” on page 9.) R 7 Restart the program source, if required. 8 Press P or · to start recording. PAUSE P or · To stop recording Press the p button. 11 K615S-21 07-12 Recording Adjusting the Recording Level Protecting a Recording The proper recording level, which differs according to the tape type, is indicated on the peak level meters for each tape type. Adjust the REC LEVEL control as high as possible without exceeding the recommended range for the inserted tape. To protect a recording on side A or B Break out the respective tab. Side A Peak level meter recording by tape type Recommended maximum peak level meter readings. Tab for side B Tab for side A dB –∞ –30 –20 To record on a cassette that is protected Cover the respective hole with tape. –10 –4 0 +2 +4 +6 +8 L R for Type I or Type II tape for Type IV tape When using Type II or Type IV cassettes Be careful not to cover the detector slots which are necessary for automatic tape-type detection. Type IV cassette Type II cassette Detector slots Tab Detector slots Tab Tab Tab Cassette care •Avoid touching the tape surface of a cassette to prevent contamination of the heads by dirt, dust, or oil on the skin. •Keep cassettes away from equipment with magnets, such as speakers and amplifiers, as erasure or distortion on the recorded tape could occur. •Do not expose cassettes to direct sunlight, extremely cold temperatures or moisture. Note on cassettes longer than 90 minutes We do not recommend the use of cassettes longer than 90 minutes except for long continuous playback. 12 K615S-21 07-12 Tips on recording level adjustment Setting the recording level too low will produce a hissing sound, while setting it too high will produce distortion. Generally, the proper recording level for high and low frequencies is lower than that for middle frequencies. When recording program sources with many high and low frequencies, set the level to a relatively low position, then make adjustments according to the recording results. Recording FM Broadcasts With the Dolby NR System If your tuner does not have an MPX filter, or, if equipped, the filter is not working effectively, set the MPX FILTER button to ON (the FILTER indicator appears) when recording FM broadcasts with the Dolby NR system. The MPX filter eliminates remnants of the 19-kHz stereo carrier and 38-kHz subcarrier signals which may impair the operation of the Dolby NR system. Be sure to turn on the DOLBY NR switch since the MPX filter will not function otherwise. Monitoring the Recorded Sound As this unit has three separate heads for recording, playback and erasure, you can check the quality of a recorded sound by comparing it with the input source signal. To listen to the input source signal, press the MONITOR button to turn on the SOURCE indicator. To listen to the sound recorded on the tape, press the MONITOR button to turn on the TAPE indicator. Comparing the recorded sound with the sound source While recording, use this monitoring function to check that there is no distortion due to excessive level settings or sound degradation due to head contamination. MONITOR setting Signal flow Band Recording head SOURCE REC LEVEL LINE IN SOURCE MONITOR Playback head TAPE LINE OUT HEADPHONES The source signal can be monitored. REC LEVEL Band Recording head LINE IN SOURCE MONITOR TAPE Playback head TAPE LINE OUT HEADPHONES The recorded signal can be monitored. What Is the Dolby HX PRO System? The Dolby HX PRO system provides precise bias control during recording to reduce distortion and improve linearity in the high-frequency range. The result is recorded sound that is highly faithful to the original. Since the HX PRO system operates only during recording, the same highquality sound is produced even during playback on other tape decks. The HX PRO system is independent from the Dolby NR system and is unaffected by the Dolby NR setting. 13 K615S-21 13-15 Calibrating the Bias Current and Recording Level Although the ATS (Automatic Tape Selection) system in your unit sets the appropriate equalization characteristics and bias current for each tape type, you may be able to obtain even better results by doing the bias current and recording level calibration function described below. BIAS Follow the procedure below to calibrate the bias current and recording level. 45 POWER →ON REC LEVEL • øOFF 5 6 • 4 • ØON • REC LEVEL MPX FILTER • • 7 3 • • POWER + – – • 8 • • MEMORY 2 C COUNTER RESET REC LEVEL • BIAS OFF B • • • DOLBY NR – + – BALANCE • • 9 1 S + 0 10 L R EJECT + MONITOR p 0 · ) PAUSE REC MUTE REC P R r CALIBRATION HEADPHONES § 0 AMS ) CALIBRATION Adjusts the recording level within a range of about ±3 dB EJECT MPX FILTER ØON øOFF DOLBY NR RESET MEMORY § – · 0 ) PAUSE REC MUTE REC P R r § 0 AMS ) 2 Press CALIBRATION. The peak level meters for adjusting the bias and recording level appear in the display window. 3 Press r , then P or · to turn on the recording test tones. REC r PAUSE √ P or · √ Playback level for an 8-kHz signal H L REC CAL TYPE Playback level for a 400-Hz signal Notes •You cannot monitor the sound during the calibration operation. •It takes 2 to 3 seconds for the test tone level to stabilize. K615S-21 13-15 + MONITOR p 9 Recording level calibration Even when the recording level is adjusted correctly, a tape with low sensitivity will result in a low playback level. The REC LEVEL calibration control allows you to compensate for sensitivity differences among tapes to equalize both recording and playback levels. This is especially important when using the Dolby NR system, since the system is most effective when recording and playback levels are the same. 2 • S – + EJECT Bias increased (+) Frequency in Hz REC LEVEL • C POWER CALIBRATION •By changing the bias, you can tailor the response to your liking, for example by slightly emphasizing the upper or lower end. •The frequency response of metal tape is much less affected by changes in the bias current than other tape types, and in some cases is uneffected. The adjustment range of this deck (about ±20 %) may therefore not be wide enough to allow adjustment for all tapes. 14 BIAS OFF B • • COUNTER 9 Output level in dB + Bias increased (highfrequency response suppressed) recorded facing outward. • Bias reduced – (highfrequency response boosted) Bias reduced (−) 1 Insert a cassette with the side to be • BIAS 2 • Bias calibration Choosing the proper bias current for a tape ensures minimum distortion and flat frequency response. Lowering the bias current boosts high-frequency response, but also results in higher distortion. Raising the bias, on the other hand, reduces distortion, but also dampens high-frequency response. You thus obtain proper bias when the bias current and high-frequency response are well balanced. 1 3 • Adjusts the bias current within a range of about ±20 % CALIBRATION Inserting a Blank Space During Recording — Record Muting 4 Adjust BIAS until both meters indicate equal playback levels. A low reading on the upper meter indicates a high bias current. 2 POWER →ON 9 9 A high reading on the upper meter indicates a low bias current. The Record Muting function allows you to insert a foursecond blank between selections to enable proper MultiAMS operation (see page 8), or to replace unwanted recorded material with a blank of any length. H L REC CAL TYPE TYPE REC LEVEL MPX FILTER • øOFF 5 6 • 4 • ØON • REC CAL 9 L 9 H • • 7 3 OFF B • • • RESET MEMORY • • 8 2 C COUNTER POWER REC LEVEL • • • BIAS BIAS BIAS • DOLBY NR – + – + BALANCE • • 9 1 S 0 10 L R EJECT MONITOR p · 0 ) PAUSE REC MUTE REC P R r CALIBRATION HEADPHONES § 0 AMS ) + – + – √ 1 √ An equal reading on both meters indicates the proper bias current condition. 1 While recording, press and release R . 9 REC MUTE L REC CAL 9 H R TYPE REC 5 Adjust REC LEVEL for calibration until both meters reach the recommended level. REC LEVEL + – The REC indicator starts flashing. During this time, no incoming signals are recorded on the tape. After four seconds, the P indicator lights up and the unit enters recording pause mode. 2 Press P to resume recording. √ Recommended level PAUSE 9 P L REC CAL 9 H TYPE The bias current is now properly adjusted and the tape sensitivity compensation has been set. Press p , then press CALIBRATION to turn the calibration function off (the display returns to normal). Rewind the tape and start the actual recording. To create a blank longer than four seconds Press the R button for the specified length of time. After four seconds, the REC indicator flashes at a faster rate. When you release the R button, the P indicator lights up and the unit goes into recording pause mode. Press the P button to resume recording. 15 K615S-21 13-15 Chapter 4 Additional Information Maintenance Cleaning the Heads and Tape Path Clean all surfaces over which the tape travels after every ten hours of operation to guard against: — low-quality sound — a decrease in sound level — excessive wow, flutter or drop-out — incomplete erasure — impairment of recording function To obtain high-quality recorded sound, we recommend cleaning before every recording. 1 Press § to open the cassette holder. 2 With the unit turned off, wipe the heads, the pinch roller and the capstan with a cotton swab slightly moistened with alcohol or commercially available cleaning fluid for tape decks. Capstans Recording head Playback head Erasing head Pinch rollers § p 0 · ) P R r Do not insert a cassette until the cleaned areas are completely dry. 16 K615S-21 16 Demagnetizing the Heads After 20 to 30 hours of use, or when you notice hiss and/or loss of high frequencies, the residual magnetism built up on the heads should be removed. 1 Turn off the power. 2 Demagnetize the heads with any commercially available demagnetizer. Refer to the instruction manual of the demagnetizer for detailed instructions. Specifications Recording system Fast winding time Bias Heads Motors 4-track 2-channel stereo Approx. 90 sec. (with Sony C-60 cassette) AC bias Erasing head × 1 (F&F head) Recording head × 1 (SD head) Playback head × 1 (SD head) Capstan motor × 1 (DC servo motor) Reel motor × 1 (DC motor) Signal-to-noise ratio (at peak level and weighted) Cassette Type IV Type II Type I (Dolby NR off) 61 dB 59 dB 57 dB S/N ratio improvement (approximate values) With Dolby B NR on : 5 dB at 1 kHz; 10 dB at 5 kHz With Dolby C NR on : 15 dB at 500 Hz; 20 dB at 1 kHz With Dolby S NR on : 10 dB at 100 Hz; 24 dB at 1 kHz Harmonic distortion 0.4% (with Type I, 160 nWb/m, 315 Hz, 3rd H.D.) 1.5% (with Type IV, 250 nWb/m, 315 Hz, 3rd H.D.) General Power requirements Power consumption Dimensions Mass Model for U.S.A.: 120 V AC, 60 Hz Model for the United Kingdom and Australia: 240 V AC, 50 Hz 23 W Approx. 430 × 123 × 310 mm (w/h/d) (17 × 47/8 × 121/4 inches) including projecting parts and controls Approx. 4.3 kg (9 lbs 8 oz) Supplied accessories Audio connecting cords (2) Optional accessory Wireless remote commander RM-J701 Design and specifications are subject to change without notice. Frequency response (Dolby NR off) 20 - 20,000 Hz (±3 dB, IEC) 20 - 16,000 Hz [±3 dB (−4dB Type IV cassette recording)] Type II cassette Type I cassette 20 - 18,000 Hz (±3 dB, IEC) 20 - 17,000 Hz (±3 dB, IEC) Type IV : Sony Type IV (METAL) Type II : Sony Type II (HIGH) Type I : Sony Type I (NORMAL) Wow and flutter ±0.065% W.Peak (IEC) 0.045% W.RMS (NAB) ±0.12% W.Peak (DIN) Inputs Line inputs (phono jacks) Outputs Line outputs (phono jacks) Headphones (stereo phone jack) Sensitivity 0.16 V Input impedance 47 k ohms Rated output level Load impedance Output level 0.5 V at a load impedance of 47 k ohms Over 10 k ohms 1 mW at a load impedance of 32 ohms 17 K615S-21 17-19 Troubleshooting Guide The following trouble checks will help you correct the most common problems encountered with your tape deck. Should any problems persist after you have made these checks, consult your nearest Sony dealer. Before proceeding with these trouble checks, verify that: •The power cord is firmly connected. •The amplifier connections are firmly made. •The heads, capstan and pinch roller are clean. •The amplifier controls and switches are correctly set. Function Buttons and Tape Transport Problems Symptom The function buttons do not work. The r button does not work. The automatic shut-off mechanism operates before the end of the tape. Excessively loud tape transport noise during fast winding. 18 K615S-21 17-19 Cause Remedy The cassette holder is not fully closed. Close the holder completely. The cassette is not properly inserted. Insert the cassette correctly. You press the button immediately after turning on the power. Wait until the P indicator stops flashing. There is no cassette in the holder. Insert a cassette. The record-protect tab has been removed from the cassette. Cover the hole with tape (page 12). The tape is slack. Take up the tape slack. The cassette shell is deformed. Use another cassette. The Memory Play function is on. Press the MEMORY button to turn off the function. This noise is caused by the cassette and is not a mechanical problem. — Recording and Playback Problems Symptom Recording or playback cannot be made or there is a decrease in sound level. Cause Remedy The heads are either dirty or magnetized. Clean or demagnetize the heads (page 16). Improper connection. Make connections properly (page 5). Improper setting of the amplifier controls. Set the amplifier controls to the appropriate positions. Excessive wow, flutter or drop-out. The head, capstan or pinch roller is dirty. Clean in accordance with instructions on page 16. Incomplete erasure. The erasing head is dirty. Clean the erasing head (page 16). Increased noise or poor reproduction in high frequencies. The heads are magnetized. Demagnetize the heads (page 16). Unbalanced tone in high frequencies. Improper setting of the DOLBY NR switch. During playing back, set the switch to the same position used in recording. The unit is placed near a television set. Move the unit away from the television set. There is noise in the space before the selection. The space before the selection is less than four seconds long. Rerecord the tape if you can, and insert a blank space of four seconds before the selection using the R button (page 15). The ) ( or 0 ) button was pressed immediately before the beginning of the following selection. — The specified selection cannot be located even when Multi-AMS is on. Playback begins in the middle of the selection when Multi-AMS is on. The selection contains one of the following: — a long pause — a passage of low frequencies or very low volume — a gradual increase or decrease in volume. While the tape is playing, press the ) or 0 button again. Noise Symptom Cause Remedy Hum noise. The unit is stacked on or under the amplifier. Separate the unit. Noise is recorded. The recording was made near equipment such as a television set or a color monitor, and interference has affected the recording on the tape and the Dolby NR system. Move the unit away from the television set or color monitor. 19 K615S-21 17-19 Sony Corporation Printed in Japan 1994 by Sony Corporation