1
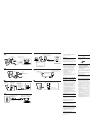
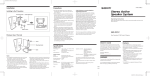
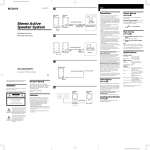
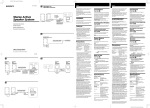
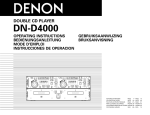
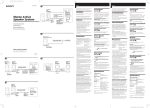
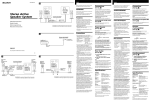
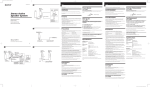
SRS-PC51.3-858-236-14.EFGS Page 1
3-858-236-14(1)
English
B
Right speaker (rear)
Enceinte droite
(arrière)
Left speaker (rear)
to an audio output jack
Enceinte gauche
(stereo mini jack)
(arrière)
à une prise de sortie audio
(minijack stéréo)
Before operating the system, please read this
manual thoroughly and retain it for future
reference.
The mains power source is required when the
system is used.
Connecting cord (not supplied)
Cordon de liaison (non fourni)
Stereo Active
Speaker System
Operating Instructions
to MIDI sound source (phono jacks)
à une source sonore MIDI (prises cinch)
to the R OUT jack
vers la prise R OUT
Bedienungsanleitung
Manual de instrucciones
WARNING
Note on the AC power adaptor
To prevent fire or shock hazard, do not expose the
system to rain or moisture.
Use only the supplied AC power adaptor. Do no
use any other AC power adaptor.
To avoid electrical shock, do not open the cabinet.
Refer servicing to qualified personnel only.
Polaritry of the plug
Features
1
Mode d’emploi
Power Source (See fig. C)
Connecting cord RK-G136HG (not supplied)
Cordon de liaison RK-G136HG (non fourni)
left speaker (front) right speaker (front)
Enceinte gauche
Enceinte droite
(avant)
(avant)
to the INPUT 2 jack
(rear)
vers la prise INPUT 2
(arrière)
to the headphones jack
(stereo mini jack)
vers la prise de casque
(minijack stéréo)
The Sony SRS-PC51 is a compact-size speaker
system with a built-in power amplifier designed
for the use with a computer. A Discman,
WALKMAN*, etc. can be connected to this system
as well.
•The magnetically shielded speakers have little
effect on a PC monitor or recorded tapes, etc.
when placed close to them.
•Easy installation on both sides of a PC monitor
with the supplied mounting brackets.
•Equipped with a headphones jack.
•Power output of 2.5 W + 2.5 W.
•IBB (Intelligent Bass Boost) circuit enable you to
obtain powerful bass, regardless of the sound
volume.
* WALKMAN is a registered trademark of Sony
Corporation.
How to use (See fig. D)
1
2
3
Press the POWER switch (Ø) to turn on
the system.
The POWER indicator lights up.
Adjust the volume with the VOLUME
control.
Adjust the TREBLE control to your
preference.
Turn off the MEGA BASS (Walkman) or BASS
BOOST (Discman, etc.) function as it may cause
sound distortion.
After listening, press the POWER switch (ø) to
turn off the system. The POWER indicator goes
out.
Listening with the headphones
Installation (See fig. A)
2
Installing to the PC monitors 1
Left speaker (rear)
Enceinte gauche (arrière)
Notes
SRS-PC51
Sony Corporation © 1996 Printed in Philippines
to OUTPUT (WOOFER)
à OUTPUT (WOOFER)
to R OUT jack of the left speaker
à la prise R OUT de l’enceinte
gauche
sub woofer
Caisson de grave
A
1
to a personal computer
à un ordinateur personnel
Mounting bracket
Support de montage
Double-sided tapes
Rubans à double face adhésif
Left speaker (rear)
Enceinte gauche (arrière)
to a wall outlet
vers une prise murale
Screw
Vis
•The supplied mounting brackets may not fit
some PC monitors. In such a case, place the
system beside the computer on top of the desk.
•Clean the surface of the mounting brackets and
the PC monitor before attaching the double-sided
tapes. Otherwise, the double-sided tapes may
not adhere firmly to the surface of the PC
monitor and the system may fall off.
•To attach the system to the PC monitor firmly
using the double-sided tapes, press the mounting
bracket firmly to the PC monitor.
•If the picture on the PC monitor is distorted by
the vibration from the speaker system, turn
down the volume first. If there seems to be no
improvement, try placing the speaker system on
top of a desk etc.
•Depending on the mounting surfaces, there may
be cases in which the mounting brackets becomes
difficult to remove once attached. Also the
double-sided tapes used on the mounting
brackets may leave some marks on the surface of
the PC monitor when they are removed.
Placing on top of the desk 2
C
AC power adaptor (supplied)
Adaptateur secteur (fourni)
to the PC monitor
vers le moniteur PC
Connections (See fig. B)
Connect the left speaker to the source equipment.
When the left speaker is connected to a computer
equipped with a monaural jack, the sound may be
heard only from the left speaker.
Rubber cushion
Tampons caoutchouc
To connect to a stereo phonetype
headphones jack
to the DC IN 9 V jack
vers la prise DC IN 9V
Use the optional PC-234HG plug adaptor or the
RK-G138HG connecting cord.
2
Connecting to a Discman, Walkman, etc.
1
Note
D
When two types of equipment are connected to the
system and are played at the same time, the sound
from both of them will come out of the speakers.
When you wish to play only one equipment, make
sure that the other equipment is turned off or its
volume is turned down.
Screw
Vis
Mounting bracket
Support de montage
1
POWER
MAX
TREBLE
Connecting to a sub woofer 2
2
VOLUME
Stand
Pied
Connect the headphones (not supplied) to the 2
(headphones) jack on the left speaker. The soun
from the speakers is automatically turned off.
Connect a sub woofer to OUTPUT (WOOFER) jack
(stereo mini jack). The volume of the connected
speaker system is adjustable with the VOLUME
control.
MIN
3
(headphones) jack
Prise de casque
Precautions
• Use only the supplied AC power adaptor for
operating the system. Do not use any other AC
power adaptors.
• After operating the system with the AC power
adaptor, disconnect the AC power adaptor from
the wall outlet if the system is not to be used fo
an extended period of time. The POWER switc
on the left speaker does not turn the AC power
adaptor off.
• Do not open the speaker cabinets. Refer
servicing to qualified personnel only.
• Do not leave the system in a location near heat
sources, or in a place subject to direct sunlight,
excessive dust, moisture, rain or mechanical
shock.
• Should any solid object or liquid fall into either
speaker, disconnect the AC power adaptor and
have the speaker checked by qualified personn
before operating it any further.
• When the speaker cabinet becomes soiled, clea
it with a soft cloth slightly moistened with a m
detergent solution. Never use alcohol, benzine
thinner as they may mar the finish.
• Although this system is magnetically shielded,
a precaution, do not leave recorded tapes,
watches, personal credit cards or floppy disks
using magnetic coding in front of the system fo
an extended period of time.
Deutsch
A
2
1
Lesen Sie vor der Inbetriebnahme diese Anleitung
sorgfältig durch und bewahren Sie sie zum
späteren Nachschlagen gut auf.
Linker Lautsprecher (hinten)
Altavoz izquierdo (parte posterior)
Montagewinkel
Ménsula para montaje
Zweiseitiges Klebeband
Cinta adhesiva por ambas caras
Vorsicht
Um Feuergefahr und die Gefahr eines elektrischen
Schlages zu vermeiden, darf das Gerät weder
Regen noch Feuchtigkeit ausgesetzt werden.
an OUTPUT (WOOFER)
(Stereo-Minibuchse)
a OUTPUT (WOOFER)
(minitoma estéreo)
an R OUT-Buchse des linken
Lautsprechers
A la toma R OUT del altavoz
izquierdo
an PC-Monitor
al monitor de
ordenador personal
Schraube
Tornillo
Gummipuffer
Amortiguador de
caucho
Subwoofer
Altavoz de subgraves
an Personalcomputer
a un ordenador personal
2
C
an Steckdose
a un tomacorriente
de la red
Schraube
Tornillo
Linker Lautsprecher (hinten)
Altavoz izquierdo (parte posterior)
Netzadapter (mitgeliefert)
Adaptador de alimentación
de CA (suministrado)
Montagewinkel
Ménsula para montaje
Ständer
Soporte
an DC IN 9 V-Buchse
a la toma DC IN 9V
B
to Audioausgang
(Stereo-Minibuchse)
a la toma de salida de audio
(minitoma estéreo)
1
POWER
2
VOLUME
Anschlußkabel
(nicht mitgeliefert)
Cable conector
(no suministrado)
TREBLE
MIN
3
Kopfhörerbuchse
Toma para auriculares (2)
an MIDI-Signalquelle (Cinchbuchsen)
a la fuente de sonido MIDI (tomas fono)
an R OUT-Buchse
a la toma R OUT
1
Betrieb (Siehe Abb. D)
Das kompakte Sony Lautsprechersystem SRS-PC51
ist mit einem eingebauten Verstärker ausgestattet
und speziell zum Anschluß an einen Computer
bestimmt. Es kann jedoch auch an einen Discman,
WALKMAN* usw. angeschlossen werden.
•Die Lautsprecher können problemlos neben
andere Geräte gestellt werden; dank der
magnetischen Abschirmung haben sie praktisch
keinen Einfluß auf das PC-Monitorbild oder
bespielte Bänder.
•Bequeme Montage an beiden Seiten eines PCMonitors mit Hilfe der mitgelieferten
Montagewinkel.
•Kopfhörerbuchse vorhanden.
•Ausgangsleistung 2,5 W + 2,5 W.
•IBB-Schaltkreis (Intelligent Bass Boost) liefert bei
jeder Lautstärke wirkungsvolle Bässe.
1
* WALKMAN ist ein eingetragenes Warenzeichen
der Sony Corporation.
Betrieb mit Kopfhörer
•Die mitgelieferten Montagewinkel eignen sich
nicht für alle PC-Geräte. Falls sie nicht passen,
stellen Sie die Lautsprecher neben den Computer
auf den Tisch.
•Reinigen Sie die Fläche der Montagewinkel und
des PC-Monitors, bevor Sie das zweiseitige
Klebeband anbringen. Ansonsten hält das
zweiseitige Klebeband nicht richtig und die
Lautsprecher können herunterfallen.
•Wenn das System mit zweiseitigem Klebeband
am PC-Monitor angebracht wird, drücken Sie
den Montagewinkel gut fest.
•Wenn das PC-Bild aufgrund von Vibrationen der
Lautsprecher beeinträchtigt ist, reduzieren Sie
versuchsweise die Lautstärke. Wird dadurch eine
Verbesserung erreicht, stellen Sie die
Lautsprecher auf einen Tisch o.a.
•Bei einigen Montageflächen lassen sich die
Montageadapter nur schwer wieder abnehmen.
Außerdem kann das zweiseitige Klebeband nach
dem Abziehen möglicherweise Flecken am PCMonitor hinterlassen.
Aufstellung auf einem Tisch 2
Verbindungskabel RK-G136HG
(nicht mitgeliefert)
Cable conector RK-G136HG
(no suministrado)
an Kopfhörerbuchse
(Stereo-Minibuchse)
a la toma para auriculares
(minitoma estéreo)
Linker Lautsprecher
(vorne)
Altavoz izquierdo
(parte frontal)
Rechter Lautsprecher
(vorne)
Altavoz derecho
(parte frontal)
Anschluß (Siehe Abb. B)
Schließen Sie den linken Lautsprecher an der
Signalquelle an.
an INPUT 2-Buchse
(hinten)
a la toma INPUT 2
(parte posterior)
Steckerpolarität
Merkmale
Hinweise
MAX
Verwenden Sie nur den mitgelieferten
Netzadapter; ein anderer Netzadapter darf nicht
verwendet werden.
2
3
Drücken Sie den POWER-Schalter (Ø),
um das System einzuschalten.
Die POWER-Anzeige leuchtet auf.
Stellen Sie am VOLUME-Regler die
Lautstärke ein.
Stellen Sie am TREBLE-Regler den Klan
wunschgemaß ein.
Schalten Sie die Funktion MEGA BASS (bei eine
Walkman) bzw. BASS BOOST (bei einem Discm
usw.) aus, da es sonst zu Verzerrungen kommen
kann.
Nach dem Betrieb schalten Sie das System durch
Drücken des POWER-Schalters aus (ø). Die
POWER-Anzeige erlischt.
Schließen Sie den Kopfhörer (nicht mitgeliefert)
die 2-Buchse des linken Lautsprechers an. Der
Lautsprecher verstummt dann automatisch.
Installation (Siehe Abb. A)
D
Linker Lautsprecher
(hinten)
Altavoz izquierdo
(parte posterior)
Hinweis zum Netzadapter
Um einen elektrischen Schlag zu vermeiden, darf
das Gehäuse nicht geöffnet werden. Überlassen Sie
Wartungsarbeiten stets nur einem Fachmann.
Installation an PC-Monitor 1
Rechter Lautsprecher
(hinten)
Altavoz derecho
(parte posterior)
Stromversorgung
(Siehe Abb. C)
Wird der linke Lautsprecher an einen Computer
mit monauraler Buchse angeschlossen, ist
möglicherweise der Ton nur vom linken
Lautsprecher zu hören.
Zum Anschließen des Lautsprechers an
eine Stereo-Klinken-Kopfhörerbuchse
Verwenden Sie den Steckeradapter PC-234HG
oder das Verbindungskabel RK-G138HG.
Anschluß an einen Discman, Walkman
usw. 1
Hinweis
Wenn die beiden angeschlossenen Audiogeräte
gleichzeitig wiedergegeben werden, strahlen die
Lautsprecher ein Mischsignal beider Geräte aus.
Soll nur ein Gerät zu hören sein, schalten Sie das
andere Gerät aus oder reduzieren Sie die
Lautstärke.
Anschluß an Subwoofer 2
Schließen Sie den Subwoofer an die OUTPUT
(WOOFER)-Buchse (Stereo-Minibuchse) an. Die
Lautstärke des angeschlossenen
Lautsprechersystems kann am VOLUME-Regler
eingestellt werden.
Zur besonderen Beachtung
• Betreiben Sie das System nur mit dem
mitgelieferten Netzadapter; ein anderer
Netzadapter darf nicht verwendet werden.
• Wenn das Lautsprechersystem längere Zeit nic
verwendet wird, trennen Sie den Netzadapter
von der Steckdose ab. Mit dem POWER-Schalt
des linken Lautsprechers wird der Netzadapte
nicht ausgeschaltet.
• Öffnen Sie niemals das Lautsprechergehäuse.
Überlassen Sie Wartungsarbeiten nur einem
Fachmann.
• Stellen Sie das System nicht in die Nähe von
Wärmequellen und auch nicht an Plätze, die
direktem Sonnenlicht, starker Staubentwicklun
Feuchtigkeit, Regen und mechanischen Stößen
ausgesetzt sind.
• Sollte ein fester Gegenstand oder Flüssigkeit in
einen Lautsprecher gelangen, trennen Sie den
Netzadapter ab und lassen Sie den Lautsprech
von einem Fachmann überprüfen, bevor Sie ih
weiterverwenden.
• Wenn das Lautsprechergehäuse verschmutzt i
reinigen Sie es mit einem weichen, leicht mit
mildem Haushaltsreiniger angefeuchteten Tuc
Alkohol, Benzin oder Verdünner dürfen nicht
verwendet werden, da diese Materialien das
Gehäuse angreifen.
• Obwohl das Lautsprechersystem magnetisch
abgeschirmt ist, sollten bespielte Cassetten,
Uhren, Kreditkarten, Disketten und andere Te
mit Magnetcodierung nicht längere Zeit vor da
Lautpsrechersystem gelegt werden.