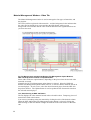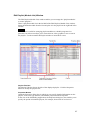
1
3-826-910-11(1)
Network Player
Management Software
Operating Instructions
Before operating the software, please read this manual thoroughly
and retain it for future reference.
BZNP-100 Version 3.00 and Later
©2003 Sony Corporation
Overview of This Manual
NOTICE TO USERS
The operating instructions provide instructions on
operating the BZNP-100 Network Player
Management Software.
The BZNP-100 software is designed to distribute
and manage audio and visual content, including
commercial videos played in public places or
educational and training videos for use in a
company. This content is send to Sony NSP-100
Network Players via a network.
The operating instructions contain the same
information as the online help. Both provide
complete information on BZNP-100 operations.
Press the F1 key to view help information on the
functions of the window or dialog box currently
having the focus. To see information on the
operations related to the window/dialog box, click
“Related Topics” link displayed on the right of the
topic title.
Click the Help Topics button in the Help window
to see the table of contents.
Program © 2003 Sony Corporation.
Documentation © 2003 Sony Corporation.
All rights reserved. This manual or the software
described herein, in whole or in part, may not be
reproduced, translated or reduced to any machine
readable form without prior written approval from
Sony Corporation.
Notations Used in This Manual
Menu commands and labeled buttons that appear
on the screen are indicated as [command name]
and [button name].
Example: [Edit], [Material Management]
Trademark Notice
• Microsoft, Windows, Windows XP and
DirectShow are registered trademarks of
Microsoft Corporation in the United States and
other countries.
• i.LINK is a trademark of Sony Corporation.
• Other system names, product names and
company names appearing in this manual are
trademarks or registered trademarks of their
respective holders. In this manual such names
are not indicated by ® or ™ symbols.
SONY CORPORATION PROVIDES NO
WARRANTY WITH REGARD TO THIS
MANUAL, THE SOFTWARE OR OTHER
INFORMATION CONTAINED HEREIN AND
HEREBY EXPRESSLY DISCLAIMS ANY
IMPLIED WARRANTIES OF
MERCHANTABILITY OR FITNESS FOR ANY
PARTICULAR PURPOSE WITH REGARD TO
THIS MANUAL, THE SOFTWARE OR SUCH
OTHER INFORMATION. IN NO EVENT
SHALL SONY CORPORATION BE LIABLE
FOR ANY INCIDENTAL, CONSEQUENTIAL
OR SPECIAL DAMAGES, WHETHER BASED
ON TORT, CONTRACT, OR OTHERWISE,
ARISING OUT OF OR IN CONNECTION WITH
THIS MANUAL, THE SOFTWARE OR OTHER
INFORMATION CONTAINED HEREIN OR
THE USE THEREOF.
Sony Corporation reserves the right to make any
modification to this manual or the information
contained herein at any time without notice.
The software described herein may also be
governed by the terms of a separate user license
agreement.
Data used to create video, graphics, and text
material for transmission from the network players
may be copyrighted.
Unauthorized distribution and/or playout of such
material may be contrary to the provisions of the
copyright laws.
Also, the system allows you to use the fonts
installed on the PC to create text material. Such
fonts are copyrighted. Authorization or right of
transmission is required to use them for playout.
Table of Contents
Table of Contents ................................................................................................................. 3
Overview ........................................................................................................... 5
System Overview............................................................................................................ 5
Operation Flowchart ....................................................................................................... 8
Major Operation Windows .............................................................................................. 9
Main Menu (Presentation Application) ................................................................................. 9
Main Menu (Scheduling Application).................................................................................. 11
Calendar Operations (Scheduling Application).......................................................... 13
Material Management Window - Video Tab ....................................................................... 14
Material Management Window - Graphics Tab .................................................................. 16
Material Management Window - Text Tab ......................................................................... 18
Material Management Window - Control Tab..................................................................... 20
Material Management Window - Playlist Tab ..................................................................... 22
Edit Playlist Window ........................................................................................................... 24
Edit Playlist (Module List) Window ..................................................................................... 27
Routine Operations ........................................................................................ 29
Material Preparations.................................................................................................... 29
Video Material Preparation ................................................................................................. 29
Registering Material Data Prior to Converting a Video File (Video Material
Preparation) ............................................................................................................... 30
Capturing Video (Video Material Preparation)........................................................... 31
Graphics Material Preparation............................................................................................ 34
Registering Material Data Prior to Converting a Graphics File (Graphics Material
Preparation) ............................................................................................................... 35
File Used for Graphics Material ................................................................................. 36
Text Material Preparation - Character Text ........................................................................ 38
Text Material Preparation - Bitmap Text............................................................................. 40
Device Control Command Preparation............................................................................... 42
Checking Materials (Preview)............................................................................................. 44
Deleting Materials and Playlists (Automatic Deletion Function and Manual Deletion) ...... 45
Importing Materials and Playlist Modules Created with the BZNP-A1 ............................... 47
Playlist Preparations ..................................................................................................... 49
What is a Playlist? .............................................................................................................. 49
Creating a New Playlist ...................................................................................................... 52
Creating a New Playlist by Listing Playlist Modules ........................................................... 54
Editing or Deleting a Playlist............................................................................................... 56
Checking a Playlist ............................................................................................................. 58
Editing Functions in the Edit Playlist Window..................................................................... 59
Adding Video, Graphics, and Text Events to a Playlist ............................................. 59
Including an External Device Control Event in a Playlist ........................................... 61
Moving and Deleting Events ...................................................................................... 62
Inserting a Playlist Module ......................................................................................... 62
Inserting a Break Event (Presentation Application) ................................................... 64
Changing the Start Time of an Event (Scheduling Application) ................................ 64
Positioning Video and/or Text .................................................................................... 65
Editing Functions in the Edit Playlist (Module List) Window............................................... 67
3
Transfer to the Network Players ................................................................................... 68
Sending Playlists to Network Players ................................................................................. 68
Sending Materials to Network Players ............................................................................... 69
Checking Transfer Status ................................................................................................... 70
Playout.......................................................................................................................... 71
Normal Playout ................................................................................................................... 71
Urgent Playout .................................................................................................................... 73
Checking of the Network Players.................................................................................. 75
Checking the Network Player Status.................................................................................. 75
Checking the Playout Log................................................................................................... 76
Finishing the Operation................................................................................................. 78
System Setup.................................................................................................. 79
Setting Up the Software................................................................................................ 79
Setting Up the NSP-100 Network Players .................................................................... 81
Editing Control Files Used on Network Players ............................................................ 82
Changing the Standby Screen and Playlist Loading Screen of the Network Players ... 84
Specifying the Special Playlists of the Network Players ............................................... 85
Setting Up Network Player Groups............................................................................... 86
NSP-100 Maintenance Commands .............................................................................. 88
Windows and Dialog Boxes........................................................................... 90
Setup Dialog Box .......................................................................................................... 90
Network Setup Dialog Box............................................................................................ 92
NSP-100 Setup Dialog Box .......................................................................................... 93
Group Setup Dialog Box ............................................................................................... 97
Edit Group Dialog Box .................................................................................................. 98
NSP-100 Settings Dialog Box....................................................................................... 99
Group Settings Dialog Box ......................................................................................... 100
Transfer Status Window ............................................................................................. 101
Transfer Results Window............................................................................................ 102
Convert Material Window............................................................................................ 103
Parameter Settings Dialog Box................................................................................... 104
Capture Window ......................................................................................................... 105
Edit Text Dialog Box ................................................................................................... 107
Properties Dialog Box ................................................................................................. 109
Font Color Setting Dialog Box .................................................................................... 111
Edit Control (External Device/NSP-100) Dialog Box .................................................. 112
View Playlist Window.................................................................................................. 113
Properties Dialog Box ................................................................................................. 114
Display Setup Dialog Box ........................................................................................... 116
Playout Log Window ................................................................................................... 118
Detail Screen Window ................................................................................................ 119
Delete Date Settings Dialog Box ................................................................................ 120
Change Start Time Dialog Box ................................................................................... 121
Password for NSP-100 Setup Dialog Box .................................................................. 122
NSP-100 Status Window ............................................................................................ 123
Preview Window ......................................................................................................... 124
Import Materials Dialog Box........................................................................................ 125
4
Overview
System Overview
The Sony BZNP-100 Network Player Management Software is designed to manage
systems that send audio and visual content, such as commercial videos played in public
places or educational and training videos in a company, to Sony NSP-100 Network
Players (referred to as "network players") via a network, then plays them.
The system uses video, graphics, and text materials. Unlike other authoring software, it
manages video, graphics, and text materials separately, rather than combining them to
make a piece of video material, and sends them together with a playlist.
This feature allows you to quickly replace some pieces of graphics and text materials
that are small in data size, or to modify the position of video and/or text on the graphics
material or produce new combinations of the materials simply by sending a new
playlist. The system enables you to fully utilize your audio and visual content for
flexible playout.
There are the following software products:
• BZNP-100
manages up to 100 network players.
• BZNP-100LE
is supplied with the NSP-100, and is a subset of this software which manages only
one network player. There are also some "limitations for BZNP-100LE" described
below.
The BZNP-100 software includes the following two applications so that you can select
one according to your needs:
The Setup dialog box is used to switch between these two applications.
• Presentation Application
Used for presentations. This application creates and manages the playlists whose
playout is controlled by the remote controller of the network player.
Externally triggered playout starting and automatic starting upon NSP-100 power-on
are also supported.
• Scheduling Application (Not included in the BZNP-100LE)
Used for automatic playout. This application creates and manages the playlists
whose playout is carried out automatically at a specified date and time.
Either application can handle the following four kinds of materials:
• Video
AVI and MPEG2 files, and Sony VSR-2000/2000A video files should be converted
to the NSP format, which is the only format the network players can play.
• Graphics
Bitmap and JPEG files should be converted to the NSP format, which is the only
format the network players can display.
• Text
Data to be superimposed on a video or graphics item should be created as text.
The system enables you to use a bitmap file to be superimposed as a piece of "text,"
too.
5
• Control commands
Commands that specify control of the PDP (Plasma Display Panel) power switch or
GPI (General Purpose Interface) pulses for devices connected to the network players
are created and used as materials.
Commands for NSP-100 control, such as to adjust volume, are also created and
managed. (They are only used in an urgent playout procedure, however, and cannot
be inserted in the playlists.)
You can create a "playlist" that lists the playout order of these materials, and send it to
the network players. Then, each of the network players plays the materials out
according to the playlist you created.
The following list shows the main operations that can be carried out using this software.
• Set up of the system.
• Prepare materials
Create materials using the BZNP-100
• Capture of video from a VCR or a camcoder connected with an i.LINK (IEEE
1394) cable and creation of AVI files.
• Conversion of video and graphics files into NSP format.
• Creation of files for subtitles, by typing in text and specifying how to display it.
Or, import materials and playlist modules created by the BZNP-A1 authoring
software.
• Creation of device control commands to control devices connected to the network
player, such as a PDP.
• Creation of playlists.
• Sending of playlists to the network players. (Materials that are not stored on the
destination network player are automatically sent with the playlist.)
• Checking the status of playlist transfer and each network player in the system.
• Retrieval of playout logs from the network players, and check the playout results.
Hint
During operation, pressing the F1 key on the keyboard displays information (help)
related to the window/dialog box currently holding the focus.
Limitations of the BZNP-100LE
The BZNP-100LE is supplied with the NSP-100, and is a subset of this software. It has
the following limitations:
• It manages only one network player.
• The Scheduling Application is not available.
As the scheduled playlists are not supported, the automatic scheduled playlist
sending function is not available.
• Video capturing is not available.
• Importing of materials is not available. (Materials and playlist modules created by
the BZNP-A1 cannot be used.)
• Video previewing on a PC is not available.
• Fonts installed on a PC cannot be used for text material, therefore, only the font
installed on the NSP-100 can be used, and multicolor text and specification of font
6
size are not available.
Bitmap text is not available, either.
• The Edit Playlist (Module List) window in which you can edit a playlist only by
using playlist modules is not available.
• The automatic playlist resending function in case of a transfer error is disabled.
7
Operation Flowchart
Upon System Installation
Make the network settings, such as the IP address, for each network player by using the
remote controller.
Then, open the Setup, Group Setup, and NSP-100 Setup dialog boxes, one by one, and
specify the required items.
During Normal Operation
The main operations are: material preparation, playlist editing, playlist/material transfer,
and log checking.
The following figure shows an example of the normal operation of this system to play
commercial videos played in the public places or educational and training videos in a
company.
Prepare Materials
z
z
z
z
Create Playlists
Send Playlists
Create AVI files
Convert video and bitmap files
Create text material and external device control
files
Import materials and playlist module created by
BZNP-A1
Specify a destination network player group, then
create a playlist for it.
List the materials in the order of playout
Specifying the date and destination and clicking the
Send button sends playlists and the necessary
materials to the network player(s).
Materials already stored in the network player are
not sent again, to save transfer time and cost.
Check Transfer Status
and Network Player Status
(Playout)
Check Playout Log
8
The network players automatically play out materials
according to the playlist.
For the Presentation Application, the remote
contoller of the network player controls the playout.
For the Scheduling Application, playout automatically
starts at the specified date and time.
When necessary, perform urgent playout.
Check the playout status.
Major Operation Windows
Main Menu (Presentation Application)
Hint
To see information on the operation, press the F1 key on the keyboard.
Then, information (help) related to the window/dialog box currently holding the focus
appears. Clicking "Related Topics" to the right of the help title shows the procedure
and other information related to the displayed window/dialog box.
Click [Help Topics] on the menu bar of the help window for information on the entire
system.
The following window is the main menu of the Sony BZNP-100 Network Player
Management Software when it is utilized as the Presentation Application. This menu
appears upon starting the software to launch its functions.
The following example uses the main menu of the BZNP-100, but that of the BZNP100LE is the same, the model name displayed being the only difference.
Import Materials Button
Opens the Import Materials dialog box to import materials and playlist modules created
using the BZNP-A1 authoring software.
Material Management Button
Opens the Material Management window where the four types of material, video,
graphics, text and device control commands, and the playlists are listed. This window
also has functions for registering and converting video and graphics files, entering text,
and for creating device control commands.
9
Video Capture Button
Opens the Capture window to create AVI files from the video of a VCR or camcoder
connected to the PC with an i.LINK (IEEE 1394) cable.
Edit Playlist Button
Opens the Edit Playlist window to create and/or edit playlists.
Transfer Status Button
Opens the Transfer Status window to check the status of playlist/material being
transferred to the network players.
NSP-100 Status Button
Opens the NSP-100 Status window to display the status of each network player in the
selected group.
Playout Log Button
Opens the Playout Log window to obtain playout logs from the network players to
check them.
Group Setup Button
Opens the dialog box used to create network player groups. You can create network
player groups and send playlists and materials to the groups, rather than to each network
player individually.
NSP-100 Setup, Setup Buttons
Opens the dialog boxes used to set up the network players and this software,
respectively.
10
Main Menu (Scheduling Application)
Hint
To see information on the operation, press the F1 key on the keyboard.
Then, information (help) related to the window/dialog box currently holding the focus
appears. Clicking "Related Topics" to the right of the help title shows the procedure and
other information related to the displayed window/dialog box.
Click [Help Topics] on the menu bar of the help window for information on the entire
system.
The following window is the main menu of the Sony BZNP-100 Network Player
Management Software when it is utilized as the Scheduling Application. This menu
appears upon starting the software to launch its functions.
Note
The following example uses the main menu of the BZNP-100. The BZNP-100LE does
not have the Scheduling Application.
Import Materials Button
Opens the Import Materials dialog box to import the materials and playlist modules
created by the BZNP-A1 authoring software.
Material Management Button
Opens the Material Management window where the four types of material, video,
graphics, text and device control commands, and the playlists are listed. This window
also has functions for registering and converting video and graphics files, entering text,
and for creating device control commands.
11
Video Capture Button
Opens the Capture window to create AVI files from the video of a VCR or camcoder
connected to the PC with an i.LINK (IEEE 1394) cable.
NSP-100 Status Button
Opens the NSP-100 Status window to display the status of each network player in the
selected group.
Playout Log Button
Opens the Playout Log window to obtain playout logs from the network players to
check them.
NSP-100 Setup, Setup Buttons
Opens the dialog boxes used to set up the network players and the software,
respectively.
Edit Playlist Button
Opens the Edit Playlist window to create and/or edit playlists.
Transfer Status Button
Opens the Transfer Status window to check the status of playlist/material being
transferred to the network players.
Group Setup Button
Opens the dialog box used to create network player groups. You can create network
player groups and send playlists and materials to the groups, rather than to each network
player individually.
Date Indication, Calendar, Previous and Next Month Buttons
Today's date is indicated on the main menu, but you can change the month of the
calendar displayed by clicking the previous and next month buttons (the buttons with
right and left triangle arrows).
Hint
Clicking the today's date indicator quickly returns the calendar display to the one for the
current month.
You can send playlists and the necessary materials simply by selecting a day on the
calendar and a destination group from the drop-down list box, then clicking the Send
button, provided the materials and playlists are ready.
The colors used for the calendar express the following meanings.
Note that the colors will not be displayed correctly if you sent the video, graphics and
text materials from the Material Management window. You need to send the playlists
from this window, the Material Management or Edit Playlist window.
Background
White
Gray
Green
Light Blue
Blue
Yellow
Red
12
Text
Gray or brown
Black or red
Black or red
Black or red
Black or red
Black or red
Black or red
Meaning
Non-playout day.
Playlist not yet created.
Playlist being edited or already edited.
Playlists and materials are being sent.
Playlists and materials successfully sent.
Necessary materials not yet sent.
A transfer error occurred.
Destination Group Drop-down List Box and Send Button
Selects one of the registered network player groups.
You can send playlists and the necessary materials simply by selecting a day on the
calendar and a destination group here, then clicking the Send button, provided the
materials and playlists are ready.
The drop-down list box is also linked with the Edit Playlist button. Selecting a group
then clicking the button enables you to proceed to operation of the selected network
player group.
Calendar Operations (Scheduling Application)
There is a calendar displayed on the main menu of the Scheduling Application, showing
status of playlist creation and transfer.
The background color of each date expresses the status of the playlists and related
materials for that day. The text color also has meaning. The color is changed by the
following operations:
Defining Non-Playout Days
It is helpful to see whether a certain day is a non-playout day or its playlist is not yet
ready, and therefore has to be created.
1
2
Right-click the date to be designated a non-playout day on the calendar of the main menu.
Click [Non-Playout Day] or [Non-Playout Holiday] on the menu.
A non-playout day appears in gray or brown. Its background color is white.
To return a non-playout day to a playout day, right-click the date, then click [Playout Day].
Click [Playout Holiday] in the same way to change a playout day to a non-playout day.
Note
Note that the playout period specified for each playlist overrides the non-playout day
settings.
When the playout period of a playlist is from September 1, 2003 to September 30, 2003,
for example, it will be played everyday during the period, even if there is a non-playout
day set for September 15.
To keep a non-playout day, in such a case, create two identical playlists. Set the
playout period for one from September 1, 2003 to September 14, 2003, and September
16, 2003 to September 30, 2003 for the other.
Switching the Color of the Days of the Week
The dates of weekdays (from Mondays to Saturdays) appear in black, and those of
Sundays appear in red, by default.
The system allows you to change the color.
1
To change the color of a day of the week, right-click the desired day of the week.
To change the color of a specific date, right-click the date.
Hint
Specify the color of the day of the week first, then specify the color of the specific holidays.
2
Click the desired item on the menu.
A workday appears in black or gray where a holiday appears in red or brown.
13
Material Management Window - Video Tab
The Material Management window is used to manage the four types of materials, and
the playlists.
The Video tab lists registered video materials. A white background color indicates that
the video file has already been converted into the NSP format, while a green
background color indicates that the video material data has been registered but has not
yet been converted.
PC File Management and NSP-100 Remote File Management Option Buttons,
NSP-100 Drop-down List Box and Update Button
Select either of the two option buttons, depending on the place where the desired video
materials are stored.
Normally, the PC File Management option button is selected. Select the NSP-100
Remote File Management option button, however, to check or delete materials stored on
a network player. In such a case, select the desired network player from the NSP-100
drop-down list box. The Update button is used to update the list of materials stored on
the selected network player.
List, Same Sorting as NSP-100 Button
The list displays the video material stored in the selected location. Temporary pieces of
material are listed at the bottom.
You can sort (ascending order) the material by clicking the title of the desired column.
When the NSP-100 Remote File Management option button is selected, clicking the
Same Sorting as NSP-100 button arranges the material in the order shown on the NSP100.
14
To modify the type and/or title of a piece of material, double click the desired column,
modify the text, then press the Enter key. To delete the material, check the picture
(preview on the PC), specify or clear the date of deletion, right-click the desired piece
of material and select the desired command from the menu.
Note
When the material stored on a network player is listed, note that the video material
displayed in red, if any, cannot be used for playout because the required file(s) of the
material is/are missing.
Delete the piece(s) of material displayed in red, then send the playlist again to resend
such material.
Hint
If an event type or title is longer than the width of the list, and thus it is not fully
displayed, move the mouse pointer over the code, type, or title. The entire text pops up.
Temporary File Button
Adds a data record for a piece of new material at the bottom of the list. It is used to
register material information to create a playlist before obtaining the video file. When
the video file becomes available, you can assign the file to the piece of material data
when conversion takes place.
Convert Material Button
Opens the Convert Material window to convert AVI, MPEG2, and VSR-2000/2000A
video files into NSP format.
Destination Drop-down List Box, Send and Abort Buttons
These are used to specify the destination network player group and send the selected
material(s). The Abort button cancels material transfer. These controls appear only
when the PC File Management option button is selected.
Urgent Section (Play and Stop Buttons)
When the PC File Management option button is selected, the play button is used for
urgent playout in which the selected piece of material is sent to a specified network
player group, and playout starts as soon as each network player receives the material.
When the NSP-100 Remote File Management option button is selected, the play button
is used to play a piece of material on the selected network player.
In either case, the play and stop buttons control urgent playout currently being
performed on the selected network player or the network players in the selected group.
Note
The urgent playout function interrupts playout currently being carried out on the
network player. Ongoing playout stops, and the selected piece of material will be
played.
Also, scheduled playout will not start during urgent playout. Check the network player
status in the NSP-100 Status window before starting urgent playout, and click the stop
button at the end.
15
Material Management Window - Graphics Tab
The Material Management window is used to manage the four types of materials, and
the playlists.
The Graphics tab lists registered graphics materials. A white background color
indicates that the bitmap file has already been converted into the NSP format, while a
green background color indicates that the graphics material data has been registered but
has not yet been converted.
PC File Management and NSP-100 Remote File Management Option Buttons,
NSP-100 Drop-down List Box and Update Button
Select either of the two option buttons, depending on the place where the desired
graphics materials are stored.
Normally, the PC File Management option button is selected. Select the NSP-100
Remote File Management option button, however, to check (preview on PC) or delete
materials stored on a network player. In such a case, select the desired network player
from the NSP-100 drop-down list box. The Update button is used to update the list of
materials stored on the selected network player.
List, Same Sorting as NSP-100 Button
The list displays the graphics material stored in the selected location. Temporary pieces
of material are listed at the bottom.
You can sort (ascending order) the material by clicking the title of the desired column.
When the NSP-100 Remote File Management option button is selected, clicking the
Same Sorting as NSP-100 button arranges the material in the order shown on the NSP100.
To modify the type and/or title of a piece of material, double click the desired column,
modify the text, then press the Enter key. To delete the material, view the picture,
specify or clear the date of deletion, right-click the desired piece of material and select
the desired command from the menu.
To change the standby screen, power off the network players after selecting the
command, then power them on again.
Hint
If an event type or title is longer than the width of the list, and thus it is not fully
displayed, move the mouse pointer over the code, type, or title. The entire text pops up.
Temporary File Button
Adds a data record for a new piece of material at the bottom of the list. It is used to
register material information to create a playlist before obtaining the graphics file.
When the graphics file becomes available, you can assign the file to the piece of
material data when conversion takes place.
Convert Material Button
Opens the Convert Material window to convert bitmap and JPEG files into the NSP
format.
Destination Drop-down List Box, Send and Abort Buttons
These are used to specify the destination network player group and send the selected
material(s). The Abort button cancels material transfer. These controls appear only
when the PC File Management option button is selected.
16
Urgent Section (Play and Stop Buttons)
When the PC File Management option button is selected, the play button is used for
urgent playout in which the selected piece of material is sent to a specified network
player group, and playout starts as soon as each network player receives the material.
When the NSP-100 Remote File Management option button is selected, the play button
is used to play a piece of material on the selected network player.
In either case, the play and stop buttons control urgent playout currently being
performed on the selected network player or the network players in the selected group.
Note
The urgent playout function interrupts playout currently being carried out on the
network player. Ongoing playout stops, and the selected piece of material will be
played.
Also, scheduled playout will not start during urgent playout. Check the network player
status in the NSP-100 Status window before starting urgent playout, and click the stop
button at the end.
17
Material Management Window - Text Tab
The Material Management window is used to manage the four types of materials, and
the playlists.
The Text tab lists registered text materials.
PC File Management and NSP-100 Remote File Management Option Buttons,
NSP-100 Drop-down List Box and Update Button
Select either of the two option buttons, depending on the place where the desired text
materials are stored.
Normally, the PC File Management option button is selected. Select the NSP-100
Remote File Management option button, however, to check or delete materials stored on
a network player. In such a case, select the desired network player from the NSP-100
drop-down list box. The Update button is used to update the list of materials stored on
the selected network player.
List
Displays the text material stored in the selected location. Lines whose length (Len.) are
not shown represent bitmap texts, that show bitmaps instead of text sentences. The
Duration column indicates the estimated time to display the piece of text material (two
seconds in the case of constant or blinking text).
You can sort (ascending order) the material by clicking the title of the desired column.
New pieces of material are listed at the bottom.
To modify the type and/or title of a piece of material, double click the desired column,
modify the text, then press the Enter key. To edit or delete the material, specify or clear
the date of deletion, right-click the desired material and select the desired command
from the menu.
Hint
If an event type or title is longer than the width of the list, and thus it is not fully
displayed, move the mouse pointer over the code, type, or title. The entire text pops up.
New Button
Opens the Edit Text dialog box to create a new piece of character text material.
Read Bitmap Button
Opens the Open dialog box to create a new piece of bitmap text material.
Hint
The bitmap files that satisfy the following conditions will be converted to material
having the same material codes as those of the original files. A piece of material that
already has that material code will be overwritten.
•
The file name (extension excluded) consists of eight characters, and the extension is
"bmp."
•
The first character of the file name is T.
•
The third through the eighth characters (six digits) of the file name are numbers.
Destination Drop-down List Box, Send and Abort Buttons
These are used to specify the destination network player group and send the selected
material(s). The Abort button cancels material transfer. These controls appear only
when the PC File Management option button is selected.
18
Urgent Section (Play, and Stop Buttons)
When the PC File Management option button is selected, the play button is used for
urgent playout in which the selected piece of material is sent to a specified network
player group, and playout starts as soon as each network player receives the material.
When the NSP-100 Remote File Management option button is selected, the play button
is used to play a piece of material on the selected network player.
In either case, the play and stop buttons control urgent playout currently being
performed on the selected network player or the network players in the selected group.
Note
The urgent playout function interrupts playout currently being carried out on the
network player. The selected text will be displayed on the piece of material that is
being played, or the selected text will override the text that is being played, if any.
Also, scheduled playout will not start during urgent playout. Check the network player
status in the NSP-100 Status window before starting urgent playout, and click the stop
button at the end.
19
Material Management Window - Control Tab
The Material Management window is used to manage the four types of materials, and
the playlists.
The Control tab lists registered control commands used for PDPs (Plasma Display
Panels) or other devices connected to the network players, as well as control commands
for the network players themselves.
Control commands for external devices are included in the events of a playlist to control
external devices along with playout. The control commands for the network players are
used in the urgent playout procedure, and are sent to the network players to be run
there.
List
Displays registered device control commands.
You can sort (ascending order) the device control commands by clicking the title of the
desired column. New device control commands are listed at the bottom.
To modify the type and/or title of a command, double click the desired column, modify
the text, then press the Enter key. To modify or delete a command, right-click the
desired control command and select the desired command from the menu.
The BZNP-100 provides the following control commands for adjusting the audio
volume of the network players. These commands cannot be inserted in the playlists.
To adjust audio volume, select the desired network player group with the Destination
drop-down list box, select the command corresponding to the desired volume, then click
the play button in the Urgent section.
Command Name
D0NspAlH
D0NspAlM
D0NspAlL
D0NspAl0
Function
Audio level: High
Audio level: Middle
Audio level: Low
Audio muting
Hint
If an event type or title is longer than the width of the list, and thus it is not fully
displayed, move the mouse pointer over the code, type, or title. The entire text pops up.
New Button
Opens the Edit Control (External Device/NSP-100) dialog box to create a new device
control command.
The BZNP-100 accepts up to 50 device control commands.
Destination Drop-down List Box
Used to specify the destination network player group to which to send the selected
device control command.
Urgent Section (Play Button)
Used for urgent playout in which the selected device control command is sent to the
specified network player group, where it will run on the network players.
Note
The urgent playout function interrupts playout currently being carried out on a network
player. Ongoing playout stops, and the selected control command will run on each
network player.
20
Check the network player status in the NSP-100 Status window before starting urgent
playout of the device control command.
21
Material Management Window - Playlist Tab
The Material Management window is used to manage the four types of materials, and
the playlists.
The Playlist tab lists registered playlists.
Note
The system stores the playlists separately according to their destination network player
groups. Selecting another network player group with the Destination drop-down list
box switches the playlists displayed.
PC File Management and NSP-100 Remote File Management Option Buttons,
NSP-100 Drop-down List Box and Update Button
Select either of the two option buttons, depending on the place where the desired
playlists are stored.
Normally, the PC File Management option button is selected. Select the NSP-100
Remote File Management option button, however, to check or delete playlists stored on
a network player. In such a case, select the desired network player from the NSP-100
drop-down list box. The Update button is used to update information on the playlists
stored on the selected network player.
List, Same Sorting as NSP-100 Button
Displays the playlists stored in the selected location.
You can sort (ascending order) the playlists by clicking the title of the desired column.
New playlists are listed at the bottom. When the NSP-100 Remote File Management
option button is selected, clicking the Same Sorting as NSP-100 button arranges the
playlists in the order shown on the NSP-100.
The item colors have the following meanings:
Color
Playlist Type
Description
Black
Normal playlist Blue
Playlist module Playlist parts to be inserted into other playlists.
They do not have the start and end date/time, and
delete date data, even in the case of the Scheduling
Application.
Purple
Imported
Playlist modules created using the Sony BZNP-A1
playlist module authoring software. They cannot be edited.
YellowPower-on start
Playlist which will automatically start when the
green
playlist
network player is powered on.
Green
Play button start Playlist which can be started by pressing the play
playlist
button of the network player's remote controller
during standby.
When the PC File Management option button is selected, only playlists created for the
network player group selected in the Destination drop-down list box appear.
To modify the type and/or title of a playlist, double click the desired column, modify
the text, then press the Enter key. To view, edit, or delete the playlist, specify or clear
the date of deletion (in the Presentation Application only), right-click the desired
playlist and select the desired command from the menu.
22
Hint
If an event type or title is longer than the width of the list, and thus it is not fully
displayed, move the mouse pointer over the code, type, or title. The entire text pops up.
New Button
Opens the Edit Playlist window to create a new playlist.
New (Module List) Button
Opens the Edit Playlist (Module List) window to create a new playlist using playlist
modules.
Destination Drop-down List Box, Send and Abort Buttons
These are used to specify the destination network player group and send selected
playlist(s). The Abort button cancels playlist transfer. These controls appear only when
the PC File Management option button is selected.
Urgent Section (Play and Stop Buttons)
When the PC File Management option button is selected, the play button is used for
urgent playout in which the selected playlist is sent to the specified network player
group, and playout starts as soon as each network player receives the playlist and the
necessary materials, if any.
When the NSP-100 Remote File Management option button is selected, the play button
is used to play a playlist on the selected network player.
In either case, the play and stop buttons control urgent playout currently being
performed on the selected network player or the network players in the selected group.
The stop button can also be used to stop normal playout of a playlist.
Note
The urgent playout function interrupts playout currently being carried out on the
network player. Ongoing playout stops, and the selected playlist will be played.
Also, scheduled playout will not start during urgent playout. Check the network player
status in the NSP-100 Status window before starting urgent playout, and click the stop
button at the end.
23
Edit Playlist Window
The Edit Playlist window enables you to create "playlists" and "playlist modules" by
combining registered video, graphics and text materials. Playlists and playlist modules
also accommodate the external device control commands. Each network player plays
the materials out according to the playlists created here.
Video, graphics and text lists are displayed in the upper half of the Edit Playlist
window. Select the desired material from the list and place it in the playlist in the lower
half of the window.
Hint
If a material/event type or title is longer than the width of the list, and thus it is not fully
displayed, move the mouse pointer over the code, type, or title. The entire text pops up.
Playlist Title Box
The Playlist Title box shows the title of the displayed playlist. Click the Properties
button to modify the playlist title.
24
Properties Button
Opens the Properties dialog box in which you can specify detailed information on the
playlist, such as the type and title, and whether playout should be repeated.
In the case of the Scheduling Application, the Properties dialog box also enables you to
specify the period of automatic playout, for example, from 03/06/07 to 03/06/13.
Video, Graphics and Text Lists
Registered material data (sequential number, type, and title) is displayed, in the same
way as in the Material Management window. Temporary pieces of material are listed at
the bottom.
The duration of video material, and the estimated time to display the piece of text
material are also displayed.
You can sort (ascending order) the material by clicking the title of the desired column.
Drag & drop the desired materials from here to the playlist. Note that a green
background indicates that the material is not ready (has not yet been converted), just as
in other windows.
Also, in the same way as in the Material Management window, you can right-click a
piece of material and use a command on the menu, such as [Preview on PC].
Playlist
A playlist is a list of materials arranged as events, in the order of playout. Each piece of
material to be played out is displayed as a separate event, depending on the material
type. There is a "Start Time" column at the leftmost edge of the list in which the start
time of each event appears. Events assigned the same number (No.) will start playing
simultaneously. The gray strip indicates a break, that is a period in which no material is
played out.
A drag & drop operation from the Video, Graphics, or Text list, above, to the playlist
adds/inserts an event at the drop position. Text material can only be added to a video or
a piece of graphics material. It cannot be an event by itself.
Hint
If an independent text event occurs, it appears in red on the playlist. The system does
not allow you to save such a playlist. Revise the playlist so that every text event will be
played together with a video and/or graphics event(s).
There is a Control column at the rightmost edge of the playlist. Right-clicking this
column displays a menu to add/clear a registered external device control command
to/from the event. Events with an external device control command are shown with the
external device control mark ( ) in this column.
Right-clicking an event displays a menu that lists the functions available for the event,
such as deleting the event or specifying the display size and position of the event.
Note
In the case of NTSC video, the system regards one second as 30 frames of video signal
although it is approximately 29.97 frames (non-drop frame mode). Hence the actual
length is longer than the duration indicated for such a piece of video material. This
error is approximately two frames for one minute and 108 frames (3.3 seconds) for one
hour. The system adjusts this error to indicate the start times of the events on the
playlist, but there still is a small amount of error (less than one second) between the
indication and the actual start time.
25
Inserted Playlist Module
If you insert a "playlist module," that is a playlist piece to be inserted into another
playlist, it appears as a light-gray comment line with a closed arrow mark ( ).
Double-clicking this closed arrow mark expands the module, and its events appear
enclosed by two light-gray comment lines whose Start Time columns have arrow marks
( and ).
The expanded playlist module can be collapsed by double-clicking the arrow mark on
its upper comment line.
Destination Drop-down List Box, Send and Abort Buttons
The Destination drop-down list box and the Send button are used to specify the
destination network player group and send the playlist. The Abort button cancels
playlist transfer.
Default Display Setup Button
Opens the Display Setup dialog box to specify the default size (only for video material)
and positions of the video and text materials.
To modify those parameters for an event, right-click the desired event, then click
[Display Setup] on the menu.
26
Edit Playlist (Module List) Window
The Edit Playlist (Module List) window enables you to arrange the "playlist modules"
to create "playlists."
There is playlist module list in the left half of the Edit Playlist (Module List) window.
Select the desired module from the list and place it in the playlist in the right half of the
window.
Hint
This window is useful for arranging playlist modules to schedule programs for a
particular, but it does not allow you to insert discrete video, graphics or text events in
the playlist. Use the normal Edit Playlist window to insert those events.
Playlist Title Box
The Playlist Title box shows the title of the displayed playlist. Click the Properties
button to modify the playlist title.
Properties Button
Opens the Properties dialog box in which you can specify detailed information on the
playlist, such as the type and title, and whether playout should be repeated.
In the case of the Scheduling Application, the Properties dialog box also enables you to
specify the period of automatic playout, for example, from 03/06/07 to 03/06/13.
27
Playlist Module List
Registered playlist module data (sequential number, code, type, title, duration, and the
number of events in the module) is displayed.
Drag & drop the desired module from here to the playlist.
Also, in the same way as in the Material Management window, you can right-click a
piece of material and use a command on the menu, such as [View].
Playlist
Displays a playlist, in which the playlist modules and the external device control events
are listed in the order of playout. There is a "Start Time" column at the leftmost edge of
the list in which the start time of each module appears, and the "Total" column at the
rightmost edge in which the total numbers of the events from the playlist top to that
line. The gray strip indicates a break, that is a period during which no material is
played out.
A drag & drop operation from the Playlist Module list at the left to the playlist
adds/inserts a playlist module at the drop position.
The external device control commands are added to the playlist as the event lines, in the
same way as the playlist modules. Right-click the line immediately below the location
where you want to insert the external device control command, and select the desired
external device control command on the sub-menu of [Insert Control (External
Device)].
Note
• In the case of NTSC video, the system regards one second as 30 frames of video
signal although it is approximately 29.97 frames (non-drop frame mode). Hence the
actual length is longer than the duration indicated for such a playlist module. This
error is approximately two frames for one minute and 108 frames (3.3 seconds) for
one hour. The system adjusts this error to indicate the start times of the events on
the playlist, but there still is a small amount of error (less than one second) between
the indication and the actual start time.
• The "Total" column of the playlist shows the total number of events from the top of
the playlist to that line. Note, however, that adding a playlist module to the playlist
inserts an extra two lines (one line each at the top and bottom of the playlist module,
as comment lines), so that the total number increases by 2 + the actual number of the
events in the playlist module.
Destination Drop-down List Box, Send and Abort Buttons
The Destination drop-down list box and the Send button are used to specify the
destination network player group and send the playlist. The Abort button cancels
playlist transfer.
28
Routine Operations
Material Preparations
Video Material Preparation
To use video material for playout, prepare the required information, such as titles, and
the video files, then send them to the network players. Video files should be converted
from AVI, MPEG2 or VSR-2000/2000A format into NSP format before sending
because the network players only play files in NSP format.
Note
• The system manages AVI files created by Adobe Premiere or captured from a video
equipment using this software, with a duration of from five seconds through 150
minutes.
To create an AVI file using Premiere, specify "1 Frame" in the "Interleave" item in
the audio setting window when exporting the timeline as a movie.
Note that the system does not accept AVI files that have no audio data.
See "Capturing Video" for details on capturing operation.
There are some restrictions to use other types, such as MPEG2(PS) or VSR2000/2000A, of video files, too. Consult your supplier or Sony sales representative
for details.
• Reading video files directly from a CD-R or DVD-R for conversion may result in an
error because of their slow reading speed. In such a case, copy the video files to the
hard disk first, then specify the copied folder.
Hint
The system also enables you to register material data prior to converting a video file.
(See "Registering Material Data Prior to Converting a Video File.") This is convenient
when you would like to create a playlist before you obtain the video files used in it.
1
2
Click [Material Management] on the main menu to open the Material Management window.
Select the Video tab, then click [Convert Material].
The Convert Material window appears.
3
Click [Browse] and specify the folder where the video files (such as AVI files) to be
converted are stored, if necessary.
4
Click [Parameter], modify the settings for protection, video rate (only for AVI files), and
audio filter (only for AVI files), if necessary, then click [OK].
Normally, leave the setting in the File Size drop-down list box unchanged. See the
explanation of the Parameter Settings dialog box for details on the items in the dialog box.
5
Select the video files to be converted from the upper video file list.
To select more than one file, hold down the Ctrl key and click them one by one. To select a
range of files, hold down the Shift key and click both the first and last files in the range.
6
Click [Start].
Conversion of the selected video files starts. The converted material appears in the lower
list on a blue background, as well as in the Material Management window.
29
Replacing Video Material Having a Certain Material Code
You can replace material that has a certain material code. This operation is useful when
you want to regularly replace a part of the content without editing the playlist.
Make sure the material meets the following conditions and perform the procedure
described above.
• Use material of the same duration as that of the one to be replaced. If the duration
of the two pieces of material are different, unexpected playout may occur.
• Make the name of the source video file the same as the material code of the one to
be replaced. To replace the piece of material with the code "M0000001," for
example, rename the captured file "M0000001.avi" using Windows Explorer.
• Allow enough time for replacement. Make sure that the new material arrives at the
network player at least 15 seconds before the playlist is to start.
Entering/Modifying the Type, Title, or Duration of the Material
Double-click the column for type, title, or duration (only editable for temporary files) of
the desired material in the Material Management window. This enables editing in that
column. Press the Enter key to complete the modification.
Specifying the Date for Automatic Deletion
Right-click the desired material in the Material Management window, then click [Set
Delete Date] or [Clear Delete Date]. When you click [Set Delete Date], a calendar
appears. Select the date for deletion, then click [OK].
Registering Material Data Prior to Converting a Video File (Video
Material Preparation)
To use video material for playout, prepare the required information, such as titles, and
the video files, then send them to the network players. Video files should be converted
from AVI, MPEG2 or VSR-2000/2000A format into NSP format before sending,
because the network players only play files in NSP format.
Note
• The system manages AVI files created by Adobe Premiere or captured from a video
equipment using this software, with a duration of from five seconds through 150
minutes.
To create an AVI file using Premiere, specify "1 Frame" in the "Interleave" item in
the audio setting window when exporting the timeline as a movie.
Note that the system does not accept AVI files that have no audio data.
See "Capturing Video" for details on capturing operation.
There are some restrictions to use other types, such as MPEG2(PS) or VSR2000/2000A, of video files, too. Consult your supplier or Sony sales representative
for details.
• Reading video files directly from a CD-R or DVD-R upon conversion may result in
error because of their slow reading speed. In such a case, copy the video files to the
hard disk, then specify the copied folder.
The system enables you to register material data prior to converting a video file. This is
convenient when you would like to create a playlist before you obtain the video files
used in it.
30
Hint
When you already have the video file to be converted, you can simultaneously register
and convert video material. (See "Video Material Preparation.")
Registering Material Information
1
2
Click [Material Management] on the main menu to open the Material Management window.
Select the Video tab and click [Temporary File].
This adds a new blank line at the bottom of the list. Its green background color means that
the corresponding video file is not yet ready.
3
Specify the type, title, and date of automatic deletion from the network player for the newly
added material.
See the explanation below for details.
4
Repeat steps 2 and 3 as necessary.
You can now create playlists using this registered material.
Converting Files
1
When you obtain the video files, click [Convert Material] in the Material Management
window to open the Convert Material window.
2
Click [Browse] and specify the folder where the video files (such as AVI files) to be
converted are stored, if necessary.
3
Click [Parameter], modify the settings for protection, video rate (only for AVI files), and
audio filter (only for AVI files), if necessary, then click [OK].
Normally, leave the setting in the File Size drop-down list box unchanged. See the
explanation of the Parameter Settings dialog box for details on the items in the dialog box.
4
Select the file to be converted from the upper video file list, then drag & drop it onto the
corresponding material data in the lower material list.
Conversion of the selected video file starts. The background color of the converted material
changes to blue.
5
Repeat step 4 for all the necessary materials.
Entering/Modifying the Type, Title, or Duration of the Material
Double-click the column for type, title, or duration (only editable for temporary files) of
the desired material in the Material Management window. This enables editing in that
column. Press the Enter key to complete the modification.
Specifying the Date for Automatic Deletion
Right-click the desired material in the Material Management window, then click [Set
Delete Date] or [Clear Delete Date]. When you click [Set Delete Date], a calendar
appears. Select the date for deletion, then click [OK].
Capturing Video (Video Material Preparation)
To use video material for playout, prepare the required information, such as titles, and
the video files, then send them to the network players. To use video, it is necessary to
capture video from a video device, create an AVI file, then convert the AVI file into
NSP format because the network players only play files in NSP format.
31
Note
• Use a camcoder or VCR connected to the PC via i.LINK (IEEE1394).
Please contact your supplier or Sony sales representative for the video devices that
you can use for capturing.
Other video devices may be used, but depending on the device, some operations,
such as shuttle control and cue-up operations, may not be available.
Note that more than one video device cannot be connected.
• Picture and sound are not synchronized during capture. Although some noise may
be output from the speaker, it will not be contained in the captured AVI file.
• Depending on the operating environment of your PC, the captured AVI file may
have skipped (dropped) frames. The In and Out points of the captured AVI file have
a margin of error of two frames or less, respectively.
1
2
3
4
5
6
Power the video device on, and insert the desired cassette tape.
Close all windows and dialog boxes except for the main menu.
Click [Video Capture] on the main menu.
The Capture window appears.
Click [Folder], then specify the folder where the AVI file should be stored.
Cue up the desired start point of the video using the VCR control buttons in the Capture
window, then click [In].
The time code of the In point appears.
Or, if you are using a DVCAM format tape, enter the time code of the In point directly in the
text box. In this case, clicking the cue up (
) button on the right cues the time code up,
then you can click [In].
In the same way, cue up the desired end point of the video, then click [Out].
The time code of the Out point and the duration calculated from the time codes of the In
and Out points in non-drop frame mode are displayed.
Or, when you are using a DVCAM format tape, enter the time code of the Out point in the
text box, cue the point up, then click [Out].
Note
The length of AVI files that can be used in the BZNP-100 is from five seconds to 150
minutes. Capturing will automatically stop when the length of the AVI file exceeds 150
minutes.
7
Click [REC].
The VCR automatically cues up the In point, then starts capturing. You can watch the video
in the Capture window. The VCR automatically stops when capturing ends at the Out point.
8
Repeat from step 5 to continue capturing.
Go to "Video Material Preparation" or "Registering Material Data Prior to Converting a Video
File" to convert the created AVI file into NSP format.
Stopping Capturing
Click [Stop].
Capturing stops immediately. The time code of the Out point and the duration are
automatically modified according to the actual AVI file.
After conversion, if you do not need this AVI file, discard it.
32
Capturing Without Specifying In and Out Points (Live Recording)
After step 3, cue up the In point of the video (if necessary), then click [Live REC].
Capturing immediately starts, and continues until you click [Stop].
The In and Out points would be the time codes when you clicked [Live REC] and
[Stop], respectively.
This function allows you to create AVI files in the same manner as you do using a video
camera.
File Name and Folder for the AVI Files
The system assigns a file name consisting of A+ a 7-digit sequential number which
starts from "A0000001" to each AVI file. The file extension is "avi."
You can change the folder where the AVI files are stored by clicking [Folder].
Changing the folder does not affect the file names. If you change the folder after
creating "A0000165.avi," for example, the AVI file created next would be named
"A0000166.avi."
Note
Note that if the remaining disk space of the drive where the AVI files are stored falls
below 500Mbytes, capturing is terminated.
33
Graphics Material Preparation
To use graphics material for playout, prepare the required information, such as titles,
and the graphics files, then send them to the network players. The graphics files should
be converted from bmp format into NSP format before sending because the network
players only play files in NSP format.
Note
The system manages graphics files in the Windows bmp format with the "bmp" file
extension, a color depth of 24-bit RGB, 8-bit Index (256 colors), 4-bit Index (16 colors)
or 1-bit Index (2 colors), and a size between 320 pixels (W) x 240 pixels (H) and 720
pixels (W) x 480 pixels (H) for NTSC, or between 320 pixels (W) x 240 pixels (H) and
720 pixels (W) x 576 pixels (H) for PAL. It also supports JPEG format files with the
"jpg" file extension.
See "Files Used for Graphics Material" for details.
Hint
The system also enables you to register material data prior to converting a graphics file.
(See "Registering Material Data Prior to Converting a Graphics File.") This is
convenient when you would like to create a playlist before you obtain the bitmap files
used in it.
1
2
Click [Material Management] on the main menu to open the Material Management window.
Select the Graphics tab, then click [Convert Material].
The Convert Material window appears.
3
Click [Browse] and specify the folder where the bitmap files to be converted are stored, if
necessary.
4
Select the bitmap files to be converted from the upper bitmap file list.
To select more than one file, hold down the Ctrl key and click them one by one. To select a
range of files, hold down the Shift key and click both the first and last files in the range.
5
Click [Start].
Conversion of the selected bitmap files starts. The converted material appears in the lower
list on a blue background, as well as in the Material Management window.
Replacing Graphics Material Having a Certain Material Code
You can replace material that has a certain material code. This operation is useful when
you want to regularly replace a part of the content without editing the playlist.
Make sure the material meets the following conditions and perform the procedure
described above.
• Make the name of the source graphics file the same as that of the material code of
the one to be replaced. To replace a piece of material with a material code of
"S0000001" with a bmp file, for example, rename the bmp file "S0000001.bmp"
using Windows Explorer.
• Allow enough time for replacement. Make sure that the new material arrives at the
network player at least 15 seconds before the playlist is to start.
34
Entering/Modifying the Type or Title of the Material
Double-click the column for type or title of the desired material in the Material
Management window. This enables editing in that column. Press the Enter key to
complete the modification.
Specifying the Date for Automatic Deletion
Right-click the desired material in the Material Management window, then click [Set
Delete Date] or [Clear Delete Date]. When you click [Set Delete Date], a calendar
appears. Select the date for deletion, then click [OK].
Registering Material Data Prior to Converting a Graphics File (Graphics
Material Preparation)
To use graphics material for playout, prepare the required information, such as titles,
and the graphics files, then send them to the network players. The graphics files should
be converted from bmp format into NSP format before sending, because the network
players only play files in NSP format.
The system enables you to register material data prior to converting graphics file. It is
convenient when you would like to create a playlist before you obtain the bitmap files
used in it.
Note
The system manages graphics files in the Windows bmp format with the "bmp" file
extension, a color depth of 24-bit RGB, 8-bit Index (256 colors), 4-bit Index (16 colors)
or 1-bit Index (2 colors), and a size between 320 pixels (W) x 240 pixels (H) and 720
pixels (W) x 480 pixels (H) for NTSC, or between 320 pixels (W) x 240 pixels (H) and
720 pixels (W) x 576 pixels (H) for PAL. It also supports JPEG format files with the
"jpg" file extension.
See "Files Used for Graphics Material" for details.
Hint
When you already have the bitmap file to be converted, you can simultaneously register
and convert graphics material. (See "Graphics Material Preparation.")
Registering Material Information
1
2
Click [Material Management] on the main menu to open the Material Management window.
Select the Graphics tab and click [Temporary File].
This adds a new blank line at the bottom of the list. Its green background color means that
the corresponding graphics file is not yet ready.
3
Specify the type, title, and date of automatic deletion from the network player for the newly
added material.
See the explanation below for details.
4
Repeat steps 2 and 3 as necessary.
You can now create playlists using this registered material.
Converting Files
1
When you obtain the bitmap files, click [Convert Material] in the Material Management
window to open the Convert Material window.
35
2
Click [Browse] and specify the folder where the bitmap files to be converted are stored, if
necessary.
3
Select the file to be converted from the upper bitmap file list, then drag & drop it onto the
corresponding material data in the lower material list.
The selected bitmap file is converted into the NSP-format. The background color of the
converted material changes to blue.
4
Repeat step 3 for all the necessary materials.
Entering/Modifying the Type or Title of the Material
Double-click the column for type or title of the desired material in the Material
Management window. This enables editing in that column. Press the Enter key to
complete the modification.
Specifying the Date for Automatic Deletion
Right-click the desired material in the Material Management window, then click [Set
Delete Date] or [Clear Delete Date]. When you click [Set Delete Date], a calendar
appears. Select the date for deletion, then click [OK].
File Used for Graphics Material
To use graphics material for playout, prepare the required information, such as titles,
and the graphics files, then send them to the network players. The graphics files should
be converted from the bmp format into NSP format before sending because the network
players only play files in NSP format.
The system manages the following types of graphic files and converts them into NSP
format.
Format
Windows bmp format with the "bmp" file extension, a color depth of 24-bit RGB, 8-bit
Index (256 colors), 4-bit Index (16 colors) or 1-bit Index (2 colors), or JPEG format
with the "jpg" file extension.
Size (W x H)
Signal
NTSC
PAL
Display Type
Under-scan (Full)
Over-scan (88%)
Under-scan (Full)
Over-scan (88%)
Min. (Pixels)
320 x 240
320 x 240
320 x 240
320 x 240
Max. (Pixels)
720 x 480
630 x 420
720 x 576
630 x 504
The standard size is 720 pixels (W) x 480 pixels (H) for an NTSC system, and 720
pixels (W) x 576 pixels (H) for a PAL system. Smaller graphics files will be displayed
at the center of the screen on a black background upon playout. Check the display area
of your display monitor and create files of appropriate size, because there are some
display monitors that cannot fully display the outer area.
Notes on Using Microsoft PowerPoint Slides
• Microsoft PowerPoint of Office 2000 exports full-color JPEG files and 256-color
bmp files. To use full color graphics files, you must export the JPEG files then
convert them into bmp format using a graphics converter.
36
• The following table shows the maximum size (W x H) of the graphics files managed
by the system in units of inches. Check this size when doing page setup for
PowerPoint slides.
Signal
NTSC
PAL
Display Type
Under-scan (Full)
Over-scan (88%)
Under-scan (Full)
Over-scan (88%)
Max. (Pixels)
720 x 480
630 x 420
720 x 576
630 x 504
Max. (Inches)
10.00 x 6.67
8.76 x 5.84
10.00 x 8.00
8.76 x 7.00
37
Text Material Preparation - Character Text
The network players display text material, such as subtitles, together with video and/or
graphics materials. To use text material for playout, prepare the required information,
such as title, and the text to be displayed, then send them to the network players.
Note
ISO 8859-1 (ASCII 8-bit code table Latin-1) characters can be used for the text
material and material/playlist titles.
1
2
Click [Material Management] on the main menu to open the Material Management window.
Select the Text tab, then click [New].
The Edit Text dialog box appears.
3
Click [Properties] then specify each item in the Properties dialog box.
See the explanation of the Properties dialog box for details.
4
Type the text.
See the explanation of the Edit Text dialog box for details.
5
Click [Save].
The newly added text data appears in the Material Management window.
Changing the Font Color
The color of the text can be specified in the Properties dialog box. The system also
enables you to specify another color for part of the text, provided the font installed on
the PC (i.e. not the font of the NSP-100) is used.
1
In the Font Settings section of the Properties dialog box, click the PC Installed option
button, then select the desired font from the drop-down list box.
And, select [16 Colors] from the Color Depth option buttons, then click [OK].
2
Type the text in the Edit Text dialog box, select the desired part by dragging the mouse,
then right-click the selected part.
3
Click [Font Color] on the right-click menu.
4
Select the desired color from the 15 colors displayed in the Font Color Setting dialog box,
then click [OK].
If the desired color is not shown, select an unnecessary color, click [Change Color] and
replace the color of that cell.
Changing the Font Style
The system enables you to specify the font style, such as bold, italic or underlined for
all or part of the text, provided the font installed on the PC (i.e. not the font of the NSP100) is used.
1
Type the text in the Edit Text dialog box, select the desired text by dragging the mouse,
then right-click the selected part.
2
Click [Font Style] on the right-click menu, then click the desired font style from the
cascading menu.
To cancel the specified font style, click the checked font style in the same way.
Note
Only one font face and size can be specified for each text material piece.
When the NSP-100 built-in font is used, you cannot specify the size, as there is only
one size. Also, it is not possible to use more than one text color nor to make the text
bold, italic, or underlined.
38
Editing Functions for Scrolling Text Material
The following editing functions are available for scrolling text material:
• Deleting the line breaks at the ends of lines (This is helpful when pasting emailed
text.)
• Adding a screen-width space at the end of a line to separate sentences in a single
piece of text material
• Stripping out unnecessary space at the end of a line
The procedure is as follows for any of the cases above:
1
2
3
Select the desired part of the text.
Right-click the selection.
A pop-up menu appears.
Click [Delete Line Break], [Add Space to End of Line], or [Strip Trailing Space], depending
on the purpose.
Modifying Text Material
Right-click the desired text material in the Material Management window, then click
[Edit] on the menu. This opens the Edit Text dialog box containing the selected text
data. Modify it as you desire, and click [Save].
To modify the type and/or title of a piece of material, double-click the column for type
or title of the desired material in the Material Management window. This enables
editing in that column. Press the Enter key to complete the modification.
Specifying the Date for Automatic Deletion
Right-click the desired material in the Material Management window, then click [Set
Delete Date] or [Clear Delete Date]. When you click [Set Delete Date], a calendar
appears. Select the date for deletion, then click [OK].
39
Text Material Preparation - Bitmap Text
The network players display text material, such as captions or subtitles, together with
video and/or graphics materials. The system enables you to use bitmap files as text
material by registering them with the required information, such as title, then sending
them to the network players.
This function is useful to display certain marks, such as a program or company logo at
the desired position on the full-size video, in the same way as you do using a downstream keying function.
The system manages the following types of files for use as bitmap text:
• Windows bmp format with a color depth of 8-bit Index (256 colors), 4-bit Index (16
colors) or 1-bit Index (2 colors).
• Bitmapped text from 16 to 100 pixels in height.
For the width, there is no problem with a bitmap file with a width of up to about
720 pixels (the width of the display). You may not able to use a bitmap file with a
width greater than that, depending on its color depth and height.
Hint
The system enables you to make the background color transparent even in the case of a
bitmap text. It considers the color corresponding to index 0 of the bitmap as the
background, hence transparent, color.
1
2
Click [Material Management] on the main menu to open the Material Management window.
Select the Text tab, then click [Read Bitmap].
The Open dialog box appears.
3
Select the desired bitmap file, then click [Open].
The selected bitmap is added as text material in the Material Management window. There
is no length (Len.) data shown for bitmap text material.
4
Right-click the added text, click [Edit] on the right-click menu, then specify each item in the
Properties dialog box.
See the explanation of the Properties dialog box for details.
It is not necessary to specify the settings in the Font Settings section, text color, and
background color for bitmap text.
Note
The system only allows you to modify the setting of the items in the Properties dialog
box after the bitmap text is registered. To replace the bitmap, create a new piece of
bitmap text and discard the unnecessary one, or see "Replacing Bitmap Text Having a
Certain Material Code" described below.
Replacing Bitmap Text Having a Certain Material Code
You can replace material that has a certain material code. This operation is useful when
you want to regularly replace a part of the content without editing the playlist.
Make sure the material meets the following conditions and perform the bitmap reading
procedure described above.
• Make the name of the source bitmap file the same as that of the material code of the
one to be replaced. To replace bitmap text with a material code of "T0000001" with
a bmp file, for example, rename the bmp file "T0000001.bmp" using Windows
Explorer.
40
• Allow enough time for replacement. Make sure that the new material arrives at the
network player at least 15 seconds before the playlist is to start.
• Attributes such as text type, speed, the number of times to be displayed, and so on,
will be those of the bitmap text that was specified last. However, the text type may
change as shown in the following table, depending on whether the width of the
original bitmap text is more than 720 pixels. Check the attributes, and modify them
if necessary.
Text type of the Text type of the
Text type of the replaced
most recently
replaced bitmap text
bitmap text
specified bitmap (720-pixel width or less) (More than 720-pixel width)
Constant
No change (Constant)
Changed to Scroll
Blink
No change (Blink)
Changed to Scroll
Scroll in
Changed to Constant
No change (Scroll in)
Scroll
Changed to Constant
No change (Scroll)
Specifying the Date for Automatic Deletion
Right-click the desired material in the Material Management window, then click [Set
Delete Date] or [Clear Delete Date]. When you click [Set Delete Date], a calendar
appears. Select the date for deletion, then click [OK].
41
Device Control Command Preparation
The system provides external device control functions for use upon playout from the
network players, such as turning on and off or switching the input lines of a plasma
display panel, or sending GPI (General Purpose Interface) pulses to devices connected
to the RS-232C connector of a network player.
To control an external device, create a device control command and send it to the
network players. This device control command is included in the events of a playlist to
control the external device during playout.
The BZNP-100 also enables you to create commands to control the NSP-100 network
players, and use them in the urgent playout procedure to control the network players.
(You cannot insert those files into the playlists, though.)
1
2
Click [Material Management] on the main menu to open the Material Management window.
Select the Control tab, then click [New].
The Edit Control (External Device/NSP-100) dialog box appears.
3
Enter the type and title of the device control command to be created in the Type and Title
text boxes, respectively.
This information is used to identify each device control command.
4
Click the PDP Control option button to control the plasma display panel connected to the
network player, or the GPI Control option button to control any other type of external device.
5
If the PDP Control option button is selected, select the desired control from the Control
drop-down list box.
If the GPI Control option button is selected, check the GPI pulse to be output. You can
check more than one check box simultaneously.
6
Click [OK].
The newly created device control command appears in the Material Management window.
Creating a Control Command for the Network Players
Select the NSP-100 Control option button in step 4 in the procedure above, type the
command for the network players in the Control text box, then click [OK].
Note
• Control commands for network players cannot be inserted into a playlist.
• An erroneous control command may result network player problems.
Refer to the protocol manual of the network player for details on how to enter a
control command. Ask your supplier or Sony sales representative about the protocol
manual.
Modifying a Device Control Command
Right-click the desired control command on the Material Management window, then
click [Edit] on the menu. This displays the Edit Control (External Device/NSP-100)
dialog box containing the selected control command data. Modify the command as
needed, then click [OK].
To modify the type and/or title of a piece of material, double-click the type or title
column of the desired material in the Material Management window. This enables
editing in that column. Press the Enter key to complete the modification.
42
Modifying the Label for a PDP Control
The Edit Control (External Device/NSP-100) dialog box allows you to modify the label
for all the items, except for "Power On" and "Power Off," in the PDP Control dropdown list box.
When you select an item in step 5, it appears highlighted. Enter the desired text, then
click [Set].
This enables you to use the appropriate labels, according to the various control
functions of the PDPs.
Controlling an External Device or the Network Players Using the Urgent Playout
Function
To control an external device or a network player using a registered control command,
select the desired network player group in the Destination drop-down list box, select the
desired control command, then click the play button in the Urgent section.
The urgent playout function interrupts playout currently being carried out on the
network player. Ongoing playout stops, and the selected control command will run on
each network player.
Check the network player status in the NSP-100 Status window before starting urgent
playout of the device control command.
43
Checking Materials (Preview)
The following procedures enable you to check the contents of the material.
In the case of a piece of video or graphics material, the picture appears in the Preview
window. The Preview window for the video material has video control buttons and a
slider used to check the desired part of the video.
In the case of a piece of character text material, the Edit Text dialog box appears.
Note
• The system sometimes divides a piece of video material into several files upon
conversion for file transfer efficiency. In such a case, you can only preview the top
(first file) of the video material.
• Previewing video material requires a playback function for MPEG2 files that is not
included in the BZNP-100 software package. Purchase a utility software application
for MPEG2 playback and install it to preview MPEG2 files. We are unable to
provide one for free because of issues related to the license agreement.
AVI files, however, can be played back using DirectShow.
Note that it is not possible to play VSR-2000/2000A files (pre-conversion) on the
PC.
When Converting Video or Graphics Files into NSP Format
On the video or graphics file list (upper list) in the Convert Material window, right-click
the desired file, then click [Preview on PC] on the menu.
In the Material Management Window
Right-click the desired piece of material, then click [Preview on PC] (or [Edit] for
character text material) on the menu.
When Editing Playlists
For video, graphics or text material list in the Edit Playlist window, right-click the
desired piece of material, then click [Preview on PC] (or [Display/Edit] in the case of
character text material).
Hint
You can use urgent playout function for preview of materials and playlists on a network
player, provided you have a monitor connected to the network player near you.
44
Deleting Materials and Playlists (Automatic Deletion Function and Manual
Deletion)
The video, graphics, and text materials, and playlists sent to the network players are
automatically deleted on the specified date so that the network players will not be
overfilled. And a piece of material or playlist will be replaced if a new piece assigned
the same code is sent.
Automatic Deletion Function
The following settings are necessary to use the automatic deletion function of the
network player.
• On the "System Administrator Setup" screen of the network player, specify "Yes"
for "Activate 'Automatic Delete'."
• Specify the automatic deletion date for each piece of material and playlist.
Specify the date for automatic deletion of video, graphics, and text materials and of
the playlists (in the case of the Presentation Application) manually. Right-click the
desired material or playlist in the Material Management window, click [Set Delete
Date], then select the date on the calendar displayed and click [OK].
To deactivate the automatic deletion function, right-click the material or playlist in
the same way, then click [Clear Delete Date].
In the case of the Scheduling Application, the day after the playout end date is
automatically specified as the automatic deletion date of the playlist. You cannot
change it.
At 0:00am, the network players that have automatic deletion enabled start searching
for playlists and materials whose automatic deletion date is that day, and delete
them.
Manual Deletion
The system also allows you to manually delete materials and playlists. Proceed as
follows to delete materials that are not assigned any date for automatic deletion.
Hint
You can also delete device control commands or materials stored on the PC with this
procedure.
See "Editing or Deleting a Playlist" for the manual deletion procedure for the playlists.
1
Click [Material Management] on the main menu to open the Material Management window,
then select the tab of the material to be deleted.
2
Click the PC File Management option button to delete materials stored on the PC.
To delete materials stored on a network player, click the NSP-100 Remote File
Management option button, then select the desired network player from the NSP-100 dropdown list box.
The list of materials stored in the selected location appears.
3
Select the material(s) to be deleted.
To select more than one piece of material, hold down the Ctrl key and click them one by
one. To select a range of material, hold down the Shift key and click both the first and last
piece of material in the range.
45
46
4
Right-click the selected material, then click [Delete] on the menu.
Or, press the Delete key on the keyboard.
A confirmation message appears.
5
Click [Yes].
Importing Materials and Playlist Modules Created with the BZNP-A1
If you created contents using the Sony BZNP-A1 authoring software, and converted it
into playlist modules for distribution to network players, the BZNP-100 enables you to
import and use such materials and playlist modules for playlist creation, so that the
contents can be distributed and played on network players.
There are two cases where distribution data created with the BZNP-A1 can be used.
Refer also to the system guide and the BZNP-100 "Operations Guide (For Using
Content Created with the BZNP-A1)" for details of the operation.
Note
The BZNP-100 does not perform automatic scheduled playlist sending and automatic
re-sending for transfer failures while it is updating material and playlist module data, or
importing packaged materials and playlist modules.
Updating Material and Playlist Module Data Lists
If the BZNP-A1 directly has written materials and playlist modules into the BZNP-100
material management folder, check and make it reflected in the Maternal Management
window as follows:
Hint
This operation is not necessary if the BZNP-100 started after the BZNP-A1 wrote its
distribution data into the BZNP-100 material management folder, as the BZNP-100
checks the material management folder upon start-up.
1
2
3
4
Close all BZNP-100 dialog boxes and windows except for the main menu.
Click [Import Materials] on the main menu.
The Import Materials dialog box appears.
Select the Update Materials option button.
Click [Start].
The BZNP-100 checks the material management folder, and updates the Material
Management window display.
Materials and playlist modules created with the BZNP-A1 appear in purple. They are
available for playlist creation/editing. To check the contents, preview the playlist module
using the procedure described in "Checking a Playlist."
Importing a Distribution Data Package Created with the BZNP-A1
If you receive a CD-R or DVD-R on which materials and playlist modules created using
the BZNP-A1 are stored as a package, import them as follows:
1
2
3
4
5
Close all BZNP-100 dialog boxes and windows except for the main menu.
Insert the medium in the drive, then click [Import Materials] on the main menu.
The Import Materials dialog box appears.
Select Import Package from BZNP-A1 option button.
Specify the packaged data folder written on the medium from the drop-down list box or by
clicking [Browse].
Click [Start].
The materials and playlist module are copied to the material management folder, and
appear in the Material Management window.
Materials and playlist modules created using the BZNP-A1 appear in purple. They are
47
available for playlist creation/editing. To check the contents, preview the playlist module
using the procedure described in "Checking a Playlist."
Note
It is not possible to modify or edit material and playlist modules displayed in purple in
the Material Management window, but you can save such text material or playlist
modules as new material/playlist modules, and edit them.
For a piece of text material, simply edit it. Then the BZNP-100 automatically registers
it as a new piece.
For a playlist module, open a blank Edit Playlist window, copy and paste the imported
playlist module using the short-cut key or by dragging it from the Material Management
window. Then, open the module, edit the content, and save it as a new playlist. Note
that you must specify playlist properties, such as the title, type, and playlist module
option, for the new playlist.
48
Playlist Preparations
What is a Playlist?
What is a Playlist?
A "playlist" is a list in which the materials are arranged in order of playout. The BZNP100 sends a playlist together with the necessary materials to the network players, then
each network player plays the materials out according to this list. Each piece of
material listed on the playlist is referred to as an "event."
In the Edit Playlist window, events are listed separately depending on the material type.
Upon playout, the text event is superimposed onto the graphics event on the same line,
then the video event on the same line is overlaid as shown below. When there are only
video and text events on a single line, however, the text event is overlaid on full screen
video.
The video and graphics event can be played either by itself or stacked in layers, but the
text event cannot be played by itself.
Operation with More than One Playlist
If there is more than one playlist for the same period on the same day, the playlist that
was sent later has the higher priority. The Scheduling Application ignores the other(s).
When playout has already started, however, the playlist currently being used for playout
would not be replaced with the new one.
The following rules are applied when there is more than one playlist (A and B) for a
certain period:
• Playout of a playlist (A) will stop 10 seconds before the start time of another playlist
(B) that was sent later than (A).
The playlist loading screen specified by the network player (default: solid black) is
displayed for about 10 seconds, then playout of playlist (B) starts.
49
• If playout of playlist (B) ends within the playout duration of playlist (A), playout of
playlist (A) will resume about one minute later.
The network player cannot start playing from the middle of a video file, though. If
the timing of the resumption of playlist (A) is in the middle of a video event, actual
playout will resume from the next event.
Example)
If there are the following three playlists for the same day, Playlist-1 is ignored, and the
network player plays Playlist-2 and Playlist-3 from 10:00:00 to 12:00:00 as shown
below.
Playlist-1
09:30:00
Time when the
playlist transfer
completed
Playlist-2
Playlist-3
09:45:00
09:50:00
Start time of the
first event
End time of the last
event
10:00:00
10:00:00
11:00:00
12:00:00
15:00:00
10:00:00
10:59:50
Playlist-2
15:00:00
11:00:00
12:00:00
After 12:01:00
Playlist-3
Playlist-2
Playout of Playlist-2 subsequently resumes, but the actual time of resumption varies
depending on the type of the corresponding event:
In the case of a graphics, or graphics and text event(s): playout of Playlist-2 will resume
about one minute after the end of Playlist-3 playout.
In the case where a video event is included: as the network player cannot start playing from
the middle of a video file, actual playout of Playlist-2 will resume from the next event.
When there is a 30-minute video event from 12:00:00, for example, playout will start with
the next event, the one that will be started from 12:30:00.
What is a Playlist Module?
There are special playlists that are made to be inserted into another playlist. They are
referred to as "playlist modules." A playlist module is also a list in which the materials
are arranged in order of playout, and it is mainly used to bundle some events.
A playlist module is made in the same procedure as a normal playlist, but it has a check
mark in the Playlist Module check box in the Properties dialog box. The difference
between a playlist module and a normal playlist is that a playlist module has no data for
a playout period and no automatic deletion date.
A playlist module is useful when you need to play the same contents in various
situations. The system even provides a simple playlist editing function (Edit Playlist
(Module List) window) that enables you to create playlists simply by listing the playlist
modules you want to use to make the playlist.
When you are using the Sony BZNP-A1 software for content authoring, timeline data is
converted to a playlist module so that the BZNP-100 can create a playlist with it and
distribute to the network players.
50
Note
• Only the events contained in the inserted playlist modules are sent to the network
players. In the case of the Scheduling Application, do not insert any normal playlist
that has start and end date data into another playlist. Otherwise, the network player
will receive two playlists for playout at the same time on the same day, and this will
cause a problem upon playout.
• Playlist modules cannot be nested. If you insert module "B" that already includes
module "A" into the current playlist, all B's events including A's are inserted, but the
comment lines corresponding to module "A" are ignored.
A playlist accommodates more than one playlist module, provided they are not
nested.
51
Creating a New Playlist
Proceed as follows to create a new playlist or playlist module.
1
Click [Edit Playlist] on the main menu.
Or, select the Playlist tab in the Material Management window, then click [New].
The Edit Playlist window appears in either case.
2
Select the network player group for which you are creating a playlist from the Destination
drop-down list box.
3
Using a drag & drop operation, add the materials to be played out from the Video, Graphics,
and Text material lists shown in the upper-half of the window to the lower playlist, one by
one.
Edit the playlist as necessary. See the topics in "Editing Functions in the Edit Playlist
Window" section for details.
4
Click [Properties].
The Properties dialog box appears.
5
In the case of the Scheduling Application, specify the start time of the first event in the Start
Time spin box. (Note that the start time of the first event must be before 24:00:00.) The
network players automatically start playout at the specified time.
When creating a "playlist module" that is to be inserted into other playlists, leave the start
time set at 00:00:00 so as not to specify its start time. Any other start time has higher
priority when a playlist module is inserted into another playlist.
This step is not necessary for the Presentation Application.
Note
The network player does not support a summer time management function. Be careful to
specify the start time if your country uses a summer time system.
6
Check the Repeat check box when you want to repeat playout of the playlist, then modify
the daily end time of the repetition in the Repeat End Time spin box, if necessary.
When creating a "playlist module," check the Playlist Module check box.
Note
Repeated playout is not possible if there is any break in the playlist, or if you are creating a
playlist module.
And, in the case of the Scheduling Application, repeated playout will automatically end 10
seconds before the start time of the next playlist.
In the case of the Scheduling Application, be sure that any playlist module (a playlist
inserted in another playlist) has a check mark in the Playlist Module check box, so that it
has no start and end date data. Otherwise, the network player will receive two playlists for
playout at the same time on the same day, and this will cause a problem upon playout.
52
7
Enter the type and title of this playlist into the respective text boxes, then click [OK].
Note that the Scheduling Application also enables you to specify the playout period of the
playlist in the Properties dialog box.
See the explanation of the Properties dialog box for details.
8
Click [OK] in the Edit Playlist window to save the playlist.
A confirmation message appears.
9
Click [Yes].
The system saves the playlist.
Hint
You can preview the playlist from using the procedure described in "Checking a
Playlist."
Undoing the last Operation
The Edit Playlist window always keeps the playlist just before the last editing operation,
so that you can cancel the last operation. Hold the Ctrl key down and press the Z key to
cancel the last operation.
Specifying the Date for Automatic Deletion of a Playlist (Presentation Application
Only)
Right-click the desired playlist in the Material Management window, then click [Set
Delete Date] or [Clear Delete Date]. When you click [Set Delete Date], a calendar
appears. Select the date for deletion, then click [OK].
In the case of the Scheduling Application, the day after the playout end date is
automatically specified as the date for automatic deletion. You cannot change it.
Playlist modules that are shown in blue or purple in the Material Management window
have no automatic deletion date data, as they would never be sent to the network
players.
Note
To use the automatic deletion function of the network player, specify "Yes" for
"Activate 'Automatic Delete'" on the "System Administrator Setup" screen of the
network player.
53
Creating a New Playlist by Listing Playlist Modules
When your playlists are combinations of routine programs, you can create playlist
modules of the programs, and list them to create daily playlists.
The system provides the Edit Playlist (Module List) window for playlists that consist
only of the existing playlist modules. It also allows you to add the external device
control events to the playlist.
Hint
• The Edit Playlist (Module List) window does not allow you to add video, graphics,
or text events. Use the normal Edit Playlist window to add discrete events.
• See "Creating a New Playlist" for details on how to create a playlist module.
1
Select the Playlist tab in the Material Management window, then click [New (Module List)].
The Edit Playlist (Module List) window appears.
2
Select the network player group for which you are creating the playlist from the Destination
drop-down list box.
3
Using a drag & drop operation, add the desired playlist modules from the playlist module list
shown in the left-half of the window to the right playlist, one by one.
The external device control commands are added to the playlist as event lines, in the same
way as in playlist modules. Right-click the line immediately below the location where you
want to insert the external device control event, and select the desired external device
control command on the sub-menu of [Insert Control (External Device)]. You can also
select the desired external device control command on the Control tab of the Material
Management window, then add it using a drag & drop operation. After adding an external
device control event, if necessary, double-click its Start Time column, and adjust the time
for device control.
Edit the playlist as needed. See the explanation in "Editing Functions in the Edit Playlist
(Module List) Window" for details.
4
Click [Properties].
The Properties dialog box appears.
5
In the case of the Scheduling Application, specify the start time of the first event in the Start
Time spin box. (Note that the start time of the first event must be before 24:00:00.) The
network players automatically start playout at the specified time.
When creating a "playlist module" that is to be inserted into other playlists, leave the start
time set at 00:00:00 so as not to specify a start time. Any other start time has higher priority
when a playlist module is inserted into another playlist.
This step is not necessary for the Presentation Application.
Note
The network player does not support a summer time management function. Be careful to
specify the start time if your country uses a summer time system.
6
Check the Repeat check box when you want to repeat playout of playlist, then modify the
daily end time of the repetition in the Repeat End Time spin box, if necessary.
When creating a new "playlist module," check the Playlist Module check box.
Note
Repeated playout is not possible if there is any break in the playlist.
And, in the case of the Scheduling Application, repeated playout will automatically end 10
seconds before the start time of the next playlist.
54
Playlist modules cannot be nested. If you insert module "B" that already includes module
"A" to the current playlist, all B's events, including A's, are inserted, but the comment lines
corresponding to module "A" are ignored.
7
Enter the type and title of this playlist in the respective text boxes, then click [OK].
Note that the Scheduling Application also enables you to specify the playout period of the
playlist in the Properties dialog box.
See the explanation of the Properties dialog box for details.
8
Click [OK] in the Edit Playlist (Module List) window to save the playlist.
A confirmation message appears.
9
Click [Yes].
The system saves the playlist.
Hint
You can preview the playlist using the procedure described in "Checking a Playlist."
Undoing the last Operation
The Edit Playlist (Module List) window always keeps the playlist just before the last
editing operation, so that you can cancel the last operation. Hold the Ctrl key down and
press the Z key to cancel the last operation.
Specifying the Date for Automatic Deletion of a Playlist (Presentation Application
Only)
Right-click the desired playlist in the Material Management window, then click [Set
Delete Date] or [Clear Delete Date]. When you click [Set Delete Date], a calendar
appears. Select the date for deletion, then click [OK].
In the case of the Scheduling Application, the day after the playout end date is
automatically specified as the date of automatic deletion. You cannot change it.
Playlist modules that are shown in blue or purple in the Material Management window
have no automatic deletion date data, as they would never be sent to the network
players.
Note
To use the automatic deletion function of the network player, specify "Yes" for
"Activate 'Automatic Delete'" on the "System Administrator Setup" screen of the
network player.
55
Editing or Deleting a Playlist
Hint
The same operation can be applied to the "playlist modules" that are made to be inserted
into another playlist.
Opening a Playlist
Open the playlist as follows to modify or edit it.
1
Click [Material Management] on the main menu to open the Material Management window,
then select the Playlist tab.
2
Select the network player group in which the playlist to be opened was registered from the
Destination drop-down list box.
3
Right-click the playlist to be opened, then click [Edit] or [Edit (Module List)] on the menu.
The Edit Playlist window or Edit Playlist (Module List) window opens containing the selected
playlist data.
4
Modify and edit the playlist as desired, then click [OK].
See the explanations of "Editing in Edit Playlist Window" or "Editing Functions in the Edit
Playlist (Module List) Window" for details.
To modify the type, title, and/or playout period, click [Properties], modify the desired item(s)
in the Properties dialog box, then click [OK].
Deleting a Playlist
The playlists on the network players are automatically deleted on the specified date so
that the network players will not be overfilled.
Proceed as follows to manually delete playlists from a network player or PC.
1
Click [Material Management] on the main menu, then select the Playlist tab.
2
Click the PC File Management option button to delete playlists stored on the PC.
To delete playlists stored on a network player, click the NSP-100 Remote File Management
option button, then select the desired network player from the NSP-100 drop-down list box.
The list of playlists stored in the selected location appears.
3
Select the playlist(s) to be deleted.
To select more than one playlist, hold down the Ctrl key and click them one by one. To
select a range of playlists, hold down the Shift key and click both the first and last playlists
in the range.
4
Right-click the selected playlist(s), then click [Delete] on the menu.
Or, press the Delete key on the keyboard.
A confirmation message appears.
5
Click [Yes].
Copying a Playlist Created for Another Network Player Group
56
1
Click [Material Management] on the main menu, then select the Playlist tab.
2
Select the network player group for the desired playlist from the Destination drop-down list
box.
3
Right-click the desired playlist, then click [Copy] on the menu.
4
Select the desired network player group from the Destination drop-down list box.
The playlists displayed change depending on the network player group selected.
5
Right-click anywhere on the list, then click [Paste] on the menu.
The copied playlist is registered in the selected network player group.
Hint
Displaying the playlist in the Edit Playlist window, switching the Destination dropdown list box to the desired network player group, then clicking [OK] also allows the
playlist to be used for the selected network player group.
Specifying the Date for Automatic Deletion (Presentation Application Only)
Right-click the desired playlist in the Material Management window, then click [Set
Delete Date] or [Clear Delete Date]. When you click [Set Delete Date], a calendar
appears. Select the date for deletion, then click [OK].
In the case of the Scheduling Application, the day after the playout end date is
automatically specified as the date of automatic deletion. You cannot change it.
Playlist modules that are shown in blue or purple in the Material Management window
have no automatic deletion date data, as they would never be sent to the network
players.
Note
To use the automatic deletion function of the network player, specify "Yes" for
"Activate 'Automatic Delete'" on the "System Administrator Setup" screen of the
network player.
57
Checking a Playlist
Previewing the Playlist
You can preview playlists on a network player using the urgent playout function,
provided you have a network player and monitor available for previewing. Preview of
each piece of material is possible, too, in the same way.
1
2
3
Click [Material Management] on the main menu to open the Material Management window.
Select the tab of the material or playlist to be previewed.
Select the PC File Management option button, and select the destination network player
group in the Destination drop-down list box.
4
Click the desired material or playlist, then click the play button in the Urgent section.
The system sends the selected material (or the playlist and the necessary materials) to the
network player and urgent playout starts.
5
Click the stop button in the Urgent section to stop the preview.
Checking the List
The Playlist tab in the Material Management window or the playlist module list in the
Edit Playlist (Module List) window only shows limited information on the playlists,
such as the titles. The following procedure enables you to check the events in the
playlists.
1
Right-click the desired playlist or playlist module, then click [View] on the menu.
The View Playlist window opens with the event data of the playlist/playlist module.
A playlist displayed in the View Playlist window is similar to that in the Edit Playlist window,
though event duration is not shown. External device control events, if included in the
playlist, are displayed with their titles on the rightmost column, not the mark.
When a "playlist module" is inserted, it appears as a light-gray comment line with a closed
arrow mark ( ). Double-clicking this mark expands the module, and its events appear
enclosed by two light-gray comment lines whose Start Time columns have arrow marks (
).
and
The expanded playlist module can be collapsed by double-clicking the arrow mark on its
upper comment line.
Hint
If an event title is longer than the list width, hence it is not fully displayed, move the
mouse pointer over it. The entire title text pops up.
58
Editing Functions in the Edit Playlist Window
Adding Video, Graphics, and Text Events to a Playlist
There are respective columns for video, graphics, and text events in the playlist. Add
the materials to be played as events in the order of playout, as follows. The leftmost
column shows the start time of each event.
Hint
• A green background color for video and graphics materials means that the
corresponding NSP formatted files are not yet ready.
• The length of a playlist should be less than 23 hours 58 minutes. The maximum
number of events per a playlist is 3,000.
Note that each network player can retain up to the following number of pieces of
material:
Material
Maximum number
Video
500
Graphics
500
Text
100
1
Select the desired material on the Video, Graphics, or Text material list displayed in the
upper-half of the Edit Playlist window.
2
Drag the selected material to the playlist and drop it at the desired position.
It is added or pasted there as an event, depending on the drop position.
Note
The playlist does not accept text materials as independent events, because a text event
cannot play by itself. The text materials can only be pasted to a line where video and/or
graphics event(s) are already assigned. If an independent text event occurs, it appears in
red on the playlist. The system does not allow you to save such a playlist.
3
When adding graphics or text material, specify the desired event duration, if necessary.
Double-click the duration column, modify the duration, then press the Enter key.
Note that it is impossible to modify the duration of a video event.
Where to Drop Material
To add the event:
at the top of a playlist
at the end of a playlist
you should drop the material:
above the first event in the playlist (the column title line).
below the last event of the playlist (the gray strip at the
bottom).
on the same line as the desired event.
In a location where
another type of event is
assigned
between two events
on the lower of the two events (while holding the Ctrl
key).
Default Duration of an Event
The duration of a video event is same as that of the corresponding video material. It
cannot be changed.
In the case of a graphics event, it would be 10 seconds. When a graphics event is added
to the line of a video event, however, the duration would be the same as that of the
59
video event.
In the case of a text event, the duration would also be the same as that of the video or
graphics event on the same line.
Note
If the text type is scroll or scroll in, note that the default text event duration would not
be related to the estimated duration that is necessary to entirely display the text material.
The duration necessary to entirely display the text material is shown in the Material
Management window.
Adjusting the Duration of a Text or Graphics Event
To adjust the duration of a graphics/text event to that of a series of video events,
perform either of the two procedures described in the following examples:
(1) To add a new piece of text material so that it will play along the No.0013 to 0017 video
events, select the range of lines of text that corresponds to the blue framed video events
(painted in cyan in the figure), then add the desired piece of text material there with a drag
& drop operation.
(2) To adjust the duration of the No.0012 graphics event to the green framed video events,
select the range of lines of graphics that corresponds to the green framed video events
(painted in lime green in the figure), right-click the selection, then click [Change Duration] on
the menu.
In either method, hold down the Shift key and click both the first (No.0012 or 0013)
and last (No.0017) lines to select the entire range.
These procedures can also be useful for the following purposes:
• To adjust the duration of a text event to that of a series of video and/or graphics
events.
• To adjust the duration of a graphics event to that of a series of video events.
Note
• This operation is not available if there is an event already specified within the range,
except for the top line.
• If there is a playlist module within the selected range, adding a text or graphics event
(or adjusting its duration) will undo the module, and the light-gray comment lines
that enclosed the module will disappear. Because this operation modifies the
content of the module, it is no longer the same as the original playlist module.
Arranging the Layout of the Screen
You can specify the size (only for video) and position of video and/or text displayed on
a piece of graphics material. See "Positioning Video and/or Text" for details.
When only video, or video and text is/are displayed, the video always appears full size.
60
Using Only the Audio Part of a Piece of Video Material as an Event
Add the desired video material to the playlist, then right-click that event and click [Use
Audio Only] on the menu.
The color of the event data changes to blue to indicate that it is an audio event.
To return it to a normal video event, right-click the event, then click [Use Audio Only]
again.
Undoing the last Operation
Hold the Ctrl key down and press the Z key to cancel the last operation.
Including an External Device Control Event in a Playlist
The playlist accommodates the external device control commands as events to control
plasma display panels or other devices connected to the network players, but the
procedure for adding the control commands is different from that of video or graphics
materials.
Hint
Upon playout, the network player sends control signals to connected devices when the
corresponding event plays.
As many devices need some time to perform the intended operation after receiving the
control signal, consider the time lag when including an external device control
command in a playlist.
Adding to a Video or Graphics Event Line
1
On the line of the desired event, right-click the Control column.
A menu appears.
2
Point to [Control (External Device)] on the menu.
A sub-menu listing the registered external device control commands appears.
3
Click the desired device control.
The device control mark (
) appears in the Control column for the selected event.
Note
When including an external device control command in an event, generally, the line of the
specified video, graphics and/or text event changes to two-line width. The system
considers that any external device control event has a two-second duration. Video,
graphics, and/or text events are longer in most, hence the playlist widens the line to show
there is a shorter event having the same event number.
Adding to a Line as an Independent Event
1
Right-click the line immediately below the location where you want to insert the external
device control event.
A menu appears.
2
Point to [Insert Control (External Device)] on the menu.
A sub-menu listing registered external device control commands appears.
3
Click the desired external device control command.
A new line is inserted, and the device control mark (
4
) appears in the Control column.
Double-click the Start Time column of the line, and adjust the time of device control.
61
Hint
You can also select the desired external device control command on the Control tab of
the Material Management window, then add it using a drag & drop operation.
Modifying or Deleting an External Device Control Event Included in a Playlist
To replace an external device control command with another one, right-click the device
control mark to be replaced, and point to [Control (External Device)]. The sub-menu
shows a check mark for the external device control command currently included in the
event. Select the desired one on the menu.
To delete an external device control command, right-click the device control mark in
the Control column, then click [Delete] on the menu.
Undoing the last Operation
Hold the Ctrl key down and press the Z key to cancel the last operation.
Moving and Deleting Events
Moving or Copying Events
A "drag & drop" operation moves the selected playlist events to the desired position,
just like when adding the materials to the playlist.
A normal drag & drop operation pastes the event in the dropped position. To insert the
event(s) between two events, hold down the Ctrl key and drag & drop them to the event
that is immediately below the insertion point.
Also, you can use Ctrl+C (Holding down the Ctrl key and pressing the C key) to copy
the selected events to the Windows Clipboard. To paste the events on the Clipboard,
specify the position on the playlist and use Ctrl+V.
Note
• Text material events cannot be independent events, because a text event cannot play
by itself. They can only be pasted to a line where a video and/or graphics event(s)
are already assigned. If an independent text event occurs, it appears in red on the
playlist. The system does not allow you to save such a playlist.
• To select the video, graphics and/or text events having the same event number as a
set, click the corresponding Start Time column.
Changing the Material for an Event
Paste the desired material over the event.
The material assigned to the event is overwritten with the newly pasted material.
Deleting Events
Right-click the event to be deleted on the playlist, then click [Delete] on the menu.
Undoing the last Operation
Hold the Ctrl key down and press the Z key to cancel the last operation.
Inserting a Playlist Module
The system enables you to insert a playlist module into the currently edited playlist. All
events of the selected playlist module are inserted as a block.
62
Note
In the case of the Scheduling Application, be sure that any playlist module has a check
mark in the Playlist Module check box, so that it has no start and end date data.
Otherwise, the network player will receive two playlists for playout at the same time on
the same day, and this will cause a problem upon playout.
1
Click [Material Management] on the main menu to display the Material Management
window, then select the Playlist tab.
2
Right-click the playlist module (shown in blue or purple) to be inserted, and click [Copy] on
the menu.
All events of that playlist module are copied.
3
In the Edit Playlist window, right-click the line that comes immediately after the inserted
playlist module, then click [Paste Playlist Module] on the menu.
The copied playlist module is inserted. It appears as a light-gray comment line with a
closed arrow mark ( ). The title of the inserted module is displayed on the comment line,
but you can modify it by double-clicking the comment, as necessary.
Double-clicking the closed arrow mark expands the module, and its events appear enclosed
by two light-gray comment lines whose Start Time columns have arrow marks (
and
).
The expanded playlist module will be collapsed by double-clicking the arrow mark on its
upper comment line.
Note
Playlist modules cannot be nested. If you insert module "B" that already includes
module "A" to the current playlist, all B's events including A's are inserted, but the
comment lines corresponding to module "A" are ignored.
A playlist accommodates more than one playlist module, provided they are not nested.
Deleting All the Events of the Inserted Playlist Module
Right-click either of the comment lines, then click [Delete] on the menu.
Editing Events of an Inserted Playlist Module
You can freely edit or delete the events of an inserted playlist module. Also, it is
possible to add a new event among those events (between the comment lines for the
inserted playlist module).
Because the events of the inserted playlist module are no longer the same as that of the
original one, the comment lines for the inserted playlist module will be deleted after
editing is completed.
Note
The comment lines for the inserted playlist module indicate that the in-between events
belong to a playlist module. However, those events will not be automatically changed
if the original playlist module is modified after insertion.
Undoing the last Operation
Hold the Ctrl key down and press the Z key to cancel the last operation.
63
Inserting a Break Event (Presentation Application)
The Presentation Application allows you to insert a break event, a point at which
playout pauses, in the playlist. Playout of the playlist resumes from the event following
to the break event when you start playout using the remote controller of the network
player.
1
Right-click the event that comes immediately after the break, then click [Insert Break] on the
menu.
A break event is inserted. It appears as a gray strip in the playlist. The start time of the
event that is immediately after the break becomes 00:00:00.
Deleting a Break Event
Right-click the break event (gray strip), then click [Delete] on the menu.
Undoing the last Operation
Hold the Ctrl key down and press the Z key to cancel the last operation.
Changing the Start Time of an Event (Scheduling Application)
There are two purposes to changing the start time.
The first is to make a break (during which nothing is played) during playout. The
software always calculates the start time of each event according to the start time of the
first event and the event's duration. Shifting the time displayed in the Start Time
column to a later time makes a break. In this case, the start time of all events on the
same line are simultaneously changed.
The second purpose is to adjust the start time of a single event. In this case, only the
start time of the selected event changes, and no other event is affected.
Changing the Start Time to Make a Break
Note
The start time of an event can be from 00:00:00 to 47:59:59, however, the start time of
the first event in a playlist must be before 24:00:00.
1
Double-click the Start Time column of the event that should be played immediately after the
break.
The start time can now be edited.
2
Add the duration of the break to the current start time, adjust the start time to accommodate
the change, then press the Enter key.
A gray strip that indicates a break appears immediately above the selected event. All the
start times of the subsequent events are recalculated.
Changing the Start Time of the Selected Event Only
Note
This operation adjusts the start time of an event and cannot be used to move the event
on the playlist.
64
1
Right-click the event whose start time should be changed, then click [Change Start Time] on
the menu.
The Change Start Time dialog box showing the current start time appears.
2
Change the start time as desired, then click [OK].
Undoing the last Operation
Hold the Ctrl key down and press the Z key to cancel the last operation.
Positioning Video and/or Text
The system enables you to specify the size (only for video) and position of a video
and/or piece of text displayed on a piece of graphics material.
Note
• When video and text events are played simultaneously on a piece of graphics
material, position the video and text so that they do not overlap. If they are
overlapped, the video material is displayed over the text.
• The unit used in the Display Setup dialog box is pixels, and the origin is the
upperleft corner of the screen. You are not allowed to have more than one user
setting whose value is the same.
If you select the "over-scan" display type upon group setting, the system adjusts the
pre-defined positions, such as "Upperleft" and "Lower," so that the video and text
can be correctly displayed on over-scan displays. The system also indicates the area
that is visible with the over-scan displays on the screen in the Display Setup dialog
box.
Note that if you use both over-scan and under-scan displays in a single network
player group, video and text may not be displayed at the expected position, on some
displays.
Specifying the Default Positions
1
Click [Default Display Setup] in the Edit Playlist window.
The Display Setup dialog box appears.
2
Specify the default positions.
Select the pre-defined settings for the video position, size, and text position, or enter the
desired values in the text boxes.
You can also move or change the size of the text/video on the picture of a monitor
displayed in the Display Setup dialog box to specify the settings.
Check the Preserve Aspect Ratio check box to fix the video aspect ratio at 3:2 (NTSC) or
5:4 (PAL).
3
Click [OK].
The settings are saved as the default and the Display Setup dialog box closes. The new
position settings are automatically specified as the default settings when you add a video
and/or text event to the playlist.
Positioning Each Event
1
Right-click the desired event in the Edit Playlist window, then click [Display Setup] on the
menu.
The Display Setup dialog box appears.
65
2
Specify the position.
Select the pre-defined settings for the video position, size, and text position, or enter the
desired values in the text boxes.
You can also move or change the size of the text or video on the picture of a monitor
displayed in the Display Setup dialog box to specify the settings.
Check the Preserve Aspect Ratio check box to fix the video aspect ratio at 3:2 (NTSC) or
5:4 (PAL).
3
Click [OK].
The settings are specified in the selected event and the Display Setup dialog box closes.
Hint
Clicking [Apply] before clicking [OK] shows you the result. This is helpful when
entering the position or size value.
Undoing the last Operation
Hold the Ctrl key down and press the Z key to cancel the last operation.
Saving the Position Setting as a Selection
The system allows you to save up to 30 settings each for the video position, video size,
and text position. This is useful to use the same position setting in many events.
1
In the Display Setup dialog box, enter the desired name for the setting in the Video Position,
Video Size, or Text Position drop-down list box.
2
Enter the desired setting in the corresponding text box(es).
You can move or change the size of the text or video on the picture of a monitor displayed
in the Display Setup dialog box to specify the settings, too.
3
Click [Save] corresponding to the item(s).
Note
• When you click [OK], the system automatically saves the setting with the name
"User defined," even if you do not save it.
• If you do not want to apply the saved setting(s) to the default, or the event selected
to open the dialog box, click [Cancel], not [OK] to close the dialog box.
• To delete a saved setting, select it in the Display Setup dialog box, then click the
corresponding [Delete].
66
Editing Functions in the Edit Playlist (Module List) Window
Editing a playlist in the Edit Playlist (Module List) window is similar to operation in the
Edit Playlist window.
Moving or Copying Modules or External Device Control Events
A "drag & drop" operation moves the selected playlist modules to the desired position,
just as it does when adding playlist modules to a playlist.
A normal drag & drop operation pastes the module in the dropped position. To insert
the module between two modules, hold down the Ctrl key and drag & drop it to the one
that is immediately below the insertion point.
Also, you can use Ctrl+C (Holding down the Ctrl key and pressing the C key) to copy
the selected playlist modules to the Windows Clipboard. To paste the modules on the
Clipboard, specify the position on the playlist and use Ctrl+V.
The external device control events can also be moved in the same way.
Inserting a Break (during which nothing is played)
In the case of the Presentation Application, right-click the module that comes
immediately after the break, then click [Insert Break] on the menu.
A break event is inserted. It appears as a gray strip in the playlist. The start time of the
module that is immediately after the break becomes 00:00:00.
In the case of the Scheduling Application, double-click the Start Time column of the
module that should be played immediately after the break, and add the duration of the
break to the current start time, adjust the start time to accommodate the change, then
press the Enter key.
A gray strip that indicates a break appears immediately above the selected module. All
the start times of the subsequent modules are recalculated.
Note
The start time of a module can be from 00:00:00 to 47:59:59 (NTSC) or 47:59:49
(PAL), however, that of the first module of a playlist must be before 24:00:00.
Replacing an External Device Control Event
To replace an external device control command with another one, right-click the device
control event to be replaced, and point to [Change Control (External Device)]. The submenu shows a check mark for the external device control command currently assigned
as the event. Select the desired one on the menu.
You can also select the desired external device control command on the Control tab of
the Material Management window, then overwrite it using a drag & drop operation.
Deleting a Module, External Device Control Event or Break
Right-click the module, external device control event, or break event (gray strip) on the
playlist, then click [Delete] on the menu.
Undoing the last Operation
Hold the Ctrl key down and press the Z key to cancel the last operation.
67
Transfer to the Network Players
Sending Playlists to Network Players
When the playlist and the necessary materials are ready, send them to the network
players. Sending a playlist automatically sends the necessary materials, too. The
Scheduling Application automatically sends everything that is necessary for playout on
the day when you click the Send button on the main menu after specifying the date and
destination network player group.
Hint
• The system does not send the playlists and materials if they are already stored on the
network player.
• The system provides an automatic playlist sending function that can be enabled in
the Setup window. Once this function is enabled, sending playlists and materials is
not necessary during normal operation. See "Setting Up the Software" for details.
1
Click [Material Management] on the main menu if the Material Management window is not
open.
2
3
Select the Playlist tab.
Select the destination network player group from the Destination drop-down list box.
The playlists created for the selected network player group appear.
4
Select the playlist(s) to be sent.
To select more than one playlist, hold down the Ctrl key and click them one by one. To
select a range of playlists, hold down the Shift key and click both the first and last playlists
in the range.
5
Click [Send].
The system starts transfer of the playlists. It enables you to check the transfer status in the
Transfer Status window. See "Checking Transfer Status" for details.
Sending Playlists for a Specific Day (Scheduling Application Only)
1
On the main menu, display the desired date on the calendar by clicking its right and left
arrow buttons.
2
Select the destination network player group in the drop-down list box located under the
calendar.
Hint
Colors used for the calendar have the following meanings. Point to a date with the mouse
pointer to see the situation written in text.
Background
White
Gray
Green
Light Blue
Blue
Yellow
Red
3
68
Date
Gray or Brown
Black or Red
Black or Red
Black or Red
Black or Red
Black or Red
Black or Red
Meaning
Non-playout day.
Playlist not yet created.
Playlist being edited or already edited.
Playlists and materials are being sent.
Playlists and materials successfully sent.
Necessary materials not yet sent.
A transfer error occurred.
Click the desired date on the calendar, then click [Send].
Sending Materials to Network Players
The system also enables you to send materials without accompanying playlists to the
network players. However, you can only send one type of material at a time. Repeat
the following procedure to send different types of materials.
1
Click [Material Management] on the main menu if the Material Management window is not
open.
2
3
4
Select the tab of the desired material.
5
Select the destination network player group from the Destination drop-down list box.
Select the material(s) to be sent.
To select more than one piece of material, hold down the Ctrl key and click them one by
one. To select a range of materials, hold down the Shift key and click both the first and last
piece of material in the range.
Click [Send].
The system starts transfer of the materials. It enables you to check the transfer status in
the Transfer Status window. See "Checking Transfer Status" for details.
69
Checking Transfer Status
Sending many videos and/or sending items to many network players is especially timeconsuming. The Transfer Status window enables you to check how much the last
transfer has progressed and whether or not an error has occurred.
The Transfer Results window that can be opened from the Transfer Status window
shows the latest transfer results of all network players respectively.
Note
The Transfer Status and Transfer Results windows do not display the results of
automatic sending for scheduled playlists.
1
Click [Transfer Status].
The Transfer Status window appears. Transfer status for each network player in the group
to which playlists and materials were sent last is shown by its background color.
Color
Yellow
Light Blue
Blue
Red
Status
Necessary materials not yet sent.
Now being transferred.
Successfully transferred.
An error occurred.
Note
The Transfer Status window displays information on the group to which
playlist/material(s) were sent last. It will be cleared by other data transfer operations,
such as obtaining a playout log, remote controlling an NSP-100 network player from
the Material Management window, and NSP-100 setup.
Hint
Click [Abort] to cancel transfer of playlists and materials. This stops transfer to the
network player that is currently receiving playlists and materials, and cancels transfer to
the rest of the network players.
Checking Transfer Results of All Network Players
Click [Transfer Results] in the Transfer Status window.
The Transfer Results window opens, and the result of the last playlist/material transfer
to each network player is displayed.
Mark
(None)
70
Result
No transfer done.
Transfer successful.
Connection error occurred.
Transfer error occurred.
There is unsent material.
Playout
Normal Playout
Normally, after sending the prepared playlists and materials to the network players,
there are no further operations you have to carry out with this software.
In the Case of the Presentation Application
The playout is controlled by the remote controller of each network player.
Refer to the operation manual of the network player for details.
In the Case of the Scheduling Application
Each network player automatically starts playout according to the period and time
specified in the playlist.
Note
• The network player does not support a summer time management function. Be
careful to specify the start time if your country uses a summer time system.
• In the case of NTSC video, the system regards one second as 30 frames of video
signal although it is approximately 29.97 frames (non-drop frame mode). Hence the
actual length is longer than the duration indicated for such a piece of video material.
This error is approximately two frames for one minute and 108 frames (3.3 seconds)
for one hour. The system adjusts this error to indicate the start times of the events
on the playlist, but there still is a small amount of error (less than one second)
between the indication and the actual start time.
• The playlist that was sent later has the higher priority.
For example, if the playlist (P0000001) whose playout time is 7/1/2002 10:00:00 20:00:00 was sent before the playlist (P0000002) whose playout time is 7/1/2002
12:00:00 - 13:00:00, the system would stop playout of P0000001 around 11:59:50,
play P0000002 between 12:00:00 and 13:00:00, prepare to resume playout of
P0000001, then resume the rest of P0000001.
If P0000002 is sent before P0000001, however, P0000002 would not be played out.
When a Power-on Start Playlist or a Play Button Start Playlist is Specified
Each network player may have the following two special playlists:
• Power-on start playlist
Automatically starts playout when the network player is powered on.
• Play button start playlist
Starts when the play button of the remote controller is pressed during standby.
See "Specifying the Special Playlists of the Network Players" for details.
You can also choose the special playlists on each network player. Refer to the
operating instructions of the NSP-100 Network Player for details.
71
Hint
In the case of the Scheduling Application, scheduled playlists have the highest priority.
Playout of a power-on start playlist or a play button start playlist will be terminated
approximately 10 seconds before the start time of a scheduled playlist.
In any case, you can check the network player status.
Also, the network player records a playout log. You can obtain this playout log from
each network player and check the playout status. See "Checking the Network Player
Status" and "Checking the Playout Log" for details.
72
Urgent Playout
Besides the normal playout function for which you have to send the necessary playlist
and materials to the network players beforehand, there is "urgent playout" function. It
sends selected piece(s) of material (and a playlist) and makes the network players play it
as soon as possible. Any pre-prepared material (and playlist) can be used.
You can also use materials or playlists that are already stored on the network player for
urgent playout.
Note
The urgent playout function interrupts playout currently being carried out on a network
player. Also, scheduled playout will not start during urgent playout. Check the
network player status in the NSP-100 Status window before starting urgent playout, and
click the stop button at the end.
Hint
• You can check the network player status. See "Checking the Network Player
Status" for details.
• For text material, you can enter text and use it for urgent playout, as well as using
previously registered text material. See the following "Creating Text Material for
Urgent Playout" for details.
• You can use this function for preview of materials and playlists on a network player,
provided you have a monitor connected to the network player near you.
1
2
3
4
5
Click [Material Management] on the main menu to open the Material Management window.
Select the PC File Management or NSP-100 Remote File Management option button,
depending on the location where the material or playlist used for urgent playout is stored.
Select the tab of the material or playlist to be used for urgent playout.
Select the destination network player group on the Destination drop-down list box when the
PC File Management option button is selected.
Select the network player to be subject to urgent playout from the NSP-100 drop-down list
box, then click [Update].
Click the desired material or playlist, then click the play button in the Urgent section.
When material or a playlist stored on the PC is selected, the system sends the selected
material (or playlist and the necessary materials) to the network players of the selected
group. Each network player starts playout as soon as it receives the entire piece of
material/playlist.
When the material or a playlist is stored on the network player, urgent playout starts
immediately on the selected network player.
Stopping Urgent Playout
Click the stop button in the Urgent section in the Material Management window.
Playout of the playlist that was interrupted by the urgent playout does not automatically
start if it has been sent from the Presentation Application.
If it has been sent from the Scheduling Application, playout may restart. The network
player restarts normal playout according to the current time and the start times assigned
to each event.
73
Note
• Urgent playout can only be stopped by clicking the corresponding stop buttons.
Make sure to click the stop button after using the urgent playout function because
only the BZNP-100 supports stopping of urgent playout.
• The stop button for the urgent playout of a playlist also enables you to stop nonurgent playout of a playlist.
Creating Text Material for Urgent Playout
1 Select the Text tab in the Material Management window.
2 Select the destination network player group with the Destination drop-down list box, then
click [New].
The Edit Text dialog box appears.
74
3
Type the text.
See the explanation of the Edit Text dialog box for details.
4
Click [Properties] then specify each item in the Properties dialog box.
See the explanation of the Properties dialog box for details.
5
Click the play button in the Urgent section of the Edit Text dialog box.
The system sends the entered text to the network players. Each network player starts
playing the text as soon as it receives the text.
6
Click [Save] when you want to save the created text.
Checking of the Network Players
Checking the Network Player Status
The system enables you to check the status of each network player in the selected
group. The remaining disk space of the hard disk in each network player is also shown.
1
Click [NSP-100 Status] in the main menu.
The NSP-100 Status window appears.
2
Select the desired group from the Group drop-down list box.
Click [Update] when the desired group is already selected.
The status and the remaining disk space of each network player in that group is displayed
on the list. When the network player is playing, information on the playlist or material also
appears.
Note
Information in the NSP-100 Status window is not automatically refreshed. Check the
date and time of the last update and click [Update] if necessary, before checking the
network player status.
75
Checking the Playout Log
The system enables you to obtain the playout log data from each network player to
check it, provided the network player is set to record the log. There are two types of
playout log: a playlist log that records playout status for each playlist, and an error log
that only records errors.
Hint
There is no limitation on the number of log files that can be obtained and stored by the
BZNP-100 software. Keeping a large number of log files may cause low performance
or problems of the PC. Check the log regularly and delete unnecessary log files by
clicking [Delete Items] or [Delete All].
1
Click [Playout Log] on the main menu.
The Playout Log window opens.
2
Select the Playlist tab to obtain/check the playlist log.
Select the Error Log tab to obtain/check the error log.
3
Select the network player from which you want to obtain the log data using the NSP-100
drop-down list box.
The date and time when the log data was obtained from the network player the last time
appears in the Date/Time box.
4
Click [Get].
The system obtains the log data from the selected network player, and adds it to the list.
The results are indicated by the following marks:
Mark
Result
Playout successful.
A warning detected.
An error detected.
Displaying Playlist Log Details
On the Playlist tab, log data for each playlist is listed. Right-click the log data of the
desired playlist then click [Log Details] on the menu to display the data of each event in
the playlist.
When Microsoft Excel is installed on the PC, clicking [Send to Excel] instead of [Log
Details] automatically starts Excel and displays the data for each event.
Compressing Log Data
When a problem occurs on the network player or in the BZNP-100, you may have to
send log data attached to an email to a person in charge of the problem. The system
provides a error log data compressing feature to reduce the size of the data attachment
to be sent.
76
1
If you have not yet obtained the log data, select the network player with the problem on the
Error Log, then click [Get].
2
Click [Compress Logs], then follow the displayed messages.
This procedure creates a compressed log file named "LOG.lzh," and places it on the
Windows desktop.
Send this file to the person in charge of the problem.
Deleting Log Data on the PC
To delete a specific data item, right-click it, then click [Delete Items] on the menu.
To delete the entire playlist log of the selected network player, click [Delete All] in the
Playout Log window.
77
Finishing the Operation
Closing the Windows of the BZNP-100
Click the button marked with an X at the upper-right corner of the window.
Quitting the BZNP-100
Click the button marked with an X at the upper-right corner of the main menu.
All the BZNP-100 operation windows automatically close.
78
System Setup
Setting Up the Software
The system provides a setup function related to this software. Normally, this is used
immediately after installation of the software.
1
Click [Setup] on the main menu.
The Setup dialog box appears.
2
Select the Presentation option button in the Application Mode section to use this software
for presentation, or the Scheduling option button to use it for automatic playout.
The Scheduling Application is not provided with the BZNP-100LE.
3
Select the video format: NTSC or PAL.
Note
If you change the video format after starting to use the system, the temporary data (video
and graphics material data without a corresponding NSP format file) will be deleted.
4
Change the folder(s) in which the converted video and graphics materials, text materials,
playlists and/or device control commands are stored in the Material Management Folders
section, if necessary.
Enter the absolute path, or the relative path from the folder where the software is installed,
or click [Browse] then select the desired folder from the folder tree.
Note
When a problem has occurred in the material database, click [Rebuild] corresponding to
the material type.
Or, when the materials on a file server are shared by more than one BZNP-100, clicking
[Rebuild] updates the material list display so that the results of other operators' operations
are reflected.
Note that, rebuilding a large database takes a long time.
5
When materials are shared by more than one BZNP-100, assign an ID (“0”-“9” or “a”-“z”) to
each BZNP-100 using the BZNP-100 ID text box, to reduce the risk of overwriting materials.
For example, specify the first BZNP-100 as "a," and the second as “b.”
A material code consists of a letter corresponding to the material type + a sequential sevendigit number, or a single letter that indicates the material type + a BZNP-100 ID + a
sequential six-digit number. (Depending on the system configuration, the sixth digit from
the right may also be a letter of the alphabet.)
6
To set/change the password used upon opening the NSP-100 Setup dialog box, enter the
current and new passwords into the respective text boxes.
Enter the same new password into the New Password and then the Retype New Password
text boxes to avoid specifying a mis-typed password.
7
To enable the automatic playlist sending function of the Scheduling Application, select
[Send (All Day)] or [Send (Limited Time)] from the Mode drop-down list box in the Automatic
Sending of Scheduled Playlists (All Groups) section, then specify the retry interval
(hour:minute).
When you select [Send (Limited Time)], specify the enabled time period with the two Time
spin boxes, too.
This setting makes the system automatically send the revised playlists and the necessary
materials to the network players, so that operation of playlist and material transfer will be
unnecessary. If an error should occur because of a network problem, the system will
79
resend the same data with the specified interval.
The Presentation Application does not support the automatic playlist sending function.
8
To make the system retry sending playlists and materials that are manually sent to the
network players until data transfer is completed, select [Yes] from the Retry drop-down list
box in the Retry for Manual Sending section.
Select [Yes] in the normal operation.
9
Click [OK].
If you change the application mode and/or video format, wait until the software automatically
restarts.
In other cases, you can continue operation.
Changing the Network Parameters
Click [Network Setup] in the Setup dialog box, make the necessary modifications in the
Network Setup dialog box, then click [OK].
Note
In normal operation, it is not necessary to change the parameters in the Network Setup
dialog box.
Consult your network administrator when changing these settings, because
inappropriate parameters may make the system unstable.
80
Setting Up the NSP-100 Network Players
The system enables you to make the settings for the network players with the BZNP100, and transfer the settings to a network player. This is useful when you are using
many network players.
Note
This operation restarts the network player(s). Do not carry out this for the network
player(s) that is/are being used for playout.
1
Click [NSP-100 Setup] on the main menu.
The NSP-100 Setup dialog box appears.
Note
Password entry may be required upon clicking [NSP-100 Setup].
Enter a valid password then click [OK]. This password is defined/modified in the Setup
dialog box.
2
Select the network player or group of network players to transfer the settings to in the
Destination section.
3
Specify or modify the items displayed above [Send] in the dialog box as desired.
See the explanation of the NSP-100 Setup dialog box for details.
4
Click [Send] to transfer the settings to the selected network player or group.
If an error occurs during transfer, an error message appears. When transferring the
settings to the group, click [Transfer Status] on the main menu and find out the network
player which did not receive the settings because of the error.
5
Repeat the procedure for the next network player or group, if necessary.
Copying the Settings of a Network Player or a Group
Select the source network player or group with the Copy from section in the NSP-100
Setup dialog box, then click [Copy].
The settings of the network player or group appear in the dialog box. Modify them, if
necessary, then transfer them to the desired network player or group.
Note
This function copies the settings stored within the BZNP-100, it does not obtain them
from the actual network player or group.
81
Editing Control Files Used on Network Players
A network player uses the following three types of files to control external devices such
as a PDP, or to run a command list.
• PdpCfg.txt: Configuration file used to control PDPs connected to the RS-232C/GPI
connector, using the external device control events, or an urgent playout procedure
of a control command.
• GpiCfg.txt: Configuration file used to control devices connected to the RS232C/GPI connector using GPI pulses output from the external device control
events, or to play a different playlist, according to the GPI pulse input to the network
player.
• CmdLst.txt: Command list file that will run on network players. It is used, for
example, to adjust the audio level, based on the time of day.
The BZNP-100 enables you to edit these files and send them to a single specified
network player, or to the network players in a specified group.
Note
An erroneous control file may result in network player problems. You can copy the
original control files back from the "BZNP-100 install folder\Masterfl" folder if there is
any trouble caused by a modified control file.
Refer to the protocol manual of the network player for details on how to edit a control
file. Ask your supplier or Sony sales representative about the protocol manual.
1
Click [NSP-100 Setup] on the main menu.
The NSP-100 Setup dialog box appears.
Note
Password entry may be required upon clicking [NSP-100 Setup].
Enter a valid password then click [OK]. This password is defined/modified in the Setup
dialog box.
2
Select the destination network player or the group of network players for the control file in
the Destination section.
3
4
Select the desired control file in the Control File Editing section.
5
6
Click [Edit] to edit the selected control file.
The application program associated with the file extension "txt" starts, and the contents of
the control file appear in the window.
If you do not want to edit the control file, proceed to step 7.
Edit the control file.
Save (overwrite) the control file, then close the text editing application program.
Do not change the file name and location.
7
Click [Send Control File] to send the control file to the specified network player or group.
The control file is sent to the network player(s) and stored there.
8
Restart the network player(s) to make the received control file effective.
Hint
When sending a GpiCfg.txt or CmdLst.txt file, restarting of the network players may not be
necessary to update the control file, depending on the contents of the file.
82
Using a Control File for Another Network Player or Network Player Group
To apply a control file to another network player or group, copy the corresponding
control file using Windows Explorer, before carrying out the procedure above.
The control files for a single network player are stored in "BZNP-100 install
folder\NSP\network player name folders," and those for a network player group are
stored in "BZNP-100 install folder\PLIST\group name folders."
For example, to apply a PDP control file for the "HQ" network player to the network
player group named "Tokyo," copy "PdpCfg.txt" from "BZNP-100 install
folder\NSP\HQ" to "BZNP-100 install folder\PLIST\Tokyo," then carry out steps 1 to 3
and 7 to 8 of the procedure above.
83
Changing the Standby Screen and Playlist Loading Screen of
the Network Players
Each network player has a "standby screen," that is, a piece of graphics material
displayed when no event is played from the network player. It also has a "playlist
loading screen" (a solid black screen by default) that is displayed while a playlist is
being loaded immediately before playout of the playlist starts. The system allows you
to change the standby and playlist loading screens to any piece of graphics material
converted using the BZNP-100.
1
Click [Material Management] on the main menu, if the Material Management window is not
open.
2
3
Select the Graphics tab.
4
Right-click the desired piece of graphics material (one which has been converted to the
NSP format), then click [Change Standby Screen] or [Change Playlist Loading Screen].
A confirmation message appears in either case.
Click [Yes].
Returning the Standby Screen to the Default Screen
You can change the standby screen back to the default screen using the piece of
graphics material provided for this purpose, titled "Default Standby Screen." The
material code of this item is "S000000N" (in the case of NTSC) or "S000000P" (in the
case of PAL), and its type is "Menu."
Note
There is no way to return the playlist loading screen to the default solid black screen.
However, you can create a similar black piece of graphics material, then designate it as
the new playlist loading screen.
84
Specifying the Special Playlists of the Network Players
Each network player may have the following two special playlists. The BZNP-100
allows you to simultaneously make a specification for all the network players in a
certain group.
• Power-on start playlist
Automatically starts playout when the network player is powered on.
• Play button start playlist
Starts when the play button of the remote controller is pressed during standby.
Hint
In the case of the Scheduling Application, scheduled playlists have the highest priority.
Playout of a power-on start playlist or a play button start playlist will be terminated
approximately 10 seconds before the start time of a scheduled playlist.
1
Click [Material Management] on the main menu, if the Material Management window is not
open.
2
Select the Playlist tab, select the desired network player group from the Destination dropdown list box, then click the PC File Management option button.
3
4
Right-click the desired playlist, then click [Start on Power-on] or [Start by PLAY Button].
Send the playlist to the selected network player group.
Canceling the Settings
To cancel the power-on start or play button start playlist setting, select the
playlist/playlist module displayed in yellow-green (in the case of the power-on start
playlist) or green (in the case of the play button start playlist) in step 3 in the procedure
above, then click [Cancel Power-on/PLAY Button Start Setting] and send the playlist to
the network player group.
Note
You can change the special playlists or cancel the setting on each network player. To
check the special playlists specified for a certain network player, click the NSP-100
Remote File Management option button and select the desired network player.
You cannot make or cancel the special playlist setting for the respective network player
from the BZNP-100, though.
85
Setting Up Network Player Groups
The system supports network player groups so that you can send the playlists and
materials to such a group, rather than to individual network players.
Creating the groups depending on the display type used in the group, such as over-scan
displays (TVs) and under-scan displays (PC displays and PDPs) is a good idea because
the system is able to adjust the positions of the video and text for over-scan displays,
which can only show an area smaller than that of under-scan displays.
Specify a network player group as follows:
Note
The BZNP-100LE supports only one network player.
In this case, clicking [Group Setup] displays the NSP-100 Settings dialog box. Perform
only step 3 below. The network player name entered is also assigned to the network
player group.
1
Click [Group Setup] on the main menu.
The Group Setup dialog box appears.
2
Register the network players used in the system.
2-1 Click [New] for NSP-100.
2-2 In the NSP-100 Settings dialog box, enter the name and IP address of the newly
registered network player, then click [OK].
Assign the IP address corresponding to that for the network player using its remote
controller. Clicking [Check Connection] checks the connection to the specified IP address,
and displays the result.
2-3 Repeat steps 2-1 and 2-2 to register all network players used in the system.
3
Create the network player groups.
3-1 Click [Edit Group].
3-2 Click [New] in the Edit Group dialog box.
3-3 Enter the group name, select the display type for the group, then click [OK].
Select "Over Scan" for TV monitors, or "Under Scan" for PC monitors and PDPs. This
selection is used to adjust the pre-defined video and text positions of the display, such as
"Upper Left" or "Lower," in the Display Setup dialog box.
3-4 Repeat steps 3-2 and 3-3 to create all the network player groups to be used in the
system.
The order of the groups shown in the Edit Group dialog box is that of the selection of the
groups shown by the software.
Arrange the groups in the desired order using a drag & drop operation, then click [OK].
4
5
Assign each network player registered in step 2 to the groups.
5-1 Select the desired group in the Group drop-down list box.
The network players that currently belong to the selected group appear in the right-hand
list, and those that do not belong to that group appear in the left-hand list.
5-2 Move the network players by selecting one and clicking [Add >>] or [<< Delete], so
that the network players that should belong to the selected group appear in the right-hand
list, and those that should not belong to that group appear in the left-hand list.
5-3 Repeat steps 5-1 and 5-2 for all groups.
6
Click [OK].
Note
A single network player can belong to more than one group.
86
Network Player Priority in a Group
When sending playlists and materials to the network player group, each network player
in the group receives them one by one, in the order listed in the Group Setup dialog
box.
The system enables you to change the order by arranging the network players registered
in the Group Setup dialog box. Use a drag & drop operation to change the listed order
of the network players, then click [OK].
Deleting a Group
Display the Edit Group dialog box, select the group to be deleted, then click [Delete].
Click [Yes] for the confirmation message, then click [OK] in the Edit Group dialog box.
The group is actually deleted when you click [OK] in the Group Setup dialog box.
Modifying the Group Name or Display Type
Display the Edit Group dialog box, select the group to be modified, then click [Edit].
In the newly displayed Group Settings dialog box, modify the name or select the
display type, then click [OK].
Clicking [OK] in the Edit Group and Group Setup dialog boxes makes the modification
effective.
Modifying a Network Player Registration
1
When the network player to be modified belongs to the selected group, first delete it from
the group to move it to the left-hand list.
2
Select the network player to be modified in the left-hand list, then click [Edit] for NSP-100.
Or, double-click the network player to be modified.
The NSP-100 Settings dialog box appears
3
Modify the name and/or IP address of the selected network player, then click [OK].
4
Assign the modified network player to the desired group, then click [OK] in the Group Setup
dialog box.
Note
Modify the IP address setting of the corresponding network player, too, when you
modify the IP address of a network player.
Deleting a Network Player Registration
1
When the network player to be deleted belongs to the selected group, first delete it from the
group to move it to the left-hand list.
2
Select the network player to be deleted in the left-hand list.
3
Click [Delete] for NSP-100.
Clicking [Yes] for the confirmation message deletes the network player registration.
4
Click [OK] in the Group Setup dialog box.
87
NSP-100 Maintenance Commands
The NSP-100 Setup dialog box provides the following two commands for maintenance
of the network players:
• Restart NSP-100
Used to restart a malfunctioning NSP-100. (Restarting may not work, though, in
case of a network problem.)
• Update Firmware
Used to update the firmware of an NSP-100 or all NSP-100s in a group.
Note
• Either button restarts the network player(s). Do not use them for network player(s)
that is/are being used for playout.
• Password entry may be required upon clicking [NSP-100 Setup].
Enter a valid password then click [OK]. This password is defined/modified in the
Setup dialog box.
Restarting an NSP-100
1
Click [NSP-100 Setup] on the main menu.
The NSP-100 Setup dialog box appears.
2
Click the Individual option button in the Destination section, and select the name of the
NSP-100 to be restarted in the Name drop-down list box.
You cannot select a network player group to restart all the network players in it.
3
Click [Restart NSP-100].
A confirmation message appears.
4
Click [Yes].
Updating the Firmware of NSP-100(s)
88
1
Click [NSP-100 Status] on the main menu.
2
Select the group to which the network player(s) to be updated belong in the Group dropdown list box.
Or, click [Update] if the desired group is already selected.
Then, check that the network player(s) to be updated is/are not currently being used for
playout.
3
Click [NSP-100 Setup] on the main menu.
The NSP-100 Setup dialog box appears.
4
In the Destination section, select the network player or group whose firmware is to be
updated.
5
Click [Update Firmware].
A confirmation message appears.
6
Click [Yes].
The firmware file is sent to the network player(s). The network player automatically restarts
after the firmware is updated.
If an error occurs during transfer, an error message appears. When you send the firmware
file to a network player group, click [Transfer Status] on the main menu and find out the
network player which did not receive the firmware file because of the error.
Hint
If the firmware file to be sent is either the same or an older version, the file is not sent. The
transfer results will be "OK," though.
89
Windows and Dialog Boxes
Setup Dialog Box
The Setup dialog box enables you to modify the settings related to this program.
Specify the desired setting for each item, then click [OK].
Application Mode Section
Selects the application mode of this software: Presentation Application mode or
Scheduling Application mode. The software in the Presentation Application mode
works as a system that plays events according to control by the remote controller
whereas that in the Scheduling Application mode works as a system that automatically
plays events according to a specified schedule.
Restarting of the application program is required to change this setting.
Video Format Section
Selects the video standard (NTSC or PAL) used by the system.
Restarting of the application program is required to change this setting.
Material Management Folders Section
Specifies the folders in which the materials and playlists are stored.
Enter the absolute path or relative path from the one where the software was installed,
or click [Browse] then select the folder in the displayed folder tree.
Note
If a problem occurs in the material database, click [Rebuild] corresponding to the
material type with the problem to rebuild the database.
Or, when the materials on a file server are shared by more than one BZNP-100, clicking
[Rebuild] updates the material list display so that the results of other operators'
operations are reflected.
Note that, however, rebuilding a large database takes a long time.
Material Code Starting Numbers Section
Specifies the numbers of the material codes that will be assigned to subsequent pieces
of material depending on the material type.
When the materials are shared by more than one BZNP-100, assigning an ID (“0”-“9”
or “a”-“z”) to each BZNP-100 in the BZNP-100 ID text box will reduce the risk of
overwriting materials.
For example, specify “a” to the first BZNP-100 and “b” to the second. The first
BZNP-100 will generate the sequential material codes for playlists from “Pa000001,”
and the second one will generate from “Pb000001,” so that the material codes will show
the BZNP-100 on which the material was created.
Hint
A material code consists of a single letter that indicates the material type + seven-digit
sequential number, or a single letter that indicates the material type + BZNP-100 ID +
six-digit sequential number. (Depending on the system configuration, the sixth digit
from the right may also be a letter of an alphabet.)
90
NSP-100 Setup Password
Sets a password used to open the NSP-100 Setup dialog box and modify its settings as
there are some important settings for the network players in the dialog box. To
set/change the password used upon opening the NSP-100 Setup dialog box, enter the
current and new passwords into the respective text boxes. The password is casesensitive, and consists of up to eight alphanumeric characters.
Enter the same new password into the New Password and then the Retype New
Password text boxes to avoid specifying a mis-typed password.
To clear the password setting, enter the current password into the Old Password text
box, clear the two text boxes for the new password, then click [OK].
Automatic Sending of Scheduled Playlists (All Groups) Section (Scheduling
Application Only)
Specifies whether the system automatically sends the playlists and the necessary
materials to the network players.
If you do not want to allow automatic sending, select [No Send] in the Mode drop-down
list box. [Send (All Day)] allows the system to send newly created playlists at any time,
whereas [Send (Limited Time)] only allows the system to send them during a specified
period in a day.
To allow automatic playlist sending, specify the retry interval (hours:minutes) in the
Interval text boxes, too, such as "0:30" in the case of retry at a 30 minute interval.
When you select [Send (Limited Time)], specify the time when the system is to send the
playlist, as well.
The Automatic scheduled playlist sending function searches for playlists that contain
events scheduled later than the current time, then compares such playlists on the PC and
the corresponding ones on the network players. Only playlists that have been updated
will be automatically sent to the network player(s).
We recommend you select [Send (Limited Time)], and specify a time such that there is
no conflict with the daily HDD sleep time specified in the NSP-100 Setup dialog box.
Retry for Manual Sending Section
Specifies whether the system automatically re-sends manually sent materials and/or
playlists if an error occurs.
We recommend you select [Yes] in the course of normal operation.
Hint
Regardless of this setting, the system always re-sends the scheduled playlists and
materials sent by the automatic playlist sending function (described above) at the
specified interval, if an error occurs.
Network Setup Button
Opens the Network Setup dialog box to change the detailed parameters related to the
network.
Note
In normal operation, it is not necessary to change the parameters in the Network Setup
dialog box.
Consult your network administrator when changing them, because inappropriate
parameters may make the system unstable.
91
Network Setup Dialog Box
The Network Setup dialog box enables you to change detailed parameters related to
network communication.
The system uses FTP for material and playlist data transfer, and Telnet to communicate
with the network players about errors and their status information.
Note
In normal operation, it is not necessary to change the parameters in the Network Setup
dialog box.
Consult your network administrator when changing them, because inappropriate
parameters may make the system unstable.
FTP Settings
The Number of Sessions text box specifies the number of network players that can be
simultaneously connected. Specifying a larger number increases the time required for
data transmission to each network player.
The Mode drop-down list box selects PORT or PASV. Normally, select the PORT
mode. Depending on the security management of the network, such as using a firewall
to prevent unauthorized accesses, however, selecting the PASV mode may enable file
transfer that is not possible in the PORT mode. Note that using the PASV mode
requires the corresponding routers.
FTP Time-out Settings
Specifies the duration until a time-out error occurs when attempting an FTP connection,
and until one occurs during FTP communication. If time-out errors occur when starting
connection or during data transfer, make the corresponding setting larger.
FTP Data Size Settings
The Sending Data Size text box specifies the size of a data packet sent at a time. A
larger setting may increase data transfer speed.
The Sending and Receiving Buffer Size text boxes specify the buffer size for
sending/receiving data. They must be larger than the setting of Sending Data Size.
Normally, specify a value quadruple of the Sending Data Size.
Telnet Time-out Settings
Specifies the duration until a time-out error occurs when attempting a Telnet
connection, and until one occurs during Telnet communication. If time-out errors occur
when starting connection or during data transfer, make the corresponding setting larger.
Default Settings Button
Returns all parameters in this dialog box to the default values.
92
NSP-100 Setup Dialog Box
The NSP-100 Setup dialog box enables you to make settings for network players and
transfer those settings to a network player.
It also provides buttons for restarting network players and upgrading firmware. The
control files used on the network players can also be edited and transferred here.
Note
• To do so, first, you must specify the settings related to the network, such as the IP
address, using the remote controller of the network player.
• Sending the settings to the network player(s) or updating the network player(s)
restarts it/them. Do not restart network player(s) that is/are being used for playout.
You can check a network player's status using [NSP-100 Status] on the main menu.
• The dialog box shows the NSP-100 settings managed by the BZNP-100.
Once you decide to use this dialog box to manage the NSP-100 settings, never use
the remote controller of the NSP-100 or the http utility to modify them, because
modifications made using the remote controller or the http utility are not reflected in
this dialog box.
Destination Section
Selects the destination where the settings or the control file should be sent.
To send the settings or the control file to one network player, click [Individual], then
select the network player from the drop-down list box.
To send the settings or the control file to all network players in a certain group, click
[Group], then select the groups from the drop-down list box.
Copy from Section
Selecting a network player or a network player group and clicking the Copy button
displays the settings of the selected network player/group in the dialog box.
This is helpful when using many network players, as you can modify a part of the
settings copied from one network player/group and send them to others.
Note
This function copies settings managed by the BZNP-100, and does not fetch the settings
from the actual network player/group.
Also, you cannot specify the copy source of the configuration file used for external
device control, nor the command list file for the network player here.
Setup Section
Makes settings related to network player operation. Refer to the operating manual of
the network player for details on this section.
Note
Leave all the MENU Screen Setup boxes blank if you do not want to specify any
settings for them.
System Administrator Setup Section
Makes settings related to the administration of the network player. Refer to the
operating manual of the network player for details on this section.
93
Note
Only numbers (four digits) can be used for the password in this section.
Leave both of the password text boxes blank if you don't intend to use any password.
Time Synchronization (NTP) Section
Select "No" from the Synchronize drop-down list box if you do not intend to use any
NTP server for time adjustment.
Make the following settings to adjust the time using the NTP server.
Item
Setting
Synchronize
"Yes"
Server IP Address
IP address of the NTP server.
Synchronize Mode
Select "Time" and set the time using the Time/Interval spin
and Time/Interval
boxes to adjust the time at the specified time everyday.
Select "Interval" and set the interval using the Time/Interval
spin boxes to adjust the time at the specified intervals.
Time Zone
Time zone where the network player and the NTP server
belong.
Network Security (FTP, Telnet) Section
Specifies the user name and password that are used by this software to access the
network player. (You should enter the same password twice to avoid specifying a mistyped password.)
When an individual network player is selected as the destination, clicking [Check
Connection] checks connection to the network player with the user name and password
stored.
Note
• Leave all the Network Security boxes blank when you want to apply default settings
for them.
• When you are replacing the PC where the BZNP-100 operates due to maintenance,
etc., enter the user name and password that are being used in the respective text
boxes, then click [Save in BZNP only]. In such a case, other items in the dialog box
do not need to be specified. Do not send the settings to the network player.
Daily HDD Sleep Setup
Modifies the daily sleep function settings of the hard disk drives in the network players.
The default setting of the network player is "Sleep Only" and the sleep start time is
"03:00am."
The Setting drop-down list box allows you to select either "Sleep Only" or "Restart
after Sleep."
Selecting "Sleep Only" makes the network player show the standby screen at the
specified time and let the HDD in the network player to sleep for about one minute.
Then, in the case of the Presentation Application, the network player starts the poweron start playlist. In the case of the Scheduling Application, the network player resumes
the scheduled playlist, or starts from the top event of the playlist if the playlist was
being played repeatedly.
Selecting "Restart after Sleep" makes the network player restart after an HDD sleep.
The Sleep Start Time spin box specifies the time (24-hour clock system) to start the
HDD sleep. Specify a time you don't expect to use the network player for playout and
file transfer.
94
Note
The NSP-100 Network Player cannot be used 24 hours a day. It cannot play materials
and playlists nor receive files for about one minute of required sleep, and for another
minute if restarted.
Select "Sleep Only" when you do not want to stop display on the monitors. The
standby screen is shown while the HDD is sleeping.
If you repeat a playlist using the Scheduling Application, we recommend you specify
the daily repeat end time in the playlist's Properties dialog box to decrease the
continuous motor operation time of the HDD.
Send Button
Sends the current settings to the specified network player or group.
NSP-100 Maintenance Commands Section
includes two buttons: Restart NSP-100 and Update Firmware.
The Restart NSP-100 button restarts the NSP-100 network player selected in the
Destination section.
The Update Firmware button updates firmware of the network player (or the network
players in the group) selected in the Destination section. The file is sent to the network
player or group, and the firmware of the network player(s) is updated.
Control File Editing Section
Enables you to edit the following three types of control files, and send them to the
network player or group specified in the Destination section.
The master files of these control files are stored in the NSP folder in the BZNP-100
install folder, and copied to "BZNP-100 install folder\NSP\network player name folder"
(in the case of a single network player), or "BZNP-100 install folder\PLIST\group name
folder" (in the case of a network player group) when first editing/sending control files.
• PdpCfg.txt: Configuration file used to control PDPs connected to the RS-232C/GPI
connector from external device control events, or in an urgent playout procedure of a
control file.
• GpiCfg.txt: Configuration file used to control devices connected to the RS232C/GPI connector using GPI pulses output from external device control events, or
in an urgent playout procedure, or to play a different playlist, based on the GPI pulse
input to the network player.
• CmdLst.txt: Command list file that will run on the network players. It is used, for
example, to adjust the audio level, depending on the time of day.
The File drop-down list box selects the control file to be edited or sent.
The Edit button opens the selected file for the network player or group specified in the
Destination section with the application program associated with the .txt files.
Overwrite the file when editing is completed.
The Send Control File button sends the selected control file to the network player or
group specified in the Destination section.
Note
• The network player needs to be restarted to make the received control file effective.
When sending a GpiCfg.txt or CmdLst.txt file, however, restarting of the network
players may not be necessary, depending on the contents of the file.
95
• An erroneous control file for the network player may result in network player
problems. You can copy the original control files back from the "BZNP-100 install
folder\Masterfl" folder if there is any trouble caused by the modified control file.
Refer to the protocol manual of the network player for details on how to edit a
control file. Ask your supplier or Sony sales representative about the protocol
manual.
96
Group Setup Dialog Box
The BZNP-100 software (except for the BZNP-100LE) manages more than one
network player. The Group Setup dialog box is used to make groups of network players
so that you can simultaneously send materials and playlists to many network players.
NSP-100 Section (Left)
New Button
Opens the NSP-100 Settings dialog box to add a new network player to the list.
Edit Button
Opens the NSP-100 Settings dialog box to modify the name and/or IP address for the
network player selected on the list.
Delete Button
Deletes the network player(s) selected on the list.
NSP-100 List
Displays registered network players that do not belong to the group selected in the Group
section on the right.
Group Section (Right)
Edit Group Button
Opens the Edit Group dialog box to create a new group or modify the priority of the groups.
Group Drop-down List Box and List
The network players that belong to the group selected with the drop-down list box are
displayed on the list.
When sending data to a group, the network players will receive it in the listed order. You
can arrange the displayed network players using a drag & drop operation to change the
order (priority).
Add>> and <<Delete Buttons
The Add >> button moves the network players selected on the NSP-100 (left) list to the
right and adds them to the selected group.
The << Delete button, on the other hand, removes the network players selected on the
right-hand list from the group. The removed network players move to the left-hand list.
97
Edit Group Dialog Box
The BZNP-100 software (except for the BZNP-100LE) manages more than one
network player. The Edit Group dialog box is used to manage “groups” of network
players so that you can simultaneously send materials and playlists to many network
players.
New Button
Opens the Group Settings dialog box to create a new group.
Edit Button
Opens the Group Settings dialog box to modify the selected group.
Delete Button
Deletes the selected group.
Group List
Lists all groups that are currently registered.
You can arrange them using a drag & drop operation to change the display order of the
groups.
98
NSP-100 Settings Dialog Box
The NSP-100 Settings dialog box is used to register an NSP-100 Network Player. A
network player plays materials according to the playlist sent from the BZNP-100. You
can use the name specified in this dialog box to identify each network player during the
operation.
Note
The BZNP-100LE manages only one network player. The name specified for the
network player here is automatically assigned as the network player group name.
NSP-100 Name Text Box
Enter a name for the network player.
It must be unique in the system.
IP Address Text Box
Enter an IP address for the network player.
It must be unique in the system.
Check Connection Button
Checks communication to the device with the specified IP address, and shows the
result.
Note that an incorrect password error will occur if a password has been set to the
network player but you have not yet finished the settings in the Setup window where
the user name and password are supposed to be registered.
99
Group Settings Dialog Box
The Group Settings dialog box is used to register a new group of network players or
modify the data of the selected one.
Group Name Text Box
Enter a name for the new group.
Note
It must be unique in the system.
Display Size Drop-down List Box
Select the display size according to the monitors connected to the network players in the
group.
Select "Over Scan" for TV monitors, or "Under Scan" for PC monitors and PDPs. This
selection is used to adjust the pre-defined video and text positions of the display, such
as "Upper Left" or "Lower" in the Display Setup dialog box. Because "Over Scan"
monitors are not able to display the entire screen, the system adjusts the display
positions when you select "Over Scan" here.
100
Transfer Status Window
The Transfer Status window enables you to check the transfer status of the playlists and
materials sent to the network players. It displays information on the group to which
playlists/materials were sent last. The information will be cleared by other data transfer
operations, such as obtaining a playout log, remote control of an NSP-100 network
player from the Material Management window, or NSP-100 setup.
Note
This window does not display the results of automatic sending for scheduled playlists.
Group Indication
Displays the name of the selected network player group. Information on this group is
displayed.
Status List
Displays the sending order and status of the network players in the selected group. The
background color of each line shows the transfer status, as explained at the bottom of
the window. When the system is set, in the Setup window, to automatically re-send the
playlists and materials if an error occurs in manual sending, the Retry column shows the
number of re-sending attempts. No indication in this column means that there were no
error occurred in the last transfer to the network player.
Hint
Resend playlists/material to the group if an error should occur.
The system sends playlists/materials only to network players which experienced
problems in the previous transfer.
Results Button
Opens the Transfer Results window in which the transfer results of all network players
are shown, not only those of the network players in a single group.
Abort Button
Cancels sending of playlist/material for the group.
101
Transfer Results Window
The Transfer Results window displays transfer results of all network players.
Information on the last transfer of playlist/material to the respective network players is
shown.
Note
This window does not display the results of automatic sending for scheduled playlists.
The list displays the group and transfer result of each network player in the sending
order. The following marks are used to indicate transfer results.
Mark
(None)
102
Result
No transfer done.
Transfer successful.
Connection error
occurred.
Transfer error occurred.
There is unsent material.
Convert Material Window
The Convert Material window converts video and graphics files into the NSP format.
The network players only play NSP format files.
There are two tabs, one each for video and graphics files respectively, but the
conversion operation is the same.
Browse Drop-down List Box and Button
Selects the folder in which the video/graphics files to be converted are stored.
The Browse button opens the Browse for Folder dialog box to select the folder. You
can also select the folder from the drop-down list box.
The video or graphics files stored in the specified folder appear on the lower list.
Note
Reading video files directly from a CD-R or DVD-R upon conversion may result in an
error because of their slow reading speed. In such a case, copy the video files to the
hard disk first, then specify the folder to which they have been copied.
Video or Graphics List (To be converted: Upper list)
Displays the video or graphics files stored in the folder specified with the Browse dropdown list box. These are original (to be converted) files.
You can sort (ascending order) the files by clicking the title of the desired column.
Double-click the file, or right-click the file then click [Preview on PC] on the menu to
view a file.
Conversion of the file is started by selecting the file and clicking the Start button, or by
a drag-and drop operation moving it to the lower material list.
Hint
Video and graphics files that satisfy the following conditions will be converted to
material having the same material codes as the original files. A piece of material that
already has that material code will be overwritten.
• The file name (extension excluded) consists of eight characters.
• The first character of the file name is M (for a video file) or S (for a graphics file).
• The third through the eighth characters (six digits) of the file name are numbers.
Parameter Button (Video tab only)
Opens the Parameter Settings dialog box to modify the parameters for video conversion.
The bar that appears next to the Parameter button shows whether the system is now
converting the video files.
Video or Graphics Material List (Converted: Lower list)
Displays all the registered video/graphics materials. The background color of each line
shows the status of the corresponding piece of material, as explained at the bottom of
the window.
Start and Stop Buttons
Starts or stops conversion of the selected files.
Note
It may take a bit of time to stop (cancel) conversion of a file.
103
Parameter Settings Dialog Box
The Parameter Settings dialog box allows you to specify the parameters used when
converting the selected video file into NSP format.
Protection Drop-down List Box
Select ON to convert the video file to the protected NSP format, or OFF for the nonprotected format.
Protected NSP format video files can only be played on network players. They cannot
be previewed on a PC.
File Size Drop-down List Box
Specifies the size of video material files managed by the system.
The system sometimes divides a piece of video material into several files for file
transfer efficiency. Select [Large] (default setting), normally. Select [Small], when
your system has specially been set to start playout of video material on the network
players before they receive the entire material data (simultaneous acquisition and
replay), or on a system where the network players obtain materials and playlists from an
FTP server.
AVI Section
Contains the parameters that are used only when an AVI file is converted into NSP
format.
Video Rate Spin Box
Specifies the bit rate (unit: Mbps) of conversion. Specifying a larger value results in a larger
file and better video quality whereas a smaller value results in a smaller file but lower video
quality.
Note
The system manages AVI files with a duration of from five seconds through 150 minutes.
Conversion will automatically stop when the material duration exceeds 150 minutes.
Filter (Audio) Drop-down List Box
Selects whether audio noise (low-level audio signals) should be cut upon conversion.
Normally, leave this set to OFF. Set it to ON if the converted video files contain
unacceptable audio noise.
104
Capture Window
The Capture window is used to capture video from a camcoder or VCR that is
connected to the PC via i.LINK (IEEE1394), creating AVI files.
Note
• Please contact your supplier or Sony sales representative for information on the
video devices that you can use for capturing.
Other video devices may be used, but depending on the device, some operations,
such as shuttle control and cue-up operations, may not be available.
• Picture and sound do not synchronize during capture. Although some noise may be
output from the speaker, it will not be contained in the captured AVI file.
• Depending on the operating environment of your PC, the captured AVI file may
have skipped (dropped) frames. The In and Out points of the captured AVI file have
a margin of error of two frames or less, respectively.
Screen and the Time Code Indication
The screen shows the video of the connected video device subject to control by the
video device controller.
The time code indication displays the current time code of the video device in blue. No
indication appears when the connected video device is in the camera mode, though.
While capturing, it counts up from 00:00:00:00 in red.
Video Device Controller
Controls the connected video device.
It has play, stop, and pause buttons, as well as fast forward/rewind (shuttle), and singleframe step buttons for both directions.
Clicking the fast forward/rewind (shuttle) button changes the play speed.
Note
Depending on the video device connected, there may be some buttons that do not
operate correctly.
Folder Button
Changes the folder where the created AVI files are stored.
The folder that was used last is selected. The "AVI" folder under the folder in which
the BZNP-100 was installed is selected immediately after installation.
In/Out Buttons, Time Code Text Boxes and Cue Up (
) Buttons
Controlling the video device and clicking the In or Out button at the desired position
defines the In or Out point. The time code of the defined In/Out point appears on the
right.
If you are using a tape recorded in the DVCAM format, you can enter the time code of
the In or Out point in the text box and click the corresponding cue up button to specify
and cue up the desired point up. Then, click the In or Out button to define the In or Out
point.
In the case of live recording, the time upon start recording appears as the In point, and
the time at the end of recording appears as the Out point.
105
Note
• Capture is not possible if a time code that is not recorded on the tape is specified as
the In or Out point.
• If the tape is not recorded in the DVCAM format, cue-up of the specified time code
may be impossible. In such a case, use the video device controller to search for the
desired scene, then click the In or Out button to define the In or Out point.
Live REC, REC, and Stop Buttons
The Live REC button immediately starts capture of the video, regardless of the
specified In and Out points (live recording). The REC button starts capturing from the
specified In point to the Out point.
The Stop button stops capturing in either case.
Duration Indication
Shows the AVI file duration calculated from the time codes of the In and Out points in
the non-drop-frame mode. When using a tape recorded in the drop-frame mode, this
indication may not be compatible with the time codes shown by the VCR.
Note
The length of the AVI files used in the BZNP-100 is from five seconds to 150 minutes.
Capturing will automatically stop when the length of the AVI file exceeds 150 minutes.
106
Edit Text Dialog Box
The Edit Text dialog box is used to create and edit text material.
Properties Button
Opens the Properties dialog box to specify the properties of the text material, such as
color or display type.
Read Text File Button
Selects a text file and imports its text to use as a piece of text material.
Font Size in this window Drop-down List Box
Selects the font size of text material used in this dialog box. Use the Properties dialog
box to specify the actual size of the text displayed by the NSP-100 (Available only for a
font installed on the PC).
Hint
The Edit Text dialog box can be enlarged. Move the mouse pointer around the frame of
the dialog box, and drag the point where the pointer shape turns into an arrow until the
dialog box becomes the desired size.
Type, Column-Line and Total Indications
Indicates the display type of the text, such as blink or scroll, the position (column and
line) of the current text cursor position, and the number of characters entered in the text,
respectively.
To change the type, click [Properties].
Contents Text Boxes
Used to enter text to be displayed.
Selecting a part of a piece of text and right-clicking it shows the menu used for text
editing.
ISO 8859-1 (ASCII 8-bit code table Latin-1) characters can be used for the text material
using the font installed in the NSP-100 and material/playlist titles.
The maximum number of characters, depending on the text type, is as follows. The
number of characters for each line is designated so as to allow the text to be shown fully
on any type of display.
Text Type
Constant
Blink
Scroll in
Scroll
No. of Characters
39
39
39 x 5 lines
5,040
107
When a font installed on the PC is used, the text material will be sent to the network
players as graphics data. The maximum number of characters varies depending on the
color depth, font size, and width of the characters. The following table shows rough
estimates.
No. of
No. of Characters of Scrolling Text
Characters
Font Size
per Line
Color Depth: 2
Color Depth: 16
12 pt. (16-pixel)
90
10,080
2,520
24 pt. (32-pixel)
45
5,040
1,260
48 pt. (64-pixel)
22
2,464
616
72 pt. (96-pixel)
11
1,232
308
Duration
Shows the estimated minimum duration that is necessary to display the text material
(two seconds for constant or blinking text). This changes according to the number of
characters or the specified scrolling speed.
Urgent Section (Play and Stop Buttons)
The play button is used to send text entered to the group selected in the Material
Management window, and to start playout as soon as possible. This is referred to as
"urgent playout." The stop button stops urgent playout of the selected group.
Note
The urgent playout function interrupts playout currently being carried out on the
network player. The entered text will be displayed on the piece of material that is being
played, or the selected text will override the text that is being played, if any.
Also, scheduled playout will not start during urgent playout. Check the network player
status in the NSP-100 Status window before starting urgent playout, and click the stop
button at the end.
Save Button
Saves text entered as a piece of text material.
108
Properties Dialog Box
The Properties dialog box is used to specify the properties of text material.
Hint
A piece of "bitmap text" material that uses a bitmap instead of text does not have data
corresponding to the Font Settings section, and text and background colors.
Font Settings Section
Used to specify the font (font face, size, and color depth) for displaying text.
First you should click either the NSP-100 Built-in or PC Installed option button.
When selecting the NSP-100 built-in font, no other settings in this section are required.
When selecting a font installed on the PC, specify the desired font from the drop-down
list box and the font size from the Size drop-down list box. Then, select "2 Colors" of
the Color Depth option buttons when using only one text color, or "16 Colors" to use
more than one text color.
Note
Only one font face and size can be specified for each text material piece.
Also, when the NSP-100 built-in font is selected, it is not possible to use more than one
text color nor to make the text bold, italic, or underlined.
Type and Title Text Boxes
Used to enter the type and title of the text material. This information will be displayed
to identify each piece of text material.
Text Type Drop-down List Box
Selects how the text material should be displayed.
Selection
Description
Constant
Displays stable text.
Blink
Displays blinking text.
Scroll
Makes text flow across the monitor from right to left.
Scroll in
Makes text entered into each line of the Contents text boxes (that fit
the width of the screen) flow to the left edge, then stop.
Color (Text and Background) Buttons
Specify the text and background colors. The squares next to the buttons indicate the
current colors. To change the setting, click [Text] or [Background], then select the
desired color in the Color dialog box.
When "16 Colors" is selected for Color Depth in the Font Settings section, you can
specify the different color to each character. Use the Edit Text dialog box to assign a
color to each part of the text. You can use only one background color, however.
Transparency Drop-down List Box
Specifies the background color transparency on a full-screen video.
In the case of a piece of bitmap text, the system considers the color corresponding to
index 0 of the bitmap as the background, hence transparent, color.
109
Speed Drop-down List Box
Selects the speed of blinking or text flow. This is effective only when the "Blink,"
"Scroll," or "Scroll in" text type is selected.
You can also enter a value in the text box on the right.
The unit is "fields/blinking" for blinking, "pixels/field" for scroll, and "fields"
(displaying duration) for scroll in.
Hint
1 field is half of 1 frame duration. It is approximately 1/60 of a second in the case of
NTSC, and 1/50 of a second in the case of PAL.
You can save the value by entering the desired name in the drop-down list box and
clicking the Save button (up to 30 settings). The Delete button deletes the selected
setting.
When you specify a value that is not pre-defined and do not save it, the system
automatically attempts to save the value with the name "User defined." A confirmation
message appears when you click [OK] in the Properties dialog box. Click [Yes] to
specify that value.
Number Text Box and Loop Check Box
Specifies the number of times an item of text displays. Checking the Loop check box
repeats text display during the event.
Position Drop-down List Box
Selects the text position. You can also enter a coordinate (unit: pixels, the top left
corner of the screen is (0,0).) in the text boxes for the position where you want the
upperleft corner of the "constant" or "blink" text to be, and a Y coordinate for the
"scroll" or "scroll in" text. You can save the coordinates by entering a name in the
Position drop-down list box and clicking the Save button (up to 30 settings). The
Delete button deletes the selected setting.
When you specify a coordinate that is not pre-defined and do not save it, the system
automatically attempts to save the coordinate with the name "User defined." A
confirmation message appears when you click [OK] in the Properties dialog box. Click
[Yes] to specify that coordinate.
Note
• The settings for the number and position will be used with urgent text playout only.
Normally, specify the number and position of each text event on the playlist.
• If you selected the "over-scan" display type upon group setting, the system adjusts
the pre-defined positions, such as "Upper" and "Lower," so that the text can be
correctly displayed on over-scan displays.
Note that if you use both over-scan and under-scan displays in a single network
player group, text may not displayed at the expected position on some of the
displays.
• The user-defined position settings saved here (up to 30 settings) are shared with the
Text Position drop-down list box in the Display Setup dialog box displayed for
editing playlists. You are not allowed to specify more than one user setting with the
same coordinate. For a "scroll" or "scroll in" text, the X coordinate, even if you
specify a user setting with an X coordinate setting that is not "0," will be ignored.
110
Font Color Setting Dialog Box
The Font Color Setting dialog box is used to specify the color of the text selected in the
Edit Text dialog box.
Clicking the desired color from the palette in the dialog box, then clicking [OK]
changes the color of the selected text.
Hint
The color shown at the upper-left corner is the default text color specified in the
Properties dialog box. It cannot be changed here by clicking [Change Color].
Change Color Button
Opens the Color dialog box to change the color of the selected position.
When your desired color is not shown on the 15-color palette, click an unnecessary
color to replace it, then click this button.
111
Edit Control (External Device/NSP-100) Dialog Box
The Edit Control (External Device/NSP-100) dialog box is used to make commands to
control PDPs (Plasma Display Panel) or other devices connected to the RS-232C/GPI
connectors of the network players, or to control the network player itself. The PDPs are
controlled through the RS-232C interface and other external devices are controlled by
GPI (General Purpose Interface) pulses.
The control commands for the external devices created in this dialog box can be added
to playlists to control devices in synchronization with playout of materials.
The control commands for network players can be used with the urgent playout
procedure to control the network players in a specified group.
Type and Title Text Boxes
Used to enter the type and title of the device control command. This information will
be displayed to identify each device control command.
PDP Control Section
Used to control PDPs connected to network players.
Clicking the PDP Control option button enables you to select a control item from the
Control drop-down list box.
Hint
The system enables you to modify the item labels displayed in the Control drop-down
list box to tailor the indication to the various types of PDP control. "Power ON" and
"Power OFF" cannot be changed, though.
Selecting an item in the drop-down list box highlights its label. Type the desired text,
then click [Set].
GPI Control Section
Used to control devices connected to the network players with GPI pulses.
Clicking the GPI option button enables you to check the box(es) for GPI Out-1 ON
through GPI Out-4 ON, to specify the GPI pulses to be output.
NSP-100 Control Section
Used to control the network players, such as, for example, adjusting audio volume.
Clicking the NSP-100 Control option button enables you to enter a command for the
network player in the Control text box.
Note
• Control commands for network players cannot be inserted into a playlist.
• An erroneous control command may result in network player problems.
Refer to the protocol manual of the network player for details on how to enter a
control command. Ask your supplier or Sony sales representative about the protocol
manual.
112
View Playlist Window
The View Playlist window is used to see the playlist selected on the Playlist tab of the
Material Management window.
This window does not enable you to edit the displayed playlist.
Hint
If an event title is longer than the list width, hence it is not fully displayed, move the
mouse pointer over it. The entire title text pops up.
Code and Title Indications
Shows the code and title of the displayed playlist.
Playlist
Displays a playlist, that is, a list of materials in the order of playout. Each piece of
material to be played out is displayed as a separate event, depending on the material
type. There is a "Start Time" column at the leftmost edge of the list in which the start
time for each event appears. Events assigned the same number (No.) will start playing
simultaneously. The gray strip indicates a break, that is a period in which no material is
played out.
A green background color indicates that the material data has been registered but has
not yet been converted. When a control command for the external device is assigned
for a event, its title is displayed in the rightmost Control column.
Like in the Edit Playlist window, when a "playlist module," that is, a playlist piece to be
inserted into another playlist, is inserted, it appears as a light-gray comment line with a
closed arrow mark ( ). Double-clicking this mark expands the module, and its events
appear enclosed by two light-gray comment lines whose Start Time columns have arrow
marks ( and ).
The expanded playlist module can be collapsed by double-clicking the arrow mark on
its upper comment line.
Note
In the case of NTSC video, the system regards one second as 30 frames of video signal
although it is approximately 29.97 frames (non-drop frame mode). Hence the actual
length is longer than the duration indicated for such a piece of video material. This
error is approximately two frames for one minute and 108 frames (3.3 seconds) for one
hour. The system adjusts this error to indicate the start times of the events on the
playlist, but there still is a small amount of error (less than one second) between the
indication and the actual start time.
113
Properties Dialog Box
The Properties dialog box is used to specify the type, title, and playout schedule (for the
Scheduling Application only) of the playlist.
Type and Title Text Boxes
Enter the type and title of the playlist that is being edited in the Edit Playlist window.
This information will be displayed to identify each playlist.
Repeat Check Box
Check this to repeat playout of this playlist, so that the first event will start again after
playout of the last event, until playout is stopped manually. Clear it to not repeat
playout.
Note
It is not possible to repeat playout of playlists that contain a break event.
Start Date and End Date Drop-down List Boxes (Scheduling Application only)
Used to specify the period during which the playlist can be used. Specify the desired
dates for the Start Date and End Date. Clicking the drop-down list button displays a
calendar from which you can select a date.
Hint
You can customize the date format using the Windows Regional and Language Options.
Open the Regional and Language Options window from the Windows Control Panel,
and specify the desired "Short date" format. Note that date indication may not fit in the
drop-down list box, depending on the selected format.
Refer to the online help of Windows for details on how to customize the date format.
Start Time Spin Box and Save as Default Button (Scheduling Application only)
Used to specify the start time of the top event of the playlist.
Clicking the Save as Default button saves the specified time, and this will be the default
for the playlists created for the same network player group from then on.
Repeat End Time Spin Box and Save as Default Button (Scheduling Application
only)
Used to specify the daily end time of a repeated playlist. These items are enabled only
when the Repeat check box has a check mark.
Clicking the Save as Default button saves the specified time, and this will be the default
for the playlists created for the same network player group from then on.
Note
The longest continuous playlist repeat duration is 23 hours and 58 minutes. Specify the
Repeat End Time so that the network player will be idle at the HDD Sleep Start Time
specified in the NSP-100 Setup dialog box.
Setting of an appropriate Repeat End Time gives you a better file transfer rate (when
transfer is performed while the network player is not being used for playout), and fewer
malfunctions of the network player HDD.
114
Playlist Module Check Box
Check this to make the current playlist a "playlist module," that is, a piece of playlist to
be inserted into another playlist as one of its parts. You cannot specify the start and end
dates for a playlist module, nor check the Repeat check box.
Note
In the case of the Scheduling Application, be sure that any playlist module has a check
mark here, so that it has no start and end date data.
Otherwise, the system will send two playlists for playout at the same time on the same
day to the network players, and this will cause a problem upon playout.
115
Display Setup Dialog Box
The Display Setup dialog box opens in the following two cases while a playlist is being
edited.
• When [Default Display Setup] (a button in the Edit Playlist window) is clicked.
This enables you to specify the default display size and position of video events, and
the default position of text events.
• When a video or text event is right-clicked, then [Display Setup] is clicked on the
menu.
This enables you to specify the size (video only) and position of that video or text.
Note
The unit used in this dialog box is pixels, and the origin is the upperleft corner of the
screen. You are not allowed to have more than one user setting whose value is the
same.
If you selected the "over-scan" display type upon group setting, the system adjusts the
pre-defined positions, such as "Upperleft" and "Lower," so that the video and text can
be correctly displayed on over-scan displays. The system also indicates the area that is
visible with over-scan displays on the screen in this dialog box.
Note that if you use both over-scan and under-scan displays in a single network player
group, video and text may not displayed at the expected position on some of the
displays.
Video Position Drop-down List Box, Save and Delete Buttons
The Video Position drop-down list box selects the position of the video. The X, Y
coordinates (upper-left corner of the video) of the selected or entered selection are
shown in the text boxes, and you can see the position on the picture in the dialog box.
You can also enter the desired values in the text boxes, or drag the video on the screen
to specify the position.
The Save and Delete buttons are used to manage the user settings. When you specify a
position that is not pre-defined, enter the name for the position in the Video Position
drop-down list box, then click the Save button to register the coordinates (up to 30
settings). The Delete button deletes the selected user setting.
Video Size Drop-down List Box, Save and Delete Buttons
The Video Size drop-down list box selects the size of the video. The width and height
of the selected or entered selection are shown in the text boxes, and you can see the size
on the picture in the dialog box.
You can also enter the desired values in the text boxes, or drag one of the eight handles
(small black squares) around the video to specify the size.
Checking the Preserve Aspect Ratio check box fixes the aspect ratio of the video at 3:2
(NTSC) or 5:4 (PAL).
The Save and Delete buttons are used to manage the user settings. When you specify a
set of width and height that is not pre-defined, enter the name for it in the Video Size
drop-down list box, then click the Save button to register the values (up to 30 settings).
The Delete button deletes the selected user setting.
Text Position Drop-down List Box, Save and Delete Buttons
The Text Position drop-down list box selects the position of text. The X, Y coordinates
(upperleft corner of the text) of the selected or entered selection are shown in the text
116
box, and you can see the position on the picture in the dialog box.
You can also enter the desired coordinate in the text box, or drag the text on the screen
to specify the position.
The Save and Delete buttons are used to manage the user settings. When you specify a
position that is not pre-defined, enter a name for that position in the Text Position dropdown list box, then click the Save button to register the coordinates (up to 30 settings).
The Delete button deletes the selected user setting.
Hint
• When the text type is "scroll" or "scroll in," only the Y coordinate (upper edge of the
text, where the top of the screen is "0") can be specified. Even if you select a user
setting with an X coordinate setting that is not "0," the X coordinate will be ignored.
• The user settings registered here are shared with the Position drop-down list box in
the Properties dialog box displayed for preparing text material.
OK and Apply Buttons
OK button saves the current settings for the event or as the default position.
Hint
If a value for the position and/or size has been entered, click [Apply] before clicking
[OK]. This changes the screen picture in the dialog box according to your settings, so
that you can check the result.
117
Playout Log Window
The Playout Log window is used to obtain the playout logs from the network players to
check them. The two tabs correspond to the two types of log data.
Hint
When a problem occurred in the system and sending error log to the person in charge of
the problem, click [Compress Logs] to reduce the size of log data.
See the explanation "Compressing Log Data" in "Checking the Playout Log" for details.
NSP-100 Drop-down List Box
Selects the network player for which the log data is being checked. The log data of the
selected network player is displayed.
Date/Time Indication and Get Button
Displays the last date and time when log data was obtained from the selected network
player. Clicking the Get button fetches log data from the selected network player, and
adds it to the list.
Delete All Button (Playlist Tab Only)
Deletes all the playlist log data of the selected network player from the PC.
Compress Logs Button
Compresses the obtained error log data.
Log
Displays the log data.
You can sort (ascending order) the log data by clicking the title of the desired column.
Tab
Contents
Playlist
Title, playout start date and time, playout end date and
time, the number of repeated times, and playout results
( OK,
Warning, or
Error) of the playlists that
were played with the selected network player.
Error Log
Date and time, level (error or warning), number and details
of each error that occurred for the selected network player.
Hint
When selecting the Playlist tab, right-clicking the log data displays a menu which you
can use to delete log data. Clicking [Log Details] displays detailed log information for
the selected playlist. When Excel is installed on the PC, there is the [Send to Excel]
command on the menu. This command starts Excel and displays log information with
it.
118
Detail Screen Window
The Detail Screen window displays the status of each event in the playlist selected on
the Playlist tab of the Playout Log window.
The type, title, start time specified in the playlist, the actual start and end times, the
duration, result, and material code are displayed. Clicking [Result Code] shows a list of
the result codes.
119
Delete Date Settings Dialog Box
The system enables you to set the date on which the video, graphics or text material, or
playlists will be automatically deleted from the network players to avoid causing them
to be too full.
The Delete Date Settings dialog box is used to specify the date on which to do this.
Click the date on the calendar, then click [OK].
Displaying Another Month on the Calendar
Click the previous month or next month (right or left arrow) button next to the year and
month indication.
120
Change Start Time Dialog Box
The Change Start Time dialog box is used to change the start time of the event selected
in the Edit Playlist window.
Modify the hour:minute:second of the start time, then click [OK].
Hint
Each hour, minute, or second field accommodates only two digits. You may have to
delete a number first to enter another: to change "00" to "05" for example, delete the
second "0" to enter "5."
121
Password for NSP-100 Setup Dialog Box
The Password for an NSP-100 Setup dialog box appears when the NSP-100 Setup
dialog box is protected by a password.
Enter the designated password, then click [OK].
Note that the password is case-sensitive.
122
NSP-100 Status Window
The NSP-100 Status window enables you to check the status of each network player in
the system. You can also see the amount of remaining hard disk drive space on each
network player in this window.
Group Drop-down List Box
Selects a group of network players to see their information.
Update Button and Date/Time Indication
Clicking the Update button updates information on each network player on the list. The
date and time of the previous updating appears on the right.
List
Shows the status of each network player that is contained in the group selected in the
Group drop-down list box.
When a network player is playing, information on the type of playout (ongoing playlist,
video, graphics and/or text, and if it is urgent playout), the current event number (in the
case of a playlist), code, and title of the material or playlist that is being played are
shown.
Also the amount of remaining hard disk drive space in the network player is also
displayed.
123
Preview Window
The Preview window enables you to check the contents of the video or graphics
material.
Note
• The system sometimes divides a piece of video material into several files upon
conversion for file transfer efficiency. In such a case, you can only preview the top
(first file) of the video material.
• Previewing the video material needs a playback function for MPEG2 files that is not
included in the BZNP-100 software package. Purchase a utility software for
MPEG2 playback and install it to preview MPEG2 files. We are unable to provide
one for free because of issues related to the license agreement.
AVI files, however, can be played back using DirectShow.
Note that it is not possible to play VSR-2000/2000A files (pre-conversion) on a PC.
Also, it is not possible to play video material protected when it was converted to the
NSP-format.
Slider (Video Material Only)
Used to check the desired position of the video material, and to start playback from that
position.
The length of the bar corresponds to the length of the entire piece of video material (or
its first file).
Play, Stop and Pause Buttons (Video Material Only)
Controls playback of video.
124
Import Materials Dialog Box
The Import Materials dialog box is used to import playlists and required materials for
distribution that were created with the Sony BZNP-A1 authoring software.
It is also used when you want to rebuild the entire material database, such as in the case
where more than one BZNP-100 shares materials.
Update Materials Option Button
Checks the data in the material management folders and updates the Material
Management window.
Select this option button when the BZNP-A1 wrote the materials and playlist module
directly into the BZNP-100 material management folder.
Also, select this to rebuild the database of all materials simultaneously.
Import Package from BZNP-A1 Option Button, Drop-down List Box and Browse
Button
Imports a distribution data package that contains materials and playlist modules created
with the BZNP-A1.
Select this option button when you receive a distribution data package stored on a
medium, such as a CD-R or DVD-R, from the BZNP-A1, then specify the folder for the
package data using the drop-down list box or the Browse button.
Delete All Files After Copy Check Box
Deletes the source files of the distribution data package after copy.
This check box is available only when the Import Package from BZNP-A1 option
button is selected.
It is used only when the BZNP-A1 and BZNP-100 exchange packaged distribution data
via a network drive, not via the media such as a CD-R or DVD-R.
Start Button
Starts updating of the material database or importing distribution data package created
with the BZNP-A1.
Abort Button
Cancels updating of the material database or importing of a distribution data package.
125
Sony Corporation
http://www.sony.net/