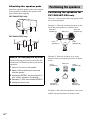
1
4-253-172-15(1)
Compact
Hi-Fi Stereo
System
Operating Instructions
Owner’s Record
The model and serial numbers are located on the rear of the unit. Record the serial
number in the space provided below. Refer to them whenever you call upon your
Sony dealer regarding this product.
Model No.
Serial No.
FST-ZX8
FST-ZX6
LBT-ZX8
LBT-ZX6
©2004 Sony Corporation
WARNING
FST-ZX8/LBT-ZX84-253-172-15(1)
WARNING
To reduce the risk of fire or electric
shock, do not expose this apparatus to
rain or moisture.
To prevent fire, do not cover the ventilation of the
apparatus with newspapers, table-cloths, curtains, etc.
And don’t place lighted candles on the apparatus.
To prevent fire or shock hazard, do not place objects
filled with liquids, such as vases, on the apparatus.
Do not install the appliance in a confined space,
such as a bookcase or built-in cabinet.
This appliance is
classified as a CLASS 1
LASER product. This
label is located on the
rear exterior.
Don’t throw away the battery with
general house waste, dispose of it
correctly as chemical waste.
NOTICE FOR THE CUSTOMERS IN THE
U.S.A.
This equipment has been tested and found to comply
with the limits for a Class B digital device, pursuant to
Part 15 of the FCC Rules. These limits are designed to
provide reasonable protection against harmful
interference in a residential installation. This
equipment generates, uses, and can radiate radio
frequency energy and, if not installed and used in
accordance with the instructions, may cause harmful
interference to radio communications. However, there
is no guarantee that interference will not occur in a
particular installation. If this equipment does cause
harmful interference to radio or television reception,
which can be determined by turning the equipment off
and on, the user is encouraged to try to correct the
interference by one or more of the following measures:
– Reorient or relocate the receiving antenna.
– Increase the separation between the equipment and
receiver.
– Connect the equipment into an outlet on a circuit
different from that to which the receiver is
connected.
– Consult the dealer or an experienced radio/TV
technician for help.
CAUTION
You are cautioned that any changes or modification not
expressly approved in this manual could void your
authority to operate this equipment.
Note to CATV system installer:
This reminder is provided to call CATV system
installer’s attention to Article 820-40 of the NEC that
provides guidelines for proper grounding and, in
particular, specifies that the cable ground shall be
connected to the grounding system of the building, as
close to the point of cable entry as practical.
This symbol is intended to alert
the user to the presence of
uninsulated “dangerous voltage”
within the product’s enclosure
that may be of sufficient
magnitude to constitute a risk of
electric shock to persons.
This symbol is intended to alert
the user to the presence of
important operating and
maintenance (servicing)
instructions in the literature
accompanying the appliance.
2GB
For customers in the United States
ENERGY STAR® is a U.S.
registered mark. As an ENERGY
STAR® partner, Sony Corporation
has determined that this product
meets the ENERGY STAR®
guidelines for energy efficiency.
Table of Contents
About this manual ................................... 5
Playable discs.......................................... 5
Getting Started
Hooking up the system............................ 8
Positioning the speakers........................ 10
Setting the clock.................................... 11
CD/MP3
Loading a disc ....................................... 12
Playing a disc ........................................ 12
— Normal Play/Shuffle Play
Playing repeatedly................................. 14
— Repeat Play
Creating your own program ..................15
— Program Play
Tuner
Presetting radio stations ........................ 16
Listening to the radio ............................ 17
— Preset Tuning
— Manual Tuning
Tape
Loading a tape....................................... 18
Playing a tape ........................................ 18
Tape – Recording
Recording your favorite tracks on a disc
into a tape........................................ 19
— CD Synchro Recording
— Program Edit
Recording to a tape manually ............... 20
— Manual Recording
Sound Adjustment
Adjusting the sound .............................. 21
Selecting the preset effect..................... 22
Adjusting the graphic equalizer and
storing the personal file .................. 22
Selecting the surround effect ................ 23
Selecting the MP3 Booster effect ......... 23
Creating a party environment ............... 24
(FST-ZX8/LBT-ZX8 only)
— X-ROUND
— FLASH
Listening to the sound in another
room ............................................... 25
— Multi Room
(FST-ZX8/LBT-ZX8 only)
Enhancing the video game sound ......... 25
— Game Sync
Mixing video game sound with other
sound source................................... 26
— Game Mixing
Singing along........................................ 26
Timer
Falling asleep to music ......................... 27
— Sleep Timer
Waking up to music.............................. 27
— Play Timer
Timer recording radio programs........... 28
Display
Turning off the display ......................... 29
— Power Saving Mode
Viewing information about the disc
in the display .................................. 30
Changing the power illuminator ........... 31
Changing the spectrum analyzer
display ............................................ 31
Adjusting the brightness of the
display ............................................ 32
continued
3GB
Optional Components
Hooking up optional components ......... 33
Listening to audio from a connected
component ...................................... 34
Recording on a connected
component ...................................... 35
Connecting external antennas ............... 35
Troubleshooting
Problems and remedies ......................... 36
Messages ............................................... 39
Additional Information
Precautions............................................ 40
Specifications........................................ 41
List of button locations and reference
pages ............................................... 44
4GB
About this manual
• The instructions in this manual are for models
FST-ZX8, FST-ZX6, LBT-ZX8 and LBTZX6. In this manual, the FST-ZX8 is used for
illustration purposes unless stated otherwise.
• This manual mainly explains operations using
the buttons on the system, but the same
operations can also be performed using the
buttons on the remote having the same or
similar names.
The FST-ZX8/LBT-ZX8 consists of the
following components:
– Tuner/CD/MP3 player/Stereo cassette
deck/Amplifier (main unit)
HCD-ZX8
– Speaker System
• Front/Surround speakers
SS-ZX8
The FST-ZX6/LBT-ZX6 consists of the
following components:
Playable discs
You can playback the following discs on this
system. The other discs cannot be played back.
List of playable discs
Format of
discs
Disc logo
Contents
Audio CDs
Audio
CD-R/CD-RW
(Audio CDs)
Audio
CD-R/CD-RW
(Discs with
MP3 audio
tracks)
Audio
– Tuner/CD/MP3 player/Stereo cassette
deck/Amplifier (main unit)
HCD-ZX6
– Speaker System
• Front speakers
SS-ZX6
continued
5GB
Discs that this system cannot
play
• A disc that has a non-standard shape (e.g.,
card, heart).
• A disc that has the adhesive, cellophone tape,
or a sticker still left on it.
• Discs other than the following:
– Audio CDs
– CD-Rs/CD-RWs that recorded in the Audio
CD format.
– CD-Rs/CD-RWs and CD-ROMs that has
MP3 audio tracks those format that
conforms to ISO 9660*1 Level 1, Level 2,
Joliet in expansion format or Multi
Session*2. MP3 audio tracks must be in
MPEG 1, 2, 2.5 Audio Layer 3 format.
• Data part of CD-Extras*3.
• Data part of Mixed CDs*4.
• Audio side of a DualDisc.
*1
ISO 9660 Format
The most common international standard for the
logical format of files and folders on a CD-ROM.
There are several specification levels. In Level 1, file
names must be in the 8.3 format (no more than eight
characters in the name, no more than three characters
in the extension “.MP3”) and in capital letters.
Folder names can be no longer than eight characters.
There can be no more than eight nested folder levels.
Level 2 specifications allow file names and folder
names up to 31 characters long. Each folder can have
up to 8 trees.
For Joliet or Romeo in the expansion format, make
sure of the contents of the writting software, etc.
*2 Multi
Session
This is a recording method that enables adding of
data using the Track-At-Once method.
Conventional discs begin at a disc control area called
the Lead-in and end at an area called Lead-out. A
Multi Sessions disc is a disc having multiple
sessions, with each segment from Lead-in to Leadout regarded as a single session.
*3 CD-Extra
This format records audio (audio CD data) on the
tracks in session 1 and data on the tracks in session 2.
*4
6GB
Mixed CD
This format records data on the first track and audio
(audio CD data) on the second and subsequent tracks
of a session.
Notes on discs
• This system can play CD-R/CD-RW discs
edited by the user. However, note that
playback of some discs may not be possible
depending on the recording device used for
recording or the disc condition.
• Discs recorded on CD-R/CD-RW drives may
not be played back because of scratches, dirt,
recording condition or the driver’s
characteristics.
• CD-R and CD-RW discs that have not been
finalized (processing to allow playback by a
normal disc player) cannot be played back.
• CD-R and CD-RW discs recorded in Multi
Session that have not ended by “closing the
session” are not supported.
• The system may be unable to playback MP3
format files that do not have the extension
“.MP3”.
• Attempting to playback non-MP3 format files
that have the extension “.MP3” may result in
noise or malfunction.
• With format other than ISO 9660 Level 1,
Level 2 or Joliet in expansion format, album
titles or track titles may not be displayed
correctly.
• The following discs take a longer time to start
playback.
– a disc recorded with complicated tree
structure.
– a disc recorded in Multi Session.
– a disc to which data can be added (nonfinalized disc).
CD-RWs that recorded in packet write format
cannot be played back.
Note on DualDiscs
This product is designed to play back discs that
conform to the Compact Disc (CD) standard.
A DualDisc is a two sided disc product which
mates DVD recorded material on one side with
digital audio material on the other side. Please
be aware that the audio side of a DualDisc may
not be played back on this product because these
discs do not conform to the CD standard.
“DualDisc” is a trademark of the Recording
Industry Association of America (RIAA).
Music discs encoded with
copyright protection
technologies
This product is designed to playback discs that
conform to the Compact Disc (CD) standard.
Recently, various music discs encoded with
copyright protection technologies are marketed
by some record companies. Please be aware that
among those discs, there are some that do not
conform to the CD standard and may not be
playable by this product.
Cautions when playing a disc
that is recorded in Multi
Session
• This system can play Multi Session discs
when an MP3 audio track is contained in the
first session. Any subsequent MP3 audio
tracks recorded in later sessions can also be
played back.
• When you play Multi Session discs with
different formats for each session, the format
of the first session is recognized as the disc
type. Tracks in the second and subsequent
sessions are played if they are the same
formats as the first session.
7GB
Getting Started
Hooking up the system
Do the following procedures 1 to 5 to hook up your system using the supplied cords and accessories
(page 43).
AM loop antenna
Surround speaker*
(Right)
FM lead antenna
3
Surround speaker*
(Left)
3
4
2
2
5
1
Front speaker
(Left)
Front speaker
(Right)
* FST-ZX8/LBT-ZX8 only.
1 Connect the front speakers.
(FST-ZX8/LBT-ZX8 only)
(FST-ZX6/LBT-ZX6 only)
Connect the speaker cords to the FRONT
SPEAKER (SPEAKER A) terminals.
Connect the speaker cords to the SPEAKER
terminals.
SPE
AKE
R
OUND L
SURR ER B)
R (SPEAK
SPEA
White
KER
L
L
R
FRONT
A)
AKER
(SPE
8GB
R
Connect the speaker cords to the terminals on the
speakers.
VOLTAGE SELECTOR
Black (#)
Red (3)
Black (#)
Red (3)
230-240V
5 Connect the power cord to a wall
outlet.
2 Connect the surround speakers.
(FST-ZX8/LBT-ZX8 only)
The demonstration appears in the display.
When you press ?/1, the system turns on
and the demonstration automatically ends.
Connect the speaker cords to the
SURROUND SPEAKER (SPEAKER B)
terminals and to the terminals on the
speakers as shown in the tip above.
Notes
• Keep the speaker cords away from the antennas to
prevent noise.
• Be sure to match the color of the speaker terminals on
the system and the connectors.
• Be sure to connect the speakers securely and
correctly.
Grey
SPE
AKE
R
OUND L
SURR ER B)
R (SPEAK
L
R
120V
220V
Getting Started
4 For models equipped with a voltage
selector, set VOLTAGE SELECTOR to
the position of your local power line
voltage.
Tip
FRONT
A)
AKER
(SPE
Inserting two R6 (size AA)
batteries into the remote
3 Connect the FM and AM antennas.
Set up the AM loop antenna, then connect
it.
e
E
e
E
Note
AM loop
antenna
If you do not use the remote for a long period of time,
remove the batteries to avoid possible damage from
battery leakage and corrosion.
AM
Tip
FM
CO
75
AXIA
L
With normal use, the batteries should last for about six
months. When the remote no longer operates the
system, replace both batteries with new ones.
Extend the FM lead
antenna horizontally
continued
9GB
Attaching the speaker pads
Attach the supplied speaker pads to the bottom
of the speakers to stabilize the speakers and
prevent them from slipping.
FST-ZX8/LBT-ZX8 only
Positioning the speakers
Positioning the speakers for
FST-ZX8/LBT-ZX8 only
There are 3 ways to place the front speakers and
the surround speakers.
Example 1: Place the surround speakers on the
top of the front speakers as shown below.
Surround
Speaker (L)
Main Unit
Surround
Speaker (R)
FST-ZX6/LBT-ZX6 only
Front
Speaker (L)
45
Front
Speaker (R)
Listener
Notice for carrying this system
Do the following procedure to protect the disc
mechanism. Use buttons on the system for the
operation.
1 Press ?/1 to turn on the system.
2 Make sure that all discs are removed
Example 2: Place the speakers at an equal
distance from your listening position as shown
below.
Front
Speaker (L)
Main Unit
Front
Speaker (R)
from the system.
3 Hold down REPEAT and then press ?/1
until “LOCK” appears in the display.
4 Release ?/1 first, then release REPEAT.
5 Unplug the power cord.
Listener
Surround
Speaker (L)
Surround
Speaker (R)
Example 3: Place the front speakers in one room
and the surround speakers in another room.
10GB
Positioning the speakers for
FST-ZX6/LBT-ZX6 only
1
2
Front
Speaker
(R)
Press CLOCK/TIMER SET.
“CLOCK” appears in the display. Then, the
hour indication flashes in the display.
Main Unit
Front
Speaker
(L)
Press ?/1 to turn on the system.
3
4
45
Press M or m (or >+ or –. on the
remote) repeatedly to set the hour.
Getting Started
Place the front speakers at an angle of 45
degrees from your listening position.
Setting the clock
Press ENTER.
The minute indication flashes in the
display.
5
6
Press M or m (or >+ or –. on the
remote) repeatedly to set the minute.
Press ENTER.
The clock starts functioning.
To adjust the clock
1 Press CLOCK/TIMER SET.
“PLAY SET?” flashes in the display.
2 Press M or m (or >+ or –. on the
remote) to select “CLOCK SET?”, then
press ENTER.
The hour indication flashes in the display.
3 Do the same procedures as step 3 to 6
above.
Note
The clock settings are canceled when you disconnect
the power cord or if a power failure occurs.
11GB
CD/MP3
Loading a disc
1
2
Playing a disc
— Normal Play/Shuffle Play
Press Z OPEN/CLOSE.
This system lets you play audio CDs and discs
with MP3 audio tracks in different play modes.
The disc tray slides out.
When playing an audio CD:
Place a disc with the label side facing
up on the disc tray.
Disc tray
number Track number
When you
play a CD
single,
place it on
the inner
circle of
the tray
ALL DISC S
1
Press Z OPEN/CLOSE to close the disc
tray.
2
3
4
5
j
EFFECT
X-GROOVE
Disc playing
indicator
To load additional discs, press DISC SKIP
to rotate the disc tray.
3
Playing time
Disc presence indicator
When playing an MP3 audio track:
Disc tray
number
Track number
Playing time
Note
Do not push the disc tray when closing it as this may
cause malfunction. Press Z OPEN/CLOSE to close the
disc tray.
ID3
MP3
ALL DISC S
1
EFFECT
X-GROOVE
2
3
Disc presence indicator
1
12GB
4
5
j
Disc playing
indicator
Press FUNCTION repeatedly until “CD”
appears in the display (or press CD on
the remote).
2
When the playback is stopped, press
PLAY MODE repeatedly until the
indication of the play mode you want
appears in the display.
To play
ALL DISCS
(Normal Play)
The tracks on all discs in the
disc tray continuously.
1 DISC
(Normal Play)
The tracks on the disc you
have selected in original
order.
ALBM
(Normal Play)
All MP3 audio tracks in the
album on the disc you have
selected in original order.
When playing an audio CD,
“ALBM” play mode
performs the same operation
as “1 DISC” play mode.
ALL DISCS
SHUF
(Shuffle Play)
The tracks on all discs in
random order.
1 DISC SHUF
(Shuffle Play)
The tracks on the disc you
have selected in random
order.
ALBM SHUF
(Shuffle Play)
The MP3 audio tracks in the
album on the disc you have
selected in random order.
When playing an audio CD,
“ALBM SHUF” play mode
performs the same operation
as “1 DISC SHUF” play
mode.
PGM
(Program Play)
3
The tracks on all discs in the
order you want them to be
played back (see “Creating
your own program” on
page 15).
To
Do this
Stop playback
Press x.
Pause playback
Press NX (or X on the remote).
Press again to resume playback.
Select a track
Press . or > (or –. or
>+ on the remote) repeatedly.
Select an album
of MP3 audio
tracks
Press ALBUM +/–.
Find a point in a
track*1
Press and hold down m or M
during playback and release it at
the point you want to resume
playback. Use button on the
remote for this operation while
playing an MP3 audio track.
Select a disc
Press one of the DISC 1 ~ 5
buttons or DISC SKIP.
CD/MP3
Select
Other operations
Switch to CD
Press one of the DISC 1 ~ 5
function from
buttons or NX (Automatic
another source
Source Selection).
and start
playback
automatically.*2
Exchange other
discs while
playing
Press EX-CHANGE. The disc tray
slides out. Then press DISC SKIP
to select the disc you want to
exchange.
Remove the disc Press Z OPEN/CLOSE.
*1 The playing time may not be displayed correctly
depending on the MP3 audio tracks.
*2 Only when there is a disc in disc tray.
Press NX (or N on the remote).
NX indicator lights up.
Tips
• You cannot change the play mode during playback.
To change the play mode, press x to stop playback.
• When an MP3 audio track with ID3 tag is played
back, “ID3” lights up in the display.
• When the current disc is a disc with MP3 audio
tracks, “MP3” lights up in the display.
continued
13GB
Notes
• This system can playback MP3 audio tracks in the
format of MPEG 1 Audio Layer 3, MPEG 2 Audio
Layer 3 and MPEG 2.5 Audio Layer 3.
• This system can playback Multi Session discs when
an MP3 audio track is located in the first session.
Any subsequent MP3 audio tracks, recorded in the
later sessions, can also be played back.
• When naming the MP3 audio tracks, be sure to add
the file extension “.MP3” to the file name.
• If you save up the extension “.MP3” to a track other
than MP3 audio tracks, the system cannot recognize
the track properly and will generate random noise
that could damage your speakers.
• You are recommended not to save other type of
tracks or unneccessary album on a disc that has MP3
audio tracks.
• The disc recorded with complicated tree structure
takes a longer time to start playback.
• When the disc is loaded, the system reads all the
tracks in that disc. If there are many albums or non
MP3 audio tracks on the disc, it may take a longer
time for playback to begin or for the next MP3 audio
track to start playback.
• An album that does not include an MP3 audio track
is skipped.
• The maximum number of albums on a disc which can
be recognize by this system is 150 (including root
album).
• The maximum number of MP3 audio tracks and
albums on a disc which can be recognize by this
system is 300.
• Depending on the encoding/writing software,
recording device, or the recording media used at the
time an MP3 audio track is recorded, you may
encounter problems such as cannot playback, sound
interruptions, and noise.
Tips
• When switching to “CD” function from “TUNER”
function by pressing NX, a longer time may be
required to access the disc. In this case, set “CD
POWER ON” by CD power manage function
(page 17).
• If you press NX while the system is turned off, the
system turns on automatically and “CD” is selected
as a function. Then, playback starts if there is a disc
in the disc tray (One Touch Play).
• If you press CD on the remote while the system is
turned off, the system turns on automatically and
“CD” is selected as a function.
14GB
Playing repeatedly
— Repeat Play
You can playback all the tracks or a single track
on a disc repeatedly.
Press REPEAT repeatedly until “REP” or
“REP1” lights up in the display.
REP: All the tracks on the disc, or all the tracks
in the album* are played back repeatedly
up to five times.
REP1: A single track is played back repeatedly
until “REP1” is canceled.
* When “ALBM” or “ALBM SHUF” is selected for
MP3 audio tracks.
To cancel Repeat Play
Press REPEAT repeatedly until both “REP” and
“REP1” disappear from the display.
Note
You cannot select “REP” and “ALL DISCS SHUF” at
the same time.
Creating your own
program
5
The track(s) is (are) programmed.
The program step number appears,
followed by total playing time.
You can make a program of up to 25 steps from
all the discs in the order you want to play them.
You can synchro record the programmed tracks
onto a tape (page 19).
1
2
3
Press FUNCTION repeatedly until “CD”
appears in the display (or press CD on
the remote).
Press PLAY MODE in stop mode
repeatedly until “PGM” lights up in the
display.
Press one of DISC 1 ~ 5 buttons or
DISC SKIP to select a disc.
To program all the tracks on a disc at once,
proceed to step 5 while “AL” appears in the
display.
To program all the MP3 audio tracks on an
album at once, press ALBUM +/–
repeatedly until the album you want appears
in the display, then proceed to step 5.
4
Press . or > (or –. or >+ on
the remote) repeatedly until the track
number you want appears in the
display.
The total playing time flashes in the display.
Total playing
time (including
selected track)
Disc tray Track
number number
Program additional discs or tracks.
To program
Repeat steps
Other discs
3 and 5
Other tracks on the 4 and 5
same disc
Other tracks on
other discs
7
CD/MP3
6
— Program Play
Press PLAY MODE.
3 to 5
Press NX (or N on the remote).
Program Play starts.
Other operations
To
Do this
Cancel Program
Play
Press PLAY MODE repeatedly
until “PGM” disappears from the
display.
Clear a track from
the end
Press CLEAR on the remote
when the playback is stopped.
Tips
• The program you made remains in the system’s
memory even after it has been played back. Press
NX (or N on the remote) to play the same
program again.
• If “--.--” appears instead of the total playing time
during programming, this means:
– you have programmed a track number which
exceeds 20.
– the total playing time has exceeded 100 minutes.
– you have programmed an MP3 audio track.
PGM
1
EFFECT
X-GROOVE
2
3
4
5
j
When programming an MP3 audio track,
press ALBUM +/– to select album, then
press . or > (or –. or >+ on
the remote) repeatedly until the track
number you want appears in the display.
15GB
6
Press TUNER ENTER or ENTER.
“Complete!” appears in the display. The
station is stored.
Tuner
Presetting radio stations
7
Repeat steps 1 to 6 to store other
stations.
You can preset up to 20 FM stations and 10 AM
stations. You can then tune in any of those
stations simply by selecting the corresponding
preset number.
Manual tuning preset
Automatic tuning preset
1
You can automatically tune in all of the stations
that can be received in your area and then store
the frequency of your favorite stations manually.
1
2
3
Press TUNER/BAND repeatedly to
select “FM” or “AM”.
Press TUNING MODE repeatedly until
“AUTO” lights up in the display.
2
3
4
Press TUNING +/– (or >+ or –. on
the remote).
The frequency changes as the system scans
for a station. Scanning stops automatically
when a station is tuned in. “TUNED” lights
up in the display. When a FM stereo
program is tuned in, “ST” lights up in the
display.
If “TUNED” does not lights up in the
display and the scanning does not stop
Set the frequency of the radio station you
want as described in steps 2 to 6 of “Manual
tuning preset”.
4
You can manually tune in and store the radio
frequency of your favorite stations.
Press TUNER/BAND repeatedly to
select “FM” or “AM”.
Press TUNING MODE repeatedly until
“MANUAL” lights up in the display.
Press TUNING +/– (or >+ or –. on
the remote) repeatedly to tune in the
station you want.
Press MEMORY (or TUNER MEMORY
on the remote).
A preset number flashes in the display. The
stations are stored from preset number 1.
preset number
MANUAL
5
6
Press TUNING +/– (or >+ or –. on
the remote) repeatedly to select the
preset number you want to store.
Press TUNER ENTER or ENTER.
“Complete!” appears in the display. The
station is stored.
Press MEMORY (or TUNER MEMORY
on the remote).
7
A preset number flashes in the display. The
stations are stored from preset number 1.
Other Operations
preset number
Repeat steps 1 to 6 to store other
stations.
To
Do this
Tune in a station
with a weak signal
Follow the procedure described
in “Manual tuning preset”
(page 16).
Stop scanning
during automatic
tuning
Press TUNING MODE.
AUTO
5
16GB
Press TUNING +/– (or >+ or –. on
the remote) repeatedly to select the
preset number you want to store.
To improve tuner reception
When the tuner reception is poor, set the CD
power manage function to “CD POWER OFF”.
The default setting is “CD POWER ON”.
Use buttons on the system for the operation.
1 Press FUNCTION repeatedly until “CD”
Listening to the radio
You can listen to a radio station either by
selecting a preset station, or by manually tuning
in the station.
appears in the display.
Listening to a preset station
— Preset Tuning
system turns on automatically.
“CD POWER OFF” appears in the display.
To set CD power on
Before tuning to preset stations, be sure to preset
them first (see “Presetting radio stations” on
page 16).
Repeat the procedure above and “CD POWER
ON” appears in the display.
1
Notes
2
• When “CD POWER OFF” is selected, disc access
time is increased.
• You cannot change the CD power manage setting in
Power Saving Mode (page 29).
3
To change the AM tuning interval
The factory settings for AM tuning interval is
9 kHz (or 10 kHz for some areas). To change the
AM tuning interval, select any AM station first,
then turn off the system. While holding down
TUNER ENTER, press ?/1 to turn on the
system again. “AM 10k STEP” or “AM 9k
STEP” appears in the display. When you change
the interval, AM preset stations will be erased.
To reset the interval, repeat the same procedure.
Use buttons on the system for the operation.
Note
You cannot change the AM tuning interval in the
Power Saving Mode (page 29).
Tips
• The preset stations are retained for half a day even if
you unplug the power cord or if a power failure
occurs.
• If you press TUNER/BAND while the system is
turned off, the system turns on automatically and
“TUNER” is selected as the function.
• You can also press FUNCTION repeatedly to select
“TUNER”.
Tuner
2 Press ?/1 to turn off the system.
3 Press ?/1 while holding down x (CD). The
Press TUNER/BAND repeatedly to
select “FM” or “AM”.
Press TUNING MODE repeatedly until
“PRESET” lights up in the display.
Press TUNING +/– (or >+ or –. on
the remote) repeatedly to select the
preset station you want.
Listening to non-preset radio
station
— Manual Tuning
1
2
3
Press TUNER/BAND repeatedly to
select “FM” or “AM”.
Press TUNING MODE repeatedly until
“MANUAL” lights up in the display.
Press TUNING +/– (or >+ or –. on
the remote) repeatedly to tune in the
station you want.
Tips
• To improve broadcast reception, adjust the supplied
antennas, or connect an external antenna.
• When an FM stereo program has static noise, press
FM MODE repeatedly until “MONO” lights up in
the display. There will be no stereo effect, but the
reception will improve.
• To record from the radio programs, see “Manual
Recording” (page 20).
17GB
Tape
Loading a tape
1
2
Press A Z or Z B.
Playing a tape
You can use TYPE I (normal) tape.
1
2
Load a tape in deck A or B.
With the side
you want to
play/record
facing forward.
3
4
Load a tape.
Press FUNCTION (or TAPE on the
remote) repeatedly until “TAPE A” or
“TAPE B” appears in the display.
Press DIRECTION repeatedly to select
“g” to play one side, “j” to play
both sides or “RELAY” (Relay Play)* to
play both decks in succession.
Press H (or N on the remote).
The tape starts playing.
Press h (or N on the remote again) to
play the reverse side.
* Relay Play follow this cyclic sequence:
Deck A (front side) t Deck A (reverse side) t
Deck B (front side) t Deck B (reverse side)
Other operations
To
Do this
Stop playback
Press x.
Pause playback
Press X on the remote.
Press again to resume playback.
Fast-forward or
rewind
Press .m or M> (or
press m or M on the remote)
in stop mode.
Switch to TAPE
A or TAPE B
function from
another source
and start
playback
automatically.*
Press h or H (Automatic
source selection).
Remove the tape Press A Z or Z B in stop mode.
* Only when there is a tape in tape deck.
18GB
Searching for the beginning of a
track (AMS*)
During playback, press .m or M> (or
press –. or >+ on the remote) repeatedly
for the number of songs you want to skip forward
(or backward).
The search direction, + (forward) or
– (backward), and the number of songs being
skipped (1 to 9) appear in the display.
* AMS (Automatic Music Sensor)
Recording your favorite
tracks on a disc into a
tape
— CD Synchro Recording
You can record a whole disc into a tape.
You can use TYPE I (normal) tape. The
recording level is adjusted automatically.
1
2
Notes
• Do not press A Z or Z B while playing a tape,
otherwise the tape could be damaged.
• The AMS function may not operate correctly under
the following circumstances:
– When the unrecorded space between songs is less
than 4 seconds long.
– When the system is placed near a television.
Tips
• During “j” or Relay Play, the deck stops
automatically after repeating the sequence for five
times.
• If you press h or H while the system is turned off,
the system turns on automatically and “TAPE A” or
“TAPE B” is selected as a function. Then, the
playback starts if there is tape in the tape deck (One
Touch Play).
• If you press N on the remote during “TAPE A”
function and there is no tape in deck A, the system
automatically switches to “TAPE B” function when
there is a tape in deck B. Then, playback will start
and vice versa.
• If you press TAPE on the remote while the system is
turned off, the system turns on automatically and
“TAPE A” or “TAPE B” is selected as a function.
Load a recordable tape into deck B.
Press FUNCTION repeatedly until “CD”
appears in the display (or press CD on
the remote). Load a disc you want to
record.
When you want to record an album of MP3
audio tracks, press PLAY MODE
repeatedly until “ALBM” lights up in the
display and then press ALBUM +/– to
select the album you want.
3
Tape/Tape – Recording
Example: searching forward 2 songs
Tape – Recording
Press CD SYNC.
Deck B stands by for recording.
REC PAUSE/START indicator flashes.
If you want to record on the reverse side,
press h (TAPE B).
4
5
Press DIRECTION repeatedly to select
“g” to record on one side. Select
“j” (or “RELAY”) to record on both
sides.
Press REC PAUSE/START.
Recording starts.
To stop recording
Press x (TAPE B).
continued
19GB
Recording a disc by specifying
track order
— Program Edit
You can record tracks from all the discs in the
order you want. Between step 2 and step 3 of
“CD Synchro Recording” (page 19), perform
step 1 to 6 of “Creating your own program”
(page 15). When programming, make sure the
playing times for each side do not exceed the
length of one side of the tape.
Notes
• You cannot use Tape Select Edit for discs containing
over 20 tracks or MP3 audio tracks.
• You cannot listen to other sources while recording.
• Game Mixing does not function during CD Synchro
Recording.
Recording to a tape
manually
— Manual Recording
You can record just the portions you like from a
disc, tape or radio program on a tape. You can
also record from connected components.
1
2
3
Tip
To check the required tape length for recording a disc,
press EDIT after you have loaded a disc in CD
function. The required tape length for the currently
selected disc appears, followed by the total playing
time for side A and side B respectively (Tape Select
Edit).
4
Load a recordable tape into deck B.
Press FUNCTION or TUNER/BAND
repeatedly (or press CD or press TAPE
repeatedly on the remote) to select the
recording source you want to record.
Load the disc or tape or tune to the
station you want to record. To record
from connected component, connect
the external audio sources.
Press REC PAUSE/START.
Deck B stands by for recording.
REC PAUSE/START indicator flashes.
If you want to record on the reverse side,
press h (TAPE B).
5
6
Press DIRECTION repeatedly to select
“g” to record on one side. Select
“j” (or “RELAY”) to record on both
sides.
Press REC PAUSE/START, then start
playing the source (for disc or tape).
Recording starts.
To stop recording
Press x (TAPE B).
20GB
Note
You cannot listen to other sources while recording.
Tips
Adjusting the sound
You can reinforce the bass and create a more
powerful sound.
Press X-GROOVE.
Each time you press the button, the display
changes as follows:
X-GROOVE OFF
Y
X-GROOVE ON
Tip
The default setting is “X-GROOVE ON”.
Sound Adjustment
• When you record on both sides, be sure to start from
the front side. If you start from the reverse side,
recording stops at the end of the reverse side.
• For recording from the tape:
If you set the direction to “j” (or “RELAY”)
when the tapes you use have different lengths, the
tapes in each deck reverses independently.
• For recording from the radio:
If noise is heard while recording from the radio,
move the respective antenna to reduce the noise.
• For recording from a disc to a tape manually:
You can press . or > (or –. or >+ on
the remote) to select tracks during recording pause
mode (after step 4 and before step 6).
• For recording from an album of MP3 audio tracks
manually:
Press PLAY MODE repeatedly until “ALBM” lights
up in the display and then press ALBUM +/– to select
the album you want.
• You can mix the sound from the component
connected to the GAME INPUT jacks with another
function such as CD, tape, radio, VCR or turntable
connected to this system. To record the mixed sound
(page 26), press GAME MIXING after step 4 of
“Manual Recording” and then press REC PAUSE/
START to start recording.
Sound Adjustment
21GB
Selecting the preset
effect
Press one of the Preset Effect buttons to select
the preset effect you want.
The preset effect name appears in the display.
See the chart “Preset effect options.”
Preset effect options
“SURR” lights up in the display if you select an
effect with surround effects.
Effect
For
SALSA
REGGAE
POP
SAMBA
TANGO
ROCK
JAZZ
DANCE
standard music sources
MOVIE
soundtracks and special listening
situations
GAME
play station 1, 2 and other video
game music source
Adjusting the graphic
equalizer and storing the
personal file
You can adjust the sound by raising or lowering
the level of specific frequency band, then store
up to a personal file (P FILE) in the memory.
Before adjustment, select the preset effect you
want for your basic sound.
1
Frequency band
2
Frequency level
Press and hold down P FILE until “P
FILE MEMORY” appears in the display.
The setting is stored automatically in the
personal file. The previous setting stored at
this memory location is erased and replaced
by the new setting.
To cancel the effect
22GB
Press < or , repeatedly to select a
frequency band, then press M or m
repeatedly to adjust the level.
Press EFFECT ON/OFF repeatedly until
“EFFECT OFF” appears in the display.
To call up the personal file
Tip
Press P FILE.
You can also select the preset effect including the
personal file by pressing EQ on the remote repeatedly.
Tip
If you do not want to store a personal file, press
ENTER after step 1.
Selecting the surround
effect
Press SURROUND.
Each time you press the button, the display
changes as follows:
Selecting the MP3
Booster effect
You can improve the sound quality of MP3
audio tracks during playback.
1
SURROUND ON
The last selected MP3 booster setting
appears in the display.
Y
SURROUND OFF
Note
Press AMP MENU repeatedly to select
“MP3 BOOSTER”.
2
Press < or , repeatedly to select the
setting you want.
The display changes as follows:
BOOSTER OFF y BOOSTER ON
3
Press ENTER.
Note
You can only listen to MP3 Booster effect during
playback of MP3 audio tracks.
Sound Adjustment
When you select certain preset effect, the surround
effect may be canceled.
23GB
Creating a party
environment
(FST-ZX8/LBT-ZX8 only)
You can create a party environment by using
X-ROUND for “moving” sound effect or/and
FLASH for flashing effect.
To enjoy the X-ROUND mode, place your front
and surround speakers at an equal distance from
your listening position (see Example 2 of
“Positioning the speakers for FST-ZX8/
LBT-ZX8 only” on page 10).
To cancel the X-ROUND effect
Press X-ROUND ON/OFF repeatedly until
“X-ROUND OFF” appears in the display. The
X-ROUND indicator turns off.
Notes
• If you cannot get the sound effect you want, check
the speaker connections.
• When the headphones are connected to the PHONES
jack, X-ROUND mode is automatically changed to
“X-ROUND OFF” and you cannot change this
setting.
Flashing sound effect
— FLASH
Moving sound effect
— X-ROUND
1
2
Press X-ROUND ON/OFF repeatedly
until the X-ROUND indicator lights up.
Hold down FLASH during
playback
The last selected X-ROUND mode appears
in the display.
The flashing effect is activated.
Press MODE repeatedly to select the
X-ROUND mode you want.
Release FLASH.
The display changes cyclically as follows:
To change the flash speed
MANUAL WAVE t MANUAL FADER
t MANUAL BAL t AUTO WAVE t
AUTO FADER t AUTO BAL t
RANDOM POS t TWISTER
Hold down FLASH and turn the JOG clockwise
or counterclockwise to change the flash speed
(1 ~ 20).
Select
To output sound
MANUAL
WAVE1), AUTO
WAVE2)
In circular motion
• You can activate the X-ROUND and FLASH effect
simultaneously.
• The power illuminator will synchronize with the
selected FLASH effect.
MANUAL
From front speakers to
FADER1), AUTO surround speakers
FADER2)
MANUAL BAL1), From left speakers to right
AUTO BAL2)
speakers
RANDOM POS
In random position
TWISTER
In circular motion like
“twister”
1)
2)
24GB
With the flash function, you can flash the sound
output. The sound cuts off periodically.
You can manually change the sound movement
from one speaker to another speaker by turning
the JOG clockwise or anticlockwise.
You can change the speed of sound movement
by turning the JOG clockwise or anticlockwise.
To cancel the flashing effect
Tips
Listening to the sound in
another room
Enhancing the video game
sound
— Multi Room
— Game Sync
(FST-ZX8/LBT-ZX8 only)
You need to connect a video game player (see
“Hooking up optional components” on page 33).
You can place your front speakers in one room
and your surround speakers in another room.
Then, use the Multi Room function to select the
speakers you want to turn on.
Press X-ROUND ON/OFF repeatedly
until “X-ROUND OFF” appears in the
display.
The X-ROUND indicator turns off.
2
Press SPEAKERS.
Each time you press the button, the
corresponding speaker indicators light up
and the display changes cyclically as
follow:
SPEAKERS A t SPEAKERS B t
SPEAKERS A+B
To select
Display
The front
speakers
SPEAKERS A
The surround
speakers
SPEAKERS B
Both the front
and surround
speakers
SPEAKERS A+B
The “GAME” preset effect is selected
automatically.
Tips
• If you press GAME while the system is turned off,
the system turns on automatically and GAME is
selected as the function.
• This operation cannot be performed in the Power
Saving Mode (page 29).
• You can also press FUNCTION repeatedly to select
“GAME”.
Sound Adjustment
1
Press GAME.
Notes
• When X-ROUND mode is selected, the Multi Room
setting automatically changes to SPEAKERS A+B.
• When the headphones are connected to the PHONES
jack, the Multi Room setting is automatically
changed to “SPEAKERS A+B” and you cannot
change this setting.
25GB
Mixing video game sound
with other sound source
— Game Mixing
You can mix the sound from the component
connected to the GAME INPUT jacks with
another function such as CD, tape, radio, VCR
or turntable connected to this system.
1
2
Select the source sound you want.
Press GAME MIXING.
Each time you press the button, the level of
the game sound changes cyclically as
follows:
MIXING LOW t MIXING MID t
MIXING HIGH t MIXING OFF
You can sing along with any stereo CD or tape.
You need to connect an optional microphone.
1
2
3
4
Turn MIC LEVEL to MIN to turn down
the microphone volume.
Connect an optional microphone to
MIC 1 or MIC 2 jacks.
Start playing the music and adjust the
volume.
Adjust the microphone volume by
turning MIC LEVEL.
After you have finished
Turn MIC LEVEL to MIN and disconnect the
microphone from MIC 1 or MIC 2 jacks.
Notes
Note
• Game Mixing is canceled when you press REC
PAUSE/START.
• Game Mixing does not function during CD Synchro
Recording.
• During Game Mixing, when “TAPE A” or “TAPE
B” function is selected, you will not hear any sound
output from GAME INPUT if you use the AMS
function.
When “TAPE A” or “TAPE B” function is selected,
you will not hear any sound output from microphone if
you use the AMS function.
Tips
• To record the mixed sound, press GAME MIXING
after step 4 of “Manual Recording” on page 20 and
then press REC PAUSE/START to start recording.
• The GAME MIXING indicator lights up in the
display while Game Mixing is activated and it will
remain active while the power is on even if the
function is changed.
26GB
Singing along
Tips
• If acoustic feedback (howling) occurs, move the
microphone away from the speakers or change the
direction of the microphone.
• If you want to record your voice through the
microphone only, you can do so by selecting the
“CD” function and not playing any disc.
• When high level sound signals are input, the system
automatically adjust the recording level to prevent
distortion of the recorded sound signals (Auto Level
Control Function).
Waking up to music
Timer
Falling asleep to music
— Sleep Timer
You can set the system to turn off after a certain
time, so that you can fall asleep to music.
— Play Timer
You can wake up to music at a preset time
everyday. Make sure you have set the clock (see
“Setting the clock” on page 11).
1
Press SLEEP repeatedly.
AUTO* t 90 t 80 t 70 t … t 10 t
OFF
* The system automatically turns off in 100 minutes or
after the current disc or tape finishes playing.
To
2
Do this
Check the
Press SLEEP once.
remaining time**
Change the time Press SLEEP repeatedly to select
to turn off
the time you want.
Cancel the Sleep Press SLEEP repeatedly until
Timer
“SLEEP OFF” appears in the
display.
3
Turn VOLUME +/– (or press VOLUME +
or – on the remote) to adjust the
volume.
Press CLOCK/TIMER SET.
“PLAY SET?” flashes in the display.
4
Press ENTER.
“ON” appears and the hour indication
flashes in the display.
5
** You cannot check the remaining time if you select
“AUTO”.
Set the time to start playback.
Press M or m (or >+ or –. on the
remote) repeatedly to set the hour, then
press ENTER.
The minute indication flashes in the
display.
Press M or m (or >+ or –. on the
remote) repeatedly to set the minute, then
press ENTER.
Notes
• Do not set to “AUTO” during CD Synchro
Recording on a tape.
• The “SLEEP” lights up in the display when the Sleep
Timer is activated.
Tip
You can use the Sleep Timer, even if you have not set
the clock.
Timer
• Disc: Load a disc. To start from a specific
track, make a program (see “Creating
your own program” on page 15).
• Tape: Load a tape with the side you want
to play facing forward.
• Radio: Tune in the preset station you
want (see “Listening to the radio” on
page 17).
Each time you press the button, the minute
display (the turn-off time) changes cyclically as
follows:
Other operations
Prepare the music source you want to
play.
6
7
Set the time to stop playback following
the same procedure as step 5.
Press M or m (or >+ or –. on the
remote) repeatedly until the music
source you want appears in the
display.
The display changes as follows:
t TUNER y CD PLAY T
t TAPE PLAY T
continued
27GB
8
Press ENTER.
The type of timer, followed by start time,
stop time and the music source appears in
the display.
9
Press ?/1 to turn off the system.
Other operations
To
Do this
Check the setting
1 Press CLOCK/TIMER
SELECT.
2 Press M or m (or >+ or
–. on the remote)
repeatedly until “PLAY
SELECT?” flashes in the
display, then press ENTER.
Change the setting
Start from step 1.
Cancel the timer
1 Press CLOCK/TIMER
SELECT.
Timer recording radio
programs
You can record from a preset radio station at the
specified time.
To timer record, you must first preset the radio
station (see “Presetting radio stations” on
page 16) and set the clock (see “Setting the
clock” on page 11).
1
2
3
4
Set the time to start recording.
Press M or m (or >+ or –. on the
remote) repeatedly to set the hour, then
press ENTER.
The minute indication flashes in the
display.
Press M or m (or >+ or –. on the
remote) repeatedly to set the minute, then
press ENTER.
• You cannot select the Play Timer and Timer
Recording at the same time.
• If you use Play Timer and Sleep Timer at the same
time, the Sleep Timer has priority.
• The Play Timer will not be activated if the system is
on.
Tips
5
Set the time to stop recording following
the same procedure as step 4.
The type of timer, followed by start time,
stop time and the preset radio station to be
recorded (e.g., “TUNER FM 5”) appears in
the display.
6
28GB
Press M or m (or >+ or –. on the
remote) repeatedly to select “REC
SET?”, then press ENTER.
“ON” appears and the hour indication
flashes in the display.
Notes
• The system turns on 15 seconds before the preset
time.
• When the Play Timer is selected, “PLAY” lights up
in the display.
Press CLOCK/TIMER SET.
“PLAY SET?” flashes in the display.
2 Press M or m (or >+ or
–. on the remote)
repeatedly until “TIMER
OFF?” flashes in the display,
then press ENTER.
Tune in the preset radio station (see
“Listening to a preset station” on
page 17).
Load a recordable tape into deck B.
7
Press DIRECTION repeatedly to select
“g” to record on one side. Select
“j” (or “RELAY”) to record on both
sides.
If you want to record on the reverse side,
press h (TAPE B). Then, press x
(TAPE B).
When you record on both sides, be sure to
start from the front side. If you start from
the reverse side, recording stops at the end
of the reverse side.
8
Press ?/1 to turn off the system.
When the recording starts, the volume level
is set to minimum.
Other operations
To
Do this
Check the setting
1 Press CLOCK/TIMER
Change the setting
Start from step 1.
Cancel the timer
1 Press CLOCK/TIMER
SELECT.
2 Press M or m (or >+ or
–. on the remote)
repeatedly until “TIMER
OFF?” flashes in the display,
then press ENTER.
Notes
• You cannot select the Play Timer and Timer
Recording at the same time.
• If you use the Timer Recording and Sleep Timer at
the same time, the Sleep Timer has priority.
• The Timer Recording will not activated if the system
is on.
• Do not operate the system from the time the system
turns on until the recording starts (about 15 seconds
before preset time).
Tips
• The system turns on 15 seconds before the preset
time.
• When the Timer Recording is selected, the “REC”
lights up in the display.
Turning off the display
— Power Saving Mode
The demonstration display and the clock display
can be turned off to minimize the amount of
power consumed during standby mode (Power
Saving Mode).
Press DISPLAY repeatedly while the
system is turned off until the
demonstration display and the clock
display disappears.
To cancel Power Saving Mode
Press DISPLAY once to show the
demonstration display or twice to show the
clock display. Each time you press the button,
the display changes cyclically as follows:
Demonstration display1) t Clock display2) t
Power Saving Mode
1)
The display changes and the indicators flashes even
when the system is turned off.
2)
“--.--” appears in the display if you have not set the
clock.
Display
SELECT.
2 Press M or m (or >+ or
–. on the remote)
repeatedly until “REC
SELECT?” flashes in the
display, then press ENTER.
Display
Note
You cannot do the following operations in Power
Saving Mode.
– setting the clock (page 11)
– changing the AM tuning interval (page 17)
– turning on the system by pressing the following
buttons
(a) TUNER/BAND
(b) GAME
(c) h/H (TAPE A)
(d) h/H (TAPE B)
(e) NX (CD)
(f) CD on the remote
(g) TAPE on the remote
– changing “CD POWER” settings (page 17)
– switching the VIDEO/MD function (page 34)
Tips
• The timer continues to operate in Power Saving
Mode.
• The ?/1 indicator lights up even in Power Saving
Mode.
29GB
1)
Viewing information
about the disc in the
display
You can check the playing time and remaining
time of the current track or current disc. When a
CD-TEXT disc or a disc with MP3 audio tracks
is loaded, you can check the information stored
on the disc, such as the titles. When the system
detects CD-TEXT discs, “CD TEXT” lights up
in the display.
Checking the remaining time
Press DISPLAY repeatedly during
playback.
Each time you press the button, the display
changes cyclically as follows:
Playing time of the current track t Remaining
time of the current track1) t Remaining time of
the current disc2) t Title of the current track3)
t Title of the current album (for a few
seconds)4) t Clock display12) (for 8 seconds)
t Effect status (for 8 seconds)
Checking the total playing
time
Press DISPLAY repeatedly when playback
is stopped (except for Program Mode).
Each time you press the button, the display
changes cyclically as follows:
Total number of tracks5) or albums6) or the total
playing time7) t Title of current album5) or title
of current disc8) t Clock display12) (for 8
seconds) t Effect status (for 8 seconds)
Press DISPLAY repeatedly when playback
is stopped during Program Play and there
is a program.
Each time you press the button, the display
changes cyclically as follows:
The last track number of the program and the
total playing time9) t Total number of
programmed tracks (for 8 seconds)10) t Disc
title11) t Clock display12) (for 8 seconds) t
Effect status (for 8 seconds)
30GB
“--.--” appears while an MP3 audio track is played
back.
2) “--.--” appears in the following cases:
– while an MP3 audio track is played back.
– All play modes except “1 DISC” and “ALBM”.
3) Only for CD-TEXT disc and a disc with MP3 audio
tracks.
When the CD-TEXT disc contains more than 20
tracks, the current track title is not displayed from
track 21 onwards.
4)
Only for disc with MP3 audio tracks.
5)
For disc with MP3 audio tracks in “ALBM” and
“ALBM SHUF” modes.
6)
For disc with MP3 audio tracks in play modes other
than “ALBM” and “ALBM SHUF”.
7) For audio CDs.
8) For disc with MP3 audio tracks in play modes other
than “ALBM”, “ALBM SHUF” and CD-TEXT
discs.
9)
“--.--” appears in the following cases:
– When the audio CD contains 21 tracks or more,
and the track number which exceeds 20 is
selected.
– When the total program exceeds 100 minutes.
– When the program list contains MP3 audio
tracks.
10)
“NO STEP” appears if there is no program.
11)
Only for CD-TEXT disc and a disc with MP3 audio
tracks.
12)
“--.--” appears in the display if you have not set the
clock.
Note
Some characters may not be displayed for track title,
album title or disc title.
Changing the power
illuminator
You can select the power illuminator as you
want.
Press ILLUMINATION repeatedly to select
the power illuminator you want when the
system is turned on.
Changing the spectrum
analyzer display
1
Press AMP MENU repeatedly to select
“SPECTRUM”.
The last selected spectrum appears in the
display.
2
Each time you press the button, the power
illuminator changes cyclically as follows:
Press < or , repeatedly to select the
setting you want.
The display changes as follows:
PATTERN 1 t PATTERN 2 t PATTERN 3
t PATTERN 4 t PATTERN OFF
SPECTRUM 1T
When X-ROUND mode is selected
(FST-ZX8/LBT-ZX8 only)
SPECTRUM OFF
SPECTRUM 3
R
t SPECTRUM 4 T R
Y
t SPECTRUM 2
Y
When X-ROUND mode is selected
(FST-ZX8/LBT-ZX8 only)
X-PATTERN* y PATTERN OFF
* The power illuminator will synchronize with the
The display changes as follows:
selected X-ROUND effect.
Notes
• When you turn VOLUME +/– (or press
VOLUME +/– on the remote), power illuminator
shows the current volume level.
• During the demonstration display, you can turn on or
off power illuminator by pressing ILLUMINATION.
X-POSITION* y SPECTRUM OFF
* The spectrum analyzer display will synchronize with
Display
Each time you press the button, the power
illuminator changes cyclically as follows:
the selected X-ROUND effect.
3
Press ENTER.
31GB
Adjusting the brightness
of the display
1
Press AMP MENU repeatedly to select
“DIMMER”.
The last selected dimmer appears in the
display.
2
Press < or , repeatedly to select the
setting you want.
The display changes as follows:
t DIMMER 1 y DIMMER 2 T
t DIMMER 3* T
* DIMMER 3 is the darkest.
3
32GB
Press ENTER.
Optional Components
Hooking up optional components
To enhance your system, you can connect optional components. Refer to the operating instructions
provided with each component.
Turntable
VCR or MD Deck
VCR or MD Deck
To the audio input of
the connected
component
From the audio output
of the turntable
From the audio output of
the connected
component
D
G
R
L
E
F
B
From the
audio output
of the video
game player
C
To the digital
input of the
MD deck
From the video
output of the video
game player
Video game player
Optional Components
A
MD Deck
To the video
input of a TV
TV
A GAME INPUT VIDEO jack
B GAME INPUT AUDIO L/R jacks
Use video cable (not supplied) to connect the
video output of the optional video game player
to this jack. You can then output video through
this system.
Use audio cords (not supplied) to connect the
audio output of the optional video game player
to these jacks. You can then output audio
through this system.
Note
The video game player image may appear on the TV
screen even if the system is turned off.
continued
33GB
C CD DIGITAL OUT jack
Use a digital optical cable (square, not supplied)
to connect the digital input of the optional MD
deck to this jack. You can then record digital
audio from this system.
Note
There is no digital audio output from this jack during
playback of MP3 audio tracks.
Listening to audio from a
connected component
To
Do this
Listen to a
connected VCR
1 Connect the audio cords.
See “Hooking up optional
components” on page 33.
2 Press FUNCTION repeatedly
until “VIDEO” appears in the
display. Start playing the
connected VCR.
Listen to a
connected MD
deck
1 Connect the audio cords.
See “Hooking up optional
components” on page 33.
2 Press ?/1 to turn off the system.
3 Hold down FUNCTION and
press ?/1. Release ?/1 first,
then release FUNCTION. The
system turns on automatically
and switches the function from
VIDEO to MD. Start playing the
connected MD deck.
Listen to the
sound of a
connected video
game player
1 Press GAME.
2 Select the preset effect.
See “Selecting the preset effect”
on page 22.
Listen to a
connected
turntable
1 Connect the audio cords.
See “Hooking up optional
components” on page 33.
2 Press FUNCTION repeatedly
until “PHONO” appears in the
display. Start playing the
connected turntable.
D VIDEO/MD OUT L/R jacks
Use audio cords (not supplied) to connect the
audio input of the optional component (such as
VCR or an MD deck) to these jacks. You can
then output audio to that component from this
system.
Note
There is no audio output from this jack during VIDEO
or MD function when GAME MIXING is turned off.
E VIDEO/MD IN L/R jacks
Use audio cords (not supplied) to connect the
audio output of the optional component (such as
VCD or MD deck) to these jacks. You can then
output audio through this system.
F VIDEO OUT jack
Use a video cable (not supplied) to connect the
video input of TV to this jack.
G PHONO IN L/R jacks
Use audio cords (not supplied) to connect the
audio output of the turntable to these jacks. You
can then output audio through this system.
Notes
• If you want to switch back to “VIDEO” function,
repeat step 2 and 3 of “Listen to a connected MD
deck”.
• If the sound is distorted or too loud when “VIDEO”
function is selected, switch to “MD” function. (See
“Listen to a connected MD deck”).
• Use buttons on the system for the operation.
34GB
Recording on a connected
component
To
Do this
Make a digital
1 Connect the optional optical
recording from
cable from CD DIGITAL OUT
an audio CD onto jack to digital audio input of the
a connected MD
MD deck.
deck
See “Hooking up optional
components” on page 33.
2 Start recording.
Refer to the operating
instructions provided with the
connected MD deck.
Note
You cannot record from an MP3 audio track digitally.
When you record from an MP3 audio track to a
connected MD deck, make an analog recording on MD
deck.
Connect an external antenna to improve the
reception.
FM antenna
Connect an optional FM external antenna. You
can also use the TV antenna instead.
FM75 Ω
COAXIAL
AM
AM antenna
Connect a 6 to 15 meters insulated wire to the
AM antenna terminal. Leave the supplied AM
loop antenna connected.
AM
FM75 Ω
COAXIAL
Insulated wire
(not supplied)
Optional Components
Make an analog 1 Connect the optional audio
cords from VIDEO/MD OUT
recording from
disc, tape, radio,
L/R jacks to the analog audio
input of the MD deck.
connected
turntable or video See “Hooking up optional
game player onto components” on page 33.
a connected MD 2 Start recording.
deck
Refer to the operating
instructions provided with
connected component.
Connecting external
antennas
35GB
Troubleshooting
Problems and remedies
Should you encounter a problem with your
system, do the following:
1 Make sure the power cord and speaker
cords are correctly and firmly connected.
2 Find your problem in the troubleshooting
checklist below and take the indicated
corrective action.
If the problem persists after doing all of the
above, consult your nearest Sony dealer.
When the ?/1 indicator flashes
Immediately unplug the power cord and check
the following items.
• Is the voltage selector set to the correct
voltage? Check the voltage for your region,
then make sure the voltage selector is set
correctly.
• Are the + and – speaker cords short-circuited?
• Are you using only the prescribed speakers?
• Is anything blocking the ventilation holes on
the rear of the system?
After checking the above items and fixing any
problems, connect the power cord again and turn
on the system. If the ?/1 indicator still flashes,
or if the cause of the problem cannot be found
even after checking all the above items, consult
your nearest Sony dealer.
General
The display starts flashing as soon as you
plug in the power cord even though you have
not turned on the power.
• The demonstration mode started. Press ?/1 (see
step 5 of “Hooking up the system” on page 8).
The clock/timer setting is canceled.
• The power cord is disconnected or a power failure
occurs. Redo “Setting the clock” (page 11). If you
have set the timer, redo “Waking up to music”
(page 27) and “Timer recording radio programs”
(page 28).
The radio presetting is canceled.
• The power cord is disconnected or a power failure
occurs for longer than half a day. Redo “Presetting
radio stations” (page 16).
36GB
There is no sound.
• Turn VOLUME +/– clockwise or press
VOLUME + on the remote.
• The headphones are connected to the PHONES
jack.
• There is no audio output during Timer Recording.
• The tape is in AMS operation during “TAPE A” or
“TAPE B” function.
• Check the Multi Room setting (see “Listening to
the sound in another room” on page 25).
“--:--” appears in the display.
• A power failure has occurred. Set the clock
(page 11) and timer settings (pages 27 – 29) again.
There is no microphone sound.
• Turn VOLUME +/– (or press VOLUME + or – on
the remote) or MIC LEVEL to adjust the
microphone volume.
• Make sure the microphone is connected to the
MIC 1 or MIC 2 jack correctly.
• The tape is in AMS operation during “TAPE A” or
“TAPE B” function.
Sound comes from one channel, or
unbalanced left and right volume.
• Place the speakers as symmetrically as possible.
• Check that the speakers are connected securely
and correctly.
• Turn off the X-ROUND effect (page 24).
Sound lacks bass.
• Check that the speaker’s + and – terminals are
connected correctly.
There is severe hum or noise.
• A TV or VCR is placed too close to the system.
Move the system away from the TV or VCR.
• Move the system away from the source of noise.
• Connect the system to a different wall outlet.
• Install a noise filter (commercially available) to
the power cord.
The sound from the component connected to
the VIDEO/MD IN L/R jacks is distorted.
• If “VIDEO” appears in the display when you press
FUNCTION repeatedly, switch to “MD” function
(see “Listening to audio from a connected
component” on page 34).
The timer cannot be set.
• Set the clock again (page 11).
The timer does not function.
• Check the timer setting (page 27 – 29) and set the
clock correctly (page 11).
• Cancel the Sleep Timer (page 27).
• You cannot activate the Play Timer and Timer
Recording simultaneously.
The remote does not function.
• Remove the obstacle between the remote and the
system.
• Move the remote closer to the system.
• Point the remote at the system’s sensor.
• Replace the batteries (R6/size AA).
• Locate the system away from the fluorescent light.
There is acoustic feedback.
• Decrease the volume level.
• Move the microphone away from the speakers or
change the direction of the microphone.
The color irregularity on a TV screen persists.
• Turn off the TV set once, then turn it on after 15
to 30 minutes. If the color irregularity still
persists, place the speakers farther away from the
TV set.
The disc tray does not open and “LOCKED”
appears on the display.
• Contact your Sony dealer or local authorized Sony
service facility.
The disc tray does not close.
• Place the disc correctly.
• Always close the tray by pressing Z OPEN/
CLOSE on the system. Trying to close the tray
with your fingers may cause problems with the
system.
The disc does not eject.
• You cannot eject the disc during CD Synchro
Recording. Press x (TAPE B) to cancel the CD
Synchro Recording, then press Z OPEN/CLOSE
on the system to eject the disc.
• Consult your nearest Sony dealer.
Disc access takes a long time.
• Set “CD POWER ON” by CD power manage
function (page 17).
The sound skips.
• Wipe the disc clean (page 40).
• Replace the disc.
• Try moving the system to a place without
vibration (e.g., on top of a stable stand).
• Try moving the speakers away from the system, or
placing them on separate stands. When you listen
to a track with bass sounds at high volume, the
speaker vibration may cause the sound to skip.
Playback does not start from the first track.
• The system is in Program Play or Shuffle Play
mode. Press PLAY MODE repeatedly until “ALL
DISCS”, “1 DISC” or “ALBM” lights up in the
display.
MP3 audio track cannot be played back.
• Recording was not performed according to the
ISO 9660 level 1, level 2, or Joliet in the
expansion format.
• The MP3 audio track does not have the extension
“.MP3”.
• The data is not stored in MP3 format even though
it has extension “.MP3”.
• The discs containing tracks other than MPEG 1, 2
and 2.5 Audio Layer 3 files cannot be played back.
• The system can play to a depth of 8 directories.
Troubleshooting
CD/MP3 player
Playback does not start.
• Open the disc tray and check whether a disc is
loaded.
• Wipe the disc clean (page 40).
• Replace the disc.
• Place the disc that this system can play.
• Place the disc correctly.
• Place the disc in the tray with the label side up.
• Remove the disc and wipe away the moisture on
the disc, then leave the system turned on for a few
hours until the moisture evaporates.
• Press NX (or N on the remote) to start
playback.
MP3 audio tracks take a longer time to
playback than others.
• After the system reads all tracks on the disc,
playback may take more time than usual if
– the number of albums or tracks on the disc is
very large.
– the album and track organization structure is
very complex.
continued
37GB
The disc title, album title, track title, ID3 tag
and the CD-TEXT characters do not appear
properly.
• Use a disc that conforms with ISO 9660 level 1,
level 2, or Joliet in the expansion format.
• The ID3 tag is not version 1 or version 2.
• The character code that can be displayed by this
system are as follows.
– Upper cases (A to Z)
– Lower cases (a to z)
– Number (0 to 9)
– Symbols (< > *, – / [ ] \ _)
Other characters may not be displayed correctly.
There is excessive wow or flutter, or the sound
drops out.
• The capstans or pinch rollers are dirty. (See
“Cleaning the tape heads” on page 41).
Tuner
If the system still does not
operate properly after performing
the above measures or other
troubles does not described
above occur, reset the system as
follows:
There is severe hum or noise (“TUNED” or
“ST” flashes up in the display).
• Set the proper band and frequency (page 16).
• Connect the antenna properly (page 9).
• Find a place and an orientation that provide good
reception, then set up the antenna again. If you
cannot obtain good reception, we recommend you
connect a commercially available external
antenna.
• The supplied FM lead antenna receives signals
along its entire length, so make sure you extend it
fully.
• Locate the antennas as far away from the speaker
cords as possible.
• Try turning off surrounding electrical equipment.
• Set “CD POWER OFF” by CD power manage
function (page 17).
A stereo FM program cannot be received in
stereo.
• Press FM MODE until “MONO” disappears.
Tape deck
The tape does not record or play, or there is a
decrease in sound level.
• The tape heads are dirty. (See “Cleaning the tape
heads” on page 41).
• The record/playback heads are magnetised. (See
“Demagnetising the tape heads” on page 41).
The tape does not erase completely.
• The record/playback heads are magnetised. (See
“Demagnetising the tape heads” on page 41).
38GB
Noise increases or the high frequencies are
erased.
• The record/playback heads are magnetised. (See
“Demagnetising the tape heads” on page 41).
The tape does not record.
• The tab has been removed from the tape. Cover
the broken tab with adhesive tape (page 41).
• The tape has reeled to the end.
Use buttons on the system for the operation.
1
2
3
4
Unplug the power cord.
Plug the power cord back in.
Press ?/1 to turn on the system.
Press x (TAPE B), TUNER ENTER and
?/1 at the same time.
The system is reset to the factory settings. You
should set the settings you made, such as the
preset stations, clock, and timer.
Messages
One of the following messages may appear or
flash in the display during operation.
CD/MP3
No Disc
There is no disc on the disc tray.
Cannot Edit
• You pressed EDIT before the information of a
disc is read.
• The selected disc is a disc with MP3 audio tracks.
• The selected audio CD contains more than 20
tracks.
NO STEP
You have cleared all the steps you programed.
OVER
You have reached the end of the disc while pressing
M during playback or pause.
Push STOP!
You have pressed PLAY MODE during playback.
Reading
The system is reading information of the disc. Some
buttons are not available.
No Tab
You cannot record the tape because the tab has been
removed from the tape.
No Tape
There is no tape in the tape deck.
Timer
OFF TIME NG!
The on time and off time of Play Timer or Timer
Recording is same.
SET CLOCK!
You pressed CLOCK/TIMER SELECT before the
clock is set.
SET TIMER!
You pressed CLOCK/TIMER SELECT before Play
Timer or Timer Recording is set.
PUSH SELECT!
You tried to set the clock or timer during timer
operation.
Sound Adjustment
Not in Use
You pressed X-ROUND ON/OFF or SPEAKERS
when the headphones are connected to the PHONES
jack.
Troubleshooting
Step Full!
You tried to program more than 25 steps.
Tape
39GB
On operation
Additional Information
Precautions
On operating voltage
Before operating the system, check that the operating
voltage of your system is identical with the voltage of
your local power supply.
On safety
• The system is not disconnected from the AC power
source (mains) as long as it is connected to the wall
outlet, even if the system itself has been turned off.
• Unplug the system from the wall outlet (mains) if it
is not to be used for an extended period of time. To
disconnect the power cord (mains lead), pull it out by
the plug. Never pull the cord itself.
• Should any solid object or liquid fall into the system,
unplug the system and have it checked by qualified
personnel before operating it any further.
• For customers in United States
One blade of the plug is wider than other for the
purpose of safety and will fit to the wall outlet only
one way. If you are unable to insert the plug fully into
the outlet, contact your dealer.
• AC power cord must be changed only at the qualified
service shop.
On placement
• Do not place the system in an inclined position.
• Do not place the system in locations where it is:
– Extremely hot or cold
– Dusty or dirty
– Very humid
– Subject to vibrations
– Subject to direct sunlight.
• Use caution when placing the system or speakers on
surfaces that have been specially treated (with wax,
oil, polish, etc.) as staining or discoloration of the
surface may result.
On heat buildup
• Although the system heats up during operation, this
is not a malfunction.
• Place the system in a location with adequate
ventilation to prevent heat buildup in the system.
• If you continuously use this system at a high volume,
the cabinet temperature of the top, side and bottom
rises considerably. To avoid burning yourself, do not
touch the cabinet.
• To prevent a malfunction, do not cover the
ventilation hole for the cooling fan.
40GB
• If the system is brought directly from a cold to a
warm location, or is placed in a very damp room,
moisture may condense on the lens inside the system.
Should this occur, the system will not operate
properly. Remove the disc and leave the system
turned on for about an hour until the moisture
evaporates.
• When you move the system, take out any disc.
If you have any question or problem concerning your
system, please consult your nearest Sony dealer.
Notes on discs
• Before playing, clean the disc with a cleaning cloth.
Wipe the disc from the center out.
• Do not use solvents such as benzene, thinner,
commercially available cleaners or anti-static spray
intended for vinyl LPs.
• Do not expose the disc to direct sunlight or heat
sources such as hot air ducts, nor leave it in a car
parked in direct sunlight.
• Do not use discs encircled with a protection ring.
This may cause a malfunction to the system.
• When using discs that have glue or similar tacky
substance on the label side of the disc or that used a
special ink when the label was printed, there is a
chance that the disc or label may become attached to
parts inside this system. When this occurs, it may not
be possible to remove the disc, and may also cause
this system to malfunction. Be sure to check that the
label side of the disc is not sticky before using.
The following types of disc should not be used:
– Rental or used discs with attached seals where the
glue extends beyond the seal. The perimeter of the
seal on the disc is tacky.
– Discs that have labels printed using a special ink
that feels tacky when touched.
• Discs with non-standard shapes (e.g., heart, square,
star) cannot be played on this system. Attempting to
do so may damage the system. Do not use such discs.
Cleaning the cabinet
Clean the cabinet, panel and controls with a soft cloth
slightly moistened with mild detergent solution. Do not
use any type of abrasive pad, scouring powder or
solvent such as thinner, benzene or alcohol.
To save a tape permanently
To prevent a tape from being accidentally recorded
over, break off the tape tab from side A or B as
illustrated.
Break off the
cassette tab
If you later want to reuse the tape for recording, cover
the broken tab with adhesive tape.
Specifications
AUDIO POWER SPECIFICATION
(LBT-ZX8 USA model only)
POWER OUTPUT AND TOTAL HARMONIC
DISTORTION:
With 6-ohm loads, both channels driven, from
120 Hz – 10 kHz; rates 140 watts per channel
minimum RMS power, with no more than 10% total
harmonic distortion from 250 miliwatts to rated
output.
Continuous RMS power output (reference):
180×2 + 180×2 watts
(6 ohms at 1 kHz, 10%
THD)
Before placing a tape in the tape deck
(LBT-ZX6 USA model only)
Take up any slack in the tape deck. Otherwise, the tape
may get entangled in the parts of the tape deck and
become damaged.
POWER OUTPUT AND TOTAL HARMONIC
DISTORTION:
When using a tape longer than
90 minutes
Cleaning the tape heads
Clean the tape heads after every 10 hours of use. Be
sure to clean the tape heads before you start an
important recording or after playing an old tape. Use a
separately sold dry-type or wet-type cleaning cassette.
For details, refer to the instructions of the cleaning
tape.
Demagnetising the tape heads
Demagnetise the tape heads and the metal parts that
have contact with the tape after every 20 to 30 hours of
use with a separately sold demagnetising tape. For
details, refer to the instructions of the demagnetising
tape.
Amplifier section
FST-ZX8
Mexican models:
The following measured at AC 127 V, 60 Hz
DIN power output (rated): 140×2 + 140×2 watts
(6 ohms at 1 kHz, DIN)
Continuous RMS power output (reference):
180×2 + 180×2 watts
(6 ohms at 1 kHz, 10%
THD)
Other models:
Additional Information
The tape is very elastic. Do not change the tape
operations such as playback, stop, and fast-winding
frequently. The tape may get entangled in the tape
deck.
With 4-ohm loads, both channels driven, from
120 Hz – 10 kHz; rates 270 watts per channel
minimum RMS power, with no more than 10% total
harmonic distortion from 250 miliwatts to rated
output.
The following measured at AC 120, 220, 240 V,
50/60 Hz
DIN power output (rated): 140×2 + 140×2 watts
(6 ohms at 1 kHz, DIN)
Continuous RMS power output (reference):
180×2 + 180×2 watts
(6 ohms at 1 kHz, 10%
THD)
continued
41GB
FST-ZX6
Mexican models:
The following measured at AC 127 V, 60 Hz
DIN power output (rated): 220 + 220 watts (4 ohms at
1 kHz, DIN)
Continuous RMS power output (reference):
280 + 280 watts (4 ohms at
1 kHz, 10% THD)
Other models:
The following measured at AC 120, 220, 240 V,
50/60 Hz
DIN power output (rated): 220 + 220 watts (4 ohms at
1 kHz, DIN)
Continuous RMS power output (reference):
280 + 280 watts (4 ohms at
1 kHz, 10% THD)
Inputs
PHONO IN (phono jacks):
sensitivity 3 mV,
impedance 47 kOhms
MIC (phone jack):
sensitivity 1 mV,
impedance 10 kOhms
GAME INPUT AUDIO L/R (phono jacks):
sensitivity 250 mV,
impedance 47 kOhms
GAME INPUT VIDEO (phono jack):
1 Vp-p, 75 ohms
VIDEO/MD IN L/R (phono jacks):
sensitivity 250 mV/
450 mV, impedance
47 kOhms
Outputs
PHONES (stereo phone jack):
accepts headphones of
8 ohms or more
VIDEO/MD OUT L/R (phono jacks):
voltage 250 mV,
impedance 1 kOhm
VIDEO OUT (phono jack):
max. output level 1 Vp-p,
load impedance 75 ohms
FRONT SPEAKER:
FST-ZX8/LBT-ZX8:
FRONT L/R
Use only the supplied
speaker SS-ZX8
SURROUND L/R
Use only the supplied
speaker SS-ZX8
FST-ZX6/LBT-ZX6:
FRONT L/R
Use only the supplied
speaker SS-ZX6
42GB
CD/MP3 player section
System
Compact disc and digital
audio system
Laser
Semiconductor laser
(λ=780 nm)
Emission duration:
continuous
Laser Output
Max. 44.6 µW*
*This output is the value
measured at a distance of
200 mm from the objective
lens surface on the Optical
Pick-up Block with 7 mm
aperture.
Frequency response
2 Hz – 20 kHz (±0.5 dB)
Wave length
780 – 790 nm
Signal-to-noise ratio
More than 90 dB
Dynamic range
More than 90 dB
OPTICAL CD DIGITAL OUT
(Square optical connector jack, rear panel)
Wave length
660 nm
Output level
–18 dBm
Tape deck section
Recording system
Frequency response
Wow and flutter
4-track 2-channel, stereo
50 – 13,000 Hz (±3 dB),
using Sony TYPE I tapes
±0.15% W. Peak (IEC)
0.1% W. RMS (NAB)
±0.2% W. Peak (DIN)
Tuner section
FM stereo, FM/AM superheterodyne tuner
FM tuner section
Tuning range
Antenna
Antenna terminals
Intermediate frequency
AM tuner section
Tuning range
Antenna
Antenna terminals
Intermediate frequency
87.5 – 108.0 MHz
FM lead antenna
75 ohms unbalanced
10.7 MHz
530 – 1,710 kHz
(with the tuning interval
set at 10 kHz)
531 – 1,710 kHz
(with the tuning interval
set at 9 kHz)
AM loop antenna
External antenna terminal
450 kHz
Speaker
General
Speaker SS-ZX8 for FST-ZX8/LBT-ZX8
Speaker system
Speaker units
Woofer:
Tweeter:
Rated impedance
Dimensions (w/h/d)
Mass
2-way, bass-reflex type
22 cm, cone type
6.5 cm, cone type
6 ohms
Approx. 290 × 353 ×
482 mm
Approx. 9.5 kg net per
speaker
Speaker SS-ZX6 for FST-ZX6/LBT-ZX6
Speaker system
Speaker units
Super Woofer/Woofer:
Tweeter:
Rated impedance
Dimensions (w/h/d)
Mass
3-way BUILT IN SW,
bass-reflex type
17 cm/17 cm, cone type
2.5 cm, horn type
4 ohms
Approx. 250 × 530 ×
362 mm
Approx. 8.5 kg net per
speaker
Power requirements
North American models:
Mexican models:
Other models:
120 V AC, 60Hz
127 V, 60 Hz
120 V, 220 V or
230 – 240 V AC, 50/60 Hz
Adjustable with voltage
selector
Power consumption
FST-ZX8/LBT-ZX8:
330 watts
FST-ZX6/LBT-ZX6:
240 watts
Dimensions (w/h/d) (Main Unit)
Approx. 362 × 437 ×
465 mm
Mass (Main Unit)
FST-ZX8/LBT-ZX8:
FST-ZX6/LBT-ZX6:
Supplied accessories:
Approx. 19.0 kg
Approx. 18.0 kg
Design and specifications are subject to change
without notice.
Additional Information
AM loop antenna (1)
FM lead antenna (1)
Remote Commander (1)
Batteries (2)
Speaker cords:
• FST-ZX6/LBT-ZX6
only 2m (2)
• FST-ZX8/LBT-ZX8
only
– grey (10 m) (2)
– white (3 m) (2)
Speaker pads:
• FST-ZX6/LBT-ZX6
only (8)
• FST-ZX8/LBT-ZX8
only (16)
43GB
List of button locations and reference pages
How to use pages 44 to 46
Use this page to find the location of buttons and other
parts of the system that are mentioned in the text.
Illustration number
r
PLAY MODE r; (13, 15, 37, 39)
R
Name of button/part
R
Reference page
Main unit
ALPHABETICAL ORDER
SYMBOLS
A–D
I–Q
ALBUM +/– rh (13)
AMP MENU qg (31)
CD SYNC ql (19)
CLOCK/TIMER SELECT 2
(28, 29)
CLOCK/TIMER SET 5 (11, 27,
28)
Deck A e; (18)
Deck B wg (18, 19, 28)
DIRECTION ef (18, 19)
DISC 1 ~ 5 rd (13, 15)
DISC SKIP t; (12, 13, 15)
Disc tray ea (12, 39)
DISPLAY 3 (29, 30)
Display 6
ILLUMINATION el (31)
IR (receptor) ek
JOG* rg (24)
MEMORY 9 (16)
MIC 1/MIC 2 jacks es (26, 36)
MIC LEVEL ed (26, 36)
MODE* rj (24)
P FILE eg (22)
PHONES jack wd (36)
PLAY MODE r; (13, 15, 37, 39)
Power illuminator wk (31)
Preset Effect buttons 7 (22)
SALSA/REGGAE/POP/
SAMBA/TANGO/ROCK/
JAZZ/DANCE/MOVIE/
GAME
E–H
EDIT ta (20)
EFFECT ON/OFF qj (22)
ENTER qh (11, 27, 28, 29, 31,
32)
EX-CHANGE rl (13)
FLASH* rs (24)
FM MODE 8 (17, 38)
FUNCTION qs (12, 15, 17, 20,
34)
GAME wa (25, 29, 34)
GAME INPUT AUDIO L/R jacks
ws (26, 33)
GAME INPUT VIDEO jack ws
(33)
GAME MIXING w; (21, 26)
44GB
R–Z
REC PAUSE/START wf (19, 20,
21)
REPEAT ra (10, 14)
SLEEP 4 (27)
SPEAKERS* rj (25)
SURROUND ej (23)
TUNER ENTER qd (16, 17, 38)
TUNER/BAND q; (16, 17, 20,
29)
TUNING +/– qa (16, 17)
TUNING MODE qf (16, 17)
VOLUME +/– wj (27, 31, 36)
X-GROOVE eh (21)
X-ROUND ON/OFF* rf (24)
?/1 (power) 1 (9, 11, 17, 28, 29,
34, 36, 38)
A Z wl (18, 19)
Z B wh (18, 19)
M/m/</, qh (11, 27, 28, 29,
32)
CD Function:
Z OPEN/CLOSE rk (12, 13)
NX (play/pause) rh (13, 15, 37)
x (stop) rh (13, 17)
m/M (rewind/fast forward)
rh (13, 39)
./> (go backward/go
forward) rh (13, 15, 21)
TAPE A function:
h/H (play) ef (18, 19, 29)
x (stop) ef (18)
.m/M> ef (18, 19)
TAPE B function:
h/H (play) qk (18, 19, 29)
x (stop) qk (18, 19, 38)
.m/M> qk (18, 19)
* FST-ZX8/LBT-ZX8 only.
1
el
ek
23 456 7
89 q; qz qs
"/1
qd
qf
R
ej
eg
eh
qh
ef
qk
ql
w;
qg
qj
wa
ed
ws
es
wd
e; wl wk wj
r; ra
rs*
rd
Additional Information
ea
wh wg wf
rf*rg*
rh
PLAY
MODE
HS
ta
t;rl
s
rk rj*
* FST-ZX8/LBT-ZX8 only.
continued
45GB
Remote control
SYMBOLS
ALPHABETICAL ORDER
A–E
F–Z
ALBUM + qf (13)
ALBUM – qh (13)
CD wf
CLEAR qk (15)
CLOCK/TIMER SELECT 2
(28, 29)
CLOCK/TIMER SET 4 (11, 27,
28)
DISC SKIP qd (12, 13, 15)
DISPLAY wh (29, 30)
ENTER qs (11, 27, 28, 29, 31,
32)
EQ qj
FM MODE 6 (17, 38)
FUNCTION 8 (12, 15, 17, 20,
34)
PLAY MODE 5 (13, 15, 37, 39)
REPEAT 6 (14)
SLEEP 1 (27)
TAPE wd
TUNER/BAND 7 (16, 17, 20,
29)
TUNER MEMORY wg (16)
TUNING MODE 5 (16, 17)
VOLUME +/– qg (27, 31, 36)
1
2
?/1 (power) 3(9, 11, 28)
x (stop) qa (13, 18)
X (pause) ql
N (play) w; (18, 19)
–. (go backward) ws (11, 13,
15, 16, 17, 19, 21, 27, 28, 29)
>+ (go forward) wa (11, 13,
15, 16, 17, 19, 21, 27, 28, 29)
m (rewind) q; (13, 18)
M (fast forward) 9 (13, 18)
3
wh
4
wg
6
wd
8
ws
9
w;
qa
qk
qs
qj
qd
qh
qf
5
7
wf
wa
q;
ql
qg
46GB
Additional Information
47GB
Sony Corporation Printed in Malaysia