1
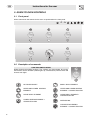
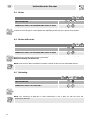
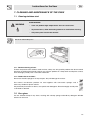
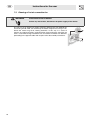
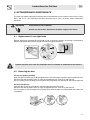
Table of Contents
1. IMPORTANT SAFETY INSTRUCTIONS ................................................................................. 4
2. INSTALLATION ....................................................................................................................... 7
3. GUIDE TO OVEN CONTROLS ............................................................................................... 8
3.1 Front panel ...................................................................................................................................................... 8
3.2 Description of commands ................................................................................................................................ 8
4. USE OF THE OVEN .............................................................................................................. 11
4.1 General advice .............................................................................................................................................. 11
4.2 Switching on the oven ................................................................................................................................... 11
4.3 Inside light bulbs ........................................................................................................................................... 11
4.4 Cooling ventilation ......................................................................................................................................... 11
5. AVAILABLE ACCESSORIES ................................................................................................ 12
5.1 Optional accessories ..................................................................................................................................... 12
6. COOKING HINTS .................................................................................................................. 13
6.1 Traditional cooking ........................................................................................................................................ 13
6.2 Hot-air cooking .............................................................................................................................................. 13
6.3 Broiler ............................................................................................................................................................ 14
6.4 Broiler with hot air ......................................................................................................................................... 14
6.5 Defrosting ...................................................................................................................................................... 14
7. CLEANING AND MAINTENANCE OF THE OVEN ............................................................... 15
7.1 Cleaning stainless steel ................................................................................................................................ 15
7.2 Door glass ..................................................................................................................................................... 15
7.3 Cleaning of hot air convection fan ................................................................................................................. 16
8. EXTRAORDINARY MAINTENANCE ..................................................................................... 17
8.1 Replacement of oven light bulbs ................................................................................................................... 17
8.2 Removing the door ........................................................................................................................................ 17
NOTE: THIS APPLIANCE MUST BE INSTALLED SOLELY AND EXCLUSIVELY BY A QUALIFIED
TECHNICIAN. ANY TECHNICAL PROCEDURES MUST BE CARRIED OUT BY AN AUTHORIZED
TECHNICIAN.
INSTRUCTIONS FOR THE USER: these instructions contain user advices, a description of the
controlsand the correct procedures for cleaning and maintenance of the appliance.
3
IMPORTANT SAFETY INSTRUCTION
1.IMPORTANT SAFETY INSTRUCTIONS
READ AND SAVE THESE INSTRUCTIONS – Your Safety And the Safety of Others Are Very Important.
We have provided many important safety messages throughout this manual and on your appliance.
Read all instructions before using your appliance and always obey all safety messages.
RECOGNIZE SAFETY INFORMATION
This is a safety alert symbol. This symbol alerts you to potential hazards that can kill or hurt you and
others.
UNDERSTAND SIGNAL WORDS
A signal word – DANGER, WARNING, or CAUTION – is used with the safety-alert symbol. DANGER
identifies the most serious hazards. It means you can be killed or seriously injured if you do not
immediately follow instructions. WARNING means you can be killed or seriously injured if you do not
follow instructions. CAUTION indicates a potentially hazardous situation which, if not avoided, may
result in minor or moderate injury.
WARNING
-
This appliance is intended for household use only.
-
Only use the appliance for its intended purpose. The manufacturer cannot be
held responsible for damages caused by improper use of this oven.
-
This appliance complies with current safety requirements. Improper use of the
appliance can lead to personal injury and material damage.
4
-
Read all instructions before installing or using the oven for the first time.
-
Keep these operating instructions in a safe place and pass them on to any
further user.
IMPORTANT SAFETY INSTRUCTION
WARNING
BURN HAZARD
Oven can produce high tempeatures that can cause burns.
To reduce the risk of fire, electrical shock, injury to persons, or damage when using
the oven, follow basic precautions, including the following.
1 READ ALL INSTRUCTIONS.
2 PROPER INSTALLATION – BE SURE YOUR APPLIANCE IS PROPERLY INSTALLED AND
GROUNDED BY A QUALIFIED TECHNICIAN.
3 NEVER USE YOUR APPLIANCE FOR WARMING OR HEATING THE ROOM.
4 DO NOT LEAVE CHILDREN ALONE - CHILDREN SHOULD NOT BE LEFT ALONE OR
UNATTENDED IN AREA WHERE APPLIANCE IS IN USE. THEY SHOULD NEVER BE ALLOWED
TO SIT OR STAND ON ANY PART OF THE APPLIANCE.
5 WEAR PROPER APPAREL – LOOSE-FITTING OR HANGING GARMENTS SHOULD NEVER BE
WORN WHILE USING THE APPLIANCE.
6 USER SERVICING – DO NOT REPAIR OR REPLACE ANY PART OF THE APPLIANCE UNLESS
SPECIFICALLY RECOMMENDED IN THE MANUAL. ALL OTHER SERVICING SHOULD BE
REFERRED TO A QUALIFIED TECHNICIAN.
7 STORAGE IN OR ON APPLIANCE – FLAMMABLE MATERIALS SHOULD NOT BE STORED IN AN
OVEN OR NEAR SURFACE UNITS.
8 DO NOT USE WATER ON GREASE FIRES – SMOTHER FIRE OR FLAME OR USE DRY
CHEMICAL OR FOAM-TYPE EXTINGUISHER.
9 USE ONLY DRY POTHOLDERS – MOIST OR DAMP POTHOLDERS ON HOT SURFACES MAY
RESULT IN BURNS FROM STEAM. DO NOT LET POTHOLDER TOUCH HOT HEATING
ELEMENTS. DO NOT USE A TOWEL OR OTHER BULKY CLOTH.
10 USE CARE WHEN OPENING DOOR – LET HOT AIR OR STEAM ESCAPE BEFORE REMOVING
OR REPLACING FOOD.
11 DO NOT TOUCH HEATING ELEMENTS OR INTERIOR SURFACES OF OVEN – HEATING
ELEMENTS MAY BE HOT EVEN THOUGH THEY ARE DARK IN COLOR. INTERIOR SURFACE
OF AN OVEN BECOME HOT ENOUGH TO CAUSE BURNS. DURING AND AFTER USE, DO NOT
TOUCH, OR LET CLOTHING OR OTHER FLAMMABLE MATERIALS CONTACT HEATING
ELEMENTS OR INTERIOR SURFACES OF OVEN UNTIL THEY HAVE HAD SUFFICIENT TIME TO
COOL. OTHER SURFACES OF THE APPLIANCE MAY BECOME HOT ENOUGH TO CAUSE
BURNS ; AMONG THESE SURFACES ARE THE OVEN DOOR AND WINDOW OF OVEN DOOR,
COULD ALSO BECOME HOT ENOUGH TO CAUSE BURNS.
12 DO NOT HEAT UNOPENED FOOD CONTAINERS – BUILD-UP OF PRESSURE MAY CAUSE
CONTAINERS TO BURST AND RESULT IN INJURY.
5
IMPORTANT SAFETY INSTRUCTION
13 PLACEMENT OF OVEN RACKS – ALWAYS PLACE OVEN RACKS IN DESIRED LOCATION
WHILE OVEN IS COOL. IF RACK MUST BE MOVED WHILE OVEN IS HOT, DO NOT LET
POTHOLDER CONTACT HOT HEATING ELEMENT IN OVEN.
14 KEEP OVEN DUCT UNOBSTRUCTED
15 PROTECTIVE LINERS – DO NOT USE ALUMINIUM FOIL TO LINE SURFACE UNIT DRIP BOWLS
OR OVEN BOTTOMS, EXCEPT AS SUGGESTED IN THE MANUAL. IMPROPER INSTALLATION
OF THESE LINERS MAY RESULT IN A RISK OF ELETRIC SHOCK, OR FIRE.
16 CLEAN ONLY PARTS LISTED IN MANUAL.
NOTE: The California Safe Drinking Water and Toxic Enforcement Act requires the Governor of
California to publish a list of substances known to the State of California to cause cancer, birth defects,
or other reproductive harm, and requires businesses to warn of potential exposure to such substances.
WARNING: This product contains a chemical known to the State of California to cause cancer, birth
defects, or other reproductive harm.
This appliance can cause low-level exposure to some of the substances listed, including benzene,
formaldehyde, carbon monoxide, toluene, and soot.
SAVE THESE INSTRUCTION
6
Instructions for the User
2. INSTALLATION
-
Before installation, make sure that the voltage and frequency listed on the data plate positioned on
door frame correspond with the household electrical supply. This data must correspond to prevent
injury an machine damage. Consult a qualified electrician if in doubt.
-
Be certain your appliance is properly installed and grounded by a qualified technician.
-
To guarantee the electrical safety of this appliance, continuity must exsist between the appliance and
an effective grounding system. It is imperative that this basic safety requirement be met. If there is
any doubt, have the electrical system of the house checked by a qualified electrician.
-
The manufacturer cannot be held responsible for damages caused by the lack, or inadequacy, of an
effective grounding system or the failure to adhere to national and local electrical codes.
-
The oven should not be operated until it has been properly installed within cabinetry.
-
Installation, maintenance and repair work should be performed by an authorized service technician.
Work by unqualified persons could be dangerous and may void the warranty.
-
Before installation or service, disconnect the power supply to the work area by “tripping” the circuit
breaker, or shutting off the main power.
7
Instructions for the user
3. GUIDE TO OVEN CONTROLS
3.1 Front panel
All the commands and controls for the oven are positioned on the front panel.
3.2 Description of commands
FUNCTION SWITCH KNOB
Select the desired cooking functions. The symbols are shown below. By turning
the knob the various function symbols lights up, simultaneously with the timer and
internal oven lights.
NO FUNCTION SET
SMALL GRILL ELEMENT
UPPER AND LOWER HEATING
ELEMENT
UPPER AND LOWER HEATING
ELEMENT + CONVECTION FAN
LARGE GRILL ELEMENT
LARGE GRILL ELEMENT +
CONVECTION FAN
LOWER HEATING ELEMENT +
CONVECTION FAN
DEFROSTING
CONVECTION HEATING
ELEMENT + CONVECTION FAN
8
Instructions for the User
THERMOSTAT KNOB
Selection of cooking temperature. Turn the knob clockwise to the required
temperature, between 120°F and 500°F. The temperature light indicates that the
oven in is heating-up phase.
When this light goes out, the selected heating temperature has been reached.
The light will come on periodically during use to indicate that the oven is being
kept at the set temperature by a thermostat.
TIMER KNOB
Lets you choose manual cooking or the timer with automatic turn-off of the oven
when done.
For manual control of cooking time, turn the knob anticlockwise to the symbol
.
To set cooking time turn the knob clockwise. The numbers from 10 to 120
correspond to minutes. Adjustment is progressive and intermediate positions
between the numbers shown may be used. At the end of programmed cooking an
intermittent sound signal is emitted. This can be de-activated by turning the
function selector knob to the position
.
9
Instructions for the user
AUTO-STOP COOKING
With this function you can set your oven to switch itself off
automatically at a particular time.
To set the auto-stop cooking time:
17 Select a cooking function and set a temperature
18 Set the current time, pull out knob “A” and turn it clockwise. For
example: current time 11.10 am.
19 To set cooking time (window “B”) turn knob “A” clockwise. For
example: window “B” will show 60 minutes.
20 At the end of cooking time , oven will shut off automatically and a
buzzer will sound
NOTE: to use the oven in a manual cooking function, you must turn knob “A” clockwiseuntil the symbol
appears in window “B”
Setting the time
To set the time, PULL OUT knob A and turn it clockwise.
Manual cooking
To use the cooker in manual cooking mode you must turn knob A clockwise until the symbol
in window B.
Timed cooking
To set cooking time (window B) turn knob A clockwise.
Expiration of cooking time
The oven will turn off automatically and a buzzer will go on (
)
De-activation of sound signal
This can be done by turning the FUNCTION SELECTOR knob to position
10
.
appears
Instructions for the User
4. USE OF THE OVEN
4.1 General advice
NOTE: When using the oven for the first time, heat it to the maximum
(500°F) for sufficient time to burn away any oily residues from manufacture.
The heating elements and the fan are de-activated when the oven door is
opened.
If you have to do something to the food in the oven, leave the door open for
the shortest for the shortes time possible, so that the internal temperature
doesn’t drop.
4.2 Switching on the oven
•
•
•
Select the required function with the function selector knob;
Select manual cooking (or a cooking time as indicated in the paragraph “3.2 Description of
commands”);
select the temperature with the thermostat knob.
4.3 Inside light bulbs
Turn on the inside light bulbs by turning the function selector knob
to any position or by opening the door with the oven turned off.
4.4 Cooling ventilation
The appliance is equipped with a cooling system which comes into
operation when the oven is switched on.
When the fans are on, they cause a normal air flow to come out
from the top and bottom of the door, which will continue for a short
time after the oven has been switched off.
11
Instructions for the user
5. AVAILABLE ACCESSORIES
The oven features 4 support positions for plates and grills of
different height.
Rack to place cookware containing food.
Rack to be placed above the glass plate to broil foods.
Glass plate suitable for cooking and also useful for collecting fats
when the broiles is in use.
Chromium-plated tubular gripper for removing hot food from
plates or grills, thus avoiding direct contact.
5.1 Optional accessories
Aluminium plate used for cakes, pizzas and oven desserts.
Cod. 050370251
Pyrex dish with glass cover: closed container which stops food
and splashes from dirtying the sides of the oven during cooking.
NOTE: Ask your authorised dealer for original accessories.
12
Instructions for the User
6. COOKING HINTS
WARNING
BURN HAZARD
Keep the oven door closed during cooking.
NOTE: During cooking, do not cover the bottom of the oven with aluminium or tin foil and do not place pans or
oven trays on it as this may damage the enamel coating. If you wish to use greaseproof paper, place it so that it
will not interfere with the hot air circulation inside the oven.
In fan-assisted mode preheating should be carried out at 90/100°F above the cooking temperature. This
considerably shortens cooking times and reduces power consumption, as well as giving better cooking results.
6.1 Traditional cooking
FUNCTION SWITCH
THERMOSTAT SELECTOR SWITCH FROM 120° TO 500°F
This classic cooking system, with the heat coming from below and above, is ideal to cook foods on one
level only. Preheat the oven to the required temperature and put the food in the oven only after the
thermostat light has gone out.
Deep-frozen meat can be put directly into the oven without defrosting. The only precaution to take is to
select lower temperatures, around 68°F, and cooking times about 1/4 longer than fresh meat cooking
times. Very fat meat can be put in when the oven is still cold.
6.2 Hot-air cooking
FUNCTION SWITCH
THERMOSTAT SELECTOR SWITCH FROM 120° TO 500°F
This system is suitable for cooking different foods and on more than one level (fish, meat etc.) without
mixing of tastes and smells.
The circulation of hot air in the oven ensures uniform heat. No preheating is required.
NOTE: Multiple cooking is possible as long as the cooking temperature of the different foods is the same.
13
Instructions for the user
6.3 Broiler
FUNCTION SWITCH
THERMOSTAT SWITCH AT MAXIMUM AND DOOR CLOSED
This permits rapid golden-browning of foods. For longer cooking periods and broiling on wide surfaces it
is better to insert the grill on a lower guide-slot, depending on the size of the pieces to be cooked.
6.4 Broiler with hot air
FUNCTION SWITCH
THERMOSTAT SWITCH AT MAXIMUM AND DOOR CLOSED
This permits a uniform distribution of heat and a greater penetration in depth. Food is lightly goldenbrowned on the outside while remaining soft inside.
Maximum cooking time 60 minutes.
NOTE: Keep the oven door closed during cooking. Heating up time must not exceed 60 minutes.
6.5 Defrosting
FUNCTION SWITCH
THERMOSTAT SWITCH IN POSITION 0
Food can be rapidly defrosted by the movement of air at room temperature.
NOTE: The advantage of defrosting at room temperature is that it does not alter the taste and
appearance of the food.
14
Instructions for the User
7. CLEANING AND MAINTENANCE OF THE OVEN
7.1 Cleaning stainless steel
BURN HAZARD
WARNING
-
Oven can produce high temperatures that can cause burns.
-
To prevent burns, allow the haeting elements to cool before cleaning.
-
Only clean parts listed in this manual.
NOTE: To keep the oven in good condition, you should clean it at regular intervals (after it has cooled).
Take out all removable parts.
7.1.1 Routine cleaning of oven
To clean and preserve the stainless steel surfaces, always use only specific products that do not contain
abrasives or chlorine-based acids. How to use: pour the product on a damp cloth and wipe the surface,
rinse thoroughly and dry with a soft cloth or deerskin.
7.1.2 Food stains or residues
Do not use metallic sponges or sharp scrapers: they will damage the surface.
Use normal, non-abrasive products for steel together with non-scratch sponges and, if
necessary, wooden or plastic utensils.
For particularly hard stains or burns, use special oven detergents. Rinse thoroughly and dry with
a soft cloth or deerskin.
7.2 Door glass
You are advised to keep it very clean, washing with a damp sponge and ordinary detergent. Window
cleaner can be used.
15
Instructions for the user
7.3 Cleaning of hot air convection fan
WARNING
ELECTRICAL SHOCK HAZARD
Before any intervention, disconnect the power supply of the device.
The fan has to be cleaned at regular intervals. Remove the rear deflector by
unscrewing nuts E. With your hand keep the blades stopped and, using a coin,
loosen the central ring nut F, rotating clockwise. In this way, it is easier to
remove any cooking residues, preventing them from burning the next time the
oven is used. After having cleaned the fan, reassemble it and the rear deflector,
proceeding in the opposite order with respect to the disassembly instructions.
16
Instructions for the User
8. EXTRAORDINARY MAINTENANCE
The oven may require extraordinary maintenance or replacement of parts subject to wear such as seals,
bulbs, and so on. The following instructions describe how to carry out these minor maintenance
operations.
WARNING
ELECTRICAL SHOCK HAZARD
Before any intervention, disconnect the power supply of the device.
8.1 Replacement of oven light bulbs
Remove upper oven protection A and ring B as well as the glass cover C, unscrewing it anticlockwise.
Replace light bulb D. Reassemble ring B, cover C and upper protection A.
CAUTION: The standard bulbs are halogen: do not touch them directly with your fingers. Use
insulation to protect your hand. Use only bulbs that are available at authorized service centers.
8.2 Removing the door
Use the two splines provided
Open the door, insert the splines G (provided) into the slit of the hinges and push them towards the oven.
Half-close the door upward to form an angle of approximately 45°, then lift up and slide off.
For re-assembly, insert the hinges into its groove then let the door rest downwards and extract splines G.
Use two screwdrivers
Open the door and fit the screwdrivers into the hinge holes from the inside.
Half-close the door upward to form an angle of approximately 45°, then lift up and slide off.
For re-assembly, insert the hinges into its groove then allow the door to rest downward and remove the
screwdrivers.
17