1
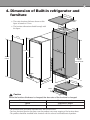
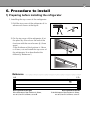
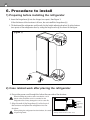
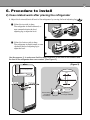
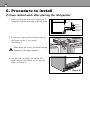
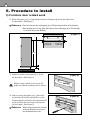
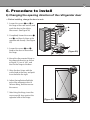
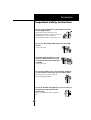
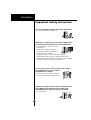
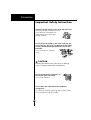
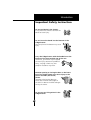
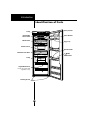
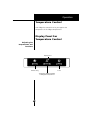
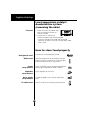
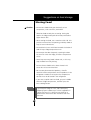
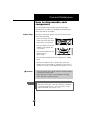
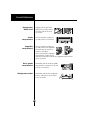
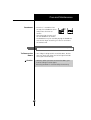
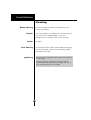
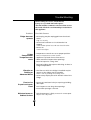
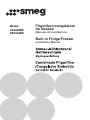
Model:
LB30AFNF
FB30AFNF
Frigorifero/congelatore
da incasso
Manuale di installazione
Built-in Fridge/Freezer
Installation Manual
20
Contents
1. Note before installing .............................................................. 21
2. Components to install .............................................................. 22
3. Assembly/Disassembly diagram of Built-in refrigerator ............ 23
4. Dimension of Built-in refrigerator and furniture ....................... 24
5. Installing the built-in refrigerator ............................................. 25
6. Procedure to install
1) Preparing before installing the refrigerator ............................... 26
2) Case related work after placing the refrigerator ....................... 28
3) Furniture door related work ...................................................... 31
4) Refrigerator door related work .................................................. 32
5) Installation checkup and finishing work .................................... 35
6) Changing the opening direction of the refrigerator door ........... 36
7) Furniture door gap .................................................................... 37
* The procedure and the method to install for the refrigerator are
same to the freezer.
Start the work after checking the followings:
This manual describes based on the door opened to the right.
If you want to open the door to the left, install after reading Page 36.
21
1. Note before installing
Caution
Install the product at the place avoiding the heat from the heater or the boiler or the
direct sunlight, with the shade and the good ventilation always.
Prepare the furniture possible to circulate air by referring to the size.
Install the product for air to smoothly flow via the front intake hole. If not, it may
cause to prevent the normal performance of the product.
Install the product at the place where no outsider enters or exits because it may
damage the power cord to cause fire.
If the furniture door gets too long for securing the space over the space, use the
furniture with the specified size because the furniture may be sagged down or cause
the inconvenience to use.
After installing the door, make sure that no lift-up is shown at the door. Make sure
that the gasket of the refrigerator door is correctly installed.
If the furniture has any soft material (for example, plaster), use the furniture made of
solid material because it has the weak bonding strength and may be damaged.
Use the furniture not twisted by heating from the product or not bent by water
generated by opening/closing the refrigerator door.
Install the product at the place with the correct horizontal/vertical size of the
furniture (within 1mm horizontally and vertically). If the furniture has no correct
horizontal/vertical position or the product is installed on the soft base, the side plate
may be deformed or the furniture may be slowly twisted for a long time.
(When 100kg load is applied, use the material or the structure with no gradual
deformation.)
Install the built-in refrigerator by two persons (one team).
When installing, protect the children from using the installing part or the installing
location.
When working, take out the screw one by one from the packaging vinyl for
preventing the damage due to being left.
Do not use the multi-cord because it may cause fire.
Before installing, make sure that the product normally operates by connecting the
power cord.
22
2. Components to install
Top cover of refrigerator
Qty: 1EA
Hinge holder
Depth adjusting bracket
(diameter = 5.5mm)
Qty: 1EA
Hinge bracket
Qty: 2EA
Qty: 1EA
Depth adjusting bracket
Qty: 2EA
Depth adjusting bracket cover
Qty: 1EA
Depth adjusting bracket cover
Top bracket cover of furniture door
Qty: 2EA
Front cover of hinge
Qty: 2EA
Top bracket of furniture door
Qty: 1EA
Qty: 2EA
Cap screw
Qty: 2EA
Paper jig
Hinge bracket cover
Qty: 1EA
Depth adjusting bracket
(diameter = 8mm)
Qty: 1EA
Ventilating cover
Qty: 2EA
Gasket
Qty: 1EA
Qty: 2EA
Door screw
Wood screw
Top bracket screw
Height adjusting nut
Spec
Spec
Qty
Spec
Qty
Spec
Qty
16
D4 6.5
4
M5
4
Qty
D4
D4
2
L16
L12
Bracket screw
Hinge screw
Spec
Qty
Spec
Qty
Spec
Qty
M5
6
D4XL16
4
-
1
Tools not
provided when
installing
(+) screw driver
Spanner
2m tape rule
23
3. Assembly/Disassembly diagram of
Built-in refrigerator
24
4. Dimension of Built-in refrigerator and
furniture
400m
m or
longe
r
The entire furniture thickness shown at this
figure is based on 15mm.
m
50m
The furniture dimension should comply with
the figure.
600m
m
r
nge
or lo
mm
0
8
5
595m
m
5
Inne 70mm
r dim
ens
ion
1775 mm
1830mm
or longer
1688.5 mm
1800mm
or longer
Inner dimension
39mm
554
mm
m
0m
/56
545
400m
m or
longe
r
mm
50
50mm
400
mm
Caution
When the furniture thickness is changed, the door size of the furniture is changed.
Furniture thickness
18mm
20mm
Furniture door size
1836mm or longer
1840mm or longer
- The furniture body should be separated from the furniture door.
- Too long furniture door for the space over the product may cause sagging of the furniture door.
- The product should be installed at the furniture with the correct horizontal/vertical position.
25
5. Installing the built-in refrigerator
The minimum space for ventilating should be prepared for the smooth heat exchange
of the refrigerator.
1. It should be structured for air to enter
from the intake hole and to exit from
the discharge hole.
2
Ceiling
min. 50mm
1
2. The passage ¡ should be secured
when the passage ¨ is not secured.
3. 200cm2 or more of the air ventilation
at ¨ and ¡ should be secured.
min. 30mm
Caution
Wall
Requirements for the furniture floor
- Floor:
We recommend to use T 20mm for securing the
hardness.
- Base:
Install the base for the floor not to be deformed
by the weight (200kg at maximum: product +
food + furniture door + opening/closing shock,
etc.).
Secure the
ventilating hole
min. 200cm2
min. 30mm
- Parallelism:
If the level of the floor is not correct, it may cause
to deform the entire furniture or not to close the
door due to the weight of the product.
Floor plan of furniture and the maximum opening of the door
252mm
min 560mm
Inner side of furniture
Side wall of furniture
min 570mm
Wall
600mm
Side wall of furniture
min 570mm
600mm
Wall
Hinge Hinge
base
Furniture door
min 560mm
Inner side of furniture
3mm
237mm
(Distance from
the wall when
completely
opened)
Wall
Wall
Standard
Special case
Caution
- Securely fix the side plate of the furniture at the wall or the adjacent furniture. Because the product is fixed
with the screws from the hinge to the side plate of the furniture, secure the side plate of the furniture at the
hinge by 30T or more. (Additionally, the rigid plate with 15T or more should be attached at the side plate
of the furniture for the refrigerator to install.) If the side plate is thin, the product may be easily shaken
when the screws directly touch the wall.
26
6. Procedure to install
1) Preparing before installing the refrigerator
1. Installing the top cover of the refrigerator
1) Fold the top cover of the refrigerator ¨ in
advance as shown at the figure.
1
2) Fix the top cover of the refrigerator ¨ at
the place by 45mm from the end of the
furniture with the wood screws (three
spots).
(If the thickness of the furniture is 18mm
or 20mm, cut and install the top cover of
the refrigerator ¨ as described at the
following “Reference“.)
1
b
Reference
AB
CD
1
Door opened to the right
If the thickness of the furniture is 18mm,
cut at A, but if it is 20mm, cut at B.
Door opened to the left
If the thickness of the furniture is 18mm,
cut at D, but if it is 20mm, cut at C.
27
6. Procedure to install
1) Preparing before installing the refrigerator
2. Insert the hinge base into the hinges (two spots). (See Figure 1)
(If the thickness of the furniture is 20mm, do not install the hinge base
.)
3. Tilt backward the refrigerator and loosely fix the height adjusting bracket at the bottom
(two spots) of the refrigerator door by using the hinge screws as shown at the figure.
(Figure 1)
2
2
3
e
e
3
2) Case related work after placing the refrigerator
4. Put out the power cord through the hole at the rear side of the furniture.
When installing the product, make sure that the cord is
placed at the rear holder not to be extended on the
refrigerator floor. It may damage the cord to cause fire.
Furniture
5. Align the end of the hinge base to the front of
the furniture and place the refrigerator into the
furniture.
When placing the refrigerator into the furniture, be careful
of squeezing hands.
Hinge base
Hinge
Front side of
the furniture
The top of the furniture (floor view)
28
6. Procedure to install
2) Case related work after placing the refrigerator
6. Adjust the horizontal/vertical level of the refrigerator by turning the level adjusting leg(
When the top side is deep
The refrigerator is tilted backward, so
turn counterclockwise the level
adjusting leg to adjust the level.
When the bottom side is deep
The refrigerator is tilted forward, so turn
clockwise the level adjusting leg to
adjust the level.
Use the spanner to make sure that the depth dimension of the front of the furniture and
the front of the refrigerator door are constant. (See Figure 2)
Front of furniture
(Figure 2)
Front of refrigerator door
4mm
Spanner
3.5mm
3mm
g
For mounting
the front of
the furniture
For mounting
the refrigerator door
).
29
6. Procedure to install
2) Case related work after placing the refrigerator
7. Make sure that the end of the hinge base
is aligned with the front right of the furniture.
Furniture
Hinge base
Hinge
Front side of
the furniture
8. Fix the top hinge and the bottom hinge by
the hinge screws (four spots).
(See Figure 3)
When fixing the screws, be careful of being
damaged by the hinge operation.
(Figure 3)
f
9. Use the ruler to make sure that the left
depth and the right depth are constant as
shown at Figure 4.
(Figure 4)
30
6. Procedure to install
2) Case related work after placing the refrigerator
10. Open the refrigerator door, place the hinge
bracket at the top left of the refrigerator,
and fix them at the furniture and the
refrigerator respectively with the wood screw
(one spot) and the bracket screws
(two
spots). (See Figure 5)
11. Insert the hinge bracket cover from the left
and then press it. (See Figure 6).
(Figure 5)
e
5
b
(Figure 6)
6
Reference
If the furniture thickness is 15mm, about 6mm of
gap between the hinge bracket cover and the
cover display is generated.
• If the furniture thickness is 18~20mm
About 1mm gap is generated.
15mm
6mm
6
display
31
6. Procedure to install
3) Furniture door related work
12. Place the paper jig on the reference line of the paper jig at the rear side of the
furniture door. (See Figure 7)
Reference - Place the reference line of the paper jig at 1595mm from the floor of the furniture.
- If the furniture door is long, place the reference line of the paper jig at 1595mm plus
‘A’ from the floor of the furniture.
(Figure 7)
Reference line
of paper jig (for
the right hinge)
Reference line
of paper jig (for
the left hinge)
1595mm
A
13. Mark two holes of the paper jig
furniture door. (See Figure 8)
at the
(Figure 8)
Before fixing with the wood screw ,
make sure that the marked point is correct.
14. After removing the paper jig , place the
top bracket of the furniture door on the
furniture plate and then fix the top bracket
of the furniture door with the wood screws
(four spots). (See Figure 9)
(Figure 9)
8
b
Reference - When fixing because the location
of the top bracket is not correct,
use the unused hole to fix.
b
32
6. Procedure to install
4) Refrigerator door related work
15. Insert the height adjusting nuts (two spots at the bottom) into the height adjusting
screw, and then place the top bracket of the furniture door at the height adjusting
screw of the top of the refrigerator door. Use the height adjusting nut to adjust the height
of the furniture door and set the level. (See Figure 10)
(Figure 10)
When installing the
furniture door, be careful
of being injured or
damaging the furniture
door when the furniture
door is dropped because
the hole is not aligned.
8
d
16. Check the place where the hole of the depth adjusting bracket is aligned with the
hole of the refrigerator door (Figure 11), and fix the depth adjusting bracket to the
left/right (four spots) of the furniture door with the wood screw . (Figure 12)
(Figure 11)
Reference
The door hole is located at
1050mm from the door floor.
Furniture door
Refrigerator door
9
(Figure 12)
8
9
1050mm
b
33
6. Procedure to install
4) Refrigerator door related work
17. Loosely fix the top bracket with the height adjusting nuts (Figure 13), and adjust the
depth gap between the furniture door and the front of the furniture to 4mm. At this time,
adjust the location of the furniture door for the furniture door not to touch the furniture
when opening/closing the door.
d
8
(Figure 13)
18. Use the spanner
to check the dimension. (See Figure 15)
(Figure 14)
Parallel
Parallel
Cooling
room
Furniture
door
g
4mm
19. If the dimension is not correct, loosen the height adjusting nuts , the door screw
and the wood screw , and repeat the work starting from Step 12.
20. Place the depth adjusting bracket as shown at the figure, fix it with the bracket screw
(two spots), and fix with the top bracket screws (four spots). (See Figure 15)
Secure the height adjusting nuts to fix the top bracket .
e
4
(Figure 15)
c
34
6. Procedure to install
4) Refrigerator door related work
21. Move the furniture door to the depth
direction to adjust the depth gap to 4mm
(See Figure 14), and fix the depth adjusting
bracket to both sides (two spots) of the
refrigerator door with the door screw .
(Figure 16)
(Figure 16)
9
a
22. Use the wood screws (four spots) to the depth adjusting bracket , move the furniture
door to the depth direction to adjust the depth gap to 4mm (See Figure 14, Figure 17), and
secure the loosely fixed bracket screw (Figure 1) to fix the depth adjusting bracket .
Depth gap
b
3
(Figure 17)
23. Place the top bracket cover on the door top and place the depth adjusting bracket
cover and on the middle and the bottom of the door respectively. (See Figure 18)
Door top
Door center
Door bottom
(Figure 18)
35
6. Procedure to install
5) Installation checkup and finishing work
24. Insert the font cover
of the hinge into the front of the inside. (two spots)
25. Insert the ventilation cover
into the rectangular floorcloth pan.
26. Attach the gasket as shown
at the figure. Attach it to the
opposite side from the hinge
side. If the gasket is long, cut it
according to the length to use.
27. Insert the cap screw
1800mm
as shown at the figure.
16
Refrig
14
erator
side
16
16
13
15
(Figure 19)
14
36
6. Procedure to install
6) Changing the opening direction of the refrigerator door
Before installing, change the door to work.
1. Loosen the screws and at
the hinge of the case section, and
push the door to the right to
disconnect. (See Figure 20)
2. Completely loosen the screws
and , and then fix them at the
opposite side loosely. (See Figure
20)
3. Loosen the screws and
fixed to the door to disconnect
the hinge.
(Figure 20)
4. Move the disconnected hinge to
the diagonal direction as shown
at Figure 21, turn it 180°, and
then fix the hinge to the door.
5. Align the door hinge with the
screw fixed at the case, and push
from the left to the right.
6. Adjust the top/bottom/left/right
gap of the refrigerator door to
remove tilting, and then secure
the screws.
7. After fixing the hinge, insert the
cap screws (two spots) at the
opposite holes of the hinge.
(Figure 21)
37
6. Procedure to install
7) Furniture door gap
When installing two pieces of furniture closely, keep the gap between them 5mm
or more.
5mm
FRIGORIFERO
Istruzioni per l'uso
Nel ringraziarvi per avere acquistato questo
prodotto SMEG, vi raccomandiamo di leggere
attentamente le seguenti istruzioni e di conservare
questo manuale per eventuali consultazioni future.
FRIDGE
User's Guide
Please read this User's Guide carefully before
operating and keep it handy for reference at all times.
KÜHLSCHRANK
Bedienungsanleitung
Lesen Sie diese Bedienungsanleitung vor dem Betrieb
sorgfältig durch und bewahren Sie sie zum späteren
Nachschlagen auf.
FRIGORÍFICO
Manual do Utilizador
Por favor leia cuidadosamente este Manual do
Utilizador antes da primeira utilização e mantenhao à mão
para poder consultálo sempre que necessário.
Table of Contents
Introduction
Operation
Registration
32
Important Safety Instruction
32
Identification of Parts
46
Temperature Control
47
Display Panel For Temperature Control
47
Power / 48
How to adjust the temperature
in the refrigerator compartment / 48
Extra Cooling / 49
Self Test / 49
Door Alarm / 49
Suggestion On
Food storage
Care and
Maintenance
Trouble Shooting
Low-temperature catalyst deodorization system
(removing the odor)
50
How to store food properly
50
Storing Food
51
General Information
52
How to disassemble each component
53
Cleaning
56
Trouble Shooting
57
* Refer to Installation Insturction for details.
31
Introduction
Registration
The model and serial number are found on the rear of
this unit. This number is unique to this unit and not
available to others. You should record requested
information here and retain this guide as a permanent
record of your purchase. Staple your receipt here.
Introduction
Date of Purchase :
Dealer Purchased From :
Dealer Address :
Dealer Phone No. :
Model No. :
Serial No. :
Important Safety Instruction
BASIC SAFETY PRECAUTIONS
This guide contains many important safety messages.
Always read and obey all safety messages.
This is the safety alert symbol. It alerts you to safety
messages that inform you of hazards that can kill or hurt
you or others or cause damage to the product. All safety
messages will be preceded by the safety alert symbol and
the hazard signal word DANGER, WARNING, or
CAUTION. These words mean:
DANGER
You will be killed or seriously injured if
you don’t follow instructions.
WARNING You can be killed or seriously injured if
you don’t follow instructions.
CAUTION
Indicates an imminently hazardous
situation which, if not avoided, may
result in minor or moderate injury, or
product damage only.
All safety messages will identify the hazard, tell you how
to reduce the chance of injury, and tell you what can
happen if the instructions are not followed.
32
Introduction
Important Safety Instruction
WARNING
To reduce the risk of fire, electric shock, or injury to
persons when using your product, basic safety
precautions should be followed, including the
following. Read all instructions before using this
appliance.
1. When connecting the power
The dedicated outlet should be used.
• Using several devices at one outlet
may cause fire.
• The electric leakage breaker may
damage food and the dispenser may
be leaked.
Do not allow the power plug to face upward or to
be squeezed at the back of the fridge-freezer.
Water may be flown into or the plug
may be damaged, which causes fire or
electric shock.
Prevent the power cord from being squeezed or
imprinted if the refrigerator is pushed in after the
power plug is extracted during the installation.
It becomes the cause of fire or electric shock.
When moving your appliance away from the wall, be
careful not to roll over or damage the power cord.
Do not allow the power cord bent or pressed by the
heavy object to be damaged.
It may damage the power cord to cause
fire or electric shock.
33
Introduction
Important Safety Instruction
Do not extend or modify the length of the power
plug.
It causes electric shock or fire by the
electric damage of the power cord or
others.
Unplug the power plug when cleaning, handling or
replacing the interior lamp of the fridge-freezer.
• It may cause electric shock or injury.
• When replacing the interior lamp of
the fridge-freezer, make sure that the
rubber ring for preventing the electric
spark within the socket is not taken
off.
Do not pull out the cord or touch the power plug
with wet hands.
It may cause electric shock or injury.
Remove water or dust from the power plug and
insert it with the ends of the pins securely
connected.
Dust, water or unstable connection may
fire or electric shock.
Pull out the power plug not by grasping
the cord but the plug of its end.
It may cause electric shock or short circuit to
fire.
34
Introduction
Important Safety Instruction
Make sure of grounding.
Consult a qualified electrician or
service person if the grounding
instructions are not completely
understood, or if you have doubts
on whether the appliance is
properly grounded.
The incorrect grounding may cause breakdown and
electric shock.
Be sure to use grounded exclusive proper voltage
consent for the power plug.
It becomes the cause of fire.
Ground
Wire
Copper
Flat
More than
30 inches
When the power cord or the power plug is
damaged or the holes of the outlet
are loosed, do not use them.
It may cause electric shock or short circuit
to make fire.
Wait for 5 minutes or longer when
reconnecting the plug.
It may cause the operation of the
freezer to fail.
After
5minutes
2. When using the fridge-freezer
Do not place the heavy object or the dangerous
object (container with liquid) on the fridge-freezer.
It may be dropped to cause injury, fire
or electric shock when opening or
closing the door.
Do not cling to the door or the shelves of the door
or the home bar of the freezer or the cool chamber.
It may make the fridge-freezer fallen
down or damage the hands. Especially,
do not allow the children to do the
above.
35
Introduction
Important Safety Instruction
Prevent children from entering the product.
It may endanger the life of a child if the
child enters the refrigerator.
Opening and closing the door of the refrigerator
vigorously may cause the stored food in the
refrigerator basket to fall by shock and hurt the
foot, so take precautions.
Do not install the fridge-freezer in the wet place or
the place which water or rain splashes.
Deterioration of insulation of electric parts
may cause electric leakage.
Do not use or store inflammable materials ether,
benzene, alcohol, medicine, LP gas, spray or
cosmetics near or in the fridge-freezer.
It may cause explosion or fire.
Do not place the lit candle within the fridge-freezer
to deodorize. Do not use drier to
dry the inside, nor light a candle to
remove odor.
It may cause explosion or fire.
36
Introduction
Important Safety Instruction
Do not store the medicine or the academic materials
at the fridge-freezer.
When the material with the strict
temperature control is stored, it may be
deteriorated or it may make an
unexpected reaction to cause any risk.
Do not use the combustible spray near the fridgefreezer.
It may cause fire.
Avoid the heating devices. Install
in places away from the fire such
as the place where flammable gas
is leaked.
It may cause fire.
Do not place flower vase, cup, cosmetics, medicine
or any container with water on the fridge-freezer.
It may cause fire, electric shock or
injury by dropping down.
In case of thunder and lightning, or not in use for a
long period of time, detach the
power plug.
There is a danger of electric shock or
fire.
37
Introduction
Important Safety Instruction
Use the submerged fridge-freezer after checking it.
It may cause electric shock or fire.
When gas is leaked, do not touch the fridge-freezer
or the outlet and ventilate the room immediately.
• The explosion by spark may cause
fire or burn.
• Because this fridge-freezer uses
natural gas (isobutene, R600a) as
the environment-friendly
refrigerant, even a small amount (80~90g) is
combustible. When the gas is leaked by the severe
damage during delivering, installing or using the fridgefreezer, any spark may cause fire or burn.
Do not spray water at the outside or the inside of
the fridge-freezer or do not clean it
with benzene or thinner.
Deterioration of insulation of electric
parts may cause electric shock or fire.
When any strange smell or smoke is detected from
the fridge-freezer, disconnect the power plug
immediately and contact to the service center.
It may cause fire.
Service
Center
38
Introduction
Important Safety Instruction
Do not allow any person except the qualified
engineer to disassemble, repair or alter the fridgefreezer.
It may cause injury, electric shock or
fire.
Do not use the fridge-freezer for non-domestic
purpose (storing medicine or testing material, using
at the ship, etc.).
It may cause an unexpected risk such
as fire, electric shock, deterioration of
stored material or chemical reaction.
When disposing the fridge-freezer, remove the
packing materials from the door.
It may cause to lock out the child.
This appliance is not intended for use by persons
(including children) with reduced physical, sensory
or mental capabilities, or lack of experience and
knowledge, unless they have been given
supervision or instruction concerning use of the
appliance by a person responsible for their safety.
Children should be supervised to ensure that they
do not play with the appliance.
39
Introduction
Important Safety Instruction
Install the fridge-freezer on the solid and level floor.
Installing it on the unstable place may
cause death by falling down the
fridge-freezer when opening or
closing the door.
Do not insert the hands or the metal stick into the
exit of cool air, the cover, the bottom of the fridgefreezer, the heatproof grill (exhaust hole) at the
backside.
It may cause electric shock or
injury.
CAUTION
Violating this direction may cause injury or damage
house or furniture. Always be careful, please.
Do not touch food or containers at
the freezer with wet hands.
It may cause frostbite.
Do not place the food in disorder inside the
refrigerator.
The food may fall during opening and closing the door
of the refrigerator and hurt people.
40
Introduction
Important Safety Instruction
Do not put bottle in the freezer.
It may freeze the contents to break the
bottle to cause injury.
Do not insert the hands into the bottom of the
fridge-freezer.
The iron plate of the bottom may cause
injury.
Carry the fridge-freezer with the handle bar at the
bottom of the front and the top of the rear.
Otherwise, your hands may be slipped
to cause injury. Because the product is
heavy, carrying it alone may hurt
people or accidents may occur.
Because opening or closing the door or the home
bar of the fridge-freezer may cause injury to the
person around it, be careful,
please.
Opening or closing the door may
cause feet or hands to be caught in
the chink in door or the child to be get
hurt by the corner.
Do not put any living animal in the
fridge-freezer.
41
Introduction
Important Safety Instruction
Warning
Precaution
42
•
This fridge-freezer must be properly installed and
located in accordance with the Installation Instruction
before it is used.
•
Before you install this fridge-freezer reference to
installation manual.
•
Never unplug your fridge-freezer by pulling on the
power cord. Always grip plug firmly and pull straight
out from the outlet.
•
After your fridge-freezer is in operation, do not touch
the cold surfaces in the freezer compartment,
particularly when hands are damp or wet. Skin may
adhere to these extremely cold surfaces.
•
Pull out the power plug prior to cleaning the fridgefreezer.
Never damage, serverely bend, pull out, or twist the
power cord because power cord damage may cause a
fire or electronic shock.
Never place glass products in the freezer because they
may be broken when their inner contents are frozen.
•
Do not directly spray water inside or outside the
fridge/freezer.
There is a risk of explosion or fire.
•
Do not insert the power plug with wet hands.
You may receive an electric shock.
•
Do not install the fridge/freezer in a damp place, where
it could be splashed with water.
Incorrect insulation of the electrical parts may cause an
electric shock or fire.
Introduction
Important Safety Instruction
Do not modify or
extend the Power
Cord length
•
Do not disassemble, repair or alter the appliance. It may
cause fire or abnormal operations, which may lead to
injury.
•
Pull the power plug out of the socket before replacing
the interior light in the refrigerator.
Otherwise, there is a risk of electric shock.
•
If possible, connect the fridge-freezer to its own
individual electrical outlet to prevent it and other
appliances or household lights from causing an overload.
It will cause electric shock or fire.
Accessibility of
Supply Plug
The supply plug of the refrigerator-freezer should be
placed in easy accessible position for quick disconnection
in emergency.
Supply Cord
Replacement
If the supply cord is damaged, it must be replaced by the
manufacturer or its service agent or a similarly qualified
person in order to avoid a hazard.
Danger
Risk of child entrapment.
Before you throw away your old refrigerator or freezer:
Take off the doors.
Leave the shelves in place so that children may not
easily climb inside.
Don't store
Don't store or use gasoline or other flammable vapors
and liquids in the vicinity of this or any other appliance.
Grounding
(Earthing)
In the event of an electric short circuit, grounding
(earthing) reduces the risk of electric shock by providing
an escape wire for the electric current. In order to
prevent possible electric shock, this appliance must be
grounded. Improper use of the grounding plug can result
in an electric shock.
43
Introduction
Important Safety Instruction
Warning
Keep ventilation openings, in the appliance
enclosure or in the built-in structure, clear of
obstruction.
Do not use mechanical devices or other means to
accelerate the defrosting process, other than those
recommended by the manufacturer.
Do not damage the refrigerant circuit.
Do not use electrical appliances inside the food
storage compartments of the appliance, unless they
are of the type recommended by the manufacturer.
The refrigerant and insulation blowing gas used in
the appliance require special disposal procedures.
When disposal, please consult with service agent
or a similarly qualified person.
This appliance contains a small amount of isobutane
refrigerant (R600a), natural gas with high
environmental compatibility, but it is also
combustible. When transporting and installing the
appliance, care should be taken to ensure that no
parts of the refrigerating circuit are damaged.
Refrigerant squirting out of the pipes could ignite
or cause an eye injury. If a leak is detected, avoid
any naked flames or potential sources of ignition
and air the room in which the appliance is standing
for several minutes.
In order to avoid the creation of a flammable gas air
mixture if a leak in the refrigerating circuit occurs, the
size of the room in which the appliance may be sited
depends on the amount of refrigerant used. The room
must be 1m2 in size for every 8g of R600a refrigerant
inside the appliance. The amount of refrigerant in your
particular appliance is shown on the identification plate
inside the appliance.
Never start up an appliance showing any signs of
damage. If in doubt, consult your dealer.
44
Introduction
Important Safety Instruction
Caution
45
•
If the wall socket is loose, do not insert the power
plug.
It may cause electric shock or fire.
•
Never unplug your refrigerator by pulling on the
power cord. Always grip plug firmly and pull it
straight out from the outlet.
You may disconnect a wire and cause a short circuit.
•
Do not use a wet or damp cloth when cleaning the
plug. Remove any foreign matter from the power
plug pins.
Otherwise, there is a risk of fire.
•
Do not put your hands into the bottom area of the
appliance.
Any Sharp edges may cause personal injury.
•
After unplugging the appliance, wait for at least
five minutes before plugging it again to the wall
socket.
Abnormal operation of the freezer may cause material
damage.
•
If the appliance is not to be used for a long time,
pull out the power plug.
Any deterioration in the insulation may cause fire.
•
Do not let children touch or play with the control
panel on the front of the appliance.
•
The refrigerant used in fridge/freezer and the
gases in the insulation material require special
disposal procedures. Ensure that none of the pipes
on the back of the appliances are damaged prior
to disposal.
Introduction
Identification of Parts
Dairy Corner
Lamp
Door Basket
Removable
Glass Shelf
Bottle Shelf
Egg Tray
Snack Corner
Bottle Guide
Multi-Air Flow Duct
2 Bottle
Door Basket
Lamp
Vegetable Drawer
Used to keep fruits and
vegetables crisp.
Leveling Screw
46
Operation
Temperature Control
Your fridge has controls that let you regulate the
temperature in the fridge compartments.
Display Panel For
Temperature Control
Adjusting the
temperatures and
functions
Display Panel
EXTRACOOL
REFRIGERATOR
Extra Cooling
3SECS
Power
Temperature Adjustment Button
for Refrigerator Compartment
47
POWER
Operation
Power
•
If you push button more than 3 seconds
you can switch on or off the Refrigerator.
POWER
3SECS
How to adjust the
temperature in the
refrigerator
compartment
•
The initial Temperature of the Refrigerator
Compartment is 0°C and 6°C respectively.
You can now adjust the temperature of the
compartments as you want.
•
REFRIGERATOR
Note
When you press the temperature
control button, the temperature
of the Refrigerator part is
change by 1 degree.
The actual inner temperature varies depending on the
food status, as the indicated setting temperature is a
target temperature, not actual temperature within
refrigerator.
Refrigeration function is weak in the initial time. Please
adjust temperature as above after using refrigerator for
minimum 2~3 days.
48
Operation
Please select this function for prompt cooling.
• This function is used when you want to cool the foods
quickly. Press the EXTRA COOL (Extra Cooling) button
once, and then the quick cool operation starts with the
lamp it.
• The Extra Cooling operation takes about 2 hours. When
its operation ends, it automatically returns to the
previous temperature setting. If you want to stop the
quick cool operation, press the EXTRA COOL button
once more, the lamp goes out, and the Extra Cooling
operation stops and the refrigerator returns to the
previous temperature setting.
Extra Cooling
•
EXTRACOOL
EXTRACOOL
In selecting
"On"
EXTRACOOL
In selecting
"Off"
This function allows you to check for operational
problems. If you think you have a problem with your
fridge, then press the temperature control button:
Self Test
- If the indicate lights move up or down, then there is no
problem with your fridge.
- If the indicate lights do not move up or down, then
please leave the power connected and call your nearest
service agent.
When the door of the fridge is left open for a while, the
alarm sounds.
Door Alarm
49
Suggestions on food storage
Low-temperature catalyst
deodorization system
(removing the odor)
1. It does not harm the stored food
with the excellent function to
remove the odor.
2. In particular it is efficient to
remove the odor of the fermented food.
- Insert the strongly smelt food into the sealed
container to store. It may cause to soak other food
with a scent.
Features
How to store food properly
Place dishes or food properly spaced.
Refrigerator shelf
Store beverage bottle or wine bottle with the
height 275mm or smaller here. (Place the glass
bottle carefully because it may breaks.)
Bottle shelf
Snack
compartment
Place small food such as cookie and bread here.
(Do not place vegetable or food in bottle.)
Vegetable
compartment
Place vegetable or fruit here.
Dairy goods
compartment
Place dairy goods such as butter and cheese
here.
Place 2.0L bottle or other big-size bottle here.
2L bottle shelf
50
Suggestions on food storage
Storing Food
Caution
Note
•
Do not store food which goes bad easily at low
temperature, such as banana, and melon.
•
Allow hot food to cool prior to storing. Placing hot
food in the fridge could spoil other food, and lead to
higher electric bills.
•
When storing the food, use a container with a lid. This
prevents moisture from evaporating, and helps food to
keep its taste and nutrients.
•
Do not block air vents with food. Smooth circulation of
cold air keeps fridge temperature even.
•
Do not open the door frequently. Opening the door
lets warm air enter the fridge, and cause temperature
to rise.
•
Never keep too many foods in door rack, as this may
stop the door from fully closing.
•
Do not refreeze food that has been thawed. This
causes loss of taste and nutrition.
•
Do not store pharmaceutical products, scientific
materials or other temperature sensitive products in the
refrigerator. Products that require strict temperature
controls must not be stored in the refrigerator.
•
If you want to quick cool new food, you put it middle
drawer of fridge compartment, and then press the
Extra Cooling button.
If you keep the fridge in a hot, and humid place,
frequently open its door or put a lot of vegetables in
it, dew may form in it, which has no effect on its
performance. Remove the dew with dust cloth free
from care.
51
Care and Maintenance
General Information
1~2 hour power failure does no harm to the foods
stores. Try to avoid opening and closing the door too
frequently.
Power Failure
•
If You Move
•
Anti Condensation
Pipe
•
The Anti-Condensation pipe
is installed around the front
side of fridge as well as on
the partition between fridge
compartment to prevent
dewing.
•
Especially after installation
or when ambient
temperature is high, the
fridge may feel hot, which is
quite normal.
Take out foods from the fridge and firmly fix the loose
items with tape.
• Do not move the fridge by sliding.
52
Care and Maintenance
How to disassemble each
component
It can be possible to disassemble only when the door is
opened by 90° or wider. Disassembling should be done by
the reverse order of assembling.
Disconnect the power plug or turn off the main power
before disassembling.
Indoor lamp
- Insert the fingers into the
inside slot of the top cover
and pull out it to remove.
- Push the upper part of the
middle cover and pull out
it to remove.
- Turn counterclockwise the
indoor lamp to
disassemble.
1
2
- Use the 240V 30W bulb for the refrigerator as indoor
lamp.
- Because the indoor lamp is consumable, when the
indoor lamp is not turned on, purchase it from the LG
Electronics Service Center and directly replace it to use.
You must check the O-RING, which is made by rubber
and prevent electric spark.
• Don’t touch the lamp, in case of light on the long
time. Because it can be very hot.
Caution
•
Note
•
•
53
Lamp capacity is MAX 30W.
The lamp will remain “ON” for 7minutes if the door
is left open and then it is “OFF” for safety. (If you
reopen the door, the lamp is “On”.)
Care and Maintenance
Slightly pull out and then
slightly lift up and pull out
the front side of the shelf
to remove.
Refrigerator/
Bottle shelf
2
2
1
1
Snack
compartment
Pull out and then slightly lift
up and pull out it to remove.
Vegetable
compartment
Pull out and then slightly lift
up and pull out the vegetable
compartment to remove as
shown at the figure.
After removing the vegetable
compartment, slightly lift up
and pull out the front side of the vegetable compartment
cover to remove.
Dairy goods
compartment
Hold both sides of the dairy goods
compartment, and then lift up and
pull out it to remove.
Refrigerator basket
Hold both sides of the refrigerator
basket, and then lift up and pull
out it to remove.
54
Care and Maintenance
- Insert the ‘-’ screwdriver into
the top of the deodorant cover
and pull out the cover to
remove.
- After removing the cover, pull
out the deodorant to remove.
- The deodorant may be reused by drying the deodorant
with the hair dryer or bathing it in the sun to remove
the soaked smell.
Deodorant
Note
Do not insert the screwdriver into the cool air opening.
To Reverse the
Doors
•
Caution
Your fridge is designed with reversible doors, do that
they may open from either the left of right hand side
to suit your kitchen design.
However, When you want to reverse the doors, you
must be calling to service agent.
Reversing the doors is not covered by the warranty.
55
Care and Maintenance
Cleaning
Be sure to unplug the power or shutdown the main
switch in your house.
Before Cleaning
Clean the outside of the fridge with a soft cloth soaked
with hot water or liquid detergent. If you use a
detergent, be sure to wipe it with a clean wet cloth.
Exterior
As above.
Interior
After Cleaning
Check that the power cord is not damaged, power plug
has not overheated, and that the power plug is tightly
inserted into the outlet.
Warning
Be sure to dry the appliance with a cloth after washing
it with water.
Do not use abrasive, petroleum, benzene, thinner,
hydrochloride acid, boiling water, rough brush, etc, as
they may damage parts of the fridge.
56
Trouble Shooting
Before calling for service, check this list.
It may save you both time and expense.
This list includes common occurrences that are not
the result of defective workmanship or materials in
this appliance.
Possible Causes
Problem
Power plug may be unplugged from the electric
outlet.
Plug it in securely.
• House fuse has blown or circuit breaker has
tripped.
Check and/or replace fuse and reset circuit breaker.
• Power cut.
Check house lights.
Fridge does not
operate
•
Fridge
Compartment
Temperature too
warm
•
Vibration or
Rattling or
Abnormal Noise
•
Frost or Ice
Crystals on frozen
Food
•
Moisture forms on
Cabinet Surface
•
Temperature control not set on proper position.
Refer to Temperature Control section.
• Appliance is placed close to heat source.
• Warm weather-frequent door openings.
• Door left open for a long time.
• Package holding door open or blocking air duct in
fridge compartment.
The floor on which the fridge is installed may be
uneven or the fridge may be unstable.
Make it even by rotating the leveling screw.
• Unnecessary objects placed in the back side of the
fridge.
Door may have been left ajar or package holding
door open.
• Too frequent or too long door openings.
• Frost within package is normal.
57
This phenomenon is likely to occur in a wet space.
Wipe it with a dry towel.
Trouble Shooting
Problem
Possible Causes
Moisture collects
inside
•
Fridge has odor
•
Door not closing
properly
•
Interior light does
not work
•
•
Too frequent or too long door openings.
In humid weather, air carries moisture into fridge when
doors are opened.
Foods with strong odors should be tightly covered or
wrapped.
• Check for spoiled food.
• Interior needs cleaning.
Refer to CLEANING section.
Food package is keeping door open.
Move packages that keep door from closing.
• Fridge is not level.
Adjust the leveling screws.
• The floor on which the fridge is installed may be
uneven or the fridge may be unstable.
Slightly raise the front side with the leveling screw.
No power at outlet.
• Light lamp needs replacing.
Refer to the Lamp Replacement section
DISPOSAL OF YOUR OLD APPLIANCE
1. When this crossed-out wheeled bin symbol is attached to a product
it means the product is covered by the European Directive
2002/96/EC.
2. All electrical and electronic products should be disposed of
separately from the municipal waste stream via designated
collection facilities appointed by the government or the local
authorities.
3. The correct disposal of your old appliance will help prevent potential
negative consequences for the environment and human health.
4. For more detailed information about disposal of your old appliance,
please contact your city office, waste disposal service or the shop
where you purchased the product.
58
SMEG IN THE WORLD
Headquarters
Smeg S.p.A.
Via Leonardo da Vinci, 4
42016 Guastalla (RE)
Tel. +39 0522 8211
Fax Italia. +39 0522 821452
Fax Export. +39 0522 821455
E-mail. [email protected]
www.smeg.it
Russia
SMEG RUSSIA
Russia, 121108, Moscow
Minskaia str., 1G- f.18
Zolotye Kliuch ll
Tel. +7 495 645 9651
Fax. +7 495 645 9661
E-mail. [email protected]
www.smeg.ru
Subsidiaries
Spain
SMEG ESPANA, S.A.
c/Hidráulica, 4 - P.I. La Ferreria
08110 Montcada i Reixac (Barcelona)
Tel. +34 (0)93 5650250
Fax. +34 (0)93 5644310
E-mail. [email protected]
www.smeg.es www.smeg.es
Belgium
N.V. SMEG BELGIUM S.A.
Schoonmansveld 12
2870 Puurs
Tel. +32 (0) 3 8609696
Fax. +32 (0)3 8860666
E-mail. [email protected]
www.smeg.be
France
SMEG FRANCE S.A.
9, rue Linus Carl Pauling
B.P. 548
76824 Mont Saint Aignan
Cedex
Tel. +33 (0)235 121414
Fax. +33 (0)235 607077
E-mail. [email protected]
www.smeg.fr
Germany
SMEG HAUSGERÄTE GmbH
Carl-Zeiss-Ring, 8-12
D-85737 Ismaning (München)
Tel. +49 (0)89 9233480
Fax. +49 (0)89 92334819
E-mail. [email protected]
www.smeg.de
Great Britain
SMEG (UK) LTD
3 Milton Park,
Abingdon Oxon OX14 4RN
Tel. +44 (0) 1235 861120
Fax. +44 (0) 1235 861120
E-mail. [email protected]
www.smeguk.com
Holland
SMEG NEDERLAND B.V.
Veemkade, 384
1019 HE AMSTERDAM
Tel. +31 (0)20 4490120
Fax. +31 (0)20 3582640
E-mail. [email protected]
www.smeg.nl
Portugal
SMEG PORTUGAL, Lda
Av. da Quinta Grande, 53 8 A
2614-521 Ed. Prime Alfragide
Amadora (Portugal)
Tel. +351 214 704 360
Fax. +351 214 704 361
E-mail. [email protected]
www.smeg.pt
Showroom Madrid
Tel. +34 (0)91 4008172
Fax. +34 (0)91 4008176
E-mail. [email protected]
Sweden
SMEG SVERIGE AB
Dockplatsen 1
21119 Malmö
Tel. +46 (0)40 669 54 90
Fax. +46 (0)40 669 54 99
E-mail. [email protected]
www.smeg.se
USA
SMEG USA
A & D Building
150 E 58th Street - 7th Floor
Suite 0762
New York, NY 10155
Tel. +1 212 265 5378
Fax. +1 212 265 5945
Toll free. +1 866 736 7634
E-mail. [email protected]
www.smegusa.com
Representative Offices
Hong Kong
Unit 301, 3/F
Tai Yip Building
141 Thomson Road
Wanchai, Hong Kong
Tel. +852 2328 2103
Fax. +852 2328 2117
E-mail. [email protected]
Saudi Arabia
P.O. Box 51689
Jeddah 21553
Tel. +966 2
6503679/6529024
Fax. +966 2 6511099
E-mail. [email protected]
9000 360 420 (8805)