1
PREPARING YOUR FIRELITE: MAC OS OR WINDOWS?.................1
USING FIRELITE WITH MAC OS............................................................1
Connecting FireLite to a Macintosh Computer ...........................................1
Storing and Transferring Data.....................................................................2
Disconnecting FireLite from a Macintosh Computer..................................2
USING FIRELITE WITH WINDOWS .......................................................3
Connecting FireLite to a Windows Computer ............................................3
Storing and Transferring Data.....................................................................4
Disconnecting FireLite from a Windows Computer ...................................4
FORMATTING FIRELITE FOR WINDOWS...........................................5
Formatting FireLite Under Windows XP or Windows 2000.......................5
Formatting FireLite Under Windows Me or Windows 98 SE.....................7
Formatting for Windows Under Mac OS X ................................................9
FAT32 or NTFS? ........................................................................................9
GETTING HELP......................................................................................... 10
REGISTERING YOUR SMARTDISK PRODUCT ................................. 10
WARRANTY TERMS ................................................................................ 11
COPYRIGHT STATEMENT..................................................................... 12
FCC COMPLIANCE .................................................................................. 12
GUIDE DE L'UTILISATEUR ................................................ 14
PRÉPARATION DE FIRELITE : MAC OS OU WINDOWS? .............. 14
UTILISATION DE FIRELITE AVEC MAC OS ..................................... 15
Connexion de FireLite à un ordinateur Macintosh.................................... 15
Stockage et transfert de données ............................................................... 15
Déconnexion de FireLite d'un ordinateur Macintosh ................................ 15
UTILISATION DE FIRELITE AVEC WINDOWS................................. 16
Connexion du FireLite à un ordinateur Windows ..................................... 17
Stockage et transfert de données ............................................................... 17
Déconnexion de FireLite d'un ordinateur Windows.................................. 18
FORMATAGE DU FIRELITE POUR WINDOWS................................. 19
Formatage du FireLite sous Windows XP ou Windows 2000 .................. 19
Formatage du FireLite sous Windows Me ou Windows 98 SE................. 21
Formatage pour Windows sous Mac OS X ............................................... 23
FAT32 ou NTFS ? .................................................................................... 23
BESOIN D'AIDE ? ...................................................................................... 24
ENREGISTREMENT DU PRODUIT SMARTDISK .............................. 25
TERMES DE LA GARANTIE ................................................................... 25
AVIS DE COPYRIGHT.............................................................................. 26
CONFORMITÉ FCC .................................................................................. 27
BENUTZERHANDBUCH....................................................... 28
VORBEREITUNG VON FIRELITE: MAC OS ODER WINDOWS? ... 28
ANWENDUNG VON FIRELITE MIT MAC OS ..................................... 29
Anschließen von FireLite an einen Macintosh Computer ......................... 29
Speichern und Übertragen von Daten ....................................................... 29
Trennen der FireLite von einem Macintosh Computer ............................. 29
ANWENDUNG VON FIRELITE MIT WINDOWS ................................ 30
Anschließen der FireLite an einen Windows-Computer ........................... 31
Speichern und Übertragen von Daten ....................................................... 31
Trennen der FireLite von einem Windows-Computer .............................. 32
FORMATIEREN VON FIRELITE FÜR WINDOWS............................. 33
Formatieren von FireLite unter Windows XP oder Windows 2000.......... 33
Formatieren von FireLite unter Windows Me oder Windows 98 SE ........ 35
Formatierung für Windows mit Mac OS X............................................... 37
FAT32 oder NTFS? .................................................................................. 37
SO ERHALTEN SIE HILFE...................................................................... 38
REGISTRIERUNG DES SMARTDISK-PRODUKTS............................. 39
GARANTIEBEDINGUNGEN.................................................................... 39
AUSSAGE ZUM URHEBERRECHT........................................................ 40
FCC-VORSCHRIFTEN.............................................................................. 41
GUIDA PER L'UTENTE......................................................... 42
PREPARAZIONE DELL'UNITÀ FIRELITE: MAC OS O WINDOWS?
....................................................................................................................... 42
UTILIZZO DI FIRELITE CON MAC OS................................................ 43
Collegamento dell'unità FireLite a un computer Macintosh ..................... 43
Memorizzazione e trasferimento di dati.................................................... 43
Scollegamento dell'unità FireLite da un computer Macintosh .................. 43
UTILIZZO DI FIRELITE CON WINDOWS ........................................... 44
Collegamento di FireLite a un computer Windows .................................. 45
Memorizzazione e trasferimento di dati.................................................... 45
Scollegamento di FireLite da un computer Windows ............................... 46
FORMATTAZIONE DELL'UNITÀ FIRELITE PER WINDOWS ....... 47
Formattazione di FireLite con Windows XP o Windows 2000................. 47
Formattazione di FireLite con Windows Me o Windows 98 SE............... 49
Formattazione per Windows in ambiente Mac OS X................................ 51
FAT32 o NTFS? ....................................................................................... 51
PER ASSISTENZA ..................................................................................... 52
REGISTRAZIONE DEL PRODOTTO SMARTDISK ............................ 53
CONDIZIONI DELLA GARANZIA ......................................................... 53
DICHIARAZIONE SUL COPYRIGHT.................................................... 54
CONFORMITÀ FCC .................................................................................. 55
MANUAL DEL USUARIO...................................................... 56
CÓMO PREPARAR SU FIRELITE: ¿MAC OS O WINDOWS? .......... 56
CÓMO UTILIZAR FIRELITE CON MAC OS ....................................... 57
Cómo conectar FireLite a una computadora Macintosh............................ 57
Cómo almacenar y transferir datos ........................................................... 57
Cómo desconectar FireLite de una computadora Macintosh .................... 57
CÓMO UTILIZAR FIRELITE CON WINDOWS................................... 58
Conexión de FireLite a una computadora con Windows .......................... 59
Cómo almacenar y transferir datos ........................................................... 59
Cómo desconectar FireLite de una computadora con Windows ............... 60
CÓMO FORMATEAR FIRELITE PARA WINDOWS .......................... 61
Cómo formatear FireLite en Windows XP o Windows 2000.................... 61
Cómo formatear FireLite en Windows Me o Windows 98 SE.................. 63
Formateo para Windows bajo Mac OS X ................................................. 65
¿FAT32 o NTFS?...................................................................................... 65
CÓMO OBTENER AYUDA....................................................................... 66
CÓMO REGISTRAR SU PRODUCTO SMARTDISK ........................... 67
TÉRMINOS DE LA GARANTÍA .............................................................. 67
DECLARACIÓN DE COPYRIGHT ......................................................... 68
CONFORMIDAD CON LAS DISPOSICIONES DE LA FCC................ 69
HANDLEIDING....................................................................... 70
VOORBEREIDING VAN DE FIRELITE: MAC OS OF WINDOWS?. 70
DE FIRELITE GEBRUIKEN MET MAC OS.......................................... 71
De FireLite aansluiten op een Macintosh-computer ................................. 71
Gegevens opslaan en kopiëren .................................................................. 71
De FireLite verwijderen uit een Macintosh-computer .............................. 71
DE FIRELITE GEBRUIKEN MET WINDOWS ..................................... 72
De FireLite aansluiten op een Windows-computer ................................... 73
Gegevens opslaan en kopiëren .................................................................. 73
De FireLite verwijderen uit een Windows-computer ................................ 74
DE FIRELITE FORMATTEREN VOOR WINDOWS ........................... 75
De FireLite formatteren onder Windows XP of Windows 2000 ............... 75
De FireLite formatteren onder Windows Me of Windows 98 Tweede editie
.................................................................................................................. 77
Formatteren voor Windows onder Mac OS X........................................... 79
FAT32 of NTFS? ...................................................................................... 80
TECHNISCHE ONDERSTEUNING......................................................... 81
SMARTDISK PRODUCTREGISTRATIE ............................................... 81
COPYRIGHT-VERKLARING .................................................................. 83
NALEVING VAN DE FCC-VOORSCHRIFTEN .................................... 83
Preparing Your FireLite: Mac OS or
Windows?
Your FireLite comes pre-formatted for immediate use with Apple Macintosh
computers running Mac OS. (It is formatted as HFS+.) If you plan to use
your FireLite only with computers running Mac OS, you can leave it
formatted as it comes from the factory, and follow the simple steps in Using
FireLite with Mac OS to connect and use your FireLite.
If you plan to use your FireLite with computers running Windows, or with
both Mac OS and Windows computers, you should reformat your FireLite so
it can be recognized by Windows before saving data to it. (Mac OS can
recognize hard drives formatted for Windows.) If this is your situation,
proceed first to Using FireLite with Windows to prepare your FireLite.
Then you can follow the guidelines in Using FireLite with Mac OS if you
also wish to use your FireLite with a computer running Mac OS.
Note: Capacity dependent on model. Your operating system may
report capacity as fewer gigabytes. 1 GB = 1,000,000,000 bytes.
Using FireLite with Mac OS
Connecting FireLite to a Macintosh Computer
Your FireLite is compatible with both the 1394a (FireWire 400) and the
1394b (FireWire 800) standards. To connect FireLite to a FireWire 400 port
on your Macintosh, first locate the bilingual (9-pin to 6-pin) cable that was
included in your package. Now connect the 6-pin connector of the bilingual
cable to an open FireWire 400 port on your Macintosh, and connect the other
end of the bilingual cable to either one of the ports on your SmartDisk hard
drive. Your hard drive will appear on the desktop as a new disk.
1
To connect FireLite to a FireWire 800 port on your Macintosh, first locate the
beta (9-pin to 9-pin) cable that was included in your package. Now connect
one end of the beta cable to an open FireWire 800 port on your Macintosh,
and connect the other end of the beta cable to either one of the ports on your
SmartDisk hard drive. Your hard drive will appear on the desktop as a new
disk.
Storing and Transferring Data
Once your SmartDisk hard drive is connected to a computer, it can be
accessed and used like any other removable disk. You can drag files to your
SmartDisk hard drive’s icon to copy them, navigate to your hard drive in
Open or Save dialog boxes, or delete files stored on your SmartDisk hard
drive. For information on copying, opening, or deleting files, consult your
computer’s documentation.
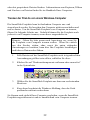
Disconnecting FireLite from a Macintosh Computer
Your SmartDisk hard drive is hot-pluggable; it can be connected and
disconnected without restarting your computer. To disconnect your
SmartDisk hard drive at any time, simply perform the following steps.
Note: Please be careful to follow the correct procedure when
disconnecting your SmartDisk hard drive. Simply unplugging the
hard drive without first following the instructions below may result
in damage to your hard drive and/or loss of data.
1.
If you have files located on your SmartDisk hard drive open in any
application, close them.
2.
Locate the icon for your SmartDisk hard drive on the desktop, and
drag it to the trash.
You may also simply shut down your computer with your SmartDisk hard
drive connected, and then disconnect it.
2
Using FireLite with Windows
Your SmartDisk hard drive comes pre-formatted as HFS+, the preferred
format when used exclusively with Apple Macintosh computers running Mac
OS. To use the hard drive on a Windows system you will need to reformat
your hard drive once so it can be recognized by Windows computers. (It will
still be recognized by Apple Macintosh computers, too.)
Follow the steps in the separate section Formatting FireLite for Windows if
you ever intend to use your SmartDisk hard drive with a Windows computer.
If you primarily use a Mac OS computer and wish to share it with a Windows
computer, you may find the steps outlined in Formatting for Windows
Under Mac OS X a more convenient procedure for preparing your
SmartDisk hard drive for Windows use.
Before proceeding, be sure that your Windows computer has either a 6-pin
FireWire 400 port or a 9-pin FireWire 800 port available. For convenience,
your SmartDisk hard drive draws its power from this port. Some computers
provide 4-pin FireWire ports only. Since 4-pin ports do not supply power,
you will need to obtain a 9-pin to 4-pin bilingual FireWire cable and separate
A/C adapter (SmartDisk model ACFWS) to use your SmartDisk hard drive
with this computer.
Connecting FireLite to a Windows Computer
Your FireLite is compatible with both the 1394a (FireWire 400) and the
1394b (FireWire 800) standards. To connect FireLite to a FireWire 400 port
on your PC, first locate the bilingual (9-pin to 6-pin) cable that was included
in your package. Now connect the 6-pin connector of the bilingual cable to an
open FireWire 400 port on your PC, and connect the other end of the bilingual
cable to either one of the ports on your SmartDisk hard drive.
To connect FireLite to a FireWire 800 port on your PC, first locate the beta
(9-pin to 9-pin) cable that was included in your package. Now connect one
end of the beta cable to an open FireWire 800 port on your PC, and connect
the other end of the beta cable to either one of the ports on your SmartDisk
hard drive.
If you are using an A/C adapter (SmartDisk model ACFWS), plug it in as
well.
3
If you are using Windows 98 SE, and your computer prompts you
to insert the Windows 98 SE Installation CD after connecting your
hard drive, it means you need to install additional FireWire (1394)
support software from Microsoft. You should disconnect your
hard drive, then locate, download, and install the latest FireWire
(1394) drivers for Windows 98 SE from the Microsoft website
http://windowsupdate.microsoft.com .
Your hard drive will appear as a new drive letter in My Computer.
Storing and Transferring Data
Once your properly formatted SmartDisk hard drive is connected to a
Windows computer, it can be accessed and used like any other removable
disk. You can drag files to your FireLite’s icon to copy them, navigate to
your FireLite in Open or Save dialog boxes, or delete files stored on your
SmartDisk hard drive. For information on copying, opening, or deleting files,
consult your computer’s documentation.
Disconnecting FireLite from a Windows Computer
Your SmartDisk hard drive is hot-pluggable; it can be connected and
disconnected without restarting your computer. To disconnect your
SmartDisk hard drive at any time, perform the following steps. You can also
disconnect your hard drive at any time while your computer is powered off.
Note: Please be careful to follow the correct procedure when
disconnecting your SmartDisk hard drive. Simply unplugging the
hard drive without first following the instructions below may result
in damage to your hard drive and/or loss of data.
1.
If you have files located on your SmartDisk hard drive open in any
application, close them.
2.
Click the Unplug or Eject Hardware button in the System Tray.
4
3.
Select your SmartDisk hard drive from the menu that appears.
4.
After a moment, Windows will display a message indicating that
your hardware can be safely removed.
You may also simply shut down your computer with SmartDisk hard drive
connected, and then disconnect it.
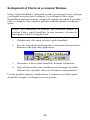
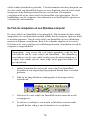
Formatting FireLite for Windows
Follow the instructions below to format your SmartDisk hard drive for use
with Windows, or with both Windows and Mac OS. You will only have to
perform this procedure once. The required steps differ depending on which
version of Windows you are using while performing the format. Follow the
instructions for your version of Windows.
Formatting FireLite Under Windows XP or Windows 2000
Follow these steps if you are using Windows XP or Windows 2000 while
formatting your SmartDisk hard drive for Windows.
Formatting deletes all information on the drive. Double check each
step before execution to ensure that you are formatting the correct
drive. Information that is lost may be irretrievable.
1.
Follow the instructions in Connecting FireLite to a Windows
Computer located earlier in this document.
2.
Open the Disk Management utility as follows:
a.
Click on the Start menu, then click Settings, and then
click Control Panel.
5
3.
b.
Double-click on Administrative Tools, and then doubleclick on Computer Management.
c.
In the Storage sub-directory, click on Disk Management.
The Write Signature and Upgrade Disk Wizard will start.
a.
Click Next to continue the Wizard.
b.
Select the SmartDisk hard drive from the list using the
checkbox.
Caution: Selecting the wrong drive at this point may cause you to
lose valuable data.
c.
Click Next to continue.
d.
Click Finish to write the signature to the hard drive.
4.
The hard drive will be listed without a drive letter, and show as
"unallocated."
5.
To create a partition, right click once on the unallocated area of the
hard drive box, and click on Create Partition.
6.
The Create Partition Wizard will start.
a.
Click Next to continue the Wizard.
b.
Choose Primary or Extended Partition (Primary is
recommended), then click Next.
c.
Enter the amount of disk space to be allocated (the
partition size). The default is the maximum available disk
space (recommended). Click Next..
d.
Assign a drive letter or path (the default letter is
recommended), then click Next.
e.
Select a file system to format the disk (FAT32 or NTFS),
verify the settings, and then click Next. Refer to the
section FAT32 or NTFS? later in this document if you
are not sure which to choose.
6
It is recommended that you select the Perform Quick Format
checkbox. A standard format could take several hours.
f.
7.
Verify the settings, and then click Finish to begin
formatting the hard drive.
When formatting has finished, the hard drive will display the
volume name, the drive letter, the size of the partition (in GB), the
file system used (FAT32 or NTFS), and a healthy status.
The hard drive is now available to use.
Formatting FireLite Under Windows Me or Windows 98 SE
Follow these steps if you are using Windows Me or Windows 98 SE while
formatting your SmartDisk hard drive for Windows.
Formatting deletes all information on the drive. Double check each
step before execution to ensure that you are formatting the correct
drive. Information that is lost may be irretrievable.
1.
Follow the instructions in Connecting FireLite to a Windows
Computer located earlier in this document.
2.
From the Start menu, click on Run, type command and press Enter.
You should see a small black MS DOS window with a prompt such
as c:\Windows.
3.
Type fdisk and press Enter. Type Y (or just hit the Enter key) in
the window that asks if you wish to enable large disk support.
4.
You will be presented with a menu of five items. You should type 5
to select the "Change current fixed disk drive" option then hit the
Enter key.
5.
You will see a list of hard drives. Your main internal hard drive will
be Disk 1. Any other hard drives will be listed as 2, 3, etc. If you
have only one hard drive in your computer, drive 2 will be the
SmartDisk hard drive. You can also verify which drive on the list is
the SmartDisk hard drive by the size under Mbytes. The number
7
should be a little less than the size marked on the product label of
your SmartDisk hard drive. Type the number that represents the
SmartDisk hard drive and press Enter.
Caution: Selecting the wrong drive at this point may cause you to
lose valuable data.
6.
You now are presented with same menu of five items from step 4.
This time, you must type 1 (Create DOS partition or Logical DOS
drive) and hit Enter.
7.
At the next menu of three items, verify that you are partitioning the
correct disk number before proceeding. Type 1 to select Create
Primary DOS Partition and press Enter. The resulting process may
take about a minute.
8.
At the prompt Do you wish to use the maximum available size for
the Primary DOS partition? respond with yes (the default) or just
hit the Enter key. The resulting process may take about a minute.
9.
When the partitioning is complete hit the Esc key twice. You will
see a message that you must restart your PC. You can ignore this
message. Hit the Esc key once more to exit the fdisk program. Type
exit and press Enter to close the MS DOS Prompt window.
10. Double click the "My Computer" icon to open the window. Unplug
the SmartDisk hard drive and then reconnect it to your PC. An icon
with a drive letter should show up in the "My Computer" window.
You will also get a dialog box stating that the drive is not
accessible. Remember the drive letter as you will need it in the next
step. Click on Cancel
11. You now need to format your SmartDisk hard drive. In the "My
Computer" window, point to the icon that represents the SmartDisk
hard drive and click the right mouse button. From the menu select
Format. At the format window select Full under Format Type and
type any label (10 characters or fewer) if you choose. Click the
Start button. You will see a warning that all files will be destroyed.
Click OK to proceed. This process will take several minutes. Once
complete, click the Close buttons and you are done.
You may be prompted to run Scandisk to check your disk, but this is not
required. If you choose to do this, you should select Thorough under Type of
8
Test since there are no files or folders on the disk yet. Be prepared to wait a
long time to complete this test.
The hard drive is now available to use.
Formatting for Windows Under Mac OS X
It is possible to format your SmartDisk hard drive in FAT32 format while
connected to an Apple Macintosh computer running Mac OS X. This may be
a convenient method if you primarily use your SmartDisk hard drive on a
Mac OS computer, but want to later connect it to a Windows computer as
well.
Your SmartDisk hard drive can be formatted and partitioned using Apple’s
Disk Utility, located in your Utilities folder. Under Disk and Volumes
Selected, select the appropriate drive, and click on the Partition tab. Under
Volume Information, expand the Format field and choose Free Space. Click
on the Erase tab, expand the Volume Format field, and click MS-DOS File
System. Click Erase and wait for the Erase to complete. Your drive is now
ready to be connected to a Windows operating system.
FAT32 or NTFS?
When formatting your SmartDisk hard drive while running Windows XP or
Windows 2000, you will have the choice between FAT32 and NTFS formats.
Following are some considerations for making your choice.
FAT32
FAT32 is compatible with the following Windows operating systems:
Windows 98, Windows 98 SE, Windows Me, Windows 2000, Windows XP.
FAT32 can also be read by Apple Macintosh computers running Mac OS.
Limitations: Under Windows 2000 and Windows XP users will not be able to
create partition sizes larger than 32GB (though they can access these larger
partitions). (This limitation does not apply to other supported operating
systems.)
9
In general, FAT32 is a good choice if you’ll be using your SmartDisk hard
drive with computers running Windows 98, Windows 98 SE, or Windows
Me, or if you’ll be using it with both Windows and Mac OS computers.
NTFS
NTFS is compatible with the following Windows operating systems:
Windows NT, Windows 2000, and Windows XP. NTFS usually results in
higher performance than FAT32, and will permit users to create partition sizes
larger than 32GB under supported operating systems.
Limitations: NTFS is not compatible with Windows 98, Windows 98 SE,
Windows Me, or Apple Macintosh computers running Mac OS.
In general, NTFS is a good choice if you’ll be using your SmartDisk hard
drive only with one or more computers running Windows XP or Windows
2000.
Getting Help
If you are experiencing difficulty installing or using your SmartDisk product,
please visit the main SmartDisk Technical Support website at
www.SmartDisk.com. From this page you can access our library of user
documentation, read answers to frequently asked questions, and download
available software updates. Although most of our customers find this content
sufficient to put them back on the right track, this page also lists ways in
which you can contact the SmartDisk Technical Support Team directly.
Please register your product (see below) before contacting SmartDisk
Technical Support.
Registering Your SmartDisk Product
You can register your SmartDisk product at
www.SmartDisk.com/Registration.asp. This registration is quick and easy and
10
will assist us in providing the best possible experience with this and future
SmartDisk products.
Warranty Terms
SmartDisk Corporation warrants its products to be free of defects in material and
workmanship under normal use and service for a period of 1 year from the date of
purchase or 3 years from the date of manufacture, whichever occurs first. Products
purchased in European Union countries covered by Directive 1999/44/EC are warranted
for a period of 2 years from the date of purchase. SmartDisk's sole obligation with
respect to claims of non-conformance made within the warranty period described above
shall be, at its option, to repair or replace any item of Equipment that SmartDisk, in its
sole discretion, determines to be defective. The Customer shall obtain a Return
Merchandise Authorization (RMA) number from SmartDisk prior to returning any
Equipment to SmartDisk under this warranty by contacting Technical Support (see
www.SmartDisk.com). The Customer shall prepay shipping charges for Equipment
returned to SmartDisk for warranty service, and SmartDisk shall pay freight charges for
the return of the Equipment to the Customer, excluding customs duties or taxes, if any.
All returns require a dated original proof of purchase and a letter explaining the
problem. SmartDisk Corporation will not be responsible for items returned without an
RMA or improperly packaged. Replacement Equipment shall be new or like new in
performance and shall be warranted for the remaining duration of the warranty term of
the non-conforming Equipment. SmartDisk Corporation will not be responsible for
recovery of customer data from returned products that incorporate data storage. All
replaced Equipment shall become the property of SmartDisk. Any claims of defects not
made within the warranty period shall be deemed waived by Customer.
SmartDisk's warranty obligations hereunder are expressly conditioned upon (i.) the
Products being properly installed, used and maintained at all times by Customer; (ii.)
the Products not being subject to unusual mechanical stress or unusual electrical or
environmental conditions or other acts of God; (iii.) the Products not being subjected to
misuse, accident or any unauthorized installation/deinstallation by Customer or other
third party; (iv.) the Products not being altered or modified in an unauthorized manner,
unless approved in writing or otherwise performed by SmartDisk and (v.) Customer
promptly installing all Product revisions that have been released for such Products by
SmartDisk throughout the warranty term. SmartDisk does not warrant that the Products
will operate in any specific combination that may be selected for use by Customer or
that the operation of the Products will be uninterrupted or error free, or that all nonconformance or defects will be remedied. Additionally, SmartDisk shall have no
warranty obligations for any failure of the Products to conform to the applicable
product specifications resulting from the combination of any Product(s) with hardware
and/or software not supplied by SmartDisk. If it is determined that any Product(s)
reported as defective or non-conforming by Customer during the warranty period is not
defective or non-conforming, SmartDisk may, at its option, charge Customer for any
11
labor provided and expenses incurred by SmartDisk in connection with such
determination, at SmartDisk's then current rates.
SmartDisk Corporation shall not be responsible for unauthorized sale or
misrepresentation by unauthorized third party resellers. SmartDisk warranties are not
transferable with ownership. Products purchased by auction, yard sale, flea market or
purchased as demo units may not be covered under SmartDisk’s warranty.
THE WARRANTIES OF SMARTDISK AND REMEDIES OF CUSTOMER SET
FORTH IN THIS SECTION ARE EXCLUSIVE AND ARE GIVEN BY SMARTDISK
AND ACCEPTED BY CUSTOMER IN LIEU OF ANY AND ALL OTHER
WARRANTIES, WHETHER EXPRESSED OR IMPLIED, INCLUDING WITHOUT
LIMITATION, ALL WARRANTIES OF MERCHANTABILITY AND FITNESS
FOR A PARTICULAR PURPOSE, ALL SUCH OTHER WARRANTIES BEING
HEREBY EXPRESSLY AND UNEQUIVOCALLY DISCLAIMED BY SMARTDISK
AND WAIVED BY CUSTOMER.
Copyright Statement
Copyright ©2004 SmartDisk Corporation.
All brands and product names referenced herein are property of their respective owners.
No part of this document may be reproduced in any form or by any means, for any
purpose, without the express written permission of SmartDisk Corporation. All rights
reserved.
FCC Compliance
This equipment has been tested and found to comply with the limits for a Class B
digital device, pursuant to Part 15 of the FCC Rules. These limits are designed to
provide reasonable protection against harmful interference in a residential installation.
This equipment generates, uses and can radiate radio frequency energy and, if not
installed and used in accordance with the instructions, may cause harmful interference
to radio communications. However, there is no guarantee that interference will not
occur in a particular installation. If this equipment does cause harmful interference to
radio or television reception, which can be determined by turning the equipment off and
on, the user is encouraged to try to correct the interference by one or more of the
following measures:
•
Reorient or relocate the receiving antenna.
12
•
Increase the separation between the equipment and receiver.
•
Connect the equipment into an outlet on a circuit different from that to
which the receiver is connected.
•
Consult the dealer or an experienced radio/TV technician for help.
13
Guide de l'utilisateur
Préparation de FireLite : Mac OS ou
Windows?
Votre FireLite est livré préformaté pour utilisation immédiate avec les
ordinateurs Apple Macintosh sur lesquels tourne Mac OS. (Il est formaté en
HFS+.) Si vous avez l'intention de n'utiliser votre FireLite que sur des
ordinateurs Mac OS, vous pouvez le laisser tel que formaté en usine.
Observez simplement les quelques étapes simples décrites sous Utilisation de
FireLite avec Mac OS pour connecter et utiliser votre FireLite.
Si vous devez l'utiliser sur des ordinateurs tournant Windows ou à la fois sur
des ordinateurs Mac OS et Windows, vous devez reformater le FireLite afin
qu'il puisse être reconnu par Windows avant d'y enregistrer des données.
(Mac OS peut reconnaître les disques durs formatés pour Windows.) Si c'est
votre cas, passez d'abord à Utilisation de FireLite avec Windows pour
préparer votre FireLite. Vous pouvez ensuite suivre les consignes de la
section Utilisation de FireLite avec Mac OS si vous devez également
utiliser le FireLite avec un ordinateur tournant sous Mac OS.
Remarque :
Capacité selon le modèle. Votre système
d'exploitation peut indiquer une capacité inférieure à celle
spécifiée pour l'unité. 1 Go = 1 000 000 000 d'octets.
14
Utilisation de FireLite avec Mac OS
Connexion de FireLite à un ordinateur Macintosh
Votre FireLite est compatible avec les normes 1394a (FireWire 400) et 1394b
(FireWire 800). Pour connecter le FireLite à un port FireWire 400 sur un
Macintosh, localisez d'abord le câble 9 broches à 6 broches (bilingual) fourni
avec l'unité. Branchez le connecteur à 6 broches du câble à un port FireWire
400 libre sur le Macintosh, et connectez l'autre extrémité du câble dans un des
ports du disque dur SmartDisk. Votre disque apparaîtra sur le bureau en tant
que nouveau disque.
Pour connecter le FireLite à un port FireWire 800 sur un Macintosh, localisez
d'abord le câble 9 broches à 9 broches (beta) fourni avec l'unité. Branchez une
extrémité du câble beta à un port FireWire 800 libre sur le Macintosh, et
connectez l'autre extrémité du câble dans un des ports du disque dur
SmartDisk. Votre disque dur apparaîtra sur le bureau en tant que nouveau
disque.
Stockage et transfert de données
Une fois que votre disque SmartDisk correctement formaté est connecté à un
ordinateur, vous pouvez y accéder et l'utiliser comme tout autre disque
amovible. Vous pouvez glisser des fichiers sur l'icône de SmartDisk pour les
copier, accéder au disque dur au moyen des boîtes de dialogue Ouvrir ou
Enregistrer ou encore supprimer des fichiers stockés sur votre disque dur
SmartDisk. Pour plus d'information sur la copie, l'ouverture ou la suppression
de fichiers, consultez la documentation de votre ordinateur.
Déconnexion de FireLite d'un ordinateur Macintosh
Votre disque SmartDisk est enfichable à chaud ; il peut donc être connecté ou
déconnecté sans que vous ayez à redémarrer votre ordinateur. Pour
débrancher votre disque dur SmartDisk en tout temps, observez les étapes
suivantes :
15
Remarque : Veillez à suivre soigneusement la procédure correcte
lors de la déconnexion du disque dur SmartDisk. Un simple
débranchement du disque dur sans suivre au préalable les
directives suivantes risque de l'endommager ou d'occasionner une
perte de données.
1.
Si des fichiers placés sur le disque dur SmartDisk sont ouverts dans
une application quelconque, fermez-les.
2.
Sur le bureau, trouvez l'icône du disque dur SmartDisk et glissez-la
dans la corbeille.
Vous pouvez aussi simplement éteindre votre ordinateur avec SmartDisk
connecté, puis déconnecter ce dernier.
Utilisation de FireLite avec Windows
Votre SmartDisk est livré préformaté en HFS+, le format préféré lorsqu'il est
utilisé exclusivement avec des ordinateurs Apple Macintosh tournant sous
Mac OS. Pour utiliser le disque avec un système Windows, vous devez le
reformater une fois afin que l'ordinateur Windows puisse le reconnaître. (Les
ordinateurs Apple Macintosh continueront à le reconnaître.)
Observez les étapes de la section Formatage de FireLite pour Windows si
vous prévoyez utiliser SmartDisk avec un ordinateur Windows. Si vous
utilisez SmartDisk principalement avec un ordinateur Mac OS et désirez le
partager avec un ordinateur Windows, les étapes de la section Formatage
pour Windows sous Mac OS X peuvent s'avérer plus pratiques pour la
préparation du disque dur SmartDisk pour être utilisé sous Windows.
Avant de commencer, vérifiez que l'ordinateur Windows comporte un port
FireWire 400 à 6 broches ou un port FireWire 800 à 9 broches libre. Pour
votre convenance, le disque dur SmartDisk utilise l'alimentation fournie par
ce port. Certains ordinateurs n'offrent que des ports FireWire à 4 broches.
Puisque les ports à 4 broches ne fournissent pas d'alimentation, vous devez
utiliser un câble 9 broches à 6 broches (bilingual) et un adaptateur CA
(SmartDisk modèle ACFWS) pour utiliser le disque dur SmartDisk avec votre
ordinateur.
16
Connexion du FireLite à un ordinateur Windows
Votre FireLite est compatible avec les normes 1394a (FireWire 400) et 1394b
(FireWire 800). Pour connecter le FireLite à un port FireWire 400 sur un PC,
localisez d'abord le câble 9 broches à 6 broches (bilingual) fourni avec l'unité.
Branchez le connecteur à 6 broches du câble à un port FireWire 400 libre sur
le PC, et connectez l'autre extrémité du câble dans un des ports du disque dur
SmartDisk.
Pour connecter le FireLite à un port FireWire 800 sur un PC, localisez d'abord
le câble 9 broches à 9 broches (beta) fourni avec l'unité. Branchez une
extrémité du câble beta à un port FireWire 800 libre sur le PC, et connectez
l'autre extrémité du câble dans un des ports du disque dur SmartDisk.
Si vous utilisez un adaptateur CA (SmartDisk modèle ACFWS), branchez-le
également.
Si vous utilisez Windows 98 SE et que votre système vous
demande d'insérer le CD d'installation de Windows 98 SE après
avoir connecté votre disque, cela signifie que vous devez installer
un logiciel de prise en charge de FireWire additionnel (1394) de
chez Microsoft. Déconnectez le disque dur, puis localisez,
téléchargez et installez les plus récents pilotes FireWire (1394)
pour Windows 98 SE depuis le site Web de Microsoft
http://windowsupdate.microsoft.com.
Votre disque dur s'affichera dans Poste de travail, et une lettre d'unité lui sera
attribuée.
Stockage et transfert de données
Une fois que votre disque SmartDisk correctement formaté est connecté à un
ordinateur Windows, vous pouvez y accéder et l'utiliser comme tout autre
disque amovible. Vous pouvez glisser des fichiers sur l'icône de FireLite pour
les copier, passer aux boîtes de dialogue Ouvrir ou Enregistrer de FireLite ou
encore supprimer des fichiers stockés sur votre SmartDisk. Pour plus
d'information sur la copie, l'ouverture ou la suppression de fichiers, consultez
la documentation de votre ordinateur.
17
Déconnexion de FireLite d'un ordinateur Windows
Votre disque SmartDisk est enfichable à chaud ; il peut donc être connecté ou
déconnecté sans nécessiter le redémarrage de l'ordinateur. Pour déconnecter
votre SmartDisk n'importe quand, observez simplement les étapes suivantes.
Vous pouvez aussi déconnecter votre disque dur à tout moment pendant que
votre ordinateur est éteint.
Remarque : Veillez à suivre soigneusement la procédure correcte
lors de la déconnexion du disque dur SmartDisk. Un simple
débranchement du disque dur sans suivre au préalable les
directives suivantes risque de l'endommager ou d'occasionner une
perte de données.
1.
Si des fichiers placés sur le disque dur SmartDisk sont ouverts dans
une application quelconque, fermez-les.
2.
Cliquez sur le bouton Déconnecter ou Éjecter le matériel dans la
barre d'état système.
3.
Sélectionnez le disque SmartDisk dans le menu qui s'affiche.
4.
Au bout d'un moment, Windows affiche un message indiquant que
votre matériel peut être retiré sans danger.
Vous pouvez aussi simplement éteindre votre ordinateur avec votre
SmartDisk connecté, puis déconnecter ce dernier.
18
Formatage du FireLite pour Windows
Observez les directives suivantes pour formater votre SmartDisk et l'utiliser
sous Windows ou avec à la fois avec Windows et Mac OS. Vous n'aurez à
effectuer cette procédure qu'une seule fois. Les étapes requises varient selon
la version de Windows utilisée lors du formatage. Observez les directives
correspondant à votre version de Windows.
Formatage du FireLite sous Windows XP ou Windows 2000
Observes les étapes suivantes si vous utilisez Windows XP ou Windows 2000
pour formater votre disque SmartDisk pour Windows.
Le formatage supprime toutes les informations contenues sur le
disque. Vérifiez bien chaque étape avant son exécution pour vous
assurer que vous formatez la bonne unité. Les données
éventuellement perdues pourraient être irrécupérables.
1.
Observez les directives de la section Connexion du FireLite à un
ordinateur Windows.
2.
Ouvrez l'utilitaire Gestion de disque comme suit :
3.
a.
Cliquez sur Démarrer, puis sur Paramètres et sur
Panneau de configuration.
b.
Double-cliquez sur Outils d'administration puis sur
Gestion de l'ordinateur.
c.
Dans le sous-répertoire Stockage, cliquez sur Gestion de
disque.
L'Assistant Écriture de signature et Mise à niveau du disque
démarre.
d.
Cliquez sur Suivant pour poursuivre.
e.
Sélectionnez le disque SmartDisk dans la liste au moyen
de la case à cocher.
19
Attention : À ce point, la sélection du mauvais disque peut
entraîner la perte de précieuses données.
f.
Cliquez sur Suivant pour poursuivre.
g.
Cliquez sur Terminer pour écrire la signature sur le disque.
4.
Le disque sera mentionné sans lettre d'unité et indiquera « non
alloué ».
5.
Pour créer une partition, cliquez sur le bouton droit de la souris dans
la zone non allouée de la case du disque et cliquez sur Création de
partition.
6.
L'Assistant Création de partition démarre.
h.
Cliquez sur Suivant pour poursuivre.
i.
Choisissez Partition principale ou Partition étendue («
principale » étant recommandée), puis cliquez sur Suivant.
j.
Entrez la quantité d'espace disque à allouer (taille de la
partition). La valeur par défaut est l'espace disque
disponible maximum (recommandé). Cliquez sur Suivant.
k.
Affectez une lettre d'unité ou un chemin (la lettre par
défaut est recommandée) puis cliquez sur Suivant.
l.
Sélectionnez un système de fichiers pour formater le
disque (FAT32 ou NTFS), vérifiez les paramètres puis
cliquez sur Suivant. Reportez-vous à la section FAT32
ou NTFS? plus loin dans ce document si vous ne savez
pas lequel choisir.
Nous vous recommandons de cocher la case Effectuer un
formatage rapide. Un format standard peut prendre plusieurs
heures.
m. Vérifiez les paramètres puis cliquez sur Terminer pour
lancer le formatage du disque.
20
7.
Lorsque le formatage est terminé, le disque affiche le nom du
volume, la lettre d'unité, la taille de la partition (en Go), le système
de fichiers utilisé (FAT32 ou NTFS) et un état d'intégrité.
Le disque est maintenant prêt à être utilisé.
Formatage du FireLite sous Windows Me ou Windows 98 SE
Observez les étapes suivantes si vous utilisez Windows Me ou Windows 98
SE pour formater votre disque SmartDisk pour Windows.
Le formatage supprime toutes les informations contenues sur le
disque. Vérifiez bien chaque étape avant son exécution pour vous
assurer que vous formatez la bonne unité. Les données
éventuellement perdues pourraient être irrécupérables.
1.
Observez les directives de la section Connexion du FireLite à un
ordinateur Windows.
2.
Depuis le menu Démarrer, cliquez sur Exécuter, tapez command et
appuyez sur Entrée. Une petite fenêtre MS DOS devrait s'afficher
avec une invite telle que c:\Windows.
3.
Tapez fdisk et appuyez sur Entrée. Appuyez de nouveau sur Entrée
depuis la fenêtre où l'on vous demande si vous désirez activer la
prise en charge de disques de grande capacité.
4.
Un menu offrant cinq options s'affiche. Tapez 5 pour sélectionner
l'option « Modifier le lecteur de disque dur en cours », puis appuyez
sur la touche Entrée.
5.
Une liste des disques durs s'affiche. Votre disque dur interne
principal est le Disque 1. Les autres disques durs éventuels sont
numérotés 2, 3, etc. Si vous n'avez qu'un disque dur dans votre
ordinateur, l'unité 2 est le SmartDisk. Vous pouvez aussi identifier
SmartDisk dans la liste d'après sa taille en méga-octets. Ce nombre
devrait être légèrement inférieur à la taille indiquée sur l'étiquette de
votre disque SmartDisk. Tapez le nombre correspondant au disque
SmartDisk et appuyez sur Entrée.
21
Attention : À ce point, la sélection du mauvais disque peut
entraîner la perte de précieuses données.
6.
Le menu à cinq options de l'étape 4 s'affiche de nouveau. Cette fois
ci, vous devez taper 1 (Créer une partition DOS ou un lecteur
logique DOS) puis appuyer sur Entrée.
7.
Dans le menu suivant de trois options, vérifiez que vous
partitionnez le bon numéro de disque avant de continuer. Tapez 1
pour sélectionner Créer une partition DOS principale et appuyez
sur Entrée. Le processus peut prendre environ une minute.
8.
À l'invite Voulez-vous utiliser la taille maximale disponible pour
une partition DOS?, répondez Oui (par défaut) ou appuyez
simplement sur la touche Entrée. Le processus peut prendre environ
une minute.
9.
Lorsque le partitionnement est terminé, appuyez deux fois sur la
touche Échap. Un message indique que vous devez redémarrer
votre PC. Vous pouvez ignorer ce message. Appuyez une fois de
plus sur la touche Échap pour quitter le programme fdisk. Tapez
exit et appuyez sur Entrée pour fermer la fenêtre d'invite MS DOS.
10. Double-cliquez sur l'icône « Poste de travail » pour ouvrir la fenêtre.
Débranchez le disque SmartDisk puis reconnectez-le à votre PC.
Une icône contenant une lettre d'unité devrait s'afficher dans la
fenêtre « Poste de travail ». Une boîte de dialogue s'affiche
également indiquant que l'unité n'est pas accessible. Souvenez-vous
de la lettre d'unité car vous en aurez besoin à l'étape suivante.
Cliquez sur Annuler.
11. Vous devez maintenant formater votre disque SmartDisk. Dans la
fenêtre « Poste de travail », pointez sur l'icône qui représente
SmartDisk et cliquez sur le bouton droit de la souris. Dans le menu,
sélectionnez Formater. Dans la fenêtre de format, sélectionnez
Complet sous Type de formatage et tapez un label (10 caractères
maximum) si vous le désirez. Cliquez sur le bouton Démarrer. Un
avertissement s'affiche indiquant que tous les fichiers seront détruits.
Cliquez sur OK pour continuer. Ce processus prend plusieurs
minutes. Une fois terminé, cliquez sur les boutons Fermer.
Vous pouvez être invité à exécuter Scandisk pour vérifier votre disque mais
cela n'est pas requis. Si vous décidez de le faire, sélectionnez Minutieuse sous
22
Type d'analyse puisqu'il n'y a pas encore de fichiers ou de dossiers sur le
disque. Armez-vous de patience car cette analyse peut nécessiter beaucoup de
temps.
Le disque est maintenant prêt à être utilisé.
Formatage pour Windows sous Mac OS X
Il est possible de formater le disque dur SmartDisk en format FAT32 lorsqu'il
est connecté à un ordinateur Apple Macintosh tournant sous Mac OS X. Cette
méthode peut s'avérer pratique si vous utilisez votre SmartDisk
principalement sur un ordinateur Mac OS mais que vous voulez aussi le
connecter plus tard à un ordinateur Windows.
Votre disque SmartDisk peut être formaté et partitionné au moyen de
l'utilitaire Disk Utility d'Apple qui se trouve dans votre dossier Utilitaires.
Sous Disk and Volumes Selected, sélectionnez le disque approprié et cliquez
sur l'onglet Partition. Sous Informations volume, développez le champ
Format et choisissez Free Space. Cliquez sur l'onglet Effacer, développez le
champ Volume Format et cliquez sur MS-DOS File System. Cliquez sur Erase
et attendez la fin de l'effacement. Votre unité est maintenant prête à être
connectée à un système d'exploitation Windows.
FAT32 ou NTFS ?
Lorsque vous formatez votre disque SmartDisk pendant que vous exécutez
Windows XP ou Windows 2000, vous pouvez choisir entre les formats
FAT32 ou NTFS. Voici quelques considérations qui faciliteront votre choix.
FAT32
FAT32 est compatible avec les systèmes d'exploitation Windows suivants :
Windows 98, Windows 98 SE, Windows Me, Windows 2000 et Windows XP.
FAT32 peut aussi être lu par les ordinateurs Apple Macintosh tournant sous
Mac OS.
Restrictions : Sous Windows 2000 et Windows XP, les utilisateurs ne peuvent
pas créer de partitions dont la taille dépasse 32 Go (bien qu'ils puissent
23
accéder à ces partitions plus volumineuses). (Cette restriction ne s'applique
pas aux autres systèmes d'exploitation pris en charge.)
En général, FAT32 est un bon choix si vous devez utiliser votre disque
SmartDisk avec des ordinateurs tournant sous Windows 98, Windows 98 SE
ou Windows Me, ou si vous devez l'utiliser à la fois avec des ordinateurs
Windows et Mac OS.
NTFS
NTFS est compatible avec les systèmes d'exploitation Windows suivants :
Windows NT, Windows 2000 et Windows XP. En général, NTFS offre de
meilleures performances que FAT32 et permet aux utilisateurs de créer des
partitions de taille supérieure à 32 Go avec les systèmes d'exploitation pris en
charge.
Restrictions : NTFS n'est pas compatible avec Windows 98, Windows 98 SE,
Windows Me, ni avec les ordinateurs Apple Macintosh tournant sous Mac OS.
En général, NTFS est un bon choix si vous devez utiliser votre disque
SmartDisk uniquement avec un ou plusieurs ordinateurs tournant sous
Windows XP ou Windows 2000.
Besoin d'aide ?
Si vous éprouvez des problèmes pendant l'installation ou l'utilisation du
produit SmartDisk, visitez le site Web d'assistance technique de SmartDisk à
www.SmartDisk.com. Cette page vous permet d'accéder à notre bibliothèque
de documentation utilisateur, de lire les réponses aux questions les plus
fréquentes et de télécharger les mises à jour logicielles disponibles. Malgré
que celle-ci propose suffisamment d'informations pour guider la plupart de
nos clients, elle fournit également les méthodes qui vous permettront de
contacter directement l'équipe d'assistance technique de SmartDisk. Veuillez
enregistrer votre produit (voir ci-dessous) avant de contacter l'assistance
technique de SmartDisk.
24
Enregistrement du produit SmartDisk
Vous pouvez enregistrer votre produit SmartDisk à
www.SmartDisk.com/Registration.asp. Cet enregistrement aussi simple que
rapide nous aidera à vous assurer une expérience optimale avec ce produit
SmartDisk et les produits futurs.
Termes de la garantie
SmartDisk Corporation garantit ses produits, sous conditions d'utilisation normales,
contre tout vice de fabrication ou de main-d'œuvre au cours de la première (1) année à
compter de la date d'achat ou pendant 3 ans à partir de la date de fabrication du produit,
selon la première occurrence. Les produits achetés dans les pays de l'Union Européenne
couverts par la directive 1999/44/EC sont garantis pour une période de deux (2) ans à
compter de la date d'achat. L'unique obligation de SmartDisk, dans le cadre des
réclamations de non-conformité pendant la période de garantie décrite ci-dessus est, au
choix de SmartDisk, de réparer ou de remplacer tout produit ou équipement que
SmartDisk, à sa discrétion, a déterminé être défectueux. Le Client doit obtenir un
numéro d'autorisation de retour de marchandise (RMA) auprès de SmartDisk avant de
faire parvenir tout équipement à SmartDisk au titre de la présente garantie en contactant
avec l'assistance technique (visitez www.SmartDisk.com). Le Client prépaiera les frais
d'expédition de tout Matériel retourné à SmartDisk dans le cadre d'un service sous
garantie, et SmartDisk prépaiera les frais d'expédition pour le retour du Matériel au
Client, à l'exclusion des droits de douane ou taxes éventuels. Une preuve d'achat
d'origine datée ainsi qu'une lettre expliquant le problème doivent accompagner tout
retour. SmartDisk Corporation ne sera pas responsable des articles retournés sans RMA
ou incorrectement emballés. Le Matériel de remplacement sera neuf ou équivalent sur
le plan des performances et il sera garanti pour la durée restante de la garantie du
Matériel non conforme. SmartDisk Corporation ne peut être tenue responsable pour la
récupération de données de client de produits retournés comportant une unité de
stockage. Le Matériel remplacé deviendra la propriété de SmartDisk. Toute réclamation
non effectuée ou défectuosité non signalée au titre de la présente garantie sont réputées
exclues par le Client.
Les obligations de SmartDisk au titre de la présente garantie reposent expressément sur
les conditions suivantes (i) les Produits ont été correctement installés, utilisés et
entretenus à tout moment par le Client ; (ii) les Produits n'ont pas été soumis à des
contraintes mécaniques ou à des conditions électriques ou ambiantes exceptionnelles, ni
à des catastrophes naturelles ; (iii) les Produits n'ont pas fait l'objet d'un mauvais usage,
d'un accident ou d'une installation/désinstallation non autorisée de la part du Client ou
d'une tierce partie ; (iv) les Produits n'ont pas fait l'objet d'altérations ou de
modifications non autorisées, à l'exclusion de celles approuvées par écrit ou autrement
25
effectuées par SmartDisk et (v) le Client a promptement installé toutes les révisions du
Produit qui ont été publiées pour de tels Produits par SmartDisk au cours de la période
de garantie. SmartDisk ne garantit pas que les Produits fonctionneront dans le cadre
d'une combinaison d'utilisation spécifique sélectionnée par le Client, que le
fonctionnement des Produits sera ininterrompu ou exempt d'erreurs ni que les non
conformités ou les défauts seront résolus. De plus, SmartDisk n'aura aucune obligation
au titre de la garantie si les Produits ne respectent pas les spécifications applicables
lorsque le ou les Produits sont utilisés en combinaison avec des matériels ou des
logiciels non fournis par SmartDisk. S'il est déterminé que tout Produit signalé comme
défectueux ou non conforme par le Client pendant la période de garantie est en bon état
de marche, SmartDisk peut, à son choix, demander au Client de payer les frais de maind'œuvre et autres dépenses encourus par SmartDisk dans le cadre de cette détermination,
selon la grille tarifaire de SmartDisk alors en vigueur.
SmartDisk Corporation ne peut être tenue responsable pour la vente non autorisée ou
toute déclaration inexacte de revendeurs tiers. Les garanties de SmartDisk ne sont pas
transférables. Les produits achetés dans le cadre d'encans, de ventes de garage, de
marchés aux puces ou achetés comme produits de démonstration ne sont pas couverts
par les garanties de SmartDisk.
LES GARANTIES DE SMARTDISK ET LES RECOURS DU CLIENT STIPULÉS
DANS CETTE SECTION SONT EXCLUSIFS. ILS SONT DONNÉS PAR
SMARTDISK ET ACCEPTÉS PAR LE CLIENT EN LIEU ET PLACE DE TOUTE
AUTRE GARANTIE, EXPRESSE OU IMPLICITE, Y COMPRIS MAIS SANS S'Y
LIMITER, TOUTE GARANTIE DE QUALITÉ MARCHANDE OU
D'ADAPTATION À UN BUT PARTICULIER. TOUTE AUTRE GARANTIE
SIMILAIRE EST, PAR LA PRÉSENTE, EXPRESSÉMENT ET
CATÉGORIQUEMENT REFUSÉE PAR SMARTDISK ET ABANDONNÉE PAR LE
CLIENT.
Avis de Copyright
Copyright ©2004 SmartDisk Corporation.
Tous les noms de marques et de produits figurant dans les présentes appartiennent à
leurs détenteurs respectifs.
Aucune partie de ce document ne peut être reproduite sous quelque forme, dans quelque
but et par quelque moyen que ce soit, sans l'autorisation expresse écrite de SmartDisk
Corporation. Tous droits réservés.
26
Conformité FCC
Cet appareil a été testé et est conforme aux limites conçues pour un appareil numérique
de classe B, selon l'Article 15 des règlements de la FCC. Ces limites ont pour but de
garantir une protection suffisante contre les interférences nuisibles lorsque l'appareil est
utilisé dans un environnement résidentiel. Cet appareil génère, utilise et peut émettre
des ondes radioélectriques. S'il n'est pas installé et utilisé conformément aux
instructions, il peut provoquer des interférences nuisibles aux communications radio. Il
est cependant impossible de garantir que des interférences ne se produiront pas dans
une installation particulière. Si cet appareil produit des interférences nuisibles à la
réception radio ou télévision, ce qui peut se déterminer en le mettant hors puis sous
tension, l'utilisateur devra essayer de corriger l'interférence en appliquant une ou
plusieurs des mesures suivantes :
•
Réorienter ou déplacer l'antenne réceptrice.
•
Augmenter la distance entre l'appareil et le récepteur.
•
Brancher l'appareil sur un circuit différent de celui auquel le récepteur est
connecté.
•
Demander l'aide du revendeur ou d'un technicien radio/TV professionnel.
27
Benutzerhandbuch
Vorbereitung von FireLite: Mac OS oder
Windows?
Ihre FireLite ist für den sofortigen Gebrauch auf Apple Macintosh Computern
mit Mac OS (als HFS+) vorformatiert. Wenn Sie FireLite ausschließlich mit
Mac OS anwenden wollen, können Sie die werksseitige Formatierung
beibehalten. Folgen Sie den im Abschnitt Anwendung von FireLite mit Mac
OS beschriebenen einfachen Schritten, um FireLite anzuschließen und in
Gebrauch zu nehmen.
Wenn Sie FireLite mit Windows-Computern oder sowohl mit Mac OS als
auch Windows verwenden wollen, sollten Sie das Laufwerk neu formatieren,
so dass es von Windows erkannt werden kann, bevor Sie Daten darauf
speichern. (Mac OS kann Festplatten, die für Windows formatiert wurden,
erkennen.) Wenn diese Situation auf Sie zutrifft, sollten Sie zunächst den
Abschnitt Anwendung von FireLite mit Windows lesen, um das Gerät
entsprechend zu präparieren. Danach können Sie den Richtlinien in
Anwendung von FireLite mit Mac OS folgen, falls Sie FireLite auch auf
Computern mit Mac OS betreiben wollen.
Hinweis: Die Kapazität ist je nach Modell verschieden. Ihr
Betriebssystem gibt die Kapazität u.U. mit weniger Gigabytes an. 1
GB = 1.000.000.000 Bytes.
28
Anwendung von FireLite mit Mac OS
Anschließen von FireLite an einen Macintosh Computer
FireLite ist mit den Standards 1394a (FireWire 400) und 1394b (FireWire 800)
kombatibel. Um FireLite an einen FireWire 400-Anschluss an einem
Macintosh-Computer anzuschließen, benötigen Sie das im Lieferumfang
enthaltene bilinguale Kabel (9-Pol-zu-6-Pol). Stecken Sie den 6-poligen
Stecker des bilingualen Kabels in einen freien FireWire 400-Anschluss am
Macintosh und das andere Ende des bilingualen Kabels in einen der
Anschlüsse Ihrer SmartDisk-Festplatte. Die Festplatte wird auf dem Desktop
als neuer Datenträger angezeigt.
Um FireLite an einen FireWire 800-Anschluss an Ihrem Macintosh-Computer
anzuschließen, benötigen Sie das im Lieferumfang enthaltene Beta-Kabel (9Pol-zu-9-Pol). Stecken Sie nun das eine Ende des Beta-Kabels in einen freien
FireWire 800-Anschluss an Ihrem Macintosh und das andere Beta-Kabelende
in einen der Anschlüsse Ihrer SmartDisk-Festplatte. Die Festplatte wird auf
dem Desktop als neuer Datenträger angezeigt.
Speichern und Übertragen von Daten
Ist die korrekt formatierte SmartDisk-Festplatte erst einmal an einen
Computer angeschlossen, kann sie wie jede andere Wechseldiskette benutzt
werden. Sie können Dateien in das SmartDisk-Symbol ziehen, um sie zu
kopieren, mit den Dialogfeldern Öffnen oder Speichern zur Festplatte
navigieren oder dort gespeicherte Dateien löschen. Informationen zum
Kopieren, Öffnen und Löschen von Dateien finden Sie im Handbuch Ihres
Computers.
Trennen der FireLite von einem Macintosh Computer
Die SmartDisk-Festplatte kann bei laufendem Computer aus- und
eingestöpselt werden. Sie brauchen den Computer nicht auszuschalten und
neu zu starten. Um die SmartDisk von Ihrem Computer zu trennen, führen
Sie einfach folgende Schritte durch.
29
Hinweis: Gehen Sie bitte genau nach Anweisung vor, wenn Sie
die Festplatte vom Computer trennen wollen. Wenn Sie einfach
nur den Stecker ziehen, ohne zuerst die unten stehenden
Anweisungen zu beachten, kann dies Ihre Festplatte beschädigen
und/oder zu Datenverlust führen.
1.
Falls Dateien auf der SmartDisk-Festplatte noch in irgendwelchen
Anwendungen geöffnet sein sollten, schließen Sie diese.
2.
Ziehen Sie das SmartDisk-Festplattensymbol auf dem Bildschirm in
den Papierkorb.
Sie können auch einfach Ihren Computer auschalten, wenn die SmartDiskFestplatte angeschlossen ist und sie anschließend vom Computer trennen.
Anwendung von FireLite mit Windows
Die SmartDisk-Festplatte wird als HFS+ vorformatiert geliefert. Dies ist das
bevorzugte Format für Anwender, die ausschließlich auf Apple Macintosh
Computern mit Mac OS arbeiten. Um die Festplatte auch mit WindowsSystemen zu benutzen, müssen Sie sie neu formatieren, so dass sie von
Windows-Computern erkannt wird. (Auch dann wird sie weiterhin von Apple
Macintosh Computern erkannt.)
Folgen Sie den Anweisungen im Abschnitt Formatieren von FireLite für
Windows , wenn Sie vorhaben, die SmartDisk-Festplatte je mit einem
Windows-Computer zu verwenden. Sollten Sie hauptsächlich einen Mac OS
Computer benutzen, die Festplatte aber auch ab und zu mit einem PC und
Windows verwenden wollen, bietet es sich eher an, die Schritte im Abschnitt
Formatieren für Windows unter Mac OS X anzuwenden, um die
SmartDisk-Festplatte auch für Windows fit zu machen.
Bevor Sie fortfahren, stellen Sie sicher, dass Ihr PC (Windows-Computer)
entweder über einen 6-poligen FireWire 400-Anschluss oder einen 9-poligen
FireWire 800-Anschluss verfügt. Aus praktischen Gründen bezieht die
SmartDisk-Festplatte ihren Strom über diesen Anschluss. Manche Computer
haben lediglich einen 4-poligen FireWire-Anschluss. Da 4-polige Anschlüsse
keinen Strom stellen können, benötigen Sie ein 9-zu-4-poliges bilinguales
FireWire-Kabel und ein separates Netzteil (AC Adapter; SmartDisk Modell
30
ACFWS), um die SmartDisk-Festplatte mit diesem Computer verwenden zu
können.
Anschließen der FireLite an einen Windows-Computer
FireLite ist mit den Standards 1394a (FireWire 400) und 1394b (FireWire 800)
kombatibel. Um FireLite an einen FireWire 400-Anschluss an einem PC
anzuschließen, benötigen Sie das im Lieferumfang enthaltene bilinguale
Kabel (9-Pol-zu-6-Pol). Stecken Sie den 6-poligen Stecker des bilingualen
Kabels in einen freien FireWire 400-Anschluss am PC und das andere Ende
des bilingualen Kabels in einen der Anschlüsse Ihrer SmartDisk-Festplatte.
Um FireLite an einen FireWire 800-Anschluss an Ihrem PC anzuschließen,
benötigen Sie das im Lieferumfang enthaltene Beta-Kabel (9-Pol-zu-9-Pol).
Stecken Sie nun das eine Ende des Beta-Kabels in einen freien FireWire 800Anschluss an Ihrem PC und das andere Beta-Kabelende in einen der
Anschlüsse Ihrer SmartDisk-Festplatte.
Wenn Sie ein Netzteil (SmartDisk-A/C-Adapter, Modell ACFWS) verwenden
wollen, schließen Sie es jetzt ebenfalls an.
Wenn Sie mit Windows 98 SE arbeiten und Ihr Computer Sie nach
Anschluss der Festplatte auffordert, die Windows 98 SE
Installations-CD einzulegen, heißt das, dass Sie zusätzliche
FireWire (1394) Support-Software von Microsoft installieren
müssen. Trennen Sie in diesem Fall die Festplatte vom Computer
und
gehen
Sie
zur
Microsoft
Webseite
http://windowsupdate.microsoft.com . Von dort können Sie die
neuesten FireWire (1394) Treiber für Windows 98 SE
herunterladen.
Die Festplatte erscheint als neuer Laufwerkbuchstabe unter Arbeitsplatz.
Speichern und Übertragen von Daten
Ist die korrekt formatierte SmartDisk-Festplatte erst einmal an einen
Windows-Computer angeschlossen, kann sie wie jede andere Wechseldiskette
benutzt werden. Sie können Dateien in das FireLite-Symbol ziehen, um sie
zu kopieren, mit den Dialogfeldern Öffnen oder Speichern dorthin navigieren
31
oder dort gespeicherte Dateien löschen. Informationen zum Kopieren, Öffnen
und Löschen von Dateien finden Sie im Handbuch Ihres Computers.
Trennen der FireLite von einem Windows-Computer
Die SmartDisk-Festplatte kann bei laufendem Computer aus- und
eingestöpselt werden. Sie brauchen den Computer nicht auszuschalten und
neu zu starten. Um die SmartDisk-Festplatte vom Computer zu trennen,
führen Sie folgende Schritte aus. Natürlich können Sie die Festplatte auch
jederzeit vom Computer trennen, wenn dieser ausgeschaltet ist.
Hinweis: Gehen Sie bitte genau nach Anweisung vor, wenn Sie
die Festplatte vom Computer trennen wollen. Wenn Sie einfach
nur den Stecker ziehen, ohne zuerst die unten stehenden
Anweisungen zu beachten, kann dies Ihre Festplatte beschädigen
und/oder zu Datenverlust führen.
1.
Falls Dateien auf der SmartDisk-Festplatte noch in irgendwelchen
Anwendungen geöffnet sein sollten, schließen Sie diese.
2.
Klicken Sie auf "Hardwarekomponente entfernen oder auswerfen"
in der Systemleiste.
3.
Wählen Sie die SmartDisk-Festplatte aus dem nun erscheinenden
Menü aus.
4.
Kurz darauf erscheint die Windows-Meldung, dass das Gerät
problemlos entfernt werden kann.
Sie können auch einfach Ihren Computer auschalten, wenn die SmartDiskFestplatte angeschlossen ist und sie anschließend vom Computer trennen.
32
Formatieren von FireLite für Windows
Folgen Sie den unten stehenden Anweisungen, um die SmartDisk-Festplatte
zum Gebrauch mit Windows (oder mit Windows und Mac OS) zu formatieren.
Sie müssen diese Schritte nur einmal durchführen. Die notwendigen Schritte
sind je nach Windows-Version, die Sie zum Formatieren verwenden,
verschieden. Folgen Sie den Anweisungen für Ihre Windows-Version.
Formatieren von FireLite unter Windows XP oder Windows 2000
Folgen Sie diesen Anweisungen, wenn Sie die SmartDisk-Festplatte mit
Windows XP oder Windows 2000 formatieren.
Beim Formatieren werden alle Daten auf der Festplatte gelöscht.
Überprüfen Sie jeden Schritt vor Durchführung genau, um sicher
zu gehen, dass Sie die richtige Festplatte formatieren.
Informationen
und
Daten
gehen
beim
Formatieren
unwiderbringlich verloren.
1.
Folgen Sie den Anweisungen unter Anschließen der FireLite an
einen Windows-Computer weiter oben in diesem Handbuch.
2.
Öffnen Sie das Diskettenverwaltungs-Dienstprogramm
folgendermaßen:
3.
n.
Klicken Sie auf dasStartmenü, dann auf Einstellungen,
dann auf Systemsteuerung .
o.
Doppelklicken Sie auf Verwaltung und dann auf
Computerverwaltung .
p.
Im Speicher-Unterverzeichnis klicken Sie auf
Diskettenverwaltung .
Write Signature und Upgrade Disk Wizard werden gestartet.
q.
Klicken Sie auf Weiter, um im Wizard fortzufahren.
r.
Wählen Sie die SmartDisk-Festplatte durch Ankreuzen
aus der Liste.
33
VORSICHT Auswahl der falschen Festplatte an dieser Stelle kann
zum Verlust wertvoller Daten führen.
s.
Klicken Sie auf Weiter, um fortzufahren.
t.
Klicken Sie auf Beenden, um die Signatur auf die
Festplatte zu schreiben.
4.
Die Festplatte wird ohne einen Laufwerkbuchstaben aufgelistet und
als "unallocated" (nicht belegt) angezeigt.
5.
Um eine Speicherplatz-Zuweisung vorzunehmen, klicken Sie mit
der rechten Maustaste einmal auf den nicht belegten Bereich des
Festplattenfeldes und klicken dann auf Partition erstellen .
6.
Der Create Partition Wizard (Assistent zur Partitionserstellung)
wird gestartet.
u.
Klicken Sie auf Weiter, um im Wizard fortzufahren.
v.
Wählen Sie Primäre oder Erweiterte Partition
(empfohlen wird Primär) und klicken Sie dann auf Weiter.
w.
Geben Sie die Menge des Festplatten-Speicherplatzes ein,
den Sie zuweisen wollen (Größe der Partition). Die
Standardvorgabe ist maximaler verfügbarer Speicherplatz
(empfohlen). Klicken Sie auf Weiter.
x.
Weisen Sie einen Laufwerkbuchstaben oder Pfad zu. (Es
empfiehlt sich, die Vorgabe zu übernehmen.) Klicken Sie
dann auf Weiter.
y.
Wählen Sie ein Dateiensystem zur Formatierung der
Festplatte (FAT32 oder NTFS), verifizieren Sie die
Einstellungen und klicken Sie dann auf Weiter. Siehe
Abschnitt FAT32 oder NTFS? weiter unten, wenn Sie
nicht sicher sind, welches System in Frage kommt.
Es wird empfohlen, das Kästchen Schnellformatierung
durchführen anzukreuzen. Eine Standardformatierung kann
mehrere Stunden in Anspruch nehmen.
34
z.
7.
Verifizieren Sie die Einstellungen und klicken Sie dann
auf Beenden, um mit der Formatierung der Festplatte zu
beginnen.
Wenn die Formatierung beendet ist, zeigt die Festplatte den Namen
des Datenträgers, den Laufwerkbuchstaben, die Größe der Partition
(in GB), das verwendete Dateiensystem (FAT32 oder NTFS) und
einen OK-Status an.
Die Festplatte kann nun in Gebrauch genommen werden.
Formatieren von FireLite unter Windows Me oder Windows 98 SE
Folgen Sie diesen Anweisungen, wenn Sie die SmartDisk-Festplatte mit
Windows Me oder Windows 98 SE formatieren.
Beim Formatieren werden alle Daten auf der Festplatte gelöscht.
Überprüfen Sie jeden Schritt vor Durchführung genau, um sicher
zu gehen, dass Sie die richtige Festplatte formatieren.
Informationen
und
Daten
gehen
beim
Formatieren
unwiderbringlich verloren.
1.
Folgen Sie den Anweisungen unter Anschließen der FireLite an
einen Windows-Computer weiter oben in diesem Handbuch.
2.
Klicken Sie im Startmenü auf Ausführen, tippen Sie command und
drücken Sie Enter. Nun sollte ein kleines schwarzes MS DOSFenster mit einer Aufforderung wie c:\Windows zu sehen sein.
3.
Tippen Sie fdisk und drücken Sie Enter. Sie werden gefragt, ob Sie
Plattenunterstützung ermöglichen wollen ("Do you wish to enable
large disk support?"). Tippen Sie Y oder drücken Sie einfach die
Enter-Taste.
4.
Es wird Ihnen ein Menü mit fünf Optionen präsentiert. Sie sollten 5
tippen, um die Option "Change current fixed disk drive" zu wählen,
und dann die Enter-Taste drücken.
5.
Sie sehen dann eine Liste mit Festplatten. Ihre Computer-interne
Hauptfestplatte ist Disk 1. Jede weitere Festplatte wird als 2, 3 etc.
aufgeführt. Wenn Sie nur eine Festplatte in Ihrem Computer haben,
35
bezeichnet Disk 2 die SmartDisk-Festplatte. Die Angabe unter
Mbytes gibt Ihnen auch Aufschluss darüber, welche Festplatte in
der Liste die SmartDisk-Festplatte ist. Die Zahl sollte etwas kleiner
sein als die, die auf dem Produktlabel Ihrer SmartDisk-Festplatte
angegeben ist. Tippen Sie die Nummer, die Ihre SmartDiskFestplatte repräsentiert, und drücken Sie Enter.
VORSICHT Auswahl der falschen Festplatte an dieser Stelle kann
zum Verlust wertvoller Daten führen.
6.
Sie erhalten jetzt dasselbe Menü mit fünf Optionen wie in Schritt 4.
Dieses Mal müssen Sie die 1 eintippen (Create DOS partition or
Logical DOS drive) und dann die Enter-Taste drücken.
7.
Im nächsten Menü mit drei Optionen müssen Sie sicherstellen, dass
Sie die richtige Festplatten-Nummer angeben, bevor Sie fortfahren.
Tippen Sie 1, um die Option Create Primary DOS Partition zu
wählen, und dann die Enter-Taste. Der damit ausgelöste Vorgang
dauert etwa eine Minute.
8.
Nach der Aufforderung Do you wish to use the maximum available
size for the Primary DOS partition? antworten Sie mit Yes
(Vorgabe) oder durch Drücken der Enter-Taste. Der damit
ausgelöste Vorgang dauert etwa eine Minute.
9.
Wenn die Partitionierung erfolgt ist, drücken Sie zweimal auf die
Esc-Taste. Es erscheint die Meldung, dass Sie Ihren PC neu starten
müssen. Diese Meldung können Sie ignorieren. Drücken Sie die
Esc-Taste noch einmal, um das fdisk-Programm zu verlassen.
Tippen Sie exit und drücken Sie die Enter-Taste, um das MS DOSFenster zu schließen.
10. Doppelklicken Sie auf "Arbeitsplatz", um das Fenster zu öffnen.
Trennen Sie die SmartDisk-Festplatte vom Computer und schließen
sie dann wieder an Ihren PC an. Im "Arbeitsplatz"-Fenster sollte
nun ein Symbol mit einem Laufwerkbuchstaben erscheinen. Es
erscheint außerdem ein Dialogfeld mit der Meldung, dass auf die
Festplatte/das Laufwerk kein Zugriff möglich ist. Merken Sie sich
den Laufwerkbuchstaben, da Sie ihn im nächsten Schritt brauchen
werden. Klicken Sie auf Abbrechen.
11. Sie müssen jetzt Ihre SmartDisk-Festplatte formatieren. Richten Sie
den Cursor im "Arbeitsplatz"-Fenster auf das Symbol, das die
36
SmartDisk-Festplatte repräsentiert und klicken Sie mit der rechten
Maustaste. Wählen Sie im neuen Menü Format. Im Formatfenster
wählen Sie unter Formattyp "Ganz" (Full) und tippen nach Belieben
einen Namen ein (maximal 10 Zeichen). Klicken Sie auf Start. Es
erscheint eine Warnung, dass alle Dateien zerstört werden. Klicken
Sie auf OK, um fortzufahren. Der Vorgang wird einige Minuten in
Anspruch nehmen. Nach Beendigung klicken Sie auf Schließen. Der
Vorgang ist nun abgeschlossen.
Sie werden eventuell aufgefordert, Scandisk laufen zu lassen, um Ihre
Festplatte zu überprüfen, aber das ist nicht notwendig. Wenn Sie Scandisk
trotzdem durchführen wollen, wählen Sie Thorough unter Type of Test, da
sich auf der Festplatte noch keine Dateien und Ordner befinden. Dieser Test
wird lange dauern.
Die Festplatte kann nun in Gebrauch genommen werden.
Formatierung für Windows mit Mac OS X
Sie können Ihre SmartDisk-Festplatte in FAT32-Format formatieren, während
sie an einen Apple Macintosh Computer mit Mac OS X angeschlossen ist.
Diese Methode bietet sich an, wenn Sie die SmartDisk-Festplatte
hauptsächlich mit einem Mac OS Computer anwenden wollen, aber sie
vielleicht später auch an einen Windows PC anschließen möchten.
Die SmartDisk-Festplatte kann mit Hilfe der Disk Utility von Apple, die sich
im Ordner Dienstprogramme befindet, formatiert und partitioniert werden.
Unter Disk and Volumes Selected wählen Sie das entsprechende Laufwerk aus.
Klicken Sie dann auf die Registerkarte Partition. Unter Volume Information
erweitern Sie das Feld Format und wählen daraus Free Space. Klicken Sie
auf die Registerkarte Erase, erweitern Sie das Feld Volume Format und
klicken Sie darin auf MS-DOS File System. Klicken Sie auf Erase und warten
Sie, bis der Vorgang abgeschlossen ist. Ihre Festplatte kann nun an ein
Windows-Betriebssystem angeschlossen werden.
FAT32 oder NTFS?
Beim Formatieren Ihrer SmartDisk-Festplatte unter Windows XP oder
Windows 2000 haben Sie die Wahl zwischen zwei Formaten, FAT32 und
NTFS. Im Folgenden finden Sie einige Überlegungen als Entscheidungshilfe.
37
FAT32
FAT32 ist mit den folgenden Windows-Betriebssystemen kompatibel:
Windows 98, Windows 98 SE, Windows Me, Windows 2000, Windows XP.
FAT32 kann auch von Apple Macintosh Computern mit Mac OS gelesen
werden.
Einschränkungen: Bei Windows 2000 und Windows XP können Anwender
Partitionen nur in Größen bis zu 32 GB erstellen (obwohl sie auf größere
Partitionen zugreifen können). (Diese Einschränkung gilt nicht für andere
unterstützte Betriebssysteme.)
Im Allgemeinen ist FAT32 eine gute Wahl, wenn Sie die SmartDiskFestplatte mit Windows 98, Windows 98 SE oder Windows Me verwenden
wollen oder sie sowohl mit Windows als auch mit Mac OS Computern
benutzen möchten.
NTFS
NTFS ist mit den folgenden Windows-Betriebssystemen kompatibel:
Windows NT, Windows 2000 und Windows XP. NTFS gewährleistet für
gewöhnlich bessere Leistungen als FAT32 und erlaubt den Anwendern, auch
Partitionen mit mehr als 32 GB in den unterstützten Betriebssystemen zu
erstellen.
Einschränkungen: NTFS ist mit Windows 98, Windows 98 SE, Windows Me
oder Apple Macintosh Computern mit Mac OS nicht kompatibel.
Im Allgemeinen ist NTFS eine gute Wahl, wenn Sie die SmartDisk-Festplatte
nur bei Computern verwenden, die mit Windows XP oder Windows 2000
arbeiten.
So erhalten Sie Hilfe
Sollten bei der Installation oder Verwendung Ihres SmartDisk-Produkts
Probleme auftreten, besuchen Sie die Website unseres technischen
Kundendienstes www.SmartDisk.com. Von dort aus haben Sie Zugriff auf
unsere Handbuchbibliothek. Außerdem finden Sie hier Antworten auf alle
38
häufig gestellten Fragen und können verfügbare Updates unserer
Softwareprogramme herunterladen. Obwohl den meisten Kunden mit dem
Webseiten-Inhalt geholfen werden kann, finden Sie hier auch Angaben zur
direkten Kontaktaufnahme mit unserem SmartDisk Support-Team. Bitte
registrieren Sie Ihr Produkt (siehe unten), bevor Sie sich an das SmartDisk
Technical Support-Team wenden.
Registrierung des SmartDisk-Produkts
Sie können Ihr SmartDisk-Produkt unter
www.SmartDisk.com/Registration.asp registrieren. Die Registrierung ist
schnell und einfach und ermöglicht uns, Sie mit dem besten Service und den
neuesten Informationen zu diesem und zukünfigen SmartDisk-Produkten zu
versorgen.
Garantiebedingungen
Die SmartDisk Corporation gewährleistet, dass ihre Produkte unter normalen
Gebrauchs- und Servicebedingungen für einen Zeitraum von einem (1) Jahr ab
Kaufdatum bzw. drei (3) Jahren ab Herstellungsdatum, je nachdem, welches zuerst
zutrifft, frei von Material- und Verarbeitungsmängeln sind. Produkte, die in einem EGLand gekauft wurden, in dem die Richtlinie 1999/44/EC Anwendung findet, erhalten
eine Garantie von zwei (2) Jahren ab Kaufdatum. SmartDisks einzige Verpflichtung in
Bezug auf Reklamationen, die innerhalb der oben beschriebenen Garantiezeit gemacht
werden, ist, das Produkt nach eigenem Ermessen zu reparieren oder zu ersetzen, falls es
von SmartDisk für defekt erklärt wurde. Bevor der Kunde ein Gerät, das unter diese
Garantie fällt, an SmartDisk zurückschickt, muss er beim Technical Support (siehe
www.SmartDisk.com) eine RMA-Nummer (Return Merchandise Authorization)
anfordern. Der Kunde muss die Versandkosten bei Einsenden des Gerätes an SmartDisk
im Voraus zahlen. SmartDisk übernimmt die Versandkosten für die Rücksendung des
reparierten Gerätes, ausschließlich eventuell anfallender Zollgebühren oder Steuern.
Dem eingesandten defekten Gerät müssen der datierte Originalkaufbeleg sowie eine
Problembeschreibung beigefügt werden. SmartDisk Corporation übernimmt keinerlei
Verantwortung für Geräte, die ohne RMA-Nummer oder unzulänglich verpackt
eingesendet werden. Ersatzgeräte sind neu oder wie neu in ihrer Leistung. Ihre
Garantiezeit entspricht der noch verbleibenden Laufzeit der Originalgarantie auf das
Erstgerät. SmartDisk Corporation übernimmt keine Verantwortung für die
Wiederherstellung von Kundendaten, die sich auf zurückgesandten Produkten mit
Datenspeicher befinden. Das ursprünglich eingesendete Gerät verbleibt im Besitz von
39
SmartDisk. Der Kunde hat kein Anrecht auf kostenlose Beseitigung von Mängeln, die
nicht innerhalb der Garantiefrist beanstandet werden.
Die hier ausgeführten Garantieverpflichtungen von SmartDisk unterliegen ausdrücklich
der Bedingung, dass (i) der Kunde die Produkte zu allen Zeiten ordnungsgemäß
installiert, angewendet und gepflegt hat; (ii) die Produkte nicht ungewöhnlicher
mechanischer Belastung, ungewöhnlichen elektrischen oder Umweltbedingungen oder
anderen Einflüssen höherer Gewalt ausgesetzt wurden; (iii) die Produkte nicht
Missbrauch, Unfällen oder unautorisierter Installation/De-Installation durch den
Kunden oder Dritte ausgesetzt wurden; (iv) die Produkte nicht unautorisiert verändert
oder modifiziert wurden, es sei denn nach schriftlicher Genehmigung oder anderweitig
durch SmartDisk ausgeführt, und (v) der Kunde alle Produktrevisionen, die während
der Garantiezeit von SmartDisk für solche Produkte veröffentlicht wurden, umgehend
installiert hat. SmartDisk garantiert weder, dass die Produkte in jeder beliebigen, durch
den Kunden zur Anwendung gewählten Kombination funktionieren oder dass der
Betrieb der Produkte ununterbrochen und fehlerfrei sein wird, noch dass alle Fehler und
Defekte behoben werden. Außerdem ist SmartDisk nicht zu Garantieleistungen
verpflichtet, sollten die Produkte aufgrund der Kombination mit Hardware und/oder
Software anderer Hersteller nicht mit den entsprechenden Produktspezifikationen
übereinstimmen. Sollte sich herausstellen, dass die während der Garantiezeit durch den
Kunden als fehlerhaft oder defekt eingesendeten Produkte weder fehlerhaft noch defekt
sind, kann SmartDisk nach eigenem Ermessen dem Kunden die entstandenen Arbeitsund sonstigen Kosten gemäß der dann geltenden Preise berechnen.
Die SmartDisk Corporation übernimmt keine Verantwortung für den unberechtigten
Verkauf oder falsche Darstellungen seitens nicht autorisierter Drittanbieter. Die
SmartDisk-Garantieleistungen lassen sich bei einem Besitzwechsel nicht übertragen.
Die SmartDisk-Garantie gilt möglicherweise nicht für Produkte, die bei einer
Versteigerung, einem Verkauf gebrauchter Artikel oder auf einem Flohmarkt erworben
bzw. als Demoversionen gekauft wurden.
DIE IN DIESEM ABSCHNITT AUSGEFÜHRTEN VON SMARTDISK
ZUGESTANDENEN GARANTIEN UND RECHTE DES KUNDEN SIND
AUSSCHLIESSLICH UND WERDEN ANSTELLE JEGLICHER ANDERER
GARANTIEN - SEIEN SIE AUSDRÜCKLICH ODER STILLSCHWEIGEND,
EINSCHLIESSLICH UND OHNE BESCHRÄNKUNG AUF ALLE GARANTIEN IN
BEZUG AUF HANDELSFÄHIGKEIT UND EIGNUNG FÜR EINEN BESTIMMTEN
ZWECK - VON SMARTDISK GEWÄHRT UND VOM KUNDEN AKZEPTIERT.
ALL SOLCHE ANDEREN GARANTIEN WERDEN HIERMIT VON SMARTDISK
AUSDRÜCKLICH UND UNWIDERRUFLICH NICHT GEGEBEN UND VOM
KUNDEN NICHT VERLANGT.
Aussage zum Urheberrecht
Copyright ©2004 SmartDisk Corporation.
40
Alle hierin erwähnten Marken und Produktnamen sind Eigentum der entsprechenden
Firmen.
Ohne die ausdrückliche schriftliche Genehmigung von SmartDisk Corporation darf kein
Teil dieses Dokuments reproduziert werden, in welcher Form und zu welchem Zweck
auch immer. Alle Rechte vorbehalten.
FCC-Vorschriften
Dieses Gerät wurde überprüft und entspricht den Grenzwerten eines digitalen Gerätes
der Klasse B gemäß Teil 15 der FCC-Bestimmungen. Diese Grenzwerte dienen dem
angemessenen Schutz gegen schädliche Störungen bei Betrieb in Wohnräumen. Dieses
Gerät erzeugt, benutzt und kann Hochfrequenzenergie abstrahlen und kann, wenn
unsachgemäß installiert und benutzt, schädliche Störungen im Funkverkehr verursachen.
Es besteht jedoch keine Garantie, dass es in einer bestimmten Umgebung nicht zu
Störungen kommen kann. Falls dieses Gerät beim Radio- oder Fernsehempfang
schädliche Störungen verursachen sollte, was durch Aus- und Wiedereinschalten des
Geräts festgestellt werden kann, wird dem Benutzer dringend empfohlen, eine
Behebung der Störungen durch eine oder mehrere der folgenden Maßnahmen zu
versuchen:
•
Neuausrichten oder Neuverlegen der Empfangsantenne.
•
Vergrößern des Abstands zwischen Gerät und Empfänger.
•
Anschließen des Geräts an einen anderen Stromkreis als den, an den der
Empfänger angeschlossen ist.
•
Zurateziehen eines Händlers oder erfahrenen Radio/Fernsehtechnikers.
41
Guida per l'utente
Preparazione dell'unità FireLite: Mac OS o
Windows?
L'unità FireLite è preformattata per consentire l'impiego immediato con
computer Apple Macintosh che operano in ambiente Mac OS (formattato
come HFS+). Se si prevede di utilizzare FireLite solo su computer Mac OS, è
possibile lasciare la formattazione di fabbrica e attenersi ai passaggi illustrati
nella sezione Utilizzo di FireLite con Mac OS per eseguire il collegamento e
utilizzare l'unità.
Se invece si prevede di utilizzare FireLite su computer Windows o con
entrambi i sistemi operativi, Mac OS e Windows, si consiglia di riformattare
l'unità, in modo da essere riconosciuta da Windows prima del salvataggio dei
dati (Mac OS riconosce i dischi rigidi formattati per Windows). In tal caso,
leggere prima la sezione Utilizzo di FireLite con Windows per preparare
l'unità FireLite. Attenersi quindi alle indicazioni contenute nella sezione
Utilizzo di FireLite con Mac OS, se si desidera utilizzare l'unità FireLite con
computer Mac OS.
NOTA: Capacità variabile in base al modello. Il sistema operativo
in dotazione potrebbe riportare una capacità in gigabyte inferiore. 1
GB = 1.000.000.000 byte.
42
Utilizzo di FireLite con Mac OS
Collegamento dell'unità FireLite a un computer Macintosh
L'unità FireLite è compatibile con gli standard 1394a (FireWire 400) e 1394b
(FireWire 800). Per collegare FireLite a una porta FireWire 400 su Macintosh,
individuare innanzitutto il cavo adattatore (da 9 a 6 pin) incluso nella
confezione. Quindi collegare il connettore a 6 pin al cavo adattatore a una
porta disponibile FireWire 400 del Macintosh e collegare l'altra estremità del
cavo a una delle porte del disco rigido SmartDisk. Il disco rigido verrà
visualizzato sul desktop come un nuovo disco.
Per collegare FireLite a una porta FireWire 800 su Macintosh, individuare
innanzitutto il cavo beta (da 9 pin a 9 pin) incluso nella confezione. Quindi
collegare un'estremità del cavo beta a una porta disponibile FireWire 800 del
Macintosh e collegare l'altra estremità del cavo a una delle porte del disco
rigido SmartDisk. Il disco rigido verrà visualizzato sul desktop come un
nuovo disco.
Memorizzazione e trasferimento di dati
Una volta collegata l'unità disco rigido SmartDisk a un computer, è possibile
accedervi e utilizzarla come qualsiasi altro disco rimovibile. È possibile
copiare i file sul disco rigido SmartDisk, trascinandoli sull'icona, visualizzare
il contenuto del disco utilizzando le finestre di dialogo Open oppure Save e
inoltre eliminare i file memorizzati. Per informazioni su come copiare, aprire
o eliminare file, consultare la documentazione in dotazione al computer.
Scollegamento dell'unità FireLite da un computer Macintosh
Il disco rigido SmartDisk è collegabile a caldo e pertanto può essere collegato
e scollegato senza riavviare il computer. Per scollegare l'unità disco rigido
SmartDisk in qualsiasi momento, attenersi alla seguente procedura.
43
NOTA: fare attenzione ad attenersi alla procedura quando si
scollega il disco rigido SmartDisk. In caso contrario, si rischia di
danneggiare l'unità e/o di perdere dati.
1.
Chiudere tutti i file aperti sul disco rigido SmartDisk.
2.
Individuare l'icona del disco rigido SmartDisk sul desktop e
trascinarla nel Cestino.
È anche possibile spegnere semplicemente il computer con il disco rigido
SmartDisk collegato e scollegarlo successivamente.
Utilizzo di FireLite con Windows
Il disco rigido SmartDisk è preformattato come HFS+, formato preferito se
utilizzato esclusivamente con computer Apple Macintosh che opera in
ambiente Mac OS. Per utilizzare il disco rigido su un sistema Windows, è
necessario riformattare l'unità una volta sola, in modo che possa essere
riconosciuta dai computer Windows (continua ad essere riconosciuta anche
dai computer Apple Macintosh).
Attenersi alla procedura illustrata in un'altra sezione, Formattazione di
FireLite per Windows , se si prevede di utilizzare il disco rigido SmartDisk
con un computer Windows. Se si utilizza principalmente un computer Mac
OS e si desidera condividere l'unità con un computer Windows, consultare la
sezione Formattazione per Windows in ambiente Mac OS X per ottenere
le istruzioni per preparare il disco rigido SmartDisk all'utilizzo in ambiente
Windows.
Prima di procedere, verificare che il computer Windows dispone di una porta
FireWire 400 a 6 pin o di una porta FireWire 800 a 9 pin. Per motivi di
convenienza, il disco rigido SmartDisk assorbe l'alimentazione da questa
porta. Alcuni computer dispongono solo di porte FireWire a 4 pin e poiché
questo tipo di porte non erogano corrente, per collegare il disco rigido
SmartDisk al computer, sarà necessario utilizzare un cavo adattatore FireWire
da 9 a 4 pin e un adattatore CA (modello SmartDisk ACFWS).
44
Collegamento di FireLite a un computer Windows
L'unità FireLite è compatibile con gli standard 1394a (FireWire 400) e 1394b
(FireWire 800). Per collegare FireLite a una porta FireWire 400 su PC,
individuare innanzitutto il cavo adattatore (da 9 a 6 pin) incluso nella
confezione. Quindi collegare il connettore a 6 pin al cavo adattatore a una
porta disponibile FireWire 400 del PC e collegare l'altra estremità del cavo a
una delle porte del disco rigido SmartDisk.
Per collegare FireLite a una porta FireWire 800 su PC, individuare
innanzitutto il cavo beta (da 9 pin a 9 pin) incluso nella confezione. Quindi
collegare un'estremità del cavo beta a una porta disponibile FireWire 800 del
PC e collegare l'altra estremità del cavo a una delle porte del disco rigido
SmartDisk.
Collegare anche l'eventuale adattatore CA (modello SmartDisk CFWS).
Se si utilizza Windows 98 SE, e dopo aver collegato il disco rigido
il computer richiede di inserire il CD di installazione di Windows
98 SE, sarà necessario installare un altro software di supporto
FireWire (1394) fornito da Microsoft. È necessario scollegare il
disco rigido, quindi individuare, scaricare e installare le versioni
più recenti dei driver FireWire (1394) per Windows 98 SE dal sito
Web Microsoft http://windowsupdate.microsoft.com .
In Risorse del computer verrà visualizzata un'altra unità corrispondente al
nuovo disco rigido.
Memorizzazione e trasferimento di dati
Una volta collegato il disco rigido SmartDisk con la corretta formattazione a
un computer Windows, vi si può accedere e utilizzarlo come qualsiasi altro
disco rimovibile. È possibile copiare i file sull'icona del disco rigido Smart
Disk trascinandoli ed esplorare il contenuto del disco attraverso le finestre di
dialogo Open o Save oppure eliminare i file memorizzati sul disco. Per
informazioni su come copiare, aprire o eliminare file, consultare la
documentazione in dotazione al computer.
45
Scollegamento di FireLite da un computer Windows
Il disco rigido SmartDisk è collegabile a caldo e pertanto può essere collegato
e scollegato senza riavviare il computer. Per scollegare il disco rigido
SmartDisk in qualsiasi momento, eseguire la seguente procedura. È possibile
inoltre scollegare il disco rigido in qualsiasi momento quando il computer è
spento.
NOTA: fare attenzione ad attenersi alla procedura quando si
scollega il disco rigido SmartDisk. In caso contrario, si rischia di
danneggiare l'unità e/o di perdere dati.
1.
Chiudere tutti i file aperti sul disco rigido SmartDisk.
2.
Fare clic sul pulsante Scollegamento o rimozione di una periferica
hardware nella barra delle applicazioni.
3.
Selezionare il disco rigido SmartDisk dal menu visualizzato.
4.
Dopo alcuni secondi verrà visualizzato un messaggio che indica
all'utente che è possibile rimuovere l'hardware senza problemi.
È anche possibile spegnere semplicemente il computer con il disco rigido
SmartDisk collegato e scollegarlo successivamente.
46
Formattazione dell'unità FireLite per
Windows
Per formattare il disco rigido SmartDisk da utilizzare in Windows oppure in
computer Windows e Mac OS, attenersi alle seguenti istruzioni. Questa
procedura va eseguita una sola volta. I passaggi richiesti dipendono dalla
versione Windows in uso durante la formattazione. Attenersi dunque alle
istruzioni relative alla specifica versione Windows.
Formattazione di FireLite con Windows XP o Windows 2000
Attenersi ai seguenti passaggi se si utilizza Windows XP o Windows 2000
durante la formattazione del disco rigido SmartDisk per Windows.
La formattazione elimina tutte le informazioni dal disco rigido.
Ricontrollare i singoli passaggi prima di procedere, per accertarsi
che si sta formattando il disco giusto. Le informazioni eliminate
non sono più recuperabili.
1.
Seguire le istruzioni in Collegamento di FireLite a un computer
Windows riportata in una sezione precedente di questo documento.
2.
Aprire la utility Gestione disco come segue:
aa. Fare clic sul menu Start e su Impostazioni; quindi su
Pannello di controllo.
bb. Fare doppio clic su Strumenti di amministrazione, quindi
doppio clic su Gestione computer.
cc. Nella sottodirectory di archiviazione, fare clic su Gestione
disco.
3.
Si avvia la procedura guidata di scrittura e aggiornamento dei dischi,
Firma e aggiornamento guidato disco.
dd. Fare clic su Avanti per continuare con la procedura.
47
ee. Selezionare il disco rigido SmartDisk dall'elenco
mediante la casella di controllo.
Attenzione: se a questo punto si seleziona il disco
sbagliato, si rischia di perdere dati importanti.
ff.
Fare clic su Avanti per continuare.
gg. Fare clic su Fine per aggiungere la firma al disco rigido.
4.
Il disco rigido viene elencato senza una lettera e indicato come
"unallocated", ossia non assegnato.
5.
Per creare una partizione, fare clic con il pulsante destro del mouse
sull'area non assegnata della casella del disco rigido, quindi fare clic
su Crea una partizione.
6.
Verrà avviata la Creazione guidata partizione.
hh. Fare clic su Avanti per continuare con la procedura.
ii.
Selezionare la partizione principale o estesa, Partizione
primaria / estesa (si consiglia la prima) e fare clic su
Avanti.
jj.
Specificare la quantità di spazio su disco da assegnare (le
dimensioni della ripartizione). Il valore massimo
corrisponde allo spazio su disco massimo disponibile
(consigliato). Fare clic su Avanti.
kk. Assegnare una lettera o un percorso (si consiglia la lettera
predefinita), quindi fare clic su Avanti.
ll.
Selezionare un sistema di file per formattare il disco
(FAT32 o NTFS), controllare le impostazioni, quindi fare
clic su Avanti. In caso di dubbi, consultare la sezione
FAT32 o NTFS? più avanti in questo documento.
Si consiglia di selezionare la casella di controllo Formattazione
veloce. La formattazione standard potrebbe richiedere ore.
mm. Controllare le impostazioni, quindi fare clic su Fine per
iniziare la formattazione del disco rigido.
48
7.
Al termine della formattazione, il disco rigido visualizza il nome del
volume, la lettera dell'unità, le dimensioni della partizione (in GB),
il file system utilizzato (FAT32 o NTFS) e lo stato.
Il disco rigido è pronto per l'uso.
Formattazione di FireLite con Windows Me o Windows 98 SE
Attenersi alla seguente procedura, se durante la formattazione del disco rigido
SmartDisk per Windows si utilizza Windows Me o Windows 98 SE.
La formattazione elimina tutte le informazioni dal disco rigido.
Ricontrollare i singoli passaggi prima di procedere, per accertarsi
che si sta formattando il disco giusto. Le informazioni eliminate
non sono più recuperabili.
1.
Seguire le istruzioni in Collegamento di FireLite a un computer
Windows riportata in una sezione precedente di questo documento.
2.
Dal menu Start, fare clic su Esegui, digitare Command e premere
Invio. Verrà visualizzata una piccola finestra nera di MS DOS con
un prompt, quale c:\Windows.
3.
Digitare fdisk e premere Invio. Digitare S (o premere il tasto Invio)
nella finestra che richiede se si desidera abilitare il supporto di
dischi di grosse dimensioni.
4.
Verrà visualizzato un menu di cinque voci. Digitare 5 per
selezionare l'opzione "Cambia l'unità disco rigido corrente", quindi
premere Invio.
5.
Verrà visualizzato un elenco di dischi rigidi. Il disco rigido interno
principale corrisponde a Disk 1. Tutti gli altri dischi rigidi saranno
elencati come 2, 3, ecc. Se il computer dispone di un solo disco
rigido, il disco 2 corrisponde al disco rigido SmartDisk. È possibile
anche controllare quale disco sull'elenco corrisponde al disco rigido
SmartDisk, secondo le dimensioni espresse in Mbyte. Il numero
dovrebbe essere leggermente inferiore alle dimensioni
contrassegnate sull'etichetta del prodotto del disco rigido SmartDisk.
Digitare il numero che rappresenta il disco rigido SmartDisk e
premere Invio.
49
Attenzione: se a questo punto si seleziona il disco sbagliato, si
rischia di perdere dati importanti.
6.
Viene visualizzato lo stesso menu con cinque voci menzionato nel
passaggio 4. Questa volta, è necessario digitare 1 (Crea partizione o
unità logica DOS) e premere Invio.
7.
Nel successivo menu di tre voci, prima di procedere controllare che
si stia ripartendo il numero del disco giusto. Digitare 1 per
selezionare l'opzione Crea partizione DOS Primaria e premere
Invio. Il processo che ne risulta richiede circa un minuto.
8.
Alla richiesta Utilizzare la dimensione massima disponibile per la
partizione DOS Primaria? confermare la risposta affermativa
(opzione predefinita) oppure premere il tasto Invio. Il processo che
ne risulta richiede circa un minuto.
9.
Al termine della ripartizione, premere il tasto Esc due volte. Verrà
visualizzato un messaggio che indica di riavviare il PC. È possibile
ignorare questo messaggio. Premere il tasto Esc ancora una volta
per uscire dal programma fdisk. Digitare exit e premere Invio per
chiudere la finestra del prompt di MS DOS.
10. Fare clic sull'icona "Risorse del computer" per aprire la finestra.
Scollegare il disco rigido SmartDisk e ricollegarlo al PC. Nella
finestra "Risorse del computer" dovrebbe visualizzarsi un'icona con
la lettera del disco rigido. Viene visualizzato inoltre una finestra di
dialogo che indica che il disco rigido non è accessibile. Ricordare la
lettera del disco rigido, necessaria per il passaggio successivo. Fare
clic su Annulla
11. A questo punto è necessario formattare il disco rigido SmartDisk.
Nella finestra "Risorse del computer" puntare sull'icona che
rappresenta il disco rigido SmartDisk, quindi fare clic con il
pulsante destro del mouse. Dal menu selezionare Formato. Dalla
finestra del formato selezionare Completo nel menu Tipo formato e
digitare un'etichetta (10 caratteri o meno) a piacere. Fare clic sul
pulsante Start. Verrà visualizzato un messaggio di avviso che tutti i
file verranno distrutti. Fare clic su OK per procedere. Questo
processo richiede alcuni minuti. Al termine, fare clic sui pulsanti
Chiudi.
50
È possibile che venga richiesto di eseguire Scandisk per controllare il disco,
ma questa operazione non è obbligatoria. Per procedere in questo senso,
selezionare Completo nel menu Tipo di controllo, in quanto sul disco non vi
sono ancora file o cartelle. Prepararsi a una lunga attesa.
Il disco rigido è pronto all'uso.
Formattazione per Windows in ambiente Mac OS X
Il disco rigido SmartDisk può essere formattato per FAT32 anche se il
computer cui è collegato è un Apple Macintosh che opera in ambiente Mac
OS X. Questo metodo risulta molto pratico, se si utilizza principalmente il
disco rigido SmartDisk su un computer Mac OS, ma si prevede di collegarlo
successivamente anche a un computer Windows.
Il disco rigido SmartDisk può essere formattato e ripartito mediante Disk
Utility di Apple, nella cartella Utilities. Nella sezione Disk and Volumes
Selected, selezionare l'unità appropriata e fare clic sulla scheda delle
Partizioni. Nel campo Volume Information, espandere il campo Format e
selezionare Free Space. Fare clic sulla scheda Erase, espandere il campo
Volume Format e fare clic su MS-DOS File System. Fare clic su Erase e
attendere il completamento della procedura di cancellazione. Il disco rigido è
pronto per il collegamento a un sistema operativo Windows.
FAT32 o NTFS?
Durante la formattazione del disco rigido SmartDisk su computer Windows
XP o Windows 2000, è necessario scegliere tra i formati FAT32 e NTFS.
Seguono alcune considerazioni in merito.
FAT32
FAT32 è compatibile con i seguenti sistemi operativi Windows: Windows 98,
Windows 98 SE, Windows Me, Windows 2000, Windows XP. FAT32 può
essere letto anche da computer Apple Macintosh con Mac OS.
Limitazioni: Con Windows 2000 e Windows XP gli utenti non saranno in
grado di creare partizioni di dimensioni superiori a 32 GB (sebbene vi
51
possano accedere) (questa limitazione non vale per altri sistemi operativi
supportati).
In linea di massima, FAT32 è un'ottima scelta se si utilizza il disco rigido
SmartDisk con computer Windows 98, Windows 98 SE o Windows Me
oppure se si utilizza sia con Windows che con Mac OS.
NTFS
NTFS è compatibile con i seguenti sistemi operativi Windows: Windows NT,
Windows 2000 e Windows XP. NTFS solitamente garantisce maggiori
prestazioni rispetto a FAT32 e consente di creare partizioni di dimensioni
superiori a 32 GB con i sistemi operativi supportati.
Limitazioni: NTFS non è compatibile con Windows 98, Windows 98 SE,
Windows Me o con computer Apple Macintosh con Mac OS.
In linea di massima, NTFS rappresenta una buona scelta se si utilizza il disco
rigido SmartDisk solo con uno o più computer Windows XP o Windows 2000.
Per assistenza
Nel caso si dovessero riscontrare problemi di installazione o di utilizzo dei
prodotti SmartDisk, visitare il sito Web dedicato al Supporto tecnico
all'indirizzo www.SmartDisk.com. Da questa pagina è possibile accedere alla
nostra libreria di documentazione utente, leggere le risposte alle domande più
frequenti e scaricare gli ultimi aggiornamenti al software. Sebbene la maggior
parte dei clienti troverà queste informazioni sufficienti per risolvere eventuali
problemi riscontrati, questa pagina elenca anche i vari modi per contattare
direttamente il team di supporto tecnico SmartDisk. Prima di contattare il
reparto Assistenza tecnica della SmartDisk, registrare il prodotto acquistato
(vedere di seguito).
52
Registrazione del prodotto SmartDisk
Registrare il prodotto SmartDisk all'indirizzo
www.SmartDisk.com/Registration.asp. La registrazione è rapida e semplice e
garantisce agli utenti tutti i vantaggi abbinati ai prodotti SmartDisk.
Condizioni della garanzia
SmartDisk Corporation garantisce che, in normali condizioni di uso e funzionamento, i
propri prodotti sono privi di difetti materiali e di fabbricazione per un periodo di 1 anno
dalla data di acquisto o 3 anni dalla data di produzione, quello dei due eventi che si
verifica prima. I prodotti acquistati nei paesi dell'Unione europea coperti dalla Direttiva
1999/44/EC sono garantiti per un periodo di 2 dalla data di acquisto. Il solo obbligo di
SmartDisk in relazione a dichiarazioni di non conformità effettuate nel periodo sotto
garanzia descritto dianzi, sarà di, a scelta della SmartDisk, riparare o sostituire qualsiasi
componente dell'apparecchiatura che, a sola discrezione di SmartDisk, venga
determinato essere difettoso. Il cliente deve ottenere presso il Supporto tecnico
SmartDisk, un numero di autorizzazione di reso merce (RMA) prima di restituire
l'apparecchiatura coperta dalla presente garanzia a SmartDisk , (visitare
www.SmartDisk.com). Il cliente si impegna a pagare in anticipo i costi di spedizione
per l'apparecchiatura restituita alla SmartDisk per la riparazione in garanzia; a sua volta
la SmartDisk si impegna a pagare i costi di trasporto per la restituzione
dell'apparecchiatura al cliente, esclusi dazi doganali o tasse, se di pertinenza. Tutti i resi
devono essere accompagnati dalla prova di acquisto originale datata e da una lettera che
spiega il problema. La SmartDisk Corporation non sarà ritenuta responsabile per
componenti restituiti senza un numero RMA o confezionati in modo inadeguato.
L'apparecchiatura di ricambio sarà nuova o come nuova in termini di prestazioni e verrà
coperta da garanzia per il restante periodo di garanzia per l'apparecchiatura non
conforme. SmartDisk Corporation non sarà ritenuta responsabile per il recupero dei dati
del cliente da prodotti resi adibiti all'archiviazione dati. Tutta l'apparecchiatura
sostituita diventa di proprietà della SmartDisk. Ogni dichiarazione di inadeguatezza non
effettuata nel periodo coperto dalla garanzia verrà ritenuta nulla dal cliente.
Pertanto gli obblighi di garanzia della SmartDisk sono espressamente soggetti alle
seguenti condizioni (i.) I prodotti dovranno essere debitamente installati, usati e
sottoposti a manutenzione dal cliente; (ii.) I prodotti non saranno soggetti a
sollecitazioni meccaniche insolite oppure a condizioni elettriche o ambientali insolite,
oppure ad eventi naturali catastrofici; (iii.) I prodotti non saranno soggetti ad abuso,
incidenti o procedure di installazione/disinstallazione da parte del cliente e/o da terzi;
(iv.) I prodotti non verranno alterati o modificati in modo non autorizzato, previo
consenso scritto della SmartDisk o altra operazione eseguita dalla SmartDisk stessa; ed
infine (v.) il cliente si impegna ad installare immediatamente tutte le revisioni al
53
prodotto offerte dalla SmartDisk durante il periodo di garanzia. La SmartDisk non
garantisce che i prodotti funzioneranno con combinazioni specifiche selezionate
dall'utente oppure che il funzionamento dei prodotti non verrà mai interrotto o sarà
esente da errori, oppure infine che verrà posto rimedio a tutti i difetti o problemi di non
conformità. Inoltre, SmartDisk non avrà alcun obbligo di garanzia in caso di guasti al
prodotto derivanti dal tentativo di conformarsi alle specifiche di pertinenza di prodotti
hardware e/o software non forniti da SmartDisk. Qualora venga determinato che i
prodotti indicati dal cliente difettosi o non conformi durante il periodo di garanzia
risultino invece funzionanti e conformi, la SmartDisk, a propria discrezione, potrà
addebitare al cliente i costi di manodopera sostenuti dalla stessa per pervenire a tale
conclusione, secondo le tariffe correnti della SmartDisk.
SmartDisk Corporation non sarà ritenuta responsabile per la vendita non autorizzata o
le false dichiarazioni di personale di rivenditori di terze parti non autorizzati. Le
garanzie SmartDisk non sono trasferibili con la titolarità. I prodotti acquistati presso
aste, mercatini all'aperto o prodotti dimostrativi potrebbero non essere coperti dalla
garanzia SmartDisk.
LE GARANZIE DELLA SMARTDISK ED I RIMEDI APPORTATI DAI CLIENTI
STABILITI IN QUESTA SEZIONE SONO ESCLUSIVI E VENGONO OFFERTI DA
SMARTDISK ED ACCETTATI DAL CLIENTE E SOSTITUISCONO QUALSIASI
ALTRA GARANZIA, ESPLICITA O IMPLICITA, INCLUSE, SENZA
LIMITAZIONE, LE GARANZIE DI COMMERCIABILITÀ ED IDONEITÀ AD UNO
SCOPO PARTICOLARE; SMARTDISK RECEDE DA TUTTE LE GARANZIE DI
CUI SOPRA, ESPLICITAMENTE ED INEQUIVOCABILMENTE, E A CUI IL
CLIENTE HA RINUNCIATO.
Dichiarazione sul Copyright
Copyright ©2004 SmartDisk Corporation.
Tutti i nomi di marche e prodotti menzionati in questa sede sono di proprietà dei
rispettivi titolari.
È vietata la riproduzione del presente documento, in parte o nella sua interezza, con
qualsiasi mezzo e forma, per qualsiasi scopo, senza l'esplicito permesso scritto della
SmartDisk Corporation. Tutti i diritti riservati.
54
Conformità FCC
Questa apparecchiatura è stata collaudata e risulta essere conforme ai limiti predisposti
per i dispositivi digitali di Classe B, in base a quanto stabilito dalla Parte 15 dei
Regolamenti FCC. Tali limiti hanno lo scopo di fornire un livello ragionevole di
protezione da interferenze dannose in applicazioni residenziali. Questa apparecchiatura
genera, usa e può irradiare energia radiofrequenze e, qualora non installata attenendosi
alle istruzioni, potrebbe causare interferenze dannose alle comunicazioni radio. Non
esiste tuttavia alcuna garanzia che le interferenze non si verifichino in particolari tipi di
installazioni. Qualora questa apparecchiatura provochi interferenze dannose alla
ricezione radio o televisiva, da determinarsi spegnendo e riaccendendo
l'apparecchiatura, si consiglia di provare ad eliminarle, adottando una o più delle misure
di cui sotto:
•
Riorientare o spostare l'antenna ricevente.
•
Aumentare la distanza tra l'apparecchiatura e l'unità ricevente.
•
Collegare l'apparecchiatura ad una presa su un circuito diverso da quello al
quale è collegata l'unità ricevente.
•
Per assistenza, consultare il concessionario o un radiotecnico esperto.
55
Manual del usuario
Cómo preparar su FireLite: ¿Mac OS o
Windows?
Su FireLite viene preformateado para su uso inmediato con computadoras
Apple Macintosh que ejecutan el sistema operativo Mac OS. (Está
formateado como HFS+). Si piensa utilizar su FireLite solamente con
computadoras que ejecutan el Mac OS, puede dejarlo formateado según viene
de fábrica y seguir los sencillos pasos detallados en Cómo utilizar FireLite
con Mac OSpara conectar y utilizar su FireLite.
Si piensa utilizar su FireLite con computadoras que ejecutan Windows o con
computadoras que ejecutan los sistemas operativos Mac OS y Windows, debe
volver a formatear su FireLite de modo que pueda ser reconocido por
Windows antes de guardar datos en él. (Mac OS puede reconocer discos
duros formateados para Windows). Si ésta es su situación, continúe primero
con Cómo utilizar FireLite con Windows para preparar su FireLite. A
continuación puede seguir las pautas delineadas en Cómo utilizar FireLite
con Mac OS si también desea utilizar su FireLite con una computadora que
ejecute Mac OS.
Nota: Capacidad según el modelo. Su sistema operativo puede
expresar la capacidad como un número inferior de gigabites. 1 GB
= 1.000.000.000 bites.
56
Cómo utilizar FireLite con Mac OS
Cómo conectar FireLite a una computadora Macintosh
Su FireLite es compatible con las normas tanto 1394a (FireWire 400) como
1394b (FireWire 800). Para conectar FireLite a un puerto FireWire 400 en su
Macintosh, localice primero el cable Bilingual (9 patillas a 6 patillas) que
venía incluido en su paquete. Ahora enchufe el conector de 6 patillas del cable
Bilingual en un puerto FireWire abierto en su Macintosh y conecte el otro
extremo del cable Bilingual a cualquiera de los puertos de su disco duro
SmartDisk. Su disco duro aparecerá en el escritorio como un disco nuevo.
Para conectar FireLite a un puerto FireWire 800 en su Macintosh, localice
primero el cable beta (9 patillas a 9 patillas) que venía incluido en su paquete.
Ahora conecte un extremo del cable beta a un puerto abierto FireWire 800 de
su Macintosh y conecte el otro extremo del cable beta a cualquiera de los
puertos de su disco duro SmartDisk. Su disco duro aparecerá en el escritorio
como un disco nuevo.
Cómo almacenar y transferir datos
Una vez que su disco duro SmartDisk esté conectado a una computadora,
puede tenerse acceso a él y utilizarse como cualquier otro disco extraíble.
Podrá arrastrar archivos al icono de su disco duro SmartDisk para copiarlos, ir
a su disco duro en los cuadros de diálogo Abrir o Guardar, o eliminar los
archivos almacenados en su disco duro SmartDisk. Para obtener información
sobre cómo copiar, abrir o eliminar archivos, consulte la documentación de la
computadora.
Cómo desconectar FireLite de una computadora Macintosh
Su disco duro SmartDisk es "enchufable en caliente"; se puede conectar y
desconectar sin reiniciar la computadora. Para desconectar su disco duro
SmartDisk en cualquier momento, simplemente lleve a cabo los pasos que se
indican a continuación.
57
Nota: Tenga cuidado de seguir el procedimiento correcto al
desconectar su disco duro SmartDisk. Simplemente desenchufar el
disco duro sin seguir primero las instrucciones que se indican a
continuación puede ocasionar daños en el disco duro y/o pérdida
de datos.
1.
Si tiene abiertos en alguna aplicación archivos que se encuentran en
su disco duro SmartDisk, ciérrelos.
2.
Localice el icono del disco duro SmartDisk en el escritorio y
arrástrelo a la papelera.
También puede simplemente apagar su computadora con el disco duro
SmartDisk conectado y luego desconectarlo.
Cómo utilizar FireLite con Windows
Su disco duro SmartDisk viene preformateado como HFS+, el formato
preferido cuando se utiliza exclusivamente con computadoras Apple
Macintosh que ejecutan Mac OS. Para utilizar el disco duro en un sistema
Windows, necesitará volver a formatear su disco duro una vez de modo que
pueda ser reconocido por las computadoras que ejecutan Windows. (Seguirá
siendo reconocido también por las computadoras Apple Macintosh).
Siga los pasos de la sección independiente Cómo formatear FireLite para
Windows si alguna vez pretende utilizar su disco duro SmartDisk con una
computadora con Windows. Si utiliza mayoritariamente una computadora
con Mac OS y desea compartir el disco duro SmartDisk con una computadora
que utilice Windows, puede que los pasos que se describen en Formateado
de Windows en Mac OS X resulten un procedimiento más cómodo para
preparar su disco duro SmartDisk para su utilización con Windows.
Antes de continuar, asegúrese de que su computadora Windows tiene
disponible bien un puerto de 6 patillas FireWire 400 o un puerto de 9 patillas
FireWire 800. Para su comodidad, su disco duro SmartDisk se alimenta de
este puerto. Algunas computadoras proporcionan sólo puertos FireWire de 4
pines. Puesto que los puertos de 4 patillas no ofrecen alimentación, deberá
obtener un cable FireWire Bilingual de 9 a 4 patillas y un adaptador C/A
58
separado (modelo SmartDisk ACFWS) para utilizar su disco duro SmartDisk
con esta computadora.
Conexión de FireLite a una computadora con Windows
Su FireLite es compatible tanto con las normas 1394a (FireWire 400) y las
1394b (FireWire 800). Para conectar FireLite a un puerto FireWire 400 en su
ordenador, encuentre primero el cable Bilingual (9 a 6 patillas) que venía
incluido en su paquete. Ahora enchufe el conector de 6 patillas del cable
Bilingual en un puerto FireWire 400 abierto en su ordenador, y el otro
extremo en cualquiera de los puertos en su disco duro SmartDisk.
Para conectar FireLite a un puerto FireWire 800 en su ordenador, primero
debe encontrar el cable beta (9 a 9 patillas) que venía incluido en su paquete.
Ahora conecte un extremo del cable beta a un puerto FireWire 800 abierto en
su computadora y conecte el otro extremo del cable beta a cualquiera de los
puertos en su disco duro SmartDisk.
Si está utilizando un adaptador C/A (modelo SmartDisk ACFWS), enchúfelo
también.
Si está utilizando Windows 98 SE, y su computadora le solicita que
inserte el CD de instalación de Windows 98 SE después de conectar
su disco duro, eso significa que necesita instalar software de soporte
adicional de FireWire (1394) de Microsoft. Debería desconectar su
disco duro, luego localizar, descargar e instalar los controladores más
recientes de FireWire (1394) para Windows 98 SE desde el sitio web
Microsoft http://windowsupdate.microsoft.com .
Su disco duro aparecerá como una nueva letra de unidad en Mi PC.
Cómo almacenar y transferir datos
Una vez que su disco duro SmartDisk debidamente formateado esté conectado
a una computadora con Windows, podrá obtener acceso al mismo y utilizarlo
como cualquier otro disco extraíble. Podrá arrastrar archivos al icono de
FireLite para copiarlos, ir a FireLite en los cuadros de diálogo Abrir o
Guardar, o eliminar los archivos almacenados en su disco duro SmartDisk.
59
Para obtener información sobre cómo copiar, abrir o eliminar archivos,
consulte la documentación de la computadora.
Cómo desconectar FireLite de una computadora con Windows
Su disco duro SmartDisk es "enchufable en caliente", es decir, se puede
conectar y desconectar sin reiniciar la computadora. Para desconectar su
disco duro SmartDisk en cualquier momento, siga los pasos que se indican a
continuación. También puede desconectar su disco duro en cualquier
momento mientras su computadora está apagada.
Nota: Tenga cuidado de seguir el procedimiento correcto al
desconectar su disco duro SmartDisk. Simplemente desenchufar el
disco duro sin seguir primero las instrucciones que se indican a
continuación puede ocasionar daños en el disco duro y/o pérdida
de datos.
1.
Si tiene abiertos en alguna aplicación archivos que se encuentran en
su CrossFire, ciérrelos.
2.
Haga clic en el botón Desconectar o Expulsar hardware de la
Bandeja del sistema.
3.
Seleccione su disco duro SmartDisk en el menú que aparece.
4.
Después de un momento, Windows mostrará un mensaje indicando
que puede retirar el hardware con seguridad.
También puede simplemente apagar su computadora con el disco duro
SmartDisk conectado, y luego desconectarlo.
60
Cómo formatear FireLite para Windows
Siga las instrucciones que se indican a continuación para formatear su disco
duro SmartDisk para utilizarlo con Windows, o con Windows y Mac OS.
Sólo tendrá que realizar este procedimiento una vez. Los pasos requeridos
varían según la versión de Windows que esté utilizando mientras da el
formato. Siga las instrucciones para su versión de Windows.
Cómo formatear FireLite en Windows XP o Windows 2000
Siga estos pasos si está utilizando Windows XP o Windows 2000 mientras
formatea su disco duro SmartDisk para Windows.
Al dar formato se eliminará toda la información de la unidad.
Verifique con detenimiento cada paso antes de ejecutar el formato
para asegurarse de estar formateando la unidad correcta. La
información perdida puede ser irrecuperable.
1.
Siga las instrucciones que aparecen en Cómo conectar FireLite a
un ordenador con Windows que se encuentra en una parte anterior
de este documento.
2.
Abra la utilidad Administración de discos de la siguiente manera:
nn. Haga clic en el menú Inicio, luego haga clic en
Configuración, y después en Panel deControl.
oo. Haga doble clic en Herramientasadministrativas, y
después en Administración de equipos.
pp. En el subdirectorio Almacenamiento, haga clic en
Administración dediscos.
3.
Comenzará el Write Signature and Upgrade Disk Wizard (Asistente
para escritura de firma y actualización de disco).
qq. Haga clic en Siguiente para continuar con el Asistente.
rr.
Seleccione el disco duro SmartDisk de la lista utilizando
la casilla de verificación.
61
Precaución: Si selecciona la unidad equivocada en este momento
podría perder información valiosa.
ss. Haga clic en Siguiente para continuar.
tt.
Haga clic en Finalizar para escribir la firma en el disco
duro.
4.
El disco duro aparecerá en la lista sin letra de unidad y se mostrará
como "no asignado".
5.
Para crear una partición, haga clic con el botón derecho una vez en
la zona sin asignar del cuadro del disco duro y haga clic sobre
Crearpartición.
6.
Comenzará a funcionar el Asistente para crear particiones.
uu. Haga clic en Siguiente para continuar con el Asistente.
vv. Elija Particiónprimaria o extendida (se recomienda
primaria) y luego haga clic en Siguiente.
ww. Introduzca la cantidad de espacio en disco que debe
asignarse (el tamaño de la partición). El tamaño
predeterminado es el máximo espacio disponible en el
disco (recomendado). Haga clic en Siguiente.
xx. Asigne una letra o ruta de unidad (se recomienda la letra
predeterminada) y luego haga clic en Siguiente.
yy. Seleccione un sistema de archivos para formatear el disco
(FAT32 o NTFS), verifique la configuración y luego haga
clic en Siguiente. Remítase a la sección ¿FAT32 o NTFS?
que se encuentra más adelante en este documento si no
está seguro sobre cuál elegir.
Se recomienda seleccionar la casilla de verificación Formato
rápido. Un formato estándar podría tardar varias horas.
zz. Verifique la configuración y luego haga clic en Finalizar
para comenzar a formatear el disco duro.
62
7.
Cuando el formato haya concluido, el disco duro mostrará el
nombre del volumen, la letra de la unidad, el tamaño de la partición
(en GB), el sistema de archivos utilizado (FAT32 o NTFS) y un
estado correcto.
Ahora el disco duro está listo para su uso.
Cómo formatear FireLite en Windows Me o Windows 98 SE
Siga estos pasos si está utilizando Windows Me o Windows 98 SE mientras
formatea su disco duro SmartDisk para Windows.
Al dar formato se eliminará toda la información de la unidad.
Verifique con detenimiento cada paso antes de la ejecución para
asegurarse de estar formateando la unidad correcta. La información
perdida puede ser irrecuperable.
1.
Siga las instrucciones que se incluyen en Cómo conectar FireLite
a una computadora con Windows que se encuentran en una parte
anterior de este documento.
2.
En el menú Inicio, haga clic en Ejecutar, escriba command y
presione Intro. Verá una pequeña ventana negra de MS DOS con un
símbolo del sistema, tal como c:\Windows.
3.
Escriba fdisk y presione Intro. Escriba Y (o simplemente presione
la tecla Intro) en la ventana que le pregunta si desea activar la
compatibilidad con discos grandes.
4.
Aparecerá un menú de cinco elementos. Debe escribir 5 para
seleccionar la opción "Cambiar la unidad actual de disco duro
fijado" y luego presionar la tecla Intro.
5.
Verá una lista de discos duros. Su disco duro interno principal será
el Disco 1. Cualquier otro disco duro aparecerá como 2, 3, etc. Si
sólo tiene un disco duro en su computadora, la unidad 2 será el
disco duro SmartDisk. También puede verificar qué unidad de la
lista es el disco duro SmartDisk por el tamaño en Mbites. El número
debe ser ligeramente inferior al tamaño marcado en la etiqueta del
producto de su disco duro SmartDisk. Escriba el número que
representa el disco duro SmartDisk y presione Intro.
63
Precaución: Si selecciona la unidad equivocada en este momento
podría perder información valiosa.
6.
Ahora aparece el mismo menú de cinco elementos del paso 4. Esta
vez, debe escribir 1 (Crear una partición o una unidad lógica de
DOS) y pulsar Intro.
7.
En el siguiente menú de tres elementos, compruebe que esté
particionando el número de disco correcto antes de continuar.
Escriba 1 para seleccionar Crear una partición primaria de DOS y
presione Intro. El proceso resultante puede tardar aproximadamente
un minuto.
8.
Cuando se le pregunte ¿Desea utilizar el tamaño máximo disponible
para la partición primaria de DOS? responda afirmativamente (el
valor predeterminado) o simplemente pulse la tecla Intro. El
proceso resultante puede tardar aproximadamente un minuto.
9.
Cuando la partición esté completa, pulse la tecla Esc dos veces.
Verá un mensaje indicándole que debe reiniciar su PC. Puede
ignorar dicho mensaje. Presione la tecla Esc una vez más para salir
del programa fdisk. Escriba exit y presione Intro para cerrar la
ventana del símbolo de MS DOS.
10. Haga doble clic en el icono "Mi PC" para abrir la ventana.
Desenchufe el disco duro SmartDisk y luego vuelva a conectarlo a
su PC. Debe aparecer un icono con una letra de unidad en la
ventana "Mi PC". También aparecerá un cuadro de diálogo que le
dirá que no puede tenerse acceso a la unidad. Recuerde la letra de la
unidad ya que la necesitará en el paso siguiente. Haga clic en
Cancelar
11. Ahora necesita formatear su disco duro SmartDisk. En la ventana
"Mi PC", seleccione el icono que representa el disco duro
SmartDisk y haga clic con el botón derecho del ratón. En el menú
seleccione Formatear. En la ventana de formato, seleccione
Completo en Tipo de formato y escriba cualquier etiqueta (10
caracteres como máximo) si así lo desea. Haga clic en el botón
Iniciar. Verá la advertencia de que se borrarán todos los archivos.
Haga clic en Aceptar para continuar. Este proceso llevará varios
minutos. Una vez completo, haga clic en el botón Cerrar y habrá
concluido.
64
Es posible que se le solicite que ejecute Scandisk para verificar su disco, pero
no es necesario. Si elige hacerlo, debe seleccionar Completa en Tipo de
prueba ya que aún no hay archivos ni carpetas en el disco. Prepárese para
aguardar un largo tiempo hasta que se complete esta prueba.
Ahora el disco duro está listo para ser utilizado.
Formateo para Windows bajo Mac OS X
Es posible formatear su disco duro SmartDisk en formato FAT32 mientras
está conectado a una computadora Apple Macintosh con Mac OS X. Este
método puede resultarle práctico si utiliza principalmente su disco duro
SmartDisk en una computadora con Mac OS, pero también desea conectarlo a
una computadora con Windows más tarde.
Su disco duro SmartDisk puede formatearse y particionarse utilizando la
Utilidad de disco de Apple, ubicada en su carpeta Utilidades. En Disco y
volúmenes seleccionados, seleccione la unidad adecuada y haga clic en la
ficha Partición. En Información de volumen, expanda el campo Formato y
elija Espacio libre. Haga clic en la ficha Borrar, expanda el campo Formato
de volumen y haga clic en Sistema de archivos MS-DOS. Haga clic en Borrar
y espere a que finalice esta función. Ahora su unidad está lista para
conectarse a un sistema operativo Windows.
¿FAT32 o NTFS?
Si formatea su disco duro SmartDisk mientras ejecuta Windows XP o
Windows 2000, tendrá la opción de elegir entre los formatos FAT32 y NTFS.
A continuación se encuentran algunos elementos a considerar para realizar su
elección.
FAT32
FAT32 es compatible con los siguientes sistemas operativos Windows:
Windows 98, Windows 98 SE, Windows Me, Windows 2000 y Windows XP.
FAT32 también pueden leerla las computadoras Apple Macintosh que
ejecutan Mac OS.
65
Limitaciones: En Windows 2000 y Windows XP, los usuarios no podrán
crear tamaños de particiones que superen los 32GB (si bien podrán tener
acceso a estas particiones de mayor tamaño). (Esta limitación no se aplica a
otros sistemas operativos admitidos).
En general, FAT32 es una buena elección si va a utilizar su disco duro
SmartDisk con computadoras que ejecutan Windows 98, Windows 98 SE o
Windows Me, o si lo va a utilizar con computadoras con Windows y Mac OS.
NTFS
NTFS es compatible con los siguientes sistemas operativos de Windows:
Windows NT, Windows 2000 y Windows XP. NTFS generalmente brinda un
rendimiento superior a FAT32 y permite que los usuarios creen particiones de
tamaño superior a 32GB en los sistemas operativos admitidos.
Limitaciones: NTFS no es compatible con Windows 98, Windows 98 SE,
Windows Me, ni con computadoras Apple Macintosh que ejecutan Mac OS.
En general, NTFS es una buena elección si va a utilizar su disco duro
SmartDisk sólo con una o más computadoras que ejecuten Windows XP o
Windows 2000.
Cómo obtener ayuda
Si tiene dificultades para instalar o utilizar su producto SmartDisk, visite el
sitio web principal de Atención técnica de SmartDisk en
www.SmartDisk.com. Desde esta página puede acceder a nuestra biblioteca
de documentación para usuarios, leer respuestas a preguntas frecuentes y
descargar las actualizaciones de software disponibles. Aunque para la
mayoría de nuestros clientes este contenido es suficiente para que encuentren
la solución correcta, esta página también enumera formas en las que se puede
comunicar directamente con el Equipo de atención técnica de SmartDisk.
Sírvase registrar su producto (ver más abajo) antes de ponerse en contacto con
el grupo de atención técnica de SmartDisk.
66
Cómo registrar su producto SmartDisk
Puede registrar su producto SmartDisk en
www.SmartDisk.com/Registration.asp. El procedimiento de registro es rápido
y sencillo, y nos ayudará a proporcionarle la mejor experiencia posible con
este producto y con futuros productos SmartDisk.
Términos de la garantía
SmartDisk Corporation garantiza que sus productos no tienen defectos en materiales ni
fabricación en condiciones de uso y servicio normales durante el periodo que ocurra
primero: 1 año a partir de la fecha de compra o 3 años a partir de la fecha de fabricación.
Los productos adquiridos en países de la Unión Europea donde está vigente la Directiva
1999/44/EC tienen una garantía de 2 años a partir de la fecha de compra. La única y
exclusiva obligación de SmartDisk en relación a reclamaciones de no conformidad
realizadas durante el periodo de garantía especificado anteriormente será, a su exclusiva
elección, la reparación o sustitución de cualquier artículo de Equipo que SmartDisk
determine, a su exclusiva discreción, defectuoso. El cliente obtendrá un número de
Autorización de Devolución de Mercancía (RMA) de SmartDisk antes de devolver
cualquier Equipo a SmartDisk según esta garantía, poniéndose en contacto con el
Servicio de Atención Técnica (véase www.SmartDisk.com). El Cliente deberá pagar
por anticipado los cargos de envío del Equipo devuelto a SmartDisk para el servicio de
garantía, y SmartDisk pagará los cargos de envío de devolución al Cliente, excluyendo
los derechos o impuestos aduaneros, si los hubiese. Todas las devoluciones exigen una
prueba de compra fechada original y una nota explicando el problema. SmartDisk
Corporation no será responsable de los artículos devueltos sin una RMA ni de aquellos
empaquetados de forma incorrecta. El Equipo de reemplazo será nuevo o similar a uno
nuevo en cuanto al rendimiento y estará garantizado por el resto del término de la
garantía del Equipo en incumplimiento. SmartDisk Corporation no será responsable de
la recuperación de los datos del cliente que se encuentren en productos devueltos que
incorporen almacenamiento de datos. Todo Equipo reemplazado se convertirá en
propiedad de SmartDisk. Se considerará que el Cliente ha renunciado a cualquier
reclamación por defectos que no se realice durante el periodo de garantía.
Las obligaciones de garantía de SmartDisk establecidas por el presente documento,
están expresamente condicionadas a (i.) que los Productos hayan sido bien instalados y
utilizados, y hayan recibido mantenimiento en todo momento por parte del Cliente; (ii.)
que los Productos no hayan sido expuestos a tensiones mecánicas inusuales, ni a
ninguna otra condición inusual, ya sea de naturaleza eléctrica, medioambiental o de
fuerza mayor; (iii.) que los Productos no hayan sido sometidos, por el Cliente o por un
tercero, a uso indebido, accidente o a cualquier instalación o desinstalación no
autorizada; (iv.) que los Productos no hayan sido alterados ni modificados de manera no
67
autorizada, a menos que las alteraciones o modificaciones hayan sido aprobadas por
escrito o, en caso contrario, hayan sido realizadas por SmartDisk y (v.) que el Cliente
haya instalado sin demora todas las Revisiones de producto publicadas para dichos
Productos por SmartDisk a lo largo del período de garantía. SmartDisk no garantiza que
los Productos funcionen en las combinaciones específicas que hayan sido elegidas por
el Cliente, como tampoco que el funcionamiento sea ininterrumpido o exento de errores,
o que serán remediados todos los incumplimientos o defectos. Además, SmartDisk no
tendrá obligación alguna de garantía por cualquier incumplimiento de los Productos con
las especificaciones de productos aplicables, que resulten de la combinación de uno o
varios Productos con hardware o software (o ambos) no proporcionado por SmartDisk.
Si se determina que uno o varios Productos informados por el Cliente como defectuosos
o en incumplimiento durante el período de garantía, no son defectuosos ni están en
incumplimiento, SmartDisk podrá, a su elección, cargar al cliente la mano de obra
proporcionada y los gastos incurridos por SmartDisk relacionados con dicha
determinación, de acuerdo con las tarifas de SmartDisk vigentes en ese momento.
SmartDisk Corporation no será responsable de ninguna venta no autorizada ni
representación engañosa realizadas por terceras partes revendedoras. Las garantías de
SmartDisk no se transmiten con la propiedad. Los productos adquiridos mediante
subasta, venta de garaje, en un mercadillo o adquiridos como unidades de demostración
pueden no estar cubiertos por la garantía de SmartDisk.
ESTA SECCIÓN ESTABLECE LAS ÚNICAS Y EXCLUSIVAS GARANTÍAS DE
SMARTDISK Y LOS REMEDIOS PARA EL CLIENTE, OTORGADOS POR
SMARTDISK Y ACEPTADOS POR EL CLIENTE, QUE SE APLICARÁN EN
LUGAR DE CUALQUIER OTRA GARANTÍA, YA SEA EXPRESA O IMPLÍCITA,
INCLUIDA, AUNQUE SIN LIMITARSE A ELLAS, CUALQUIER GARANTÍA DE
COMERCIALIZACIÓN E IDONEIDAD PARA UN FIN EN PARTICULAR, O
CUALQUIER OTRA DE LAS GARANTÍAS QUE MEDIANTE LA PRESENTE
RECHAZA SMARTDISK, Y A LAS CUALES RENUNCIA EL CLIENTE,
EXPRESA E INEQUÍVOCAMENTE.
Declaración de Copyright
Copyright ©2004 SmartDisk Corporation.
Todas las marcas y nombres de productos aquí mencionados son propiedad de sus
respectivos propietarios.
Ninguna parte de este documento puede reproducirse de forma ni por medio algunos,
sin importar el fin, sin la autorización expresa y por escrito de SmartDisk Corporation.
Todos los derechos reservados.
68
Conformidad con las disposiciones de la
FCC
Este equipo se ha probado y se ha determinado que cumple con los límites establecidos
para los dispositivos digitales Clase B, de conformidad con la Parte 15 de la normativa
de la FCC. Estos límites están diseñados para brindar una protección razonable contra
interferencias perjudiciales en una instalación residencial. Este equipo genera, utiliza y
puede irradiar energía de radiofrecuencia y, si no se instala y utiliza conforme a las
instrucciones, puede ocasionar interferencias perjudiciales a las comunicaciones de
radio. No obstante, no puede garantizarse que no se produzcan interferencias en una
instalación específica. Si este equipo ocasiona interferencias perjudiciales a la recepción
de radio o televisión, lo cual puede determinarse encendiendo y apagando el equipo, se
recomienda al usuario que intente corregir la interferencia tomando una o más de las
siguientes medidas:
•
Reorientar o reubicar la antena receptora.
•
Aumentar la separación entre el equipo y el receptor.
•
Conectar el equipo a una toma eléctrica en un circuito diferente al utilizado
por el receptor.
•
Consultar al distribuidor o a un técnico de radio/TV experimentado para
obtener ayuda.
69
Handleiding
Voorbereiding van de FireLite: Mac OS of
Windows?
De FireLite is zodanig ingesteld dat hij direct kan worden gebruikt op een
Apple Macintosh-computer waarop Mac OS draait. De indeling is HFS+.
Indien u van plan bent om de FireLite alleen met Mac OS-computers te
gebruiken, kunt u de fabrieksinstellingen handhaven en de eenvoudige
procedure volgen in De FireLite gebruiken met Mac OS om de FireLite aan
te sluiten en te gebruiken.
Indien u van plan bent om de FireLite te gebruiken met Windows-computers
of met zowel Mac OS- als Windows-computers, moet de FireLite zodanig
opnieuw worden geformatteerd dat hij ook door Windows kan worden
herkend, omdat er anders geen gegevens via Windows op kunnen worden
opgeslagen. Mac OS herkent stations die voor Windows zijn geformatteerd.
Wilt u de FireLite met Windows gebruiken, ga dan eerst naar De FireLite
gebruiken met Windows om de FireLite voor te bereiden. Vervolgens kunt
u de aanwijzingen volgen in De FireLite gebruiken met Mac OS, indien u
de FireLite ook met een Mac OS-computer wilt gebruiken.
Opmerking: Capaciteit afhankelijk van model. Het is mogelijk dat
uw besturingssysteem een capaciteit van minder gigabytes
aangeeft. 1 GB = 1.000.000.000 bytes.
70
De FireLite gebruiken met Mac OS
De FireLite aansluiten op een Macintosh-computer
Uw FireLite is compatibel met zowel de 1394a (FireWire 400) als de 1394b
(FireWire 800) norm. Om op uw Macintosh de FireLite aan te sluiten op een
FireWire 400 poort, moet u eerst de bilingual kabel (9-pins naar 6-pins) uit
het pakket halen. Sluit de 6-pins connector van de bilingual kabel nu aan op
een open FireWire 400 poort op uw Macintosh en sluit het andere uiteinde
van de bilingual kabel aan op een van de poorten van de vaste schijf op de
SmartDisk. Uw vaste schijf verschijnt als nieuwe schijf op het bureaublad.
Om op uw Macintosh de FireLite aan te sluiten op een FireWire 800 poort,
moet u eerst de betakabel (9-pins naar 9-pins) uit het pakket halen. Sluit nu op
uw Macintosh het ene uiteinde van de betakabel aan op een FireWire 800
poort en het andere uiteinde op een van de poorten van de vaste schijf op uw
SmartDisk. Uw vaste schijf verschijnt als nieuwe schijf op het bureaublad.
Gegevens opslaan en kopiëren
Als de vaste schijf van SmartDisk eenmaal op de computer is aangesloten,
kan deze als iedere andere verwisselbare schijf worden benaderd en gebruikt.
U kunt bestanden naar het pictogram van de vaste schijf van SmartDisk
slepen om ze te kopiëren, naar de vaste schijf navigeren via de
dialoogvensters Openen en Opslaan of bestanden die op de vaste schijf van
SmartDisk zijn opgeslagen verwijderen. Zie de handleiding van uw computer
voor informatie over het kopiëren, openen en verwijderen van bestanden.
De FireLite verwijderen uit een Macintosh-computer
De vaste schijf van SmartDisk is hot-pluggable. Dat betekent dat deze schijf
aangesloten en verwijderd kan worden zonder dat de computer opnieuw hoeft
te worden opgestart. Om de vaste schijf van uw SmartDisk op een
willekeurig moment te kunnen verwijderen, dient u de volgende stappen uit te
voeren.
71
Opmerking: zorg ervoor dat u de juiste procedure volgt bij het
verwijderen van de vaste schijf van SmartDisk. Het simpelweg
verwijderen van de vaste schijf zonder eerst de aanwijzingen op te
volgen, kan schade aan de vaste schijf en/of gegevensverlies tot
gevolg hebben.
1.
Indien bestanden die zich op de vaste schijf van SmartDisk
bevinden in een toepassing zijn geopend, dienen deze te worden
gesloten.
2.
Selecteer het pictogram van de vaste schijf van SmartDisk op het
bureaublad en sleep het naar de prullenbak.
Ook kunt u de computer gewoon uitschakelen terwijl de vaste schijf van
SmartDisk nog aangesloten is en deze vervolgens verwijderen.
De FireLite gebruiken met Windows
De vaste schijf van SmartDisk heeft een HFS+-structuur. Deze structuur heeft
de voorkeur wanneer de vaste schijf alleen wordt gebruikt met Apple
Macintosh-computers waarop Mac OS draait. Om de vaste schijf op een
Windows-systeem te kunnen gebruiken, dient de vaste schijf zodanig opnieuw
te worden geformatteerd dat deze gemakkelijk door Windows-computers kan
worden herkend. De vaste schijf zal ook herkend blijven worden door Apple
Macintosh-computers.
Volg de stappen in het aparte gedeelte De FireLite formatteren voor
Windows indien u van plan bent de vaste schijf van SmartDisk ooit met een
Windows-computer te gaan gebruiken. Als u voornamelijk een Mac OS
computer gebruikt en deze wilt delen met een Windows-computer, dan vindt
u het wellicht gemakkelijker om de procedure te gebruiken die staat
beschreven onder Formatteren voor Windows onder Mac OS X als u de
vaste schijf van uw SmartDisk wilt voorbereiden voor gebruik met Windows.
Controleer eerst of uw Windows-computer een 6-pins FireWire 400 poort of
een 9-pins FireWire 800 poort heeft. Uit oogpunt van gemak betrekt de vaste
schijf van uw SmartDisk stroom via deze poort. Sommige computers hebben
alleen 4-pins FireWire-poorten. Aangezien 4-pins poorten geen stroom
leveren, heeft u een bilingual 9-pins naar 4-pins FireWire-kabel en een
72
afzonderlijke netvoedingsadapter (SmartDisk-model ACFWS) nodig om
samen met uw computer de vaste schijf van uw SmartDisk te kunnen
gebruiken.
De FireLite aansluiten op een Windows-computer
Uw FireLite is compatibel met zowel de 1394a (FireWire 400) als de 1394b
(FireWire 800) norm. Om op uw PC de FireLite aan te sluiten op een
FireWire 400 poort, moet u eerst de bilingual kabel (9-pins naar 6-pins) uit
het pakket halen. Sluit vervolgens de 6-pins connector van de bilingual kabel
aan op een open FireWire 400 poort op uw PC en sluit het andere uiteinde van
de bilingual kabel vervolgens aan op een van de poorten van de vaste schijf
op uw SmartDisk.
Om op uw PC de FireLite aan te sluiten op een FireWire 800 poort, moet u
eerst de betakabel (9-pins naar 9-pins) uit het pakket halen. Sluit op uw PC
vervolgens het ene uiteinde van de betakabel aan op een open FireWire 800
poort en sluit het andere uiteinde van de betakabel aan op een van de poorten
van de vaste schijf op uw SmartDisk.
Als u een netvoedingsadapter (SmartDisk-model ACFWS) gebruikt, steek
deze dan in het stopcontact.
Indien u gebruik maakt van Windows 98 Tweede editie en de
computer u vraagt om de installatie-cd van Windows 98 Tweede
editie te plaatsen nadat u de vaste schijf heeft aangesloten, dan is
vereist dat u de extra ondersteunende FireWire-software (1394)
van Microsoft installeert. U moet uw vaste schijf verwijderen en
vervolgens de nieuwste FireWire (1394) drivers voor Windows 98
SE
downloaden
vanaf
de
Microsoft-website
http://windowsupdate.microsoft.com en deze hierna installeren.
Uw vaste schijf verschijnt als een nieuwe stationsletter onder Deze computer
(My Computer).
Gegevens opslaan en kopiëren
Als de vaste schijf van SmartDisk eenmaal op de juiste wijze is geformatteerd
en op de computer is aangesloten, kan deze als iedere andere verwisselbare
73
schijf worden benaderd en gebruikt. U kunt bestanden naar het pictogram van
de vaste schijf van SmartDisk slepen om ze te kopiëren, naar de vaste schijf
navigeren via de dialoogvensters Openen en Opslaan of bestanden
verwijderen die op de vaste schijf van SmartDisk zijn opgeslagen. Zie de
handleiding van uw computer voor informatie over het kopiëren, openen en
verwijderen van bestanden.
De FireLite verwijderen uit een Windows-computer
De vaste schijf van SmartDisk is hot-pluggable. Dat betekent dat deze schijf
aangesloten en verwijderd kan worden zonder dat de computer opnieuw hoeft
te worden opgestart. Om de vaste schijf van SmartDisk op een willekeurig
moment te kunnen verwijderen, dient u de volgende stappen uit te voeren.
Ook kunt u de vaste schijf op een willekeurig moment verwijderen terwijl de
computer is uitgeschakeld.
Opmerking: zorg ervoor dat u de juiste procedure volgt bij het
verwijderen van de vaste schijf van SmartDisk. Het simpelweg
verwijderen van de vaste schijf zonder eerst de aanwijzingen op te
volgen, kan schade aan de vaste schijf en/of gegevensverlies tot
gevolg hebben.
1.
Indien bestanden die zich op de vaste schijf van SmartDisk
bevinden in een toepassing zijn geopend, dienen deze te worden
gesloten.
2.
Klik op de knop Hardware ontkoppelen of uitwerpen in het
systeemvak.
3.
Selecteer de vaste schijf van SmartDisk in het menu dat wordt
weergegeven.
4.
Even later verschijnt er een bericht in Windows waarin wordt
gemeld dat het veilig is om de hardware te verwijderen.
74
Ook kunt u de computer gewoon uitschakelen terwijl de vaste schijf van
SmartDisk is aangesloten en deze vervolgens verwijderen.
De FireLite formatteren voor Windows
Volg onderstaande aanwijzingen om de vaste schijf van SmartDisk te
formatteren voor gebruik met Windows of met zowel Windows als Mac OS.
Deze procedure hoeft slechts eenmaal te worden uitgevoerd. De vereiste
stappen verschillen afhankelijk van de Windows-versie die u gebruikt tijdens
het formatteren. Volg de aanwijzingen voor de Windows-versie die u
gebruikt.
De FireLite formatteren onder Windows XP of Windows 2000
Volg de hieronder genoemde stappen indien u gebruik maakt van Windows
XP of Windows 2000 bij het formatteren van de vaste schijf van SmartDisk
voor Windows.
Door het formatteren worden alle gegevens van de schijf gewist.
Controleer iedere stap goed voordat u hem uitvoert, zodat u er
zeker van bent dat u de juiste schijf aan het formatteren bent.
Gegevens die verloren gaan kunnen waarschijnlijk nooit meer
teruggehaald worden.
1.
Voer de instructies uit onder De FireLite aansluiten op een
Windows-computer die eerder in dit document staan beschreven.
2.
Open de Disk Management utitility (het hulpprogramma
Schijfbeheer) als volgt:
aaa. Klik op het menu Start, klik vervolgens op Instellingen en
vervolgens op Configuratiescherm.
bbb. Dubbelklik op Systeembeheer en dubbelklik op
Computerbeheer.
ccc. Klik in de submap Storage (Opslag) op Disk Management
(Schijfbeheer).
75
3.
De wizard Write Signature and Upgrade Disk (Handtekening en
schijf opwaarderen) gaat van start.
ddd. Klik op Next (Volgende) om door te gaan met de wizard.
eee. Selecteer de vaste schijf van SmartDisk door middel van
het selectievakje.
Voorzichtig: het selecteren van de verkeerde schijf op dit punt kan
het verlies van waardevolle gegevens als gevolg hebben.
fff. Klik op Next (Volgende) om door te gaan.
ggg. Klik op Finish (Voltooien) om de handtekening weg te
schrijven naar de vaste schijf.
4.
De vaste schijf verschijnt in een lijst zonder stationsletter en wordt
weergegeven als "unallocated"("niet toegewezen").
5.
Klik eenmaal met de rechtermuisknop op het niet toegewezen
gebied van het vaste-schijfvak om een partitie te maken en klik op
Create Partition (Partitie maken).
6.
De wizard Create Partition (Partitie maken) gaat van start.
hhh. Klik op Next (Volgende) om door te gaan met de wizard.
iii. KiesPrimary partition (Primaire partitie) of Extended
partition (Uitgebreide partitie). Het wordt aanbevolen om
Primaire partitie te selecteren. Klik vervolgens op Next
(Volgende).
jjj. Voer de hoeveelheid toe te wijzen schijfruimte
(partitiegrootte) in. De standaardwaarde is de maximaal
beschikbare schijfruimte (aanbevolen). Klik op Next
(Volgende).
kkk. Wijs een stationsletter of een pad toe (de standaardletter
wordt aanbevolen) en klik vervolgens op Next (Volgende).
lll. Selecteer een bestandssysteem om de schijf te formatteren
(FAT32 of NTFS), controleer de instellingen en klik
vervolgens op Next (Volgende). Raadpleeg het gedeelte
76
FAT32 of NTFS? verderop in dit document indien u niet
zeker weet welke u moet kiezen.
Het wordt aanbevolen om het selectievakje Perform Quick Format
(Snelformattering uitvoeren) in te schakelen. Een normale
formattering kan uren in beslag nemen.
mmm.
Controleer de instellingen en klik vervolgens op
Finish (Voltooien) om te beginnen met het formatteren
van de vaste schijf.
7.
Wanneer het formatteren voltooid is, wordt bij de vaste schijf de
volumenaam weergegeven, de stationsletter, de partitiegrootte (in
GB), het gebruikte bestandssysteem (FAT32 of NTFS) en de
huidige status.
De vaste schijf is nu gereed om in gebruik te worden genomen.
De FireLite formatteren onder Windows Me of Windows 98
Tweede editie
Volg deze stappen indien u gebruik maakt van Windows Me of Windows 98
Tweede editie bij het formatteren van de vaste schijf van SmartDisk voor
Windows.
Door het formatteren worden alle gegevens van de schijf gewist.
Controleer iedere stap goed voordat u hem uitvoert, zodat u er
zeker van bent dat u de juiste schijf aan het formatteren bent.
Gegevens die verloren gaan kunnen waarschijnlijk nooit meer
teruggehaald worden.
1.
Voer de instructies uit onder De FireLite aansluiten op een
Windows-computer eerder in dit document.
2.
Klik in het menu Start op Uitvoeren, typ command en druk op
Enter. Als het goed is, ziet u dan een klein zwart MS DOS-venster
met de prompt c:\Windows.
77
3.
Typ fdisk en druk op Enter. Typ Y (of druk op de toets Enter) in
het venster waarin u wordt gevraagd of u ondersteuning voor grote
schijven wilt inschakelen.
4.
U krijgt een menu met vijf items te zien. U dient 5 in te voeren om
de optie "Change current fixed disk drive" te selecteren. Vervolgens
drukt u op de toets Enter.
5.
U krijgt een lijst met vaste schijven te zien. De belangrijkste interne
vaste schijf is Disk 1. Alle andere vaste schijven worden in de lijst
weergegeven als Disk 2, 3, etc. Indien er zich slechts één vaste
schijf in de computer bevindt, wordt station 2 de vaste schijf van
SmartDisk. U kunt ook controleren welke schijf van de lijst de vaste
schijf van SmartDisk is door de grootte in Mb te bekijken. Het getal
zou iets kleiner moeten zijn dan de grootte die wordt aangegeven op
het productlabel van de vaste schijf van SmartDisk. Typ het getal
dat de vaste schijf van SmartDisk vertegenwoordigt en druk op
Enter.
Voorzichtig: het selecteren van de verkeerde schijf op dit punt kan
het verlies van waardevolle gegevens als gevolg hebben.
6.
U krijgt hetzelfde menu met vijf items te zien als in stap 4. Deze
keer dient u 1 in te voeren, Create DOS partition or Logical DOS
drive. Druk op Enter.
7.
Bij het volgende menu met drie items dient u te controleren of u de
juiste schijf aan het partioneren bent voordat u verdergaat. Typ 1
om Create Primary DOS Partition te selecteren en druk op Enter.
Het proces dat hierop volgt kan ongeveer een minuut in beslag
nemen.
8.
Bij de prompt Do you wish to use the maximum available size for
the Primary DOS partition? antwoordt u met Yes
(standaardantwoord) of drukt u op de toets Enter. Het proces dat
hierop volgt kan ongeveer een minuut in beslag nemen.
9.
Nadat het partitioneren voltooid is, tweemaal op de toets Esc
drukken. U wordt gevraagd om de pc opnieuw op te starten. U kunt
dit bericht negeren. Druk nogmaals op de toets Esc om het fdiskprogramma te verlaten. Typ exit en druk op Enter om het MS DOS
Prompt-venster te sluiten.
78
10. Dubbelklik op het pictogram "Deze computer" om het venster te
openen. Verwijder de vaste schijf van SmartDisk en sluit hem
opnieuw aan op de pc. Er dient een pictogram met een stationsletter
te verschijnen in het venster "Deze computer". Er verschijnt ook een
dialoogvenster waarin wordt gemeld dat het station niet
toegankelijk is. Onthoud de stationsletter. Deze heeft u nodig in de
volgende stap. Klik op Annuleren.
11. Nu moet u de vaste schijf van SmartDisk formatteren. In het venster
"Deze computer" dient u het pictogram aan te wijzen dat de vaste
schijf van SmartDisk vertegenwoordigt. Klik op de rechter
muisknop. Selecteer in het menu de optie Formatteren. Selecteer
Full (Volledig) in het venster Format (Formatteren) onder Format
Type (Soort indeling) en voer een willekeurige naam van maximaal
10 tekens in. Klik op de knop Start. Er verschijnt een
waarschuwing dat alle bestanden worden vernietigd. Klik op OK
om door te gaan. Dit proces neemt een aantal minuten in beslag.
Eenmaal voltooid, klik dan op de knoppen Sluiten en u bent klaar.
Het kan zijn dat u wordt gevraagd om Scandisk uit te voeren om de schijf te
controleren, maar dit is niet nodig. Indien u dit toch wenst te doen, dient u
Thorough (Uitvoerig) te selecteren bij Type of Test (Soort test) aangezien er
zich nog geen bestanden of mappen op de schijf bevinden. Wees erop
voorbereid dat het lang duurt voordat deze test is voltooid.
De vaste schijf is nu gereed om in gebruik te worden genomen.
Formatteren voor Windows onder Mac OS X
Het is mogelijk de vaste schijf van uw SmartDisk te formatteren in de
FAT32-indeling terwijl deze aangesloten is op een Apple Macintoshcomputer die onder Mac OS X draait. Dit kan een handige methode zijn
indien u de vaste schijf van SmartDisk hoofdzakelijk op een Mac OScomputer gebruikt, maar u deze later ook op een Windows-computer wilt
kunnen aansluiten.
De vaste schijf van SmartDisk kan worden geformatteerd en gepartitioneerd
met gebruik van de Disk Utility van Apple die zich in de map Utilities bevindt.
Selecteer het van toepassing zijnde station onder Disk and Volumes Selected
en klik op het tabblad Partition. Klik op het veld Format onder Volume
Information en kies Free Space. Klik op het tabblad Erase, selecteer het veld
Volume Format en klik op MS-DOS File System. Klik op Erase en wacht
79
totdat alles gewist is. De schijf is nu gereed om te worden aangesloten op een
Windows-besturingssysteem.
FAT32 of NTFS?
Wanneer u de vaste schijf van SmartDisk formatteert op een Windows XP of
een Windows 2000 systeem, heeft u de keuze tussen FAT32- en NTFSindeling. Hieronder volgen een aantal aandachtspunten voor het maken van
uw keuze.
FAT32
FAT32 is compatibel met de volgende Windows-besturingssystemen:
Windows 98, Windows 98 Tweede editie, Windows Me, Windows 2000,
Windows XP. FAT32 kan ook door Apple Macintosh-computers met Mac
OS worden gelezen.
Beperkingen: gebruikers kunnen onder Windows 2000 en Windows XP geen
partities maken die groter zijn dan 32 GB. De gebruikers kunnen de grotere
partities echter wel benaderen. Deze beperking is niet van toepassing op
andere ondersteunde besturingssystemen.
Over het algemeen is FAT32 een goede keuze indien u de vaste schijf van
SmartDisk met computers gaat gebruiken waarop Windows 98, Windows 98
Tweede edite of Windows Me draait of indien u de vaste schijf van
SmartDisk gaat gebruiken met zowel Windows-computers als Mac OS
computers.
NTFS
NTFS is compatibel met de volgende Windows-besturingssystemen:
Windows NT, Windows 2000 en Windows XP. De prestaties van NTFS zijn
over het algemeen beter dan die van FAT32 en gebruikers kunnen op de
ondersteunde besturingssystemen partities maken van meer dan 32 GB.
Beperkingen: NTFS is niet compatibel met Windows 98, Windows 98
Tweede editie, Windows Me of Apple Macintosh-computers waarop Mac OS
draait.
80
Over het algemeen is NTFS een goede keuze indien de vaste schijf van
SmartDisk alleen wordt gebruikt met een of meerdere computers waarop
Windows XP of Windows 2000 draait.
Technische ondersteuning
Als u moeilijkheden ondervindt bij het installeren of gebruiken van uw
SmartDisk-product, bezoek dan de technische ondersteuning van SmartDisk
op www.SmartDisk.com. Vanaf deze pagina heeft u toegang tot onze
bibliotheek met gebruikershandleidingen, kunt u de antwoorden lezen op
veelgestelde vragen en kunt u de beschikbare software-updates downloaden.
Ook al is de informatie op deze pagina meestal voldoende om onze klanten
weer op het goede spoor te helpen, wordt op deze pagina ook aangegeven hoe
u het technische ondersteuningsteam van SmartDisk direct kunt benaderen.
Registreer het product (zie hieronder) voordat u contact opneemt met
SmartDisk Technical Support.
SmartDisk Productregistratie
U kunt uw SmartDisk-product registreren op
www.SmartDisk.com/Registration.asp. De registratieprocedure is snel en
eenvoudig en helpt ons ervoor te zorgen dat u zoveel mogelijk plezier beleeft
aan de huidige en toekomstige SmartDisk-producten.
Garantiebepalingen
SmartDisk Corporation garandeert dat zijn producten bij normaal gebruik en onderhoud
gedurende 1 jaar vanaf de datum van aankoop of 3 jaar vanaf de datum van fabricage,
welke situatie zich dan ook het eerst voordoet, vrij zijn van fabrieks- en materiaalfouten.
Op producten die zijn gekocht in landen van de Europese Unie en die vallen onder
richtlijn 1999/44/EC, rust een garantie van een periode van 2 jaar vanaf de datum van
aankoop.Als in de garantieperiode een claim wordt ingediend omdat apparatuur niet aan
het hierboven genoemde blijkt te voldoen, dan is SmartDisk alleen verplicht om
apparatuur te repareren of vervangen waarvan alleen SmartDisk bepaalt of die defect is.
Of apparatuur wordt gerepareerd of vervangen, bepaalt SmartDisk zelf.De klant moet
een Return Merchandise Authorization (RMA) nummer opvragen bij SmartDisk
voordat apparatuur aan SmartDisk krachtens deze garantie kan worden geretourneerd.
Hiervoor dient contact te worden opgenomen met de technische ondersteuning (zie
www.SmartDisk.com). De klant betaalt vooraf de verzendkosten van de aan SmartDisk
81
geretourneerde apparatuur die bestemd is voor service krachtens de garantie, en
SmartDisk betaalt de verzendkosten van de apparatuur die terug wordt gezonden naar
de klant, exclusief douaneverplichtingen of belastingen, indien deze zich voordoen.
Alle retouren moeten vergezeld gaan van een origineel en gedateerd aankoopbewijs en
een brief waarin het probleem wordt beschreven. SmartDisk Corporation is niet
verantwoordelijk voor artikelen die zonder RMA-nummer of niet goed verpakt worden
geretourneerd. Vervangende apparatuur is nieuw of qua prestatie zo goed als nieuw. De
garantietermijn voor deze apparatuur loopt tot het einde van de oorspronkelijke
garantietermijn van de defecte apparatuur. SmartDisk Corporation is niet
verantwoordelijk voor het herstellen van klantgegevens die opgeslagen zijn op
geretourneerde producten. De vervangen apparatuur wordt eigendom van SmartDisk.
Claims die buiten de garantieperiode worden ingediend, worden door SmartDisk niet in
behandeling genomen.
De garantieverplichtingen van SmartDisk zijn expliciet onderhevig aan het volgende: (i)
de Producten moeten te allen tijde op de juiste manier door de klant geïnstalleerd,
gebruikt en onderhouden worden; (ii.) de Producten zijn niet blootgesteld aan
ongebruikelijke mechanische stress, een ongebruikelijke elektrische omgeving,
bijzondere weersomstandigheden of andere situaties van force majeure; (iii.) de
Producten zijn niet blootgesteld aan oneigenlijk gebruik, ongevallen of
ongeautoriseerde installatie/de-installatie van welke aard ook door handeling van de
klant of een derde; (iv.) de Producten mogen niet zonder toestemming worden
gewijzigd, tenzij schriftelijk goedgekeurd of op andere wijze uitgevoerd door
SmartDisk en (v.) De klant installeert tijdig alle productrevisies die door SmartDisk
voor de betreffende producten gedurende de garantietermijn worden uitgebracht.
SmartDisk garandeert niet dat de Producten functioneren in welke specifieke
combinatie dan ook die de klant kiest voor eigen gebruik of dat de Producten
ononderbroken en foutloos functioneren of dat alle afwijkingen of defecten zullen
worden gerepareerd. Bovendien is SmartDisk niet gebonden door
garantieverplichtingen indien de Producten niet functioneren conform de
productspecificaties als dit het gevolg is van het feit dat een of meer producten worden
gecombineerd met hardware en/of software die niet afkomstig is van SmartDisk. Indien
door de klant tijdens de garantieperiode aan SmartDisk wordt bericht dat een Product
defect is of niet voldoet, maar door SmartDisk wordt vastgesteld dat het product niet
defect is of wel voldoet, heeft SmartDisk het recht om, indien SmartDisk dit verkiest,
de klant de uren en kosten in rekening brengen die door SmartDisk zijn besteed om tot
een dergelijke vaststelling te komen, tegen de prijzen die op dat moment door
SmartDisk worden gehanteerd.
SmartDisk Corporation is niet verantwoordelijk voor onbevoegde verkoop of verkeerde
voorstelling van zaken door onbevoegde wederverkopers. SmartDisk-garanties zijn niet
overdraagbaar. Producten die zijn gekocht op een vlooienmarkt, straatverkoop of als
demonstratie-apparaat, vallen mogelijk niet onder de garantie van SmartDisk.
DE GARANTIES VAN SMARTDISK EN DE RECHTSMIDDELEN VAN DE
KLANT DIE HIER WORDEN UITEENGEZET ZIJN EXCLUSIEF EN WORDEN
DOOR SMARTDISK GEGEVEN EN DOOR DE KLANT AANVAARD IN PLAATS
VAN ALLE ANDERE GARANTIES, HETZIJ EXPLICIET OF IMPLICIET, MET
INBEGRIP VAN, MAAR NIET BEPERKT TOT, ALLE GARANTIES MET
82
BETREKKING TOT DE VERKOOPBAARHEID EN GESCHIKTHEID VOOR EEN
BEPAALD DOEL, WAARBIJ EXPLICIET EN ONMISKENBAAR DUIDELIJK IS
DAT SMARTDISK GEVRIJWAARD WORDT VAN AL DEZE ANDERE
GARANTIES EN DE KLANT HIERVAN AFSTAND DOET.
Copyright-verklaring
Copyright ©2004 SmartDisk Corporation.
Alle merken en productnamen die in dit document worden genoemd zijn eigendom van
de betreffende eigenaren.
Niets uit dit document mag verveelvoudigd worden, in enige vorm of op enige wijze,
noch op elektronische, noch op optische, noch op mechanische wijze, voor welk doel
dan ook, zonder de expliciete schriftelijke toestemming van SmartDisk Corporation.
Alle rechten voorbehouden.
Naleving van de FCC-voorschriften
Dit apparaat is getest en voldoet aan de beperkingen die overeenkomstig Deel 15 van de
FCC-voorschriften gesteld worden aan een digitaal apparaat uit klasse B. Deze
beperkingen zijn bedoeld om een redelijke bescherming te bieden tegen schadelijke
storingen in een installatie die in een woonomgeving staat. Dit apparaat produceert en
gebruikt radiogolven en kan deze uitstralen. Als de apparatuur niet volgens de
aanwijzingen is geïnstalleerd of wordt gebruikt, kan dit schadelijke storingen in
radioverbindingen tot gevolg hebben. Het goed opvolgen van de aanwijzingen biedt
echter geen garantie dat er in een bepaalde installatie geen storingen zullen voorkomen.
Als dit apparaat inderdaad schadelijke storingen veroorzaakt in de ontvangst van radioof televisiesignalen (dit kan worden vastgesteld door de apparatuur uit en aan te zetten),
verdient het aanbeveling een of meer van de volgende maatregelen te nemen om de
storing te verhelpen:
•
Verander de ontvangstantenne van richting of van plaats.
•
Zet het apparaat en de ontvanger verder uit elkaar.
•
Sluit het apparaat aan op een ander circuit dan dat waarop de ontvanger is
aangesloten.
•
Raadpleeg de leverancier of een ervaren radio/tv-technicus.
83