1
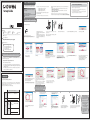
Step 1 : Configure the Network
To reset to the factory default settings
This Setup Guide explains how to configure C-6700WG
(this product) to be used in a wireless LAN environment.
This product has 3 methods of initial configuration as listed below:
- Configuration through a wireless LAN
- Configuration through a wired LAN
- Configuration using a USB memory
Important:
The print server only needs to be configured on
one computer.
Setup Guide
This Setup Guide describes how to configure this product through a
wireless LAN or wired LAN.
After setup is complete, go to:
‘Step 2: Install the Applications’ for each computer
that will use the printer.
For other configuration methods, please refer to the users manual.
Perform the factory default configuration according to the connection between this product
and the PC.
- To perform the factory default configuration with a wireless LAN connection, refer to
Configure Through a Wireless LAN .
- To perform the factory default configuration with a wired LAN connection, refer to
Configure Through a Wired LAN.
2. Push and hold the button on the print server while re-inserting the AC plug
into the electric outlet. Continue holding.
If this product has been used in another network, reset it to the factory default settings.
For details on the factory default configuration, refer to To reset to the factory default settings.
2.
Configure Through a Wireless LAN
1. Remove the AC plug from the electric outlet.
3.
3. The Status LED(Orange) will light when the factory default configuration
settings have been restored. Release the push switch.
5.
4.
1.
The following item is required:
WA03790XX
Contents
C-6700WG
Power Supply
Stand
CX User Software
Rubber Feet
Setup Guide
Warranty Booklet
When the product is placed in the horizontal (side) position, please use the rubber feet provided to prevent the unit from sliding.
Place one on each corner.
For User Registration
Install the printer driver on your PC.
For details, refer to the manual that came with
your printer.
-USB cable
(Do not connect the printer to this product yet. Printer
will be connected in ‘18’)
(Install the printer driver on your PC and make
sure you can print with a directly attached USB
connection from your computer before using
this product.)
Use to connect this product and a printer.
There is no need to purchase a new USB cable when a cable was
bundled with the printer to be connected to this product.
Check the message and click OK.
Insert the CD-ROM (CX User Software) into your Windows PC.
Verify the Wireless LED(Green) blinks.
Connect the AC adapter to this product and the power
plug to the outlet.
http://www.silexamerica.com/register/
Customer Support
7.
6.
8.
10.
9.
USA : silex technology america, Inc.
E-mail : [email protected]
URL : http://www.silexamerica.com/
Phone: 801-748-1199
US Toll Free Phone: 866-765-8761
Note: A more detailed manual including troubleshooting tips can be found on the CD
(Insert the CD, and click on Manual when the Autorun menu appears) of this product.
Startup menu is displayed.
Click Print Server Setup.
Click Wireless.
* In a Windows XP (SP2 or higher) or Vista environment, the above message
will be displayed. Select
. Yes
* The User Account Control screen is displayed when configuration is performed
on Windows Vista. Select Continue.
Safety instructions are noted in the Readme file on the CX User Software . Be sure to read
them before using this product.
CX Wireless Setup screen is displayed.
Check the notes on the screen and select
Configure print server wirelessly from your
computer and click Next.
Read the SOFTWARE LICENSE AGREEMENT and click
Yes.
If the screen above is displayed, select the wireless
network card to be used and click OK.
*
- Safety instructions regarding the radio waves
This screen is displayed only when two or more
network cards are installed on your PC.
Select this product and click Next.
Please note the following instructions:
- Do not use this product near medical devices such as a heart pacemaker. The radio
wave generated by this product may interfere with the operation of these devices and
may threaten one's life.
- Do not use this product near microwave ovens. The radio wave used by microwave
ovens may cause interference to this product.
12.
11.
14.
13.
Introduction
If the screen above is displayed, you need to change
the wireless settings on the PC manually.
Read the message and click OK.
Collect wireless LAN setting information
To use this product over the wireless LAN network, you need to configure wireless LAN
settings as appropriate for your network. This information needs to be identical to the
communication devices such as an access point.
Please collect the following information before the setup.
* If you use Windows XP or Vista and the setup utility automatically
changed the wireless settings on the PC, this screen is not displayed.
If the wireless settings on the PC differ from the
configuration information on the screen above, change
the PC wireless settings to match those displayed on
the screen.
Verify the wireless settings on the PC and click Next.
* Please refer to your wireless network adapter documentation for
Select a product to be configured and click Next.
Select Get IP Address Automatically
and click Next.
* If your product is not displayed on the list, click Refresh.
* If multiple products are displayed in the list, check the
Ethernet Address on the label of this product.
Select the SSID for your home or office
wireless network. If your network is security
enabled, enter the network key or password
and confirm it. Click Next.
* If the wireless network that you wish to use is not shown in
the list, click Detailed Config and configure each setting.
instructions on how to temporarily change your computer’s wireless
settings to match those of the print server.
Important: When you make this temporary change, your computer will
no longer be connected to the wireless network or Internet. After you
have completed the setup for the print server, you will need to change
your computer’s wireless settings back to their current settings. Please
make sure you write down the settings for your wireless network before
you make these changes for the print server configuration.
Write down your network configuration
Wireless mode
Ad hoc (ch.
) / Infrastructure
15.
16.
<< If you did not need to change the
wireless settings on the PC manually
in ‘11’, this screen will appear
>>
<< If you changed the wireless settings
on the PC manually in ‘11’, this
screen will appear
>>
17.
18.
The initial configuration of
this product is complete and
you do not need to configure
the print server any more.
SSID
Encryption
method
Encryption
method
WEP KEY
or
Pre-Shared
Key
WEP
(Open / Shared)
After setup is complete on one
computer, each user that wants
to use the Canon printer:
/ WPA / WPA2
Confirm the configuration parameters and
click Execute.
Select Yes and click Finish.
* Application install screen will be displayed as
shown in Step 2 - 3.
Click Finish.
Change the wireless settings on the PC
(that you have manually changed) back
to the previous settings written down in
‘11’.
To ensure these settings take effect,
unplug the AC adapter from the electrical
outlet and then plug it back in.
Connect the printer to be shared over the network along
with this product via a USB cable and insert the power
plug of this product into the outlet.
Go to
Step 2: Install the Applications
on the next page
Note: If you manually changed
the wireless settings at ‘11’
on your PC, go straight to
‘3’ in Step 2.
2.
Configure Through a Wired LAN
-network cable
5.
4.
6.
7.
1.
The following items are required:
-Ethernet Hub
3.
Install the printer driver on your PC.
For details, refer to the manual that came with
your printer.
-USB cable
Connect a network cable to this product.
Connect the other end of the network cable
to a network hub, switch, or router.
(Install the printer driver on your PC and make
sure you can print with a directly attached USB
connection from your computer before using
this product.)
Use to connect this product and a printer.
There is no need to purchase a new USB cable if a cable was
bundled with the printer to be connected to this product.
Click Wired.
15.
Confirm the configuration parameters and click
Execute.
10.
11.
Startup menu is displayed.
Click Print Server Setup.
Read the message on the screen and click OK .
When you will use this product in the wireless
network, select the wireless network that you wish
to use from the list, enter the wireless network key
and click Next.
Select Get IP Address Automatically
and click Next.
* If your product is not displayed in the list, click Search.
* If multiple products are displayed in the list, check the
Ethernet Address on the label of this product.
* If the wireless network that you wish to use is not
shown in the list, click Detailed Config and configure
each setting.
17.
16.
Select Yes and click Finish.
13.
12.
Select a product to be configured and click Next.
Read the SOFTWARE LICENSE AGREEMENT and
click Yes.
Quick Setup screen is displayed.
Read the notes on the screen and click Next.
* In a Windows XP (SP2 or higher) or Vista environment, the above message
will be displayed. Select Yes.
* The User Account Control screen is displayed when configuration is performed
on Windows Vista. Select Continue.
14.
Insert the CD-ROM (CX User Software) into your Windows
PC.
* Use a crossover cable when connecting this product directly to the PC.
9.
8.
Verify the Link LED (Green) turns on and the
Wireless LED (Green) turns off.
Connect the AC adapter to this product and the power
plug to the outlet.
(Do not connect the printer to this product yet. Printer
will need to be connected at ‘17’.)
To reflect the wireless configuration, disconnect the power
plug from the outlet and unplug the network cable.
Connect the printer to be shared over the network along
with this product via a USB cable and insert the power plug
of this product into the outlet.
* If you are to use this product in a wired LAN environment after you finish the
setup, you do not have to unplug the network cable.
Important: It is necessary to install the
applications on each computer that
will use the Canon multifunction
printer.
4.
3.
Step2 : Install the Application
6.
5.
2.
1.
Check the message and click OK.
Insert the CD-ROM (CX User Software) into your
Windows PC.
8.
Check the notes on the screen and click Next.
Click Application Installation.
* The User Account Control screen is displayed when configuration is
performed on Windows Vista. Select Continue.
10.
9.
Select Yes and click Finish.
7.
Add CX Print Wizard screen is displayed.
Click Next.
11.
Select the destination print server and Click
Next.
Read the SOFTWARE LICENSE AGREEMENT and click
Yes.
12.
Click Next.
Select the applications you want to install
and click Next.
* CX Print is for printing from your computer.
* SX Virtual Link is for scanning and other functions.
(1) Windows Security screen is displayed. Choose Install.
(2) The screen to confirm the user adding the application to the Windows firewall exemptions list
is displayed. Select Yes.
.
14.
13.
Confirm the configuration parameters and
click Finish.
* When in a Windows XP (SP2 or higher) or Vista environment, the above message will be
displayed. Select Yes.
* The message below is displayed when installing the application on Windows Vista.
Click Start.
Select the printer you want to use with this
product and click Next.
15.
Follow the instructions in the message on the
screen and click Finish.
Click Finish.
Now, the printer can be used in a network environment.
* If the IP address of this product is changed after the port is created,
printing from the port will be unavailable.
Step3 : Use the Canon Multifunction Printer
4.
3.
2.
To disconnect:
Printing:
Important: One person can be connected with SX Virtual Link
for scanning at a time. When you are done scanning, you should
disconnect from the Canon multifunction printer in SX Virtual
Link so it will be available for another PC to be able to connect.
The printer is set up as a Windows printer. Just select the approriate Canon printer
when printing.
Scanning and other functions:
1.
Click start - All Programs - SX Virtual Link - SX Virtual Link.
Confirm "
" (available).
Select the Canon multifunction printer and click Connect.
Confirm " " (connected).Refer to the operation manual
of the Canon multifunction printer to use the scanner,
card reader, and fax function.
Select the Canon multifunction printer and click
Disconnect.


![WA03380XA_A2_1_deu [Converted]](http://vs1.manualzilla.com/store/data/006781415_1-0a20a0cc41e52d67ac4cbe3b1d41e7f0-150x150.png)
