1
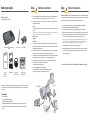
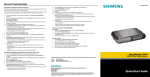
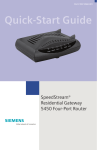
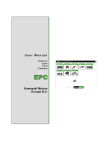
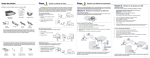
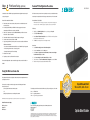
Step
3
Print Server Set-up (optional)
Common PC Configuration Procedures
Consult the User Guide on CD-ROM for step-by-step installation and configuration instructions specific
to your operating system.
For PCs that are new to your network or were not previously connected to your broadband connection,
ensure that you have completed both of the PC Setup procedures below for each PC on the network.
Printer Port Driver Installation for Windows:
1. Ensure that the printer is connected to the parallel port on the router and both the printer and
router are powered on.
2. Insert the supplied CD-ROM into your CD-ROM drive. If the setup program does not start
automatically, run SETUP from the root folder on the CD-ROM.
3. At the Choose Components screen, select the Printer Port Driver option. Follow the on-screen
instructions to complete the installation.
4. After the driver installation is complete, the Printer Port Setup screen will appear.
5. Select the desired device and port number. Click Add.
6. A pop-up message will inform you that the port has been created successfully, and the Windows
Add Printer wizard will launch.
• Select the correct Printer Manufacturer and Model, or use the "Have Disk" option if appropriate.
• If desired, change the Printer name so it is easily recognized
• If prompted about Sharing, do NOT enable Sharing.
7.
Installation is now complete.
8. Repeat the procedure for each PC that will share the printer.
PC Setup- Windows 95/98/98SE/Me
For non-standard configurations or print server troubleshooting procedures, consult the User Guide on
CD-ROM.
007-0312-001
NOTE: Windows XP Users: The following are general procedures covering most Windows operating systems.
Refer to the User’s Guide on CD-ROM for step-by-step configuration procedures specific to Windows XP.
TCP/IP Setup
1. Right-click on the Network Neighborhood icon on your desktop, select Properties.
2. Select TCP/IP-> Ethernet Adapter
3. Ensure Obtain an IP Address Automatically is selected. The DHCP server in the SpeedStream
router will provide an IP address for the PC.
4. Click OK twice, then restart your PC even if no changes were made.
Internet Access
1. Select Start Menu-> Settings-> Control Panel-> Internet Options.
2. Select the Connections tab and click the Setup button.
3. Select I want to set up my Internet Connection manually or I want to connect through a
Local Area Network (LAN) and click Next.
4. Select I connect through a Local Area Network (LAN) and click Next.
5. Uncheck all boxes on the Local Area Network Internet Configuration screen and click Next.
6. Follow the remaining on-screen prompts until the wizard has finished.
Using the Wireless Connection
The SpeedStream Wireless Router is configured to work seamlessly with other SpeedStream wireless
products right out of the box.
You may need to reconfigure some wireless settings to ensure that all settings match between
wireless devices if you are:
a) Also using another manufacturer’s wireless products
OR
b) Adding the SpeedStream router to an existing wireless network
Technical Support for North America is available 24 hours a day, 7 days a week, by phone, email or online:
Phone:
Email:
Online:
SpeedStream® 2624
Wireless DSL/Cable Router
1-877-823-6722
[email protected]
http://www.support.speedstream.com
NOTE: Mismatched wireless settings will prevent successful wireless network connections between devices.
Default Wireless Interface Settings:
SSID: SpeedStream
Channel: 11
WEP: Disabled
For more information regarding SpeedStream® products visit: www.speedstream.com.
Efficient Networks, Inc.
A Siemens Company
4849 Alpha Road
Dallas, TX 75244
©2002 Efficient Networks, Inc. A Siemens Company. All rights reserved. Efficient Networks, its logos, "Live a Broadband Life" and SpeedStream are
registered and unregistered trademarks of Efficient Networks, Inc. Siemens and the Siemens logo are registered trademarks of Siemens AG,
Germany. All other brand names and trademarks are held by their respective companies. Efficient Networks reserves the right to make changes to
product specifications at any time without notice.
Quick-Start Guide
Before you begin:
Step
Package Contents
1.
Your package includes the following:
2.
1
Step
Hardware Installation
Ensure that the SpeedStream Wireless Router is powered OFF before commencing with installation.
Leave your DSL/Cable modem connected to its wall socket (phone line or cable outlet).
Use Cat 5 Ethernet cable(s) to connect PC(s) and/or a hub or switch to one of the LAN ports on the
SpeedStream Wireless Router
AND/OR
Use an 802.11b compatible wireless network adapter to connect PC(s) to the router using the wireless
method.
NOTE: In order to connect to the router, the wireless settings of each wireless adapter in use must match those of the
SpeedStream router. Below are the default settings of the SpeedStream wireless router:
3.
SpeedStream 2624 Wireless DSL/Cable Router
SS2624
Wireless Antenna
AC Power Adapter
4.
5.
FREE
6.
7.
E X T E N D E D WA R R A N T Y !
G E T A O N E Y E A R H A R D WA R E WA R R A N T Y E X T E N S I O N
O N Y O U R S P E E D S T R E A M P R O D U C T.
Safety and Certi
ficat
JUST GO TO
SpeedStream
ions
SpeedStream® Quic
®
www.speedstream.com/reg/extwrnty
Software CD-ROM
L i v e
k-Start Guide
a
B r o a d b a n d
L i f e ™
to
ere ,
th isw whcat ion
epto kno
L eduo.
KePC
r
t, DS t inf
r you por duc
neafor sup pro
go and new
w w w . s p e e d s t r e a m . c o m
007-0105-002
This offer may be revoked, amended, supplemented, revised, altered, changed or terminated at any time without notice in the sole and absolute
discretion of Efficient Networks, Inc. This offer is available on select products only. This offer is available in select countries only. The offer is
good for thirty (30) days from the date of installation. Offer void where prohibited by law. Certain restrictions may apply.
© 2001 Efficient Networks, Inc. A Siemens Company
Safety and
Certifications
Information
Quick-Start Guide
Documentation/
Printer Port Driver CD
Extended Warranty
and Registration Card
This guide covers only the most common situations. Please refer to the full User’s Guide on the CD-ROM
if your network uses any of the following: existing router, existing DHCP server, or PC(s) using fixed (static)
IP addresses.
SSID: SpeedStream
Channel: 11
WEP: Disabled
Connect your DSL/Cable modem to the WAN port on the SpeedStream Wireless Router using the
Ethernet cable supplied with your DSL/Cable modem. If no cable was supplied with your modem, use
a straight-through CAT 5 Ethernet cable.
Attach the wireless antenna to the connector provided on the back of the router. Secure the antenna
by turning the grooved or ridged ring on the antenna until snug (Do not over tighten).
(Optional) If you intend to use the SpeedStream wireless router’s print server functionality, connect the
parallel cable of the printer to the printer port on the router before powering on the router.
Connect the power adapter to the SpeedStream router. Use only the power adapter provided.
After the router is power ON, verify LED functionality below:
• The Status LED should flash, then turn Off.
• The Power, WAN, and Wireless LEDs should be ON.
• For each active LAN (PC) connection, the LAN Link/Act LED should be ON.
• If the printer is On and Online, the Print Act LED should be ON
PC(s) with
wireless adapter
Back View
6
Requirements:
• DSL or Cable Modem
• PC(s) with the TCP/IP protocol installed
• Cat 5 Ethernet cables with RJ-45 connectors
• Installed wireless network adapter for each PC that will be wirelessly connected to the network
• Installed 10/100 Ethernet network adapter for each PC that will be connected to the network via
cabling
R
4
2
Printer
5
3
DSL/Cable
modem
PC(s) and/or
hub or switch
2
Router Configuration
Windows XP and Me Users: If you have Universal Plug and Play (UPnP) enabled , Windows may detect the
SpeedStream router upon startup and provide a shortcut to the router on your desktop. If so, double-click the
SpeedStream router icon and skip to step 3 in the router configuration procedure below.
1.
2.
3.
4.
5.
Start your web browser. In the Address box, enter the following: HTTP://192.168.254.254
Press Enter. The SpeedStream Simple Setup Wizard will launch.
Follow the on-screen instructions and choose the appropriate Internet connection method.
When prompted, enter the Internet connection information provided by your Internet service provider.
At the end of the Setup Wizard, the router will run an Internet connection test to complete the setup
process. Ensure that your DSL or Cable modem is connected properly and powered on
NOTE: If your Service Provider currently requires you to use separate PPPoE client software, discontinue use of this
software and enter your username and password in the PPPoE Connection username and password fields. The
SpeedStream Wireless Router will negotiate the PPPoE logon to your service provider’s network.
6.
7.
Visit www.SpeedStream.com to register your new SpeedStream product.
If additional configuration is desired, select the Advanced link from the left-side menu to configure
Firewall parameters, Security options and Special Applications such as online games and video
conferencing applications.
See reverse for optional Print Server set-up and Wireless Configuration Procedures