1
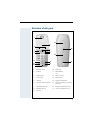
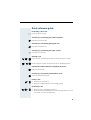
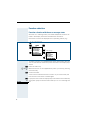
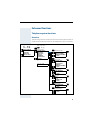
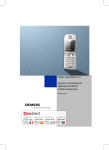
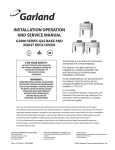
HiPath 4000
Gigaset M1 professional
in
HiPath Cordless Enterprise
Operating Instructions
Safety notes for the mobile telephone
Danger:
•
•
Do not use the mobile telephone in potentially explosive
atmospheres.
A transmitter power is emitted by your mobile telephone,
see page 57. Please observe safety procedures for your
area.
Note:
•
•
For people with hearing aids: radio signals may interfere
with hearing aids.
Please provide the operating instructions with the mobile
telephone if giving it to another user.
Overview of unit parts
1
14
2
3
15
4
6
8
5
7
16
9
17
10
11
13
12
1
Receiver inset
10
Hash key
2
Display
11
NET/callback
key
3
Display keys
12
Direct call key
4
Control key
13
Microphone
5
Talk key
14
Ringer loudspeaker
6
On-hook and on/off key
15
Screws for battery compartment lid
7
Speakerphone key
16
Battery compartment lid
8
Missed calls list
17
Slot for attachment clip
9
Star key
I
Safety notes for using the battery
Caution:
•
•
•
Only used approved batteries, see page 10.
Avoid contact with fire and water.
Only use the approved C39280-Z4-C373 power supply unit
in accordance with the environmental specifications.
Note:
Please dispose of the battery, the telephone, the
charging shell and the plug-in power supply unit in
accordance with the environmental specifications.
II
Quick reference guide
Performing a direct call:
Press the direct call key.
Activating or deactivating the mobile telephone:
a
Hold down the on/off key.
Activating or deactivating the keypad lock:
ª Hold down the hash key.
Activating or deactivating the ringer volume:
« Hold down the star key.
Starting a call:
c/u + o
Press the talk or speakerphone key and enter the phone number.
or
o + c/u Enter the phone number and press the talk or speakerphone key.
Opening the mobile telephone’s telephone directory:
D Press the control key.
Activating or deactivating speakerphone mode:
u Press the speakerphone key.
Ending a call:
aor k
•
•
Press the on-hook key or
Place the mobile telephone in the charging shell.
Answering a call:
c/u or k
•
•
Press the talk or speakerphone key or
Remove the mobile telephone from the charging shell (only if "Auto Answer" is active, see page 35).
III
IV
Contents
Overview of unit parts ............................................ I
Quick reference guide ......................................... III
Operating instructions ............................................1
Useful information about the mobile telephone 1
Features ........................................................................ 1
Environmental conditions.............................................. 2
Radio range ................................................................... 2
Displaying the radio range ........................................ 2
Leaving the radio network ........................................ 2
Keys, function selection and display ...................3
Function keys................................................................ 3
NET/Callback key .......................................................... 4
Control key .................................................................... 4
Display keys .................................................................. 5
Operating status display ............................................... 5
Function selection ......................................................... 8
Function selection with the on or message status... 8
Selection in dial/ringing/call status............................ 9
Putting the mobile telephone into service........10
Removing the protective cover ................................... 10
Inserting the battery.................................................... 10
Charging and using the battery ................................... 11
Operating and charging times ................................ 12
Permitted batteries................................................. 12
Fitting the attachment clip .......................................... 13
Activating/deactivating the mobile telephone ............. 13
Setting the language ................................................... 14
Registering the mobile telephone at the system ........ 15
Overview ................................................................ 15
V
Preparing for registration ........................................15
Registering at the system for the first time............17
Registering at another system................................17
Determining direct call numbers .................................18
Activating/deactivating the keypad lock.......................18
Conducting calls ....................................................19
Internal/external dialling ...............................................19
Dialling via the telephone directory or NET
carrier list .....................................................................21
Answering a call ..........................................................21
Speakerphone mode ...................................................22
Conducting direct calls ................................................23
Muting the microphone ...............................................23
Number redial.........................................................24
Overview .....................................................................24
Manual number redial..................................................24
Automatic redial...........................................................24
Processing the redial list..............................................25
Telephone directory and NET carrier list ..........26
Overview .....................................................................27
Telephone directory functions .....................................27
Sending and receiving entries .....................................28
Entering an anniversary ...............................................28
Dialling with the telephone directory or NET
carrier list .....................................................................29
Settings ....................................................................30
Overview .....................................................................30
Default state ................................................................31
Setting the sound setting functions ............................32
Menus.....................................................................32
Activating/deactivating the ringer............................34
Activating/deactivating the warning tone ................34
Activating/deactivating the vibration alarm .............35
Setting the auto answer function ................................35
VI
Resetting the defaults................................................. 35
Selecting a base .......................................................... 36
Enhanced functions...............................................37
Telephone system functions....................................... 37
Overview ................................................................ 37
Using the service codes ......................................... 38
Forwarding calls ..................................................... 40
Variable call forwarding...................................... 40
Fixed call forwarding.......................................... 40
Call forwarding for other phone numbers .......... 40
Using the mailbox................................................... 41
Using the missed calls list ...................................... 41
Opening the digital telephone directory ................. 42
Performing the display test .................................... 42
Using the message waiting indication.................... 42
Performing the code functions ............................... 43
Mobile telephone functions ........................................ 44
Room monitor and walkie-talkie mode ................... 44
Overview ........................................................... 44
Using as a room monitor ................................... 44
Operating in walkie-talkie mode ........................ 45
Performing the time functions................................ 47
Overview ........................................................... 47
Functions ........................................................... 48
Switching functions ..............................................49
Ringing status ............................................................. 49
Overview ................................................................ 49
Functions................................................................ 49
Call status ................................................................... 50
Overview ................................................................ 50
Functions................................................................ 51
Setting up an enquiry during a call..................... 51
Toggle – switching between two users............. 51
Adding callers to a conference .......................... 51
Transferring a call............................................... 52
Picking up a call ................................................. 52
VII
Entering text............................................................53
Character table ............................................................53
Key utilisation ..............................................................54
Appendix..................................................................55
Troubleshooting...........................................................55
Cleaning the mobile telephone....................................56
Technical data..............................................................57
HiPath Cordless Enterprise .....................................57
Mobile telephone ....................................................57
Accessories .................................................................58
Declaration of conformity ............................................59
List of abbreviations ....................................................60
Index.........................................................................61
VIII
Operating instructions
These operating instructions describe your mobile telephone and its
functions on your communications system.
All functions that can be performed via your mobile telephone are described here. If some of the required functions are not available on
your mobile telephone, it may be due to one of the following:
• The function is not configured for you or your mobile telephone please contact your system administrator.
• Your communications platform does not feature this function please contact your Siemens contract partner to upgrade.
Useful information about the mobile
telephone
Features
Mobile Your mobile telephone includes the following features:
telephone • Mobile telephone registration and operation at up to four DECT
telephone systems
• Automatic call acceptance on removal from the charging shell
• Speakerphone mode
• Number redial for the last five numbers
• Protection against inadvertent key activation
• Telephone directory for 200 entries
HiPath Cordless HiPath Cordless Enterprise is a cordless DECT telephone system and
Enterprise is comprised of the following components:
• Radio exchange for the communications system
• Bases (transmitter/receiver)
• Mobile telephones
• Charging shells
HiPath Cordless Enterprise has the following features:
• Internal and external calls in the entire HiPath Cordless Enterprise
radio network
• Internal and external availability at one telephone number throughout the entire radio network (roaming)
• Automatic handover between bases
• Call forwarding to internal users
• Automatic callback for internal calls
• Consultation during a call
• Conference for up to eight users
1
Environmental conditions
For safety information, see the back cover. Permitted temperature
range, see page 57.
Note:
Do not install the mobile telephone in the vicinity of electronic
equipment to avoid mutual interference.
Radio range
Displaying the radio range
Connection The strength of the incoming signal is displayed by the "receive field
quality strength" icon in on or message status:
|
Ò
Ñ
Ð
no receive field strength
low receive field strength
50% receive field strength
100% receive field strength
Range problems The radio range is different indoors and outdoors, see page 57.
Note:
Please consult your system administrator in the event of range
problems.
Leaving the radio network
After leaving the The base name flashes on the display. The mobile telephone attempts
radio network repeatedly to synchronise with a base. The intervals between synchronisation attempts increase on account of the integrated power
saving function.
Note:
In order to save the battery you can switch off your mobile
telephone (this will reset the date and time, see page 40).
Re-registering Switch off the mobile telephone and switch it back on again.
2
Keys, function selection and display
Function keys
The following function keys are available:
Key
Name
Use
a
On-hook and
on/off key
•
•
•
•
End a call
Cancel functions
Jump back to the previous menu
Switch the mobile telephone to
off status; activate or deactivate
(see page 13)
c
Talk key
•
•
•
Answer a call
Dial a phone number
Switch from speakerphone mode
to handset mode
Access telephone system functions
•
u
Speakerphone
key
•
•
•
•
Answer a call
Dial a phone number
Switch from handset to speakerphone mode
Access telephone system functions
?
Missed calls
list
Access message lists
«
Star key
Activate/deactivate the ringer
ª
Hash key
Activate/deactivate keypad lock
R
NET/Callback
key
• Open the NET carrier list
• R-key function
(see page 4)
Direct call key
Select a predefined direct call
number, (see page 23)
3
NET/Callback key
The NET/Callback key provides access to the following functions depending on how it is operated:
Operation
Function
Press and hold (min.
1 second)
Open the Net carrier list
Press
R-key function:
• Insert Pause (e.g. between the
prefix and the phone number, or
when checking a mailbox)
• End connection to a mailbox
(e.g. when performing a callback, setting up a conference or
transferring a call)
Control key
The control key is assigned different functions depending on the operating situation:
Control
Key
In idle status
E
In lists and
menus
In an input field
Next menu level
up
Move the cursor
up one line
D
Open the mobile’s telephone
directory
Next menu level
down
Move the cursor
down one line
G
Open the menu
Select an entry
(OK)
Move the cursor
right
F
Open the list of
internal users
Next menu level
up, cancel
Move the cursor
left
Note:
Some functions associated with the right display key can also
be performed with the control key.
4
Display keys
Each display key can be programmed with one function. Display key
programming depends on the operating status. A function can be represented by text or an icon. The following icons exist:
Icon
Name
Use
z
Redial
Open a list of the last five phone
numbers called
©
Menu
Open the general menu
Î
Go Back
Next menu level up,
cancel
[
OK
Confirm and select function
X
Delete
Delete inputs from right to left
Up/Down
Select function (in dial/ringing and
call status only, see page 5)
I
Internal
Call up system menu
J
Missed calls
list
Open the missed calls list, display
text messages
Operating status display
The following operating statuses are available:
Operating status
Display
Off status
Blank display – calls cannot be received.
On or message status
The user interface of the mobile telephone is displayed. The base
name is visible.
Dial status
(after pressing the talk key
without entering the phone
number)
The user interface of the telephone
system is displayed. The telephone
system functions valid for the operating status are visible.
Ringing status
(after entering the phone
number and pressing the talk
key)
The user interface of the telephone
system is displayed. The telephone
system functions valid for the operating status are visible.
5
Operating status
Display
Call status
The user interface of the telephone
system is displayed. The telephone
system functions valid for the operating status are visible.
Note:
The display language set by default is English. For information
on changing the language, please see pages 14 and 30.
On or message Example for on or message status display:
status
1
2
3
4
5
U
Ð
Base 1
22.09.01
06:25
z
©
1
Charging status
2
Receive field strength
3
Current base display
4
Date and time
5
Current functions of the display keys
1
Prompt to enter phone
number
2
Functions offered by the telephone system
3
Current functions of the display keys
Dial status Example for dial status display:
1
2
3
Please select
Lst no redial?
I[
Ringing status Example for ringing status display:
1
2
3
4
6
123456789 MOORE
CALLBACK
I[
1
Name of the user
2
Internal phone number of the
user
3
Functions offered by the telephone system
4
Current functions of the display
keys
Call Example for call status display:
status
1
2
3
4
123456789 MOORE
MUTE ON
I[
1
Name of the user
2
Internal phone number of the
user
3
Functions offered by the telephone system
4
Current functions of the display keys
7
Function selection
Function selection with the on or message status
With the on or message status, the mobile telephone functions are
listed in the display. These are summarized in the menus.
Overviews of menus are displayed in this operating manual, e.g.:
G On or message status
or
©
D
E
xt
Main menu
Family/Fun
Calendar/Clock
Sound Settings
H/Set Settings
Base Settings
˜˜˜˜˜˜˜˜˜˜˜˜˜˜˜˜
Î
[
H/Set Settings
D Auto Answer
E
Language
Register H/Set
Select Base
Reset Handset
˜˜˜˜˜˜˜˜˜˜˜˜˜˜˜˜
To select a function or a supplementary menu, please follow the overview for the relevant section and press the function and display keys
shown:
© Press the menu key.
E or D Mark the function or the supplementary menu you want by pressing
the control key.
[ Confirm with OK.
A line of stars indicates the end of a menu. If you scroll further, the
first function in the menu is marked again.
Go Back
8
Î If you press one of the two display keys when the star line is selected,
or the system jumps to the next menu level up or to on or message status.
Selection in dial/ringing/call status
The telephone system functions appear in the display in dial, ringing
and call statuses.
For example, you can scroll through the following functions in call status:
MUTE ON
xt
CONSULT
xt
START CONF.
xt
START TRANSFER
xt
PICKUP
Proceed as follows to select a function:
or
Mark the function you want by pressing the display key.
[ Confirm with OK.
9
Putting the mobile telephone into service
Removing the protective cover
Remove the protective cover from the display before putting the mobile telephone into service.
Inserting the battery
Note:
The battery supplied is not charged. It gets charged once it is
in the mobile telephone.
Note:
•
•
•
•
Please observe the safety notes on the back cover and
page II.
Only use permitted battery, see page 12.
Open the battery compartment in a dust-free environment
only.
Your telephone directory entries and all settings remain
stored even if you remove the battery. The date and time
settings, however, are lost. See page 47.
Opening the Unscrew the battery compartment lid with a coin, for example (1), and
battery remove it (2).
compartment
Inserting the Insert the permitted battery (3).
battery
1
2
6
3
5
4
Closing the Replace the lid (4), slide it back over the battery compartment (5) and
battery screw it on tightly (6).
compartment
10
Charging and using the battery
To charge the battery, insert the mobile telephone into the charging
shell with the keypad facing forwards.
Caution:
Only use the approved C39280-Z4-C373 power supply unit to
operate the charging shell.
The charging status is indicated by the charge status display. This
flashes during charging:
=
e
V
U
Battery empty
Battery 33% charged
Battery 66% charged
Battery 100% charged
Note:
•
•
•
Initial charging: charge the battery for at least 16 hours, regardless of the charging status icon. Without replacing it in
the charging shell, use the mobile telephone until the "battery low" beep is heard. This action aligns the charge status display with the battery operating times.
To achieve full operating and charging times (see page 12),
let the mobile telephone discharge a number of times
without replacing it in the charging shell until the battery
low beep sounds.
For future charging: you can place your mobile telephone
in the charging shell each time it is used. Charging is electronically controlled which ensures that the battery is
charged optimally.
11
Operating and charging times
The operating times are only achieved after several charging and discharging cycles.
Capacity
(mAh)
Standby mode
(hours)
Talk time
(hours)
Charging time
(hours)
500
up to 250
over 15
approx. 5.5
Permitted batteries
The following battery is permitted for the mobile telephone:
Nickel Metal Hydrid (NiMH), 500 mAh
Order no. V30145-K1310-X229
12
Fitting the attachment clip
A second battery compartment lid is supplied with the mobile telephone featuring a slot for the attachment clip. Assemble the
attachment clip as follows:
Opening the Unscrew the battery compartment lid with a coin, for example, (1) and
battery remove it (2).
compartment
Closing the Replace it with the second lid featuring the clip slot (3). Slide this back
battery over the battery compartment (4) and screw it on tightly (5).
compartment
Assembling the Press the attachment clip until it locks into the slot (6).
attachment clip
5
1
2
4
3
6
Activating/deactivating the mobile telephone
a
Press the on-hook key until the activation or deactivation is confirmed
by a crescendo tone sequence.
See page 5 for display when the handset is on or in message status.
Note:
•
•
The mobile telephone can only be fully switched off when
removed from the charging shell.
The mobile telephone is automatically set to on or message status if it is placed in the charging shell, see page 5.
13
Setting the language
You can change the language if your preferred language is not set by
default:
© or G Open the main menu.
Select the main menu.
H/Set Settings
or:
H/Set Settings
[ Confirm your selection.
Select the menu item.
Language
or:
Language
[ Confirm your selection.
D or E Select the required language.
[ Confirm your selection.
Note:
For information on resetting the mobile telephone’s default
language, see page 30.
14
Registering the mobile telephone at the system
Note:
When the telephone system is put into service, the system
administrator provides you with mobile telephones which
have already been registered. You only have to register new
mobile telephones when extending the telephone system.
Overview
G On or message status
or
©
D
E
Î
xt
Main menu
Family/Fun
Calendar/Clock
Sound Settings
H/Set Settings
Base Settings
˜˜˜˜˜˜˜˜˜˜˜˜˜˜˜˜
[
H/Set Settings
Î
Language
Register H/Set
Select Base
Reset Handset
˜˜˜˜˜˜˜˜˜˜˜˜˜˜˜˜
[
D Auto Answer
E
Î
Register H/Set
D Base 1
E
[
Î
PIN
[
Base 2
Base 3
Base 4
˜˜˜˜˜˜˜˜˜˜˜˜˜˜˜˜
Preparing for registration
•
•
Ask your system administrator for the following information:
– Phone number of the mobile telephone.
– Base PIN (HiPath system).
– Mobile telephone code number (PIN E1).
– Is this code number valid throughout the network? If so, then
the entries listed below should be terminated with "#".
– Code (for activating the menu for entering the mobile telephone
code number).
Enter the following data here:
System administrator
System administrator phone number
Mobile telephone phone number
Code
To prevent misuse of your mobile telephone do not disclose any
other information.
15
Second •
telephone
Open the login window on the telephone system with a second
telephone. Carry out the steps described below.
The second telephone can be a mobile telephone that has already
been registered or a Hicom telephone with display, e.g.
"Optiset E".
It has to be registered at the same system and connected to the
same network node. Ask your administrator about this.
Note:
The login window closes automatically after ten minutes. Mobile telephone registration must be performed within this time
and must not exceed one minute.
o Enter the code for activating the code number.
Enter station no.
Please enter the phone number assigned. For network-wide code no.:
terminate the phone number with "#".
Enter ID
Enter the mobile telephone’s code number (PIN E1). Stars are displayed instead of digits. For network-wide code no.: terminate the
phone number with "#".
ID entered for
45678
The phone number entered is displayed, e.g.45678.
o Enter the phone number displayed for confirmation but do not terminate with "#".
The ring tone sounds briefly. The logon window opens for 10 minutes
when the ring tone is no longer audible.
16
Registering at the system for the first time
Registering a Proceed as follows when registering the mobile telephone:
mobile telephone
© or G Open the main menu.
H/Set Settings
Select the main menu.
[ Confirm your selection.
Register H/Set
Select the menu item.
[ Confirm your selection.
Please enter PIN
Enter base PIN (HiPath system). Stars are displayed instead of figures.
[ Confirm your entry.
Base 1
If registration has been successful, the name of the base is displayed,
with intermediate display of the ring symbol.
Registering at another system
Please proceed as shown in the overview on page 15 to register the
mobile telephone. Once you have selected the "Register H/Set" function, proceed as follows:
Please enter PIN:
Enter base PIN (HiPath system).
[ Confirm your entry.
Base 2
If registration has been successful, the name of the base is displayed,
with intermediate display of the ring symbol.
Note:
Your mobile telephone is now ready for operation. We recommend setting the date and time to ensure the correct date is
recorded for all calls, see page 47.
17
Determining direct call numbers
You must determine a direct call number to perform a direct call. The
room monitor number is used as the direct call number. This number
is then selected once you activate the direct call key, see page 23. The
room monitor function must be deactivated for this.
Enter the direct call number via the room monitor function, see
page 44.
Room monitor
You can store a direct call number in the redial list by saving the
number separately as "direct call" in your mobile telephone’s telephone directory.
D Store the direct call number as "direct call" in your mobile telephone’s
telephone directory, see page 26.
Activating/deactivating the keypad lock
The keypad lock protects the telephone against inadvertent key activation, e.g.when carrying it in a bag or pocket. The keypad lock is automatically deactivated when a call is received and re-activated when
the call is over.
The keypad lock has no effect on the direct call key. In other words,
direct call is possible if the keypad lock is activated.
ª
Press the hash key in the on or message status until a crescendo tone
sequence confirms that the keypad has been activated or deactivated.
A key icon on the display indicates that keypad lock is active.
18
Conducting calls
Note:
Dialling is only possible when the mobile telephone is active.
On or message status is then shown on the display, see
page 5.
c oru
a ork
a
Start a call with the talk or speakerphone key.
You can end a call with the on-hook key or by placing the mobile telephone in the charging shell.
You can also use the on-hook key to cancel all functions.
Internal/external dialling
Internal calls are calls within the telephone system. External calls are
calls in the public telephone network.
Preparing a
call
o and X Enter the phone number and, where applicable, correct individual
characters with the "Delete" display key.
Note:
You can also start by pressing the talk key and then enter the
phone number. Each digit is then immediately dialled.
o or F For internal dialling:
or D Enter the internal phone number of the user or use the control key to
open the list of internal users or the mobile telephone’s telephone directory, see page 26.
o or D For external dialling:
Enter the external code, e.g. "0" , plus the external phone number or
use the control key to open the mobile telephone’s telephone directory, see also page 26.
19
You can use the menu key to activate the following functions when
entering the phone number:
©
D
Dial preparation
Insert Pause
Insert TBR
Copy to Directory
E
˜˜˜˜˜˜˜˜˜˜˜˜˜˜˜˜
Note:
•
c or u
•
"Insert Pause": insert a dial pause, e.g.between the prefix
and phone number or when checking a mailbox (not relevant for HiPath Cordless Enterprise).
"Insert TBR": not relevant HiPath Cordless Enterprise.
Press the talk or speakerphone key.
Note:
•
•
For internal dialling: If the called party is currently conducting a call or is not answering, you can activate the "CALLBACK" function. The called party’s mobile telephone calls
you back automatically.
For external dialling: you are not allowed to conduct external calls if "no access" appears.
Conducting a call
E/D and [ You can scroll through the list of functions that appears during the call
and execute any of the functions shown, see page 9. The following is
also displayed:
For internal dialling:
The phone number and name of the user is displayed.
For external dialling:
The phone number dialled is displayed.
Note:
If you receive a second call while conducting this call, an alerting tone is activated.
20
Ending a
call
a or k
Press the on-hook key or place the mobile telephone in the charging
shell.
The call charges are displayed, depending on the system setting.
Note:
The dialled phone number is automatically stored for number
redial.
Dialling via the telephone directory or NET
carrier list
For information on dialling with the mobile telephone’s telephone directory or NET carrier list, see page 26.
Answering a call
The ringer sounds at the mobile telephone and, depending on the
user (internal/external), the number and the name of the caller are displayed.
The vibration alarm can also announce a caller, see page 35.
The mobile telephone offers this function for deactivating the ringer.
Silent
A call can be answered in the following ways:
k
c or u
Mobile telephone in the charging shell:
Remove the mobile telephone from the charging shell (functions only
if "Auto Answer" is active, see page 35).
Mobile telephone outside the charging shell:
Press the talk or speakerphone key.
21
Speakerphone mode
Advantages Speakerphone mode offers you the following advantages:
• Other persons can listen to and participate in the call.
• Your hands are free.
• When dialling, you can hear the ring tone, for example, without
having to lift the mobile telephone to your ear.
Application Use of the speakerphone mode is recommended for a noise level of
up to 50 dB (A).
Activating Speakerphone mode can be activated during a call, when dialling or
when answering a call:
u Press the speakerphone key.
Setting the The volume can be set during a call:
volume
u Press the speakerphone key once more.
F or G Reduce or increase the volume.
Save the volume set if required.
Save
Deactivating You can deactivate speakerphone mode and switch to handset mode
during a call:
c
Press the talk key.
Note:
Hold down the speakerphone key if you want to replace the
mobile telephone in the charging shell during a call,
e.g.because the battery is empty.
22
Conducting direct calls
Note:
•
•
A direct call number must be determined in the room monitor function before the first direct call is performed, see
pages 18 and 44.
The phone number must be changed each time this function is switched from room monitor to direct call and vice
versa.
If a direct call number is specified, you can conduct direct calls in on
or message status. This is also possible if the keypad lock is activated.
a...a
If the mobile telephone is in dial, ringing or call status, press the onhook key repeatedly (if necessary) to switch to on or message status.
Press the direct call key.
If automatic redial is activated:
Press the direct call key twice.
Note:
Direct calls cannot be performed in the following cases:
• If the mobile telephone is in default state.
• If the mobile telephone is in dial, ringing or call status.
• If the direct call number has been deleted in the room
monitor function.
• If the room monitor function is activated.
• If the walkie-talkie mode is activated.
Muting the microphone
MUTE ON
You can use this function to mute the telephone’s microphone while
you are conducting a call, if you want to talk in private to a different
person in the same room.
[ Press the display key to mute the microphone. The call is placed on
hold and the called party hears music on hold.
[ Press the display key again to re-activate the microphone. You can
now resume your conversation with the called party.
23
Number redial
z Use the "Redial" display key to open the number redial list. The last
five phone numbers dialled are automatically saved in the redial list.
If you tried to call a party from the mobile telephone’s telephone directory, the name of the party is displayed in case of number redial.
Overview
z
D
E
On or message status
xt
Î
Redial
<Number 1>
<Number 2>
<Number 3>
<Number 4>
<Number 5>
˜˜˜˜˜˜˜˜˜˜˜˜˜˜˜˜
©
D
E
Redial
Automatic Redial
Display Number
Copy to Directory
Delete Entry
˜˜˜˜˜˜˜˜˜˜˜˜˜˜˜˜
Î
[
View
<Number>
<Name>
˜˜˜˜˜˜˜˜˜˜˜˜˜˜˜˜
Manual number redial
z Use the "Redial" display key to open the redial list.
D or E Select the phone number you want with the control key.
c
Press the talk key.
Automatic redial
Automatic Redial
The phone number is automatically redialled ten times at 20 second
intervals. Speakerphone mode is automatically activated, the speakerphone key flashes. This function deactivates automatically after ten
unsuccessful dial attempts.
Please proceed as shown in the overview on page 24 to activate the
automatic redial function.
24
Off
Dial this function to cancel automatic redial, or press any key.
Note:
The automatic redial function deactivates automatically in the
event of an intermediate call.
Processing the redial list
To find the function you are looking for, please refer to the overview
on page 24. The following functions are available:
Display Number
Call up one of the numbers saved in the redial list.
Copy to Directory
Transfer a phone number from the redial list to the mobile telephone’s
telephone directory. Then enter a name for the entry (max. 16 characters).
Delete Entry
Delete a number in the redial list.
25
Telephone directory and NET carrier list
D Use the control key to open the mobile telephone’s telephone direc-
tory. The mobile telephone can save entries with names and phone
numbers in its telephone directory. The entries are arranged in the following sequence: blanks, digits, letters, other characters.
Note:
If configured, you can use the telephone system’s digital telephone directory as well as the mobile telephone’s directory,
see page 42.
R Use the NET/Callback key to open the mobile telephone’s NET carrier
list (press and hold, see page 4). The mobile telephone can save the
prefixes for telephone companies or other locations in its NET carrier
list (not relevant for HiPath Cordless Enterprise).
Note:
•
•
•
26
Operation of the telephone directory and NET carrier list is
identical. The anniversary function is not available in the
NET carrier list.
You can transfer the redial list phone numbers to the mobile telephone’s telephone directory, see page 25.
The external code must be entered before external phone
numbers, e.g."0".
Overview
D On or message status
or
R
xt
Telephone directory
D New Entry
<Entry 1>
<Entry 2>
...
E ˜˜˜˜˜˜˜˜˜˜˜˜˜˜˜˜
Î
[
D
E
New Entry
<Number>
<Name>
Anniv.
View
Change
Edit Entry
D <Number>
<Name>
E Anniv.
©
D
E
*: not relevant for HiPath Cordless Enterprise
Telephone directory
Use Number
Delete Entry
Send Entry*
Delete List
Send List*
Available Memory
˜˜˜˜˜˜˜˜˜˜˜˜˜˜˜˜
Î
Î
Î
Change
Anniv.
D Date
Time
E Prompt
Change
Anniv.
D Date
Time
E Prompt
[
Delete
Delete All
Entries?
[
FG
[
FG
No
Yes
Telephone directory functions
Please proceed as shown in the overview on page 27 to perform a telephone directory or NET carrier list function on the mobile telephone.
New Entry
Save a new entry with the name (max. 16 characters), phone number
(max. 32 characters) and anniversary in the mobile telephone’s telephone directory.
Save a new prefix number in the NET carrier list.
View
View an entry.
Change
Change an entry.
Save
Save a newly generated or modified entry.
Insert Pause
Insert a dial pause, e.g.between the prefix and phone number or
when checking a mailbox.
Insert TBR
For analogue lines: insert a prompt before the phone number to enable feature utilisation.
27
Call up a phone number saved in the mobile telephone’s telephone directory.
Display Number
Call up a prefix number saved in the NET carrier list. You can extend
this and use it for connection setup.
Delete Entry
Delete an entry in the mobile telephone’s telephone directory.
Delete List
Delete the entire telephone directory or the NET carrier list, e.g. when
lending the mobile telephone to another user. The directory is only deleted after the security prompt has been confirmed.
Available Memory
Show the total number of entries that can still be saved in the mobile
telephone’s telephone directory and the NET carrier list. Up to 200 entries are possible.
Sending and receiving entries
Copy Entry
This function is not supported in HiPath Cordless Enterprise and can
or: only be used in conjunction with Gigaset bases.
Copy List
Entering an anniversary
You can enter an anniversary for the called party when creating a new
entry and changing an existing entry.
Please proceed as shown in the overview on page 27 to select or create an entry.
D Use the control key to mark the field for the anniversary.
Change
Confirm with the display key.
o + D Enter the date (day/month), the time (hour/minutes) and the signalling
type.
Note:
•
•
•
28
Please note the special features of the mobile telephone’s
internal clock, see page 47.
The 12-hour display is active if "am" or "pm" appears beside
the time. You can change the display mode by pressing the
left display key.
Ten ringer melodies with display or a display without a ringer melody are available for signalling.
[ Save the anniversary.
You can use this display key to delete the anniversary.
Delete
Dialling with the telephone directory or NET
carrier list
Note:
•
•
Dialling is only possible when the mobile telephone is active. On or message status is then shown on the display,
see page 5.
The mobile telephone’s telephone directory or NET carrier
list must contain entries.
D or R Press the control key or the NET/Callback key. The entries are displayed with the associated names.
D/E or o Scroll to the required entry or enter the first letter of the entry.
Note:
If the initial letter you want to enter is not the first letter on the
relevant key, the key must be pressed the appropriate number
of times to obtain the required letter.
Display Number
Select and confirm the function. The numbers are displayed. Follow
the overview shown on page 27.
D or o For NET carrier list: add the phone number to the selected prefix
(chaining).
c
Press the talk key. The number displayed is dialled.
29
Settings
Overview
The following overview shows the functions for setting the mobile
telephone.
G
On or message status
©
xt
Main menu
Family/Fun
Calendar/Clock
Sound Settings
H/Set Settings
˜˜˜˜˜˜˜˜˜˜˜˜˜˜˜˜
or
D
E
Î
[
Sound Settings
D Handset Volume
E
[
Ringer Setting
Advisory Tones
Silent Alert
˜˜˜˜˜˜˜˜˜˜˜˜˜˜˜˜
H/Set Settings
D Auto Answer
E
[
Language
Register H/Set
Select Base
Reset Handset
˜˜˜˜˜˜˜˜˜˜˜˜˜˜˜˜
Î
[
D
E
[
D
E
[
30
Ringer Setting.
Time C
Save
Language
Deutsch
English
...
˜˜˜˜˜˜˜˜˜˜˜˜˜˜˜˜
[
Select Base
Base 1
Base 2
Base 3
Base 4
Best Base
˜˜˜˜˜˜˜˜˜˜˜˜˜˜˜˜
[
Reset H/Set
Reset settings to
default state?
No
Yes
Default state
The following table shows the mobile telephone’s default settings:
Settings
Explanation/notes
Levels
Default
state
Sound
Settings
Ringer volume
5
5
Ringer melody
Handset volume
10
3
1
1
Loudspeaker
Key tones, audible each time a
key is pressed.
Battery tone, audible approx.
5 minutes before battery runs
out.
Confirmation tone, indicates
whether actions were successful
or unsuccessful.
Vibration alarm
5
-
5
on
-
on
-
on
-
off
Time
control
Reduce or increase the ringer vol- ume for a specific length of time.
off
Auto
answer
Define whether the talk key must be pressed to accept a call when
the mobile telephone is removed
from the charging shell.
Select different languages.
14
on
Language
Default
status
Resetting the defaults deletes
the redial and direct call numbers
and resets the sound settings.
The registration (logon) is retained.
german
or
english
-
31
Setting the sound setting functions
Finding and Please proceed as shown in the overview on page 30 to find a sound
setting setting function. Then set the required sound setting function as follows:
F or G Use the control key to change the volume, the melody or the status
of the sound setting function.
D or E Use the control key to switch to the next function you want to set in
the menu.
Press this display key to save the settings after setting the sound setting functions displayed in the menu.
Save
Menus
Menu When selecting the menu, the tone sounds at the current setting in
handset mode. You can choose between five volume levels in handset mode and three volume levels in speakerphone mode.
Handset Volume
___Handset Volume__
1
2
f
B
Î
1
Volume in handset mode
2
Volume in speakerphone
mode
g
Save
Menu When selecting the menu, the ringer sounds at the current setting.
You can choose between five ringer volumes, the crescendo ring
(gradual increase in volume), no ringer and ten ringer melodies (these
cannot be saved in HiPath Cordless Enterprise).
Ringer Settings
1
2
3
___Ringer Settings__
f
Time C.
g
9
Save
1
Ringer volume
2
Ringer melody
3
Time control activation function for the ringer volume
Display when ringer is deactivated.
32
Time C.
Menu You can set a different ringer volume for a specific length of time in
this menu (e.g.during the night).
1
2
3
Time ctrl.:
From:
Until:
Î
Î
On g
00:00
00:00
f
1
Time control status
2
Start of the timeframe
3
End of the timeframe
Save
Note:
Please take account of the special features of the mobile telephones’ internal clock, see page 42.
Menu The advisory tones have the following meaning:
Advisory Tones
Advisory tone
Meaning
Key tones
Every keystroke is confirmed
Confirmation
tones
•
•
•
Battery tone
1
2
3
Confirmation tone (crescendo tone sequence) when saving inputs/settings and
when placing the mobile telephone in the
charging shell
Error beep (decrescendo tone sequence)
to signal incorrect inputs
End-of-menu beep at the menu end
The battery must be charged.
___Advisory tones___
Key Tones: f On g
f On g
Confirm.:
f On g
Battery:
Save
Î
1
Key tone status
2
Confirmation tone status
3
Battery tone status
33
Activating/deactivating the ringer
Deactivating
« Hold down the key until you hear a confirmation tone.
The ringer is deactivated.
Activating
« Hold down the key until you hear a confirmation tone.
Note:
The ringer cannot be activated with the star key if it was deactivated via the menu.
Activating/deactivating the warning tone
When activated, the warning tone deactivates all other tones. An incoming call is signalled by this brief tone.
If the mobile telephone is in a call pickup group, a pickup call is also
signalled by the warning tone.
Activating
« Hold down the key until you hear a confirmation tone.
Press the display key within three seconds.
Beep
The warning tone is activated.
Deactivating
« Hold down the key until you hear a confirmation tone.
Note:
The warning tone cannot be activated if the ringer was deactivated.
34
Activating/deactivating the vibration alarm
You can activate the vibration alarm in addition to or in place of the
ringing tone.
Silent alert
Please proceed as shown in the overview on page 30 to activate or
deactivate the vibration alarm.
The activated function is ticked. It can be deactivated by selecting the
option once more.
The ringing tone can be deactivated if the vibration alarm is activated,
see page 34.
Setting the auto answer function
This function allows you to accept calls by removing the mobile telephone from the charging shell.
Auto Answer
Please proceed as shown in the overview on page 30 to activate and
deactivate the auto answer function.
The activated function is ticked. It can be deactivated by selecting the
option once more.
Resetting the defaults
Reset Handset
This function allows you to restore the default settings at your mobile
telephone, e.g. when lending your mobile telephone to a third party.
Please proceed as shown in the overview on page 30 to restore the
default settings.
The default settings are described on page 31. The mobile telephone
features are handled as follows when resetting the defaults:
Feature
Action
Sound settings
reset
Direct call number
deleted
System registration
retained
Telephone directory
retained
Select Services menu
version-dependent
Redial list
deleted
35
Selecting a base
Select Base
If your mobile telephone is registered at multiple bases, then you can
set a specific base or the base with the best reception as the base to
be used. The mobile telephone then switches automatically to this
base.
Please proceed as shown in the overview on page 30 to select the
base. The selected base is ticked.
36
Enhanced functions
Telephone system functions
Overview
The following overview shows the service functions which can be accessed from the System menu on the telephone in dial or call status.
On or message status
F xt
System menu
BASIC SERVICE
MAILBOX
QUERY NO.
START DTB
DISPLAY TEST
Dial or call status
[ I
xt
Service menu
DESTINATIONS
SWITCHES
VOICE INFO
PIN/COS
REMINDER
OTHER FUNCT.
CANCEL
[
[
or:
Enter the code
Service:
[
[
[
[
DESTINATIONS
VARY FORWARD
FIXED FORWARD
FORWARD NUMBER
RETURN
[
SWITCHES
SECOND CALL
DO NOT DISTURB
CALL PROTECT
FORWARD
FORWARD NUMBER
RETURN
[
VOICE INFO
OWN MAILBOX
OTHER MAILBOX
RETURN
[
PIN/COS
PIN 1
PIN 5
CHANGE COS
RETURN
[
REMINDER
NEW REMINDER
RETURN
[
OTHER FUNCT.
DISPLAY
RETURN
[
37
Using the service codes
The following table shows the service functions which you can execute via your mobile telephone either in interactive mode (see overview on page 37) or in the service menu by entering the codes displayed.
The individual functions must be enabled. The codes are standard
codes. They can be set differently. For more information, consult your
system administrator.
The successful execution of a service function is signalled by a crescendo tone sequence whereas a faulty execution is signalled by a decrescendo tone sequence.
Note:
You can answer calls while performing service menu functions
if you quit the service menu.
Function
Explanation/notes
Standard
code
Variable call forwarding
See page 40
11
Fixed call forwarding
See page 40
12
Speed dialling
Not relevant for Hicom
cordless E.
13
Forward number
Switches
See page 40
14
Second call
Function only available to limit- 21
ed extent!
Do not disturb
You will not receive any more 22
calls if you activate do-not-disturb. "Do-not-disturb" is displayed if the calling party is an
internal caller.
Function not available!
23
Destinations
Call protect
Hunt group
38
Ask your system administrator! 24
The hunt group can be activated and deactivated.
Individual
code
Function
Explanation/notes
Standard
code
Switches (continued)
Call forwarding
See page 40
25
Forward number
Voice info
See page 40
26
Own mailbox
Prerequisite: a mailbox has
51
been set up for your mobile telephone. Activated according to
voice prompting system!
Activated according to voice
52
prompting system!
Other mailbox
PIN/COS
PIN 1
PIN 5
Change class of service
Reminder
New reminder
Other functions
Tone dialling
Display
Individual
code
Ask your system administrator! 61
Ask your system administrator! 62
Prerequisite: PIN 1 is known! 67
No more external connections
can be set up, for example, after a COS is changed.
For saving daily appointments, 7
for example,0930 for 9.30 am.
The reminder is signalled by
the call signal - confirm with
any key, and if necessary with a
second call after a set time.
Prerequisite: an external call is 81
in progress. You can send
DTMF signals once this function is activated.
Note: rapid changeover to
DTMF with hash and star key.
Your name and number are not 82
displayed on the called party’s
telephone.
39
Forwarding calls
VARY FORWARD
FIXED FORWARD
FORWARD NUMBER
HiPath Cordless Enterprise offers the following functions for call forwarding. Please proceed as shown in the overview on page 37 and follow the prompts to perform the function. You can also activate these
functions directly with service codes, see page 38.
Note:
The system emits an advisory beep when you press the talk
key if call forwarding is activated.
Variable call forwarding
VARY FORWARD
You can use this function to forward calls to another phone number.
The phone number is not saved in the mobile telephone after forwarding is deactivated.
Fixed call forwarding
FIXED FORWARD
You can use this function to save a phone number to which you want
to forward calls when necessary.
Call forwarding for other phone numbers
FORWARD NUMBER
40
You can use this function to forward calls from one phone number to
another phone number. The phone numbers are not saved in the mobile telephone after forwarding is deactivated.
Using the mailbox
If you set up fixed call forwarding to the mailbox, you can then play
back and delete incoming messages. Please proceed as shown in the
overview on page 37 and follow the prompts to open the mailbox.
You can choose one of the following functions if there is a voice message in the mailbox:
OUTPUT
Play back message.
DELETE
Delete message.
NEXT
Check other messages.
CANCEL
Cancel.
Using the missed calls list
The caller’s phone number is saved if you do not answer a call. The
CLIP function must be enabled for this. You can query the phone numbers stored in the mobile telephone and subsequently dial or delete
these numbers.
Depending on the telephone system setting, the last or first five calls
are saved in the missed calls list. The "oldest" call is automatically deleted by subsequent calls if the last five calls are stored. You must delete calls individually if the first five calls are saved.
QUERY NO.
Please proceed as shown in the overview and follow the prompts to
perform the function.
A tick after an entry in the missed calls list indicates that you have already called this number back.
You can select one of the following functions once you have selected
an entry and opened the supplementary menu:
DIALING
Dial a phone number.
DELETE
Delete a phone number.
NEXT
Display the next entry.
PREVIOUS
Display the previous entry.
41
Opening the digital telephone directory
START DTB
You can use this function to open the telephone system’s digital telephone directory.
Note:
The digital telephone directory must be configured at the telephone system.
Please proceed as shown in the overview on page 37 and follow the
prompts to perform the function.
Performing the display test
Using this function, it is possible to check whether all display items
are displayed correctly.
DISPLAY TEST
Please proceed as shown in the overview on page 37 and follow the
prompts to perform the function.
All display items are briefly dimmed when performing this function. If
not, please consult your system administrator.
Using the message waiting indication
J If you did not accept calls or voice mails, these are signalled by this
icon on the mobile telephone’s display line.
J or? With this function, you can call up all new messages in the mailbox or
access the caller list directly.
Note:
Voice messages and calls that were already played back are
not signalled.
42
Performing the code functions
The following table shows code functions which you can execute by
entering the standard codes displayed.
The individual functions must be enabled. The codes are standard
codes. They can be set differently. For more information, consult your
telephone system administrator. If different codes are set, you can enter these in the "Individual code" column.
The successful execution of a code function is signalled by a crescendo tone sequence whereas a faulty execution is signalled by a decrescendo tone sequence.
Code functions
Standard
code
Call waiting/override
*19
*40 / #40
Do not disturb on/off
Deactivating variable call forwarding
#44
Activating/deactivating display
suppression
*5 / #5
Changing/resetting the class of
service
*18 / #18
Activating/deactivating identification (before entering the PIN)
*24 / #24
Activating tone dialling during a
call
*#
Storing a callback request
*9
*13 / #13
Excluding/including a hunt group
member
Redial
• Save
• Dial
Call pickup
Speed dialling, individual/central
Individual
code
*6
*6
*70
*28 / *29
43
Mobile telephone functions
Room monitor and walkie-talkie mode
Overview
G On or message status
or
Î
xt
©
Main menu
[
Family/Fun
D Family/Fun
Calendar/Clock
D Room monitor
Sound Settings
H/Set Settings
E Base Settings
˜˜˜˜˜˜˜˜˜˜˜˜˜˜˜˜
E
Walkie-Talkie
˜˜˜˜˜˜˜˜˜˜˜˜˜˜˜
Î
[
D
E
Room monitor
Room M.: Off/On
Call to:
Level: High/Low
Deactivating
Off
FG
Change
Save
o/I
FG
Call mobile telephone
Call
Using as a room monitor
This function allows you to monitor a room from a remote location.
The distance between the mobile telephone and the anticipated noise
source should be 1 to 2 meters at least. The mobile telephone dials a
phone number you saved as soon as the volume in this room reaches
a specific level. The called party can hear the noise in the monitored
room when the call is answered.
Note:
• Please ensure that the number saved is not an external
barred phone number and that an answering machine is
not activated for the call number saved.
• The number saved here is used as a direct call number if
the room monitor function is deactivated. The direct call
number can be selected by activating the direct call key,
see page 23.
Attention:
•
•
44
Direct call is not possible if the room monitor function is activated.
The phone number must be changed when switching this
function from room monitor to direct call if the call is to be
transferred to different destinations.
Please proceed as shown in the overview on page 44 to configure and
deactivate the room monitor function.
A call received at a mobile telephone at which the room monitor function is activated is only signalled on the display. The ringer does not
sound and the display and the keypad do not light up. The mobile telephone operating time is significantly reduced when the room monitor function is activated.
Operating in walkie-talkie mode
This function allows you to operate mobile telephones outside the radio network.
Mobile telephones cannot be used for calls in walkie-talkie mode. The
range between the mobile telephones involved is max. 300 m. The
mobile telephone operating time is significantly reduced in this mode.
Prerequisites
• The mobile telephones used must be registered at the same base
and have selected this base.
•
or:
The mobile telephones used must have set "Best Base".
Note:
All mobile telephones within range and at which walkie-talkie
mode is active and "Best Base" is set are called.
•
or:
The mobile telephones used are not registered.
Note:
All mobile telephones within range and at which walkie-talkie
mode is active but are not registered are called.
45
Activating and deactivating
Please proceed as shown in the overview on page 44 to activate and
deactivate walkie-talkie mode.
Attention:
Direct call is not possible if the walkie-talkie mode is activated.
Making and answering calls
Calling mobile
telephone
Press the display key.
Call
Called mobile The call is signalled by a ringing tone and a message on the display.
telephone
Silent
c or u
k
k
Press the display key. The ringing tone is deactivated and the call is
signalled by a message on the display.
Press the talk key or speakerphone key.
The two mobile telephones are connected to each other.
Note:
•
•
46
The call lasts for just 20 seconds and must be answered.
Although all mobile telephones are called, a call can only be
performed between two of them.
Performing the time functions
Overview
G
On or message status
©
xt
Main menu
D
Family/Fun
Calendar/Clock
Sound Settings
H/Set Settings
Base Settings
˜˜˜˜˜˜˜˜˜˜˜˜˜˜˜˜
or
E
Î
[
D
E
Calender/Clock
Set Appoints.
Alarm Clock
Missed Dates
Date/Time
˜˜˜˜˜˜˜˜˜˜˜˜˜˜˜˜
Î
[
D
E
[
D
E
[
D
E
[
D
E
Set Appoints.
Appoint On/Off
Date
Time
¼
Alarm Clock
Alarm Clock On/Off
Time
¼
FG
Save
am/pm
FG
FG
Save
FG
Missed Dates
Delete
List of missed appointments or anniversaries
Date/Time
Date
Time am/pm
Mode
Save
Note:
Please observe the following if you want to use the appointment, alarm clock or anniversary function in the mobile telephone’s telephone directory:
• First of all, set the date and time. This sets the mobile telephone’s internal clock.
• Do not deactivate the mobile telephone afterwards as this
would reset the date and time. The appointment, alarm
clock and the anniversary set would otherwise be based on
the wrong time.
• Check the date and time from time to time and reset
where applicable.
47
Functions
Set Appoints.
You can arrange for your mobile telephone to remind you of an appointment. Only one appointment can be set. Please proceed as
shown in the overview on page 47 to enter the appointment.
o 1905 For example: enter the time 19:05.
¼ This icon indicates that an appointment is set.
Note:
No appointment reminders are performed during automatic
redial and in call status.
o Press any key to deactivate an appointment reminder.
Alarm Clock
When the alarm clock is activated, it rings every day at the set time.
You can choose between 12-hour display (am, pm) and 24-hour display. Please proceed as shown in the overview on page 47 to enter
the alarm time.
o 1905 For example: enter the time 19:05.
¼ This icon indicates that an alarm call is set.
Note:
No alarm calls are performed during automatic redial and
when the room monitor is active.
o Press any key to deactivate an alarm call.
Missed Dates
An appointment or anniversary which was signalled by your mobile
telephone but not answered is saved in a missed dates list. Please
proceed as shown in the overview on page 47 to display the missed
dates list.
¼ This icon indicates that the missed dates list contains an unanswered
appointment.
‚ This icon indicates that the missed dates list contains an unanswered
anniversary.
Missed Appoint.
This display indicates a new unanswered appointment or anniversary.
Date/Time
We recommend setting the date and time to ensure the correct time
is recorded for all calls. You can choose between 12-hour display (am,
pm) and 24-hour display. Please proceed as shown in the overview on
page 47 to enter the date and time.
o 1905 For example: enter the time 19:05.
48
Switching functions
Ringing status
Overview
The following overview shows the switching functions which can be
accessed in ringing status. The desired called party is called in the
ringing status but has not yet answered the call.
On or message status
o+c
Ringing status
Switching functions
CALLBACK
DIAL AGAIN
[
[+o
Functions
CALLBACK
You can use this function to save a callback request if the internal party called is conducting a call, does not answer or switched off his/her
mobile telephone.
The callback is performed by the telephone system as soon as the
called party performs one of the following tasks:
• Ends the call
• Activates the mobile telephone and conducts a call
• Performs the callbacks saved in the telephone system’s mailbox
The callback is deleted if you do not answer it within four rings.
Note:
•
•
DIAL AGAIN
Stored callbacks can not be deleted. Program the telephone system to perform the callbacks.
The number of callbacks that can be stored depends on
the system setting.
You can use this function to save a phone number if the internal party
called is conducting a call or does not answer.
49
Call status
Overview
The following overview shows the switching functions which can be
accessed in call status.
Call status
Switching functions
MUTE ON
CONSULT
START CONF.
START TRANSFER
PICKUP
[
[
[
Activate/deactivate microphone
MUTE OFF
[
Initiate consultation
Please dial
o
Call pickup
TO WAIT. CALL
Perform enquiry
Cancel enquiry
TO WAIT. CALL
End
RRETURN
1st calling party
Toggle
[
xt
Start conference
Please dial
o
xt
Perform conference
CONFERENCE
xt
Cancel conference
TO WAIT. CALL
xt
Expand conference
EXPAND CONF.
2nd calling party
Toggle
Start transfer
Please dial
[
[
[
End conference
a
Dial a phone number
Please dial
xt
EXPAND CONF.
o
Perform transfer
a
Cancel transfer
TO WAIT. CALL
50
[
[
Dial a phone number
Please dial
xt
CONF. TRANSFER
[
[
o
[
o
[a
Functions
Please proceed as shown in the overview on page 50 to use one of
these functions.
Setting up an enquiry during a call
CONSULT
You can use this function to consult another internal or external party
while a call is in progress.
Note:
If you are routed to a voicemail system’s mailbox when performing a callback, you can terminate the function with the
NET/Callback key (hold it down for at least 1 second).
Toggle – switching between two users
Toggle
You can use this function during an enquiry to switch back and forth
between calling parties as often as needed.
Note:
The toggle function cannot be performed with a voicemail system mailbox.
Adding callers to a conference
START CONF.
This function allows you to set up a telephone conference with up to
eight calling parties. The calling parties are added one after the other.
Repeat the procedure described in the overview on page 50 for each
calling party.
Note:
If you are routed to a voicemail system’s infobox during a conference, you can terminate the function with the NET/Callback
key (hold it down for at least 1 second).
51
Transferring a call
START TRANSFER
You can use this function to forward an external call which you answered to another station.
Note:
If you are routed to a voicemail system’s mailbox when transferring a call, you can terminate the function with the NET/Callback key (hold it down for at least 1 second).
Picking up a call
PICKUP
52
You can use this function to answer calls for another phone on your
own phone.
Entering text
Character table
:
¿
¡
=
>
%
$
¥
¤
b
c
2
ä
á
à
d
e
f
3
ë
é
è
ê
¡
g
h
i
4
ï
í
ì
î
k
l
5
£
m
n
o
6
ö
ñ
ó
ò
¤
p
q
r
s
7
ß
¥ t
u
v
8
ü
ú
ù
û
¬
w
x
y
z
9
ÿ
ý
,
?
!
0
+
a}A
*
/
(
)
<
#
@
\
&
§
^
Ÿ a
¢ j
Þ
«
ª
.
b
Press x 14
-
£
a
Press x 13
Press x 10
å
â
s
Press x 12
Press x 9
ø
1
]
Press x 11
Press x 8
æ
Press x 7
õ
Press x 6
ô
Press x 5
ç
Press x 4
ã
Press x 3
â
Press x 2
Press x 1
This character table is the internal character table of the mobile telephone. It shows the assignment of all keys:
"
‘
;
_
a: Blank is inserted
b: Switch from lower case to upper case letters
53
Key utilisation
To enter a character, press the appropriate key the relevant number of
times or until the character appears.
The first letter of a word is automatically written in upper case letters.
This is followed by lower case letters.
A character is always inserted to the left of the cursor.
D E F G Control the cursor.
X Delete the character to the left of the cursor.
54
Appendix
Troubleshooting
Some malfunctions can be resolved without outside intervention. The
following table provides a list of such malfunctions.
Error
Possible cause
Remedy
No display.
Mobile telephone not Press on-hook key unswitched on.
til confirmation tone
sounds.
Battery is empty.
Charge or replace battery.
No reaction to keystroke.
Keypad lock activated.
Press hash key until
confirmation tone
sounds.
De-crescendo tone
sequence during input.
An incorrect entry
was made.
Repeat key sequence
while watching the
display; where applicable, consult the operating instructions.
The line "Base n" flash- The mobile telephone
is outside the base raes (n= 1 - 4).
dio range; radio signal
too weak.
Mobile telephone not
registered.
No ringer at the mobile telephone.
Nothing audible during a call.
Move into radio
range, i.e. change location if necessary.
Register mobile telephone.
Interval between syn- Switch the mobile telchronisation attempts ephone off and
are too long.
switch it back on
again.
Ringer is deactivated. Activate the ringer.
The left side of the
control key was
pressed – the microphone and the receiver inset are muted.
Press the "Go Back"
display key to re-activate the microphone
and the receiver inset.
55
Error
The following appears
immediately after the
talk key is pressed:
Possible cause
Remedy
HiPath Cordless En- Repeat call later.
terprise is being used
by other users.
Connect. Release
No dial tone available;
no calls can be made.
The following, for ex- Mobile telephone is
ample, appears:
blocked.
Base 1
Outgoing and incoming calls and activation/deactivation are
not possible.
Remove the battery
from the mobile telephone and then re-insert it, see page 10.
Cleaning the mobile telephone
To clean the mobile telephone and the charging shell, simply wipe
them with a damp or antistatic cloth; never use a dry cloth.
Do not use abrasive cleaning agents!
56
Technical data
HiPath Cordless Enterprise
Standards
DECT in accordance with ETSI TBR 6/10/22
Number of channels 120 duplex channels
Radio frequency range 1.88 GHz to 1.90 GHz
Duplex operation
Time duplex with a 10 ms frame length each
Channel configuration 1728 kHz
Bit rate
Modulation
1152 kbit/s
GFSK
Voice encoding
Transmit power
32 kbit/s (ADPCM)
10 mW average power per channel,
250 mW peak power per channel
Range
Outdoors approx. 300 m,
indoors approx. 50 m
Mobile telephone
For Gigaset M1 professional:
EU guidelines
89/336/EC "Electromagnetic Compatibility"
73/23/EC "Electrical Apparatus for Potentially
Explosive Atmospheres"
Acoustic shock suppression: maximum
sound pressure level
in accordance with
TBR10, Annex D
118 dB (A)
Operating times with
fully charged battery
see page 12
Permitted environmental conditions
for operation
-10 °C to +40 °C
100% relative humidity, splash resistant
(IP 64)
Weight incl. battery
Dimensions excl. attachment clip
(L x B x H)
approx. 141 g
approx. 150 x 57 x 27 mm
57
Accessories
Charging shell
The S30807-K6718-X charging shell is used for charging the battery
and storing the mobile telephone safely. Further information about
this is available on request. Please contact your nearest Siemens
sales office.
Power supply unit
The power supply unit is used for operating the charging shell. Only
use the permitted C39280-Z4-C373 power supply unit.
Headset
Only recommended headsets may be used for the Gigaset M1 professional mobile telephone.
The use of headsets with noise-absorbing features is recommended
for noise levels of 75 dB (A) and over.
To connect the headset, remove the rubber seal and plug the connector into the port.
Replace the rubber seal once the headset has been disconnected
from the mobile telephone. This guarantees acoustic features and enables hands-free talking.
58
Declaration of conformity
Your mobile telephone is supplied for use within a specific country,
which is displayed on the underside of the device. Country-specific
features must be observed.
The device complies with the basic requirements of the R&TTE Directive and therefore displays the CE symbol.
Extract from original declaration
„We, Siemens AG, declare, that the above mentioned product is manufactured according to our Full Quality Assurance System certified by
CETECOM ICT Services GmbH with the registration number
"Q810820M" in compliance with ANNEX V of the R&TTE-Directive 99/
05/EC. The presumption of conformity with the essential requirements regarding Council Directive 99/05/EC is ensured."
Senior Approvals Manager
The Declaration of Conformity (DoC) has been signed. In case of
need, a copy of the original DoC can be made available via the company hotline.
59
List of abbreviations
The following is a list of abbreviations used in this manual.
60
Abbreviation
Definition
%
ADPCM
Percent
Adaptive Differential Pulse Code Modulation
°C
CTR
Degrees Celsius
Common Technical Regulation
dB
DECT
Decibel
Digital Enhanced Cordless
Telecommunications
DTB
ES
Digital telephone directory
European Standard
ETSI
European Telecommunications Standard
Institute
EU
g
European Union
Gram
GAP
GFSK
Generic Access Profile
Gaussian Frequency Shift Key
GHz
H
Gigahertz
High
kbit/s
kHz
Kilobits per second
Kilohertz
L
LED
Length
Light Emission Diode
m
mAh
Metre
Milliampere-hour
mm
MHz
Millimetre
Megahertz
ms
mW
Milliseconds
Milliwatt
Pa
SMS
Pascal
Short Message Service
TBR
W
Technical Basis for Regulation
Width
Index
A
Abbreviations ............................ 60
Accessories .............................. 58
Activating .................................. 13
Alarm clock ............................... 48
Alert tones ................................ 33
Anniversary ............................... 28
Assembling the attachment clip 13
Attachment clip ........................... I
Auto Answer ............................. 35
Available memory ..................... 28
B
Base selection .......................... 36
Battery
capacity ............................... 12
charging .............................. 11
charging time ...................... 12
inserting the battery ............ 10
low beep ............................. 31
operating times ................... 12
permitted battery ................ 12
standby mode ..................... 12
talk time .............................. 12
Battery compartment lid .............. I
Battery tone
function ............................... 31
set ....................................... 33
C
Call
answering ........................... 21
picking up ................ 43, 50, 52
transferring ................... 50, 52
Call forwarding .......................... 39
call number ......................... 40
fixed .............................. 38, 40
variable .................... 38, 40, 43
Call number suppression .... 39, 43
Call protect ............................... 38
Call status ........................... 5, 6, 7
Call waiting ............................... 43
Callback ........................ 43, 49, 51
Callback key ............................. I, 3
Capacity .................................... 12
Chaining .................................... 29
Character table ......................... 53
Charge status ........................... 11
Charging shell ........................... 58
Charging time ........................... 12
Cleaning .................................... 56
Clip ...............................................I
Code functions ......................... 43
Codes ................................. 38, 43
Conducting calls ....................... 19
Conference ......................... 50, 51
Confirmation ............................. 33
Confirmation tone
function .............................. 31
set ...................................... 33
Connection quality ...................... 2
Control key ...............................I, 4
COS .......................................... 39
D
Date .......................................... 48
Deactivating .............................. 13
Default Reset ........................... 35
Default state ............................. 31
Deleting
entry ................................... 28
number ............................... 28
Dial a phone number .......... 19, 49
Dial pause ................................. 20
Dial status ................................... 6
Digital telephone directory ....... 42
Direct call
conducting direct calls ........ 23
determining numbers ......... 18
direct call key ......................I, 3
Display ..........................................I
call status ......................... 5, 7
dial status ............................. 5
on or message status ........... 6
Display available memory ......... 28
Display keys .............................I, 5
Display test .............................. 42
61
Do not disturb .....................38, 43
DTB ...........................................42
E
Electronic equipment
interference ...........................2
Enquiry ................................50, 52
Entering text ..............................53
Entries
recieve entries .....................28
send entries ........................28
F
Features
Hicom cordless EM ...............1
mobile telephone ..................1
Forwarding
phone number .........38, 39, 40
Function keys ..............................3
Function selection
call status ..............................9
dial status ..............................9
message status .....................8
on status ...............................8
ringing status .........................9
H
Handset volume ........................32
Hash key ..................................I, 3
Headset .....................................58
HiPath ..........................................1
HiPath Cordless Enterprise
features .................................1
Hunt group ..........................38, 43
I
ID for code no. ..........................16
Identification ..............................43
Internal/external dialling ............19
K
Key tones
function ...............................31
set .......................................33
Keypad lock ...............................18
62
Keys
control keys ........................... 4
display keys .......................... 5
function keys ......................... 3
L
Loudspeaker ................................ I
M
Mailbox ............................... 39, 41
Message waiting indication ...... 42
Microphone .................................. I
muting ................................. 23
Missed calls list ................. I, 3, 41
Missed dates ............................ 48
Mobile telephone
features ................................. 1
operating times ................... 57
N
NET carrier list .......................... 26
dialling ................................. 29
NET key ................................... I, 3
Network nodes ......................... 16
Number redial ........................... 24
automatic ............................ 24
deleting an entry ................. 25
list ....................................... 24
manual ................................ 24
number transfer .................. 25
O
On or message status ................ 6
On/off key ................................ I, 3
On-hook key ............................. I, 3
Operating statuses ..................... 5
Override .................................... 43
Overview
call status .............................. 9
code functions .................... 43
dial preparation ................... 20
NET carrier list ..................... 26
number redial ...................... 24
registering ........................... 15
room monitor ...................... 44
service functions ................. 37
settings ............................... 30
switching functions ............. 50
telephone directory ............. 27
time functions ..................... 47
walkie-talkie mode .............. 44
P
Permitted batteries ................... 12
PIN ............................................ 39
Power supply unit ..................... 58
Protective cover ........................ 10
R
R key ........................................ I, 3
Radio network
leaving ................................... 2
re-registering ......................... 2
Radio range ................................. 2
Range ....................................... 57
Range problems ......................... 2
Receiver inset .............................. I
Redial ........................................ 43
Register .................................... 17
Reminder .................................. 39
Reset ........................................ 35
Ringing status ......................... 5, 6
Room monitor ........................... 44
S
Second call ............................... 38
Service codes ........................... 38
Set appoints. ............................. 48
Setting the language ................. 14
Signalling method ............... 39, 43
SLC menu ................................. 37
Sound setting functions ............ 32
Speakerphone key ................... I, 3
Speakerphone mode ................ 22
activating ............................. 22
deactivating ......................... 22
setting the volume .............. 22
Speed dialling ..................... 38, 43
Standby mode .......................... 12
Star key .................................... I, 3
Switches ................................... 38
Switching functions .................. 49
System administrator ............... 15
System menu ........................... 37
T
Talk key ....................................I, 3
Talk time ................................... 12
Technical data ........................... 57
Telephone directory .................. 27
~ of the mobile telephone .. 26
~ of the system .................. 42
available memory ............... 28
deleting ............................... 28
deleting an entry ................. 28
dialling ................................ 29
new entry ........................... 27
using the phone number .... 28
Time ......................................... 48
Time control ............................. 33
Toggle ................................. 50, 51
Tone dialling ....................... 39, 43
Transmit power ........................ 57
Troubleshooting ........................ 55
U
Unit parts ....................................III
V
Vibration alarm .......................... 35
Voice info .................................. 39
W
Walkie-talkie mode ................... 45
Warning tone ............................ 34
63
www.hipath.de
This device has been manufactured in accordance with our certified environmental management system (ISO 14001). This process
minimises energy consumption, the use of primary raw materials and waste production.
© Siemens AG 2004
Information and Communication Networks
Hofmannstr. 51 • D-81359 München
Order no.: A31003-G2123-B200-1-7619
The information in this document contains only general descriptions
and features that may not always apply as described in specific cases or
that may change as a result of the further development of the products. The required features are only binding if they are expressly agreed
when the contract is signed.
Subject to availability and technical changes.
Printed in Federal Republic of Germany
14.04.2004