1
1
MODEL
HR-GB201
OPERATION MANUAL
If you require any advice or assistance regarding
your Sharp product, please visit our web-site
www.sharp.co.uk/customersupport.
Customers without Internet access may telephone
08705 274277 during office hours (or (01) 676 0648
if telephoning from Ireland).
0101
for UK (9JCG5230100042)
Thank you for purchasing this SHARP product.
For the best performance, read this manual carefully.
It will guide you in operating your SHARP product.
HR-GB201 9JCG5230100042
PORTABLE JUKEBOX RECORDER
Special Notes
! Warnings
NOTES FOR USERS IN THE U.K. AND
IRELAND
SERVICE INFORMATION
In the unlikely event of your equipment requiring repair, please use the supplied postage paid label to
send your unit to the Sharp repair centre or contact
the dealer or supplier from whom it was purchased.
Where this is not possible, please visit our web-site
www.sharp.co.uk/customersupport.
Customers without internet access may telephone
08705 274277 during office hours (or (01) 676 0648
if telephoning from Ireland).
" The supplied AC adaptor contains no user serviceable
parts. Never remove covers unless qualified to do so.
It contains dangerous voltages, always remove the
mains plug from the main outlet socket before any service operation or when not in use for a long period.
" To prevent fire or shock hazard, do not expose this
appliance to dripping or splashing liquids. No objects
filled with liquids, such as vases, shall be placed on
the apparatus.
" Never use an AC adaptor other than the one specified.
Otherwise, problems or serious hazards may be created.
Please note; all calls will be charged at local rate.
Certain replacement parts and accessories may be
obtained from our main parts distributor.
WILLOW VALE ELECTRONICS LTD.
0121 766 5414
In the unlikely event of this equipment requiring repair during the guarantee period, you will need to
provide proof of the date of purchase to the repairing
company. Please keep your invoice or receipt, which
is supplied at the time of purchase.
0303
i
HR-GB201 9JCG5230100042
04/5/11
HR-GB201_UK_common.fm
2
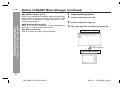
! About SHARP Music Manager
" When recording important selections, make a preliminary test to ensure that the desired material is properly recorded.
" SHARP is not liable for damage or loss of your recording arising from malfunction of this unit.
" At full volume, prolonged listening to a personal stereo
may damage the user's hearing. This model complies
with the law if used with the correct earphones (model
number RPHOE0001YCKZ). If the earphones are
damaged in any way, please order using the model
number given above.
SHARP Music Manager offers features to work with a
hard disk drive. These include:
" Transfer of MP3, WMA and WAV files for playback.
! Notes
" Recording and playback of any material may require
consent, which SHARP is unable to give. Please refer
particularly to the provisions of the Copyright Act
1956, the Dramatic and Musical Performers Protection
Act 1958, the Performers Protection Acts 1963 and
1972 and to any subsequent statutory enactments
and orders.
" This equipment complies with the requirements of
Directives 89/336/EEC and 73/23/EEC as amended
by 93/68/EEC.
HR-GB201 9JCG5230100042
! Caution
! About digital rights management
Digital Rights Management protects rights of artists
in the music industry and their digital works. Use of
SHARP Music Manager is subject to the following
restrictions:
" Only MP3, WMA and WAV files can be played on a
hard disk drive when transfer is performed using
SHARP Music Manager.
" Only audio files directly recorded on a hard disk drive
(using analogue line input or a microphone) can be
transferred to your PC using SHARP Music Manager.
D
F
S
V
I
N
P
E
ii
HR-GB201 9JCG5230100042
04/5/11
HR-GB201_UK_common.fm
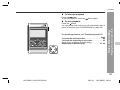
-Accessories-
General Information
HR-GB201
Accessories
Remote Control x 1
Earphones x 1
(with the ear pads)
AC Adaptor
(9JCRADPA8000AF) x 1
Multi-link Station
(Cradle) x 1
Travel Pouch x 1
USB Connection Cable x 1
CD-ROM x 1
Notes:
! Only the above accessories are included.
! The AC adaptor may be different from the one in the drawing.
Warning:
! The AC adaptor supplied with the HR-GB201 must not be used with other equipment.
! Use only the supplied AC adaptor.
1
HR-GB201 9JCG5230100042
04/5/18
HR-GB201_UK.fm
Contents
" Voice Recording
Controls and indicators . . . . . . . . . . . . . . . . . . . . . .3, 4
Precautions . . . . . . . . . . . . . . . . . . . . . . . . . . . . . . . . . .5
General notes . . . . . . . . . . . . . . . . . . . . . . . . . . . . . . . .6
Recording with the built-in microphone . . . . . . . . . 30
Playing recorded voice data . . . . . . . . . . . . . . . 31, 32
Advanced playback . . . . . . . . . . . . . . . . . . . . . . . . . . 33
" Power Source
" Recording from CD
Charging the main unit . . . . . . . . . . . . . . . . . . . . . .7, 8
Turning the power on . . . . . . . . . . . . . . . . . . . . . . . . . .8
Recording from a CD player . . . . . . . . . . . . . . . . 34, 35
Playing recorded music data . . . . . . . . . . . . . . . 35, 36
" Software Installation
" Advanced Features
System requirements . . . . . . . . . . . . . . . . . . . . . . . . . .9
Outline of SHARP Music Manager . . . . . . . . . . .10, 11
Installing SHARP Music Manager . . . . . . . . . . . . . . .12
" Transferring from PC
Connecting the unit to a PC . . . . . . . . . . . . . . . . . . .13
Disconnecting the unit . . . . . . . . . . . . . . . . . . . . . . .14
Starting SHARP Music Manager . . . . . . . . . . . . .15, 16
Transferring audio data . . . . . . . . . . . . . . . . . . . .17, 18
Editing playlists . . . . . . . . . . . . . . . . . . . . . . . . . .19, 20
Folder settings . . . . . . . . . . . . . . . . . . . . . . . . . . . . . .21
Editing music information . . . . . . . . . . . . . . . . . . . . .22
Playing transferred audio data . . . . . . . . . . . . . .23, 24
Advanced playback. . . . . . . . . . . . . . . . . . . . . . . 25 - 29
2-6
Page
Transferring image data from a
digital camera . . . . . . . . . . . . . . . . . . . . . . . . . . . 37, 38
Changing default settings. . . . . . . . . . . . . . . . . 39 - 41
Hold function . . . . . . . . . . . . . . . . . . . . . . . . . . . . . . . 41
Listening to sound using the
external equipment . . . . . . . . . . . . . . . . . . . . . . . . . . 42
" References
Folder structure . . . . . . . . . . . . . . . . . . . . . . . . . . . . 43
Error messages . . . . . . . . . . . . . . . . . . . . . . . . . . . . . 44
Troubleshooting . . . . . . . . . . . . . . . . . . . . . . . . . 44 - 46
Maintenance . . . . . . . . . . . . . . . . . . . . . . . . . . . . . . . . 46
Specifications. . . . . . . . . . . . . . . . . . . . . . . . . . . . 47, 48
8
10
14
-Contents-
Page
General Information
" General Information
HR-GB201
30
34
38
44
2
HR-GB201 9JCG5230100042
04/5/18
HR-GB201_UK.fm
HR-GB201
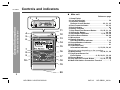
Controls and indicators
" Main unit
-Controls and indicators-
General Information
1
2
3
11
4
12
5
6
13
14
00 03 30
7
8
15
10
16
9
17
10
18
Reference page
1. Strap Eyelet
2. Line Input Socket . . . . . . . . . . . . . . . . . . . . . . . . 34
3. Earphone Output/
Remote Control Socket . . . . . . . . . . . . . 23, 31, 35
4. Data Format Indicator . . . . . . . . . . . . . . . . . 23, 33
5. Hold Indicator . . . . . . . . . . . . . . . . . . . . . . . . . . . 41
6. Battery Indicator . . . . . . . . . . . . . . . . . . . . . . . . . . 8
7. Skip Down/Fast Reverse Button . . . 23, 25, 31, 36
8. Volume Up Button . . . . . . . . . . . . . . . . . . . . . 24, 26
9. Stop/Power Off Button . . . . . . . . . . . . 8, 23, 32, 36
10. Volume Down Button. . . . . . . . . . . . . . . . . . . 24, 26
11. Microphone . . . . . . . . . . . . . . . . . . . . . . . . . . . . . 30
12. Battery Charge/
Hard Disk Access Indicator . . . . . . . . . . . . . . 7, 13
13. Repeat/Random Indicator . . . . . . . . . . . . . . . . . 33
14. Hold Switch . . . . . . . . . . . . . . . . . . . . . . . . . . . . . 41
15. Character/Time/
Information Indicator . . . . . . . . . . 8, 23, 30, 34, 43
The display varies depending on the operation.
16. Menu Button. . . . . . . . . . . . . . . . . . . . 24, 26, 31, 36
17. Play/Pause/Power On/
Enter Button . . . . . . . . . . . . . . 8, 23, 29, 31, 32, 36
18. Record Button . . . . . . . . . . . . . . . . . . . . . . . . 30, 34
19. Skip Up/Fast Forward Button . . . . . . 23, 25, 31, 36
20. Multi-link Station Connection Terminal . . . . . . . 7
19
20
3
HR-GB201 9JCG5230100042
04/5/18
HR-GB201_UK.fm
HR-GB201
2-6
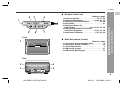
" Remote control unit
4
Reference page
1. Earphone Socket . . . . . . . . . . . . . . . . . . . 23, 31, 35
2. Equaliser/Bass Button . . . . . . . . . . . 24, 26, 31, 36
3. Volume Up and Down Buttons . . . . . . . . . . . 24, 26
4. Hold Switch . . . . . . . . . . . . . . . . . . . . . . . . . . . . . 41
5. Play/Pause/Power On/
Enter Button . . . . . . . . . . . . . . 8, 23, 29, 31, 32, 36
6. Skip Up/Skip Down/Fast Forward/
Fast Reverse Buttons . . . . . . . . . . . . 23, 25, 31, 36
7. Stop/Power Off Button . . . . . . . . . . . . 8, 23, 32, 36
1
5
6
7
Front
" Multi-link station (Cradle)
1
Reference page
1. Connection Terminal (to Main Unit) . . . . . . . . . . . 7
2. Line Output Socket (Variable) . . . . . . . . . . . . . . 42
3. 5 V DC Input Socket . . . . . . . . . . . . . . . . . . . . . . . 7
4. USB Socket (A type) . . . . . . . . . . . . . . . . . . . . . . 37
5. USB Socket (Mini B type) . . . . . . . . . . . . . . . . . . 13
8
10
-Controls and indicators-
3
General Information
2
14
30
34
38
Rear
2
4
3
5
LINE OUT DSC IN
44
PC
4
HR-GB201 9JCG5230100042
04/5/18
HR-GB201_UK.fm
-Precautions-
General Information
HR-GB201
Precautions
" Important
" Storing the unit
! Do not wear your earphones when you are crossing
streets or near traffic.
! Do not use your earphones whilst driving a
motor vehicle, it may create a traffic hazard and may be illegal. Remember to obey
all of the safety rules in your area.
! Do not play the unit at a high volume.
Hearing experts advise against extended
listening at high volume levels.
Avoid using or leaving the unit in the following places.
! Places exposed to direct sunlight for many hours (especially in cars with the doors and windows closed) or near
heaters. (The cabinet may deform, change colour or the
unit may malfunction.)
! Places exposed to excessive dust.
! Places exposed to water.
! Places where temperatures are excessively high or low.
! Places (bathrooms) where the humidity is extremely high.
! Places with strong magnetic fields such as TVs or loudspeakers.
! Places exposed to vibration.
! Places where sand can easily enter the inside of the unit
(beaches etc.).
! If the unit is used near radio tuners or TVs, noise and/or
picture interference may result. If you experience these
problems, move the unit away from such devices.
! If you experience ringing in your ears, reduce the volume
or discontinue use.
! No naked flame sources, such as lighted candles, should
be placed on the apparatus.
! The apparatus is designed for use in moderate climate.
! In case of an electrical storm, unplug the AC adaptor for
safety.
! This unit should only be used within the range of 0°C 40°C (32°F - 104°F).
To avoid accidental electric shock or other possible
problems, observe the precautions listed below.
! Do not disassemble or modify the unit.
! Do not drop or subject the unit to shock.
! Do not use the unit near open flames.
! Do not spill liquid on the unit.
! Do not use an external power supply, other than the 5 V
DC supplied with this unit, as it may damage the unit.
! SHARP is not responsible for damage due to improper
use. Refer all servicing to a SHARP authorised service
centre.
It is not recommended to put this unit
into a rear pocket, as this may damage
the product when sitting.
Using this unit near mobile phones
may cause noise pickup. If it occurs,
move it away from them.
" Copyright
Copyright laws protect sounds, images, computer programmes, databases, other materials and copyright holders.
Duplicated material is limited to private use only. Use of
materials beyond this limit or without permission of copyright
holders may constitute copyright infringement, and be subject to criminal punishment.
5
HR-GB201 9JCG5230100042
04/5/18
HR-GB201_UK.fm
General notes
" Trademarks
! IBM and PC/AT are registered trademarks of International Business Machines Corporation.
! Macintosh is a trademark of Apple Computer, Inc.,
registered in the United States and other countries.
! Microsoft and Windows are registered trademarks of
Microsoft Corporation in the United States and/or
other countries.
! MMX and Pentium are trademarks or registered trademarks of Intel Corporation.
! All brand names and product names are trademarks
or registered trademarks of their respective owners.
2-6
In the unlikely event that there is some problem like loss
of recorded audio content due to HDD malfunction,
please be aware beforehand that Sharp will bear no responsibility to compensate for the content which could
not be recorded or edited, for the loss of recorded or edited audio content, or for other related direct or indirect
damages.
" If a power failure occurs
! The content being recorded will be damaged if power
failure occurs.
! The content being played back may be damaged.
" For important recording
! If the HDD malfunctions, the content recorded on the
HDD may be lost. If you wish to save content permanently, we recommend copying or moving the content
to a PC, etc..
" Audio data
! Back up your data stored on this product periodically
in case of loss or alteration.
! Sharp shall not be liable for any damages or loss of
data resulting from defects in this product or your computer.
! Audio data transferred to this product cannot be
played back on other HR-GB201 or equipment.
8
10
-General notes-
! Reproduction in part or in whole without prior permission is prohibited.
! The attached software and manual may be used only
on a single computer.
! In no event shall Sharp be liable for any damages to
you or any other party arising from the use of this
product.
! Before using third-party connecting devices or software, consult the dealer or manufacturer. Sharp shall
not be liable for any damages caused by malfunction
resulting from the use of unspecified products.
! Designs, specifications, and contents are subject to
change without notice for improvement.
! Screen shots in this manual are for reference only.
Sharp shall not be liable for any errors in this manual.
General Information
" Software and operation manual
HR-GB201
14
30
34
38
44
6
HR-GB201 9JCG5230100042
04/5/18
HR-GB201_UK.fm
HR-GB201
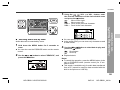
Charging the main unit
Battery charge
indicator (red)
1
2
3
Connect the AC adaptor to the DC IN 5V socket on
the cradle.
Plug the AC adaptor into the wall socket.
Place the main unit on the cradle.
! Press down the unit firmly.
! Battery charge indicator (red) lights up.
Power Source
-Charging the main unit-
" About charging time
Press down the unit
with its front side
facing toward you.
Fit to the
connection
terminal of
main unit
The battery fully charges in approx. 4 hours, and the
battery charge indicator goes out.
Notes:
! Charge the battery within the range of 5°C - 35°C
(41°F - 95°F).
! The unit and the cradle may get warm during or after
charge. This is normal.
! When charging battery for the first time or after a long
period of disuse, battery life may be shorter. Repeat
charge/discharge cycle 4 to 5 times to restore the full
capacity.
" Built-in battery
Rear
LINE OUT DSC IN
PC
To the wall socket
! The built-in battery may discharge completely when
this product is left unused for long periods. Recharge
the battery before use.
! Charging time depends on the battery condition and
ambient temperature.
! At low temperatures, continuous playing time is shortened.
! Sharp shall not be liable for any damages resulting
from loss or alteration of data caused by malfunction,
repairs, or complete discharge of the battery.
AC 100 - 240 V,
50/60 Hz
7
HR-GB201 9JCG5230100042
04/5/18
HR-GB201_UK.fm
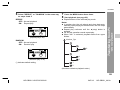
3
HR-GB201
The remaining amount of battery level is shown by the
battery indicator during operation.
When the battery
level is high
When the battery
level is very low
00 0
Hold down the
button for 2 seconds or more.
The startup screen apThen the display will look
pears for a while.
like a file browser.
0000
0000
" Battery replacement
This product has a built-in battery.
! The capacity after 300 cycles is expected to be equal
to or more than 80% of the rated capacity. The capacity after 500 cycles is expected to be equal to or more
than 60% of the rated capacity.
! The battery life and the operating time may be shortened by usage conditions, long periods of disuse, etc.
! The battery is a consumable item. If it does not charge
or the operating time is noticeably shorter than normal, replace with a new battery.
! Replacement should be carried out by qualified
personnel only. Contact your dealer or local
SHARP service facility. Never disassemble this
product for this purpose.
Caution:
Pay attention to the environment when disposing of this
product (the built-in battery should be handled separately).
PORTABLE JUKEBOX RECORDER
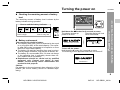
To turn off the power:
Hold down the button for 2 seconds or more.
The following screen appears before the unit turns off.
Power Source
How to read the battery indicator
GOOD BYE !
-Charging the main unit/Turning the power on-
" Checking the remaining amount of battery
level
2-6
8
10
14
30
34
38
44
8
HR-GB201 9JCG5230100042
HR-GB201 9JCG5230100042
Turning the power on
04/5/18
HR-GB201_UK.fm
HR-GB201
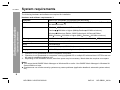
System requirements
The following hardware and software are required for installation.
-System requirements-
Software Installation
Hardware and software requirements *1
Computer
IBM PC/AT-compatible (not operable with Macintosh)
OS
Microsoft Windows 98SE/Me/2000 Professional/XP Professional/XP Home Edition standard install *2
CPU
Windows XP Professional/XP Home Edition
Pentium
300 MHz or higher (MMX Pentium 233 MHz minimum)
Windows Millennium Edition, 2000 Professional, 98 Second Edition
MMX Pentium 233 MHz or higher (MMX Pentium 200 MHz minimum)
Memory
64 MB minimum (128 MB or more recommended for Windows XP)
Hard disk space
10 MB minimum required *3
Drive
CD-ROM drive
Interface
Available USB port (USB 2.0/1.1)
Display
1024 x 768 pixels or better, high colour (16-bit) or better
*1
*2
*3
Operation is not guaranteed on all the compatible computers.
Operation is not guaranteed on computers running upgraded OS or multiple OS with dual-boot. NTFS format can
be used for standard installation only.
Depending on the Windows version, more free space may be necessary. Music data also requires more space.
Notes:
! You cannot install SHARP Music Manager on Windows 98 or earlier. Use SHARP Music Manager in Windows 98
Second Edition or later.
! Simultaneous use of other security systems may cause problems (application deadlock, automatic system reboot,
etc.).
9
HR-GB201 9JCG5230100042
04/5/18
HR-GB201_UK.fm
Outline of SHARP Music Manager
PC
(SHARP Music Manager)
HR-GB201
2-6
SHARP Music Manager is software that allows you to
transfer audio data (MP3, WMA, or WAV files) to the main
unit. You can manage the data and edit playlists.
8
1
Convert audio data
(MP3, WMA, or WAV
format) with Windows
Media Player, etc.
2
3
Transfer audio data to a PC using Windows Media
Player, etc. For details, refer to "HELP" of the
software.
Transfer the audio data to the unit (see page 17).
Play back the audio data (see page 23).
Notes:
! Audio data transferred by SHARP Music Manager can
only be played back on this unit.
! This unit cannot play audio data transferred by other
applications.
Transfer
Software Installation
Audio data
(MP3, WMA, WAV)
-Outline of SHARP Music Manager-
" Transferring audio data
10
14
30
34
38
Play
44
USB connection cable
10
HR-GB201 9JCG5230100042
04/5/18
HR-GB201_UK.fm
HR-GB201
Outline of SHARP Music Manager (continued)
Software Installation
-Outline of SHARP Music Manager-
MP3 (MPEG-1 Audio Layer 3):
MPEG is an international standard developed by Moving
Picture Experts Group, a working group of ISO. Audio
data can be compressed to about one-tenth to onetwelfth its original size.
WMA (Windows Media Audio):
WMA is an audio compression format developed by
Microsoft, or a file encoded in this format.
WAV (Wave Sound) file:
WAV is an audio file widely used in Windows.
" Creating/editing playlists
1
2
3
Transfer audio data to the unit.
Create a playlist (see page 19).
Play audio data from the playlist (see page 29).
Navigation window
Edit the playlist
Playlist edit window
11
HR-GB201 9JCG5230100042
04/5/18
HR-GB201_UK.fm
Installing SHARP Music Manager
Insert the supplied CD-ROM into your CD-ROM
drive.
! The "Software Installer" screen appears.
2-6
Click the "Next" button.
Click the "Next" button.
8
! When the installation is completed, the "Setup Complete" screen appears.
2
Click the "Install SMM" button.
! The "Welcome" screen appears.
3
Click the "Next" button.
! The "Choose Destination Location" screen appears.
7
Click the "Finish" button.
! Check the "Yes, Launch the program file." box. After
installation, SHARP Music Manager starts.
Notes:
! If the "Software Installer" screen does not appear in
step 1, double click the "autorun.exe" stored on the
CD-ROM from Explorer, etc.
! When you use Windows 98 Second Edition, insert the
supplied CD-ROM and click the "Install W98SE Driver"
button to install the driver.
Software Installation
1
5
6
-Installing SHARP Music Manager-
Exit all applications before starting the installation.
HR-GB201
4
Click the "Next" button.
! The "Set Program Shortcuts" screen appears.
14
30
34
38
44
12
HR-GB201 9JCG5230100042
10
04/5/18
HR-GB201_UK.fm
HR-GB201
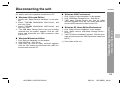
Connecting the unit to a PC
Hard disk
access
indicator
(green)
-Connecting the unit to a PC-
Transferring from PC
Connect the unit to a PC to transfer audio data. To disconnect the unit, see "Disconnecting the unit" on page
14.
Rear
LINE OUT DSC IN
PC
USB connection
cable
1
2
3
Turn on the unit (see page 8).
Connect the AC adaptor to the DC IN 5V socket
and place the unit on the cradle (see page 7).
Connect the unit to a PC with a USB connection
cable.
! The hard disk access indicator (green) flashes.
! Whilst the unit is connected to the PC, the screen
below appears.
Caution:
! It is recommended to use the AC adaptor when connecting the unit to a PC. Otherwise data on the unit
may be corrupted when batteries run out.
! Do not disconnect a USB connection cable or remove
the unit from the cradle whilst transferring data from a
PC. Data on the unit may be corrupted.
Note:
The operation buttons on the main unit do not work if it is
connected to a PC. Disconnect the PC to operate on the
unit (see page 14).
PC
To the USB port
13
HR-GB201 9JCG5230100042
04/5/18
HR-GB201_UK.fm
Disconnecting the unit
HR-GB201
For details, refer to the operation manual for the PC.
" Windows 2000 Professional
" Windows 98 Second Edition
1
2
3
3
4
" Windows Millennium Edition
1
2
3
Click "Remove Hardware" on the taskbar.
Click "USB Disk - Stop Drive".
"USB Disk can now be safely removed" appears.
Click the "OK" button and disconnect the USB connection cable from the PC.
Click "Unplug or eject hardware" on the taskbar.
Click "USB Mass Storage Device - Stop Drive".
"USB Mass Storage Device can now be safely
removed" appears. Click the "OK" button and disconnect the USB connection cable from the PC.
" Windows XP Home Edition/Professional
1
2
3
Click "Safely Remove Hardware" on the taskbar.
Click "Safely remove USB Mass Storage Device Drive(*:)".
"Safe To Remove Hardware" appears. Click the message and disconnect the USB connection cable from
the PC.
(*) Drive letter of this unit
8
10
-Disconnecting the unit-
2
Double click "Safely Remove hardware" on the taskbar.
Select "TOSHIBA MK2004GAL USB Device", and
then click "Stop".
Select "TOSHIBA MK2004GAL USB Device", and
then click "OK".
"The USB Mass Storage Device can now be safely
removed from the system" appears. Click the "OK"
button and disconnect the USB connection cable
from the PC.
Transferring from PC
1
2-6
14
30
34
38
44
14
HR-GB201 9JCG5230100042
04/5/18
HR-GB201_UK.fm
HR-GB201
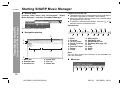
Starting SHARP Music Manager
" How to start
Transferring from PC
-Starting SHARP Music Manager-
From the "Start" menu, click "All Programs", "Sharp
Music Manager", and then "SharpMusicManager".
Folder tree and file list:
! The folder tree shows a structure of drives and folders.
HR-GB201 appears as "SHARP" (drive name).
! When you select a drive or folder, the contents within
are displayed in the file list.
! To display or hide the lower folders, Click the " " or " "
indicator next to drive/folder icons.
Standard bar:
The navigation window appears.
1
3
5
7
9
11
13
15
" Navigation window
2
3
1.
2.
3.
4.
5.
6.
7.
8.
1
2
5
4
6
1. Menu bar
2. Standard bar
3. Address bar
4. Folder tree
5. File list
6. Status bar
4
6
Back
Forward
Up One Level
Audio File Only
Search
Send To Player
Delete
Views
8
9.
10.
11.
12.
13.
14.
15.
16.
10
12
14
16
Edit Playlist
Edit Music Info
Update Music Info
Set Start (See page 18.)
Cut
Copy
Paste
Help
Note:
You can also access the functions on the standard bar
from the menu bar.
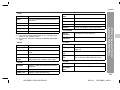
" Menu bar
1
2
3
4
5
6
15
HR-GB201 9JCG5230100042
04/5/18
HR-GB201_UK.fm
4
Create new folders in a selected folder. *1
Open...
Execute applications according to the file
extension.
Delete
Delete a selected folder/file.
Rename
Change folder names. *2
Properties
Display folder/file properties.
Exit
Exit SHARP Music Manager.
(*1) You cannot create a new folder in the "Jukebox_Sys"
folder on the "SHARP" drive.
(*2) File names cannot be changed on SHARP Music Manager.
Display all data or audio file only.
Back
Display the previous folder.
Forward
Display the next folder.
Up One Level
Display the upper folder.
Refresh
Update the display of files and folders.
4. Favorites
Add To
Favorites
Add folders to a favourite list.
Organize
Favorites
Organise a favourite list.
2. Edit
5. Tools
Cut
Cut a selected folder/file.
Search
Search files.
Copy
Copy a selected folder/file.
Edit Playlist
The playlist edit window appears (see
page 19).
Paste
Move a cut/copied folder/file to a selected
folder.
Edit Music
Info
Edit audio data information (see page 22).
Delete
Delete a selected folder/file.
Send To
Player
Transfer audio data or folders containing
audio data to the "Jukebox_Sys" folder.
Update Music
Info
Update the ID3 tag management information of all audio data within the device.
Transferring from PC
New Folder
Audio File
Only
-Starting SHARP Music Manager-
1. File
HR-GB201 9JCG5230100042
HR-GB201
2-6
8
10
14
30
34
38
6. Help
3. View
ToolBars
Display or hide the standard bar and address bar.
Status Bar
Display or hide the status bar.
Folder Tree
Display or hide the folder tree.
Help Topics
The help window appears.
About SharpMusicManager...
Version information appears.
44
16
HR-GB201 9JCG5230100042
04/5/18
HR-GB201_UK.fm
HR-GB201
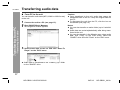
Transferring audio data
! From PC to the unit
You can transfer audio data (MP3, WMA or WAV format)
to the unit.
Connect the unit to a PC (see page 13).
Start SHARP Music Manager.
" The navigation window appears.
-Transferring audio data-
Transferring from PC
1
2
3
Caution:
" Once transferred to the unit, audio data cannot be
transferred back to the PC. Keep the original data on
the PC.
" To disconnect the unit from the PC, click the icon on
the taskbar (see page 14).
Notes:
" You can also transfer an entire folder (up to 9 subfolders).
" Audio data are sorted alphabetically after being transferred to the unit.
" You can also transfer in the following way; select audio
data, click "Copy" on the "Edit" menu, select the
"SHARP" drive and click "Paste" on the "Edit" menu.
Select audio data on the PC and click "Send To
Player" on the "Edit" menu.
" Audio data is transferred to the "Jukebox_Sys" folder
on the "SHARP" drive.
17
HR-GB201 9JCG5230100042
04/5/18
HR-GB201_UK.fm
HR-GB201
1
Start SHARP Music Manager.
" The navigation window appears.
2
Select audio data in the "ENCODE" or "VOICE
RECORD" folder on the "SHARP" drive, and click
"Copy" on the "Edit" menu.
1
Start SHARP Music Manager.
" The navigation window appears.
8
2
Select audio data to delete and click "Delete" on
the "Edit" menu.
" The "Confirm File Delete" window appears.
3
Click the "Yes" button.
Caution:
"Are you sure you want to send (file name) to the
Recycle Bin?" appears. When you click "Yes", the
audio data is permanently deleted (not moved to the
Recycle Bin).
3
Select a target folder on the PC and click "Paste"
on the "Edit" menu.
Note:
Right-click operations are not available for audio data in
the "Jukebox_Sys" folder.
! Setting the startup folder
Specify a folder to be displayed first when SHARP Music
Manager starts.
10
-Transferring audio data-
You can transfer data recorded with the built-in microphone or LINE IN to a PC (see pages 30 or 34 - 35).
2-6
! Deleting audio data from the unit
Transferring from PC
! From the unit to PC
34
38
2
44
Click the "OK" button.
" A startup folder is created.
18
HR-GB201 9JCG5230100042
30
1
Select a folder and click "Set Start" on the standard bar (see page 15).
" The "SharpMusicManager" dialogue box appears.
Note:
Audio data in the "Jukebox_Sys" folder cannot be transferred.
14
04/5/18
HR-GB201_UK.fm
HR-GB201
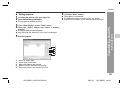
Editing playlists
Create a playlist to play audio data in your desired order.
Start SHARP Music Manager.
! The navigation window appears.
3
7
1
2
Connect the unit to a PC (see page 13).
Click "Edit Playlist" on the "Tools" menu.
! The playlist edit window appears.
-Editing playlists-
Transferring from PC
6
Select audio data to add to the playlist.
! The data is added to the playlist.
! Select from MP3, WMA and WAV files.
! Only the audio data on the "SHARP" drive can be
added.
! Change the order with the "Upward" and "Downward"
buttons. Playback starts from the top of the playlist.
" Creating a playlist
Click the "Save" button.
! If the "File Save As" dialogue box appears, name and
save the playlist. Select the "PLAYLIST" folder on the
"SHARP" drive as a location.
8
Click the "Exit" button.
! Playlist edit window closes.
Note:
Playlist files have the extension "m3u".
4
Click the "New" button.
! The "New M3U File" dialogue box appears. Name the
playlist and save it to the "PLAYLIST" folder on the
"SHARP" drive.
5
Click the "Add" button.
! The "Open File" dialogue box appears.
19
HR-GB201 9JCG5230100042
04/5/18
HR-GB201_UK.fm
HR-GB201
Click the "Save" button.
! The playlist is overwritten.
! To change the name, click the "Save As" button.
! Click the "Exit" button to exit without saving changes.
Connect the unit to a PC (see page 13).
Start SHARP Music Manager.
! The navigation window appears.
Click "Edit Playlist" on the "Tools" menu.
Click the "Open" button and select a desired
playlist.
! The playlist edit window appears.
! Only files with the extension "m3u" can be selected.
5
Edit the playlist.
1
2
3
4
5
10
-Editing playlists-
3
4
8
Transferring from PC
1
2
2-6
6
" Editing playlists
14
30
34
38
1.
2.
3.
4.
5.
Move up audio data.
Move down audio data.
Add audio data to the playlist.
Remove audio data from the playlist.
Sort audio data in the playlist by name.
44
20
HR-GB201 9JCG5230100042
04/5/18
HR-GB201_UK.fm
HR-GB201
Folder settings
" Assigning folders
" Organising folders
Assign folders to open them quickly.
1
1
2
Click "Add To Favorites" on the "Favorites" menu.
! The "Add My Favorite" dialogue box appears.
-Folder settings-
Transferring from PC
Start SHARP Music Manager.
! The navigation window appears.
Click "Organize Favorites" on the "Favorites"
menu.
! The "My Favorites" dialogue box appears.
2
Select a favourite name to organise from the "My
Favorites" dialogue box.
1
2
3
4
5
3
Enter the name and location of a folder and click
the "Add" button.
! The favourite name is assigned.
! Click the "..." button to search the folder location.
" Opening assigned folders
1.
2.
3.
1
2
4.
5.
Click "Favorites" menu.
Select an assigned favourite name.
! The folder of the favourite name opens.
Move up a favourite name.
Move down a favourite name.
Add a new favourite name. The "Add My Favorite" dialogue box appears. A new favourite name is added
to the bottom of the favourite name list.
Rename a selected favourite name.
Remove a favourite name.
3
Click the "Done" button.
! The "My Favorites" dialogue box closes and the
change is saved.
21
HR-GB201 9JCG5230100042
04/5/18
HR-GB201_UK.fm
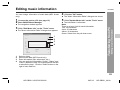
Editing music information
HR-GB201
2-6
5
8
1
2
Click "Update Music Info" on the "Tools" menu.
! The information is refreshed.
Connect the unit to a PC (see page 13).
Start SHARP Music Manager.
! The navigation window appears.
3
Click "Edit Music Info" on the "Tools" menu.
! The "Music Information Editor" dialogue box appears.
Note:
There is an entry limit for each information.
Title: 30 characters
Artist: 30 characters
Album: 30 characters
Genre: Select from the pull-down menu.
1
2
3
4
1.
2.
3.
4.
Select a folder.
Select audio data (MP3 format only).
Enter information (title, artist name, etc.)
You can apply the information ("Artist", "Album" and
"Genre") entered in step 3 to all audio data in the folder selected in step 1. Click the "SetAll" button on the
right of each field box.
Transferring from PC
Click the "OK" button.
! The "Music Information Editor" dialogue box closes.
-Editing music information-
4
You can change information of audio data (MP3 format
only).
14
30
34
38
44
22
HR-GB201 9JCG5230100042
10
04/5/18
HR-GB201_UK.fm
HR-GB201
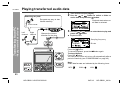
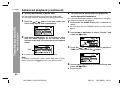
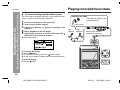
Playing transferred audio data
1
2
Attaching ear pads
Turn on the unit (see page 8).
Use the
or
button to select a folder or
audio data and press the
button.
Ear pads are easy to tear.
Handle carefully.
0002
0001
Playback starts when audio data is selected.
Transferring from PC
-Playing transferred audio data-
Pull to cover.
Left
channel
L
Right
channel
3
Observe the correct
direction for the plug.
Use the
or
button to select data to play and
press the
button.
! Playback starts.
R
Sampling frequency
00 03 30
Bit rate
10
To interrupt playback:
Press the
button.
To resume playback, press the
button again.
To stop playback:
Press the button.
You can set the main unit to turn off automatically after a
period of inactivity (see "POWERDOWN" on page 40).
Note:
Audio data formats are indicated by the following icons:
MP3:
WMA:
WAV:
23
HR-GB201 9JCG5230100042
04/5/18
HR-GB201_UK.fm
HR-GB201
4
10
Normal
ROCK
CLASSIC
USER
U-BASS
JAZZ
" Equaliser
The unit has five preset equaliser modes and one
customisable equaliser mode: Normal, ROCK, CLASSIC,
JAZZ, U-BASS and USER.
Select a mode according to a music genre or your preference.
" Customising "USER" mode
1
Hold down the MENU button for 2 seconds or
more.
! You can also use the EQ/BASS button on the remote
control.
or
button to select "SETUP", and
button.
Select "EQ/BASS" in the same way as step 2.
8
5
Press the MENU button.
! The previous screen appears and the setting is complete.
Note:
Whilst the playback window is open, you can also use the
EQ/BASS button on the remote control to change the
equaliser mode. The mode changes with each press.
1
Use the
press the
2-6
button to select an equaliser
Volume (0 - 20)
The sound escaping from your earphones may annoy
people around you. In particularly crowded places (such
as trains or buses), reduce the volume.
2
3
or
Select "USER" from equaliser modes (see steps 1
- 4 on the left).
2
Transferring from PC
Whilst the playback window is
open, use the VOL + button and
VOL - button to increase and decrease the volume.
Use the
mode.
Press the
button.
! A cursor appears on the left side of the band (60 Hz).
3
4
5
Press the
or
then press the
-Playing transferred audio data-
" Volume control
button to adjust the gain level,
button to adjust another band.
30
34
44
Repeat step 3 for other settings.
Press the MENU button.
04/5/18
14
38
24
HR-GB201 9JCG5230100042
10
HR-GB201_UK.fm
HR-GB201
Advanced playback
" Selecting audio data by information
You can select audio data by title, artist name, etc.
Use SHARP Music Manager to name audio data and edit
other information (see page 22).
" To locate the desired portion
-Advanced playback-
Transferring from PC
1
For fast forward:
Press and hold down the
button during playback.
For fast reverse:
Press and hold down the
button during playback.
Notes:
! Normal playback will resume when the
or
button is released.
! No sound is heard during fast forward and fast
reverse. See the time counter.
! Fast forward and fast reverse are not possible across
data.
Hold down the MENU button for 2 seconds or
more.
! You can also use the EQ/BASS button on the remote
control.
2
or
button to select "ID3Tag", and
button.
00 03 30
10
3
Select one of the following parameters in the
same way as step 2.
Artist
" To locate the beginning of audio data
To move to the beginning of the next audio data:
Press the
button during playback.
To replay the current audio data:
Press the
button during playback.
Notes:
! To skip some data at one time, press the
or
button repeatedly until the desired audio data
appears.
! Operations (skip, etc.) may not be possible whilst
accessing the hard disk (indicator lights green).
Use the
press the
Album
Genre
Others
4
Select information (title, artist name, etc.) in the
same way as step 2.
! The corresponding audio data appears.
5
Use the
or
button to select data to play and
press the
button.
! Playback starts.
25
HR-GB201 9JCG5230100042
04/5/18
HR-GB201_UK.fm
HR-GB201
Audio data can be searched by name.
1
Hold down the MENU button for 2 seconds or
more.
! You can also use the EQ/BASS button on the remote
control.
2
Use the
press the
or
button to select "SEARCH", and
button.
00
30
10
! You can specify up to the first 3 characters.
! In the search field, you can enter only characters used
in data names.
4
Use the
or
button to select data to play and
press the
button.
: Scroll down.
: Scroll up.
! Playback starts.
8
10
-Advanced playback-
" Selecting audio data by name
2-6
Using the
,
, VOL + or VOL - button, enter
the first few characters of the desired data name
and press the
button.
:
Move cursor right.
:
Move cursor left.
VOL +: Scroll to the previous character.
VOL -: Scroll to the next character.
Transferring from PC
3
04/5/18
30
34
38
Notes:
! To cancel the operation, press the MENU button (main
unit) or EQ/BASS button (remote control) for 2 seconds or more.
! This search is available only for audio data transferred
from a PC (cannot be used for data recorded with the
built-in microphone or LINE IN).
44
26
HR-GB201 9JCG5230100042
14
HR-GB201_UK.fm
HR-GB201
Advanced playback (continued)
" Repeat play or random play
-Advanced playback-
Transferring from PC
3
Specify audio data to play in CLASS, and select REPEAT
or RANDOM to play audio data repeatedly or in random
order.
1
Hold down the MENU button for 2 seconds or
more.
! You can also use the EQ/BASS button on the remote
control.
2
Use the
press the
4
5
Select "REPEAT" in the same way as step 2.
Select "CLASS" in the same way as step 2.
Use the
or
button to select one of the following parameters, and press the MENU button.
ALL*:
ONE:
(Single)
ALBUM:
Play back all audio data on the main unit.
Play back only the selected audio data.
Play back all audio data in a folder containing
your choice.
(*) indicates default setting.
or
button to select "SETUP", and
button.
! The previous screen appears and the setting is complete.
00 03 30
10
27
HR-GB201 9JCG5230100042
04/5/18
HR-GB201_UK.fm
HR-GB201
Select "REPEAT" or "RANDOM" in the same way
as steps 4 and 5.
REPEAT:
OFF*: Normal playback
ON: Repeat play
Start playback (see page 23).
! Playback starts in the selected play mode.
8
ON
Notes:
! In random play, the unit selects and plays data automatically. After playing all the data once, the unit stops
automatically.
! Repeat play continues until the
(stop) button is
pressed.
! For normal operation cancel repeat play.
! When "ALL" is selected, playback starts from upper
folders.
(Repeat play is off)
Jukebox_Sys
RANDOM:
OFF*: Normal playback
ON: Random play
6
3
OFF
2-6
Press the MENU button three times.
ON
4
(Random play is off)
(*) indicates default setting.
10
-Advanced playback-
OFF
7
8
Transferring from PC
6
30
34
38
5
1
44
2
(Numbers indicate a playback order.)
28
HR-GB201 9JCG5230100042
14
04/5/18
HR-GB201_UK.fm
HR-GB201
Advanced playback (continued)
" Adding bookmarks to audio data
You can add bookmarks to your favourite audio data.
You can play favourite audio data by adding bookmarks.
Press the
or
button in the stop mode, and
select audio data to add a bookmark to.
0003
0000
-Advanced playback-
Transferring from PC
1
" To listen to the audio data in a playlist or
audio data with bookmarks
You can play bookmarked data or audio data in a playlist.
For details on playlist, see page 19.
1
Hold down the MENU button for 2 seconds or
more.
! You can also use the EQ/BASS button on the remote
control.
2
2
Hold down the
button for 2 seconds or more
until the "BMK" appears on the left side of the
selected audio data (also possible in the playback
mode).
0003
0000
BMK
Use the
press the
or
button to select "Playlist", and
button.
00 03 30
10
3
BMK
Press the
or
button to select a playlist or
"BMK List", then press the
button.
0002
0000
! Go back to step 1 to add another bookmark.
Note:
To delete a bookmark, select audio data with a bookmark, and press the
button for 2 seconds or more.
M3U
BMK
4
Use the
or
button to select data to play and
press the
button.
! Playback starts.
29
HR-GB201 9JCG5230100042
04/5/18
HR-GB201_UK.fm
Recording with the built-in microphone
HR-GB201
2-6
You can record voice data with the built-in microphone.
Hold down the
more.
! Recording starts.
8
REC button for 2 seconds or
00 00 03
To interrupt recording:
Press the
button.
To resume recording, press the
button again.
To stop recording:
Press the button.
Notes:
! You can change the recording quality (see page 40).
! Whilst recording with the built-in microphone, data is
written to the hard disk at regular intervals (about
every 30 minutes at 64 kbps, and every 15 minutes at
128 kbps). Mechanical sound is recorded each time.
Voice Recording
Microphone
Turn on the unit (see page 8).
-Recording with the built-in microphone-
1
2
10
14
30
34
38
44
30
HR-GB201 9JCG5230100042
04/5/18
HR-GB201_UK.fm
HR-GB201
Playing recorded voice data
1
2
Attaching ear pads
Ear pads are easy to tear.
Handle carefully.
Voice Recording
-Playing recorded voice data-
Pull to cover.
Left
channel
Right
channel
Turn on the unit (see page 8).
Hold down the MENU button for 2 seconds or
more.
! You can also use the EQ/BASS button on the remote
control.
3
Observe the correct
direction for the plug.
Use the
or
and press the
00
button to select "RECORD",
button.
30
10
L
R
4
Select "VOICE RECORD" in the same way as step
3.
0000
0002
5
Use the
or
button to select data to play and
press the
button.
! Playback starts.
! Adjust the volume and select a favourite equaliser
(see page 24).
31
HR-GB201 9JCG5230100042
04/5/18
HR-GB201_UK.fm
HR-GB201
2-6
" To interrupt playback
Press the
button.
To resume playback, press the
button again.
8
For further operations, see "Transferring from PC".
Page
To locate the desired portion . . . . . . . . . . . . . . . . . . 25
To locate the beginning of voice data . . . . . . . . . . . 25
(Refer to the procedure for audio data.)
Repeat play or Random play . . . . . . . . . . . . . . . 27, 28
Voice Recording
Press the button.
You can set the main unit to turn off automatically after a
period of inactivity (see "POWERDOWN" on page 40).
-Playing recorded voice data-
" To stop playback
10
14
30
34
38
44
32
HR-GB201 9JCG5230100042
04/5/18
HR-GB201_UK.fm
HR-GB201
Advanced playback
6
Press the
button.
! The start point (A) is created.
A
00 00 03
7
-Advanced playback-
Voice Recording
10
" A - B repeat play
You can play voice data repeatedly by specifying start
and end points.
1
2
3
B
Set "REPEAT" (steps 1 - 3, page 27).
Use the
or
and press the
button to select "REPEAT A-B",
button.
Use the
or
button to select "ON".
OFF*: Normal playback
ON: A - B repeat play.
(*) indicates default setting.
4
Press the MENU button three times.
! You can also use the EQ/BASS button on the remote
control.
5
Press the
button again to enter the end point
(B).
! A - B repeat plays from the start point (A) to the end
point (B).
Play the voice data (steps 3 - 5, page 31).
00 00 30
10
To normal playback:
Press the
button.
To stop A - B repeat play:
Press the button.
! The A - B repeat play setting remains even after playback.
! To resume A - B repeat play, start playback and proceed to step 6.
Note:
If "REPEAT A-B" is set to "ON", voice data playback cannot be paused.
33
HR-GB201 9JCG5230100042
04/5/18
HR-GB201_UK.fm
Recording from a CD player
HR-GB201
2-6
" Playback sound-actuated recording
Audio cable
(commercially available)
Music from CDs is recorded as MP3 files.
The unit starts recording when a signal from LINE IN
socket is detected (Synchronised recording).
1
2
3
8
Connect a CD player to the main unit.
Turn on the unit (see page 8).
Hold down the
more.
REC button for 2 seconds or
00 00 00
4
Begin playback on the CD player.
! Recording will begin automatically.
To interrupt recording:
! When the CD player is stopped, the music data number increases by one and the unit will enter the synchro recording pause mode. When playback is
resumed, recording will also resume.
! If a silence lasts for 2 seconds or more, the music data
number increases by one and recording will be
paused (number does not increase for approximately
5 seconds after recording starts). When the unit
receives sound again, recording automatically starts.
! A new music data is created when recording resumes.
To stop recording:
Press the button.
Notes:
! To cancel synchro recording, see page 40.
! You can change the recording quality (see page 40).
Recording from CD
CD player
-Recording from a CD player-
To audio output sockets
04/5/18
14
30
34
38
44
34
HR-GB201 9JCG5230100042
10
HR-GB201_UK.fm
Playing recorded music data
Recording from CD
-Recording from a CD player/Playing recorded music data-
HR-GB201
" To start recording from the desired point
Attaching ear pads
You can make recordings manually if you cancel the settings of synchro recording (see page 40).
1
2
3
4
5
Ear pads are easy to tear.
Handle carefully.
Connect a CD player to the main unit.
Pull to cover.
Turn on the unit (see page 8).
Cancel the settings of synchro recording (see
page 40).
Begin playback on the CD player.
At the point you want to record, hold down the
REC button for 2 seconds or more.
! Recording starts.
Left
channel
L
Right
channel
Observe the correct
direction for the plug.
R
00 00 00
To interrupt recording:
Press the
button.
! To resume recording, press the
button again.
! A new music data is created when recording resumes.
To stop recording:
Press the button.
35
HR-GB201 9JCG5230100042
04/5/18
HR-GB201_UK.fm
HR-GB201
2-6
" To interrupt playback
Hold down the MENU button for 2 seconds or
more.
! You can also use the EQ/BASS button on the remote
control.
3
Use the
or
and press the
button to select "RECORD",
button.
Press the
button.
To resume playback, press the
button again.
Press the button.
You can set the main unit to turn off automatically after a
period of inactivity (see "POWERDOWN" on page 40).
For further operations, see "Transferring from PC".
00
30
10
4
Select "ENCODE" in the same way as step 3.
8
" To stop playback
Page
To locate the desired portion . . . . . . . . . . . . . . . . . . 25
To locate the beginning of music data . . . . . . . . . . 25
(Refer to the procedure for audio data.)
Repeat play or Random play . . . . . . . . . . . . . . . 27, 28
0000
0002
Recording from CD
Turn on the unit (see page 8).
5
Use the
or
button to select data to play and
press the
button.
! Playback starts.
! Adjust the volume and select a favourite equaliser
(see page 24).
-Playing recorded music data-
1
2
10
14
30
34
38
44
36
HR-GB201 9JCG5230100042
04/5/18
HR-GB201_UK.fm
HR-GB201
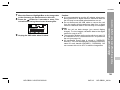
Transferring image data from a digital camera
Advanced Features
-Transferring image data from a digital camera-
Connect a digital camera to the main unit to save image
data.
1
2
3
4
5
Turn on the unit (see page 8).
If connected, disconnect the USB connection
cable from the cradle.
Connect the AC adaptor to the DC IN 5V socket
and place the unit on the cradle (see page 7).
Connect the USB cable of the digital camera into
the USB socket (A type).
Turn on the digital camera.
0000
0003
Rear
6
LINE OUT DSC IN
PC
Use the
or
button (scroll up/down) and the
button (enter the directory) to browse the content of the flash card.
0000
0003
Digital camera
USB cable
(commercially
available)
To the USB port
Image data can only be directly transferred when using the USB Mass Storage Class Bulk-Only Transport
(BOT) recommended by Microsoft.
37
HR-GB201 9JCG5230100042
04/5/18
HR-GB201_UK.fm
HR-GB201
Press the
button for 2 seconds or more. This
unit will start saving the selected directory/file.
0000
0003
0
0
9
100
100
Unplug the USB cable when finished.
Caution:
! It is recommended to use the AC adaptor when transferring data from a digital camera. Otherwise data on
the unit may be corrupted when batteries run out.
! Do not disconnect the USB cable or remove the unit
from the cradle whilst transferring data from a digital
camera. Otherwise data on the unit may be corrupted.
Notes:
! Use the unit as data storage (you cannot display
images). To view images, retransfer data to the digital
camera or copy to a PC.
! The operation buttons on the main unit do not work if it
is connected to a PC. Disconnect the PC to operate on
the unit (see page 14).
! All transferred image data is stored in "USBDATA"
directory. This unit automatically creates the directory
name for each transfer (DATA0001 - DATA9999). You
can connect this unit to a PC to edit the image data.
Advanced Features
8
2-6
Move the Reverse Highlight Box to the image data
or the directory you want to save to this unit.
-Transferring image data from a digital camera-
7
8
10
14
30
34
38
44
38
HR-GB201 9JCG5230100042
04/5/18
HR-GB201_UK.fm
HR-GB201
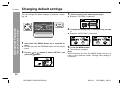
Changing default settings
Advanced Features
-Changing default settings-
You can change the default settings of playback, recording, etc.
3
Select a menu in the same way as step 2.
! Example: "SYSTEM" is selected
4
Change the setting item in the same way as step
2.
! Example: "AUTO PLAY" is selected
OFF
1
Hold down the MENU button for 2 seconds or
more.
! You can also use the EQ/BASS button on the remote
control.
2
Use the
press the
or
button to select "SETUP", and
button.
ON
OFF
ON
5
Press the MENU button.
! The setting is complete.
Note:
Whilst selecting an item, the MENU button lets you to
return to the previous screen. Change other settings if
necessary.
00 03 30
10
39
HR-GB201 9JCG5230100042
04/5/18
HR-GB201_UK.fm
HR-GB201
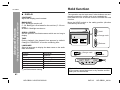
AUTO PLAY
OFF*
ON
POWERDOWN
OFF*
10 - 100
SYNCHRONOUS
OFF
ON*
ENCODER
64 - 320 (128*)
VOICE
32 - 128 (64*)
INITIALIZE
NO*
YES
INFORMATION
DISPLAY
CONTRAST
0 - 10 (9*)
BACKLIGHT
OFF
5 - 20 (10*)
ALWAYS
SCROLL SPEED
1 - 16*
TIME
NORMAL*
REVERSE
LANGUAGE
See page 41.
REPEAT
See pages 27 - 28 or 33.
EQ/BASS
See page 24.
" SYSTEM
2-6
AUTO PLAY:
The unit plays the last played audio data automatically.
Auto play is disabled once you connect and disconnect
the unit from a PC.
8
POWERDOWN:
The unit automatically turns off after the set time of inactivity (10 - 100 minutes).
10
SYNCHRONOUS:
The unit starts recording when a signal from LINE IN
socket is detected, and saves recordings as MP3 files
when signals break. You do not need to press the REC
and button repeatedly to record each track on the CD.
ENCODER:
Adjust the recording quality. The higher the bit rate, the
better the quality of recordings.
VOICE:
Adjust the voice recording quality.
INITIALIZE:
Restore all settings to the default.
Advanced Features
SYSTEM
SETTING ITEM
-Changing default settings-
MENU
30
34
38
INFORMATION:
Check the firmware version, total hard disk capacity
(shown in percent) and the total number of data.
44
(*) indicates default setting.
40
HR-GB201 9JCG5230100042
14
04/5/18
HR-GB201_UK.fm
Hold function
HR-GB201
" DISPLAY
Advanced Features
-Changing default settings/Hold function-
CONTRAST:
Adjust the display panel contrast.
BACKLIGHT:
OFF: Backlight remains off.
5 - 20: Backlight is illuminated for the set time (5 - 20 seconds).
ALWAYS: Backlight remains on.
The operation can be kept even if other buttons are accidentally pressed in a place such as a crowded train.
Use either the unit or remote control to activate the hold
function.
Move the HOLD switch to the safety position (direction
indicated by the arrow).
Hold
SCROLL SPEED:
Set the speed to scroll data names which are too long to
display.
TIME:
During playback, the elapsed time appears by default.
Change to "REVERSE" to see the remaining time.
Orange mark
Hold
Release
Release
LANGUAGE:
Select a language to display the data name or the audio
data information.
English*
French
Germany
Hungarian
Italian
Norwegian
Polish
Portuguese
Romanian
Spanish
Swedish
Chiness_Trad.
Croatian
Czech
Danish
Dutch
(*) indicates default setting.
Orange mark
Hold
Release
If the hold function is active whilst the power is turned
off, the power cannot be turned on by mistake and the
battery will not be drained.
41
HR-GB201 9JCG5230100042
04/5/18
HR-GB201_UK.fm
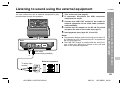
Listening to sound using the external equipment
3
4
5
Rear
LINE OUT DSC IN
PC
2-6
Turn on the unit (see page 8).
If connected, disconnect the USB connection
cable from the cradle.
Connect the LINE OUT socket of the cradle to
external equipment via an audio cable (commercially available).
Connect the AC adaptor to the DC IN 5V socket
and place the unit on the cradle (see page 7).
Start playback (see pages 23, 31 and 36).
Notes:
! The operation buttons on the main unit do not work if it
is connected to a PC. Disconnect the PC to operate on
the unit (see page 14).
! The LINE OUT output is coupled with the sound volume of this unit. Adjust the volume on the unit and
then on the external equipment.
Audio cable
(commercially available)
Advanced Features
1
2
External equipment
To audio input
sockets
-Listening to sound using the external equipment-
You can connect the unit to external equipment to play
recorded data through the speakers.
HR-GB201
(L)
(R)
42
HR-GB201 9JCG5230100042
04/5/18
HR-GB201_UK.fm
8
10
14
30
34
38
44
HR-GB201
Folder structure
This unit can record approx. 5,000 songs (MP3 files encoded at 128 kbps, 4 minutes per data).
The following is a recommended folder structure to access the desired audio data quickly.
Folders on the unit
Jukebox_Sys
Display
0000
0004
Album name 1
-Folder structure-
References
Artist name 1
Audio data 1
Audio data 2
Audio data 3
0000
0004
Album name 2
Audio data 1
Audio data 2
Audio data 3
0012
0000
Artist name 2
43
HR-GB201 9JCG5230100042
04/5/18
HR-GB201_UK.fm
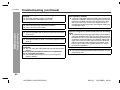
Error messages
Troubleshooting
! SHARP Music Manager
Many potential "problems" can be resolved by the owner without calling a service technician. If something seems to be
wrong with this product, check the following before calling
your authorised SHARP dealer or service centre.
2-6
The format of the playlist is When the format of the playincorrect
list is incorrect.
You cannot add audio data When adding audio data
from another drive to the
from other drives.
playlist.
You cannot save a playlist
to other drive
When trying to save the playlist to another drive.
You cannot manipulate the You tried to use audio data in
selected item on this drive the "Jukebox_Sys" folder by
right-click.
You cannot manipulate the You tried to copy or cut audio
data in the "Jukebox_Sys"
selected file(s) (It is copy
folder.
protected)
8
The unit does not turn on.
" Is the AC adaptor disconnected?
" Is the built-in battery exhausted?
" Is the unit in the hold mode?
" Is the
button pressed for 2 seconds or more?
" Has condensation formed inside the unit?
" Is the unit being influenced by mechanical shock or by
static electricity?
No sound is heard from the earphones.
" Is the volume set too low?
" Are the earphones plugged in?
When the operation buttons are pressed, the unit does
not respond.
" Is there data playable on the unit?
" Is the unit in the hold mode?
" Is the remote control in the hold mode?
" Is the built-in battery exhausted?
" Is the earphones plug inserted firmly?
" Is the unit connected to a PC?
" Press the button for 10 seconds or more to turn off
the unit and then turn it on.
References
MEANING
When attempting to copy
files from "Jukebox_Sys"
folder to the local hard drive.
-Error messages/Troubleshooting-
ERROR MESSAGES
You cannot transfer the
selected file(s) (It is copy
protected)
HR-GB201
Some sounds are skipped.
" Is the built-in battery exhausted?
" Is the unit being subjected to excessive vibration?
04/5/18
14
30
34
38
44
44
HR-GB201 9JCG5230100042
10
HR-GB201_UK.fm
HR-GB201
Troubleshooting (continued)
The battery charge indicator does not light even after
charging.
! Is the AC adaptor properly connected?
! Is temperature extremely high or low?
References
-Troubleshooting-
Voice recording is not possible.
! Is the unit connected with LINE IN socket.
! Is the unit in the hold mode?
Music recording is not possible.
! Is the audio cable well inserted into the LINE IN socket
of the unit?
The battery runs out faster.
! The built-in battery is dead. You need to replace it (see
page 8).
The operation is unstable whilst the PC and the unit are
connected.
! Are you using the USB cable that was purchased separately?
Windows 98 Second Edition does not recognise the
unit as a portable hard drive.
! Is the USB mass storage driver (on the setup CDROM) installed?
The unit does not play 12 hours although it is specified
in the operation manual.
! 12 hours of playback is based on MP3 files encoded at
a bit rate of 128 kbps. Power consumption is minimised
under this condition since the unit accesses the hard
disk only once every 28 minutes. Higher bit rate increases the access and power consumption leading to
less playback time.
In audio data information playback mode, I cannot find
a specific song which can be found under file browsing
mode.
! The SHARP Music Manager will build the audio data information database right after the audio data are transferred into the unit. If you stop transferring in before the
completion of file transferring, the SHARP Music Manager won't build the audio data information database
which is required under audio data information playback mode. Please click "Update Music Info" icon to
recreate the database.
SHARP Music Manager does not start.
! You cannot open two SHARP Music Manager or more
at the same time.
45
HR-GB201 9JCG5230100042
04/5/18
HR-GB201_UK.fm
Maintenance
HR-GB201
2-6
" Cleaning
When the unit has condensation inside, the disk signals
cannot be read, and the unit may not function properly.
When the unit becomes dirty
Clean it with a soft cloth. When the unit is excessively
dirty, use a soft cloth dampened in water (external surfaces only).
Clean the plugs and the connecting sockets.
If the plugs or sockets are dirty, noise may be heard.
Cleaning will prevent noise.
To remove condensation:
Leave the unit for approximately 1 hour. The condensation should evaporate and unit will work properly.
" Upgrading the firmware
For possible firmware upgrades, visit our support web
site at:
"http://sharp-world.com/products/netmd/index.htm".
You can download firmware files to your PC to upgrade
this product.
8
Caution:
! Do not use chemicals for cleaning (petrol, paint thinner, etc.). It may damage the cabinet finish.
! Do not apply oil to the inside of the unit. It may cause
malfunctions.
References
In the following cases, condensation may form inside the
unit.
! Shortly after turning on a heater.
! When the unit is placed in a room where there is
excessive steam or moisture.
! When the unit is moved from a cool place to a warm
place.
Caution:
Never format the hard disk on this product. Functions
may be disabled.
-Troubleshooting/Maintenance-
" Moisture condensation
10
14
30
34
38
44
46
HR-GB201 9JCG5230100042
04/5/18
HR-GB201_UK.fm
HR-GB201
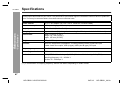
Specifications
References
-Specifications-
As a part of our policy of continuous improvement, SHARP reserves the right to make design and specification changes for
product improvement without prior notice. The performance specification figures indicated are nominal values of production
units. There may be some deviations from these values in individual units.
Power source:
DC 5 V: AC adaptor (AC 100 - 240 V, 50/60 Hz, use with cradle)
Power consumption:
0.5 A (switching type AC adaptor)
Output power:
RMS: 10 mW (5 mW + 5 mW)
Charging time:
Approx. 4 hours (fully charged, when using the AC adaptor included with the unit)
Dimensions:
Width: 63.4 mm (2-1/2")
Height: 19.1 mm (25/32")
Depth: 105 mm (4-5/32")
Weight:
157 g (0.35 lbs.)
Sockets:
Main unit: Earphones (impedance: 32 ohms)/remote control, Audio line input
Cradle: Audio line output, USB (A type), USB (mini B type), DC input
Frequency response:
20 - 20,000 Hz
Recording method:
MP3
Audio format:
MP3 (MPEG-1/2 Audio Layer 3), WMA (Windows Media Audio), WAV (PCM)
Sampling frequency: 16 - 48 kHz *1
Bit rate: 32 - 320 kbps *1
(*1) A combination of sampling frequency and bit rate differs depending on audio format.
47
HR-GB201 9JCG5230100042
04/5/18
HR-GB201_UK.fm
HR-GB201
2-6
MP3 320 kbps (Quality: BEST)
MP3 256 kbps (Quality: HIGH)
MP3 128 kbps (Quality: MID)
MP3 96 kbps (Quality: FAIR)
MP3 64 kbps (Quality: LOW)
MP3 128 kbps (Quality: BEST)
MP3 96 kbps (Quality: HIGH)
MP3 64 kbps (Quality: MID)
MP3 48 kbps (Quality: FAIR)
MP3 32 kbps (Quality: LOW)
Storage media:
20 GB hard disk drive (1.8 inch)
Input sensitivity:
2 V (recording level: 20 k ohms for "LINE IN")
Output level:
Earphones: 5 mW + 5 mW (maximum output level/32 ohms)
10
References
Recording bit rate:
(voice recording)
8
Line out: 200 mV (-12 dB/10 k ohms)
Battery life:
Continuous recording: Approx. 4 hours
Continuous play: Approx. 12 hours
-Specifications-
Recording bit rate:
(audio recording)
14
30
34
! Continuous recording:
Microphone recording at 64 kbps (earphone output 0.5 mW + 0.5 mW)
Line-in recording at 128 kbps (earphone output 0.5 mW + 0.5 mW)
! Continuous playback:
MP3, 128 kbps (earphone output 0.5 mW + 0.5 mW)
! The values are the standard values when the unit is used at an ambient temperature of 25°C (77°F).
38
44
48
HR-GB201 9JCG5230100042
04/5/18
HR-GB201_UK.fm
TERMS OF GUARANTEE
Subject to the terms listed below, Sharp Electronics (U.K.)
Ltd. (hereinafter called “the Company”) guarantee to provide for the repair of, or at its option replace this Sharp
Equipment, or any component thereof, (other than batteries), which is faulty or below standard, as a result of
inferior workmanship or materials.
The conditions of this guarantee are:
1. The guarantee shall only apply to defects which occur
within one year from the date of purchase, provided
that this equipment is sent to the repair address within
this period.
2. This guarantee covers equipment intended for private
domestic use only. This guarantee does not apply to
equipment used in the course of a business, trade or
profession.
3. The guarantee does not cover batteries.
4. This guarantee does not cover any faults or defects
caused by accident, misuse, fair wear and tear, neglect,
tampering with the equipment, or any attempt at adjustment or repair other than by a Service Facility appointed by Sharp.
5. In the unlikely event of a defect occuring, the product
must be returned to the Company’s repair centre with
proof of purchase. A postage paid label and a fault report form are supplied with the product for this purpose.
It is your responsibility to ensure that the packaging is
adequate, and to obtain proof of posting.
Further details of the repair service, which is available
after the guarantee period on a chargeable basis, and
additional report forms and labels can be obtained by
telephoning 0870 738 0000.
6. No person has any authority to vary the terms or conditions of this guarantee.
7. This guarantee is offered as an additional benefit to
the consumer’s statutory rights and does not affect
these rights in any way.
SHARP ELECTRONICS (U.K.) LTD.
Sharp House, Thorp Road, Newton Heath, Manchester, M40 5BE
SHARP CORPORATION
for UK (9JCG5230100042)
9906
9JCG5230100042
04G S YT 2