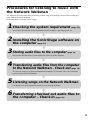
1
3-248-530-12 (1)
SonicStage
Ver.1.5
for Sony Network Walkman
Operating Instructions
This manual describes how to install the SonicStage software and
explains its basic operations for use with the Network Walkman.
Before you start, please also review the instruction manual of your Network
Walkman.
© 2003 Sony Corporation
Program ©2001, 2002 Sony Corporation
Documentation ©2003 Sony Corporation
• SonicStage, OpenMG, “MagicGate”, “MagicGate Memory Stick”, “Memory Stick”, “Memory Stick Duo”, ATRAC,
ATRAC3, ATRAC3plus and their logos are trademarks of Sony Corporation.
• “WALKMAN” is a registered trademark of Sony Corporation to represent Headphone Stereo products.
is a trademark of Sony Corporation.
• Microsoft, Windows, Windows NT and Windows Media are trademarks or registered trademarks of Microsoft
Corporation in the United States and/or other countries.
• IBM and PC/AT are registered trademarks of International Business Machines Corporation.
• Macintosh is a trademark of Apple Computer, Inc. in the United States and/or other countries.
• MMX and Pentium are trademarks or registered trademarks of Intel Corporation.
• All other trademarks are trademarks of their respective owners.
In this manual, TM and ® marks are not specified.
• Copyright laws prohibit reproducing the software or the manual accompanying it in whole or in part, or renting the
software without the permission of the copyright holder.
• In no event will SONY be liable for any financial damage, or loss of profits, including claims made by third parties,
arising out of the use of the software supplied with this player.
• In the event a problem occurs with this software as a result of defective manufacturing, SONY will replace it.
However, SONY bears no other responsibility.
• The software provided with this player cannot be used with equipment other than that which is so designated.
• Please note that, due to continued efforts to improve quality, the software specifications may be changed without
notice.
2
Table of Contents
What you can do with the SonicStage
software ............................................. 4
How to store digital audio files on the
computer ..................................... 6
What is “Check-in/Check-out”? ........ 6
On copyright protection .................... 7
About this manual ................................... 8
About Network Walkman .................. 8
Procedures for listening to music with the
Network Walkman ............................. 9
Checking the system requirement ......... 10
Installing the SonicStage software on the
computer .......................................... 11
Before installing the software ......... 11
Installing “SonicStage Ver.1.5”
software ..................................... 12
Basic Operations
About SonicStage .................................. 13
Playing audio files ........................... 13
Recording/Transferring audio files ..... 13
Storing audio files to the computer ....... 14
Starting SonicStage ......................... 14
Recording audio files from audio CDs to
the hard disk of the computer ... 14
Labeling audio files
of recorded tracks ...................... 17
Transferring audio files from the computer to
the Network Walkman – Check-out .... 18
Connecting your Network Walkman to
the computer ............................. 18
Transferring audio files to your Network
Walkman – Check-out ............... 18
Transferring checked out audio files to the
computer – Check-in ....................... 20
Connecting your Network Walkman to
the computer ............................. 20
Transferring audio files to your computer
– Check-in ................................. 20
Playing/Editing audio files
on the computer ...............................
Playing back songs ..........................
Editing track/album titles ................
Creating a playlist to
organize tracks ..........................
22
22
22
22
Advanced Operations
Downloading audio files from EMD service
sites to your computer ..................... 23
Using an EMD service .................... 23
Importing audio files such as MP3 or WAV
format files (Import) ........................ 24
Others
Uninstalling (Remove) the SonicStage
software ........................................... 26
When using Windows® XP/Windows
2000 .......................................... 26
When using Windows 98 Second
Edition/Windows Millennium
Edition ....................................... 26
Various settings and notes ..................... 27
About the system restore on Windows
XP/Windows Millennium
Edition ....................................... 27
For the user using the following
operating system ....................... 27
About switching to the system suspend
or system hibernation mode while
operating SonicStage ................ 28
About backing up audio files .......... 28
Features of copyright protection ............ 29
Troubleshooting ..................................... 30
Index ...................................................... 33
Notes
• The illustrations in this manual may differ from the
actual software.
• Explanations in this manual assume that you are
familiar with basic operations of Windows. For
how to use your computer and operating system,
please refer to the respective manuals.
3
What you can do with the SonicStage
software
Storing songs to your computer
You can store songs from the audio CDs or the Internet to a
computer using the SonicStage software.
(page 14, 23, 24)
Audio CDs
Internet
WAV/MP3 format
audio files
On the computer
Listening
You can play the audio CDs or audio files
stored in the computer. (page 22)
4
With the SonicStage software, you can store audio files from audio CDs, etc., to the hard disk of your
computer, and manage the files collectively.
SonicStage is a comprehensive software application that enables users to manage the audio files on the
computer, play the audio files in various ways, edit the audio files, or transfer audio files to external devices
such as a Network Walkman.
Transferring audio files
You can transfer audio files from your computer to
external devices such as a Network Walkman using
the SonicStage software. (page 18)
to your Network Walkman
Editing
You can easily edit the music or album titles
with a keyboard. (page 17)
Creating music
libraries
You can create music libraries with your
favorite music on your computer.
5
How to store digital audio files on the computer
Before listening to music with your Network Walkman, you need to transfer and save digital audio files on
the hard disk of your computer using the SonicStage software. You can store digital audio files with the
SonicStage software in the following ways:
• Recording audio files from audio CDs using the CD-ROM drive of your computer (compressed in the
ATRAC3 or ATRAC3plus format). (page 14)
• Downloading audio files from EMD (Electronic Music Distribution) service sites on the Internet, etc.
(page 23)
• Converting existing MP3 or WAV format audio files to the ATRAC3 or ATRAC3plus format which is
encrypted in SonicStage format*. (page 24)
* For the Network Walkman NW-E7/E10, you can transfer MP3 format audio files using the SonicStage software.
What is “Check-in/Check-out”?
After saving digital audio files on the hard disk of your computer, you can transfer those digital audio files
to your Network Walkman using the SonicStage software.
Transferring audio files from the computer to your Network Walkman is called “Check-out,” and from your
Network Walkman to the computer is called “Check-in.”
For details, refer to “Transferring audio files from the computer to your Network Walkman–Check-out” on
page 18.
You can check out each audio
file up to three times.
Check-out
6
If you check in an audio file, the audio
file will be available for Check-out.
Check-in
On copyright protection
The SonicStage software allows users to record and play digital audio files while maintaining the
copyrights of its holders by using the copyright protection technology “OpenMG”* developed by Sony.
The SonicStage software encrypts all audio files in OpenMG format and saves them on the hard disk of
your computer to prevent incorrect handling or unauthorized distribution of audio files.
* The copyright protection technology of your Network Walkman conforms to the Secure Digital Music Initiative (SDMI)
specifications.
The digital music player has some restrictions on recording and playing audio files to protect copyrights.
You can check in audio files only to the same computer from which they were checked out. They cannot be
copied or checked in to another computer. For details, refer to “Features of copyright protection” on page
29.
You can check in
audio files only to
the computer from
which they were
checked out.
You cannot copy
or move audio
files to another
computer.
You cannot check in audio
files to any computer other
than the computer used
for Check-out.
Restrictions on audio content
High quality digital audio content is widely available through music distribution services on the Internet.
To protect the copyrights of its holders from unauthorized distribution, some audio content is distributed
with certain restrictions on recording and playing audio files. For example, the playback period or playback
count for the data may be limited.
“Move” function of the “MG Memory Stick”
You can move audio files directory recorded on an “MG Memory Stick”, copyright information and
additional information to the SonicStage software on your computer. For details about moving audio files,
refer to the online Help for the SonicStage software.
Notes
• You cannot move audio files between a computer and an external device/medium unless the external device/medium is
compatible with the MG Memory Stick.
• The only audio files that can be moved between your computer and the MG Memory Stick are those that are permitted
by copyright information.
7
About this manual
This manual explains the basic operations of the SonicStage software for the Network Walkman.
For the operation of the Network Walkman, refer to the instruction manual for it.
For the description of each menu and detailed information of the SonicStage software, refer to the online
Help for the SonicStage software.
To display online Help
You can display the online Help in the following ways:
• Click the [Start] button, select [Programs*] and then the help you want to view from [SonicStage].
* Select “All Programs” for Windows XP.
• While running the SonicStage software, click
from the [Help] menu.
and then select the help you want to view
z Tip
In the “Help of SonicStage,” “Devices/Media” is a generic term used to refer to the Network Walkman, or NetMD, etc. In
this manual, “Network Walkman” or “device and medium” are used.
About Network Walkman
Refer to the instruction manual of your Network Walkman to make sure that the following features are
supported. You cannot use the feature if your Network Walkman does not support it.
• ATRAC3plus format files
• MP3 format files
• Group function
8
Procedures for listening to music with
the Network Walkman
The following is the procedure that you need to perform using the SonicStage software before listening to
music with the Network Walkman.
For details, please read each reference page.
1 Checking the system requirement
(page 10)
This section describes the system requirement such as computer, operating system, etc.
m
2 Installing the SonicStage software on
the computer
(page 11)
m
3 Storing audio files to the computer
(page 14)
This section describes how to record audio files from CDs to the computer.
m
4 Transferring audio files from the computer
to the Network Walkman – Check-out (page 18)
You need to connect your Network Walkman and computer. For details, refer to the instruction
manual of your Network Walkman.
m
5 Listening songs on the Network Walkman
For details, refer to the instruction manual of your Network Walkman.
m
6 Transferring checked out audio files to
the computer – Check-in
(page 20)
9
Checking the system requirement
The supplied software “SonicStage Ver.1.5” is designed to be operated in the following system
environments.
Computer
IBM PC/AT Compatible
– CPU: Pentium II 400 MHz or higher (Pentium III 450 MHz or higher
is recommended)
– Hard disk space: 120MB or more (Requires additional drive space
depending on the Windows version or audio file sizes.)
– RAM: 64 MB or more (128 MB or more is recommended)
– CD-ROM drive (for installing and recording from audio CDs)
– Sound board
– USB port (USB1.1 compliant)
Operating System
Factory installed:
Windows XP Home Edition/Windows XP Professional
Windows Millennium Edition
Windows 2000 Professional
Windows 98 Second Edition
Display
High color (16-bit color) or higher
800 × 480 dots or more (800 × 600 dots or more is recommended)
Other
Access to the Internet when using EMD (Electronic Music Distribution)
service sites on the Internet
The following system environments are not supported.
•
•
•
•
•
•
•
•
Macintosh
Other versions of Windows XP/2000/98 (not listed above)
Windows NT
Windows 95
Self-made computers
Operating system upgraded from system standards
Multimonitor environment
Multiboot environment
Note
We do not ensure trouble-free operation on all computers that satisfy the system requirements.
10
Installing the SonicStage software on
the computer
Before installing the software
Make sure to install the supplied SonicStage Ver. 1.5 software.
Install and overwrite the supplied SonicStage Ver. 1.5 software even if you have already installed Sonic
Stage Ver. 1.5. You can continue to use audio files stored in SonicStage after overwriting the software.
Before overwriting, back up your stored audio files in case any problem occurs, for details, refer to the help
of SonicStage or OpenMG Jukbox.
Install SonicStage Ver. 1.5 even if you have installed SonicStage Premium, and Use SonicStage Ver. 1.5
when you check out to your Network Walkman. SonicStage Premium will not be overwritten when you
install SonicStage Ver. 1.5.
1 Make sure to note the following:
• The dedicated USB cable is not connected.
The SonicStage software may not operate properly if it is installed while the dedicated USB cable is
connected to the computer.
• All other Windows programs are closed.
Especially, be sure to quit capacious programs such as virus check software.
• The free space of the computer’s hard disk is sufficient.
The SonicStage software requires 120MB or more free space of the computer’s hard disk to be
installed. Also, additional drive space is required depending on the Windows version or audio file
sizes.
2 Depending on the operating system or software installed on your computer,
please notice the following before installing the SonicStage software.
When using Windows XP
• The operation of the SonicStage software is restricted. Log on with the Administrator group account
when installing the software.
• If “System restore” is performed, the audio files managed by the SonicStage software may not be
played. (page 27)
When using Windows Millennium Edition
If “System restore” is performed, the audio files managed by the SonicStage software may not be
played. (page 27)
When using Windows 2000
The operation of the SonicStage software is restricted. Log on with the “Administrator” account (user
name) when installing the software.
When OpenMG Jukebox or older version of SonicStage is installed
• When SonicStage Ver.1.5 is installed, the older version of SonicStage or OpenMG Jukebox Ver.1.0
to 2.0 will be automatically overwritten.
• When SonicStage Ver.1.5 is installed, OpenMG Jukebox Ver.2.2 will be updated to the newest
version.
• The stored audio files are automatically converted to the SonicStage Ver1.5 format files.
• If you use OpenMG Jukebox Ver.2.2 and OpenMG Jukebox is displayed on the task tray, change
the setting to remove it from the task tray. To change the setting, Select the [Tool] menu from
OpenMG Jukebox and click [Setting], and then select [General] tab and uncheck [Add Jukebox
Startup on the task tray].
• Even if SonicStage Ver.1.5 is installed, SonicStage Premium will not be overwritten. You can use
both versions of the software on your computer.
11
Installing “SonicStage Ver.1.5” software
1
Insert the SonicStage installation CD-ROM into the CD-ROM drive of your computer.
The setup program starts up automatically. The SonicStage 1.5 installation window is displayed.
2
Click [SonicStage 1.5].
3
Click the model of your Network Walkman.
You can also select multiple models in case that you have two or more Network Walkmans.
4
Click [Install] and follow the on-screen instructions.
5
Click [Restart] when installation is completed.
Notes
• Do not delete, move, or edit the installed folders using Windows Explorer or any other application. It may cause
improper operation of the SonicStage software.
• Do not quit installation or remove the CD-ROM while installing the software.
• Do not install the software using a CD-ROM drive via a network. Always use the CD-ROM drive on the computer that
the software is installed into.
z Tip
While uninstalling the old version of the OpenMG Jukebox software, the message “Remove shared File?” will be
displayed. Click [Yes to All]. And then click [Yes] when the message “Are you sure you want to proceed?” is displayed.
Installing only the driver file for the Network Walkman
After installing the supplied SonicStage Ver.1.5 software, you can install only the driver file for the
Network Walkman for the following cases as needed.
• The Network Walkman connected to the computer is not recognized.
• The other model of the Network Walkman has been selected when you install the SonicStage Ver.1.5
software.
To install only the driver file, insert the SonicStage installation CD-ROM into the CD-ROM drive of your
computer and select “Driver” in the step 2 above to install the corresponding driver file for your Network
Walkman.
If you hold old versions of the SonicStage or OpenMG Jukebox installation CDROMs
You cannot overwrite the SonicStage Ver.1.5 software with old versions of the software. If you
accidentally overwrite it with an old version, all stored audio files may be deleted.
Note
All stored audio files will be deleted if you uninstall the SonicStage Ver.1.5 software and install old versions of the
software. Even when backing up using a back up tool, the restoration of audio files on the old version of the SonicStage
software is not guaranteed.
12
Basic Operations
About SonicStage
Playing audio files
Double-click the Source Icon to start playing.
Source icons
Basic Operations
With the SonicStage software, you can easily play audio files by clicking on the Source icons at the top of
the window and recording/transferring audio files by using the Recording button.
Recording/Transferring audio files
Click the Recording button to display the Recording Assistant panel for recording audio files from audio
CDs or transferring audio files to your Network Walkman (Check-in/Check-out).
1 Click
2 Select a recording/
transferring source
3 Select a recording/
transferring target
,
4 Click
Click
to display the Recording Assistant panel.
In the Recording Assistant panel, click icons and select a combination of recording/ transferring, and then
click
(Jump to Record Window) to display the Record/Transfer window.
13
Storing audio files to the computer
This section explains how to record audio files from audio CDs to the hard disk of your computer. You can
also transfer audio files from media other than audio CDs. For details, refer to the online Help for the
SonicStage software.
Starting SonicStage
Double-click the [SonicStage] icon on the desktop, or click the [Start] button and then select
[Programs*], [SonicStage], and [SonicStage].
The “SonicStage” window is displayed.
* Select [All Programs] on Windows XP.
When SonicStage is started, the message “Auto-configure all SonicStage compatible media?” displays. If
you click “Yes,” audio files supported by SonicStage (WAV, MP3, Windows Media, OpenMG) will be
automatically played from the next time. If you click “No,” you can configure the audio file formats
automatically played by SonicStage.
The “Welcome to SonicStage” window is displayed. It explains how to use SonicStage.
Recording audio files from audio CDs to the
hard disk of the computer
1
Insert an audio CD into the CD-ROM drive of your computer.
If the following Record/Transfer window is displayed automatically, skip to step 4.
The list area will be displayed at the bottom of the window. The audio files in the audio CD will be
displayed on the left side of the list area.
If the Record/Transfer window is not displayed automatically, follow step 2.
Record All button
Record Setting button
Rec Selection button
Stop button
Select All (Cancel check) button
CD Info button
14
Notes
2
Click
.
The Recording Assistant panel is displayed.
3
Click and select
then click 3
(CD) for [1 Sources] and
(Jump to Record Window).
Basic Operations
• For the first time when recording the audio files using the CD-ROM drive, the “CD-ROM Drive
Optimization” dialog box will be displayed when an audio CD is inserted into the drive. With the
“CD-ROM Drive Optimization” dialog box, the drive check will be performed to record audio files
from the CD-ROM drive properly. Click “Start” to check your CD-ROM drive.
• When using an external CD-ROM drive, connect the drive to the computer prior to starting
SonicStage.
(Music Drive) for [2 Targets], and
The Record/Transfer window is displayed.
4
Click
in the middle of the window and select the recording format and bit rate.
• Format
Please select the file format supported by your Network Walkman. (Note that if ATRAC3plus is selected, the file
created cannot be played on a Network Walkman not supporting the ATRAC3plus format.)
• Bit Rate
The bit rate affects the sound quality and recording time. A high bit rate offers better sound quality but shortens the
recording time, if the recording format is constant. Contrary, the low bit rate is inferior to the high bit rate in
quality but lengthens the recording time and enables you to check out more tracks to your Network Walkman.
5
Click
(CD Info) to acquire the CD information such as an album title or track titles.
The latest CD information is automatically downloaded from the CD information service site on the
Internet. (To use the Internet CD information service, your computer must be connected to the
Internet.)
Note
The CD information for some audio CDs may not be available. You can enter by using the keyboard in such a case.
(page 17)
continued
15
Storing audio files to the computer (continued)
6
Click
(Record All).
Recording from the audio CD starts.
When recording is completed, the playlist will be registered on the hard disk and the recorded audio
files will be stored in the playlist.
When you want to select tracks to be recorded
Uncheck the CD Track# that you do not want to record and click
(Rec Selection). Each click
changes the status (check/uncheck) alternately. The CD Track# unchecked will not be recorded*.
in the
When you want to record only one or two tracks, you can clear all checks by clicking
“Select All” item at the bottom left of the window and then check the CD Track# you want to record.
* When the Record All button is clicked, the status (check/uncheck) will not affect the selection and all tracks will
be recorded.
When you want to stop recording
Click
(Stop) at the bottom of the window.
If you click
(Rec Selection), you can restart recording for the rest of the selected tracks.
z Tip
Click
16
if the list area is not displayed at the bottom of the Record/Transfer window.
Labeling audio files of recorded tracks
You can edit the track titles after recording audio files as needed.
1
Click
2
If the list area is not displayed, click
(Music Drive).
Basic Operations
.
“All Playlists” stored on the hard disk are displayed.
Edit button
3
Click
at the bottom right of the window.
The edit area is displayed.
Properties button
4
Select the playlist including the track you want to edit the title in “All Playlists” at the left
of the window.
Tracks in the selected playlist are displayed on the right side of the edit area.
5
Click and select the track, and click
(Properties) at the bottom left of the window.
The Track Information is displayed.
6
Enter the new title in the “Title” field and click [OK].
The track title is changed.
17
Transferring audio files from the computer
to the Network Walkman – Check-out
You can check out tracks in the playlists of SonicStage to your Network Walkman.
Connecting your Network Walkman to the
computer
For details, refer to the instruction manual of your Network Walkman.
When using a device supporting “MG Memory Stick”, insert the “MagicGate Memory Stick” media into
the device before connecting to the computer.
Transferring audio files to your Network
Walkman – Check-out
1
Click
2
Click and select
(Music Drive) for [1 Sources] and
(Device/Media) for
[2 Targets], and then click 3
(Jump to Record Window).
to display the Recording Assistant Window.
The Record/Transfer window is displayed.
Device/media
Drop-down list
Transfer mode button
3
Select the device/media from the drop-down list at the right of the window.
When using the Network Walkman supporting two or more medium types, select the target medium.
When you check out to the built-in flash memory, select “Network Walkman (Internal),” and when
you check out to the “Memory Stick”, select “Network Walkman (Memory...).”
18
4
Click
in the middle of the window and select the transfer mode.
• Using ATRAC3plus
• Transfer Mode
– Standard transfer: The original data format and bit rate are selected for the Check-out. You can also select the
transfer method for the audio files that cannot be transferred with the original formats by clicking [Details].
– Maximize available transfer space: The low bit rates are selected for the Check-out. You can click [Set up of
minimum bit rate] to select the data format and lower limit of the bit rate.
5
If the list area is not displayed, click
.
Basic Operations
Check the box only when you use the Network Walkman supporting ATRAC3plus. (ATRAC3plus format files can
be played on the device supporting ATRAC3plus only. Always uncheck the box when you use the Network
Walkman not supporting ATRAC3plus.)
The list area is displayed at the bottom of the Transfer window. The list for selecting tracks to be
checked out will be displayed on the left side of the list area.
Check-Out All button
Check-Out button
Stop button
6
Select the playlist including the tracks you want to check out from the list on the left side.
Tracks in the selected playlist are displayed in the middle of the list area.
7
Click
(Check-Out All).
All tracks in the playlist are checked out.
When you want to select tracks to be checked out from the playlist
Select tracks you want to check out from the list in the middle of the list area and click
Out).
(Check-
When you want to stop Check-out
Click
in the “Processing” dialog box or
(Stop) in the window.
Notes
• When the free memory space of the target device/media becomes insufficient while checking out, the alert message will
be displayed and the Check-out will be terminated automatically.
• Do not remove the USB cable, battery, or “Memory Stick” while checking out. It will cause damage to data,
malfunction, or improper operation.
• The suspend functions (stand-by, hibernation) and screen saver function controlled by a computer’s timer will not work
during checking out.
z Tip
If the Network Walkman supports the Group function, tracks to be checked out are transferred to the Network Walkman by
group. A group is a unit like a folder on the computer. You can manage a lot of tracks easily and efficiently by using the
Group function.
You can create groups in any “Memory Stick” using the SonicStage Ver.1.5 software but you cannot use the group
function if your device does not support it.
19
Transferring checked out audio files
to the computer – Check-in
Transferring audio files from your Network Walkman to the computer is called “Check-in.” You can check
in audio files only to the computer from which they were checked out.
Connecting your Network Walkman to the
computer
For details, refer to the instruction manual of your Network Walkman.
When using the device supporting MG Memory Stick, insert the “MagicGate Memory Stick” media into
the device before connecting to the computer.
Transferring audio files to your computer
– Check-in
1
Click
2
Click and select
(Music Drive) for [1 Sources] and
(Device/Media) for
[2 Targets], and then click 3
(Jump to Record Window).
to display the Recording Assistant Window.
The Record/Transfer window is displayed.
3
Select the device/media from the drop-down list at the right of the window.
When using the Network Walkman supporting two or more medium types, select the target medium.
When you check in from the built-in flash memory, select “Network Walkman (Internal),” and when
you check in from the “Memory Stick”, select “Network Walkman (Memory...).”
4
If the list area is not displayed, click
.
The list area is displayed at the bottom of the Transfer window. The list of tracks stored in your
Network Walkman will be displayed on the right side of the list area.
5
Click
(Check-In All).
All tracks in your Network Walkman are checked in.
When using the Network Walkman supporting two or more medium types, all tracks stored in the
target medium selected in step 3 are checked in.
When you want to select tracks or groups to be checked in
Select tracks or groups you want to check in from the list at the right of the list area and click
(Check-In). Only selected tracks or groups will be checked in.
20
When you want to stop Check-in
Click
in the “Processing” dialog box or
(Stop) in the window.
Notes
Basic Operations
• Do not remove the USB cable, battery, or “Memory Stick” while checking in. It will cause damages to data,
malfunction, or improper operations.
• You cannot check in audio files that are checked out from other computers. When you want to increase the free memory
space on your Network Walkman, delete audio files. If you delete audio files from your Network Walkman, those files
will be checked in automatically when your Network Walkman is connected to the computer that you used for Checkout. Therefore, the remaining Check-out count increases automatically.
• Suspend functions (stand-by, sleep) and screen savers of the computer do not work while checking in.
21
Playing/Editing audio files on the
computer
On your computer, you can play audio files in audio CDs, hard disk, or your Network Walkman, and edit
track or album titles.
Playing back songs
1
Click the Source Icon to select the device.
2
Click
at the middle of the window.
The content area is displayed at the bottom of the window. The list of tracks stored in the selected
device will be displayed in the content area.
3
Select the track to be played.
If you select
(Music Drive) in step 1, double-click the playlist storing the track you want to
play and then select the track.
4
Click
.
The track selected in step 3 is played.
Editing track/album titles
To edit track/album titles, click
at the bottom right window to display the edit area. For details on
how to use the edit area, refer to the online Help for the SonicStage software.
Creating a playlist to organize tracks
You can create playlists to organize favorite tracks stored in SonicStage. This feature is useful when you
want to check out only your favorite tracks to your Network Walkman. For details, refer to the online Help
for the SonicStage software.
22
Advanced Operations
Downloading audio files from EMD
service sites to your computer
What is EMD (Electronic Music Distribution) service?
EMD stands for Electronic Music Distribution, which is a generic name for services that
distribute digital audio contents via the Internet or other kinds of networks.
To use an EMD service supporting OpenMG
A system to access the Internet is required on your computer. Sign up with an Internet service
provider, properly configure your computer, and then configure the settings of the Web browser
before using services.
After the connection to the Internet is set up, view the EMD service sites using the Internet Panel of
SonicStage or other Web browser.
Using an EMD service
Click
to display the Internet Panel.
Information about the OpenMG web site is displayed.
Advanced Operations
1
Internet button
2
Click “EMD” at the right of the window.
The list of EMD service sites is displayed.
3
Select the EMD service site you want to access from the list.
Connecting to the Internet starts and the EMD service site is displayed. EMD service sites provide
information about digital audio contents, how to use EMD services, etc. For details, refer to
information on the site.
23
Importing audio files such as MP3 or
WAV format files (Import)
You can import the following format audio files to SonicStage.
• MP3 format files
You can import Raw MP3 (Extension: .mp3) and RIFF MP3 (Extension: .wav or .mp3) files.
16 bits, Monaural/Stereo, 32 kHz/44.1 kHz/48 kHz (Variable Bit Rate (VBR) is not supported.)
• WAV format files
Linear PCM, 16 bits, Monaural/Stereo, 32 kHz/44.1 kHz/48 kHz
• WMA (Windows Media Audio) compliant audio files (Extension: .wma or .asf)
16 bits, Monaural/Stereo, 44.1 kHz
Depending on the copyright protection, some WMA compliant audio files may not be imported.
1
Click
(Import) at the top right of the window.
The Import window is displayed.
2
When the list area is not displayed, click
.
The list area is displayed at the bottom in the Import window.
Import button
Import all button
Select View drop-down list
3
Click
(Import All) in the middle of the Window, configure the import settings, and
then click [Next].
Configure the file location to be imported, file type, and file format after import.
4
Select audio files you want to import.
All audio files that can be imported are displayed. Uncheck boxes for files you do not want to import.
5
Click [Next].
Importing audio files starts. When importing audio files is completed, the playlist that has the same
name as the selected folder will be created and the imported audio files will be stored in the playlist.
To check on the imported audio files, follow step 6 to 7.
24
6
Double-click the [All Playlists] folder in the list area.
All the created playlists storing imported audio files are displayed in the list area.
7
Select the playlist you want to check on the imported audio files and select [List] from the
Select View drop-down list on the right of the list area.
The list of imported audio files is displayed on the right of the list area.
Notes
z Tips
• You can also configure the file format after import by clicking
. The new setting will be displayed in the window.
and selecting “Options” and “Import.”
• You can also configure the file format after import by clicking
For details, refer to “Changing the setting of SonicStage” in “Setting the options for importing files” using the online
Help for the SonicStage software.
• If a track title is preset for the imported audio files, such as ID3 data of MP3 format files, the title will be displayed in the
“Title” field of the Playlist of SonicStage. If a title is not preset, the name of the imported audio file will be displayed in
the “Title” field of the Playlist of SonicStage.
Advanced Operations
• All imported audio files can be played on SonicStage but some files may not be checked out depending on file status. For
details, refer to “Importing audio files from your computer” in “File formats that can be imported” using the online Help
for the SonicStage software.
• SonicStage refers to the originals of the imported MP3/WAV files when you play or check out imported files. Prior to
the case of deleting or moving original files, copy the files to a specific folder in the hard disk before importing them to
SonicStage.
If the referred file is stored in a removable media such as a CD-ROM, the following messages are displayed when
you start to play or check out an audio file without the media.
For playing: “The song file not found.”
For checking out: “Detected song(s) cannot be transferred. Cannot locate the copyright information for the selected
song(s).”
If the referred file is on a network, messages may be displayed as stated above when you start to play or check out an
audio file without the network connection.
25
Others
Uninstalling (Remove) the SonicStage
software
When using Windows® XP/Windows 2000
Log on with the “Administrator” account (user name) and then follow the instructions below. For details on
how to log on, refer to the manual for your computer.
1
Windows XP: Click the [Start] menu and [Control Panel].
Windows 2000: Click the [Start] menu, [Settings], and [Control Panel].
The “Control Panel” window is displayed.
2
Windows XP: Click the [Add/Remove Programs] icon.
Windows 2000: Double-click the [Add/Remove Programs] icon.
The Add/Remove Programs dialog box is displayed.
3
Click [Change or Remove Programs].
4
Select [SonicStage 1.5] from the [Currently installed programs] list, and click [Change or
Remove] ([Change/Remove] for Windows 2000).
The SonicStage software is uninstalled.
When using Windows 98 Second Edition/
Windows Millennium Edition
1
Click the [Start] menu, [Settings], and [Control Panel].
The “Control Panel” window is displayed.
2
Double-click the [Add/Remove programs] icon.
The “Add/Remove programs Property” dialog box is displayed.
3
Select [SonicStage 1.5] from the [Currently installed programs] list, and click [Add/
Remove].
The SonicStage software is uninstalled.
26
Various settings and notes
About the system restore on Windows XP/
Windows Millennium Edition
When using Windows XP or Windows Millennium Edition, the audio files managed by the SonicStage
software may not be played if a “system restore” is performed. Always back up the audio files managed by
the SonicStage software prior to performing a “system restore.” After performing a “system restore,”
restore the audio files using the back up data to enable playing the audio files managed by the SonicStage
software.
For details on how to back up, refer to the online Help for the SonicStage software.
Note
The error message may be displayed when the playback of the audio files has been disabled due to the “system restore.” In
such a case, follow the on-screen instructions.
For the user using the following operating system
Depending on the operating system on your computer, please notice the following.
When using Windows XP
The operation of the SonicStage software is restricted as follows.
• Log on with the Administrator group account when installing or using the software.
• The SonicStage software can be used on both Professional Edition and Home Edition.
• The NTFS format is available on system standards (default system) only.
Others
When using Windows XP, the audio files managed by the SonicStage software
may not be played if a “system restore” is performed.
Always back up audio files managed by the SonicStage software prior to performing a “system restore.”
After performing a “system restore,” restore the audio files using the back up data to enable playing the
audio files managed by the SonicStage software.
For details on how to back up, refer to the online Help for the SonicStage software.
Note
The error message may be displayed when playback of audio files has been disabled due to “system restore.” In such a
case, follow the on-screen instructions.
When using Windows Millennium Edition
When using Windows Millennium Edition, the audio files managed by the
SonicStage software may not be played if a “system restore” is performed.
Always back up audio files managed by the SonicStage software prior to performing a “system restore.”
After performing a “system restore,” restore the audio files using the back up data to enable playing the
audio files managed by the SonicStage software.
For details on how to back up, refer to the online Help for the SonicStage software.
Note
The error message may be displayed when the playback of the audio files has been disabled due to the “system restore.” In
such a case, follow the on-screen instructions.
continued
27
Various settings and notes (continued)
When using Windows 2000
The operation of the SonicStage software is restricted as follows.
•
•
•
•
Log on with the “Administrator” account (user name) when installing the software.
Log on with the “Administrator” account (user name) when using the software.
The SonicStage software can be used on Professional Edition only.
The NTFS format is available on system standards (default system) only.
When using Windows 98 Second Edition
When importing MP3 format files to your computer or playing WAV format files,
note the following.
If Microsoft Windows Media Player 7.0 or later version is not installed, download it from the Microsoft
web site (http://www.microsoft.com) and install.
About switching to the system suspend or system
hibernation mode while operating SonicStage
• Do not switch the system to the system suspend or system hibernation mode when recording audio files
from an audio CD or checking in/out. It may cause data to be lost, or improper system restore. Disable
the setting for the automatic mode-switching.
• Do not replace media during the system suspend or system hibernation mode. It may cause data to be
lost when the system is restored.
• Your Network Walkman may not be recognized by the system after switching to the system suspend or
system hibernation mode. In such a case, remove the USB cable from the computer and reconnect it.
About backing up audio files
Always back up data prior to performing significant operations such as a system recovery. To back up data,
click the [Start] menu, [Programs]*, [SonicStage], and [SonicStage Backup Tool].
For details on how to back up, refer to the online Help for the SonicStage software.
* Select [All Programs] on Windows XP.
28
Features of copyright protection
Features of copyright protection by OpenMG
The “SonicStage” software employs the “OpenMG” copyright protection technology developed by Sony to
protect copyrights of music contents. OpenMG uses a high-level cryptographic technology in accordance
with the SDMI rules to handle music data with copyright protection on computers.
Users should be notified of the restrictions mentioned below.
• Audio files imported into the hard disk of the computer using the “SonicStage” software cannot be
played if copied onto another computer.
• Audio files transferred (checked out) from the computer to the device/media cannot be played if copied
onto another computer.
• Audio files transferred (checked out) from the computer cannot be transferred (checked in) to another
computer.
• Identical “SonicStage” software cannot be installed in two or more computers.
• If Usage Rules are included in the music data by way of the copyright holder or the distributor, operation
will be restricted in accordance with the Usage Rules. For music data that does not have a Usage Rule,
such as some audio CDs, operation will be restricted in accordance with the Default Usage Rule of
SDMI. This Default Usage Rule states that “each file can be checked out up to three times.”
• Regarding music data not supported by the “SonicStage” software in accordance with the SDMI rules,
the “SonicStage” software cannot handle music data including a copy prohibition signal.
• On upgrading the “SonicStage” software
The “SonicStage” software has been developed in accordance with the current SDMI rules. In the case
that the rules are revised, some functions of the “SonicStage” software may become unavailable. In such
a case, Sony will offer an upgrade kit for the software. Please note that the upgrade kit may be a paid
service depending on the case.
Others
29
Troubleshooting
If you encounter trouble while using the SonicStage software, please follow the procedures below.
1 Refer to “Troubleshooting” in this manual.
2 Refer to the online Help for the SonicStage software.
3 Refer to the Web support page.
Click the [Menu] button of SonicStage software, and then select [Web Site], [Support], and [Network
Walkman].
If the problem cannot be solved, consult your nearest Sony dealer.
On installing the SonicStage software
Symptom
Cause/Remedy
The software cannot be installed.
• The operating system not supported by the software is used.
c Refer to page 10.
• All other Windows programs are not quit.
c Installing the software while other program is running may cause
problems. Especially, be sure to quit capacious programs such as
virus check software.
• The Network Walkman is connected to the computer.
c The software cannot be installed if the dedicated USB cable is
connected to the computer. Disconnect the USB cable and
reinstall the software. (page 12)
• The free space of the computer’s hard disk is insufficient.
c The software requires 120MB or more free space of the computer’s
hard disk to be installed.
30
It seems that the installation is
stopped.
A message dialog box such as an alert message is displayed behind
the installation window.
c Hit the [Tab] key while pressing the [Alt] key. When a message is
displayed, follow it. If no message is displayed, the installation will
still continue. Please wait for a while.
The status gauge on the window is
not moving.
The access lamp for the CD-ROM
drive or hard disk does not blink for
a few minutes.
The computer is busy with the installation.
c The installation is still continuing. Please wait for a while. Depending
on the specification of the CD-ROM drive or the computer, the
installation may take 30 minutes or more.
On connecting the Network Walkman and computer
Symptom
Cause/Remedy
The computer does not recognize your
Network Walkman.
• The dedicated USB cable is not connected to the Network
Walkman properly.
c Connect the dedicated USB cable properly.
• The dedicated USB cable is disconnected.
c Connect the dedicated USB cable.
• The driver file for the Network Walkman has not been installed.
c Install the driver for your Network Walkman. (page 12)
“CONNECT” is not displayed* on
your Network Walkman when
connected to the computer with the
dedicated USB cable.
• Please wait for the authentication of the SonicStage software.
• Another application is running on the computer.
c Wait for a while and reconnect the dedicated USB cable. If the
problem cannot be solved, disconnect the dedicated USB cable,
restart the computer, and then reconnect the dedicated USB cable.
• The dedicate USB cable is disconnected.
c Connect the dedicated USB cable.
* For details on the display, refer to the
manual for your Network Walkman.
• A USB hub is used.
c Connecting via a USB hub is not guaranteed. Connect the dedicated
USB cable directly to the computer.
On checking in/out audio files
Symptom
Cause/Remedy
Audio files cannot be checked out.
• The dedicated USB cable is not connected to your Network
Walkman properly.
c Connect the dedicated USB cable properly.
• The audio file has already been checked out three times.
c Check in the audio file to the computer and then check it out
again.
Others
• The free space of the memory (built-in flash memory or “Memory
Stick”) to where you want to check out audio files is insufficient.
c Check in the unnecessary audio files and increase the free space.
• The medium (built-in flash memory or “Memory Stick”) to where
you want to check out audio files has already reached the maximum
number of audio files that the medium can store.
c The number of audio files/groups that each medium can store has
limitations. Check in the unnecessary audio files by group.
• The audio file to be checked out has a limited playing period or
playing count.
• Audio files with a limited playing period or playing count may not
be checked out due to restrictions set by copyright holders. For
details on the settings of each audio file, contact the distributor or
refer to the OpenMG web site by clicking the [Internet] button in
SonicStage.
• The “Memory Stick” to where you want to check out audio files does
not support MagicGate.
c Use an “MG Memory Stick”.
continued
31
Troubleshooting (continued)
Symptom
Cause/Remedy
The number of audio files that can be
checked out is limited. (Available
recording time is short.)
• The free memory space of the medium (built-in flash memory or
“Memory Stick”) to where you want to check out audio files is not
enough for the size of audio files to be checked out.
c Check in the unnecessary audio files and increase the free space.
• Data other than audio files are stored in the media (built-in flash
memory or “Memory Stick”) to where you want to check out audio
files.
c Move the data other than audio files to the computer and increase
the free space.
Audio files cannot be checked in.
• Any computer other than the computer used for Check-out is selected
for the Check-in target.
c Audio files cannot be checked in to any computer other than the
computer used for Check-out.
• The audio file has been deleted from the computer used for Checkout.
c The audio file cannot be checked in if the file is deleted from the
computer used for Check-out.
Audio files are checked in
automatically when your Network
Walkman is connected to the computer.
If an audio file is deleted from your Network Walkman using
SonicStage installed on any computer other than the computer used for
Check-out, the file will be checked in automatically when your Network
Walkman is connected to the computer that you used for Check-out.
Therefore, the remaining Check-out count increases automatically.
After connecting your Network
Walkman to the computer, “Memory
Stick” is displayed but files cannot be
found.
• The “Memory Stick” is not inserted.
c Insert the “Memory Stick”.
• There is a problem with the “Memory Stick”.
c Insert the “Memory Stick” and check the display of the Network
Walkman while disconnecting the dedicated USB cable. If an error
message is displayed, follow the message. For details, refer to the
manual for your Network Walkman.
• The computer once enters the suspend mode then recovers.
c You may not transfer the data properly after the computer recovers
from the suspend mode. Disconnect the dedicated USB cable and
connect the cable again.
32
The operation of your Network
Walkman becomes unstable while it is
connected to the computer.
A USB hub or USB extension cable is used.
c Connecting via a USB hub or USB extension is not guaranteed.
Connect the dedicated USB cable directly to the computer.
“Failed to authenticate Device/Media.”
is displayed on the computer screen
while connecting your Network
Walkman to the computer.
Your Network Walkman is not connected to the computer properly.
c Quit the SonicStage software and verify the connection of the
dedicated USB cable. Restart the SonicStage software.
“Cannot access the Device/Media.” is
displayed when you select the media
(built-in flash memory or “Memory
Stick”) to be used on your Network
Walkman.
The error message may be displayed when you select the media (built-in
flash memory or “Memory Stick”) in SonicStage.
c Reconnect your Network Walkman to the dedicated USB cable or
select the media once again.
O
Index
Online Help
OpenMG
OpenMG Jukebox Software
A
ATRAC3
ATRAC3plus
Audio CD
6
6, 8, 15, 19
14
P
Playlist
B
Bit rate
15, 19
CD (Audio CD)
CD-ROM
Check-out
Check-in
Copyright
Computer
6, 10, 14, 22, 28,
29
6, 10, 12, 14, 15,
25
6, 7, 9, 13, 18, 25
6, 7, 9, 13, 20, 21
7, 24, 29
6, 7, 9, 10, 11, 12,
14, 15, 18, 20, 21,
22, 23, 28, 29
6, 10, 23
H
Hard Disk
Help (Online Help)
S
SDMI
SonicStage Software
Starting (the software)
System requirements
Track title
15, 17, 25
Transferring
6, 9, 13, 18, 20
Transferring
to the computer
20
to the Network Walkman
18
U
6, 7, 10, 11, 14, 16,
17, 22, 25, 29
7, 8, 14, 22, 25, 27,
28, 30
Uninstalling
Uninstalling (the software)
Usage Rule
USB cable
I
Installing
Internet (EMD service)
Importing
10, 11, 12, 27, 28,
30
6, 10, 23
24, 25, 28
M
MagicGate Memory Stick
Menu
MP3
7, 29
6, 7, 8, 9, 11, 12,
13, 14, 22, 25, 26,
27, 28, 29
14, 15
10
Others
6, 23, 28
12, 31
E
EMD service
7, 29
6, 7, 10, 13, 14, 15,
16, 17, 20, 28
T
D
Downloading
Driver file
16, 17, 18, 19, 22,
24, 25
R
Restrictions
Recording
C
7, 8, 14, 22, 25, 27,
28, 30
7, 14, 23, 29
11, 12
7, 18, 20
8, 11, 26, 28
6, 8, 14, 24, 25,
28
12
26
29
11, 19, 21, 28, 30,
31, 32
W
WAV format
6, 14, 24, 25, 28
Windows 2000
10, 11, 26, 28
Windows Millennium Edition
10, 11, 26, 27
Windows XP
8, 10, 11, 14, 26,
27, 28
WMA
24
33
Printed on 100% recycled paper using VOC
(Volatile Organic Compound)-free vegetable
oil based ink.
Printed in Japan