1
n
o
MANUAL
MODEL NO.
9ti.
41369
911.41369
, ,, :,: ..........................
• Safety Instructions
Features
Read and Follow All Safety
Rules and Operating
Instructions Before First
Use of This Product
o
o
o
o
o
Operation
Care and Cleaning
Problem Solving
Easy Adjustment
Consumer Service
229C4820PO
70(SR_
0295)
TABLEOFCONTENTS
Range Safety ........................................
Fea_:ures
Oven
..........
3-4
=.......................
@,on_trM CBock
& Tie_er
a_aaaaa_one_a_mmRa=_u_m_ua_n_nan_aai_m
=u
Cook_r_
'Tips
............
6_9
6
6
6
7
8
9
9
$pec#al
Feafture$
...............
17-18
12 Hour Shut-Off .................................... 17
Centigrade Selection ............................. 17
12 Hour Clock ....................................... 17
Control Lockout ..................................... 18
Cook and Hold ...................................... 18
Arrow speed ..........................................
18
10-12
Strong Smell or Odor ............................. 10
No Peeking ............................................
10
Aluminum Foil ........................................
10
Preheating .............................................
10
Oven Light .............................................
10
Temperature Sensor .............................. 10
Oven Vent ..............................................
10
Fan ........................................................
11
Moisture .................................................
1t
Low Temperature Zone ......................... 11
Using Delay Start ................................... 11
Bakeware ..............................................
1t
Element Cycling .................................... 11
Bakware Placement ............................... 11
Oven Racks ...........................................
12
Temperature Adjustment ................. 12, 23
Se_ting
The
@on_r@U ...............
To Set Bake ...........................................
To Set Time Bake ..................................
To Set Delay Bake .................................
For your convenience
ser_a_ _umbers
_ _e
14
14
14
14
14
SeHf-@He_n_g
.....................
15, 16
Preparing Your Oven ............................ 15
Oven Door Gasket ................................. 15
Door Lock Device .................................. 15
Walls of the Oven .................................. 15
How to Set A Clean Cycle .................... 16
To Stop A Cycle .................................... 16
After The Cycle ...................................... 16
To Set A Delayed Cycle ....................... 16
5
Traditional Oven Function .......................
Timed Oven Function ..............................
Touch Pads .............................................
Control Display ........................................
Clock, Kitchen Timer ...............................
Tones .......................................................
F-Codes ...................................................
Ove_
Br@_#_ng ..................................
General Rules ........................................
Preparing Meats ....................................
Oven Rack Position ...............................
To Set Broil ............................................
Control Panel .........................................
Broiler Pan and Grid ..............................
Oven Racks ...........................................
Glass .....................................................
Oven Door .............................................
Replacing the Light Bulb .......................
13
19
19
19
19
20
20
Before Calling for Service ................ 21, 22
Consumer Service Numbers ................. 24
Warranty
13
13
13
_nd future referencej
please _ri_e down your mode_ and
space prov_de_,
T_ey are _oca_ed on _t_e _ren_ _rame,
SEF_L
_MBER:
......
2
,,,
.....................
......................
TY
To insure safety for yourself, family and home,
please read your Owner's Manual carefully.
Keep it handy for reference.
Pay close attention to the Safety sections.
BE, SURE, your appliance
is installed
grounded by a qualified technician.
TEACH
_EVE,R
STORE,
items of
interest to children in cabinets
above the appliance.
and
_EE,P
CH#LDE_E,#*#
_EVER
"ERY to repair or replace any part of
the appliance unless instructions are given in
this manual. All other work should be done by
a qualified technician.
,, Not to play with controls or
any part of the appliance.
o Not tosit, climborstandon
the oven door.
NE,VEE_ _E,_R
loose fitting
using your appliance.
clothing
ALYJ,_YS
_,EEP the appliance
area free
from things that will bum.
Food, wooden
utensils and grease build up could catch fire.
Plastic utensils could melt and canned foods
could explode.
Your appliance should never
be used as a storage area.
when
_E,VER USE, a towel or other bulky cloth as
a pot holder and make sure the pot holder is
dry. Moist pot holders could cause steam
burns.
Keep dish towels, dish cloths, pot
holders and other linens a safe distance away
from your appliance.
AL_VAYS
_EE,P your appliance
clear of
things that will bum (gasoline
and other
flammable vapors or liquids).
ALWA Y_ KEEEP combustible
wall
coverings,
curtains and other linens a safe
distance from the appliance.
USE,
your
appliance for warming or
heating the room.
BE SUrE
inst_Hed
a_tached
THS,_ book for later use.
_E,VE,R HEAT unopened food containers.
Pressure build up can cause the container to
burst and cause injury.
NEVER LEA VE jars or cans of fat or
drippings in or near your appliance.
_he appHiance
is secureSy
5n a cabine_
_ha_ Hs firmly
_o _'he house
s_ruc_ure_
SOME, @,LE,_E,_S
produce
noxious fumes and wet cloths
or sponges could cause steam
burns.
3
_.
important safety precautions
/
continued
FETY
CONTINUED
#MP@_TANT
$AFETY
_@T#CE
E
PL,_@E
@VE_
RA@KS
in the desired
position while the oven is cool. If racks must be
moved while oven is hot, do not let potholder
contact the hot oven element.
AF27E_ E_OI1LII_G_ always take the broiler
pan and grid out of the oven and clean them.
Leftover grease in the broiler pan could catch
fire the next time you use your oven.
ALWAYS
USE care when opening the oven
door. Let steam escape before moving foods.
_EVE_
USE aluminum foil to line the oven
bottom. Improper use of foil could start a fire.
ve_,i_
or damage
ovens.
_eer
_r w_n_ow
READ AND
UNDERSTAND THIS
NFORMA T ON
NOW .
CLEf&H @HL Y the parts listed in this manual.
Follow all cleaning instructions.
nF THE SELFo@LE_HUHG
mode
malfunctions, turn off the controls or disconnect
the power supply. Have sen,iced by a qualified
technician.
HEVE_
_UB_ move
gasket on self-cleaning
vJ_,_ an epe_
Should you ever need it, you will not ha ve
time ior reading.
Be sure everyone
in
your home knows wha_ to de in case of
fire. Never use water on a grease fire; it
_Jill only spread the flames.
the door
HEVEF_ clean utensils, cookware, removable
parts or broiler pan and grid in the self-clean
cycle.
@VE_
F_F_E:
Do no_ try to move the pan!
_. Close
oven door and turn
controlstheoff.
D@ H@T
USE
oven cleaners
_ No
commercial oven cleaner should be used in or
around any part of the oven.
2.
4
If fire continues, throw baking soda on the
fire, or use a dry chemical, foam, or halon
type extinguisher.
IIIii11111111
To remove the adhesive left from packaging tape, use household dishwashing liquid, mineral oil
or cooking oil With a soft cloth, rub into the area and allow to soak. Rinse and dry well. Repeat
procedure using an appliance polish to insure no damage is done to the range. This shouRd
be done before _he oven Us _urned on for _he firs__ime= The _ape canno_ be
rer_oved once _he @verahas hea_ed.
Where can you look forpackaging
Door handle
Door trim
tape ?
Contro! panel area
Oven area
5
[",BBB BB:BB1
m
"o_ ..........
,
I _LAT _
_
IT_
CLD_ _Ji
@ @@
@ @@
TEMP
"
TIMED OVEN
ERCFiEN
TIMER
0
FLOUR MIH
,J
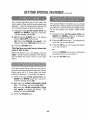
Your new touch pad control will al!ow you to set oven functions with ease. Below are the different
types of functions and a description of each.
BA_E
_ Cook foods in the traditional oven
with a temperature range of 170°F to 550°F.
BROIl& _ Cooks cuts of meat at 550°F hi broil
or 450 ° low broil from the direct heat of the
upper element. Broiling should be done with
the door opened to the broil stop position.
CLfEA_ -- Cleans the inside area of the oven
foryou. When the cycle is finished the oven will
tum off automatically.
OVE_ CO0_!!_G
TOME-- Choose bake or
clean. Set the amount of time you prefer foods
to cook or the oven to clean and have the oven
turn off automatically.
E#EL_ _E_ B_E
@_ CLEAN -- Choose
bake or clean.
Set the amount of time you
prefer foods to cook or the oven to clean. Set
the time of day you prefer the oven to turn on.
When the function is finished the oven will turn
off automatically,
_@@
TheHOUE#andMtlE_#UTEP
ads
set the time of day,
length
of
HOUR MIa cooking
time, length of cleaning
_
time, the delayed
start time and
_..zJ ". _..ZJ the time set on the Kitchen
Timer.
@
TEMP
The TEMP pad sets the
temperature used for cooking.
The START pad must be pressed
to activate any oven function.
The OVE_
COO_8_G
THME
pad is used when setting the
length of cooking time.
The DELA _ STAF_T T_ME pad
is used to set the time of day you
prefer the oven to turn on and
start cooking.
The CLEAR/OFF
pad is used to
cancel any oven function and the
end of cycle tone. _ w_HUnot
car_ceH _e CUoc_: or _c_en
Timer.
oven control, clock and timer continued
VE#
and VUT H
continued
CONTROL DISPLAY
OVENTEMPERATURE
INDICATOR
_S
h'==_ h'_
h'_
O / S _'=_ O_
o O_
_
° _0
FLASHING
INDICATOR _. E £_u £_e: y_e _
TOALERTYOUTOSET
''iT
TEMPERATURE
ORA ATIME
_'Q
_
_
INDICATORTOLET YOUKNOW
THEOVENHASTURNEDON
E _
T _._
The display is an easy reference
the display works.
TUF_E
This indicator
has a multiple
o #Esplla_fs
_e
f.e_e_'af,
LOCATION
FORTHETIMEOFDAY
..4- CLOCK,
KITCHEN
TIMER,DELAY
_-_ gj
STARTTIME,cLEANING
TIMEOVENCOOKING,
OR
0 VENFUNCTION
INDICATOR
to use while using your control,
H_DnCA
Below are descriptions
of how
SET EHD#CA TO_S _ The set indicator will
flash in combination
with an oven function or
timed function to let you know you need to set
a time or temperature.
Example: _ET"
and
"BAKE"
will flash to fet you know you need to
set the bake temperature.
TG_
purpose.
ure
#_sp_a_'s are erc#_" oo¢_e _ "ERR" - tf
the oven temperature
indicator
flashes
"_';
then you ha ve set an in valid time or
temperature.
Press the OLEAF_/OFF pad
to clear the control and reset your oven
function.
T_ME E_DIIOA'EOR _ Displays the time of
day, cooking time, delayed start time, cleaning
time or the time set on the kitchen timer.
D_s_EaVs a #'emEndee' oode -- "PUSH
and START" - If the time indicator flashes the
words "PUSH
S1f'ART '_, then you need to
press the START pad to activate your setting.
_, t_sp_a_t's
Overe ProbEe_sIf your
control flashes '_'_" and a number or letter,
you have experienced
an oven problem.
Please read the section on _oCO#ES
in
your manual.
O_ _D_CA TOR -function is seL
_
_"_
,'_.
, €O0_
0 VENFUNCtiON
INDICATOR
TEMPEF_A
_,,.
! DELAY
SAKE
CLEAN START
C -OCK
CLEA,
I
_'_I
L_BROIL\LOCKEDDODR
@VE_
",._
OVE_
FU_CT_Ot_
E_D#CATORS
Displays which oven function has been set,
when the oven door locks, and if the function
is delayed.
Will light when an oven
7
oven control, clock and timer continued
continued
The clock must be set for the correct time of
day before a delayed oven function can work
properly.
The time of day cannot be changed
during a timed oven function, but can be
changed during a bake or broil function.
HOW
TO SET
HOUR
The Kitchen Timer is used to time cooking
processes
or other household activities. It
does not control the oven. It can be set for up
to 9 hours and 59 minutes. It will count down
in minutes until the fast 60 seconds is reached
then the control will beep once.
When the
countdown reaches zero, the control will beep
3 times followed by one beep every 6 seconds
until the _tlTCHEH
TBMER OH/OFF pad is
pressed. The 6 second tone can be canceled.
See Tones on the following page.
THE CLOCE_
MIN
@@
I.
Press the CLOCK
2,
Press the HOUR
time.
THE
and MnH pads to set the
=,.c..=
TIMER
THE
T#ME_
'_
HOUR
MIN
pad.
CLOCK
While using your oven for cooking, if you wish
to check the time of day press the CLOC_
pad. The current time of day will show in the
display.
POWER
TO SET
pad.
3o Press the START
RECALL
HOW
FA#LURE
if you have experienced
a power failure, the
time flashing in the display will be incorrect.
Reset your Clock.
Any oven function
need to be reset.
that was in process
t.
Press the _tlTCHEH
pad.
2,
Press HOUR
set time.
3,
Press
4.
When the countdown
press the _HTCHEH
pad.
TBMER
OH/OFF
and/or MItH arrow pads to
the START
pad.
has reached zero,
TRMER G_/OFF
To cancel the timer during the countdown
press the TUMER OH/OFF pad twice,
will
8
Oven control, clock and timer continued
continued
A TTE_T#O_
This tone will sound if you make an error or an
oversight
is made while ,setting an oven
function.
Your new control has a series of tones that will
sound at different times.
These tones may
sound while you set the control for an oven
function, or at the end of the oven function. It
will also alert you there maybe a problem with
the functions.
Below are the types of tones
and a brief description of each.
Examples
WH#LE
SETT#_G
CO_TROL
bn
THE
OF
T#MED
CVCLE
CA_3CEL
THE
6 SECO_D
2.
Press the _HTCHE_
TIIMER Oh#/OFF
pad. The display will show "COb,_ BEEP"
(continous beep).
Press the KBTCHE_
TIIMER O_/OFF
pad again. The display will show _'BEEP"
(beep canceled).
4.
Press the START
identified
by
T TOPEE
If you set an oven function and the control
beeps while the display is flashing _'F" and a
number _F.4" or letter _F_" there may be a
problem
with the control or oven.
Simply
press the CLEA_JOFF
pad and wait about
an hour. Try setting the function again. If tl_e
code repeats, write down the flashing code
and call for service.
Tell the technician
what the code was flashing.
BEEP
Press and hold the BA#_[E and B_OHL
pads, a* _the same ftHme for 3 seconds,
until the display shows "SF".
the
When you set an oven temperature, the oven
automatically
starts to heat.
When the
temperature
inside the oven reaches the
temperature you have set, a tone will sound to
let you know the oven is ready for baking.
TGE#E
t,
and not pressing
Pressing
an additional
function
pad
witf_out first setting a temperature or time.
PECEHEA
At the end of a timed cooking function, you will
hear 3 short beeps followed by I beep every
6 seconds.
This 6 second beep will continue
to sound until the C_.EA_OFF
pad is pressed
or you may select the special feature to cancel
this 6 second beep from sounding at the end
of future cycles.
TO
Setting a function
START pad.
Any of these can be quickly
watching the display.
When you press a touch pad you will hear a
beep. This beep will let you know you have
placed enough pressure on the pad to
activate it. (The arrow pads do not beep.)
E_3D
would be:
ao Setting a clean cycle and the oven door is
not properly closed.
Cu
TO_ES
T@_E
pad.
if you would like to retum the 6 second beep
repeat steps above until the display shows
your choice and press start.
9
It is normal to have some odor when using your
oven for the first time. This is caused by the
heating of new parts and insulation.
Let the oven preheat thoroughly when recipes
call for preheating.
Preheating is bringing the
temperature up to the temperature you will be
using during baking.
When the oven has
reached the preheat temperature, a tone will
sound. Have foods nearby, ready to place in
the oven.
To help eliminate this odor, ven_iBa_e _#e
room by ope_Hn_ a _Bndo_
er us_
a
ven_ hood_
In the back of the oven you will notice a small
tube. This is a heat sensor that maintains the
temperature of the oven. Never move or bend
this tube.
Never cover the oven
bottom or oven rack
with aluminum
foil.
Improper
use can
cause poor heat flow,
poor baking results,
and may damage the
oven finish.
OVEN TEMPERATURE
SENSOR
The oven vent is located just above the door.
This area could become hot during oven use.
The vent is important for proper air circulation.
_ever
bBoc_ _hHs ven_.
Opening the door often to check foods
cause heat loss and poor baking results.
1]@
will
oven cooking tips continued
TEP8con nue ,
During any oven operation you may hear a fan
noise. This is the internal cooling fan that
keeps all electrical parts from overheating,
it
is not uncommon for this fan to keep running
even after the oven is turned off.
FLA T COOKIE
As the oven heats, the change in temperature
inside the oven causes water droplets to form
on the oven door glass. To prevent this, open
the door momentarily to allowthe moist air out.
If baking with more than one pan, place the
pans so each has at least 1 to 1 1/2" of air
space around it. Place pans so one is not
directly above the other.
SHEETS
(without sides)
Flat cookie sheets allow
airto circulate all around
the cookies
for even
browning.
SHINY PANS
(reflect heat)
Shiny pans are perfect for cakes and quick
breads that have a golden brown crust.
GLASS, DARK NONoSTICK, OR
DARKENED BY AGE BAKEWARE
(absorb heat)
Perfect for yeast breads, pie crust or foods
that have a brown crust. The oven temperature
should be reduced by 25°F.
The Oven Temperature Sensor at the back of
the oven continuously senses and controls the
temperature
inside the oven.
To keep a
constant set temperature,
the elements will
cycle or turn on and off during cooking.
The low temperature
zone of your oven
(between 170 _and 2OO°F) is available to keep
hot cooked foods warm. However, foods kept
at these temperatures
longer than 2 hours
may spoil.
When using your convenient
Delay Start
operation, foods such as dairy products, fish,
poultry, etc., should never sit more than 1 hour
before cooking. Room temperatures
and the
heat from the oven light promote bacterial
growth.
t 1]
oven cooking tips continued
_P8
The oven racks are designed with stop locks,
a convenience
as
well as a safety
_ump n_
precaution for
_c_
placing foods in or
_,uu#e
removing foods from
the oven. When the
racks are placed
correctly in the oven,
the guides
have a
bump to prevent the racks from tilting.
Your oven has four (4) rack positions that may
be used during cooking.
continued
1. Turn OVEN SET knob
to ZI&_E.
Turn OV£@J
_'£MF
knob to temperature on
recipe.
T_e £op posi_Ho_is onBya Ssideo fl_
can_o_ be ssed _s a rac£ posH_Bon_
o
When baking is
complete
turn
O_I£M SE_" knob
OFF,
to
4
3
_2
1. Open lower oven door
to the broil stop
position.
Anyways
pBace@yenrac£sgn_heproper
posi_io_whSBeores iscooB°
You may feel that your new oven cooks
differently
than the oven it replaced.
We
recommend
that you use your new oven a
few weeks to become more familiar with it,
following the times given in your recipes as
a guide.
See Do It Yourself Adjustment
in
back of this manual to make the adjustment
ff you feel your oven is too hot or too cool for
your cooking preference.
1,2
°
Push in and tum both
the @_t_M $£T
and
the @%¢_M _'_
knobs to ZBO_&.
When cooking is
complete,
turn
the
@%¢_
S_2" knob to
OFF.
1= Press the t_/_E
To set the oven to delay the start, cook for a
pad.
specific
amount
automatically:
2o Press the Temp UP and/or
@OY_
arrow pads to set
the oven temperature
you
prefer to use.
TEMP
3.= Press the $T,_fl_"
TEMP
pad,
TEMP
@
_OVEN
HOUR
MIN
off
pad.
3, Press the O V_P_
e, OOK_tt_G
_'HME pad.
amount
GG
@@
pad.
HOUR
_tilN
Press the Hour and/or
Minute UP and DO_b,_
arrow pads to set the
amount of time you prefer
your foods to cook.
2o Press the Temp UP and/or
DOW¢_ arrow pad to set
the oven temperature you
prefer to use.
5, Press the #Efl, J&Y
_TART
_'H[_REpad.
3, Press the OVEN
COOKIt_G
_'BME pad.
6o Press the Hour and/or
Minute UP and DOW_
arrow pads to set the time
of day you prefer the oven
to turn on.
lCOOK,'_GI
G@
@@
turn
2, Press the Temp UP and/
or DO_fb,_ arrow pads to
set the oven temperature
you prefer to use.
TIME
t, Press the [_A_E
and
1= Press the _,_
OVEN
COOKING
To set the oven to cook for a specific
of time and tum off automatically:
of time
HOUR
4o Press
the Hour and/or
Minute UP and DO_f_€_
arrow pads
to set the
amount of time you prefer
your foods to cook.
MIN
7. Press the $7"_"
These
_ver_ opera_io_s
w_er_ feasting.
may
pad.
be used
The oven will cut off at the end of the cooking
time unless the temperature hold feature has
been activated.
5= Press the START" pad.
13
Broiling is cooking by direct
heat from the upper element.
The oven door should remain
opened to the broil stop lock
position during broiling.
It is not necessary to preheat the oven when
broiling. Use the broiler pan and grid that
came with your range. Both are designed for
proper drainage of fat and liquids.
The U.S.
that meat
cooked to
poisoning
Department
of Agriculture
notes
cooked rare is popular, but meat
only 140 °F (rare) means that some
organisms may survive.
Moving meats away from the element will allow
the meat to cook to the center while browning
on the outside. Using this positioning,
cook
side 1 at least 2 minutes longer than side 2. if
your oven is connected to 208 volts, you may
want to use a higher rack position and!or broil
foods longer.
The size, weight, thickness, starting temperature
and your preference of the doneness of the meat
wil! affect broiling. This chart is based on
meats at refrigerator temperature.
RACK
POSITION
3
3
3
2
o Choose tender cuts of meat at least 3/4"
thick for broiling.
o Trim the outer layer of fat silt the edges to
keep meats from curling.
Always use tongs to turn meats. Piercing
meat allows juices to escape.
,_ Salt the first side of meats just before
turning, the second side just before
serving. Brush chicken and fish with butter
several times as they broil
o Chicken and fish should be placed on the
grid skin side down. For fish, lightly grease
the grid to prevent sticking.
The closer you place
foods to the broil
element, the faster foods brown on the outside
yet remain red to pink in the center.
tao Press the BB08tL pad.
_Tbu's _,_HR8
a#_e_at#c,
se_ _H Bce_O_
aBSy
_]b. While the indicator is flashing in
the display, press the $_@8&
pad again if you prefer to use
L O Broil.
2,
Press the _$TzSRTYpad.
3o
When broiling is finished, press
the @_,EAB/OFF pad.
Utensils should never be le#
in a self-clean cycle.
t= Remove the broiler pan
racks,
utensils
and any foil that __
may be in the I[
oven.
and grid,
.o_.._o
2, Soil on the front
frame, i" inside
;
the oven, and
outside the door
gasket will need to be cleaned
The oven racks
may
be
cleaned during the selbclean
cycle, but will lose their luster
and becem_ hard to slide, if you choose
to leave them in during the cycle, wiping
them down with vegetable oil after the
cycle will help them slide easier.
oven
Al_vays make sure the oven light is off
during _he self-clean
cycle _o prolong
the life of the bulb.
by hand.
For the first clean cycle, vent the room
with an opened window or hood vent,
This will prevent
the strong odor from
heating new parts.
Clean these areas with hot water, soap-fitted
steel wool pads or cleansers such as Soft
Scrub® to remove any soil. Rinse well with
clean water and dry.
3,
Wipe up any heavy spillovers
bottom.
on the oven
4, Do not clean
the door gasket.
The
fiberglass material of the oven door gasket
cannot withstand abrasion. It is essential
for the gasket to remain intact. If you notice
it becoming worn, frayed, or displaced on
the door, it should be replaced.
The door gasket
_oRPANEL
is designed
to
have a 5-6" gap
at the bottom of
the door.
_
This allows
for Doe,u,_
o
When the door locks, _-GC_
#GGB will
show in the display. The oven temperature wilt
need to drop below the locking temperature
before the door can be opened. The word
LGCK_
DGGB will go out in the display,
o
If LOCK DGGR flashes in the display, the
door is not closed completely, simply press
on the door.
GASKET
Clean only as touch-up between clean cycles.
Use dishwashing
liquid,
warm water, or
soap-filled steel wool pad.
Rinse well after
cleaning and dry.
proper air circulation. It is normal for your oven
door to give the appearance of not having a
good seal against the range. This is due to the
gasket. The location of the gasket on the oven
door maintains a good seal and prevents any
heat loss.
_EVE_
USE OVE_J CLEA_Ef_S
_ O_
A_tOU_D
AE#Y PART GF THE OVE_o
When cleaning,
be sure not to bend
displace the temperature sensor located
the back wall of the oven.
t5
or
on
self-clean cycle continued
The Clean Cycle is automatically
set for 4
hours, but you may change this to 3 hours if
oven is lightly soiled up to 5 hours ff oven is
heavily soiled.
@@
@@
Press the CLFJ_
pad.
4 hours will show in the
display.
@@
@@
HOUR
t= Press the @LE._b# pad.
HOUR
lf you want to change the
length of clean time press
the UP and/or #OIF_
arrow pad,
M|N
3, Press the START
3. Press the #E_
Y
START
THME pad.
pad.
HOUR
@
Simply press the CLEAE_/OFF
pad. You will need to wait for the
oven temperature
to drop below the lock
temperature
(approx.
1 hour)
before
attempting to open the door. Locked door will
go out of the display.
After the cycle,you may
notice some white ash in _j
the oven. Just wipe it up
with a damp cloth or
sponge.
_i_#
##_e c_ea_Hsg
_.--"
/
Ve# ace _e_ satisfied
res#Nfts_
_s_
MIN
4. Press the UP or DO_M
arrow pads to set the time
youprefer the clean cycle
to start.
5. Press the START
If white spots remain, scrub them with a
soap-filled steel woo! pad. Be sure to rinse
thoroughly.
These are usually deposits of salt
that cannot be removed during the cycle.
B__or amy tease#
&6JN
If you want to change the
length of clean time press
the UP and/or #@_
arrow pads.
repea_
_be c_¢8eo
16
pad.
gHBSPESEA£
FEt TBRE$OF YOB 88
Your new touch pad con trol has additional features that you may choose to use. After making your
selection, ff you want to change the setting, follow the steps until the display shows your choice.
Your control is set to use the 12 hour clock. If
you prefer to use the 24 hour Military Time
clock or black out the display:
The control is automatically
set to turn off the
oven after 12 hours baking or 3 hours broiling
should you forget and leave the oven on. If you
want to remove this feature:
1. Press and hold, at the same
time, the
BAK_ and BF_OHL pads for 3 seconds,
until the display shows SF.
1, Press and hold, at the sar_r_e time_ the
BAKE and BRONL pads for 3 seconds,
until the display shows SF.
2, (a) Press the OfLOC_ pad. The display
shows 12hr.
If this is your choice press
the START pad.
2, Press the DELAY
STAR?" TNME pad.
The display shows t 2shdr_
(I2 hour
shut-off).
or
Press the DE_.AY
START
TEME pad
again. The display will showno shdn
(no
shut-off).
(b} Press the CLOCK
pad again. The
display will show 24hr. Example: 5:00 on
the t2 hour clock will show 17:00 hours on
the military clock.
If this is your choice
press the START pad.
3, Press the STt'AR'_" pad.
or
(c} Press the CLOCK pad again.
The
display will showOFF.
If this is yourchoice
press STAF£T.
The display will not show
time. {The DeBay Start T_me feature
will reef operateo}
Your oven control is set for the Fahrenheit
tempera ture selection. Most recipes are given
using the Fahrenheit scale. You can change
this to use the Centigrade selection:
t.
Press and hold, at the same time, the
BA_E and BROB& pads for 3 seconds,
until the display shows SF.
2, laJ Press the BP, ON& pad. The control
display will show the degrees sign and F.
_bJ Press the B_OSfL, pad again. This will
change F (Fahrenheit) to C (Centigrade).
3, Press the STYART pad.
1 7
setting special features continued
Your control will allow you to lock down the
touch pads so they cannot be activated when
pressed,
if you°re worried about leaving the
oven unsupervised,
activate this feature:
This special feature will allow you to change
the speed; # 1 means speed of change is slow
up to #5 which means speed of change is fasL
To set the speed you prefer, follow these
steps:
1. Press and hold, at the same time, the
BAKE and BE_OEL pads for 3 seconds,
until the display shows SF.
1. Press and hold, at the .same tHrne, the
BAKE and BRORfL pads for 3 seconds,
until the display shows SF.
2, _a} Press the CLEAN pad. The display
shows LOC OFF (lockout off).
_b) Press the @LEAN pad aga6n.
The
display will show LOC ON (lockout on).
3, Press the START
This feature
oven Es not
2, Press the UP arrow pad. The display
show the current set speed.
3=
pad.
can onNy be set
in use.
when
t_e
the speed
or
Press the DO_qfE_ arrow pad to decrease
the speed down to the number 1.
When this feature is on, the display will show
fLO@9 ff a touch pad is pressed. (This feature
will not affect the Clock, Timer or Oven light
pads.)
4.
Your new control has a cook and hold feature
for timed cooking only that will keep hot cooked
foods warm up to 3 hours after the timed
cooking is finished. To activate this feature.
7]. Press and hold, at f_he same t_me, the
BAKE
and BROIIL pads for 3 seconds,
until the display shows SF,
2, _aJ Press the OVEE_ COOKB_G
THME
pad. The display will show HtLd OFF.
t[bJ Press the OVE_
COOKHNG
TnME
pad a.Oa_n to activate the feature.
The
display will show HtLd 0_.
3, Press the START
Press the UP arrow to increase
up to the number 5.
will
pad.
_8
Press
the START
pad.
@,LEANH_G
MA TERBALS
o Dishwashing
o Warm water
o Soft cloth
CLEANING
MAT R AL*TOUS =
TO USE:
o Dishwashing
detergent
o Soap-filled steel wool pad
o Warm water
detergent
TO CLEAN:
Wash and rinse well.
TO _EMOVE:
Pull the racks out and up to remove.
@,LEANHNG
o Dishwashing
o Warm water
MA TEfCHALS
TO REPLACE:
Set the raised back of the rack on the pair of
rack guides.
Push until you reach the stop
locks, then lift the front of the rack until the back
slides easily under the bump. Push rack into
the oven.
T@ US_
detergent
o Soap-filled steel woo! pad
o Commercial oven cleaner
TO @LEAN:
Allow the pan to soak. Sprinkle the grid with
dishwashing detergent and cover with a damp
cloth or paper towel and let stand. Scour as
needed. Wash, rinse, and dry well. You may
also place both the pan and grid in the
dishwasher.
@LEAN#NG
MA TER#ALS
TO
USE:
o Glass cleaner
o Paper towels
o Baking soda
TO CLEAN:
For everyday cleaning, use glass cleaner and
a paper towel. For stubborn soil, use paste of
baking soda and water. Rinse thoroughly.
t9
TO RE_OVE:
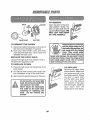
BULB
Open the door to the broil
stop position. Grasp the
door on each side and rift
up and off the hinges. #@
P_OT MFE THE #OOR
8Y THE HAN#LEo
UVE
COLLAR
BAIL WiRE
BULB COVER
TO REMOVE
THE
CO VE_:
_"
When the door is remove_
and the hinge arms are in
the broil stop position,
do
not bump into the hinge
arms. They could snap
back and cause injury to
hands and damage the porcelain finish
of the front frame. Cover the hinge arms
with empty paper towel rolls or towels
while working in the oven area.
t. Disconnect electrical power to the oven at
the main circuit breaker or fuse box.
2. Hold your hand under cover and firmly
push back the bail wire, until it clears and
releases the bulb cover.
REPLACE
THE
LSGHT
BULB:
Unscrew the light bulb and replace
40-watt home appliance bulb.
T@ REPLACE
COVEE_:
_n
it with a
Place the bulb cover into the groove of the
bulb socket,
TO REPLJ_CE:
Remove the paper towel
rolls or towels. Make sure
the hinges are still in the
broil stop position, Grasp
the door on each side.
Lift the door over each
hinge, Line the slots at
the bottom of the door
with the hinges. Sfide the
door
down
over
the
hinges as far as it will go.
Pull the bail wire forward until it snaps into
the indentation on top of the bulb cover.
3, Reconnect
the electrical power to the oven,
Do not touch a hot oven light
bulb. Do not touch a bulb with
wet hands or wet cloth.
Never touch the electrically
five collar on the bulb when
removing
or replacing
the
bulb.
Do not remove any
screws.
20
To save you time and money, before making a service call, check the list below for any problem
you may feel you ha ve with the performance of your range. If the problem is some thing you cannot
repair, use the Consumer Service Numbers located at the back of this manual
_f#en _akHng
ae_y caHBs_ _ve
_he _o_eB _ber_
repair par_s 8_s_ _se _d
c_re T_a_ua8 a_ _e
da_e @f purchase _vaiS_Meo
PROBLEM
POSSIBLE
CAUSE
POSSIBLE
SOL UTION
The dUspBay @_your
co_r@B _s _Bas_c_g
"F" _M_,_,_e_ _ a
_m_er
_e' lle_er,
Range malfunction.
Press the CLEAR/OFF pad.
Let the
range cool for 1 hour and place the
range back into an oven operation. If the
problem repeats, carl for service.
@ve# _11_ #_f_ _er£;
ft_atl_, _epera_veo
No power to range,
a,
Check the household circuit breaker
or fuse box.
b, Check to make sure the range is
plugged in.
ao Oven is not preheated.
Be sure to preheat
sounds.
pro!_erBvo
_. Improper rack or pan
placement.
bo Maintain uniform air space around
pans and utensils. See oven cooking
section.
_o Oven vent blocked
covered.
c,
_o Improper
@ver_ _e_pera_ure
Seer.S
wor_[_
until the tone
or
use of foil.
Keep
vent clear.
_o Racks should
baking.
not be covered
during
e, Improper temperature
setting for utensfl used.
e. Reduce temperature
25 degrees
glass or dull/darkened
pans.
L
L
Check recipe and measurement.
_. Improper oven control
calibration.
g,
#o Range and oven rack
not level.
_
Check the temperature
adjustment
following this section.
Check the installation instructions for
Oven control calibration.
See oven cooking
ao Light switch is in off
position.
a,
_o Bulb needs to be.
replaced,
bo Check or replace
bulb.
Recipe not followed.
for
leveling.
section.
_r_accur_te.
2_
Check switch setting.
light
before calling for,service continued
PROBLEM
POSSIBLE
Foods do rno_
broiH properByo
POSSIBL E SOL UTION
CAUSE
a° Improper rack
position.
bo Oven preheated.
co improper use of foil,
do Oven door closed
during broiling.
Check broil pan placement; see broiling section.
b. Do not preheat when broiling,
_J
C.
Check broiling section.
Open door to broil stop position.
e, Low voltage (208
volts).
fo Improper broiling
time.
e_ Use higher rack position and/or
Oven wHHUno_
uMock.
Clean cycle is not
finished,
Oven must drop below the lock
temperature before the door will unlock.
Oven
cBean
a,
Controls were not set
properly,
b, Clean cycle was
interrupted,
c. Oven was soiled
heavily,
a.
a. Dirty oven,
a, Check for heavy spillover.
b. Use of foil not recommended.
did no_
or resuU_s
_Jere pooro
Oven
strokes.
bo Improper use of
aluminum foil.
co Broiler
grease
oven.
Oven
em_£s
odor,
pan containing
left in the
cooking time.
Check broiling
section,
section of this
b, The normal clean cycle should fast 4
hours,
c,
c.
Heavy
before
repeat
spilfovers
should
the cycle is set.
the cycle.
be removed
You can also
Clean pan and grid after each use,
ao Put oven
Control set for degrees
Centigrade Mode,
See setting special
22
chart in broiling
Check the self-cleaning
manual.
a, Oven insulation may
emit odor during the
first few operations,
Failure to wipe out
excess soil prior to
the self-clean cycle,
ba
@ar_r_e_se_ 350 °
Bake
L
longer
speed
off."
through
self-clean
up process
of odor
cycle to
"wearing
bo Wipe excess soil off before beginning
self-clean cycle,
features section.
You may feel that your new oven cooks
differently
than the oven it replaced.
We
recommend that you use your new oven a few
weeks to become
more familiar
with it,
following the times given in your recipes as a
guide.
et
If you think your new oven is too hot (burning
foods)
or not hot enough
(foods
are
undercooked) you can adjust the temperature
yourself. The appearance and texture of foods
is a better indicator of oven accuracy than an
inexpensive thermometer, such as those found
in grocery stores, to check the temperature
setting of your new oven. These thermometers
can vary by 20-40 degrees.
In addition, the
oven door must be opened to read these
thermometers.
Opening the door wilt change
the temperature of the oven.
5_
Hold the knob handle (A on illustration)
while tuming the knob skirt (B on illustration)
in the desired direction. As you turn you
should be able to hear clicks and feel
notches or teeth. Each click or notch is 10°.
You can tum up to 5 clicks or notches in
either direction.
When you reach the desired adjustment,
retighten both screws.
Do not force the knob onto the thermostat
stem or you may damage it.
t,
4.
To decide
how much
to change
the
temperature,
set the oven temperature
25
degrees higher (if foods are undercooked)
or
25 degrees lower (if foods are burning) than
the temperature in your recipe, then bake. The
results of this "test" should give you an idea of
howmuch the temperature shoufd be changed.
Press and hold down both the
BAKE and BRONL pads for 3
seconds, untif the display shows
SF.
2, Press
the BAKE
pad.
A
factory set 2 digit number will
show in the display, usually 00.
TEMP
@
Ill you _h_k
the oven is
no_ he_ eneugh_
3. a. Press the TEMP UP arrow
pad to increase
_+J the
temperature up to +35°F.
or
Nf you think
too hot,
&
t,
Turn OVEN SET knob to OFF and remove
the oven temp knob by pulling straight off.
2. Look at the back of the knob. The arrow
pointing to the center of the upper screw
indicates the original factory setting. The
knob can be adjusted up to 50_F hotter or
50°F cooler, in 10° increments.
3. Use a screwdriver to loosen the two screws
about 1 turn each.
the
even
_s
b. Press the TEMP
DOWN
arrow pad to decrease
[.J the
temperature down to .,35°F.
4. Press the START
pad,
This increased
or decreased
temperature
setting will remain in memory until the above
steps are repeated.
A power failure will not
affect this setting.
The Broil and Self-Clean temperatures
wilt not
be affected.
23
Forthe repair or repJacementpartsyouneed
defivereddirectJyto yourhome
Call 7 am - 7 pm, 7 days a week
1 o8@@o_
(1°800°366°7278)
For in-home major brandrepair service
Call 24 hours a day, 7 days a week
°8@@°
(1-800-473-7247)
For the _ocationof a
Sears partsand RepairCenterin yourarea
Call 24 hours a day, 7 days a week
FIBBBBB
1 o8@@o488ol
For information on purchasinga Sears
Maintenance Agreement or to inquire
about an existing Agreement
Call 9 am - 5 pro, Monday-Saturday
1
_®55
America's Repair Specialists
,24
KEH ©RE
f
"-,
FUILrL O_f
Dear Customer:
Our constant efforts are
directed toward making
sure your new Kenmore
Oven will arrive at your
home in perfect condF
tlon and will
give you
properperformance.
As
part of these efforts, we
feel tt Is our responsiblllty to provide you with
this warranty
range.
:
for your
Rocydod P,",por
VE_,R WARRAI£TV
O_ THI_ FIICTIONitG
P_.RT@ EXCI_IPT GLASS P_.RT@
OF AL1L _
tf, within one year from the date of Installation, any part, other than a
glass part, falls to function properly due to a defect In material or
workmanship,
Sears will repair or replace it, free of charge.
FUILIL 30.DAY WARRA_'_[_ O_ @ILASS PARTS AND Ft_IiSH OF
IORCEILAtN Et'_A_JtEL,PAIIITIIIII_O1 BRIGHT I?,_ETALFIII_4IIIIE@
PtITI
if, within 30 days from the date of tnstallaUon, any glass part or the
finish on any porcelain enamel, painted or bright metal part is defective
tn material or workmanship,
Sears will replace the part, free of charge.
FU_.& 9@_II)AY _JARRANTY
01_,I#,_I!IIOI_IANICAIL A_U@T_NT$
For 90 days from the date of installation, Sears will provide, free of
charge, any mechanical adjustments necessary for proper operation of
the range, e×cept for normal maintenance.
If the range is subjected to other than private family use, the above
warranty coverage is effective for only 90 days.
WAIIRABIT&r SERVICE IS AVAt!.AIIItLE B'f COIITACTIIG
THE NEAR,.
EST SEARS SERVICE CENTER/DEPARTRtENT tN THE UNITED
STATES
This warranty applies only while this product is In use in the United States.
Thts warranty gives you specific legal rights, and you may also have other
rights which vary from state to state.
SEARS, ROEIIUCf_ AI:_I) CO.
f)ep_. 817 W#A
_.
Hof_aa
Es_a&es, II. !i18179/
"We Service Wl_at We Sell" is our assurance
service is nationwide.
to you that you can depend on Sears for service because Sears
Your Kenmore Oven has added value when you consider that Sears has a service unit near you staffed by Sears
trained technicians.., professionaltechniclans
specifically trained on Sears appliances, having the parts, tools
and equipment to ensure that we meet our pledge to you-- "We Service What We Self'
TO F_RTHER
ADD TO THE VALUE
OF YOUR
RANGE,
Kenmore Ranges are deslgned, manufactured and tested for
years of dependable operation. Yet, any modern appliance may
require s_rvlce from time to time. The Sears Warranty plus the
Sears Maintenance Agreement provides protection from unexpected repair bills and assuresyou of enJoytng maximum range
efficiency.
Here's a comparative warranty and _alntenance Agreement
chart showing you the benefits of a Sears Range Maintenance
Agre_menL
BUY A SEARS
Yo_-t_ of Owner_|dp
t
_#IAIINTENANCE
Covarc_D_
:=!
Ropl_cemon_
of _te_¢gva
POx1. Oth.l' ,h_
Porcal.n
A_REEI_ENT,
y_r
2rid Yl>t..r
W
3td Ye_.r
NA
NA
MA
NA
Or G]I_.#
90 DAYS
30 DAYS
Ar_n_al
4
Prevenlva
M=ln_art.
,_00c,°_o|_o_,,°qoo=,NA
W - W_tlt
MA - M_ nt,an='i¢_ ^_n_m_t
CONTACT YOUR SEARS SALESPERSON OR LOCAL SEARS SERVICE
CENTER TODAY AND PURCHASE A SEARS _AIINTF.NAF,_CF-AGREEMENT.
Sold by @EAR@, ROEBUCK
AND CO.
Hof_r_an
_s_ates_
IlL 80179
-- Printed In the United States --
n
o
MAHUM.
DEI=CONSUMIDOR
MOBELONO.
9tt°
41369
_o
911, 41369
PRECAUCION:
Lea y siga todas /as reg/as y/as
instrucciones
para elfuncionamiento
antes de usar este producto por
primera vez
o /nstmccionesdeseguridad
o Caracter[sticas
o Funcionamiento
o Cuidadoy Limpieza
o CSmoresolver Problemas
o AjusteF_cil
o ServicoParael Consumidor
Sears_
Roebuck
and
Co=_ Hoffrnan
Esta,es_
#L 60179
U.S.A.
229c4020PO70(SR10295)
C6mo asar a la parrilla ....................
Reglas Generafes ..................................
C6mo preparar las cames ....................
Posici6n de parrilla ................................
Cdmo asar a fa parritta ..........................
Seguridad en el uso de ta estufa ......... 3-4
Caracteris_Hcas
.......................
Con_roR DeR Homo
.................
Consejos
para
ceciaar
_or_o
..................................
en
Autotimpieza
..............................
15, 16
Cdmo preparar et homo ....................... 15
Setto de la puerta del homo ................. 15
Dispositivo para enganchar la puerta .. 15
Paredes del homo ................................. 15
C5mo programar un ciclo de fimpieza. 16
C6mo detener un ciclo de fimpieza ...... 16
Despu_s de ciclo .................................. 16
C_mo empezar un ciclo demorado ...... t6
5
6-9
Funciones tradicionales del homo ..........
Funciones automaticas det homo ...........
Botones ...................................................
Dial de los controles ................................
Reloj, Crondmetro de la cocina ...............
Tonos .......................................................
Cddigos F ................................................
6
6
6
7
8
9
9
COme seleccionar
programas
.....................................................
el
10- t2
Otor u ofor fuerte .................................... 10
No mire ..................................................
t0
Papel de aluminio .................................. 10
Precalentamiento ................................... 10
Luz del homo ........................................
10
Sensor de temperatura def homo .......... I0
Ventilacidn del homo ............................. I0
Funcionamiento del ventifador .............. 11
Humedad ..............................................
1t
Zona de temperatura baja ..................... t t
Cuando use un comienzo demorado .... 1t
Utensitios ...............................................
1t
Ciclo de los elementos .......................... ! 1
Cdmo colocar los utensflios .................. t I
Parrillas del homo .................................. t2
Ajuste a ta temperatura def homo.., t2, 23
C6rno seSeccionar
programas
espec_Mes
del centrM
...........
............
17-I8
Apagado en 12 horas ............................
Sefecci5n de centigrados .....................
Reloj a 12 horas .....................................
Control de cierre ....................................
Mantencion de temperatura ..................
Ve!ocidad de los botones con flechas ..
17
17
17
18
t8
t8
Panel de control ....................................
Cacerola y parrilla para cocinar ............
Parritlas det homo ..................................
Vidrio .....................................................
Puerta del homo ....................................
C_mo reempfazar el foco de fa luz det
homo .....................................................
t9
19
19
19
20
20
Antes de ltamar para un servicio ..... 21, 22
Ndmeros para servicios det
consumidor ........................................... 24
Garantia
t3
Cdmo programar para homear ............. I3
Cdmo homear en forma autom_tica ...... t3
Cdmo homear en forma demorada ....... !3
Para su con veniencia y referencia
futura,
y de serie en el espacio que se provee,
NUMERO
14
t4
14
14
14
por favor escriba el ndmero de modelo
Es_dn ubicados en el marco frontal
NUMERO
DE MODELO:
2
DE SERIE:
_,_R.I& G,_R,_TBZAR
su seguridad,
la de su
familia y la de su hogar, por favor lea su Manual del
Consumidor cuidadosamente.
Mant#ngalo
a la mano para referencias.
Ponga
mucha atencidn a las secciones
de seguridad.
Usted
reconocer_
todas
las referencias
imporlantes por las letras oscuras y los sfmbolos a
trav#s de su manual.
GUARDE
instalada
pot
un
t_cnico
especializado
y que haga tierra
ASEGURESE
adecuadamente. que suestufasea
NUNCA
3"R_ TE de reparar o reempfazar
una
parle det estufa a menos que fas instrucciones
se
den en este manual. Todo otro trabajo deberfa ser
hecho por un t_cnico especiatizado.
E_SE_E
_ LOS
NB_OS
o Nojugar con los controles
la estufa.
o No sentarse,
del homo.
b#UNCA
subirse
NUNC_
GUARDE
cosas de
interns para los ni4os en los
gabinetes sobre el estufa.
_
A:
o cualquierparte
o pararse
USE ropa suelta cuando
sobre la puerta
use el estufa.
USE
libro para un uso futuro.
S#EMPRE
MANTENGA
el brea de fa estufa
despejada de cosas que se podrfan quemar. La
acumufaci_n de comida y grasa y los utensilios de
madera se podrfan incendiar.
Los utensilios de
pf#stico
se podrfan derretir y fas comidas
en
conservas podrfan exptotar.
Su homo nunca se
deberfa usar para afmacenar cosas.
de
_UNCA
USE una toalfa u otro pa4o abultado
como agarradera y asegOrese que fa agarradera
est# seca.
Las agarraderas
hdmedas podrfan
causar quemaduras
por vapor.
IVlantenga fas
toallas y los pa#os para pfatos, agarraderas
y
otros pa_os a una distancia prudente del estufa.
_Ub#CA
ESTE
S#EMPRE MANTENG_
el estufa despejada de
cosas que se podrfan quemar (gasotina y otros
vapores y fiquidos inflamables).
S#EMPRE
MANTENGA
los
combustibles
de las paredes,
pa4os a una distancia prudente
revestimientos
cortinas y otros
de la estufa.
NUNC_
CAME_TE
contenedores
de atimentos
cerrados. El aumento de ta presi6n podrfa causar
que et contenedor
explole y cause heridas.
¢eUfeCA
DEJE
frascos
o latas de grasa o
goteaduras
sobre o cerca de ta estufa.
su estufa
para entibiar
o cafentar
una habitacidn.
ALGUNOS
L_MP#ADOR[ES
producen
vapores nocivos y los _
paY_os y las esponjas
mojadas
podrfan causar quemaduras
por
vapor.
Asege_rese
que eB homo
est_ Jns_atado
_irrne_en_e
en un gabine_e
que es_
bien
pegado
a ga es_ruc_ura
de la
cas_=
3
instrucctones
;mpor[antes
de seguridad
/
cont
;t_DVE_TE_CBA
DE SEGUF_UDAD
8MPGF_TA_TE_
COU.OQU_
en la posicidn
Si las parrillas
est,_ caliente,
contacto con
LAS PARRSLLAS
DEL HORt_O
deseada mientras el homo est_ fr[o.
se deben mover mientras el homo
no permita que la agarradera haga
el quemador caliente del homo.
DESPUES
DE ASAR
A LA PARRHLILA,
siempre saque la cacerola y la parrilla para asar
del homo y Ifmpielas. Los sobrados de grasa en
la cacerola
para asar podrfan
incendiarse
la
prdxima vez que usted use el homo.
$SEMPRE
7"ENGA
CUVDADO
cuando
abra ta
puerta def homo.
Deje que el aire caliente y el
vapor escapen antes de mover los alimentos.
_UP_ICA USE papef de aluminio para forrar el
fondo del homo. El uso inadecuado del papef de
afuminio podrfa empezar un incendio.
[
_
EST N ORM C ON
AHORAf
Si alguna
vez la necesita, no
tendr,_ tlempo para leerla.
Aseg_rese
que
todos en su hogar sepan qu_ hacer en caso
de incendio.
Nunca use agua sobre un
incendio de grasa, esto solamente extender,_
ILIIMPHE $OfLAME_TE
las partes que se listan
en este manual Siga todas las instrucciones para
la limpieza.
$B EL MODULO
PAF_A LA AUTGLHMPHEZA
funciona mal, apague los controfes o desconecte
la electricidad.
Pida un servicio por un t_cnico
especializado.
L las flamas.
.........................................................
_J
FUEGG
E_ EL HOF_G:
;b_o *ra_e de mover Ha caceroHa _.
NUNCA
FF_VEGUE, mueva, o da_ie el seffo de fa
puerta en las estufas con autolimpieza.
_U_CA
TRA TE de limpiar los utensflios, oflas,
partes removibles o la cacerola y la parrilta para
asar en el ciclo de autolimpieza.
2. Si et incendiocontinOa,
arroje soda
11, losCierre
fa puerta def h°m° y apagUecontroles.
para cocinar sobre el fuego, o use
un extintor
de qufmico
seco,
espuma o "haton".
t_O USE limpiadores parahornos-Ningdn
fimpiador
comercial se debeda usar dentro o afrededor de
ninguna parte del homo.
4
IIIIIIIlltllllllllllillllllllllllllltll
Para sacar el residuo del adhesivo de la cinta de empaque, use detergente
ffquido para plato& aceite
mineral o aceite para cocinar, con un pado suave frdtelos sobre el _rea y permita que se remoje. Enjuague
y seque bien, Repita el procedimiento
usando un pulidorpara
estufas para asegurarse que el homo no
se da_e. Es_e se deberia
hacer
an_es de encender
Na es_ufa pot primera
vez. La cinta
no se puede saca_" una vez que el homo se haya calen_ado,
La c_n_a
de
Superficie
empaque
se puede
encon*rar
de fa cubierta
Manilfa de fa puerta
en
Nas siguientes
g, reas:
Area del panel de control
Area del homo
5
Moldura
de fa puerta
rSBa
@ @@
@ QQ
TEh'IP
HOUR
TIMEt) OVEN
K[TCHEH
TIMER
h,llH
J
Su nuevo control a botones le permitir_ programar las funciones del homo con facifidad.
los diferentes tipos de funciones y una descripcidn
de cada uno.
HOF_EAR
Y ASAR -- Cocina los alimentos en
el homo tradicional a una temperatura entre I 70_F
y 550_F.
M#s abajo est_n
Los botones
y DOWN
hora
def dfa, UP
tiempo
de ponen
coccidn, la
tiempo
de limpieza,
hora
de
t&SZ&R A fLz& PARFflfLLA
-- Cocina ta came a
550°Fen alto o a 450_ F en bajo al ca!or directo def
elemento superior. Se debe asar a la parriffa con
la puerta abierta en la posicidn de tope para asar.
programado,
fa temperatura
en el
comienzo
demorado
y el tiempo
Cron6metro
de fa Cocina.
E! botdn ST_R_
debe empujarse
para activar cuafquier
funciOn del
horno.
fLIMPlIEZZ_ -- Limpia el _rea interior def homo
por usted.
Cuando el ciclo termina, el homo se
apagar_ autom_ticamente.
Et botdn
OV_#_
CO_G
7f_M_ se usa para programar la
cantidad de fiempo para cocinar.
THEMPO DE COCNNAR
_
E& HORNO
Seleccione
hornear,
o limpiar.
Programe
la
cantidad de tiempo en que desee que los alimentos
se cocinen o que el homo se limpie y que el horno
se apague autom_ticamente.
El botdn #_
Y STAR'S" _/_
se usa para programar la hora del
dfa en ta cual desea que el homo
se encienda
para empezar
a
cocinar o fimpiar.
HORt_EADO
0 LHMPHEZA
DEMORADA
-Seleccione hornear o limpiar. Programe ta cantidad
de tiempo en que desea cocinar la comida o
limpiar el homo.
Ponga la hora del dfa en que
desee que el homo se encienda.
Cuando la
funcidn
termine,
el homo
se apagar_
autom_ticamente.
El botdn C&F__R/OFF se usa para
cancelar
cualquier
funcidn del
homo y el tono de fin de ciclo. No
cance_ar_
e_ Re_o_ o e_
Cren_rnetro
de Ha Coc_#a,
6
control det homo, reloj y crondmetro continOa
PANEL DE CONTROL
IflDICADORDE
TEMPERATURA
\\
._
-_
,_
LUZIHTERMITENTEQUELEI,'_
/
0f
-
tNDICADORQUELE
AVISAQUEELHORNO
SEHA ENCEflDtDO
,_
_
,_
,,_
_ _,;
_;_
_
I n_
= _
_
AVISA
QUEPROGRAME
UHA_ I ' L_' _=l _==_'
iHJ_u=JL_
TEMPERATURA
0 UN TIEMPO I DELAYBAKE CLEAN
_
---__.._..
HOB_#
mOItiple.
--
DE
LA
Este indicador
TUR_
-r-
COCINA FLORADE COM/EflZO
0 _E.MPODELIMPIEZA,
INDICADORDEFU_/CIONES
AUTOMATICAS
usa los controles.
Abajo estb la descripciOn
de cdmo
###D#CADORES
DE PROGE_t_M_
--Et
indicador de programa pesta_iear_ en combinacidn
con una funcidn del homo o una funcidn autom,_tica
para avisarle que necesita programar un tiempo o
una temperatura.
Ejemplo:
"SET"
y "BAf._E"
pesta#ear_n para a visarle que tiene que programar
la temperatura para homear.
DEL
tiene un propdsito
e! indicador de temperatura del homo pesta_ea
';£._R,';
entonces
usted ha programado
un
tiempo o una temperatura incorrecta.
Empuje
el botdn CL£APJOb'F para despejar et control
y reprogramar
fa funcidn def homo.
Mues_a
pe'o_ernas
control pesta#ea "P" y un
est_ experimentando
un
Por favor lea la seccidn
manual
_
_=J IDEMOAAD'b
COCClOAIEIV
n HOmVO
_
fbcil de usar mientras
T;EMPE_J_
uJ
COOI(_TOP_/TIMER)
INDtCADORDE FUNCIO[_
DELHORNO
flMD_CAfDOR
o _
STARTCLOCKCLEANI
_B___ROIL\LOC,
KEDDOOR
El panel es una referencia
funciona.
UBICACiONPARALit HORADEL Dill
! _0 "00 "00_.0
_ _ 0F30_0°B._O
0F_01
b EL
AEtoJ,
o.oNoM_.o
o_
#MD#Ct_DOE¢ DE LA HOF_A --Mueslra
ta hora
del dfa, tiempo de coccidn,
hora de comienzo
demorado
o fa hora
programada
en el
cronc_metro
de la cocina.
_e_ _o_'_o
-- Si el
nOmero o letra, usted
problema
del homo.
COD_GOS-F
en su
Mues_ra u_ c6digo para recerdar--"PUSH
START"
- Si et indicador de ta hora del homo
pesta#ea las palabras "PUSH START",
entonces
usted tiene que empujar el boron START para
activar su program&
#P#D#C,_DOIR DE E_CEE_D#DO -- Se encenderb
cuando se programe una funcidn del homo.
HMD#CI_DORES
DE L_S FUMC#Ot4ES
DEL
HORNO
-Muestran
qu_ funcidn ha sido
programada
y si fa funcidn es demorada.
7
control del homo, reloj y cron6metro continOa
El reloj debe ponerse a la correcta hora del dfa
antes que una funcidn demorada del homo funcione
correctamente.
La hora del dfa no se puede
cambiar durante una funcidn autom_tica del homo,
pero se puede cambiar durante una funcidn para
homear o asar a la parrilla.
COM@
P@ ER
El crondmetro de la cocina se usa para medir el
tiempo de los procesos
para cocinar
u otras
actMdades
del hogar. No controta el homo. Se
puede programar
hasta 9 horas y 59 minutos.
Contar_ hacia atras en minutos hasta que Ilegue a
los Oftimos 60 segundos. Cuando la cuenta Ilegue
a :0, e! control sonar_ 3 veces seguido de un
senido cada 6 segundos hasta que se empuje el
botdn _BTCHE_
THMER O_t/OFF.
EL F EL@J
COMO
P_OG_M_
CF_O_OMETF_O
@
t.
Empuje
2.
Empuje
DOW_
3.
Empuje
el botdn CLOCK.
los botones con las ffechas UP o
para poner la hora correcta del dfa.
el botdn
START.
11. Empuje
OFF.
PAR_
VOLVER
AL _ELOJ
Mientras est_ usando el horno para cocinar, empuje
el botdn CLOCK,
si desea ver la hora del dfa. La
hora presente del dfa se ver_ en el dial.
CORTE
EL
ELECTF_C@
KBTCHE_
WMER
2.
Empuje los botones con fas ftechas
DO_fl_ para poner fa hora.
3.
Empuje
4,
Cuando ta cuenta ffegue a :0, empuje
KHTCHEE_ TIIMER OE_/OFF.
el botdn
O_/
UP o
START.
el botdn
Para cancefar el crondmetro
durante fa cuenta,
empuje e! botdn TUMER ON/OFF
dos veces.
Si ocurre un corte de corriente, la hora que se
muestra en el dial estarb incorrecta.
Ponga
nuevamente el reloj a la hora.
Cualquier
funcidn
estaba en proceso
el bot6n
para cocinar del homo que
tendr8 que ser reprogramada.
8
control det homo, relol" y cronometro
continOa
TONO
DE A TEE_#C#ON
Este tono sonar_ si hace un error u omite algo
mientras programa una funci6n def homo.
El nuevo control tiene una serie de tonos que
sonar_n a tiempos diferentes. Estos tonos pueden
sonar mientras usted programa
una funcidn del
homo, o al final de una funcidn def homo. Tambi_n
le avisar_ si existe un problema con una de las
funciones.
M_s abajo estbn los tipos de tonos y
una breve descripcidn
de cada uno.
TONOS
MNEI;_TRAS
CONTROL
PROGRAMA
Unos ejemplos
Cuando empuje un botdn usted escuchar_
un
tono. Este tono le hara saber que aptic6 suficiente
presi6n sobre e! botdn para activarto.
TOnG AL Fn_AL
_UTOMA TtlCG
DE U_
DE 6
_], Empuje y sujete los botones BAE_tE y BROEL,
a tla mEsma vez para 3 segundos, hasta que
e! dia! muestre "SF'L
Empuje el botdn E_#TCHE¢_J TNMER
OFF. El dial mostrar# "COH BEEP"
continuo).
3,, Empuje el bot6n
OFF nuevamente.
(tono cancelado).
4.
b.
Empujar un bot6n para una funcidn adicional
sin programar
primero ta temperatura
o el
tiempo.
ON/
(tono
E_#TCHEN
TIMER
0_/
El dial mostrarb "BEEP"
Empuje el bot6n START,
para cancetar
tono y salir de este mddufo especial.
de estos
se puede
con mirar et dial.
el botd)n
identificar
DE PRECALENTAMVEE_TO
Si usted programa
una funcir_n del homo y el
control hace sonar un tono mientras una "F" y un
nOmero o "FII" est_n pestar_eando
en el dial,
podria existir un probtema con el control o homo.
Simplemente
empuje el botdn CLEAR/OFF
y
espere una hora. Trate de programar
fa funci6n
nuevamente.
Si el cddigo se repite, escriba el
cr_digo que pesta#ea
y llame para un servicio.
D[gale at t_cnico que codigo estaba pesta_1eando.
programa especial para cancelar y evitar que et
tono de 6 segundos
suene at final de un ciclo
futuro.
2.
una funcidn y no empuje
Cuando programa una temperatura en ef horno, el
homo empieza a calentarse
automaticamente.
Cuando fa temperatura dentro def homo ftega a ta
temperatura que usted program6, sonar8 un tono
para avisarle que el homo est8 listo para homear.
CSCLO
EL TGHO
Programar
START.
TONO
Despu#s de una funci6n para cocinar autom_tica,
usted escuchar# tres tonos cortos seguidos por
un tono cada 6 segundos.
El tono de cada 6
segundos seguirb sonando hasta que empuje el
bol6n CLEAR/G_F
ousted decida seleccionar el
COMO C_CELt&R
SEGUE_DOS
a,
Cuatquiera
rbpidamente
EL
sedan:
el
Si desea volver a los tonos de cada 6 segundos,
repita los pasos de arriba hasta que e! dial muestre
su seleccidn y empuje "sftar_"
(comienzo).
9
J88
Permita que et homo se precafiente
bien cuando
tas recetas
requieren
precafentamiento.
El
precalentamiento
es subir la temperatura
a la
temperatura que va a usar cuando hornee, Cuando
el homo
tlegue
a la
temperatura
de
precatentamiento,
sonar_ un tono.
Tenga los
alimentos a la mano y listos para ponerlos en el
homo.
Es normal sentir un poco de olor cuando use su
homo por primera vez. Esto es causado por et
calentamiento
de las partes nuevas y del aislante.
Para ayudar a eliminar
este olor, venf_Be aa
H_b#acH6n
a#riende
u#a ven_a_a o usando
_na ca_pana
de ventiBaci6n.
HMPORTA_7_:
Nunca cubra el fondo
de! homo o ia parrilla
del homo con papel
de aluminio.
El uso
inadecuado
puede
causar
una
mala
circulacidn
del calor,
pobres resultados
af
hornear,
y podrfa
da#ar el acabado del homo.
En ta parte trasera det homo usted notar_ un
pequer)o tubo. Esto es un sensor de calor que
mantiene la temperatura del homo. Nunca mueva
o dobte este tubo.
SENSOR
La
ventilacidn
del
horno
est_
ubicada
inmediatamente
sobre fa puerta.
Esta _rea se
podrfa calentar mucho durante et uso del homo.
La ventilacidn
es importante
para la correcta
circulaci6n
del aire. _unca
ebs_ruya
8a
ven_ilaci6ra.
DE TEMPERATURA
DF...LHORNO
Si abre ta puerta para mirar los afimentos causar_
una perdida de ca lor. La p#rdida de ca!or causar_
ma!os resuftados cuando homee.
Use la fuz del
homo para revisar los atimentos mientras ese
homean.
t0
consejos para cocinar en el homo contind_an
SGEN, R
Durante cualquier operacidn
ofr un ruido de ventilador.
A medida que el homo se calienta, el cambio de
temperatura dentro de! homo causa que gotas de
agua se formen sobre el vidrio de la puerta def
homo. Para prevenir esto, abra ta puerta por unos
momentos para permitir que salga el aire homed&
del homo usted podrfa
Esto es el ventifador
intemo para enfriar y prevenir que todas las partes
el_ctricas se recalienten.
No es poco comdn que
el ventilador siga corriendo incluso despu_s que
e! homo se haya apagado.
Estas son unas pocas recomendaciones
obtener buenos resultados cuando hornee.
BANDEJAS
BAJAS
UTENSfMOS
Siestb horneando con m#s de un utensifio, coldquetos
de manera que cada uno tenga por Io menos de 1"
a 1 1/2" de espacio de aire a su afrededor. Coloque
los utensilios
de manera que ninguno
quede
directamente encima de otro.
para
PARA
GALLETAf3 (sin lados)
Las bandejas
bajas para
,cjalletas permiten que el aire
circule
alrededor
de /as
galletas para que se doren
en forma pareja.
continuacidn
_,,=_,='=======_=_,==='='=,
BRILLANTES
(que reflejen calor)
Los utensilios briflantes son perfectos para que los
queques ypanes r_pidos tengan una corteza cak_
dorada.
UTENSIMOS
DE VIDR!O,
PEGADURA&
U OPACOS
OSCUROS
CONTRA
El Sensor de Temperatura del Homo en fa parte
lrasera del homo mide y controfa continuamente
ta
lemperatura denlro def homo. Para mantener una
temperatura programada constante, los etementos
harbn un cicto de encendido y apagado mientras
el homo cocina.
POR LA EDAD
(absorven et calor)
Son perfectos para panes con levadura, cortezas
para pasteles o alimentos que tengan una corteza
caf6. La temperatura def homo se deberfa reducir
en 25°F.
Cuando
use su conveniente
operaci6n
de
Comienzo Demorado,
los atimentos tales como
productos f_cteos, pescado, ayes, etc., nunca se
deberfan dejar expuestos pot m_s de una hora
antes de ser cocinados.
La temperatura ambiente
y e! calor de la fuz def homo pmmueven
el
crecimiento
de bacterias.
La zona de temperatura
baja de su homo (entre
170' y 200"F) est_ disponsible para mantener los
alimentos tibios. Sin embargo, los atimentos que
se mantengan
a esta temperatura por mas de 2
horas se podrfan echar a perder.
t t
Consejos para cocinar en el homo contint_an
(continuacidn)
Las parrillas del horno est_n
diser_adas con topes, una
convenienciaytambi_nuna
Te_E E_
precaucidn
de seguridad
Las Gul,_s
PARA LAS'..
para colocar
o sacar la P,_R_ULU4S
comida del horno. Cuando
las parriflas estan puestas
correctamente en el homo,
las gufas tienen un tope
para prevenir que las parrillas se den vuelta.
Su homo tiene cuatro (4) posiciones para parrilfas
que se pueden usar cuando homee.
S
La posHci6n
de m_s arriba
es soSamen,e
una guia.
l_o puede
ser usada
come
posici6n
para una parriila.
2.
,
Ponga la PERHLLA DE
TEMP,
en
la
temperatura de la receta.
Cuando
termine de
hornear ponga fa
PER_LLA
DE
PfRGGRAMA
en
AP_QGADG
(OFF).
4
3
2
_#e_pre
coBoque 8as parri#Has deR berne
en la posHcH6n correcta
cuande
e#
home
es_
frie.
I.
step).
2,
3.
Usted podrfa pensar que su homo nuevo cocina
diferentemente
al homo que reempfazd.
Le
recomendamos
que use su homo nuevo pot varias
semanas para que se famitiarice
mbs con d,
siguiendo los tiempos que se dan en ta receta
como una gufa.
Vea Ajustes de Temperatura,
Hbgafos usted Mismo, en la pbgina 23 de este
manual para hacer los ajustes si cree que su l_omo
est_l funcionando
demasiado
cafiente o frfo para
su preferencia.
12
Abra la puerta def homo
de
abajo
en
la
POSBCVO_ DE PARO
P_,_A
A$_
A LA
PAR#LLA
(EJROUL
Empuje
y haga girar
ambas
periltas
OVEN
SET y OVEN TEMP a
BROIL,
Cuando
termine
de
cocinar, ponga ta periffa
de PRGGRAMA
DEL
HO_HG
e_
APAGADO
{OFF).
s pedor)
t,
Empuje
Para programar
que el homo empiece en
forma demorada,
cocine
por un tiempo
especifico y se apague automaticamente.
el botdn BAKE.
2. Empuje
los botones con las
flecha
UP y DOg[f_
para
programar la temperatura
del
homo que desea usar.
TEMP
1.
TEMP
3,
Empuje
@
el botdn START.
OVEN
COOKING
TIME
Empuje
el botdn
f3,A_,E.
2. Empuje los botones Temp
con las flechas UP o DO _tVN
para
seleccionar
la
temperatura
det homo que
desea usar.
3, Empuje el botdn OVEN
COOKfI_G
TNME.
Para programar que el homo cocine por un tiempo
especffico y se apague autom_ticamente.
4_
t. Empuje
el botdn f_A_E,
HOUR
MIN
@@
2. Empuje el bot6n con la flecha
UP
o
DO_f_
para
seleccionat
fa temperatura
que desea usar,
TEMP
_B
6B
f 0rE.
lCOOK=NG
I
3, Empuje el bot6n GVE_
COOKgNG 7BME.
HOUR
L2 J
(_
HOUR
(_
MIN
MIN
@@
flechas UP
o DOW_ conpara
4, Empuje
los botones
las
Horas
y Minutos
para
seleccionar
la cantidad
de
Empuje et bot6n
STAF_T TIIME.
Es*as operaciones
usar para asar,
DELJ_ Y
Empuje los botones con
fas flechas UP o DO_f_
para Horas y Minutos para
programar fa hora del dia
en fa cuaf desea que e!
homo se encienda.
7, Empuje
_(_tiempoenquedeseacocinar
los alimentos.
5o Empuje
Empuje los botones con tas
flechas UP y DOW_
para
Horas
y Minutos
para
sefeccionar
la cantidad de
tiempo en que desea cocinar
los afimentos.
ef botdn
de# homo
START.
se pueden
Et homo se apagarb at t_rmino del tiempo para
cocinar a menos que et programa
para
mantencidn de temperatura se haya activado.
el botdn $'FART.
t3
Asar es cocinar al calor directo del
elemento superior.
La puerta del
homo deberfa permanecer
abierta
en la posicidn de tope para asar
cuando ase a la parrilla.
No es necesario
precalentar
el
homo cuando ase a la parrilla. Use la cacerofa y
la parrilla para asar que viene con su estufa.
Ambas
est_n
diser_adas
para
drenar
adecuadamente
la grasa y los Ifquidos.
El papel de aluminio
debe ser
moldeado
Hrmemente
a la
parrilla y debe hacer cortes en
el papel que est&n alineados
con las ranuras de la parriila.
Esto permite que la grasa y los
I(quldos calgan a la cacerola, evitando que
se produzca
un incendio y humo excesivo.
$iempm saque la ¢acerola
y la pan'ilia
del homo.
6uardar
y olvidar
una
cacerola para asarsuda
en
el homo es un peligro para
producir un incendioo humo.
El Departamento
de Agricultura
de los Estados
Unidos nota que las cames cocinadas
crudas
son populares,
pero que la came que se cocina
hasta sdfo 140°t=, (cruda) significa que algunos
organismos
venenosos podrfan sobrevivir.
Mientras m_s cerca cotoque los alimentos del
etemento para asar, m_s rbpido se dorarbn por
afuera, pero quedando rojo o rosado en ef centro.
Cofocando las cames fejos del etemento permitir8
que las cames se cocinen en el centro mientras se
doran por afuera. Usando estas posiciones, cocine
el fado 1 por fo menos 2 minutos mbs que et fado 2.
Si su homo est_ conectado a 208 voftios, usted
podrfa usar una posicidn de parriffa m_s afta y/o
cocinar los alimentos pot m_s tiempo.
El tama4o, peso, grosor, temperatura iniciaf y su
preferencia personal afectar_ el asado a fa parriffa.
Esta tabla est# basada en cames a la temperatura
det refrigerador.
POSICION DE
PARRILLA
3
3
o Seleccione codes de cames bfandas que tengan
por lo menos 3/4" de grueso para asar a ta
parrifla.
o Corte el exceso de grasa de las oriffaso haga
cortes en las orillas para evitar que fa came se
enrosque.
o Siempre use tenazas para dar vuetta la came.
Si hace hoyos en la came, permitirb que et jugo
se escape.
o Ponga sal sobre el primer lado de la came
inmediatamente
antes de darla vuefta, y sobre
el segundo
lado inmediatamente
antes de
servirla. Aplique mantequilla sobre ef pollo y el
pescado con una brocha varias veces mientras
se asan.
o Et polio y el pescado
deberfan ser puestos
sobre la parrilla con fa pief hacia abajo. Para el
pescado,
aplique un poco de grasa sobre ta
parrilla para evitar que se pegue.
14
tao Empuje el botdn _RG#L.
fEstto
au_om#_icamen_e
pregrama
ASADG
en
HII.
ALTOJ
Mientras et indicador pestar_ea en
el dia!, empuje et botdn BROHnuevamente
si usted desea usar
AS_DG
en Bt_dO.
2.
Empuje
el bot_n
STI_RT.
3=
Cuando termine de asar, empuje
el bot6n CLEAR/OFF.
Los
utensilios
nunca
se
deberian dejar dentro del homo
durante un ciclo de autolimpieza.
Las parriilas
del horno
se
podrian limpiar durante el ciclo
de autolimpieza,
pero perder#n
su brillo y
se pondr_n dificiles de desllzar.
SI decide
dejarlas dentro durante el ciclo de limpieza,
p#seles aceite vegetal para que se deslicen
m#s f#cilmente.
Saque la cacerola
y la parri!la para
asar, la parrilla del
homo, utensilios,
y cualquier papel
de aluminio
que
podrfa quedar en
el homo.
La suciedad en el /
frente del marco, -D£ _ PUE_A
1" dentro
del
homo, y alrededor
def sello de la puerta
homo tendra que ser limpiada a mano.
Siempre asegdrese
que la luz del homo
est#
apagada
durante
el ciclo
de
autolimpieza
para alargar la vlda del foco.
Durante el primer ciclo de I/mpleza, venti/e
la habitacidn con una ventana abierta o una
campana de venti/acidn.
Esto evitard el olor
fuerte producido
por e/ ca/en tamien to de las
partes nuevas.
det
Limpie estas _reas con agua caliente, fanillas con
jabdn o lirnpiadores como Soft Scrub para sacar
cualquier
suciedad.
Enjuague bien con agua
limpia y seque.
3.
Limpie cualquier
del homo.
a
derrame
pesado
def rondo
o Cuando lapuerta se enganche, LGCKED DOOR
aparecer_ en el dial. La temperatura tendrb que caer
rn_s abajo de la temperatura de enganche antes
que la puerta pueda ser abierta. La patabra LOCK
DOGR desaparecerb det dial.
No limpie et sello de la puerta del homo. El
material de libra de vidrio de la puerta del
homo no soporta fa abrasi6n. Es esencia! que
el selfo permanezca intacto. Si nota que se
est,_gastando, trizando, o saliendo de lapuerta,
deberfa ser reemplazado.
o Si£OCK DOORpestar]ea
en efdiat, fapuerta no
est_ enganchada completamente,
simplemente
empuje fa puerta.
Limpie sotamente para retocarlas entre cicfos de
Iimpieza.
Use detergentes
tfquidos para platos,
agua tibia, o lanillas de acero con jab6n, Enjuague
bien despues de limpiar y seque.
El sello de la puerta
estb diser]adopara
P_.EL
DE LA PUERTA
SELLO
que
tenga
un
espacio de 5-6 ° en
el fondo del homo.
Esto permite
fa
c ir c u /a c i 5 n
._v_sT,_,_.To
D__ PuE.T,
adecuada del aire.
Es normal que su homo d# la apariencia de no tener
un buen sello sobre el homo. Esto se debe at seflo.
La ubicacidn del selfo sobre la puerta del homo
mantiene la puerta sellada y previene cualquier
p#rdida de calor.
P_U_C_
USE
LHMPU,_DGRES
PARA
HOR_OS
DEP_TRO
G ALREDEDOR
DE
CU_LGU#E_
PI_TE
DEL HOR_O,
Cuando timpie, a segOrese de no dobfar o mover et
sensor de fa temperatura
ubicado en la pared
trasera del homo.
"_5
ciclo de autolimp_eza continOa en la pagina siguiente
El Ciclo de Limpieza est_ programado
para 4
horas, pero usted podrfa cambiar esto desde 3
horas si el homo esta le vemente sucio a 5 horas si
el homo est_ mw sucio.
t o Empuje
a
Empuje el bot6n CLEA_.
Mostrar_ 4 horas en el dial.
@@
@@
HOUR
2.
MIN
3.
HOUR
@@
Empuje el botdn con las
flechas UP o DO_Z_ para
la Hora y los Minutos para
seleccionar la cantidad de
tiempo que usted desee
que dure el cic!o.
Empuje
et botdn
MIN
1
Despu6s del ciclo usted
podrfa notar un poco de
cenizas
blancas
en e!
horno.
Simplemente
Ifmpielas con un paso o
esponja
_J
homed&
Si algunas manchas blancas persisten, fri_guefas
con una lanilla de acero con jabdn. Asegdrese de
enjuagar bien, Estas son generafmente dep6sitos
de sal que no se pueden sacar durante el cicto.
SH peB" aSguna
_'az6n
us_ed
¢_e quec#a
sa_isfecbo
cen
Kos resut_ades
de _a
8impieza,
simpBemen_e
repita
el cicHo.
16
Empuje los botones con fas
flechas UP o DGW_# para
la Hora y los Minutos, para
sefeccionar fa cantidad de
tiempo que quiere usarpara
el ciclo.
Empuje
START
el bot6n
TSME,
DELJ& 2'
Empuje los botones con tas
flechas UP o DGW_ para
ta Hora y los Minutos, para
seleccionar
la hora en fa
cuat usted desea que el
ciclo comience.
5.
Empuje
MIN
@@
Simplemente
empuje
el botdn
CLEARfGFF.
Usted necesitarb
esperar a que la temperatura
del
homo baje mbs que la temperatura
de enganche (aprox. 1 hora) antes
de tratar
de abrir
la puerta.
_'Locked Door" desaparecer_ del
dial.
C&EA_.
4_
START.
HOUR
el botdn
el botdn START.
$ CCIOH R
El nuevo
control
a botones
FRO RAMA$ $FECUALE$
tiene programas
adicionales
Empuje y sujete, an _is_o
_Nempo, el botdn
BAKE y BROnL, hasta que el dial muestre
SF.
2.
Empuje el botdn DELLA Y START
TIME
E/
dial muestra 1,2shdn (apagado en 12 horas).
Empuje
seleccionar.
t.
Empuje y sujete, a Ra rnNsma vez, el bot6n
BAK[_ y BRON£ hasta que et dial muestre
SF.
2.
(aJ Empuje el botdn Cn-OCK. El dial mostrar_
12hr. Si #sta es su sefecciOn, empuje el botdn
S1t't_F_T.
o
(b) Empuje el botdn CLOC_
nuevamente.
El
dial mostrar_ 24hr. Ejemplo: 5:00 en el refoj
de 12 horas leer# 17:00 en el refoj de 24 horas.
Si _sta es su seteccirJn, empuje el botdn
$1YART.
Empuje el botdn
Dt_ILAY ST,_RT
TIME
nuevamente.
El dial mostrarb rhe shdn
(no
apagado).
3.
puede
Su control estb programado
para usar el reloj en
12 horas, Si usted prefiere usar Flora Militar de 24
horas o poner el dial en blanco, se hace ash
El control se programa
autom_ticamente
para
apagarse
despu#s
de hornear por i2 horas o
despu_s de asar a la parrilla por 3 horas en caso
que se le olvide y deje el homo encendido.
Si
desea eliminar este programa:
I,
que usted
COnTrOL
e! boron ST_IR'£,
o
(c) Empuje el bot6n CLOCK nuevamente.
El
dial ahora mostrara
OFF.
(La hora no se
mostrar_ en el dial). Si #sta es su selecciOn,
empuje START.
La hora no se mostrar9 en et
dia!.
El control del homo est_ programado
para la
seleccidn
de temperaturas
en Fahrenheit.
La
mayorfa de las recetas se dan usando la escala
Fahrenheit.
Usted puede cambiar esto y usar una
selecciOn en Centfgrados.
Se hace ash
t.
Empuje y sujete, a Ba rnJs_a vez, los botones
I_AB{E y BROIl& hasta que el dial muestre SF.
2,
(a} Empuje el botdn BROIIL. El dial del controf
mostrar& el signo para grado y F.
r_b)Empuje el boron BROItL nuevamente.
Esto
cambiar_ F (Fahrenheit) a C (Cenffgrado).
3.
Empuje
el bot_n ST'ART.
7
programas
especiates
contind_an
El control le permitira cerrar
que no se puedan activar
se preocupa
de dejar el
active este programa.
Se
t.
los botones de manera
cuando los empuje, Si
homo sin supervisidn,
hace ash
Este Programa Especial le permitir_ cambiar la
velocidad, # 1 significa que et cambio de velocidad
es lento hasta #5 que significa que el cambio de
ve!ocidad es rSpido. Para seleccionar la velocidad
que prefiere, siga estos pasos:
Empuje y sujete, a Ha mHsma
vez, el
botdn BAKE y BROBIL, hasta que el dial
muestre SF.
1.
_aJ Empuje el botdn C,_-EA_.
El dial
muestra &OC OFF (cierre inactivo).
_bJ
Empuje
el
botdn
CLEA_
nuevamente.
El dial mostrarb LOC ON
(cierre acfivado).
3o Empuje
Empuje el botdn con fa ftecha UP,
mostrar_ una posici6n de velocidad
5.
el botdn START.
_sfte
prograrna
se puede
$olarnen_e
cuando
eH horn#
_w
seHecc_onar
no esft# en
Empuje el bot(_n ST,_R'_.
EI nuevo control tiene un programa de mantencidn
de temperatura
para cocinar autom_ticamente
solamente que mantendrb
la comida que ha sido
cocinada
tibia hasta 3 horas despu#s
que el
cocinado
autombtico
termina.
Para activar este
programa:
Empuje y sujete, a Oa misma vez, Ios botones
B._f_E y BROIl#-, hasta que et dial muestre
$Fo
TIME.
{b)Empuje el botdn OVfEN COOKIlNG
7"liME
nuevamente
para
ac_var
es_e
programa.
El dial mostrar_ _#-d ON.
3.
Empuje
aumentar
ta
Empuje el bot6n con la ffecha DOW'N para
disminuir fa vefocidad hasta et ndmero 1.
Cuando este programa
est# activado, et control
sonarb y el dial mostrarb &OC ON, Si se empuja
un botdn.
r_
a) Empuje el botdn 0 YEN COOKING
El dial mostrarb H#-d OFF.
Empuje ta flecha
UP para
velocidad hasta el ndmero 5.
El dial le
entre 1 y
0
#SO.
1.
Empuje y sujete, a Ba mJs_a
vez, Ios botones
BA_E
y BROH#-, hasta que el dial muestre
SF,
el botdn S_AR'€'.
t8
@UE MA TERNALE$
DE R_IIMPnE_
QUE
USI_R:
MA TERSALES
DE LHMP_EE.A
o Detergente Ifquido para platos.
o Agua tibia.
,, Patio suave
o Detergente para platos
o Laniltas de acem con jabdn
_e
use
Hrnpia_ores
lcnoro_..
P._BA
Hmpiadores
indus_riaRes_
_,Agua tibia
abrasives,
o blanquedores
LIMPHAR:
Lave y enjuague
PARA
bien.
SACAR:
Tire tas parrillas
hacia afuera y hacia arriba.
PAF_A COLOC_RLAS
QUE
MA 7ERNALES
,, Detergente
lfquido
o Agua tibia.
o Lanillas de acero
,, Limpiador
hornos.
COMO
DE LNMPIEZA
NUEVAMENTE:
Coloque ta parte /evantada de la parrilta sobre un
par de gufas para parriffas.
Empuje hasta que
ffegue a un tope, levante el frente de fa parrifla
hasta que fa parte de atr_s se destice f_cifmente
USAR:
para platos.
bajo el tope.
con jabdn.
comercial
USAR:
Empuje
la parriffa hacia
el homo.
para
LBMPIAR:
QUE
Permita
que la cacemla
se remoje.
Ponga
detergente para platos sobre la parrilfa y cubra
con un patio o una toafla hdmeda por un rato.
Friegue a medida
que sea necesario.
Lave,
enjuague, y seque bien. Usted tambi#n podrfa
poner la cacerota y la parri!fa en la lavadora de
platos,
MA TERNALES
DE LgMPBEZ._
USAR:
o Limpiador para vidrio
o Toallas de papel
o Soda para hornear
PARA
LHMPHAR:
Para timpieza diaria, use un fimpiador para vidrios
y una toafla depapel.
Para suciedadpesada,
use
una pasta de soda para homear y agua. Enjuague
bien.
19
ESREMOVE E$
P._RA
FOCO
COLORCON
CUBIERTA
DELFOCO
COMO
t.
2.
SACA_t
Abra la puerta hasta la
posicidn de tope para asar
a laparrilla. Tome lapuerta
de cada fado y lev_ntela
de las bisagras.
_0
LEVANTE
LI_ PUERTA
DE L,_ MAP_IILL,_°
80QUETE
t1LAMBRE
_UJETADOB
LA CUBIERTA:
Desconecte la electricidad hacia el homo en el
• circuito principal o en la caja de los fusibles.
Cuando la puerta se saca y
las blsagras
estdn
en la
posicl6n para asar a la parrilla,
no pase a llevar los brazos de
las bisagras. Podrfan cerrarse
violentamente
y causarle
herldas en las manos y datiar
el acabado de porcelana
en el marco frontal
Cubra los brazos de las bisagras
con tubos
de toallas vac(os o con toailas mien tras traba]a
en el #rea del homo.
Coloque la mano debajo de la cubierta y tire
firmemente
el afambre sujetador
basra que
suelte la cubierta del foco.
REEMPLACE
EL FOCO
#E LA LUE::
Desatornille el foco de ta luz y reemplacelo
con un
foco para homos residenciales
de 40 watt.
PARA
RECOLOCAR
LA CUB#ERTA:
#.
Coloque la cubierta
del foco.
2.
Tire el alambre sujetador hacia adelante hasta
que caiga en la indencidn sobre la cubierta det
foco.
3.
Reconecte
SACABLA:
en la ranura
la electricidad
del soquete
PABA
REEMPLAZAR:
Saque
los tubos
de
toaflas
vacfos
o las
toalfa& AsegOrese que
los brazos
de las
bisagras todavfa estbn
en fa posicidn de tope
/
J
/
para asar.
Tome la
puerta de cada tado.
Levante la puerta sobre
cada bisagra.
Ponga
tas ranuras det rondo
de la puerta en lfnea con tas bisagras.
Desfice la
puerta hacia abajo sobre las bisagras io mbs
posibfe.
hacia el homo.
No toque el foco de la luz caliente
del homo. No toque un foco con
las manos moJadas o con un
patio mojado.
Nunca
toque
el collar
con
electricidad
de un foco cuando
Io saque o Io reemplace.
No
saque ninguno de los torniilos.
20
SE VfC U8
Para ahorrar tiempo y dinero, antes de flamar para un servicio, revise la fista de m,ts abajo para cualquier
problema que usted crea que tiene con el funcionamiento
de su estufa. Si el problema es algo que usted
no puede reparar, use los NOmeros de Servicio para el Consumidor que se encuentran af final de este
manual. Cuando
haga un BVamado_, _enga dispon_bGe e8 n#mero
de modeHo_ tXsta de parses
para reparacHones_
rnanuaB de uso y cuidado
y Ba fecha de compra.
PROBLEMA
POSIBLE
CA USA
Ell diaN deB con_ro#
pesta_ea
una "F"
seguHda
per urn
n#mero
e Betra,
Mal funcionamiento
fa eslufa,
Ell faomo no
_uncB#na;
fto_almenfte
ineperan_e,
No pasa electricidad
la estufa,
ILo$ aH_entT:os
cocinan
adecuadamen_e.
a.
no se
POSIBLE
de
SOLUCION
Empuje ef botdn CLEAR/OFF,
Permita que fa
estufa se enfrfe por una hora y ponga
nuevamente el homo en funcionamiento.
Si el
problema se repite, ftame para un servicio.
a
a.
El horno
no se
precalent6.
t_. Posicidn incorrecta
de fa parritfa o ta
cacerola.
a.
b.
Asegdrese
de precalentar
hasta que
suene el tono.
Mantenga
un espacio de aire uniforme
alrededor de tas ottas y utensilios.
Vea ta
seccidn para Cocinar en el Homo.
co La ventifacidn
det
homo est_ obstruida
o cubierta.
ca. Uso incorrecto
def
papel de afuminio.
e. Temperatura
incorrecta
para el
utensilio usado,
f. No se siguid
la
receta.
c.
Mantenga
d_
No cubra
g.
Mata cafibraci6n del
control det homo.
g.
Revise
ta
temperatura
h.
La estufa o la parrilla
del homo no estbn
niveladas.
h.
Vea las instrucciones
ta nivelacidn.
&a _empera_ura
homo
no parece
esftar e,_ac_a.
deg
Calibracidn
homo.
PLafiuz _eB homo
_unciona
no
a.
b.
def control det
El interruptor de la luz
est_ apagado.
El foco necesita ser
reempfazado.
_
Revise la caja del circuito de fa casa o fos
fusibles.
b. Revise y asegOrese que ta estufa est_
enchufada.
e,
f.
ta ventitaci6n
tas parriltas
despejada.
cuando
homee,
Reduzca la temperatura
en 25 grados
para utensifios
de vidrio, oscuros
u
opacos,
Revise fa receta y fas medidas.
Vea la secci6n
homo.
secci6n
de ajustes
a ta
que sigue esta seccidn.
de instafaci6n
de c6mo cocinar
a.
Rew'se ta posiciSn
b.
Revise o reemptace
de ta luz.
para
en el
del interruptor.
el foco
Antes de tlamar para un servicio contin_ta
PROBLEMA
Los
aHH_enftos
POSIBLE
ne
a
Revise ta posick_n de las cacerolas;
vea ta seccidn para asar a la parrilla.
No precaliente cuando ase a la parrilla.
c,
Lea fa seccidn
para asar a fa parrilla.
Abra la puerta
para asar.
a la posicidn
e,
L
Mal uso de papel de
co
aluminio,
La puerta del homo se
do
cerrd durante el asado a
la parrilla.
Bajo voltage (208
e,
Vottios).
Cantidad de tiempo
L
incorrecta para asar.
La puer_a deB
horno
rDo se
desenganc/_a,
El cic!o de limpieza
terminado,
nO se
Hirnpi6 e 8os
resul_ados
fueror_
maios.
a,
_0 #_orno
humea=
no ha
Los controles no se
pusieron bien.
b,
El ciclo de limpieza
interrumpido.
c, El homo estaba
demasiado sucio.
fue
a. Homo sucio.
b, Mal uso de papel
aluminio.
de
c. Se dejd_ la cacerofa
para asar con grasa
dentro det homo.
EO horno
oBor=
emUte
un
SOLUCION
Posicidn incorrecta de la a,
parrilla.
b, El homo se precalentd,
b.
d,
EV horno
POSIBLE
a,
Se _S_n
adecuada_en_e
#a parrigHa.
CA USA
a.
El aislante del homo
podrfa emitir un ofor
durante los primeros
de tope
Use posicidn de parritla m_s afta y/o
ase por mbs tiempo.
Yea la tabla para asar en fa seccidn
de cdmo asar a fa parrilla.
La temperatura det homo debe caer a menos
de fa temperatura de enganche antes que se
pueda abrir ta puerta,
a.
Lea ta seccid)n de autofimpieza
manual
b,
Ef cicfo de limpieza normaf deberfa ser de
4 horas y 20 minutos.
c,
Los derrames grandes se deberfan limpiar
antes de programar
un ciclo.
Usted
tambi_n podr(a repetir el cicfo.
a.
Vea que no hayan derrames
b,
No se recomienda
aluminio.
C_
Limpie fa cacerofa
de cada uso.
de este
grandes,
el uso def papet
y la parrilta
de
despu6s
a.
Ponga ef homo en un c iclo de autotimpieza
para aceferar el proceso de eliminar el
ofor,
b.
Limpie el exceso de suciedad antes de
comenzar un ciclo de autofimpieza.
USOS.
b.
_',_opuede
programar
a 35G°.
P_ornear
No limpiar e! exceso
de suciedad antes det
cicfo de autolimpieza.
Controf programado
modo de grados
Centigrados,
para
22
Yea la secci6n
especiales.
cdmo programar
funciones
AdU$ $#E
MP
T#RA = "
Usted podrfa pensar que su nuevo homo cocina
diferentemente
al horno
que reemplazd.
Recomendamos
que use su homo nuevo unas
pocas semanas para que se familiarice
con _1,
siguiendo los tiempos que se dan en las recetas
como una gufa.
,
8A ,85 #$TEBMESM#"
Use un destomilfador
para soltar los dos
tornillos aproximadamente
una vuelta cada
UnOo
.
Si cree que su nuevo homo esta funcionando
demasiado
caliente
(quema la comida)
o no
calienta Io suficiente (la comida no queda bien
cocida)
usted
mismo
puede
ajustar
la
temperatura.
La apariencia
y la textura de los
alimentos son mejores indicadores de la exactitud
de un homo que un term6metro barato, como los
que se venden en las tiendas, para controfar la
posicidn de la temperatura
de su nuevo homo.
Estos term6metros
pueden
variar entre 20-40
grados. Adembs, la puerta se tiene que abrir para
leer estos termdmetros.
Abrir la puerta cambiarb
la temperatura
del homo.
,
Sujete la manilfa de la peri!la (,4 en fa ifustraci6n)
mientras hace girar et disco de ta perilla (Ben
la ilustraci6n)
en la direccidn
deseada.
A
medida que hace girar usted deberfa oft los
clicks o sentir los dientes, Cada click o diente
es t0 °. Usted puede hacer girar hasta 5 clicks
en cada direccidn.
Cuando ilegue al ajuste necesario,
nuevamente los dos tomillos.
aprete
No fuerce fa peritfa en et tatlo del termostato
Io podrfa dar_ar.
Para decidir en cuanto cambiar fa temperatura,
suba la temperatura
del homo en 25 grados (se
los alimentos no quedan bien cocidos)
o baje fa
temperatura en 25 grados (si la comida se quema)
de la temperatura de la receta, luego homee. Los
resultodaos de esta "prueba" le deberfan dar una
idea de cubnto se deberfa cambiar fa temperatura.
Empuje y sujete los botones
BAKE
y BROBrL basra que el
dial muestre SF.
+
Empuje el botdn BArgE,
Un
ndmero puesto en fbbrica de dos
dfgitos aparecer#
en el dial,
generalmente
oo.
Si tree
que el homo
es_
Ho suficientemen_e
caBien_e,
3a.
MAS
.
MAS FRIO
Haga girar la perifla OVEN SET" a la posici6n
OFF (APAGADOJ
y saque fa perilla de fa
temperatura
tir_ndola derecho hacia afuera.
2. Mire la parte trasera de la perifla. La flecha que
sef_ala hacia el centro def tornillo superior
indica la posicidn
original que viene de ta
fbbrica.
La perilla puede ser ajustada hasta
50 _ F m_s caliente
o 50 _ F m_s frfo, en
incrementos
de 10 _.
no
Empuje el botdn con la felcha
UP TEMP para aumentar (+) fa
temperatura hasta +35 °F si usted
cree que et homo
no est_
funcionando
1o suficientemente
catiente, oo,
Si cree que eB homo
dernasiado
caSien_e_
[_'(_
o
est#
3b.
Empuje el bot6n con ta flecha
DO_fN TEMP para bajar (-) fa
temperatura hasta -35°F. Si cree
que e! hornoest_
funcionando
demasiado cafiente.
4.
Empuje
el botdn START.
" Este aumento o disminuici6n
en la posici6n de la
temperatura
permanecerb
en fa memoria hasta
que los pasos de arriba sean repetidos.
Un corte
de corriente no afectar_ esta posicidn.
23
Las temperaturas para asar a ta parrifta o para ta
autofimpieza
no ser#n afectadas.
Para partesde reparacioneso de
reempBazoque necesla
Llamede 7 am - 7 pm, 7 diasa la semana
t
0
=PAIIT
(1-800-366-7278)
Parareparacionesy servi¢iode marcas
mayores el SI casa
Llame24 horasal dia, 7 diasa la semana
=IB@@=4=IIEPilII II
(1-800-473-7247)
Paraubicarun Centrede Servicio de
Reparacionesen su_rea
Ltame24 horasal dia, 7 diasa la semana
EIEt
il =8@@=488= _ £££
Parainferrnaciones acerca de Contratesde
MantencionSears o parapreguntasacerca
de un Contratoexistente
Liame de 9 am - 5 pm, Lunes-S_bado
fi =8@@=8_W'=6@55
Los especialistas de reparaciones de America
24
BBBBBB
...............................
...........
J
_
_
Estlmado
TODO U_3 A_O DE: GARANT_A COMPILETA PARA LAS FUNClONES DE
_
TODAS LAS PARTES EXCEPTO 0.AS DE VIDRIO
5t, dentro de| lapse de un abe a parttr de la fecha de Instalac]6n,
cualquler parte 1
que no sea de vidrlo, funclona mal debido a un defecto en el material o en la manol
ctlente:
Nuestros esluerzos
constantes
est_n
de obra, Se,_rs la reparard o la reemplazard,
dlrlgldos
GARAHTIA
ACABADO
a asegurar
TOTAL DE 30 DIAS PAPJ_ LAS PARTES
DE ViDRIO
Y EL|
DE ESI_ALTE
PORCELANi;i/JtDO,
PARTES
DE METAL
PINTADO
O BRiLLAHTE
|
SI, dentro de los trelnta dlas poster|ores a la Instalaclbn, cualquler parts de vtdrlo|
o el acabado de cualquier esmalte porcslanlzado o parts de metal ptntado o|
brltlante tlene defectos en el material o mane de obra, Sears reemplazard la parte,l
sin costo alguno.
que su nueva Estufa
Kenmore Ilegue a su
hogar en perfectas
condiclones
servicio
/
/
y le d_ ei
adecuado.
GARAHTIA
TOTAL
DE 90 D_AS EH AJUSTES
_'_ECAHICOS
|
Durante 90 dias a partlr de ta fecha de Instalaclbn, Sears proporctonarb, sin costo|
alguno, cualquler ajuste mecdnico necesar]o para la correcta operachEn de la|
estufa, exceptuando el mantenlmlento normal.
sl la estufa est_ suJeta a otro use que no sea el prlvado familiar, la cobertura de|
la garantla menclonada arrlba ser_ efectlva s61o durante 90 dlas.
|
Come parts de estos
esfuerzos, sentimos
/
que es
responsabilldad
nuestra
proporctonarle
esta
garantla
para su
estuia.
EL SERVECIO
DE GARAHTIA
ESTA DIISPOHIBLE
COH SOLO
||
POHERSE
EH COHTACTO
COH EL CEHTRO
O DEPARTAMEHTO
DE/
SERVIC_O
SEARS _AS CERCAHO
EH LOS ESTADOS
UHI[DOS,
Esta garantla se apltca s61o cuando este producto se use en los Estados Unidos. /
Esta garantla le brtnda derechos legales especIficos, y tambi&n puede tener otros|
derechos que vartan de un estado a otro.
/
/
@
SEARS,
ROEBUC={
ANDco. l
LE © IJI©S
Eotatesp
IL 60179
)
..................
_
j
_dO
P,_pol
m_C
Hoffman
_
1
sin costo alguno.
I L© @II
£11VIOIO
VII II)II©£
"Le dames servicio a to que vendemos" es la manera de asegurarle que puede depender de Sears par° el servicio
porquo e! se_'vic!o Sears se ofrece en _odo e! pa/s.
Su Estufa Kenmore tlene un valor agregado cuando us_ed considera que Sears posse una untdad de servicio cerca
de usted, que cuenta con un equlpo Sears de _cnlcos
capacttados...t_cnlcos
profeslonales
especfflcamente
entrenados pat° maneJar los aparatos Sears, y que tienen acceso alas partes, herramlentas
y equipo para asegurar
que cumplamos nuestro compromlso con usted: "lEe dames servtclo a Io que vendemosF'
PARA A_PLIAR
EL VALOR DE SU ESTUF_, CO[_FRE _H CONTR_TO
DE _AL_TEHIMIIEI_ITO
SEARS.
L_ estu£,_s l_ene_ol, e e._l_n dise_das,
_a_cadas
y probada_
p_'a
_'Inda_'ie
a_oS
_e epe_ciSn
ten,labia,
Sin
emba_'go,
cu_lquier
_para_o
enode_ne
puede
_equerir
de _Ig_n
seR'vieio
_e vez
ea
cuan_o,
La ga_'ant[a
Sea_s_
ade]_n_s
del
Inespe_
m_Ima
y lo
offclencta
He aqu_ una
cen_:tta_:o
bene_icles
pae'a
,_e_u_'_n
qUe
en es_u_a_.
ga_'_n_la
compa_a_lv_
dO _Ja_eai_iel_;e
do un contra_Lo
disabuse
de
y una Iabla
AI_c_ d_ c_,rtura
de I_ ptop_odod
1=}" e_O
2* °_O
:_e¢ =_Io
G
AN
AM
1 "_="_'_°"'_="°_°'=°'
......
r_uo no =a_
d_ pcrcal_t_a
o riddle
90 DAY_
2 ,_,=_
...... .,1=
G
AM
AM
3 ...oo-.=0o,=°_,_0'o
G
AM
AM
A['_
AN
t_
del
._1
que le _ues_'a
los
_an_enimien_o
Sears
=4
R_vial6t_
p_,ve_l
€_1u°1 d° m=r_lonlmt_'_to
.....
Ilct,ud
de u=t.d
AN
Es_ufas,
POI_OASE E_ COHTACTO
CO[_ ._ VEHDEDOR
DE SEARS 0 CON EL CENTRO DE SERVICIO
SEARS
L_ LOCALIDAD
HeY MIS_O
Y CO_PRE
UN CONTRATO
DE _ANTENIIMIEHITO
SEARS.
_1__O_
®
Vended°
_.a marc°
_e °parades
po_" SEARS,
ROEBUCt_
elec_redom_sfdcos
AND
die mayo_
CO._ Hoff_n'_an Es_a_es_
--
tmp_'ese
e,
ven_a
en Amdrica
IL 60_179
Los Es_a_os
Un_dos
DE