1
CONTENTS
SAFETY
PRECAUTIONS:
AVOIDIHG
POSSIBLE
EXPOSURE
MICROWAVE
ENERGY
FEATURES
OF YOUR/OVEN
MICROWAVE
Control
TO
OVEN
...........................................................................................
7
Timer, Using e Hold Time ......................................................
8
To Time Delrost, Hold and Cook .................................. 8
Microwave Time Cooking ....................................................
9
Defrosting by Time, Auto Delrost, Stand Time ........10
Conversion Guide, Auto Defrost Guide .....................11
Temperature Cooking, Temperature Probe .......... 12
Auto Roast, Auto Simmering
13
Auto Cook, Auto Cooking Contro!
Guide
13, 14, 15, 16
Microwave Oven Shelf ....................................... 17, 19
...........................................................................
...................................
LOWER
OVEN
Control, Clock and Timer ..........................................
20,
Bake, Delay Bake and Hold Mode ....................... 21,
Broiling .............................................................................
Self-Clean Cycle .......................................................24,
Cleaning Tips ............................................................ 26,
REMOVABLE
21
22
23
25
27
PARTS
...........................................................................................
.....
28,
29
Removal o| Packaging Tape .............................................
29
CALLIHG
FOR
SERVICE
30-32
......................................................................................
BEFORE
Thermostat
Adjustments
MODELS
........................................... 33
49425, 49429
o
A
oSAFETY
UAL
MNM085-7 SR10015
SAVE
Read all instructions
appliances,
basic safety
before
THESE
INSTRUCTIONS
using th_s appliance.
precautions
should
be followed,
When using electrical
including
the following:
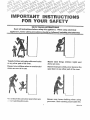
Teach children notto play with oven knobs
or any other part of the oven.
Hever store things
above an oven.
Never leave children alone or unattended
where an oven is in use.
Never let anyone climb, sit or stand on the
open door or any other part of the oven.
;!e:; er leave the oven door open when you
_._,_not watching the oven.
Never" wear loose clothing
when using
your oven. Such clothing could catch fire,
1
children
might
want
NESAFtO
Toi insure
safety
for yourself
and your
home,
please
Ca_efuiiyl Keep it handy for quick easy reference.
safety
sections
looking
for the
of your manual.
A
symbol
read your
Owner's
Pay close attention
You can recognize
the safety
Manual
to the
sections
by
or the word "Safety".
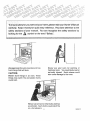
Never" use your oven for warming
or
heating a room.
You could be burned or
seriously
injured.
Such misuse could
aIso cause damage to the oven.
Always keep the oven area clear and flee
from things that will burn.
CAUTION:
Never
store things
in an oven. These
things may catch fire and plastic items
could melt.
Never use a towel or other bulky cloth as
a potholder.
Such cloths could catch fire
on a hot element.
2
NESAF11
Read all instructions BEFORE using this appliance.
De no_ block oven vent area.
Wh_
using electrica_ appliances,
basic safety
precautions should be followed, including the followtn_;
Ke_p oven free from grease buildup Keep clean t_
maintain good vent!ng and to avoid grease fires.
_lways use this appliance only for its intended use as
described in lhis manual.
Place oven shelf tn desired position while oven Is cool
if shelves must be handl_edwhen hot, do not let pot holde _
contact heating units in the oven
_
sure your appliance Is properly installed
_;ounded b_ a qualified technician In accordance
_h_ insis_l_t!on tn_ructions
provtoec,
ant
wi_
PuHin=_ ot_ shelf to the shelf stop Is a convenience ir
lifting heavy foods. It is also a precaution against burn_
from touching hot surfaces of the door or oven walf_
_eio,'_;. perzormin;
any service, DISCONNECT T_-iE
R._.N{._E POWER SUPPLY AT THE HOUSEHOL£
DISTribUTION
PANE;. BY REMOVING THE FLISE OF_
SWITCHING O_F THE CIRCUIT BREAKEP,.
When using cookin_ or roasting bags In oven,, follow the
manufacturer's directions
_,o not: use your oven to dry Items; tf overheated, they
can catch fir&
LI €_ _f_l_" =._r,_polholders
Moist or damp potholders
Dr_h_T_f_'_-.es may result in burns from steam. Do no,
1_ p_f_lders touch hot heating elemenls. Do not use
&';_W_I or ¢F_f/_rbulky cloth.
Do no_ clean door gasket.
The door gasket Is
essentiai for a good seal. Care should be taken not to
rub, damage or move the gasket.
eep oven and vent clean to maintain good venting and
ic_avmd grease fires.
Do not use oven cleaners,, No commercial overl cleaner
or oven liner protective coating of any kind should be
used |n or around any part of the oven.
Wh._n cooking pork, follow the directions exactly and
n!w.3ys cool{ the meat to an Internal temperature of at
least 170_F. This assures that, in the remote possibility
that lrichina may be present In the meat, tt will be killed
and the meat will be safe to eat.
Clean only parts listed In this Owner's Manual.
]Before self-cleaning
other cookware.
the oven, remove broiler pan and
Do not use aluminum fell anywhere In the oven except
as described In this manual. Misuse could result In a
Stan_ away irom the oven when opening the oven
door. Hot air or steam which escapes can cause burns
1o hands, face or eyes.
shock, fire hazard or damage to the oven.
This appliance
should
be serviced
only by
qualified
service
personnel.
Contact
nearest
authorized sentice facility for examination_ repair
or adjustment,
[3o z_ot a/lempt to repair or replace any part of your oven
u:}less it is specifically recommended in this book. All
oliver servicing
should be referred to a qualified
technician°
This appliance must be connected to a grounded,
metamc, permanent wiring system, or an equipment
grounding conductor should be run with the circuit
conductors and connected to the equipment grounding
terminal or lead on the appliance.
The possibility c!
electrical shock exists with an unplugged microwave.
C,_,UTtON: items of interest to children should not be stored in cabinels alive
an oven. Children climbing on the oven to reach
items
_ould b_ seriously injured.
Do not operate this appliance If it is not working
properly or if it has been damaged or dropped.
D_ ,,_i store or use combustible materials, gasoline or
uther !lammable vapors and liquids in the vicinity of this
or any other appliance,
As with any appliance, close supervision
when used by children.
Do not let cooking grease or olher flammable materials
accumulate in or near the oven.
Is necessary
tf self-cleanlng
mode malfunctions,
turn off and
disconnect at the fuse or ctrcuit breaker panel. Have
serviced by a qualified technician.
Do not tOUCl_heating elements or Interior surface of
ovP.n. These surfaces may be hot enough to burn even
though they _re dark In color. Do not let clothing or other
_Iammable materials contact the interior of the oven.
Allow sufficient time for cooling.
Do not heat unopened food contalnerso Pressurebulldup may make container burst and cause injury.
Potentially hot surfaces Include the oven vent opening
and surfaces near the opening and crevices around the
oven door° Remember: The Inside surface of the oven
may be hot when the door is opened.
3
NESAF18-1
SAVE THESE IINSTRUCT_ONS
IMPORTAHT
SAFETY
NOTICE
The California Safety Drinking Water and Toxic
Enforcement Act requires the governor of California to
publish a list of substances known to the state to cause
birth defects or other reproductive harm and requires
businesses to warn customers of potential exposure to
such substances.
The fiberglass insulation in self-clean ovens gives off a
very small amount of carbon monoxide during the
cleaning cycle. Exposure can be minimized by venting
with an open window or using a ventilation fan or hood.
READ
AND
UNDERSTAND
INFORMATION
NOW!
THIS
Should you ever need it, you will not have time for
reading.
Never use water on a grease
spread the flames,
OVEN
fire--it
will
only
1, Close oven door and turn controls off.
2. IF FiRE CONTINUES, THROW BAKING SODA ON THE
FiRE OR USE A DRY CHEMICAL FOAM, OR HALON
TYPE EXTINGUISHER.
TO
AVOID
De nell pop popcorn in your microwave oven unless i
a special microwave popcorn accessory or unless yo
use popcorn labeled for use in microwave ovens°
Do not overcook potatoes_ They could
catch fire and damage your oven.
dehydrat_
Do not operate the oven while empty to avoid damag,
to the oven and the dangerof fire. if by accident the over
should run empty a minute or two, no harm is done
However, try to avoid operating the oven empty at at
times_it saves energy and prolongs life of the oven.
If materials
inside oven{s) should ignite, keel"
oven door closed, turn oven off, and disconnect th_
power cord, or shut off power at the fuse or circui
breaker panel.
Some products,
such as eggs and sealec
containers--for
example, closed glass jars--ma_
explode and should not be heated in this oven.
FIRE
PRECAUTIONS
Paper towels,
napkins, wax paper and other recycle
paper products can contain metal flecks which mE
cause arcing or ignite. Paper products containing nylc
or nylon filaments should be avoided, as they may al_
ignite.
POS-
See door surface cleaning instructions in this manual.
Do no! defrost beverages_especia]ly
carbonated
ones_in narrow necked bottles. Even if the container i_
opened, pressure can build up. This can cause the
container tO burst, resulting in injury.
SIBLIE EXPOSURE
TO EXCESSIVE
MICROWAVE
ENERGY
Use metal enly as directed
in cookbook,
Felt
strips used on meat roasts are helpful when used as
shown In cookbookr
DO NOT ATTEMPT to operate this oven with the door
open since open door operation can result in harmlui
exposure to microwave energy. It is important not to
defeat or tamper with the safety interlocks.
TV dinners may be microwaved in foil trays less than
3/4" high; remove top foil cover and return tray to box.
When using metal in microwave oven, keep metal (except
microwave oven shelf) at least 1" away from sides of
oven.
DO NOT PLACE any object between the oven front face
and the door orallow soil orcleaner residue to accumulate
on sealing surfacesr
DO NOT OPERATE the oven if it Is damaged.
It is
particularly important that t he oven door close properly,
and that there is no damage to the door, hinges and
latches (broken or loosened), and door seals and sealing
surfaces.
THE OVEN SHOULD NOT be adjusted or repaired by
anyone except properly qualified service personnel.
TO REDUCE
THE
THE
MICROWAVE
RISK
OVEN
OF FIRE
IN
CAVITY:
Do not overtook
food. Carefully attend appliance if
paper, plastic, orothercombustible materials are placed
in the oven to facilitate cooking_
Remove wire twist-ties from paper or plastic bags
before placing bags in oven.
Do not use your microwave oven to dry newspapers or
other ttems.
Cooking utensils may become hot because of heat
transferred from the heated food. Potholders may be
needed to handle the utensil.
Sometimes
the oven floor can become too hot to
touch. Be careful touching the floor during and after
cooking.
Foods cooked In liquids (such as pasta) may tend to boil
over more rapidly than foods containing less moisture°
Should this occur refer to the cleaning section of this
manual.
Do not use a thermometer in food you are microwaving
unless the thermometer is designed or recommended
for use in the microwave oven.
Remove the temperature probe from the oven when not
using it to cook with, If you leave the probe inside th_
oven wffhout _nserting it in food or liquid, and turn or
NESAF19
mlcrowave e_.ergy,
ttcan c_eatee_ectr_ca_
a_c_ngIn_h_
oven and d_mage the oven walls.
Wh_= hea_!ng pac_ag.=d foods, a_w_ys place them on
a microwave proof dish.
Examples are microwave
French fries or microwave popcorn.
._NO|D h_a_ing baby food in glass jars, even wt_hou'i
their lids; especially meat _nd egg mixtures.
be NOT deep fa_ fry In your microwave.
safe procedure In the confined cavity.
Do no_ I_o_! eggs in a m_crovs_ve oven° Pressure
can build up Inside egg yolk and may cause it to burst,
resulting In injury.
This is not a
DO _OT attempt to do home canning In your microwave.
It Is Impossible to be sure atl areas of the jar have
reached bo!_lng temperature for the proper processing
time.
FOODS WITH UNBROKEN OUTER "SKIN" such as
potatoes, sausages, tomatoes, apples, chicken livers
and other giblets, and egg yolks (see pi'evious caution)
should be pierced to a_!ow steam to escape rJuring
cooking.
SPOP;TA_,;_OL_
BO_LtHQ
_
Under
certain
circumstances, tIqulds may start to boil during orshortty
after removal from the microwave°
To prevent burns
from splashing liquid, st_r liquid briefly before
removing the container from the microwave oven.
PLASTIC UTENSILS designed for microwave cooking
are very useful, but should be used carefully. Even
mIcrowave plastic may not be as tolerant of overcooking
conditions as are glass or ceramic materials and may
so_t_n or char if subjected to short periods of
overcooking. In longer exposures to overcooktng, the
food and utensils could Ignite, For these reasons:
This rn_c_owave even _s specifically
he_t or cook food_ and is not
la_orstory
o_ indus_ia!
use.
MICROWAVE
OV H
designed _o
intended
fo_
SHELF
1) Use microwave plastics only and use them In strict
compliance
with the utensil manufacturer's
recommendations,
Remove the shelf from the oven when not in use.
2) Do not subject empty utensils to microwaving.
DO NOT store or cook with shelf on floor of oven,
Product damage may result,
3) Do not permit children to use plastic utensils without
complete supervision.
Use po_he_ders when handling the shelf and utensils,
They may be hot.
"BOILABLE"cooking
pouches andtightlyctosedplastic
b_gs should be slit, pierced or vented as directed in
cookbook. Ifthey are not, plastic could burst during or
immediately after cooking, posslbly resulting in injury.
DO NOT use microwave browning dish on shelf. The
shelf could overheat.
AlSo, plastic storage containers should be at least
partially uncovered because they form a tight seal.
When cooking wit h containers tightly covered wtt h plastic
wrap, remove covering carefully and direct steam away
from hands and face.
5
NESAF2O-1
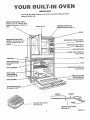
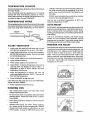
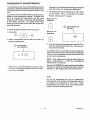
Y@
LTo
OVEN
IMPORTANT:
The model and serial
wave on the left wall.
WINDOW WITH METAL SHIELD
Cooking
can be viewed while
keeping microwaves confined to
oven°
number
of your oven is located
Inside
the micro-
TEMPERATURE PROBE
RECEPTACLE (See page 12)
DOOR LATCH
GRILLE
MICROWAVE OVEN DOOR
HANDLE, PuJI to open. Door
must be latched for oven to
MICROWAVE
operate.
OVEN CONTROLS
(See page 7)
MICROWAVE OVEN SHELF
.__.-.--(See page 19)
- OVEN VENTAREA
.LOWER OVEN CONTROLS
(Seepage20)
....
SELF-CLEAN OVEN
AUTOMA_C DOOR
LATCH
GRILLE
LIGHT
BROIL ELEMENT
REMOVABLE OVEN RACK
(See page 28}
SELF-CLEAN
OVEN INTERIOR
(See pages 25, 26)
REMOVABLE OVEN
DOOR wlWtNDOW
(Lower Oven; See page 28)
BAKE ELEMENT
OVEN DOOR GASKET
(See pages
BROILER PAN & GRiD
(See page 24)
TEMPERATURE
(See page 12)
6
PROBE
NEBIFO5-3
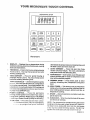
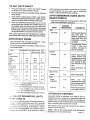
MICROWAVE OVEN
][
D RosTj
[DEFROST
cook
HOLD
%
Pow1[. .o o
Kenmore
1,
DOSPLAY .-- Displays time or temperature during
cooking functions, power level belng used, cooking
mode and Instructions.
2
TIM7 COOK-- Pressto microwave using automatic
Power Level 10. You may change power level after
entering cooklng time.
3
TIME DEFROST -- Press for gentle thawing at
automati¢ Power Level 3. You may change power
Ievel after entering defrosting time.
_'£_t,) _OOf(!HOLD
-- Use the temperature probe
_o c_ck. Press this pad and then set a temperature
_}y pt _sslng number pads. Once food reaches this
_mp_rature, the oven switches to HOLD setting and
m_iif_lalns that temperature until you open the door
_r press the CLEARIOFF pad.
',
POWEFI CONTROL
_ Press this pad before
_J_.h._ringanother power level number if you want to
_:_mnge iron} automatic Power Love! 10 (H!GH]
; ,rcoohh_g orPow._r Level 3[LOW} {ordefrosllng.
%H i'D COOK -- PreSS thlsp_d and then number
: _ ' ':;:;_:_,
k e;J ¢_rJe ,,l_.ffn
b e_",._ndo'_i_ SulomatloBI!y
determines the proper amount of cooking time until
the food Is done and oven shuts off.
7,
AUTO DEFROST -- Press this pad, then Code
number and food weight. The oven automatically
sets power levels and defrosting time.
8.
AUTO ROAST-Insert probe, touch this pad, and
desired number pad for code to temperature cook
meat with automatic program.
9. NUMBER
PADS -- Press these pads to enter
cooking, defrosting time, temperature and power
level.
10. HOLD TI_IER _ This _eature uses no microwave
energy when It functions as either a kitchen timer or
as a holding period between defrost and tlme or
temperature cooklng.
tl.
START -- After all selections
pad to start oven.
are made, touch this
2. CL_AFb'OFF-- When touched, it shuts off the oven
and erases al_ settlngs_
NOTE: The microwave fan operates durtr_g mlcrowaw
c_oklng and Isalso used !o cool the cor_._roLHeat Iron'}
_he lower oven, along with hm_t from the microwave
{_ _.n, t_'_aya_o cm_se _he f,_n to operate. The fan may
operate with both ovens off and wf}; turn ]lseif oil'
HEM]C07-2
THE
HOLD
HOW TO TIME
COOK
TIMER
The HOLD TIMER
has three timing functions:
DEFROST,
HOLD AND TiME
•
It can be set as a minute timer°
1_ Press TiME
•
It can be set as a holding time after defrosting.
2, Press number pads to set defrosting time. (Defrosting
Is automatically set on power level 3 but can be
changed by touching the POWER CONTROL pad
and the desired power level.)
= Press HOLD
TI_ER.
It can be set to delay cooking_
The HOLD TIMER operates without microwave energy.
TO SET MINUTE
TIMER
DEFROST.
The minute timer displays minutes:seconds.
The
maximum time setting is 99 minutes and 99 seconds.
4. Press number pads to set holding time,
5. Press TIME COOK.
t.
6. Press number pads to set cooking time.
7o Press START;
Press HOLD TIMER,
TIMER
HOLD
2.
(As each function Is automatically performed, the oven
display showsthelnstructlonsentered and the function.)
]
Press number pads to set amount of time, For
example, to set three minutes press 3, 0, and 0.
When time is up, the oven signals and the display
flashes =ENID_, The oven shuts off. To cancel, press
CLEAR/OFF.
QUESTIONS
AND
ANSWERS
Q. What wlll happen If I accidentally reverse my defrost,
hold and cook Instructions?
3_
A. The oven will automatically rearrange your program.
Defrosting will always come first, then hold, and then
the cooking function.
Press START.
%
Q, Can t defrost and hold only?
When time Is up, oven signals and display
"END".
flashes
To cancel press CLEAR/OFF.
USING
A HOLDING
TiME
The HOLD TIMER can be used to program a "holdlng
time" between microwave cooking functions, The time
can range from one second to 99 minutes and 99 seconds.
A holding time may be found In some of your recipes°
PROGRAMMING
DELAYED
COOKING
1. To delay cooking up to 99 minutes and 99 seconds,
touch either TIME COOK, TEMP COOK/HOLD or
AUTO ROAST,
2, Enter cook time, temperature or code by pressing
number pad(s),
3. Press HOLD TIMER.
4. Enter number of minutes to delay cooking. WHEN
DELAYING TEMP COOK!HOLD or AUTO ROAST,
BE SURE PROBE IS IN FOOD.
A. Yes. All you need to do Is program In Time Defrost
and the amount of time, then program Hold and the
amount of time, Be sure to put the thawed dish in the
refrigerator promptly.
Q_ I programmed my oven for a specific defrosting time
but it defrosted longer than necessary.
What
happened?
A. When Instructions conflict, the oven carries out the
last instruction. You may have set oven to Defrost for
4 minutes, hold for 2 minutes, and then defrost for 6
minutes° The oven would defrost for 6 minutes and
hold for 2 minutes.
Never let food such as dairy pro.
ducts, fish, meat, poultry, etc.,
sit for more than I hour before
cooking starts, when you set your
oven for a delay start.
Room
temperature
promotes the growth
of harmful bacteria.
5. Press START. Timer will count down to zero_ Cooking
will begin when timer countdown Is complete. Display
will show power level when cooklng begins.
To cancel, press CLEAR/OFF.
Note: Fan and light will operate
energy is used during delay.
but no microwave
If door is opened the countdown wtlt stop. To resume
delay program, close door and press START.
NEMIC08
Power level 10 will _ displayed.
power level as descr!bed above.
The time cooking feature altows you to preset the cooking time. The oven shuts off automat:Ca!ly at the end of
the cooking time.
If desired, chang_
4. Press number pads to set second cook!rig time.
Power }eve_ 10 (High) is recommended for most cock°
tng, but you may change thls for more flexibility.
1. Press T_JE COG_;.
5. Press START.
i
%
COOk
IME
2. Press number pads to enter cooking time.
The display will show "COOK T]_ME', the first power
level, and the first programmed cook time, counting
down.
At the end of the first programmed cook tlme, the
second power level, "COOK T|M_"_ and the second
programmed cook time, counting down will show In the
display.
Power level 10 wil! be displayed. If power level 10 Is not
desired, press POWER CONTROL
and then press
number pad to select new power level.
When time is up, the ovan signals and display flashes
=_Hi_Y'. The ovan, light and fan shut off.
3. Press START.
Q_ST_ON_
A_JD ANSWERS
Q. i s_t my oven for the time called for in the r_clpe, but
at the end of the ttme allowed, my food wasn't done.
What happened?
When time is up, the oven signals and display flashes
=END". The oven Ilgh_ and fan shut oil.
TII_,_E COOR
A.
I_
T],_I_ COO_ BRlets you set two time cooking functions
within one wogFam. This Is Ideal when you want to
changa power teve!s durlng your cooking operations.
1. Press T_
Q. I touched the number pads and s_lected my power
level. When ! touched START, however, my oven did
not come on. Why not?
COOK.
A. TI_I_ COOK must be touched before setting the
cook!ng tlme with the number pads or else your
oven will not begln cooking.
TiME
COOK
Q. I want to cook on a power ievel other than High. What
do I need to do?
A.
2. Press number pads to seI cooking tt,_.
To cook on a power tore! other than High, first touch
TIME COOK and set the desired cooking time. Then
touch POWER CONTROL. "Power 10" appears on
the d!splay. Enter new power level on the number
pads and then touch START.
Q, Can 1Interrupt my Time Cook function to check the
food?
Power level 10 will be displayed. If power level 10 Is not
desired, press IPOWER CO_TROL
and then press
number pad to select new power level.
3. Press TIM_
Many TI_
COOK recipes give you a tlm_ range to
prevent overcooklng. Set th_ oven for the minimum
time, tes_ the food for donensss, and cook your food
a I!ttle longer If necessary.
A,
COOK.
9
Yes. To rasume cooking, simply close the door and
press START. The time must be reset for cooking to
resume unless time ls remaining on timer.
NEM1CO9
DEFROST|NG
•
BY TIM
Power Level 3 Is automatlcally set for defrosting,
you may change this for more flexibility.
Q. Should all foods be completely
cooktng?
but
A° Some foods should not be completely thawed before
cooking. For example, fish sticks should stll[ be
slightly frozen.
• See your cookbook for defrosting help.
1. Press TIME DEFROST_
2. Press number pads to set 1/2 of defrosting time in the
cookbook.
Q_
Power level 3 will be displayed° If you wish to change the
power level, press POWER COHTROL
and the new
number.
Can I open the door during defrostlng to check on
the progress of my food?
A. Yes. You may open the door at any time during
microwavlng. To resume defrosting, close door and
press START° If time Is left on the timer, the oven
begins operating. If not, reset timer.
3. Press START.
When cycle is over, the oven signals and display flashes
"END". The oven automatically shuts off.
AUTOMATIC
4. Turn package over, stir food or rotate dish° Repeat
steps 1-3.
DEFROSTING
thawed before
DEFROSTING
With Auto Defrost, the oven automatically sets the
defrosting time and power levels for you. First you
choose the code number from I to 3 tor the food you are
defrosting, then enter the food weight in pounds and
tenths of a pound (see Conversion Guide) and press
START,
The oven calculates defrosting time and
changes power levels during defrostlng to give even
defrosting results.
TiPS
•
Foods frozen in paper or plastic can be defrosted In
package.
•
Family-size, pre-packaged, frozen entrees can be
defrosted
and mlcrowaved.
Remove from foil
container and place in a microwave safe dish.
•
For even defrosting some foods may need to be
broken apart or separated part of the way through the
defrosting time.
TO SET AUTO
Check your cookbook
2o Press number pad to enter selected code from Auto
Defrost Guide on next page_
•
QUESTIONS
for defrosting
DEFROST
1. Press AUTO DEFROST.
tips.
AND ANSWERS
Q. When I press START, I hear a dull thumping noise.
What Is It?
3. Press number pads to el_ter welghL For example,
press 1 and 2 for weight of 1.2 pounds. See Conversion
Guide.
A. This sound Is normal It lets you know the oven Is
using a high power level
4. Press START. Display shows "DEFTIME" and defrost
time counts down,
Go
Twice during defrosting, the oven will beep four times,
"TURN" flashes in display and oven shuts oft. Open the
door, attend your food (see Auto Defrost Guide), close
door and press START. When defrosting is completed,
"END" flashes and oven beeps four times. "END"
remains on display and oven beeps every minute until
door is opened or CLEAR/OFF Is pressed_
Can I defrost small Pems in a hurry?
A° Yes. Raise the power level after entering the timer
Power level 7 cuts the total defrosting time about in
half; power level 10 cuts the total defrosting time to
about one-third. During either, rotate or stir
foods frequently.
Q*
Why do the defrosting times tn the cookbook not
seem right for my food?
STAND
TiME
When using Auto Defrost feature, It is necessary to
allow food to stand In order to finish defrosting. You
may remove the food from the oven. In some cases, It
should stand in your refrigerator. Recommended stand
times are given In the Auto Defrost Guide.
A. Defrosting times are averages. Defrosting time can
vary according to your freezer° Set your oven for the
time Indicated In the cookbook. If food is still not
completely thawed at the end of that time, reset your
oven and adjust time accordingly.
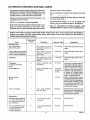
CONVERSION GUIDE
It weight of food Is stated In pounds and ounces, the
ounces must be converted to tenths (.1) of a pound.
t0
NEMIC17
CONVERSION
GU|D_
If welght of food Is stated in pounds and ounces, the ounces must be converted
!
1
!
I
..............................L....
l CODE
!
,_-
!
k----k----
....... .__£_s
.................................
MIN..MACL
RECOMMENDED
;
to tenths (.1) of a pound.
WEIGHT
FOODS
FIRST
SIGNAL
,
SECOND
j
12.-I3
.8
14-_5
.,,q
€
SIGNAL
Separate and _-htetdwhere
necessary.
5 mlnute_.
Seperl;te,,
Remove datros_d pieces
minutes
Turn over.
Remove defrosted areas and break
s1_rt.
5 minutes
Beef Pallas
Turn over.
Separate patties.
S minutes
Roast
Turn over and shteld.-
Rtbs
Turn over°
Steak
Turn over_
Stew
Turn over end
separate.
Whole Chicken
Turn over and shieid_
Turkey Breast
(breast side up)
Turn over.
Shield where necessary.
20 minutes In refrigerator
Chicken
Pieces
Turn over.
Separate and remove defrosted
_leces.
5 minutes
Cornish
Hens (.whole)
Remove wrapper
and turn over.
Ground Meat
!
r._
Turn Dye:,,
F_ank'lurtars, Sausage
{
Remove defrosted pieces. Shield If
necessary,
30 minutes In refrigerator
10 minutes
S minutes
Separate and remove defrosted
$ minutes
10 minutes; run cold
water _n cavity ...........
1
Fish Ffllsls
Whole Fillets
Turn over_
Separate
_teoes.
end remove
defrosted
5 minutes
Separate°
Seperele
>laces,
end remove
defrosted
5 mlnu_es
[
Shrimp, Scallops
'
10 minutes; runcold
Water In cavity
Turn over and shleld
tell and heed,
Hold under cold running
water
E:13es or _hin areas of meat will defrost more rapidly than other areas. A!ler first or second signal, feel meat lot
.:.z_nnspots and shield these areas with small pieces el foil. Do not let fell touch oven walls or oven door.
It
NEMtClO
TEMPERATURE
Internal temperature
for many foods,
COOKING
"PROBE" will flash if you do not seat the cable end of
the probe securely into the receptacle In the oven
wall or If you touch AUTO ROAST and forget to use
the probe°
is the best test of doneness
Temp Cook/Hold takes the guesswork out of cooking
because the oven automatically switches to "HOLD"
setting after reaching the preset food temperature until
you open the door or touch CLEAR/OFF.
TEMPERATURE;
DO NOT leave the probe in the oven if it Is not Inserted
in food or you may damage the oven,
You can set a minimum temperature
maximum temperature of 199°F_
P_OBE
AUTO
The temperature probe Is a food thermometer that gauges
the tnternaltemperature of your food. The probe must be
used when using TEMP COOK/HOLD or AUTO ROAST
of 80°F and
ROAST
AUTO ROAST uses the temperature probe to cook to the
desired serving temperature.
Auto Roast uses up to 3
power settings which automatically switch during
roasting, providing tender, even cooking results without
overcooklng.
Just as in conventional roasting, only tender roasts
should be Auto Roasted until specified Internal
temperatures are reached. Less tender roasts should
be mlcrowaved by time, according to your recipe.
TO SET
PREPARE
TEMP/CGOK
1.
Insert probe Into food and seat cable end of probe
securely Into receptacle tn oven walt. Close door_
2.
Press TEMP COOK/HOLD_ F (Fahrenheit) In display.
ENTER TEMP will flash In display, See your cookbook
for desired temperature,
3.
Press number pads to enter desired temperature°
4.
Press POWER CONTROL.
5.
Press number pads to enter power level
6.
Press START. It Internal temperature of the food is
less than 80°F, the display will show "COOL".
if
temperature Is 80°F or above, display will show
temperature counting up.
7.
When set temperature ls reached, the oven will
sound and display will show "HOLD". The oven will
then hold the temperature°
8.
Press CLEAR/OFF to stop the cycle°
THE ROAST
Place tender beef roast on rack In microwave safe dish.
Insert probe horizontally lnto the center meaty area, not
touching bone or faL Make sure the handle does not
touch the food or sides of the oven. Cover with wax
paper. Pork or ham roasts need no trivet, Add 1t2 cup
water to roast dish; cover with plastic wrap. Allow room
for probe when covering. Place meat in oven with probe
to the rtghL Insert cable end of probe firmly into the
receptacle on oven wall,
If you fall to use the probe and try to set TEMP/COOK,
display will flash "PROBE"°
9.
Remove probe and food from oven.
COOKING
TIPS
•
Use a lower power level; it will heat more evenly
though requiring more time.
•
Be sure frozen food Is completely defrosted before
inserting probe° Probe may break off if it is used in
frozen foods.
i
Cover foods loosely for moisture
even heatlng_
control and quick
Dellcate butter ictngs, ice cream, froz_.n toppings,
etc,, soften rapidly at warm temperatures. Batters,
doughs, and frozen foods are also difficult to cook
with the probe. It is best to TIME COOK these foods.
12
NEMICll-2
TO SET AUTO
ROAST
1.
Press AUTO ROAST. "AUTO"and
"TEMP" appear
on display and "ENTER CODE" flashes,
2.
Press number pad to set Auto Roast Code, See Auto
Roast Guide.
3.
Press START. Display shows "COOL"and"CODE"
until Food temperature reaches 8O°FoAt 80°F,dtsplay
switches to show moat's Internal temperature.
4.
When you select Auto Roast Codes 1,2, 3, or 4, th_
oven signals with 4 beeps and "TURN" flashes on
the display when it's time to turn the roast over.
After you turn the roast, close the door and press
START again. (NOTE: Oven continues to cook after
the signal whether or not roast Is turned over.)
180°F until you remove food and lurn off oven. If stirring
is recommended,
you can reset oven by retouching
START. Press CLEAR/OFF after cooking°
AUTO
S!_MERING
ROAST
,
CODE
6)
Total time includes time to bring food to 180°F, and
hold at that temperature until done.
FOOD
APPROX,
TIME/HOURS
COMMENTS
Beet
Pot Roast
5-7
Add enough liquid to
just cover meat. I!
adding vegetables,
make sure they are
completely covered
by liquid,
5-8
Precook meat. Place
After a pre-programmed food temperature is reached,
oven slg nals with 4 beeps and "END"appears on display.
AUTO
ROAST
GUIDE
• Use containers and coverings as directed.
probe correctly In roast before cooking.
,
Place
Chill
Recommended codes are also shown inside oven on
Auto Roast Guide.
Food
Cod_ Final Tamp Approx Time
(rain. per Ib,,)
Beef
Tender Roast
Rare
M_dium
Wet!
probe 1" from top
surface.
Stir after 3
hours, if possible.
Hold'
Chicken
(mine)
1
2
3
115 °
10-13
125 °
145 =
13-15
t5-17
4
1
170 °
115 =
t4-17
12-15
10
5
190 =
10_12
10
5
1£0°
t0-t2
t75 _
10-12
Stewing
4-6
Add 4 cups liquid.
Insert
probe Into
meatiest area of Inner
thigh from below end
and parallel to leg,
Turn over after 1/2 of
time.
Broiler/Fryer
3-4
Same procedure
above.
4-6
Add 4 cups liquid.
Stock/
Vegetable
7-10
Make
sure
that
vegetables and meat
are covered by liqui&
Stir every 3 hours,
Split pea
5-7
Add enough liquid to
cover peas at least 2".
0
0
5-10
IPork
Loin Roast
j Precooked
3 !be WhsI_
0
[;,r,ke y' '
Soup
,'
._._k_d _o ,._llnal temperalure
of I40_F or
; ,: L; :_t_ ;oOntain bacteria=
• ' ,,',',_ u;e# standing
tlme before ser,Jh_g
;
, r ,_ i_,lo meatiest
=_ea el =in_=e_ thigh
, ,:: _ :',_ ._ed _parallei to leg,
__f_.-"-."}b8
hot'_zt_n[ally into mealiest
area,
,,,,, ::;_,_AT,_C _IM_4ERING
as
Ham or Pork
Roast
';h::lo
(AUTO
GIJID_
(AUTO
:;,' _ _i'.:_
t :._,_ code 6 is used forAulomatlc Simmering,
,_iira _ h ;; iu'des time to bring food to 180° F, and hold
'"b_! |_r;;[;_,£r_;[_F£.
urliil
done. To set Auto S)mmer]ng,
_:t: inslruc_ions for setting AUTO ROAST. Display
:) ,v_ 'Cr.I_OTL"unlit food is 80'°F, then switches to show
_d iem#e_alur£ until t 80_F. Oven sw}tches to Hold at
'
AUTO_ilATIC
COOKIHG
Use AUTO COOK to eliminate your need to look up
cooking time in your cookbook or guess how long to set
cooking time. By sensing the steam that escapes as
food microwaves, the control adjusts the oven's cooking
ilme to various types and amounts of food.
This feature ts best used with foods that you want to
steam or retain moisture,
NOTE:
13 Cooking
Use of the me|al
is .or
she_i with
recommended,
Aulon_tlc
NEMIC12.1
TO SET
AUTO
COOK
TO ADJUST
2. Press number pad of desired Code. See chart on next
page.
3. Press START.
1_
The word "AUTO" appears on the display and the sensor
is activated to sense steam from food.
CLOSED
34
Do not open the oven door while "AUTO" is displayed.
Steam escaping from the oven can affect cooking
performance.
If the door is opened, "ERROR" appears.
Close the door and press START immediately°
AUTOMATIC
COOKING
CODES
Press
AUTO COOK.
Press number pad of code and press 1 to adjust the
code to cook 20% less time or 9 to adjust the code to
cook 20% longer.
Refer to section on containers and covers on page 17,
DOOR
COOK
You can set the oven to cook for 20% less time than the
code would regularly provide by adding a 1 after any
Auto Cook code° You can set the oven to cook for 20%
more time than the code would regularly provide by
adding a 9 after any Auto Cook code.
1. Press AUTO COOK.
KEEP
AUTO
Press START. "AUTO" shows on display. DO NOT
OPEN DOOR until first signal, then rotate dish 112
turn if needed, Close door and press START to
finish cooking.
FOODS
CODES
Automatic Cooking Codes 1 through 9 are designed to
give you easy automatic results with a number of roods
RECOMUENDED
A wide variet y of 1oods including meats, fish casseroles,
vegetables, leftovers and convenience
foods can be
Auto Cooked°
CODE 1 Is designed for reheating foods quickly and
turns off the oven automatically as soon as the sensor
detects steam from the toods_
FOODS
When CODES 2 through 9 are selected, the oven
determines how much additional cooking time is needed
after steam has been sensed.
Oven automatically
switches to TiME COOK and slg nals. When the signal is
heard, the oven door may be opened for stirring, turning
or rotating food.
NOT
RECOMMENDED
Foods that must be cooked uncovered, foods that require
constant
attention,
foods that require addition of
ingredients during cooking, and foods catting for a dry
look and crisp surface after cooking should not be Auto
Cooked. Time cook these foods. Foods that microwave
best using the temperature
probe should be Temp
Cooked or Auto Roasted.
A guide behind the oven door lists cooking codes.for
_requentty prepared fresh or uncooked foods.
14
NEMIC134
AUTOMATIC
COOKING
CONTROL
GUIDE
Do not open oven door during Auto cycle° When oven
signals and countdown time is displayed, door may
be opened for stirring, turning or rotating food. To
resume cooking, close door and touch START.
tightly to ensure even cooking.
Be sure outside of container and inside of oven are
dry.
tf food needs additional cooking, return to oven and
use Auto Cook Code 1.
Match the amount of food to the slze of container. Fill
containers at least 1/2 full.
Add 1/4-1/2 cup water to fresh vegetables.
Most foods should be covered with lid to dish or wax
paper to prevent spattering to keep oven clean.
Spareribs, pot roasts and meat loaf should be covered
•
Use preference control "1" or "9" to adjust cook
times to suit your individual tastes. See page 14o
•
Use of Automatic
Cooking
feature
with
DOUBLE DUTY® shelf is not recommended.
HOTE: Oven will not accept "Auto Cook Code" if the even is hot, If the words "Auto Cook Delay"
appear, you must cool the oven before using Auto Cook or you may choose to use Time or
Temperature
Microwave
Cooking•
Food
Canned
;'Auto Cook"
Code
Container
Approx.
Time
Comments
Foods
Thin foods such as
soup, broth, gravy.
Thick foods such as canned
ravioli, chunky soups, beef
stew, all canned vegetables.
Microwave-safe
container matched
size of food.
Microwave.safe
container
matched
size of food.
2-3 mlnJcup
Cover with lid to dish or wax
paper.
4 minJcup
Cover with lid to dish or wax
paper.
4 minJcup
Cover with lld to dish or wax
paper.
to
to
Leftovers
Microwave-safe
container matched to size
of food.
TV Dinners
(except for those with
pasta)
Cook in container
comments)°
(see
8-10 min_
Frozen
Entrees
Cook in container
comments).
(see
17-20 mln.
depend}ng
on size
Frozen
Mea!a
Pouch
FrDzen
L_sagn_
1 or 1 1!2 qt. casserole
with lid to dish
If foil tray ls no more than 3/4"
deep, remove foil top, return to
original box end reclose box. If
tray Is more than 1" deep,
remove food and place in
microwave.safe dish andcover.
If dinner ts tn paper board
contain or, remove from box and
cook In orlglnal container.
3-8 mlm
When
mtcrowavtng
meals
containing 2 pouches, make 1Inch slit In center of each pouch.
Place pouch containing meat
on microwave.safe
plate, with
remaining pouch on top. Flex
pouch before serving.
10-20 min.,
Remove lasagna from foil tray
and place In microwave-sate
dish and cover. Let stand 3 to 5
minutes before serving.
12-16 min,
Cover with lid.
Cassero|es
With precookedIngredients
In a white sauce such as
tuna noodle casserole,
lurkey letrazztnL
2-3 qtr casserole
lid to dish.
Wilh r,_w ingredients such
_ hamburger patty stew,
scalloped potatoes,
seafood casseroles,,
2-3 qt,,casserole with lid
to dish
15
wtth
16-24 rain.
Cover with lid,
NEMICt6
AUTOMAT|C
COOKJHG
CONTROL
"Auto Cook"
Code
Food
GUIDE
App,ox.Ti e t
Container
Comments
Meats and Seafood
Chicken pieces (up to
3 Ibs.)
5
12 x 8 x 2-in. glass
dish
8-20 mtno
Fish fillets (1 Ibo)
1
12 x 8 x 2-in, glass
dish
6_9 mlno
Cover tightly with plastic wrap.
Meat loaf (1 1/2 Ibs..)
9
10-in. pie plate
25-30 mino
Cover tightly with plastic wrap.
Hamburger patties
(4-5)
3
t2 x 8 x 2-in. glass
dish
7-9 mino
Cover with wax paper. When oven
signals, rotate dish 112 turn.
Sausage patties
(1 lb.)
5
12 x 8 x 2-in. glass
dish
7-9 mln.
Coverwith wax paper. Whenoven
signals, rotate dish 1/2 turn.
Pork chops
(4-1" thick)
6
12 x 8 x 2-in gtass
dish
22-25 min,
Baste with barbecue sauce. Cover
withwax paper. When oven signals,
rotate dish 1/2 turn..
13 x 9 x 2-in glass
dish
1 hr. 30 mlno
1 hr. 45 min
Cover tightly with plastic wrap,
venting one corner. When oven
signals, rearrange ribs..
Spare ribs
(up to 3 Ibs.)
Cover with wax paper to prevent
spatters.
Swiss steak
(1 1/2 Ibs.)
3 qL casserole w/lid
60-65 mtn.
Cover with lld.
Chuck roast
(up to 5 Ibs.)
13x9
dlsh
65_90 mtno
Cover tightly with plastic wrap.
Shrimp (up to I Ibm)
1 1/2 qL glass
lid
x 2-tin gtass
dish
wi
4-6 min
Rice
Regular, raw, t cup
9
2-qt.. casser.ole wllld
21-28 mino
Follow instructions
package,
on
rice
instant,
1
2-qt.. casserole w/lid
5-8 mino
Fo!low
instructions
package°
on
rice
2
2-qL casserole
10-15 mlno
Add 1/4 to 1/2 cup water.
Cover with lid.
1 cup
Vegetables
Fresh such as carrots,
artichokes, cauliflower,
broccoli, brussels
sprouts (1 lb..)
w!lid
Baking potatoes, 2-4
None
8-16 min.
depending
on number
Pierce with fork and place on oven
floor in a square arrangement. Turn
potatoes over when oven signals
and remaining time is displayed.
Frozen block such as
peas, green beans,
spinach, broccoli
1 112qL casserole wl
lid
B-I 0 min,
Add 2 tablespoons water_
Cover with lid..
12-13 mln.
Add 114cup water,,
Lima beans
t
1 1/2 qt. casserole w/lid
Frozen pouch such as
broccoliln
buHersauce,
corn, peas
2
Lay pouch on
microwave-safe
Cover with lido
7*9 mtn,
Make 1" slit in pouch before
cooking. Stir well before serving.
12-14 mtno
Core apples and fill with butter and
brown sugar,, Cover with lid.
dish
Fruit
Baked apples, 4
1
2-qt. casserole w!lid
If after completing Auto Cook Cycle, food needs additional warming,
Code #1.
16
simply re-cover food and use Auto Cook
NEMIC15
MUCROW VIiHG
AUTO ]ATaC
TiiP$
• Make sure all cookware used in your microwave oven
Is suitable for microwaving_ Most glass casseroles,
cooking dishes, measuring dishes, measuring cups,
custard cups, pottery or china dinnerware which doe_
nol have metallic trim or glaze with a metallic sheen cap
be usec
Som_ cookware ts labete_; 5uitabie in:
COHTA_H_._
Never use tight-sealing plastic c0vers--they can
prevent steam from escaping and cause food to
overtook,
,
Matchtheamountoffoodtolhesizeoflhecontalnero
Fill containers at least half fullo
Be sure the outside of the cooking container and the
inside of the microwave oven are dry before placing
food in the oven. Beads of moisture turning Into
steam can mislead the sensor_
•
rotating or
Stir or rotate some foods after a beeping signal. See
Automatic Cooking Control Guide.
Use microwave-safe casseroles or bowls for entrees
and vegetables, Cover with llds that fit. If lids are not
available, use plastic wrap or wax paper. Plastic wrap
should be loose over food to allow for expansion. Seal
by pressing plastic wrap firmly around edges.
• _team builds up pressure In foods which are tightly
cowred by a skin or membrane. Pierce potatoes, egg
yolks and chicken livers to prevent bursting.
H &T NG
For frozen entrees in paperboard trays, remove tray
from box but do not remove film over tray. Thick entrees
may take longer to cook--see guide on page 15.
Before placing food in dishes to cook using your
m_crowave oven shelf, check to see if the dishes will fit
[og_[her on or under the shelf, Also, be sure cookware
is microwave-safe,
For frozen foods in metal trays, remove 1ollcovering and
baked goods, re.insert tray into box and close ends of
box.
Slit plastic pouches 1 inch as shown above. Break food
up thoroughly after oven stgnals_
Cookware Ior heating or reheating Includes a 1-cup
measuring cup, 9x5x3-1nch loaf dishes or 9-inch pie
plates,
Leftovers may be placed in small individual
plastic bowls or divided plates.
COVERS
Aiw_ys use microwave-sale
containers and cover
them witl_ lids, wax paper or plastic wrap. Wonder It
it's microwave safe? Put It to the test described in
Microwave Cooking Tips.
, P_per towels, wax paper and plastic wrap can be used
i,o co}er dlshes in order to retain molsture and prevent
spatterttlFj. Be sure to vent plastic wrap so steam can
escape.
COOKWARE FOR SHELF
R HF=AT NG
A_D
Appropriate containers and coverings help assure good
cooking results.
t,;yo_J a,'_ not sure it a dish is microwave-sa1_, use titi:
_ast: P._acein the microwave oven both the dish you ar_
_._stit_._.3r_:._
a glass measuring cup filled with one cup e _
wa_et. Set the measuring cup of water either in or next
ia the dish. Microwave 1 minute at High power, if the
di_t_ heat_, tt should not be used for microwavlng° tf the
dish remains cool and only the water in the cup heats,
lhen the dish is mlcrowave-safe.
• Som_, mlcrowaved foods require stirring,
rearrangh_g Check the cookbook.
CO0 I G
Use oblong or square containers for chicken or corn on
the cob. Plastic wrap covering should be loose over
food to allow for expansion, Seal by pressing plastic
wrap firmly around edges.
ceramic or
Use wax paper or plastic wrap instead of lids on
casseroles. Lids may add too much height to dish.
Paper plates--while
they may be used for Time and
Temperature Cooking and Defrosting, do not use them
with automatic cooking. Use mlcrowave-safe plates or
bowls for reheating.
Cover with plastic wrap c_"wax
paper.
Follow Automatic Cooking Control Guide setting for
casseroles. Cover casserole meat and vegetables with
sauce. Cool hot ingredients or sauces. If they are not
cool, use TIME COOK.
17
NEMIC20
Q,
r
Why does my oven cut off after the Auto cycle when
using Auto Cook Code I when it does not alter other
settings?
Am
When using Code 1, there is no second phase of
minutes counting down. Cooking is completed in
first phase oi cooking.
0_
If food is not completely
cooked
suggested code, what should I do?
A
Use Time Cook and power leve! 10 for -3few tonsures
to complete cooking.
,i
after
My scalloped polatoes were not completely cooked
after using Auto Cook. Why not?
A,
tf you prepared the sauce in the oven pdorto cover_: .
the potatoes with the sauce, there may have b ,_
too much remaining moisture In the oven Dry _
oven completely before using Auto Coo_ since _;,
function operates by senslng -steam l_ th_ _v,.
Also, starting Auto Cook wffh hot foods ca_Js:
steam In the oven too soon.
Q
Which foods are best Time Cooked, rather than Au;.
Cooked?
usin_
Q_ Do all fresh or frozen vegetables require a standing
period after cooking with Auto Cook?
A, Bakery foods, candles, melted chocolate or food_
when a dry or crisp surface ts desired are cooked
best by Time Cook.
A_ Most vegetables are cooked to a crisp state during
Auto Cook. It is recommended that you let the
vegetables stand for up to 5 mtnutas depending on
slze and density of pieces. The standing tlme also
enhances the overall flavor and appearance of most
vegetables.
Q_
Q_
Q_
Are plastic containers
with tight
appropriate for Auto Cooking?
t%,
No, most types of plastic storage dishes, butter
tubs, etc., are not recommended for mlcrowavlng.
Also tight fitting plastic lids may prevent adequate
steam from escaping and may keep food from
cooking properly.
What If I don't fully cover the dish In Auto Cook?
A. Oven senses steam too quickly, shortens the cooking
time and undercooks food. Cover tightly and reset
Auto Cook..
a_
fitting
lids
I tried to warm chow mein noodles using Auto Cook.
Why didn't this work?
Do the shapes and sizes of foods make a difference
when using Auto Cook?
A_ Add water to the vegetables as recommended on
guide and cover well for even, complete cooking.
A. Food must have some moisture in order to create
steam. Dry foods such as chow mein noodles,
potato chips and other such foods do not have
enough moisture.
Q,
Q_
ta
*
Should I use Auto Cook to coo.-,
pudding
or sauces?
A. Most pudding and sauces require a lot of stirring
during
cooking;
therefore,
time cooking
is
recommended.
May I use Auto Cook when ! am cooking my foods In
more than one dish?
Ao No. It is best to use Time Cook when cooking many
loods_
t
18
NEMIC14
YOUR
MICROWAVE
OVEN
iMPORTANT
SHELF
REHF=ATIING
MICROWAVE
SAFETY
Tips
INFORMATmON
o DO HOT
shelf
on
damage
• Use
metal
MAY
o DO
when
utensils.
handEing
THEY
HOT
of
Cooking
microwave
on metal
she]If.
store
dish
shelf
is not
with
Similar
Foods
Two casseroles -- Cover with plastic wrap. Use
staggered arrangements of food. Place food on right
side of shelf and left side of floor. Microwave and
reverse positions of food after 1/2 of tlme_ Also, heat
small bowls of leftovers this way, stirring and
reversing positions after half of tlmeo
BE HOT,
browning
• Use
result,
potholders
shelf
and
Reheating
Two plates of leftovers --- Arrange thick or dense
foods to outside edges of plate and cover with plastic
wrap. Stagger plates with one on shelf and one on
oven floor. Microwave for 2-3 minutes on HIGH (10)
and reverse position of plates (top to bottom) and
rotate 1/2 turn. Continue heating until hot.
STORE
OR COOK
with
floor
of oven.
Product
may
for
iN YOUR
Two frozen entrees (5-7 ozoeach) or two W dinners-Follow package directions. If there are foil covers,
remove them. Place one "IV dinner on right snell and
second dinner on left floor. Microwave and reverse
positions (top and bottom) and rotate foods 1/2 turn.
Continue mlcrowavlng as directed until foods are
done.
Automatic
recommended.
The wire shelf is designed for added capacity heating
and reheating In your microwave oven. More than
one food may be heated or reheated and ready to
serve at the same time.
Tips for
Food
When microwaving with the oven shelf, it Is important
to arrange foods properly. Cookware size is important.
Be sure dishes will fit together on or under the shelf.
Food size should be considered; foods over 4 Inches
high or 3 1/2 Ibs., are not recommended for shelf
cooking.
Reheating
Different
Types
of
When heating different types of food together, foods
which should be served hot must be placed on the oven
floor, while foods which are only warmed should be
placed on the shelf. Microwave energy enters the oven
from the bottom only. It Is important to remember that
foods absorb microwave energy at different rates. You
may need to start heating large or dense food a few
minutes ahead of smaller or less dense foods. Stagger
and rotate foods as described above.
Batters and dough foods and also uncooked foods
which need to be prepared from scratch should be
cooked without the oven shelf following
recipe
directions°
Use potholders when handling foods heated together
with your oven shelf, especially when heating larger
amounts of food. Extra steam generated from multiple
food cooking may make cookware hotter than with
regular mtcrowavtng..
POSiT|ONING
THE
$HII_LF
To position the microwave oven shelf, tip the back
slightly and fit the shelf support g uldes ontothe support
guides located on each side of the oven in the rear.
Next, lower the front until the shelf support guides fit
onto the support guides located at each side of the oven
in the front.
When properly positioned, the shelf should fit snugly In
place, be level and not touch the back wall of the oven.
If _rcing occurs when using the shelf to cook
more fhan one food at the same timej turn the
oven off. Make sure the shelf is positioned right
side up on all four shelf supports and not touching
oven walls.
19
NEMiC06
YOUR
LOWER
COHTROL
starting
and stopping
operations°
LOWER OVEN
times
for
timed
oven
TNE CLOCK
8/.XE
[8!88
To change the time of day all lower oven controls must
be off,
OL_
_'_B e 8 r_ N BB ,5_
_A_E
I
[
BROIL
) [
When power is first connected to your cooking center or
after a power failure, the digital display on both the
microwave and the lower oven control will show lighted
8s and 18s and all oven functions for about 15 seconds°
Then el! lights go off and "RESET" appears in the upper
display and "PF" (Power Failure) appears in the lower
display.
COOK
TiME
TO
STOPTIME
SET
THE
CLOCK
CLOCK MUST B5 SET BEFORE ELECTRONgC
CONTROLS FOR LOWER OVEN Will
WORK.
CLEAN
I [
UGHT 1
CLOCK
1.
Press CLOCK.
CLOCK
ON/OFF
1
2° Press number pads to set time of day.
_t"
MICROWAVE
WHILE OVEN
FAN MAY OPERATE
IS CLEANING
Clock must be set before any Conventional
function will operate.
Oven Timer
1o DISPLAY
_-- Displays
time of day, time or
temperature during cooking, cooking mode, and
tells you what to do next.
2. BAKE _ Press to set oven to bake.
3. BROIIL _ Lets you broil at futl power by touching
BROIL and START pads. Lets you select Lo Broil for
longer, slower broiling.
4. CLEAH _ Press to select Self_Cleaning function.
Follow all instructions in section on Self-clean cycle.
5. OV[EN LBGHT _ Press to turn oven light on and off.
6. COOK T_M5 _Usetoenteramount
for automatic baking.
of time required
7. STOP I"_
_ Use when baking or cleaning to
enter the time of day you want oven to turn off°
3.
Press START.
TO R_CALL
%
Tt;_E
OF DAY
To check the time of day when display is showing other
information, press CLOCK. The time of day shows as
long as you press CLOCK, plus an additional 3 seconds.
TO ELIMINATe:
C1LOCI(
DISPLAY
If you do not wish to use your Clock you can blank the
time of day on your oven. Although youwlllnot seeft, the
clock will maintain the correct time of day. It will reappear
for the duration of any function that displays a start time
and stop time.
1.
Press and hold both CLOCK and STOP TiME until
display goes blank.
8. CLOCK _ Press to enter time of day or check time
of day when display is showing other information.
9. T|_ER
_ Lets you time any kffchen function.
10. START _ PRESS to start any cooking or cleaning
function.
11. CLEARIOFF
_ Cancels
CLOCK and TIMER.
all operations
except
t2, HUli_BER PADS -- Press these pads to set any
function requiring numbers; time of day on clock,
timer, oven temperature, inlernal food temperalure,
To make the time of day reappear press CLOCK.
TI ER
The Timer can be set up to 11 hours and 59 minutes. The
Timer counts down in minutes until the last minute is
reached, then seconds are displayed.
When the timer
reaches "0", "TIMER" flashes in the display.
NCERC05q
2O
The smallest amount of time you can set is I minute.
NOTE:
The Timer
does not control
oven
operations,
CLEAR/OFF
does not control the
Timer.
TO SET
THE
1. Press TIMER.
TIMER
[
TtMER
(
2, Press NUMBER pads to set the amount of tlme you
want. For example, press 3,0,0, to set three hours.
It" you make a mistake,
again_
3- Press START°
press TIMER twice and begin
I_
L___J
1he Timer will immediately start to countdown,
After 1
mlnuIe has passed display will change.
When time
_ _.q_i
_lc!own is complete, the control will beep four times
,_J the display will flash. Press TIMER to cancel.
TO CANCEL
TIMER
4, p_ss TIMER.
THE RECALL
MODE
t,
2.
3o
4.
Press BAKE.
Press number pads to enter oven temperature.
Press COOK TIME.
Press number pads to enter length of cook time
called for in your recipe. (Hours:minutes).
5o Press START,
6. When cook time is complete, the oven enters the
HOLD MODE. Press CLEAR/OFFwhen you are ready
to remove the food.
TO SET DELAY
START
Use this feature to set your oven to turn on and
automatically enter HOLD MODE at a later time.
Follow steps 1 through 4 under TO SET IMMEDIATE
START, then:
5. Press STOP TIME.
6. Press number pads to enter time of day you want
oven to turn off.
7. Press START. The control calculates the correct
start time. Display shows time of day, "BAKE",
"START TIME", AND "STOP TIME". The start time
appears in the lower left display, and the stop time
appears In the lower right display.
NOTE: if you entered an impossible
Stop Time
and Cook Time combination,
such as one that
would require a start time earlier than the current
time of day, the "Err", "START TIME"_ and "STOP
TIME" flash on display. To correct, press COOK
TiME and enter the correct cook time or press
STOP TIME and enter the correct stop time.
Tuuch the pad of any function you have set to recall the
in.',clt:3ation you set. The display will showthe setting for
4 seconds°
8. When Stop Time is reached, the oven automatically
enters the HOLD MODE. Press CLEAR/OFF when
If you recall a function and want to change it, press the
appropriate pad and then enter new setting. Next, press
START.
THE
TO SET" BAKE
1, P,ress BAKE.
The display will show 0.
I
BAKE
NOTE: You can change the bake temperature while
baking by pressing BAKE and the number pads for the
new temperature.
iMMEDIATE
HOLD
MODE
Your oven automatically enters the HOLD MODE after
completing timed bake. At the end of timed baking, the
word"End" flashes 4 times In the display and the control
beeps 4 times. The oven temperature decreases to
150_F and the lower right display flashes "Hid". The
oven temperature will remain 150°F until you press
CLEAR!OFF.
]
2. Press number pads to enter the temperature called for
in your recipe, For example, press 3, 5, and 0, to set
350°Fr
3. Press START. The display shows "BAKE", "TEMP",
the oven set temperature and actual oven temperature
as the oven heats. When set temperature Is reached,
the control beeps six times and "PrE" flashes In the
display. The display then shows the set temperature
continuously.
4 When baking Is completed, press CLEAR/OFF.
TO SET
you are ready to remove the food.
START
L_Se.this feature to start cooking now and have oven
21
automatically enter HOLD MODE at end of cook time.
When you set your oven for a delay
start, never let food such as dairy
products,
fish, meat, etc., sit for
more than I hour before cooking
starts.
Room temperature
promotes the growth of harmful bacte.
rla. Be sure the oven light is off
because
heat from the bulb will
speed bacteria growth,
The low temperature
zone of this
range (between
150 ° and 200°F} is
available
to keep hot cooked foods
warm.
Food kept longer than two
hours at these low temperatures
may spoil,
NCCTL09
OVIH
!i)0011111
o
When coektng a food for the first time tn your new
oven, use time g!ven on reclpes as a gtdde,
Your new oven has been set correcly at the factory
and Is more apt to be accurate than the o_e_ it
replaced.
After you have used your ov_n for awhile, if you feel
your oven should be holer or cooler, you can adjust
it yourself. See T_E_Oz3T,_,7,5.DJL_$T_,'_._NTS
In this manual.
•
Always fofow
•
Measure Ingredients
Cakes, cookies, muffins, and quick breads shou!d
be baked In shiny pans -- to reflect the heat -because they should have a light golden crust.
Yeast breads and pin crusts should be baked in
glass or dull (non-shiny) pans --to absorb the heat
because they should have a brown, crisp cnJst.
Be su_'e the ut_derside of the pan is shiny, too,.
Darkened undersides will absorb the heat and may
cause over-browning on the bottom of your food.
recipe cat'efuly.
properly.
Use proper pan placement,
Place pans on the oven racks with 1" to t 1/2" of air
space on all sides of each pan. Avoid overcrowding
the oven.
Pans too close to each other, to oven walls or to the
oven bottom block the free movement of air. Improper air movement causes uneven browning
cooking.
and
Oven temperatures should be reduced 25 degrees
below recommended temperatures If exterio r of pan
Is predarkened, darkened by age or oven proof
glass.
2 cake layers
There may be some ode rwhen the oven is first used.
This is caused by the heating of new parts and
insulation.
Do not cover an entire oven rack with foil. The foil
can block normal heat flow and cause poor baking
results, Do NOtplace any foil directly above the bake
element. Foil used on the oven bottom under the
etement may damage the oven surface; therefore, it
should not be used°
4 cake layers
Cookies should be baked on flat cookie sheets
without sides to allow the air to circulate properI?
When baking several items stagger pans so that no
pan is directly abo,_e another.
When recipes require preheating, have food near_)
befor_ you open the oven door. II tl_e oven doo.J L
ai),:,wed to remain open for more lhan a brief tir¢_,._
t!_e preh£._t temperature will be losl
Let lhe oven p_eheat Ihoroughiy before coo_ing
baked products. Listen for preheat notitication tone
and put the food in the oven.
Opening the door too o!en to check iood duri)_
baking will attow heat toss and may cause poor
baking results,
_.,&
NEOVC03-2
Broiling
PO$1TBONIHG
TO SET BROIL
Broiling is cooktng by direct heat from the broil element.
Tender cuts of meat or marinated meat should be selected for broiling. For best results steaks and chops
should be at least 3/4" thick,
1. Press BROIL. "HI" and "BROIL" appear In display,
2, Press BROIL again to set LO broil, You can alternate
between HI(550°F) and LO(450°F) by pressing
BROIL.
3, Press START,
•
The closer the food is to the b roll element, the faster the
meat browns on the outside, yet stays red to pink In the
center. Moving the meat farther away from the element
lets the meat cook to the center while browning outside.
Side one should be cooked 1-2 minutes longer than stde
two,
TIPS
YourlowerovendoorshouldbeopentotheBROIL
STOP position while broiling.
Food
Use only the broiler pan and grid that came with
your range for broiling° They are designed for
proper drainage of fat and liquids and hetp prevent
spatter, smoke or fire.
.
,
Rack
Position
4 = Highest
t = Lowest
Total
Time
(minutes)
Steak - 1" Thick
Do not prehea_ when broiling.
Preheating may
cause the thermostat to cycle the broil element oft
al_d on, For even broiling on both sides, start the
food on a cold pan°
Trim the outer layer of fat from steaks and chops°
Slit the fatty edges to keep the meat from curling.
•
PAN
After placing food on the broiler pan. put the pan on an
oven rack In the proper posltlom The recommended
rack position and cooking time can be found In the chart
below°
4. Press CLEAR/OFF when broiling is complete.
Most foods can be broiled at the HI broil setting
Select the LO Broil setting to avoid excessive
browning or drying of foods that should be cooked
to the well-done stage (such as thick pork chops or
poultry),
BROILING
BROBLER
Rare
4
9-11
Medium
3
13-15
Well Done
3
21-23
Medium
3
16-18
Well Done
4
7-9
Lamb Chops - 1" Thick
3
18-21
Pork Chops - 1" Thick
3
27-29
Pork Chops t/2" Thick
3
16-18
Ham Slice - t/2" Thick
3
11-12
Fish (Fillets)
3
11-13
Chicken (Halves)
2
45-55
Frankfurters
3
8-11
Bacon
3
9-11
Ground Beef Patties
For maximum juiciness, salt the first side just before turning the meal Salt the second side just
before serving,
Brush chicken and fish with butter several times as
they broil. When broiling fish, grease the grid to
prevent sticking and broil with skin side down, It is
not necessary to turn fish,
Never leave a soiled broiler pan in the range.
Grease in the pan may smoke or burn the next tlme
the oven Is used.
Be sure you know the correct procedure for
putting out a grease fire. See the section on
safety,
Do not cover the entire broiler
grid with foil. Poor drainage
of hot fat may cause a broiler
fire.
This chart Is a general guide. The size, weight, thickness, and starting temperature of the food, as well as
your own personal preference, will affect the cooking
timer Times in the chart are based on the food being at
refrigerator temperature.
If a fire starts, close the oven
door and turn controls off. if
fire continues,
throw baking
soda on the fire. Do not put
water on the fire.
23
NEBRL07-2
BEFOR
A CLEAN
CYCL
"i, Press CLEAN, The display will fi}asb aSTA_ _ _t_
show the last entered clean ti;t_a
Remove the broiler pan and grid, oven rac_;s, a!_
u_a_lslts and _n_t felt that may be !n tt_e oven, G3 not
tiy t_ ciear_ '.t_ensifsor any o_her objects in th_ ov_n
durit_g & sei_-ciea;_ cycle, i_ oven racks _e _-={__n
n_mber pads to enier hOP_s: m;r_,e;; de.._P_ _t"
cleaning, The most frequenfly recommended _.t_
_me is three hours. You c8_, s_l a clet}_ Hrr_ _ 1 ::_O
(one hour and thirty mfnutes_ up _o 4:00 (;o_r,he_sL
_. T_ b_gln cleaning ImmedI_te_y, pr_
START', "T_/P..
display viii show the stop time, an0 I_LO_ _ _}_I
flash in the display for 15 seconds whl_s th_ d-_"
locks° When the door is Iocke_ "LOC_<5_" ,._!i:
remain In the dispia V
you choose to leave the racks In the oven, yo_ csn
polish the edges o_"the racks with stee; woo_ an_
apply a small amount of vegetable ot| to the rack
edges after the serf-clean cycle. Thts wltl make the
racks easier to slide.
Soil o n the o,J_n fro_. {r_rn_. the,door _Iner oUlSid_ !h_
eoor al,
n M'ron ed e
oven c v; y oppro ,
1" Into the oven) viii not be cleaned durin_ _ cf_r
cycle (see Illustration below). Clean these areas by
hand before starting a clean cycle.
Beiore sat}ing delay staA, ma_'.e£,ute _,P,u
Uv el_ t_;O,
the correct time of day.,
Do not a_tow waler to run down inside the slols
in the door. Open the d_or completely
when
cleaning the top edge.
3, Press SIOP TiME pad.
Follow steps 1-2 above, then:
4
Press number pads for the time of day you want
cleaning to be finished.
5. Touch START.
FRONTFRAME
Display shews "START TIME", "STOP TIME", "CLEAN"
and the time of day° When t he door Is locked, "LOCKED''
will remain inthe display.
_/,OTE_ Oven aut_maHca_y
flgu_ss the st_#.ing
t;rn_ SO cIe_PJ_
w_] en-,_ al t_e s_op ilme _ou
hav_ sel_cied.
If you enteran impossible stop time, then "ERR", "START
TIME", and "STOP TIME" flash in the display. To correct,
press STOP TIME and enter a new stop time.
NOTE: Both the lower oven fan an'J _he micrawave tan n_ay operate du_ing ot after seH-cleantP,_ ei_¢] will
C.o_p_ttr_.,_nl
_'_"_""
DOOR UNER
%
continue
to ,)pupate until control
_empe_a_u:e$
coo] r_own.
Your oven ligh_ should be OFF during a sell.clean
cy#L = b3 prolong the li{e of the bulb.
Use hot valet with a soap-,f!lled steel wool pad, the_
rinse well
3. Wipe up heavy sptliovers on the oven bottom. Too
much sott may cause smoking during the clean cyc}e.
4 Do not rub the door seal, The ,qber_;_s mated-3t eI
the sea! has an extremely low resls._ance to abrasion.
An intact and well fitting oven door seal is essential
for energy efficient oven operatlon and good baking
results, If you notice the seal becoming worn, frayed
or damaged In any way or if it has become displaced
on the door, you should replace the seal,
24
NESCL08-3
AF'rI,_R
A CLEAN
CYCLE
QUESTIONS
After a clean cycle Is complete, the oven door will stay
locked until the oven temperature cools to a safe level
When the oven has cooled "LOCKED" will disappear
from display. "CLEAN" will remain In display until you
press CLEAR/OFF or enter an oven operation. NEVER
TRY TO FORCE THE DOOR TO OPEN WHEN "LOCKED"
IS IN THE DISPLAY.
Q. Can I use commercla! oven cleaners on any part of
my self-cleaning oven?
A. No cleaners or coatings should be used on or around
any part of this oven.
If white spots remain, remove them with a soap-filled
steel wool pad. Be sure to rinse thoroughly with a
vinegar and water mixture. These deposits are usually
a salt residue that cannot be removed by the clean cycle.
Q. Can I clean the woven gasket around the oven door?
A. No. Do not to rub, move, or damage the gasket.
Qo Is it normal to hear "crackling sound" during cleanIng?
A_ Yes. This Is the metal heating and cooling.
If the oven is not clean after one clean cycle, the cycle
may be repeated.
A CLEAN
CYCLE
(3. Why do I have ash left in my oven after cleaning?
A. Some types of soil will leave a deposit, It can be
removed with a damp sponge or cloth.
t. Press CLEAR/OFF.
2. Wait until "LOCKED" is no longer in display and door
wil! open easily° Never force the door°
NOTE:
AHSWER$
Q. If my oven clock Is not set to correct time of day, can
I still self-clean my oven?
A. Yes, however, I! you desire to set a delay self-clean
cycle to end at a specific time of day your clock
should be set to the correct time of day.
After a clean cycle, you may notice some white ash in the
oven° Just wipe It up with a damp cloth.
TO INTERRUPT
AHD
What should ! do If excessive smoking occurs during
cleaning?
Ao This Is caused by excessive soil and you should
switch the OVEN to OFF. Open windows to rld room
of smoke, Allow the oven to cool for at least one hour
before opening the door. Wipe up excess soll and
reset the clean cycle,
Q_
The microwave cooling fan will come on approximately one hour Into the clean cycle, The
fan will run for a short period of time after the
clean cycle ts completed.
Should there be any odor during the cleaning?
A. Yes, there may be a slight odor during the first few
cleanings. Failure to wipe out excessive soil might
also cause an odor when cleanlng_
Qr
25
NESCL09-3
Q -I=IAIII -£@ TII$
On the folowlng pages, al removable pans of your Cooking Cen_er are sho'_vn. R-_fer to those pages when clean!ng
your C_okJn_ C_nte._. Warm water, a ml!d detergent, and a soft cloth are saie to use on al cleanable parts of your
range. Do not use metal scouring pads, except where recommended. Range finish will be porcelain enamel
Porcelain enamel looks like a painted surface.
PA_T
CLEANtF_G MATE,_IAL$
RE_,_ARK$
Bake and Broil Units
DO NOT clean the bake and broil
units
Any soil will burn off when the unit Is "
heated. NOTE: The bake unit Is hinged
and can be lifted gently to clean the oven
floor,
tf splIIover,
residue or ash
accumulates around the bake unlt, gently
wtpe around the unit with warm water.
Broiler Pan and Grld
Detergent,
warm water, soap-
Remove soled pan from oven to cool.
Drain fat or dr!pplngs. Fill pan with warm
water. Sprin_de grid wih detergent and
cover with damp cloth or paper towels.
Let pan and grid soak for a few minutes.
R!nse or scour as needed. Dry well. Grid
and pan may be washed In a dishwasher.
filled scouring
pad, plastic
scouring pad, commercial oven
cleaner
DO NOT use oven cleaner around
any part of the oven
Glass
Glass cleaner and paper towels
If you need additional clean!ng for
spotting, wash with equal parts
white vinegar and warm water.
Rinse well and dry.
Do not allow water to run down Inslde
openings In do0rwhlle cleaning. Remove
stubborn soil with past_ of baiting soda
and water. Do not use abrastve cleanerso
Rlnse thoroughly, Door can be removed;
see removable parts secton.
Door should be completely open
when cleaning top edge.
Metal, Including Chrome
S_de Trims and Trim Strips
Wash,rinse,
and thenpolshwitha dry
cloth.
DO NOT uses_.ee!
_mol,
abras!ves,
Soap end water
ammonia, acids, or commercial oven
cleaners which may damage the flni_h.
Set{-Clesn]ng Own Interior
DO NOT use oven cleaner around
any part of the oven
Detergent, warm water, scouring
pad or soap-filled sloe! wool pad
Rinse thoroughiy al_.r cleaning. Cleaning
Inside the oven need only be done as an
optional touch-up between set-clean
cycles. S¢_a_
the _lf.cle_nlng
oven sectlon
of this manual ior more Information.
Oven Door Gasket of
Self-Cleaning Oven
DO NOT CLEAN
DO HOT RUB, MOVE OR DAMAGE THE
DOOR GASKET.
See Self-Cleaning
Section for more Inlormaflon.
Oven Racks
Detergent, warm water, scouring
pad or soap-filed st_.ei wool pad
Remove
Lightly dmnpened cloth
Don't use sharp-edged utensls around
th_ contro! panel They might dam_
IL
DO HOT use abrasive cleaners,
steel or plastic pads.
DO NOT use cleaning sprays or large
amounts o_ soap and water_ These can
cause problems
wilh the control
mechanisms.
Control Psnet
25
from oven to clean.
Rinse
thoroughly.
NECCH08-3
CLEANING
TIPS; (co.t.)
PART
CLEANING
P,_ATERIALS
RF._ARKS
Temperature Probe
Sudsy cloth, plastic scouring pad,
water or dishwasher
Care should be taken In handling _
probe, DO NOT twist it, DO NOTdrop
It. Clean as soon as possible afteruse.
Wipe with sudsy cloth, then rub metal
parts with plastic scouring pad, if
necessary.
Microwave Oven Shelf
Accessory
Mild soap and water or dishwasher
Do not clean In selFcleanlng oven.
Outside of Microwave Oven
Soap and damp cloth
Clean with soap and damp cloth, then
rinse wlth damp cloth and dry. Wipe
the window clean with a damp cloth.
Chrome is best wiped with a damp
cloth and then with a dry towel,
Inside Microwave Oven
Baking soda and water, Bon Amf®
cleaner
Open the door a few minutes after
cooking to help alr out the Interior.
Occasionally wipe with a solution of
baking soda and water to keep Interior
fresh_
Spills and spatters may wipe up with a
paper towel. Some may requtre a damp
cloth.
Remove grease with a sudsy cloth,
then rinse and dry. High heat generated
by use of a Brown 'N Sear® dish may
cause scorched appearing stains on
oven floor. These may be removed
with Bon Aml®brand cleanser. Follow
Instructions on can, then rinse and dry
thoroughly. Do not use It on painted
surfaces - tt may scratch the palnL
Microwave
Oven Door:
a) Window
Sudsy warm water
wipe up spatters daily. Wash window
with a small amount of sudsy, warm
water. Rinse and dry,
b! Metal and plastic parts
Damp cloth
Use a damp cloth to remove all soil.
Do not use abrasives, such as
cleaning powders, or steel or plastic
pads.
27
NECCH09
To
repg_ce',
1° Hold the door over the hinges with the s!ots at the
bottom edge of the door lined up with the hinges,
The hinge arms must still be in the stop
position.
2° Slide the door down onto the hinges as far as it wi!l
go and close the door.
SLOTS
REMOVABLE
OVEN
RACKS
Be careful not to scratch the oven finish when installing
or removing oven racks°
To instalh
1. Set the raised back edge of the rack on a pair of rack
guides.
2. Push the rack In until you reach the bump In the rack
guide, then lift the front of the rack a bit and push the
rack all the way in.
To remove= _
NOTE=
The racks are designed with stop locks.
When the racks are
placed correctly on the
rack support and extended from the oven,
the stop lock prevents
the racks from tilting
when you are removing food from the racks
or placing food on
them.
BUMP
GUIDE
1. Pull the oven rack out, then up, in one motlom .Se_
the cleaning charL
NOT_:
For best performance, remove oven racks during a clean cycle lfoven racks are left in the range during a selflcleaning
cycle, they will darken, fuse their luster and become hard to slide, tf you choose Doleave the racks In the oven, you
can polish the edges of the racks with s_eel wool and apply a small amount of vegetable oil to the rack edges afler
the self-clean cycle.
R PLACING
OVEN
LIGHT
To replace
]
Do not tou_.h hot ove_ bulb. Do z_ot
touch bulb wi_h wet hands. Never
wii0e oven llghtarea wi_h wet cloth.
[
To
|
J
Never to_ch the etectr_calty
live
metal coitar on _he l_atb when re.
prating.
rer_ov
cover=
1 Piece cover into groove el lamp receptacle. Pullwlr_
bail forward until it snaps tnlo place. Be certain wir_
bail is in center of cover. Wire will held cover firmly
when in correct posltlon,
2. Connect power to oven.
.
BULB
SOCKET
e=
1. Disconnect electric power ':o H'..eoven _t the mai:_
fuse or circuit breaker or up,pl_g the oven from !h_
electric outlet,
2. Hold your b_;_d under cow_ kn,d i_:n:_y p_,shba,_
the bail wire u_lfit it clears th=.cover° The c_,v_.! wiil
fall into yoL, r l_and. DO HOT _=_MOV_ AP_'Y
SCREW_ TO RF-I_,_OVE TH_ COVER,
3. Replace bulb w_tI_40-wa_t hom_ appliance
bu)b
6OL_ C_VER
SA_LW;RE
NEMNT1O3
RE OVAL
OF PACKAGBNG
TAPE:
k
When packaging tape is removed from new appliances, a residue Is sometimes left on t_ie appliance. The safest way
to remove this adhesive, and prevent damageto the product finish, is by using an application of household liquid dish
washing detergent, mineral o1!, or cooking oil. Apply with soft cloth and allow to soak. Wipe with soft cloth. DO NOT
use plastic pad or equivalent.
Wipe dry and then apply an appliance polish to thoroughly clean and protect the
surface, This procedure is also safe for the face of microwave doors and other plastic and lexan parts.
NOTE: The plastic tape that is not removed from chrome trim on range parts CANNOT be removed if baked on.
t
MICROWAVE
OVEN
rl...,
iii
i1,,i....
iii
i i
i,
i, ii
jjl,lll
/.."
H
LAMP
To replace:
1. Disconnect power at main fuse or circuit breaker
panel.
4. Remove the tape around the base of the IlghL The
tape Is there to prevent the light from loosening
during shipment and door closings. Removing the
tape may be difficult.
2o Open microwave oven door, then remove the two
Phlllips head screws from the bottom of the grille.
Remove the grille,
5. Unscrew the bulb carefully. Use a cloth to protect
your hands In case the glass breaks.
NOTE:
The light is not standard.
Replace
a similar 125 volt, 20 Watt bulb,
it wi_h
6. Screw replacement bulb lnto socket and replace llght
cover and grille. Reconnect power to cooking center.
3. Remove the light cover by removing the two Phillips
head screws.
MICROWAVE
SHELF
ACCESSORY
To position the Microwave Oven shelf, tip the back
s!lg htly and fit the shelf support guides onto the support
guides located on each side of the oven in the rear.
Next, lower the front until the shelf support guides fit
onto the support guides located at each slde of the oven
In the front.
When properly positioned, the shelf should fit snugly In
place, be level and not touch the back wall of the oven.
NOTE:
If electrical
arcing occurs when using
the shelf to cook more than one food at the same
timer turn the oven off. Make sure the shelf is
positioned right.side-up on all four shelf supports
and not touching oven walls.
29
NEMNTt 7-1
IIIFOIIII
ALLI£1i
F@I
SI_INVICl
Say-_ _.i_e a_ _oney _ Ch_ck _his list befe:'e yo_ catg _o_ s__;_ice°
To et_inate un_;ecessary service ca!s, -lrst, read alt the tnstruclons
in this manu_i carefully. Than, tf you have a
problem, always check this list of common problems and possible solutions before you call for service.
I_.you do ;',_vea probl_ you cannot {ix ycur_lf, call your nearest Sears Store or Service ('.enter for help. V_en calling, have
,our man_,_l aP_ _pa!r pa_s t_ handy wih the model number, _rta! number and purchase d_e of your oven.
Do_,_,1r CAL_. FOR SERV_C5
UHTIL YOU CHEC_
Oven disi3!ay fla_he__."F" _nd a
num[;er; oven sto_s _,'ktag
,
Posslb_e oven rnsHunctton
• Pr-_sCLEARfOFF. Letovencooldown._or
1 hour. Piece oven back into operation. If
problem repeats, call for service.
Oven does not v.sork; tot_3ty
inoperativ_
,
No power
, Check
fuse°
Oven does not heat; clock
okay
• Oven controls set incorrectly
to oven
• Clock set incorrectly
,
Foods do not bake properly
,
Oven not
enough
• Improper
ment
preheated
Foods do not brol properly
long
rack or pen place-
setting
Tone does not sound
• Be sure to preheat:
• Maintain uniform alr space (1" to I 1/2")
around pans and utensils; see cooking
hints section.
• Do not line oven bottom with foil.
not cover an entire rack with foil.
Do
• Reduce temperature
glass or dull/darkened
for
25 degrees
pans.
• Is recipe tested and reliable?
• Check the Installation instructions for
leveling Instructions.
• Using improper
• See even cooking section.
cookware
• Oven calibration
• Is recipe tested and reliable?
See Thermostat Adjustments.
• Improper rack position
• Checkbroilerpan
Ing section.
• Oven preheated
• Do not preheat when
• Improper utensil used
• Use broiler pan and grid supplied wRh
range.
.
• Open door to broil stop position;
removable oven door section.
Oven door closed during broil
broiling time
• Dirty oven
placement.
See broil-
broiling°
see
• Check bmlling chart tn broiling section.
• Wipe up heavy spi!lovers
bottom.
Broiler pan containing grease
left tn oven
Oven tight does not work
instructlons,
• Rectpe not fo!lowed
• Oven rack not level
• improper
Oven smokes
Check oven control
or
until preh eat tone sounds o r 10 mine.
• Improper temperature
for utensil used
seems
circuit breaker
Clock must have correct time of day to set
Timed Operations for specific time of day.
• Improper use of foil
Oven temperature
Inaccurate
,=
household
on the oven
• Clean pan and grid after each use.
• Light switch In off position
Check switch setting.
,
Light bulb burned out
Check or replace light bulb; see removable parts section.
• Tone has been eliminated
Push and hold CLEARtOFF to activate
tone.
3O
NESER07-3
BEFORE
CALLING
FOR
PROBLEM
• Food does not roast or
bake properly
SERVICE
PO$SIIBL_
(CONTINUED)
CAUSE
DON'T
UNTIL
• Recipe not followed
• Is recipe tested and reliable?
• Range and oven rack not level
, Check the Installation Instruc.
tlons for leveling Instructions.
Using improper cookware
. Loweroven
will not self-clean
CALL FOR SERVICE
YOU CHECK
• See cooking section of this
manual
Check self-clean Instructions.
• Controls not set properly
i
• Clean cycle interrupted too
soon
i
Heavily soiled ovens require a
3 1/2 hour clean cycle.
• Oven too dirty
i
Heavy splllovers
should be
removed before setting clean
cycle. Repeat clean cycle.
or poor self-cleaning results
Lower oven door will not
unlock
• Clean cycle not complete
Electronic Touch Pads will not
work
• Clock not set
Touch CLOCK pad and enter
time.
• Electrical service has caused
Interference on main power line
If it can't be reset by touching
pads, disconnect your cooking
center at main fuse or circuit
breaker. Watt one minute and
reconnect
power.
Reset
CLOCK.
• START pad not touched
Touch START pad.
• Door not Closed correctly
Make sure door is securely
closed_
' • Electronic Display Panel goes
blank or blinks
. Control Panel on, yet oven
will not operate
Oven must cool
below
lock
temperature after clean cycle Is
complete.
Another function was touched
Touch CLEAR/OFF to cancel.
Numbers not entered
touching Time Cook
after
Complete setting.
Finished
temperature
entered after entering
Roast Code 7
not
Auto
Complete
CLEAR/OFF
accidentally
pad
touched
No code number entered after
touchlng Auto Roast
3!
setting.
• Repeat setting.
• Complete setting.
NESER12-2
POSSIBL_.
CAU._
UNTIL
• Foods over_.ookedo;
YOU O_
::_:_.
Not enough t_me se_ when
using "lIME COOK function
because starting lemperalure_
of ioods varied widei_
"- Probe Rot f,_s_L,=_,__....._e, i
,
!t;corract power tevei entare_
- Dish no_ rotate_, _.urne.d o_
stirred as called for in recipe
• Too many dishes
same time
• "PROBE"
appears on display
lt_ ov_
a,'.
, Do notov_rcrowo
_,_
Food notthoroughlydefrosled
, Check Defrost section oiman_.
Improper use of coverings
. F'_!!ow instructions
and recipe.
Probe not used, although
Roast pad touched
Aulo
in manua
• See PROBE section of manual
Probe not insertedpropeMy into
oven receptacleor food
"ERROR" appems on display
ALL, THIES@{ AF:_ NORMAL
I_iICROW.a,VF_OV_H:
Wl_en using Auto Roast Code 7
to Temp Cook/Hold, you have
entered a temperature of less
than BO" or more than 199°F
ON YOUF_
, Dull thumping
Sore _ "P,/,Fad}o
tnterfer ance mig hiba noticed wMle
using
your microwave
oven, It Is similar to lhe
tnl_rIersnce caused by other small appiiance_
_nd doe_ no_ Indicate a problem with your oven
around door or ouier case.
sound while own
Is in use.
• Microwave fan may operma wilh both ovens oil
Is cooling the control and will turn Itself off.
of
Dimming oven light and change In blower sound
may occur wh!!e operating at power levels other
than hlgh.
• Slearnor vapor escaping [._oma_ound door
• Light _eflection
• See Auto Roast section
manual for instructions,
It
32
NESER13
THERMOSTAT
ADJUSTMENTS
The temperature in your new oven has been set correctly
at the factory, so be sure to follow the recipetemperat ures
and cooking times the first few tlmes you bake in your
oven.
Continue to hold BAKE untll the display changes to
show the preset oven temperature adjustment,
4. The temperature can be adjusted up to +35°F hotter
or -35°F cooler. Press 1 to increase in 5 ° change.
Press 0 to decrease In 5 ° change.
If you think the oven should be hotter or cooler, you can
adjust the oven temperature yourself° To decide how
much to change the temperature,
set the oven
temperature 25°F higher or lower than the temperature
in your recipe, then bake. The results of this "test"
should give you an Idea of how much the temperature
should be changed_
Press 1or +5 °
increase
Q
Te adjust temperature
follow these instructions:
Press for .5 _
decrease
1. Push BAKE.
J
2. Select a temperature
SET BETWEEN -35°F
AND +35°F
\,
-95
between 500°F and 550"F by
pressing number pads.
Q
5o When you have made the adjustment, push START to
return the display to the time of day. Use your oven
as you would normally.
SET BETWEEN
500°F AND 550°F
The adjustment you have made to the oven temperature
w_llbe remembered by the control and will automatically
adjust the oven temperature by that amount each time
you set a bake temperature.
5 25
NOTE: Th_s adjustr_nt
will not affect Broi! or
Clean temperatures,
1! will be remembered
when power is removed.
Pressing CLEAP_OFF or any function in the adjust
ther_stat
mode will cancel the mode and any
chan_es to the adjustn3ent
will not be saved.
3 IMMEDIATELY, press BAKE again and hold for aboLd
4 seconds, This disptaywill show"ADJ" and "TEMP"
wiIi flash in fhe display.
NOTE:
We do not recommend
the use of inexpensive
thermometers, such as those found the grocery stores,
to readjust the temperature
of your oven.
These
thermometers may vary 20 ° - 4O°F. Your oven has been
preset to maximize cooking efficiency.
33
NESERt4-1
34
KENMOli E
E
NTY
_-_
llllllll
i
FULL ONE YEAR WARRANTY
ON THE FUNCTIONgNG
PARTS EXCEPT GLASS PARTS
OF ALL
If, within one year from the date of Installation, any part, other than aglass
part, fails to function properly due to a defect In ma'terlai or workmanship,
Sears w!|l repair or replace It, free of charge.
Dear Customer:
Our constant efforts are
directed
toward
making
sure your new Kenmore
Oven will arrive at your
home In perfect condition
and will give you proper
performance.
As p_rt of
these efforts, we feel It Is
our responsibility
to pro-
vide you with this warranty
for your range.
FULL 3e-DAY WARRANTY ON GLASS PARTS AND FINISH OF PORCELAiN ENAMEL, PAINTED OR BRIGHT METAL FINISHED PARTS
If, wlthln 30 days from the date of Installation, any glass part or the finish
on any porcelain enamel, painted or brlght metal part Is defective In
materla! or workmanship, Sears will replace the part, free of charge.
FULL 90.DAY WARRANTY
ON MECltANICAL
ADJUSTMENTS
For 90 days from the date of Installation, Sears will provide, free of charge,
any mechanical adjustments necessary for proper operation of the range,
except for normal malntenanceo
tf the range Is subjected to other than private family use, the above
warranty coverage Is effective for only g0 days.
WARRANTY SERVICE iS AVAILABLE BY CONTACTING THE NEAREST
SEARS SERVICE CENTER/DEPARTMENT IN THE UNITED STATES
This warranty applies only while this product Is In use In the United States.
This warranty gives you specific legal rights, and you may also have other
rights which vary from state to state.
_
SEARS,
ROEBUCK
and CO.
Dept.
731
CR.W
Sears Tower
_¢J_dP_p_,
Chicago,
WE SERVICE
WHAT
IL
60684
SELL
We,_jervlce What We Sell" Is our assurance to you that you can depend on Sears for service because Sears
5ePv_c_ Is nationwide.
_Lr _-_enlnore Oven has added value when you consider that Sears has a service unit near you staffed by
_'e.._ _.rained technicians..,
professional technicians specifically trained on Sears appliances, having the
, ,; tools and equipment to ensure that we meet our pledge to you _ "We Service What We Sell_"
T_ FURTHER ADD TO THE VALUE OF YOUR RANGE_ BUY A SEARS MAINTENANCE AGREEMENT.
Years of Gwnershlp Coverage
_ _r_moreOvens are designed, manufacturedand
te_ted foryears of dependableoperation. Yet,any
modern appliancemay require service from time
to lime. The Sears Warranty plus the Sears Maintenance Agreement provides protectionfrom unP.xpected repair bills and assures you of enjoying
maximum range efficiency.
;'_ere'sa comparative warranty and Maintenance
Agreement chart showing you the benefits of a
1
2rid Year
3rd Ye,_r
W
MA
MA
MA
MA
MA
MA
MA
MA
Replacement
ofDetecfJve
.o.. ot.°r,,a°.erceleJ.
or Glass
goDAYS
2
W
Mechanical
A_fo.,.,a°,
.........................
3oDAYS
W
3
Po,cei°t°on_Glee°Pa.o
.................................
4
Seal_ Range Maintenance Agreement.
1st Year
Annual Preventive Malnten-
o_ooC.o°.o,..r._o.o, MA
W - Watr_t n_,y
MA ,* MeJntenzmce
Agroomo_,!
CONTACT YOUR SEARS SALESPERSON OR LOCAL SEARS SERVICE
CENTER TODAY AND PURCHASE A SEARS MAINTENANCE AGREEMENT.
!<.-.
_"%_ _
J'_
0
_e
® America's
Sold by SEARS,
ROEt3UCK
Best Selling
AND CO._ Chicago,
Appliance
Brand
IL 60684
-- Printed
in LaFayette,
Georgia