1
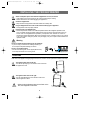
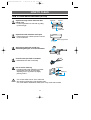
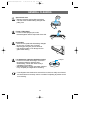
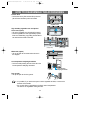
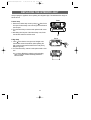
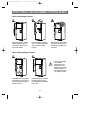
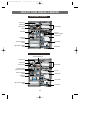
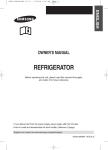
DA99-00743A(TD-PJT)
3/18/04 4:12 PM
Page 1
ENGLISH
OWNER’S MANUAL
REFRIGERATOR
Before operating the unit, please read this manual thoroughly,
and retain it for future reference.
If you unplug the power supply, you should wait 5 min before plugging in again.
DA99-00743A REV(0.0)
DA99-00743A(TD-PJT)
3/18/04 4:12 PM
Page 3
FEATURES
Digital temperature control display
(option)
• The display shows all functions of the
appliance which can be easily controlled.
• Because this operating instruction book covers
various models, the characteristics of your
refrigerator may differ slightly from those
described in this manual.
Vacation (option)
• Save on energy consumption by switching
off the fridge and maintaining only the
freezer.
Warning
• The appliance is not intended for use by children
without adult supervision.
• Children should be supervised to ensure that they
do not play with the appliance.
• The appliance must be positioned so that the plug
is accessible after installation.
SUPER fast freezing function (option)
• The Super Freeze function allows you to
freeze food quickly. Ice can be produced
faster.
Surround Cooling System
• Freshness depends on cooling speed. The
surround cooling system blows cold air to
every corner for even cooling.
Quick opening and closing system!
• Vegetables and fruits can be rapidly
accessible to prevent loss of cold temp using
a rail system design in high-humidity
vegetable room and special fresh room
which operates smoothly only by pulling and
pushing the handle.
CONTENTS
FEATURES................................................................................. 3
WARNINGS / SAFETY PRECAUTIONS ................................. 4
INSTALLING THE FRIDGE/FREEZER.................................... 6
USING THE CONTROL FEATURES (ELECTRONIC CONTROL TYPE) .... 7
USING THE CONTROL FEATURES (DIAL CONTROLTYPE)................ 8
MAKING ICE............................................................................... 9
FUNCTIONS OF WATER DISPENSER (OPTION)................ 10
HOW TO CLEAN ..................................................................... 11
GENERAL CLEANING ........................................................... 12
HOW TO DISASSEMBLE THE ACCESSORIES .................. 13
REPLACING THE INTERIOR LIGHT.......................................14
HOW TO INSTALL AND DISASSEMBLE THE DOOR HANDLE ....15
PROBLEMS AND SOLUTIONS ...............................................16
USAGE PRECAUTIONS ..........................................................17
VIEW OF YOUR FRIDGE / FREEZER....................................18
A slightly opened door is closed
automatically.
• In case of a slight opening of the
refrigerator door, it will close automatically by
using an energy saving automatic
closing function.
3
DA99-00743A(TD-PJT)
3/18/04 4:12 PM
Page 4
WARNINGS / SAFETY PRECAUTIONS
To avoid any risk of personal injury, material damage or incorrect use of the appliance, be sure to
observe the following safety precautions. (After reading these owner’s instructions, please keep them in
a safe place for reference). Remember to hand them over to any subsequent owner.
Indicates that a danger of death or
serious injury exists.
Indicates that a risk of personal
injury or material damage exists.
Warning
Caution
LP gas or other such substances may cause an
explosion.
Warning
Do not disassemble, repair or alter the
appliance.
• It may cause fire or abnormal operations, which
may lead to injury.
Do not plug several appliances into the same
sockets.
• This could cause overheating and the risk of fire.
Keep the power plug away from the rear of the
fridge/freezer.
• A damaged power plug may cause fire due to
overheating.
Pull the power plug out of the socket before
replacing the interior light in the refrigerator.
• Otherwise, there is a risk of electric shock.
Do not directly spray water inside or outside
the fridge/freezer.
• There is a risk of fire or electric shock.
Be sure to earth the appliance.
• Otherwise, it may cause material damage and
electric shock.
Do not spray inflammable gas near the
fridge/freezer.
• There is a risk of explosion or fire.
If you wish to dispose of the fridge/freezer,
throw it away after removing the door or its
seals.
• In this way, it is not possible for a child to remain
trapped inside it.
• The gases in the insulation material required
special disposal procedure.
• Please tie up the extra length of the power cord at
the back of the refrigerator so as not to be
touched on the floor preventing the power cord
from being crushed by the rollers upon relocation.
Do not bend the power cord excessively or
place heavy articles on it.
This constitutes a fire hazard. If the power cord
is damaged, have it replaced immediately by the
manufacturer, its service agent or a similarly
qualified person.
Do not insert the power plug with wet hands.
• You may receive an electric shock.
Do not put a container filled with water on top
of the appliance.
• If the water spills on to any electrical parts, it may
lead to fire or electric shock.
Do not install the fridge/freezer in a damp place,
where it could be splashed with water.
• Incorrect insulation of the electrical parts may
cause an electric shock or fire.
• Do not place the equipment directly under the
sunlight.
Do not store volatile and inflammable
substances in the refrigerator.
• The storage of benzene, thinner, alcohol, ether,
4
DA99-00743A(TD-PJT)
3/18/04 4:12 PM
Page 5
Do not touch any containers and food in the
freezer with wet hands.
• It may cause frostbite.
Warning
• Keep ventilation openings in the appliance
enclosure or mounting structure clear of
obstruction.
• Do not use mechanical devices or any other
means to accelerate the defrosting process, other
than those recommended by the manufacturer.
• Do not damage the refrigerant circuit.
• Do not use electrical appliances inside the
fridge/freezer, unless they are a type
recommended by the manufacturer.
Remove any foreign matter from the power plug
pins.
• Otherwise, there is a risk of fire.
Do not insert your hand into the bottom area of
the appliance.
• Any sharp edges may cause personal injury.
After unplugging the appliance, wait for at least
five minutes before plugging it in again to the
wall socket.
• Abnormal operation of the freezer may cause
material damage.
Caution
If the appliance is not to be used for a long
period of time, pull out the power plug.
• Any deterioration in the insulation may cause fire.
Do not store too much food in the appliance.
• When you open the door, an item may fall out and
cause personal injury or material damage.
Do not let children touch or play with the
controller of the appliance.
• Do not allow children to play with this appliance.
• Repairs and maintenance of the appliance should
only be performed by a qualified technician.
Incorrect repairs by an unqualified person are a
potential source of danger that may have critical
consequences for the user of the appliance.
• Never put ice cubes or ice lollies straight from the
freezer into your mouth. (The low temperature
may cause “freezer burns”.)
Do not put bottles or any kinds of glass in the
freezer.
• The container may break and cause personal
injury.
If the wall socket is loose, do not insert the
power plug.
• It May cause electric shock or fire.
Do not disconnect the power cord by pulling
on it.
• You may disconnect a wire and cause a short
circuit.
Do not store articles on top of the appliance.
• When you open or close the door, the articles may
fall and cause personal injury or material damage.
Do not store pharmaceutical products,
scientific materials or other temperaturesensitive products in the refrigerator.
• Products that require strict temperature controls
must not be stored in the refrigerator.
Do not let a child hang from the door.
5
DA99-00743A(TD-PJT)
3/18/04 4:12 PM
Page 6
INSTALLING THE FRIDGE/FREEZER
Allow an adequate space and install the fridge/freezer on a firm, level floor.
• If the appliance is not level, there may be unusual noises and poor cooling.
• Wait for at least one hour before plugging the appliance in.
Clean the fridge/freezer.
• Wipe and clean the appliance inside and outside with a damp cloth.
Plug the fridge/freezer into a wall socket used exclusively by this appliance.
• This appliance must be properly earthed.
Place the food in the fridge/freezer.
• Set the temperature control to the colder temperature and let the refrigerator operate for one
hour. The freezer should get slightly chilled and the motor should run smoothly with a soft hum
and no noise. Your fridge/freezer is operated by a compressor which switches “on and off” to
maintain the internal temperature. When the compressor is new, it requires running in for a period
of up to five months. During this period, it may be slightly noisy. This is quite normal and does not
represent a fault.
Warning
Use of an earthed socket exclusively for the appliance:
• If you are using a socket with an earthing terminal, you
do not require a separate earthing connection.
Use of a non-earthed socket:
• Connect the “earthing wire” to the copper plate and bury
it at a depth of at least 25 cm in the ground.
LEVELLING
If the front of the appliance is slightly higher than the rear, the door can be opened and closed more easily.
The appliance tilts down to the left.
Turn the left adjusting leg in the direction of the arrow until
the appliance is level.
The appliance tilts down to the right.
Turn the right adjusting leg in the direction of the arrow
until the appliance is level.
Caution
• When the level adjustment legs are not fixed on the
floor, the refrigerator could move.
6
DA99-00743A(TD-PJT)
3/18/04 4:12 PM
Page 7
USING THE CONTROL FEATURES (ELECTRONIC CONTROL TYPE)
Super Freeze
You can push this button, when you
want to make ice or cool food quickly.
If you push Super Freeze button the
indicator will work for 25hrs nonstop.
To stop Super Freeze, simply press
the Super Freeze button once more.
Vacation
If you are going on a long vacation or
business trip or you do not need to
use the refrigerator, press the
vacation button.
The refrigerator is switched off but the
freezer remains on.
The vacation indicator remains on
while in vacation mode.
●
●
●
●
●
●
Caution
• You must empty the
refrigerator before pressing
the vacation button.
1. Freezer Temp Setting
1) With the initial power is on, Freezer will be set at -19°C and Fridge will be set at 3°C
automatically. At this time, the temp on the display panel means the temp in the
fridge/freezer and as the temp decreases the displayed temp also decreases down to
the set temp. Afterward, the displayed temp is the set temp.
2) Freezer Temp can be set from -14 °C to -25 °C with Freezer temp setting button.
2. Fridge Temp Setting
1) Fridge Temp can be set from 7 °C to 1 °C with Fridge temp setting button.
2) Fridge set temp varies slightly from actual temperature according to the user ’s way of
storing food and Ambient temp.
3. Door Alarm
●
If the door is open wider than 15 °, after 2 minutes the warning sounds for 10 seconds
with 1 minute interval.
7
DA99-00743A(TD-PJT)
3/18/04 4:12 PM
Page 8
Using the control features (DIAL CONTROL TYPE)
- Freezer -
cold
colder
COLDER:
When storing large quantities of foods to be frozen, or producing ice quickly.
• Adjust the temperature control to the "COLDER"position.
COLDER to COLD:
When using MID range.
• Adjust the temperature control to the halfway position between COLDER and COLD.
COLD:
When storing a small quantity of food to be frozen.
• Adjust the temperature control to the COLD position.
colder
cold
- Fridge -
COLDER:
When storing large quantities of food to be refrigerated or not cold enough.
• Adjust the temperature control to the "COLDER" position.
COLDER to COLD:
When using MID range.
• Adjust the temperature control to the halfway position between COLDER and COLD.
COLD:
When the food refrigerated is frozen, or there is a small quantity of food.
• Adjust the temperature control to the COLD position.
8
DA99-00743A(TD-PJT)
3/18/04 4:12 PM
Page 9
MAKING ICE
- TWIST ICE MAKER
Making Ice Cubes
Remove the ice cube tray by pulling it towards you.
Fill the tray with water up to the maximum water level
marked on the rear of the tray.
Slide the tray back into the holder, taking care not to
spill the water.
Wait until the ice cubes are formed.
Freezing time :
It is recommended that you wait for about one hour
with the temperature set to Super Freeze for the ice
cubes to form.
Removing the Ice Cubes
Make sure that the ice cube storage bin is in place
under the ice cube tray. If not, slide it into place.
Twist one of the levers firmly in the clockwise direction
until the tray twists slightly.
Result : The ice cubes fall into the storage bin.
Repeat Step 2 for the other half of the tray, if
necessary.
Remove the storage bin by:
• Lifting it slightly
• Pulling it towards you
- REMOVABLE ICE TRAY
Making ice cubes
Remove the ice cube tray by pulling it towards you.
Fill the tray with water up to the maximum water level
marked on the rear of the tray.
Place it under the freezer shelf or on the freezer shelf .
Removing the ice cubes
To remove ice cubes, hold the tray at its ends and twist gently.
Warning
Danger of explosion
• Glass bottles containing liquids that can freeze should never be stored in the freezer
as the glass will explode when the contents freeze.
9
DA99-00743A(TD-PJT)
3/18/04 4:12 PM
Page 10
FUCTIONS OF WATER DISPENSER(OPTION)
With the water dispenser, you can obtain chilled water easily without opening the
refrigerator door.
HOW TO USE WATER DISPENSER
Lift up and pull out the water tank.
• Hold the handgrips on both sides to lift out the
water tank.
• Clean the inside of water tank when using it for
the first time.
Fill the water tank with water, ensuring that it is in a stable position, allowing for
the extended water supply outlet.
• Fill with water up to 2.5l. If it is filled higher than this, it may overflow when the lid is
closed.
• It is impossible to fill the tank with water while it is positioned in the refrigerator.
Hand-grip
Round lid
Water tank
Water spout
Method 1.
Fill the water lifting the round lid in the
arrow direction to open.
Method 2.
Please fill the water after holding and
lifting the large lid to open it.
Close the refrigerator door after fitting the
water tank.
• Confirm that the water spout is outside after
closing the door.
Press down the water supply lever after placing a
cup on platform.
• Place the cup deep inside to touch the back wall.
• Check that the locking device is set to "open". Water
can only be dispensed on this setting.
• Throw away 2~3 cups of water when using the water
dispenser for the first time after installation.
• Approximately 1 0~1 5 cups of water are available.
When the water dispenser is not in use.
After removing water tank, tightly insert the cap for sealing in
place of water spout, so that cool air escapes.
10
Water supply lever
DA99-00743A(TD-PJT)
3/18/04 4:12 PM
Page 11
HOW TO CLEAN
HOW TO CLEAN WATER DISPENSER (OPTION)
Separate the large lid from water tank after
pulling it out.
• It can be separated from water tank by pulling
up the hand-grip.
Hand-grip
Large lid
Water tank
Separate the water tank from water spout.
• Hold the upper part of water spout and unscrew
it in arrow direction.
Water supply device
After washing water tank and lid with
dishwashing detergent, rinse them with water.
Clean the water spout with a soft brush.
• Disassemble and clean occasionally.
How to use the water tray
• Frequently empty water collected in the watertray and wipe it out with dry clothe after
separating it from cup platform by slightly
pressing “PUSH ”.
Caution
cup platform
Water-tray
• Do not store water over 60° in the water tank.
• Be careful not to damage or lose the water spout.
• Do not let children mishandle the water spout. It may cause water overflow.
11
DA99-00743A(TD-PJT)
3/18/04 4:12 PM
Page 12
GENERAL CLEANING
Special fresh room
• Wipe and clean the high humidity special fresh
room with water and dishwashing detergent after
pulling it out.
Freezer / Fridge Shelf
• In case of foods spillages, pull out the
freezer/refrigerator self and wipe it with clean cloth.
Door Gasket
• Clean the door gasket with dishwashing detergent
the door can not easily close if it is dirty.
• Wipe the gaps along the grooves with cloth.
• Care should be taken not to damage the door
gasket while cleaning.
Low temperature catalysing deodorizer (option)
• In case of food smells in the fridge, Use the low
temperature catalyzing deodorizer after
disassembling, soak in clean water and dry it
completely in the sunshine.
• After disassembling, dip into clean water and leave
to dry completely in sunlight before reinserting.
Note
Catalyzer
• This refrigerator has wheels as its rear and front so that it can easily move forward
and back whenever necessary and it is convenient for adjusting its position as well
as for cleaning.
12
DA99-00743A(TD-PJT)
3/18/04 4:12 PM
Page 13
HOW TO DISASSEMBLE THE ACCESSORIES
Freezer shelf
• Pull out the ice tray first and then lift up the front
part of freezer shelf and pull it out forward.
Vegetable room
High humidity vegetable room and Special
fresh room (option)
• Lift up the vegetable room lid and pull it forward.
• Pull out vegetable box and high humidity special
fresh room while lifting it up pulling forward after it
has reached the middle of the slide.
Special fresh room
(Large size)
(Small size)
Water tank (option)
• Lift up and pull out the water tank as shown in
the diagram.
Low temperature catalyzing deodorizer
• Pull it out while pressing the end of the sill on the
low temperature catalyzing deodorizer.
Low temperature
catalyzing deodorizer
Door guards
• Lift up and pull out the door guards.
Note
• It is possible, if you need more space to store vegetable and fruits, to remove the
drawers and ice maker.
• Do not store fruits or vegetables in the fresh control compartment.
The fruits or the vegetables could get frozen.
13
DA99-00743A(TD-PJT)
3/18/04 4:12 PM
Page 14
REPLACING THE INTERIOR LIGHT
Always unplug the appliance when replacing the refrigerator light. This eliminates the danger of
electric shock.
Front
Freezer lamp
1. Remove the indoor lamp cover by using a + driver, fit the
front part of indoor lamp cover into the groove and then fit
the rear part.
2. Turn the indoor lamp to remove and replace it with a new
one.
3. After fitting the front part of the indoor lamp cover, fit the
rear sill area and then re-fit the screw.
Front
Fridge lamp
1. Insert _ driver into the front groove of the light cover.
Pull forward an then downwards. (After replacing the
light, insert the rear part first and then the front part by
fitting into groove.)
2. Turn the indoor lamp, remove it and replace it with a new
one.
❊ If you have difficulties in replacing and purchasing
parts, contact the nearest Samsung Electronics
Service Center.
14
DA99-00743A(TD-PJT)
3/18/04 4:12 PM
Page 15
HOW TO INSTALL AND DISASSEMBLE THE DOOR HANDLE
- When assembling the handle...
• Match the Handle Locking
Tabs installed on the left
hand side of the door and
the handle inserts.
• Fix the handle by pulling it
down or hammering it lightly
with a tool like a rubber
hammer.
• Check whether the locking
tabs inside the handle are
assembled by pulling it up
and down.
- When disassembling the handle...
Caution
• Separate the locking tabs by
hammering the lower part of
the handle with a tool like a
rubber hammer.
• Pull the handle up to detach
the locking tabs from the
handle inserts and separate
each other.
15
• There is a possibility
of the handle
detachment when
excessive force is
applied to the handle
during relocation of
the refrigerator, so do
not grab the handle.
DA99-00743A(TD-PJT)
3/18/04 4:12 PM
Page 16
PROBLEMS AND SOLUTIONS
The appliance is not operating at all or the temperature is too high
• Check that the power plug is correctly connected.
• Is the temperature controller in the fridge/freezer correctly set?
• Is there direct sunlight on the appliance or are there heat sources nearby?
• Is the back of the appliance too near to the wall?
The food in the refrigerator is frozen
• Is the temperature controller in the fridge set to the colder temperature?
• Is the surrounding temperature too low?
• Did you put food with a high water content in the refrigerator?
There are unusual noises
• Check that the appliance is installed on a stable, level floor.
• Is the back of the appliance too near to the wall?
• Have any foreign objects fallen behind or under the appliance?
• Is the noise coming from the compressor in the appliance?
• A ticking sound may be heard inside the appliance; this is normal. This sound occurs when the various
accessories contract or expand.
The front corners and sides of the appliance are warm and condensation starts to form
• Heat-proof pipes are installed in the front corners of the appliance to prevent condensation from forming.
When the surrounding temperature rises, this may not always be effective. However, this is not abnormal.
• In very humid weather, condensation may form on the outer surface of the appliance when the moisture
in the air comes into contact with the cool surface of the appliance.
You can hear a liquid bubbling in the appliance.
• This is the refrigerant, which cools the inside of the appliance.
There is a bad smell inside the appliance
• Food may not be sealed correctly in a container.
• If there is a bad smell, the low temperature catalysing deodorizer may require cleaning.
There is a layer of frost on the appliance’s walls
• Is the air outlet on the appliance blocked?
• Space the food out as much as possible to improve ventilation.
• Is the door fully closed?
Condensation forms on the inside wall of the appliance and around vegetables
• Food with a high water content is stored uncovered with a high humidity level or the door has been left
open for a long time.
• Store the food with a cover or in sealed containers.
16
DA99-00743A(TD-PJT)
3/18/04 4:12 PM
Page 17
USAGE PRECAUTIONS
Store food with a high water content at the
front of a refrigerator shelf.
Store hot food in the appliance after it has
cooled.
• If you store cold food, you save on electricity and
improve refrigeration.
Tips
Power Saving Tips
• Install the appliance in a cool, dry room with adequate ventilation.
Ensure that it is not exposed to direct sunlight and never put it near a direct source of heat (radiator, for
example).
• Never block any vents or grills on the appliance.
• Allow warm food to cool down before placing it in the appliance.
• Put frozen food in the refrigerator to thaw.
You can then use the low temperatures of the frozen products to cool food in the refrigerator.
• Do not keep the door of the appliance open for too long when putting food in or taking food out.
The shorter the time for which the door is opened, the less ice will form in the freezer.
• When freezing food or storing it in the freezer, place the food in freezer compartment in sealed
containers.
17
DA99-00743A(TD-PJT)
3/18/04 4:12 PM
Page 18
VIEW OF YOUR FRIDGE / FREEZER
ELECTRONIC CONTROL
Freezer Lamp
Freezer Shelf
Freezer Guard
Twist Ice Maker
(option)
Deodorizer
Egg Tray
Water Tank (option)
Variety Guard
Fridge Shelf
(option)
Jumbo Guard
Special Fresh Room
(option)
High Humidity Vegetable
Room
Bottle Guard
MECHANICAL CONTROL
Controller Freezer Room
Freezer Lamp
Freezer Shelf
Freezer Guard
Ice Tray (option)
Deodorizer (option)
Fridge Temp Controller
Egg Tray
Special Fresh Room
(option)
Variety Guard
Fridge Shelf
(option)
Jumbo Guard
High Humidity Vegetable
Room
Bottle Guard
18
DA99-00743A(TD-PJT)
3/18/04 4:12 PM
Page 19
MEMO
DA99-00743A(TD-PJT)
3/18/04 4:12 PM
Page 20