1
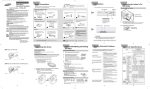
Safety Precautions
CD-ROM DRIVE
SH-152
Warning/Caution
The following are basic precautions to ensure user safety
and reduce the risk of property damage.
Warning:
To warn the user that failure to comply with the instructions may result in
serious injury or death.
Caution:
To caution the user that failure to comply with the instructions may result in
damage to property.
Connecting the Cables to the
CD-Rom
Introduction
Design and specifications are subject to change without prior notice.
When you install the drive
Connecting the Cables
Eject Button
Place the drive on a level
surface.
User's Guide - ENGLISH
Failure to do so may cause the
device to fall onto a hard surface,
resulting in damage or malfunction.
Avoid low - or high-temperature
environments.
Do not place the drive in
direct sunlight.
Avoid high-humidity environments.
Power cable
Front
EIDE cable
Master/slave select terminal
FCC Compliance
Audio cable
This equipment has been tested and found to comply with the limits for a
Class B digital device, pursuant to Part 15 of the FCC rules.
These limits are designed to provide reasonable protection against harmful
interference in a residential installation.
This equipment generates, uses, and can radiate radio frequency energy and,
if not installed and used in accordance with the instructions, may cause
harmful interference to radio communications. However, there is no guarantee
that interference will not occur in a particular installation. If this equipment
does cause harmful interference to radio or television reception, which can be
deter-mined by turning the equipment off and on, the user is encouraged to
try to correct the interference by one or more of the following measures:
Disc compartment
While operating
Do not drop the drive, and protect it
fromsevere shocks.
Handle with caution to prevent
damage from external shock.
It can damage the drive or cause
it to malfunction.
Do not move the drive while in operation
and do not attempt to open the disc tray
byforce. Make sure to close all working
programs before attempting to open the tray
and always use the open/close button.
power off the computer, insert a pin
or unfolded paper clip in the hole
CAUTION
Change or modifications not expressly approved by the manufacturer
responsible for compliance could void the user’s authority to operate
the equipment.
Do not disassemble, attempt to repair or
modify the device without express
approval as directed in the manual.
To protect against the risk of
fire, do ot spill such liquids as
alcohol and benzene on the
drive.
2
Connecting the EIDE cable
3
Installing a jumper on the master/slave select terminal
The 4-pin power cable from the internal power unit of your computer must
be connected to the power terminal the rear of the CD-ROM drive.
Insert the EIDE cable (40-pin), which is connected to the hard
disk to the interface terminal.
(Place the red line of the cable close to the Pin 1.)
Connect a jumper to the rear side of the CD-ROM.
If the jumper is connected to MA (Master), it will work in the Master mode.
If the jumper is connected to SL (Slave), it will work in the Slave mode.
If the jumper is connected to CS (CSEL), you can control the device by using the
host interface signal CSEL. (In general, connection to MA is recommended.)
Important to read and understand
at all times
To reduce the risk of damage,
electric shock, and fire.
Do not disassemble
CS : Cable Select(CSEL)
SL : Slave
MA: Master
Digital output Master/slave select terminal Power terminal
terminal
LASER STANDARD
Accessories
IEC 60825-1 : 1993 + A1 : 1997 + A2 : 2001
- http://www.samsung-ODD.com
- www.samsung.com
BG68-00787A Rev.01
EIDE cable, 4 screws.
Any change or modification not expressly approved by designated qualified personnel could
void your authority to operate this device.
1. Check to see that the disc does not have a crack before use. If the disc has a crack (especially around the center hole),
it is recommended that you make a copy immediately and use the copy instead. When a cracked disc is used continuously,
the size of the crack is likely to grow and it will eventually result in irreparable damage to the disc.
2. Do not use low quality discs (i.e., illegal products, scratched or damaged discs).
1
When using one EIDE cable
System Requirements
Connect the cable to the SL (Slave) of the Master/Slave Select Terminal at the rear
of the CD-ROM drive.
Slave Drive (Choose the SL Jumper)
Intel Pentium 166MHz(or higher), 16 MB of RAM (or higher) with an EIDE
interface, Windows 98 / 2000 / ME / XP Windows NT 4.0 (or higher)
Installing the CD-Rom Drive
How to install the CD-ROM drive on your PC. First, remove the cover;
connect the cable to the CD-ROM drive and then to the PC.
1
MainBoard
If necessary, attach a horizontal bracket
to both sides of the drive.
You can purchase these accessories separately
from your computer dealer.
(Screws for use: M3 X 6 X 4)
When using two EIDE cable
Connect the cable to the MA (Master) of the Master/Slave Select Terminal at the rear
of the CD-ROM drive.
Using the Drive/Storing and Cleaning
Your Discs
2
MainBoard
-If there is two Optical drive, select MA (Master) / SL (Slave).
Master Drive (Choose the MA Jumper)
Slave Drive (Choose the SL Jumper)
Solving Technical Problems
1
2
3
Insert the disc (CD) with the label on the disc
The CD-ROM drive is not
detected by the computer.
After booting the computer, open the disc
compartment by pressing the Eject button.
After installing the CD-ROM
drive, the PC gets slower.
facing upwards and close the disc compartment
The CD-ROM drive is not
by pressing the Eject button. The indicator light
recognized by MS-DOS.
comes on.
Play the disc (CD).
The CD-ROM drive is not
detected by Windows.
Follow the instructions provided with the disc.
A video card or MPEG software and a sound card need to be installed to view video CDs.
Remove the plate from a free expansion slot and install the
CD-ROM drive, as shown in the illustration.
If you have no free expansion slot, install the drive in place of the
diskette drive.
Make sure to use the standardized screws supplied (M3X6).
- To use screws other than M3X6 may result in malfunction.
SEC 1
PRI 1
Connect the 4-pin audio cable between the sound output terminal on the
CD-ROM drive and the audio input terminal on the sound card.
4
Technical Specifications
The friction noise generated during SPIN-UP and STOP is caused by the
Automatic Ball Balancing System(ABS) and is not a malfunction.
No sound is heard from an
audio CD.
Playing Video CDs
SEC 1
Connecting the audio cable from a sound card
SECTIONS
Push the power button and boot the computer.
Run the CD player program supplied with the sound card or play the
Windows Media Player.
Master Drive (Choose the MA Jumper)
PRI 1
Using the CD-ROM Drive
4
4
3
Playing CD-DA/Audio CDs
- If there is only one Optical drive: select MA (Master).
Design and specifications are subject to change without prior notice.
2
Installing the Drive
Hard Drive
Interface terminal
Rear
Never allow food particles or
foreign substances to enter the
drive casing.
Connecting the power cable
In particular, a disc with a crack on the
inner tracks may break while in use.
Other
• Consult the dealer or an experienced radio/TV technician for help.
1
and push firmlhy)
Do not insert a pin into the emergency
opening while in operation.
• Increase the separation between the equipment and receiver.
• Connect the equipment into an outlet on a circuit different from that to
which the receiver is connected.
LED
when you press the Eject button,
Do not use cracked, distorted or
damaged discs.
Sound output terminal
• Re-orient or relocate the receiving antenna.
Hard Drive
Emergency eject hole
If the compartment does not open
If the drive is vertically installed, you cannot use an 8 cm MiniDisc because the disc is
movable.
A CD is not read or is read
too slowly.
The disc compartment will
not open.
Storing Your Discs
Check that the power, audio and EIDE cables are correctly
connected to the computer.
Change the EIDE cable and reconnect it to the computer.
Preferably, connect a second EIDE cable to the CD-ROM drive
in master mode.
Check the position of the jumper in the master/slave select
terminal.
Reinstall the device driver or update it with the latest version by
downloading it from the Samsung Web site.
- http:// www.samsung-ODD.com
- http:// www.samsung.com
DISC
This case may occur when there is a Windows installation
problem; reinstall Windows.
Check whether the audio cable is correctly connected to the sound
output terminal on the CD-ROM drive and the sound card CD-IN
terminal.
Check that the sound card is operational.
Insert a pin or unfolded paper clip in the emergency hole and push
FRONT
PANEL
REAR PANEL
plays a Video CD, the pictures
Access time (typical)
Data buffer capacity
Laser
Slide mechanism
Spindle motor
Load mechanism
General
52X, 7800KB/s(MAX)
PIO Mode 4, DMA MW2, UDMA2
90ms(typical)
128KB
Semiconductor laser
Step Motor
Brushless motor
Tray, DC motor(Soft Eject)
Mode-1 : 1block / 1012 bits, Mode-2 : 1 block/10 9 bits
Eject button
Auto eject or Auto inject
Indicator(LED)
POWER ON/BUSY
Required power
+5V DC 1.3A, +12V DC 1.5A
Interface connector
ATAPI
Line out 0.70 ± 20%(Vrms), 47kΩ
Audio output
Work area
OPERATING
ENVIRONMENT Storage area
reliability
When the MPEG software
120mm or 80mm
Jumper block
firmly until the disc compartment opens.
Do not place a disc in direct sunlight.
Store a disc vertically in a well-ventilated and
stable location.
Do not write or attach a label on a disc.
Do not drop a disc or place heavy objects on it.
Disc diameter
ERROR RATE
Check whether the CD is of good quality and clean it,
if necessary.
Check that the power cable is correctly connected.
Power off and disconnect the PC.
Disc types supported
Data transfer rate
DRIVE PER FORMANCE
SH-152
CD-DA, CD-ROM Mode-1, CD-ROM XA Mode-2 Form-1,
Form-2, Photo-CD(Single, Multi-session), Video CD ready,
CD-Plus, CD-Extra, Enhanced CD, CD-I/FMV, CD-R/RW
Molex 70203 or other compatible models
Temperature : 5~45 °C, Humidity : 10~80%
Temperature : -25~60 °C, Humidity : 10~90%
Dimensions
148.2 (W) x 42(H) x 184(D)mm
Net weight
740g (set only)
MTBF
125,000 POH (Duty 20%)
Adjust the size of the replay screen.
After checking the display resolution, adjust it, if necessary.
are not regular and the running
speed is too slow.
Plate
Hard Drive
MainBoard
The Disc is not in message is
Cleaning Your Discs
(Choose the MA Jumper) (Choose the SL Jumper)
CD-Rom
Drive
Horizontal
Bracket
displayed even though a disc
Do not touch the surface
of a disc; hold it by the
edges.
To clean a disc, polish lightly
from the inside of the disc to the
outside with a soft cotton cloth.
has been inserted.
The CD-ROM drive is not
detected after it is connected
The disc may not function properly if there are fingerprints, foreign substances or
dust on the disc surface.
5
6
7
to a sound card.
The computer may not recognize the disc if you start playback
too quickly after inserting the disc.
Open and close the disc compartment and try again.
Clean the disc and try again.
The interface mode of the sound card is AT-BUS.
You must therefore connect the CD-ROM drive to the EIDE
port on the PC mother board, rather than to the sound card,
or install an EIDE compatible sound card.
8
9
Instrucciones de seguridad
CD-ROM DRIVE
SH-152
Advertencia / Precaución
Advertencia: Para advertir al usuario de que el no seguimiento de las instrucciones puede dar lugar
Conexión
dethe
losCables
cables
to con
the el
Connecting
CD-ROM
CD-Rom
Introducción
Introduction
a lesiones de gravedad o la muerte.
A continuación se detallan ciertas normas básicas de seguridad
para el usuario y que reducen el riesgo de daños en la propiedad.
Precaución: Para prevenir al usuario de que el no seguimiento de las instrucciones puede dar lugar
a daños en las cosas.
El diseño y las especificaciones están sujetos a cambios sin previo aviso.
Instalación
Botón de expulsión (eject)
Coloque la unidad en una
superficie horizontal.
Evite los entornos de baja o
elevada temperatura.
No exponga la unidad a la luz
directa del sol.
Si no se hace así, es posible que el
dispositivo caiga a una superficie
dura y se produzca un daño o un
problema de funcionamiento.
Guía del usuario – Español
Evite los entornos de humedad
elevada.
Cable de alimentación
Power cable
Cable EIDE
EIDE cable
Parte
Delantera
Terminal de Selección Maestro/Esclavo.
Master/slave select terminal
Cable de audio
Audio cable
Compartimento del disco
Mientras está en funcionamiento
Evite que caiga al suelo y que
se someta a golpes fuertes.
Trátelo con cuidado para evitar
daños producidos por un golpe.
Puede provocar daños o un
funcionamiento incorrecto en la
unidad.
Orificio de expulsión de emergencia
Si el compartimento no se abre al
No mueva la unidad mientras esté en
apague el ordenador, inserte un
fuerza. Asegúrese de cerrar todas las
objeto fino o un clip enderezado en el
aplicaciones antes de abrir la bandeja y utilice
orificio y empuje con fuerza
En especial, un disco con una grieta en las
pistas del interior puede romperse mientras
está en funcionamiento.
Otros
Terminal de la interfaz
Parte
Posterior
Para reducir el riesgo de daños,
electrocución y fuego.
Conecte el cable al dispositivo SL (Esclavo) del Terminal de Selección Maestro/Esclavo de la
parte posterior del drive CD-ROM.
Intel Pentium 166MHz(o superior), 16 MB de RAM (o superior) con una
interfaz, Windows 98 / 2000 / ME / XP Windows NT 4,0 (o superior)
Instalación de la unidad CD-ROM
CD-ROM Drive (Escoja el Jumper SL)
Instalación de la unidad de CD-ROM en el equipo.
Primero, quite la cubierta; conecte el cable con la unidad de CD-ROM y,
entonces, con el equipo.
HDD
1
Tablero madre
Cuando se usa dos cables EIDE
Conecte el cable al dispositivo MA (Maestro) del Terminal de Selección Maestro/Esclavo de la
parte posterior del drive CD-ROM.
CD-ROM Drive (Escoja el Jumper MA)
Design und technische daten Köunen ohne Aukündigung geändert werden.
1
2
Presione el botón de alimentación y arranque el ordenador.
3
Inserte el disco (CD) con la etiqueta colocada
Solución de problemas de grabación
2
PRI 1
Tablero madre
- Si hay dos unidades opticas, seleccione MA (Master, Maestro) en la parte
posterior de una de ellas, y SL (Slave, Esclavo) en la parte posterior de la otra.
Quite la placa de una ranura de extensión libre e instale la
unidad CD-ROM, según se muestra en la figura.
Si no tiene ninguna ranura de extensiónlibre, instale la unidad en lugar
de la unidad de disquete.
Cerciórese de utilizar los tornillos estándar suministrados (M3X6).
- Utilizar tornillos distintos del estándar M3X6 puede provocar un funcionamiento
incorrecto.
CD-ROM Drive (Escoja el Jumper MA)
CD-ROM Drive (Escoja el jumper SL)
Terminal de Selección Maestro/Esclavo.
El equipo no detecta la unidad
de CD-ROM.
Una vez iniciado el ordenador, abra el compartimento
de disco pulsando el botón de expulsión (Eject).
hacia arriba y cierre el compartimento pulsando
el botón de expulsión (Eject). El indicador
Tras instalar la unidad de CD-ROM,
el PC se ralentiza.
MS-DOS no reconoce la unidad
de CD-ROM.
luminoso se enciende.
4
Conectar un jumper a la parte posterior del CD-ROM. Si el jumper se conecta al
MA (Maestro), funcionará el modo Maestro. Si el jumper se conecta al dispositivo
SL (Esclavo), funcionará el modo Esclavo. Si el jumper se conecta al CS (CSEL),
se podrá controlar el dispositivo usando la señal de interface host CSEL.
(En general, se recomienda la conexión MA)
CS : Cable Select(CSEL)
CS : Cable Select(CSEL)
SL : Esclavo
SL : Slave
MA: Maestro
MA: Master
4
Cable de audio
Conecte el cable de audio de 4 patillas entre el terminal de salida de sonido de la
unidad de CD-ROM y el terminal de entrada de audio de la tarjeta de sonido.
Reproduzca el disco (CD).
Windows no detecta la unidad de
Reproducción de discos CD-DA y de Audio
Siga las instrucciones proporcionadas con el disco.
Es necesario tener instalado software de la tarjeta de vídeo o MPEG,
junto con una tarjeta de sonido,para poder visualizar los CD de vídeo.
Si la unidad está instalada verticalmente, no es posible reproducir los MiniDisc de
8 centímetros porque el disco no queda en su los MiniDisc de 8 centímetros porque el sitio.
Almacenamiento de los discos
No exponga el disco a la luz solar directa.
Guarde los discos en posición vertical en un lugar
estable y con buena ventilación.
No escriba ni pegue etiquetas en los discos.
No deje caer los discos ni coloque objetos pesados sobre ellos.
SEC 1
44
Especificaciones
Technical Specifications
El sonido friccional detectado durante el funcionamiento de Giro (Spin-Up) y
Parada (Stop) está provocado por el sistema ABS (Sistema de balance automático,
Automatic Ball Balancing System(ABS) y no se debe a un funcionamiento incorrecto.
Compruebe que los cables de alimentación, audio e EIDE estén
conectados correctamente al equipo.
Cambie el cable EIDE y vuélvalo a conectar al equipo.
Preferiblemente, conecte un segundo cable EIDE a la unidad
de CD-ROM en modo maestro.
Compruebe la posición del puente en el terminal de selección
maestro/esclavo.
Reinstale el controlador de dispositivo o actualícelo con la
versión más reciente que puede descargar de la página Web
de Samsung.
- http:// www.samsung-ODD.com - Http:// www.samsung.com
CD-ROM.
Esto se puede producir cuando existe un problema de
instalación de Windows; reinstale Windows.
El CD de música no suena.
Asegúrese de que el cable de audio esté conectado correctamente
al terminal de salida de sonido en la unidad de CD-ROM y al
terminal CD-IN de la tarjeta de sonido..
Compruebe que la tarjeta de sonido esté operativa.
Reproducción de CD de vídeo
SEC 1
HDD
Uso de la unidad de CD-ROM
Ejecute el programa reproductor de CD suministrado con la tarjeta de sonido,
o bien el programa Windows Media Player.
- Si sólo hay una grabadora Unidad optica, seleccione MA (Master, Maestro).
3
Inserte el cable EIDE (40-pin), el cual está conectado al disco duro, al terminal
de interface. (Coloque la línea roja del cable cerca al Pin 1)
33
Utilizaciónde la unidad / Almacenamiento
y limpieza de los discos
En caso de necesidad, acople un
soportehorizontal a los laterales de la unidad.
Puede comprar estos accesorios por separado al
distribuidor del equipo.
(Tornillos recomendados: M3 X 6 X 4)
Cable EIDE y 4 tornillos.
22
Instalación de la unidad
Requisitos del sistema
Cable EIDE
Terminal de salida Master/slave select terminal Terminal de energía
digital
1. Asegúrese de que el disco no contenga una grieta antes de utilizarlo. Si el disco tiene una grieta (especialmente en el
área del círculo central), se recomienda hacer una copia inmediatamente y usar la copia en su lugar. Cuando se utiliza
continuamente un disco agrietado, el tamaño de la grieta tenderá a crecer y tarde o temprano el disco quedará inservible.
2. No utilice discos de mala calidad (es decir, de origen ilegal, agrietados o dañados).
11
Cuando se usa un cable EIDE
2
El cable de alimentación de 4 patillas de la unidad de alimentación interna debe
estar conectado al terminal de alimentación situado en la parte posterior de la
unidad de CD-ROM.
Do not disassemble
Accesorios
BG68-00787A Rev.01
Cable de alimentación
No desensamblar.
No desmonte, intente reparar o
modifique la unidad sin autorización
expresa en el manual.
Para protección frente al riesgo de
fuego, no derrame líquidos como el
alcohol o el benceno en la unidad.
Cualquier cambio o modificación no aprobado expresamente por personal cualificado podría significar
que el usuario no es una persona con autoridad para utilizar este dispositivo.
1
siempre el botón de abrir o cerrar.
No inserte ningún objeto puntiagudo
en la apertura de emergencia mientras esté
en funcionamiento.
Jamás permita que entren
partículas de comida o sustancias
ajenas a la caja de la unidad.
Luz
indicadora
pulsar el botón de expulsión (Eject),
No utilice discos agrietados,
deformados o dañados.
funcionamiento y no intente abrir la bandeja a la
Terminal de salida de
sonido
- http://www.samsung-ODD.com
- www.samsung.com
Conexión de los cables
El CD no se puede leer o la
DISCO
se abre.
correctamente.
Apague y desconecte el equipo. Inserte un objeto fino o un clip
enderezado en el orificio de emergencia y empuje con fuerza hasta
que se abra el compartimiento.
Cuando el software MPEG reproduce
un CD de vídeo, las imágenes no son
uniformes y la velocidad de ejecución
Diámetro del disco
Velocidad de
transferencia de datos
Tiempo de acceso (typical)
120mm or 80mm
52X, 7800KB/s(MAX)
PIO Mode 4, DMA MW2, UDMA2
TASA DE ERROR
PANEL
FRONTAL
Botón de expulsión
ENTORNO
OPERATIVO
GENERAL
FIABILIDAD
90ms(typical)
128KB
Semiconductor laser
Step Motor
Brushless motor
Bandeja. Motor de CA (Expulsión suave). Hori/Vert
Mode-1 : 1block / 1012 bits, Mode-2 : 1 block/10 9 bits
Expulsión automática o introducción automática
Indicador luminoso(LED) POWER ON/BUSY
Alimentación necesaria
PANEL
POSTERIOR
lectura es lenta.
Compruebe que el cable de alimentación esté conectado
Tipos de discos
compatibles
CD-DA, CD-ROM Mode-1, CD-ROM XA Mode-2 Form-1,
Form-2, Photo-CD(Single, Multi-session), Video CD ready,
CD-Plus, CD-Extra, Enhanced CD, CD-I/FMV, CD-R/RW
RENDIMIENTO Búfer de datos
DE LA
Láser
UNIDAD
Mecanismo móvil
Motor del eje
Mecanismo de carga
Instale la versión más reciente del controlador de dispositivo.
El compartimiento de disco no
SH-152
ELEMENTO
Salida de audio
+5V DC 1.3A, +12V DC 1.5A
ATAPI
Line out 0.70 ± 20%(Vrms), 47kΩ
Bloque de puentes
Molex 70203 or other compatible models
En funcionamiento
Temperatura: 5~45 °C, Humedad: 10~80%
Almacenamiento
Temperatura: -25~60 °C, Humedad: 10~90%
148.2 (W) x 42(H) x 184(D)mm
Conector de la interfaz
Dimensiones
Peso neto
740g (sólo el aparato)
MTBF
125.000 POH(20% rendimiento)
Ajuste el tamaño de la pantalla de reproducción.c
Una vez comprobada la resolución de la pantalla, ajústela si es
necesario.
es demasiado lenta.
Limpieza de los discos
PRI 1
Placa
(Escoja el Jumper MA)
HDD
Tablero madre
(Escoja el jumper SL)
Soporte
Horizontal de
Launidad de
CD-ROM
No toque la superficie del
disco; sujételo por los
bordes.
Aparece el mensaje "Disc is not
Para limpiar un disco, frótelo
suavemente de dentro hacia fuera
con un paño de algodón.
haya insertado un disco.
No se detecta la unidad de CD-ROM
The disc may not function properly if there are fingerprints, foreign substances or
dust the disc surface.
5
in" (No hay disco) aunque se
56
67
después de haberla conectado a una
tarjeta de sonido.
Es posible que el equipo no reconozca el disco si la reproducción
se inicia inmediatamente después de insertar el disco. Abra y
cierre el compartimiento e inténtelo de nuevo.
Limpie el disco e inténtelo de nuevo.
El modo de interfaz de la tarjeta de sonido es AT-BUS. Por lo
tanto, debe conectar la unidad de CD-ROM al puerto EIDE de la
placa base del PC, en lugar de conectarla a la tarjeta de sonido,
o instalar una tarjeta de sonido compatible con EIDE.
78
89