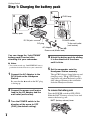
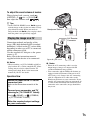
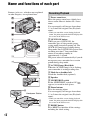
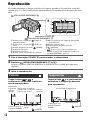
1
3-286-593-11(1)
Digital HD Video Camera Recorder
Operating Guide
US
Guía de operaciones
ES
HDR-SR10
For details on the advanced operations, please refer to “Handycam
Handbook” (PDF).
Para obtener más información acerca de las funciones avanzadas,
consulte la “Guía práctica de Handycam” (PDF).
© 2008 Sony Corporation
IMPORTANT
SAFEGUARDS
WARNING
To reduce fire or shock hazard, do
not expose the unit to rain or
moisture.
Do not expose the batteries to
excessive heat such as sunshine,
fire or the like.
For your protection, please read these safety
instructions completely before operating
the appliance, and keep this manual for
future reference.
Carefully observe all warnings, precautions
and instructions on the appliance, or the one
described in the operating instructions and
adhere to them.
Use
Power Sources
This set should be operated only from the type of
power source indicated on the marking label. If
you are not sure of the type of electrical power
supplied to your home, consult your dealer or
local power company. For those sets designed to
operate from battery power, or other sources, refer
to the operating instructions.
Polarization
This symbol is intended to alert
the user to the presence of
uninsulated “dangerous
voltage” within the product’s
enclosure that may be of
sufficient magnitude to
constitute a risk of electric
shock to persons.
This symbol is intended to alert
the user to the presence of
important operating and
maintenance (servicing)
instructions in the literature
accompanying the appliance.
This set may be equipped with a polarized ac
power cord plug (a plug having one blade wider
than the other).
This plug will fit into the power outlet only one
way. This is a safety feature. If you are unable to
insert the plug fully into the outlet, try reversing
the plug. If the plug should still fail to fit, contact
your electrician to have a suitable outlet installed.
Do not defeat the safety purpose of the polarized
plug by forcing it in.
Overloading
Do not overload wall outlets, extension cords or
convenience receptacles beyond their capacity,
since this can result in fire or electric shock.
Object and Liquid Entry
Never push objects of any kind into the set
through openings as they may touch dangerous
voltage points or short out parts that could result
in a fire or electric shock. Never spill liquid of any
kind on the set.
Attachments
Do not use attachments not recommended by the
manufacturer, as they may cause hazards.
US
2
Cleaning
Unplug the set from the wall outlet before
cleaning or polishing it. Do not use liquid cleaners
or aerosol cleaners. Use a cloth lightly dampened
with water for cleaning the exterior of the set.
Installation
Water and Moisture
long periods of time, unplug it from the wall
outlet and disconnect the antenna or cable system.
This will prevent damage to the set due to
lightning and power-line surges.
Service
Damage Requiring Service
Do not place the set on an unstable cart, stand,
tripod, bracket, or table. The set may fall, causing
serious injury to a child or an adult, and serious
damage to the set. Use only a cart, stand, tripod,
bracket, or table recommended by the
manufacturer.
Unplug the set from the wall outlet and refer
servicing to qualified service personnel under the
following conditions:
– When the power cord or plug is damaged or
frayed.
– If liquid has been spilled or objects have fallen
into the set.
– If the set has been exposed to rain or water.
– If the set has been subject to excessive shock by
being dropped, or the cabinet has been
damaged.
– If the set does not operate normally when
following the operating instructions. Adjust
only those controls that are specified in the
operating instructions. Improper adjustment of
other controls may result in damage and will
often require extensive work by a qualified
technician to restore the set to normal operation.
– When the set exhibits a distinct change in
performance – this indicates a need for service.
Ventilation
Servicing
The slots and openings in the cabinet are provided
for necessary ventilation. To ensure reliable
operation of the set, and to protect it from
overheating, these slots and openings must never
be blocked or covered.
– Never cover the slots and openings with a cloth
or other materials.
– Never block the slots and openings by placing
the set on a bed, sofa, rug, or other similar
surface.
– Never place the set in a confined space, such as
a bookcase, or built-in cabinet, unless proper
ventilation is provided.
– Do not place the set near or over a radiator or
heat register, or where it is exposed to direct
sunlight.
Do not attempt to service the set yourself as
opening or removing covers may expose you to
dangerous voltage or other hazards.
Refer all servicing to qualified service personnel.
Do not use power-line operated sets near water –
for example, near a bathtub, washbowl, kitchen
sink, or laundry tub, in a wet basement, or near a
swimming pool, etc.
Power-Cord Protection
Route the power cord so that it is not likely to be
walked on or pinched by items placed upon or
against them, paying particular attention to the
plugs, receptacles, and the point where the cord
exits from the appliance.
Accessories
Lightning
For added protection for this set during a lightning
storm, or when it is left unattended and unused for
Replacement parts
When replacement parts are required, be sure the
service technician has used replacement parts
specified by the manufacturer that have the same
characteristics as the original parts.
Unauthorized substitutions may result in fire,
electric shock, or other hazards.
Safety Check
Upon completion of any service or repairs to the
set, ask the service technician to perform routine
safety checks (as specified by the manufacturer)
to determine that the set is in safe operating
condition.
US
3
Read this first
Before operating the unit, please read this
manual thoroughly, and retain it for future
reference.
CAUTION
Replace the battery with the
specified type only. Otherwise, fire
or injury may result.
For customers in the U.S.A. and
CANADA
RECYCLING LITHIUM-ION BATTERIES
Lithium-Ion batteries are recyclable.
You can help preserve our
environment by returning your
used rechargeable batteries to the
collection and recycling location
nearest you.
For more information regarding
recycling of rechargeable batteries, call toll free 1800-822- 8837, or visit http://www.rbrc.org/
Caution: Do not handle damaged or leaking
Lithium-Ion batteries.
Regulatory Information
Declaration of Conformity
Trade Name: SONY
Model No.: HDR-SR10
Responsible Party: Sony Electronics Inc.
Address: 16530 Via Esprillo, San Diego, CA
92127 U.S.A.
Telephone number: 858-942-2230
This device complies with Part 15 of the FCC
Rules. Operation is subject to the following two
conditions: (1) This device may not cause
harmful interference, and (2) this device must
accept any interference received, including
interference that may cause undesired operation.
Notes
HDR-SR10 is to be used with the
Handycam Station Model DCRA-C220 and
AC Adaptor Model AC-L200/L200B.
CAUTION
You are cautioned that any changes or
modifications not expressly approved in this
manual could void your authority to operate this
equipment.
Owner’s Record
The model and serial numbers are located on the
bottom. Record the serial number in the space
provided below. Refer to these numbers whenever
you call your Sony dealer regarding this product.
Model No. HDRSerial No.
Model No. ACSerial No.
For customers in the U.S.A.
If you have any questions about this
product, you may call:
Sony Customer Information Center 1-800222-SONY (7669).
The number below is for the FCC related
matters only.
US
4
Note
This equipment has been tested and found to
comply with the limits for a Class B digital
device, pursuant to Part 15 of the FCC Rules.
These limits are designed to provide reasonable
protection against harmful interference in a
residential installation. This equipment generates,
uses, and can radiate radio frequency energy and,
if not installed and used in accordance with the
instructions, may cause harmful interference to
radio communications.
However, there is no guarantee that interference
will not occur in a particular installation. If this
equipment does cause harmful interference to
radio or television reception, which can be
determined by turning the equipment off and on,
the user is encouraged to try to correct the
interference by one or more of the following
measures:
– Reorient or relocate the receiving antenna.
– Increase the separation between the equipment
and receiver.
– Connect the equipment into an outlet on a
circuit different from that to which the receiver
is connected.
– Consult the dealer or an experienced radio/TV
technician for help.
The supplied interface cable must be used with the
equipment in order to comply with the limits for a
digital device pursuant to Subpart B of Part 15 of
FCC Rules.
•
For the State of California, USA only
Perchlorate Material - special handling may
apply, See
www.dtsc.ca.gov/hazardouswaste/perchlorate
Perchlorate Material: Lithium battery contains
perchlorate.
•
Notes on use
•
Supplied items
The numbers in ( ) are the supplied
quantity.
• AC Adaptor (1)
• Power cord (Mains lead) (1)
• Handycam Station (1) A
• Component A/V cable (1) B
• A/V connecting cable (1) C
• USB cable (1) D
• Wireless Remote Commander (1)
A button-type lithium battery is already installed.
• Rechargeable battery pack NP-FH60 (1)
• CD-ROM “Handycam Application Software”
(1) (p. 24)
– Picture Motion Browser (Software)
– PMB Guide
– Handycam Handbook (PDF)
• “Operating Guide” (This manual) (1)
A
B
C
D
•
•
•
•
•
Using the camcorder
• The camcorder is not dustproofed, dripproofed
or waterproofed. See “Precautions” (p. 30).
• Do not do any of the following when the
(Movie)/
(Still) mode lamps or the
ACCESS lamps (p. 12, 16) are lit or flashing.
•
Otherwise, the media may be damaged,
recorded images may be lost or other
malfunctions could occur.
– Eject the “Memory Stick PRO Duo”
– Remove the battery pack or AC Adaptor from
the camcorder
– Apply mechanical shock or vibration to the
camcorder
When connecting your camcorder to another
device with communication cables, be sure to
insert the connector plug in the correct way.
Pushing the plug forcibly into the terminal will
damage the terminal and may result in a
malfunction of your camcorder.
Connect cables to the connectors of the
Handycam Station when using your camcorder
attached to the Handycam Station. Do not
connect the cables to both the Handycam
Station and your camcorder.
Do not apply shock or vibration to your
camcorder. The internal hard disk of the
camcorder may not be recognized or recording/
playback may not be possible.
Do not use your camcorder in very loud areas.
The hard disk of your camcorder may not be
recognized, or recording may not be possible.
To protect the internal hard disk from shock by
dropping, the camcorder has drop sensor
function*. When a drop occurs, or under a nongravity condition, the block noise made when
this function is activated by the camcorder may
also be recorded. If the drop sensor catches a
drop repeatedly, recording/playback may be
stopped.
When the temperature of the camcorder
becomes extremely high or extremely low, you
may not be able to record or play back on the
camcorder, due to the protection features of the
camcorder being activated in such situations. In
this case, a message appears on the LCD screen
(p. 28).
Do not turn on the camcorder in a low-pressure
area, where the altitude is more than 3,000
meters (9,800 feet). Doing so may damage the
hard disk drive of your camcorder.
If you repeat recording/deleting images for a long
time, fragmentation of data occurs on the media.
Images cannot be saved or recorded. In such a case,
save your images on some type of external media
first, and then perform [MEDIA FORMAT]*.
Fasten the grip belt and hold your camcorder
correctly while recording.
US
US
5
Types of “Memory Stick” you can use
with your camcorder
• For recording movies, it is recommended that
you use a “Memory Stick PRO Duo” of 1 GB or
larger marked with:
–
(“Memory Stick
PRO Duo”)*
–
(“Memory Stick
PRO-HG Duo”)
* Marked with Mark2 or not, either can be
used.
• To adjust the LCD panel, open the LCD panel
90 degrees to the camcorder (1), then rotate it
to the best angle to record or play (2). You can
rotate the LCD panel 180 degrees to the lens
side (2) to record in mirror mode.
190 degrees to the
camcorder
290 degrees
(max.)
• A “Memory Stick PRO Duo” of up to 8 GB has
been confirmed to operate correctly with this
camcorder.
• See page 11 for the recordable time of a
“Memory Stick PRO Duo.”
• “Memory Stick PRO Duo” and “Memory Stick
PRO-HG Duo” are both called as “Memory
Stick PRO Duo” in this manual.
On recording
2180 degrees (max.)
• The LCD screen is manufactured using
extremely high-precision technology, so over
99.99% of the pixels are operational for
effective use. However, there may be some tiny
black points and/or bright points (white, red,
blue, or green in color) that appear constantly on
the LCD screen. These points are normal results
of the manufacturing process and do not affect
the recording in any way.
• Remove the insulation sheet before using the
Remote Commander.
Insulation sheet
US
6
• Before starting to record, test the recording
function to make sure the image and sound are
recorded without any problems.
• Compensation for the contents of recordings
cannot be provided, even if recording or
playback is not possible due to a malfunction of
the camcorder, recording media, etc.
• TV color systems differ depending on the
country/region. To view your recordings on a
TV, you need an NTSC system-based TV.
• Television programs, films, video tapes, and
other materials may be copyrighted.
Unauthorized recording of such materials may
be contrary to the copyright laws.
On playing back recorded images on
other devices
• Your camcorder is compatible with MPEG-4
AVC/H.264 High Profile for HD (high
definition) image quality recording. Therefore,
you cannot play back images recorded with HD
(high definition) image quality on your
camcorder with the following devices;
– Other AVCHD format compatible devices
which are not compatible with High Profile
– Devices which are not compatible with the
AVCHD format
Table of Contents
Save all your recorded image data
• To prevent your image data from being lost,
save all your recorded images on external media
periodically. It is recommended that you save
the image data on a disc such as DVD-R using
your computer*. Also, you can save your image
data using a VCR, or a DVD/HDD recorder*.
When the camcorder is connected to a
computer
• Do not try to format the hard disk of the
camcorder using a computer. If you do so, your
camcorder may not operate correctly.
Note on disposal/transfer
• Even if you perform [MEDIA FORMAT]* or
formatting the hard disk of the camcorder, you
may not delete data from the hard disk
completely. When you transfer the camcorder, it
is recommended that you perform [
EMPTY]* to prevent the recovery of your data.
Also, when you dispose of the camcorder, it is
recommended that you destroy the actual body
of the camcorder.
About language setting
• The on-screen displays in each local language are
used for illustrating the operating procedures.
Change the screen language before using your
camcorder if necessary (p. 10).
IMPORTANT SAFEGUARDS .........2
Read this first ..................................4
Getting Started
Step 1: Charging the battery pack
...................................................... 8
Step 2: Turning the power on, and
setting the date and time .............10
Changing the language setting
................................................... 10
Step 3: Selecting the media ..........11
Recording/Playback
Recording .....................................13
Playback .......................................14
Playing the image on a TV ........... 15
Name and functions of each part
.................................................... 16
Indicators displayed during recording/
playback ......................................18
Performing various functions - “
HOME” and “
OPTION” ..........20
Saving images ..............................22
Deleting images ............................23
About this manual
• The images of the LCD screen used in this
manual for illustration purposes are captured
using a digital still camera, and therefore may
appear different from the actual images of the
LCD screen.
• In this Operating Guide, the hard disk of your
camcorder and “Memory Stick PRO Duo” are
called “media.”
• The screenshots are from Windows Vista. The
scenes may vary depending on the operating
system of the computer.
* Refer also to “Handycam Handbook” (PDF) and
“PMB Guide.”
Enjoying with a computer
Performing with a computer ..........24
Installing and viewing “Handycam
Handbook” (PDF) ...................... 24
Installing “Picture Motion Browser”
................................................... 24
Troubleshooting
Troubleshooting ............................27
Additional Information
Precautions ...................................30
Specifications ................................32
US
7
Getting Started
Step 1: Charging the battery pack
5
4
/CHG lamp
3
5
Battery pack
1
DC IN jack
2
POWER switch
DC plug
AC Adaptor
To the wall outlet
(wall socket)
Power cord (Mains lead)
You can charge the “InfoLITHIUM”
battery pack (H series) after
attaching it to your camcorder.
b Notes
• You cannot attach any “InfoLITHIUM” battery
pack other than the H series to your camcorder.
1 Connect the AC Adaptor to the
DC IN jack on the Handycam
Station.
Be sure that the v mark on the DC plug
is facing up.
2 Connect the power cord (mains
lead) to the AC Adaptor and the
wall outlet (wall socket).
3 Turn the POWER switch in the
direction of the arrow to OFF
(CHG) (the default setting).
US
8
4 Attach the battery pack by sliding
it in the direction of the arrow
until it clicks.
5 Set the camcorder onto the
Handycam Station securely.
The /CHG (charge) lamp lights up and
charging starts. The /CHG (charge)
lamp turns off when the battery pack is
fully charged. Remove the camcorder
from the Handycam Station.
To remove the battery pack
Turn the POWER switch to OFF (CHG).
Slide the BATT (battery release) lever and
remove the battery pack.
BATT (battery release) lever
To charge the battery pack using only
the AC Adaptor
Turn the POWER switch to OFF (CHG),
then connect the AC Adaptor directly to the
DC IN jack on the camcorder.
POWER switch
DC IN jack
Open the jack
cover.
DC plug
Available running time for the
supplied battery pack
Charging time:
Approximate time (min.) required when
you fully charge a completely exhausted
battery pack.
Recording/Playback time:
Approximate time (min.) available when
you use a fully charged battery pack.
“HD” stands for high definition image
quality, and “SD” stands for standard image
quality.
(Unit:min.)
“Memory
Stick PRO
Duo”
Hard disk
HD
SD
Charging time
HD
SD
135
Recording time*1*2
Continuous
recording time
90
110
90
110
Typical
recording
time*3
40
50
40
50
Playback time*2
130
130
130
130
On the battery pack
• When you remove the battery pack or
disconnect the AC Adaptor, turn the POWER
switch to OFF (CHG) and make sure that the
(Movie) lamp/
(Still) lamp (p. 10)/
ACCESS lamps (p. 12, 16) are turned off.
• The power will not be supplied from the battery
as long as the AC Adaptor is connected to the
DC IN jack of your camcorder or the Handycam
Station, even when the power cord (mains lead)
is disconnected from the wall outlet (wall
socket).
Getting Started
With the v mark
on the right
*1 [REC MODE]: SP
*2 When the LCD backlight is on
*3 Typical recording time shows the time when
you repeat recording start/stop, turning the
power on/off and zooming.
On the charging/recording/playback time
• Times measured when using the camcorder at
25°C (77°F) (10°C to 30°C (50°F to 86°F) is
recommended).
• The available recording and playback time will
be shorter when you use your camcorder in low
temperatures.
• The available recording and playback time will
be shorter depending on the conditions under
which you use your camcorder.
On the AC Adaptor
• Use the nearby wall outlet (wall socket) when
using the AC Adaptor. Disconnect the AC
Adaptor from the wall outlet (wall socket)
immediately if any malfunction occurs while
using your camcorder.
• Do not use the AC Adaptor placed in a narrow
space, such as between a wall and furniture.
• Do not short-circuit the DC plug of the AC
Adaptor or battery terminal with any metallic
objects. This may cause a malfunction.
• Even if your camcorder is turned off, AC power
source (mains) is still supplied to it while
connected to the wall outlet (wall socket) via the
AC Adaptor.
US
9
Step 2: Turning the power on, and setting the
date and time
(HOME) (p. 20)
Touch the button on the
LCD screen.
1
POWER switch
60min
When using the
camcorder for the
first time, the
[CLOCK SET]
screen appears on
the LCD screen.
STBY
AREA SET
Chicago
Mexico City
New York
Bogota
Santiago
JAN 1 2008
12:00:00AM
CLOCK SET
NEXT
1 While pressing the green button,
60min
turn the POWER switch
repeatedly in the direction of the
arrow until the respective lamp
lights up.
(Movie): To record movies
2008 Y
STBY
1 M
1 D
12
00 AM
CLOCK SET
NEXT
The clock starts.
(Still): To record still images
Go to step 3 when you turn on your
camcorder for the first time.
• When you turn on
(Still) lamp, the
screen aspect ratio is changed to 4:3
automatically.
2 Touch
(HOME) t
(SETTINGS) t [CLOCK/
LANG] t [CLOCK SET].
3 Select the desired geographical
area with
[NEXT].
/
, then touch
4 Set [DST SET] or [SUMMERTIME],
US
10
[Y] (year), [M] (month), [D] (day),
hour and minute, then touch
.
z Tips
• The date and time does not appear during
recording, but they are automatically recorded
on the media, and can be displayed during
playback.
• You can turn off the operation beeps by
touching
(HOME) t
(SETTINGS) t
[SOUND/DISP SET] t [BEEP] t [OFF].
Changing the language setting
You can change the on-screen displays to
show messages in a specified language.
Touch
(HOME) t
(SETTINGS)
t [CLOCK/ LANG] t
[ LANGUAGE SET], then select the
desired language.
Step 3: Selecting the media
You can select the hard disk or “Memory
Stick PRO Duo” as the recording/playback/
editing media on your camcorder. Select the
media for movies and still images
separately.
The default setting is hard disk for movies
and still images.
Hard disk
HDD
HDD
MEMORY STICK
MEMORY STICK
MOVIE MEDIA SET
Select the media and image quality.
Getting Started
3 Touch the desired media and
image quality.
“Memory Stick”
Movie
Still
image
indicates HD (high definition)
image quality, and
indicates SD
(standard definition) image quality.
b Notes
• You can do recording/playback/editing
operations for the selected media. When you
want to change media, reselect the media.
• The recordable time with [HD SP] recording
mode (the default setting) is as follows:
– On the internal hard disk: approx. 11 h 50 m
– On a “Memory Stick PRO Duo” (4 GB) made
by Sony Corporation: approx. 1 h 5 m
z Tips
• Check the number of recordable still images on
the LCD screen of your camcorder (p. 18).
1 Touch
(HOME) t
(MANAGE MEDIA).
4 Touch [YES] t
.
The media is changed.
To select the media for still images
Touch [PHOTO MEDIA SET] in step 2,
then touch the desired media.
To check the media setting
1 Turn the POWER switch repeatedly to light
up the
(Movie)/
(Still) lamp,
depending on which media setting you
want to check.
2 Check the media icon on the screen.
Media icon
: Hard disk
: “Memory Stick PRO Duo”
2 Touch [MOVIE MEDIA SET] to
select the media for movies.
The media setting screen appears.
Inserting a “Memory Stick PRO
Duo”
Insert a “Memory Stick PRO Duo” if
“Memory Stick PRO Duo” has been
selected as the media.
For types of “Memory Stick” you can use in
your camcorder, see page 6.
US
11
1 Insert the “Memory Stick PRO
Duo.”
1 Open the Memory Stick Duo cover in
the direction of the arrow.
2 Insert the “Memory Stick PRO Duo”
into the Memory Stick Duo slot in the
right direction until it clicks.
3 Close the Memory Stick Duo cover.
3 Touch [YES].
To record only still images on a
“Memory Stick PRO Duo,” touch [NO].
To eject the “Memory Stick PRO Duo”
Open the Memory Stick Duo cover and
lightly push the “Memory Stick PRO Duo”
in once.
b Notes
ACCESS lamp (“Memory
Stick PRO Duo”)
2 If you have selected “Memory
Stick PRO Duo” as the movie
media, turn the POWER switch
until the
(Movie) lamp lights
up.
If the POWER switch is set to OFF
(CHG), turn it on while pressing the
green button.
The [Create a new Image Database
File.] screen appears on the LCD screen
when you insert a new “Memory Stick
PRO Duo.”
US
12
• Do not open the Memory Stick Duo cover
during recording.
• If you force the “Memory Stick PRO Duo” into
the slot in the wrong direction, the “Memory
Stick PRO Duo,” the Memory Stick Duo slot, or
image data may be damaged.
• If [Failed to create a new Image Database File.
It may be possible that there is not enough free
space.] is displayed in step 3, format the
“Memory Stick PRO Duo.” Note that formatting
will delete all data recorded on the “Memory
Stick PRO Duo.”
• When inserting or ejecting the “Memory Stick
PRO Duo,” be careful so that the “Memory
Stick PRO Duo” does not pop out and drop.
Recording/Playback
Recording
The images are recorded on the media selected in the media setting (p. 11). In the default
setting, both movies and still images are recorded on the hard disk.
POWER switch C
START/STOP D
: To record movies
: To record still images
[STBY] t [REC]
START/STOP A
Recording/Playback
(HOME) B
(p. 20)
PHOTO
E
Flashing t Lights up
1 Turn the POWER switch C until the respective lamp lights up.
Press the green button only when the POWER switch C is in the OFF (CHG) position.
2 Start recording.
Movies
Press START/STOP D (or A).
To stop recording, press START/STOP D
(or A) again.
z Tips
• You can check the recordable time and the
remaining capacity by pressing
(HOME) B
t
(MANAGE MEDIA) t [MEDIA
INFO].
• You can capture still images by pressing
PHOTO E during movie recording.
• The maximum continuous recordable time of
movies is approximately 13 hours.
Still Images
Press PHOTO E lightly to adjust the
focus A (a beep sounds), then press
it fully B (a shutter click sounds).
appears beside
or
. When
disappears, the image has been recorded.
• When a movie file exceeds 2 GB, the next
movie file is created automatically.
US
13
Playback
You can play back the image recorded in the media that has been set on the media setting
(p. 11). In the default setting, the images on the hard disk are played back.
(VIEW IMAGES) A
POWER switch B
(VIEW IMAGES) C
1 Goes to the
(Film Roll Index) screen
2 Goes to the
(Face Index) screen
3 Goes to
(HOME)
4 Previous 6 images
5 Next 6 images
6 Returns to the recording screen
7 Displays movies with HD (high definition)
image quality*
8 Displays still images
9 Searches for images by date
q;
(OPTION)
*
appears when you select the movie with SD
(standard definition) image quality in [MOVIE
MEDIA SET] (p. 11).
1 Turn the POWER switch B to turn on your camcorder.
2 Press
(VIEW IMAGES) C (or A).
The VISUAL INDEX screen appears on the LCD screen (It may take some seconds).
3 Start playback.
Movies
Still Images
Touch the
or
tab, then select
the desired movie to play back.
Beginning of the
movie/previous
movie
Stops (goes to the
INDEX screen)
US
14
Toggles Play
or Pause as
you touch
Touch the
tab, then select the
desired still image to play back.
Slide show
Next movie
Reverse/Forward
(OPTION)
Goes to the VISUAL
INDEX screen
Previous/Next
(OPTION)
To adjust the sound volume of movies
When playing back a movie, touch
(OPTION) t
tab t [VOLUME],
then adjust the volume with
/
.
z Tips
• On the VISUAL INDEX screen, i/B appears
with the image on the tab that was most recently
played back/recorded. When you touch an
image marked with i/B, you can play it back
from the point it was previously stopped.
Handycam Station
Playing the image on a TV
b Notes
• When recording, set [X.V.COLOR] to [ON] to
play back on an x.v.Color-compliant TV. Some
settings may need to be adjusted on the TV
when playing back. Refer to the instruction
manual of your TV for details.
Operation flow
Switch the input on the TV to the
connected jack.
Refer to the instruction manuals of the
TV.
r
Connect your camcorder and TV
referring to [TV CONNECT Guide].
Touch
(HOME) t
(OTHERS)
t [TV CONNECT Guide].
r
Make the required output settings
on your camcorder.
Recording/Playback
Connection methods and quality of the
image (HD (high definition)/SD (standard
definition)) viewed on the TV screen differ
depending on what type of TV is connected,
and the connectors used.
Use the supplied AC Adaptor as the power
source (p. 8).
Refer also to the instruction manuals
supplied with the device to be connected.
A/V Remote
Connector
Open the jack cover.
b Notes
• When the A/V connecting cable is used to
output images, images are output with SD
(standard definition) image quality.
• Your camcorder and the Handycam Station are
equipped with A/V Remote Connector or A/V
OUT jack (p. 16). Connect the A/V connecting
cable or component A/V cable either to the
Handycam Station or to your camcorder. If you
connect A/V connecting cables or component A/
V cable to both the Handycam Station and your
camcorder at the same time, image disturbance
may occur.
US
15
Name and functions of each part
Buttons, jacks, etc., which are not explained
in other chapters, are explained here.
Recording/Playback
1 Power zoom lever
Move the power zoom lever slightly for a
slower zoom. Move it further for a faster
zoom.
You can magnify still images from about
1.1 to 5 times the original size (Playback
zoom).
• When you touch the screen during playback
zoom, the point you touched will be displayed in
the center of the LCD screen.
8
9
0
qs
qa
qd
qf
qg
qh
qj
qk
ql
w;
2 QUICK ON button
When you press QUICK ON, the
camcorder goes to sleep mode (power
saving mode) instead of turning off. The
QUICK ON lamp keeps flashing during
sleep mode. Press QUICK ON again to start
recording next time. Your camcorder
returns to recording standby in
approximately 1 second.
The power turns off automatically if you do
not operate your camcorder for a certain
period during sleep mode.
3 ACCESS lamp (Hard disk)
When the ACCESS lamp is lit or flashing,
your camcorder is writing/reading data.
4 Hook for a shoulder belt
Attach the shoulder belt (optional).
8 Speaker
wa
ws
qs
Handycam Station
ws
7
6
US
16
9 NIGHTSHOT switch
Set the NIGHTSHOT switch to ON (
appears) to record in dark places.
0 Zoom buttons
Press for zooming in/out.
You can magnify still images from about
1.1 to 5 times the original size (Playback
zoom).
• When you touch the screen during playback
zoom, the point you touched will be displayed in
the center of the LCD screen.
qa RESET button
Press RESET to initialize all the settings
including the clock setting.
qd EASY button
Press EASY to display
and most of
the settings are set automatically for easy
recording/playback. To cancel, press EASY
again.
qf DISP/BATT INFO button
You can switch the screen display when
you press while the power is set to on.
When you press while the POWER switch
is set to OFF (CHG), you can check the
remaining battery.
6 A/V Remote Connector/A/V OUT
jack
Connect with the component A/V cable or
A/V connecting cable.
7 (USB) jack
Connect with the USB cable.
qs
(DISC BURN) button
Create a disc by connecting the camcorder
to a computer, etc. For details, see “PMB
Guide” (p. 26).
qh Active Interface Shoe
The Active Interface Shoe supplies power
to optional accessories such as a video light,
a flash, or a microphone. The accessory can
be turned on or off as you operate the
POWER switch on your camcorder.
qj Built-in microphone
Sound picked up by the internal
microphone is converted to 5.1ch surround
sound and recorded.
ws Interface connector
Connect your camcorder and the Handycam
Station.
Recording/Playback
qg . (back light) button
Press . (back light) to display . for
adjusting the exposure for backlit subject.
Press . (back light) again to cancel the
backlight function.
qk Flash
The flash will flash automatically
depending on recording conditions in the
default setting.
Touch
(HOME) t
(SETTINGS)
t [PHOTO SETTINGS] t [FLASH
MODE] to change the setting.
ql Remote sensor/Infrared port
Receives the signal from the Remote
Commander.
w; Camera recording lamp
The camera recording lamp lights up in red
during recording. The lamp flashes when
the remaining media capacity or battery
power is low.
wa Tripod receptacle (Bottom surface)
Attach a tripod (optional) to the tripod
receptacle using a tripod screw (optional:
the length of the screw must be less than 5.5
mm (7/32 in.)).
Connecting to other devices
5 HDMI OUT (mini) jack
Connect with the HDMI cable (optional).
US
17
Indicators displayed during recording/playback
Recording movies
A HOME button
B Remaining battery (approx.)
C Recording status ([STBY] (standby) or
[REC] (recording))
D Recording quality (HD/SD) and
Recording mode (FH/HQ/SP/LP)
E Recording/playback media
F Counter (hour/minute/second)
G Recording remaining time
Recording still images
H OPTION button
I FACE DETECTION
J VIEW IMAGES button
K Face Index set
L 5.1ch surround recording
M Image size
N Approximate number of recordable still
images and media/During still image
recording
O Return button
Viewing movies
P Playback mode
Q Current playing movie number/Number
of total recorded movies
R Previous/Next button
S Video operation buttons
T Current playing still image number/
Number of total recorded still images
Viewing still images
U Playback folder
Displays only when the playback media
of still images is a “Memory Stick PRO
Duo.”
V Slide show button
4.0M
W Data file name
X VISUAL INDEX button
US
18
Indicators when you made
changes
Upper right
Indicator
Following indicators appear during
recording/playback to indicate the settings
of your camcorder.
Upper left
Center
Meaning
FADER
LCD backlight off
Drop sensor off
Upper right
Drop sensor activated
Media for still images
Bottom
Indicator
Meaning
Face Index
Bottom
Picture effect
Upper left
Indicator
Recording/Playback
FACE DETECTION
Digital effect
Meaning
Manual focus
9
AUDIO MODE
Self-timer recording
Flash, REDEYE
REDUC
BLT-IN ZOOM MIC
SCENE SELECTION
Backlight
.
n
SteadyShot off
WIDE SELECT
EXPOSURE/
SPOT METER
Center
TELE MACRO
Indicator
4.0M
White balance
MICREF LEVEL low
3.0M
ZEBRA
Meaning
X.V.COLOR
IMAGE SIZE
CONVERSION LENS
Slide show set
NightShot
z Tips
Super NightShot
• Indicators and their positions are approximate
and differ from what you actually see. See
“Handycam Handbook” (PDF) for details.
• The recording date and time is recorded
automatically on the media. They are not
displayed while recording. However, you can
check them as [DATA CODE] during playback.
Color Slow Shutter
PictBridge connecting
E
Warning
US
19
Performing various functions - “
“ OPTION”
You can display the menu screen by
pressing
(HOME) A (or B)/
(OPTION). For details of the menu
items, see “Handycam Handbook” (PDF)
(p. 24).
HOME” and
To see the explanation of the HOME
MENU (HELP)
1 Press
(HOME) A (or B).
2 Touch
(HELP).
The bottom of
(HELP) turns orange.
(HOME) B
(OPTION)
(HOME) A
Using the HOME MENU
You can change the operating settings for
your convenience. Press
(HOME) A
(or B) to display the menu screen.
Menu items
3 Touch the item you want to learn about.
When you touch an item, its explanation
appears on the screen.
To apply the selected item, touch [YES].
Using the OPTION MENU
The
(OPTION) MENU appears just like
the pop-up window that appears when you
right-click the mouse on a computer.
Press
(OPTION) to display the menu
items you can change in the current
situation.
Category
Menu items
1 Touch the desired category then
item to change the setting.
2 Follow the instructions on the
screen.
z Tips
• If the item is not on the screen, touch
/
to
change the page.
• To hide the HOME MENU screen, touch
.
• You cannot simultaneously select or activate the
grayed items in the current recording/playback
situation.
US
20
Tab
1 Touch the desired tab then item
to change the setting.
2 After completing the setting,
touch
.
b Notes
• When the item you want is not on the screen,
touch another tab. If you cannot find the item
anywhere, the function is not available under the
current situation.
• The
(OPTION) MENU cannot be used
during Easy Handycam operation.
Items of the HOME MENU
(CAMERA) category
TV
CONNECT
Guide*
(MANAGE MEDIA) category
MOVIE
MEDIA
SET*
PHOTO
MEDIA
SET*
MEDIA
INFO
MOVIE*
PHOTO*
(VIEW IMAGES) category
MEDIA
FORMAT*
[HDD], [MEMORY STICK]
REPAIR
IMG.DB F.
[HDD], [MEMORY STICK]
(SETTINGS) category
VISUAL
INDEX*
INDEX*
MOVIE
SETTINGS
[REC MODE], [AUDIO
MODE], [NIGHTSHOT
LIGHT], [WIDE SELECT],
[DIGITAL ZOOM],
[STEADYSHOT], [AUTO
SLW SHUTTR],
[X.V.COLOR],
[GUIDEFRAME], [ZEBRA],
[
REMAINING SET],
[SUB-T DATE], [FLASH
MODE]*, [FLASH LEVEL],
[REDEYE REDUC], [FACE
DETECTION], [
INDEX
SET]*, [CONVERSION
LENS]
PHOTO
SETTINGS
[
IMAGE SIZE]*, [FILE
NO.], [NIGHTSHOT LIGHT],
[STEADYSHOT],
[GUIDEFRAME], [ZEBRA],
[FLASH MODE]*, [FLASH
LEVEL], [REDEYE REDUC],
[FACE DETECTION],
[CONVERSION LENS]
VIEW
IMAGES
SET
[DATA CODE],
[
DISPLAY]
SOUND/
DISP SET**
[VOLUME]*, [BEEP]*, [LCD
BRIGHT], [LCD BL LEVEL],
[LCD COLOR]
OUTPUT
SETTINGS
[TV TYPE], [DISP OUTPUT],
[COMPONENT]
INDEX*
PLAYLIST
(OTHERS) category
DELETE*
[
[
DELETE],
DELETE]
PHOTO
CAPTURE
MOVIE DUB [
[
t
t
DUB],
DUB]
PHOTO
COPY
[COPY by select], [COPY by
date]
EDIT
[
[
DELETE],
DELETE], [DIVIDE]
PLAYLIST
EDIT
[
[
[
[
[
[
[
ADD], [
ADD],
ADD by date],
ADD by date],
ERASE], [
ERASE],
ERASE ALL],
ERASE ALL],
MOVE], [
MOVE]
PRINT
USB
CONNECT
Recording/Playback
SMTH SLW
REC
[
USB CONNECT],
[
USB CONNECT], [DISC
BURN]
US
21
Saving images
CLOCK/
LANG
[CLOCK SET]*, [AREA SET],
[DST SET], [SUMMERTIME],
[
LANGUAGE SET]*
GENERAL
SET
[DEMO MODE], [REC
LAMP], [CALIBRATION],
[A.SHUT OFF], [QUICK ON
STBY], [REMOTE CTRL],
[DROP SENSOR], [CTRL
FOR HDMI]
* You can set these items also during Easy
Handycam operation.
** The menu name is changed to [SOUND
SETTINGS] during Easy Handycam operation.
Items of the OPTION MENU
Items you can set only on the OPTION
MENU will be described below.
tab
[FOCUS], [SPOT FOCUS], [TELE MACRO],
[EXPOSURE], [SPOT METER], [SCENE
SELECTION], [WHITE BAL.], [COLOR
SLOW SHTR], [SUPER NIGHTSHOT]
tab
[FADER], [D.EFFECT], [PICT.EFFECT]
tab
Due to the limited capacity of the media,
make sure that you save the image data to
some type of external media such as a
DVD-R or a computer.
You can save the images recorded on the
camcorder as described below.
Using a computer
By using “Picture Motion Browser” on the
supplied CD-ROM, you can save the
images recorded on your camcorder with
HD (high definition) image quality or SD
(standard definition) image quality.
You can rewrite movies with HD (high
definition) image quality from the computer
to your camcorder, if necessary. For details,
see “PMB Guide” (p. 26).
Creating a disc with One Touch
(One Touch Disc Burn)
You can save images recorded on the hard
disk of your camcorder directly to a disc
with ease by pressing the
(DISC
BURN) button.
Saving images on a computer
(Easy PC Back-up)
[BLT-IN ZOOM MIC], [MICREF LEVEL],
[SELF-TIMER], [TIMING], [RECORD
SOUND]
You can save images recorded on the
camcorder on the hard disk of a computer.
– (The tab depends on the situation/No tab)
Creating a disc with selected images
[SLIDE SHOW], [SLIDE SHOW SET],
[COPIES], [DATE/TIME], [SIZE]
You can save images copied to your
computer on a disc. You can also edit those
images.
Connecting your camcorder to
other devices
For details, see “Handycam Handbook”
(PDF).
US
22
Deleting images
Connecting with the A/V connecting
cable
You can dub to VCRs, DVD/HDD
recorders with SD (standard definition)
image quality.
Connecting with the USB cable
You can dub to movie dubbing compatible
DVD writers, etc., with HD (high
definition) image quality.
z Tips
Deleting movies
1 Touch
(HOME) t
(OTHERS) t [DELETE].
2 Touch [
DELETE].
3 Touch [
Recording/Playback
• You can dub movies or copy still images from
the hard disk to a “Memory Stick PRO Duo.”
Touch
(HOME) t
(OTHERS) t
[MOVIE DUB]/[PHOTO COPY].
Select the media which contains the image
you want to delete before the operation
(p. 11).
DELETE] or [
DELETE], then touch the movie to
be deleted.
The selected movie is marked with
4 Touch
t [YES] t
.
.
To delete all movies at one time
In step 3, touch [
DELETE ALL]/[
DELETE ALL] t [YES] t [YES] t
.
To delete still images
1 In step 2, touch [
DELETE].
2 Touch [
DELETE], then touch the
still image to be deleted.
The selected still image is marked with
.
3 Touch
t [YES] t
.
z Tips
• To delete all still images on the media, in step
2, touch [
DELETE ALL] t [YES] t
[YES] t
.
US
23
Enjoying with a computer
Performing with a computer
Handbook/software to be
installed
The installation screen for “Handycam
Handbook” (PDF) appears.
x “Handycam Handbook” (PDF)
“Handycam Handbook” (PDF) explains in
detail about your camcorder and its
practical use.
x “Picture Motion Browser” (only for
Windows users)
“Picture Motion Browser” is the supplied
software. You can enjoy the following
operations.
–
–
–
–
Creating a disc with one touch operation
Importing images to a computer
Editing imported images
Creating a disc
b Notes
• The supplied software “Picture Motion
Browser” is not supported by Macintosh
computers. To use a Macintosh computer
connected to your camcorder, see the
following website for details.
http://guide.d-imaging.sony.co.jp/mac/ms/us/
4 Select the desired language and the model
name of your Handycam, then click
[Handycam Handbook (PDF)].
Installation starts. When the installation is
completed, the short-cut icon of
“Handycam Handbook” (PDF) appears on
the desktop of your computer.
• The model name of your Handycam is
printed on its bottom surface.
5 Click [Exit] t [Exit], then remove the
CD-ROM from the disc drive of your
computer.
To view “Handycam Handbook,” doubleclick the short-cut icon of “Handycam
Handbook.”
z Tips
Installing and viewing
“Handycam Handbook” (PDF)
To view “Handycam Handbook” (PDF),
you need to install Adobe Reader on your
computer.
Continue with the installation, even if a
confirmation screen of an unknown
publisher appears.
1 Turn on the computer.
2 Place the CD-ROM (supplied) in the disc
drive of your computer.
The select screen for installation appears.
• For Macintosh users, follow the steps below.
1 Turn on the computer.
2 Place the CD-ROM (supplied) in the
disc drive of your computer.
3 Open the [Handbook] folder in the CDROM, double-click the [US] folder and
then drag-and-drop the
“Handbook.pdf” on the computer.
To view “Handycam Handbook,”
double-click “Handbook.pdf.”
Installing “Picture Motion
Browser”
x System requirements
OS: Microsoft Windows 2000 Professional
SP4/Windows XP SP2*/Windows
Vista*
* 64-bit editions and Starter (Edition) are not
supported.
3 Click [Handycam Handbook].
US
24
Standard installation is required.
Operation is not assured if the above OS
has been upgraded or in a multi-boot
environment.
CPU: Intel Pentium 4 2.8 GHz or faster
(Intel Pentium 4 3.6 GHz or faster, Intel
Pentium D 2.8 GHz or faster, Intel Core
Duo 1.66 GHz or faster, or Intel Core 2
Duo 1.66 GHz or faster is
recommended.)
Intel Pentium III 1 GHz or faster
enables the following operations:
– Importing the contents to the computer
– One Touch Disc Burn
– Creating an AVCHD format disc/DVDvideo
– Copying a disc
– Processing only the contents in SD
(standard definition) image quality
x Installation procedure
You need to install the software to your
Windows computer before connecting
your camcorder to the computer. The
installation is required only for the first
time.
Contents to be installed and procedures
may differ depending on your OS.
1 Confirm that your camcorder is not
connected to the computer.
2 Turn on the computer.
b Notes
• Log on as an Administrator for installation.
• Close all applications running on the
computer before installing the software.
Enjoying with a computer
Memory: For Windows 2000/Windows
XP: 512 MB or more (1 GB or more is
recommended.)
For processing SD (standard definition)
image quality content only, 256 MB of
memory or more is necessary.
recorder may fail to eject the media and
may erase its contents without warning.
DVD media containing AVCHD footage
may be played on a compatible Blu-ray
Disc™ player/recorder or other compatible
device.
3 Place the supplied CD-ROM in the disc
drive of your computer.
The installation screen appears.
For Windows Vista: 1 GB or more
Hard disk: Disk volume required for
installation: Approximately 500 MB
(10 GB or more may be necessary when
creating AVCHD format discs.)
Display: Minimum 1,024 × 768 dots
Others: USB port (this must be
provided as standard, Hi-Speed USB
(USB 2.0 compatible) is recommended),
DVD burner (CD-ROM drive is
necessary for installation)
Attention
This camcorder captures high definition
footage in the AVCHD format. Using the
enclosed PC software, high definition
footage can be copied onto DVD media.
However, DVD media containing AVCHD
footage should not be used with DVD based
players or recorders, as the DVD player/
If the screen does not appear
1 Click [Start], then click [My
Computer]. (For Windows 2000,
double-click [My Computer].)
2 Double-click [SONYPICTUTIL (E:)]
(CD-ROM) (disc drive).*
* Drive names (such as (E:)) may vary
depending on the computer.
4 Click [Install].
5 Select the language for the application to
be installed, then click [Next].
6 As the screen to confirm the connection
appears, connect your camcorder to the
computer following the steps below.
US
25
1 Connect the AC Adaptor to the
Handycam Station and a wall outlet
(wall socket).
2 Set your camcorder onto the Handycam
Station, then turn on your camcorder.
3 Connect the (USB) jack of the
Handycam Station (p. 17) to the
computer using the supplied USB
cable.
The [USB SELECT] screen appears on
your camcorder automatically.
4 Touch [
USB CONNECT] or [
USB CONNECT] on the [USB
SELECT] screen of your camcorder.
To disconnect the USB cable
1 Click the
icon t [Safely remove USB
Mass Storage Device] t [OK] (Windows
2000 only) on the task tray on the bottom
right of the desktop of the computer.
2 Touch [END] t [YES] on the screen of
your camcorder.
3 Disconnect the USB cable.
Operating the “Picture Motion
Browser”
To start “Picture Motion Browser,” click
[Start] t [All Programs] t [Sony Picture
Utility] t [PMB – Picture Motion
Browser].
For the basic operation of “Picture Motion
Browser,” see “PMB Guide.” To display
“PMB Guide,” click [Start] t [All
Programs] t [Sony Picture Utility] t
[Help] t [PMB Guide].
z Tips
7 Click [Continue].
8 Read [License Agreement], select [I accept
the terms of the license agreement] if you
agree, then click [Next].
9 Confirm the installation settings, then click
[Install].
b Notes
• Even if a screen prompting you to restart
your computer appears, you do not need to
restart it at this time. Restart your computer
after completing the installation.
• It may take some time for the authentication.
0 Follow the on-screen instructions to install
the software.
Depending on the computer, you may need
to install third party software. If the
installation screen appears, follow the
instructions to install the required software.
qa Restart the computer if required to
complete the installation.
qs Remove the CD-ROM from the disc drive
of your computer.
US
26
• If the [USB SELECT] screen does not appear,
touch
(HOME) t
(OTHERS) t
[USB CONNECT].
Troubleshooting
Troubleshooting
If you run into any problems using your
camcorder, use the following table to
troubleshoot the problem. If the problem
persists, disconnect the power source and
contact your Sony dealer.
Notes before sending your camcorder
for repair
• Your camcorder may be required to initialize or
change the current hard disk of the camcorder,
depending on the problem. In the event of this,
the data stored on the hard disk will be deleted.
Be sure to save the data on the internal hard disk
(see “Handycam Handbook” (PDF)) onto other
media (backup) before sending your camcorder
for repair. We will not compensate you for any
loss of hard disk data.
• During repair, we may check a minimum
amount of data stored on the hard disk in order
to investigate the problem. However, your Sony
dealer will neither copy nor retain your data.
• For the symptoms of your camcorder, see
“Handycam Handbook” (PDF) and for
connecting to the computer, see “PMB Guide.”
The power does not turn on.
The camcorder does not operate
even when the power is set to on.
• It takes a few seconds for your
camcorder to be ready to shoot after the
power is turned on. This is not a
malfunction.
• Disconnect the AC Adaptor from the
wall outlet (wall socket) or remove the
battery pack, then reconnect it after
about 1 minute. If the functions still do
not work, press the RESET button
(p. 16) using a pointed object (If you
press the RESET button, all settings,
including the clock setting, are reset).
Your camcorder gets warm.
• This is because the power has been
turned on for a long time. This is not a
malfunction.
The power abruptly turns off.
• Use the AC Adaptor.
• Turn on the power again.
• Charge the battery pack (p. 8).
Pressing START/STOP or PHOTO
does not record images.
• Set the POWER switch to
(Movie)
or
(Still) (p. 13).
• You cannot record images in sleep
mode. Press the QUICK ON button
(p. 16).
• Your camcorder is recording the image
you have just shot on the media. You
cannot make new recording during this
period.
• The media is full. Delete unnecessary
images (p. 23).
• Total number of movie scenes or still
images exceeds the recordable capacity
of the media. Delete unnecessary
images (p. 23).
Troubleshooting
• Attach a charged battery pack to the
camcorder (p. 8).
• Connect the plug of the AC Adaptor to
the wall outlet (wall socket) (p. 8).
• The temperature of your camcorder is
extremely high. Turn off your
camcorder and leave it for a while in a
cool place.
• The temperature of your camcorder is
extremely low. Leave your camcorder
with the power of your camcorder on.
Turn off the camcorder and take it to a
warm place. Leave the camcorder there
for a while, then turn on the camcorder.
The recording stops.
• The temperature of your camcorder is
extremely high/low. Turn off your
camcorder and leave it for a while in a
cool/warm place.
US
27
You cannot install “Picture Motion
Browser.”
• Check the computer environment
required to install “Picture Motion
Browser.”
• Install “Picture Motion Browser” in the
proper order (p. 25).
“Picture Motion Browser” does not
work correctly.
• Quit “Picture Motion Browser” and
restart your computer.
Self-diagnosis display/Warning
indicators
If indicators appear on the LCD screen,
check the following.
If the problem persists even after you have
tried to fix a couple of times, contact your
Sony dealer or local authorized Sony
service facility.
Indicators
Causes/Solutions
C:04:ss
• The battery pack is not an
“InfoLITHIUM” battery pack
(H series). Use an
“InfoLITHIUM” battery pack
(H series) (p. 8).
• Connect the DC plug of the
AC Adaptor to the DC IN jack
of the Handycam Station or
your camcorder securely
(p. 8).
C:13:ss /
C:32:ss
• Remove the power source.
Reconnect it and operate your
camcorder again.
E:20:ss /
E:31:ss /
E:61:ss /
E:62:ss /
E:91:ss /
E:94:ss
• A malfunction that you cannot
service has occurred. Contact
your Sony dealer or local
authorized Sony service
facility. Inform them of the 5digit code, which starts from
“E.”
101-0001
• When the indicator flashes
slowly, the file is damaged or
unreadable.
Your camcorder is not recognized by
the computer.
• Disconnect devices from the USB jack
of the computer other than the
keyboard, mouse, and your camcorder.
• Disconnect the USB cable from the
computer and the Handycam Station,
and restart the computer, then connect
the computer and your camcorder again
in the proper order.
• An error may have occurred
with the hard disk drive in
your camcorder.
• The hard disk of the camcorder
is full. Delete unnecessary
images on the hard disk.
• An error may have occurred
with the hard disk drive in
your camcorder.
E
• Battery power is low.
• The temperature of your
camcorder is getting high.
Turn off your camcorder and
leave it in a cool place.
US
28
• The temperature of your
camcorder is low. Make the
camcorder warm.
• When the indicator flashes
slowly, free space for
recording images are running
out.
• No “Memory Stick PRO Duo”
is inserted (p. 11).
• When the indicator flashes
quickly, there are not enough
free space for recording
images.
• Delete unnecessary images, or
format the “Memory Stick
PRO Duo” after storing the
images on other media (p. 22).
• The Image Database File is
damaged.
• The “Memory Stick PRO
Duo” is damaged. Format the
“Memory Stick PRO Duo”
with your camcorder.
• An incompatible “Memory
Stick Duo” is inserted.
-
• Access to the “Memory Stick
PRO Duo” was restricted on
another device.
Troubleshooting
• There is something wrong with
the flash.
• The amount of light is not
sufficient. Use the flash.
• The camcorder is unsteady.
Hold the camcorder steady
with both hands. However,
note that the camera-shake
warning indicator does not
disappear.
• The drop sensor function is
activated. You may not record/
play back images.
• The media is full.
• Still images cannot be
recorded during processing.
Wait for a while, then record.
US
29
Additional Information
Precautions
On use and care
• Do not use or store the camcorder and
accessories in the following locations:
– Anywhere extremely hot, cold or humid.
Never leave them exposed to temperatures
above 60°C (140°F), such as under direct
sunlight, near heaters or in a car parked in the
sun. They may malfunction or become
deformed.
– Near strong magnetic fields or mechanical
vibration. The camcorder may malfunction.
– Near strong radio waves or radiation. The
camcorder may not be able to record properly.
– Near AM receivers and video equipment.
Noise may occur.
– On a sandy beach or anywhere dusty. If sand
or dust gets in your camcorder, it may
malfunction. Sometimes this malfunction
cannot be repaired.
– Near windows or outdoors, where the LCD
screen or the lens may be exposed to direct
sunlight. This damages the inside of the LCD
screen.
• Operate your camcorder on DC 6.8 V/7.2 V
(battery pack) or DC 8.4 V (AC Adaptor).
• For DC or AC operation, use the accessories
recommended in these operating instructions.
• Do not let your camcorder get wet, for example,
from rain or sea water. If your camcorder gets
wet, it may malfunction. Sometimes this
malfunction cannot be repaired.
• If any solid object or liquid gets inside the
casing, unplug your camcorder and have it
checked by a Sony dealer before operating it
any further.
• Avoid rough handling, disassembling,
modifying, physical shock, or impact such as
hammering, dropping or stepping on the
product. Be particularly careful of the lens.
• Keep the POWER switch setting to OFF (CHG)
when you are not using your camcorder.
• Do not wrap your camcorder with a towel, for
example, and operate it. Doing so might cause
heat to build up inside.
• When disconnecting the power cord (mains
lead), pull it by the plug and not the cord (lead).
• Do not damage the power cord (mains lead)
such as by placing anything heavy on it.
• Keep metal contacts clean.
US
30
• Keep the Remote Commander and button-type
battery out of children’s reach. If the battery is
accidentally swallowed, consult a doctor
immediately.
• If the battery electrolytic liquid has leaked:
– Consult your local authorized Sony service
facility.
– Wash off any liquid that may have contacted
your skin.
– If any liquid gets in your eyes, wash with
plenty of water and consult a doctor.
x When not using your camcorder for a
long time
• Periodically turn it on and let it run such as by
playing back or recording images for about 3
minutes.
• Use up the battery pack completely before
storing it.
LCD screen
• Do not exert excessive pressure on the LCD
screen, as it may cause damage.
• If your camcorder is used in a cold place, a
residual image may appear on the LCD screen.
This is not a malfunction.
• While using your camcorder, the back of the
LCD screen may heat up. This is not a
malfunction.
x To clean the LCD screen
If fingerprints or dust make the LCD screen
dirty, it is recommended you use a soft
cloth to clean it. When you use the LCD
Cleaning Kit (optional), do not apply the
cleaning liquid directly to the LCD screen.
Use cleaning paper moistened with the
liquid.
On handling the casing
• If the casing is soiled, clean the camcorder body
with a soft cloth lightly moistened with water,
and then wipe the casing with a dry soft cloth.
• Avoid the following to avoid damage to the
finish:
– Using chemicals such as thinner, benzine,
alcohol, chemical cloths, repellent, insecticide
and sunscreen
– Handling the camcorder with above
substances on your hands
– Leaving the casing in contact with rubber or
vinyl objects for a long period of time
About care and storage of the lens
• Wipe the surface of the lens clean with a soft
cloth in the following instances:
– When there are fingerprints on the lens
surface.
– In hot or humid locations
– When the lens is exposed to salty air such as
at the seaside.
• Store in a well-ventilated location subject to
little dirt or dust.
• To prevent mold, periodically clean the lens as
described above. It is recommended that you
operate your camcorder about once a month to
keep it in optimum state for a long time.
On charging the pre-installed
rechargeable battery
x Procedures
Connect your camcorder to a wall outlet
(wall socket) using the supplied AC
Adaptor, and leave it with the POWER
switch set to OFF (CHG) for more than 24
hours.
You can use your camcorder in any countries/
regions using the AC Adaptor supplied with your
camcorder within the AC 100 V to 240 V, 50/60 Hz
range.
Use a commercially available AC plug adaptor [a],
if necessary, depending on the design of the wall
outlet [b].
AC-L200/L200B
[a]
[b]
To change the battery of the Remote
Commander
1 While pressing on the tab, inset your
fingernail into the slit to pull out the
battery case.
2 Place a new battery with the + side
facing up.
3 Insert the battery case back into the
Remote Commander until it clicks.
Tab
WARNING
Battery may explode if mistreated. Do not
recharge, disassemble or dispose of in
fire.
Additional Information
Your camcorder has a pre-installed
rechargeable battery to retain the date, time,
and other settings even when the POWER
switch is set to OFF (CHG). The preinstalled rechargeable battery is always
charged while your camcorder is connected
to the wall outlet (wall socket) via the AC
Adaptor or while the battery pack is
attached. The rechargeable battery will be
fully discharged in about 3 months if
you do not use your camcorder at all. Use
your camcorder after charging the preinstalled rechargeable battery.
However, even if the pre-installed
rechargeable battery is not charged, the
camcorder operation will not be affected as
long as you are not recording the date.
Power supply
• When the lithium battery becomes weak, the
operating distance of the Remote Commander
may shorten, or the Remote Commander may
not function properly. In this case, replace the
battery with a Sony CR2025 lithium battery.
Use of another battery may present a risk of fire
or explosion.
US
31
Specifications
System
Video compression format: AVCHD (HD)/
MPEG2 (SD)/JPEG (Still images)
Audio compression format: Dolby Digital 2/5.1ch
Dolby Digital 5.1 Creator
Video signal: NTSC color, EIA standards
1080/60i specification
Hard disk: 40 GB
When measuring media capacity, 1 GB equals
1 billion bytes, a portion of which is used for
data management.
Recording format: Movie (HD): AVCHD 1080/
60i
Movie (SD): MPEG2-PS
Still image: Exif Ver.2.2*
Image device: 3.6 mm (1/5 type) CMOS sensor
Recording pixels (still image, 4:3):
Max. 4.0 mega (2 304 × 1 728) pixels**
Gross: Approx. 2 360 000 pixels
Effective (movie, 16:9):
Approx. 1 490 000 pixels
Effective (still image, 16:9):
Approx. 1 490 000 pixels
Effective (still image, 4:3):
Approx. 1 990 000 pixels
Lens: Carl Zeiss Vario-Sonnar T
15 × (Optical), 30 ×, 180 × (Digital)
Focal length: F1.8 ~ 2.6
Filter diameter: 30 mm (1 3/16 in.)
f=3.1 ~ 46.5 mm (1/8 ~ 1 7/8 in.)
When converted to a 35 mm still camera
For movies: 40 ~ 600 mm (1 5/8 ~ 23 5/8 in.)
(16:9)
For still images: 37 ~ 555 mm (1 1/2 ~ 21 7/8
in.) (4:3)
Color temperature: [AUTO], [ONE PUSH],
[INDOOR] (3 200 K),
[OUTDOOR] (5 800 K)
Minimum illumination: 5 lx (lux) ([AUTO SLW
SHUTTR] [ON], Shutter speed 1/30 sec)
0 lx (lux) (during NightShot function)
* “Exif” is a file format for still images,
established by the JEITA (Japan
Electronics and Information Technology
Industries Association). Files in this
format can have additional information
such as your camcorder’s setting
information at the time of recording.
** The unique pixel array of Sony’s ClearVid
CMOS sensor and image processing
system (BIONZ) allows for still image
resolution equivalent to the sizes
described.
Input/Output connectors
A/V Remote Connector: Component/video and
audio output jack
HDMI OUT jack: HDMI Type C mini connector
USB jack: mini-B
LCD screen
Image: 6.7 cm (2.7 type, aspect ratio 16:9)
Total dot number: 211 200 (960 × 220)
General
Power requirements: DC 6.8 V/7.2 V (battery
pack)
DC 8.4 V (AC Adaptor)
Average power consumption: During camera
recording with normal brightness:
Hard disk:
HD: 4.5 W SD: 3.7 W
“Memory Stick PRO Duo”:
HD: 4.5 W SD: 3.7 W
Operating temperature: 0 °C to + 40 °C (32 °F to
104 °F)
Storage temperature: -20 °C to + 60 °C (-4 °F to +
140 °F)
Dimensions (approx.): 81 × 76 × 129 mm
(3 1/4 × 3 × 5 1/8 in.) (w/h/d)
including the projecting parts
81 × 76 × 134 mm
(3 1/4 × 3 × 5 3/8 in.) (w/h/d)
including the projecting parts, and the supplied
rechargeable battery pack attached
Mass (approx.): 480 g (1 lb) main unit only
560 g (1 lb 3 oz) including the supplied
rechargeable battery pack
Handycam Station DCRA-C220
Input/Output connectors
A/V OUT jack: Component/video and audio
output jack
USB jack: mini-B
AC Adaptor AC-L200/L200B
Power requirements: AC 100 V - 240 V, 50/60 Hz
Current consumption: 0.35 - 0.18 A
US
32
Power consumption: 18 W
Output voltage: DC 8.4 V*
Operating temperature: 0 °C to + 40 °C (32 °F to
104 °F)
Storage temperature: -20 °C to + 60 °C (-4 °F to +
140 °F)
Dimensions (approx.): 48 × 29 × 81 mm
(1 15/16 × 1 3/16 × 3 1/4 in.) (w/h/d)
excluding the projecting parts
Mass (approx.): 170 g (6.0 oz) excluding the
power cord (mains lead)
* See the label on the AC Adaptor for other
specifications.
Rechargeable battery pack NP-FH60
Maximum output voltage: DC 8.4 V
Output voltage: DC 7.2 V
Capacity: 7.2 Wh (1 000 mAh)
Type: Li-ion
Design and specifications of your camcorder and
accessories are subject to change without notice.
• Your camcorder is produced under the license of
Dolby Laboratories.
On trademarks
Additional Information
• “Handycam” and
are registered trademarks of Sony Corporation.
• “AVCHD” and “AVCHD” logotype are
trademarks of Matsushita Electric Industrial
Co., Ltd. and Sony Corporation.
• “Memory Stick,” “
,” “Memory Stick
Duo,” “
,” “Memory Stick
PRO Duo,” “
,”
“Memory Stick PRO-HG Duo,”
“
,” “MagicGate,”
“
,” “MagicGate Memory
Stick” and “MagicGate Memory Stick Duo” are
trademarks or registered trademarks of Sony
Corporation.
• “InfoLITHIUM” is a trademark of Sony
Corporation.
• “x.v.Color” is a trademark of Sony Corporation.
• “BIONZ” is a trademark of Sony Corporation.
• “BRAVIA” is a trademark of Sony Corporation.
• Dolby and the double-D symbol are trademarks
of Dolby Laboratories.
• Dolby Digital 5.1 Creator is a trademark of
Dolby Laboratories.
• HDMI, the HDMI logo and High-Definition
Multimedia Interface are trademarks or
registered trademarks of HDMI Licensing LLC.
• Microsoft, Windows, Windows Media,
Windows Vista, and DirectX are either
registered trademarks or trademarks of
Microsoft Corporation in the United States and/
or other countries.
• Macintosh and Mac OS are registered
trademarks of Apple Inc. in the U.S. and other
countries.
• Intel, Intel Core, and Pentium are trademarks or
registered trademarks of Intel Corporation or its
subsidiaries in the United States and other
countries.
• Adobe, the Adobe logo, and Adobe Acrobat are
either registered trademarks or trademarks of
Adobe Systems Incorporated in the United
States and/or other countries.
All other product names mentioned herein may be
the trademarks or registered trademarks of their
respective companies. Furthermore, ™ and “®”
are not mentioned in each case in this manual.
US
33
Lea esto primero
Antes de poner en funcionamiento la
unidad, lea detenidamente este manual y
consérvelo para futuras consultas.
– Guía de PMB
– Guía práctica de Handycam (PDF)
• “Guía de operaciones” (este manual) (1)
A
B
C
D
Uso de la videocámara
Nombre del producto: Videocámara
Modelo: HDR-SR10
ADVERTENCIA
Para reducir el riesgo de incendios o
electrocución, no exponga la unidad
a la lluvia ni a la humedad.
No exponga las pilas a fuentes de
calor excesivo, como la luz solar
directa, el fuego o similares.
PRECAUCIÓN
Sustituya la batería únicamente por
otra del tipo especificado. De lo
contrario, es posible que se
produzcan incendios o lesiones.
Notas sobre el uso
Elementos suministrados
Los números entre ( ) corresponden a la
cantidad suministrada.
• Adaptador de alimentación de ca (1)
• Cable de alimentación (1)
• Handycam Station (1) A
• Cable de A/V de componente (1) B
• Cable de conexión de A/V (1) C
• Cable USB (1) D
• Control remoto inalámbrico (1)
La pila de litio tipo botón ya viene instalada.
• Batería recargable NP-FH60 (1)
• CD-ROM “Handycam Application Software”
(1) (pág. 26)
– Picture Motion Browser (software)
ES
2
• La videocámara no está protegida contra el
polvo, las salpicaduras o el agua. Consulte
“Precauciones” (pág. 33).
• No intente realizar ninguna de las siguientes
operaciones cuando los indicadores de modo
(Película)/
(Imágenes fijas) o los
indicadores ACCESS (pág. 12, 17) estén
encendidos o parpadeen. Si lo hace, los soportes
podrían dañarse, podrían perderse las imágenes
grabadas, o bien, producirse otras fallas en el
funcionamiento.
– Expulsar el “Memory Stick PRO Duo”
– Extraer la batería o el adaptador de
alimentación de ca de la videocámara.
– Someter la videocámara a golpes o a
vibraciones.
• Al conectar la videocámara a otro dispositivo
mediante cables de comunicaciones, asegúrese
de insertar la clavija del conector de la forma
correcta. Si ejerce presión al insertar el conector
en el terminal, este último podría dañarse y
ocasionar el mal funcionamiento de la
videocámara.
• Conecte los cables a los conectores de la
Handycam Station cuando utilice la
videocámara conectada a la Handycam Station.
No conecte los cables a ninguna de las
Handycam Station ni a la videocámara.
• No someta la videocámara a golpes ni
vibraciones. Es posible que el disco duro de la
videocámara no se reconozca o que la operación
de grabación o reproducción no sea posible.
• No utilice la videocámara en lugares con mucho
ruido. Es posible que el disco duro de la
videocámara no se reconozca o que la operación
de grabación no sea posible.
• Para proteger el disco duro interno de los golpes
provocados por una caída, la videocámara
dispone de un sensor de caída*. Si la cámara
sufre una caída, o en condiciones de ausencia de
gravedad, puede que se grabe el sonido de
bloqueo que emite la videocámara cuando se
activa dicha función. Si el sensor de caída
detecta golpes repetidos, la grabación o la
reproducción podrían detenerse.
• Cuando la temperatura de la videocámara es
extremadamente alta o baja, es posible que no se
pueda grabar ni reproducir, ya que podrían
activarse las funciones de protección de la
videocámara. En este caso, aparece un mensaje
en la pantalla LCD (pág. 31).
• No encienda la videocámara en zonas de baja
presión con una altitud superior a 3 000 metro.
Si lo hace, podría dañarse el disco duro de la
videocámara.
• Si graba y elimina imágenes repetidamente durante
mucho tiempo, los datos del soporte quedan
fragmentados. Las imágenes no se pueden guardar
ni grabar. En dicho caso, guarde las imágenes en
algún tipo de soporte externo primero y, a
continuación, ejecute [FORMAT.SOPORTE]*.
• Apriete la correa de sujeción y sujete la
videocámara correctamente durante la
grabación.
190 grados respecto
de la videocámara
290 grados
(máx.)
ES
2180 grados (máx.)
• La pantalla de cristal líquido se fabricó con
tecnología de alta precisión, lo que hace que
más del 99,99% de los píxeles sean funcionales.
Sin embargo, es posible que aparezcan
constantemente algunos pequeños puntos negros
o brillantes (blancos, rojos, azules o verdes) en
la pantalla LCD. Estos puntos son el resultado
normal del proceso de fabricación y no afectan
en modo alguno a la grabación.
• Retire la lámina de aislamiento del control
remoto antes de utilizarlo.
Lámina de aislamiento
Tipos de “Memory Stick” que pueden
utilizarse con la videocámara
• Para ajustar el panel de cristal líquido, ábralo 90
grados respecto de la videocámara (1) y, a
continuación, gírelo en el ángulo que le resulte
más adecuado para grabar o reproducir (2).
Puede girar el panel de cristal líquido 180
grados hacia el lado del objetivo (2) para
grabar en modo de espejo.
• Para la grabación de películas, se recomienda
que utilice un “Memory Stick PRO Duo” de
1 GB o mayor con la marca:
–
(“Memory Stick
PRO Duo”)*
–
(“Memory Stick
PRO-HG Duo”)
* Con o sin la marca Mark2, se pueden
utilizar ambos.
• Se comprobó que los “Memory Stick PRO
Duo” de hasta 8 GB de capacidad funcionan
correctamente con esta videocámara.
• Consulte la página 11 para obtener información
acerca del tiempo de grabación de un “Memory
Stick PRO Duo”.
• Tanto el “Memory Stick PRO Duo” como el
“Memory Stick PRO-HG Duo” se denominan
“Memory Stick PRO Duo” en este manual.
ES
3
Grabación
• Antes de comenzar a grabar, pruebe las
funciones de grabación para asegurarse de que
la imagen y el sonido se graben sin problemas.
• No es posible compensar el contenido de las
grabaciones, aun si la grabación o la
reproducción no son posibles debido a una falla
en el funcionamiento de la videocámara, de los
soportes de grabación, etc.
• Los sistemas de televisión en color varían en
función del país o la región. Si desea ver su
grabación en un televisor, necesita un televisor
con sistema NTSC.
• Los programas de televisión, películas, cintas de
video y demás materiales pueden estar sujetos a
derechos de autor. La grabación no autorizada
de tales materiales puede ir en contra de las
leyes sobre los derechos de autor.
Reproducción de imágenes grabadas
en otros dispositivos
• La videocámara es compatible con MPEG-4
AVC/H.264 High Profile para la grabación con
calidad de imagen HD (alta definición). Por lo
tanto, no se pueden reproducir imágenes
grabadas con calidad de imagen HD (alta
definición) en la videocámara con los siguientes
dispositivos;
– Otros dispositivos compatibles con el formato
AVCHD que no son compatibles con High
Profile
– Dispositivos que no son compatibles con el
formato AVCHD
Guarde todos los datos de imagen
grabados
• Para evitar que se pierdan sus datos de imagen,
guarde todas las imágenes grabadas en soportes
externos. Se recomienda guardar los datos de
imagen en un disco como, por ejemplo, un
DVD-R mediante la computadora*. También se
pueden guardar los datos de imagen con una
videograbadora o una grabadora de DVD/
HDD*.
ES
4
Cuando la videocámara está
conectada a una computadora
• No intente formatear el disco duro de la
videocámara con una computadora. Si lo hace,
la videocámara podría funcionar
incorrectamente.
Nota sobre eliminación y
transferencia
• Incluso si ejecuta [FORMAT.SOPORTE]* o
formatea el disco duro de la videocámara, es
posible que no pueda eliminar totalmente los
datos del disco duro. Si transfiere la
videocámara, se recomienda ejecutar
[
VACIAR]* para evitar la recuperación de
los datos.
Además, cuando deseche la videocámara, se
recomienda destruir el cuerpo de la misma.
Acerca del ajuste de idioma
• Para ilustrar los procedimientos operativos se
utilizan indicaciones en pantalla en cada idioma
local. Si es necesario, cambie el idioma de la
pantalla antes de utilizar la videocámara
(pág. 10).
Acerca de este manual
• Las imágenes de la pantalla de cristal líquido
utilizadas en este manual se capturaron con una
cámara digital de imágenes fijas; por lo tanto,
pueden ser distintas de las imágenes que
aparezcan en realidad.
• En esta guía de operaciones, tanto el disco duro
de la videocámara como el “Memory Stick PRO
Duo” se denominan “soporte”.
• Las capturas de pantalla corresponden a
Windows Vista. Las escenas pueden variar en
función del sistema operativo de la
computadora.
* Consulte también la “Guía práctica de
Handycam” (PDF) y la “Guía de PMB”.
Índice
Lea esto primero .............................2
Procedimientos iniciales
Paso 1: Carga de la batería............ 6
Paso 2: Conexión de la alimentación
y ajuste de la fecha y la hora ........ 9
Información complementaria
Precauciones ................................33
Especificaciones ...........................35
Cambio del ajuste de idioma ...... 10
Paso 3: Selección del soporte ...... 11
Grabación/reproducción
Grabación ..................................... 13
Reproducción ............................... 14
Reproducción de imágenes en un
televisor ..................................... 15
Nombres y funciones de los
componentes .............................. 17
Indicadores que se muestran durante
la grabación/reproducción .......... 19
Realización de distintas funciones:
“
HOME” y “
OPTION” ....... 21
Almacenamiento de imágenes ..... 24
Borrado de imágenes ................... 25
Utilización con una
computadora
Utilización con una computadora
..................................................... 26
Instalación y visualización de la
“Guía práctica de Handycam”
(PDF) ......................................... 26
Instalación de “Picture Motion
Browser” .................................... 27
Solución de problemas
Solución de problemas ................. 30
ES
5
Procedimientos iniciales
Paso 1: Carga de la batería
5
4
Indicador
/CHG
3
5
Batería
1
Toma de entrada de cc
2
Interruptor POWER
Clavija de cc
Adaptador de alimentación de ca
Cable de alimentación
Puede cargar la batería
“InfoLITHIUM” (serie H) después de
conectarla a la videocámara.
b Notas
• No puede colocar en la videocámara otra batería
“InfoLITHIUM” que no sea de la serie H.
1 Conecte el adaptador de
alimentación de ca a la toma de
entrada de cc de la Handycam
Station.
Compruebe que la marca v de la clavija
de cc esté orientada hacia arriba.
Al tomacorriente
de pared
4 Instale la batería deslizándola en
el sentido de la flecha hasta que
haga clic.
5 Coloque la videocámara
firmemente en la Handycam
Station.
Se enciende el indicador /CHG
(carga) y se inicia el proceso de carga.
El indicador /CHG (carga) se apaga
cuando la batería está totalmente
cargada. Retire la videocámara de la
Handycam Station.
2 Conecte el cable de alimentación
al adaptador de alimentación de
ca y al tomacorriente de pared.
3 Deslice el interruptor POWER en
el sentido de la flecha hasta la
posición OFF (CHG) (ajuste
predeterminado).
ES
6
Para extraer la batería
Deslice el interruptor POWER hacia la
posición OFF (CHG).
Deslice la palanca BATT (liberación de la
batería) y extraiga la batería.
(Unidad: min)
Palanca BATT (liberación de la batería)
Disco duro
“Memory
Stick PRO
Duo”
HD
HD
SD
Tiempo de carga
SD
135
Tiempo de grabación*1*2
Gire el interruptor POWER hacia la
posición OFF (CHG) y, a continuación,
conecte el adaptador de alimentación de ca
directamente a la toma de entrada de cc de
la videocámara.
Interruptor POWER
90
110
90
110
Tiempo de
grabación
normal*3
40
50
40
50
Tiempo de
reproducción*2
130
130
130
130
*1 [MODO GRAB.]: SP
*2 Con la luz de fondo de la pantalla de cristal
líquido encendida.
*3 El tiempo de grabación normal indica el tiempo
de grabación al repetir las operaciones de
inicio/parada, conexión/desconexión de la
alimentación y utilización del zoom.
Con la marca v
del lado derecho
Clavija de cc
Tiempo de
grabación
continua
Procedimientos iniciales
Para cargar la batería sólo con el
adaptador de alimentación de ca
Toma de
entrada de
cc
Abra la tapa
de la toma.
Tiempo de funcionamiento
disponible para la batería
suministrada
Tiempo de carga:
Tiempo aproximado (min) necesario para
cargar por completo una batería totalmente
agotada.
Tiempo de grabación/reproducción:
Tiempo aproximado (min) disponible
cuando utiliza una batería completamente
cargada.
“HD” significa calidad de imagen de alta
definición y “SD” significa calidad de
imagen estándar.
Acerca de la batería
• Antes de extraer la batería o desconectar el
adaptador de ca ajuste el interruptor POWER en
la posición OFF (CHG) y compruebe que el
indicador
(película)/
(imágenes fijas)
(pág. 9) o el indicador ACCESS (pág. 12, 17)
estén apagados.
• No se suministrará energía de la batería
mientras el adaptador de alimentación de ca se
encuentre conectado a la toma de entrada de cc
de la videocámara o de la Handycam Station,
aunque el cable de alimentación esté
desconectado del tomacorriente de pared.
Acerca del tiempo de carga/grabación/
reproducción
• Tiempos calculados utilizando la videocámara a
una temperatura de 25 °C (se recomienda una
temperatura de 10 °C a 30 °C)
• El tiempo de grabación y de reproducción
disponible será más corto cuando utilice la
videocámara a bajas temperaturas.
ES
7
• En función de las condiciones en las que utilice
la videocámara, es posible que el tiempo de
grabación y reproducción disponible se vea
reducido.
Acerca del adaptador de alimentación de
ca
• Si utiliza el adaptador de alimentación de ca
conéctelo a un tomacorriente de pared cercano.
Si se produce alguna falla de funcionamiento al
utilizar la videocámara, desconecte el adaptador
de alimentación de ca del tomacorriente de
inmediato.
• No utilice el adaptador de alimentación de ca
colocado en un espacio angosto, tal como entre
una pared y los muebles.
• No provoque un cortocircuito en la clavija de cc
del adaptador de ca ni en el terminal de la
batería con ningún objeto metálico. Esto puede
provocar fallas en el funcionamiento.
• Aunque la videocámara esté apagada, seguirá
recibiendo adaptador de alimentación de ca
(corriente doméstica) mientras esté conectada a
la toma de pared mediante el adaptador de
alimentación de ca
ES
8
Paso 2: Conexión de la alimentación y ajuste de
la fecha y la hora
(HOME) (pág. 21)
Toque el botón que aparece en
la pantalla de cristal líquido.
1
60min
Cuando use la
videocámara por
primera vez,
aparecerá la
pantalla
[AJUS.RELOJ]
en la pantalla de
cristal líquido.
ESPERA
AJUS.ZONA
Chicago
Ciudad de México
Nueva York
Bogotá
Santiago
12:00:00AM
AJUS.RELOJ
SIGUIENTE
1 Mientras mantiene presionado el
botón verde, gire el interruptor
POWER varias veces en la
dirección de la flecha hasta que
se encienda el indicador
correspondiente.
(Película): para grabar películas
(Imágenes fijas): para tomar
imágenes fijas
Vaya al paso 3 cuando encienda la
videocámara por primera vez.
• Al encender el indicador
(Imágenes
fijas), el formato de la pantalla cambia
automáticamente a 4:3.
2 Toque
(HOME) t
(AJUSTES) t [AJ.REL./
IDIOM. ] t [AJUS.RELOJ].
3 Seleccione la zona geográfica
Procedimientos iniciales
Interruptor
POWER
4 Ajuste [HORA VERANO], [A]
(año), [M] (mes), [D] (día), las hora
y los minuto
A continuación, toque
.
60min
2008 A
ESPERA
1 M
1 D
12
00 AM
AJUS.RELOJ
SIGUIENTE
El reloj se pondrá en funcionamiento.
z Sugerencias
• La fecha y la hora no aparecen durante la
grabación, aunque se graban automáticamente
en el soporte y se pueden mostrar durante la
reproducción.
• Para desactivar los pitidos de operación, toque
(HOME) t
(AJUSTES) t
[AJUS.SON./PANT.] t [PITIDO] t
[DESACTIV.].
deseada con
/
y, a
continuación, toque [SIGUIENTE].
ES
9
Cambio del ajuste de idioma
Puede modificar las indicaciones en
pantalla para que muestren los mensajes en
un idioma determinado.
Toque
(HOME) t
(AJUSTES)
t [AJ.REL./IDIOM. ] t [ AJUSTE
IDIOMA] y, a continuación, seleccione el
idioma deseado.
ES
10
Paso 3: Selección del soporte
Puede seleccionar el disco duro o el
“Memory Stick PRO Duo” como soporte de
grabación/reproducción/edición en la
videocámara. Seleccione el soporte para
películas e imágenes fijas por separado.
El ajuste predeterminado es el disco duro
para películas e imágenes fijas.
Aparecerá la pantalla de ajuste del
soporte.
HDD
HDD
MEMORY STICK
MEMORY STICK
AJ.SOPORTE PEL.
Disco duro
Selec.soporte y calidad de imagen.
Película
Procedimientos iniciales
3 Toque el soporte y la calidad de
“Memory Stick”
Imagen
fija
b Notas
• Puede realizar operaciones de grabación,
reproducción y edición para los soportes
seleccionados. Vuelva a seleccionar el soporte,
cuando desee cambiarlo.
• El tiempo de grabación con el modo de
grabación [HD SP] (ajuste predeterminado) es el
siguiente:
– En el disco duro interno: aprox. 11 h 50 m
– En un “Memory Stick PRO Duo” (4 GB)
fabricado por Sony Corporation: aprox. 1 h
5m
imagen deseados.
indica calidad de imagen HD (alta
definición) y
indica calidad de
imagen SD (definición estándar).
4 Toque [SÍ] t
.
Se cambiará el soporte.
Para seleccionar el soporte para las
imágenes fijas
Toque [AJ.SOPORTE FOTO] en el paso 2
y, a continuación, toque el soporte deseado.
z Sugerencias
• Compruebe el número de imágenes fijas que se
pueden grabar en la pantalla de cristal líquido de
la videocámara (pág. 19).
1 Toque
(HOME) t
(GESTIONAR SOPORTE).
ESPERA
AJ.SOPORTE PEL.
AJ.SOPORTE FOTO
INFO SOPORTE
FORMAT.SOPORTE
Comprobación de los ajustes del
soporte
1 Gire el interruptor POWER varias veces
para que se encienda el indicador
(Película)/
(Imágenes fijas) en
función del soporte que desee verificar.
2 Compruebe el icono del soporte que
aparece en pantalla.
ESPERA
GESTIONAR SOPORTE
Icono del soporte
2 Toque [AJ.SOPORTE PEL.] para
: Disco duro
: “Memory Stick PRO Duo”
seleccionar el soporte para las
películas.
ES
11
Inserción de un “Memory Stick
PRO Duo”
Inserte un “Memory Stick PRO Duo” si
seleccionó “Memory Stick PRO Duo”
como soporte.
Para saber qué tipos de “Memory Stick”
puede utilizar en la videocámara, consulte
la página 3.
1 Inserte el “Memory Stick PRO
Duo”.
1 Abra la tapa del Memory Stick Duo en
el sentido de la flecha.
2 Inserte el “Memory Stick PRO Duo” en
la ranura para Memory Stick Duo en la
dirección correcta hasta oír un clic.
3 Cierre la tapa del Memory Stick Duo.
Aparece la pantalla [Crear nuevo
arch.base de datos de imágenes.] en la
pantalla LCD cuando inserta un
“Memory Stick PRO Duo” nuevo.
No existe archivo de base de datos de
imágenes. No se pueden grabar ni reproducir
películas. ¿Desea crear un nuevo archivo?
TIEMPO ESTIMADO:10s
SÍ
NO
Crear nuevo arch.base de datos de imágenes.
3 Toque [SÍ].
Para grabar solamente imágenes fijas en
un “Memory Stick PRO Duo”, toque
[NO].
Para expulsar el “Memory Stick PRO
Duo”
Abra la tapa del Memory Stick Duo y
empuje ligeramente el “Memory Stick PRO
Duo” una vez.
b Notas
Indicador ACCESS
(“Memory Stick PRO Duo”)
2 Si selecciona “Memory Stick PRO
Duo” como soporte para
películas, deslice el interruptor
POWER hasta que se encienda el
indicador
(Película).
Si el interruptor POWER está ajustado
en OFF (CHG), enciéndalo mientras
mantiene presionado el botón verde.
ES
12
• No abra la tapa del Memory Stick Duo durante
la grabación.
• Si introduce el “Memory Stick PRO Duo” en la
ranura a la fuerza en el sentido incorrecto, el
“Memory Stick PRO Duo”, la ranura del
Memory Stick Duo o los datos de imagen
podrían quedar dañados.
• Si aparece [Error al crear un nuevo archivo de
base de datos de imágenes. Es posible que no
exista suficiente espacio libre.] en el paso 3,
formatee el “Memory Stick PRO Duo”. Tenga
en cuenta que al formatear, se borrarán todos los
datos grabados en el “Memory Stick PRO Duo”.
• Tenga cuidado al insertar o extraer el “Memory
Stick PRO Duo”, para que el “Memory Stick
PRO Duo” no salte y caiga.
Grabación/reproducción
Grabación
Las imágenes se graban en el soporte seleccionado en la configuración de soporte (pág. 11).
En el ajuste predeterminado, se reproducen las películas y las imágenes fijas grabadas en el
disco duro.
Interruptor POWER C
START/STOP D
GRAB.
: para grabar películas
: para grabar imágenes fijas
[ESPERA] t [GRAB.]
START/STOP A
PHOTO
E
Grabación/reproducción
(HOME) B
(pág. 21)
4,0M
Parpadea t Se enciende
1 Gire el interruptor POWER C hasta que se encienda el indicador
correspondiente.
Presione el botón verde solamente cuando el interruptor POWER C se encuentre en la
posición OFF (CHG).
2 Inicie la grabación.
Películas
Presione START/STOP D (o A).
Para detener la grabación, presione
START/STOP D (o A) nuevamente.
z Sugerencias
• Para verificar el tiempo de grabación y la
capacidad restante, presione
(HOME) B
t
(GESTIONAR SOPORTE) t [INFO
SOPORTE].
• Para capturar imágenes fijas, presione PHOTO
E durante la grabación de una película.
Imágenes fijas
Presione PHOTO E ligeramente
para enfocar A (se oye un pitido) y,
a continuación, presione totalmente
B (se oye el clic del obturador).
aparece junto a
o
. Cuando
desaparece, significa que se ha grabado la
imagen.
• El tiempo máximo de grabación continua de
películas es de aproximadamente 13 hora
• Cuando un archivo de película supera los 2 GB,
el siguiente archivo de película se crea
automáticamente.
ES
13
Reproducción
Es posible reproducir la imagen grabada en el soporte ajustado en la pantalla de ajuste del
soporte (pág. 11). En la configuración predeterminada, se reproducen las imágenes del disco
duro.
(VISUALIZAR IMÁGENES) A
1
2
3
9
4
5
6
HDD
0
7
8
Interruptor POWER B
(VISUALIZAR IMÁGENES) C
1 Permite pasar a la pantalla
(Índice de
rollos de película)
2 Permite pasar a la pantalla
(Índice de
caras)
3 Permite desplazarse al menú
(HOME)
4 6 imágenes anteriores
5 6 imágenes siguientes
6 Permite volver a la pantalla de grabación
7 Muestra películas con calidad de imagen HD
(alta definición)*
8 Muestra imágenes fijas
9 Permite buscar imágenes por fecha
q;
(OPTION)
*
aparece al seleccionar la película con
calidad de imagen SD (definición estándar) en
[AJ.SOPORTE PEL.] (pág. 11).
1 Gire el interruptor POWER B para encender la videocámara.
2 Presione (VISUALIZAR IMÁGENES) C (o A).
Aparece la pantalla VISUAL INDEX en la pantalla LCD (es posible que tarde unos
segundo)
3 Inicie la reproducción.
Películas
Toque la ficha
o
,a
continuación seleccione la película
que desee reproducir.
Principio de
la película/ Alterna entre el modo de
reproducción y el de pausa Película
película
cada vez que se toca
siguiente
anterior
Permite detener (ir a Rebobinado/avance
la pantalla INDEX) rápido
(OPTION)
ES
14
Imágenes fijas
Toque la ficha
y, a continuación,
seleccione la imagen fija deseada
para reproducirla.
Presentación de diapositivas
Permite pasar a la
pantalla VISUAL
INDEX
Anterior/Siguiente
(OPTION)
Para ajustar el volumen del sonido de
las películas
Cuando reproduzca una película, toque
(OPTION) t ficha
t [VOL.] y, a
continuación, ajuste el volumen con
/
.
z Sugerencias
• En la pantalla VISUAL INDEX, aparecerá
i/B con la imagen de la ficha que se
reprodujo o grabó más recientemente. Si toca
una imagen con la marca i/B, podrá
reproducirla desde el punto en que se detuvo
anteriormente.
Los métodos de conexión y la calidad de la
imagen (HD (alta definición)/SD
(definición estándar)) que se visualiza en la
pantalla del televisor difieren según el tipo
de televisor que esté conectado y de los
conectores utilizados.
Utilice el adaptador de alimentación de ca
suministrado como fuente de alimentación
(pág. 6).
Consulte además el manual de
instrucciones del dispositivo que conecte.
Cambie la entrada en el televisor a
la toma conectada.
Consulte el manual de instrucciones del
televisor.
r
Conecte la videocámara y el
televisor siguiendo las
indicaciones de la [GUÍA
CONEXIÓN TV].
Toque
(HOME) t
(OTROS) t
[GUÍA CONEXIÓN TV].
r
Realice los ajustes de salida
necesarios en la videocámara.
Grabación/reproducción
Reproducción de imágenes en
un televisor
Flujo de operaciones
Handycam Station
Conector
remoto de A/V
b Notas
• Cuando grabe, ajuste [X.V.COLOR] en
[ACTIVADO] para poder realizar la
reproducción en un televisor compatible con
x.v.Color. Es posible que tenga que regular
algunos ajustes en el televisor durante la
reproducción. Consulte el manual de
instrucciones de su televisor para obtener más
información.
Abra la tapa de la toma.
b Notas
• Cuando se utiliza el cable de conexión de A/V
para la emisión de imágenes, éstas se emiten con
calidad de imagen SD (definición estándar).
ES
15
• La videocámara y la Handycam Station están
equipadas con un Conector remoto de A/V o
una toma A/V OUT (pág. 17). Conecte el cable
de conexión de A/V o el cable de A/V de
componente a la Handycam Station o a la
videocámara. Si conecta los cables de conexión
A/V o el cable A/V del componente a
Handycam Station y a la videocámara al mismo
tiempo, pueden producirse perturbaciones en la
imagen.
ES
16
Nombres y funciones de los componentes
Los botones, tomas y otros elementos que
no se explican en otros capítulos se
describen en este apartado.
Grabación/reproducción
1 Palanca del zoom motorizado
Mueva la palanca del zoom motorizado
levemente para obtener un zoom más lento.
Muévala más para obtener un zoom más
rápido.
Es posible ampliar imágenes fijas desde
aproximadamente 1,1 hasta 5 veces su
tamaño original (zoom de reproducción).
• Si toca la pantalla mientras utiliza el zoom de
reproducción, el punto que toque aparecerá en el
centro de la pantalla de cristal líquido.
8
0
qs
qa
qd
qf
qg
qh
qj
qk
ql
w;
wa
2 Botón QUICK ON
Al presionar QUICK ON, la videocámara
pasa a modo suspendido (modo de ahorro
de energía) en lugar de apagarse. El
indicador QUICK ON parpadea en modo
suspendido. Vuelva a presionar QUICK ON
para iniciar la grabación la próxima vez. La
videocámara regresa al modo de espera de
grabación en aproximadamente 1 segundo.
La cámara se apaga automáticamente si no
la utiliza durante un tiempo determinado
mientras se encuentra en modo suspendido.
Grabación/reproducción
9
3 Indicador ACCESS (disco duro)
Si el indicador ACCESS está encendido o
parpadea, significa que la videocámara está
escribiendo o leyendo datos.
4 Gancho para la bandolera
Coloque la bandolera (opcional).
8 Altavoz
9 Interruptor NIGHTSHOT
Ajuste el interruptor NIGHTSHOT en ON
(aparece
) para grabar en lugares
oscuros.
ws
qs
Handycam Station
ws
7
6
0 Botones de zoom
Presiónelos para ampliar o alejar la imagen.
Es posible ampliar imágenes fijas desde
aproximadamente 1,1 hasta 5 veces su
tamaño original (zoom de reproducción).
• Si toca la pantalla mientras utiliza el zoom de
reproducción, el punto que toque aparecerá en el
centro de la pantalla de cristal líquido.
ES
17
qa Botón RESET
Presione RESET para inicializar todos los
ajustes, incluido el del reloj.
qd Botón EASY
Presione EASY para mostrar
; la
mayoría de los ajustes se establecerán
automáticamente para facilitar las
operaciones de grabación o reproducción.
Para cancelar esta función, vuelva a
presionar EASY.
qf Botón DISP/BATT INFO
Podrá cambiar la visualización en pantalla
si lo presiona con la videocámara
encendida.
Si lo presiona con el interruptor POWER
ajustado en OFF (CHG), podrá comprobar
la energía restante de la batería.
qg Botón . (contraluz)
Presione . (contraluz) para que aparezca
., que le permitirá ajustar la exposición de
motivos a contraluz. Presione . (contraluz)
de nuevo para cancelar la función de
contraluz.
qj Micrófono integrado
El sonido que capta el micrófono interno se
convierte en sonido envolvente de 5,1
canales y se graba en este modo.
qk Flash
El flash se dispara automáticamente en
función de las condiciones de grabación
con el ajuste predeterminado.
Toque
(HOME) t
(AJUSTES) t
[AJUST.FOTO CÁM.] t [MODO
FLASH] para cambiar el ajuste.
ql Sensor remoto/puerto de infrarrojos
Permite recibir la señal del control remoto.
w; Indicador de grabación de la cámara
El indicador de grabación de la cámara se
ilumina en rojo durante la grabación. El
indicador parpadea cuando la capacidad
restante del soporte o la energía de la
batería se está agotando.
ES
18
wa Receptáculo del trípode (superficie
inferior)
Coloque un trípode (opcional) en el
receptáculo correspondiente mediante un
tornillo para trípode (opcional: la longitud
del tornillo debe ser inferior a 5,5 mm)
Conexión a otros dispositivos
5 Toma HDMI OUT (mini)
Conecte el cable HDMI (opcional).
6 Conector remoto de A/V/ Toma
A/V OUT
Conecte el cable de A/V de componente o
el cable de conexión de A/V.
7 Toma (USB)
Conecte el cable USB a esta toma
qs Botón
(DISC BURN)
Para crear un disco, conecte la videocámara
a una computadora, etc. Para obtener más
información, consulte la “Guía de PMB”
(pág. 29).
qh Active Interface Shoe
La Active Interface Shoe suministra
alimentación a accesorios opcionales como,
por ejemplo, una luz de video, un flash o un
micrófono. El accesorio se puede encender
o apagar al utilizar el interruptor POWER
de la videocámara.
ws Conector de interfaz
Conecte la videocámara y la Handycam
Station a esta toma.
Indicadores que se muestran durante la
grabación/reproducción
Grabación de películas
A Botón HOME
B Energía restante de la batería (aprox.)
GRAB.
C Estado de grabación ([ESPERA] (en
espera) o [GRAB.] (grabación))
D Calidad de grabación (HD/SD) y modo
de grabación (FH/HQ/SP/LP)
E Grabación/reproducción del soporte
F Contador (hora/minuto/segundo)
G Tiempo de grabación restante
Grabación de imágenes fijas
H Botón OPTION
I DETECCIÓN CARA
Grabación/reproducción
J Botón VISUALIZAR IMÁGENES
4,0M
K Ajuste de Índice de caras
L Grabación de sonido envolvente de 5,1
canales
M Tamaño de imagen
Visualización de películas
N Número aproximado de imágenes fijas
grabables y soporte/durante la grabación
de imágenes fijas
O Botón Volver
P Modo de reproducción
Q Número de película de reproducción
actual/Número total de películas
grabadas
R Botón anterior/siguiente
S Botones de control de video
Visualización de imágenes fijas
4,0M
T Número actual de imagen fija de
reproducción/Número total de imágenes
fijas grabadas
U Carpeta de reproducción
Sólo aparece cuando el soporte de
reproducción de imágenes fijas es un
“Memory Stick PRO Duo”.
V Botón de presentación de diapositivas
W Nombre del archivo de datos
X Botón VISUAL INDEX
ES
19
Indicadores que aparecen al
realizar modificaciones
Parte superior derecha
Indicador
Los siguientes indicadores aparecen
durante la reproducción/grabación para
indicar los ajustes de la videocámara.
Luz de fondo de la
pantalla de cristal líquido
desactivada
Parte superior
derecha
Parte superior
izquierda
Parte central
Significado
DESVANECEDOR
Sensor de caída desactivado
Sensor de caída activado
ESPERA
Soporte para imágenes
fijas
FUND
BLANCO
Parte inferior
Indicador
Parte inferior
Significado
Índice de caras
Parte superior izquierda
Indicador
DETECCIÓN CARA
Efecto de imagen
Significado
MODO AUDIO
Efectos digitales
Enfoque manual
9
Grabación con
disparador automático
SELEC.ESCENA
Flash, R.OJOS ROJ.
MIC.ZOOM INCOR.
NIVEL REFMIC bajo
Contraluz
.
n
Balance de blancos
SteadyShot desactivado
SELEC.PANOR.
EXPOSICIÓN/
MEDID.PUNTO
Parte central
TELE MACRO
Indicador
4,0M
3,0M
Significado
1,9M
CEBRA
TAM.IMAGEN
X.V.COLOR
OBJETIVO CONVER.
Presentación de
diapositivas ajustada
NightShot
z Sugerencias
Super NightShot
• Los indicadores y sus posiciones no son exactos
y difieren de lo que realmente se ve. Consulte la
“Guía práctica de Handycam” (PDF) para
obtener más información.
• La fecha y la hora de grabación se graban
automáticamente en el soporte. No se muestran
durante la grabación. No obstante, se pueden
consultar como [CÓDIGO DATOS] durante la
reproducción.
Color Slow Shutter
Conexión PictBridge
E
ES
20
Advertencia
Realización de distintas funciones: “
y “ OPTION”
Para visualizar la pantalla de menú,
presione
(HOME) A (o B)/
(OPTION). Para obtener más
información acerca de los elementos del
menú, consulte la “Guía práctica de
Handycam” (PDF) (pág. 26).
HOME”
• La situación actual de grabación o reproducción
no le permite seleccionar ni activar
simultáneamente los elementos atenuados.
Para ver la explicación del HOME
MENU (HELP)
1 Presione
(HOME) A (o B).
2 Toque
(HELP).
La parte inferior de
(HELP) se ilumina
en naranja.
(HOME) B
ESPERA
PELÍCULA
FOTO
(OPTION)
GR.LEN.UNIF.
Grabación/reproducción
(HOME) A
TOMA DE IMÁGENES
Uso del HOME MENU
Es posible modificar los ajustes de
operación como más le convenga. Presione
(HOME) A (o B) para visualizar la
pantalla de menú.
3 Toque el elemento sobre el cual desea
obtener información.
Al tocar un elemento, su explicación
aparece en la pantalla.
Para aplicar el elemento seleccionado,
toque [SÍ].
ESPERA
BORRAR
COPIA PELÍCULA
Uso del OPTION MENU
TOMA FOTOGRÁF.
1/3
COPIAR FOTO
Elementos del
menú
OTROS
Categoría
1 Toque la categoría deseada y, a
continuación, el elemento cuyo
ajuste desee modificar.
El
(OPTION) MENU se muestra como
la ventana emergente que aparece al hacer
clic con el botón derecho del ratón de una
computadora.
Presione
(OPTION) para visualizar los
elementos del menú que puede modificar en
la situación actual.
ESPERA
ENFOQUE
ENFOQ.PUNTO
AUTOM.
AUTOM.
TELE MACRO
DESACTIV.
2 Siga las instrucciones de la
pantalla.
z Sugerencias
• Si el elemento no se muestra en pantalla, toque
/
para cambiar de página.
• Para ocultar la pantalla HOME MENU, toque
.
Elementos del
menú
TOMA DE IMÁGENES
Ficha
1 Toque la ficha deseada y, a
continuación, el elemento cuyo
ajuste desee modificar.
ES
21
2 Luego de completar el ajuste,
toque
EDICIÓN
PLAYLIST
.
b Notas
• Si el elemento deseado no aparece en la
pantalla, toque otra ficha. Si no puede encontrar
el elemento, significa que la función no se
encuentra disponible en la situación actual.
• No se puede utilizar el
(OPTION) MENU
durante el funcionamiento en modo Easy
Handycam.
Categoría
Categoría
FOTO*
GR.LEN.
UNIF.
(VISUALIZAR IMÁGENES)
VISUAL
INDEX*
INDEX*
PLAYLIST
BORRAR*
(OTROS)
[
[
BORRAR],
BORRAR]
TOMA
FOTOGRÁF.
ES
(GESTIONAR SOPORTE)
AJ.
SOPORTE
FOTO*
INFO
SOPORTE
INDEX*
Categoría
[
CONEXIÓN USB],
[
CONEXIÓN USB],
[DISC BURN]
AJ.
SOPORTE
PEL.*
PELÍCULA*
22
CONEXIÓN
USB
GUÍA
CONEXIÓN
TV*
Categoría
AÑADIR],
AÑADIR],
AÑAD.p.fecha],
AÑAD.p.fecha],
BORRAR],
BORRAR],
BORRAR TODO],
BORRAR TODO],
MOVER],
MOVER]
IMPRIMIR
Elementos del HOME MENU
(TOMA DE IMÁGENES)
[
[
[
[
[
[
[
[
[
[
t
t
COPIA
PELÍCULA
[
[
COPIAR],
COPIAR]
COPIAR
FOTO
[COPIAR por selec.],
[COPIAR por fecha]
EDIT
[
[
BORRAR],
BORRAR], [DIVIDIR]
FORMAT.
SOPORTE*
[HDD], [MEMORY STICK]
REP.ARCH.
BD.IM.
[HDD], [MEMORY STICK]
Categoría
(AJUSTES)
AJUSTES
PEL.CÁM
[MODO GRAB.],
[MODO AUDIO],
[ILUM.NIGHTSHOT],
[SELEC.PANOR.], [ZOOM
DIGITAL], [STEADYSHOT],
[OB.LENTO AUTO],
[X.V.COLOR], [GUÍA
FOTOG.], [CEBRA],
[
RESTANTE AJ.],
[FECHA SUBT.], [MODO
FLASH]*, [NIVEL FLASH],
[R.OJOS ROJ.], [DETECCIÓN
CARA], [
AJUSTE
INDEX]*, [OBJETIVO
CONVER.]
[
TAM.IMAGEN]*,
[NÚM.ARCHIVO],
[ILUM.NIGHTSHOT],
[STEADYSHOT], [GUÍA
FOTOG.], [CEBRA], [MODO
FLASH]*, [NIVEL FLASH],
[R.OJOS ROJ.], [DETECCIÓN
CARA], [OBJETIVO
CONVER.]
Ficha
VIS.
AJUSTES
IMÁG
[CÓDIGO DATOS],
[PANTALLA
]
[PRES.DIAP.], [AJUS.PASE DIAPO.],
[COPIAS], [FECHA/HORA], [TAMAÑO]
AJUS.SON./
PANT.**
[VOL.]*, [PITIDO]*, [BRILLO
LCD], [NIV LUZ LCD],
[COLOR LCD]
AJUSTES
SALIDA
[TIPO TV], [SALIDA PANT.],
[COMPONENTE]
AJ.REL./
IDIOM.
[AJUS.RELOJ]*,
[AJUS.ZONA], [DST SET],
[HORA VERANO], [AJUSTE
IDIOMA
]*
AJUST.
FOTO CÁM.
[DESVANECEDOR], [EFECTO DIG.],
[EFECTO IMAG.]
Ficha
[MIC.ZOOM INCOR.], [NIVEL REFMIC],
[AUTODISPAR.], [TEMPORIZ.], [GRABAR
SONIDO]
– (Las fichas dependen de la situación/sin ficha)
Grabación/reproducción
AJUST.
[MODO DEMO],
GENERALES [IND.GRAB.],
[CALIBRACIÓN],
[APAGADO AUTO],
[ESPERA ENC.RÁP.],
[CTRL REMOTO], [SENSOR
CAÍDA], [CTRL.PARA
HDMI]
* Puede ajustar estos elementos durante el modo
Easy Handycam.
** El nombre del menú cambia a [AJUSTES
SONIDO] durante el funcionamiento en modo
Easy Handycam.
Elementos del OPTION MENU
A continuación se describen los elementos
que solamente se pueden ajustar en el
OPTION MENU.
Ficha
[ENFOQUE], [ENFOQ.PUNTO],
[TELE MACRO], [EXPOSICIÓN],
[MEDID.PUNTO], [SELEC.ESCENA],
[BAL.BLANCOS], [COLOR SLOW SHTR],
[SUPER NIGHTSHOT]
ES
23
Almacenamiento de imágenes
Debido a la capacidad limitada del soporte,
asegúrese de guardar los datos de imagen
en algún tipo de soporte externo, como un
DVD-R o una computadora.
Las imágenes grabadas en la videocámara
se pueden guardar en el modo que se indica
a continuación.
Mediante una computadora
Puede utilizar “Picture Motion Browser”
del CD-ROM suministrado, para guardar
las imágenes grabadas en la videocámara
con calidad de imagen HD (alta definición)
o calidad de imagen SD (definición
estándar).
Puede reescribir películas con calidad de
imagen HD (alta definición) desde la
computadora a la videocámara, si es
necesario. Para obtener más información,
consulte la “Guía de PMB” (pág. 29).
Creación de un disco con un solo
toque (One Touch Disc Burn)
Para guardar fácilmente las imágenes
grabadas en el disco duro de la videocámara
directamente en un disco, presione el botón
(DISC BURN).
Almacenamiento de imágenes en una
computadora (Easy PC Back-up)
Se pueden guardar las imágenes grabadas
de la videocámara en el disco duro de una
computadora.
Creación de un disco con imágenes
seleccionadas
Puede guardar las imágenes copiadas en un
disco a la computadora. También puede
modificar dichas imágenes.
ES
24
Conexión de la videocámara a
otros dispositivos
Para obtener más información, consulte la
“Guía práctica de Handycam” (PDF).
Conexión con el cable de conexión
A/V
Puede realizar copias en videograbadoras y
grabadoras de DVD/HDD con calidad de
imagen SD (definición estándar).
Conexión con el cable USB
Puede realizar copias en grabadoras de
DVD, etc. compatibles con la grabación de
películas con calidad de imagen HD (alta
definición).
z Sugerencias
• Puede copiar películas o imágenes fijas del
disco duro en un “Memory Stick PRO Duo”.
Toque
(HOME) t
(OTROS) t
[COPIA PELÍCULA]/[COPIAR FOTO].
Borrado de imágenes
Seleccione el soporte que contiene la
imagen que desea eliminar antes de la
operación (pág. 11).
Eliminación de películas
1 Toque
(HOME) t
t [BORRAR].
2 Toque [
(OTROS)
BORRAR].
Grabación/reproducción
3 Toque [
BORRAR] o
[
BORRAR] y, a continuación,
la película que desea eliminar.
La película seleccionada tiene la marca
.
4 Toque
t [SÍ] t
.
Para eliminar todas las películas de
una vez
En el paso 3, toque [
BORRAR
TODO]/[
BORRAR TODO] t [SÍ]
t [SÍ] t
.
Para eliminar imágenes fijas
1 En el paso 2, toque [
BORRAR].
2 Toque [
BORRAR] y, a
continuación, la imagen fija que desea
eliminar.
La imagen fija seleccionada tiene la
marca .
3 Toque
t [SÍ] t
.
z Sugerencias
• Para eliminar todas las imágenes fijas del
soporte, en el paso 2, toque [
BORRAR
TODO] t [SÍ] t [SÍ] t
.
ES
25
Utilización con una computadora
Utilización con una computadora
Guía práctica/software que se
va a instalar
x “Guía práctica de Handycam” (PDF)
En la “Guía práctica de Handycam” (PDF)
se brindan explicaciones detalladas sobre la
videocámara y su uso práctico.
x “Picture Motion Browser” (sólo para
usuarios de Windows)
“Picture Motion Browser” es el software
suministrado. Puede realizar las siguientes
operaciones.
–
–
–
–
• El software “Picture Motion Browser”
suministrado no es compatible con
computadoras Macintosh. Para utilizar una
computadora Macintosh conectada a la
videocámara, consulte el sitio web siguiente
para obtener más información.
http://guide.d-imaging.sony.co.jp/mac/ms/es/
Instalación y visualización de la
“Guía práctica de Handycam”
(PDF)
Para poder ver la “Guía práctica de
Handycam” (PDF), deberá tener Adobe
Reader instalado en la computadora.
Continúe con la instalación aunque
aparezca una pantalla de confirmación de
un editor desconocido.
1 Encienda la computadora.
2 Coloque el CD-ROM (suministrado) en la
unidad de disco de la computadora.
Aparecerá la pantalla de selección de la
instalación.
ES
Aparecerá la pantalla de instalación de
la “Guía práctica de Handycam” (PDF).
Creación de un disco con un solo toque
Importación de imágenes en una computadora
Edición de las imágenes importadas
Creación de un disco
b Notas
26
3 Haga clic en [Handycam Handbook].
4 Seleccione el idioma deseado y el nombre
del modelo de la Handycam y, a
continuación, haga clic en [Handycam
Handbook (PDF)].
Se iniciará la instalación. Cuando ésta
finalice, aparecerá el icono de acceso
directo de la “Guía práctica de Handycam”
(PDF) en el escritorio de la computadora.
• El nombre del modelo de la Handycam está
impreso en la parte inferior de la unidad.
5 Haga clic en [Exit] t [Exit] y, a
continuación, extraiga el CD-ROM de la
unidad de disco de la computadora.
Para ver la “Guía práctica de Handycam”,
haga doble clic en el icono de acceso
directo correspondiente.
z Sugerencias
• Los usuarios de Macintosh deben realizar los
pasos siguientes.
1 Encienda la computadora.
2 Coloque el CD-ROM (suministrado) en
la unidad de disco de la computadora.
3 Abra la carpeta [Handbook] del CDROM, haga doble clic en la carpeta
[ESUS] y, a continuación, arrastre y
suelte el archivo “Handbook.pdf” en la
computadora.
Para ver la “Guía práctica de
Handycam”, haga doble clic en
“Handbook.pdf”.
Instalación de “Picture Motion
Browser”
x Requisitos del sistema
Sistema operativo: Microsoft Windows
2000 Professional SP4/Windows XP
SP2*/Windows Vista*
* Las ediciones de 64-bit y Starter (Edition)
no son compatibles.
Se requiere la instalación estándar.
No se garantizan las operaciones en un
entorno basado en una actualización de
los sistemas operativos descritos
anteriormente ni en un entorno de inicio
múltiple.
– Importación del contenido en la
computadora
– One Touch Disc Burn
– Creación de un disco de formato AVCHD/
DVD video
– Copia de un disco
– Procesamiento sólo del contenido con
calidad de imagen SD (definición estándar)
Memoria: Para Windows 2000/Windows
XP: 512 MB o más (se recomienda
1 GB o más).
Para el procesamiento sólo de contenido
de calidad de imagen SD (definición
estándar), se requiere una memoria de
256 MB o más.
Para Windows Vista: 1 GB o más
Disco duro: Volumen de disco necesario
para la instalación: aproximadamente
500 MB (es posible que se requieran
10 GB o más cuando se creen discos de
formato AVCHD).
Otros: puerto USB (debe proporcionarse
como estándar, se recomienda USB de
alta velocidad (compatible con USB
2.0)), grabadora de DVD (se requiere
una unidad de CD-ROM para la
instalación).
Atención
Esta videocámara captura imágenes de alta
definición en el formato AVCHD.
Mediante el software para PC suministrado,
se podrán copiar imágenes de alta
definición en un soporte DVD. No obstante,
el soporte DVD que contiene imágenes
AVCHD no debe utilizarse con grabadoras
o reproductores basados en DVD, ya que es
posible que este tipo de dispositivo DVD no
expulse el soporte y que borre su contenido
sin advertencia. Los soportes DVD que
contienen imágenes AVCHD se pueden
reproducir en un reproductor o una
grabadora compatible con Blu-ray Disc™ u
otro dispositivo compatible.
Utilización con una computadora
CPU: Intel Pentium 4 a 2,8 GHz o superior
(se recomienda Intel Pentium 4 a
3,6 GHz o superior, Intel Pentium D a
2,8 GHz o superior, Intel Core Duo a
1,66 GHz o superior o Intel Core 2 Duo
a 1,66 GHz o superior).
El uso de un procesador Intel Pentium
III a 1 GHz o superior permite las
operaciones siguientes:
Pantalla: mínimo de 1 024 × 768 puntos
x Procedimiento de instalación
Debe instalar el software en la computadora
Windows antes de conectar la
videocámara a ésta. La instalación se
debe realizar sólo la primera vez.
El contenido y los procedimientos de la
instalación pueden variar en función del
sistema operativo.
1 Compruebe que la videocámara no está
conectada a la computadora.
2 Encienda la computadora.
b Notas
• Inicie sesión con permisos de administrador
para realizar la instalación.
• Cierre todas las aplicaciones que se estén
ejecutando en la computadora antes de
instalar el software.
3 Coloque el CD-ROM suministrado en la
unidad de disco de la computadora.
Aparecerá la pantalla de instalación.
ES
27
Si la pantalla no aparece
1 Haga clic en [Start] y, a continuación,
en [My Computer]. (En Windows
2000, haga doble clic en [My
Computer].)
2 Haga doble clic en [SONYPICTUTIL
(E:)] (CD-ROM) (unidad de disco).*
* Los nombres de las unidades (por
ejemplo, (E:)) pueden variar según la
computadora.
4 Haga clic en [Install].
5 Seleccione el idioma de la aplicación que
desea instalar y, a continuación, haga clic
en [Next].
6 Cuando aparezca la pantalla de
confirmación de la conexión, realice los
pasos siguientes para conectar la
videocámara a la computadora.
1 Conecte el adaptador de alimentación
de ca a la Handycam Station y al
tomacorriente de pared.
2 Coloque la videocámara en la
Handycam Station y, a continuación,
encienda la videocámara.
3 Conecte la toma (USB) de la
Handycam Station (pág. 18) a la
computadora mediante el cable USB
suministrado.
Aparecerá automáticamente la pantalla
[SELEC.USB] en la videocámara.
4 Toque [
CONEXIÓN USB] o
[
CONEXIÓN USB] en la pantalla
[SELEC.USB] de la videocámara.
ES
28
7 Haga clic en [Continue].
8 Lea el [License Agreement], seleccione [I
accept the terms of the license agreement]
si está de acuerdo y, a continuación, haga
clic en [Next].
9 Compruebe los ajustes de la instalación y, a
continuación, haga clic en [Install].
b Notas
• Aunque aparezca una pantalla que le solicite
que reinicie la computadora, no es necesario
hacerlo en este momento. Reinicie la
computadora cuando finalice la instalación.
• Es posible que la autenticación demore
cierto tiempo.
0 Siga las instrucciones que aparecen en
pantalla para la instalación del software.
Según la computadora, es posible que deba
instalar software de otros fabricantes. Si
aparece la pantalla de instalación, siga las
instrucciones para instalar el software
necesario.
qa Reinicie la computadora si se requiere para
completar la instalación.
qs Extraiga el CD-ROM de la unidad de disco
de la computadora.
Para desconectar el cable USB
1 Haga clic en el icono
t [Safely
remove USB Mass Storage Device] t
[OK] (sólo en Windows 2000) de la
bandeja de tareas situada en la parte
inferior derecha del escritorio de la
computadora.
2 Toque [FIN] t [SÍ] en la pantalla de la
videocámara.
3 Desconecte el cable USB.
Utilización de “Picture Motion
Browser”
Para iniciar “Picture Motion Browser”,
haga clic en [Start] t [All Programs] t
[Sony Picture Utility] t [PMB – Picture
Motion Browser].
Para conocer las operaciones básicas de
“Picture Motion Browser”, consulte la
“Guía de PMB”. Para visualizar la “Guía de
PMB”, haga clic en [Start] t [All
Programs] t [Sony Picture Utility] t
[Ayuda] t [Guía de PMB].
z Sugerencias
• Si no aparece la pantalla [SELEC.USB], toque
(HOME) t
(OTROS) t
[CONEXIÓN USB].
Utilización con una computadora
ES
29
Solución de problemas
Solución de problemas
Si surge algún problema al utilizar la
videocámara, consulte la siguiente tabla
para solucionarlo. Si el problema persiste,
desconecte la fuente de alimentación y
póngase en contacto con su distribuidor de
Sony.
Notas antes de enviar a reparar la
videocámara
• En función del problema, puede que sea
necesario iniciar la videocámara o bien, cambiar
el disco duro de la misma. En ese caso, se
borrarán los datos almacenados en el disco duro.
Asegúrese de guardar los datos del disco duro
interno (consulte la “Guía práctica de
Handycam” (PDF)) en otro soporte (copia de
seguridad) antes de enviar la videocámara a
reparar. No asumimos ninguna responsabilidad
por la pérdida de datos del disco duro.
• Durante la reparación, es posible que tengamos
que revisar una mínima cantidad de los datos
almacenados en el disco duro para investigar el
problema. No obstante, el distribuidor Sony no
copiará ni conservará los datos.
• Para consultar los problemas de la videocámara,
consulte la “Guía práctica de Handycam” (PDF)
y, para obtener información acerca de la
conexión de la videocámara a la computadora,
consulte la “Guía de PMB”.
La videocámara no se enciende.
• Instale una batería cargada en la
videocámara (pág. 6).
• Conecte la clavija del adaptador de
alimentación de ca al tomacorriente de
pared (pág. 6).
La videocámara no funciona, aun
cuando la alimentación está
encendida.
• Después de encender la videocámara,
tarda unos cuantos segundo en estar
lista para tomar imágenes. No se trata
de una falla de funcionamiento.
ES
30
• Desconecte el adaptador de
alimentación de ca del tomacorriente de
pared o extraiga la batería y vuelva a
conectarlos transcurrido
aproximadamente 1 minuto.
Si las funciones no funcionan, presione
el botón RESET (pág. 18) utilizando un
objeto puntiagudo (si presiona el botón
RESET, se restablecerán todas
funciones, incluido el reloj).
• La temperatura de la videocámara es
extremadamente elevada. Apague la
videocámara y déjela un tiempo en un
lugar fresco.
• La temperatura de la videocámara es
extremadamente baja. Deje la
videocámara con la alimentación
encendida. Apague la videocámara y
llévela a un lugar más cálido. Déjela
allí durante un rato y a continuación
enciéndala.
La videocámara se calienta.
• Esto se debe a que ha estado encendida
durante mucho tiempo. No se trata de
una falla de funcionamiento.
La alimentación se desconecta
bruscamente.
• Utilice el adaptador de alimentación de
ca
• Vuelva a encender la alimentación.
• Cargue la batería (pág. 6).
Al presionar START/STOP o PHOTO
no se graban imágenes.
• Ajuste el interruptor POWER en
(Película) o
(Imágenes fijas)
(pág. 13).
• No se pueden grabar imágenes en modo
suspendido. Presione el botón QUICK
ON (pág. 17).
• La videocámara graba en el soporte la
imagen que acaba de tomar. No se
pueden realizar nuevas grabaciones
durante este periodo.
• El soporte está lleno. Elimine las
imágenes innecesarias (pág. 25).
• El número total de escenas de película
o de imágenes fijas supera la capacidad
de grabación del soporte. Elimine las
imágenes innecesarias (pág. 25).
La grabación se detiene.
• La temperatura de la videocámara es
extremadamente alta o baja. Apague la
videocámara y déjela un tiempo en un
lugar fresco o cálido.
Visualización de
autodiagnóstico/indicadores de
advertencia
Si en la pantalla LCD aparecen indicadores,
compruebe lo siguiente.
Si el problema persiste aun después de
intentar solucionarlo varias veces, póngase
en contacto con su distribuidor de Sony o
con un centro de servicio técnico local
autorizado de Sony.
Causas/soluciones
C:04:ss
• La batería no es una batería
“InfoLITHIUM” (serie H).
Utilice una batería
“InfoLITHIUM” (serie H)
(pág. 6).
• Conecte firmemente la clavija
de cc del adaptador de
alimentación de ca a la toma
de entrada de cc de la
Handycam Station o de la
videocámara (pág. 6).
C:13:ss /
C:32:ss
• Desconecte la fuente de
alimentación. Conéctela de
nuevo y vuelva a poner en
funcionamiento la
videocámara.
E:20:ss /
E:31:ss /
E:61:ss /
E:62:ss /
E:91:ss /
E:94:ss
• Se ha producido una falla de
funcionamiento que no puede
solucionar sin la ayuda del
servicio técnico. Póngase en
contacto con su distribuidor de
Sony o con un centro de
servicio técnico local
autorizado de Sony. Indíquele
el código de 5 dígitos que
comienza por la letra “E”.
101-0001
• Si el indicador parpadea
lentamente, significa que el
archivo está dañado o es
ilegible.
No es posible instalar “Picture
Motion Browser”.
• Compruebe el entorno informático
necesario para instalar “Picture Motion
Browser”.
• Instale “Picture Motion Browser” en el
orden adecuado (pág. 27).
“Picture Motion Browser” no
funciona correctamente.
• Cierre “Picture Motion Browser” y
reinicie la computadora.
La computadora no reconoce la
videocámara.
• Desconecte cualquier dispositivo de la
toma USB de la computadora que no
sea el teclado, el ratón o la
videocámara.
• Desconecte el cable USB de la
computadora y de la Handycam
Station, reinicie la computadora y, a
continuación, vuelva a conectar la
computadora y la videocámara en el
orden adecuado.
Solución de problemas
Indicadores
• Es posible que se haya
producido un error en la
unidad de disco duro de la
videocámara.
ES
31
• El disco duro de la
videocámara está lleno.
Elimine las imágenes
innecesarias del disco duro.
• Es posible que se haya
producido un error en la
unidad de disco duro de la
videocámara.
E
• La batería dispone de poca
energía.
• La cantidad de luz es
insuficiente. Use el flash.
• La videocámara se encuentra
en posición inestable.
Sostenga la videocámara
firmemente con ambas manos.
No obstante, tenga en cuenta
que el indicador de advertencia
de sacudidas de la cámara no
desaparecerá.
• La temperatura de la
videocámara aumenta. Apague
la videocámara y déjela en un
lugar fresco.
• La función del sensor de caída
está activada. Es posible que
no pueda grabar o reproducir
imágenes.
• La temperatura de la
videocámara es baja. Deje que
la videocámara se caliente.
• El soporte está lleno.
• Las imágenes fijas no se
pueden grabar durante el
procesamiento. Espere unos
instantes y, a continuación,
grábelas.
• Si el indicador parpadea
lentamente, el espacio libre
para grabar imágenes se está
agotando.
• No se ha insertado ningún
“Memory Stick PRO Duo”
(pág. 12).
• Si el indicador parpadea
rápidamente, no existe espacio
libre suficiente para grabar
imágenes.
• Elimine las imágenes
innecesarias o formatee el
“Memory Stick PRO Duo”
después de almacenar las
imágenes en otro soporte
(pág. 24).
• El archivo de base de datos de
imágenes está dañado.
• El “Memory Stick PRO Duo”
está dañado. Formatee el
“Memory Stick PRO Duo” con
la videocámara.
• El “Memory Stick Duo”
insertado es incompatible.
-
• Se ha restringido el acceso al
“Memory Stick PRO Duo” en
otro dispositivo.
• Existe algún tipo de problema
con el flash.
ES
32
Información complementaria
Precauciones
Uso y cuidados
• No utilice la videocámara envuelta en una
toalla, por ejemplo. Si lo hace, puede
recalentarse internamente.
• Cuando desconecte el cable de alimentación,
tire del enchufe y nunca del cable.
• Procure no dañar el cable de alimentación al
colocar un objeto pesado sobre él.
• Mantenga limpios los contactos metálicos.
• Mantenga el control remoto y la pila tipo botón
fuera del alcance de los niños. En caso de
ingestión de la pila, consulte a un médico de
inmediato.
• Si se producen fugas del líquido electrolítico de
la pila:
– Póngase en contacto con un centro de servicio
técnico local autorizado de Sony.
– Limpie con agua cualquier líquido que haya
estado en contacto con su piel.
– Si le cae líquido en los ojos, láveselos con
agua abundante y acuda a un médico.
x Cuando no utilice la videocámara
durante un tiempo prolongado
• Enciéndala periódicamente y déjela operar, por
ejemplo reproduciendo o grabando imágenes
durante unos 3 minuto.
• Agote la batería completamente antes de
guardarla.
Pantalla de cristal líquido
• No ejerza excesiva presión sobre la pantalla de
cristal líquido porque puede dañarse.
• Cuando utilice la videocámara en un lugar frío,
es posible que en la pantalla de cristal líquido
aparezca una imagen residual. No se trata de una
falla de funcionamiento.
• Mientras utiliza la videocámara, la parte
posterior de la pantalla de cristal líquido se
puede calentar. No se trata de una falla de
funcionamiento.
x Para limpiar la pantalla de cristal
líquido
Si la pantalla de cristal líquido se ensucia de
huellas dactilares o polvo, se recomienda el
uso de un paño suave para limpiarla. Si
utiliza el kit de limpieza para la pantalla de
cristal líquido (opcional), no aplique el
líquido de limpieza directamente sobre la
pantalla. Utilice papel de limpieza
humedecido con el líquido.
Información complementaria
• No utilice ni almacene la videocámara y los
accesorios en los siguientes lugares:
– En lugares extremadamente cálidos, fríos o
húmedos. Nunca los deje expuestos a
temperaturas que superen los 60 °C como, por
ejemplo, bajo la luz directa del sol, cerca de
calentadores o en un automóvil estacionado
bajo el sol. Podrían deformarse o sufrir fallas
de funcionamiento.
– Cerca de campos magnéticos intensos o
vibraciones mecánicas. La videocámara
podría sufrir fallas de funcionamiento.
– Cerca de ondas radiofónicas fuertes o
radiaciones. Es posible que la videocámara no
pueda grabar correctamente.
– Cerca de receptores de AM y de equipos de
video. Es posible que se produzcan ruidos.
– En una playa o en cualquier lugar con mucho
polvo. Si entra arena o polvo en la
videocámara, pueden causar una falla de
funcionamiento. En ocasiones, esta falla de
funcionamiento puede resultar irreparable.
– Cerca de ventanas o en el exterior, donde la
pantalla de cristal líquido o el objetivo pueden
quedar expuestos a la luz solar directa. Esto
dañaría el interior de la pantalla de cristal
líquido.
• Alimente la videocámara con cc de 6,8 V/7,2 V
(batería) o cc de 8,4 V (adaptador de
alimentación de ca)
• Para alimentar la videocámara con cc o ca
utilice los accesorios recomendados en este
manual de instrucciones.
• No permita que la videocámara se moje; por
ejemplo, bajo la lluvia o por el agua del mar. Si
la videocámara se moja, podría sufrir fallas de
funcionamiento. En ocasiones, esta falla de
funcionamiento puede resultar irreparable.
• Si entra algún objeto o líquido la videocámara,
desconéctela y haga que la revise un distribuidor
de Sony antes de volver a utilizarla.
• Evite manipular, desarmar o modificar la
videocámara bruscamente y exponerla a golpes
o impactos como martillazos, caídas o
pisotones. Sea especialmente cuidadoso con el
objetivo.
• Cuando no vaya a utilizar la videocámara,
mantenga el interruptor POWER en la posición
OFF (CHG).
ES
33
Manipulación de la unidad
• Si la unidad está sucia, limpie el cuerpo de la
videocámara con un paño suave ligeramente
humedecido con agua y, a continuación, limpie
la unidad con un paño suave seco.
• No realice ninguna de las acciones siguientes
para evitar dañar el acabado:
– Usar productos químicos como diluyentes,
bencina, alcohol, paños con productos
químicos, repelentes, insecticidas y pantallas
solares
– Utilizar la videocámara con las sustancias
mencionadas en las manos
– Dejar la unidad en contacto con objetos de
goma o vinilo durante un tiempo prolongado
Cuidado y almacenamiento del
objetivo
• Frote la superficie del objetivo con un paño
suave en los casos siguientes:
– Cuando la superficie del objetivo presente
huellas dactilares.
– En lugares cálidos o húmedos
– Cuando el objetivo esté expuesto al aire
salado como, por ejemplo, a orillas del mar.
• Guárdelo en un lugar bien ventilado donde no
haya suciedad ni mucho polvo.
• Para evitar la aparición de moho, limpie el
objetivo periódicamente como se ha descrito
anteriormente. Se recomienda que utilice la
videocámara aproximadamente una vez al mes
para mantenerla en óptimo estado durante un
tiempo prolongado.
Carga de la batería recargable
preinstalada
ES
34
La videocámara contiene una batería
recargable preinstalada para conservar la
fecha, la hora y otros ajustes aunque el
interruptor POWER se ajuste en OFF
(CHG). La batería recargable preinstalada
siempre se carga mientras la videocámara
está conectada al tomacorriente de pared a
través del adaptador de alimentación de ca
o cuando tiene la batería insertada. La
batería recargable se descargará
completamente transcurridos
aproximadamente 3 meses si no
utiliza la videocámara en absoluto. Utilice
la videocámara después de cargar la batería
recargable preinstalada.
Sin embargo, aunque no esté cargada, el
funcionamiento de la videocámara no se
verá afectado, siempre que no se esté
grabando la fecha.
x Procedimientos
Conecte la videocámara a un tomacorriente
de pared mediante el adaptador de
alimentación de ca suministrado y déjela
con el interruptor POWER ajustado en la
posición OFF (CHG) durante más de 24 h
(hora)
Para cambiar la pila del control
remoto
1 Al tiempo que mantiene presionada la
lengüeta, inserte su uña en la ranura
para extraer la cubierta del
compartimiento de la pila.
2 Coloque una nueva pila con el lado +
hacia arriba.
3 Inserte de nuevo la cubierta del
compartimiento de la pila en el control
remoto hasta que haga clic.
Lengüeta
ADVERTENCIA
La pila puede explotar si se utiliza de
manera incorrecta. No la recargue, ni la
desarme, ni la arroje al fuego.
• Cuando la pila de litio disponga de poca energía,
es posible que la distancia de operación del
control remoto se reduzca o que éste no
funcione correctamente. En ese caso, sustituya
la pila por una de litio Sony CR2025. Si utiliza
otro tipo de pila, podría producirse un incendio
o una explosión.
Especificaciones
Sistema
** La exclusiva matriz de píxeles del sensor
ClearVid CMOS y el sistema de
procesamiento de imágenes de Sony
(BIONZ) permiten que la resolución de
imágenes fijas sea equivalente a los
tamaños descritos.
Conectores de entrada/salida
Conector remoto de A/V: toma de salida de audio
y video/componente
Toma HDMI OUT: miniconector HDMI tipo C
Toma USB: mini-B
Pantalla de cristal líquido
Imagen: 6,7 cm (tipo 2,7, formato 16:9)
Número total de puntos: 211 200 (960 × 220)
Generales
Requisitos de alimentación: cc de 6,8 V/7,2 V
(batería)
cc de 8,4 V (adaptador de alimentación de ca)
Consumo medio de energía: Durante la grabación
con la cámara con brillo normal:
Disco duro:
HD: 4,5 W SD: 3,7 W
“Memory Stick PRO Duo”:
HD: 4,5 W SD: 3,7 W
Temperatura de funcionamiento:
De 0 °C a + 40 °C
Temperatura de almacenamiento:
De -20 °C a + 60 °C
Dimensiones (aprox.): 81 × 76 × 129 mm
(an/al/prf)
incluidas las piezas salientes
81 × 76 × 134 mm (an/al/prf)
incluidas las piezas salientes con la batería
recargable suministrada conectada
Peso (aprox.): 480 g sólo la unidad principal
560 g incluida la batería recargable
suministrada
Información complementaria
Formato de compresión de video: AVCHD (HD)/
MPEG2 (SD)/JPEG (Imágenes fijas)
Formato de compresión de audio: Dolby Digital 2/
5,1 canales
Dolby Digital 5.1 Creator
Señal de video: Color NTSC, estándares EIA
Especificación 1080/60i
Disco duro: 40 GB
En el cálculo de la capacidad del soporte,
1 GB equivale a mil millones de bytes, parte
de los cuales se utiliza para la administración
de datos.
Formato de grabación: Película (HD): AVCHD
1080/60i
Película (SD): MPEG2-PS
Imagen fija: Exif versión 2,2*
Dispositivo de imagen: sensor CMOS de 3,6 mm
(tipo 1/5)
Píxeles de grabación (imagen fija, 4:3):
máximo de 4,0 megapíxeles (2 304 × 1 728)**
Brutos: aprox. 2 360 000 píxeles
Efectivos (película, 16:9):
aprox. 1 490 000 píxeles
Efectivos (imagen fija, 16:9):
aprox. 1 490 000 píxeles
Efectivos (imagen fija, 4:3):
aprox. 1 990 000 píxeles
Objetivo: Carl Zeiss Vario-Sonnar T
15 × (óptico), 30 ×, 180 × (digital)
Distancia focal: F1,8 ~ 2,6
Diámetro del filtro: 30 mm
f=3,1 ~ 46,5 mm
Cuando se convierte en una cámara
fotográfica de 35 mm
Para películas: 40 ~ 600 mm (16:9)
Para imágenes fijas: 37 ~ 555 mm (4:3)
Temperatura del color: [AUTOM.], [UNA
PULS.], [INTERIOR] (3 200 K),
[EXTERIOR] (5 800 K)
Iluminación mínima: 5 lx (lux) ([OB.LENTO
AUTO] [ACTIVADO], velocidad del
obturador de 1/30 s)
0 lx (lux) (durante la función NightShot)
* “Exif” es un formato de archivo para
imágenes fijas establecido por la JEITA
(Japan Electronics and Information
Technology Industries Association). Los
archivos en este formato pueden contener
información adicional como, por ejemplo,
la información de ajustes de la
videocámara en el momento de la
grabación.
ES
35
Handycam Station DCRA-C220
Conectores de entrada/salida
Toma A/V OUT: toma de salida de audio y video/
componente
Toma USB: mini-B
Adaptador de alimentación de ca ACL200/L200B
Requisitos de alimentación: ca de 100 V a 240 V
50/60 Hz
Consumo de corriente: De 0,35 a 0,18 A
Consumo de energía: 18 W
Tensión de salida: cc de 8,4 V
1,5 A ó 1,7 A (refiérase a
la etiqueta del adaptador
suministrado)
Temperatura de funcionamiento:
De 0 °C a + 40 °C
Temperatura de almacenamiento:
De -20 °C a + 60 °C
Dimensiones (aprox.): 48 × 29 × 81 mm
(an/al/prf) excluidas las piezas salientes
Peso (aprox.): 170 g excluido el cable de
alimentación
Batería recargable NP-FH60
Tensión máxima de salida: cc de 8,4 V
Tensión de salida: cc de 7,2 V
Capacidad: 7,2 Wh (1 000 mAh)
Tipo: iones de litio
El diseño y las especificaciones de los accesorios
y de la videocámara están sujetos a cambios sin
previo aviso.
• La videocámara se fabrica bajo licencia de
Dolby Laboratories.
Marcas comerciales
• “Handycam” y
son
marcas comerciales registradas de Sony
Corporation.
• Los logotipos “AVCHD” y “AVCHD” son
marcas registradas de Matsushita Electric
Industrial Co., Ltd. y Sony Corporation.
ES
36
• “Memory Stick”, “
”, “Memory Stick
Duo”, “
”, “Memory Stick
PRO Duo”, “
”,
“Memory Stick PRO-HG Duo”,
“
”, “MagicGate”,
“
”, “MagicGate Memory
Stick” y “MagicGate Memory Stick Duo” son
marcas comerciales o marcas comerciales
registradas de Sony Corporation.
• “InfoLITHIUM” es una marca comercial de
Sony Corporation.
• “x.v.Color” es una marca comercial de Sony
Corporation.
• “BIONZ” es una marca comercial de Sony
Corporation.
• “BRAVIA” es una marca comercial de Sony
Corporation.
• Dolby y el símbolo de la doble D son marcas
comerciales de Dolby Laboratories.
• Dolby Digital 5.1 Creator es una marca
comercial de Dolby Laboratories.
• HDMI, el logotipo de HDMI y High-Definition
Multimedia Interface son marcas comerciales o
marcas comerciales registradas de HDMI
Licensing LLC.
• Microsoft, Windows, Windows Media,
Windows Vista, y DirectX son marcas
comerciales registradas o marcas comerciales de
Microsoft Corporation en los Estados Unidos y/
o en otros países.
• Macintosh y Mac OS son marcas comerciales
registradas de Apple Inc. en los Estados Unidos
y en otros países.
• Intel, Intel Core y Pentium son marcas
comerciales o marcas comerciales registradas de
Intel Corporation o de sus filiales en Estados
Unidos y en otros países.
• Adobe, el logotipo de Adobe y Adobe Acrobat
son marcas comerciales registradas o marcas
comerciales de Adobe Systems Incorporated en
Estados Unidos y/u otros países.
Todos los demás nombres de productos
mencionados en este manual pueden ser marcas
comerciales o marcas comerciales registradas de
sus respectivas compañías. Además, en este
manual, ™ y “®” no se incluyen de forma expresa
en todos los casos.
Puede encontrar más información sobre este
producto y respuestas a las preguntas más
frecuentes en nuestro sitio Web de atención
al cliente.
Printed on 70% or more recycled paper
using VOC (Volatile Organic Compound)free vegetable oil based ink.
Impreso en papel reciclado en un 70% o
más utilizando tinta hecha con aceite
vegetal exento de compuesto orgánico
volátil (COV).
Printed in Japan
US/ES
Additional information on this product and
answers to frequently asked questions can
be found at our Customer Support Website.