1
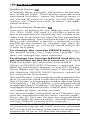
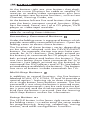
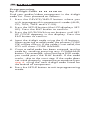
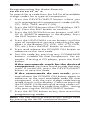
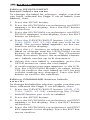
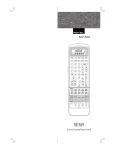
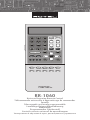
POWER
1
2
3
4
5
6
7
8
9
+10
0
MEM
FRQ DIRECT
TUNE
PRESET
FM MONO
BAND
X
ON
OFF
CH
VOL
SMART
SMT
MUTE
GUIDE
MENU
C
M
CTR
OSD
ENT
AUD
CD
SEARCH-
SEARCH+
S
R
SUB
SUR
TUN
TAPE
EXT
DEVICE / INPUT
V1
V2
V3
V4
V5
RR-1060
RR-1060
Universal Learning Remote Control
Télécommande universelle à apprentissage de commandes
Spanish
Telecomando universale programmabile
Lernfähige Universalfernbedienung
Nederlands
Programmerbar fjärrkontroll
Controlo remoto universal de aprendizagem
Универсальный обучаемый пульт дистанционного управления
3
Rotel products are designed to comply with international directives on the Restriction of
Hazardous Substances (RoHS) in electrical and electronic equipment and the disposal of
Waste Electrical and Electronic Equipment (WEEE). The crossed wheelie bin symbol indicates compliance and that the products must be appropriately recycled or processed in
accordance with these directives.
Tous les appareils Rotel sont conçus en totale conformité avec les directives internationales concernant les restrictions d’utilisation de substances dangereuses (RoHS) pour
l’environnement, dans les équipements électriques et électroniques, ainsi que pour le
recyclage des matériaux utilisés (WEEE, pour Waste Electrical and Electronic Equipment).
Le symbole du conteneur à ordures barré par une croix indique la compatibilité avec ces
directives, et le fait que les appareils peuvent être correctement recyclés ou traités dans
le respect total de ces normes.
Los productos Rotel están diseñados para satisfacer la normativa internacional en materia de Restricción del Uso de Sustancias Peligrosas (RoHS) en equipos eléctricos y
electrónicos y eliminación de Desechos Procedentes de Equipos Eléctricos y Electrónicos
(WEEE). El símbolo del carro de la basura tachado significa la plena satisfacción de la citada normativa y que los productos que la incluyen deben ser reciclados o reprocesados
en concordancia con las misma.
Tutti i prodotti Rotel sono realizzati secondo le norme internazionali per il trattamento
delle sostanze pericolose ( RoHs - Restriction of Hazardous Substances) in apparecchi elettrici ed elettronici, e per lo smaltimento di prodotti elettrici ed elettronici (WEEE - Waste
Electrical and Electronic Equipment). Il simbolo del cestino dei rifiuti con una croce sopra,
indica la compatibilità con queste norme e che il prodotto deve essere opportunamente
riciclato o smaltito in accordo con le direttive vigenti.
Rotel-Produkte entsprechen den internationalen Richtlinien über die Beschränkung der
Verwendung bestimmter gefährlicher Stoffe in Elektro- und Elektronikgeräten (Restriction
of Hazardous Substances (kurz RoHS genannt)) und über Elektro- und Elektronik-Altgeräte (Waste Electrical and Electronic Equipment (WEEE)). Die durchgestrichene Mülltonne
steht für deren Einhaltung und besagt, dass die Produkte ordnungsgemäß recycelt oder
diesen Richtlinien entsprechend entsorgt werden müssen.
Rotel Producten worden zo ontworpen dat zij voldoen aan de internationale regels betreffende de beperking van milieuonvriendelijke grondstoffen die gebruikt kunnen worden
in elektrische en elektronische apparatuur. Het symbool met de vuilcontainer met het
kruis erdoor betekent voor u dat u, wanneer u dit apparaat wilt afvoeren, dit moet doen
volgens de regels die daarvoor hier gelden.
Rotels produkter är utformade för att följa de internationella direktiven RoHS (Restriction of Hazardeous Substances) och WEEE (Waste Electrical and Electronic Equipment)
som behandlar hur uttjänta elektriska och elektroniska produkter tas om hand. Symbolen med den överkorsade soptunnan innebär att produkterna måste återvinnas eller tas
om hand enligt dessa direktiv.
Продукты Rotel спроектированы так, чтобы соответствовать требованиям международных
директив по ограничению применения вредных веществ в электротехническом и
электронном оборудовании (Restriction of Hazardous Substances - RoHS), а также по
обращению с отслужившим свой срок электротехническим и электронным оборудованием
(Waste Electrical and Electronic Equipment - WEEE). Изображение перечеркнутого мусорного
бачка на колесах означает соответствие этим требованиям, а также то, что эти продукты
должны быть вторично использованы (рециклированы) или же обработаны в соответствии
с упомянутыми выше директивами.
4
RR-1060
Layout • Disposition des commandes
Spanish • Disposizione dei tasti
Aufbau • Dutch • Layout
Apresentação
Расположение органов управления
�
�
POWER
�
1
2
3
4
5
6
7
8
9
+10
0
MEM
FRQ DIRECT
TUNE
PRESET
FM MONO
BAND
X
ON
OFF
CH
VOL
SMART
SMT
GUIDE
MUTE
MENU
C
M
CTR
OSD
ENT
SEARCH-
SEARCH+
S
R
SUB
SUR
�
AUD
�
CD
TUN
TAPE
EXT
DEVICE / INPUT
V1
V2
V3
RR-1060
V4
V5
5
POWER
1
2
3
4
5
6
7
8
9
+10
0
MEM
�
FRQ DIRECT
TUNE
PRESET
X
ON
OFF
CH
VOL
�
SMART
SMT
MUTE
GUIDE
MENU
C
M
CTR
BAND
��
OSD
��
ENT
FM MONO
�
SEARCH-
SEARCH+
S
R
SUB
SUR
CD
DISC1
DISC2
DISC3
DISC4
EQ
DYN
REC
ZONE
SUR+
DISC-
DISC+
PROG RANDOM REPEAT
2CH
PL C
PL M
5CH
7CH
DIGEST
TITLE
P-SCAN
OPEN
DISPLAY
AUDIO
ANGLE
SBTITLE
ZOOM
DISP
TAPE2
PHONO
TONE
D-SLT
A-B
GOTO
SLOW
P-TUN
TP
TA
DVD
�
DISC5
RESUME REPEAT
SCAN
PTY
INPUT 1
INPUT 2
ASPECT
DISP
POWER
INPUT 3 TV/VCR RECORD
PIP
POP
��
OUTPUT
SETUP
��
��
6
RR-1060
Flip Down Cover • Volet rabattable
Spanish • Sportellino apribile
Aufklappbare Abdeckung • Dutch
Uppfällbart lock • Tampa articulada
Откидывающаяся вниз крышка
LIGHT
LIGHT
7
Character Map • Jeu des caractères
affichés • Spanish • Lista dei
caratteri Zeichenübersicht • Dutch
Teckenbeskrivning • Mapa de
Caracteres • Таблица символов
Learning Commands • Apprentissage
de commandes • Spanish
Apprendimento comandi
Lernen von Befehlen • Dutch
Inlärning av kommandon
Aprendizagem de Comandos
Таблица символов
POWER
1
2
3
4
5
6
7
8
+10
0
OFF
CH
VOL
9
MEM
FRQ DIRECT
ON
X
SMART
SMT
GUIDE
TUNE
PRESET
MUTE
MENU
M
C
OSD
CTR
ENT
FM MONO
BAND
AUD
CD
V1
V2
SEARCH-
SEARCH+
S
R
SUB
SUR
TUN
TAPE
EXT
DEVICE / INPUT
V3
RR-1060
V4
V5
8
RR-1060
Contents
Layout
Flip Down Cover
Character Map
Learning Commands
2
4
5
5
Introduction .............................................................. 8
Key Features
8
Sensible Precautions
8
Battery Installation
8
Overview .................................................................. 9
IR Emitter/Sensor
9
LCD Display
9
Light Button
9
Folding Cover
10
Device/Input Buttons
10
EXT Button
11
Basic Command Buttons
11
Secondary Command Buttons
12
Multi-Step Buttons
12
Setup Button
12
Operating the RR-1060 ............................................13
Sending IR Commands
Smart Macro Commands
Multi-Step Button Operation
Backlighting
13
14
14
14
Programming ...........................................................15
Programming Rotel components by Model Search
15
Programming by Brand Name
16
Programming by 4-Digit Code
18
Programming by Auto-Search
19
9
Learning Commands From Another Remote ............... 20
Learning Commands
20
Multi-Step Button Learning
21
Smart Macro Programming ...................................... 22
Smart Macro Programming
22
Clearing a Smart Macro
23
Changing a Smart Macro
23
Clearing learned commands ..................................... 24
Clearing a Single Learned Command
24
Clearing All Learned Commands
for a DEVICE/INPUT Button
Clearing All Learned Commands
for ALL DEVICE/INPUT Buttons
24
25
Custom Labels ......................................................... 25
Switching between two pages of labels
25
Editing DEVICE/INPUT button labels
26
Editing COMMAND button labels
26
Changing Smart Macro labels
27
Additional Setup Options ......................................... 28
Volume/Mute Punch-Through
28
Disabling the Beep Tone
29
Clone Function
29
Restore Factory Defaults
30
10
RR-1060
Introduction
The RR-1060 Universal Learning Remote Control
can replace up to nine remote controls, operating
A/V components from Rotel or other brands.
Key Features
• Programmed to operate Rotel surround sound
processors, receivers, and DVD players.
• Simple programming for hundreds of components using built-in codes.
• Learning function to teach the RR-1060 commands from other remotes. Multi-step learning on five buttons for multiple command sequences from other remotes.
• Twenty Smart Macro keys send up to 20 commands with the press of two buttons.
• LCD DISPLAY provides visual feedback during
programming and operation, including status
indicators, and customizable labels for every
command button.
• Backlighting for use in dark rooms along
with optional beep whenever a button is
pressed.
• Cloning feature for easy duplication of the entire
command set from one RR-1060 to another.
Sensible Precautions
• The RR-1060 is rugged, but it is not indestructible. So please don’t drop it!
• Do not expose the RR-1060 to moisture. To
clean the RR-1060, use a soft, lint-free damp
cloth. Avoid harsh cleaning solvents.
• Don’t try to take the RR-1060 apart. Disassembly will void the warranty.
Battery Installation
Remove the RR-1060 and the 4 AAA batteries
from the box. Turn the RR-1060 over and slide
the cover off the battery compartment by compressing the release tab and lifting up. Place the
four AAA batteries inside (follow the polarity illustrations on the bottom of the compartment) and
replace the cover.
11
Overview
The RR-1060 is a universal learning remote control that can operate all of the components in your
audio/video system. Control codes for Rotel components are already programmed. You can easily
customize the RR-1060 to operate other components by selecting command sets for hundreds of
components from the RR-1060’s extensive database. See the Programming section of this manual for easy to follow instructions. For components
not in the database or for additional commands,
you can teach the RR-1060 commands using your
existing remotes. See the Learning section of this
manual for easy to follow instructions.
Once the programming is complete, select a
component with the press of a button to turn
the RR-1060 into the remote control for your CD
player, TV, or VCR.
Here is the layout of the RR-1060:
IR Emitter/Sensor
The IR Emitter/Sensor is located in the top edge of
the RR-1060. It sends the IR commands and must
be pointed at the desired component. It also receives IR codes from your other remotes during
the LEARNING process.
LCD Display
The LCD DISPLAY provides status information including the device currently selected and a customizeable label for each button as it is pressed.
The eight character alphanumeric display also
provides simple prompts when programming the
RR-1060. These indicators and prompts are noted
in the appropriate sections of this manual.
Light Button
The RR-1060 provides automatic backlighting in
a dim room. The backlighting turns on whenever a button is pressed, including the LIGHT button on the side of the remote. The backlighting
stays on for about 5 seconds each time a button
is pressed.
NOTE:
In a bright room, the backlighting function
is disabled to save battery power.
12
RR-1060
Folding Cover
A folding cover conceals the buttons at the bottom of the RR-1060. These buttons provide extra
command functions. Leave the folding cover in
the closed position to simplify the RR-1060 for
routine use. Open the cover to access the additional buttons.
Device/Input Buttons
Two rows of buttons on the folding cover (AUD,
CD, TUN, TAPE, EXT and V1–V5) are used to select a component for control by the remote and,
if desired, to activate the input for the component
you are operating. How long the button is pressed
determines whether a device is selected just for
control by the remote or whether that input on
the A/V receiver or surround sound processor
is also activated.
To change the remote DEVICE only, press
the button briefly (less than one second). This
does not change the input selection.
To change the remote DEVICE and the input selection on the A/V receiver, press and
hold the button for more than one second.
When a DEVICE/INPUT button is pressed, the
label for that button appears in the LCD display.
These labels can be customized, if desired. See
the Labeling DEVICE/INPUT Buttons section of
the manual for instructions.
The AUD button is pre-programmed to operate Rotel A/V receivers and surround sound processors.
The V1 button is pre-programmed to operate Rotel
DVD players. The CD button is pre-programmed
to operate Rotel CD players.All other buttons are
unprogrammed and can be used to learn the control codes of other remote controls.
The control codes of the AUD and V1 buttons can
also be reprogrammed for other control codes.
If you do so, you can restore the original Rotel
control codes for these buttons. See the Restoring
Factory Defaults section of this manual.
NOTE: The DEVICE/INPUT buttons are also used
in programming the RR-1060 and are available
for storing and sending Smart Macros (automatic
sequences of up to 20 learned commands).
13
EXT Button
The EXT button is a special input selection button
for Rotel audio/video receivers or surround sound
processors. It is used to select the multi-channel
analog inputs when playing SACD or DVD-A discs.
This bypasses the digital/analog processing in the
receiver or surround sound processor.
Press and hold the EXT button for more than one
second to select the multi-channel analog input on
a Rotel A/V receiver. The EXT button contains a
duplicate of the remote commands programmed
in the V1 device. Therefore, you cannot program
or learn command codes for the EXT button.
The V1 button should be used for Rotel or other
DVD players, allowing you to select the normal
input with the V1 button or the multichannel analog input with the EXT button. Both DEVICE/INPUT
buttons contain the same remote codes.
Basic Command Buttons
This large group of buttons duplicates the functions on the remote controls for your audio/video
components. Each button can store commands
for nine different components, selected by pressing one of the DEVICE/INPUT buttons (AUD, CD,
TUN, TAPE and V1–V5).
When using the RR-1060, first press the DEVICE/
INPUT button for the desired component. Then,
press COMMAND buttons to send the commands
learned for that component.
At the top right of this group are basic command
buttons such as Power On and Off, Volume, Channel Selection and Muting. The Smart Macro button is also in this group. See the Smart Macro
Programming section of this manual for more
information.
At the top left of this group are twelve numeric
keypad buttons that are used to make direct track
selections on a CD or DVD player or direct channel selections on a TV, cable decoder, satellite
receiver, etc.
14
RR-1060
At the bottom right are nine buttons that duplicate the cursor functions for cable or satellite TV
receiver or audio/video components plus four
round buttons are for extra functions, such as Last
Channel, Viewing Guide, etc.
At the bottom left are five oval buttons that duplicate the basic transport control functions (Play,
Fast Forward, Pause, etc.) of a CD player, DVD
player or video tape recorder.
NOTE:
The numeric buttons, 0 – 9, are also available for sending Smart Macros.
Secondary Command Buttons
Under the folding cover is a group of buttons which
provide secondary command functions. Open the
folding cover to access these buttons.
The function of these buttons varies depending
on the device selected with the DEVICE/INPUT
buttons. For example, the top two rows have commands for A/V receivers (see labels printed on
the buttons) or commands for CD players (see labels printed above and below the buttons). The
two rows below these have commands for A/V
receivers (see labels printed on the buttons) or
commands for DVD players and VCRs (see labels
printed above and below the buttons). The bottom
two rows of buttons include commands for TVs.
Multi-Step Buttons
In addition to normal functions, the five buttons
labeled SCAN, PTY, P-TUN, TP and TA provide a
special option – learning up to three commands
on a single button from another remote. The first
command is sent when the button is pressed once,
the second command is sent the next time the button is pressed, and the third command is sent the
third time the button is pressed. See the Learning
Multi-Step Buttons section for information.
Setup Button
The SETUP button in the lower right corner under
the folding cover, is used to enter the setup mode
for programming, learning, relabeling, storing
macros, and other configuration functions.
15
Operating the RR-1060
This section of the manual explains the basic
operation of the RR-1060 and most of its standard features.
NOTE: The AUD DEVICE/INPUT button of the
RR-1060 is pre-programmed with control codes
for Rotel A/V receivers or surround sound processors. The V1 button is pre-programmed to operate
Rotel DVD players. The CD button is pre-programmed to operate Rotel CD players.The other
DEVICE/INPUT buttons (TUN, TAPE and V2 – V5)
are unprogrammed. You must program or learn
commands for these DEVICE/INPUT buttons.
Sending IR Commands
Instead of putting down one remote and picking up another, you simply press a button on the
RR-1060 to convert it from the remote control for
your CD player to the remote control for your TV
set. Here’s how:
1. Press a DEVICE/INPUT button (for under one
second) to activate the command set for the
desired component. For example, press the
AUD button to control a Rotel surround processor. The label for your selection appears
in the display. The selected command set remains active until you press a different DEVICE/INPUT button.
2. Press a COMMAND button to send an IR command to the component you have selected.
For example, press the POWER ON button to
turn on a Rotel surround processor. The label
for the COMMAND button appears in the display. If the label “NO DATA” appears in the
display, the button has no learned command
for that DEVICE.
NOTE: The default labels that appear in the display
match the button labels. You can customize the
labels for every DEVICE/INPUT and COMMAND
button.
Remember that the COMMAND buttons duplicate
controls on many different types of audio/video
components. Their function depends on the type
of component selected. Make sure that you have
pressed the correct DEVICE/INPUT button and
use the button labels as guides.
16
RR-1060
When a button is pressed, a beep tone confirmation is heard. This feature can be disabled. See
the Disabling the Beep Tone section of the manual.
When an IR command is being sent, a triangular indicator appears in the upper right corner of
the LCD display and the label for the command is
shown in the display. These labels can be customized. See the Labelling Command Buttons section
of this manual. If a button is pressed that has no
command, the LCD shows NO DATA.
Smart Macro Commands
Twenty of the buttons on the RR-1060 (the 10 DEVICE/INPUT buttons plus the number buttons 0 –
9) can store multiple command macro sequences
– for example, a sequence that turns on the TV set,
selects channel 5, turns on the surround processor, and selects the TV input. A macro sequence
is sent by pressing the SMART button followed by
the button where the macro is stored:
1. Press the SMART button. A SMART? prompt
appears in the LCD.
2. Press the button where the Smart Macro sequence is stored.
NOTE: If you push a Smart Macro button that has
not been programmed, the word EMPTY followed
by the name of the button appears in the display
and the remote returns to normal mode.
Multi-Step Button Operation
The five buttons labelled SCAN, PTY, P-TUN,
TP, and TA provide a special option – the ability to learn up to three different commands. The
first command is sent when the button is pressed
once, the second command is sent the next time
the button is pressed, and the third command is
sent the third time the button is pressed.
Backlighting
In a dark room, the RR-1060 automatically activates its backlighting feature for 5 seconds when a
button is pressed. Press the LIGHT button to manually turn on the backlighting in a dim room. This
button is disabled in a bright room.
17
Programming
The RR-1060 contains hundreds of command sets
for components. Programming the remote involves
selecting the command sets that correspond to
the components in your system and assigning
each of them to one of the nine DEVICE buttons
by entering the 4-digit code for that component.
This need only be done once during initial setup
of the RR-1060.
There are four ways of finding the correct 4-digit
code. The easiest way to program Rotel components is to search by the model number. For other
components, you can search the database by the
brand name of your component. A third option
is to try the codes available for your brand from
the list of 4-digit codes. Finally, you can search
the database for ALL codes, until you find one
that works.
NOTE: Programming the RR-1060 is done in a
menu-driven setup mode accessed by pressing
the SETUP button, then using the UP/DOWN and
+/– cursor keys to navigate menus, and pressing
the ENT button to confirm selections. At any time
during the process, you can exit the setup mode
and return to normal operation by pressing the
SETUP button.
Programming Rotel components
by Model Search
You can find the correct 4-digit code for Rotel
components by searching the database for the
model number of your Rotel Audio, DVD, or CD
component.
When using the model search, the DEVICE/INPUT buttons can only be programmed for specific
types of components as follows:
AUD:
CD:
TUN:
TAPE:
V1:
V2:
V3:
V4:
V5:
Audio components only
CD players only
Audio, DVD, CD only
Audio, DVD, CD only
DVD only
Audio, DVD, CD only
Audio, DVD, CD only
Audio, DVD, CD only
Audio, DVD, CD only
18
RR-1060
1. Press the DEVICE/INPUT button where you
wish to program this component’s code (AUD,
CD, TUN, TAPE and V1–V5).
2. Press the SETUP button (the LCD displays SETUP). Press the ENT button to confirm.
3. Press the UP/DOWN cursor buttons until SETUP MODEL appears in the display. Press the
ENT button to confirm.
4. Press the UP/DOWN cursor buttons until the
type of component you are searching for appears in the display (AUD, DVD, CD) Press
the ENT button to confirm. The first available
model number appears in the display.
5. Use the UP/DOWN cursor buttons to scroll
through the list until the desired model number
appears. Press ENT to confirm the selection.
6. Press any COMMAND button to test the new
code. For example, when programming a CD
player, you could push the PLAY button to see
if the disc begins play. If the command works,
press ENT to save the the code selection and
return to normal operation.
NOTE:
You can press the SETUP button to exit the
programming at any time.
Programming
by Brand Name
You can also use the following search method
to find and test the code numbers available for
your brand of component. When using the brand
search, the DEVICE/INPUT buttons can only be
programmed for specific types of components
as follows:
AUD:
CD:
TUN:
TAPE:
V1:
V2:
V3:
V4:
V5:
Rotel audio components only
CD players only
Any component
Any component
DVD only
Any component
Any component
Any component
Any component
19
To program using the brand search:
1. Press the DEVICE/INPUT button where you
wish to program this component’s codes (AUD,
CD, TUN, TAPE and V1–V5).
2. Press the SETUP button (the LCD displays SETUP). Press the ENT button to confirm.
3. Press the UP/DOWN cursor buttons until SETUP BRAND appears in the display. Press the
ENT button to confirm.
4. Press the UP/DOWN cursor buttons until the
type of component you are searching for appears in the display (TV, VCR, SAT, CTV, DVD,
CD, etc.) Press the ENT button to confirm. The
first available brand starting with the letter A
appears in the display.
5. Select the first letter of your component’s brand,
using the +/– cursor buttons. Then, use the
UP/DOWN cursor buttons to scroll through
the list until the desired brand appears. Press
ENT to confirm.
6. The brand along with the first available 4-digit
code for that brand appears in the LCD.
7. Press any COMMAND button to test the first
available code for your brand. For example,
if you are testing a code for a TV, you could
press the CH UP button to confirm that the
channel changes on the TV. The 4-digit code
being tested is shown in the display.
If the command button operates the
component, you have found a code that may
work. You can test additional commands by
pressing more COMMAND keys. If successful, press the ENT button to save the code.
If the command button does not work,
press the UP cursor button again to test the
next code for that brand, with the new 4digit code being tested shown in the display.
Continue testing codes until you find one that
works, saving it by pressing the ENT button.
8. Press the SETUP button at any time to exit the
programming mode.
20
RR-1060
Programming
by 4-Digit Code
Find your audio/video component in the 4-digit
code list. Then proceed as follows:
1. Press the DEVICE/INPUT button where you
wish to program this component’s codes (AUD,
CD, TUN, TAPE and V1–V5).
2. Press the SETUP button (the LCD displays SETUP). Press the ENT button to confirm.
3. Press the UP/DOWN cursor buttons until SETUP CODE appears in the display. Press the
ENT button to confirm.
4. Input the 4-digit code using the 0–9 buttons.
Upon entering a valid code, the phrase CODE
OK will be shown. If the code is not valid, the
LCD will show CODE INVALID.
5. Once a valid code has been entered, test the
code by sending pressing any COMMAND
button. For example, when testing a DVD code,
you could press the PLAY button. If the code
works, skip to the next step. If the code does
not work properly, repeat the procedure from
step 4, using the next 4-digit code listed for
the brand of component.
6. Press the SETUP button to exit to programming
mode.
21
Programming by Auto-Search
To search for a code from the full list of available
4-digit codes for a type of component:
1. Press the DEVICE/INPUT button where you
wish to program this component’s codes (AUD,
CD, TUN, TAPE and V1–V5).
2. Press the SETUP button (the LCD displays SETUP). Press the ENT button to confirm.
3. Press the UP/DOWN cursor buttons until SETUP A. SEARCH appears in the display. Press
the ENT button to confirm.
4. Press the UP/DOWN cursor buttons until the
type of component you are searching for appears in the display (TV, VCR, SAT, CTV, DVD,
CD, etc.) Press the ENT button to confirm.
5. Press and release the POWER ON button to
advance to the next code.
6. Test the code by pressing any COMMAND
buttons suitable for that component. For example, if testing a CD player, press the PLAY
button.
If the commands work for the desired
component, you have found a code that may
work. If successful, press the DEVICE/INPUT
button to save the code.
If the commands do not work, press
and release the POWER ON button again to
advance to the next available code for that
component, with the new 4-digit code being
tested shown in the display. Continue pressing
the POWER ON button and testing codes until you have found a code that works, saving
it by pressing the DEVICE/INPUT button.
7. Press the SETUP button at any time to exit the
programming mode.
NOTE:
You can return to the previous 4-digit code
by pressing the MUTE command button.
22
RR-1060
Learning Commands
From Another Remote
If you are unable to find a command set using
the Programming steps, or if you need additional commands, you can teach the RR-1060 commands directly from your existing remotes. This
procedure is called Learning.
Learning Commands
To teach the RR-1060 the commands from one of
your other remotes, place the two remote controls
end to end as shown in the illustration at the front
of this manual. The IR signals sent by the other
remote must be aimed at the IR emitter/sensor of
the RR-1060.
1. Press the DEVICE/INPUT button where you
wish to learn this component’s codes (AUD,
CD, TUN, TAPE and V1–V5).
2. Press the SETUP button (the LCD displays SETUP). Press the ENT button to confirm.
3. Press the UP/DOWN cursor buttons until SETUP LEARNING appears in the display. Press
the ENT button to confirm.
4. Press the COMMAND button that you wish to
learn (Power On, CH UP/DOWN, etc.). The
name of that COMMAND button appears in
the display beneath the word LEARNING.
5. Press and hold the corresponding button on
the original remote until the display shows
“OK” indicating that the command has been
learned.
If the LCD shows an ERROR message,
the command was not successfully learned.
Try again.
If the LCD shows a NO DATA message,
no signal was received from the original remote. Adjust the position of the two remotes
and try Step 3 again.
6. To learn additional buttons, repeat steps 4
and 5.
7. Press the SETUP button to exit the learning
mode when you are finished.
23
NOTE : The RR-1060 has enough memory to
learn 600 commands. If the memory capacity is
reached, the LCD displays FULL when you attempt
to learn a command.
Multi-Step Button Learning
The five buttons labeled SCAN, PTY, P-TUN, TP,
TA provide a special option – the ability to learn
up to three different commands on a single button. During operation, the first command is sent
when the button is pressed once, the second command is sent the next time the button is pressed,
and the third command is sent the third time the
button is pressed.
To program a multi-step button using the SCAN
button as an example:
1. Follow the first five steps under “Learning
Commands” in the previous section (pressing
the desired SCAN button instead of a COMMAND button in Step 4) to program the first
command for the SCAN button.
2. Press the SCAN button a second time. “S1-2”
shows in the display. Press and hold the next
button on the original remote until the “OK!”
confirmation appears.
3. To learn a third command, press the SCAN
button a third time. The display shows “S1-3”
indicating that it is ready to learn the third
command. Press and hold the next command
button on the original remote until the “OK!”
confirmation appears.
NOTE: To change the programming of any command for a multi-step button, it is necessary to start
over beginning with the first command.
24
RR-1060
Smart Macro Programming
Twenty of the buttons on the RR-1060 (the 10 DEVICE/INPUT buttons plus the numeric buttons 0 –
9) can store multiple command macro sequences
– for example, a sequence that turns on the TV
set, selects channel 5, turns on the surround processor, and selects the TV input.
Smart Macro Programming
A macro sequence is sent by pressing the SMART
button followed by the button where the macro is
stored. To program a macro sequence, first make
sure that all of the desired commands have already
been programmed or learned by the RR-1060 – the
Smart Macro feature simply records a sequence
of individual RR-1060 button commands.
1. Press the SETUP button.
2. Press the UP/DOWN cursor buttons until SETUP SMART appears in the display. Press the
ENT button to confirm.
3. When the LCD shows the prompt ADD SMART?,
press one the Smart Macro keys (AUD, CD,
TUN, TAPE, EXT, V1–V5, or 0–9). The LCD
briefly shows ADD followed by the name of
the Smart Macro key being programmed.
4 When the LCD shows the prompt STEP 1, press
the first COMMAND button in the Smart Macro sequence.
5. When the LCD shows the prompt STEP 2,
press the second command in the macro sequence.
6. Continue until the Smart Macro sequence
is complete (up to a maximum of 20 commands). Press the SETUP button to finish the
Smart Macro programming.
7. A confirmation message, CONFIRM? appears
in the LCD. Use the UP/DOWN buttons to select either YES (to save the new Smart Macro)
or NO (to erase the Smart Macro programming). Press the ENT button to confirm.
NOTE: Smart Macro buttons can have custom labels. See the Custom Labels section of the manual
for information.
25
Clearing a Smart Macro
To clear a previously saved Smart Macro:
1. Press the SETUP button and then press the UP/
DOWN cursor buttons until SMART appears
in the display. Press ENT.
2. Press the UP/DOWN cursor buttons until
SMART CLEAR appears in the display. Press
the ENT button to confirm. CLEAR SMART?
appears in the display.
3. Press the Smart Macro button to be cleared
(for example, press 1 to clear a Smart Macro
stored in the 1 button).
4. A confirmation appears in the LCD. Use the
UP/DOWN buttons to select YES (to clear
the Smart Macro) or NO (to keep the Smart
Macro). Press the ENT button to confirm.
NOTE: If you attempt to clear unprogrammed Smart
Macro button, the word EMPTY appears and the
remote returns to normal mode.
Changing a Smart Macro
To change a previously saved Smart Macro:
1. Press the SETUP button. Then, press the UP/
DOWN cursor buttons until SMART appears
in the display. Press ENT.
2. Press the UP/DOWN cursor buttons until
SMART EDIT appears in the display. Press the
ENT button to confirm. EDIT SMART? appears
in the display
3. Press the Smart Macro button to be changed
(for example, press 1 to change a Smart Macro stored in the 1 button).
4. Use the UP/DOWN buttons to select the STEP
# you wish to change, for example STEP 10.
Press the ENT button to confirm.
5. When the CHG TO ? prompt appears, press
the new command button for that step.
6. Repeat steps 5 and 6 to change any other
commands, then press the SETUP button.
26
RR-1060
7. A confirmation appears in the LCD. Use the
UP/DOWN buttons to select either YES (to
change the command) or NO (to discard the
changes). Press ENT to confirm.
NOTE: If you attempt to change an unprogrammed
Smart Macro button, the word EMPTY appears
and the remote returns to normal mode.
Clearing learned commands
You can clear a single learned command, a multistep command, all of the learned commands for a
single DEVICE/INPUT button, or all of the learned
commands for all DEVICE/INPUT buttons:
Clearing a Single Learned Command
1. Press the DEVICE/INPUT button where the
learned command is stored.
2. Press the SETUP button (the LCD displays SETUP). Press the UP/DOWN cursor buttons until EDIT appears in the display. Press the ENT
button to confirm.
3. Press the UP/DOWN cursor buttons until CLEAR
ONE KEY appears in the display. Press the
ENT button to confirm.
4. When the SELECT KEY prompt is displayed,
press the command button you wish to
clear.
5. A confirmation message appears in the LCD.
Use the UP/DOWN buttons to select either
YES (to clear the learned command) or NO
(to keep command). Press the ENT button to
confirm.
Clearing All Learned Commands
for a DEVICE/INPUT Button
1. Press the DEVICE/INPUT button where the
learned command is stored.
2. Press the SETUP button (the LCD displays SETUP). Press the UP/DOWN cursor buttons until EDIT appears in the display. Press the ENT
button to confirm.
27
3. Press the UP/DOWN cursor buttons until CLEAR
ONE DEV appears in the display.
4. Press the ENT button to delete all learned commands for the DEVICE/INPUT button.
Clearing All Learned Commands for
ALL DEVICE/INPUT Buttons
1. Press the SETUP button (the LCD displays SETUP). Press the UP/DOWN cursor buttons until EDIT appears in the display. Press the ENT
button to confirm.
2. Press the UP/DOWN cursor buttons until CLEAR
ALL DEV appears in the display.
3. Press the ENT button to delete all learned commands for all DEVICE/INPUT buttons.
Custom Labels
Whenever you press a button on the RR-1060, its
name appears in the display. By default, the labels
appearing in the LCD when a button is pressed
match the printed labels for each button. There
are two complete sets (“pages”) of labels stored
in the RR-1060. You can switch between the two.
The first page of labels cannot be changed. The
labels for the second page can be customized.
This allows you to return to the default labels at
any time by switching back to the first page.
Switching between
two pages of labels
1. Press the SETUP button.
2. Press the UP/DOWN cursor buttons until MULTI
LANGUAGE appears in the display. Press the
ENT button to confirm.
3. Press the UP/DOWN cursor buttons until the
desired set of labels (PAGE 1 or PAGE 2) appears in the display. Press the ENT button to
confirm the selection.
28
RR-1060
Editing DEVICE/INPUT
button labels
To change the label for a button, make sure that
you have selected the Page 2 set of labels (see
above), then:
1. Press the SETUP button.
2. Press the UP/DOWN cursor buttons until EDIT
appears in the display. Press the ENT button
to confirm.
3. Press the UP/DOWN cursor buttons until EDIT
DEVICE appears in the display. Press the ENT
button to confirm.
4. Press the DEVICE/INPUT button (AUD, CD,
TUN, TAPE, EXT, V1–V5) that you wish to relabel. The current label appears on the second line of the display.
5. Press the +/– buttons to select a letter in the
label to change and the UP/DOWN cursor
buttons to change the letter. The Character
Map illustration shows the available characters. Labels can be up to 8 characters.
6. When the new label is complete, press the
SETUP button to save the new label.
7. A confirmation message appears in the LCD.
Use the UP/DOWN buttons to select either
YES (to confirm the new label) or NO (to exit
without making any changes). Press the ENT
button to confirm the selection.
Editing COMMAND button labels
To change the label for a button, make sure that you
have selected the Page 2 set of labels, then:
1. Press the DEVICE/INPUT button (AUD, CD,
TUN, TAPE, V1–V5) containing the COMMAND button you wish to relabel.
2. Press the SETUP button.
3. Press the UP/DOWN cursor buttons until EDIT
appears in the display. Press the ENT button
to confirm.
4. Press the UP/DOWN cursor buttons until EDIT
KEY appears in the display. Press the ENT button to confirm.
29
5. Press the COMMAND button that you wish
to relabel. The current label appears on the
second line of the display.
6. Press the +/– buttons to select a character to
change and the UP/DOWN cursor buttons to
change the letter. The “Character Map” illustration shows the available characters. Labels
can be a maximum of 8 characters.
7. When the new label is complete, press the
SETUP button to save the new label.
8. A confirmation message appears in the LCD.
Use the UP/DOWN buttons to select either
YES (to confirm the new label) or NO (to exit
without making any changes). Press the ENT
button to confirm the selection.
Changing Smart Macro labels
To change the label for a Smart Macro:
1. Press the SETUP button.
2. Press the UP/DOWN cursor buttons until
SMART appears in the display. Press the ENT
button to confirm.
3. Press the UP/DOWN cursor buttons until
SMART RENAME appears in the display.
Press the ENT button to confirm.
4. Press the Smart Macro button that you wish
to relabel. The current label appears on the
second line of the display. If the button does
not have a Smart Macro programmed, the
word EMPTY appears in the display.
5. Press the +/– buttons to select a character to
change and the UP/DOWN cursor buttons to
change the letter. The “Character Map” illustration shows the available characters. Labels
can be a maximum of 8 characters.
6. When the new label is complete, press the
SETUP button to save the new label.
7. A confirmation message appears in the LCD.
Use the UP/DOWN buttons to select either
YES (to confirm the new label) or NO (to exit
without making any changes). Press the ENT
button to confirm the selection.
30
RR-1060
Additional Setup Options
Volume/Mute Punch-Through
In many systems, the volume is adjusted at the TV
set or the A/V processor. For convenience, the
RR-1060 has a Volume Punch-Through feature
that copies the volume and mute commands from
either the TV device or AUD to DEVICE/INPUT
buttons for other components such as CD players, VCRs, SAT receivers, and DVD players. After
enabling this feature, volume and mute controls
for your choice of the TV or A/V processor are
always available even when one of these other
DEVICE/INPUT command sets is active.
To enable the Volume Punch-through feature:
1. Press the SETUP button.
2. Use the UP/DOWN cursor buttons to select
PUNCH THROUGH on the LCD display. Press
the ENT button to confirm.
3. When the prompt SELECT appears in the
display (after about 2 seconds), use the UP/
DOWN cursor buttons to select either AUD or
TV. This selection is the DEVICE/INPUT whose
volume control you wish to use in other modes.
Press ENT to confirm.
4. When the prompt TARGET appears in the display, use the UP/DOWN cursor buttons to select the DEVICE/INPUT where you want the
volume and mute commands to be copied to.
For example, if you want to use AUD volume
even from the CD mode of the remote, select
CD as the target. Press ENT to confirm.
The factory default setting for the Punch-Through
feature is as follows:
AUD:
CD:
TUN:
TAPE:
V1:
V2:
V3:
V4:
V5:
AUD volume
AUD volume
AUD volume
AUD volume
AUD volume
No Punch-Through
No Punch-Through
No Punch-Through
No Punch-Through
31
Disabling the Beep Tone
As shipped from the factory, the RR-1060 beeps
as confirmation whenever a button is pressed. This
feature can be disabled or enabled as follows:
1. Press the SETUP button (the LCD displays SETUP).
2. Press the UP/DOWN cursor buttons until BEEP
SOUND appears in the display. Press the ENT
button to confirm.
3. Press the UP/DOWN cursor buttons until BEEP
ON or BEEP OFF appears in the display. Press
the ENT button to select the desired option.
Clone Function
The CLONE function transfers all programming,
learned commands, labels, and settings from one
RR-1060 to a second RR-1060. To transfer the
programming, place two RR-1060 remotes with
their IR windows facing each other about 2 to 3
inches apart, then proceed as follows.
On the remote that will be receiving
the data:
1. Press the SETUP button.
2. Press the UP/DOWN cursor buttons until
CLONE appears in the display. Press the ENT
button to confirm.
3. Press the UP/DOWN cursor buttons until RECEIVE appears in the display. Press the ENT
button.
On the remote that will be sending the
data:
1. Press the SETUP button (the LCD displays SETUP).
2. Press the UP/DOWN cursor buttons until
CLONE appears in the display. Press the ENT
button to confirm.
3. Press the UP/DOWN cursor buttons until
SEND appears in the display. Press the ENT
button.
32
RR-1060
The data transfer begins. The sending remote displays SENDING DATA. The receiving remote displays RECEIVING DATA. At the completion of the
data transfer (which may take 4 or 5 minutes), one
of the following confirmation messages appears
in the display of the receiving RR-1060:
• If the data transfer is successful, the SEND
OK prompt appears on the sending remote
and RECEIVE OK appears on the receiving
remote.
• If the data transfer is not successful, ERROR appears in the LCD on the receiving remote. and
the unit reverts to normal operating mode.
After 30 seconds or when any button is pressed,
the remotes return to normal operation.
NOTE:
Do not attempt to use the CLONE function to
transfer data from any remote other than another
Rotel RR-1060.
Restore Factory Defaults
You can restore the RR-1060 to the factory default
configuration with a simple procedure described
below. Restoring the factory configuration restores
all of the preset code sets for DEVICE/INPUT
buttons, clears all learned commands, restores
all factory labels, restores the factory punch-thru
settings, and turns the beep tone on.
1. Press the SETUP button.
2. Press the UP/DOWN cursor buttons until DEFAULT SETTING appears in the display. Press
the ENT button to confirm.
3. A confirmation message appears in the LCD.
Use the UP/DOWN buttons to select either
RESET YES (to restore the factory defaults) or
RESET NO (to exit without making any changes). Press the ENT button to confirm the selection.
4. In a few seconds, a RESET OK prompt in the
LCD will confirm the restoring of factory defaults.
NOTE:
Smart Macros are not reset by restoring
factory defaults. Use the Clearing a Smart Macro
instructions to delete stored Smart Macros.
The Rotel Co. Ltd.
10-10 Shinsen-Cho
Shibuya-Ku
Tokyo 150-0045
Japan
Phone: +81 3-5458-5325
Fax: +81 3-5458-5310
Rotel of America
54 Concord Street
North Reading, MA 01864-2699
USA
Phone: +1 978-664-3820
Fax: +1 978-664-4109
Rotel Europe
Dale Road
Worthing, West Sussex BN11 2BH
England
Phone: +44 (0)1903 221600
Fax: +44 (0)1903 221525
Rotel Deutschland
Kleine Heide 12
D-33790 Halle/Westf.
Germany
Phone: +49 05201-87170
Fax: +49 05201-73370
www.rotel.com
082 OM RR-1060 • 092205
English • Français • Italiano • Deutsch
Svenska • Portugese • Русский