1
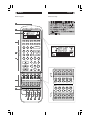
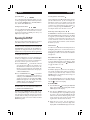
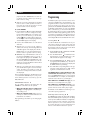
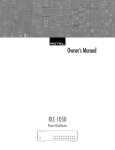
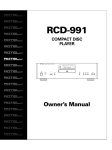
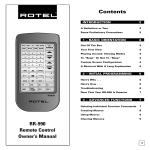
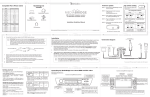
Owner’s Manual
AUD
TV
SAT
VCR
DVD
CD
TUN
AV 1
AV 2
AV 3
1
2
3
4
5
6
7
8
9
+10
0
X
POWER
CH
VOL
INPUT
BAND
GUIDE
PLAY
C
MUTE
MENU
UP
M
OSD
TRACK
PAUSE
ENT
STOP
S
SEARCH –
TV/VCR
PIP
CD
+
PREV CH
DWN
R
SEARCH+
SWAP
POS
ANT
MODE
TUN
PH
TAPE1
TAPE2
V1
V2
V3
V4
V5
INPUT1
INPUT2
INPUT3
TV/VCR
RECORD
MONO
SETUP
DIRECT
AUDIO
ANGLE
FILTER
EXT IN
BACK
ZONE
ZONE
PTY
SELECT
TA
CLEAR
MODE
FM
SHIFT
ZOOM
TUNER
DVD
MACRO
TIME/ALM
CLEAR
/ CLONE
LANG
FM
SUBTITLE NARROW
TITLE
PRESET
SCAN
SUR +
DYNMC
TP
DISPLAY
CONDITION DISPLAY
EDIT
LEARN
PRELOAD
RESET
PAGE 1/2
RR-969
Universal Learning Remote Control
2
RR-969
English
Button Layout
Character Map
1
2
3
AUD
TV
SAT
VCR
DVD
CD
TUN
AV 1
AV 2
AV 3
1
2
3
4
5
6
7
8
9
+10
0
X
4
POWER
5
CH
VOL
INPUT
6
BAND
MUTE
GUIDE
PLAY
MENU
C
M
UP
OSD
TRACK
PAUSE
+
ENT
STOP
PREV CH
DWN
S
TV/VCR
PIP
CD
7
CD
R
SEARCH –
SEARCH +
SWAP
POS
ANT
MODE
TUN
PH
TAPE1
TAPE2
DISC1
DISC2
DISC3
DISC4
DISC5
CD
TUN
PH
TAPE1
TAPE2
V1
V2
PROGRAM RANDOM
V3
V4
V5
REPEAT
DISC
DISC+
V1
V2
V3
V4
V5
SETUP
AUDIO
ANGLE
SUBTITLE
TITLE
INPUT1
INPUT2
INPUT3
TV/VCR
RECORD
FILTER
EXT IN
ZONE
PRESET
SUR +
MONO
SETUP
DIRECT
AUDIO
ANGLE
DISPLAY
FILTER
EXT IN
BACK
ZONE
ZONE
PTY
SELECT
TA
CLEAR
MODE
FM
SHIFT
8
ZOOM
TUNER
DVD
9
MACRO
TIME/ALM
FM
SUBTITLE NARROW
TITLE
SUR +
DYNMC
TP
DISPLAY
CONDITION DISPLAY
/ CLONE
CLEAR
LANG
EDIT
LEARN
PRELOAD
RESET
PAGE 1/2
10
12
11
14
13
16
15
SHIFT
ZOOM
DVD
PRESET
SCAN
TV/VCR
PIP
CD
PTY
TA
TP
CLEAR
MODE
CONDITION
SWAP
POS
ANT
MODE
TUN
PH
TAPE1
TAPE2
V1
V2
V3
V4
V5
INPUT1
INPUT2
INPUT3
TV/VCR
RECORD
FM
MONO
DIRECT
FILTER
EXT IN
ZONE
PRESET
FM
NARROW
SUR +
SHIFT
PTY
TA
TP
DISPLAY
18
17
TUNER
3
4
RR-969
English
5
Learning Steps
4
D
Sliding Cover
AUD
TV
SAT
VCR
DVD
AUD
TV
SAT
VCR
DVD
CD
TUN
AV 1
AV 2
AV 3
CD
TUN
AV 1
AV 2
AV 3
1
2
3
1
2
3
4
5
6
4
5
6
POWER
CH
7
8
9
+10
0
X
VOL
CH
7
8
9
+10
0
X
INPUT
BAND
GUIDE
PLAY
C
BAND
GUIDE
PLAY
M
C
-
ENT
DWN
SEARCH –
TV/VCR
CD
DISC1
PIP
+
PREV CH
S
PAUSE
ENT
STOP
+
PREV CH
R
S
SEARCH +
SEARCH –
DWN
R
DISC2
SWAP
DISC3
POS
DISC4
ANT
DISC5
MODE
SWAP
POS
ANT
MODE
TUN
PH
TAPE1
TAPE2
CD
TUN
PH
TAPE1
TAPE2
V1
V2
V3
V4
V5
V1
V2
V3
V4
V5
REPEAT
INPUT3
DISC
DISPLAY
DISC+
RECORD
INPUT1
INPUT2
INPUT3
TV/VCR
RECORD
TUNE
PRESET
ANGLE
CHANGE NARROW
SUBTITLE
TITLE
DIRECT
AUDIO
ANGLE
FM
FILTER
SHIFT
ZOOM
TUNER
DVD
MACRO
DIRECT
AUDIO
EXT IN
BACK
ZONE
SELECT
CLEAR
PTY
MODE
TA
TIME/ALM
CLEAR
/ CLONE
LANG
PAGE 1/2
FM
SCAN
SUR +
DYNMC
DISPLAY
CONDITION
DISPLAY
TP
AF
EDIT
LEARN
PRELOAD
RESET
FM
MONO
SETUP
FILTER
SHIFT
ZOOM
TUNER
DVD
MACRO
EXT IN
BACK
ZONE
ZONE
PTY
SELECT
TA
CLEAR
E
TIME/ALM
CLEAR
/ CLONE
LANG
PAGE 1/2
2
B
DVD
CD
TUN
AV 1
AV 2
AV 3
1
2
3
4
5
6
7
8
9
+10
0
X
BAND
MUTE
GUIDE
INPUT3
DISPLAY
MENU
RECORD
UP
FM
DYNMC
TP
DISPLAY
POWER
CH
SEARCH +
CD
MONO
SETUP
VCR
M
TV/VCR
PIP
PROGRAM
INPUT1 RANDOM
INPUT2
SAT
OSD
TRACK
STOP
TV
MUTE
MENU
UP
OSD
TRACK
PAUSE
AUD
VOL
INPUT
MUTE
MENU
UP
POWER
FM
SUBTITLE NARROW
TITLE
PRESET
SCAN
SUR +
DYNMC
TP
DISPLAY
CONDITION DISPLAY
EDIT
LEARN
PRELOAD
RESET
VOL
INPUT
3
C
PLAYINPUT2
INPUT1
FM
MONO
SETUP
C
DIRECT
AUDIO
ANGLE
FILTER
TRACKEXT IN
BACK
SHIFT
ZONE
PTY
SELECT
TA
CLEAR
MODE
ZOOM
TUNER
DVD
MACRO
TIME/ALM
CLEAR
/ CLONE
LANG
SUBTITLE NARROW
TITLE
OSD
SCAN
SUR +
CONDITION DISPLAY
EDIT
LEARN
PRELOAD
RESET
PAGE 1/2
1
A
6
RR-969
English
Contents
Introduction ..................................................
Key Features
Sensible Precautions
Battery Installation
7
Introduction
7
7
7
7
Thank you for purchasing the RR-969 Universal Learning Remote Control. The RR-969 can replace up to ten
infrared remote controls, operating audio or video
components from Rotel or other manufacturers.
Key Features
Navigating the RR-969 ................................. 7
IR Emitter/Sensor
8
LCD Display
8
Light Button and Light Sensor
8
Sliding Cover
8
Device Buttons
8
9
Basic Command Buttons
Secondary Command Buttons
9
Leaf Overlay
9
9
POWER and Multi-Step Buttons
Special Buttons
10
Configuration Buttons
10
• Simple programming using your existing remotes
to teach the RR-969 their commands.
Operating the RR-969 ................................. 10
Sending IR Commands
10
Sending Macro Commands
11
11
Multi-Step Button Operation
LIGHT Button
11
KEY TONE Button
11
11
Time/Alarm Feature
LOW BATTERY Indicator
12
Sensible Precautions
Programming .............................................. 13
Learning Mode
13
Multi-Step Button Learning
13
14
Macro Programming
Clearing Stored Commands
15
Preload Function
15
Clone Function
15
Reset Button
16
Remove the RR-969 and the 4 AAA batteries from the
box. Turn the RR-969 over and lift the cover off the battery compartment by compressing the release tab and
lifting up. Place the four AAA batteries inside (follow
the polarity illustrations on the bottom of the compartment) and replace the cover.
Custom Labels ............................................. 16
Multi-language Mode
17
17
Button Labels
• Pre-programmed to operate Rotel Surround Sound
processors and receivers.
• LCD DISPLAY provides visual feedback during programming and operation, including time of day, status
indicators, and customizable labels for every command button.
• Backlighting for ease of use in dark rooms along
with optional beep whenever a button is pressed.
• Twenty MACRO keys send a sequence of up to 20
commands with the press of two buttons.
• TIMER/ALARM function beeps at the programmed
time or sends a MACRO sequence.
• The RR-969 is rugged, but it is not indestructible.
So please don’t drop it!
• Do not expose the RR-969 to moisture. To clean the
RR-969, use a soft, lint-free damp cloth. Avoid harsh
cleaning solvents.
• Don’t try to take the RR-969 apart. Disassembly will
void the warranty.
Battery Installation
Navigating the RR-969
The RR-969 replaces up to ten remote controls. Teaching the RR-969 to operate your components takes just
minutes and need only be done once. See the LEARNING section of this manual for easy to follow instructions.
Once the programming is complete, select a component with the press of a button to turn the RR-969 into
the remote control for your CD player, TV, or VCR.
8
RR-969
English
Here is the layout of the RR-969:
IR Emitter/Sensor
The IR Emitter/Sensor is located in the top edge of the
RR-969. It sends the IR commands and must be pointed
at the desired component. It also receives IR codes from
your other remotes during the LEARNING process.
LCD Display
The LCD DISPLAY provides information including time
of day, alarm time, and status indicators. An eight character alphanumeric display provides simple prompts when
programming the RR-969. These indicators and prompts
are noted in the appropriate sections of this manual.
In addition, the display shows a customizable label when
a button is pressed.
Light Button
and Light Sensor
The RR-969 provides automatic backlighting. In a dim
room, the LIGHT SENSOR automatically turns on backlighting for 6 seconds whenever a button is pressed.
In a dim room, you can manually turn on the lighting
by pressing the LIGHT button on the side of the remote.
The lights stay on for 6 seconds and for an additional
6 seconds each time another button is pressed.
NOTE:
In a bright room, the backlighting function is
disabled to save battery power.
Sliding Cover
A sliding cover conceals the buttons at the bottom of
the RR-969. These buttons provide extra command functions used in programming and configuring the unit. Leave
the sliding cover in the UP position to simplify the RR-969
for general use. Slide the cover DOWN to access the
additional buttons.
Device Buttons
Ten buttons at the top of the RR-969 determine which
command set is active. For example, press the AUD button
and the RR-969 becomes the remote control for your
Rotel Surround Sound Processor. Press the TV button and
the RR-969 becomes the remote control for your TV set.
To operate the RR-969, first press the DEVICE key for
the desired component. Then, press COMMAND keys
to send the commands learned for that component.
NOTE:
The DEVICE buttons are also used in programming the RR-969 and are also available for storing
and sending MACROS (automatic sequences of up to
20 learned commands).
9
Basic Command Buttons
This large group of buttons duplicates the functions on
the remotes for your audio/video components. Each
button can store commands for ten different components,
selected by pressing a DEVICE key.
At the top right of this group are basic command buttons such as Power, Volume, Channel Selection, Muting, and Band.
At the top left are twelve numeric keypad buttons, used
for direct track selection on a CD Player or direct channel selection on a TV set.
NOTE: The ten buttons labeled 0 – 9 are also available
for sending MACROS (sequences of up to 20 learned
commands).
At the bottom left is a group of five rectangular buttons
that duplicate the transport functions on a tape recorder
or VCR (Stop, Play, Pause, etc.).
At the bottom right are nine buttons that duplicate the
menu functions found on a cable or satellite TV receiver
or audio/video components with an on-screen menu
system. The four round buttons are used for extra functions, such as Last Channel, Viewing Guide, etc.
Secondary Command Buttons
Below the BASIC COMMAND buttons is a group of
oval buttons which provide secondary command functions. To simplify the use of the RR-969, these buttons
are typically concealed behind a sliding access cover.
The function of these buttons varies depending on the
type of component. For example, the top two rows provide
source selection when controlling a surround processor and input switching or picture-in-picture functions
for a VCR. A leaf overlay simplifies the use of these buttons.
Leaf Overlay
A LEAF OVERLAY provides button labels for various
components. When controlling a A/V receiver, refer
to the labels printed on the buttons. Flip the LEAF OVERLAY
to the down position to see labels for TVs and VCRs
(top group of buttons) and AM/FM tuners (bottom group).
Flip the LEAF OVERLAY up to see printed labels for CD
and DVD players.
POWER
and Multi-Step Buttons
In addition to normal functions, the POWER Button and
the five buttons labeled SHIFT, PTY, TA, TP, DISPLAY provide
a special option – learning up to three commands on
a single button. The first command is sent when the button
is pressed once, the second command is sent the next
time the button is pressed, and the third command is
sent the third time the button is pressed. This feature can
be used, for example, to handle a component that has
separate buttons for power on and power off.
10 RR-969
English 11
Special Buttons
Sending Macro Commands
Five rectangular buttons behind the sliding cover are
used for programming the RR-969 and for special features such as the MACRO function, the TIME/ALM functions, and the KEY TONE feature.
Twenty of the buttons on the RR-969 (the 10 device buttons
plus the number buttons 0 - 9) can store multiple command macro sequences – for example, a sequence that
turns on the TV set, selects channel 5, turns on the surround processor, and selects the TV input. A macro sequence is sent by pressing the MACRO button
followed by the button where the macro is stored.
Configuration Buttons
Four recessed buttons behind the sliding cover are used
in configuring the unit. These buttons are recessed to
prevent pressing them accidentally. Use the tip of a
ballpoint pen to press them.
Multi-Step Button Operation
This section of the manual explains the basic operation
of the RR-969 and most of its standard features.
The POWER Button and the five buttons labelled SHIFT,
PTY, TA, TP, DISPLAY provide a special option – the ability
to program up to three different commands. The first
command is sent when the button is pressed once, the
second command is sent the next time the button is
pressed, and the third command is sent the third time
the button is pressed.
NOTE:
LIGHT Button
Operating the RR-969
The RR-969 is pre-programmed with the codes
for Rotel surround sound processors stored under the
AUDIO DEVICE storage bank. All other DEVICE storage banks are empty and will not operate until commands for those components have been programmed.
Sending IR Commands
Instead of putting down one remote and picking up
another, you simply press a button on the RR-969 to
convert it from the remote control for your CD player to
the remote control for your TV set. Here’s how:
1. Press a DEVICE button
to activate the command
set for the desired component. For example, press
the AUD button for a Rotel surround processor. The
label for your selection appears in the display. The
selected command set remains active until you press
a different DEVICE button.
2. Press a COMMAND button
to send an IR
command to the component you have selected. For
example, press the POWER button to turn on or off
a Rotel surround processor. The label for the COMMAND button appears in the display. If the label
“EMPTY” appears in the display, the button has no
learned command for that DEVICE.
NOTE: The default labels that appear in the display match
In a dark room, the RR-969 automatically activates its
backlighting feature for 6 seconds when a button is
pressed. Press the LIGHT button to manually turn on the
backlighting in a dim room. This button is disabled in
a bright room.
KEY TONE Button
The RR-969 can be configured to beep whenever a button
is pressed. When this feature is activated, the indicator appears in the display. Press the /CLONE button
to toggle this feature on or off.
Time/Alarm Feature
The RR-969 displays the current time in the display. It
also includes an alarm feature which beeps for fifteen
seconds at a specified time and, if desired, send a
MACRO sequence of commands such as turning on a
VCR and begin recording.
Press the TIME/ALM button to turn the alarm function
on or off. When the alarm function is activated, an alarm
indicator
is shown in the display.
To set the TIME:
the button labels. You can customize the labels for every DEVICE and COMMAND button.
1. Press the EDIT button
followed by the TIME/ALM
button. The hour digits of the display flash and SET
HOUR appears in the display.
Remember that the COMMAND buttons duplicate controls on many different types of audio/video components. Their function depends on the type of component
selected. Make sure that you have pressed the correct
DEVICE button and use the button labels and LEAF
OVERLAY as guides.
2. Press the UP or DOWN buttons to set the correct
hour. Advancing the hour sequentially steps through
two options: 12-hour mode with a PM indicator and
24-hour mode. Continue advancing until you have
set the current time in the mode you prefer. Holding the buttons activates a fast scan mode.
3. When the hour is correct, press the + button to
advance to the next step. The minute digits of the
display flash and SET MINUTES appears in the dis-
12 RR-969
play. Press the UP or DOWN buttons to set the correct minutes. Press the – button if you need to go
back to the hours setting.
4. When the correct time is displayed, press the EDIT
button to return to normal operation. If no button is
pressed for 15 seconds, the unit returns to normal
operation with the new time displayed.
To set the ALARM:
1. Press the EDIT button
followed by the TIME/ALM
button. Set the correct time of day (if necessary).
Press the TIME/ALARM button a second time to set
the time you wish the alarm to go off. The alarm
indicator flashes indicating alarm setting mode.
The hour digits of the time display begin flashing
and SET HOUR appears in the display.
2. Press the UP or DOWN buttons to set the desired
alarm hour.
3. When the hour is correct, press the + button to
advance to the next step. The minute digits flash and
“SET MIN” appears in the display. Press the UP or
DOWN buttons to set the desired alarm minutes.
Press the – button to go back to the hours setting.
4. OPTIONAL. If you want the RR-969 to send one of
the memorized MACRO sequences, press the +
button again. The display shows “MACRO?”. Press
the desired MACRO button (a DEVICE button or the
0 - 9 buttons). That button’s label shows in the display. Be sure to position the RR-969 so that it is aimed
at the desired components.
5. When the correct alarm time setting is displayed,
press the EDIT button again to return to normal operation. If no button is pressed for 15 seconds, the
unit returns to normal operation with the new alarm
time displayed.
At the programmed alarm time, the RR-969 beeps for
15 seconds and the MACRO sequence, if any, is sent.
To turn off the beep before 15 seconds is up, press the
TIME/ALM button.
LOW BATTERY Indicator
The
indicator appears in the display when the
batteries are weak and need to be replaced:
• When the indicator appears solidly in the
display, the backlighting feature is disabled to preserve battery power.
• When the indicator blinks, battery power is
extremely low and the unit will lock all functions until
fresh batteries are installed.
All programming is saved while you are changing the
batteries.
English 13
Programming
The RR-969 replaces up to ten remote controls, one for
each of the DEVICE buttons. The AUD button is preprogrammed with the codes for Rotel Surround Sound
Processors and Receivers. Rotel codes are pre-programmed for the VOLUME UP/DOWN buttons for all
ten DEVICE command banks. To use the other DEVICE
button command sets, you must teach the RR-969 the
IR commands from each of your remotes using the LEARNING mode. Additional programming options such as
special macro programming, clearing memorized commands, cloning commands from one RR-969 to another,
and resetting the RR-969 are described later in this section.
Learning Mode
To teach the RR-969 the commands from one of your
other remotes, place the two remote controls end to end
as shown in the illustration at the front of this manual.
The IR signals sent by the other remote must be aimed
at the IR emitter/sensor of the RR-969.
1. Press the LEARN button
on the RR-969. The LEARN
indicator blinks in the display.
2. Press the DEVICE button
on the RR-969 for the
appropriate type of component (CD, TV, etc.). The
name of that button appears in the display.
3. Press the COMMAND button
that you wish
to program (4, CH UP/DOWN, etc.). The name of
that COMMAND button appears in the display and
the LEARN indicator stops blinking.
4. Press and hold the corresponding button on the original remote until the display shows “OK!” indicating that the command has been learned.
The LEARN indictor resumes blinking once the
command has been learned. Repeat Steps 3 and
4 for each COMMAND button you wish to program
in that DEVICE bank – for example, for each transport
and track selection function on your CD player.
If the LCD shows an ERROR message, the command was not successfully learned. Try again.
If the LCD shows a NO DATA message, no signal was received from the original remote. Adjust the
position of the two remotes and try Step 3 again.
The RR-969 exits the LEARN mode following 15 seconds without pressing any buttons.
Multi-Step Button Learning
The POWER Button and the five buttons labeled SHIFT,
PTY, TA, TP, DISPLAY provide a special option – the ability
to learn up to three different commands on a single button.
During operation, the first command is sent when the
button is pressed once, the second command is sent
the next time the button is pressed, and the third command is sent the third time the button is pressed.
14 RR-969
NOTE:
Use this feature when programming the multistep POWER button for a remote control with separate
POWER ON and POWER OFF buttons.
To program a multi-step button using the SHIFT button
as an example:
1. Follow Steps 1 – 3 from the previous section to learn
the first command for the SHIFT button.
2. Press the SHIFT button a second time. “S1-2” shows
in the display. Press and hold the next button on the
original remote until the “OK!” confirmation appears.
3. To learn a third command, press the SHIFT button a
third time. The display shows “S1-3” indicating that
it is ready to learn the third command. Press and
hold the next command button on the original remote until the “OK!” confirmation appears.
English 15
Clearing Stored Commands
The CLEAR button
erases learned commands from
a single button, all of the commands under a particular DEVICE button, or a MACRO sequence.
1. Press the recessed CLEAR button with the point of a
ball point pen. A “CLEAR?” prompt appears.
2. Press a COMMAND button to clear a single command. Press a DEVICE button to clear all commands
stored for that DEVICE. Press the MACRO button
and then the button where the macro is stored to
erase a MACRO sequence. A confirmation “OK!”
appears in the display.
3. The RR-969 automatically leaves the CLEAR mode
if no button is pressed for 15 seconds. Manually
exit by pressing the CLEAR button again.
NOTE:
Preload Function
Macro Programming
Press the recessed PRELOAD button
with a ballpoint
pen to restore the RR-969 to its original factory programming (for example, to restore the Rotel surround sound
codes if they are accidently reprogrammed). “LOADING” appears in the display while the codes are being restored, followed by a confirmation “OK!” when
the process is complete.
To change the programming of any command
for a multi-step button, it is necessary to start over beginning with the first command.
Twenty of the buttons on the RR-969 (the 10 device buttons
plus the number buttons 0 - 9) can store multiple command macro sequences – for example, a sequence that
turns on the TV set, selects channel 5, turns on the surround processor, and selects the TV input. A macro sequence is sent by pressing the MACRO button
followed by the button where the macro is stored.
To program a macro sequence, first make sure that all
of the desired commands have already been learned
by the RR-969 – the macro feature simply records a
sequence of individual RR-969 button commands.
1. Press the LEARN button
. The “LEARN” indicator appears in the display.
1. Press the MACRO button. The LCD displays
“MACRO?” asking where to store the sequence.
2. Press one of the available macro COMMAND buttons (device buttons or 0 - 9 numeric button). An
“M” followed by the name of the button appears
briefly in the display (e.g. “M.0”).
3. “Step 1” appears in the display indicating that the
unit is ready to learn the first step in the macro. Press
the desired individual commands until the entire
sequence has been performed. Each button press
is confirmed in the display followed by a prompt
for the next step.
4. To enter a time delay following a command, hold
the button for the desired length of the time delay.
5. When the entire macro sequence has been entered,
press the LEARN button to complete the process. A
confirmation “MAR.OK” appears in the display.
NOTE: Pressing PRELOAD erases ALL learned commands
and labeling. Make sure this is what you want to do!
Clone Function
The CLONE function transfers all programming from one
RR-969 to a second RR-969. To transfer the programming, place two RR-969 remotes with their IR windows
facing each other, then proceed as follows.
On the remote that will be receiving the data:
1. Press the EDIT button
display.
. “EDIT?” appears in the
2. Press the /CLONE button
. A prompt “REC/
TRX?” appears with either the “REC” or “TRX” flashing.
3. If necessary, press the – key until the “REC” is flashing and press the ENT button to confirm. The RECEIVER indication and “WAITING” show in the DISPLAY, confirming that the unit is ready to receive data.
NOTE :
Cancel the clone function by pressing the
/CLONE button again.
On the remote that will be sending the data:
1. Press the EDIT button
display.
. “EDIT?” appears in the
2. Press the /CLONE button
. A prompt “REC/
TRX?” appears with either the “REC” or “TRX” flashing.
16 RR-969
3. If necessary, press the – key until the “TRX” is flashing and press the ENT button to confirm. The TRANSMITTER and indicators along with the word “SENDING” appear in the display confirming that data is
being sent. It takes 10 minutes to send all of the data.
4. When the data has been completely transferred, the
“OK” confirmation appears in the display and the
remote returns to normal operating mode.
NOTE:
Cancel the clone function by pressing the
/CLONE button again.
Once the transfer has started, the following
information appears in the display of the
receiving RR-969:
1. The LOADING indicator appears during the actual
data transfer, which takes ten minutes.
2. If the data transfer is successful, the “OK” prompt
appears and the unit returns to normal mode.
3. If corrupted data is received, the CLONE REPT indicator advises you to repeat the procedure.
4. If no data is received for 60 seconds in receive mode,
“NO DATA” appears in the LCD and the unit reverts
to normal operating mode.
NOTE:
Do not attempt to use the CLONE function to
transfer data from any remote other than another Rotel
RR-969.
Reset Button
Should the RR-969 stop functioning , press the RESET
button with the tip of a ballpoint pen. The clock settings
will be lost, but all learned commands will be retained.
Custom Labels
Whenever you press a button on the RR-969, its name
appears in the display. By default, the labels match the
printed labels for each button. You can change the labels that appear when a button is pressed – to change
the language or to customize the labels to match your
specific components.
There are two complete sets (“pages”) of labels stored
in the RR-969. You can switch between the two. We recommend that you not change the first page of labels.
Use the second page to enter custom labels. This allows you to return to the default labels at any time.
English 17
Multi-language Mode
To switch from the first page of labels to the second page,
press the recessed LANG–PAGE 1/2 button with the
tip of a ballpoint pen. Press the button again to toggle
back to the first page. The new selection, either “PAGE
1” or “PAGE 2” appears briefly in the display.
Button Labels
To change the label for a button:
1. Press a DEVICE button to select the command set
for which you wish to change the labels. For example,
press TUNER to change the labels that appear when
a button in the TUNER command set is pressed.
2. Press the EDIT button
pears in the display.
. The prompt “EDIT?” ap-
3. Press the DEVICE or COMMAND button you wish
to relabel. The current label appears in the display
with the first letter flashing.
4. Press the UP or DOWN buttons to change the flashing
letter, stepping through the list of characters. Press
the “X” button on the numeric keypad to insert a
blank space in the label.
5. Press the – or + button to move to the next character in the label.
6. Repeat steps 4 and 5 to complete the new label,
which is self-centering in the display.
7. To label another button, press another DEVICE or
COMMAND button and repeat the above steps. The
RR-969 saves the new labels and returns to normal
mode if no buttons are pressed for 15 seconds. Press
the EDIT button to return manually.
NOTE:
Different labels can be memorized for a single
command button under each of the 10 command sets.
Relabeling only changes the command button label
for the DEVICE bank that is active when the labeling is
performed.
The Rotel Co. Ltd.
10-10 Shinsen-Cho
Shibuya-Ku
Tokyo 150-0045
Japan
Phone: +81 3-5458-5325
Fax: +81 3-5458-5310
Rotel of America
54 Concord Street
North Reading, MA 01864-2699
USA
Phone: +1 978-664-3820
Fax: +1 978-664-4109
Rotel Europe
Meadow Road
Worthing, West Sussex BN11 2RX
England
Phone: +44 (0)1903 524 813
Fax: +44 (0)1903 524 831
Rotel Deutschland
Kleine Heide 12
D-33790 Halle/Westf.
Germany
Phone: +49 05201-87170
Fax: +49 05201-73370
www.rotel.com
082 OMRR-969ENG 022800