1
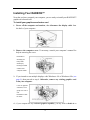
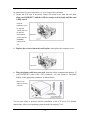
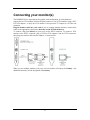
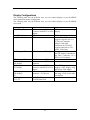
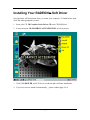
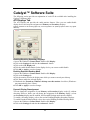
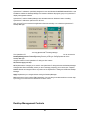
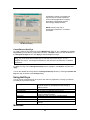
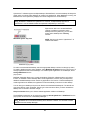
RADEON™ SERIES
User’s Manual
G03-ATI9000
Rev: 2.0
Copyright © 2002, ATI Technologies Inc. All rights reserved.
ATI and all ATI product and product feature names are trademarks and/or registered trademarks
of ATI Technologies Inc. All other company and/or product names are trademarks and/or
registered trademarks of their respective owners. Features, performance and specifications are
subject to change without notice. Product may not be exactly as shown in the diagrams.
Reproduction of this manual, or parts thereof, in any form, without the express written
permission of ATI Technologies Inc. is strictly prohibited.
Table of contents
Introduction ............................................................................................................. 1
Features AT A Glance............................................................................................... 1
ATI’s CATALYST Software Suite........................................................................... 1
Multiple Displays and 3D Gaming Experience .................................................... 1
Direct 3D and OpenGL ......................................................................................... 1
HydraVision .......................................................................................................... 2
Installing Your RADEON™................................................................................... 3
Connecting Your monitor(s) .................................................................................. 5
Display Configuration ........................................................................................... 6
Installing Your RADEON™ Soft Driver............................................................... 7
Windows “New Hardware Found” ....................................................................... 8
Installing the ATI Driver for Windows 98, Windows ME ................................... 8
Installing the ATI Driver for Windows 2000/XP/NT4.0 ...................................... 8
Multiple Display Support : Windows 98, Windows ME ...................................... 9
Catalyst Software Suit ............................................................................................ 11
ATI Display Tab.................................................................................................... 11
ATI Color Tab....................................................................................................... 13
ATI Options Tab ................................................................................................... 14
ATI Overlay Tab ................................................................................................... 1
Direct 3D Control Panel ......................................................................................... 17
Main and Custom Setting...................................................................................... 17
Direct 3D Compatibility Setting ........................................................................... 18
OpenGL Control Panel........................................................................................... 19
Main and Custom Setting...................................................................................... 20
OpenGL Compatibility Setting ............................................................................. 20
SMARTGART......................................................................................................... 21
Using TV Out........................................................................................................... 22
View your PC’s display on a TV .......................................................................... 22
Connecting to a TV or VCR.................................................................................. 22
How to Enabled/Disabled The TV Display........................................................... 23
Using and Adjusting TV Out ................................................................................ 23
How TV Display Connect Be Used ...................................................................... 23
Reducing Edge Distortion ..................................................................................... 24
Using HydraVision for Windows 98SE/ME/2000/XP/NT4.0 .............................. 25
Desktop Management Controls............................................................................. 26
Hot Keys Controls................................................................................................. 28
MultiDesk.............................................................................................................. 29
Troubleshooting Tips .............................................................................................. 30
i
Introduction
The RADEON
Series graphic accelerators delivers ground breaking 3D graphics
performance.
• Designed and built by ATI Technologies Inc.
• Powered by the RADEON Series Visual Processing Unit (VPU).
• Awesome 3D gaming performance.
• Support for OpenGL® applications.
• Support for Direct 3D® applications.
• High resolution in 3D up to 2048x1536.
• Best performance for today’s and tomorrow’s applications.
• Supports TV-out to connect your PC to your TV or VCR.
Features At A Glance
The RADEON Series provides high performance acceleration for today's demanding 3D
graphic applications. Its main features are:
• VIDEO IMMERSION™ II which provides industry-leading DVD playback and digital
TV decode capability
• CHARISMA ENGINE™ II which is the main GPU, providing the necessary power to
accelerate today’s 3D games and applications
• SMARTSHADER™ technology which can realistically create the visual properties of any
material, like glass, metal, wood, and produce 3D depth by rendering the object’s shadows
• SMOOTHVISION™ which provides users with various degrees of jagged edge removal
from 3D images, allowing users to configure their own high quality or high performance
gaming experience
• PIXEL TAPESTRY™ II which provides even greater 3D rendering power
• TV output support
ATI’s Catalyst™ Software Suite
Multiple Displays and 3D Gaming Experience
ATI’s Catalyst Software Suite provides multiple display functionality, and the advanced
graphic features, such as SMARTSHADER, for the ultimate 3D gaming experience. For
help on installing the Catalyst Software Suite, refer to the Getting Started Guide.
The Catalyst Software Suite installs the ATI display tabs. These tabs are accessed through
the Windows® Display Control Panel, through the Advanced... button located on the
Settings tab. For a detailed explanation of each ATI tab, refer to Catalyst™ Software
Suite.
Direct 3D® and OpenGL®
The Catalyst Software Suite also supports the latest versions of Direct 3D® and OpenGL®.
Many new 3D game titles, and the latest versions of older titles, will virtually come to life
as they utilize their advanced Direct 3D® or OpenGL® features. Gamers can finetune
these settings for the ultimate experience in 3D image quality or 3D gaming performance.
ATI’s Direct 3D® and OpenGL® tabs are available through the Windows® Display
Control Panel, through the Advanced... button located on the Settings tab.
For a detailed explanation of the Direct 3D® and OpenGL® tabs, refer to Direct 3D®
Control Panel on page 17, and OpenGL® Control Panel on page 19.
1
HydraVision™
In addition to the multiple display functionality available with ATI’s Catalyst Software
Suite, you can also use HydraVision for advanced multi-monitor management. For more
information on HydraVision, please refer to the page 25.
Preparing Your Computer
READ ME FIRST !
Turn off the power to your system and discharge your body’s static electric charge by
touching a grounded surface—for example, the metal surface of the power supply—before
performing any hardware procedure.
The manufacturer assumes no liability for any damage, caused directly or indirectly, by
improper installation of any components by unauthorized service personnel. If you do not feel
comfortable performing the installation, consult a qualified computer technician.
Damage to system components, the accelerator card, and injury to yourself may result if
power is applied during installation.
NOTE: Before installing your RADEON™ we recommend that you first uninstall the driver
for your current video card and reconfigure your operating system to use the
standard display driver (VGA) supplied with your operating system. For more
information about changing to the VGA driver, see your operating system
documentation.
2
Installing Your RADEON™
Now that you have prepared your computer, you are ready to install your RADEON™
graphics accelerator card.
To install your graphics accelerator card
1. Power off the computer and monitor, then disconnect the display cable from
the back of your computer.
2. Remove the computer cover. If necessary, consult your computer’s manual for
help in removing the cover.
Remember to
discharge your
body’s static
electricity by
touching the metal
surface of the
computer chassis.
3. If you intend to run multiple displays with Windows® 98 or Windows® Me (see
page 9), then proceed to step 4. Otherwise, remove any existing graphics card
from your computer.
If the old graphics
card sticks, rock it
gently from end to
end.
Remember to save
the screw.
Or, if your computer has any on-board graphics capability, you may need to disable it on
3
the motherboard. For more information, see your computer documentation.
4. Locate the AGP slot. If necessary, remove the metal cover from this slot; then
align your RADEON™ with the AGP slot, and press it in firmly until the card
is fully seated.
Grasp the
RADEON™ by the
top edge and
carefully seat it into
the AGP slot.
Ensure that the
RADEON CARD
metal contacts are
Completely
pushed into the
slot.
5. Replace the screw to fasten the card in place, and replace the computer cover.
RADEON CARD
6. Plug the display cable into your card; then turn on the computer and monitor. If
your RADEON™ came with a DVI connector, you can connect a flat panel
display to the appropriate connector, as shown below.
Make sure all
cables are securely
connected.
You are now ready to proceed with the installation of the ATI driver. For detailed
instructions, select your operating system from the list on page 7 to 9.
4
Connecting your monitor(s)
The RADEON Series, depending on the graphic card configuration, provides hardware
support for one VGA monitor and one flat panel monitor, or two VGA monitors using a DVII-to-VGA adapter*, or only one VGA monitor. It also provides TV Output via a S-Video out
connector.
Plug the monitor cable into your card (if you are running multiple monitors, connect their
cables to the appropriate connectors), then turn on the PC and monitor(s).
To connect a flat panel directly to your card, use the DVI-I connector. To connect a VGA
monitor to the DVI-I connector, plug a DVI-I-to-VGA adapter* into the DVI-I connector,
then plug your monitor cable into the adapter*, as shown below.
When you use multiple monitors with your card, one monitor will always be Primary. Any
additional monitor(s) will be designated as Secondary.
5
Display Configurations
The following table lists the different ways you can connect displays to your RADEON
Series with multi-monitor configuration
The following table lists the different ways you can connect displays to your RADEON
Series with
Display Configuration
One CRT display
One DFP display
One TV
Connector(s) Used
VGA connector OR DVI-I
Connector with DIV-I-to-VGA
adapter
DVI-I connector
TV Output
CRT display + TV
VGA connector + TV Output
DFP display + TV
CRT display +
DFP display
CRT display +
CRT display
DVI-I connector + TV Output
VGA connector + DVI-I
connector
VGA connector + DVI-I
connector with DVI-I-to-VGA
adapter
VGA connector + DVI-I
connector + S-Video out
CRT display +
DFP display +
TV
CRT display +
CRT+ TV
UNSUPPORT
CONFIGURATION
6
Comments
CRT-cathode ray tube analog
Display
DFP–digital flat panel display
Cards with S-Video out also
support Composite out via a
S-Video-to-Composite
adapter. Cards with
Composite out DO NOT
support connection to TVs
with S-Video input
Unsupported configuration if
the CRT display is attached to
the DVI-I connector via a
DVI-I-to-VGA adapter
The DVI-I connector can
support a CRT display using
the DVI-to-VGA adapter
The TV display will “clone”
the image of one of the other
two displays
Installing Your RADEON™ Soft Driver
New hardware will be detected after you restart your computer. To finish below steps
click Yes when prompted to restart.
1. Insert your CD, 3D Graphics Series Driver CD, into CD-ROM drive.
2. It auto run menu, 3D GRAPHICS ACCELERATOR, as below picture:
3. Click VGA DRIVER, and ATi Driver are shown and it will auto installation.
4. If you can’t success install it automatically , please conduct page 8 to 9.
7
Windows® “New Hardware Found”
To identify new hardware in Windows® 98 or Windows® Me
1. Windows® 98 or Windows® Me may launch the “Update Device Driver Wizard”
to install the Standard VGA Driver. If it does, follow the step-by-step instructions
below to allow Windows® to correctly identify your new hardware.
If the Wizard does not appear, proceed directly to Installing the ATI Driver for
Windows® 98, Windows® Me.
2. Click Next.
3. Click Finish.
4. Insert your Windows® 98 or Windows® Me CD into your CD-ROM drive.
5. Click OK.
6. Type the following:
D:\WIN98 or D:\WINME
(If D is not your CD-ROM drive, substitute D with the correct drive letter.)
7. Click OK.
8. Click Yes to restart your computer.
You are now ready to install the ATI driver. Proceed to Installing the ATI Driver for
Windows® 98, Windows® Me, and follow the step-by-step instructions to complete
the installation.
Installing the ATI Driver for Windows® 98, Windows® Me
With Windows® 98 or Windows® Me running on your computer, you need to
install the ATI driver to take advantage of the higher performance, resolutions,
and special graphic features of the RADEON™.
To ensure you install the latest driver, use the ATI Installation CD that shipped
with your RADEON™.
8
To install the ATI driver for Windows® 98 or Windows® Me
1. Insert the ATI INSTALLATION CD into your CD-ROM drive.
2.
3.
4.
5.
6.
7.
8.
9.
If Windows® runs the CD automatically, proceed to step 6.
Click Start.
Select Run.
Type the following:
D:\ATISETUP
(If D is not your CD-ROM drive, substitute D with the correct drive letter.)
Click OK.
Click on ATI Easy Install to begin the Installation Wizard.
Click Next.
Click Yes.
Follow the Wizard’s on-screen instructions to complete the installation.
The Express installation option is recommended. If your RADEON™ includes a
multimedia component, the software for that component will automatically be
installed, along with the ATI driver, by selecting this option.
Installing the ATI Driver for Windows® 2000/XP/NT4.0
With Windows® 2000/XP/NT4.0 running on your computer, you need to install the
ATI driver to take advantage of the higher performance, resolutions, and special
graphic features of the RADEON™.
To ensure you install the latest driver, use the ATI Installation CD that shipped with
your RADEON™.
To install the ATI driver for Windows® 2000/XP/NT4.0
1. Insert the ATI INSTALLATION CD into your CD-ROM drive.
2.
3.
4.
5.
6.
7.
If Windows® runs the CD automatically, proceed to step 6.
Click Start.
Select Run.
Type the following:
D:\ATISETUP
(If D is not your CD-ROM drive, substitute D with the correct drive letter.)
Click OK.
Click on ATI Easy Install to begin the Installation Wizard.
Follow the Wizard’s on-screen instructions to complete the installation.
The Express installation option is recommended. If your RADEON™ includes a
multimedia component, the software for that component will automatically be
installed, along with the ATI driver, by selecting this option.
9
Multiple Display Support: Windows® 98, Windows® Me
Windows® 98 and Windows® Me support the simultaneous use of more than one
display device. You simply install a separate PCI card for each additional display you
intend to use. With multiple displays, you can extend your desktop, run different
programs on separate displays, even play some newer games with multiple views.
Each display can have a different resolution and color depth!
Note that, under Windows® 98 and Windows® Me, one graphics card is automatically
designated by the system as the primary card. Each additional graphics card is
designated by the system as a secondary card. Certain 3D and multimedia features are
only available on the primary graphics card. The primary card is the one that
displays the POST (Power On Self Test) information during startup. If you are
installing a PCI graphics card, you need to consider the following:
•
If you install both a PCI and an AGP graphics card in the same system, your
motherboard BIOS may assign the RADEON™ AGP card as the secondary card.
If this happens, some manufacturers offer an upgraded BIOS that allows an AGP
card to be reassigned as the primary card. Contact your system vendor for further
details.
10
Catalyst™ Software Suite
The following section provides an explanation of each ATI tab available after installing the
Catalyst™ Software Suite.
ATI Displays Tab
The ATI Displays tab provides the multi monitor features. Here you can enable/disable
display devices and swap the assignment of Primary and Secondary displays.
Features presented in the following pages may not be supported in all operating systems and/or may appear
differently.
Enabling/Disabling Secondary Displays
1 Access the Windows® Control Panel. Double-click Display.
2 Click on the Settings tab and then the Advanced... button.
3 Click on the ATI Displays tab.
4 Click the enable/disable button for the display device you want to enable/disable.
5 Click OK or Apply to save the changes.
Enabling Extended Desktop Mode
1 Access the Windows® Control Panel. Double-click Display.
2 Click on the Settings tab.
3 Click the monitor icon for the display onto which you want to extend your desktop.
4 Click Yes to enable the selected display.
5 Checkmark the Extend my Windows desktop onto this monitor check box (Windows®
may automatically place it there).
6 Click OK or Apply to save the changes.
Dynamic Display Reassignment
You can change the assignment of your Primary and Secondary display on the fly, without
rebooting. However, before you can change the assignment of the Primary display, at least
one Secondary display must be enabled, and Extended Desktop mode must be enabled.
To enable a Secondary display, refer to the section Enabling/Disabling Secondary Displays.
To enable Extended Desktop Mode, refer to the section Enabling Extended Desktop Mode.
1 Access the Windows® Control Panel. Double-click Display.
2 Click on the Settings tab and then the Advanced... button.
11
3 Click on the ATI Displays tab.
In Windows® XP, Windows® Me The ATI Displays tab shows you the display(s) that are
active. The Primary display has the button depressed. To change the display assignment,
you can click the Primary display’s button or you can click the button of the other display
device.
In Windows® 2000 Clicking on the button will reassign the Primary and Secondary monitors.
Clicking on the button creates a clone or mirror image of the Primary display onto the
Secondary display. Clicking on the button extends your desktop to a Secondary display
located to the right of the Primary display. Clicking on the button extends your desktop to a
Secondary display located below the Primary display.
4 Click OK or Apply to save the changes.
Virtually Repositioning Your Displays
1 On the Settings tab, click and drag the appropriate monitor icon to the desired position.
For example, the secondary display can be dragged to the left of the primary display,
allowing it to be virtually on the left, as shown below.
2 Click OK or Apply to save the changes.
Ratiometric Expansion
Your RADEON Series offers ratiometric expansion (or digital panel scaling as it is commonly
known). This expands a low resolution image to fill a higher resolution panel. However,
ratiometric expansion is only available on the Primary display. Therefore, if a flat panel
display (FPD) is set as Secondary, the Extended Desktop mode is disabled and the resolution
is less than the FPD’s native resolution. This causes the FPD to default to center mode.
12
ATI Color Tab
The ATI Color tab is used to adjust the color settings. You can change the red, green and blue
display colors. Desktop brightness and Game Gamma (brightness) can also be changed.
ATI Color Tab
Desktop Brightness
This increases or decreases the brightness of your desktop. The higher the gamma value, the higher
the brightness of your display.
Color Curve
This adjusts the selected color (red, green or blue check button) by moving the color curve with your
mouse.
Game Gamma button
This accesses Game Gamma Properties.
Defaults button
This allows you to reset the desktop brightness and color settings to default values.
Clicking the Game Gamma button accesses the Game Gamma Properties.
Game Gamma Properties
Red Green Blue sliders
These controls allow you to increase or decrease the color brightness of Direct 3D® and OpenGL®
games played in full screen mode.
RGB Lock
Uncheck this to adjust the RGB sliders individually. Check this to adjust all three sliders at the same
time.
Defaults button
This allows you to reset the Game Gamma settings to default values.
13
ATI Options Tab
The ATI Options tab provides detailed driver information and access to the card’s
specifications. You can also enable or disable the ATI taskbar icon.
ATI Options Tab
Version Information
Provides the Catalyst version number, 2D version number and the driver build information.
Details button
Provides access to the Details tab which lists the card’s hardware details and driver information.
Reactivate all warning messages
This allows you to reactivate any disabled graphics warning messages.
Enable ATI taskbar icon application
Unchecking this allows you to disable the ATI taskbar applications and removes the ATI icon
from your system tray.
Clicking the Details button provides access to the Details tab.
ATI Overlay Tab
The ATI Overlay tab allows you to configure the brightness, contrast, saturation, hue and
gamma properties of your video overlay.
Video Overlay
Video overlay allows for the viewing of full-motion video on your PC. However, there is only
one video overlay, which is only available on the Primary display. The video overlay
controls are automatically activated during playback of any video file type that
supports overlay adjustments.
14
Show ATI icon on taskbar
Unchecking this allows you to remove the ATI icon from your system tray without disabling the ATI
icon applications.
Disable quick resolution feature
Quick resolution feature is accessible by left clicking the ATI icon in the system tray. Checking
this option disables the feature.
Reduce DVI frequency on high resolution
Resolves display corruption or no image at high resolutions (for example 1280x1024 @75Hz) using a
digital DVI display. (This setting has no effect when using a DVI-to- VGA adapter)
Alternate DVI operational mode
Use this option if you are experiencing display corruption on your DVI flat panel.
ATI Overlay Tab Brightness
Use this slider to adjust the brightness of the video image.
Contrast
Use this slider to adjust the contrast in the video image.
Saturation
Use this slider to adjust the vividness of the color. Sliding it all the way to the left removes all color and
produces a black and white picture.
Hue
Use this slider to adjust the pureness or tint of the red, green and blue components of the color.
Gamma
Use this slider to adjust the overall intensity of the video image.
Clone mode options
Click this button to access Clone Mode overlay settings. These settings only apply to video content
when viewed in dual-controller Clone mode.
Defaults button
This allows you to reset the Overlay settings to default values.
15
Clone Mode Settings
Clone Mode Options Standard
Video content is displayed on your Primary display only.
Theater Mode
Video content is displayed on your Primary and Secondary displays. Video content is displayed on
your Secondary display(s) is always in full screen mode.
Note: your computer must be set for 16-bit color depth or higher to use this mode.
Same on all
Video content is displayed on your Primary and Secondary display is exactly the same manner.
For example, all displays will show video output in full screen mode.
Theater Mode Settings
These settings are available when Theater Mode is selected.
Same as source video
The aspect ratio of the source video is maintained for full screen display. Note: that this option may
result in black bars on either the horizontal or vertical sides of the video display.
Full Screen Video
The source video is scaled so that your display is showing full screen. Note: if the source video
contains horizontal black bars, as do some DVD movies, the full screen video will also contain black
bars.
4:3 (Standard TV)
Select this option if the aspect ratio of the display device showing full screen video has the standard
4:3 aspect ratio (standard TVs and monitors).
16:9 (Widescreen)
Select this option if the aspect ratio of the display device is showing full screen video has a 16:9
aspect ratio (widescreen HDTVs).
16
Direct 3D® Control Panel
Using this tab, gamers can fine-tune the settings for Direct 3D® games.
Main and Custom Settings
In the Main Settings you can maximize overall performance by moving the slider to the left,
or you can enhance overall image quality by moving the slider to the right.
Main Settings slider
This allows you to emphasize what kind of application experience you’d like to have. Moving the slider
to the left will maximize application performance, while moving the slider to the right will provide
excellent 3D image quality. Moving this slider from one position to the next changes the individual
Custom Settings sliders found below.
Custom Settings checkbox
When Custom Settings is checked, the Main Settings slider is disabled, allowing you to move each
individual slider in the Custom Settings section below. Setting the individual sliders gives you complete
control over your application experience. Using Custom Settings is recommended for advanced users
only.
SMOOTH VISION Anti-Aliasing
SmoothVision Anti-Aliasing improves image quality by removing jagged edges from 3D images,
resulting in smoother, more natural-looking objects. Selecting Application Preference will result in
high quality images, with negligible reduction in the application’s performance.
SMOOTH VISION slider
SmoothVision Anti-Aliasing can be applied using different sample patterns and sample points such as
2X, 4X, or 6X. Moving this slider to the right increases sampling to provide the most realistic 3D image.
SMOOTH VISION Anisotropic Filtering checkbox
Anisotropic filtering uses a texture filtering technique that blends multiple texture samples together.
Selecting Application Preference will result in high quality textures, with a negligible reduction in the
application’s performance.
SMOOTH VISION Anisotropic Filtering slider
The number of samples taken when anisotropic filtering is performed can vary. By moving this slider to
the right, as the number of samples taken increases, the quality of the final image increases
significantly. 16X provides extremely detailed, crisp-looking images as a result of the largest number of
texture samples possible.
17
Texture Preference slider
Selecting this decides whether your application should use high quality or high performance textures.
Moving the slider to the right delivers the highest quality experience. Moving the slider to the left
emphasizes a high performance solution while still providing good visuals.
Mipmap Detail Level slider
This will allow you to choose the texture quality of the mipmaps the application will use. Mipmaps are a
collection of different sized textures of the same image. As the user moves closer to a 3D object the
image quality should increase, requiring a higher quality texture of the same image. The base mipmap
is the highest quality texture, and all subsequent mipmaps are smaller sized textures of the same
image. Moving the slider to the right selects a higher quality base mipmap. Moving the slider to the left
selects a lower quality mipmap.
Wait for Vertical Sync
Wait for vertical sync will lower the frame rate of full screen games but reduce the image tearing that
can occur with the higher frame rate. Selecting Application Preference allows the application to
decide whether or not it should display its frames at the refresh rate of the monitor. Selecting Always
Off allows the application to run at its highest possible frame rate, regardless of the monitor’s refresh
rate which is typically less than the frame rate at which the application will run.
TRUFORM
Truform uses High Order Surface geometry to generate more detailed and realistic terrain and
character models for applications that support this technology. Select Application Preference to
enable Truform. Select Always Off to disable Truform.
Compatibility Settings button
This button allows you to access advanced settings that can solve compatibility issues for a few
specific Direct 3D® applications.
Defaults
This button allows you to reset the Direct 3D® settings to default values.
Direct 3D® Compatibility Settings
Support DXT texture formats
Enabling this allows applications to use this kind of texture format. There are a few applications that
can only support a limited number of texture formats. By selecting Disabled, the driver will not support
DXT texture formats, thus reducing the number of texture formats supported.
Alternate pixel center
This may eliminate problems with some Direct 3D® games which display vertical and horizontal lines
around textures, or text that appears incorrect. However, this setting should only be used if you are
experiencing the symptoms mentioned, as it may cause problems with other games.
Defaults button
This button allows you to reset the Direct 3D® Compatibility Settings to default values.
18
OpenGL® Control Panel
Using this tab, gamers can fine-tune the settings for OpenGL® games.
Main and Custom Settings
In the Main Settings you can maximize overall performance by moving the slider to the left,
or you can enhance overall image quality by moving the slider to the right.
Main Settings slider
This allows you to emphasize what kind of application experience you’d like to have. Moving the slider
to the left will maximize application performance, while moving the slider to the right will provide
excellent 3D image quality. Moving this slider from one position to the next changes the individual
Custom Settings sliders found below.
Custom Settings checkbox
When Custom Settings is checked, the Main Settings slider is disabled, allowing you to move each
individual slider in the Custom Settings section below. Setting the individual sliders gives you complete
control over your application experience. Using Custom Settings is recommended for advanced users
only.
SMOOTH VISION Anisotropic Filtering checkbox
Anisotropic filtering uses a texture filtering technique that blends multiple texture samples together.
Selecting Application Preference will result in high quality textures, with a negligible reduction in the
application’s performance.
SMOOTH VISION Anisotropic Filtering slider
The number of samples taken when anisotropic filtering is performed can vary. By moving this slider to
the right, as the number of samples taken increases, the quality of the final image increases
significantly.16X provides extremely detailed, crisp-looking images as a result of the largest number of
texture samples possible.
SMOOTH VISION checkbox
SmoothVision (Anti-Aliasing) improves image quality by removing jagged edges from 3D images,
resulting in smoother, more natural looking objects.
SMOOTH VISION slider
SmoothVision (Anti-Aliasing) can be applied using different sample patterns and sample points such
as 2X, 4X, or 6X. Moving this slider to the right increases sampling to provide the most realistic 3D
image.
Texture Preference slider
Selecting this decides whether your application should use high quality or high performance textures.
Moving the slider to the right delivers the highest quality experience. Moving the slider to the left
emphasizes a high performance solution while still providing good visuals.
19
Mipmap Detail Level slider
This will allow you to choose the texture quality of the mipmaps the application will use. Mipmaps are a
collection of different sized textures of the same image. As the user moves closer to a 3D object the
image quality should increase, requiring a higher quality texture of the same image. The base mipmap
is the highest quality texture, and all subsequent mipmaps are smaller sized textures of the same
image. Moving the slider to the right selects a higher quality base mipmap. Moving the slider to the left
selects a lower quality mipmap.
Wait for Vertical Sync
Wait for vertical sync will lower the frame rate of full screen games but reduce the image tearing that
can occur with the higher frame rate. Selecting Application Preference allows the application to
decide whether or not it should display its frames at the refresh rate of the monitor. Selecting Always
Off allows the application to run at its highest possible frame rate, regardless of the monitor’s refresh
rate which is typically less than the frame rate at which the application will run.
TRUFORM
Truform uses High Order Surface geometry to generate more detailed and realistic terrain and
character models for applications that support this technology. Select Application Preference to
enable Truform. Select Always Off to disable Truform.
Compatibility Settings button
This button allows you to access advanced settings that can solve compatibility issues for a few
specific OpenGL® applications.
Defaults
This button allows you to reset the OpenGL® settings to default values.
OpenGL® Compatibility Settings
Force Z-buffer depth
This allows you to explicitly set the Z-Buffer depth. Most applications will work best when Disabled is
selected
Alpha dithering method
When applications use both dithering and alpha blending, visual artifacts can occur. This option allows
you to select how the application should handle both features at the same time. In most cases Error
Diffusion will handle this situation quite well, but there are a few cases where selecting Ordered may
be necessary
Support KTX buffer region extension
Enabling this feature allows rapid updates of those portions of your screen that have changed. Note
that most applications will not be affected by activating this feature
Defaults button
This button allows you to reset the OpenGL® Compatibility Settings to default values.
20
SMARTGART™
SMARTGART is a suite of testing and diagnostics tools that perform a variety of bus tests to
determine the optimal settings for your ATI graphics accelerator installed in your computer.
SMARTGART automatically configures your graphics device to the optimal settings.
SMARTGART does not actually disable any AGP functionality in your computer’s hardware.
It simply instructs the ATI CATALYST driver not to use a specific AGP function if that
specific AGP function hasn’t passed the SMARTGART diagnostics test.
Set AGP Settings
Experienced users can manually change the AGP speed. You will need to reboot your
computer for this change to take effect. The possible AGP speed is dependent on the
motherboard chipset and design. Your computer’s available AGP speeds are shown in the
SMARTGART dialog.
Fast Write
Fast Write allows the CPU to transfer data directly to the graphics accelerator. By default, this
feature is set to ON providing your motherboard’s chipset supports Fast Writes. Some
motherboard specifications may claim chipset support for Fast Writes but may not be
compatible with many different graphics accelerators. Changing the AGP settings could result
in system instability.
This setting is disabled for many computers because the motherboard is not capable of
supporting this feature.
Retest All
Click this button to retest all graphic bus capabilities. All tests and diagnostics are initiated
immediately following a system restart.
Any settings that have previously been set to Off will be turned on, providing the test passes.
Problems can arise if the user enables a secondary graphics accelerator (in a multiple monitor environment) after
the operating system has loaded. The problem exists because the secondary graphics card is enabled after the
SMARTGART diagnostic test have been run. To ensure system stability you should restart the computer after the
secondary graphics accelerator is enabled so that both graphics accelerators can be tested with SMARTGART.
Using TV Out
21
View your PC’s display on a TV
Your RADEON Series has TV Out capability. You can attach your card to a TV and monitor
at the same time. Or you can connect it to your VCR and record your monitor’s display. TV
display is ideal for playing games, giving presentations, watching movies, and browsing the
Internet. The following tips will help you get the most out of your TV Out feature.
IMPORTANT INFORMATION for European Customers
Some PC monitors in Europe cannot be used simultaneously with TV display. When you enable TV
display in Europe, the refresh rate for the monitor and TV is set to 50Hz. Some monitors may not
support this refresh rate and could be damaged. • Please check the documentation supplied with your
monitor to see if your monitor supports a refresh rate of 50Hz.
If your monitor does not support 50 Hz (or if you are not sure), then turn off your monitor
before turning on your PC when using your TV as a display.
For information on disabling TV display, see How To Enable/Disable The TV Display on page 23.
Some TVs in Europe may use a SCART connection. If you use SCART, please read Using SCART
Connectors for European TVs on page 22 before attempting to connect your PC to your European
TV.
Connecting to a TV or a VCR
To connect your RADEON Series to a TV or a VCR, use the available TV Output connector.
Your card will support either a S-video connector or a Composite connector. If your TV has
cable input only, you can connect your card to your TV through your VCR or an RF
modulator (available in most electronics stores). The RADEON Series with the Composite
out connector DOES NOT support connection to TVs with S-Video In. Connecting Your TV
Output to a TV or VCR
1 Turn off your PC and your TV (or VCR).
2 Determine if your TV (or VCR) has a S-Video In or Composite In connection.
3 The TV Output on your RADEON Series will be either a S-Video connector or Composite
connector. Attach an appropriate cable to the TV Output on your card (S-Video or
Composite*). Attach the other end of the cable to your TV (or VCR). Refer to the
illustration for further help.
4 Turn on your PC and your TV (or VCR).
Starting Windows® with TV Display Enabled
The TV screen may become scrambled during the initial Windows® logo display. This is only
a temporary effect and your screen will be restored within a few seconds. During start up,
your RADEON Series will go through a sequence of mode settings, during which your TV
display will remain blank. This process takes only a few seconds and helps program the TV
display.
Using SCART Connectors for European TVs
The above illustration shows how to connect your PC to a European TV using the SCART.
The SCART connector supports only the Composite video format, which means you will
have to use a S-Video-to-Composite video adapter cable if your RADEON Series supports
the S-Video connector. If your European TV has S-Video In, you can use a S-Video cable*
( also available in most consumer electronic stores) rather than the SCART connector if your
RADEON Series supports the S-Video connector.
How To Enable/Disable The TV Display
22
1 Access the Windows® Control Panel. Double-click Display.
2 Click on the Settings tab and then the Advanced... button.
3 Click on the ATI Displays tab. Click on the TV button.
4 Click the enable/disable button.
5 Click OK or Apply to save the changes.
Using and Adjusting TV Out
For information about how to use TV display, right click the ATI taskbar icon, point to Help,
then point to ATI Television Display.
How TV Display Cannot Be Used
A TV cannot be left connected to the RADEON Series if two analog monitors are connected,
even if the TV is off and not enabled in the software. An analog monitor connected to the
DVI-I connector cannot be left connected to your RADEON Series when TV out is enabled.
In both cases, your graphics card will become overloaded, resulting in a dim image on all
devices.
Using a Monitor vs. Using the TV Display
Using your TV for your PC’s display is ideal for playing games, giving presentations,
watching movies, and browsing the Internet. However, the display on your monitor may
change or looked squashed. This occurs because the display adjusts to fit the dimensions of
your TV. To correct the monitor’s display, use the monitor’s control buttons to adjust its
display size and position. Some single frequency monitors may not work with TV display
enabled. If you experience problems when TV display is enabled, disable TV display to
restore your monitor’s display.
Adjusting Monitor Display
The size of the display on your monitor may be smaller and not perfectly centered when you
have TV display enabled. These effects are caused by the changes required to provide a
proper display on the TV. Use the controls available on the Adjustments tab on the Monitor
Properties page (accessible by clicking on the Monitor button on the ATI Displays tab) to
adjust the display on your monitor only. Click on the TV button to adjust the TV display only.
Viewing Text on a TV
A TV is designed primarily to show moving, rather than static, images. The large dot pitch of
a TV (which is fine for moving video) will yield poor quality static images such as text. The
small text sizes commonly used for PC desktops can appear blurred or unclear on a TV. You
can compensate for this by using larger fonts.
To Use Larger Display Fonts
1 Access the Windows® Control Panel. Doubleclick Display.
2 For Windows® XP, click the Appearance tab. For Windows® Me and Windows® 2000,
click the Settings tab, the Advanced... button, then the General tab.
3 In the Font Size box, select the size you want your displayed fonts to be.
4 Click Apply. If prompted, click Yes to restart your PC.
Reducing Edge Distortion
23
When using a TV for your PC’s display, you may see some edge distortion on the left and
right side of your TV screen. This effect depends on your TV and the PC application you are
running. To reduce edge distortion, you can increase the TV display’s horizontal size.
To Increase the Horizontal Size
1 Access the Windows® Control Panel. Double-click Display.
2 Click on the Settings tab and then the Advanced... button.
3 Click on the ATI Displays tab.
4 Click on the TV button.
5 Click the Adjustments tab.
6 In the Screen Size section, click on the plus (+) button beside the horizontal arrowheads to
increase the horizontal size of the TV display.
7 Click OK or Apply to save the changes you have made. You can also reduce edge
distortion by increasing the TV’s contrast.
To Increase the TV Contrast
1 Access the Windows® Control Panel. Double-click Display.
2 Click on the Settings tab and then the Advanced... button.
3 Click on the ATI Displays tab.
4 Click on the TV button.
5 Drag the Contrast slider to the right to increase the contrast.
6 Click OK or Apply to save the changes you have made.
Changing Display Configurations
If you move your PC to a place where you are using TV display only, make sure that you
have the TV display feature enabled. You can set your display resolution as high as 1024x768.
However, higher resolutions will result in a virtual desktop. If a TV is your only display
device and a higher mode is selected, the display on your TV will disappear.
Using Older Games and Applications
Some older games and applications may program your RADEON Series directly, to run
under a specific display mode. This may cause your TV display to turn off automatically or
become scrambled (the PC monitor will not be affected). Your TV display will be restored
once you exit the game or if you restart your PC.
Using HydraVision™ for Windows® 98SE / ME/2000/XP/NT4.0
24
HydraVision™ software is specifically designed for use with Windows ® 98SE/ME/2000/XP/NT4.0 and
installation enables the Desktop Manager and creates a Windows ® program group for HydraVision™
display management software.
HydraVision™ and the Desktop Manager are activated whenever Windows ® starts. Installing
HydraVision™ adds menu options to the ATI Icon.
Click on the ATI icon to access the application’s features and help, or to unload the HydraVision™
Desktop Manager.
Accessing HydraVision™ Desktop Manager
The HydraVision™ Desktop Manager allows you to modify your display options. You can access the
Desktop Management and Hot Keys dialog boxes by clicking on the appropriate tab in the
Desktop Manager.
Along the bottom of each HydraVision™ dialog are four buttons:
OK, Cancel, Apply and Help.
OK implements the changes you’ve made in the HydraVision™ dialog and exits the Desktop Manager.
Changes take effect immediately unless you see a message prompting you to restart your computer.
Cancel discards all changes made to any section of the HydraVision™ dialog and closes the Desktop
Manager.
Apply implements your changes without closing the Desktop Manager.
Help connects to local or online HTML-based help. You can also get context-sensitive on-screen help
by moving your mouse over the relevant text for each control.
Desktop Management Controls
25
The Desktop Management Dialog
The Desktop Management dialog lets you determine the behavior of pop-up windows and dialog
boxes in a multiple monitor environment.
Dialog control:
Enable dialog repositioning—Toggles dialog control on and off. When it is checked, you can choose
to have dialog boxes appear on the parent application’s monitor. (The parent application is the
application that generated the dialog box.) If the parent application or associated monitor cannot be
located, the dialog box defaults to monitor 1. You can also choose to have dialog boxes appear on the
monitor in which the cursor is located or to always appear on a specific monitor in the array.
Window control:
Single monitor windows—When this box is checked, windows are sized no larger than a
single monitor. Windows that are placed on monitor splits are automatically relocated to the
monitor on which most of the window appears.
HydraVision™ Max/Restore button management—Allows you to control the behavior of the
Windows® Maximize button. When HydraVision™ is running, a HydraVision™ Max/Restore
button appears in the upper right corner of your application title bars. Clicking this icon makes
the active window maximize in one of two ways:
Max to window corners causes windows to maximize to the monitor(s) that contain the
window’s upper left and lower right corners.
Max to full desktop causes windows to maximize to the entire monitor array.
Max child windows—Keeps windows generated by parent applications from splitting across monitors.
(A child window is a window residing within a parent application window.) The ability to keep child
windows on a single monitor when maximized is extremely useful for editing multiple documents side
by side in a parent application.
Note:The HydraVision™ application title bar icon changes from a single square to two smaller
squares when a window is in a HydraVision™ maximized state. Clicking the icon again restores
the active window to its default state as a single square.
General:
26
Application position memory—Check this box to “remember” the size and location of application
windows when they are closed and reapply those settings when the application is reopened.
Automatically align monitors—Under Windows ® 98SE and Windows ® Me, you can manually define
monitor placement from the Settings dialog in the Display Properties dialog box. When this box is
checked, HydraVision™ will override user-defined monitor placement if the monitors are not evenly
aligned.
Note:This control will work only if all monitors are running at the same resolution and your
desktop is configured as a rectangle (monitors side-by-side).
Remove HydraVision™titlebar buttons—This box removes or restores the buttons placed on
the title bar in installed applications.
Remove MultiDesk system tray icon—This box removes or restores the MultiDesk system
tray icon.
MultiDesk Settings—This button gives access to all the MultiDesk Properties. Here you can enable,
disable and name active desktops.
Load/Unload Desktop Manager—This button restores or removes the HydraVision™ Desktop
Manager tracking program. You should only select this option if you do not want to use any multiple
monitor dialog box controls and window controls or hot keys.
Note:MultiDesk will not reload automatically when Windows ® restarts. You will need to reload
MultiDesk from the Desktop Manager.
Load/Unload MultiDesk—This button restores or removes multiple desktop functionality.
Note:MultiDesk will not reload automatically when Windows ® restarts. You will need to reload
MultiDesk from the Desktop Manager dialog box.
Individual Application Settings—This button allows you to specify, enable and disable desktop
management settings for individual applications. You can access these settings by clicking on the
down arrow of the HydraVision™ icon in the application title bar or by clicking the Individual
Application Settings button in the Desktop Management dialog.
Note:These settings override the global settings defined in the Desktop Management dialog.
Hot Keys Controls
27
HydraVision™ allows you to specify hot
key shortcuts for common operations
such as starting applications, snapping
applications to designated monitors,
and changing display resolution.
NOTE: Hot Keys only work if
HydraVision HydraVision™ is installed
and loaded.
The Hot Keys Dialog
Create/Remove Hot Keys
To create custom hot key sequences, select a Modifier key (Shift, Alt, etc.), a Hot key, and the Hot
key function you want this key combination to perform. Click Add to enter your new combination in
the Assigned hot keys list box. Click Apply to activate assigned hot keys.
Note:ATI recommends that a modifier key be used with any function key (F1, F2, etc.)
assigned as a hot key. This will prevent interference with the function of these keys in individual
applications.
To delete a hot key from the Assigned hot keys list box, highlight it, click Remove, and then click
Apply.
You can also disable all hot keys listed in the Assigned hot keys list box by checking the Disable hot
keys box near the bottom of the Hot Keys dialog.
Using Hot Keys
You can use any assigned hot key at any time, from within any application, to change your display.
Provided hot key functions include:
Snap App to Monitor
Allows you to move or “snap” active windows or dialogs from
monitor to monitor for quick placement and viewing of
desktop contents.
HydraVision™ Pop-up Menu
Allows on-the-fly access to HydraVision™ controls.
Run Application
Lets you start any application with a hot key.
Gather All Windows to Monitor 1 Allows you to find applications that are hidden or are open
and lost on disabled monitors.
Find Cursor
Locates the cursor on a busy or crowded desktop
Next Desktop
Accesses other active desktops
Zoom Display In/Out
Causes the desktop resolution to increase or decrease.
Zoom In/Out on Monitor
Causes the resolution of the active monitor to increase or
decrease.
MultiDesk
28
HydraVision™ software supports multiple desktops. With MultiDesk, one active desktop will always be
visible, while up to eight active desktops can reside in the background. When MultiDesk is running, the
MultiDesk icon in the system tray displays the number assigned to the current desktop.
Note:MultiDesk is installed with HydraVision™. However, multiple desktop support and
HydraVision™ can be loaded/unloaded and operated independently of each other.
Right-click on this icon to access MultiDesk
controls. In addition to accessing active
desktops from the system tray, you can also
access active desktops with a Hot key
shortcut.
MultiDesk System Tray Icon
NOTE: Hot Keys only work if HydraVision™ is
installed and loaded.
MultiDesk Pop-Up Menu
To switch to another defined desktop, select the appropriate desktop number from the pop-up menu.
To enable, disable and name active desktops, select MultiDesk Properties from the pop-up menu. To
arrange applications within active desktops, or to enable specific applications on all desktops, select
Arrange MultiDesk from the
pop-up menu.
MultiDesk Properties allows you to control the desktops. Right-click a Desktop tab to set it Active,
Inactive, or Disabled. Inactive desktops MAY contain applications; however, they are temporarily
disabled. Disabled desktops cannot contain any applications. If an Active or Inactive desktop that
contain applications is disabled, the application will be automatically moved to an Active desktop.
You can also give a desktop a unique name. Double-click the desired desktop tab. The tab will turn
gray and a blinking cursor will appear. Simply type in the new name. When you have renamed the
desktop click on the tab to save the change.
Keep on all desks allows you to have a selected application visible on all desktops.
The MultiDesk functionality can be removed by selecting Unload HydraVision™ MultiDesk from the
pop-up menu of the ATI Icon or the Desktop Manager.
Note:MultiDesk will not reload automatically when Windows ® restarts. You will need to reload
MultiDesk from the Desktop Manager.
Troubleshooting
Tips
29
The following troubleshooting tips may help if you experience problems. Contact your
dealer or ATI for more advanced troubleshooting information.
•
Check that the card is seated properly in the AGP slot.
•
Ensure the display cable is securely fastened to the card’s display connector.
•
Make sure that the monitor and computer are plugged in and receiving power.
•
If necessary, disable any built-in graphics capabilities on your motherboard.
For more information, consult your computer’s manual or manufacturer.
(NOTE: Some manufacturers do not allow the built-in graphics to be disabled or to
become the secondary display.)
•
Make sure you selected the appropriate display device and graphics card when you
installed the ATI driver.
•
For more troubleshooting tips, right-click the ATI icon in the taskbar and select
Troubleshooting.
•
If you have problems during bootup, start your computer in Safe Mode. In
Windows® 98 or Windows® Me, press and hold the CTRL key until the
Microsoft® Windows® Startup Menu appears on the screen. Then select the
number for Safe Mode, and press Enter. (You can also use F8 to bring up the
Microsoft Windows® Startup Menu.) In Safe Mode, bring up the Device
Manager and check for duplicate display adapter and monitor entries if you are
only using one graphics card.
•
For more assistance, use the Troubleshooting Guide located in the Windows®
Help or contact your computer manufacturer.
ATI is a registered trademark of ATI Technologies Inc. in Canada, the United States and/or other countries. Windows is a
registered trademark of Microsoft Corporation in the United States and/or other countries. All other trademarks and/or registered
trademarks are the properties of their respective owners.
30