1
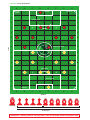
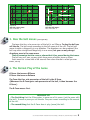
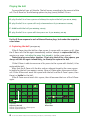
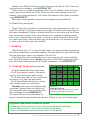
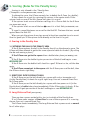
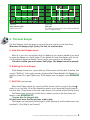
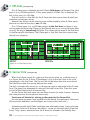
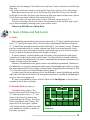
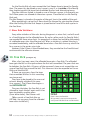
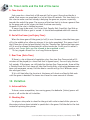
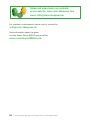
Figure 01 - Set Up for Kick Off
A
1
B
C
D
corner
square
E
F
G
H
corner arc
goal area
2
1
2
rows
penalty area
3
3
4
4
5
5
6
6
7
7
8
8
center spin circle
8
8
7
7
6
6
5
5
penalty arc
4
4
3
3
penalty spot
2
2
1
1
goal line
A
B
C
D
E
F
G
H
columns
Goal Keeper
Defenders
Strikers and Midfielders
Field Players
Attention! Choking hazard! Small pieces, not for children under three years old.
1. Set Up and Kick-Off
2. How the Pawns Move
3. How the Ball Moves
4. The Normal Play
5. Scoring
6. The Goal Keeper
7. Off Side
8. Corner Kick
9. Fouls
10. Free Kick
11. Time Limits
12. Variation
Description:
Soccer Tactics WORLD combines the strategy of soccer with the heart of the game.
Eleven players per team on a traditional full-length field. This game includes dribbling,
passing and capturing the ball; and intense battles for ball control.
But watch out - yellow and red cards can be handed out! There are short and long
passes, and offensive and defensive strategies. Free Kicks, Goal Kicks, Corner Kicks
and Penalty Kicks. And don’t be caught Off-Side!
Play a full 90 minute game (or set your own time). This game plays like the real
thing. Soccer Tactics WORLD is Pure Soccer Emotion!
Ages: 7+
Players: 2 (for 4 players you can have 2 players on each team)
Included: 2 teams (11 pawns each: red and blue), 2 dice, 1 football disc, 1 timer,
5 red cards, 10 yellow cards, 2 spinners (1 is a spare), 1 board, 2 score dials, short
rules, 1 instruction booklet, 1 trophy, 1 shooting die (see page 13)
Object of the game:
The object of the game is to win the game by out-scoring your opponent in a
timed 90 minute game (2 forty-five minute halves) or whatever time limit that you
choose.
1. Set Up and Kick-Off
A. Set Up (see Figure 01)
Each team has eleven pawns (players): Two strikers and four midfielders (pawns
with numbers); four defenders (without numbers) and one Goal Keeper (1). The ten
players who are not the Goal Keeper are also called field players.
Row 1 will have the Goal Keeper on one of the two squares in the Goal Area.
Row 4 will have the 4 defenders in columns B, D, E and G.
Row 6 will have the 4 midfielders (any numbers) in columns A, C, F and H.
Row 8 will have the two strikers (any numbers) lined up anywhere in the row.
However the team kicking the ball (the O-Team) must have one pawn with the ball
in the circle (either square). The other team’s strikers must respect the one square
Free Kick zone (see ‘Free Kick’, rule 10).
The O-Team (Offense) sets up their pawns first.
Soccer Tactics WORLD - Rules © 2004-2007 Randy J. Thompson | Stein-Thompson Games
3
Place the yellow and red cards anywhere beside the board.
Each team has one die.
B. Kick-Off
Before the timer is started both teams roll the dice to see who gets to Kick-Off.
The team that has the higher roll gets to kick off the second half. The team with the
lower roll gets to kick off the first half. This team then starts the game as the
O-Team (Offense).
To kick off the game, the O-Team places the ball and one of its strikers in one of
the squares in the center circle. The pawn can be placed directly on the ball (this
shows the ball possession). The opponent’s strikers have to respect the one square
zone around the pawn with the ball (see Figure 12).
When everything is set up, you start the timer. The O-Team rolls the die to kick
(play) the ball. (Note: On the Kick-Off you do not move a pawn first.)
The ball must move forward and across the center line. The O-Team then rolls the
die again and can attempt to capture the ball (see ‘Capturing the ball’, rule 4A).
The pawn that did the Kick-Off is not allowed to touch the ball again until another
pawn has touched it. (Just like real Soccer!)
2. How the pawns move (see Figure 02)
To move a pawn you roll the die. The pawn moves according to the full amount
of the roll.
The pawn can move straight or diagonally in any direction. The directions can be
combined, but you can only change directions once in the same move.
A pawn cannot go back to a square that it has crossed during that move.
Pawns can pass through squares that are occupied with a pawn from the same team
but cannot pass through squares with pawns of the opponent’s team (because the
opponent’s pawn blocks the way).
The pawn can only go as far as the same square as the opponent; not past it (on that
move). On a subsequent move you can move past it.
Defenders have to stay in their own half. They are not allowed to cross the center
midfield line. Strikers and midfielders can go anywhere on the board. The Goal Keeper
can move only one square in any direction (see ‘The Goal Keeper’, rule 6).
Each square may have only one pawn from each team on it maximum. Two pawns
from one team are not allowed to be on the same square.
The maximum amount of pawns (from the same team) that are allowed to be
directly beside each other in a row is four. The maximum amount of pawns (from the
same team) that are allowed to be directly beside each other in a column is three.
This is to avoid too much blocking.
In the Penalty Area the maximum amount of field players allowed from either
team is four (besides the Goal Keeper).
Only one pawn from each team is allowed in the Goal Area. Usually one is the
Keeper.
Each move has a time limit of 60 seconds from when the die is rolled (see ‘Time
Limits’, rule 11).
4
Soccer Tactics WORLD - Rules © 2004-2007 Randy J. Thompson | Stein-Thompson Games
Figure 02
How the pawns move
Roll of the die: 4
Figure 03
How the ball moves
Roll of the die: 4
3. How the ball moves (see Figure 03)
The team that has sole possession of the ball is on Offense. To play the ball you
roll the die. The ball moves according to the full amount of the roll. The ball can
move straight or diagonally in any direction. The directions can be combined (the
ball may move straight and diagonally in one move) but you can only change
directions once in the same move.
The ball cannot go back to a row or column that it has passed during that move.
The ball can pass over squares which have pawns of either team on them.
Each move has a time limit of 60 seconds from when the die is rolled (see ‘Time
Limits’, rule 11)
4. The Normal Play of the Game
O-Team: the team on Offense
D-Team: the team on Defense
The Team that has sole possession of the ball is the O-Team.
(Whenever the D-Team gains sole possession of the ball, it then becomes the
O-Team.)
The O-Team moves first.
OFFENSIVE SET
• The first thing that the O-Team does is move one of its pawns (not the pawn with
the ball). To move a pawn you roll the die. The pawn moves according to the amount
of the roll.
• The second thing that the O-Team does is play (move) the ball:
Soccer Tactics WORLD - Rules © 2004-2007 Randy J. Thompson | Stein-Thompson Games
5
Playing the ball
To move the ball you roll the die. The ball moves according to the amount of the
roll. The O-Team has the following options to play (move) the ball. It can:
A. play the ball to a free square and attempt to capture the ball (see rule 4A, below)
B. play the ball to a square with only a teammate on it (see ‘Direct Pass’ rule 4B)
C. dribble with the ball (see ‘Dribbling’, rule 4C)
D. play the ball to a square with two pawns on it (see ‘Battling’, rule 4D)
For the D-Team response to each of these offensive plays, look under the respective
rules below.
A. Capturing the ball (see Figure 04)
If the O-Team plays the ball to a free square (a square with no pawns on it), then
the O-Team rolls the die again immediately and can attempt to capture the ball (by
moving any pawn, including the pawn that played it, to the same square).
These two plays are always together. If you play the ball to a free square, you
always roll the die again immediately, to attempt to capture the ball.
If the O-Team is able to move one of its pawns to the square with the ball, it has
captured the ball.
After that the D-Team rolls the die, and can attempt to get to the same square
to battle for the ball (see ‘Battling’- rule 4D). Move a D-Team pawn the amount of the
roll. If the D-Team can reach the square with the ball and the O-Team’s pawn, then
there is a battle for the ball.
If the D-Team cannot reach this square, then it becomes the turn of the O-Team
again.
C
B
A
Figure 04
Capturing the ball
Pawn A plays the ball to a free square.
Pawn B captures the ball.
6
B
A
Figure 05
Direct Pass
Soccer Tactics WORLD - Rules © 2004-2007 Randy J. Thompson | Stein-Thompson Games
(However the D-Team still moves a pawn the amount of the roll.) The O-Team has
kept possession and begins a new OFFENSIVE SET.
If the O-Team is not able to reach the ball on its first attempt, it will still move
a pawn the amount of the roll. If the D-Team can then reach the ball on its first
attempt, it has captured the ball. The D-Team then becomes the O-Team and begins
a new OFFENSIVE SET.
Both teams always get the same amount of attempts to get to the ball.
B. Direct Pass (see Figure 05)
If the O-Team plays the ball to a square that has only a teammate on it, this is a
Direct Pass (there is no D-Team move on this play). The O-Team must then play the
ball again immediately. If there is another Direct Pass on this extra play, the O-Team
does not go again (except if the second direct pass is received inside the penalty
area or on a long distance shot square - see rule 5B - in which case the O-Team shoots
for a goal right away.) After the extra play the D-Team then rolls the die and tries
to move a pawn to the square with the ball.
C. Dribbling
If the O-Team rolls a ”1” to play the ball, there is an option (besides playing only
the ball) to move the ball and pawn together. The pawn which has possession of the
ball may move one square in any direction with the ball.
The D-Team then rolls the die and tries to move a pawn to the square with the
ball. If the D-Team gets there a battle takes place. If the D-Team cannot get there
then the O-Team keeps possession of the ball and begins a new OFFENSIVE SET.
D. ”Battling” for the ball (see Figure 06)
C
A battle immediately takes place when:
B
• The D-Team moves a pawn to the square
that has the O-Team pawn with the ball.
• The O-Team plays the ball to a square with
two pawns on it (one from each team).
• The O-Team dribbles the ball to a square
A
with a D-Team pawn on it (see rule 4C).
To battle, both teams roll the dice at the
Figure 06
Battling for the ball
same time. The team with the highest roll
The D-Team pawn (C) moves to the square
wins the battle, gets sole possession of the
with the O-Team pawn and the ball.
ball, and begins a new OFFENSIVE SET.
(The team that wins the battle places its
pawn on the ball to show the ball possession.) If there is a tie, roll the dice again.
Any pawn on your team can battle for the ball.
The defender (halma) pawns count as +1 on top of the die roll (battling).
The Goal Keeper counts as +2 on top of the die roll (battling).
Strikers and midfielders count the exact amount of the die roll.
Soccer Tactics WORLD - Rules © 2004-2007 Randy J. Thompson | Stein-Thompson Games
7
5. Scoring (Rules for the Penalty Area)
Scoring is only allowed in the *Penalty Area.
(*Exception: see ‘Long Distance Shot’, rule 5B.)
To attempt to score, the O-Team normaly has to defeat the D-Team (in a battle).
It then shoots for a goal, by spinning the spinner in the center circle. If the
spinner lands on one of the four Soccer ball areas it is a goal!
If the spinner lands on one of the two red flags it is a Corner Kick for the O-Team
(see ‘Corner Kick’, rule 8).
If the spinner lands on one of the two areas it is a Goal Kick (see ‘Goal Kick’, rule
6C).
If a goal is scored the teams are re-set for the Kick Off. The team that was scored
against does the Kick Off.
When you spin the spinner it must go around at least two complete turns to count.
Give it a good spin! If the spinner lands directly on the line it is a goal.
A. Scoring in the Penalty Area
1. CAPTURING THE BALL IN THE PENALTY AREA
If the O-Team captures the ball in the Penalty Area it has the chance to score. The
D-Team will then attempt to get to the same square to battle for the ball. (By rolling
the die and moving a pawn.)
If the D-Team can get to the square then a battle takes place (see ‘Battling’, rule
4D).
If the D-Team wins the battle it gains possession of the ball and begins a new
OFFENSIVE SET.
If the O-Team wins the battle it will shoot for a goal! If there is a tie, roll the dice
again.
If the D-Team cannot get to the square with the O-Team pawn and the ball, then
the O-Team shoots right away.
2. DIRECT PASS INTO THE PENALTY AREA
If the O-Team passes the ball directly to a square with only a teammate on it
(in the Penalty Area) it shoots for a goal right away. Even on a second Direct Pass.
No D-Team move.
If the O-Team passes the ball directly to a square with two pawns on it (in the
Penalty Area) a battle takes place immediately. If the O-Team wins it shoots. If the
D-Team wins it gets possession of the ball and begins a new OFFENSIVE SET.
B. Long-Distance Shot (see Figure 07)
There are two squares marked with a star just outside of the Penalty Area.
If an O-Team pawn receives a Direct Pass on one of these squares it is a scoring
chance. Even on a second Direct Pass.
The O-Team shoots immediately! The Long-Distance Shot squares count as normal
for all other plays.
8
Soccer Tactics WORLD - Rules © 2004-2007 Randy J. Thompson | Stein-Thompson Games
Figure 07
Long-Distance Shot
Squares C4 and F4
Figure 08
Goal Kick
All of the opposition pawns must leave the Penalty
Area for the Goal Kick.
6. The Goal Keeper
The Goal Keeper starts the game on one of the two squares in the Goal Area.
Whenever the Keeper plays (kicks) the ball, he uses two dice.
A. How the Goal Keeper moves
When it is your turn to move a pawn (on defense) you have to decide if you want
to move the Keeper or a field player. If you decide to move the Keeper, you do not
roll the die but move the Keeper. He can move one square in any direction.
If the die is rolled, you must move a field player (the Keeper cannot be moved).
B. Battling the Goal Keeper
If the Keeper comes to a square with an O-Team pawn and the ball to battle, the
normal ”Battling” rules apply (rule 4D). Anytime the O-Team defeats the Keeper in a
battle it shoots for a goal right away. If the Keeper wins he begins a new OFFENSIVE
SET.
C. Goal Kick (see Figure 08)
When the O-Team shoots for a goal and the spinner lands on one of the two
areas it is a Goal Kick. All of the opposition pawns must leave the Penalty Area for
the Goal Kick. (Place them in the row, and columns just outside of the Penalty Area.)
The Keeper gets possession of the ball on either square in the Goal Area and
begins a new OFFENSIVE SET.
Use two dice for the goal kick.
The ball must leave the Penalty Area to be in play.
The Keeper can not touch the ball again (after playing it) until another pawn has
touched it. (Just like in real Soccer!)
Soccer Tactics WORLD - Rules © 2004-2007 Randy J. Thompson | Stein-Thompson Games
9
7. Off-Side (see Figure 09)
If an O-Team pawn is between the last D-Team field player and the goal line, that
pawn is in an Off-Side position. If this pawn receives a Direct Pass or captures the
ball in this area, it is Off-Side.
This will result in a Free Kick for the D-Team from the square where the ball was
played to (see ‘Free Kick’, rule 10).
However the ball can come into this area and be played by other O-Team pawns
that are on-side and the play is not Off-Side.
If an O-Team pawn is in an Off-Side position in the Goal Area and there is any
scoring opportunity for the O-Team (in the Penalty Area or on a Long-Distance-Shot
square), the play is immediately Off-Side. This is because the pawn in the Goal Area
is interfering with the Keeper. The D-Team gets a Free Kick from the square where
the ball was played to.
Figure 09
Off-Side
Pawn B is in an Off-Side position.
Figure 10
Corner Kick
8. Corner Kick (see Figure 10)
When the O-Team shoots for a goal and the spinner lands on a red flag area, it
is a Corner Kick for the O-Team. If the Keeper is out of the Goal Area it has to be
placed back in the Goal Area. The Corner Kick will be taken from the same side of
the field from where the scoring attempt was made.
The ball is placed in the corner arc, on the corner square, where the kick will come
from. The pawn that attempted to score will kick the Corner Kick. Place this pawn
just off of the field close to the corner flag.
For the Corner Kick each team can now move 3 pawns (or make 3 moves - because
the same pawn can be moved more than once).
You do not roll the die for setting up the pawns for the Corner Kick.
You can move any pawns from anywhere on the board, to anywhere on the board.
(Of course the defenders and the Keeper must stay in their own half.)
So beginning with the D-Team, each team now alternately places 1 pawn at a time.
No pawns from the D-Team can be within 1 square all around the ball (Free Kick
Zone). Only 4 pawns maximum from the D-Team are allowed in the Penalty Area
10
Soccer Tactics WORLD - Rules © 2004-2007 Randy J. Thompson | Stein-Thompson Games
(besides the Goal Keeper). The O-Team can only have 4 pawns maximum in the Penalty
Area also.
Only 1 pawn from each team can occupy the Goal Area squares. One is the Keeper.
When both teams are set up for the Corner Kick then the O-Team rolls the die.
To do the Corner Kick, the pawn near the corner flag now moves to the corner square.
The O-Team now moves the ball the amount of the roll.
The ball starts out from the corner square. The next square counts as 1.
The pawn that does the Corner Kick is not allowed to touch the ball again until
it has been touched by another pawn (from either team).
There is no Off-Side on a Corner Kick.
9. Fouls (Yellow and Red Cards)
A. Fouls
When battling (rule 4D) takes place and one team rolls a “6” (best) and the other team
rolls a “1” (worst) this means that a foul has been committed by the team rolling the
”1”. A Free Kick is awarded to the team that rolled the ”6” (see ‘Free Kick’, rule 10). The pawn
that has committed the foul is shown a yellow card. When one team commits a foul,
the other team shows the card to the pawn and places the card in the foul section
at the far end of the board (beside the number or letter).
If a pawn receives a second yellow card, that pawn is disqualified from the game!
A yellow and a red card are shown to that pawn, and the red card is placed in the foul
section (remove the yellow card). The pawn is removed from the game and placed on its
number or letter in the foul section.
However, the defenders are a group and are not individually numbered. Therefore if
the defenders (as a group) receive two yellow cards, the defender pawn that was shown
the second yellow card is then shown a red card and is disqualified from the game. (The
”D” in the foul section is for the Defender (halma) pawns.)
To make space for future yellow cards for the defenders, move that defender and the
red card to the side of the board. The next yellow card that is awarded to the defenders
count as their first yellow card.
If a foul is committed by a pawn of the D-Team in the Penalty Area, a Penalty Kick is
awarded to the O-Team (see below).
B. Penalty Kick (see Figure 11)
If a battle takes place in the
Penalty Area, and the O-Team rolls a
”6” and the D-Team rolls a ”1”, this
means that there has been a foul
committed by the D-Team. A Penalty
Kick is awarded to the O-Team. The
pawn of the D-Team gets a yellow
card, which will be placed in the foul
area beside the number or letter of
the pawn (see above).
Figure 11
Penalty Kick
Soccer Tactics WORLD - Rules © 2004-2007 Randy J. Thompson | Stein-Thompson Games
11
For the Penalty Kick all pawns except the Goal Keeper have to leave the Penalty
Area. The pawns can be placed on any square in rows 3 or 4 outside of the Penalty
Area, beginning with the team that committed the foul and alternating teams.
The pawn that was fouled is placed on one of the two squares in the penalty arc.
No D-Team pawns are allowed on these two squares. Place the ball on the Penalty
Kick spot.
The Goal Keeper is placed on the center of the goal line in the middle of the goal.
When everything is set up the O-Team shoots for the goal by spinning the spinner.
After the Penalty Kick the Goal Keeper is placed back on one of the two squares in
the Goal Area.
C. Minor Rule Violations
Every other violation of the rules during the game is a minor foul, and will result
in a Free Kick given to the offended team. No red or yellow cards (or Penalty Kicks)
are awarded for these minor fouls. An example of an minor foul would be the moving
of a defender pawn into the offensive half. When a violation is noticed the play is
corrected immediately, and the offended team takes a Free Kick from any one of the
four squares in the center spin circle.
However if the O-Team is the offended team, they can decline the Free Kick and
continue with the offensive chance.
10. Free Kick (see Figure 12)
After a foul (see ‘Fouls’, rule 9) the offended team gets a Free Kick. The offended
team gets the ball on the square where the foul was committed. The pawn that was
fouled does the Free Kick. All pawns of the opponent’s team must respect the one
square Free Kick Zone around the ball. This zone must also be respected on Corner
Kicks and the Kick-Off.
If there are any pawns from the team
that committed the foul in this zone they
must move out.
They have to be placed in the rows and
columns directly outside of this zone
(any squares). The O-Team then begins a
new OFFENSIVE-SET.
The pawn that does the Free Kick is not
allowed to touch the ball again until it has
been touched by another pawn
Figure 12
Free Kick
(from either team). Real Soccer rule!
Pawn A does the Free Kick.
[When you do a Free Kick after an
All opponent’s pawns must respect the
Off-Side, use any pawn from the offended
one square Free Kick Zone around the ball.
team close to the ball.]
12
Soccer Tactics WORLD - Rules © 2004-2007 Randy J. Thompson | Stein-Thompson Games
11. Time Limits and the End of the Game
A. Time Limits
Each move has a time limit of 60 seconds (ball or pawn) from when the die is
rolled. Most moves are completed in a lot less than 60 seconds. This time limit is in
the rules to make sure that nobody is delaying the game on purpose, especially
towards the end of the game. The purpose of the time limit is to have a general flow
to the game and not for players to check the timer constantly.
However: If the rule is violated see rule 9C.
If pawns have to be reset - for Corner Kick, Penalty Kick, Free Kick, Goal Kick or
the new Kick Off after a goal is scored - it should be completed within 60 seconds.
B. End of the Game (and Injury Time)
When the timer goes off the game (or half) is over. However, when the timer goes
off in the middle of an offensive chance, it has to be completed. This means that if
the O-Team has at least played the ball into the *Penalty Area (before the timer goes
off) it must be allowed to complete this offensive chance. It will result in either a
goal or not. Corner Kicks must be allowed to be completed as well.
*Or has played a Direct Pass to a Long-Distance Square
C. Over Time (Extra Time)
If there is a tie at the end of regulation play, then two Over Time periods of 15
minutes will be played (or a time limit that is agreed upon). You must play the two
full periods. If the teams are still tied after the two Over Time periods, there will be
a Penalty Shoot Out. Each team will take five Penalty Kicks, alternating between each
team (see ‘Penalty Kick’, rule 9B). Roll the dice to see who will go first. Whoever scores
the most goals wins.
If it is still tied after the shoot-out, the teams will shoot one Penalty Kick each
until the game is decided. The teams must have the same amount of chances.
12. Variation
A. Advanced Rule:
To have a more competitive, low-scoring game, the defender (halma) pawns will
count as +2 on the die roll in battles.
B. Shooting Die:
For players who prefer to shoot for the goal with a die instead of the spinner in
the center circle we have included a special die in the game. Roll the die for the shot
instead of spinning the spinner.
Soccer Tactics WORLD - Rules © 2004-2007 Randy J. Thompson | Stein-Thompson Games
13
Yellow and green teams are available
on our website: www.stein-thompson.com
email: [email protected]
For questions and comments please send us an email to:
[email protected]
More information about the game
and the Soccer Tactics WORLD League online:
www.soccertacticsWORLD.com
14
Soccer Tactics WORLD - Rules © 2004-2007 Randy J. Thompson | Stein-Thompson Games