1
Step 2: Program your remote
Universal Remote Control
Owner’s Manual
RCR412BR / RCR412SR / RCR412SIR
Manual del Propietario (parte posterior)
SAVE THIS MANUAL AND THE CODE LISTS!
Remote controls can sometimes lose their programming
when you change the batteries. Make sure you keep the
manual and code lists in a safe place so that you can
reprogram the remote if you need to.
Tip: This remote is already programmed to operate
most RCA-branded TVs, VCRs, DVD players and satellite
receivers. Just press the corresponding key—DVD for
>Ê6Ê«>ÞiÀ]Ê/6ÊvÀÊ>ÊÌiiÛÃ]Ê-/U
U/
ÊvÀÊ>Ê
Ã>ÌiÌiÊÀiViÛiÀ]Ê6
,U18ÊvÀÊ>Ê6
,°
To use this universal remote with your home entertainment
system, first you need to program it to control your devices.
There are four ways you can program the universal remote to
operate your devices:
UÊ
UÊÊ
/
iÊBrand Code Search searches through the codes for
select brands of devices. It’s not as easy as the auto code
search, but it can be faster.
UÊÊ
/
iÊDirect Code Entry lets you enter a code from the
accompanying code list for your brand of device. It’s not as
easy as the other methods, but it’s potentially the fastest
method.
UÊÊ
/
iÊManual Code Search lets you manually go through
all the codes for the device you’re trying to control.
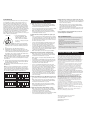
Auto Code Search
The Auto Code Search goes automatically through all the
V`iÃÊvÀÊÌ
iÊ`iÛViÊÞÕ½ÀiÊÌÀÞ}ÊÌÊVÌÀ°Ê7
iÊÞÕÊw`Ê
the one that operates your device, you can stop the search and
store that code.
Your universal remote requires two AA alkaline batteries
(batteries may or may not be included, depending on model).
To install the batteries:
/ÊiÝÌÊÜÌ
ÕÌÊÃ>Û}Ê>ÊiÜÊV`iÊ>ÌÊ>ÞÊ«ÌÊÊÌ
iÊÕÌÊ
Code Search, press the "Ê
key.
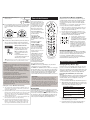
Step 1: Install your batteries
Remove the battery compartment
cover.
2.
Insert the batteries, matching the
batteries to the (+) and (–) marks
inside the battery compartment.
3.
Push the battery cover back into place.
1.
Manually turn on the device you
want to control.
2.Ê *ÀiÃÃÊ>`Ê
`ÊÌ
iÊ`iÛViÊiÞÊÞÕÊÜ>ÌÊÌÊ«À}À>°Ê7
iÊ
UÊÊÌÊÝÊ`Ê>`ÊiÜÊL>ÌÌiÀiðÊ
UÊÊÌÊÝÊ>>i]ÊÃÌ>`>À`ÊV>ÀLâV®ÊÀÊ
ÀiV
>À}i>LiÊViV>`Õ®ÊL>ÌÌiÀið
UÊÜ>ÞÃÊÀiÛiÊ`]ÊÜi>ÊÀÊÜÀÕÌÊL>ÌÌiÀiÃÊ«À«ÌÞÊ
>`ÊÀiVÞViÊÀÊ`ëÃiÊvÊÌ
iÊÊ>VVÀ`>ViÊÜÌ
ÊV>Ê
and National Regulations.
3.Ê 7>ÌÊÕÌÊÌ
iÊ"
Battery Saver
Your universal remote control saves battery power by
automatically turning off if any key is pressed for more than
60 seconds. This saves your battery life should your remote
get stuck in a place where the keys remain depressed, such as
between sofa cushions.
U"ÊiÞ comes on and stays on. Then
release both keys.
4.
Bra
The
the s
bran
TIP
Ì
i
ÀiV
6
ad
>Ê
YES: Press the STOP key. You’re
done! You’ve programmed this
device key.
NO: Press REVERSE again. The remote tests the next
code in the batch.
Ê
/
pro
pro
ii«Ê«ÀiÃÃ}Ê,6,-ÊiÛiÀÞÊÓÊÃiV`ÃÊÕÌÊÞÕÀÊ`iÛViÊ
ÌÕÀÃÊL>VÊ°Ê7
iÊÌÊ`iÃ]Ê«ÀiÃÃÊ-/"*°
Note: If you accidentally press the REVERSE key after your
device turns on, press the FORWARD key. Then, wait two
seconds to see if your device turns off again.
NOTES
/
Co
1.
Throughout the programming of each key, be sure to keep
the remote pointed at the IR sensor of the device you are
currently programming the remote to control.
Test the remote with the device to make sure the
device key is programmed with the correct code for
>ÝÕÊvÕVÌ>ÌÞ°ÊvÊÃiÊvi>ÌÕÀiÃÊ`½ÌÊÜÀ]ÊÌÀÞÊ
>Ê`vviÀiÌÊV`i°Ê-iiÊÌ
iʺ/iÃÌ}ÊÌ
iÊ
`iÊvÀÊ>ÝÕÊ
Functionality” section below for more information.
2.Ê
During the Auto Code Search, the remote ignores
iÞ«ÀiÃÃiÃÊÌ
>ÌÊ>Ài½ÌÊ«>ÀÌÊvÊÌ
iÊÃi>ÀV
°Ê
/
iÊÃi>ÀV
ÊÌiÃÊÕÌÊ>vÌiÀÊÌÜÊÕÌiÃÊÌ
iÊ" U"ÊiÞÊ
blinks four times and turns off, and the last programmed
V`iÊÕ`iÀÊÌ
>ÌÊ`iÛViÊiÞÊÃÊÀiÌ>i`®°
3.Ê
/
iÊ" U"ÊiÞÊLÃÊvÕÀÊÌiÃÊ>`ÊÌÕÀÃÊvvÊÜ
iÊÌ
iÊ
ÀiÌiÊ
>ÃÊ}iÊÌ
ÀÕ}
Ê>ÊÌ
iÊV`iðÊ/
iÊÀiÌiÊiÝÌÃÊ
Ì
iÊÕÌÊ
`iÊ-i>ÀV
°ÊvÊÞÕÀÊ`iÛViÊ
>ýÌÊÌÕÀi`ÊvvÊÞiÌ]Ê
try a different search method.
Testing the Code for Maximum Functionality
1.
Try a variety of the device’s functions with the remote. If
some device features don’t work, go to next step to try a
different code.
2.
Repeat the Auto Code Search Method from the beginning.
7
iÊÞÕÀÊ`iÛViÊÌÕÀÃÊvv]Ê`ÊÌÊÃÌ«ÊÃi>ÀV
}°Ê
Instead, with the unit now off, continue to press the PLAY
key every 5 seconds until the unit turns back on.
you’re holding down the device key, use your other hand
to press and hold the remote’s " U"Êkey at the same
time.
Battery Precautions:
7
iÊÞÕÀÊ`iÛViÊÌÕÀÃÊvv]Ê«ÀiÃÃÊ
the REVERSE key on the remote
and wait at least 2 seconds.
The remote tries the last of the
previous ten codes.
Did your device turn on?
/
iÊAuto Code Search goes automatically through all the
codes for the device you’re trying to control. It’s the easiest
method, but it can sometimes take longer than some of the
other programming methods.
TIPS: Each device key is associated with a type of device—
Ì
iÊ/6ÊÃÊ«ÀiÃiÌÊÌÊÃi>ÀV
ÊvÀÊ/6Ã]Ê-/U
U/
ÊvÀÊÃ>ÌiÌiÊ
ÀiViÛiÀÃ]ÊV>LiÊLÝiÃÊÀÊ`}Ì>Ê/6ÊVÛiÀÌiÀÃ]Ê6ÊvÀÊ
6Ê«>ÞiÀÃ]Ê>`Ê6
,U18ÊvÀÊ6
,ÃÊÀÊ6,ðÊ/Ê«À}À>Ê
a device key for a different type of device, see the Changing
>ÊiÞ½ÃÊiÛViÊ/Þ«i section.
1.
5.
3.
Once the unit turns back on, press the REVERSE key on the
remote every 2 seconds until your device turns off again.
7
iÊÞÕÀÊ`iÛViÊÌÕÀÃÊvvÊ>}>]Ê«ÀiÃÃÊÌ
iÊ-/"*ÊiÞ°
4.
Test the key’s functionality again by attempting to control
a variety of the device’s functions. If the code that has
been stored controls the majority of the device’s functions,
programming is complete. If the code stored does not give
maximum functionality, try another code.
4.Ê
5.
6.
Point the remote directly at the
front panel of the device you
want to control. Press PLAY on
the remote and wait 5 seconds.
The remote is testing a batch of
10 codes on your device.
Did your device turn off?
YES: Go to step 5.
NO: Press PLAY again. The remote tests the next batch of
10 codes.
Ê
ii«Ê«ÀiÃÃ}Ê*9ÊiÛiÀÞÊxÊÃiV`ÃÊÕÌÊÞÕÀÊ`iÛViÊ
turns off.
Ê
Brand Code Search
The Brand Code Search goes through only the codes for one of
the select brands listed in the accompanying code list. If your
brand of device is listed, this search can be very quick and easy.
TIPS: Each device key is associated with a type of device—
Ì
iÊ/6ÊÃÊ«ÀiÃiÌÊÌÊÃi>ÀV
ÊvÀÊ/6Ã]Ê-/U
U/
ÊvÀÊÃ>ÌiÌiÊ
ÀiViÛiÀÃ]ÊV>LiÊLÝiÃÊÀÊ`}Ì>Ê/6ÊVÛiÀÌiÀÃ]Ê6ÊvÀÊ
6Ê«>ÞiÀÃ]Ê>`Ê6
,U18ÊvÀÊ6
,ÃÊÀÊ6,ðÊ/Ê«À}À>Ê
a device key for a different type of device, see the Changing
>ÊiÞ½ÃÊiÛViÊ/Þ«i section.
/
iÊ" U"ÊiÞÊÃiÀÛiÃÊ>ÃÊ>Ê`V>ÌÀÊ}
ÌÊ`ÕÀ}Ê
programming, giving you feedback at each stage of the
process.
ViÊ
r
/ÊiÝÌÊÜÌ
ÕÌÊÃ>Û}Ê>ÊiÜÊV`iÊ>ÌÊ>ÞÊ«ÌÊÊÌ
iÊÀ>`Ê
Code Search, press the "Ê
key.
1.
Manually turn on the device you
want to control.
2.Ê `ÊÞÕÀÊ`iÛVi½ÃÊLÀ>`ÊÊÌ
iÊ
Brand Code list section of the
accompanying code list. Circle
the number for your brand and
keep the list handy.
NOTES
3.
Throughout the programming of each key, be sure to keep
the remote pointed at the IR sensor of the device you are
currently programming the remote to control.
Press and hold the device key you want to program (the
" U"ÊiÞÊViÃÊ®°Ê
Ê
7
iÊÞÕ½ÀiÊ
`}Ê`ÜÊÌ
iÊ`iÛViÊiÞ]ÊÕÃiÊÞÕÀÊÌ
iÀÊ
hand enter the first five-digit code for your brand in the
V`iÊÃÌÊÌ
iÊ" U"ÊiÞÊ}iÃÊvvÊ>vÌiÀÊÌ
iÊwÀÃÌÊ`}Ì®°
Test the remote with the device to make sure the device
iÞÊÃÊ«À}À>i`ÊÜÌ
ÊÌ
iÊVÀÀiVÌÊV`iÊvÀÊ>ÝÕÊ
vÕVÌ>ÌÞ°ÊvÊÃiÊvi>ÌÕÀiÃÊ`½ÌÊÜÀ]ÊÌÀÞÊ>Ê`vviÀiÌÊ
V`i°Ê-iiÊÌ
iʺ/iÃÌ}ÊÌ
iÊ
`iÊvÀÊ>ÝÕÊÕVÌ>ÌÞ»Ê
section below for more information.
s
List
a de
List
gos
Códi
TV
0
1
2
0
3
9
8
7
6
5
4
VCR
0
1
9
8
7
6
5
4
3
2
1
D
DV
2
3
5
4
/CA
6
7
8
9
BLE
SAT
0
1
2
3
4
5
6
7
8
9
3.Ê *ÀiÃÃÊ>`Ê
`ÊÌ
iÊ`iÛViÊiÞÊÞÕÊÜ>ÌÊÌÊ«À}À>°Ê7
iÊ
you’re holding down the device key, use your other hand
ÌÊ«ÀiÃÃÊ>`Ê
`ÊÌ
iÊÀiÌi½ÃÊ" U"ÊiÞÊ>ÌÊÌ
iÊÃ>iÊ
time.
4.Ê 7>ÌÊÕÌÊÌ
iÊ"
U"ÊiÞÊViÃÊÊ>`ÊÃÌ>ÞÃÊ°Ê/
iÊ
release both keys.
AY
5.
the
n.
Look at the number you circled for
your device’s brand code number.
Press that number on the remote
keypad.
ol
ns,
ive
6.
Point the remote directly at the
front panel of the device you want
ÌÊVÌÀ°Ê*ÀiÃÃÊ" U"ÊÊÌ
iÊ
remote and wait 2 seconds. The
remote is testing a single code for
your device’s brand.
Did your device turn off?
YES: Press the STOP key to store the code. You’re done!
You’ve programmed this device key.
NO: *ÀiÃÃÊ" U"Ê>}>°Ê/
iÊÀiÌiÊÌiÃÌÃÊÌ
iÊiÝÌÊV`iÊ
for your brand.
Ê
ii«Ê«ÀiÃÃ}Ê" U"ÊiÛiÀÞÊÓÊÃiV`ÃÊÕÌÊÞÕÀÊ`iÛViÊ
ÌÕÀÃÊvv°Ê7
iÊÌÊ`iÃ]Ê«ÀiÃÃÊ-/"*°
y
Ì
t
/
iÊ" U"ÊiÞÊLÃÊvÕÀÊÌiÃÊ>`ÊÌÕÀÃÊvvÊÜ
iÊÌ
iÊ
ÀiÌiÊ
>ÃÊ}iÊÌ
ÀÕ}
Ê>ÊÌ
iÊV`iðÊ/
iÊÀiÌiÊiÝÌÃÊÌ
iÊ
À>`Ê
`iÊ-i>ÀV
°ÊvÊÞÕÀÊ`iÛViÊ
>ýÌÊÌÕÀi`ÊvvÊÞiÌ]ÊÌÀÞÊ>Ê
different search method.
2. Ê ,i«i>ÌÊÌ
iÊÀ>`Ê
`iÊ-i>ÀV
ÊvÀÊÌ
iÊLi}}°Ê7
iÊ
the device turns off for the first time, don’t press the STOP
key, which would store the same code. Instead, with the
unit now off, continue to press the " U" key repeatedly
until the unit turns back on.
3.
Once the unit turns back on, you have found another code
that operates the device. Press the STOP key.
4.
Test the key’s functionality again by attempting to control
a variety of the device’s functions. If the code that has
been stored controls the majority of the device’s functions,
programming is complete. If the code stored does not give
maximum functionality, try another code.
Direct Code Entry
ng.
2.Ê *
/
iÊÃi>ÀV
ÊÌiÃÊÕÌÊ>vÌiÀÊÌÜÊÕÌiÃÊÌ
iÊ" U"ÊiÞÊ
blinks four times and turns off, and the last programmed
V`iÊÕ`iÀÊÌ
>ÌÊ`iÛViÊiÞÊÃÊÀiÌ>i`®°
Ê
f
a
M
w
ÕÀ}ÊÌ
iÊÀ>`Ê
`iÊ-i>ÀV
]ÊÌ
iÊÀiÌiÊ}ÀiÃÊ
iÞ«ÀiÃÃiÃÊÌ
>ÌÊ>Ài½ÌÊ«>ÀÌÊvÊÌ
iÊÃi>ÀV
°Ê
Testing the Code for Maximum Functionality
1. Try a variety of the device’s functions with the remote. If
some device features don’t work, go to the next step to try
a different code.
Code
1.
Direct Code Entry lets you enter a code from the accompanying
code list for your brand of device. It’s not as easy as the other
methods, but it’s potentially the fastest method.
TIP: Each device key is associated with a type of device—the
/6ÊÃÊ«ÀiÃiÌÊÌÊÃi>ÀV
ÊvÀÊ/6Ã]Ê-/U
U/
ÊvÀÊÃ>ÌiÌiÊ
ÀiViÛiÀÃ]ÊV>LiÊLÝiÃÊÀÊ`}Ì>Ê/6ÊVÛiÀÌiÀÃ]Ê6ÊvÀÊ6Ê
«>ÞiÀÃ]Ê>`Ê6
,U18ÊvÀÊ6
,ÃÊ>`Ê6,ðÊ/Ê«À}À>Ê>Ê
device key for a different type of device, see the Changing a
iÞ½ÃÊiÛViÊ/Þ«i section.
/
iÊ" U"ÊiÞÊÃiÀÛiÃÊ>ÃÊ>Ê`V>ÌÀÊ}
ÌÊ`ÕÀ}Ê
programming, giving you feedback at each stage of the
process.
1.
Manually turn on the device you
want to control.
r
4.Ê 7
iÊÞÕ½ÛiÊwÃ
i`ÊiÌiÀ}ÊÌ
iÊwÛi`}ÌÊV`i]Êii«Ê
Code
Ê
gos
Códi
TV
0
1
2
0
7
6
5
4
3
9
8
VCR
0
1
YES: You’re done! You’ve programmed this device key.
Ê
"]ÊÌÊLi`ÊvÕÀÊÌiÃÊ>`ÊÌÕÀi`Êvv\ÊYou have
either entered a code number that is not in the code lists or
missed a step in the code entry procedure. Try step 3 again.
NOTES
,iiLiÀÊÌÊiÌiÀÊÌ
iÊV`iÊvÀÊvÕÌÕÀiÊÀiviÀiViÊÊÌ
iÊLÝÊ
provided in the Code Retrieval section of this manual.
vÊÞÕÀÊLÀ>`ÊýÌÊÃÌi`ÊÊÌ
iÊV`iÊÃÌ]ÊÕÃiÊiÊvÊÌ
iÊ
`iÊ
-i>ÀV
ÊiÌ
`ÃÊÌÊ«À}À>ÊÌ
iÊÀiÌiÊVÌÀ°Ê,iviÀÊÌÊÌ
iÊ
ÕÌÊ>`Ê>Õ>Ê
`iÊ-i>ÀV
ÊiÌ
`ð®
If you release the device key any time during the Direct Code
ÌÀÞÊ«ÀVi`ÕÀi]ÊÌ
iÊ" U"ÊiÞÊLÃÊvÕÀÊÌiÃ]Ê>`Ê
Ì
iÊ«ÀViÃÃÊÃÊiÝÌi`°Ê/
iÊ>ÃÌÊ«À}À>i`ÊV`iÊÕ`iÀÊÌ
iÊ
device key is retained.
Test the remote with the device to make sure the device
iÞÊÃÊ«À}À>i`ÊÜÌ
ÊÌ
iÊVÀÀiVÌÊV`iÊvÀÊ>ÝÕÊ
vÕVÌ>ÌÞ°ÊvÊÃiÊvi>ÌÕÀiÃÊ`½ÌÊÜÀ]ÊÌÀÞÊ>Ê`vviÀiÌÊV`iÊ
in the list.
D
DV
2
0
3
4
5
6
7
8
9
BLE
/CA
SAT
1
2
3
4
5
6
7
8
9
T
Ì
NO
Thr
poi
the
Tes
iÞ
vÕ
V`
sec
Du
iÞ
Manual Code Search
/
i
blin
V`
The Manual Code Search lets you go one-by-one through all
Ì
iÊV`iÃÊvÀÊÌ
iÊ`iÛViÊÞÕ½ÀiÊÌÀÞ}ÊÌÊVÌÀ°Ê7
iÊÞÕÊw`Ê
the one that operates your device, you can stop the search and
store that code.
The
Ài
>
ad
9
8
7
6
5
4
3
2
1
P
Ü
s
ÃÊÌ
iÊ" U"ÊiÞʶÊ
Each device key is associated with a type of device—the TV is
«ÀiÃiÌÊÌÊÃi>ÀV
ÊvÀÊ/6Ã]Ê-/U
U/
ÊvÀÊÃ>ÌiÌiÊÀiViÛiÀÃ]Ê
V>LiÊLÝiÃÊÀÊ`}Ì>Ê/6ÊVÛiÀÌiÀÃ]Ê6ÊvÀÊ6Ê«>ÞiÀÃ]Ê
>`Ê6
,U18ÊvÀÊ6
,ÃÊÀÊ6,ðÊ/Ê«À}À>Ê>Ê`iÛViÊiÞÊvÀÊ
a different type of device, see the
>}}Ê>ÊiÞ½ÃÊiÛViÊ
Type section.
s
List
a de
List
4.
`}Ê`ÜÊÌ
iÊ`iÛViÊiÞÊ>`ÊÊ>ÌÊÌ
iÊ" U"ÊiÞ°Ê
TIPS:Ê/
iÊ" U"ÊiÞÊÃiÀÛiÃÊ>ÃÊ>Ê`V>ÌÀÊ}
ÌÊ`ÕÀ}Ê
programming, giving you feedback at each stage of the process.
2.Ê `ÊÌ
iÊ
`iÊÃÌÊÌ
>ÌÊV>iÊÜÌ
Ê
the remote. Locate the section for
the type of device you’re trying to
program, and find your brand in
that section. Circle the codes for
your brand and keep them handy.
3.Ê 7
The Manual Code Search method may take a long time
because the remote searches through all of the codes in
ÌÃÊiÀÞÊiLÞi°ÊvÊÞÕÀÊLÀ>`ÊÃÊÃÌi`ÊÊÌ
iÊÀ>`Ê
`iÃÊÀÊÌ
iÊ
`iÊÃÌÃ]ÊwÀÃÌÊÌÀÞÊÌ
iÊÀ>`Ê
`iÊ-i>ÀV
ÊÀÊ
the Direct Code Entry method.
/ÊiÝÌÊÜÌ
ÕÌÊÃ>Û}Ê>ÊiÜÊV`iÊ>ÌÊ>ÞÊ«ÌÊÊÌ
iÊ>Õ>Ê
`iÊ-i>ÀV
]Ê«ÀiÃÃÊÌ
iÊ"Ê
ÊiÞ°
Test
1. T
s
s
2. Ê ,
t
k
u
u
3.
O
t
4.
T
f
f
d
1.
Manually turn on the device you
want to control.
ÀÊ
2.Ê *ÀiÃÃÊ>`Ê
`ÊÌ
iÊ`iÛViÊiÞÊÞÕÊÜ>ÌÊÌÊ«À}À>°Ê7
iÊ
you’re holding down the device key, use your other hand
ÌÊ«ÀiÃÃÊ>`Ê
`ÊÌ
iÊÀiÌi½ÃÊ" U"ÊiÞÊ>ÌÊÌ
iÊÃ>iÊ
time.
3.Ê 7>ÌÊÕÌÊÌ
iÊ"
U"ÊiÞÊViÃÊÊ>`ÊÃÌ>ÞÃÊ°Ê/
iÊ
release both keys.
4.
Point the remote directly at the front panel of the device you
Ü>ÌÊÌÊVÌÀ°Ê*ÀiÃÃÊ" U"ÊÊÌ
iÊÀiÌiÊ>`ÊÜ>ÌÊÓÊ
seconds. The remote is testing a single code for your device.
Did your device turn off?
YES: Press the STOP key to store
the code. You’re done! You’ve
programmed this device key.
r
n.
NO: *ÀiÃÃÊ" U"Ê>}>°Ê/
iÊ
remote tests the next code for
your device.
Ê
Ê
iÊ
iÊ
Ê
`iÊ
l
w`Ê
and
ss.
is
Ã]Ê
ÀÊ
>Ê
In most cases, the keys on
this remote perform the same
functions as the keys on your
original remotes once you’ve
programmed this remote to
operate your components.
Many keys on this remote
have other functions as well.
ii«Ê«ÀiÃÃ}Ê" U"ÊiÛiÀÞÊÓÊ
seconds until your device turns off.
7
iÊÌÊ`iÃ]Ê«ÀiÃÃÊ-/"*°
TIP: Because there are so many codes, you may have to press
Ì
iÊ" U"ÊiÞÊ>ÞÊÌiÃp«ÃÃLÞÊ
Õ`Ài`ÃÊvÊÌið
NOTES
Throughout the programming of each key, keep the remote
pointed at the IR sensor of the device you are programming
the remote to control.
Test the remote with the device to make sure the device
iÞÊÃÊ«À}À>i`ÊÜÌ
ÊÌ
iÊVÀÀiVÌÊV`iÊvÀÊ>ÝÕÊ
vÕVÌ>ÌÞ°ÊvÊÃiÊvi>ÌÕÀiÃÊ`½ÌÊÜÀ]ÊÌÀÞÊ>Ê`vviÀiÌÊ
V`i°Ê-iiÊÌ
iʺ/iÃÌ}ÊÌ
iÊ
`iÊvÀÊ>ÝÕÊÕVÌ>ÌÞ»Ê
section below for more information.
During the Manual Code Search, the remote ignores
iÞ«ÀiÃÃiÃÊÌ
>ÌÊ>Ài½ÌÊ«>ÀÌÊvÊÌ
iÊÃi>ÀV
°Ê
/
iÊÃi>ÀV
ÊÌiÃÊÕÌÊ>vÌiÀÊÌÜÊÕÌiÃÊÌ
iÊ" U"ÊiÞ
blinks four times and turns off, and the last programmed
V`iÊÕ`iÀÊÌ
>ÌÊ`iÛViÊiÞÊÃÊÀiÌ>i`®°
The " U"ÊiÞ blinks four times and turns off when the
ÀiÌiÊ
>ÃÊ}iÊÌ
ÀÕ}
Ê>ÊÌ
iÊV`iðÊ/
iÊÀiÌiÊiÝÌÃÊÌ
iÊ
>Õ>Ê
`iÊ-i>ÀV
°ÊvÊÞÕÀÊ`iÛViÊ
>ýÌÊÌÕÀi`ÊvvÊÞiÌ]ÊÌÀÞÊ
a different search method.
Testing the Code for Maximum Functionality
1. Try a variety of the device’s functions with the remote. If
some features of your devices don’t work, go to the next
step to try a different code.
2. Ê ,i«i>ÌÊÌ
iÊ>Õ>Ê
`iÊ-i>ÀV
ÊvÀÊÌ
iÊLi}}°Ê7
iÊ
the device turns off for the first time, don’t press the STOP
key, which would store the same code. Instead, with the
unit now off, continue to press the " U"Êkey repeatedly
until the unit turns back on.
3.
Once the unit turns back on, you have found another code
that operates the device. Press the STOP key.
4.
Test the key’s functionality again by trying a variety of
functions. If the code controls the majority of the device’s
functions, programming is complete. If the code stored
does not give maximum functionality, try another code.
Accessing Device Menus and Guides
Co
Many devices use on-screen menus and guides to help you
>Û}>ÌiÊÌ
ÀÕ}
Ê>ÊÌ
iÀÊvi>ÌÕÀiÃÊ>`Ê«À}À>}°Ê7
iÊ
this remote may not access every menu or guide system
of every device model, it does offer some menu and guide
functionality.
Onc
you
you
find
box
prog
but
dev
it do
rem
the
Dire
dev
To use a device’s on-screen menu or guide system, you first
have to put the remote in Menu or Guide Mode.
Illuminated " U" key
serves as an indicator light to
provide feedback.
Þ°Ê
de
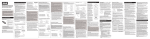
Tour of the Remote
1.
Make sure your devices are turned on and your TV is set
ÌÊÌ
iÊVÀÀiVÌÊ`iÛViÊ«ÕÌÊÕÃiÊÌ
iÊ *1/ÊiÞÊÌÊÌ}}iÊ
through inputs when in TV Mode.)
2.
Press the device key whose menu you want to access.
ΰÊÊ /Ê>VViÃÃÊiÕÃ]Ê«ÀiÃÃÊÌ
iÊ 1ÊiÞ°Ê/Ê>VViÃÃÊ}Õ`iÃ]Ê
«ÀiÃÃÊÌ
iÊ1ÊiÞ°Ê/
iÊ" U"ÊiÞÊÃÌ>ÀÌÃÊL}]Ê
indicating you are in Menu or Guide Mode.
Device keys (TV,
-/U
U/
, 6,
6
,U18) put the remote in
the right mode to control your
device.
{°ÊÊ 1ÃiÊÌ
iÊ6"³ÉÊ>`Ê
³ÉÊiÞÃÊÌÊ
navigate through the on-screen
menu system or guide. To select the
}
}
Ìi`ÊÌi]Ê«ÀiÃÃÊÌ
iÊ"ÊiÞ°
TIP:ÊvÊÌ
iÊÀiÌiÊ`iýÌÊÀië`]Ê
V
iVÊÌÊÃiiÊÌ
>ÌÊÌ
iÊ" U"ÊiÞÊÃÊ
ÃÌÊL}°Ê/
iÊ" U"ÊiÞÊÌiÃÊ
out after 20 seconds. If this happens,
ÕÃÌÊ«ÀiÃÃÊÌ
iÊ 1ÊiÞÊ>}>]Ê>`Ê
then retry your selection.
Backlight key ( ) turns
backlighting on/off.
1 and 1 put the
remote in menu/guide mode,
which makes the É6"Ê
keys serve as arrow keys;
they also access the same
features as the keys on your
original remotes.
and 6" keys have dual
functions: they can act as
navigation keys in menu
systems as well as channel
and volume controllers
outside the menus. The
CH keys also provide skip
forward and skip back control
for DVD players and DVRs
that support this functionality.
Ó°ÊÊ
ΰÊÊ
4.
Exiting Menu/Guide Mode
The remote automatically times out of Menu or Guide Mode
after 20 seconds of inactivity (no keys being pressed). At that
time, the remote clears the displayed menu from the TV.
Actual model may vary
from illustration
"Ê
exits remote programming; it also performs the
same functions as on your original remotes.
TheÊ *1/ and pÊ`>Ã
®Êkey has three functions: (1) it toggles
through all the video sources connected to your TV; (2) when
the remote is in VCR mode, this button toggles between VCR
and the TV input; (3) when you’re entering digital channel
numbers directly, this button lets you separate the main
channel number from the sub-channel number (such as 59.1).
IMPORTANT
iV>ÕÃiÊÌ
ÃÊÀiÌiÊVÌÀÃÊÀiÊÌ
>ÊiÊ`iÛVi]ÊÞÕÊ
ÕÃÌÊwÀÃÌʺÌi»ÊÌ
iÊÀiÌiÊÜ
V
Ê`iÛViÊÞÕÊÜÃ
ÊÌÊ
operate. That means, if you wish to operate your TV, you
ÕÃÌÊwÀÃÌÊ«ÀiÃÃÊÌ
iÊ/6ÊiÞÊÌÊ«ÕÌÊÌ
iÊÀiÌiÊÊÌ
iÊ/6Ê
Mode. The remote stays in that device mode until you press
>Ê`vviÀiÌÊ`iÛViÊiÞ°ÊÀÊiÝ>«i]ÊvÊÞÕÀÊÀiÌiÊÃÊÊ/6Ê
Mode and you want to operate the DVD player, you must
press the DVD key to change device modes.
If you want to exit the Menu Mode yourself, press the
VÀÀië`}Ê`iÛViÊiÞÊÊÌ
iÊÀiÌiÊ/6]Ê-/U
U/
]Ê
6]Ê6
,U18®°Ê/
iÊ" U"ÊiÞÊÌÕÀÃÊvv°
5.
Advanced Functions
Changing A Key’s Device Type
Each device key is associated with a type of device—the TV is
«ÀiÃiÌÊÌÊÃi>ÀV
ÊvÀÊ/6Ã]Ê-/U
U/
ÊvÀÊÃ>ÌiÌiÊÀiViÛiÀÃ]Ê
cable boxes or digital TV converters, DVD for DVD players, and
6
,U18ÊvÀÊ6
,ÃÊÀÊ6,ðÊ/Ê«À}À>ÊÌ
iÃiÊiÞÃÊÌÊVÌÀÊ
a different kind of device, you have to reassign them first.
,i>ÃÃ}}ÊÌ
iÊ6
,U18ÊiÞÊ/Ê
ÌÀÊ"Ì
iÀÊ
Devices
/
iÊ6
,U18ÊiÞÊ`iv>ÕÌÃÊÌÊVÌÀÊ>Ê6
,ÊÀÊ6,°ÊvÊÞÕÊÜ>ÌÊ
Ì
iÊ6
,U18ÊiÞÊÌÊVÌÀÊ>Ê`vviÀiÌÊ`iÛViÊ>Ê>``Ì>Ê
TV, DVD, satellite, cable box or digital TV converter, for
example), you must reassign it.
£°ÊÊ *ÀiÃÃÊ>`Ê
`ÊÌ
iÊ6
,U18ÊiÞ°Ê/
iÊ" U"ÊiÞÊÌÕÀÃÊ°
Ó°ÊÊ 7
iÊ
`}Ê`ÜÊÌ
iÊ6
,U18ÊiÞ]Ê«ÀiÃÃÊ>`ÊÀii>ÃiÊÌ
iÊ
number key on the keypad for the device you wish to control
ÃiiÊÌ
iÊV
>ÀÌÊLiÜ®°Ê/
iÊ" U"ÊiÞÊÌÕÀÃÊvv°
6
,U18Ê9Ê
" /,"-\
>V}
Ì}
Backlight illumination helps you see the remote control keys
better in the dark. You can turn backlight illumination on or off
by pressing the backlight key ( ). Backlighting stays on as
long as keys are being pressed and turns off six seconds after
the last keypress. Once the backlight time has timed out, any
keypress will reactivate it. If the backlight illumination is on,
and you press the backlight key, the backlight turns off.
No
co
>
th
Additional TV
press 1
VCR or DVR
press 2
Additional DVD
press 3
Additional satellite, cable box or
digital TV converter
press 5
ΰÊÊ ,ii>ÃiÊÌ
iÊ6
,U18ÊiÞ°Ê/
iÊ" U"ÊiÞÊLÃÊvÕÀÊ
ÌiÃÊ>`ÊÌ
iÊÌÕÀÃÊvv°Ê/
iÊ6
,U18ÊiÞÊÃÊÜÊÃiÌÊÌÊ
control the device type you selected.
{°ÊÊ ÜÊÌ
iÊ`ÀiVÌÃÊÊÌ
iÊ>ÕÌ]ÊLÀ>`]Ê`ÀiVÌÊiÌÀÞ]ÊÀÊ
>Õ>ÊV`iÊÃi>ÀV
ÊÌÊ«À}À>ÊÌ
iÊ6
,U18ÊiÞ°Ê
TI
"
No
pr
Û>
/
u
iÊ
st
set
iÊ
`iÃ]Ê
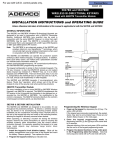
Code Retrieval
Once you’ve programmed the remote to control your devices,
you may want to record the codes for future reference. If
you used the Direct Code Entry method, this is easy. Just
find the codes you entered and make a note of them in the
boxes below. If you used one of the Code Search methods to
program your remote or if you used the Direct Entry method
but don’t remember the code, you will need to retrieve each
device’s five-digit code. Retrieving the actual code and writing
it down will save you time if you ever need to program the
remote again (e.g., if programming is lost when you change
the batteries). If the codes are recorded, you can use the
Direct Entry method to reprogram your remote to control your
devices, which is quick and easy.
" U"ÊiÞ
ÌÊ
ct the
iÞ°
]Ê
ÃÊ
iÃÊ
ns,
`Ê
de
hat
]Ê
V is
ÀÃ]Ê
, and
ÌÀÊ
ÊÜ>ÌÊ
>Ê
Press and hold the device
iÞÊ/6]Ê-/U
U/
]Ê6]Ê
6
,U18®ÊÜ
ÃiÊV`iÊÞÕÊ
ÜÃ
ÊÌÊÀiÌÀiÛi°Ê/
iÊ" U"Ê
iÞÊÌÕÀÃÊ°Êii«Ê«ÀiÃÃ}ÊÌ
iÊ
device key.
Ó°ÊÊ 7
iÊ
`}ÊÌ
iÊ`iÛViÊiÞÊ`Ü]Ê«ÀiÃÃÊ>`Ê
`ÊÌ
iÊ
"ÊiÞ°Ê/
iÊ" U"ÊiÞÊÌÕÀÃÊvv°ÊvÌiÀÊ
`}Ê`ÜÊ
LÌ
ÊiÞÃÊvÀÊÌ
ÀiiÊÃiV`Ã]ÊÌ
iÊ" U"ÊiÞÊÌÕÀÃÊL>VÊ
on.
Problem: The remote does not operate your device.
UÊÊ
>iÊÃÕÀiÊÌ
iÊÀiÌiÊÃÊÊÌ
iÊVÀÀiVÌÊ`iÊLÞÊ«ÀiÃÃ}ÊÌ
iÊ
VÀÀië`}Ê`iÛViÊiÞÊ/6]Ê-/U
U/
]Ê6]Ê6
,U18®°Ê
This tells the remote which device to operate.
UÊÊ
,iÛiÊ>ÞÊLÃÌ>ViÃÊLiÌÜiiÊÌ
iÊÀiÌiÊ>`ÊÌ
iÊ`iÛVi°Ê>iÊ
sure you’re aiming the remote at the device’s IR sensor.
UÊÊ
>iÊÃÕÀiÊÌ
iÊL>ÌÌiÀiÃÊ>ÀiÊvÀiÃ
Ê>`Ê>ÀiÊ«À«iÀÞÊÃÌ>i`°Ê
Replace the batteries with two new AA batteries, if necessary
(see the Battery Installation section).
Problem: The remote can’t be programmed to operate your
device.
UÊÊ
4.
Starting with the number 1 key, press and release each
number key on the keypad in the following order: 1-9, then
ä°Ê/
iÊÕLiÀÊÌ
>ÌÊV>ÕÃiÃÊÌ
iÊ" U"ÊiÞÊÌÊLÊÃÊÌ
iÊ
first number of the code. As you find each number of the
code, write it down for future reference.
Note: All TV codes begin with the number 1; all VCR and DVR
codes begin with the number 2; all DVDs, the number 3; and
>ÊÃ>ÌiÌiÊÀiViÛiÀÃ]ÊV>LiÊLÝiÃÊ>`Ê`}Ì>Ê/6ÊVÛiÀÌiÀÃ]Ê
the number 5.
5.
Repeat step 4 until you have retrieved all five numbers in
Ì
iÊV`i°ÊvÌiÀÊÌ
iÊwvÌ
ÊÕLiÀÊÃÊÀiÌÀiÛi`]ÊÌ
iÊ" U"Ê
key blinks briefly, then turns off.
TIP:Ê/ÊiÝÌÊÌ
iÊ
`iÊ,iÌÀiÛ>Ê`iÊ>ÌÊ>ÞÊÌi]Ê«ÀiÃÃÊÌ
iÊ
"Ê
ÊiÞ°
vÊÞÕ½ÀiÊÕÃ}ÊÌ
iÊÀiVÌÊÌÀÞÊ«À}À>}ÊiÌ
`ÊÌÊiÌiÀÊ
the codes for your brand and the unit is still not functioning
properly, try the auto, brand, or manual search method.
UÊÊ
/ÊVÌÀÊVLÊÕÌÃ]ÊiÊ/6É6
,ÃÊÀÊ/6É6Ã]ÊÞÕÊÕÃÌÊ
program the individual corresponding device keys to control
each part of the combo unit. Once programmed successfully, the
/6ÊiÞÊVÌÀÃÊÌ
iÊ/6ÊvÕVÌÃ]Ê>`ÊÌ
iÊ6
,U18ÊÀÊ6ÊiÞÊ
controls the VCR or DVD functions.
UÊÊ
>iÊÃÕÀiÊÌ
iÊL>ÌÌiÀiÃÊ>ÀiÊvÀiÃ
Ê>`Ê>ÀiÊ«À«iÀÞÊÃÌ>i`°
Problem: The remote doesn’t perform commands properly.
UÊÊ
>iÊÃÕÀiÊÌ
iÊÀiÌiÊÃÊÊÌ
iÊVÀÀiVÌÊ`iÊLÞÊ«ÀiÃÃ}ÊÌ
iÊ
VÀÀië`}Ê`iÛViÊiÞÊ/6]Ê-/U
U/
]Ê6]Ê6
,U18®°Ê
This tells the remote which device to operate.
UÊÊ
>iÊÃÕÀiÊ`iÛViÊÃÊÀi>`ÞÊvÀÊiÝ>«i]ÊÌ
iÊ6Ê«>ÞiÀÊ
>ÃÊ>Ê
disc loaded).
UÊÊ
9ÕÊ>ÞÊ
>ÛiÊ«ÀiÃÃi`Ê>ÊÛ>`ÊiÞÊvÀÊÌ
iÊ`iÊÌ
iÊÀiÌiÊÃÊ°
UÊÊ
vÊÞÕ½ÀiÊÌÀÞ}ÊÌÊiÌiÀÊ>ÊV
>iÊÕLiÀÊ`ÀiVÌÞ]ÊÌÀÞÊ«ÀiÃÃ}Ê
Ì
iÊ"ÊiÞÊ>vÌiÀÊiÌiÀ}ÊÌ
iÊV
>iÊÕLiÀÊ>ÃÊÌ
ÃÊÃÊ>Ê
requirement of certain models and brands.
UÊÊ
/
iÀiÊÃÊ>Ê«ÃÃLÌÞÊÌ
>ÌÊ>Ê«À}À>i`ÊV`iÊ>ÞÊÞÊLiÊ
able to control some of your device features (for example, only
turns a device on and off). To confirm that the device key is
programmed with the correct code for maximum functionality,
test the device. Attempt to control a variety of the device’s
functions with the remote. If some of the features of your
devices don’t work, try programming the remote with a different
code in the list using the Direct Code Entry Method, until you
find the code that allows the remote to control the majority of
your device’s functions. Different codes can provide different
levels of functionality.
Note: If you press an invalid key during the Code Retrieval
process, the remote will not respond. If you do not press a
Û>`Ê
`iÊ,iÌÀiÛ>ÊiÞÊ/6]Ê-/U
U/
]Ê6]Ê6
,U18]Ê
"]Ê"Ê
®]Ê
`iÊ,iÌÀiÛ>ÊÌiÃÊÕÌÊ>vÌiÀÊ£xÊÃiV`ðÊ
/
iÊ" U"ÊiÞÊLÃÊvÕÀÊÌiÃ]Ê>`ÊÌ
iÊÌÕÀÃÊvv°
TV CODE
1
vÊÞÕÊ>ÀiÊÌiÃÌ}ÊÌ
iÊÀiÌiÊÜ
iÊ«À}À>}ÊÌ]ÊÞÕÊ>ÞÊLiÊ
too far away from the device or at a wrong angle. There must be
an unobstructed path between the remote and the IR sensor on
the device. Move closer and make sure you point the remote at
the device you’re trying to control.
UÊÊ
ΰÊÊ ,ii>ÃiÊLÌ
ÊiÞðÊ/
iÊ" U"ÊiÞÊÀi>ÃÊ°
SAT•CBL•DTC CODE
5
*ÀLi\Ê/
iÊ" U"ÊiÞÊ`iÃÊÌÊ}
ÌÊÜ
iÊÞÕÊ«ÀiÃÃÊ>ÊiÞ°
SAT
ÃÊ°
iÊÌ
iÊ
ntrol
1.
Troubleshooting
DVD CODE
CABLE
DTV CONVERTER
VCR•AUX CODE
3
DVR/VCR
DVD
TV
UÊÊ
9ÕÊ>ÞÊ
>ÛiÊ«ÀiÃÃi`Ê>ÊÛ>`ÊiÞÊvÀÊÌ
iÊ`iÊÌ
iÊÀiÌiÊÃÊ
in.
UÊ
>iÊÃÕÀiÊÌ
iÊÀiÌiÊÃÊÊÌ
iÊVÀÀiVÌÊ`iÊLÞÊ«ÀiÃÃ}ÊÌ
iÊ
VÀÀië`}Ê`iÛViÊiÞÊ/6]Ê-/U
U/
]Ê6]Ê6
,U18®°Ê
This tells the remote which device to operate.
UÊÊ
>iÊÃÕÀiÊÌ
iÊL>ÌÌiÀiÃÊ>ÀiÊvÀiÃ
Ê>`Ê>ÀiÊ«À«iÀÞÊÃÌ>i`°Ê
Replace the batteries with two new AA batteries, if necessary
(see the Battery Installation section).
-/U
U/
*ÀLi\Ê/
iÊÀiÌiÊÜÊÌÊV
>}iÊV
>iÃÊÊ`iÛVi°
UÊ
>iÊÃÕÀiÊÌ
iÊÀiÌiÊÃÊÊÌ
iÊVÀÀiVÌÊ`iÊLÞÊ«ÀiÃÃ}ÊÌ
iÊ
VÀÀië`}Ê`iÛViÊiÞÊ/6]Ê-/U
U/
]Ê6]Ê6
,U18®°Ê
This tells the remote which device to operate.
UÊÊ
*ÀiÃÃÊÌ
iÊ"ÊiÞÊ>vÌiÀÊÞÕÊiÌiÀÊ>ÊV
>iÊÕLiÀ°
UÊÊ
,iÛiÊ>ÞÊLÃÌ>ViÃÊLiÌÜiiÊÌ
iÊÀiÌiÊ>`ÊÌ
iÊ`iÛVi°Ê>iÊ
sure to aim the remote at the IR sensor on the device.
Problem: The device’s menu does not appear on the TV screen.
UÊÊ
>iÊÃÕÀiÊÞÕÊ
>ÛiÊViVÌi`ÊÌ
iÊ`iÛViÊÌÊÞÕÀÊ/6Ê«À«iÀÞÊ>`Ê
selected the correct input. (See your devices’ Owner’s Manuals for
proper connection procedures.)
UÊ
>iÊÃÕÀiÊÌ
iÊÀiÌiÊÃÊÊÌ
iÊVÀÀiVÌÊ`iÊLÞÊ«ÀiÃÃ}ÊÌ
iÊ
VÀÀië`}Ê`iÛViÊiÞÊ/6]Ê-/U
U/
]Ê6]Ê6
,U18®°Ê
This tells the remote which device to operate.
UÊÊ
iÕÊ>VViÃÃÊýÌÊÃÕ««ÀÌi`ÊvÀÊ>ÊLÀ>`ðÊ9ÕÊ>ÞÊii`ÊÌÊÕÃiÊ
your original remote control to access menu functions for some
devices.
ÀÊÀiÊvÀ>Ì]Ê«i>ÃiÊÛÃÌÊÜÜÜ°ÀV>>VViÃÃÀiðV
Consumer Help Line: 1-800-420-7968
Care and Maintenance
UÊÊii«ÊÌ
iÊÀiÌiÊ`ÀÞ°ÊvÊÌÊ}iÌÃÊÜiÌ]ÊÜ«iÊÌÊ`ÀÞÊi`>ÌiÞ°
UÊÊ1ÃiÊ>`ÊÃÌÀiÊÌ
iÊÀiÌiÊÞÊÊÀ>ÊÌi«iÀ>ÌÕÀiÊ
environments.
UÊÊ>`iÊÌ
iÊÀiÌiÊ}iÌÞÊ>`ÊV>ÀivÕްʽÌÊ`À«ÊÌ°
UÊÊii«ÊÌ
iÊÀiÌiÊ>Ü>ÞÊvÀÊ`ÕÃÌÊ>`Ê`ÀÌ°
UÊÊ7«iÊÌ
iÊÀiÌiÊÜÌ
Ê>Ê`>«ÊVÌ
ÊVV>Ã>ÞÊÌÊii«ÊÌÊ
looking new.
UÊÊ`vÞ}ÊÀÊÌ>«iÀ}ÊÜÌ
ÊÌ
iÊÀiÌi½ÃÊÌiÀ>Ê`iÛViÃÊV>Ê
cause malfunction and invalidate its warranty.
Limited Lifetime Warranty
Audiovox Electronics Corporation (the “Company”) warrants to you the
original retail purchaser of this product that should it, under normal use
and conditions, be proven defective in material or workmanship during
its lifetime while you own it, such defect(s) will be repaired or replaced
(at the Company’s option) without charge for parts and repair labor. To
LÌ>ÊÀi«>ÀÊÀÊÀi«>ViiÌÊÜÌ
ÊÌ
iÊÌiÀÃÊvÊÌ
ÃÊ7>ÀÀ>ÌÞ]ÊÌ
iÊ«À`ÕVÌÊ
is to be delivered with proof of warranty coverage (e.g. dated bill of sale),
specification of defect(s), transportation prepaid, to the Company at the
address shown below.
/
ÃÊ7>ÀÀ>ÌÞÊ`iÃÊÌÊVÛiÀÊ«À`ÕVÌÊ«ÕÀV
>Ãi`]ÊÃiÀÛVi`ÊÀÊÕÃi`ÊÕÌÃ`iÊ
Ì
iÊ1Ìi`Ê-Ì>ÌiÃÊÀÊ
>>`>°Ê/
ÃÊ7>ÀÀ>ÌÞÊÃÊÌÊÌÀ>ÃviÀ>LiÊ>`Ê`iÃÊ
not extend to costs incurred for installation, removal or reinstallation of
Ì
iÊ«À`ÕVÌ°Ê/
ÃÊ7>ÀÀ>ÌÞÊ`iÃÊÌÊ>««ÞÊvÊÊÌ
iÊ
«>Þ½ÃÊ«]Ê
the product has been damaged through alteration, improper installation,
mishandling, misuse, neglect, accident, or the simultaneous use of different
battery types (e.g. alkaline, standard or rechargeable).
/Ê8/ /Ê"Ê/Ê
"* 9½-Ê/9Ê1 ,Ê/-Ê7,, /9Ê-Ê
LIMITED TO THE REPAIR OR REPLACEMENT PROVIDED ABOVE AND, IN NO
6 /]Ê-Ê/Ê
"* 9½-Ê/9Ê8
Ê/Ê*1,
-Ê*,
Ê
*Ê9Ê*1,
-,Ê",Ê/Ê*,"1
/°
/
ÃÊ7>ÀÀ>ÌÞÊÃÊÊiÕÊvÊ>ÊÌ
iÀÊiÝ«ÀiÃÃÊÜ>ÀÀ>ÌiÃÊÀÊ>LÌiÃ°Ê 9Ê
*Ê7,, /-]Ê 1 Ê 9Ê*Ê7,, /9Ê"Ê
,
//9Ê",Ê/ --Ê",ÊÊ*,/
1,Ê*1,*"-Ê-Ê
Ê/Ê/"Ê1,/" Ê"Ê/-Ê7,, /9°Ê Ê "Ê
-Ê-Ê
/Ê
"* 9ÊÊÊ",Ê 9Ê
" -+1 /Ê",Ê /Ê
-Ê7/-"6,°Ê Ê«iÀÃÊÀÊÀi«ÀiÃiÌ>ÌÛiÊÃÊ>ÕÌ
Àâi`Ê
to assume for the Company any liability other than expressed herein in
connection with the sale of this product.
Some states/provinces do not allow limitations on how long an implied
warranty lasts or the exclusion or limitation of incidental or consequential
damage so the above limitations or exclusions may not apply to you. This
7>ÀÀ>ÌÞÊ}ÛiÃÊÞÕÊëiVwVÊi}>ÊÀ}
ÌÃÊ>`ÊÞÕÊ>ÞÊ>ÃÊ
>ÛiÊÌ
iÀÊÀ}
ÌÃ]Ê
which vary from state/province to state/province.
U.S.A.: Audiovox Electronics Corporation, 150 Marcus Blvd., Hauppauge,
New York 11788
CANADA: Õ`ÛÝÊ,iÌÕÀÊ
iÌiÀ]ÊVÉÊiV]ÊÈÈnxÊii`ÞÊ,>`]Ê
1ÌÊÎ]ÊÀÊ£È]ÊÃÃÃÃ>Õ}>]Ê"Ì>ÀÊÊx/ÊÎx
ÀÊ
ÊÌÊ
©2010 Audiovox Accessories Corporation
111 Congressional Blvd., Suite 350
Carmel, IN 46032
ÀÊ
Trademark(s) ® Registered
,
,{£ÓÊ1-Êäx