1
5713212551/06.09
2
A6
A3 A4 A5
A7
A2
A1
A8
A21
A20
A9
A19
A10
A18
A12
A17
A13
A14
A16
A23
A15
B2 B3B4 B5B6
B1
B8
B7
B9
B12 B13 B14
B11
B15
3
B10
A11
1
2
3
4
5
6
7
8
9
10
11
12
13
14
15
4
16
17
18
20
21
22
5
19
SETTING WATER HARDNESS................. 15
CONTENTS
INTRODUCTION ..................................7
Measuring water hardness.............................. 15
Set water hardness ......................................... 16
Symbols used in these instructions ................. 7
Letters in brackets ............................................ 7
Troubleshooting and repairs ............................. 7
TECHNICAL SPECIFICATION .................. 16
DISPOSAL ....................................... 16
SAFETY ............................................7
MEANING OF LIGHTS DURING NORMAL
OPERATION .................................... 17
Fundamental safety warnings ........................... 7
DESIGNATED USE ................................8
MEANING OF THE ALARM LIGHTS .......... 17
INSTRUCTIONS...................................8
TROUBLESHOOTING........................... 19
DESCRIPTION.....................................8
ELECTRICAL REQUIREMENTS................ 20
Description of the appliance.............................. 8
Description of control panel.............................. 8
PRELIMINARY CHECKS .........................9
Checking the appliance ..................................... 9
Installing the appliance ..................................... 9
Connecting the appliance.................................. 9
Using the appliance for the first time ................ 9
TURNING THE APPLIANCE ON .................9
TURNING THE APPLIANCE OFF .............. 10
SETTING AUTO-OFF (STAND BY) ............ 10
ENERGY SAVING ............................... 10
MAKING COFFEE ............................... 10
Selecting the coffee taste ................................ 10
Selecting the quantity of coffee in the cup ...... 11
Adjusting the coffee mill ................................. 11
Tips for a hotter coffee:................................... 11
Making coffee using coffee beans................... 11
Making coffee using pre-ground coffee .......... 11
MAKING CAPPUCCINO ........................ 12
Cleaning the cappuccino maker after use........ 12
HEATING WATER ............................... 13
CLEANING ....................................... 13
Cleaning the coffee maker............................... 13
Cleaning the coffee grounds container............ 13
Cleaning the drip tray...................................... 14
Cleaning the inside of the machine ................. 14
Cleaning the water tank................................... 14
Cleaning the coffee spouts.............................. 14
Cleaning the pre-ground coffee funnel............ 14
Cleaning the infuser ........................................ 14
DESCALING ..................................... 15
6
INTRODUCTION
SAFETY
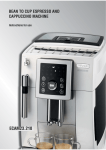
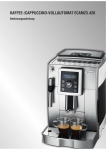
Thank you for choosing the ESAM04.110 Bean to
cup coffee maker.
To get the best result of your new coffee machine please readthese instructions carefully before
use. This should ensure optimum
results and maximum safety.
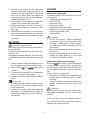
Fundamental safety warnings
Danger!
This is an electrical appliance and may therefore
cause electric shock.
You should therefore follow the following safety
warnings:
UÊ
iÛiÀÊÌÕV
ÊÌ
iÊ>««>ViÊÜÌ
Ê`>«Ê
>`ÃÊ
or feet.
UÊ
iÛiÀÊÌÕV
ÊÌ
iÊ«Õ}ÊÜÌ
Ê`>«Ê
>`ðÊ
UÊ >iÊÃÕÀiÊÌ
iÊÃViÌÊÕÃi`ÊÃÊvÀiiÞÊ>VViÃÃble at all times, enabling the appliance to be
unplugged when necessary.
UÊ 1«Õ}Ê `ÀiVÌÞÊ vÀÊ Ì
iÊ «Õ}Ê Þ°Ê Ê iÛiÀÊ
pull the power cable as you could damage
it.
UÊ /Ê`ÃViVÌÊÌ
iÊ>««>ViÊV«iÌiÞ]Ê«>ce the main switch at the back of the appliance in the 0 position (fig. 6).
UÊ vÊ Ì
iÊ >««>ViÊ ÃÊ v>ÕÌÞ]Ê `Ê ÌÊ >ÌÌi«ÌÊ ÌÊ
repair. Turn it off, unplug from the mains
socket and contact the Customer Services
Department.
UÊ vÊ Ì
iÊ «Õ}Ê ÀÊ «ÜiÀÊ V>LiÊ ÃÊ `>>}i`]Ê ÌÊ
must be replaced by De’Longhi customer
services only to avoid all risk.
Symbols used in these instructions
Important warnings are identified by these
symbols.
These warnings must absolutely be respected.
Danger!
Failure to observe the warning could result in
possibly life threatening injury from electric
shock.
Important!
Failure to observe the warning could result in injury or damage to the appliance.
Danger of burns!
Failure to observe the warning could result in
scalds or burns.
Please note:
This symbol identifies important advice or information for the user.
Letters in brackets
The letters in brackets refer to the diagrams in
the Description of the appliance on page 3.
Important!
Keep all packaging (plastic bags, polystyrene
foam) away from children.
Troubleshooting and repairs
In the event of problems, first try and resolve
them following the information given in the sections “Meaning of the alarm lights on page 17
and “Troubleshooting” on page 19.
If this does not resolve the problem or you require further information, you should consult
Customer Services by calling the number given
on the annexed “Customer Service” sheet.
If your country is not among those listed on the
sheet, call the number given in the guarantee.
If repairs are required, contact De’Longhi Customer Services only.
The addresses are given in the guarantee certificate provided with the machine.
Important!
The appliance is not intended for use by persons
(including children) with reduced physical, sensory or mental capabilities, or lack of experience and knowledge, unless they have been given
supervision or instruction concerning use of
the appliance by a person responsible for their
safety. Children should be supervised to ensure
that they do not play with the appliance.
Danger: Risk of burns!
This appliance produces hot water and steam
may form while it is in operation.
Avoid contact with splashes of water or hot steam.
7
DESIGNATED USE
DESCRIPTION
This appliance is designed and made to prepare
coffee and heat drinks.
All other use is considered improper.
This appliance is not suitable for commercial
use.
The manufacturer is not liable for damage deriving from improper use of the appliance.
This is a household appliance only. It is not intended to be used in:
UÊ ÃÌ>vvÊÌV
iÊ>Ài>ÃÊÊÃ
«Ã]ÊvwViÃÊ>`ÊÌ
iÀÊ
working environments;
UÊ v>ÀÊ
ÕÃiÃ
UÊ LÞÊ ViÌÃÊ Ê
ÌiÃ]Ê ÌiÃÊ >`Ê Ì
iÀÊ ÀiÃdential type environments
UÊ Li`Ê>`ÊLÀi>v>ÃÌÊÌÞ«iÊiÛÀiÌð
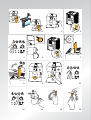
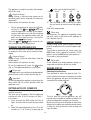
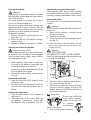
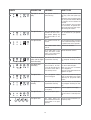
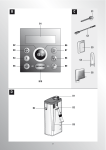
Description of the appliance
(page 3 - A )
A1. Grinding adjustment knob
A2. Main switch
A3. Beans container
A4. Beans container lid
A5. Pre-ground coffee funnel lid
A6. Compartment for measure
A7. Cup shelf
A8. Pre-ground coffee funnel
A9. Steam spout
A10. Cappuccino maker (removable)
A11. Steam nozzle (removable)
A12. Water tank
A13. Power cable
A14. Cup tray
A15. Drip tray
A16. Infuser door
A17. Coffee grounds container
A18. Coffee spout (adjustable height)
A19. Coffee guide
A20. Infuser
A21. Control panel
INSTRUCTIONS
Read these instructions carefully before using
the appliance.
- Failure to respect these instructions may result in burns or damage to the appliance.
The manufacturer is not liable for damage
deriving from failure to follow these instructions.
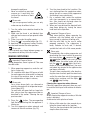
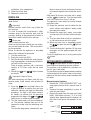
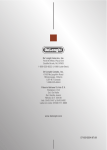
Description of control panel
(page 2 - B )
A number of buttons on the panel have a double
function. This is indicated in brackets in the description.
button: turns the appliance on and off.
B1.
(stand by).
B2. Temperature OK or 1 cup coffee light (If the
light flashes, the appliance is preheating;
when on steadily, the appliance has reached
the ideal temperature to make coffee).
: button: to make 1 cup of coffee
B3.
B4. Temperature OK or 2 cup coffee light (If the
light flashes, the appliance is preheating;
when on steadily, the appliance has reached
the ideal temperature to make coffee).
button: to make 2 cups of coffee
B5.
B6. Temperature OK for steam light
button: to select the steam function
B7.
B8. Coffee quantity selection knob (short, standard or long)
B9. Selection knob to choose the coffee taste
(for a mild, standard or strong coffee) or to
.
use pre-ground coffee
B10. Steam knob
light: no water
B11.
Please note:
If the appliance is passed to other persons, they
must also be provided with these instructions.
8
B12.
light: grounds container full
B13.
light: general alarm
Rinsing or descaling button with light
B14.
B15. ECO energy saving mode button with light
Using the coffee maker for the first time
Please note:
UÊ vviiÊ
>ÃÊLiiÊÕÃi`ÊÌÊv>VÌÀÞÊÌiÃÌÊÌ
iÊ>«pliance and it is therefore completely normal
for there to be traces of coffee in the mill. The
machine is, however, guaranteed to be new.
UÊ 9ÕÊ Ã
Õ`Ê VÕÃÌÃiÊ Ü>ÌiÀÊ
>À`iÃÃÊ >ÃÊ
soon as possible following the instructions
in the section “Setting water hardness” on
page 15.
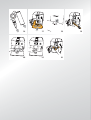
1. Remove the water tank, fill to the MAX line
with fresh water then replace in the appliance
(fig. 1).
2. Turn the cappuccino maker outwards and
place a container with a minimum capacity
of 100 ml underneath (fig. 2).
3. Plug the appliance into the mains socket and
place the main switch on the back of the appliance in the I position (fig. 3).
button (fig. 4); IMMEDIATELY
4. Press the
/,7,-Ê7/ ÊÊ81Ê"ÊÎäÊ
-
" -®]ÊÌÕÀÊÌ
iÊÃÌi>ÊLÊ>ÌVVÜse as far as it will go (fig. 5). This is priming
the water system. (It is normal for the machine to make some noise).
5. Wait for delivery of hot water to stop automatically. The lights flash to indicate that you
must close the steam tap by turning the steam knob to the 0 position.
6. Turn the steam knob to the 0 position. The
appliance goes off automatically.
To use the appliance, turn it on.
PRELIMINARY CHECKS
Checking the appliance
After removing the packaging, make sure the
product is complete and undamaged and that all
accessories are present.
Do not use the appliance if it is visibly damaged.
Contact Customer Service (see enclosed guarantee leaflet).
Installing the appliance
Important!
When you install the appliance, you should follow the following safety warnings:
UÊ /
iÊ>««>ViÊ}ÛiÃÊvvÊ
i>Ì°Ê
After positioning the appliance on the
worktop, leave a space of at least 3 cm
between the surfaces of the appliance and
the side and rear walls and at least 15 cm
above the coffee maker.
UÊ 7>ÌiÀÊ«iiÌÀ>Ì}ÊÌ
iÊ>««>ViÊVÕ`ÊV>ÕÃiÊ
damage.
Do not place the appliance near taps or sinks.
UÊ /
iÊ>««>ViÊVÕ`ÊLiÊ`>>}i`ÊvÊÌ
iÊÜ>ÌiÀÊ
it contains freezes.
Do not install the appliance in a room where
the temperature could drop below freezing
point.
UÊ ÀÀ>}iÊÌ
iÊ«ÜiÀÊV>LiÊÊÃÕV
Ê>ÊÜ>ÞÊÌ
>ÌÊÌÊ
cannot be damaged by sharp edges or contact with hot surfaces (e.g. electric hot plates).
Please note:
UÊ 7
iÊÕÃ}ÊÌ
iÊ>««>ViÊvÀÊÌ
iÊwÀÃÌÊÌi]Ê
you need to make 4-5 cups of coffee or 4-5
cappuccinos before the appliance starts to
give satisfactory results.
Connecting the appliance
Important!
Check that the mains power supply voltage corresponds to the value indicated on the rating plate on the bottom of the appliance.
Connect the appliance to an efficiently earthed
and correctly installed socket with a minimum
current rating of 10A only.
If the power socket does not match the plug on
the appliance, have the socket replaced with a
suitable type by a qualified professional.
TURNING THE APPLIANCE ON
Please note:
Before turning the appliance on, make sure the
main switch on the back of the appliance is in the
I position (fig. 3).
Each time the appliance is turned on, it performs
an automatic preheat and rinse cycle which cannot be interrupted.
9
The appliance is ready for use only after completion of this cycle.
button (see the light/time table).
15min 30min
1h
2h
3h
Danger of burns!
During rinsing, a little hot water comes out of
the coffee spouts and is collected in the drip tray
underneath.
Avoid contact with splashes of water.
.
3. Press the ECO button to confirm the selection and return to normal use of the appliance.
Auto-off is programmed.
butUÊ /ÊÌÕÀÊÌ
iÊ>««>ViÊ]Ê«ÀiÃÃÊÌ
iÊ
ton (fig. 4). The
and
lights flash
while the appliance is heating up and performing an automatic rinse cycle. By circulating
the hot water, the appliance heats both the
boiler and the internal circuits. During this
light flashes.
phase, the
When the
and
lights remain on steadily, the appliance is at temperature.
Please note:
To disconnect the appliance completely, place
the main switch at the back of the appliance in
the 0 position (fig. 6).
ENERGY SAVING
Energy saving mode reduces energy consumption in compliance with current European regulations.
To activate or deactivate this mode, press the
ECO button. After a period of inactivity, if ECO
mode is active the ECO button light comes on.
This mode is active by default.
TURNING THE APPLIANCE OFF
Each time the appliance is turned off, it performs
an automatic rinse cycle which cannot be interrupted.
Danger of burns!
During rinsing, a little hot water flows from the
coffee spouts.
Avoid contact with splashes of water.
Please note:
A few seconds may elapse between energy saving mode and delivery of the first coffee.
button
To turn the appliance off, press the
(fig. 4). The appliance performs a rinse cycle.
MAKING COFFEE
Please note:
If the appliance is not used for an extended period,
place the main switch in the 0 position (fig. 6).
Selecting the coffee taste
Turn the knob to select the required taste. Turning it clockwise increases the quantity of coffee
beans the appliance will grind and therefore the
strength of the coffee obtained.
Important!
To avoid damaging the appliance, never place the
main switch (fig. 6) in the 0 position while the
appliance is on.
SETTING AUTO-OFF (STAND BY)
The appliance is set by default to go off if not
used for two hours.
The time can be changed so that the appliance
switches off after 15 or 30 minutes, or after 1,
2 or 3 hours.
1. Press and hold the ECO button until the 5
lights at the back of the control panel come
on.
2. Select the required period of time (15 or 30
minutes or 1, 2 or 3 hours) by pressing the
The first time you use the appliance, you will
need to make a number of coffees to identify the
correct knob position through trial and error.
Make sure not to turn the knob too far clockwise,
otherwise the coffee may be delivered too slowly
(a drop at a time), particularly when making two
cups of coffee.
10
nal circuits of the appliance and thus raising
the coffee temperature.
UÊ Ü>ÀÊÌ
iÊVÕ«ÃÊLÞÊÀÃ}ÊÌ
iÊÜÌ
Ê
ÌÊÜ>ter (using the hot water function).
Selecting the quantity of coffee in the cup
Select the required quantity of coffee by turning
the knob.
Making coffee using coffee beans
Important!
Do not use caramelised or candied coffee beans
as they could stick to the coffee mill and make it
unusable.
Turning it clockwise increases the amount of coffee obtained.
The first time you use the appliance, you will
need to make a number of coffees to identify the
correct knob position through trial and error.
1. Fill the container with coffee beans (fig. 8).
2. Place under the coffee spouts:
- 1 cup, if you want 1 coffee (fig. 9);
- 2 cups, if you want 2 coffees.
3. Lower the spouts as near as possible to the
cup. This makes a creamier coffee (fig. 10).
4. Press the button corresponding to the numor 2 cups
ber of coffees required (1 cup
, fig. 11 and 12).
5. Preparation begins and the
and
lights flash.
Adjusting the coffee mill
The coffee mill is set by default to prepare coffee correctly and should not require regulating
initially.
However, if after making the first few coffees you
find that the coffee is either too weak and not
creamy enough or delivery is too slow (a drop
at a time), this can be corrected by adjusting the
grinding adjustment knob (fig. 7).
Please note:
UÊ 7
iÊÌ
iÊ>V
iÊÃÊ>}ÊVvvii]Ê`iÛiÀÞÊ
can be interrupted at any moment by presor
sing one of the two coffee buttons (
).
UÊ ÌÊÌ
iÊi`ÊvÊ`iÛiÀÞ]ÊÌÊVÀi>ÃiÊÌ
iʵÕ>tity of coffee in the cup, just press (within 3
seconds) one of the coffee buttons (
or
).
Once the coffee has been made, the appliance is
ready to use again.
Please note:
The grinding adjustment knob must only be turned when the coffee mill is in operation.
If the coffee is delivered too
slowly or not at all, turn one
click clockwise towards “7”.
For fuller bodied creamier
coffee, turn one click anticlockwise towards “1” (do
not turn more than one click
at a time otherwise the coffee could be delivered a drop
at a time).
Please note:
For hotter coffee, see the section “Tips for a hotter coffee”.
Important!
If the coffee is delivered a drop at a time, too
weak and not creamy enough or too cold, read
the tips in the “Troubleshooting” section on page
19.
These adjustments will only be evident after at
least 2 cups of coffee have been made.
If this adjustment does not obtain the desired
result, turn the knob another click.
Making coffee using pre-ground coffee
Tips for a hotter coffee:
For hotter coffee, you should:
UÊ LivÀiÊ`iÛiÀ}ÊÌ
iÊVvvii]Ê«iÀvÀÊ>ÊÀÃiÊ
button. Hot water
cycle by pressing the
is delivered from the spout, heating the inter-
Important!
UÊ
iÛiÀÊ>``Ê«Ài}ÀÕ`ÊVvviiÊÜ
iÊÌ
iÊ>chine is off or it could spread through the
inside of the machine and dirty it. This could
11
UÊ
6. Turn the steam knob to the I position. Steam is delivered from the cappuccino maker,
giving the milk a creamy frothy appearance
and making it more voluminous;
7. For a creamier froth, rotate the container
with slow movements in an upward direction. (You should not discharge steam for
more than 3 minutes at a time);
8. When you have obtained the required froth,
stop steam delivery by turning the steam
knob back to the 0 position.
damage the appliance.
iÛiÀÊÕÃiÊÀiÊÌ
>ÊiÊiÛiÊ
measure or it could dirty the
inside of the machine or block
the funnel.
Please note:
If you use pre-ground coffee, you can only
make one cup of coffee at a time.
1. Turn the coffee taste selection knob to the
position.
2. Make sure the funnel is not blocked, then
add one level measure of pre-ground coffee
(fig. 13).
3. Place a cup under the coffee spouts.
1 cup coffee button (fig. 11).
4. Press the
To deactivate the pre-ground coffee function,
turn the knob to one of the other positions.
Important! Danger of burns
Stop steam delivery before removing the
container with the frothed milk to avoid
burns caused by splashes of boiling milk.
9. Add the milk froth to the cup of coffee
prepared previously. The cappuccino is
ready. Sweeten to taste and, if desired,
sprinkle the froth with a little cocoa powder.
Please note:
A few seconds may elapse between energy saving mode and delivery of the first coffee.
Please note:
UÊ vÊi`>ÌiÞÊ>vÌiÀÊ>}ÊV>««ÕVVÊ>`Ê
deactivating the steam function by pressing
you press the
or
the steam button
button because you want to make
another coffee, the coffee maker will be too
hot (the
and
lights flash to indicate an unsuitable temperature). You must
wait about ten minutes for the appliance too
cool down sufficiently.
To cool it down more quickly, after deactivating the steam function, open the steam knob
and let the water flow out of the cappuccino
maker into a container until the lights
and
stop flashing.
MAKING CAPPUCCINO
Important! Danger of burns
During preparation, steam is given off. Take care
to avoid scalds.
1. When preparing cappuccino, make the coffee in a large cup;
2. Fill a container with about 100 grams of milk
for each cappuccino to be made. In choosing
the size of the container, bear in mind that
the milk doubles or triples in volume;
Please note:
For a richer denser froth, use skimmed or
partially skimmed milk at refrigerator temperature (about 5°C).
To avoid milk with poor froth or large bubbles, always clean the cappuccino maker as
described in the section “Cleaning the cappuccino maker”.
Cleaning the cappuccino maker after use.
Clean the cappuccino maker each time you use it
to avoid the build-up of milk residues or blockages.
Important! Danger of burns
When cleaning the cappuccino maker, a little hot
water is delivered.
Avoid contact with splashes of water.
3. Press the
button. The corresponding
light flashes, indicating that the appliance is
heating up;
5. Turn the cappuccino maker outwards and
immerse in the milk container (fig. 13);
1. Deliver a little water for a few seconds by rotating the steam knob to the I position.
Then turn the steam knob to the 0 position to
stop the flow of hot water.
12
CLEANING
2. Wait for a few minutes for the cappuccino
maker to cool down. Grip the handle of the
cappuccino maker tube firmly in one hand
and with the other rotate the cappuccino
maker anticlockwise (fig. 14) and remove by
pulling downwards (fig. 15).
3. Wash all parts of the cappuccino maker thoroughly with a sponge and warm water.
4. Make sure the holes shown by the arrows in
fig. 16 are not blocked. If necessary, clean
with a pin.
5. Replace the inner section by inserting it carefully onto the adjustable tube, then insert the
steam nozzle and turn anticlockwise to lock
it in place.
Cleaning the coffee maker
The following parts of the machine must be cleaned regularly:
- coffee grounds container (A17),
- drip tray (A15),
- water tank (A12),
- coffee spouts (A18),
- pre-ground coffee funnel (A8),
- inside of the machine, accessible after opening the infuser door (A16),
- infuser (A20).0
Important!
UÊ Ê ÌÊ ÕÃiÊ ÃÛiÌÃ]Ê >LÀ>ÃÛiÊ `iÌiÀ}iÌÃÊ
or alcohol to clean the coffee maker. With
De’Longhi superautomatic coffee makers,
you need not use chemical products to clean
the machine.
UÊ
iÊvÊÌ
iÊV«iÌÃÊV>ÊLiÊÜ>Ã
i`ÊÊ>Ê
dishwasher.
UÊ Ê ÌÊ ÕÃiÊ iÌ>Ê LiVÌÃÊ ÌÊ ÀiÛiÊ iVÀÕstations or coffee deposits as they could
scratch metal or plastic surfaces.
HOT WATER
Important! Danger of burns.
iÛiÀÊi>ÛiÊÌ
iÊ>V
iÊÕÃÕ«iÀÛÃi`ÊÜ
iÊ`ilivering hot water.
As shown below, stop delivery of hot water when
the cup is full.
The cappuccino maker becomes hot while water
is being delivered and must be held by the handle
only.
Cleaning the coffee grounds container
light flashes, the coffee grounds
When the
container needs emptying. Unless you clean the
grounds container, the light will continue to flash
and the appliance cannot be used to make coffee.
To clean (with the machine on):
UÊ "«iÊÌ
iÊÃiÀÛViÊ`ÀÊÊÌ
iÊvÀÌÊvÊÌ
iÊ>«pliance, extract the drip tray (fig. 17), empty
and clean.
UÊ «ÌÞÊÌ
iÊ}ÀÕ`ÃÊVÌ>iÀÊ>`ÊVi>ÊÌ
roughly to remove all residues left on the
bottom.
1. Place a container under the cappuccino maker (as close as possible to avoid splashes).
2. Check that the
and
lights are on
steadily.
3. Turn the steam knob a half turn anticlockwise
as far as it will go. Delivery begins.
4. Stop by turning the steam knob to the 0 position
Please note:
UÊ vʺiÀ}ÞÊ->Û}»Ê`iÊÃÊ>VÌÛi]ÊÞÕÊ>ÞÊ
have to wait a few seconds before the hot
water is delivered.
UÊ vÊ ÞÕÊ Ü>ÌÊ ÌÊ >iÊ ÃÌi>Ê >vÌiÀÊ «Ài«>À}Ê
hot water, it is recommended to empty the
water circuits opening the steam knob for a
few seconds.
Important!
When removing the drip tray, the grounds container must be emptied, even if it contains few
grounds.
If this is not done, when you make the next coffees, the grounds container may fill up more than
expected and clog the machine.
13
Cleaning the drip tray
Cleaning the pre-ground coffee funnel
Check regularly (about once a month ) that the
pre-ground coffee funnel (A6) is not blocked. If
necessary, remove coffee deposits with a brush.
Important!
If the drip tray is not emptied regularly, the water
could overflow from the edge and seep inside or
around the machine.
This could damage the machine, the surface it
rests on or the surrounding area.
The drip tray is fitted with a level indicator (red)
showing the level of water it contains (fig. 18).
Before the indicator protrudes from the cup tray,
the drip tray must be emptied and cleaned.
To remove the drip tray:
1. Remove the drip tray and the grounds container (fig. 17);
2. Empty the drip tray and grounds container
and wash them;
3. Replace the drip tray and grounds container.
Cleaning the infuser
The infuser (A11) must be cleaned at least once
a month.
Cleaning the inside of the machine
Important!
The infuser must not be extracted when the machine is on.
1. Make sure the machine is correctly turned
off (see Turning off).
2. Open the service door
3. Extract the drip tray and the grounds container (fig. 17).
4. Press the two red release buttons inwards
and at the same time pull the infuser outwards (fig. 22).
Danger of electric shock!
Before cleaning internal parts, the machine must
be turned off (see “Turning off”) and unplugged
vÀÊ Ì
iÊ >ÃÊ «ÜiÀÊ ÃÕ««Þ°Ê iÛiÀÊ iÀÃiÊ
the coffee maker in water.
Important!
, -Ê7/Ê7/,Ê" 9Ê
"Ê7- Ê1*Ê+1ÊÊ "Ê-Ê7-,
Do not use washing up liquid to clean the infuser
as it could cause damage.
1. Check regularly (about once a month) that
the inside of the appliance (accessible after
removing the drip tray) is not dirty.
If necessary, remove coffee deposits with the
brush supplied and a sponge.
2. Remove the residues with a vacuum cleaner
(fig. 19).
Cleaning the water tank
1. Clean the water tank (A12) regularly using
mild soapy water
2. Rinse the water tank thoroughly and fill the
tank with fresh water and put back in the appliance.
5. Soak the infuser in water for about 5 minutes, then rinse under the tap.
6. After cleaning, replace the infuser by sliding
it onto the internal support and pin at the
bottom, then push the PUSH symbol fully in
until it clicks into place.
Cleaning the coffee spouts
1. Clean the coffee spouts with a sponge or
cloth (fig. 21).
2. Check the holes in the coffee spout are
not blocked. If necessary, remove coffee deposits with a toothpick (fig. 22).
Please note:
If the infuser is difficult to
insert, before insertion,
adapt it to the right size
by pressing
the two levers
shown in the figure.
7. Once inserted, make sure the two
14
red buttons have snapped out.
8. Close the infuser door.
9. Replace the water tank.
forms a series of rinses and pauses to remove limescale deposits from inside the machine.
After about 30 minutes, the water tank is empty
light comes on. Turn the steam knob
and the
a half turn clockwise as far as it will go.
The appliance is now ready for rinsing through
with clean water.
11. Empty the container used to collect the descaler solution and replace it empty under
the cappuccino maker.
12. Remove the water tank, empty, rinse under
running water, fill with clean water and replace.
13. Turn the steam knob a half turn anticlockwise. Hot water comes out of the spout.
14. When the water tank is completely empty,
light goes out and the
light cothe
mes on.
15. Turn the knob to the 0 position, fill the water
tank again and the appliance goes off automatically.
To use the appliance, turn it on by pressing the
button.
DESCALING
Descale the appliance when the
panel flashes.
light on the
Important!
Descaler contains acids which may irritate the
skin and eyes.
It is vital to respect the manufacturer’s safety
warnings given on the descaler pack and the
warnings relating to the procedure to follow in
the event of contact with the skin and eyes.
Please note:
Use De’Longhi descaler only.
Under no circumstances should you use sulphamic or acetic based descalers. Their use invalidates the guarantee.
Failure to descale the appliance as described
above also invalidates the guarantee.
1. Turn the machine on.
2. Empty the water tank (A12).
3. Pour the descaler diluted with water (respecting the proportions indicated on the descaler pack) into the water tank.
Place an empty container with a minimum
capacity of 1.5 litres under the hot water
spout.
and
lights to come
4. Wait for the
on steadily.
SETTING WATER HARDNESS
The
message comes on after a period of
time established according to water hardness.
The machine is set by default for a hardness value of 4 (very hard water).
The machine can also be programmed according
to the hardness of the mains water in the various
regions so that the machine needs to be descaled
less often.
Important! Danger of burns
Hot water containing acid flows from the cappuccino maker. Avoid contact with splashes of
water.
Measuring water hardness
£°Ê ,iÛiÊÌ
iʺ/"/Ê, --Ê/-/»Ê`cator paper attached to this manual from its
pack.
2. Immerse the paper completely in a glass of
water for one second.
3. Remove the paper from the water and shake
lightly. After about a minute, 1, 2, 3, or 4 red
squares form, depending on the hardness of
the water. Each square corresponds to one
level.
button and hold it down for
5. Press the
at least 5 seconds to confirm that you have
added the solution and begin the descaling
procedure. The light in the button remains
on steadily to indicate that the descaling
and
programme has begun (the
lights go out as coffee cannot be made).
6. Turn the steam knob a half turn anticlockwise. The descaler solution flows out of the
cappuccino maker into the underlying container.
The descale programme automatically per-
Level 1
15
Level 2
providing this service.
Disposing of a household appliance separately
avoids possible negative consequences for the
environment and health deriving from inappropriate disposal and enables the constituent materials to be recovered to obtain significant savings
in energy and resources.
As a reminder of the need to dispose of household appliances separately, the product is marked with a rubbish bin bearing a cross.
Level 3
Level 4
Set water hardness
1. Make sure the appliance is off (but connected to the mains electricity supply and with
the main switch in the I position);
button for at least 6
2. Press and hold the
seconds. The
lights come on;
3. Confirm the selection by pressing the
button.
4. Turn the selection knob and set the level
shown by the indicator paper (see previous
paragraph).
button to confirm the setting.
5. Press the
6. Press the
button to exit the menu.
The machine is now reprogrammed with the new
water hardness setting.
TECHNICAL SPECIFICATION
Voltage:
220-240 V~ 50/60 Hz max. 10 A
Absorbed power:
1450 W
Pressure:
15 bar
Water tank capacity:
1,7 L
Size: LxHxD:
280x364x400 mm
Cable length:
1,5 m
Weight:
10,8 kg
UÊ
UÊ
UÊ
UÊ
The appliance complies with the following EC directives:
-Ì>`LÞÊÀiVÌÛiÊ°Ê£ÓÇxÉÓäänÆ
ÜÊ6Ì>}iÊÀiVÌÛiÊÓääÈÉxÉ
Ê>`ÊÃÕLsequent amendments;
ÊÀiVÌÛiÊÓää{É£änÉ
Ê>`ÊÃÕLÃiµÕiÌÊ
amendments
>ÌiÀ>ÃÊ>`Ê>VViÃÃÀiÃÊV}ÊÌÊVtact with food conform to EEC regulation
1935/2004.
DISPOSAL
Important information for correct disposal of the product in accordance
with EC Directive 2002/96/EC.
At the end of its working life, the product must not be disposed of as urban
waste.
It must be taken to a special local authority differentiated waste collection centre or to a dealer
16
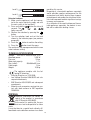
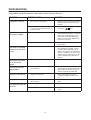
MEANING OF LIGHTS DURING NORMAL OPERATION
LIGHTS
1
2
3
4
5
6
7
8
DESCRIPTION
MEANING
The lights flash
The water is not yet at the ideal temperature.
Wait for the lights to come on steadily
before making coffee
The lights are on steadily
The appliance is ready to make coffee
The light is on steadily
The appliance is delivering one cup of
coffee
The light is on steadily
The appliance is delivering two cups of
coffee
The steam light is flashing
Wait for the light to remain on steadily
before using the steam function
The steam light is on stea- The appliance is ready to deliver steam
dily
The light is on steadily
The appliance is in energy saving mode
The light is on steadily
The automatic descaling programme is
underway
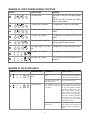
MEANING OF THE ALARM LIGHTS
LIGHTS
1
DESCRIPTION
MEANING
WHAT TO DO
The light is on steadily
Insufficient water in the
tank
Fill the tank with water and/or insert it correctly, pushing it as far as
it will go until it clicks into place.
The tank is dirty or clogged with limescale
Rinse or descale the tank
The grinding is too fine
and the coffee is delivered
too slowly
Repeat coffee delivery and turn
the grinding adjustment knob (fig.
10) one click clockwise towards
"7" while the coffee mill is in operation. If after making at least 2
coffees delivery is still too slow,
repeat the correction procedure,
turning the grinding adjustment
knob another click until delivery
is correct (see the section: “Adjusting the coffee mill).
The machine is not able to
make coffee
If the problem persists, turn the
steam knob to the I position and
deliver water from the cappuccino
maker
The light flashes
2
17
LIGHTS
3
DESCRIPTION
MEANING
WHAT TO DO
The light is on steadily
The grounds container is
full or missing
Empty the grounds container and
drip tray, clean and replace (fig.
23).
Important: when removing the drip
tray, the grounds container MUST
be emptied, even if it contains few
grounds.
If this is not done, when you make
the next coffees, the grounds container may fill up more than expected and clog the machine
The light flashes
The “pre-ground coffee”
function has been selected without placing any
pre-ground coffee in the
funnel
Place pre-ground coffee in the funnel or deselect the “pre-ground”
function
The light flashes
The machine must be descaled
The descaling procedure described
in the section “Descaling” needs to
be performed as soon as possible.
The coffee beans have
run out
Fill the beans container
If the coffee mill is very
noisy, this means a small
stone in the coffee beans
has blocked the mill.
Contact Customer Services
4
5
6
There is an unusual The infuser has not been Insert the infuser as described in
the paragraph "Cleaning the infunoise and the lights replaced after cleaning
ser"
flash alternately
7
The lights flash
alternately
The coffee maker has just
been turned on, the infuser is not inserted correctly and the service door is
not correctly closed.
Press the word PUSH on the infuser until it clicks into place.
Make sure the two red buttons
have snapped out.
Close the service door and turn the
appliance on again
The lights flash
The pre-ground
funnel is clogged
coffee
Empty the funnel with the help of a
brush as described in the section
“Cleaning the pre-ground coffee
funnel”.
The light is on
steadily
The infuser has not been
replaced after cleaning.
Insert the infuser as described in
the paragraph “Cleaning the infuser”
The inside of the appliance
is very dirty
Clean the appliance thoroughly
The light flashes
The service door is open
If you cannot close the door, make
sure the infuser is correctly inserted
The lights flash
The coffee maker has
been switched on with the
steam knob in the open
position
Turn the steam knob clockwise until delivery stops
8
9
10
11
18
TROUBLESHOOTING
Below is a list of some of the possible malfunctions.
If the problem cannot be resolved as described, contact Customer Services.
PROBLEM
POSSIBLE CAUSE
SOLUTION
The coffee is not hot
UÊ
/
iÊVÕ«ÃÊÜiÀiÊÌÊ«Ài
i>Ìi`°Ê
UÊ
7>ÀÊÌ
iÊVÕ«ÃÊLÞÊÀÃ}ÊÌ
iÊÜÌ
Ê
ÌÊ
Ü>ÌiÀÊ °°ÊÞÕÊV>ÊÕÃiÊÌ
iÊ
ÌÊÜ>ÌiÀÊ
function).
UÊ
/
iÊvÕÃiÀÊ
>ÃÊVi`Ê`ÜÊLiV>ÕÃiÊ
2/3 minutes have elapsed since the last
coffee was made.
UÊ
ivÀiÊ>}ÊVvvii]Ê
i>ÌÊÌ
iÊvÕÃiÀÊLÞÊ
button.
pressing the
UÊ
/
iÊVvviiÊÃÊ}ÀÕ`ÊÌÊV>ÀÃiÞ°
UÊ
/ÕÀÊÌ
iÊ}À`}Ê>`ÕÃÌiÌÊLÊiÊ
click anticlockwise towards “1” while the
coffee mill is in operation (fig. 7). The
effect is only visible after delivering 2
coffees (see the section: “Adjusting the
coffee mill” on page 11).
UÊ
/
iÊVvviiÊÃÊÕÃÕÌ>Li°ÊÊ
UÊ
1ÃiÊ«Ài}ÀÕ`ÊVvviiÊvÀÊiëÀiÃÃÊ
coffee makers.
The coffee is delivered
too slowly or a drop at
a time.
UÊ
/
iÊVvviiÊÃÊ}ÀÕ`ÊÌÊwiÞ°Ê
UÊ
/ÕÀÊÌ
iÊ}À`}Ê>`ÕÃÌiÌÊLÊ
one click clockwise towards “7” while
the coffee mill is in operation (fig. 7).
Continue one click at a time until coffee
delivery is satisfactory. The effect is only
visible after delivering 2 coffees (see the
section: “Adjusting the coffee mill” on
page 11).
Coffee does not come
out of one of the
spouts.
UÊ
/
iÊëÕÌÃÊ>ÀiÊLVi`°Ê
UÊ
i>ÊÌ
iÊëÕÌÃÊÜÌ
Ê>ÊÌÌ
«V°Ê
The frothed milk has
large bubbles
UÊ
/
iÊÊÃÊÌÊV`ÊiÕ}
ÊÀÊÃÊÌÊ
semi-skimmed.
UÊ
9ÕÊÃ
Õ`Ê`i>ÞÊÕÃiÊÃi`ÊÀÊÃi
skimmed milk at refrigerator temperature
(about 5°C). If the result is not as you
wished, try changing brand of milk.
The milk is not frothed
UÊ
>««ÕVVÊ>iÀÊ`ÀÌÞ°Ê
UÊ
i>Ê>ÃÊ`iÃVÀLi`ÊÊÌ
iÊÃiVÌÊ
“Cleaning the cappuccino maker after
use”
Steam delivery stops
UÊ
ÊÃ>viÌÞÊ`iÛViÊÃÌ«ÃÊÃÌi>Ê`iÛiÀÞÊ
after 3 minutes.
UÊ
7>Ì]ÊÌ
iÊ>VÌÛ>ÌiÊÌ
iÊÃÌi>ÊvÕVÌÊ
again.
The appliance does not
come on.
UÊ
ÌÊÃÊÌÊ«Õ}}i`ÊÌÊÌ
iÊ>ÃÊÃViÌ°Ê
UÊ
*Õ}ÊÌÊÌ
iÊ>ÃÊÃViÌ°
UÊ
/
iÊ>ÊÃÜÌV
ÊÊÃÊÌÊÌÕÀi`Ê°
UÊ
*>ViÊÌ
iÊ>ÊÃÜÌV
ÊÊÌ
iÊÊ«ÃÌÊ
(fig. 3).
The coffee is weak or
not creamy enough.
19
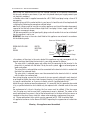
ELECTRICAL REQUIREMENTS
Before using this appliance ensure that the voltage indicated on the product corresponds
with the main voltage in your home, if you are in any doubt about your supply contact your
local electricity company.
The flexible mains lead is supplied connected to a B.S. 1363 fused plug having a fuse of 13
amp capacity.
Should this plug not fit the socket outlets in your home, it should be cut off and replaced with
a suitable plug, following the procedure outlined below.
Note: Such a plug cannot be used for any other appliance and should therefore be properly
disposed of and not left where children might find it and plug it into a supply socket - with
the obvious consequent danger.
N.B. We recommend the use of good quality plugs and wall sockets that can be switched off
when the machine is not in use.
IMPORTANT: the wires in the mains lead fitted to this appliance are coloured in accordance
with the following code:
Green and Yellow to Earth
, Ê Ê9"7ÊÊÊÊ
1ÊÊ
,"7 Ê
13 amp
Fuse
,/
1/,
6
Blue to
neutral
Brown to
live
Cord Clamp
As the colours of the wires in the mains lead of this appliance may not correspond with the
coloured markings identifying the terminals in your plug, proceed as follows:
- The wire which is coloured green and yellow must be connected to the terminal in the
or coloured green or
plug which is marked with the letter E or by the earth symbol
green and yellow.
- The wire which is coloured blue must be connected to the terminal which is marked with
Ì
iÊiÌÌiÀÊ ÊÀÊVÕÀi`ÊL>V°
- The wire which is coloured brown must be connected to the terminal which is marked
with the letter L or coloured red.
When wiring the plug, ensure that all strands of wire are securely retained in each terminal.
Do not forget to tighten the mains lead clamp on the plug. If your electricity supply point has
only two pin socket outlets, or if you are in doubt, consult a qualified electrician.
Should the mains lead ever require replacement, it is essential that this operation be carried
out by a qualified electrician and should only be replaced with a flexible cord of the same
size.
After replacement of a fuse in the plug, the fuse cover must be refitted. If the fuse cover
is lost, the plug must not be used until a replacement cover is obtained. The colour of the
correct replacement fuse cover is that of the coloured insert in the base of the fuse recess or
elsewhere on the plug. Always state this colour when ordering a replacement fuse cover.
Only 13amp replacement fuses which are asta approved to B.S. 1362 should be fitted.
/
ÃÊ>««>ViÊVvÀÃÊÌÊÌ
iÊ ÀÃÊ Êxxä£{ÊÀi}>À`}ÊÌ
iÊÃÕ««ÀiÃÃÊvÊÀ>`ÊÌiÀference.
Warning - this appliance must be earthed
20