1
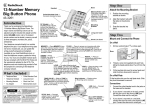
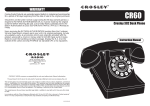
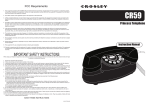
READ THIS FIRST We have designed your telephone to conform to federal regulations and you can connect it to most telephone lines. However, each device you connect to the phone line draws power from it. This power draw is the device’s Ringer Equivalence Number, or REN. The REN is shown on the bottom of your phone. If you are using more than one phone or other device on the line, add up all the RENs. If the total is more than five (or three in rural areas), your phones might not ring. If ringer operation is impaired, remove one of the devices from the line. If your phone causes problems on the phone line, the telephone company can disconnect your service. The phone company tries to notify you in advance. If advance notice is not practical, the telephone company notifies you as soon as possible and advises you of your right to file a complaint with the FCC. The phone company can also make changes to its lines, equipment, operations, or procedures that could affect the phone’s operation. The phone company notifies you in advance, so you can take the necessary steps to prevent interruption of your phone service. FCC STATEMENT Your telephone complies with Part 68 of FCC Rules. You must, upon request, provide the FCC registration number and the REN to your telephone company. These numbers are shown on the bottom of your phone. Note: You must not connect your telephone to: • coin-operated systems • party-line systems • most electronic key phone systems CARE • Keep the phone dry. • Handle the phone carefully. Do not drop it. • Do not use or store the phone in temperature extremes. Limited One-Year Warranty This product is warranted by RadioShack against manufacturing defects in material and workmanship under normal use for one (1) year from the date of purchase from RadioShack company-owned stores and authorized RadioShack franchisees and dealers. EXCEPT AS PROVIDED HEREIN, RadioShack MAKES NO EXPRESS WARRANTIES AND ANY IMPLIED WARRANTIES, INCLUDING THOSE OF MERCHANTABILITY AND FITNESS FOR A PARTICULAR PURPOSE, ARE LIMITED IN DURATION TO THE DURATION OF THE WRITTEN LIMITED WARRANTIES CONTAINED HEREIN. EXCEPT AS PROVIDED HEREIN, RadioShack SHALL HAVE NO LIABILITY OR RESPONSIBILITY TO CUSTOMER OR ANY OTHER PERSON OR ENTITY WITH RESPECT TO ANY LIABILITY, LOSS OR DAMAGE CAUSED DIRECTLY OR INDIRECTLY BY USE OR PERFORMANCE OF THE PRODUCT OR ARISING OUT OF ANY BREACH OF THIS WARRANTY, INCLUDING, BUT NOT LIMITED TO, ANY DAMAGES RESULTING FROM INCONVENIENCE, LOSS OF TIME, DATA, PROPERTY, REVENUE, OR PROFIT OR ANY INDIRECT, SPECIAL, INCIDENTAL, OR CONSEQUENTIAL DAMAGES, EVEN IF RadioShack HAS BEEN ADVISED OF THE POSSIBILITY OF SUCH DAMAGES. Some states do not allow the limitations on how long an implied warranty lasts or the exclusion of incidental or consequential damages, so the above limitations or exclusions may not apply to you. In the event of a product defect during the warranty period, take the product and the RadioShack sales receipt as proof of purchase date to any RadioShack store. RadioShack will, at its option, unless otherwise provided by law: (a) correct the defect by product repair without charge for parts and labor; (b) replace the product with one of the same or similar design; or (c) refund the purchase price. All replaced parts and products, and products on which a refund is made, become the property of RadioShack. New or reconditioned parts and products may be used in the performance of warranty service. Repaired or replaced parts and products are warranted for the remainder of the original warranty period. You will be charged for repair or replacement of the product made after the expiration of the warranty period. This warranty does not cover: (a) damage or failure caused by or attributable to acts of God, abuse, accident, misuse, improper or abnormal usage, failure to follow instructions, improper installation or maintenance, alteration, lightning or other incidence of excess voltage or current; (b) any repairs other than those provided by a RadioShack Authorized Service Facility; (c) consumables such as fuses or batteries; (d) cosmetic damage; (e) transportation, shipping or insurance costs; or (f) costs of product removal, installation, set-up service adjustment or reinstallation. This warranty gives you specific legal rights, and you may also have other rights which vary from state to state. RadioShack Customer Relations, 200 Taylor Street, 6th Floor, Fort Worth, TX 76102 • Keep the phone away from dust and dirt. We Service What We Sell • Do not modify or tamper with the phone’s internal components. Doing so might invalidate the phone’s warranty and void your FCC authorization to operate it. If the phone is not operating as it should, take it to your local Radio Shack store for assistance. If the trouble is harming the phone lines, the phone company might ask you to disconnect the telephone until you fix the problem. 10A99 Memory Desktop Fashion Phone ■ Adjustable Ringer ■ Handset Volume Control ■ Redial ■ Flash ■ Hearing-Aid Compatible 04/99 RadioShack A Division of Tandy Corporation Fort Worth, Texas 76102 Printed in Indonesia Owner’s Manual Cat. No. 43-1301 (Dove Gray) Cat. No. 43-1302 (Graphite) Cat. No. 43-1303 (Spruce) MOUNTING THE PHONE USING THE PHONE MEMORY, STORE, and M1, M2, and M3 — See “Storing/Dialing Numbers in Memory.” Wall Mounting (With or Without a Wall Plate) The mounting bracket comes attached to the lower base of the phone for immediate wall mounting. Lift out the memory index card and record important phone numbers. Adjust the handset holder by sliding the clip up. Then rotate it and slide it back into the slot. To mount the phone on a wall plate, connect the supplied short cord to the phone’s line jack and route it through the groove on the base. 3 15/16 Inches (100 mm) To mount the phone without a wall plate, connect the supplied long cord. Then use two 3/16-inch (5 mm) screws (not supplied) to mount the phone on the wall. Mounting with a Wall Plate Mounting without a Wall Plate Desktop Mounting To place the phone on a flat surface, remove the mounting bracket by sliding the bracket to the right and then away from the phone. Insert the tab on the wide end of the bracket into the base’s upper left slot, and the other tab into the base’s upper right slot. Then slide the bracket to the right to snap the bracket into place. If you have pulse service, press /TONE to dial numbers as tone signals. The phone returns to pulse dialing when you hang up. * Press to disconnect a call. Set to TONE or PULSE according to the type of service you have. Plug the handset cord into the jacks on the handset and base. Set the RINGER to OFF, LOW or Set the . You can make to OFF calls , LOW withor HIGH RINGER . Youoff, canand make the ringer youcalls can with HIGH the ringer off,ifand receive calls you you hearcan another receiveon phone calls theifsame you hear line another ringing. Press REDIAL to dial the last number dialed (up to 31 digits). Set VOLUME LOW/MED/HIGH to adjust the volume you hear through the handset. Press FLASH for a timed switchhook signal for special services, like Call Waiting. Note: If you do not subscribe to any special services, pressing FLASH might disconnect the call. To make or answer a call using a headset, press HEADSET. Then (if you are making a call), dial the phone number. To end a call, press HEADSET again. The headset indicator lights when you make and receive a call using a headset, and turns off when you end a call. The headset jack ( )lets you connect an optional headset, so you can step away within the cord’s reach to do another job (available from RadioShack). To connect a headset, insert the headset’s 3/32-inch (2.5-mm) plug into . STORING/DIALING NUMBERS IN MEMORY Note: The phone company can charge you for the installation of the necessary jacks. The USOC number of the jack to be installed is RJ11C (RJ11W for a wall jack). You can store up to 13 numbers (three priority – M1, M2, M3, and 10 standard – one for each number key). To store a number (up to 16 digits) in memory: CAUTION 1. Lift the handset. If you wear a headset, press HEADSET. Then press STORE. RISK OF ELECTRIC SHOCK. DO NOT OPEN. 2. Enter the telephone number you want to store. Then press STORE. This symbol is intended to alert you that parts inside the telephone present a risk of electric shock. 3. To store a number in a priority memory, press M1, M2, or M3. For standard memories, enter the 1-digit number (0–9) for the location where you want to store the number. This symbol is intended to alert you to important operating and servicing instructions included in the papers with the telephone. To dial a number in a priority memory: 1. Lift the handset. If you wear a headset, press HEADSET. 2. Press the priority button (M1, M2, or M3) for the number you want to call. To dial a number in standard memory: 1. Lift the handset. 2. Press MEMORY. 3. Enter the 1-digit location number for the number you want to call. 4. To store more numbers, repeat Steps 1–3. 1999 Tandy Corporation. All Rights Reserved. RadioShack is a registered trademark used by Tandy Corporation.