1
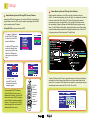
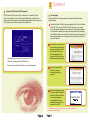
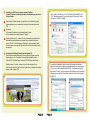
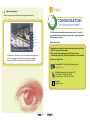
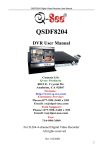
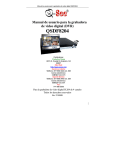
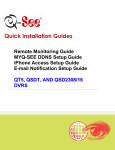
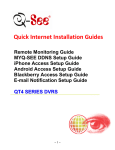
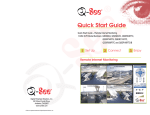
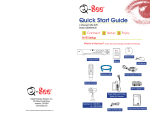
Quick Start Guide
Quick Start Guide – Remote Internet Monitoring
4 Channel DVR
For Models: QSTD5304
QSDF8204
QSD2304L
1 Setup
2 Connect
3 Enjoy
Remote Internet Monitoring
L o g in
S o ftw a re S e tu p
R e m o te Pla yb a ck
R e m o te DV R Co n fig u ra tio n
R e m o te P TZ
Digital Peripheral Solutions, Inc.
8015 East Crystal Drive,
Anaheim, CA 92807
www.Q-See.com
Q-See is a registered trademark of Digital Peripheral Solutions, Inc.
L a rg e P ictu re
Q u a d P ictu re
N e xt V id e o Ch a n n e l
C a m e ra A u d io
S n a p Pictu re
D V R Re co rd
1 Setup
B
A
Remote Monitoring Setup for DVR using DHCP to setup IP address
Accessing the DVR from a single router: To access the DVR from a computer that is
using the same router as the DVR, set up the network settings using either the DHCP
option or assigning a static IP address:
To Setup DHCP (Most common routers are DHCP)
1. To assign an IP address to
the DVR using DHCP, select
the Menu Key on the DVR to
access the Main Menu.
Remote Monitoring Setup for DVR using a Static IP address
Setup the network configuration on the DVR to work with the settings on the router.
Static IP: To obtain the router settings, go to the Run Option on a computer that is attached
to the same router as the DVR and type “cmd”. Select OK to bring up the command
prompt screen, as shown in the picture below. Type “ipconfig” at the prompt to access
the router settings. Capture the Gateway and Subnet Mask Numbers (see green arrows
below). On the DVR push the Menu Key to prompt the Main Menu, use the Direction Keys
to select the Network option and push Enter to display the Network Screen. Select the IP
Config option and select Enter to display the IP Config Window.
2. Use the DVR Direction Keys
to select the Network Option
(red box) and push Enter Key.
Select the IP Configuration
option (green box) and select
Enter.
3. Under IP Config:
select DHCP, select OK
and reboot the system for
settings to register.
Convert assigned DHCP IP address to
a Static IP Address: (Do this so your IP
address does not change.) Push the INFO
button on the remote or DVR front panel to
get the IP address information assigned by
the router. Then go back to the IP config
window change to static, and enter the IP
addresses from the info screen.
To set the IP address of the DVR use the same first three sets of numbers as the Gateway
and assign a fourth set of numbers that is different from all other devices attached to the
same router. For example: if the IP address of your computer in the ipconfig was a single or
two digit number, use a number in the 100s, if in the 100s, use 200.
Push the
INFO
button on
the remote
control to
see the
newly
assigned IP
address.
Page 1
Page 2
2 Connect
C
Attaching the DVR directly to DSL/Cable modem
PPPOE: Select the PPPOE option in the IP config options. To access the IP config
window: Push the Menu Key on the DVR to prompt the Main Menu. Use the Direction
Keys to select the Network option and push Enter to display the Network Screen, select the
IP Config option and select Enter to display the IP Config Window.
A
To access the DVR from a remote computer over the internet via internet browser
(Internet Explorer).
1
Forward Port 80 and Port 2000 on the router attached to the DVR, to the IP address
of the DVR. *If you can’t use HTTP Port 80 or 2000 due to use or your Internet
Service Provider, use a different port in the same range. When selecting a different
port, forward the IP address of the router to the new port and change the settings in
the DVR Network settings. You will also need to add the new port to the end of the IP
address in the browser window. For example, if you use port 83, you add :83 to the
end of the IP address.
2
For instructions on how to forward
ports on the most popular routers
go to www.portforward.com. Click
on the orange “Routers” link in
the second paragraph, select
your router from the list of router
manufacturers, brand and model.
3
Click on the orange “Default
Guide” link to view port
forwarding instructions for
your router.
4
Into the Internet Explorer address
bar, enter the public IP address of
the router the DVR is attached to.
You can get this by going to
www.myipaddress.com on a
computer that is attached to the
same router as the DVR.
1. Use the Enter key to change the IP config setting to PPPOE
2. Enter user id and password in the PPPOE section
*Contact your Internet Service Provider for your user id and password
Port Forwarding
For additional help with forwarding ports on your router, please visit :
www.portforward.com/qsee
Page 3
Page 4
B
Accessing the DVR through a static or dynamic IP address
*Dynamic IP address can change from time to time depending on your Internet
Service Provider.
1
If the Dynamic IP address changes, you can find the new IP address by going to
www.myipaddress.com on a computer that is attached to the same router as the
DVR.
2
Two options:
a) Get a static IP address from your Internet Service Provider.
b) Use a dynamic domain name instead of IP address.
3
Dynamic domain name: Go to www.no-ip.com or www.dyndns.com Register and
download the free web software on a computer that is connected to the same
router as the DVR. Run the software and follow the on screen prompts to install.
On some routers you can input the login information into the router instead of using
the computer.
C
Accessing the DVR through Internet Explorer Browser (IE):
Once the ports have been forwarded, you must modify your browser controls by
allowing pop-ups. Go to Tools Option in Internet Explorer (Red Box below).
Select the POP UP Blocker Option and turn off POP UP Blocker (Blue Arrows).
Go to “Security” (Red Box C2), click on “Custom Level” (Green Box C2), click
“OK”. New window opens (C3), scroll down to Active X Controls and Plug Ins
and set all to “Prompt” or “Enabled”.
C2
C3
!
!
If you get an error message “Program Cannot Load” because the publisher is
unknown or the program is unsigned, go to Internet Explorer, tools, internet options
(C1) then click on the “Advanced” tab (Red Box C4). It will display window (C5).
Scroll down to “Security”, click on the options “Allow Software to Run or Install Even
If the Signature is Invalid” and “Allow Active Content to Run Files on My Computer”
(Red Box C5)
Enable the Active X Controls, go back up to the Tool Bar, and select Tools.
Select from the drop down “Internet Options” (green arrow), prompting a new display
window, shown on page 6 (C2).
C1
C4
C5
!
D
Accessing the DVR through Internet Explorer Browser (IE):
Modify internet browser controls.
!
Page 5
Page 6
!
D
3 Enjoy
Remote Viewing Window
When you connect you will see the remote viewing window shown below:
CONGRATULATIONS
on your purchase!
This Q-See product has undergone extensive quality control. If you have
any issues during the setup process, please contact our support department
before returning the product.
L o g in
S o ftw a re S e tu p
R e m o te Pla yb a ck
R e m o te DV R Co n fig u ra tio n
We have your solution!
R e m o te P TZ
1) Need assistance setting up the remote monitoring feature with your Q-See
DVR? Visit www.portforward.com/qsee
L a rg e P ictu re
Q u a d P ictu re
N e xt V id e o Ch a n n e l
C a m e ra A u d io
S n a p Pictu re
D V R Re co rd
2) Visit our Q-See Support Section at www. Q-See.com for instant
troubleshooting tips, FAQs, DVR firmware downloads, Live Chat and More.
For information on the features of how to use the remote viewing program
refer to the Users Manual. The login for the remote viewing program is
the same as the DVR, user name is admin and password is 123456.
3) Contact our Support Team:
On the Web: (24/7) Visit the Technical Support Section
www.Q-See.com
By Phone (Monday thru Friday, 9am-5pm (PST)
Tech Support 1 (877) 998 3440, ext 539
Customer Service 1 (877) 998 3440 ext. 538
@
Page 7
Page 8
By Email:
[email protected]
Quick Reference
Notes:
Page 9