1
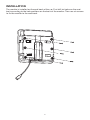
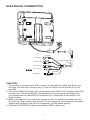
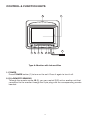
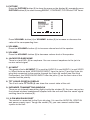
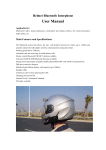
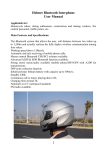
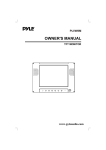
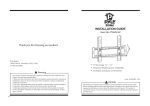
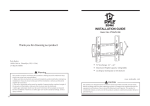
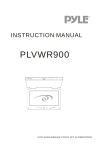
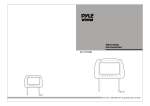
PLVHR5IR
OWNER’S MANUAL
MONITOR
INSTALLATION
The monitor is installed on the seat back of the car. First drill six holes on the seat
back according to the hole positions on the back of the monitor. Then use six screws
to fix the monitor to the seat back.
2
ELECTRICAL CONNECTION
(1)
(2)
YELLOW
(3) VIDEO IN
WHITE
PVC CABLE (BLACK)
(4) AUDIO L IN
RED
(5) AUDIO R IN
BLACK
(7) RED
(6) DC PLUG
(8) BLACK
(9) REMOTE
BLACK
CAUTION:
1. The monitor is connected to DVD or other unit through the cable with 9-pin mini
din plug. Put the 9-pin mini din plug (1) into the 9-pin mini din socket (2) of the
monitor.
2. The yellow VIDEO IN socket (3) is connected to the VIDEO OUT socket of the DVD
or other unit. The white AUDIO L IN socket (4) is connected to the AUDIO OutLeft socket and the red AUDIO R IN socket (5) is connected to the AUDIO OutRight socket.
3. When you want to let the unit work, please cut the (7) and (8) two wires from the
DC plug (6). Then connect the red wire (7) to the positive (+) terminal of the power
supply and the black wire (8) to the negative (-) of the power supply.
4. The black (9) REMOTE plug is connected to DVD or other unit.
3
CONTROL & FUNCTION KEYS
9
8
10
7
2
1
5
4
3
6
Type A: Monitor with Infrared Box
1. POWER
Press POWER button (1) to turn on the unit. Press it again to turn it off.
2. IR (=REMOTE SENSOR)
Through the remote sensor IR (2), you can control DVD unit or another unit that
connected to the monitor through the 9-pin plug with the corresponding remote
handset.
4
3. PICTURE
Press the PICTURE button (3) to show the menu on the display (8), repeatedly press
PICTURE button (3) to select among BRIGHT, CONTRAST, COLOR and TINT items.
MENU
BRIGHT
32
CONTRAST 32
COLOR
32
TINT
32
Press VOLUME+ button (4) or VOLUME- button (5) to increase or decrease the
value of the corresponding item.
4. VOLUME+
Press the VOLUME+ button (4) to increase volume level of the speaker.
5. VOLUMEPress the VOLUME- button (5) to decrease volume level of the speaker.
6. JACKS FOR EARPHONE
There is a jack EAR. (6) for earphone. You can connect earphone to the jack to
receive sound signal.
7. AV INPUT
The group of jacks AV INPUT (7) is used for AUDIO R in and AUDIO L in and VIDEO
in. When there are both VIDEO/AUDIO INPUT from the jacks (7) and the 9-pin din
plug that connected to the monitor through the 9-pin din socket (see Electrical
Connection), the VIDEO/AUDIO INPUT from the jacks (7) on the front view of the
monitor has the priority.
8. TFT LIQUID CRYSTAL DISPLAY
The 5 inch color TFT LCD (8) can show the current state of the unit.
9. INFRARED TRANSMITTING WINDOW
There are six infrared transmitting lights inside the window (9), the user can put on
the infrared wireless headphones supplied with the unit and hear the sound signal
emitting from the window (9).
10. 9-PIN MINI DIN SOCKET
The socket is connected to the 9-pin din plug. It is used for AUDIO IN, VIDEO IN
and power supply input. Trough the socket (10), you can connect audio/video
system to the unit.
5
www.pyleaudio.com
88-T1323-03