1
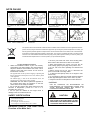
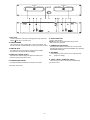
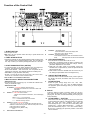
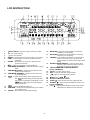
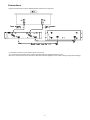
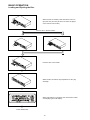
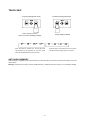
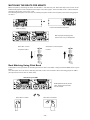
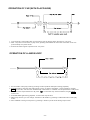
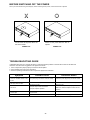
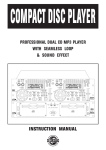
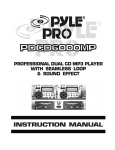
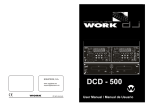
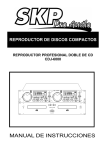
PDCD940MP
PROFESSIONAL DUAL CD MP3
PLAYER WITH SEAMLESS LOOP
& SOUND EFFECT
TABLE OF CONTENTS
NOTE ON
USE …………………………………………………………………2
FOR SAFE AND EFFICIENT OPERATION ………………………2
DESCRIPTION OF THE FUNCTIONS ……………………………3
FUNCTION OF THE MAIN UNIT………………………………………3
FUNCTION OF THE CONTROL UNIT…………………………………4
LCD INSTRUCTION …………………………………………………6
PARAMETER SETTING INSTRUCTION ……………………………7
CONNETIONS ………………………………………………………9
BASIC OPERATION ………………………………………………10
LOADING AND EJECTING THE DISC………………………………10
TRACK SKIP ………………………………………………………10
ANTI SHOCK MEMORY ……………………………………………11
MATCHING THE BEATS PER MINUTE ……………………………12
BEAT MATCHING USING PITCH BEND……………………………12
OPERATION OF CUE AND LOOP ………………………………13
BEFORE SWITCHING OFF THE POWER ………………………
14
TROUBLESHOOTING GUIDE ……………………………………14
USB DRIVER & DJM
PROGRAM………………………………….15
-1-
NOTE ON USE
BE CAREFUL OF HIGH TEMPERA-
TO AVOID DUST & MOISTURE
TO
TURE
AVOID
PLACING
ON
UN-
DO NOT USE CHEMICALS
STABLE LOCATION
IF OUT OF WORK, CONTACT
KEEP
SALES AGENCY IMMEDIATELY
MAGNETISM
AWAY
FROM
TV
&
DO NOT OPEN THE CASE
CARE WITH THE POWER CORD
This product shall not be treated as household waste. Instead it shall be handed over to the applicable collection
point for the recycling of electrical and electronic equipment. By ensuring this product is disposed of correctly, you
will help prevent potential negative consequences for the environment and human health, which could otherwise
be caused by inappropriate waste handling of this product. The recycling of materials will help to conserve natural
resources. For more detailed information about recycling of this product, please contact your local city office, your
household waste disposal service or the shop where you purchased the product.
For Safe and Efficient Operation
• Select the installation location of your unit carefully.
Avoid placing it in direct sunlight. Also avoid locations
subject to vibration and excessive dust, heat, cold or
moisture. Keep away from sources of hum such as
transformers or motors.
The apparatus shall not be exposed to dripping or splashing and
that no objects filled with liquids, such as vases, shall be placed
on the apparatus.
The MAINS plug is used as the disconnected device, the
disconnect device shall remain readily operable.
WARNING: The user shall not place this apparatus in
the confined area during he operation so that the
mains switch can be easily accessible.
• Do not use this compact disc player where there are
extremes in temperature ( below 41 o F/5 o C or
exceeding 95 o F/35 o C )
• Do not open the cabinet as this might result in
damage to the set or electrical shock.
• Be sure your hands are clean when handing discs.
Never insert a disc which has a crack on its surface.
• When disconnecting the power cord form the AC
outlet, always grasp it by the plug. Never pull the cord.
• Do not use force when operating the switches and
buttons.
• Before moving the set, be sure to disconnect the
power cord and all connecting cables.
• To keep the laser pickup clean, do not forget to close
the disc tray.
• Do not attempt to clean the unit with chemical solvents
as this might damage the finish. Use a clean, dry cloth.
• Keep this manual in a safe place for future reference.
CAUTION:
USE OF CONTROLS OR ADJUSTMENTS OR
PERFORMANCE OF PROCEDURES OTHER THAN
THOSE SPECIFIED HEREIN MAY RESULT IN
HAZARDOUS RADIATIO EXPOSURE.
CAUTION
SAFETY CERTIFICATION
Laser Diode Properties
Material: Ga.-Al-As
Wavelength: 755-815 nm (25oC)
Laser Output: Continuous Wave max. 0.5mW
TO PREVENT ELECTRIC SHOCK DO NOT REMOVE COVER (OR BOTTOM SCREWS). NO USER
SERVICEABLE PARTS INSIDE REFER SERVICING
TO QUALIFIED SERVICING PER- SONNEL.
DESCRIPTION OF THE FUNCTIONS
Function of the Main Unit :
-2-
POWER
1. Disc Tray
The disc is placed on this tray. Pressing the disc tray open/close
buttons e will open or close the tray.
2. START/PAUSE
This connector is used for fader start; connect it to a mixer, and
remote control the “START/PAUSE” by moving the fader of mixer
3. DIGITAL OUT
The digital from each CD player is output from these jacks.
Connect to the line input of the D/A Amplifier
6. EJECT BUTTON
Press to eject the disc.
NOTE: Disc won’t be ejected unless stop or pause
button has been push first.
7. POWER (Power Switch)
Press the power switch to turn the unit on, and the LED
indicator will be light. To switch the POWER off by pressing
the POWER switch again
8. AC INPUT
Connecting this power cord into an AC wall outlet with
the
proper AC voltage.
4. LINE OUT (Output Jacks)
The audio from each CD player is output from these jacks.
Connect to the line input of the mixer.
9. TACT / LOCK / CUE PLAY option
5. CONNECTOR PORTS
Select the type of switch in the mixer for FADERSTART
wire remote control.
The 8-pin termination permits the connection of the main
unit to the control unit 1.
-3-
Function of the Control Unit
Bu
1. EJECT BUTTON
Press to eject the disc.
Note: Disc can’t be ejected unless the stop or pause button has
been pushed first.
z
5.
the button for 3 seconds to switch OUTRO function.
Note: OUTRO is not available for MP3 music.
6.
The buttons are direct access keys (0~9). To select the number of the
7.
* Multi function ON
z
z
z
LCD shows[ clear memory ] for 2 sec
Number1:CUE Point Store Function。
Record new CUE Point Information , and LCD Display
shows
[ Store□□□/○○○ ] for 2 seconds.
□□□:Present saved CUE point number.
ON/OFF BUTTON (PITCH)
PITCH BUTTON
Select the pitch change range from ±4%, ±8%, ±16%,
±100% (for CDDA), ±4%, ±8%, ±16% for (MP3 Playback).
The playback speed will change when you move the pitch
control slider.
track you would like to play.
z Number 0 : CUE Point Memory Clear Function。
Hold these two buttons for 2 seconds to clear CUE
Point data.
KEY ON/OFF SWITCH
Press the button to be PITCH ON mode, press it again on
the PITCH ON mode, and blinks with unit on the PITCH
OFF mode.
4. Multi functions / DIRECT ACCESS BUTTONS
* Multi function off
ry
Press the button to switch KEY mode on or off.
z KEY OFF: The display shows the “KEY” in blinking, and
the key changed according to the pitch change. The key
parameter adjustment is not in effect
z KEY ON: The “KEY” lights on the display, turning the
SCOPE knob to adjust the key. Slide the pitch slider will
also change the key.
z KEY LOCK: Press the SCOPE knob to lock the key as
set, sliding the pitch slider does not change the key.
3. CONT./SINGLE BUTTON ( OUTRO)
To press this button it can switch between auto cue single and
continue. The selected mode is indicated on the display.
*AUTO CUE SINGLE - After each track, the unit pauses at the
beginning of next track. The playback starts from audible point.
*CONTINUE -To play all tracks continually.
*OUTRO - The unit will play the last 30 seconds of each track. Press
M em o
Number8: ID3 display select
Press the button to switch ID3 display item
(File name / Title / Album / Artist )
Number9:Folder/File select button
Press these 2 buttons to enter the Folder/File select
mode.
Use Skip button to search the Folder/File.
z
2. TIME / STOP BUTTON
This button switches the time display between total remaining time,
each remaining time and elapsed playing time. The unit will be in
the “stop” mode if you continue pressing the button for 3 seconds.
f f er
8. RELAY
Press the “RELAY” button to activate. When one unit is in
play mode, and the other unit is in “pause” mode; pause the
playing unit, the other unit will automatically start to play (the
button will blink)..
9.
PITCH BEND + / - BUTTON
When each of the two CD players is playing, the pitch bend
function allows the position of the bass beat to be matched
after the pitch has been adjusted. The pitch will
automatically rise up to + 16% from the current setting while
pressing the “ + “button. While pressing the “ – “ button, the
pitch will automatically drop to - 16 % from current setting.
By the way of changing the pitch the position of the beats
can be matched.
○○○:Remain memory volume.
Number2:Recall CUE Point Function。
The function can be ON only in PAUSE mode and use JOG
WHEEL to select the Cue points. After the CUE point is found,
press Play button to activate.
LCD Display shows [ Buffer CUE ]
Sec。
NO function for Number 3-7
-4-
*Speed Control (SEARCH indicator off)
10. PITCH CONTROL SLIDER
Rotating the wheel, in play mode, will change the playback
speed accordingly. While rotating clockwise, the player
speed increase; rotating counterclockwise, the speed
decrease.
To match the choices of playback speed (8%, 16%, 32%,
100%), you can choose what range you want between
minimum (up side) and maximum (bottom side) by moving
the pitch control slider.
*Search (SEARCH indicator lights)
11. SAM. BUTTON
Rotating the wheel, the player will forward or backward
quickly. The searching speed changed according to the
dialing speed. It can be carried out by one frame increment.
Sampler is a kind of sound effect that you record the music
from the track. While playing the music, you can use the
sampler to mix with music. The maximum length is 8 seconds.
1.
Set start point: Press the MEMO key, and then press
SAM button, after memorizing the SAM button flashes quickly
(2 times in 1 sec)
2.
Set End point: Press the SAM button again, when the
end point is memorized, the SAM button lights up (not flash).
3.
Play Sampler: During PLAY mode, press the SAM
button, then the button will flash slowly. (1 time in 1 sec)
The searching speed changed according to the dialing
speed. It can be carried out by one frame increment.
21. SEARCH BUTTON
Pressed the button to switch the function of Jog Dial
between SEARCH and PITCH BEND.
z When the indicator LED is light, dial the jog for quick
search forward and backward.
z When the indicator LED is off, dial the jog for pitch bend
function.
z If the jog is unmoved for 8 seconds, the indicator is off,
and the jog is for pitch bend function.
12. TRACK BUTTON
These buttons select the track to be played.
13. +10 BUTTON
Press the button to forward 10 tracks. If you forward 10 tracks,
and the tracks over total tracks, the unit will jump to track 1...
22. SOUND EFFECT
between PLAY and PAUSE modes.
REVERSE: The music is playing backward. This sound effect
can be performed independently, or in parallel with other effect.
SCRATCH: Move the JOG Wheel backward or forward like
scratching a turntable record. This sound effect can be
performed independently, or in parallel with other effect.
14. HOT-CUE
This unit will allow you to play from 3 cue points instantly.
a. Set CUE memory: Press the MEMO button first, and
then press the CUE button to complete the CUE setting,
then this CUE button will light up.
b. Play” CUE” memory: Upon pressing specific CUE button,
it will flash about 5 seconds.
Note: This function is not available during perform
REVERSE sound effect.
23. CONNECTOR PORT
The 8-pin(6-pin) termination permits the connection of the
control unit to the main unit.
24.
SLEEP:
Leave the unit unused for 30 minutes; the machine will shut off
automatically.
15. BPM BUTTON
You can get the BPM number automatically or manually.
Pressing the BPM BUTTON for 3 seconds to switch
between auto and manual control. The BEAT will be shown
on the display! Under the manual mode, tapping this button
to get the beat value.
16. PLAY/ PAUSE BUTTON
Each press of this button causes the operation to change
between PLAY and PAUSE modes.
17. CUE BUTTON
The cue function allows the CD returning to the memorized point.
In PAUSE mode, pressing the CUE button to set the cue point,
and the CUE button blinks; in PLAY mode, press this button to
pause the unit at the memorized point
18. BOP BUTTON
The playback will automatically play from the CUE point upon
the button is pressed.
19. Seamless Loop (2 sets)
There is A, B/LOOP/ EXIT, RELOOP buttons.
i.. A BUTTON---“start point” (A point. Also, Cue 1 could be A
point) After setting up the A point, the red Led light up
ii.. B/LOOP/ EXIT BUTTON: ---“ End point”(B point). Press the B
/LOOP button to set up the B point and start the loop playback
automatically. Loop lights on the display and the 3 LEDs flash.
Press this button again to exit the LOOP playback.
iii.. Return to the loop playback by pressing the RELOOP while in
performance. However, if your want to return to loop playback,
you can press RELOOP BUTTON
iv.. Change “ START POINT” and” END POINT” by pressing the
A& B/ LOOP/ EXIT button again
v.. The interval between A and B point must be more than 20
frames; otherwise, the B point will be canceled, then LOOP
function disappear and LOOP fades on the display
20. JOG WHEEL
-5-
LCD INSTRUCTION
1.
2.
3.
4.
5.
6.
7.
8.
9.
10.
11.
TOTAL TRACK – the track number of the CD or CARD.
15.
MINUTES – Shows the minutes elapsed or remaining
16.
SECONDS – Shows the seconds elapsed or remaining
17.
FRAMES – The CD Player breaks down a second into 75
depending on mode setting.
– The unit is in playing.
– The unit is paused
depending on mode setting.
SINGLE – Shows when the unit is set to play only one track.
CONT – Shows when the unit is set to play the all tracks
continually.
OUTRO – Shows when the unit is set to play the last 30
seconds of each track.
MP3 – Lights up when the unit is playing MP3 file.
TIME MODE (ELAPSED) – Shows the time as it is taking
place.
TIME MODE(TOTAL) – Shows how much time is left on
full CD, but not for MP3 CD.
TIME MODE (REMAIN) – Shows how much time is left
on a particular track.
18.
19.
THE PARAMETER OF SOUND EFFECT
(not for CDMP630)
20. PITCH – The pitch change range
21. KEY – Lights up when KEY mode activated
22.
– A1 lights up after setting up start point(A point). A1
BPM: Manual ; BPM
: Auto
Number of Beat per minute
25. CARD ▼– Lights up when the unit is reading SD card.
26. EFFECT ▼ – Lights up when the EFFECT function is on.
(not for CDMP630)
27. +10 ▼ – Lights up and indicate the scope value of effect
24.
light up after exiting the LOOP playback
and in performance.
– Refer to SEAMLESS LOOP A1.
TIME BAR – Show the time length depending on the setting
14.
of the “TIME” mode.
TRACK – Shows the track number that is playing.
– Lights up when KEY mode activated.
23.
and
flash after setting end point (B point)
and start the loop playback automatically. A1 and
12.
13.
frames for accurate cueing. This shows the
frames elapsed or remaining depending on mode
setting.
EFFECT MODE DISPLAY – Shows the effect name
selected in effect parameter setting mode and
shows the song name in performance.
parameter to be adjusted 10 units each time.
-6-
Connections
Typical connections with a mixer is illustrated below. Please use it for reference.
* Connect the connection cords to the line inputs of your mixer.
* The connection cords and the remote control connection cable are supplied with the main unit.
* Be sure to use the remote control connection cable which has been supplied. Use of another cable type might cause damage.
-7-
BASIC OPERATION
Loading and Ejecting the Disc
When the disc is loaded, press the EJECT button to
eject the disc (This may be done on either the player
or the remote control side.)
Place a disc in the disc loader
8 cm disc
12 cm disc
Push the disc to the loader.
Ø
While the disc is loaded, the preparation for disc play
will begin.
Ø
When preparation is completed, the total tracks number
& total playing time will display.
Ø
To the desired track
-8-
TRACK SKIP
To go back through the tracks
To advance through the tracks
Tracks change as follows
Tracks change as follows
(This is for a disc containing 4 tracks)
When this button is pressed once, the CD player will
When this button is pressed once, the CD player
skip backward to the beginning of the track, press
will advance to the beginning of the next track.
twice will skip backward to the previous track.
ANTI SHOCK MEMORY
This CD Player is equipped with an anti-shock memory, wish memorize 10 seconds of music before reading, to be not in
case of shock.
Warning: This system can't work in case of repetitive shocks or vibrations and if the memory is not completely charged.
-9-
MATCHING THE BEATS PER MINUTE
Match the pitch by monitoring the music of both UNIT 1 and UNIT 2 by ear. When the tempo of the music of the
selected CD player is slow compared to the tempo of the other player, move the slider to the + side and match
the tempo. When fast, move to the - side.
The following description is for the case of matching the pitch of UNIT 2 to the pitch of the music being played
on UNIT 1.
Bu
f f er
M em o
ry
Press PLAY/PAUSE to start UNIT 2.
UNIT 1 is playing.
Both CD players are playing discs.
Listen to UNIT 2 in your headphones.
Bu
y
f f er M em o r
When UNIT 2 is slow
When UNIT 2 is fast compared
compared to UNIT 1
to UNIT 1
Beat Matching Using Pitch Bend
A description of the procedure for matching the beat of UNIT 1 and UNIT 2 using the PITCH BEND stick is given
below.
This description is for the case of matching the beat of UNIT 2 to the beat of the music being played on UNIT 1.
(This procedure can be done on either Unit).
After Matching the BPM's
BPM’s (Beat Per Minute) are the
same, however the bass beats
Bu
When UNIT 2 is ahead.
y
f f er M em o r
are not matched.
When UNIT 2 is behead.
- 10 -
OPERATION OF CUE (WITH PLAY/PAUSE)
1. In pause mode, press CUE button to memorize a point for playing back. We mean it “cue point”.
2. After “cue point” is memorized, in play mode, pressing CUE button will return the music back to the cue
point and keep it in pause mode.
3. Press PLAY button again to perform from “cue point”.
OPERATION OF A AND B/LOOP
1. Set “A POINT” under play mode by pressing A button (without interruption during playback).
2. Press B/LOOP to memorize the ending point of loop, we mean it “B POINT”. At the meantime, it blinks
LOOP on the LCD, and the music automatically comes back to “A POINT” and loops between A & B points.
3. While the music loops between A & B, press
to leave the loop. At the meantime, it lights LOOP
on the LCD.
4. Press RELOOP again during playback, it returns the loop function.
5. Within play interval, you can change “A POINT” & “B POINT” by pressing A & B/LOOP button under play
mode.
6. Also available to change “start point” by pressing A button in pause mode during loop function.
- 11 -
BEFORE SWITCHING OFF THE POWER
When you have finished using the CD player, before switching off the power, ensure that the disc is ejected
Do not switch off the power when the
disc in the loader.
Switch off the power after the disc is
ejected.
POWER OFF
POWER OFF
TROUBLESHOOTING GUIDE
If difficulties arise with your compact disc player, locate the apparent problem in the left-hand column of the table and
follow the corrective action suggested in the right-hand column.
1. Is the compact disc player properly connected to the amplifier?
2. Is the amplifier set for the proper operation?
3. Have the operating instructions for the compact disc player been followed?
Symptom
Possible Cause
Corrective Action
The power fails to switch on
when the POWER switch is set
Poor power plug connection at the AC outlet.
Insert the power plug firmly into the AC outlet.
The disc is loaded upside down.
Reload the disc with the label side up.
The disc is too dirty.
Clean the disc.
to ON
Disc play does not start
No sound
Sound skips
Hum
Improper output cable connections.
Improper amplifier operation.
The CD player is subject to vibrations or
Connect the output cable properly.
Make sure that the amplifier controls are set
properly.
Change the installation location.
physical shock.
Loose cable connections.
Firmly connect all audio plugs.
- 12 -
www.pyleaudio.com
IMPORTANT: Pack carefully in original carton if possible. We are not
responsible for damage incurred in returning items for repair. A letter
stating your exact street addres, daytime phone number, and the problem
you are experiencing should be included. You must also enclose a copy
of the original receipt a sproof of date of purchase
PYLE SERVICE CENTER
1600 63RD street
Brooklyn, NY 11204
1-800-444-5671