1
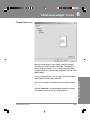
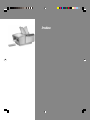
DA900 AddressRight™ Printer
Operating Guide
SV60970-OG Rev. A
FCC Compliance
This equipment had been tested and found to comply with the limits for a Class A digital device,
pursuant to Part 15 of the FCC rules. These limits are designed to provide reasonable protection
against interference when the equipment is operated in a commercial environment. This equipment
generates, uses, and can radiate radio frequency energy, and if not installed and used in
accordance with the users manuals, may cause harmful interference to radio communications.
Operation of this equipment in a residential area is likely to cause harmful interference in which case
the user will be required to correct the interference at his own expense.
Shielded cables must be used with this unit to insure compliance with Class A limits.
Canadian DOC Compliance
This digital apparatus does not exceed in the Class A limits for radio noise emissions from digital
apparatus set out in the Interference-causing Equipment Regulations (Standard ICES-003) of the
Canadian Department of Communications.
Le present appareil numerique n'emet pas de bruits radioelectriques depassant les limites
applicables aux appareils numeriques de la class A prescrites dans le Reglement sur le brouillage
radioelectrique edicte par le ministere des Communications du Canada.
SV60970-OG Rev. A September 2002
©2002, Pitney Bowes Inc. All rights reserved.
This book may not be reproduced in whole or in part in any fashion or stored in a retrieval system of
any type or transmitted by any means, electronically or mechanically, without the express written
permission of Pitney Bowes Inc.
We have made every reasonable effort to assure the accuracy and usefulness of this manual,
however, we cannot assume responsibility for errors or omissions or liability for the misuse or
misapplication of our products.
These materials and the related software are confidential and proprietary property of Pitney Bowes
Inc. and may not be lent, sold, hired out, or made available to others in any form, or be disposed of
by way of trade in any form, without the express written consent of Pitney Bowes Inc.
The data used in screen examples in this manual are fictitious unless otherwise noted, and are
intended solely to document proper use of the software.
ZIP Code is a registered trademark of the United States Postal Service. Envelope Design and
AddressRight are trademarks of Pitney Bowes Inc. Microsoft, MS and MS-DOS are registered
trademarks and Windows NT, Windows, Access, and Word are trademarks of Microsoft Corporation. PB Supply LineSM is a service mark of Pitney Bowes. AddressRightTM is a trademark of Pitney
Bowes. Other trademarks mentioned in this manual are the property of their respective owners.
Contents
1
Introduction
About Your Printer ............................................. 1-2
What's in this Book ........................................... 1-3
What Do I Need to Know? ................................ 1-4
Important Safety Notes ..................................... 1-4
2
Specifications
Media Requirements ......................................... 2-2
Printer Output .................................................... 2-3
Physical Equipment Specifications .................. 2-4
Performance Specifications ............................. 2-4
Environmental Requirements ........................... 2-4
Computer Requirements .................................. 2-5
Options .............................................................. 2-5
3
Meet the DA900
Printer Components .......................................... 3-2
Control Panel ..................................................... 3-4
DA900 Printer Control Panel Messages ........... 3-5
DA900 Menu Options ........................................ 3-6
4
Setting Up Your Printer
About This Chapter ........................................... 4-2
Choose a Location for the Printer .................... 4-2
Unpack the Printer and Check Contents ......... 4-2
Remove the Plastic ........................................... 4-3
Remove the Foam ............................................. 4-3
Attach the Side Guides ..................................... 4-4
Install the Ink Cartridges ................................... 4-4
iii
Contents
Install the Bulk Ink Cartridge ............................ 4-6
Connect to Your Computer ............................... 4-8
Connect to Power ............................................. 4-9
Turn on the Printer ............................................ 4-9
Install the Print Driver...................................... 4-10
5
Printer Adjustments
About This Chapter ........................................... 5-2
Set the Separator Gap ...................................... 5-2
Adjust the Side Guides ..................................... 5-5
Adjust the Feed Ramp ...................................... 5-6
Adjust for Media Thickness .............................. 5-7
Physically Position the Printheads ................... 5-8
Adjust the Upper Exit Rollers ........................... 5-9
Print Test Pieces .............................................. 5-10
6
Using the DA900 Print Driver
About this Chapter ............................................ 6-2
About Envelope Designer™ Plus...................... 6-2
Making the DA900 the Default Printer .............. 6-2
Accessing the Print Driver ................................ 6-3
The General Tab ................................................ 6-4
Printing Preferences ......................................... 6-5
Advanced Options: Paper Size ......................... 6-6
Advanced Options: Head Adjustment .............. 6-7
Advanced Options: Print Quality ...................... 6-8
Advanced Options: Feed Delay ........................ 6-9
Advanced Options: Inverted Printing ............. 6-10
Advanced Options: Language ........................ 6-11
iv
SV60970-OG Rev. A
Contents
7
Maintenance
General Cleaning ............................................... 7-2
Replacing the Inkjet Cartridge .......................... 7-2
Setting "Ink Left" Feature when
Replacing Cartridges .................................. 7-3
Purging the Printhead Nozzles ......................... 7-6
Cleaning the Printheads .................................... 7-6
Cleaning the Media Sensor ............................... 7-7
Replacing the Separator Tips ........................... 7-8
Replacing the Feed Rollers ............................. 7-10
8
Troubleshooting
Getting Help....................................................... 8-2
Phone Support .................................................. 8-2
Before You Call ............................................ 8-2
The World Wide Web ................................... 8-2
Power Problems ................................................ 8-3
Feeding Problems ............................................. 8-3
Intermittent Feeds ....................................... 8-3
Multiple Feeds ............................................. 8-4
Paper Jams in Printer.................................. 8-4
Printing Problems .............................................. 8-4
Printer Does Not Respond to Software ...... 8-4
No Print on Media ....................................... 8-5
Print Slanted or Skewed ............................. 8-6
Non-Uniform Space between Lines ........... 8-6
Poor Print Quality .............................................. 8-6
Blurry Print ................................................... 8-6
Print too Light .............................................. 8-6
Print Streaking or Smearing ....................... 8-7
SV60970-OG Rev. A
v
Contents
White Lines or Streaks ................................ 8-7
Prints Garbage ............................................ 8-8
No Barcode Prints ....................................... 8-8
Prints Wrong/Incomplete Information .............. 8-8
Not All List Addresses Print ........................ 8-8
Extra Lines, Lost Data ................................. 8-8
Wrong Colors Print ...................................... 8-9
Addresses Print off Media .......................... 8-9
Addresses Print too High or Low ............... 8-9
Addresses Print Upside Down .................... 8-9
Printer Errors ................................................... 8-10
9
Supplies and Options
Supplies and Accessories ................................. 9-2
How to Order ..................................................... 9-3
Options .............................................................. 9-3
Appendices
A. Glossary .......................................................A-1
B. DA900 Application Notes ........................... B-1
Fixed-Head Versus Shuttle
Head Printers ........................................ B-2
Printheads and Bands ................................ B-2
Color ........................................................... B-4
Unprintable Areas ...................................... B-4
Dual Purpose Ruler .................................... B-5
Other Printer Characteristics ..................... B-5
Compatibility Issues ................................... B-6
Index
vi
SV60970-OG Rev. A
1
Introduction
About Your Printer .............................................. 1-2
What's in this Book? ........................................... 1-3
What Do I Need to Know? .................................. 1-3
Important Safety Notes ....................................... 1-4
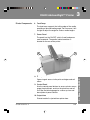
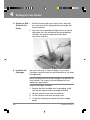
1 Introduction
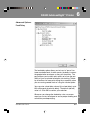
About Your Printer
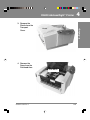
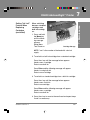
The Pitney Bowes DA900 AddressRightTM Printer is a
high-speed inkjet printer designed to help you produce
professional-looking envelopes. It offers these advanced
features:
• Crisp, clear, high-quality printing using advanced
inkjet technology
• Multiple-color printing:
black, red, blue and fastdrying black
• Easy control of
fonts, font placement, barcode
characteristics
and graphics
• Extensive
graphic
printing
capability
• Up to 24 text blocks
• High speed printing for greater throughput per
hour
• Ability to print virtually all international postal barcodes
• Easy feeding with built-in, top-loading feeder
• Expanded media choices allow printing on a wide
range of papers and sizes
• Multiple print speeds for different quality levels
• Multi-database capacity
• Suitable for use with most text editors, word processing and mail list programs. Especially recommended for use with Pitney Bowes SmartMailer™
and Envelope Designer™ Plus.
1-2
SV60970-OG Rev. A
What's in this Book
This operator guide explains how to set up, use and
maintain your DA900 AddressRight™ Printer. The sections
include:
1
Introduction
Introduces you to the DA900 AddressRight™ Printer
and includes important safety notes.
2
Specifications
Lists complete product and material specifications.
3
Meet the DA900 Printer
Familiarizes you with the names of the printer parts,
including the user control panel.
4
Set Up the Printer
Explains how to assemble and connect the printer to
your computer.
5
Printer Adjustments
Explains how to set up the printer for your job.
6
Using the DA900 Print Driver
Explains how to set up the printer driver software.
7
Maintenance
Explains how to care for your printer and keep it
functioning properly.
8
Troubleshooting
Explains how to fix common problems and tells you
what error messages mean.
9
Supplies and Options
Lists the supplies available for your printer and explains how to order them.
Appendices
Provides a glossary of technical terms and DA900
application notes.
SV60970-OG Rev. A
1-3
1
1 - Introduction
DA900 AddressRight™ Printer
1 Introduction
What Do I Need To
Know?
You should be familiar with your computer and basic Windows® operations. For example, you should know how to
open and close windows and menu items using a mouse
or equivalent keyboard commands. If you're not sure how
to do something, consult the Microsoft Windows User's
Guide or choose Help from the Windows Start menu.
Other Sources of
Information
•
Separator Installation Instructions (SV60866)
•
Feed Roller Installation Instructions (SV60867)
•
Bulk Ink Installation Instructions (SV60868)
•
W980 Stacker User Guide (SV60305)
Important Safety
Notes
1-4
IMPORTANT! Please follow these commonsense precautions whenever you use your
printer.
•
Read and save all instructions before you attempt to
operate your printer.
•
To protect against electric shock, plug the machine
into a properly grounded wall outlet. DO NOT use an
adapter plug. Use of an adapter could compromise
the ground and cause a possible shock hazard or
damage to the equipment in the event of a short
circuit.
•
DO NOT remove the ground pin from the line cord.
•
Avoid using outlets controlled by wall switches;
someone could accidently shut your printer off.
•
DO NOT use an outlet that shares the same circuit
with other machines with heavy current demand such
as air conditioners, refrigerators, etc.
SV60970-OG Rev. A
Important Safety
Notes (continued)
SV60970-OG Rev. A
1
•
Use the power cord wall plug as the primary means of
disconnecting the machine from the AC power. The
wall outlet should be near the machine and easily
accessible.
•
DO NOT route the power cord over sharp edges or
trap it between pieces of furniture.
•
Insure that there is no strain on the power cord where
it passes between the equipment, walls or furniture.
•
Be certain the area in front of the wall receptacle into
which the machine is plugged is free from obstruction.
•
Do not remove the covers; they enclose hazardous
parts. If the machine has been dropped or has
otherwise had the covers stressed in any way, report it
to Pitney Bowes Service. Keep fingers, loose clothing,
jewelry, ties and long hair away from moving parts.
•
To reduce the risk of fire or electrical shock, DO NOT
attempt to disassemble this machine. If service is
required, contact Pitney Bowes customer service.
•
Use only Pitney Bowes approved and supplied ink
cartridges and cleaners.
•
Avoid touching moving parts or materials while the
machine is in use. Before clearing a jam, be sure
machine mechanisms come to a complete stop.
•
Use the equipment only for its intended purpose.
•
Always follow the specific occupational safety and
health standards prescribed for your workplace.
•
Turn off the machine and unplug power cords at the
end of the working day to reduce the risk of injury.
1-5
1 - Introduction
DA900 AddressRight™ Printer
1 Introduction
Notes
1-6
SV60970-OG Rev. A
2
Specifications
Media Requirements .............................
Printer Output........................................
Physical Equipment Specifications ......
Performance Specifications .................
Environmental Requirements ...............
Computer Requirements ......................
Options ..................................................
2-2
2-3
2-4
2-4
2-4
2-5
2-5
2
Specifications
Media
Requirements
For best results, make sure your material fully conforms to
our published specifications. See the table below and the
material notes that follow.
Media Size
The DA900 can print on the following range of material
sizes:
Width
Height
Thickness
Maximum
17"
13.5"
0.375"
Minimum
5"
3.5"
0.004"
Stapling/Clipping
IMPORTANT! Never run stapled or paper-clipped media
through your printer. These methods of binding the mailpiece will seriously damage your printer. The printer's
warranty does not cover components damaged through
improper use.
Any folded material needs to be tabbed. See the figure
below.
Tab
Types of Media
The printer can be used with the following types of
material:
•
•
•
2-2
Envelopes
Booklets-Tabbed
Paper
•
•
Postcards
Catalog envelopes
SV60970-OG Rev. A
DA900 AddressRight™ Printer
Media
Requirements
(continued)
1
2
The printer is designed to feed and print on a range of
materials with various finishes and coatings. However,
since coated or gloss stocks do not easily absorb ink,
smearing may occur. Print may appear fuzzy on porous
paper. The texture of the media has a direct effect on both
the print quality and ink drying time.
Be aware that when printing in high quality mode or humid
conditions, drying time increases.
Printer Output
Image Area: 3" x 17" using six printheads.
Average Media Output: These specifications apply to any
image size and type that fits within the 3" x 17" print area,
including text, graphics and barcodes. Average media
output varies depending on material used, length of
media, machine condition and operator skill.
Print Quality
600 x 150 dpi
600 x 200 dpi
600 x 300 dpi
600 x 600 dpi
Speed
21,800 #10 envelopes/hr.
18,000 #10 envelopes/hr.
13,000 #10 envelopes/hr.
7,200 #10 envelopes/hr.
Graphics and Logos: Allows printing of bitmapped
graphics and logos.
Font Point Size: Downloadable fonts up to 72 points.
SV60970-OG Rev. A
2-3
2 - Specifications
It is best to test each new type of media to determine
performance levels before beginning the job. If you require
fast-drying ink, contact the Pitney Bowes Supply LineSM.
See Chapter 8—Supplies and Options.
2
Specifications
Physical Equipment
Specifications
Performance
Specifications
Environmental
Requirements
Physical Dimensions: 17" (430mm) H; 25.4" (645mm) W;
21" (535mm) D
Weight:
20.7lbs. (45.5kg) with 6 ink car
tridges
Operator Display:
2 x 24 characters
Control Language:
PCL5, modified
Product Life:
30,000,000 pieces or five years
after installation, whichever
comes first.
Duty Cycle:
Normal Usage: 157,000 pieces
per month
Maximum Usage: 500,000 pieces
per month
Average throughput:
21,800 DL envelopes/hr. max
at 150 x 600 d.p.i.
Noise Level:
Idle Mode
Operating Mode
Operator Position
Electrical:
100-120VAC; 60Hz; 2.5A
Ports:
1 Parallel Port; 1 USB port
Operating Conditions:
Nonoperating Conditions
(power off):
2-4
< 6.6 Bel (A)
< 8.4 Bel (A)
< 73 dBa
Temperature: 12 to 35°C
Humidity: 10 to 80%
Temperature: 5 to 40°C
Humidity: 10 to 90%
SV60970-OG Rev. A
DA900 AddressRight™ Printer
Computer
Requirements
•
An IBM or IBM-compatible 133 Megahertz Pentium
computer or better.
•
32MB RAM, minimum.
•
1GB minimum available hard drive space.
•
Available LPT1 Parallel Port. IMPORTANT: you must
set this to Extended Parallel Port (EPP) configuration
or the equivalent highest speed bi-directional configuration.
1
2
Options
SV60970-OG Rev. A
•
Available USB Port.
•
Windows® XP, 95, 98, NT 4.0 or NT2000 installed. All
must operate in a non-networked environment.
•
A 6X CD-ROM drive or better.
•
A 13" monitor capable of 800 x 600 resolution or
better.
•
Keyboard and mouse.
W980 Stacker
2-5
2 - Specifications
OR
2
Specifications
Notes
2-6
SV60970-OG Rev. A
3
Meet the DA900
Printer
Printer Components ..............................
Control Panel.........................................
Control Panel Messages .......................
DA900 Menu Options ............................
3-2
3-4
3-5
3-6
3
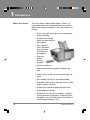
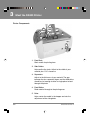
Meet the DA900 Printer
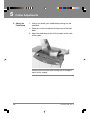
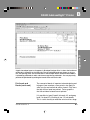
Printer Components
2
3
5
4
6
1
7
1. Feed Deck
Stack media for printing here.
2. Side Guides
Help confine the stack. Adjust to the width of your
material plus 1/16" clearance.
3. Separators
Adjust to the thickness of your material. The gap
between the four separator fingers and the feed rollers
should be just enough to allow a single piece to feed
through the printer.
4. Feed Rollers
Feed material through to the printing area.
5. Ruler
Helps center the media in the hopper and sets the
adjustment of the side guides.
3-2
SV60970-OG Rev. A
3
DA900 AddressRight™ Printer
Printer Components
6. Feed Ramp
The feed ramp supports the trailing edge of the media,
providing a forward feeding angle. You can move it left
to right to adjust the angle for various media lengths.
7. Power Panel
The panel has the ON/OFF switch (fused) and power
cord receptacle. The parallel cable connector is
located on the rear of the printer.
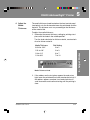
8
9
10
Opens to gain access to the print cartridges and exit
rollers.
9. Control Panel
Use the control panel buttons to access printer menus,
purge the printheads, and turn the printer on and off
line. See the following page for a close-up view and
description of panel controls.
10. Output Area
Printed material is ejected from printer here.
SV60970-OG Rev. A
3-3
3 - Meet the DA900
8. Transport Door
3
Meet the DA900 Printer
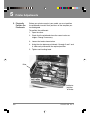
Control Panel
1
5
3
2
4
7
6
8
1. Media Thickness Adjustment — Turn knob
counterclockwise for thin media, clockwise for thick
media.
2. On Line Button — Turns the printer on and off line.
When lit, the DA900 is ready to accept data from your
computer and begin printing.
3. - Key — When in menu mode scrolls to the previous
selection. When in select mode, scrolls through
choices.
4. + Key — When in menu mode, scrolls to the next
selection. When in select mode, scrolls through the
choices.
5. Enter Key — Selects the currently displayed menu
options.
6. Menu — Displays the options on the Main Menu and
the Setup Menu. The printer must be off line to access
the menus.
7. Reset — Clear the memory of the DA900 and wait for
new information from the computer.
8. Test Print — Prints a test envelope to verify print
quality and feed.
3-4
SV60970-OG Rev. A
DA900 AddressRight™ Printer
DA900 Printer
Control Panel
Messages
3
PRINTER OFFLINE - Printer is waiting for data and the
main drive motor is off. This message appears when you
turn the power on.
PRINTER ONLINE - The main drive motor is on and
waiting for the feeder to be turned on.
PRINTING - Both main drive and feeder are on. Printer is
feeding media and printing. If no media is in the hopper,
the printer shuts down after one half second.
SETUP MENU -The printer is in Setup Mode.
SERVICE MENU - The printer is in Service Mode.
TEST PRINTING - The printer is in Test Mode. Press
ENTER to print a test sheet.
ENTER TO FEED - Press the ENTER key to engage the
feeder.
ENTER TO STOP FEED - Press the ENTER key to
disengage the feeder.
OUT OF PAPER - The paper sensor does not detect
media within one half second of starting the feeder.
REMOTE STOP - The software stopped the printer from
printing.
PAPER JAM - Paper jam detected.
Setup Menu Functions
To place the printer in Setup Mode, hold the MENU key
for two seconds. Use the + and - keys to move through
the functions.
TOTAL COUNT - Displays the total pieces fed.
PR W990 - Displays the current version of BIOS software
SV60970-OG Rev. A
3-5
3 - Meet the DA900
OPERATOR STOP - The operator caused the printer to
stop printing.
3
Meet the DA900 Printer
DA900 Menu
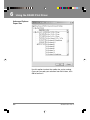
Options
3-6
Press the Menu key to access the Main Menu.
Press + Key to move from one option to the next.
Press Enter to
clear Counter.
Printer Offline
Clear Batch Counter
0000
Make sure there
is material in the
feeder.
Press Enter to
Stop Purge.
Printer Offline
Press Enter to Purge
0000
Printer Offline
Press Enter to Stop
0000
Press Enter to
Toggle ON/OFF
Printer Offline
Printer Enhancement is ON
0000
Press Enter to
Reset Ink to
100%
Printer Offline
Enter when Head 1 Filled
0000
Printer Offline
Enter when Head 2 Filled
0000
Printer Offline
Enter when Head 3 Filled
0000
Printer Offline
Enter when Head 4 Filled
0000
Printer Offline
Enter when Head 5 Filled
0000
Printer Offline
Enter when Head 6 Filled
0000
SV60970-OG Rev. A
DA900 AddressRight™ Printer
DA900 Menu
Options
3
Press the Menu key (hold for two seconds) to access the
Setup Menu.
Press + Key to move from one option to the next.
The DA900 can use
a Bulk Ink system
for each Head.
Press Enter to
change from
Cartridge to Bulk
Ink or from Bulk Ink
to Cartridge
Setup Menu
Total Count:
0000
0000
Setup Menu
PB W991
0000
VX.XX rX pXX
Head 1 Uses a Cartridge
Enter to use Bulk Ink
Head 2 Uses a Cartridge
Enter to use Bulk Ink
Head 3 Uses a Cartridge
Enter to use Bulk Ink
3 - Meet the DA900
Head 4 Uses a Cartridge
Enter to use Bulk Ink
Head 5 Uses a Cartridge
Enter to use Bulk Ink
Head 6 Uses a Cartridge
Enter to use Bulk Ink
SV60970-OG Rev. A
3-7
3
Meet the DA900 Printer
Notes
3-8
SV60970-OG Rev. A
4
Setting Up Your
Printer
About this Chapter ................................ 4-2
1. Choose a Location for the
Printer .............................................. 4-2
2. Unpack the Printer and
Check Contents ............................... 4-2
3. Remove the Plastic ......................... 4-3
4. Remove the Foam ........................... 4-3
5. Attach the Side Guides ................... 4-4
6. Install the Ink Cartridges ................. 4-4
7. Install the Bulk Ink Cartridge .......... 4-6
8. Connect to Your Computer ............. 4-8
9. Connect to Power ........................... 4-9
10. Turn on the Printer .......................... 4-9
11. Install the Print Driver ................... 4-10
4
Setting Up Your Printer
About this Chapter Your printer is normally installed by your Pitney Bowes
Customer Service Representative. We've included these
instructions for your convenience in the event you need to
move your printer and reinstall it.
To install your printer and software, follow steps 1 through 10
in this chapter.
1. Choose a Good
Location
Choose a stable, safe surface for your printer.
2. Unpack the
Printer
As you remove the contents from the box, check all parts
against the list below.
Package Contents
•
•
•
•
•
•
•
•
•
•
•
•
•
•
•
•
•
4-2
Printer
Inkjet Cartridges (6)
Parallel Printer Cable
USB Printer Cable
Side Guides
Power Cord
Allen Wrench
Separator Tips
Segment Rollers
Installation Quality Report
Operator Safety Tip Card
Installation Quality Card
USPS Template
Printer Driver/Envelope Designer™ Plus Software CD
Quick Setup Instructions
Quick Reference Instructions
Operating Guide
SV60970-OG Rev. A
DA900 AddressRight™ Printer
Plastic
4 - Setup
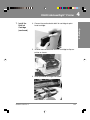
3. Remove the
Plastic from the
Transport
Cover
4. Remove the
Foam from the
Printhead Area
Foam Blocks
SV60970-OG Rev. A
4
4-3
4
Setting Up Your Printer
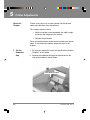
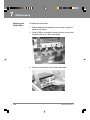
5. Attach the Side 1. Position the side guide screw holes so they align with
the screw holes on the side guide block assembly. See
Guides to the
the picture below.
Printer
2. Insert the screws provided and tighten them so that the
side guides are firmly attached to the side guide block
assembly. You need a standard #2 Phillips head
screwdriver to do this.
6. Install the Ink
Cartridges
You can install up to six inkjet cartridges in your printer.
Cartridges are held in place by vertical brackets on the inkjet
cartridge holder.
NOTE: You do not have to install cartridges in all positions to
run the printer. The number you install depends on your
addressing requirements.
Install the cartridges as follows:
1. Remove the inkjet cartridge from its packaging. Avoid
touching the copper contacts and gold printhead.
2. Remove protective tape from the printhead.
3. Lift the transport cover over the output area.
4. Lift the blue retaining lever above the inkjet cartridge
holder.
4-4
SV60970-OG Rev. A
DA900 AddressRight™ Printer
4
HINT: When you
store cartridges
outside of the printer
overnight, place
them in the docking
station. For prolonged storage,
place them in a
covered Tupperwaretype container with a
damp sponge or
towel to maintain
humidity.
4 - Setup
6. Install the Ink
Cartridges
(continued)
5. With the gold printhead contacts pointing toward the
printhead holder pins, fully insert the cartridge into the
holder. DO NOT contact or bend the printhead holder
pins.
6. With the cartridge fully inserted, lower the blue retaining
lever. This pulls the cartridge inward to contact the
printhead holder pins.
7. Close the latch.
8. Repeat the above procedure for the remaining
cartridges.
WARNING! Cartridge ink may be harmful if
swallowed. Keep new and used cartridges out
of the reach of children. Always discard empty
cartridges immediately.
SV60970-OG Rev. A
4-5
4
Setting Up Your Printer
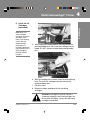
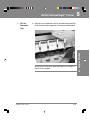
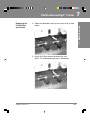
7. Install the
Bulk Ink
Cartridge
1. Unpack contents of box. Make sure you
have:
•
Three Bulk Ink Cartridges
•
Three Bulk Ink Printheads
•
Bulk Ink Cartridge Shelf
•
Three Screws
2. Attach tray for bulk ink cartridge by aligning the three
screw holes on the tray with the three screw holes on the
bottom rear of the printer.
3. Place bulk ink cartridge on tray.
4-6
SV60970-OG Rev. A
DA900 AddressRight™ Printer
4. Connect hose attached to bulk ink cartridge to printhead cartridge.
4 - Setup
7. Install the
Bulk Ink
Cartridge
(continued)
5. Channel hose attached to bulk ink cartridge to clips on
printer as shown.
6. Insert printhead cartridge into holder.
SV60970-OG Rev. A
4
4-7
4
Setting Up Your Printer
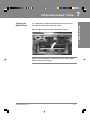
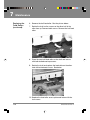
8. Connect to
Your
Computer
The printer is equipped with both a USB and parallel port as
shown below. You can use either port to establish
communications between the printer and your computer.
1. If you're using the USB port, plug one end of the USB
cable into the printer's USB port, and the other end into
the computer's USB port.
2. If you're using the parallel port, align the end of the cable
connector labeled "printer" with the 37-pin female "D"
connector located on the rear panel of the printer. Secure
the connector by snapping the wire clips over the
corresponding tabs on the cable as shown below.
USB Port
Parallel Port
Align the end of the cable connector labeled "computer"
with the parallel port on your computer, then push the
cable connector into the port. Secure the connection by
tightening the screws on either side of the cable.
IMPORTANT! You must set your computer's parallel port to
the EPP (Enhanced Parallel Port) setting. You need to enter
your computer's hardware setup mode at startup before the
operating system loads. Refer to the user instructions for your
computer if you are unsure about how to do this. Be sure to
save the new settings before you exit the setup mode.
4-8
SV60970-OG Rev. A
DA900 AddressRight™ Printer
A Special Note for DEC Computer Users:
1. Hold F2 during bootup.
2. Choose “advanced” and then “integrated peripherals”.
3. Change parallel port settings (using plus and minus keys)
to:
Parallel Port: 378, IRQ7
Parallel Port Mode: ECP-DMA1 or ECP-DMA3
4. Save settings.
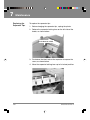
9. Connect to
Power
1. Connect the female end of the power cord to the power
receptacle located on the right side of the printer as
shown below.
2. Plug the male end of the power cord into a grounded
outlet. Avoid switched outlets and those that share
circuits with machines that have heavy current demand
such as air conditioners, refrigerators, etc.
Also, please review the safety information in Chapter 1—
Introduction of this guide.
10. Turn On the
Printer
SV60970-OG Rev. A
Once you've connected the cable, press the printer's
power switch to the "l" (ON) position. The printer control
panel should read: "Printer Offline."
4-9
4 - Setup
8. Connect to
Your
Computer
(continued)
4
4
Setting Up Your Printer
11. Install the
Print Driver
4-10
Follow the installation instructions on the CD-ROM furnished
with your printer.
SV60970-OG Rev. A
5
Printer
Adjustments
About this Chapter ................................ 5-2
1. Set the Separator Gap...................... 5-2
2. Adjust the Side Guides ..................... 5-5
3. Adjust the Feed Ramp ...................... 5-6
4. Adjust for Media Thickness .............. 5-7
5. Physically Position the Printheads ... 5-8
6. Adjust the Upper Exit Rollers ........... 5-9
7. Print Test Pieces ............................. 5-10
5
Printer Adjustments
About this
Chapter
To print a job, you must set up the printer for the job and
make print selections from the software.
This chapter explains how to:
• Adjust the printer to accommodate the width, height,
thickness and weight of your material
• Position the printheads
These setup adjustments determine how reliably your printer
feeds. To set the printer properly follow the steps in this
chapter.
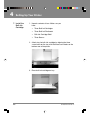
1. Set the
Separator
Gap
1. Be sure your media falls within the specifications listed in
Chapter 2 of this guide.
2. Release the separator locking lever located on the left
side of the feeder as shown below.
Push down to unlock
5-2
SV60970-OG Rev. A
DA900 AddressRight™ Printer
3. Raise the four separators to their up and locked position.
(Use the two center separators for narrow media and all
Always print a test piece after making any of the adjustments in this chapter.
SV60970-OG Rev. A
5-3
5 - Adjust Printer
1. Set the
Separator
Gap
5
5
Printer Adjustments
1. Set the
Separator
Gap
4. Using the ruler as a guide, center the media for this print
job under the separators and lower them to rest on the
media.
HINT: Never run
stapled or paperclipped media
through your printer.
5. Move the locking lever up to lock the separators in place.
Push up to lock
5-4
SV60970-OG Rev. A
DA900 AddressRight™ Printer
Place one piece of media on the feeder table and adjust the
side guides to the width of the media plus 1/16".
Always print a test piece after making any of the adjustments
in this chapter.
SV60970-OG Rev. A
5-5
5 - Adjust Printer
2. Adjust the
Side Guides
5
5
Printer Adjustments
3. Adjust the
Feed Ramp
1. Always fan (aerate) your media before placing it on the
feed deck.
2. Place your stack of media on the input area of the feed
deck.
3. Adjust the feed ramp so that it lifts the back of the stack
of the media.
Always print a test piece after making any of the adjustments in this chapter.
5-6
SV60970-OG Rev. A
DA900 AddressRight™ Printer
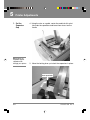
4. Adjust for
Media
Thickness
5
The media thickness knob located on the front control panel
(see below) sets the distance between the printheads and the
material. This distance must vary according to the thickness
of the material fed.
To adjust for media thickness:
1. Determine the correct thickness setting by printing a test
piece with the knob in the middle position.
Turn the knob clockwise for thicker material, counterclockwise for thinner material.
Dial Setting
0.004 to 1/32"
0 to 2
1/32 to 1/8"
2 to 3
1/8 to 1/4"
3 to 7
1/4 to 3/8"
7 to 10
5 - Adjust Printer
Media Thickness
Media Thickness Knob
2. If the address on the test piece appears blurred or too
light, lower the printhead (turn knob counterclockwise). If
the address appears smeared, turn knob clockwise in
small increments and continue testing until the printing is
clear.
SV60970-OG Rev. A
5-7
5
Printer Adjustments
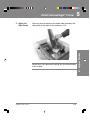
5. Physically
Position the
Printheads
Before your printer can print your media, you must position
the printheads to match their positions on the template you
have designed.
To position the printheads:
1. Open the cover.
2. Check that the printheads have the correct color cartridges. Change if necessary.
3. Loosen the knobs shown below.
4. Using the ruler between printheads 2 through 5 and 1 and
6, slide each printhead to the required position.
5. Tighten each locking knob.
Ruler
Indicates
position
of Knobs
5-8
SV60970-OG Rev. A
DA900 AddressRight™ Printer
6. Adjust the
Upper Exit
Rollers
5
The upper exit rollers will move when you move printheads
one and six. You may need to adjust them so that they do not
touch any printed area of the exiting material.
Note that when you adjust the rollers, you are also moving
printheads 1 and 6 because they are attached.
To adjust the upper exit rollers:
1. Loosen the locking knob on the printhead holder assembly.
2. Slide printheads 1 and 6 to where you want them.
Knobs
SV60970-OG Rev. A
5-9
5 - Adjust Printer
3. Tighten the locking knob.
5
Printer Adjustments
7. Print Test
Pieces
We recommend that you print a test piece every time you
change any of the adjustments covered in this chapter.
1. Make sure your material conforms to our published specifications and that its loaded properly.
2. Turn the printer on and wait for the Printer Offline prompt
to appear on the operator display.
3. Press the Test Print button on the printer control panel.
The operator display prompts Test Printing Enter to Feed.
4. Press Enter. The envelope feeds and a sample address
prints.
5. Press Enter again to stop printing.
6. Check print quality. If it is not satisfactory, you can make
changes using the setup options available in the DA900
print driver. See Chapter 6.
If your material is not feeding reliably, check all setup adjustments in this chapter, particularly the setting of the
media thickness knob.
5-10
SV60970-OG Rev. A
6
Using the DA900
Print Driver
About this Chapter ................................ 6-2
About Envelope Designer™ Plus ......... 6-2
Making the DA900 the
Default Printer ................................. 6-2
Accessing the Print Driver .................... 6-3
The General Tab .................................... 6-4
Printing Preferences ............................. 6-5
Advanced Options: Paper Size ............. 6-6
Advanced Options: Head Adjustment .. 6-7
Advanced Options: Print Quality .......... 6-8
Advanced Options: Feed Delay ............ 6-9
Advanced Options: Inverted
Printing .......................................... 6-10
Advanced Options: Language ............ 6-11
6
Using the DA900 Print Driver
About this Chapter
This chapter explains how to use the DA900 print driver.
The instructions assume the print driver is installed and
you are running Windows 2000, XP or NT.
IMPORTANT! Please note that the print driver is compatible with Windows 98, but that the driver screens differ
somewhat from those shown here. Setup options, however, are the same, and the instructions presented in this
chapter apply generally to all versions of the Windows operating system with which the print driver is compatible.
The information in this chapter is limited to an explanation
of advanced setup options specific to the DA900 printer.
Other options such as printer sharing, port assignments,
security and device settings are not covered here. These
settings are best left to advanced users or system administrators
About Envelope
Designer™ Plus
Envelope Designer Plus is included on the installation CDROM furnished with your printer. It is a an easy-to-use
software application that lets you design an envelope
template to help you position the printheads of your
DA900. The online help furnished with the application includes useful information about the DA900 print driver.
You will also find helpful information in Appendix B—
DA900 Application Notes.
If you are using a third-party mail list program, consult the
user instructions furnished with it.
Making the DA900
the Default Print
Driver
1. From the Start Menu, select Settings.
2. Click on Printers.
3. Right Click on the Pitney Bowes DA900
icon.
4. Click on Set as Default Printer. A check
mark appears next to the Pitney Bowes
DA900 icon.
6-2
SV60970-OG Rev. A
6
DA900 AddressRight™ Printer
Accessing the Print
Driver
1. From the Start Menu, select Settings.
2. Click on Printers.
3. Right Click on the Pitney Bowes DA900 icon.
4. Click on Properties. The Printer Properties dialog box
displays as shown on the next page.
If you're running Envelope Designer Plus, you can select
certain print driver options from within the program. To do
so:
1. Open the Envelope Designer Plus application.
2. Click on the printer icon. The Print Envelope dialog
box displays.
3. Click on Properties. You can choose the page orientation you want (portrait or landscape). See page 6-5.
4. Click on Advanced... to
select paper size (page 6-6)
•
adjust the printheads (page 6-7)
•
choose print quality (page 6-8)
•
select the feed delay (page 6-9)
•
invert printing (page 6-10)
•
select a language (page 6-11)
6 - Print Driver
•
SV60970-OG Rev. A
6-3
6
Using the DA900 Print Driver
The General
Tab
This is the printer properties window as it appears in the
Windows 2000, XP and NT environments. The window
displays information about your printer and allows you to
enter its location and any comments.
Click on Print Test Page to test printer operation.
Click on Printing Preferences... to set up advanced options. The Printing Preferences window displays as shown
on the next page.
6-4
SV60970-OG Rev. A
6
DA900 AddressRight™ Printer
Printing Preferences
Select the orientation of your media using this window.
The choices are Portrait and Landscape. The default or
normal setting is portrait. This is suitable for the majority
of applications since most media feeds best with the short
edge leading.
Once you've made your selection, click on OK to confirm
it.
Click on Advanced... to make additional printer settings.
The window shown on the next page displays.
SV60970-OG Rev. A
6-5
6 - Print Driver
A very few applications, such as small, square envelopes
might require a landscape orientation.
6
Using the DA900 Print Driver
Advanced Options:
Paper Size
Use this option to select the media size you're running.
Once you've made your selection from the list box, click
OK to confirm it.
6-6
SV60970-OG Rev. A
6
DA900 AddressRight™ Printer
Advanced Options:
Head Adjustment
(Print Heads)
Hint: For additional information on printhead
placement, see Appendix B—DA900 Application Notes.
This option permits precise alignment of text or graphic
elements printed by adjacent printheads. You can adjust
the point at which each printhead fires in increments of
0.001 inch. You can delay printing (-) up to a maximum of
0.048 inch or accelerate it (+) up to a maximum of 0.048
inch. The default (normal) value is 0. Click OK when
you've entered the values you want.
1. Use Envelope Designer™ Plus to determine correct
printhead position. Note the location of the printhead
bands relative to the ruler displayed in the envelope
template.
2. Physically position the printheads. See Chapter 5.
3. Run several test pieces to check the alignment of text
and graphic elements.
4. If fine adjustment is required, enter an adjustment
value for the appropriate printhead(s). Continue to adjust in small increments and repeat tests until alignment is satisfactory.
SV60970-OG Rev. A
6-7
6 - Print Driver
The recommended adjustment process is:
6
Using the DA900 Print Driver
Advanced Options:
Print Quality
The settings in this dialog box determine print quality.
• 150 dpi is equivalent to draft quality
• 300 dpi is equivalent to near letter quality
• 600 dpi is equivalent to letter quality
The higher the resolution setting and the slower the belt
speed, the sharper the print quality. High resolution printing lowers average throughput.
When you've made your selections, click on OK.
NOTE: When 600 dpi is selected, the only available belt
speed is 22.
Choosing an acceptable resolution for your particular job
is a matter of finding the right balance between quality
and productivity. You must also consider the quality of the
paper stock you are using. See Media Requirements on
page 2-3.
6-8
SV60970-OG Rev. A
6
DA900 AddressRight™ Printer
The feed delay option allows you to insert a "pause" between envelope feeds. In other words, the delay increases
the gap between envelopes as they exit the printer. The
pause allows you to check print quality or lessen the possibility of jams as printed envelopes are stacking. The delay also allows for more print drying time, especially when
you are running coated stock or using the stacker option.
You can enter a feed delay value of 0 (no feed delay) up to
600 milliseconds (maximum delay). The default (normal)
value is 0. Click OK to confirm your selection.
Whenever you change the feed delay value, we recommend you run test envelopes to assure proper feeding and
satisfactory envelope drying.
SV60970-OG Rev. A
6-9
6 - Print Driver
Advanced Options:
Feed Delay
6
Using the DA900 Print Driver
Advanced Options:
Inverted Printing
Special Note for Envelope Designer™ Plus
Users:
You cannot select inverted printing from
Envelope Designer's
Edit menu. You will
see a warning message if you attempt to
do so. Select inverted
printing from the Advanced Options window as instructed
here.
You can choose to invert printing by selecting the appropriate option (Off or On) from the list box. Off is the default
(normal) setting. Click OK to confirm your selection.
Inverted printing may be useful in the following situations:
• You want to feed envelopes flap first. This approach can solve envelope nesting problems when
using a power stacker.
• The printer heads cannot reach the far end of an
oversized envelope. With inverted printing selected, feed envelopes backwards (rotate 180 degrees and feed flap down and leading).
• You want to print on the left side of an oversized
envelope.
6-10
SV60970-OG Rev. A
DA900 AddressRight™ Printer
6
Advanced Options:
Language
6 - Print Driver
While eight choices are displayed in the Language list
box, only English is currently supported.
SV60970-OG Rev. A
6-11
6
Using the DA900 Print Driver
Notes
6-12
SV60970-OG Rev. A
7
Maintenance
General Cleaning ................................... 7-2
Replacing the Inkjet Cartridge .............. 7-2
Setting "Ink Left" Feature When
Replacing Cartridges ............................ 7-3
Purging the Printhead Nozzles ............. 7-6
Cleaning the Printheads ....................... 7-6
Cleaning the Media Sensor .................. 7-7
Replacing the Separator Tips ............... 7-8
Replacing the Feed Rollers ................ 7-10
7
Maintenance
General
Cleaning
Your printer is designed to provide trouble-free service with a
minimal amount of care. To keep it in top condition, you
should schedule regular cleaning of the feed rollers, exit
rollers and lower guide.
•
Clean the printhead cartridge and cover with a lint-free
cloth and distilled water only. Order cleaning kit, supply
#902-1. See Chapter 8 for ordering instructions.
•
Never spray or pour water directly on or into the printer;
excess liquid could harm electronic parts. Always
dampen a rag and apply it to the parts to be cleaned.
•
Clean all rubber rollers and transport belts with water or
alcohol.
•
Keep petroleum-based cleaning solvents away from
rubber or plastic parts.
NOTE: Use of any other cleaning solvents will void all
warranties.
Replacing the
Inkjet Cartridge
Follow the steps below to replace the inkjet cartridge.
1. Lift up the blue retaining lever located above the cartridge
holder.
2. Remove the cartridge by pulling the top toward you and
lift the cartridge up and out of the holder.
3. Remove a new print cartridge from its packaging. Take
care not to touch the copper contacts or printhead
nozzles. Remove protective tape from the printhead.
7-2
SV60970-OG Rev. A
Replacing the
Inkjet Cartridge
(continued)
4. With the gold printhead contacts pointing toward the
printhead holder pins, insert cartridge into holder. See
the figure below. Use extreme caution not to contact or
bend printhead holder pins.
5. With the cartridge inserted, lower the blue retaining lever.
This pulls the cartridge inward to make contact with the
printhead holder pins.
6. Repeat this procedure for each cartridge.
Setting "Ink Left"
Feature When
Replacing
Cartridges
When loading new inkjet cartridges for the first time:
1. After loading the new cartridges, turn the printer on.
2. Press the Menu key.
3. Press the + key until the message “Enter when Head 1 is
filled” appears in the display.
4. Press the Enter key and the message “Head 1 has new
Cartridge” appears in the display.
5. Press the + key again for Head 2 and repeat steps 4 and
5 until all of the cartridges have been identified.
SV60970-OG Rev. A
7-3
7
7 - Maintenance
DA900 AddressRight™ Printer
7
Maintenance
Setting "Ink Left"
Feature When
Replacing
Cartridges
(continued)
6. To check that you have identified ("filled") all of the
cartridges, press and hold the Test Print key until the
Service Menu appears. Then use the – key to display the
following message:
Service Menu:
Ink Levels
100% 100% 100% 100% 100% 100%
NOTE: Step 6 can also be used to check the level of the ink
in the cartridges at any time during operation of the printer.
When replacing empty cartridge with new cartridge:
1. When the ink in the cartridge reaches a low level, the
printer will stop feeding and the following message will
be displayed:
Printer Offline
nnn
Head n Low:
Press ENTER
NOTE: "nnn" is the number of the head with a low ink
supply.
2. Press Enter and the following will be displayed:
Printer Offline
nnn
ENTER when head is filled
3. Replace the cartridge and press Enter again. The display
will change to the following:
Printer Offline
nnn
Head n has a new cartridge
IMPORTANT: You should replace a cartridge when the
printer indicates the ink has run out. If you don't, or reset
the ink left setting to circumvent the low ink warning, the
cartridge will run out of ink very soon after and prevent
you from printing.
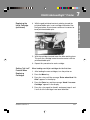
Store the inkjet cartridges in the docking station (photo, next
page) or in an area that is free of dust and paper particles. Do
not keep them in an area that is too dry for a long period of
time. Discard used cartridges in the normal manner.
7-4
SV60970-OG Rev. A
DA900 AddressRight™ Printer
When switching
between standard
cartridges and
bulk ink cartridges:
1. Press and hold
the Menu key
until the following message
appears:
Setup Menu
Total Count nn
7 - Maintenance
Setting "Ink Left"
Feature When
Replacing
Cartridges
(continued)
Cartridge Storage
NOTE: "nnn" is the number of the head with a low ink
supply.
2. To switch to a bulk ink cartridge from a standard cartridge:
Press the + key until the message below appears:
Head n uses a cartridge
Enter to use bulk ink
Press Enter and the following message will appear:
Head n is using bulk ink
Enter to use a cartridge
3. To switch to a standard cartridge from a bulk ink cartridge:
Press the + key until the message below appears:
Head n uses a bulk ink
Enter to use cartridge
Press Enter and the following message will appear:
Head n uses a cartridge
Enter to use bulk ink
4. Press the + key to move to the next head and repeat steps
2 and 3 as necessary.
SV60970-OG Rev. A
7
7-5
7
Maintenance
Purging the
Printhead Nozzles
If the printhead is inactive for a period of time, ink may dry in
the nozzle. White streaks will then appear in the printed text
or graphic.
To obtain better quality, purge the printhead nozzles:
1. Turn on the printer.
2. Feed in paper (for the purged ink to fall on).
3. Press the Menu key; "Enter to Purge" displays on the
control panel.
4. Press the Enter key and the printheads purge.
Cleaning the
Printheads
To achieve good print quality, maintenance of the printhead
is required. Paper fiber, dust and dried ink can build up on
the printhead.
To clean the printhead:
1. Use a lint-free towel with no chemical additives to clean
the printhead. Moisten the towel with distilled water. (An
abrasive cloth can put scratches on the printhead,
preventing ink from coming out of the nozzle properly.)
2. Wipe the cartridge nozzles in the direction of the nozzle
rows. Harmful particles on the top of the printhead can
be wiped into the nozzles if you are not careful. See the
figure below for the proper way to wipe the ink cartridge.
7-6
SV60970-OG Rev. A
Cleaning the
Media Sensor
It is important to keep the media sensor clean. Use compressed air to blow dust from the sensor.
See the figure below for the location of the sensor.
NOTE: Move printheads 2/3 and 4/5 to the outside to gain
better access to the sensor.
SV60970-OG Rev. A
7-7
7
7 - Maintenance
DA900 AddressRight™ Printer
7
Maintenance
Replacing the
Separator Tips
To replace the separator tips:
1. Before changing the separator tips, unplug the printer.
2. Release the separator locking lever on the left side of the
feeder, as shown below.
Push down to unlock
3. Push down the black tab on the separator to expose the
screw, as shown below.
4. Move the separator locking lever up to its locked position.
7-8
SV60970-OG Rev. A
Replacing the
Separator Tips
(continued)
5. Using a Phillips screwdriver, remove the screw and metal
cover over the separator tip. Use the tip of the
screwdriver to push down on the separator tip. Unlock
and remove the separator tip.
6. Replace with a new rubber separator tip.
7. Reinstall the metal cover and screw as shown below. Do
not overtighten.
SV60970-OG Rev. A
7-9
7
7 - Maintenance
DA900 AddressRight™ Printer
7
Maintenance
Replacing the
Feed Rollers
To replace the feed rollers:
1. Before removing the feed roller access plate, unplug the
power to the printer.
2. Using a Phillips screwdriver, remove the four screws from
the feed roller access plate. See below.
3. Remove the feed roller access plate. See below.
7-10
SV60970-OG Rev. A
Replacing the
Feed Rollers
(continued)
4. Rotate the feed roller shaft so the screws face up. See
below.
←
5. Use a 3/32" Allen wrench to remove the two
8/32 x 1/4" buttonhead cap screws. See below.
SV60970-OG Rev. A
7-11
7
7 - Maintenance
DA900 AddressRight™ Printer
7
Maintenance
Replacing the
Feed Rollers
(continued)
6. Remove the half feed roller. See the picture below.
7. Rotate the shaft so the screws on the other half of the
roller face up. Remove both screws. Remove the half feed
roller.
8. Place the new half-feed roller on the shaft and secure
with both buttonhead cap screws.
9. Rotate the shaft and replace the feed roller on the other
side with buttonhead screws. See below.
10. Replace the feed roller access plate and fasten with the
four screws.
7-12
SV60970-OG Rev. A
8
Troubleshooting
Getting Help .......................................... 8-2
Phone Support ................................ 8-2
Before You Call ................................ 8-2
The World Wide Web ...................... 8-2
Power Problems .................................... 8-3
Feeding Problems ................................. 8-3
Intermittent Feeds ........................... 8-3
Multiple Feeds ................................. 8-4
Paper Jams in Printer ..................... 8-4
Printing Problems ................................. 8-4
Printer Does Not Respond to
Software .......................................... 8-4
No Print on Media ........................... 8-5
Poor Print Quality .................................. 8-6
Prints Wrong/Incomplete
Information ...................................... 8-8
Printer Errors ....................................... 8-10
8
Troubleshooting
Getting Help
There may be times when you need help to solve a
problem, or you may want more information about how
your printer works. Pitney Bowes provides several
information resources.
Phone Support
Technical support is available from the Pitney Bowes
National Diagnostic Center.
Before You Call
Please read the troubleshooting information in this
chapter. In many cases, this information will help you
resolve the problem. Note that you can often restore
normal operation by turning the printer off and then on.
If you can't fix the problem, call our National Diagnostic
Center at 1-800-253-6565. Please have the following
information at hand:
•
Product name: DA900 AddressRight inkjet printer.
•
Serial number: See the right side of the printer.
•
Nature of problem: What happens and when does it
happen? Did the printer display an error message?
•
The steps you've already taken to solve the problem
and the results.
The World Wide Web
We encourage you to visit our web site at:
http://www.pitneybowes.com
You'll find the latest information about our products and
services as well as helpful answers to frequently asked
questions.
8-2
SV60970-OG Rev. A
8
DA900 AddressRight™ Printer
Power
Problems
Nothing happens when power is turned on. No LCD
display.
•
Check that power cord is plugged in.
•
Reconnect or reseat the cable from PC to printer.
Make sure clips are hooked, printer and screws are
seated, and computer is connected properly.
•
Turn printer OFF and then ON.
•
Plug a different device into the outlet you are using. If the outlet does not work, plug the printer
into a different outlet.
•
Feeding
Problems
SV60970-OG Rev. A
Static electricity is interfering with operation. Turn
the printer OFF and ON.
Intermittent feeds
•
Be sure to use the feed ramp. (See Chapter 3-Meet
the DA900.) The paper support adds a gentle slope
to the stack and helps feeding.
•
Check that the side guides are not too tight or too
far from media.
•
The feed rollers may be dirty. Clean the feed rollers
with water or alcohol wipes. DO NOT use any
other solvents or detergents. They could damage
the feed rollers.
•
Paper dust may be blocking the feed sensor. Clean
the sensor with compressed air.
•
The feed gap may be too tight or too loose. Adjust
the separator to the thickness of the material.
•
Your media may be too thin or too thick. Minimum
thickness is 0.004"; maximum is 0.375."
8-3
8 - Troubleshooting
General
8
Troubleshooting
Feeding Problems
(continued)
Multiple feeds
•
The feed gap may be too tight or too loose. Adjust
the separator to the thickness of the material.
•
Paper dust may be blocking the feed sensor. Clean
the sensor with compressed air.
•
Paper stuck together. Separate paper before feeding.
•
Side guides too far from media. Set side guides to
width of media plus 1/16".
Paper Jams in Printer
•
Clear jam and remove pieces remaining under
printhead.
•
Check for the following:
1. Paper not loaded correctly. Set side guides to
width of media plus 1/16".
2. Separators improperly adjusted. Adjust
separators to thickness of material.
3. Media is curled or bent. Uncurl media.
4. Media is too thin. Media must be at least
0.004".
5. Dirty sensor. Clean sensor.
6. Worn separator tip. Replace separator tip.
Printing Problems
Printer does not respond to software
•
8-4
Check connection between printer and computer.
If you have a good parallel port connection, the
"on-line" LED on the printer control panel will be lit.
SV60970-OG Rev. A
8
DA900 AddressRight™ Printer
No print on media
•
Purge ink cartridge (see Chapter 6—Maintenance).
•
Clean cartridge inkjets with tissue or soft cotton
cloth and water.
•
Tape on printhead or print nozzle. Remove tape.
•
Cartridge not properly inserted. Remove and reinsert the cartridge into the cartridge holder.
•
Clean sensor.
•
The job has been started from the printer. Restart.
Run print job from Envelope Designer Plus.
•
Bad connection.
1. If this port can communicate with printer using
another parallel cable, replace cable.
2. If the port cannot communicate using another
parallel cable, check printer.
3. If the port cannot communicate using another
parallel cable and the printer is okay, check
parallel port on the computer.
SV60970-OG Rev. A
•
The cartridge may be empty, faulty or dried out.
Install a new print cartridge. When storing cartridges outside of the printer overnight, place
them in the docking station. For prolonged storage, place them in a covered Tupperware-type
container with a damp sponge or towel to maintain
humidity.
•
You may have positioned your address so far left
or right that it is printing off the envelope. Adjust
the print band vertically, adjust the side guides on
the printer, or check that you have selected the
correct envelope size from the drop-down box on
the menu bar.
8-5
8 - Troubleshooting
Printing Problems
8
Troubleshooting
Printing Problems
(continued)
Print slanted/skewed
•
Check the separator gap and adjust as required.
•
Margins set to less than 1/4". Reset the margins to
1/4" or more.
•
Note that the maximum allowable skew is +/-2.5°
relative to bottom edge of material. A minimal skew
is allowed.
Space between lines not uniform
Poor Print Quality
•
Printheads not aligned properly. Align printheads.
•
You have fields which have a value in some records
and none in other records.
Blurry print
•
Printhead too high. Lower printheads.
•
Too much dust in printer. Clean rollers and
printheads.
•
Printheads were scratched when cleaned. Replace
print cartridge. When cleaning, use proper wipe in
correct direction.
•
Media is glossy, recycled, too porous or too absorbent. Use appropriate paper.
Print too light
8-6
•
At the start of a run or if printing is paused for more
than about four minutes, the user must purge and
test until print quality is acceptable.
•
Print speed set too fast. Reset to slower speed.
•
Printhead clogged or dirty. Purge and clean
printheads.
•
Print resolution set too low. Select higher resolution.
SV60970-OG Rev. A
8
DA900 AddressRight™ Printer
Poor Print Quality
(continued)
•
Running low on ink. Replace cartridge.
•
Envelope thickness adjustment too low. Raise
printheads.
•
Exit roller dirty. Clean exit roller with water.
•
Printhead dirty. Clean printheads.
•
Ink is not being absorbed because paper is coated
or plastic. Use fast-dry ink.
•
You are printing in high resolution mode on glossy
media. Change print quality, or use W853 dryer, or
use fast-dry ink.
•
High humidity is slowing down drying time. Use
fast-dry ink.
White lines/streaks in a line of print or in graphics
SV60970-OG Rev. A
•
Cartridge not properly inserted. Remove and reinsert the cartridge into the carriage holder.
•
Ink cartridge nozzle crusted over. Clean with lintfree, dampened cloth.
•
Cartridge was hit, shaken or dropped. Replace
cartridge.
•
Tap water was used to clean cartridge and mineral
deposits have blocked the ink chamber. Replace
the cartridge and use only distilled water to clean
printheads.
•
Wrongly directed or forceful wipes have driven particles into nozzles. Replace the cartridge. Clean
printheads as directed in Chapter 6—Maintenance.
•
Addresses not positioned properly; too close to
center of media.
8-7
8 - Troubleshooting
Print streaking/smearing on material
8
Troubleshooting
Poor Print Quality
(continued)
•
Chosen envelope size is too small. Select correct
envelope size from drop-down box on menu bar.
•
If your graphic has a white line through it, the
printheads may need to be banded together.
Prints garbage
•
Poor cable connections. Check parallel cable.
Make sure cable is connected securely at both
ends. Does cable exceed maximum 6' length? Replace cable with a good cable.
•
Interface problem. Check printer setup at computer.
•
Ink supply low. Replace cartridge.
•
Turn the printer off and on. Restart job.
No barcode
Prints wrong/
incomplete
information
•
Wrong font selected. Choose USPS barcode font.
•
No ZIP Code. Check ZIP Code.
•
Barcode not enabled. Enable bar code.
Not all addresses on the list have printed
•
You have selected only some addresses to print.
Select Print from the File menu and select All Addresses.
•
You have added or removed records from a mail
list and then printed without first exiting the application used to modify the list. Correct by reattaching the layout to the modified list.
Extra lines on media, losing data
•
8-8
Buffer overflow. Check the data in your database.
Close the print job screen. Power down printer for
a few seconds, then restart print job.
SV60970-OG Rev. A
8
DA900 AddressRight™ Printer
Prints wrong/
incomplete
information
(continued)
The colors on the envelope are not the colors you want
•
You have assigned the wrong colors to the
printheads. Return to Print Head Properties
screens and recheck the assignment of colors to
heads.
•
Check that the physical location of the printheads
in their mounting brackets matches the template
setup.
Addresses nearly off media
Chosen envelope size is too small. Select correct
envelope size from drop-down box on menu bar.
Address too high or too low
•
Check image on layout screen. You may have input
the wrong positioning.
•
Adjust side guides or printheads on their mounting
brackets to set how far from the bottom edge of a
piece the fields are printed.
•
Center media in input area. (Use "0" reference on
ruler.)
Address prints upside down on media
•
SV60970-OG Rev. A
Stock direction set wrong. Change from Forward
to Reverse or Reverse to Forward where you want
to insert the field.
8-9
8 - Troubleshooting
•
8
Troubleshooting
Printer Errors
Out of Paper
The paper sensor did not detect paper within one second
of starting the feeder. Check if input bin is empty. Refill
paper.
OR
Dirty sensor not seeing media. Clean sensor.
OR
Jam blocking path. Clear jam.
OR
Separator out of adjustment. Adjust separator.
Paper Jam
Remove jam and feed media again.
8-10
SV60970-OG Rev. A
9
Supplies and
Options
Supplies and Accessories .................... 9-2
How to Order ......................................... 9-3
Options .................................................. 9-3
9
Supplies and Options
Supplies and
Accessories
Supply
Order Number
Ink Cartridge, Black
660-1
Ink Cartridge, Fast Drying Black
660-6
Ink Cartridge, Black Bulk Ink Kit
635-4
Ink Cartridge, Blue
635-1
Ink Cartridge, Red
635-3
Ink Cartridge, Fast Drying Black, 6 pack
674-5
Ink Cartridge, Black 6 pack
674-4
Separator Tips Kit
633-8
Feed Rollers Kit
633-0
Cleaning Kit
902-1
IMPORTANT: Do not use the alcohol
contained in Cleaning Kit 902-1 on
printer rollers as it may damage them.
The following table summarizes available ink types to help
you choose the right ink for your application.
9-2
Regular Ink
Fast Dry Ink
Cost
Lower
Higher
Media Type
Absorbent
Glossy
Stacking
Conveyer
Bin
Print Quality
Best
Good
SV60970-OG Rev. A
9
DA900 AddressRight™ Printer
How to Order
Ordering Online
To order supplies, access www.pitneybowes.com/supplies
You'll find a complete, easy-to-navigate online store that
offers a wide assortment of Pitney Bowes supplies at
attractive prices. Be sure to take advantage of special
quantity pricing and online discounts.
Ordering by Phone
Call 1-800-243-7824. Our representatives will be happy to
answer your questions and take your order.
Requesting a PB Supply Catalog
Call the number above or e-mail us at [email protected].
Pitney Bowes offers an optional power stacker used to
stack output from your printer.
9 - Supplies/Options
Options
SV60970-OG Rev. A
9-3
9
Supplies and Options
Notes
9-4
SV60970-OG Rev. A
Appendix A
Glossary
A
Appendix A—Glossary
[+] key on the printer control panel which advances one menu item when in Setup
and Service modes.
[-] key on the printer control panel which backs up one menu item when in Setup
and Service modes.
2 of 5 Barcode — a barcode describing a series of digits (0-9) in which each digit is
represented by five elements. An element is either a space or a bar, two of which are
thick. This is a non-USPS barcode for special applications not related to mailing,
such as parcel tracking, inventory management, etc.
128 Barcode — a barcode used when label length is a consideration because it is
very compact and results in a dense symbol. This is a non-USPS barcode for special
applications not related to mailing, such as parcel tracking, inventory management, etc.
Accessories — a tab on the Property Sheet (File/Printer Setup) which allows you set
package, tray and feeder breaks.
Alignment Tool - a moveable, vertical line used to align the left edge of fields on the
template in Envelope Designer Plus. This line initially appears to the immediate right
of the template.
Align Heads — a tab on the Property Sheet (File/Printer Setup) which allows you
realign the software printhead settings if they do not accurately reflect the position
as shown on the Head Info tab.
Belt Speed — the actual speed at which the printer transports your media. Note
that the resolution available is dependent on the belt speed you have set. The slower
the belt speed, the better the resolution.
Auto-Detection — a software feature that analyzes the first record to determine the
number of lines per record if you enter "0" in the "lines per record" box in the
Database Attributes box.
Barcodes - a way of encoding numbers and letters into an ID by using a
combination of bars and spaces of varying widths. The barcode is read by a scanner
attached to a computer to look up all specific information associated with that ID. In
the case of postal barcodes, specifications are issued by the USPS regarding the
location of the barcode on the printed piece. These specifications should be
consulted to ensure compliance with postal regulations.
A-2
-2
SV60970-OG Rev. A
A
DA900 AddressRight™ Printer
Bitmap — a graphical object made up of a series of dots, some of which are black
(or another color), some a contrasting color, which make up the art.
Bitmap Editor — allows you to launch a bitmap editor program from within
Envelope Designer Plus to edit bitmap art. Select Tools/Bitmap Editor. NOTE: A
bitmap editor program must be associated with this file format on your PC for this to
work. Typically, Microsoft Paint will be assigned as the default bitmap editor.
Blotter — an area near the bottom right corner of the piece outline onto which all
new fields are dropped. You can move them from there to a spot on one of the print
heads by clicking and holding the mouse button down and dragging.
Control Panel — the panel on the front of the printer with an LCD display, control
buttons, and the media thickness knob.
.CSV file - Comma Separated Variable, a type of database with variable length
fields. This type of variable is usually associated with spreadsheet applications.
DBase II, IV, V — a type of database associated with Microsoft FoxPro.
Database — a list of records of identical structure (although the content of each
record varies). Each record contains one or more pre-defined fields.
Database Mode — the mode which displays the database addresses that will print
with the template displayed.
Database Step Direction — a menu choice from Edit which allows you to change
the direction in which the database is printed.
Delimiter — a symbol used to separate database fields (delimiters can be tabs,
spaces, commas, quotation marks, or carriage returns).
Design Mode — the mode which displays the fields that you have selected for the
template addresses.
Destination Address — a menu selection which brings you to the destination
address text block editor to choose information to be printed in the destination
address on your media and information to be taken from the database field, if any.
SV60970-OG Rev. A
A-3
Appendix A
Belt Speed — the speed at which the printer moves the media past the printhead area.
A
Appendix A—Glossary
DPI — Dots Per Inch. A measurement of print resolution. The higher the number, the
better the print quality.
Driver — the software driver for the printer.
Enter Key — the key on the printer control panel which engages the feeder.
Envelope Designer™ Plus - the software you use to design an envelope template,
attach a mailing list, and print.
Envelope Size Window — a screen used to set the exact size of the piece being
printed so that it appears correctly in the layout screen.
Error — a light on the printer which indicates a problem such as a jam or no media
loaded.
Feed Deck — the center plate on which media to be fed into printer is placed.
Feeder — the area of the printer where the media enters.
Feed Ramp — the sliding support which tilts the mail on the feed deck.
Feed Rollers — the rollers in the feeder section of the printer which push the paper
through the feeder. You can order a kit to replace the rollers when they wear.
Feed Roller Access Plate — the plate in the feed deck which must be removed in
order to change the feed rollers.
Field Type — a printable address, barcode or logo.
Files of Type — a drop-down menu listing all the database files you have added to
the database folder.
Fixed Text — text which you can place on the media, but that is not dependent on
the records in the database.
Graphic Block Properties — (Edit /Add Graphic) a window which allows you to
select and enable logos or other art.
A-4
SV60970-OG Rev. A
A
DA900 AddressRight™ Printer
Head Info — a tab and screen on the Property Sheet (File/Printer Setup) which lists
printhead details.
Human Readable — the alphanumeric portion of a barcode that does not require
use of a decoding device for a human to interpret.
Image Area — the printable area of the envelope: 3 inches x 17 inches.
Indent Tiles — the printhead indent tiles at the right of the template show the
printheads being used for each text block and are numbered blue to indicate
reverse direction or red for forward direction.
Indexing — a process of storing how many lines or fields are in each record when
accessing a .txt or .csv database. The indexing process is done only once for each
database when Envelope Designer Plus first accesses a database.
Ink Cartridges — a consumable supply item which provides the ink for printing.
You install them in the inkjet cartridge holders.
Job — part of or all of a database that will be printed. It specifies the name of the
database, which records are to be printed, and which label format will be used.
Jobs Folder — a folder which shows information about the job such as total
number of records, template used to layout the job, resolution, and last record
processed. Job files have a .AJPJT extension and are stored in the Projects folder.
Layout Screen — the desktop area on which the fields and printheads are arranged
in Envelope Designer Plus.
Locking Knob — the four knobs which loosed then tighten the printhead cartridge
holders into position.
Logo — a symbol used to represent a company, department, institution, etc.. The
printer software can add up to eight different bitmap logos or graphics to the printed
piece.
SV60970-OG Rev. A
A-5
Appendix A
Head Dividers — in the View Menu, toggles on and off the grey lines used to mark
the boundary of a print head area.
A
Appendix A—Glossary
Logo Folder — a folder used to store any logos and graphics in Windows.
Media — envelopes, flats, postcards, catalog envelopes, tri-folds, etc., which are
being fed into the printer. See Chapter 2, Specifications, for material sizes.
Media Sensor — a sensor that identifies the leading edge of the media and
communicates this to the software. It is located behind the front feed plate just
before the printhead carriage.
Media Thickness Adjustment — a knob on the printer control panel that adjusts
for media thickness; counterclockwise for thin media, clockwise for thick media.
Menu — a key on the printer control panel which displays the current state of
operation. You also hold this key down to access setup mode.
Online — a light on the printer control panel indicating that the motor of the printer
is running and is ready to feed mailing pieces.
Paper Support — a guide which moves forward and backward to support the
media at the correct angle for feeding.
Parallel Port — a port on the rear of the printer where the cable to your computer is
connected.
Pause Job Button — a button that, when pressed, stops the printer and ends the
transmission of data to it.
Planet Barcode — a machine-readable barcode that is used in addition to the
USPS Postnet barcode when you want to track the progress of outgoing mail and/or
incoming business reply mail as it is being processed by the USPS.
Postnet USPS Barcode — the machine-readable USPS barcode used to receive
postal discounts when sending mail domestically. There are Postnet codes for
addresses with a Zip Code®, a Zip+4® and Zip+4+2®.
Power Cord Receptacle — an outlet for the printer power cable.
Power Switch — a switch on the right side of the printer which turns the printer ON
and OFF.
A-6
SV60970-OG Rev. A
A
DA900 AddressRight™ Printer
Printing Bands — a menu item under Tools which allows you to group printheads
together in Envelope Designer Plus as they are on the printer. Printing bands also
allow graphics that are larger than a single printhead area to be printed across
several printhead areas.
Printheads — the part of the print cartridge which prints on your media. The DA900
has six printheads.
Print Order — the order in which records will be printed. You can print the lowest
numbered records first or the highest first. (See Database Direction.)
Print Speed — the speed at which the media is printed.
Project Folder — a folder which stores all the information necessary for the
software to format and run the job.
Property Sheet — a screen selected under File/Printer Setup which allows you to
set and view details on printhead information, set tray and package breaks and
other functions that are available in Envelope Designer Plus.
Properties — a tab on the Property Sheet (File/Printer Setup) which allows you to
enable or cache pre-rendered fonts.
Purge — a printer menu option that cleans the inkjets.
Record — a unique set of data in the database subdivided into fields. For example,
an individual's name and address would be a record, while the name, first line of
address or postal code would be examples of fields.
Record Size — the number of lines of data in a record, including blank lines used to
delineate the end of a record.
Reset — a key on the printer control panel which clears the printer's memory.
SV60970-OG Rev. A
A-7
Appendix A
Printer Setup — (in the File menu) opens the Property Sheet which allows you to
set and view details on print head information, set tray and package breaks and
other functions that are available in Envelope Designer Plus.
A
Appendix A—Glossary
Resolution — the quality of the image, measured by number of ink drops per inch
(dpi). Note that the resolution available is dependent on the belt speed you have set.
The slower the belt speed, the better the resolution.
Return Address — a menu selection which brings you to the return address text
block editor to choose information to be printed in the return address on your
media.
Return/Form Feed Delimited Files — types of files generally stored as .txt files,
delimited by the return character with the end of record a form feed symbol,
formerly used on adhesive label printers.
Run Indicator — a line indicating that printing is in progress.
Save Template As... — a function (in the File Menu) which saves an untitled
template file (an .ajpjt file) as a copy of the file being worked on under a different file
name.
Segmented Rollers — replaceable rollers which feed the media into the print area.
Separators — part of the printer which separates the media as they are printed.
Separator Gap — the adjustable gap between the separators and the feed deck.
Separator Locking Lever — a lever on the left side of the feeder used to lock the
separators in place.
Separator Tips — user-replaceable tips which help separate the media when
feeding.
Side Guides — guides which move in and out to secure media feed position.
Stock Direction — the direction that pieces can be printed; either forward or
reverse. In forward direction, the left edge of the piece goes under the printheads
first. In reverse direction, the right edge of the piece goes under the printheads first.
Template — a screen representation of what a mailpiece or packaging piece will
look like when it is printed. It specifies which heads will be used, the printing
direction, and the location and content of the addressing or barcode information.
A-8
SV60970-OG Rev. A
A
DA900 AddressRight™ Printer
Appendix A
Test Print — a key on the printer control panel used to place the printer in test
mode. This enables you to test the printer without the software. Also, a light on the
printer which indicates that it is powered up and initialized.
Text Block Properties — a display which allows you to enable text blocks and to
set font, type size and type style.
Text Fields — (Edit /Destination Address or Return Address) a series of lines on
which you can position several fields from the database as well as fixed text and
other values.
Text Field Buttons — buttons on the Envelope Designer Plus tool bar which allow
you to add return, destination, and fixed text blocks to the template.
Text Block Editor — allows you to specify where fields in the database will appear
on the template. When the job is printed, Envelope Designer Plus replaces the field
name with the corresponding text or value in the database record.
Tilde — (~) a symbol used to mark the beginning and the end of a field.
Tray and Package Breaks — properties which allow you to stop the printer in order
to separate media according to USPS regulations.
USPS — United States Postal Service.
USPS Postnet Bar Code — a machine-readable barcode employed by the USPS
for the sorting and directing of mail. There are Postnet codes for addresses with a
Zip Code®, a Zip+4® and Zip+4+2®.
USPS Postnet Bar Code icon — (on the Tool Bar) adds USPS Postnet Bar Code to
media.
SV60970-OG Rev. A
A-9
A
Appendix A—Glossary
A-10
SV60970-OG Rev. A
Appendix B
Application Notes
Fixed Head Versus Shuttle-Head
Printers ............................................ B-2
Printheads and Bands .......................... B-2
Color ...................................................... B-4
Unprintable Areas ................................. B-4
Dual Purpose Ruler ............................... B-5
Other Printer Characteristics ................ B-5
Compatibility Issues .............................. B-6
B
Appendix B—Application Notes
Fixed-Head Versus
Shuttle Head
Printers
Fixed-head printers differ from shuttle-head printers
in a few very important ways. The DA900 is a fixedhead printer with six print heads that operate on four
bands. Each print head is able to print 1/2 inch of
your layout. Therefore, the DA900 is able to print a
total of three inches of text and/or graphics.
This differs from shuttle-head printers, which are able
to print your entire envelope layout. The trade-off in
print area is improved speed. By fixing the location of
the print heads, printing can occur at a high speed as
media is moved under the heads.
Printheads and
Bands
Designing an envelope layout for the DA900 also imposes different requirements than those associated
with a typical shuttle-head printer. With the threeinch printable area spread across six heads, it is critical that you think about what information must be
placed where on the mailpiece. In this regard, Envelope Designer™ Plus, which is furnished with the
printer, is an excellent tool that can help you layout
the mailpiece within the limitations imposed by a
fixed-head printer.
By default, heads 4 and 5 are permanently attached
to each another, as are heads 2 and 3. Heads 1 and 6
are independent, with independent bands. Thus, the
six heads print the information contained in four
“bands”. In this configuration, the DA900 has two 1inch bands, and two 1/2 inch bands.
The envelope layout editor in Envelope Designer™
Plus attempts to duplicate the physical layout and
limitations of the DA900 printer. For example, while
you may overlay bands 1 and 2 (since they are on
separate rails on the printers), you cannot overlay or
place band 1 “under” band 4—since heads 1 and 6
are on the same rail.
B-2
-2
SV60970-OG Rev. A
B
Appendix B
Appendix B
DA900 AddressRight™ Printer
Printheads and
Bands (continued)
The concept of bands is important when designing and
laying out your envelope, since certain rules apply to
what you can and cannot do within a band. Only items
that are within a band are printed. Text or graphics
that fall outside of a band are not printed.
It is possible to “gang” head 6 to heads 4-5, and gang
head 1 to head 2-3, resulting in two 1.5-inch bands.
This is useful should you need the extra inch for a large
SV60970-OG Rev. A
Appendix B
A typical envelope layout as it appears in Envelope Designer Plus. It shows the location of
printheads 1 through 6 on the right side. The six printhead bands are shown as clear areas; non-printing areas are crosshatched. In the example above, the destination address
is printed by printheads 2 and 3 and the message line by printhead 1. You can physically
position the printheads by relating the bands to the ruler on the left.
B-3
B
Appendix B—Application Notes
Printheads and
Bands (continued)
graphic or text message. Be aware that dragging
bands on the envelope layout and placing them next
to each other does not result in larger print areas. You
must enter the Fixed Head tab and select Attach to
expand the printable area.
Color
While color is supported in the DA900, note that its
use is different than with other Pitney Bowes
AddressRight shuttle-head printers. The DA900 employs “spot color,” meaning that each of the six print
heads uses a single-color ink cartridge. Thus, if a red
ink cartridge is placed in head 1, everything in that
band will print in red.
By overlaying bands 1 and 2 (head 6 with heads 5-4)
or band 3 with 4 (heads 3-2 with head 1), you can design a layout with up to two colors on a single line of
text. For example, by placing the first half of a text
message on head 6 with a red ink cartridge, and the
second half on head 5 with a blue ink cartridge, you
can set up your layout such that the text message has
the first part of the text in red and the rest in blue.
Graphics, however, will always be of one color.
Unprintable Areas
One important physical limitation that is not represented in Envelope Designer™ Plus is the unprintable
area that exists when you try to place heads 1 and 6
next to each other.
If you place heads 1 and 6 next to each other on the
printer, there will be approximately 1.7 inches of unprintable space between them due to the ink storage
portion of each ink cartridge. Thus, while it may appear in your Envelope Designer layout that you can
place these two bands next to each other, you must
remember that it may not physically possible to set the
bands in these positions. The same limitation applies
to heads 5-4 and 3-2.
B-4
SV60970-OG Rev. A
Another difference between a fixed-head printer and
shuttle-head printer is the use of the ruler. In a shuttlehead printer, the left ruler is zeroed at the upper left
corner of the envelope. In the fixed-head printer, this
ruler is zeroed in the middle of your envelope. Envelope
Designer Plus reflects this approach.
Envelope Designer's ruler displays the true size of your
envelope in inches or millimeters. With the scale set to
inches, the left ruler also provides you with an indication of where to position the heads on the DA900.
There is a corresponding ruler on the DA900, with zero
in the middle of the printer. Use the left ruler in Envelope Designer Plus—using the inch (not millimeter)
scale—to determine where to set your print heads.
SV60970-OG Rev. A
It is important to be aware of other DA900-unique characteristics:
•
The printer does not support rotation of text and
graphics.
•
Text that overflows a printable area will not be
printed. The warning message, “Items outside
printable area” appears. When a block of text is
completely on a non-printable area, the text is
grayed out.
•
If a graphic is larger than the size of the band into
which it is placed, the graphic will be automatically
resized to fit within the band. The part of the
graphic that falls outside the printable area will be
clipped.
•
Envelope designs created in Envelope Designer Pro
are automatically converted to Envelope Designer
Plus.
Appendix B
Other Printer
Characteristics
Appendix B
Dual Purpose
Ruler
Appendix B
B
DA900 AddressRight™ Printer
B-5
B
Appendix B—Application Notes
Compatibility
Issues
B-6
The DA900 will work with most text editors, word processing and mail list programs. We do not however,
recommend using Windows Notepad.
SV60970-OG Rev. A
Index
Index
Symbols
+ Key 3-4
- Key 3-4
A
Address
prints high or low 8-9
prints off media 8-9
prints upside down 8-9
Addresses
some do not print 8-8
Adjustment
Media Thickness (Separator) 3-4
Adjustments
feed ramp 5-6
media thickness 5-7
printhead position 5-8
separator gap 5-2
side guides 5-5
upper exit rollers 5-9
Advanced setup options 6-5
B
Bands
printhead, alignment of B-2
Barcode does not print 8-8
Belt speed
setting the 6-8
Benefits of 1-2
Blurry print 8-6
Bulk ink cartridges
switching from standard cartridges 7-5
C
Cartridges, inkjet
loading for the first time 7-3
replacement 7-2
Cleaning 7-2
solvents 7-2
Cleaning kit
ordering 9-3
Clipping
warning against 2-2
Color
use of B-4
Colors print incorrectly
(wrong colors print) 8-9
I-2
Compatibility issues B-6
Computer
requirements 2-5
Contents of printer carton 4-2
Control language 2-4
Control panel 3-3, 3-4
D
DEC computer
special parallel port settings for 4-9
Dimensions, equipment 2-4
Display, operator 2-4
Duty cycle 2-4
E
Electrical specifications 2-4
Enter key 3-4
Envelope
Fanning 5-6
Envelope Designer Plus
sample layout B-3
Environmental requirements 2-4, 2-6
Extra lines print 8-8
F
Features 1-2
Feed
gap incorrect 8-3
rollers dirty 8-3
sensor dirty 8-3
Feed delay
setting the 6-9
Feed Ramp 3-2, 3-3
Feed ramp
adjustment 5-6
Feed rollers
ordering replacement 9-3
replacing 7-10
Feeding problems 8-3, 8-4
Fixed-Head printers
application notes B-2
SV60970-OG Rev. A
DA900 AddressRight™ Printer
G
M
Ganging printheads B-3
Garbage prints 8-8
Maintenance
cartridge, inkjet, replacement 7-2
cleaning 7-2
feed rollers, replacing 7-10
"Ink Left" feature, setting the 7-3
media sensor, cleaning 7-7
printhead nozzles, purging 7-6
printheads, cleaning the 7-6
separator tips, replacing 7-8
Media
fanning 5-6
out of specification 8-3
thickness adjustment 5-6, 5-7
thickness knob
location of 5-7
Media sensor
cleaning 7-7
Media Thickness Adjustment 3-4
Menu 3-4
Main 3-4
Setup 3-4
Messages 3-5
Printer Control Panel 3-5
Multiple feeds 8-4
Hard drive
space required 2-5
Help, calling for 8-2
I
Ink
ordering 9-3
types available 9-3
Ink cartridge
ordering replacements 9-3
Ink cartridges
bulk
installing 4-6
Installing 4-4, 4-5
safety 4-5
storing 4-5
"Ink Left" feature
setting the 7-3
Installation
bulk ink cartridge 4-6
computer connections 4-8
ink cartridges 4-4
power connection 4-9
side guides 4-4
Intermittent feeds 8-3
Inverted printing 6-10
K
Key
Enter 3-4
Minus 3-4
Test Print 3-4
L
Landscape mode
selecting 6-5
Language
selecting (for print driver) 6-11
Light print 8-6
Location, choosing a 4-2
SV60970-OG Rev. A
N
No barcode prints 8-8
No print on media 8-5
Noise level 2-4
O
On Line Button 3-4
On/Off switch 3-3
Online
ordering of supplies 9-3
Operating conditions, environmental 2-4
Operating systems supported 2-5
Operator display 2-4
Options
ordering 9-3
Options, available 2-5
Options for your printer 9-3
Ordering supplies and accessories 9-3
Out of paper
error 8-10
Output area 3-3
Index
H
1
I-3
Index
P
Paper jams 8-4
Paper size
selecting 6-6
Paper Thickness Adjustment 3-4
Parallel port 2-5
Phone support 8-2
Poor print quality 8-6, 8-7, 8-8
Portrait mode
selecting 6-5
Power
connection 4-9
turning on 4-9
Power panel 3-3
Power problems 8-3
Print
blurry 8-6
Colors 1-2
slanted/skewed 8-6
streaking/smearing 8-7
too light 8-6
Print driver
accessing the 6-3
feed delay 6-9
inverted printing 6-10
language selection 6-11
making DA900 the default 6-2
paper size selection 6-6
print quality settings 6-8
printhead position
fine adjustment 6-7
Print quality
settings for 6-8
Printer
characteristics B-5
errors 8-10
fails to respond to software 8-4
preferences 6-5
properties window 6-4
Printer Components, Location of 3-2, 3-3
Feed Ramp 3-2
Input Area 3-2, 3-3
Interface Panel 3-2, 3-3
Separators 3-2, 3-3
Side Guides 3-2
Printer Control Panel Messages 3-5
I-4
Printhead
bands B-2
cleaning 7-6
color cartridges 5-8
ganging B-3
head info 5-8
locking knobs 5-8
lowering 5-6
nozzles, purging 7-6
position 6-7
position adjustment 5-8
sliding 5-9
Printing problems 8-4, 8-5
Prints
garbage 8-8
wrong/incomplete information 8-9
R
Reset 3-4
Ruler 5-4
Ruler, dual purpose B-5
S
Safety Notes 1-4, 1-5
Separator 5-4
locking lever 5-4
Separator tips
ordering 9-3
replacing 7-8
Side guides 8-3
adjustment 5-5
installing the 4-4
Space between lines not uniform 8-6
Specifications
computer requirements 2-5
electrical 2-4
environmental requirements 2-4, 2-6
media size 2-2
media types 2-2
performance 2-4
printer output 2-3
Spot color B-4
Stapling
warning against 2-2
Static electricity 8-3
Supplies
ordering 9-3
ordering by phone 9-3
SV60970-OG Rev. A
DA900 AddressRight™ Printer
T
Technical support phone number
1-800-537-2488 8-2
Test page
printing a 6-4
Test Print 3-4
Test Print Key 3-4
Throughput, average 2-4
Transport Door 3-3
Troubleshooting
address
prints high or low 8-9
prints off media 8-9
prints upside down 8-9
blurry print 8-6
extra lines print 8-8
feeding problems 8-3
intermittent feeds 8-3
multiple feeds 8-4
no barcode 8-8
no print on media 8-5
paper jams 8-4
poor print quality 8-6, 8-7, 8-8
power problems 8-3
print slanted/skewed 8-6
print streaking/smearing 8-7
print too light 8-6
printing problems 8-4, 8-5
prints garbage 8-8
some addresses do not print 8-8
space between lines not uniform 8-6
static electricity 8-3
white lines/streaks in print 8-7
wrong colors print 8-9
wrong/incomplete information prints 8-8
W
W980 Stacker 2-5
Weight 2-4
White lines/streaks in print 8-7
World Wide Web
Pitney Bowes URL 8-2
Wrong/incomplete information prints 8-8
Index
Supplies and accessories 9-2
Supply catalog
requesting a 9-3
U
Unprintable areas B-4
Upper exit rollers
adjustment 5-9
URL
for Pitney Bowes 8-2
SV60970-OG Rev. A
1
I-5
One Elmcroft Road
Stamford, Connecticut 06926-0700
www.pitneybowes.com
*SV60970-OGRevA*
Printed on recycled paper
PB Form SV60970-OG Rev. A
9/02
© 2002 Pitney Bowes Inc.
All rights reserved. Printed in USA.