1
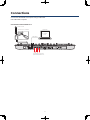
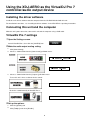
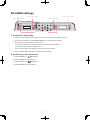
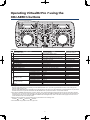
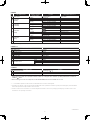
DJ SYSTEM
XDJ-AERO
VirtualDJ Pro 7
Connection Guide
The XDJ-AERO is equipped with a computer control mode, allowing commercially available DJ software to be
controlled when the XDJ-AERO is connected with a computer by USB cable.
The Atomix “VirtualDJ Pro 7” DJ software can be controlled using this unit. Furthermore, the XDJ-AERO can also
be used as the VirtualDJ Pro 7 audio output device.
Please follow the instruction below using “Virtual DJ”.
- Update the firmware of XDJ-AERO to the latest version.
The latest version is available in the following website.
http://pioneerdj.com/support/
- Install the driver software of XDJ-AERO onto your computer.
- Ensure that Control Mode is selected for XDJ-AERO after Virtual DJ Pro 7 is launched.
Disclaimer
I
Virtual DJ ” is a product of Atomix Productions.
In principle, Pioneer is not in the position of answering any inquiries on the usage of the software itself.
Please refer to the help menu or access the following support page of Atomix Productions:
JK KMLN O OP#P#PRQ ST UKMV2WYX Z \[ Q ]^`_0Oa]^;bKaWc] K OMT bdZce2f`Q JKg_hX
JK KMLN O OP#P#PRQ ST UKMV2WYX Z \[ Q ]^`_0O PRT idT OMT bdZce2f`Q JKg_hX
!#" $ %& '
)( %*+ , ( %*+- , ( %*. % ( %*+./"0 12 3 4. 4526 $ & 7 8& % %.1:9;% <= %> 1$3%3 '
6$5?.<@ 5 88
BA %$' %.1:9' <;'%C1$3%3 '
,
H
7
D E2F4D " % 8& % '3
& 13 C G
Connections
Connect the XDJ-AERO and computer using a USB cable.
One USB cable is required.
Connections with VirtualDJ Pro 7
To power outlet
Computer
Power cord (included)
VirtualDJ Pro 7
USB cable
AC adapter (included)
SIGNAL
GND
DC IN
USB
R
L
MASTER OUT2
R
L
MASTER OUT1(TRS)
LINE PHONO R
L
PHONO2 / LINE2
LINE PHONO R
L
PHONO1 / LINE1
dB
0dB
MIC ATT.
MIC
XDJ-AERO rear panel
Component, amplifier,
powered speakers, etc.
3
Using the XDJ-AERO as the VirtualDJ Pro 7
controller/audio output device
Installing the driver software
Install this unit’s driver software onto the computer from the CD-ROM included with this unit.
For installation instructions, see “Installing the driver software” in the XDJ-AERO’s operating instructions.
Connecting this unit and the computer
With this unit’s power turned on, connect this unit and the computer using a USB cable.
VirtualDJ Pro 7 settings
1 Open the Settings screen.
Launch VirtualDJ Pro 7, then click the [CONFIG] icon.
2 Make the audio output routing setting.
1
Click [Sound Setup].
2
Select as shown below from the [Sound card:] pull-down menu.
3
Select as shown below from the [Outputs:] pull-down menu.
To use this unit’s mixer section to mix the sound:
!"#$&%')(+*,-
.*/!"#$0%213(-
To mix the sound internally in VirtualDJ Pro 7:
45$6879;:0"#$&%<=(*2,->$?0@#A&%65"#$&%1(B
3 Set up the options.
1
Click the [Options] tab.
2
Click [Tooltips] and select [Disable].
XDJ-AERO settings
DECK 1 rotary selector
DECK 2 rotary selector
DECK 1 [MIDI] button
DECK 2 [MIDI] button
1
STANDBY/ON
2
3
4
WPS
PHONO1/
DECK1 LINE1
5V
rekordbox
TIME
AUTO CUE
QUANTIZE
TRIM
TOP
USB
STOP
MIDI
PHONO2/
TRIM
500mA
DECK2 LINE2
MASTER
LEVEL
BACK
HI
9
rekordbox
HI
9
HEADPHONES
MIXING
INFO
MASTER
REC
UTILITY
USB
CUE
MIDI
INFO
LEVEL
MID
9
MID
TIME
AUTO CUE
QUANTIZE
MIC
9
UTILITY
USB
0
MASTER
[INFO (UTILITY)] button
1 Set this unit’s mixer mode.
1Press this unit’s [INFO (UTILITY)] button for over 1 second to open the [UTILITY] screen.
2Turn the rotary selector to select [MIXER MODE], then press the rotary selector.
3To use this unit’s mixer section to mix the sound:
Turn the rotary selector to select [XDJ-AERO], then press the rotary selector.
To mix the sound internally in VirtualDJ Pro 7:
Turn the rotary selector to select [PC], then press the rotary selector.
4Press the [INFO (UTILITY)] button close the [UTILITY] screen.
2 Set this unit to the control mode.
1Press the DECK 1’s [
MIDI] button.
2Press the DECK 1’s rotary selector.
3Press the DECK 2’s [
MIDI] button.
4Press the DECK 2’s rotary selector.
5
BACK
Operating VirtualDJ Pro 7 using the
XDJ-AERO’s buttons
2
3
4
WPS
PHONO1/
DECK1 LINE1
5V
TIME
rekordbox
AUTO CUE
QUANTIZE
w
2
MIDI
INFO
UTILITY
USB
e
BEAT
u
f g
AUTO
BEAT LOOP
TRANS
1
h i
FX SELECT
FLANGER
ECHO
500mA
BACK
TOP
TRIM
HEADPHONES
MIXING
j
LEVEL/DEPTH
ROLL
LEVEL
1
NK
BA
5
E
PL
M CH
SA AUN
L
4
0
SE
A
8
CH1
9
FILTER
SHIFT
p
10
9
8
7
6
5
4
3
2
1
0
SYNC
FWD
REV
PLAY/PAUSE
PHONES
t
CROSS F.
CURVE
s
MASTER
3
FILTER
THRU
a
c
e
0
EQ
BEAT
1
h i
FX SELECT
TRANS
FLANGER
ECHO
ROLL
1
2
3
4
BACK
j
LEVEL/DEPTH
TEMPO
9
6
HI
ON/OFF
MIC
CH2
10
9
8
7
6
5
4
3
2
1
0
5
E
PL
M CH
SA AUN
L
6
d
p
NK
BA
10
16
WIDE
9
7
SE
A
8
MASTER
TEMPO
TEMPO
SHIFT
b
4
CUE
MASTER
3
SYNC
FWD
REV
PLAY/PAUSE
r
2
v
f g
AUTO
BEAT LOOP
9
o
AUTO MIX
CH1
CUE
UTILITY
n
MASTER
INFO
LEVEL
USB
LEVEL
9
q o
TEMPO
LOW
w
MIDI
9
LOW
n
MASTER
TEMPO
b
4
CH2
MID
m
LOW
WIDE
9
7
J
DR OG
UM
16
AUTO CUE
QUANTIZE
MIC
H
RC
d
3
H
RC
6
2
10
9
TIME
rekordbox
9
m
TEMPO
6
HI
l
MID
MASTER
9
l
MASTER
REC
CUE
DECK2 LINE2
k
MASTER
LEVEL
HI
USB
STOP
PHONO2/
TRIM
k
J
DR OG
UM
1
STANDBY/ON
a
c
1. Player
No
1
XDJ-AERO buttons
Rotary selector (turn)
Rotary selector (press)
2 BACK button
3 PLAY/PAUSE button
4 CUE button
AUTO BEAT LOOP control (turn)
5
AUTO BEAT LOOP control (press)
6 JOG DRUM button
7 SAMPLE LAUNCH button
8 MASTER TEMPO button
9 TEMPO RANGE button
a SYNC button
b TEMPO adjustment control
JOG DRUM Off (Vinyl)
Jog dial (turn outer section)
JOG DRUM Off (CD)
JOG DRUM On
JOG DRUM Off (Vinyl)
JOG DRUM Off (CD)
c Jog dial (turn top)
JOG DRUM On
JOG DRUM Off (Vinyl)
Jog dial (press top)
JOG DRUM Off (CD)
JOG DRUM On
d SHIFT
Function
Move cursor up/down
When a track is selected: Load
When a folder is selected: Open folder
When a track is selected: Move cursor to folder
When a folder is selected: Open/Close folder
Play/Pause
Cue Set/Play, Cue back
Auto Loop Size Select Half & Double
Auto Loop On/Off
Switch jog mode *1
Switch FX/hot cue/sampler *2
keylock On/Off
Tempo Range (6% 10% 16% 100%)
Beat Sync
Tempo Control
Pitch Bend
Pitch Bend
Pitch Bend
Scratch
Pitch Bend
—
Scratch On
—
Cue Set/Play, Cue back
Shift
When SHIFT button is on
Move cursor up/down
Browser Zoom
—
Stutter Play
Jump To Track Start
Move Grid
Reloop
—
—
keylock On/Off
Switch panel *3
Master Deck Select
Tempo Control
—
—
—
Search
Search
Search *4
—
—
—
—
*1 The jog mode switches each time the JOG DRUM button is pressed.
When the JOG DRUM button is off (lit dimly), the XDJ-AERO operates in the vinyl mode (jog dial indicators lit blue) or CD mode (jog dial
indicators lit blue, flashing red).
When the JOG DRUM button is on (lit brightly), the jog dial functions in the same way as the CUE button (jog dial indicators lit red). The mode
switches between the vinyl and CD mode when the JOG DRUM button is pressed and held for 1 second then released.
*2 E
ach time the SAMPLE LAUNCH button is pressed, buttons 15 to 18 switch between the effect mode and the hot cue mode. When pressed
and held for over 1 second, the mode switches to the sampler mode. When the SAMPLE LAUNCH button is pressed in the sampler mode, the
mode switches to the hot cue mode. The SAMPLE LAUNCH button’s LED lights dimly when in the effect mode, brightly when in the hot cue
mode, and flashes when in the sampler mode.
*3 With the default 4-deck skin, the panel display on the deck switches in the following order:
“PLAYER” “LOOPS” “EFFECTS” “PLAYER” …
*4 The XDJ-AERO only operates when in the play mode.
6
2. Effect
No
XDJ-AERO buttons
e BEAT control
f
FX SELECT
(TRANS)
FX SELECT
g
(FLANGER)
SAMPLE LAUNCH
indicator status
—
Lit dimly
Lit brightly
Flashing
Lit dimly
Lit brightly
Flashing
Windows
Lit dimly
h
FX SELECT
(ECHO)
Echo Effect On/Off
Effect On/Off
Hot Cue3
Deck 1,3 : Sampler3 Play/Stop
Deck 2,4 : Sampler7 Play/Stop
BeatGrid On/Off
Hot Cue4 *5
Deck 1,3 : Sampler4 Play/Stop
Deck 2,4 : Sampler8 Play/Stop
Effect Parameter2
Mac OS
Lit brightly
Flashing
FX SELECT
i
(ROLL)
Function
Effect Parameter1
Effect On/Off
Hot Cue1
Deck 1,3 : Sampler1 Play/Stop
Deck 2,4 : Sampler5 Play/Stop
Flanger On/Off
Hot Cue2
Deck 1,3 : Sampler2 Play/Stop
Deck 2,4 : Sampler6 Play/Stop
Lit dimly
Lit brightly
Flashing
j SHIFT
When SHIFT button is on
Effect Select
—
Delete Hot Cue1
—
—
—
Delete Hot Cue2
—
—
—
—
Delete Hot Cue3
—
—
—
Delete Hot Cue4 *5
—
—
Sampler Volume
*5 Though not displayed on the default skin, the fourth hot cue can be operated.
3. Mixer *6
No
k
l
m
n
o
p
q
r
XDJ-AERO buttons
TRIM control
EQ [HI] control
EQ [MID] control
EQ [LOW] control
FILTER control
Channel fader
HEADPHONES CUE *7
Crossfader
Function
THRU
s Crossfader curve
t AUTO MIX button
Input Gain
EQ (Hi)
EQ (Mid)
EQ (Low)
Filter
Channel Fader
Monitor On/Off
Cross Fader
Disabled
Full
Scratch
Automatic mixing On/Off
4. Others
No
XDJ-AERO buttons
u INFO/UTILITY button
v INFO/UTILITY button
w TIME/AUTO CUE
Function
DECK Change A C *6
DECK Change B D *6
Switch Time/Remain
*6 O
perates when this unit’s mixer mode is set to “PC”. When the mixer mode is set to “PC”, deck switching is possible with the INFO/UTILITY
button and the four decks can be operated. VirtualDJ’s 4-deck skin is displayed when “VirtualDJ 7 [4 Decks]:XXXXxXXXX” is selected at
“CONFIG” “Skins”.
*7 When monitoring the sound over headphones, set the HEADPHONES MIX control in VirtualDJ Pro 7 to 0 %.
• “-” is indicated for operations that cannot be used because no functions are assigned.
• The amount of change in the sound and playing speed when such operations as scratching and pitch bending are performed differs
from when operations are performed on this unit alone.
• The various functions of VirtualDJ Pro 7 can be assigned to buttons on this unit by changing the mapping. For details, refer to the
VirtualDJ Pro 7’s operating instructions
<DRX1026-A>
7