1
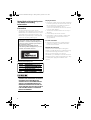
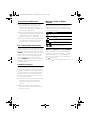
MAN-AVIC-X1-EN HW.book Page 1 Friday, January 16, 2004 11:41 AM
Q sound.vision.soul
Hardware Manual
ENGLISH
DVD AV NAVIGATION HEAD-UNIT
AVIC-X1
MAN-AVIC-X1-EN HW.book Page 2 Friday, January 16, 2004 11:41 AM
MAN-AVIC-X1-EN HW.book Page 1 Friday, January 16, 2004 11:41 AM
Introduction
Manual Overview
This manual mainly describes hardware-related
information such as the part names of the
Navigation System or precautions for use. Please
read this manual and all other enclosed manuals
before using your Navigation System. The
following issues are described in each chapter:
How to use this manual
Introduction
This chapter describes precautions for the use of
the Navigation System.
How to Use Navigation Unit and
Names of the Parts
This chapter describes matters that are important
to know before using the Navigation System, such
as the names of each part, inserting/ejecting
discs.
Terminology
Before moving on, take a few minutes to read the
following information about the conventions used
in this manual. Familiarity with these conventions
will help you greatly as you learn how to use your
new equipment.
• Buttons on your Navigation System are
referred to as:
Ex.) POS button, NAVI MENU button.
• Items in various menus or touch keys
displayed on the screen are referred to like
this:
Ex.) “Destination”, “Settings”.
• Extra information, alternative use and other
notes are presented like this:
Ex.)
❒ When the source icon is not displayed, you
can display it by touching the screen.
• The references are indicated like this:
Ex.)
➲ For suitable discs ➞ Page 6
Appendix
This section describes how to handle the
Navigation System or discs and the specifications
of the Navigation System.
1
MAN-AVIC-X1-EN HW.book Page 2 Friday, January 16, 2004 11:41 AM
Table of Contents
Introduction 1
Appendix 19
Manual Overview 1
How to use this manual 1
Terminology 1
Table of Contents 2
Important Safety Information 3
Notes Before Using the System and Additional
Safety Information 4
Precaution 4
Update DVD 6
Playable discs 6
DVD video disc region numbers 6
Features (Characteristics of this hardware) 7
To protect the LCD screen 8
For viewing LCD comfortably 8
Condition memory 8
What the marks on DVDs indicate 8
When an operation is prohibited 8
Resetting the microprocessor 9
Troubleshooting 19
Error messages 20
Vehicles that Cannot Obtain Speed Pulse Data 20
Conditions Likely to Cause Noticeable Positioning
Errors 20
Handling and Care of the Disc 20
Navigation map discs 20
DVD drive and care 20
DVD discs 21
CD-R/CD-RW discs 21
MP3 files 21
Ambient conditions for playing disc 23
Using the display correctly 23
Handling the display unit 23
Liquid crystal display (LCD) screen 23
Keeping the LCD screen in good condition 24
Small fluorescent tube 24
Glossary 24
Specifications 25
Chapter 1
How to Use Navigation Unit and
Names of the Parts 11
Display unit 11
Turning the unit on and selecting a source 13
Loading a disc 14
Adjusting the volume 14
Turning the source off 14
Using the REAR button 14
Opening and closing the LCD panel 15
Adjusting the LCD panel angle 15
Turning the LCD panel horizontal 15
Changing the wide screen mode 16
Operating the picture adjustment 16
Adjusting the dimmer 17
Protecting your unit from theft 17
Removing the front panel 17
Attaching the front panel 17
2
MAN-AVIC-X1-EN HW.book Page 3 Friday, January 16, 2004 11:41 AM
Important Safety Information
❒ The data encoded in the disc for this product
is the intellectual property of the provider, and
the provider is responsible for such content.
Before using your Navigation System, be sure to
read and fully understand the following safety
information:
❒ Keep this manual handy as a reference for
operating procedures and safety information.
❒ Read the entire manual before operating this
Navigation System.
❒ Pay close attention to all warnings in this
manual and follow the instructions carefully.
❒ The navigation features of this unit (and rear
view camera option if purchased) is intended
solely as an aid to you in the operation of your
vehicle. It is not a substitute for your
attentiveness, judgement, and care when
driving.
❒ Do not install the display where it may (i)
obstruct the driver’s vision, (ii) impair the
performance of any of the vehicle’s operating
systems or safety features, including air bags,
hazard lamp buttons or (iii) impair the driver’s
ability to safely operate the vehicle.
❒ Do not operate this Navigation System (or the
rear view camera option if purchased) if doing
so in any way will divert your attention from
the safe operation of your vehicle. Always
observe safe driving rules and follow all
existing traffic regulations. If you experience
difficulty in operating the system or reading
the display, park your vehicle in a safe location
and make necessary adjustments.
❒ Do not attempt to install or service your
display by yourself. Installation or servicing of
the display by persons without training and
experience in electronic equipment and
automotive accessories may be dangerous
and could expose you to the risk of electric
shock or other hazards.
❒ Never allow others to use the system unless
they have read and understood the operating
instructions.
❒ Please remember to wear your seat belt at all
times while operating your vehicle. If you are
ever in an accident, your injuries can be
considerably more severe if your seat belt is
not properly buckled.
❒ Never use this Navigation System to route to
hospitals, police stations, or similar facilities
in an emergency. Please call the appropriate
emergency number.
❒ Using the most current map DVDs will allow
for most accurate destination mapping.
Update DVDs are available through your local
Pioneer dealer.
❒ Route and guidance information displayed by
this equipment is for reference purposes only.
It may not accurately reflect the latest
permissible routes, road conditions, one way
streets, road closures, or traffic restrictions.
❒ Never use headphones while driving.
❒ Traffic restrictions and advisories currently in
force should always take precedence over
guidance given by this product. Always obey
current traffic restrictions, even if this product
provides contrary advice.
❒ Failure to input correct information about the
local time may result in the product providing
improper routing and guidance instructions.
❒ Never set the volume of your Navigation
System so high that you cannot hear outside
traffic and emergency vehicles.
❒ To promote safety, certain functions are
disabled unless the handbrake is on.
3
MAN-AVIC-X1-EN HW.book Page 4 Friday, January 16, 2004 11:41 AM
Notes Before Using the System
and Additional Safety
Information
Precaution
• The tuner frequencies on this unit are
allocated for use in Western Europe, Asia, the
Middle East, Africa and Oceania. Use in other
areas may result in improper reception. The
RDS function operates only in areas with FM
stations broadcasting RDS signals.
CAUTION
This product contains a laser diode of higher
class than 1. To ensure continued safety, do not
remove any covers or attempt to gain access to
the inside of the product.
Refer all servicing to qualified personnel.
The following caution label appears on your unit.
Location: on the bottom of the unit
On the top of the display unit.
• LIGHT GREEN LEAD AT POWER
CONNECTOR IS DESIGNED TO DETECT
PARKED STATUS AND MUST BE
CONNECTED TO THE POWER SUPPLY
SIDE OF THE HANDBRAKE SWITCH.
IMPROPER CONNECTION OR USE OF
THIS LEAD MAY VIOLATE APPLICABLE
LAW AND MAY RESULT IN SERIOUS
INJURY OR DAMAGE.
4
Display Definition
• From here on after, the screen that is attached
to the body of the product will be referred to as
the “Front Display”. Any additional optional
screen that is purchased for use in
conjunction with this product will be referred
to as the “Rear Display”.
• The Pioneer CarStereo-Pass is for use only in
Germany.
• Protect this product from moisture.
• If the battery is disconnected or discharged,
the memory will be erased and must be
reprogrammed.
In case of trouble
• Should this product fail to operate properly,
contact your dealer or nearest authorised
Pioneer Service Station.
Handbrake interlock
Certain functions offered by this Navigation
System could be dangerous if used while driving.
To prevent them being used while in motion,
there is an interlock with your vehicle’s
handbrake. If you attempt to use these functions
during driving, they may be inoperable. If so, stop
in a safe place, apply the handbrake, then
operate.
MAN-AVIC-X1-EN HW.book Page 5 Friday, January 16, 2004 11:41 AM
To ensure safe driving
• To avoid the risk of accident and the
potential violation of applicable laws, this
unit should never be used while the
vehicle is being driven except for
Navigation purposes. Also, and Rear
Displays should not be in a location where
it is a visible distraction to the driver.
• In some countries or states the viewing of
images on a display inside a vehicle even
by persons other than the driver may be
illegal. Where such regulations apply, they
must be obeyed and this unit’s DVD or TV
features should not be used.
This unit detects whether your vehicle’s
handbrake is engaged or not, and prevents you
from watching a DVD or TV on the front display
while driving. When you attempt to watch a DVD
or TV, the warning VIDEO VIEWING IS NOT
AVAILABLE WHILE DRIVING will appear on
the front display.
To watch a DVD or TV on the front display, park
your vehicle in a safe place and apply the
handbrake.
Colour difference of the map display
between day and night
Night display
The examples in this manual are illustrated using
the daytime display. When driving at night, the
colours you see may differ from those shown.
To use this function, the Orange/white lead to
this unit must be connected correctly.
When using a display connected to
REAR OUT
This unit’s REAR OUT is for connection of a
display to enable passengers in the rear seats to
watch the DVD or TV.
❒ The map screen navigation images output to
the rear display differ from standard NTSC
format images. Therefore, their quality will be
inferior to the images that appear on the front
display.
• NEVER install the rear display in a
location that enables the driver to watch
the DVD or TV while driving.
To avoid battery exhaustion
Be sure to run the vehicle engine while using this
unit. Using this unit without running the engine
can result in battery drainage.
• Do not use with vehicles that do not
feature an ACC position.
About Rear View Camera
• With an optional rear view camera, you are
able to use this product as an aid to keep an
eye on trailers, or backing into a tight parking
spot.
• SCREEN IMAGE MAY APPEAR
REVERSED.
• USE INPUT ONLY FOR REVERSE OR
MIRROR IMAGE REAR VIEW CAMERA.
OTHER USE MAY RESULT IN INJURY
OR DAMAGE.
➲ Day/Night Display ➞ Operation Manual
5
MAN-AVIC-X1-EN HW.book Page 6 Friday, January 16, 2004 11:41 AM
About Dolby Digital/DTS sounds
• The rear view camera function is to use
this product as an aid to keep an eye on
trailers, or backing into a tight parking
spot. Do not use this function for
entertainment purposes.
• Please note that the edges of the rear view
camera images may differ slightly
according to whether full screen images
are displayed when backing, and whether
the images are used for checking the rear
when the vehicle is moving forward.
Update DVD
• Updated Navigation DVDs are available for
purchase from your local Pioneer dealer that
includes the most current map and point of
interest information. Contact your local
Pioneer dealer for details.
Playable discs
About DVD-video and CD
DVD and CD discs that display the logos shown
below can be played back on this built-in DVD
drive.
DVD video
CD
❒ It is not possible to play back DVD audio
discs. This DVD drive may not be able to play
discs bearing the marks shown above.
About DVD map disc
You can use discs intended for this product. Use
only discs approved by Pioneer.
➲ For details on other discs ➞ Page 20
6
The AVIC-X1 will down-mix Dolby Digital signals
internally and the sound will be output by the
stereo. (Equipped with optical output for future
extension.)
❒ Manufactured under licence from Dolby
Laboratories. “Dolby” and the double-D
symbol are trademarks of Dolby Laboratories.
❒ Only digital output of DTS audio is possible. If
navigation unit’s optical digital outputs are
not connected. DTS audio will not be output,
so select an audio setting other than DTS.
DVD video disc region numbers
DVD video discs that have incompatible region
numbers cannot be played on this DVD drive. The
region number of the player can be found on the
bottom of this unit.
The illustration below shows the regions and
corresponding region numbers.
MAN-AVIC-X1-EN HW.book Page 7 Friday, January 16, 2004 11:41 AM
Features (Characteristics of this
hardware)
Touch panel key operation
It is possible to operate this unit by using touch
panel keys.
Built-in Navigation system
You can use DVD map discs that are compatible
with Pioneer navigation systems.
Memory navigation
The navigation system can memorise a certain
amount of information up to the set destination.
The navigation system continues to operate even
when you remove the map disc, allowing you to
play a CD or DVD while using the navigation. (If
the destination is particularly distant, you may
need to set the map disc again.)
DVD video playback
It is possible to play back DVD video, DVD-R
(video mode) and DVD-RW (video mode).
Remember that use of this system for
commercial or public viewing purposes may
constitute an infringement on the author’s rights
protected by the Copyright Law.
CD playback
Music CD/CD-R/CD-RW playback is possible.
MP3 file playback
It is possible to play back MP3 files recorded on
CD-ROM/CD-R/CD-RW (ISO9660 Level 1/Level 2
standard recordings).
• Supply of this product only conveys a licence
for private, non-commercial use and does not
convey a licence nor imply any right to use this
product in any commercial (i.e. revenuegenerating) real time broadcasting (terrestrial,
satellite, cable and/or any other media),
broadcasting/streaming via internet, intranets
and/or other networks or in other electronic
content distribution systems, such as payaudio or audio-on-demand applications. An
independent licence for such use is required.
For details, please visit
http://www.mp3licensing.com.
video system or else images will not be correctly
reproduced.
Multi-aspect
Switching between wide screen, letter box and
panscan display is possible.
Multi-audio, Multi-subtitle, and Multiangle
You can switch between multiple audio systems,
subtitle languages, and multiple viewing angles
of a scene recorded on a DVD as desired.
❒ This product incorporates copyright
protection technology that is protected by
method claims of certain U.S. patents and
other intellectual property rights owned by
Macrovision Corporation and other rights
owners. Use of this copyright protection
technology must be authorised by
Macrovision Corporation, and is intended for
home and other limited viewing uses only
unless otherwise authorised by Macrovision
Corporation. Reverse engineering or
disassembly is prohibited.
Rear entertainment
By setting the DVD video, etc. in the built-in DVD
drive, you can output images and sounds from
the DVD drive to the rear display even when the
screen of this unit is displaying navigation.
Rear view camera ready
You can display what is behind the vehicle to
connect a rear view camera.
➲ “About Rear View Camera” ➞ Page 5
NTSC/PAL compatibility
This unit is NTSC/PAL system compatible. When
connecting other components to this unit, be
sure components are compatible with the same
7
MAN-AVIC-X1-EN HW.book Page 8 Friday, January 16, 2004 11:41 AM
To protect the LCD screen
❒ Do not allow direct sunlight to fall on the
display when this unit is not being used.
Extended exposure to direct sunlight can
result in LCD screen malfunction due to the
resulting high temperatures.
❒ When using a portable phone, keep the aerial
of the portable phone away from the display to
prevent disruption of the video by the
appearance of spots, coloured stripes, etc.
What the marks on DVDs
indicate
The marks below may be found on DVD disc
labels and packages. They indicate the type of
images and audio recorded on the disc, and the
functions you can use.
Mark
Indicates the number of subtitle
languages.
❒ Never touch the screen with anything besides
your finger when operating the Touch Panel
functions. The screen can scratch easily.
Indicates the number of viewing angles.
Indicates the picture size (aspect ratio:
screen width-to-height ratio) type.
Indicates the number of the region
where playback is possible.
For viewing LCD comfortably
Due to its construction, the view angle of the LCD
screen is limited. The viewing angle (vertical and
horizontal) can be increased, however, by using
BRIGHT to adjust the black density of the video.
When using for the first time, adjust the black
density in accordance with the viewing angle
(vertical and horizontal) to adjust for clear
viewing. DIMMER can also be used to adjust the
brightness of the LCD screen itself to suit your
personal preference.
Condition memory
This function memorizes audio language, subtitle
language, angle number and aspect ratio made
during disc playback for up to 30 discs. Without
any special operations, the final setting details
during playback of a disc are memorised. The
next time a disc is played, the previous settings
are automatically applied.
❒ With some discs, audio language and subtitle
language are automatically specified, in
which case condition memory does not
function.
❒ When the number of discs exceeds 30,
settings for the latest disc replace those for
the least recent disc.
8
Meaning
Indicates the number of audio systems.
When an operation is prohibited
When you are watching a DVD and attempt to
perform an operation, sometimes it may not be
performed because of the programming on the
disc. When this happens, this unit indicates the
icon
on the screen.
❒ The icon
may not appear in certain discs.
MAN-AVIC-X1-EN HW.book Page 9 Friday, January 16, 2004 11:41 AM
Resetting the microprocessor
• Pressing the RESET button deletes the
contents of the product’s memory. For
details, see section “About the Data being
Deleted” of the Operation Manual.
Pressing RESET button lets you reset the
microprocessor to its initial settings without
changing the condition memory.
The microprocessor must be reset under the
following conditions:
• Prior to using this unit for the first time after
installation.
• If the unit fails to operate properly.
• If there appear to be problems with the
operation of the system.
• When changing the combination of the
equipment.
• When adding/removing additional products
that attach to the unit.
• When the display and the Hide-away units are
re-connected.
1
Turn the ignition switch OFF.
2
Press RESET button with a pen tip or
other pointed instrument.
RESET button
❒ If you have connected other equipment (for
example, a TV tuner) to this by cable, be sure
to reset that equipment too.
❒ After completing connections or when you
want to erase all memorised settings or return
the unit to its initial (factory) settings, switch
your engine ON or set the ignition switch to
ACC ON before pressing RESET button.
9
MAN-AVIC-X1-EN HW.book Page 10 Friday, January 16, 2004 11:41 AM
10
MAN-AVIC-X1-EN HW.book Page 11 Friday, January 16, 2004 11:41 AM
Chapter 1
How to Use Navigation Unit and Names of the Parts
Chapter 1
Display unit
How to Use Navigation Unit and Names of the Parts
(1) DISP button
Press to select different displays.
Press this button and hold to display radio text
when the source is RADIO.
(3) Sub display
Current time or the information of the audio
source currently playing is displayed when the
LCD panel is closed.
(2) TA/NEWS button
Press to turn traffic announcements function on
or off. Press and hold to turn NEWS function on
or off.
(4) Ambient light sensor
Senses ambient light. This system automatically
adjusts the brightness of the display to
compensate for ambient light.
11
How to Use Navigation Unit and Names of the Parts
Chapter 1
MAN-AVIC-X1-EN HW.book Page 12 Friday, January 16, 2004 11:41 AM
(5) FLIP DOWN/CLOCK button
Press to turn the LCD panel horizontal
temporarily when the LCD panel is upright.
Press to turn the clock of the sub display on or off
when the LCD panel is closed.
(17) WIDE button
Press to select a desired mode for enlarging a 4:3
picture to a 16:9 one.
Press and hold to enter the PICTURE ADJUST
mode.
(6) OPEN/CLOSE button
Press to open or close the LCD panel.
(18) REAR button
Press to output to the REAR OUT terminal the
sound and images of a disc inserted in the builtin DVD drive that is different the currently
selected source.
(7) NAVI/AV button
Use to switch between Navigation map displays
and audio operation displays.
(8) POS button
Press to view the map or return to guidance.
Also, when the map is scrolling, pressing this
button returns you to the display of the map of
your surroundings.
Use to switch the view mode of the navigation
when the map of your surroundings is displayed.
(9) NAVI MENU button
Press to display a menu of Navigation.
(10) RESET button
Press to return to the factory settings (initial
settings).
➲ Resetting the microprocessor ➞ Page 9
(11) DETACH button
Press to remove the front panel from the display
unit.
(12) Joystick
Move to do manual seek tuning, fast forward,
reverse and track search controls. Push to
display A.MENU.
(13) EQ button
Press to select various equalizer curves.
(14) EJECT button
Press to eject a disc from this unit.
(15) BAND button
Radio:
Press to select among three FM and MW/LW
bands.
Built-in DVD drive:
When playing back a disc containing an MP3 file
and audio data (CD-DA), pressing this button
switches playback between the MP3 file and CDDA. Touch and hold this button when a disc
containing an MP3 file is inserted returns you to
the root folder.
(16) ANGLE (+/–) button
Press to change the LCD panel angle.
12
(19) ENT button
Press to switch between the background
displays.
(20) Disc loading slot
Insert a disc to play.
(21) SRC (SOURCE) button
This unit is turned on by selecting a source. Press
to cycle through all of the available sources.
Press and hold to turn the source off.
(22) VOLUME/ATT button
Rotate to increase or decrease the volume. Press
to quickly lower the volume level, by about 90%.
Press once more to return to the original volume
level.
(23) LCD panel
(24) LCD screen
MAN-AVIC-X1-EN HW.book Page 13 Friday, January 16, 2004 11:41 AM
Turning the unit on and
selecting a source
Turn the ignition switch (ACC) ON.
The product’s power supply comes on.
2
Press SRC button to select a source.
Press SRC button repeatedly to switch
between the following sources:
DAB (digital audio broadcasting) – RADIO
(tuner) – TV (television) – AV (video input) –
DISC [CD, MP3, CD/MP3] (built-in DVD drive)
– S-DVD (DVD player/multi-DVD player) –
M-CD (multi-CD player) – EXT-1 (external
unit 1) – EXT-2 (external unit 2) – AUX
(Auxiliary equipment)
❒ Press and hold to turn the source off.
❒ In the following cases, the sound source will
not change to them:
– When a unit corresponding to each source
is not connected to this unit.
– When no disc (DVD-video, CD) is set in this
unit.
– When no disc is set in the DVD-player (SDVD).
– When no magazine is set in the multi-CD
player.
– When no magazine is set in the multi-DVD
player.
– When the AUX (auxiliary input) is set to off
(refer to Operation Manual).
– When the AV (video input) is not set to
VIDEO (refer to Operation Manual).
13
How to Use Navigation Unit and Names of the Parts
1
❒ When this unit’s blue lead is connected to the
vehicle’s auto-aerial relay control terminal, the
vehicle’s aerial extends when ACC (ignition) is
turned on and attach the front panel. To
retract the antenna, detach the front panel.
The vehicle’s aerial extends regardless of
turning this unit’s source on or off.
Chapter 1
• If the program is not installed, see
“Operation Manual” and install the
program.
❒ External unit refers to a Pioneer product (such
as one available in the future) that, although
incompatible as a source, enables control of
basic functions by this unit. Two external units
can be controlled by this unit. When two
external units are connected, the allocation of
them to external unit 1 or external unit 2 is
automatically set by this unit.
How to Use Navigation Unit and Names of the Parts
Chapter 1
MAN-AVIC-X1-EN HW.book Page 14 Friday, January 16, 2004 11:41 AM
Loading a disc
Adjusting the volume
• Insert a disc into the disc loading slot.
Format reading will start.
For DVD-video, CD
❒ DISC AUTO is off in the default setting.
➲ DISC AUTO ➞ Operation Manual
❒ When a disc is already loaded in this unit,
select the source by pressing SRC button.
❒ To eject a disc, press EJECT button.
For the map disc
❒ Inserting the disc starts DVD navigation
mode.
❒ Removing the disc sets Memory navi
mode.
• Use VOLUME to adjust the audio sound
level.
With this product, rotate VOLUME to
increase or decrease the volume.
❒ To adjust the navigation volume, go to the
navigation menu.
➲ Navigation volume adjustment ➞
Operation Manual
❒ You can use NAVI/AV button to switch
between navigation map displays and audio
operation displays.
❒ The DVD drive plays one, standard, 12-cm or
8-cm (single) disc at a time. Do not use an
adapter when playing 8-cm discs.
❒ Do not insert anything other than a disc into
the disc loading slot.
➲ Playable discs ➞ Page 6
❒ If you cannot insert a disc completely or if
after you insert a disc the disc is not
recognised, check that the label side of the
disc is up. Press EJECT button to eject the
disc, and check the disc for damage before
inserting the disc again.
❒ If the DVD drive does not operate properly, an
error message such as ERROR-11 may be
displayed.
➲ Error messages ➞ Operation Manual
Turning the source off
• Press SRC button and hold until the
source turns off.
❒ This product can be switched off by
turning the ACC (ignition) OFF or
detaching the front panel.
Using the REAR button
You can output the sound and video of the disc in
the built-in DVD drive to the rear display
regardless of whether DVD drive is selected as
the source or not (REAR ON mode).
• When you have turned the REAR ON mode
on by pressing REAR button, you cannot
turn it off even if you press SRC button
and hold. In this case, press REAR button
to turn the REAR ON mode off.
• Press REAR button to turn the REAR ON
mode.
The sound and video are outputted to the rear
display and the illumination colour of REAR
button changes to different colour.
❒ To turn the REAR ON mode off, press
REAR button again.
❒ When a CD or CD-ROM is inserted, sound
only is output to the rear display.
➲ Selecting the video of rear display ➞
Operation Manual
14
MAN-AVIC-X1-EN HW.book Page 15 Friday, January 16, 2004 11:41 AM
Opening and closing the LCD
panel
• Do not close the LCD panel with hands by
force. That cause malfunction.
➲ Setting close/open function ➞ Operation
Manual
• The automatic close/open function will operate
the display as follows.
– When the ignition switch is turned OFF
while the LCD panel is open, the LCD panel
will close after six seconds.
– When the ignition switch is turned ON again
(or turned to ACC), the LCD panel will open
automatically.
– Removing or attaching the front panel will
automatically close or open the LCD panel.
➲ Removing the front panel ➞ Page 17
• When the ignition switch is turned OFF after
the LCD panel has been closed, turning the
ignition switch ON again (or turning it to ACC)
will not open the LCD panel. In this case, press
OPEN/CLOSE button to open the LCD panel.
• When closing the LCD panel, check to make
sure that it has closed completely. If the LCD
panel has stopped halfway, leaving it like this
could result in damage.
❒ The adjusted the LCD panel angle will be
memorised and the LCD panel will
automatically return to this angle the next
time the LCD panel is opened.
Turning the LCD panel
horizontal
When the LCD panel is upright and it hinders the
operation of the air conditioner, the position of
the panel can be turned horizontal temporarily.
• Press FLIP DOWN/CLOCK button to turn
the LCD panel horizontal.
❒ To return to original position, press FLIP
DOWN/CLOCK button again.
❒ The LCD panel returns to the original
position automatically with beep sounds
10 seconds after operation.
• Press OPEN/CLOSE button to open the
LCD panel.
❒ To close the LCD panel, press OPEN/
CLOSE button again.
Adjusting the LCD panel angle
Important:
• If you can hear the LCD panel knocking against
your vehicle’s console or dashboard, press
ANGLE (–) button to move the LCD panel a
little forward.
• When adjusting the LCD panel angle, be sure
to press ANGLE (+/–) button. Forcibly
adjusting the LCD panel by hand may damage
it.
15
How to Use Navigation Unit and Names of the Parts
The LCD panel will be opened or closed
automatically with the turning of the ignition
switch on or off. You can turn off the automatic
close/open function.
Chapter 1
• Press ANGLE (+/–) button to adjust the
LCD panel to an easily viewable angle.
The LCD panel angle continues changing as
long as you press ANGLE (+/–) button and
hold.
MAN-AVIC-X1-EN HW.book Page 16 Friday, January 16, 2004 11:41 AM
How to Use Navigation Unit and Names of the Parts
Chapter 1
Changing the wide screen mode
• Press WIDE button to select the desired
setting.
Press WIDE button repeatedly to switch
between the following settings:
FULL (full) – JUST (just) – CINEMA
(cinema) – ZOOM (zoom) – NORMAL
(normal)
❒ The navigation map and the rear view camera
picture is always FULL.
Operating the picture
adjustment
1
Press WIDE button and hold to display
PICTURE ADJUST.
BRIGHT – Adjust the black intensity
CONTRAST – Adjust the contrast
COLOR – Adjust the colour saturation
HUE – Adjust the tone of colour (red is
emphasised or green is emphasised)
DIMMER – Adjust the brightness of display
BACK-CAMERA – Switch to the picture
adjustment display for the rear view camera
❒ Touching “SOURCE” (or “NAVI”) while
adjusting the rear view camera image
returns you to the previous screen. (Except
when the vehicle’s gearstick is in reverse
[R].)
❒ The adjustments of BRIGHT and
CONTRAST are stored separately for
light ambient (daytime) and dark ambient
(nighttime). A sun
or moon
is
displayed to the left of BRIGHT and
CONTRAST, respectively, as the ambient
light sensor determines brightness or
darkness.
❒ You cannot adjust HUE for PAL video.
❒ You cannot adjust COLOR and HUE for
the source without a video and navigation
map display.
❒ You can adjust the picture adjustment for
the rear view camera only when CAMERA
in SETUP menu is turned on.
➲ Setting for rear view camera ➞ Operation
Manual
❒ The picture adjustment may not be able to
be used with some rear view cameras.
❒ The same setting is selected for the normal
background picture and the navigation
map display.
2
Touch “+” or “–” to adjust the selected
item.
Each time you touch “+” or “–” increases or
decreases the level of selected item.
+24 – –24 is displayed as the level is
increased or decreased.
FULL (full)
A 4:3 picture is enlarged in the horizontal
direction only, enabling you to enjoy a 4:3 TV
picture (normal picture) without any omissions.
JUST (just)
The picture is enlarged slightly at the centre and
the amount of enlargement increases
horizontally toward the ends of the picture,
enabling you to enjoy a 4:3 picture without
sensing any disparity even on a wide screen.
CINEMA (cinema)
A picture is enlarged by the same proportion as
FULL or ZOOM in the horizontal direction and
by an intermediate proportion between FULL and
ZOOM in the vertical direction; ideal for a
cinema-sized picture (wide screen picture) where
captions lie outside.
ZOOM (zoom)
A 4:3 picture is enlarged in the same proportion
both vertically and horizontally; ideal for a
cinema-sized picture (wide screen picture).
NORMAL (normal)
A 4:3 picture is displayed as it is, giving you no
sense of disparity since its proportions are the
same as that of the normal picture.
❒ Different settings can be memorised for each
video source.
❒ When video is viewed in a wide screen mode
that does not match its original aspect ratio, it
may appear differently.
❒ Remember that use of this system for
commercial or public viewing purposes may
constitute an infringement on the author’s
rights protected by the Copyright Law.
❒ Video will appear grainy when viewed in
CINEMA or ZOOM mode.
16
MAN-AVIC-X1-EN HW.book Page 17 Friday, January 16, 2004 11:41 AM
3
Touch “ESC” to hide the touch panel
keys.
Adjusting the dimmer
Press WIDE button and hold to display
PICTURE ADJUST.
❒ The ambient light level icon used as the
standard for adjusting DIMMER appears
above the level bar.
❒ The icons indicating the current ambient
brightness used for adjusting BRIGHT
and CONTRAST may differ from
DIMMER slightly.
• Yellow sun
– bright ambient light
(daytime)
• Red sun
– intermediate brightness
(evening)
• Blue moon
– dark ambient light
(nighttime)
2
Touch 2 or 3 to adjust the brightness.
The level indicates the brightness of the
screen being adjusted. The further the level
indicator moves to the right, the brighter the
screen.
3
Touch “ESC” to hide the touch panel
keys.
❒ Because of the LCD screen
characteristics, you may not be able to
adjust the screen at low temperatures.
Important:
• Never use force or grip the display and the
buttons tightly when removing or attaching.
• Avoid subjecting the front panel to excessive
shocks.
• Keep the front panel out of direct sunlight and
high temperatures.
• After detached the front panel, keep it in the
safe place not to result in scratching or
damage.
Removing the front panel
1
Press DETACH button to remove the front
panel.
2
Gently grip the right side of the front
panel and slowly pull it outward.
Take care not to drop the front panel and
protect it from contact with water or other
fluids to prevent permanent damage.
Attaching the front panel
• Replace the front panel by holding it
upright to this unit and clipping it
securely into the mounting hooks.
17
How to Use Navigation Unit and Names of the Parts
1
The front panel can be detached from the display
unit to discourage theft, as described below.
Chapter 1
The DIMMER adjustments for daytime, evening,
and nighttime ambient light are stored
separately. The brightness of the LCD screen
adjusts automatically to the optimum level in
accordance with the ambient light based on the
set values.
Protecting your unit from theft
How to Use Navigation Unit and Names of the Parts
Chapter 1
MAN-AVIC-X1-EN HW.book Page 18 Friday, January 16, 2004 11:41 AM
18
MAN-AVIC-X1-EN HW.book Page 19 Friday, January 16, 2004 11:41 AM
Appendix
Troubleshooting
➲ About troubleshooting other than description
below ➞ Appendix of the Operation Manual
Symptom
There’s no picture.
Cause
The handbrake cord is not connected.
The handbrake is not applied.
Nothing is displayed
and the touch panel
keys cannot use.
LCD Panel knocking
against your vehicle’s
console or dashboard.
Video image appears
grainy.
The operation is prohibited for the disc.
The operation is not compatible with the
disc’s organization.
Appendix
The icon
is
displayed, and
operation is not
possible.
The picture stops
(pauses) and the unit
cannot be operated.
The picture is
stretched, the aspect is
incorrect.
Rear display picture
disappears.
Action (See)
Connect a handbrake cord, and apply the
handbrake.
Connect a handbrake cord, and apply the
handbrake.
This operation is not possible.
This operation is not possible.
Reading of data has become impossible
during playback.
After pressing 7 once, start playback once
more.
The aspect setting is incorrect for the
display.
Select the appropriate setting for your
display. (Page 16)
• The source disc being listened to with the
product has been ejected.
• The REAR button was pressed and REAR
ON mode switched off.
• There was a problem with the rear display
or a faulty wiring connection, for example.
• Rear View is selected on the screen.
• When the gearstick is in [R], displays rear
view camera images. (When “NAVI” is
selected in REAR DISP menu.)
The setting for the rear view camera is
incorrect.
The gearstick was placed in [R] when the
rear view camera was not connected.
• Before ejecting the disc, switch the
source. This problem may occur when
certain connection methods are used.
• Press the REAR button to turn REAR ON
mode on.
• Check the rear display and its connection.
• Select view mode other than Rear View.
• Move the gearstick other than turn [R]
position. (Select SOURCE in REAR DISP
menu.)
Connect a rear view camera correctly.
Press NAVI/AV button to return to the
source display and then select the correct
setting for CAMERA.
➲ About CAMERA setting ➞ Operation
Manual
Press ANGLE (+/–) to adjust the LCD
angle. Forcibly adjusting the LCD panel by
hand may damage it.
Select a different mode to view videos.
Incorrect setting of angle.
This happens when videos are viewed in
CINEMA or ZOOM mode.
19
Appendix
MAN-AVIC-X1-EN HW.book Page 20 Friday, January 16, 2004 11:41 AM
Error messages
Handling and Care of the Disc
➲ About error messages ➞ Appendix of the
Operation Manual
Some basic precautions are necessary when
handling your discs.
Vehicles that Cannot Obtain
Speed Pulse Data
Navigation map discs
The speed pulse data comes from the speed
sensing circuit. The location of this speed
sensing circuit depends on your vehicle model. In
some cases, it is impossible to make a
connection to it, and in such a case we
recommend that the ND-PG1 speed pulse
generator (sold separately) be used.
• Be sure to connect the speed pulse lead. If
not, vehicle location error will increase.
• Do not use discs other than those intended for
this product. Use only discs approved by
Pioneer.
➲ For suitable discs ➞ Page 6
❒ If you wish to use other navigation discs,
first check that they are compatible with
this equipment and approved by Pioneer.
DVD drive and care
• Use only normal, round discs. If you insert
irregular, non-round, shaped discs they may
jam in the DVD drive or not play properly.
Conditions Likely to Cause
Noticeable Positioning Errors
For various reasons such as the state of the road
you are travelling on and the state of reception of
the GPS signal, the actual position of your vehicle
may differ from the position displayed on the map
screen.
Some types of vehicle may not output a speed
signal while driving at just a few kilometres per
hour. In such a case, the current location of your
vehicle may not be displayed correctly while in a
traffic jam or in a car park.
• The current vehicle position cannot be
displayed exactly under all conditions, due to
variations in satellite reception, road
conditions, the vehicle’s condition, and any
objects in contact with the aerial.
• Also, GPS reception may be unavailable during
certain weather conditions, when driving in
tunnels or garages, or when signal
interference may occur such as when driving
between tall buildings or near large vehicles.
20
• Check all discs for cracks, scratches or
warping before playing. Discs that have cracks,
scratches or are warped may not play properly.
Do not use such discs.
• Avoid touching the recorded (non-printed side)
surface when handling the disc.
• Store discs in their cases when not in use.
• Keep discs out of direct sunlight and do not
expose the discs to high temperatures.
• Do not attach labels, write on or apply
chemicals to the surface of the discs.
• To clean dirt from a disc, wipe the disc with a
soft cloth outward from the centre of the disc.
• If the heater is used in cold weather,
condensation may form on components inside
the DVD drive. Condensation may cause the
DVD drive to not operate properly. If you think
that condensation is a problem turn off the
DVD drive for an hour or so to allow the DVD
drive to dry out and wipe any damp discs with a
soft cloth to remove the moisture.
• Road shocks may interrupt disc playback.
MAN-AVIC-X1-EN HW.book Page 21 Friday, January 16, 2004 11:41 AM
DVD discs
CD-R/CD-RW discs
• When CD-R/CD-RW discs are used, playback
is possible only for discs which have been
finalised.
• It may not be possible to playback CD-R/CDRW discs recorded on a music CD recorder or
a personal computer because of disc
characteristics, scratches or dirt on the disc,
or dirt, condensation, etc. on the lens of this
unit.
• Playback of discs recorded on a personal
computer may not be possible depending on
the application settings and the environment.
Please record with the correct format. (For
details, contact the manufacturer of the
application.)
• Playback of CD-R/CD-RW discs may become
impossible in case of direct exposure to
sunlight, high temperatures, or the storage
conditions in the vehicle.
MP3 files
• MP3 is short for MPEG Audio Layer 3 and
refers to an audio compression technology
standard.
• This unit allows playback of MP3 files on CDROM, CD-R and CD-RW discs. Disc recordings
compatible with level 1 and level 2 of ISO9660
and with the Romeo and Juliet file system can
be played back.
• It is possible to play back multi-session
compatible recorded discs.
• MP3 files are not compatible with packet write
data transfer.
• The max. number of characters which can be
displayed for a file name, including the
extension (.mp3), is 30 characters from the first
character.
• The max. number of characters which can be
displayed for a folder name is 30 characters.
• In case of files recorded according to the
Romeo and Juliet file system, only the first 30
characters can be displayed. Depending on the
width of the characters, the screen may not be
able to display 30 characters.
• When playing discs with MP3 files and audio
data (CD-DA) such as CD-EXTRA and MIXEDMODE CDs, both types can be played only by
switching mode between MP3 and CD-DA.
• The folder selection sequence for playback and
other operations becomes the writing
sequence used by the writing software. For this
reason, the expected sequence at the time of
playback may not coincide with the actual
playback sequence. However, there also is
some writing software which permits setting of
the playback order.
• Files are compatible with the ID3 Tag Ver. 1.0
and Ver. 1.1 formats for display of album (disc
title), track (track title) and artist (track artist).
• Only when MP3 files of 32 kHz, 44.1 kHz and
48 kHz frequencies are played back, the
emphasis function is valid. (16 kHz, 22.05 kHz,
24 kHz, 32 kHz, 44.1 kHz, 48 kHz sampling
frequencies can be played back.)
21
Appendix
• With some DVD video discs, it may not be
possible to use certain functions.
• It may not be possible to play back some DVD
video discs.
• When DVD-R/DVD-RW discs are used,
playback is possible only for discs which have
been finalized.
• When DVD-R/DVD-RW discs are used,
playback is possible only for discs which have
been recorded with the Video format (video
mode). It is not possible to play back DVD-RW
discs which have been recorded with the Video
Recording format (VR mode).
• It may not be possible to play back DVD-R/
DVD-RW discs which have been recorded with
the Video format (video mode), because of disc
characteristics, scratches or dirt on the disc,
or dirt, condensation, etc. on the lens of this
unit.
• It is not possible to play back DVD-ROM discs
other than Pioneer DVD map disc or DVD-RAM
discs.
• Playback of discs recorded on a personal
computer may not be possible depending on
the application settings and the environment.
Please record with the correct format. (For
details, contact the manufacturer of the
application.)
• Titles and other text information recorded on a
CD-R/CD-RW disc may not be displayed by this
unit (in the case of audio data (CD-DA)).
• If you insert a CD-RW disc into this unit, time
to playback will be longer than when you insert
a conventional CD or CD-R disc.
• Read the precautions with CD-R/CD-RW discs
before using them.
MAN-AVIC-X1-EN HW.book Page 22 Friday, January 16, 2004 11:41 AM
Appendix
• There is no m3u playlist compatibility.
• There is no compatibility with the MP3i (MP3
interactive) or mp3 PRO format.
• The sound quality of MP3 files generally
becomes better with increasing bit rate. This
unit can play recordings with bit rates from 8
kbps to 320 kbps, but in order to be able to
enjoy a certain sound quality, it is
recommended to use only discs recorded with
a bit rate of at least 128 kbps.
About folders and MP3 files
• An outline of a CD-ROM with MP3 files on it is
shown below. Subfolders are shown as folders
in the folder currently selected.
Important:
• When naming an MP3 file, add the
corresponding filename extension (.mp3).
• This unit plays back files with the filename
extension (.mp3) as MP3 files. To prevent noise
and malfunctions, do not use this extension for
files other than MP3 files.
1
2
3
q First level
w Second level
e Third level
Notes:
• This unit assigns folder numbers. The user can
not assign folder numbers.
• If you are using a folder that does not contain
an MP3 file, the folder itself will display but you
will not be able to see any files in the folder.
• MP3 files in up to 8 tiers of folders can be
played back. However, there is a delay in the
start of playback on discs with numerous tiers.
For this reason we recommend creating discs
with no more than 2 tiers.
• It is possible to play back up to 253 items from
a folder on a single disc.
22
MAN-AVIC-X1-EN HW.book Page 23 Friday, January 16, 2004 11:41 AM
Ambient conditions for playing
disc
• At extremely high temperatures, a temperature
cutout protects this product by switching it off
automatically.
• Despite our careful design of the product, as a
result of mechanical wear, ambient conditions
for use, or handling of the disc, small
scratches that do not affect actual operation
may appear on the disc surface. This is not a
sign of the malfunction of this product.
Consider it to be normal wear and tear.
Using the display correctly
Handling the display unit
• When the LCD panel is subjected to direct
sunlight for a long period of time, it will
become very hot resulting in possible damage
to the LCD screen. When not using this unit,
close the LCD panel and avoid exposing it to
direct sunlight as much as possible.
• The display unit should be used within the
temperature ranges shown below.
• Be careful of fingers, long hair, and loose
articles of clothing which could possibly
get caught between the LCD panel and the
main body and cause serious injury.
Liquid crystal display (LCD)
screen
• If the LCD panel is near the vent of an air
conditioner when it is opened, make sure that
air from the air conditioner is not blowing on it.
Heat from the heater may break the LCD
screen, and cool air from the cooler may cause
moisture to form inside the display unit
resulting in possible damage. Also, if the LCD
panel is cooled down by the cooler, the LCD
screen may become dark, or the life span of
the small fluorescent tube used inside the LCD
panel may be shortened.
• Small black dots or white dots (bright dots)
may appear on the LCD screen. These are due
to the characteristics of the LCD screen and do
not indicate a problem with the display unit.
23
Appendix
• If liquid or foreign matter should get inside
this product, turn off the power
immediately and consult your dealer or the
nearest authorised PIONEER Service
Station. Do not use the product in this
condition because doing so may result in a
fire, electric shock, or other failure.
• If you notice smoke, a strange noise or
smell from the display unit, or any other
abnormal signs on the LCD screen or Sub
display, turn off the power immediately
and consult your dealer or the nearest
authorised PIONEER Service Station.
Using this product in this condition may
result in permanent damage to the system.
• Do not disassemble or modify this
product, as there are high-voltage
components inside which may cause an
electric shock. Be sure to consult your
dealer or the nearest authorised PIONEER
Service Station for internal inspection,
adjustments or repairs.
• Operating temperature range: –10 to +50 °C
• Storage temperature range: –20 to +80 °C
• Do not use the display unit at temperatures
higher or lower than the operating temperature
range because the display unit may not
operate normally and the display unit can be
damaged.
• The LCD screen is exposed in order to increase
its visibility within the vehicle. Please do not
press strongly on it as this may damage it.
• Do not place anything on the LCD panel when
it is deployed. Also, do not attempt to carry out
angle adjustment, or open/close the LCD panel
by hand. Applying strong force to the LCD
panel may damage it.
• Do not push the LCD screen with much force
as this may scratch it.
• Never touch the LCD screen with anything
besides your finger when operating the Touch
Panel functions. The LCD screen can scratch
easily.
• Be careful not to place anything between the
LCD panel and the main body when the LCD
panel is opening or closing. If an object gets
between the LCD panel and main body, the
LCD panel may stop working.
MAN-AVIC-X1-EN HW.book Page 24 Friday, January 16, 2004 11:41 AM
• At low temperatures, the LCD screen may be
dark for a while after the power is turned on.
• The LCD screen will be difficult to see if it is
exposed to direct sunlight.
• When using a portable phone, keep the aerial
of the portable phone away from the display
unit to prevent disruption of the video by the
appearance of spots, coloured stripes, etc.
Appendix
Keeping the LCD screen in good
condition
• When removing dust from the LCD screen or
cleaning the LCD screen, first turn the system
power off, then wipe with the supplied cloth.
• When wiping the LCD screen, take care not to
scratch the surface. Do not use harsh or
abrasive chemical cleaners.
Small fluorescent tube
• A small fluorescent tube is used inside the
display to illuminate the LCD screen.
– The fluorescent tube should last for
approximately 10,000 hours, depending on
operating conditions. (Using the display unit
at low temperatures reduces the service life
of the fluorescent tube.)
– When the fluorescent tube reaches the end
of its useful life, the LCD screen will be dark
and the image will no longer be projected. If
this happens, consult your dealer or the
nearest authorised PIONEER Service
Station.
24
Glossary
➲ Glossary ➞ Appendix of the Operation Manual
MAN-AVIC-X1-EN HW.book Page 25 Friday, January 16, 2004 11:41 AM
Specifications
Navigation
GPS Receiver:
System .......................... L1, C/Acode GPS
SPS (Standard Positioning Service)
Reception system ........ 8-channel multi-channel
reception system
Reception frequency ... 1,575.42 MHz
Sensitivity ..................... –130 dbm
Position update frequency
................................... Approx. once per second
GPS aerial:
Aerial ............................ Micro strip flat aerial/righthanded helical polarization
Aerial cable .................. 5.0 m
Dimensions (W ✕ H ✕ D)
................................... 34 ✕ 13 ✕ 36 mm
Weight .......................... 105 g
Display
Screen size/aspect ratio...... 6.5 inch wide/16:9
(effective display area:
144 ✕ 76 mm)
Pixels .................................... 336,960 (1,440 ✕ 234)
Type....................................... TFT active matrix,
transmissive type
Colour system ...................... NTSC/PAL compatible
Operating temperature range
........................................... –10 – +50 °C
Storage temperature range
........................................... –20 – +80 °C
Angle adjustment ................ 50 – 110°
(initial settings: 110°)
25
Appendix
General
Rated power source ............ 14.4 V DC
(allowable voltage range:
12.0 – 14.4 V DC)
Earthing system................... Negative type
Max. current consumption
................................... 10.0 A
Display unit:
Dimensions (W ✕ H ✕ D):
DIN
Chassis ................. 178 ✕ 50 ✕ 160 mm
Nose...................... 188 ✕ 58 ✕ 34 mm
D
Chassis ................. 178 ✕ 50 ✕ 165 mm
Nose...................... 170 ✕ 46 ✕ 29 mm
Weight .......................... 2.5 kg
Hideaway unit:
Dimensions (W ✕ H ✕ D)
................................... 180 ✕ 30 ✕ 140 mm
Weight .......................... 0.7 kg
Audio
Maximum power output ..... 50 W ✕ 4
50 W ✕ 2 ch/4 $ + 70 W ✕ 1
ch/2 $ (for subwoofer)
Continuous power output... 27 W ✕ 4 (DIN 45324,
+B=14.4 V)
Load impedance.................. 4 $ (4 – 8 $ [2 $ for 1 ch]
allowable)
Preout max output level/output impedance
........................................... 1.0 V/100 ohm
Equalizer (3-Band Parametric Equalizer):
Low
Frequency............. 40/80/100/160 Hz
Q Factor................ 0.35/0.59/0.95/1.15 (+6 dB
when boosted)
Gain ...................... ±12dB
Mid
Frequency............. 200/500/1k/2k Hz
Q Factor................ 0.35/0.59/0.95/1.15 (+6 dB
when boosted)
Gain ...................... ±12dB
High
Frequency............. 3.15k/8k/10k/12.5k Hz
Q Factor................ 0.35/0.59/0.95/1.15 (+6 dB
when boosted)
Gain ...................... ±12dB
Loudness contour
Low ............................... +3.5 dB (100 Hz), +3 dB
(10 kHz)
Mid................................ +10 dB (100 Hz), +6.5 dB
(10 kHz)
High ...................... +11 dB (100 Hz), +11 dB
(10 kHz)
(volume: –30 dB)
Tone controls:
Bass
Frequency............. 40/63/100/160 Hz
Gain ...................... ±12dB
Treble
Frequency............. 2.5k/4k/6.3k/10k Hz
Gain ...................... ±12dB
HPF:
Frequency .................... 50/80/125 Hz
Slope............................. –12 dB/oct
Subwoofer:
Frequency .................... 50/80/125 Hz
Slope............................. –18 dB/oct
Gain .............................. ±12dB
Phase............................ Normal/Reverse
Appendix
MAN-AVIC-X1-EN HW.book Page 26 Friday, January 16, 2004 11:41 AM
DVD Drive
System .................................. DVD video, Compact disc
audio, MP3 system
Usable discs......................... DVD video, Compact disc,
MP3
Region number .................... 2
Signal format:
Sampling frequency .... 44.1/48/96 kHz
Number of quantization bits
................................... 16/20/24; linear
Frequency response ............ 5 – 44,000 Hz (with DVD, at
sampling frequency 96 kHz)
Signal-to-noise ratio ............ 97 dB (1 kHz) (IEC-A
network)
(CD: 96 dB (1 kHz) (IEC-A
network))
Dynamic range .................... 95 dB (1 kHz)
(CD: 94 dB (1 kHz))
Distortion.............................. 0.008 % (1 kHz)
Output level:
Video ............................. 1.0 Vp-p/75 $ (±0.2 V)
Audio............................. 1.0 V (1 kHz, 0 dB)
Number of channels............ 2 (stereo)
MP3 decoding format.......... MPEG-1 & 2 Audio Layer 3
FM tuner
Frequency range .................. 87.5 – 108.0 MHz
Usable sensitivity ................. 8 dBf (0.7 µV/75 $, mono, S/
N: 30 dB)
50 dB quieting sensitivity .... 10 dBf (0.9 µV/75 $, mono)
Signal-to-noise ratio ............ 75 dB (IEC-A network)
Distortion.............................. 0.3 % (at 65 dBf, 1 kHz,
stereo)
0.1 % (at 65 dBf, 1 kHz,
mono)
Frequency response ............ 30 – 15,000 Hz (±3 dB)
Stereo separation ................ 45 dB (at 65 dBf, 1 kHz)
Selectivity ............................. 80 dB (±200 kHz)
MW tuner
Frequency range .................. 531 – 1,602 kHz (9 kHz)
Usable sensitivity ................. 18 µV (S/N: 20 dB)
Signal-to-noise ratio ............ 65 dB (IEC-A network)
LW tuner
Frequency range .................. 153 – 281 kHz
Usable sensitivity ................. 30 µV (S/N: 20 dB)
Signal-to-noise ratio ............ 65 dB (IEC-A network)
Note:
• Specifications and the design are subject to
possible modifications without notice due to
improvements.
26
MAN-AVIC-X1-EN HW.book Page 27 Friday, January 16, 2004 11:41 AM
MAN-AVIC-X1-EN HW.book Page 28 Friday, January 16, 2004 11:41 AM
PIONEER CORPORATION
4-1, MEGURO 1-CHOME, MEGURO-KU, TOKYO 153-8654, JAPAN
PIONEER ELECTRONICS (USA) INC.
P.O. Box 1540, Long Beach, California 90801-1540, U.S.A.
TEL: (800) 421-1404
PIONEER EUROPE NV
Haven 1087, Keetberglaan 1, B-9120 Melsele, Belgium
TEL: (0) 3/570.05.11
PIONEER ELECTRONICS ASIACENTRE PTE. LTD.
253 Alexandra Road, #04-01, Singapore 159936
TEL: 65-472-1111
PIONEER ELECTRONICS AUSTRALIA PTY. LTD.
178-184 Boundary Road, Braeside, Victoria 3195, Australia
TEL: (03) 9586-6300
PIONEER ELECTRONICS OF CANADA, INC.
300 Allstate Parkway, Markham, Ontario L3R OP2, Canada
TEL: (905) 479-4411
PIONEER ELECTRONICS DE MEXICO, S.A. de C.V.
Blvd. Manuel Avila Camacho 138 10 piso
Col. Lomas de Chapultepec, Mexico, D.F. 11000
TEL: 55-9178-4270
Published by Pioneer Corporation.
Copyright © 2004 by Pioneer Corporation.
All rights reserved.
Printed in Belgium
MAN-AVIC-X1-EN HW