1
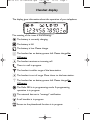
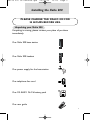
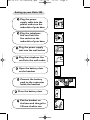
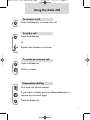
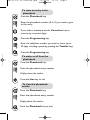
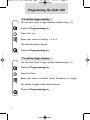
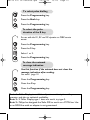
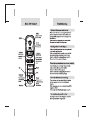
Xalio 200 UK refonte.qxd 25/02/03 13:18 Page 1 Handset display The display gives information about the operation of your telephone. The meaning of the icons is the following : The battery is currently charging. The battery is full. The battery is low. Please charge. The handset has no battery power left. Please charge for 24 hours. The handset receives an incoming call. There is a call in progress. The handset is within range of the base station. The handset is out of range. Move closer to the base station. The handset has no battery power left. Please charge for 24 hours. The Xalio 200 is in programming mode. A programming operation is in progress. The network has sent a message notification. A call transfer is in progress. Access to the phonebook function is in progress. 1 Xalio 200 UK refonte.qxd 25/02/03 13:18 Page 2 Contents Xalio 200 handset 11 12 Handset display 1 Environment & Safety Installing the Xalio 200 3 Troubleshooting Using the Xalio 200 5 To answer a call To end a call To make an external call Preparatory dialling To store an entry in the phonebook To make a call from the phonebook To view the phonebook entries To delete an entry To call the last number called (Redial) To call back last caller To transfer a call between two handsets (Xalio 200 Duo only) 5 5 5 5 6 6 6 7 7 7 7 Programming the Xalio 200 8 To set the ringer melody To set the ringer volume To change the earpiece volume To select Caller Display type To select tone dialling To select pulse dialling To select the pulse duration of the R key To clear the message network indication Notes 2 International guarantee 8 8 9 9 9 10 10 10 10 Xalio 200 UK refonte.qxd 25/02/03 13:18 Page 3 Installing the Xalio 200 PLEASE CHARGE THE XALIO 200 FOR 24 HOURS BEFORE USE. Unpacking your Xalio 200 If anything is missing, please contact your place of purchase immediately. One Xalio 200 base station One Xalio 200 handset DEF ABC GHI MNO JKL PQRS WXYZ TUV # R One power supply for the base station One telephone line cord One 2/3 AAX2 Ni-Cd battery pack PHILIPS 2,4 V One user guide ABC GHI JKL DEF MNO PQRS TUV 3 Xalio 200 UK refonte.qxd 25/02/03 13:18 Page 4 Setting up your Xalio 200 1 Plug the power supply cable into the power socket on the underside of your base. 2 Plug the telephone line cord into the line socket on the underside of your base. 1 2 3 3 Plug the power supply unit into the wall socket 4 Plug the telephone line cord into the wall socket 5 Open the battery door on the handset 4 5 6 Connect the battery pack to the connector inside the handset 6 PHILIPS 2,4 V PHILIPS 2,4 V 7 7 Close the battery door PHILIPS 2,4 V 8 4 Put the handset on the base and charge for 24 hours before use. 8 24 Xalio 200 UK refonte.qxd 25/02/03 13:18 Page 5 Using the Xalio 200 To answer a call Press the Line key to answer the call. To end a call Press the Line key. Or Replace the handset on the base To make an external call Press the Line key. ABC GHI PQRS JKL TUV DEF MNO WXYZ Dial the number Preparatory dialling ABC GHI PQRS JKL TUV DEF MNO WXYZ First enter the phone number. If you make a mistake press the Correction key to remove any incorrect digits. Press the Line key. 5 Xalio 200 UK refonte.qxd 25/02/03 13:18 Page 6 To store an entry in the phonebook Press the Phonebook key. ABC GHI JKL PQRS TUV DEF MNO WXYZ Enter the phonebook number (0 to 9) you want to give to this entry. If you make a mistake press the Correction key to remove any incorrect digits. Press the Programming key. R ABC GHI PQRS JKL TUV DEF MNO WXYZ Enter the telephone number you want to store (up to 23 digits, including a pause by pressing the Transfer key). Press the Programming key. R To make a call from the phonebook Press the Phonebook key. ABC GHI PQRS JKL TUV DEF MNO WXYZ Enter the phonebook entry number. Display shows the number. Press the Line key to call. To view the phonebook entries Press the Phonebook key. ABC GHI PQRS JKL TUV DEF MNO WXYZ Enter the phonebook entry number. Display shows the number. 6 Press the Phonebook key to exit. Xalio 200 UK refonte.qxd 25/02/03 13:18 Page 7 To delete an entry Press the Phonebook key. ABC GHI PQRS R JKL TUV DEF MNO WXYZ Enter the phonebook entry number you want to delete. Press the Programming key twice. To call the last number called (Redial) Press the Redial key. Display shows the number. Press the Line key. To call back last caller To use this function you must first subscribe to the Caller Display Service. (See note 1 page 11). Press the Redial key twice. Press the Line key. To transfer a call to the other handset (Xalio 200 Duo only) You can forward a call to the other handset. During a call : Press the Intercom key. Both handsets will ring. Press the Line key on the selected handset. 7 Xalio 200 UK refonte.qxd 25/02/03 13:18 Page 8 Programming the Xalio 200 To set the ringer melody You can choose from 3 ringer melodies (default setting = 2). Press the Programming key. R Press the 1 key. ABC GHI JKL PQRS TUV DEF MNO WXYZ Enter your choice of melody 1, 2 or 3. The selected melody is played. Press the Programming key. R To set the ringer volume You can choose from 3 ringer volumes (default setting = 2). Press the Programming key. R Press the 2 key. ABC ABC GHI JKL PQRS TUV DEF MNO WXYZ Enter your choice of volume 1(low), 2(medium) or 3 (high). The melody is played at the selected volume. Press the Programming key. R 8 Xalio 200 UK refonte.qxd 25/02/03 13:18 Page 9 To change the earpiece volume You can choose from 3 earpiece volume levels (default setting = 2). Press the Programming key. R Press the 3 key. DEF ABC GHI JKL PQRS TUV DEF MNO WXYZ Enter your choice of volume 1(low), 2(medium) or 3 (high). Press the Programming key. R To select Caller Display type You can choose from 2 types (default setting = 2). To use Caller Display you must first subscribe to the Service from the your Network operator. (See Note 1, 2 and 3 page 11). Press the Programming key. R Press the 0 key. ABC GHI JKL PQRS R TUV DEF MNO WXYZ Select 1 or 2. Press the Programming key. To select tone dialling Tone dialling is the default setting. R Press the Programming key. Press the Star key. R Press the Programming key. 9 Xalio 200 UK refonte.qxd 25/02/03 13:18 Page 10 To select pulse dialling Press the Programming key. R Press the Hash key. # Press the Programming key. R To select the pulse duration of the R key For use with the R1, R2 and R3 operator or PABX service access. Press the Programming key. R Press the 5 key. JKL ABC GHI JKL PQRS TUV R DEF MNO WXYZ Select 1 or 2. Press the Programming key. To clear the network message indication Use this function if the network does not clear the message indication after reading. See note 1 page 10. R GHI R Press the Programming key. Press the 4 key. Press the Programming key. Note 1 : Caller Display is available subject to a subscription with your operator, and also to technical availability. Note 2 : If Caller Display type 1 does not work, try type 2. Note 3 : Philips has designed the Xalio 200 to work on a PSTN line. Use on an ISDN line with an adapter is not guaranteed. 10 Xalio 200 UK refonte.qxd 25/02/03 13:18 Page 11 International Guarantee Dear Customer, Thank you for purchasing this Philips product which has been designed and manufactured to the highest quality standards. If, unfortunately, somethings should go wrong with this product Philips guarantees free of charge labour and replacement parts irrespective of the country where it is repaired during a period of 12 months from date of purchase (6 months for replacement/rechargeable batteries). This international Philips guarantee complements the existing national guarantee obligations to you of dealers and Philips in the country of purchase and does not affect your statutory rights a customer. The Philips guarantee applies provided the product is handled properly for its intended use, in accordance with its operating instructions and upon presentation of the original invoice or cash receipt, indicating the date of purchase, dealers name and model and production number of the product. The Philips guarantee may not apply if : l The documents have been altered in any way or made illegible ; l The model or production number on the product has been altered, deleted, removed or made illegible ; l Repairs or product modifications and alterations have been executed by unauthorised service organisations or person ; l Damage is caused by accidents including but not limited to lightning, water or fire, misuse or neglect. Please note that the product is not defective under this guarantee in the case where modifications become necessary in order for the product to comply with local or national technical standards which apply in countries for which the product was not originally designed and/or manufactured. Therefore always check whether a product can be used in a specific country. In case your Philips product is not working correctly or is defective, please return your phone to the place of purchase or the Philips National Service Centre. In the event you require service whilst in another country a dealer address can be given to you by the Philips Consumer Help Desk in that country. In order to avoid unnecessary inconvenience, we advise you to read the operating instructions carefully before contacting your dealer. Methods of Transport within the UK: Please be aware whichever method of transport is chosen it is the consumers' responsibility to package the faulty unit for return to a level which prohibits accidental damage. Philips is not responsible for damage/loss caused during carriage to the Service Centre. Freepost: Please write the following address onto your package. This method of transport will take 2-3 working days to reach the Service Centre. Philips Service Centre FREEPOST (SCE10569) RUGBY - Warwickshire - CV21 1BR NB: Philips recommend all parcels to be returned to the Philips Service Centre be submitted over the counter at your Post Office and a proof of postage requested. Please note the Royal Mail insurance limit for lost/damage using the Freepost service is £26. Upto £250 insurance and next day delivery can be obtained via Royal Mail Special Delivery, however, the consumer will be responsible for this cost.* Methods of Transport within IRELAND: Please contact Philips Service Support , Dublin IMPORTANT (For UK only): Please ensure the following are included when returning a genuinely faulty phone to the Philips Service Centre : - Name, Return Delivery address, Daytime contact number, Proof of Purchase (copy) - Both handset and base have to be returned. - Any accessories pertinent to the use of the phone, ie, Power supply/line cords. - A brief description of the assumed fault - Despatch note (if your phone has previously been exchanged). Failure to include all the necessary information will cause delays in servicing your phone. Please allow 2-3 days from receipt at the service centre for your replacement/repaired product to be returned to you. If an out of warranty charge applies Philips shall contact you before the product is returned. Philips shall pay for the return carriage on all in-warranty exchanges. *Should you wish to return your products for service at your own cost (via a courier service or Royal Mail Special Delivery) please ensure the items are suitably packed for transport and sent to the following address: Philips Service Centre 1 Great Central Way Butlers Leap Rugby - Warwickshire - CV21 3XH For Philips Service Support in UK, (incl Channel Islands) please call 0870 900 9070 (Open during normal business hours, excluding National holidays and weekends) For Philips Service Support in Ireland please call 1850 304700 11 Xalio 200 UK refonte.qxd 25/02/03 13:18 Page 12 Environment and Safety Safety information The Xalio 200 is not designed for making emergency calls when the power fails. An alternative should be made available for making emergency calls. Conformity Hereby PHILIPS declares that the Xalio 200 is in compliance with the essential requirements and other relevant provisions of directive 1999/S/EC. A certificate of conformity can be found at www.philips.com. The product can only be connected to the telephone network in the geographical area which is indicated on the label on the bottom of the base station. Power requirements The product requires an electrical supply of 220-240V, alternating monophased current, excluding IT installations defined in standard EN 60-950. WARNING The electrical network is classified as dangerous according to criteria in the standard EN 60-950. The only way to power down the product is to unplug the power supply from the electrical outlet. Ensure the electrical outlet is located close to the apparatus and is always easily accessible. Telephone connections The voltage on the network is classified as TNV-3 (Telecommunications Network Voltages) as defined in the standard EN 60-950. Safety precautions Do not allow the handset to come into contact with liquids. Do not open the handset or the base station. This could expose you to high voltages. Do not allow the charging contacts or the battery to come into contact with conductive materials. Environmental care Please remember to observe the local regulations regarding the disposal of your packaging materials, exhausted batteries and old phones and where possible promote their recycling. 12