1
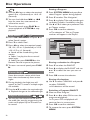
Return
your Warranty
Registration Card
within 10 days
EE
E
S
Congratulations on purchasing this Philips product.
We’ve included everything you need to get started.
If you have any problems, Philips Representatives can
help you get the most from your new product by explaining:
• Hookups,
• First Time Setup, and
• Feature Operation.
Do not attempt to return this product to the store.
RTAN
PO
T!
Read this manual first!
760
DVD
IM
DVD Video Player
Owner's Manual
WH
Y INS
ID
For fast help, call us first!
1-800-531-0039
Thank you for making Philips a part of your home!
1
Return your Warranty Registration card today to
ensure you receive all the benefits you’re entitled to.
• Once your Philips purchase is registered,
you’re eligible to receive all the privileges
of owning a Philips product.
• So complete and return the Warranty
Registration Card enclosed with your
purchase at once, and take advantage
of these important benefits.
Warranty
Verification
Owner
Confirmation
Model
Registration
Registering your product
within 10 days confirms
your right to maximum
protection under the
terms and conditions of
your Philips warranty.
Your completed Warranty
Registration Card serves
as verification of ownership in the event of product theft or loss.
Returning your Warranty
Registration Card right
away guarantees you’ll
receive all the information
and special offers which
you qualify for as the
owner of your model.
Know these
safety symbols
For Customer Use
Enter below the Serial No. which is located on the rear of the cabinet. Retain this
information for future reference.
CAUTION
RISK OF ELECTRIC SHOCK
DO NOT OPEN
CAUTION: TO REDUCE THE RISK OF ELECTRIC SHOCK, DO NOT
REMOVE COVER (OR BACK). NO USER-SERVICEABLE PARTS
INSIDE. REFER SERVICING TO QUALIFIED SERVICE PERSONNEL.
Serial No. ________________________
This “bolt of lightning” indicates uninsulated material
within your unit may cause
an electrical shock. For the safety of
everyone in your household, please do
not remove product covering.
WARNING: TO PREVENT
FIRE OR SHOCK HAZARD, DO
NOT EXPOSE THIS EQUIPMENT TO
RAIN OR MOISTURE.
s
shock, match wide blade of plug to
wide slot, and fully insert.
t
The “exclamation point” calls
attention to features for
which you should read the
enclosed literature closely to prevent
operating and maintenance problems.
2
Model No. _______________________
CAUTION: To prevent electric
MAC5097
TR
ATION
N
IS
Visit our World Wide Web Site at http://www.philips.com
IT
AY
DED W
S REG
EE
y!
r
r
Hu
HIN 10 D
Congratulations on your purchase,
and welcome to the “family!”
Dear Philips product owner:
Thank you for your confidence in Philips.You’ve selected one of the best-built,
best-backed products available today.And we’ll do everything in our power to
keep you happy with your purchase for many years to come.
As a member of the Philips “family,” you’re entitled to protection by one
of the most comprehensive warranties and outstanding service networks
in the industry.
What’s more, your purchase guarantees you’ll receive all the information
and special offers for which you qualify, plus easy access to accessories
from our convenient home shopping network.
And most importantly you can count on our uncompromising commitment
to your total satisfaction.
All of this is our way of saying welcome – and thanks for investing in a
Philips product.
Sincerely,
Lawrence J. Blanford
President and Chief Executive Officer
P.S. Remember, to get the most from your Philips product, you
must return your Warranty Registration Card within 10 days.
So please mail it to us right now!
3
IMPORTANT
IMPORTANT SAFETY
SAFETY INSTRUCTIONS
INSTRUCTIONS
1.
1. Read
Readthese
theseinstructions.
instructions.
2.
Keep
these
instructions.
2. Keep these instructions.
12.
12.
3.
3. Heed
Heedall
allwarnings.
warnings.
4.
Follow
all
4. Follow allinstructions.
instructions.
5.
5. Do
Donot
notuse
usethis
thisapparatus
apparatusnear
near
water.
water.
6.
Clean
6. Cleanonly
onlywith
withdry
drycloth.
cloth.
13.
13.Unplug
Unplugthis
thisapparatus
apparatusduring
duringlightning
lightning
storms
stormsor
orwhen
whenunused
unusedfor
forlong
longperiods
periodsof
of
time.
time.
7.
7. Do
Donot
notblock
blockany
anyventilation
ventilation
14.
Referall
allservicing
servicingto
toqualified
qualifiedservice
service
14.Refer
openings.
openings.Install
Installin
inaccordance
accordancewith
with
the
manufacturer´s
the manufacturer´sinstructions.
instructions.
personnel.
personnel.Servicing
Servicingisisrequired
requiredwhen
whenthe
the
apparatus
apparatushas
hasbeen
beendamaged
damagedininany
anyway,
way,
such
suchas
aspower-supply
power-supplycord
cordor
orplug
plugisis
damaged,
liquid
has
been
spilled
damaged, liquid has been spilledor
orobjects
objects
have
fallen
into
the
apparatus,
the
have fallen into the apparatus, theapparatus
apparatus
has
hasbeen
beenexposed
exposedto
torain
rainor
ormoisture,
moisture,does
does
not
operate
normally,
or
has
been
not operate normally, or has beendropped.
dropped.
8.
8. Do
Donot
notinstall
installnear
nearany
anyheat
heatsources
sources
such
suchas
asradiators,
radiators,heat
heatregisters,
registers,stoves,
stoves,or
or
other
otherapparatus
apparatus(including
(includingamplifiers)
amplifiers)that
that
produce
produceheat.
heat.
9.
9. Do
Donot
notdefeat
defeatthe
the
safety
safetypurpose
purposeof
ofthe
the
polarized
or
AC Polarized
polarized or
AC Plug
Polarized
grounding-type
Plug
grounding-typeplug.
plug.
AApolarized
polarizedplug
plughas
hastwo
twoblades
bladeswith
withone
one
wider
widerthan
thanthe
theother.
other.AAgrounding
groundingtype
typeplug
plug
has
hastwo
twoblades
bladesand
andaathird
thirdgrounding
groundingprong.
prong.
The
Thewide
wideblade
bladeor
orthe
thethird
thirdprong
prongare
are
provided
for
your
safety.
If
the
provided for your safety. If theprovided
providedplug
plug
does
doesnot
notfit
fitinto
intoyour
youroutlet,
outlet,consult
consultan
an
electrician
electricianfor
forreplacement
replacementof
ofthe
theobsolete
obsolete
outlet.
outlet.
10.
Protectthe
thepower
powercord
cordfrom
frombeing
being
10.Protect
walked
walkedon
onor
orpinched,
pinched,particularly
particularlyatatplugs,
plugs,
convenience
receptacles,
convenience receptacles,and
andthe
thepoint
point
where
wherethey
theyexit
exitfrom
fromthe
theapparatus.
apparatus.
Use
Useonly
onlywith
withthe
thecart,
cart,stand,
stand,
tripod,
tripod,bracket,
bracket,or
ortable
tablespecified
specified
by
bythe
themanufacturer
manufactureror
orsold
soldwith
with
the
apparatus.When
a
cart
the apparatus.When a cartisis
used,
used,use
usecaution
cautionwhen
whenmoving
moving
the
thecart/apparatus
cart/apparatuscombination
combination
to
toavoid
avoidinjury
injuryfrom
fromtip-over.
tip-over.
15.
CAUTION––To
Batteryusage
usageCAUTION
15.Battery
To
prevent
preventbattery
batteryleakage
leakagewhich
whichmay
mayresult
resultinin
bodily
injury
or
damage
to
the
unit:
bodily injury or damage to the unit:
●
●
Install
Installall
allbatteries
batteriescorrectly,
correctly,++and
and--as
as
marked
on
the
unit.
marked on the unit.
●
●
Do
Donot
notmix
mixbatteries
batteries(old
(oldand
andnew
newor
or
carbon
carbonand
andalkaline,
alkaline,etc.).
etc.).
●
●
Remove
Removebatteries
batterieswhen
whenthe
theunit
unitisisnot
notused
used
for
foraalong
longtime.
time.
EL
EL6475-E003:
6475-E003:01/6
01/6
11.
11.Only
Onlyuse
useattachments/accessories
attachments/accessories
specified
specifiedby
bythe
themanufacturer.
manufacturer.
Class II equipment symbol
This symbol indicates that the unit has
a double insulation system
4
General Information
Environmental Information
Laser safety
All unnecessary packaging has been omitted.
The packaging has been made easy to separate
into three materials: cardboard (box),
polystyrene foam (buffer) and polyethylene
(bags, protective foam sheet).
This unit employs a laser. Due to possible
eye injury, only a qualified service person
should remove the cover or attempt to
service this device.
Your DVD player consists of materials which
can be recycled and reused if disassembled by a
specialized company. Please observe the local
regulations regarding the disposal of packaging
materials, exhausted batteries and old
equipment.
NOTE:
PICTURES SHOWN MAYBE
DIFFERENT BETWEEN
COUNTRIES.
Manufactured under license from Dolby
Laboratories. “Dolby”, “Pro Logic” and the
double-D symbol are trademarks of Dolby
Laboratories.
CAUTION
(WARNING LOCATION: ON THE
BACKPLATE OF THE SET)
NEVER MAKE OR CHANGE
CONNECTIONS WITH THE
POWER SWITCHED ON.
This product incorporates copyright protection
technology that is protected by method claims of
certain U.S. patents and other intellectual
property rights owned by Macrovision
Corporation and other rights owners. Use of this
copyright protection technology must be
authorized by Macrovision Corporation, and is
intended for home and other limited viewing
uses only unless otherwise authorized by
Macrovision Corporation. Reverse engineering or
disassembly is prohibited.
LASER
Type
Wave length
Output Power
Beam divergence
WARNING
Semiconductor laser
GaAlAs
650 nm (DVD)
780 nm (VCD/CD)
7 mW (DVD)
10 mW (VCD/CD)
60 degree
For Customer Use:
Read carefully the information located at
the bottom of your DVD VIDEO player
and enter below the Serial No. Retain this
information for future reference.
Model No. DVD VIDEO 760
Serial No. ________________
To reduce the risk of fire or electric shock,
do not expose this appliance to rain or
moisture.
CAUTION
Use of controls or adjustments or
performance of procedures other than
herein may result in hazardous radiation
exposure.
The set complies with the FCC-Rules, Part
15 and with 21 CFR 1040.10.
Canada
This digital apparatus does not exceed the
Class B limits for radio noise emissions
from digital apparatus as set out in the
Radio Interference Regulations of the
Canadian Department of Communications.
5
Contents
Introduction
Disc Operations
Supplied accessories ................................... 8
Region Codes ............................................... 8
Care and safety information ..................... 8
Playable Media ............................................ 19
Playing discs ................................................ 19
Resuming playback from the last
stopped point (DVD/VCD) ............... 19
Using the Disc Menu ................................ 20
Symbols Used in this Manual .................. 20
Basic playback controls ...................... 20-22
Pausing playback ................................... 20
Selecting track/chapter ....................... 20
Zoom ...................................................... 20
Shuffle ..................................................... 21
Repeat ..................................................... 21
Repeat A-B ............................................. 21
Time Search ........................................... 21
Forward/Reverse Searching ......... 21-22
Slow Motion .......................................... 22
Camera Angle ........................................ 22
Program favorite tracks ...................... 22
Connections
Basic Connections ...................................... 9
Picture ...................................................... 9
Sound ........................................................ 9
Connecting TV ..................................... 10-12
Using CVBS jack ................................... 10
Using S-Video jack ............................... 10
Using Component Video jack
(PrCr PbCb Y) ....................................... 11
Using an accessory RF modulator .... 12
Connecting the power cord ................... 12
Optional: Connecting 2-channel Stereo ...
....................................................................... 13
Optional: Connecting Digital AV Receiver
....................................................................... 13
Media Slot Operations
Functional Overview
Front and Rear Panels .............................. 14
Remote Control ........................................ 15
Getting Started
Step 1: Inserting batteries into the
Remote Control ........................................ 16
Using the Remote Control to operate
the Player ............................................... 16
Step 2: Setting the TV ......................... 16-18
DVD System Menu Hierarchy ........... 17
Navigating System Menu ..................... 17
Selecting the color system that
corresponds to your TV ..................... 18
Step 3: Setting language preference ....... 18
6
General Information ................................. 23
Supported Media Types ....................... 23
Precautions in handling Memory Cards
.................................................................. 23
JPEG and MP3 Operations
Digital Photo Manager ....................... 24-26
Album View ............................................ 24
Photo Manager Features .............. 25-26
Digital Music Manager ........................ 27-28
Album/Track View ................................ 27
Music Manager Features ..................... 28
Contents
DVD Menu Options
Preferences ........................................... 29-31
General Operation .............................. 29
Picture - Colour Setting (Smart
Picture) ................................................... 29
Picture - Video Shift ............................. 29
Sound - Night Mode ............................ 29
Sound - Karaoke Vocal ........................ 30
Features - Wake-up Timer .................. 30
Features - Help-line ............................. 30
Features - Beeper ................................. 30
Features - Status Window .................. 31
Features - Display Dim ....................... 31
Setup ............................................................ 31
General Operation .............................. 31
Language ................................................. 31
TV - System ........................................... 31
TV - TV Shape ....................................... 32
Audio - Digital Output ........................ 32
Audio - Analog Output ....................... 33
Audio - PCM Output .......................... 33
Features - PBC ...................................... 33
Features - Sleep Timer ........................ 34
Access Control ..................................... 34
Access - Country ................................. 34
Access - Parental Level ....................... 34
Access - Change PIN ........................... 35
Access - Disc Lock .............................. 35
Troubleshooting ......................... 36–37
Specifications ...................................... 38
Glossary ...................................................................... 39
7
General Information
Supplied accessories
Composite video
cable (yellow)
Audio cable
(white, red)
POWER
2
PLAYLIST
SAVE
CLEAR
MODE
abc
3
ghi
jkl
4
5
6
pqrs
tuv
wxyz
7
8
mno
9
RETURN
DISPLAY
0
SYSTEM
É
DISC
MENU
É
OK
MENU
É
ë
É
É
Remote Control
and
two AA batteries
def
2
1
É
ë
STOP
PLAY
PAUSE
É
Å
Ç
SUBTITLE
AUDIO
ZOOM
REPEAT
REPEAT
SHUFFLE
T-C
SCAN
A-B
¶ Avoid high temperatures, moisture,
water and dust
– Do not expose the system, batteries
or discs to humidity, rain, sand or
excessive heat (caused by heating
equipment or direct sunlight.) Always
keep the disc tray closed to avoid dust on
the lens.
¶ Avoid condensation problem
– The lens may cloud over when the
player is suddenly moved from cold to
warm surroundings, making it impossible
to play a disc. Leave the player in the
warm environment until the moisture
evaporates.
¶ Do not block the vents
– Do not operate the DVD Player in an
enclosed cabinet, allow about 10 cm (4
inches) of free space all around the player
for adequate ventilation.
10 cm
(4 inches)
Region Codes
10 cm
(4 inches)
Discs must be labeled for ALL regions or
Region 1 in order to play on this Player.
You cannot play Discs that are labeled for
other regions.
Look for symbols above on your DVD
discs.
1
ALL
Care and safety information
¶ Power supply voltage
– Check that the operating voltage
indicated on the typeplate (or beside the
voltage selector) is identical to the
voltage of your local power supply. If not,
please consult your dealer.
– During Standby mode, the DVD player
is still consuming some power. To
disconnect the system from the power
supply completely, remove the AC power
plug from the wall socket.
8
PHILIPS
DVD Home Cinema System
10 cm
(4 inches)
¶ Care of the cabinet
– Use a soft cloth slightly moistened
with a mild detergent solution. Do not
use a solution containing alcohol, spirits,
ammonia or abrasives.
¶ Finding a suitable location
– Place the player on a flat, hard, and
stable surface.
¶ Care of disc
– To clean a CD, wipe it in a
straight line from the center
towards the edge using a
soft, lint-free cloth. A
cleaning agent may damage
the disc!
– Write only on the printed side of a
CDR(W) and only with a soft felt-tipped
pen.
– Handle the disc by its edge, do not
touch the surface.
Connections
Basic Connections
● Please refer to the instruction books of
your TV, VCR, Stereo or other devices as
necessary to make the best connections.
The following guidelines are options for
the best picture and sound quality
available on your DVD player.
Picture
* Use CVBS Video Output for good
picture quality.
** Use S-Video Output for better
picture quality.
*** Use Component Video Output for
best picture quality.
Use Component Video Out with
Progressive Scan enabled for excellent
flicker-free picture quality (to enable this
you need a Progressive Scan TV).
Sound
1 Digital audio connections provide the
clearest sound with a digital amplifier or
receiver. Connect the DVD player’s
COAXIAL or OPTICAL DIGITAL AUDIO
OUT to your amplifier or receiver.
2 If the above connection is not possible,
use the audio cables (white/red) to
connect AUDIO IN (L/R) jacks to your
amplifier, receiver, stereo or TV.
Warning!
– Never make or change
connections with the power
switched on.
– Connect the DVD Player directly
to the TV.
– Do not connect the DVD player
AUDIO OUT to the PHONO IN of
your amplifier or receiver.
Your TV may have only an RF-style input,
usually labeled Antenna In, 75 ohm or RF
In and you will need an RF modulator to
operate. See your retailer on RF
modulator availability and operations.
9
Connections
Connecting TV
Back
of TV
Back
of TV
LEFT
AUDIO IN
S-VIDEO IN
RIGHT
AUDIO IN
RIGHT
AUDIO IN
VIDEO IN
LEFT
AUDIO IN
TO TV
AUDIO IN
TO TV
VIDEO IN
1
3
TO TV
S-VIDEO IN
TO TV
AUDIO IN
3
1
DIGITAL AUDIO OUT
PCM/ MPEG2/
Dolby Digital
R
L
VIDEO
Pr/Cr
Pb/Cb
Y
PROGRESSIVE
COAXIAL OPTICAL
S-VIDEO
OUT
/
INTERLACE
R
2
L
VIDEO
Pb/Cb
Y
PROGRESSIVE
ICAL
S-VIDEO
INTERLACE
Pr/Cr
2
IMPORTANT!
– You only need to make one video
connection from the following
options, depending on the
capabilities of your TV system.
Using CVBS jack
1 Use the composite video cable (yellow)
to connect the DVD Player’s CVBS
(VIDEO) jack to the video input jack (or
labeled as A/V In,Video In, Composite or
Baseband) on the TV (cable supplied).
2 Set the PROGRESSIVE/INTERLACE
switch to INTERLACE.
3 To hear the sound of this DVD Player
through your TV, use the audio cables
(white/red) to connect AUDIO OUT (L/
R) jacks of the DVD Player to the
corresponding AUDIO IN jacks on the TV
(cable supplied).
10
Using S-Video jack
1 Use the S-Video cable to connect the
DVD Player’s S-VIDEO OUT jack to the
S-Video input jack (or labeled as Y/C or SVHS) on the TV (cable not supplied).
2 Set the PROGRESSIVE/INTERLACE
switch to INTERLACE.
3 To hear the sound of this DVD Player
through your TV, use the audio cables
(white/red) to connect AUDIO OUT (L/
R) jacks of the DVD Player to the
corresponding AUDIO IN jacks on the TV
(cable supplied).
Connections
Back
of TV
R
L
VIDEO
Pb/Cb
Y
PROGRESSIVE
AUDIO IN
S-VIDEO
Pr/Cr
INTERLACE
Pr/Cr
Pb/Cb
Y
TO TV
AUDIO IN
TO TV
Y Pb/Cb Pr/Cr IN
3
1
GITAL AUDIO OUT
PCM/ MPEG2/
Dolby Digital
2
R
L
VIDEO
Pr/Cr
Pb/Cb
Y
PROGRESSIVE
AXIAL OPTICAL
S-VIDEO
INTERLACE
IMPORTANT!
– Component Video connection
provides highest picture quality.
These options must be available on
your TV.
Progressive / Interlace SELECTOR
This switch will change the type of signal
output from the Component Video Out
on the player.
Interlace:
Select this setting when connected to a
standard (interlace format) TV.
Progressive:
Select progressive when you have a TV
that can accept progressive signals (480/
525p) to enjoy accurate colour
reproduction and high quality images.
Using Component Video jack
(PrCr PbCb Y)
1 Use the component video cables (red/
blue/green) to connect the DVD Player’s
PrCr / PbCb / Y jacks to the
corresponding Component video input
jacks (or labeled as PrCr / PbCb / Y or
YUV) on the TV (cable not supplied).
2 Set the PROGRESSIVE/INTERLACE
switch to INTERLACE.
3 To hear the sound of this DVD Player
through your TV, use the audio cables
(white/red) to connect AUDIO OUT (L/
R) jacks of the DVD Player to the
corresponding AUDIO IN jacks on the TV
(cable supplied).
11
Connections
Connecting the power cord
Back
of TV
2
INT IN
TO TV
VIDEO
IN
AUDIO IN
R
L
CH3 CH4
COMPONENT
VIDEO IN
AUDIO
OUT
S-VIDEO
IN
Pr/Cr
~ AC MAINS
Pb/Cb
VIDEO IN
Y
TO TV
VIDEO IN
1
DIGITAL AUDIO OUT
PCM/ MPEG2/
Dolby Digital
MAINS
R
L
VIDEO
Pr/Cr
Pb/Cb
Y
DIGITAL AUDIO OUT
PCM/ MPEG2/
Dolby Digital
PROGRESSIVE
COAXIAL OPTICAL
S-VIDEO
INTERLACE
MAINS
COAXIAL OPTICAL
IMPORTANT!
– If your TV only has a single
Antenna In jack (or labeled as 75
ohm or RF In), you will need an RF
modulator in order to view the DVD
playback on the TV. See your
electronics retailer or contact
Philips for details on RF modulator
availability and operations.
Using an accessory RF modulator
1 Use the composite video cable (yellow) to
connect the DVD Player’s CVBS (VIDEO)
jack to the video input jack on the RF
modulator.
2 Use the RF coaxial cable to connect the
RF modulator to your TV’s RF jack (cable
not supplied).
12
After everything is connected properly,
plug in the AC power cord to the
power outlet.
Never make or change any connections
with the power switched on.
Press STANDBY ON on the DVD
Player front panel,
“NO Media” may appear on the
display panel.
NO MEDIA
IR
Connections
Optional : Connecting 2-channel
Stereo
Optional : Connecting Digital AV
Receiver
AV Receiver
STEREO
LEFT
AUDIO IN
RIGHT
AUDIO IN
COAXIAL IN
OR
OPTICAL IN
TO STEREO
AUDIO IN
TO Digital AV Receiver
DIGITAL AUDIO IN
DIGITAL AUDIO OUT
PCM/ MPEG2/
Dolby Digital
T
R
L
L
S-VIDEO
MAINS
INTERLACE
Pr/Cr
Pb/Cb
R
L
Pr/Cr
Pb/Cb
VIDEO
PROGRESSIVE
Stereo has Dolby Pro Logic or Right
/ Left Audio In jack
1 Select one of the video connections
(CVBS VIDEO IN, S-VIDEO IN,
COMPONENT VIDEO IN) depending on
the options available on your TV.
2 Set the PROGRESSIVE/INTERLACE
switch to INTERLACE for CVBS or SVIDEO connections.
3 Set the PROGRESSIVE/INTERLACE
switch to PROGRESSIVE for
COMPONENT VIDEO IN connection
with a Progressive Scan TV.
4 Use the audio cables (white/red) to
connect AUDIO OUT (L/R) jacks of
the DVD Player to the corresponding
AUDIO IN jacks on the stereo system
(cable supplied).
PROGRESSIVE
COAXIAL OPTICAL
Y
1
2
3
4
5
S-VIDEO
INTERLACE
Receiver has a PCM, Dolby Digital
or MPEG2 decoder
Select one of the video connections
(CVBS VIDEO IN, S-VIDEO IN, SCART or
COMPONENT VIDEO IN) depending on
the options available on your TV.
Set the PROGRESSIVE/INTERLACE
switch to INTERLACE for CVBS or SVIDEO connections.
Set the PROGRESSIVE/INTERLACE
switch to PROGRESSIVE for
COMPONENT VIDEO IN connection
with a Progressive Scan TV.
Connect either the COAXIAL or
OPTICAL jack of the DVD Player to the
corresponding COAXIAL or OPTICAL
Digital Audio In jack on your Receiver
(cable not supplied).
Set the DVD Player’s Digital Output to
PCM-ONLY or ALL depending on the
capabilities of your Receiver (see “Digital
Output”, page 32).
Helpful Hint:
– If the audio format of the Digital Output
does not match the capabilities of your
receiver, the receiver will produce a strong,
distorted sound or no sound at all.
13
Functional Overview
Front and Rear Panels
9 STOP
– To stop playback
STANDBY ON B
– To switch the DVD Player to
Standby mode or ON
T NEXT
– To search or select next chapter
or track
Disc tray
OPEN/CLOSE /
– Open/Close the disc tray
2; PLAY/PAUSE
– To start or interrupt playback
Media Slot
(Memory card slot)
– To slot in Compact Flash, Secure
Digital (SD), Memory Stick, MMC,
Smart media, Microdrives (1GB) or
Extreme Digital (XD) cards using a
PCMCIA (type 1) adapter
PREV S
– To search or select previous
chapter or track
EJECT /
– To eject an inserted PCMCIA
adaptor
DVD760
DVD VIDEO PLAYER
IR
See page 23 for Media Slot
Pr/Cr Pb/Cb Y VIDEO OUT
– Connect to a TV with Pr/Cr Pb/
Cb Y inputs
MAINS (AC Power Cord)
– Connect to a standard AC outlet
CVBS (VIDEO OUT)
– Connect to CVBS Video inputs of
a TV
COAXIAL (Digital audio out)
– Connect to coaxial AUDIO inputs
of a digital audio equipment
AUDIO OUT (Left/Right)
– Connect to AUDIO inputs of an
amplifier, receiver or stereo system
OPTICAL (Digital audio out)
– Connect to optical AUDIO inputs
of a digital audio equipment
Progressive / Interlace
– To switch between Progressive or
Interlace Video output
S-VIDEO OUT
– Connect to a TV with S-Video inputs
DIGITAL AUDIO OUT
PCM/ MPEG2/
Dolby Digital
MAINS
R
L
VIDEO
Pr/Cr
Pb/Cb
Y
PROGRESSIVE
COAXIAL OPTICAL
S-VIDEO
INTERLACE
Caution: Do not touch the inner pins of the jacks on the rear panel.
Electrostatic discharge may cause permanent damage to the unit.
14
Functional Overview
Remote Control
PLAYLIST
– To access available list of audio
playlists
SAVE
– To save back edited photos and
to copy MP3 music files from
CD to Memory card
POWER
2
PLAYLIST
CLEAR
SAVE
MODE
abc
def
1
2
3
ghi
jkl
mno
4
5
6
pqrs
tuv
7
8
wxyz
9
RETURN
1 2 3 4
– To select an item in the system
menu/disc menu
OK
– Confirms the selection
PREV S
– To search or select previous
chapter or track
SUBTITLE
– To access into subtitle language
system menu
AUDIO
– To access into audio language
system menu
REPEAT A-B
– Repeats playback a specific
section on a disc
REPEAT
– Selects various repeat modes
SHUFFLE
– To playback chapters/tracks in
random order
0
SYSTEM
DISC
MENU
É
DISC MENU
– Enters or exits the disc
contents menu
– Switches on or off the playback
control mode (for VCD
version 2.0 only)
DISPLAY
MENU
É
OK
É
É
RETURN
– To go back to previous menu
É
ë
STOP
PLAY
PAUSE
Ç
É
Å
ë
É
STANDBY ON B
– To switch the DVD player to
standby mode or ON
SUBTITLE
AUDIO
ZOOM
REPEAT
REPEAT
SHUFFLE
T-C
SCAN
CLEAR
– To hide a selected image from
a slide show
MODE
– To choose which media (Disc
or Memory Card) and
content (Pictures or Music)
for playback
Numeric Keypad (0-9)
– Enters a track/title number of
the disc
A-B
DISPLAY
– Activate/deactivate CD text if
available on the disc (audio CDs)
SYSTEM MENU
– Enters or exits the system
setup menu
T NEXT
– To search or select next
chapter or track
STOP ( Ç )
– To stop playback
PLAY ( B )
– Starts playback
PAUSE ( ; )
– Pause playback temporarily /
frame-by-frame playback
ZOOM
– Enlarge a picture on the TV
screen
T-C
– Selects a title or chapter
SCAN
– Plays the first 10 seconds of
each track/chapter within a disc
15
Getting Started
Step 1: Inserting batteries into
the Remote Control
3
1
2
3 Close the cover.
Using the Remote Control to
operate the Player
1 Aim the Remote Control
IR
directly at the remote
sensor (iR) on the front
panel.
POWER
2
PLAYLIST
CLEAR
SAVE
1
MODE
abc
def
2
3
ghi
jkl
4
5
pqrs
tuv
7
8
mno
6
wxyz
9
RETURN
DISPLAY
0
SYSTEM
É
OK
MENU
É
ë
É
É
É
DISC
MENU
É
ë
STOP
PLAY
PAUSE
É
Å
Ç
SUBTITLE
AUDIO
ZOOM
REPEAT
REPEAT
SHUFFLE
T-C
SCAN
A-B
CAUTION!
– Remove batteries if they are
exhausted or if the Remote Control
is not being used for a long time.
– Do not use old and new or
different types of batteries in
combination.
– Batteries contain chemical
substances, so they should be
disposed of properly.
16
IMPORTANT!
Make sure you have completed all
the necessary connections. (See
pages 10-12 “Connecting TV”).
video-in channel. You should see the blue
Philips DVD background screen on the
TV.
following the indications (+-) inside
the compartment.
between the Remote
Control and the DVD
Player while operating the
DVD Player.
Setting the TV
1 Turn on the TV and set to the correct
1 Open the battery compartment.
3 Insert two batteries type R06 or AA,
2 Do not put any objects
Step 2:
2 Usually these channels are between the
lowest and highest channels and may be
called FRONT, A/V IN, or VIDEO. See your
TV manual for more details.
➜ Or, you may go to channel 1 on your
TV, then press the Channel down button
repeatedly until you see the Video In
channel.
➜ Or, the TV Remote Control may have a
button or switch that chooses different
video modes.
➜ Or, set the TV to channel 3 or 4 if you
are using an RF modulator.
Getting Started
DVD System Menu Hierarchy
DVD Player Menu
ToolBar
Play Option
View
Disc Navigation
Audio
Subtitle
Search
Angle
Zoom
Chapter Preview
Program
Time
Fast
Slow
Frame by Frame
Program
Disc Navigation
Playlist
Clear All
Preferences
Picture
Sound
Color Settings
Brightness
Contrast
Sharpness
Saturation
Video Shift
Features
Night Mode
Karaoke Vocal
Wakeup Timer
Helpline
Beeper
Status Window
Display Dim
Setup
Language
TV
Menu Language
Default Audio
Default Subtitle
Audio
TV System
TV Shape
Navigating System Menu
Features
Digital Output
Analog Output
PCM Output
PBC
Sleep Timer
Access
Enter PIN
Country
Parental Level
Change PIN
Disc Lock
2 Use 1 2 3 4 keys on the Remote
Control to navigate in the menu.
This DVD Player has an On-screen
System Menu which allows you to
access the various features and
settings of the Player.
3 Press OK to confirm selection.
4 To remove the menu, press SYSTEM
MENU.
1 Press SYSTEM MENU.
➜ The menu bar will appear on the TV
screen.
Play Option
View
Search
Toolbar
Preference
Setup
Welcome to DVD menu. Use navigation keys to move around
the menu.
17
Getting Started
Selecting the color system that
corresponds to your TV
Step 3: Setting language
preference
This DVD Player is compatible with both
NTSC and PAL. In order for a DVD disc
to play on this Player, the color system of
the Disc, the TV and the DVD Player
should match.
You can select your preferred language
settings so that this DVD Player will
automatically display its System Menu (and
DVD Disc menus) in your preferred
language. If the language selected is not
available on a disc, the disc’s default
setting language will be used instead.
TV
Setup
TV System
TV System
Language
PAL
NTSC
TV Shape
Setup
Auto
Video Output
Menu Language
Menu Language
Svenska
English
Default Audio
Default Subtitle
Español
Français
Português
Use ↓ or ↑ to change the values, OK to confirm, ← to leave the
submenu
Use ↓ or ↑ to change the values, OK to confirm, ← to leave the
submenu
1 Stop playback and press SYSTEM MENU.
2 Press 4 twice to select ‘Setup’.
3 Use the 1 2 3 4 keys on the Remote
Control to navigate in the menu.
Move to ‘TV’ and press 4.
Move to ‘TV System’ and press 2.
Auto – Select this if the connected TV is
compatible with both NTSC and PAL
(multi-system). The output format will be
in accordance with the video signal of the
disc.
NTSC – Select this if the connected TV
is NTSC system. It will change the video
signal of a PAL disc (VCD only) and
output in NTSC format.
PAL – Select this if the connected TV is
PAL system. It will change the video signal
of a NTSC disc and output in PAL format.
4 Select an item and press OK.
5 To remove the menu, press SYSTEM
MENU.
18
1 Stop playback and press SYSTEM
MENU.
2 Press 4 twice to select ‘Setup’.
3 Use the 1 2 3 4 keys on the Remote
Control to navigate in the menu.
Move to ‘Language’ and press 4.
Move to ‘Menu Language’ and press 2.
4 Select a language and press OK.
5 Use the 1 2 3 4 on the Remote Control
to navigate in the menu.
Move to one of the following and press 2.
– ‘Default Audio’ (disc’s soundtrack)
– ‘Default Subtitle’ (disc’s menu)
6 Select a language and press OK.
7 To remove the menu, press SYSTEM
MENU.
Helpful Hint:
– Some discs (example Karaoke discs) are
recorded on multiple audio channels.
Press AUDIO repeatedly during playback to
choose LR to hear both channels, LL to hear
left channel (only music) and RR to hear right
channel (only vocal).
Disc Operations
IMPORTANT!
– Depending on the DVD or VIDEO
CD, some operations may be
different or restricted.
– Do not push on the disc tray or
put any objects other than disc on
the disc tray. Doing so may cause
the disc player malfunction.
Playable Media
Your DVD Player will play:
● Discs:
– Digital Video Discs (DVDs)
– Video CDs (VCDs)
– Super Video CDs (SVCDs)
– Digital Video Discs + Recordable(DVD+R)
– DigitalVideo Discs + Rewritable(DVD+RW)
– Compact Discs (CDs)
– MP3 disc on CD-R(W):
– Maximum 30 characters display.
– Supported sampling frequencies :
32 kHz, 44.1 kHz, 48 kHz
– Supported Bit-rates : 32~256 (kbps),
variable bitrates
– Picture (JPEG) files on CD-R(W):
– JPEG/ISO 9660 format.
● Memory Cards:
– JPEG files and MP3 files from the
following memory cards.
– Compact Flash (Type I and II,
including IBM Microdrive)
– Secure Digital (SD)
– Smart Media
– Memory Stick
– Multimedia Card (MMC)
– Extreme Digital (XD)
IMPORTANT!
If the inhibit icon (X) appears on the
TV screen when a button is pressed,
it means the function is not available
on the current disc or at the current
time.
Playing discs
1 Connect the power cords of the DVD
Player and TV (and any optional stereo or
AV receiver) to a power outlet.
2 Turn on the TV power and set to the
correct Video In channel. (See page 16
“Setting the TV”).
3 Press STANDBY ON on the DVD front
panel.
➜ You should see the blue Philips DVD
background screen on the TV.
4 Press OPEN•CLOSE 0 button to open
the disc tray and load in a disc, then press
the same button again to close the disc
tray.
➜ Make sure the label side is facing up.
For double-sided discs, load the side you
want to play facing up.
5 Playback will start automatically
(depending on the disc type).
➜ If a disc menu shows on the TV, see
next page on “Using the Disc Menu”.
➜ If the disc is locked by parental control,
you must enter your four-digit password.
(See page 34).
6 At any time, simply press STOP to stop
playback.
Resuming playback from the last
stopped point (DVD/VCD)
● In stop mode and when the disc has not
been ejected, press PLAY B.
Helpful Hint:
– If you are having trouble playing a
certain media, remove the media and try a
different one. Improper formatted media will
not play on this DVD Player.
To cancel resume mode
● In stop mode, press STOP 9 again.
19
Disc Operations
Using the Disc Menu
Basic playback controls
Depending on the disc, a menu may
appear on the TV screen once you load
the disc.
Unless otherwise stated, all operations
described are based on Remote Control
use. Some operations can be carried out
using the DVD System Menu.
To select a playback feature or item
● Use the 1 2 3 4 or numeric keypad
(0-9) on the Remote Control, then press
PLAY B or OK to start playback.
To access or remove the menu
● Press DISC MENU on the Remote
Control.
For VCD with Playback Control
(PBC) feature (version 2.0 only)
● At any time during playback, press DISC
MENU to return to the menu screen.
● In stop mode, press DISC MENU to
switch between ‘PBC ON’ and ‘PBC OFF’.
➜ The VCD PBC menu is accessible only
when PBC is set to ON.
Pausing playback DVD VCD
1 During playback, press PAUSE ;.
➜ Playback will pause and sound will be
muted.
2 Press PAUSE ; repeatedly to select the
previous or next picture frame.
3 To return to normal playback, press
PLAY B.
Selecting track/chapter
DVD
VCD
CD
1 Press T or S briefly during
playback to go to the next chapter/track
or to return to the beginning of the
currect chapter/track respectively.
Symbols Used in this Manual
2 Press S twice briefly to step back to
The below symbols appear in some
headings and notes with the following
meanings:
3 To go directly to any chapter/track, enter
DVD
– Description refers to playback of DVD-video discs
VCD
– Description refers to playback of Video CDs
CD
– Description refers to playback of Audio CDs
MP3
JPEG
– Description refers to playback of MP3 files
the previous chapter/track.
the chapter/track number using the
numerical keys (0-9).
Zoom DVD VCD
Zooming allows you to enlarge the video
image during playback.
1 Press ZOOM during playback.
2 Within 5 seconds, press 1 2 3 4 to pan
across the TV screen.
3 Press OK repeatedly to increase and
– Description refers to playback of JPG files
decrease the zoom factor.
➜ Playback will continue.
Helpful Hint:
– This feature is also applicable for JPEG
picture playback. See “Digital Photo
Manager”, page 24.
20
Disc Operations
Shuffle
Time Search DVD VCD
DVD
The Time Search function allows you to
start playback at any chosen time on the
disc.
On a DVD disc - this shuffles the playing
order of chapters within a title, if the
title has more than one chapter.
VCD
CD
On an Audio CD, Video CD - this
shuffles all the tracks in random order
within a disc.
Search
Program
Toolbar
Time
Fast
Slow
Time
Frame by Frame
1 Press SHUFFLE during playback.
➜ SHUFFLE appears on the TV screen
for about two seconds.
3:00:00
Use ← or → to select other options, ↓ to enter the submenu
2 To return to normal playback, press
SHUFFLE again.
Repeat DVD VCD CD MP3
You can play a chapter, track, title or
entire disc repeatedly.
● Press REPEAT continuously to choose
a Repeat mode during playback.
➜ DVD
CHAPTER/TITLE/DISC/OFF appears on
the TV screen.
➜ VCD CD
TRACK/DISC/OFF appears on the TV screen.
➜ MP3
TRACK/ALBUM/DISC/OFF appears on
the TV screen.
Repeat A-B DVD VCD CD
You can play only a specific portion of a
Title or Track repeatedly.
1 During playback, press REPEAT A-B as
your chosen starting point.
➜
REPEAT A appears on the TV screen.
2 When the disc reaches your selected
ending point, press REPEAT A-B again.
➜
A/B appears briefly on the TV
screen, and the repeat sequence begins.
3 To resume regular playback, press
REPEAT A-B again.
➜
A/B OFF appears on the TV screen.
Enter the time to skip to (in hr:min:secs)
1 Press SYSTEM MENU and press 2 to
select ‘Search’ option.
2 Press 4 to select ‘Time’ and press 2 to
enter into the submenu.
➜ Playback will pause.
3 Enter hours, minutes and seconds in the
time edit box using Remote Control
numerical key pad.
➜ If incorrect or invalid time is entered,
the numbers will blink on the TV screen.
4 Press OK to confirm selection.
5 To remove the menu, press SYSTEM
MENU.
Helpful Hint:
– This feature will not be applicable to
VCD discs with Playback control in PBC ON.
Forward / Reverse Searching
DVD
VCD
1 Press SYSTEM MENU and press 2 to
select ‘Search’ option.
2 Press 4 to select ‘Fast’.
3 Use 1 2 to select the required speed: -4, 8 or -32 (backward), or +4, +8 or +32
(forward).
➜ Audio will be muted.
4 To return to normal speed, press PLAY
B.
21
Disc Operations
CD
1 Use the 1 2 keys to select the required
speed: -8 or -4 (backward), or +4 or +8
(forward).
2 You can also hold down T or S
keys for more than two seconds to
activate fast search.
3 To end the search, press PLAY B to
resume playback or STOP 9 to stop
playback.
Slow Motion DVD VCD
Setting a Program
1 Press SYSTEM MENU and press 2 to
select ‘Program’ option during playback.
2 Press 4 to select ‘Disc Navigation’.
3 Press 2 to display Titles and press 2 again
to display Chapters if available in the disc.
4 Use 3 or 4 to select your preferred Title
or Chapter number .
5 Press OK to confirm selection.
➜ The selection of Title or Chapter
numbers will appear in the ‘Playlist’.
1 Press SYSTEM MENU and press 2 to
select ‘Search’ option.
2 Press 4 to select ‘Slow’.
3 Press 1 2 to select the required speed: 1/8, -1/4, -1/2 or -1 (backward), or +1/8,
+1/4, +1/2 or +1 (forward).
➜ Sound will be muted during slow
motion.
➜ Select 1 to play the disc at normal
speed again.
➜ Select 0 or press PAUSE ; on the
Remote Control to pause the picture.
4 To return to normal speed, press PLAY
B.
Camera Angle DVD
Some discs contain scenes which have
been shot simultaneously from various
angles.
1 During playback, the Angle icon will
appear on the TV screen if multiple angles
are available.
2 Use the 3/4 to select the required angle.
➜ Playback changes to the selected angle.
Program favorite tracks DVD VCD
● You can play the contents of the disc in
the order you want by programming the
tracks to be played. Up to 20 tracks can
be stored.
Program
Toolbar
Program
Disc Navigation
Clear All
Playlist
1.Title 0 : Chap
Program
Disc Navigation
2.Title 0 : Chap
3.Title 0 : Chap
Playlist
Use ← to select other options,
↓ toAll
enter the submenu
Clear
4.Title 0 : Chap
Press OK to delete selected track from playlist
Erasing a selection in a Program
1 Press 4 to select the PLAYLIST.
2 Press 2 to display the PLAYLIST and use
3 or 4 to select the item you want to
erase.
3 Press OK to erase the selection.
Erasing all selections
● Use 4 to select CLEAR ALL and press 2
to select CLEARED.
➜ All selections will be erased.
Switching a Program ON/OFF
1 Move to select ‘Program’.
2 Press 2 or 1 to select ON to start the
programmed playback.
➜ Or press OFF and playback will
continue from its current point.
3 Press OK to confirm selection.
4 To remove the menu, press SYSTEM
MENU.
22
Program
Toolbar
Playlist
Media Slot Operations
General Information
● This DVD Player is equipped with a
Media Slot that enables you to:
➜ View Digital Photos (JPG) from your
Digital Camera’s Memory Card.
➜ Play MP3 files from Memory Cards.
● The Media Slot is a PCMCIA (PC Card)
slot similar to the one that you find on
Notebook Computers. Using the
appropriate PC Card Adaptor, you can
read photo (JPG) and MP3 files from the
following types of memory cards.
➜ Compact Flash
(Type I and II, including IBM Microdzine)
➜ Secure Digital (SD)
➜ Smart Media
➜ Memory Stick
➜ Multimedia Card (MMC)
➜ Extreme Digital (XD)
●
●
●
●
Supported Media Types
Only Digital Photos of .JPG or .JPEG
extensions can be read by the Media Slot.
Files with extensions .BMP, .GIF, .TIFF etc.
cannot be viewed using this DVD Player.
Only MP3 music files can be played from
Memory Cards using this DVD Player.
Note that it is not possible to play files
with .PLS, .WMA, .WMV, .MP4, .MPEG,
etc. extensions.
Different Digital Cameras have different
capabilities. The size of your JPG photo
file depends on the type of Camera that
you have. The speed with which a photo
is read and displayed on your TV screen
depends on the resolution of your
camera and the settings with which you
took the picture.
The smaller the file size, the faster it will
be to draw it on screen. (see section on
‘Operation Digital Photo Manager’).
●
●
●
●
Precautions in handling Memory
Cards
Never insert a memory card directly into
the Media Slot. Always use the appropriate
PCMCIA (PC Card) Adaptor.
Never eject the PC Card Adaptor or
Memory Card from the Media Slot while
it is in Read or Write operation.
Do not format your Memory Card using
your Computer. Always use your Camera
to format the Memory Card. Computer
formatted Memory Cards may not be
readable by the Media Slot.
Do not transfer other types of files from
your Computer into the Memory Card.
Adding files other than JPEG or MP3 files
on the same Memory Card may render it
unusable by the Media Slot.
Three simple steps to instant
viewing & sharing of digital Photos
1 First, remove the memory card from your
digital camera.
2 Plug the card into the PC card adapter.
3 Insert the PC card into the Media Slot on
your player.
➜ Playback will start automatically.
IMPORTANT!
– Ensure that the PCMCIA adaptor
is fully inserted into the slot.
23
JPEG and MP3 Operations
Digital Photo Manager JPEG
● This feature allows you to manage your
digital photos (JPEG only) on your TV
screen. Photos from Picture CDs and
Memory Cards can be viewed. See section
on Media Slot for details on Memory
Cards.
● You can also navigate to the buttons
above the Thumbnails to start a Slide
Show or to move to the Next/Previous
Page/Roll.
Photo Manager Menu Hierarchy
ToolBar
View
Edit
Album
Rotate
Zoom
Slide Show
Filters
Red Tint
Green Tint
Blue Tint
Flip Photo
Play Show
Timer
Repeat
Set Order
Album View
● When you insert a Memory Card
containing JPEG pictures into the Media
Slot (using the appropriate PCMCIA
Adaptor) or when you play a Picture CD
on your Disc tray, the DVD Player will
automatically recognize the pictures and
bring up the Photo Manager Album View.
● You will see Thumbnail images of the
digital photos (if available on Disc or
Card) tiled across the screen.
● If a Thumbnail is not available, the
appropriate message will be displayed in
the box. No filenames will be displayed.
● You can use your 1 234 buttons to
navigate through the Album view.
● Press OK on your selected photo to view
it on full screen.
24
Helpful Hint:
– At any time in the Digital Photo Manager,
pressing DISC MENU button on your
Remote Control will take you back to the
Album View.
IMPORTANT!
– At any time, pressing MODE
button will bring up the Application
Manager menu where you can select
the media type (eg. Pictures, Music)
and the source of the media type
(eg. Memory Card, Disc) that you
wish to play.
JPEG and MP3 Operations
Photo Manager Features
● To activate the Photo Manager Toolbar,
press the SYSTEM MENU button after
you have displayed the picture on full
screen.
➜ The Toolbar appears on screen.
➜ Select ZOOM to zoom into the
picture. Press OK repeatedly to increase
the zoom factor or 1 234 buttons to
pan across the picture.
Press ZOOM button to exit the zoom.
View Options
➜ Select ALBUM to go back to Album
(Thumbnail) view.
➜ Select ROTATE to rotate the picture
90 degrees right on your screen. The
rotated picture is NOT saved
Edit Options
➜ Select FILTERS to apply various edit
filters to your picture. The following filters
can be applied to get different effects on
your picture. Soften, Black and White,
Negative, Sepia and Color Negative.
➜ Select RED/GREEN/BLUE TINT to
increase or decrease the Red/Green/Blue
Tint of your picture.
25
JPEG and MP3 Operations
➜ Select RESET at any time to undo any
editing that you have applied to the
picture.
➜ Select TIMER to increase or decrease
the speed of Slide Show display.You can
choose between Fast, Medium and Slow.
Helpful Hints:
– The edited picture is NOT saved
automatically on to your Memory Card. Press
SAVE button to save back the edited picture.
– You cannot save an edited picture on to a
Picture CD Disc.
– RESET is NOT possible if you have already
saved the edited picture back to your
Memory Card.
➜ Select REPEAT to set the Slide Show
mode to Repeat or not.
Slide Show
➜ Select PLAY SHOW to start the Slide
Show mode. If you have not set a
particular order for the show (see SET
ORDER below), then by default all
pictures in the currect Roll will be played
in the order in which they appear in the
Card or Disc.
26
➜ Select ORDER to choose your favorite
pictures for Slide Show, to hide those you
do not want to be included in the Show,
and to set the order in which you want
them to be appearing in the Show.
➜ In this view, you can also navigate to
the buttons on screen.
Select ‘Album’ to go back to Album
(Thumbnail) view.
Select ‘Undo’ to undo the last order
setting operation you performed.
Select ‘Reset’ at any time to revert back to
the original order.
Select ‘Play Show’ to start the Slide Show.
JPEG and MP3 Operations
Digital Music Manager MP3
CD
● This feature allows you to organise and
play your digital music from various
sources. The following media types are
supported;
– Audio CDs
– MP3 files on CD-R/RW discs
– MP3 files on Memory Cards. See section
on Media Slot for details on Memory
Cards.
Music Manager Menu Hierarchy
ToolBar
Disc
Playlist
Play
Copy
Play
Create
Edit
Album/Track View
● When you insert a Memory Card
containing MP3 files into the Media Slot
(using the appropriate PCMCIA Adaptor)
or when you play an Audio CD/MP3 CD
on your Disc tray, the DVD Player will
automatically recognize the Music files
and bring up the Music Manager Album
View.
● You will see the list of Albums (if available
on Disc or Card) tiled across the screen.
● If no albums are available, the list of Tracks
will be displayed.
● You can use your 1 234 buttons to
navigate through the Album/Track view.
● Press OK or PLAY to start playback.
● Press 2 continuously to view Track Info
(like Artist name, Genre, Track Time etc.)
if available.
Helpful Hint:
– At any time in the Digital Music
Manager, pressing DISC MENU button on
your Remote Control will take you back to
the Album View.
IMPORTANT!
– At any time, with a valid MP3 CD
in the tray and a valid Memory Card
in the Media Slot, pressing SAVE
button will initiate the copy of
selected Tracks from the Disc to the
Memory Card.
– Pressing MODE button will bring
up the Application Manager menu
where you can select the media type
(eg. Pictures, Music) and the source
of the media type (eg. Memory Card,
Disc) that you wish to play.
27
JPEG and MP3 Operation
Music Manager Features
● To activate the Music Manager Toolbar,
press 1 button while in the Album view.
➜ The Toolbar appears on screen with
highlight on DISC,PLAY.
Playlist Options
➜ Select PLAY to view existing Playlists
and to start playback.
Play Options
➜ Select PLAY to go back to Album/Track
view and start playback.
➜ Select COPY to copy Albums/Tracks
from an MP3 CD to a valid Memory Card.
➜ Select CREATE to create a new Playlist.
You can give a name to the new Playlist
using the Remote Control digit buttons
which operate like a Mobile Phone
alphanumeric keypad.
➜ Maximum of 99 Album/Tracks can be
saved into the playlist.
➜ Select EDIT to add new Albums/Tracks,
to re-order or delete Album/Tracks in an
existing Playlist or to delete an existing
Playlist completely. Use CLEAR button to
delete Albums/Tracks in Playlist.
28
DVD Menu Options
Preferences
Picture – Video shift
In the Preferences menu, you can
customize your DVD player when playing
a DVD disc to suit your own personal
requirements and settings.
Video shift can be used to adjust the
horizontal position of the picture on your
TV screen by scrolling the slider to the
left or right.
General operation
1 Press SYSTEM MENU on the Remote
Control.
Picture
Preference
Contrast
2 Press 4 to select ‘Preferences’.
3 Use 1 2 3 4 to navigate submenus and
Sharpness
Saturation
Video Shift
1
select your preferred option.
4 To remove the menu, press SYSTEM
MENU.
➜ At any time, in the menu, you can press
RETURN key on your Remote Control
to go back one level in the system menu.
Picture – Color Setting
(Smart Picture)
You can select from one of five predefined
sets of color settings and one set
(Personal) which you can define yourself.
Picture
Preference
Colour Setting
Use ↓ or → to change the value, OK to confirm, ← or ↑ to move to
other options
Sound – Night Mode
On
When you want to optimize the dynamics
of your sound output. High volume
outputs are softened, enabling you to
watch your favorite action movie without
disturbing others at night.
Off
To enjoy the surround sound with its full
dynamic range.
Colour Setting
Animation
Sound
Rich
Brightness
Natural
Contrast
Soft
Sharpness
Personal
Preference
Night Mode
Off
On
Karaoke Vocal
Use ↓ or ↑ to change the values, OK to confirm, ← to leave the
submenu
1 When Personal is selected it allows you
to fine-tune saturation, brightness,
contrast and sharpness.
Use ↓ or → to change the value, OK to confirm, ← or ↑ to move to
other options
2 Use 2 or 1 keys to adjust the values of
these parameters.
3 Press OK or 1 to exit.
29
DVD Menu Options
Sound – Karaoke vocal
Features – Helpline
On
Downmixes the karaoke channels on a
multi-channel Karaoke disc to normal
stereo - allowing you to hear both the
lyrics and music together.
On
Helpline appears at the bottom of the TV
screen with a brief description of the
selected option.
Off
If you no longer require the help-line.
Sound
Preference
Features
Preference
Night Mode
Karaoke Vocal
Off
On
Wake-up Timer
Helpline
On
Off
Beeper
Status Window
Use ↓ or → to change the value, OK to confirm, ← or ↑ to move to
other options
Use → to toggle the values ↓ or ↑ to move to other options..
Features – Wake-up Timer
The DVD player will turn on automatically
after the selected time. Disc playback may
begin automatically (depending on the
type of disc in tray). Pressing any button
on the DVD player or Remote Control
during Standby mode will cancel the
Wakeup timer mode.
Features
Preference
Wake-up Timer
27
Helpline
Helpful Hint:
– For certain features, the help-line may
remain visible even if you have turned it OFF
in the menu. This is only to offer special
instructions on how to operate those
functions.
Features – Beeper
The DVD player will beep each time you
press a button on the DVD player or
Remote Control. The beeper can be set
to ON or OFF.
Beeper
Status Window
Features
Preference
Use ↓ or ↑ to change the values, OK to confirm, ← to leave the
submenu
Wake-up Timer
Helpline
Helpful Hint:
– The values for the Wake-up Timer that
you can choose will be in steps of 30
minutes.
30
Beeper
Off
On
Status Window
Use → to toggle the values ↓ or ↑ to move to other options..
DVD Menu Options
Features – Status Window
On
Displays the current play state and time
information and appears on the TV
screen.
Off
No more status updates are shown on
screen.
Features
Setup
SETUP menu consists of settings which
are essential for selecting the appropriate
audio and video settings on your DVD
Player; to match your equipment like TV,
Receiver etc. It also allows you to choose
default viewing settings like language,
access control etc.
● Playback will stop when SETUP menu is
entered.
Preference
General operation
Wake-up Timer
1 Press SYSTEM MENU on the Remote
Helpline
Control.
Beeper
Status Window
On
Off
Use → to toggle the values ↓ or ↑ to move to other options..
2 Press 4 to select ‘Setup’.
3 Use 1 2 3 4 to navigate submenus and
select your preferred option.
4 To remove the menu, press SYSTEM
Features – Display DIM
This function is used to adjust the
brightness of display on the front panel of
the DVD Player.
MENU.
➜ At any time, in the menu, you can press
RETURN key on your Remote Control
to go back one level in the system menu.
Language
Features
● Refer to Getting Started for Menu
Language, Default Audio and Default
Subtitle on section “Setting Language
Preference” in page 18.
Preference
Helpline
Beeper
Status Window
Display Dim
0
TV - TV System
Use → to toggle the values ↓ or ↑ to move to other options..
● Refer to Getting Started for TV System
on section “Selecting the color system that
corresponds to your TV” in page 18.
31
DVD Menu Options
TV – TV Shape
Audio – Digital output
Set the aspect ratio of the DVD Player
according to the TV you have connected.
Set the Digital output according to your
optional audio equipment connection.
All
If you have connected your DIGITAL
AUDIO OUT to a multi-channel decoder/
receiver.
PCM Only
Only if your receiver is not capable of
decoding multi-channel audio.
Off
Select this to deactivate the digital output.
TV
Setup
TV Shape
TV System
TV Shape
4:3 Pan Scan
Video Output
4:3 Letterbox
16:9
Use ↓ or ↑ to change the values, OK to confirm, ← to leave the
submenu
4:3 Pan Scan
If you have a normal TV and want both
sides of the picture to be trimmed or
formatted to fit your TV screen.
4:3 Letter Box
If you have a normal TV. In this case, a
wide picture with black bands on the
upper and lower portions of the TV
screen will be displayed .
16:9
If you have a wide-screen TV.
16:9
4:3
Letter Box
4:3
Pan Scan
Helpful Hint:
– TV shape setting for Pan Scan is subject
to availability on the disc.
32
Audio
Setup
Digital Output
Digital Output
PCM Only
All
Analog Output
Off
PCM Output
Use ↓ or ↑ to change the values, OK to confirm, ← to leave the
submenu
DVD Menu Options
Audio – Analog output
Allows you to set the stereo analog
output of your DVD Player.
Stereo
When set to Stereo, the Dolby Digital
signals from the disc are downmixed
directly into analog stereo from the
AUDIO OUT jacks. Use this option when
connecting directly to a TV or stereo.
Dolby Surround-compatible
Use this option only when your DVD
Player’s AUDIO OUT jacks are connected
to a Dolby Pro-Logic decoder.
3D Sound
3D sound provides a virtual surround
sound experience using just two speakers.
Use this option when connecting directly
to a TV or stereo.
Audio
Setup
Analog output
Digital Output
Stereo
Analog Output
Dolby Surr-com
PCM Output
Audio – PCM Output
If you connect the DVD Player to a PCM
compatible receiver via the digital outpu
(coaxial or optical) you may need to
adjust PCM OUTPUT.
Audio
Setup
PCM output
Digital Output
48 kHz
Analog Output
96 kHz
PCM Output
Use ↓ or ↑ to change the values, OK to confirm, ← to leave the
submenu
48 kHz
When 48kHz has been selected, 96kHz
PCM data, (if available on disc) will be
converted to 48kHz.
96 kHz
96kHz PCM audio on non-copy protected
DVD discs will be played back at 96kHz.
For copy protected discs, the digital
output will be downsampled to 48kHz.
3D Sound
Features – PBC
Use ↓ or ↑ to change the values, OK to confirm, ← to leave the
submenu
Playback Control feature (only for VCD
2.0) can be set to ON or OFF (see page
20 ‘Using the Disc Menu’ ).
Features
Setup
PBC
Off
On
Sleep Timer
Use → to toggle the values ↓ or ↑ to move to other options..
33
DVD Menu Options
Features – Sleep Timer
On
The DVD Player will go to standby after a
pre-defined time.
Access – Parental Level
Access
Setup
Enter PIN
Country
Features
Parental Level
Setup
3
Change Pin
PBC
Sleep Timer
On
Off
Use ↓ or → to change the value, OK to confirm, ← or ↑ to move to
other options
1 Press SYSTEM MENU and press 4 to
Use → to toggle the values ↓ or ↑ to move to other options..
➜ Playback will stop.
Access
¶ Some DVDs may have a parental level
assigned to the complete disc or to
certain scenes on the disc. This feature
lets you set playback limitation level. The
rating levels are from 1 to 8 and are
country dependant.You can prohibit the
playing of certain discs that are not
suitable for your children or have certain
discs played with alternative scenes (if
available on disc).
Access – Country
● Parental Level codings are applicable only
for the country specified on the disc set
by the disc manufacturer.
● So, for some discs, you may need to
choose the country for which the disc is
coded in order to play at the Parental
Level you select.
Access
Setup
Country
Enter PIN
select ‘Setup’ option.
2 Press 2 to select ‘Access’.
Yugoslavia
Country
Albania
Parental Level
Andorra
Change PIN
Austria
Bahrain
Use ↓ or ↑ to change the values, OK to confirm, ← to leave the
submenu
3 Enter your correct 4-digit code.
4 Press 4 to ‘Parental Level’, then press 2/1
to select a rating from 1 to 8 for the disc
inserted.
➜ Select “0” to deactivate Parental Level
➜ Select a rating from 1 to 8; discs or
scenes with the same rating or lower will
play. Higher rated discs or scenes will not
play unless you enter your 4-digit code.
5 Press SYSTEM MENU again to exit the
Setup menu.
Rating explanations
8 ADULT
– Mature material; should be viewed only by
adults due to graphic sexual material, violence or
language.
7 NC-17
– No children under age 17; not recommended
viewing for children under age 17.
6 PG-R
– Parental Guidance - Restricted; recommended
that parents restrict children under 17 from
viewing or allow to view only when supervised by
a parent or adult guardian.
4 PG13
– Material is unsuitable for children under age 13.
3 PG
– Parental Guidance suggested.
1G
– General Audience; recommended as acceptable
for viewers of all ages.
0 NO PARENTAL
– It will play all discs.
34
DVD Menu Options
Access – Change PIN
1 Press SYSTEM MENU and press 4 to
select ‘Setup’ option.
2 Press 2 to select ‘Access’.
➜ Playback will stop.
3 Enter your 4-digit code.
4 Press 4 to ‘Change Pin’, then press 2 to
Access – Disc Lock
When the disc is locked, the player will
store its specific code into the memory
for future identification. For the next
playback, the DVD Player will prompt you
to enter the password. Then, press OK to
load the disc.
enter the 4-digit code again.
5 Enter the new 4-digit code.
6 Enter the new 4-digit code a second time
to confirm.
➜ The new 4 digit code will take effect.
Access
Setup
Country
Parental Level
Change Pin
Disc Lock
Off
On
7 Press SYSTEM MENU again to exit the
Setup menu.
Use → to toggle the values ↓ or ↑ to move to other options..
1 Press SYSTEM MENU and press 4 to
select ‘Setup’ option.
2 Press 2 to select ‘Access’.
➜ Playback will stop.
3 Press the 34 keys to highlight DISC
LOCK.
4 Enter its submenu by pressing the 2 key.
➜ Discs will not play when “ON” is
selected, unless you enter your 4-digit
code.
5 Press SYSTEM MENU again to exit the
Setup menu.
Notes:
– When a locked disc is loading, the DVD
Player will prompt you to enter your
password (0000 is the default password).
– To change the password, refer to the
option CHANGE PIN.
35
Troubleshooting
WARNING
Under no circumstances should you try to repair the system yourself, as this will
invalidate the warranty. Do not open the system as there is a risk of electric shock.
If a fault occurs, first check the points listed below before taking the system for repair.
Problem
Solution
No power
– Check if the AC power cord is properly connected.
No picture
– Check if the TV is switched on.
– Check the video connection
Distorted picture
– Sometimes a small amount of picture distortion may
appear depending on the disc being played back. This
is not a malfunction.
– Connect DVD Player directly to the TV.
– Make sure the disc is compatible with the DVD/
Player.
– Ensure that the DVD Player’s TV System is set to
match that of the Disc and your TV.
Completely distorted picture or
black/white picture with DVD
36
No sound or distorted sound
– Adjust the volume.
– Check that the speakers are connected correctly.
No audio at digital output
– Check the digital connections.
– Check if the audio format of the selected audio
language matches your receiver capabilities.
Picture freezes momentarily
during playback
– Check the disc for fingerprints/scratches and
clean with a soft cloth wiping from center to edge.
Disc can’t be played
–
–
–
–
No return to start-up screen when
disc is removed
– Reset the unit by switching the player off, then on
again.
The player does not respond to
the Remote Control
– Aim the Remote Control directly at the sensor
on the front of the player.
– Reduce the distance to the player.
– Replace the batteries in the Remote Control.
– Re-insert the batteries with their polarities (+/–
signs) as indicated.
Buttons do not work or player stops
responding
– To completely reset the player, unplug the AC
cord from the AC outlet for 5-10 seconds.
The DVD+R/DVD+RW/CD-R must be finalized.
Ensure the disc label is facing up.
Check if the disc is defective by trying another disc.
If you have recorded a Picture CD or MP3 CD
yourself, ensure that your disc contains at least 10
pictures or 5 MP3 tracks.
– Region code incorrect.
Troubleshooting
Problem
Solution
Player does not respond to some
operating commands during playback.
– Operations may not be permitted by the disc.
Refer to the instructions of the disc jacket.
DVD Player cannot read
CDs/DVDs
– Use a commonly available cleaning CD/DVD to
clean the lens before sending the DVD Player for
repair.
Menu items cannot be selected
– Press STOP twice before selecting System Menu.
– Depending on the disc availability, some menu items
cannot be selected.
DVD Player cannot read Memory Cards – Check whether you have valid content in the
Memory Card.
– Ensure that you are using the correct PC Card
adaptor.
– Insert the PC Card fully into the Media Slot.
If you are unable to remedy a problem by following these hints, consult your dealer
or service center (HOTLINE).
37
Specifications
TV STANDARD (PAL/50Hz) (NTSC/60Hz)
AUDIO PERFORMANCE
Number of lines
Playback
DA Converter
DVD
625
Multistandard
525
(PAL/NTSC)
VIDEO PERFORMANCE
Component video
output (480i/p)
Video output
S-Video output
Video Shift
Y: 1 Vpp into 75 ohm
PbPr: 0.7 Vpp into 75 ohm
1 Vpp into 75 ohm
Y: 1 Vpp into 75 ohm
C: 0.3 Vpp into 75 ohm
Left/Right
AUDIO FORMAT
Digital
MPEG
Dolby Digital
PCM
MP3 (ISO 9660)
Compressed
Digital
16, 20, 24 bits
fs, 44.1, 48, 96 kHz
96, 112, 128, 256 kpps
& variable bit rate
fs, 32, 44.1, 48kHz
24 bits
fs 96 kHz 4 Hz - 44 kHz
fs 48 kHz 4 Hz - 22 kHz
CD/Video CD
fs 44.1kHz 4 Hz - 20 kHz
S-Video CD
fs 48 kHz 4 Hz - 22 kHz
fs 44.1kHz 4 Hz - 20 kHz
Signal-Noise (1kHz)
100 dB
Dynamic Range (1kHz)
100 dB
Crosstalk (1kHz)
100 dB
Distortion and Noise (1kHz)
97 dB
MPEG MP3
MPEG Audio Layer 3
CONNECTIONS
Y Pb Pr output (480i/p)
Video output
S-Video output
Audio L+R output
Digital Output
Cinch 3x (green, blue, red)
Cinch (yellow)
Mini DIN, 4 pins
Cinch (white/red)
1 coaxial, 1 optical
IEC958 for CDDA / LPCM
IEC1937 for MPEG1/2, Dolby
Digital, DTS
Analog Stereo Sound
Dolby Surround-compatible downmix from Dolby Digital
multi-channel sound
3D Sound for virtual surround sound on 2 speakers
CABINET
PiCTURE FORMAT
Dimensions (w x h x d)
Weight
Digital Images
.JPG, .JPEG
Maximum resolution 5 Mega Pixels
POWER SUPPLY (UNIVERSAL)
435 x 51 x 302 mm
Approximately 3.0 Kg
Power inlet
120V, 60Hz
Power usage
Approx. 20 W
Power usage standby < 4 W
* typical playing time for movie with 2 spoken languages and
3 subtitle languages
Specifications subject to change without prior notice
38
Glossary
Analog: Sound that has not been turned into
numbers. Analog sound varies, while digital sound has
specific numerical values. These jacks send audio
through two channels, the left and right.
Aspect ratio: The ratio of vertical and horizontal
sizes of a displayed image. The horizontal vs. vertical
ratio of conventional TVs. is 4:3, and that of widescreens is 16:9.
AUDIO OUT Jacks: Jacks on the back of the DVD
System that send audio to another system (TV, Stereo,
etc.).
Bit Rate: The amount of data used to hold a given
length of music; measured in kilobits per seconds, or
kbps. Or, the speed at which you record. Generally,
the higher the bit rate, or the higher the recording
speed, the better the sound quality. However, higher
bit rates use more space on a Disc.
Chapter: Sections of a picture or a music piece on a
DVD that are smaller than titles. A title is composed
of several chapters. Each chapter is assigned a chapter
number enabling you to locate the chapter you want.
Component Video Out Jacks: Jacks on the back of
the DVD System that send high-quality video to a TV
that has Component Video In jacks (R/G/B, Y/Pb/Pr,
etc.).
Disc menu: A screen display prepared for allowing
selection of images, sounds, subtitles, multi-angles, etc
recorded on a DVD.
Digital: Sound that has been converted into
numerical values. Digital sound is available when you
use the DIGITAL AUDIO OUT COAXIAL or
OPTICAL jacks. These jacks send audio through
multiple channels, instead of just two channels as
analog does.
Dolby Digital: A surround sound system developed
by Dolby Laboratories containing up to six channels
of digital audio (front left and right, surround left and
right center and subwoofer).
DTS: Digital Theater Systems. This is a surround
sound system, but it is different from Dolby Digital.
The formats were developed by different companies.
JPEG: A very common digital still picture format. A
still-picture data compression system proposed by the
Joint Photographic Expert Group, which features small
decrease in image quality in spite of its high
compression ratio.
MP3: A file format with a sound data compression
system. “MP3” is the abbreviation of Motion Picture
Experts Group 1 (or MPEG-1) Audio Layer 3. By using
MP3 format. one CD-R or CD-RW can contain about
10 times as much data volume as a regular CD can.
Multichannel: DVD is specified to have each sound
track constitute one sound field. Multichannel refers
to a structure of sound tracks having three or more
channels.
Parental Level: A function of the DVD to limit
playback of the disc by the age of the users according
to the limitation level in each country. The limitation
varies from disc to disc; when it is activated, playback
will be prohibited if the software’s level is higher than
the user-set level.
PCM (Pulse Code Modulation): A system for
converting analog sound signal to digital signal for
later processing, with no data compression used in
conversion.
PCMCIA Card (PC Card): A credit-card size
adaptor that allows you to read picture files (JPG) and
MP3 files from Memory Card.
Playback control (PBC): Refers to the signal
recorded on video CDs or SVCDs for controlling
reproduction. By using menu screens recorded on a
Video CD or SVCD that supports PBC, you can enjoy
interactive-type software as well as software having a
search function.
Progressive Scan: It displays all the horizontal lines
of a picture at one time, as a signal frame. This system
can convert the interlaced video from DVD into
progressive format for connection to a progressive
display. It dramatically increases the vertical
resolution.
Region code: A system for allowing discs to be
played back only in the region designated beforehand.
This unit will only play discs that have compatible
region codes. You can find the region code of your
unit by looking on the product label. Some discs are
compatible with more than one region (or ALL
regions).
S-Video: Produces a clear picture by sending
separate signals for the luminance and the color. You
can use S-Video only if your TV has S- video In jack.
Title: The longest section of a picture or music
feature on DVD, music, etc., in video software, or the
entire album in audio software. Each title is assigned a
title number enabling you to locate the title you want.
VIDEO OUT jack: Jack on the back of the DVD
System that sends video to a TV.
39
52 Limited Warranty
Digital Video Disc Player
90 days Free Product Exchange / 91 days–One Year Reduced-Cost Exchange
WHO IS COVERED?
You must have proof of the date of purchase to exchange
your product. A sales receipt or other document showing
the date that you purchased the product is considered such
proof.
WHAT IS COVERED?
Warranty coverage begins the day you buy your product. For
90 days thereafter, you may exchange the defective product
for a free new or renewed product through Philips.
From 91 days to one year from the date of purchase, you will
pay a preset exchange fee to obtain a new or renewed
product. Follow the exchange procedures on the next page.
This exchange opportunity ends one year after the date of
purchase.The replacement product is covered only for the
warranty period of the original product.When the warranty
on the original product expires, the warranty on all replaced
products also expires.
When it is necessary for you to ship the product to Philips for
exchange, you will pay the shipping costs for shipment to Philips.
Philips will pay the shipping costs when returning a product to
you.
and keep both nearby. Also keep the original box and
packing material in case you need to return your product.
BEFORE EXCHANGING THE PRODUCT...
Please check your owner’s manual before exchanging the
product. Adjustments of the controls discussed there may
save you time and money.
LIMITATION OF LIABILITY AND REMEDY...
PHILIPS IS NOT LIABLE UNDER ANY CIRCUMSTANCES
FOR ANY DIRECT, INDIRECT, SPECIAL, INCIDENTAL, OR
CONSEQUENTIAL DAMAGES, HOWSOEVER INCURRED,
EVEN IF NOTIFIED OF THE POSSIBILITY OF SUCH
DAMAGES.
TO THE EXTENT PERMITTED BY LOCAL LAW,THE
REMEDIES PROVIDED IN THIS WARRANTY STATEMENT
ARE YOUR SOLE AND EXCLUSIVE REMEDY.
THIS LIMITED WARRANTY GIVES YOU SPECIFIC LEGAL
RIGHTS, AND YOU MAY ALSO HAVE OTHER RIGHTS
WHICH VARY FROM STATE/PROVINCE TO
STATE/PROVINCE.
TO EXCHANGE YOUR PRODUCT IN THE U.S.A.,
PUERTO RICO, OR U.S. VIRGIN ISLANDS...
FOLLOW THE INSTRUCTIONS STATED PREVIOUSLY IN
THE “WHAT IS COVERED” SECTION, OR REFER TO THE
EXCHANGE INSTRUCTIONS ON THE NEXT PAGE.
IN THE U.S.A., PUERTO RICO, AND U.S.VIRGIN ISLANDS,
ALL IMPLIED WARRANTIES, INCLUDING THE IMPLIED
WARRANTIES OF NON-INFRINGEMENT,
MERCHANTABILITY AND FITNESS FOR A PARTICULAR
PURPOSE, ARE SPECIFICALLY DISCLAIMED, AND TO THE
EXTENT INCONSISTENT WITH LAW OF THE
LOCALITY OF THE USER, LIMITED IN DURATION TO
THE DURATION OF THIS EXPRESS WARRANTY.
BECAUSE SOME STATES DO NOT ALLOW LIMITATIONS
ON HOW LONG AN IMPLIED WARRANTY MAY LAST,
THIS LIMITATION MAY NOT APPLY TO YOU.
WHAT IS EXCLUDED?
Your warranty does not cover:
• shipping charges to return defective product.
• labor charges for installation or setup of the product,
adjustment of customer controls on the product, and
installation or repair of antenna systems outside of the
product.
• product repair and/or part replacement because of
improper installation, abuse, neglect, misuse, accident,
unauthorized repair or other cause not within the
control of Philips.
• a product that requires modification or adaptation to
enable it to operate in any country other than the
country for which it was designed, manufactured,
approved and/or authorized, or repair of products
damaged by these modifications.
• incidental or consequential damages resulting from the
product. (Some states do not allow the exclusion of
incidental or consequential damages, so the above
exclusion may not apply to you.This includes, but is not
limited to, prerecorded material, whether copyrighted or
not copyrighted.)
• a product used for commercial or institutional purposes
(including but not limited to rental purposes).
TO EXCHANGE A PRODUCT IN CANADA...
Please contact Philips at:
1-800-661-6162 (French Speaking)
1-800-531-0039 (English or Spanish Speaking)
In Canada, this warranty is given in lieu of all other
warranties.There are no other warranties, express or
implied, including any implied warranties of merchantability
or fitness for a particular purpose.
WHERE IS EXCHANGE AVAILABLE?
Warranty exchange is available in all countries where the
product is officially distributed by Philips. In countries where
Philips does not distribute the product, the local Philips
service organization will attempt to exchange the product,
although there may be a delay if the appropriate product is
not readily available.
REMEMBER...
Please record below the model and serial numbers found on
the product. Also, please fill out and mail your warranty
registration card promptly. It will be easier for us to notify
you if necessary.
MODEL #__________________________________
SERIAL #__________________________________
MAKE SURE YOU KEEP...
Please keep your sales receipt or other document showing
proof of date of purchase. Attach it to the owner’s manual
Philips, P.O. Box 520890, Miami, FL 33152 (402) 536-4171
EL6478E004 / 3-02
40
Limited Warranty (cont’d) 53
EXCHANGE INSTRUCTIONS
To exchange your product with Philips (per the warranty conditions stated previously), remember:
• If you exchange the product within 90 days of the original purchase, there is no cost to you.*
• If you exchange the product more than 90 days after but less than one year after the day of original purchase, contact
Philips at 1-800-531-0039 to determine the preset cost for exchange.
• If you do not have your original sales receipt, or if you have any questions, call Philips at 1-800-531-0039.
To obtain a replacement product from Philips:
1. Contact Philips at 1-800-531-0039 to determine the cost for exchange.
2. Complete the Exchange Form below.
3. Pack the product and its accessories in the original box or a suitable alternative.You will receive replacement
accessories with your replacement product. For packing details, call Philips at 1-800-531-0039.
4. Put the completed Exchange Form, a copy of the original sales receipt, and the proper payment amount into an
envelope. DO NOT SEND CASH. Do not staple or clip these items together. Label the envelope “Return Documents
Enclosed.” Place this envelope in the box with the product.
5. Seal the box with packing tape and return the product via United Parcel Service (UPS), insured and freight prepaid, to:
Philips Exchange Program
Suite A
406 North Irish Street
Greeneville,TN 37745
ATTENTION: DVD EXCHANGE
A replacement will be sent to you via UPS within 48 business hours of Philips’ receipt of the product.
*When it is necessary for you to ship the product to Philips for exchange, you will pay the shipping costs for shipment to Philips.
Philips will pay the shipping costs when returning a product to you.
EXCHANGE FORM
Your Address (street address to which replacement should be delivered, no P.O. boxes allowed):
Name:
Street Address:
Apt. #:
City:
State/Province:
Zip Code/Postal Code:
Phone (day):
Phone (night):
Exchange Fee:
+ Sales Tax:
= Total:
Method of Payment: (Check one. Please, no cash or CODs.)
_____ Check/Money order
Check/Money order No.
_____
_____
_____
_____
American Express
Visa
Novus/Discover
Mastercard
Account number
___________________________
___________________________
___________________________
___________________________
Expiration date
__________
__________
__________
__________
Signature: _____________________________________________________________
Detailed reason for return, use additional paper if necessary: _____________________________________________
_______________________________________________________________________________________________
Model Number
Serial Number
Remember, the return box should include the following:
• The product,
•
• Completed Exchange Form and sales receipt,
•
Accessories supplied with the product, and
Payment, if applicable.
41
PHILIPS CONSUMER ELECTRONICS COMPANY
A Division of Philips Electronics North America Corporation, Knoxville, Tennessee 37914-1810, USA
DVD 760
CLASS 1
LASER PRODUCT
3139 246 12311
IB8444E001
The products and services described herein are
not necessarily available in all countries
Due to continuous product improvements this
document is subject to change without notice.
42
Printed in China
SL-0319/17-1