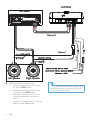
1
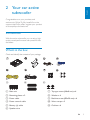
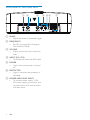
Register your product and get support at
www.philips.com/welcome
CSM1000
EN
User manual
ES
Manual del usuario
13
PT-BR
Manual do Usuário
25
RU
Руководство пользователя
37
=+&1 Ⴌ߀൱Ҭ
3
49
English
Contents
1 Important
Safety
Notice
2 Your car active subwoofer
Introduction
What’s in the box
Overview of the main unit
3 Installation
Mount the subwoofer in car
Connect wires
4 Use your active subwoofer
Adjust phase
Adjust frequency
Adjust volume
About the protector indicator
4
4
4
5
5
5
6
7
7
7
9
9
9
9
9
5 Product information
10
6 Troubleshooting
11
EN
3
1 Important
Any changes or modifications made to this
device that are not expressly approved by
Philips Consumer Lifestyle may void the user’s
authority to operate the equipment.
Safety
•
•
•
•
•
•
•
•
Read and understand all instructions
before you use the apparatus. If damage
is caused by failure to follow instructions,
the warranty does not apply.
This unit is designed for negative ground
(earth) 12 V DC operation only.
Use only the supplied mounting hardware
for a safe and secure installation.
Do not connect any active speakers (with
built-in amplifier) to the speaker terminals
of the unit. Doing so may damage the
active speakers.
To ensure safe driving, adjust the volume
to a safe and comfortable level.
To avoid short circuit, do not expose the
apparatus, remote control or remote
control batteries to rain or water.
Never expose the apparatus to direct
sunlight, naked flames or heat.
Clean the apparatus with soft, damp
cloth. Never use substances such as
alcohol, chemicals or household cleaners
on the apparatus.
Notice
Environmental information
All unnecessary packaging has been omitted.
We have tried to make the packaging easy to
separate into three materials: cardboard (box),
polystyrene foam (buffer) and polyethylene
(bags, protective foam sheet.)
Your system consists of materials which can
be recycled and reused if disassembled by
a specialized company. Please observe the
local regulations regarding the disposal of
packaging materials, exhausted batteries and
old equipment.
4
EN
2010 © Koninklijke Philips Electronics N.V. All
rights reserved.
Specifications are subject to change without
notice. Trademarks are the property of
Koninklijke Philips Electronics N.V. or their
respective owners. Philips reserves the right
to change products at any time without being
obliged to adjust earlier supplies accordingly.
English
2 Your car active
subwoofer
Congratulations on your purchase, and
welcome to Philips! To fully benefit from the
support that Philips offers, register your product
at www.philips.com/welcome.
Introduction
With the active subwoofer, you can enjoy highquality sound performance with powerful bass
and beats.
What’s in the box
Check and identify the contents of your package:
i
j
k
a Main unit
g Tap type screw (M6x8 mm) x 4
b Mounting plates x 2
h Washer x 4
c Power cable
i Machine screw (Ø5x20 mm) x 4
d Power control cable
j Velcro straps x 2
e Battery (+) cable
k Cushion x 4
f Speaker wire
EN
5
Overview of the main unit
a
b
c
a PHASE
• Adjust the phase of subwoofer signal.
b FREQUENCY
• Set LPF (low-pass-filter) frequency
from 80Hz to 120Hz.
c VOLUME
• Adjust volume from 0 to maximum
level.
d INPUT (Ch1, Ch2)
• To connect car audio with RCA cable.
e POWER
• Light in blue when power is turned
on.
f PROTECTED
• Lights in red when the protector is
activated.
g POWER/HIGH LEVEL INPUT
• To connect power supply (+12VDC power supply, ground wire, and
remote control wire) and car audio
with bare wires.
6
EN
d ef
g
English
3 Installation
Note
• Follow all mounting and wiring instructions.
Mount the subwoofer in car
You can mount the subwoofer either under a
seat or on the rear tray.
Note
• Make sure that the mounting location is safe
for drilling and wiring, and it will not interfere
with the mechanical and electrical components
of the vehicle.
• For under-seat installation, make sure that it
does not obstruct seat mobility.
Connect wires
Caution
1
Place the subwoofer on the location for
installation.
2
Mark the positions of the four screw
holes.
3
Drill the holes with driller of
approximately 4mm in diameter.
4
Mount the subwoofer with the supplied
screws and brackets.
• Ensure that all loose leads are insulated with
electrical tape.
1
Connect the subwoofer to your car audio
by:
• (option 1) connect to bare speaker
wires from car audio.
• (option 2) connect to the car audio
directly via an RCA cable.
EN
7
CSM1000
Car audio
Option 2
Option 1
Left speaker
2
8
Right speaker
Make the power connection by:
• connect the ground wire from the
car to the GND socket.
• connect the remote wire from the
car audio to the REM socket.
• With this connection, you can turn
on/off the subwoofer with the car
audio.
• connect the power wire from the car
battery to the +12V socket
EN
Tip
• If your car audio does not have remote output,
connect the remote input terminal (REM) to
the accessory power supply.
Note
• Before playing music, position all knobs at the
minimum level.
Adjust phase
The location of the subwoofer determines the
overall quality of the music. Even you are seat at
sweet spot, the bass effect you heard might not
in-phase with the overall music signal, for the
subwoofer created a phase difference. In this
case, you can change the phase of bass signal to
enhance overall bass response, as well as overall
feeling of the music.
1
Press down PHASE.
» The bass signal is 180 degree out of
phase with the original one.
•
To resume original bass effect, press
PHASE again to release the button.
About the protector
indicator
English
4 Use your active
subwoofer
The subwoofer has a built-in protection circuit
to protect the transistors and speakers in
following conditions:
• The subwoofer is overheated.
• A DC current is generated in the
speakers.
• The battery voltage is over low or
over high. Or
• The speaker terminals are short
circuited.
When the PROTECTED indicator
lights up in red, the subwoofer shuts
down automatically. In this case,
please:
1
Take out the disc or tape and turn off the
car audio.
2
3
Check the cause of the malfunction.
If the subwoofer is overheated, let it cool
down.
Adjust frequency
You can change LPF (low-pass-filter) frequency
from 80Hz to 120Hz.
1
Rotate FREQUENCY to adjust
frequency.
Adjust volume
You can change volume from minimum level (0)
to maximum level.
1
Rotate VOLUME.
EN
9
5 Product
information
Note
• Product information is subject to change
without prior notice.
Speaker type
Maximum output power
Rated power
Operating frequency
Phase
S/N ratio
(rated power: 4ohms)
Sensitivity
(1% distortion)
Operating voltage
Dimensions (DxWxH)
Weight (main unit)
10
EN
Active subwoofer
550Watt
85Watt
80Hz ~ 120Hz
0°, 180°
95dB
100mV at RCA,
1.8V at speaker
level
14.4V
(10.5V ~ 16V)
240 x 350 x 80mm
3.9 kg
English
6 Troubleshooting
To keep the warranty valid, never try to repair
the system yourself.
If you encounter problems when using this
apparatus, check the following points before
requesting service. If the problem remains
unsolved, go to the Philips web site (www.
philips.com/welcome). When you contact
Philips, ensure that the apparatus is nearby
and the model number and serial number are
available.
The sound is too low.
•
The volume is not set correctly (see
“Adjust volume”).
The sound is interrupted or stopped suddenly.
•
The thermal protector is activated.
Reduce the volume.
•
The ventilation outlet is blocked. Remove
any obstructions from the outlet.
Alternate noise is heard.
•
The power connecting wires are installed
too close to the RCA pin cords.
•
The ground wire is not securely
connected to a metal point of the car.
•
Negative speaker wires touch the car
chassis.
Sound is distorted.
•
Make sure the speaker polarity is correct.
•
Adjust phase.
The protector indicator lights up in red.
•
The subwoofer is overheated. Cool down
the subwoofer.
The unit becomes abnormally hot.
•
Place the subwoofer in a well ventilated
location.
EN
11
© 2010 Koninklijke Philips Electronics N.V.
All rights reserved.
CSM1000_00_UM_V1.2