1
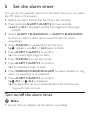
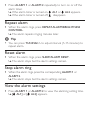
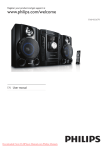
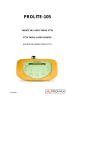
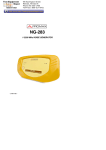
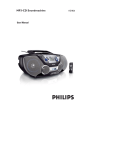
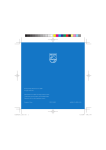
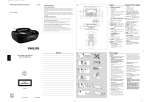
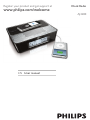
Register your product and get support at
Clock Radio
www.philips.com/welcome
AJ4200
EN User manual
1
a
f
b
g
h
i
j
k
c
d
e
l
m
n
o
2
3
1
Important
Safety
a
Read these instructions.
b
Keep these instructions.
c
Heed all warnings.
d
Follow all instructions.
e
Do not use this apparatus near water.
f
Clean only with dry cloth.
g
Do not block any ventilation openings. Install in accordance
with the manufacturer’s instructions.
h
Do not install near any heat sources such as radiators, heat
registers, stoves, or other apparatus (including amplifiers)
that produce heat.
i
Protect the power cord from being walked on or pinched,
particularly at plugs, convenience receptacles, and the point
where they exit from the apparatus.
j
Only use attachments/accessories specified by the
manufacturer.
k
Use only with the cart, stand, tripod, bracket, or
table specified by the manufacturer or sold with the
apparatus.When a cart is used, use caution when
moving the cart/apparatus combination to avoid injury
from tip-over.
l
Unplug this apparatus during lightning storms or when
unused for long periods of time.
m
Refer all servicing to qualified service personnel. Servicing is
required when the apparatus has been damaged in any way,
such as power-supply cord or plug is damaged, liquid has
been spilled or objects have fallen into the apparatus, the
apparatus has been exposed to rain or moisture, does not
operate normally, or has been dropped.
n
Apparatus shall not be exposed to dripping or splashing.
o
Do not place any sources of danger on the apparatus (e.g.
liquid filled objects, lighted candles).
p
This product may contain lead and mercury. Disposal of
these materials may be regulated due to environmental
considerations. For disposal or recycling information, please
contact your local authorities or the Electronic Industries
Alliance: www.eiae.org.
q
Where the plug is used as the disconnect device, the
disconnect device shall remain readily operable.
C Warning
•
•
•
•
•
Never remove the casing of this apparatus.
Never lubricate any part of this apparatus.
Never place this apparatus on other electrical equipment.
Keep this apparatus away from direct sunlight, naked flames or
heat.
Ensure that you always have easy access to the power cord, plug
or adaptor to disconnect the apparatus from the power.
Notice
This product complies with the radio interference
requirements of the European Community.
This product complies with the requirements of the following
directives and guidelines: 2004/108/EC + 2006/95/EC
Any changes or modifications made to this device that are not
expressly approved by Philips Consumer Lifestyle may void the
user’s authority to operate the equipment.
Recycling
Your product is designed and manufactured with high
quality materials and components, which can be recycled
and reused.
When you see the crossed-out wheel bin symbol attached
to a product, it means the product is covered by the
European Directive 2002/96/EC:
Never dispose of your product with other household
waste. Please inform yourself about the local rules on the separate
collection of electrical and electronic products. The correct
disposal of your old product helps prevent potentially negative
consequences on the environment and human health.
Environmental information
All unnecessary packaging has been omitted. We have tried to
make the packaging easy to separate into three materials: cardboard
(box), polystyrene foam (buffer) and polyethylene (bags, protective
foam sheet.)
Your system consists of materials which can be recycled and reused
if disassembled by a specialized company. Please observe the local
regulations regarding the disposal of packaging materials, exhausted
batteries and old equipment.
D Note
• The type plate is located on the bottom of the apparatus.
2
Your clock radio
Congratulations on your purchase, and welcome to Philips! To fully
benefit from the support that Philips offers, register your product at
www.philips.com/welcome.
Introduction
With this clock radio with mobile phone charger, you can:
• enjoy the FM radio
• know the time
• wake up to favourite radio tone
• set two alarms to ring at different time
• charge a mobile phone of major brands.
What’s in the box
Check and identify the contents of your package:
• Main unit
• AC power adapter
• User manual
• Quick start guide
• Compatibility sheet
Overview of the main unit (See 1)
a
SLEEP/ALARM RESET
• Set sleep timer.
• Reset alarm setting.
b
WEEKDAY/WEEKEND ALARM
• Switch between weekday alarm and weekend alarm.
c
•
d
PRESET
Select a preset radio station.
ALARM 1
Set the alarm timer.
View the alarm time.
Turn on/off the alarm.
•
•
•
e
REPEAT ALARM/BRIGHTNESS CONTROL
Repeat the alarm.
Adjust the display brightness.
•
•
f
SET TIME/AUTO SCAN
Set the time and date.
Scan radio stations.
•
•
g
PRESS TO OPEN
Press to open the compartment.
•
h
RADIO ON/OFF
Switch radio on or off.
•
i
TUNING+/Tune to a radio station.
Adjust time and date.
Select time format.
•
•
•
j
ALARM 2 BUZZ/RADIO
Select alarm tone for alarm 2.
•
k
ALARM 1 BUZZ/RADIO
Select alarm tone for alarm 1.
•
l
VOL
• Adjust volume.
m
ALARM 2
• Set the alarm timer.
• View the alarm time.
• Turn on/off the alarm.
n
USB charging socket
o
DC IN jack
3
Get started
E Tip
• Use of controls or adjustments or performance of procedures
other than herein may result in hazardous radiation exposure or
other unsafe operation.
Always follow the instructions in this chapter in sequence.
If you contact Philips, you will be asked for the model and serial
number of this apparatus. The model number and serial number are
on the bottom of the apparatus. Write the numbers here:
Model No. __________________________
Serial No. ___________________________
Connect power (See 2)
E Caution
• Risk of product damage! Ensure that the power supply
voltage corresponds to the voltage printed on the
back or the underside of the apparatus.
• Risk of electric shock! When you unplug the AC
power cord, always pull the plug from the socket.
Never pull the cord.
• Before connecting the AC power cord, ensure you
have completed all other connections.
1 Connect the power adapter to
• the DC IN jack on the rear of the main unit
• the power socket.
Adjust the volume level
1 Turn VOL to increase/decrease the volume level.
Adjust display brightness
1 Press REPEAT ALARM/BRIGHTNESS CONTROL repeatedly to
select different brightness levels of the display.
Set time and date
1 Press RADIO ON/OFF repeatedly to turn off radio.
2 Press and hold SET TIME/AUTO SCAN for 2 seconds.
» Year digits begin to blink.
3 Press TUNING+/- to set year.
4 Press SET TIME/AUTO SCAN to confirm.
5 Repeat steps 3-4 to set the month.
6 Repeat steps 3-4 to set the date.
7 Repeat steps 3-4 to set the hour
8 Repeat steps 3-4 to set minute.
» Time format begins to blink.
9 Repeat steps 3-4 to select 12 hour or 24 hour format.
4
Listen to radio
Tune to a radio station
1 Press RADIO ON/OFF repeatedly to turn on radio.
2 Press TUNING+/- repeatedly to tune to a radio station.
Program radio stations automatically
D Note
• You can program a maximum of 20 preset radio stations
1 Press RADIO ON/OFF repeatedly to turn on radio.
2 Press and hold SET TIME/AUTO SCAN for 2 seconds.
» All available stations are programmed in the order of
waveband reception strength.
» The first programed radio station broadcasts automatically.
» To interrupt scan, press SET TIME/AUTO SCAN.
Program radio stations manully
D Note
• You can program a maximum of 20 preset radio stations.
1 Press RADIO ON/OFF repeatedly to turn on radio.
2 Press TUNING+/- repeatedly to tune to a radio station.
3 Press and hold PRESET for 2 seconds.
» “CH“ begins to blink.
4 Press PRESET repeatedly to select a preset number.
5 Press and hold PRESET for 2 seconds to confirm.
6 Repeat steps 2-5 to program more stations.
E Tip
• To overwrite a programmed station, program another station in
its place.
Select a preset radio station
1 Press RADIO ON/OFF repeatedly to turn on radio.
2 Press PRESET to select a radio station.
5
Set the alarm timer
You can set two separate alarms. For the alarm tone, you can select
the FM radio, or the buzzer.
1 Before you start, ensure that the time is set correctly.
2 Press and hold ALARM 1/ALARM 2 for two seconds.
» AL1 or AL2 is displayed and the hour digits and days begin
to blink.
3 Switch ALARM 1 BUZZ/RADIO or ALARM 2 BUZZ/RADIO
to buzz or radio to select alarm sound for alarm 1 and 2
respectively.
4 Press TUNING+/- repeatedly to set the hour.
»
appears and AL1 or AL2 begins to blink.
5 Press ALARM 1/ALARM 2 to confirm.
» The minute digits begin to blink.
6 Press TUNING+/- to set the minute.
7 Press ALARM 1/ALARM 2 to confirm.
» The weekdays begin to blink.
8 Press WEEKDAY/WEEKEND ALARM to select whether to ring
alarm on weekdays or at weekend.
9 Press ALARM 1/ALARM 2 to confirm.
» AL1 or AL2 is displayed.
» The apparatus turns on automatically at the set time and
rings with radio or buzz.
Turn on/off the alarm timer
D Note
• Ensure that you already set the alarms successfully.
1 Press ALARM 1 or ALARM 2 repeatedly to turn on or off the
alarm timer.
» If the alarm timer is turned on, AL1 or AL2 appears.
» If the alarm timer is turned off,
disappears.
Repeat alarm
1 When the alarm rings, press REPEAT ALARM/BRIGHTNESS
CONTROL.
» The alarm repeats ringing minutes later.
E Tip
• You can press TUNING+/- to adjust interval (5-15 minutes) to
repeat alarm.
Reset alarm
1 When the alarm rings, press SLEEP/ALARM RESET.
» The alarm stops but the alarm settings remain.
Stop alarm ring
1 When the alarm rings, press the corresponding ALARM 1 or
ALARM 2.
» The alarm stops but the alarm settings remain.
View the alarm settings
1 Press ALARM 1 or ALARM 2 to view the alarming setting time.
» [ AL1] or [ AL2] appears.
6
Other features
Set the sleep timer
You can set the clock radio to turn off automatically after a certain
period of time.
1 Press SLEEP/ALARM RESET repeatedly to select time (in
minutes).
» The apparatus turns off automatically after the set period of
time.
To turn off the sleep timer:
1 Press SLEEP/ALARM RESET repeatedly until [OFF] (off)
appears or press RADIO ON/OFF.
»
is displayed when sleep timer is on and disappears when
it is off.
Charge a mobile phone (See 3)
D Note
• The accompanied charging adapters do not support all types of
mobile phones. Refer to the appended compatibility sheet to see
if your phone is supported.
1
2
3
4
Press PRESS TO OPEN to open the compartment.
Select a charger adapter that matches your mobile phone.
Take out the cable with a connector.
Connect the charger adapter to .
• the connector or the USB charging cable (not supplied)
• your mobile phone.
After charging finishes,
1 Disconnect the device from the charge adapter.
2 Disconnect the charger adapter and save it in the compartment.
(See 3)
7
Product information
D Tip
• Product information is subject to change without prior notice.
Specifications
Tuner (FM)
Tuning Range
87.5 - 108MHz
Tuning grid
50KHz
Sensitivity
- Mono, 26dB S/N Ratio
<22 dBf
Search Selectivity
>28dBf
Total Harmonic Distortion
<3%
Signal to Noise Ratio
>50dB
General information
Power adapter
Model: AS150-065-AN Philips
Input: 100-240V~50/60 Hz,
0.7A
Output: 6.5V DC, 2.3A
Operation Power Consumption
20W
Standby Power Consumption
0.5W
Dimensions
- Main Unit (W x H x D)
180 x 50 x 133 mm
Weight
- With Packing
- Main Unit
0.725 kg
0.435 kg
8
Troubleshooting
E Caution
• Never remove the casing of this apparatus.
To keep the warranty valid, never try to repair the system yourself.
If you encounter problems when using this apparatus, check the
following points before requesting service. If the problem remains
unsolved, go to the Philips web site (www.philips.com/support).
When you contact Philips, ensure that your apparatus is nearby and
the model number and serial number are available.
No power
• Ensure that the AC power plug of the apparatus is connected
properly.
• Ensure that there is power at the AC outlet.
No sound
• Adjust the volume.
No response from the apparatus
• Disconnect and reconnect the AC power plug, then turn on the
apparatus again.
• Use a ball pen to press the reset button on the rear of the
apparatus to restore factory settings. This operation resets all
settings except the clock.
Poor radio reception
• Increase the distance between the apparatus and your TV or
VCR.
• Fully extend the antenna.
• Connect an outdoor antenna instead.
Timer does not work
• Set the clock correctly.
• Switch on the timer.
Clock/timer setting erased
• Power has been interrupted or the power plug has been
disconnected.
• Reset the clock/timer.
Chareger does not charge the connected device
• Make sure the USB cable is properly inserted into the device
and the charger.
• Make sure the adapter suits the connected device well.
• Damaged USB cable or connector tip.Replace USB cable and/
or connector tip.
• Wrong connector tip used. Check connector tip and replace if
necessary.
• Non supplied USB cable/connector tip used. Replace with
supplied USB cable/connector tip.
• Problems with electrical circuit of the apparatus. Take the
apparatus to your local distributor.
AUSTRALIA - Philips Manufacturers Warranty for Australia only
These warranty conditions are valid for the
following consumer electronics products:
Colour Televisions, Projection TV, Plasma &
LCD TV, Video Cassette Recorders, CD
Recorders & Players, DVD Players, DVD
Recorders, DVD Recorders with HDD, Audio
Systems, Home Theatre systems, Digital Set
Top Box & Portable Audio products.
The benefits given to the purchaser by this
warranty are in addition to all other rights
and remedies which the purchaser has in
respect of the product under the Trade
Practices Act or other Commonwealth or
State Law.
Philips Consumer Electronics warrants its products to
the purchaser as follows and subject to the stated
conditions.
1 Year Free Repair Service - at Philips ASC
Colour Television, Plasma Television, LCD Television,
Projection Televsion, DVDR/VCR Combo, DVD
Recorders with Hard Drive, LCD Projectors, Wireless
Audio Systems, Audio Systems, Home Theatre
Systems & Digital Set-Top-Box.
1 Year free Replacement – at your Retailer
Portable Audio, MP3 Infotainment products, Video
Cassette recorders, DVD Player, DVD/VCR Combo
Player, DVD Recorder without HDD & Portable
DVD/LCD players.
Conditions of Repair Warranty
1. All claims for warranty service should be made to
2.
3.
4.
5.
6.
7.
your nearest Philips Authorised Service Centre or the
Philips Technology Care Centre. Reasonable evidence
of date of purchase must be provided.
This warranty extends only to defects in material or
workmanship occurring under normal use of the product
when operated in accordance with the instructions.
If a replacement product is supplied under the repair
policy it is warranted, under this warranty, for the
remainder of the warranty of the original purchased
product only.
Home service is provided only within the normal
service area of one of our recommended Authorised
Service Centres (ASC). It will be provided for
television receivers only with a screen side of 67cms
or above (product includes CRT, LCD TV, PTV, and
Plasma TV). Televisions with screen side less than
67cms and all other products types are to be taken or
sent by the consumer to the workshop of your
nearest Authorised Service Centre, at the Consumer’s
expense.
This Manufacturers Warranty is limited to 3 months
for the above listed Consumer Electronics products if
used in commercial applications.
Philips may, at its discretion choose to replace rather
than repair any product covered by this warranty.
Product accessories are covered by the same
warranty period. Please contact the Philips Technology
Care Centre for free replacement of faulty accessories.
8. This Manufacturers Warranty is neither transferable
nor valid in countries other than Australia.
This warranty does not cover:
a) Mileage or travel outside the normal service area
covered by selected Authorised Service Centre.
b) Service costs arising from failure to correctly
adjust the controls of the product or to observe the
instructions, or inspections that reveal that the
product is in normal working order.
c) Product failures caused by misuse, neglect,
accidental breakage, transit damage, inexpert repairs
or modification by un-authorised persons, external
fires, lightning strikes, floods, vermin infestation or
liquid spillage.
d) Cleaning of video or audio heads.
e) Inadequate receiving antennae.
f) Replacement of worn or used batteries or other
consumables.
g) Consumer products used in commercial applications
(This warranty is limited to 3 months only).
h) Second hand products.
The conditions contained in this warranty
card replace and override the provision of
the Philips World-Wide Guarantee for
products purchased in Australia and used in
Australia.
Service is provided through more than 100
accredited Authorised Service Centres throughout
Australia. For direct contact with the nearest
recommended Authorised Service Centre in capital
& regional cities/towns
Authorised Service Centre Network
1300 361 392
Customer suppor t is provided in Australia by our
trained call centre staff. For assistance with product
features and specifications, please call
Technology Care Centre
1300 363 391
Please record the following information for
your records and keep in a safe place.
We recommend retaining your purchase
receipt to assist with any warranty claim.
Model number :....................................................
Serial number :....................................................
Date of purchase:....................................................
Retailer:....................................................
Philips Consumer Electronics
a division of Philips Electronics Australia Limited
ABN 24 008 445 743,
Level 1, 65 Epping Road NORTH RYDE NSW 2113.
Warranty valid for all new products purchased after 1st January 2007
© Royal Philips Electronics N.V. 2009
All rights reserved.
Specifications are subject to change
without notice.Trademarks are the
property of Koninklijke Philips Electronics
N.V. or their respective owners.