1
r
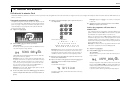
Owner’s Manual
Thank you for choosing a Roland EXR-46 OR Interactive Arranger, a novel keyboard with a superior Roland sound source, an intuitive user interface, a USB port, V-LINK
compatibility and a host of other useful functions.
To get the most out of the EXR-46 OR and to ensure many years of trouble-free service, we urge you to read through this Owner’s Manual thoroughly.
To avoid confusion, let’s agree to use the word “button” for all keys on the front panel, and use “key” only when referring to the EXR-46 OR’s keyboard.
Before using this instrument, carefully read the “Important notes” (p. 7). They provide information concerning the proper operation of the EXR-46 OR. Be sure to keep this
manual in a safe place for future reference.
Copyright © 2006 ROLAND EUROPE. All rights reserved. No part of this publication may be reproduced in any form without the written permission of Roland Europe S.p.a.
r EXR-46 OR
1. Features
Superior sound source
The EXR-46 OR’s sounds are based on full-length (uncompressed) waveforms, which is unique in this price range. This
produces vibrant, realistic sounds quite unlike anything you
would expect from a budget-friendly arranger keyboard. The
EXR-46 OR’s tone generator is 64-voice polyphonic.
Combined with the new amplification system and Digital
Bass Enhancer function, the EXR-46 OR sounds truly amazing, with a clear high end and a powerful low range.
Drum Pad mode
The EXR-46 OR provides a “Drum Pad” mode that allows you
to assign drum sounds to the 8 highest keys (right side of
the keyboard). You can use this function to play live drum or
percussion parts to the EXR-46 OR’s Style or Song playback.
Lock functions
The EXR-46 OR is equipped with five buttons that allow you
to filter various settings from the User Programs you recall.
This allows for a more flexible and efficient use of your registrations, because settings you do not need in a given situation can be ignored.
Flash memory and USB
The EXR-46 OR comes with 99 oriental Music Styles in ROM,
50 additional Music Styles and several Standard MIDI Files.
The additional Styles and SMFs reside in the EXR-46 OR’s
Flash memory area, whose contents can be expanded and
managed via a USB connection with your PC or Macintosh
computer.
New concept
The EXR-46 OR is 19-part multitimbral, with 3 parts that can
be played via the keyboard (Main, Split and Dual). The Main
part can be used to play melodies or for drumming, while
the Split and Dual parts allow you to quickly add a second
sound to your solo playing.
2
Furthermore, the EXR-46 OR provides a new selection routine for Music Styles, Tones, songs, and User Programs: the
FAMILY [√][®] buttons can be used for selecting specific
groups, while the SELECT [√][®] buttons allow you to choose
a setting within the selected group.
Have fun!
Excellent Arranger
The EXR-46 OR comes loaded with 149 Music Styles prepared by Roland’s legendary Style foundry. As usual, several
patterns are available (INTRO, ORIGINAL, VARIATION, FILL
and ENDING), with additional options via the BAND
ORCHESTRATOR buttons.
3 scale memories plus User Program-dependent
scale settings
The EXR-46 OR is Roland’s first arranger keyboard to provide
3 scale memories (for oriental tunings) and the possibility to
save the currently used tuning settings in a User Program.
That way, each of the 200 User Program memories could use
a different tuning system.
And much, much more…
A metronome and several educational functions are provided, while three digital effects processors (Reverb, Chorus
and MFX) can be used to further enhance the already amazing sound quality.
The EXR-46 OR can play back GM, GM2, GS and XG song
data, so that you can virtually use any Standard MIDI File
available at your Roland dealer or on the Internet.
Note: The EXR-46 OR supports XG Light and therefore only provides the basic set of compatible functions.
The EXR-46 OR is also equipped with a floppy disk drive
(2DD/2HD) for data management and importing Music
Styles prepared for older Roland arranger instruments.
Microsoft and Windows are registered trademarks of Microsoft Corporation
USA in the United States and other countries.
Apple and Macintosh are registered trademarks of Apple Computer Corporation USA in the United states and other countries.
Mac OS is a registered trademark of Apple Computer Corporation.
Other names of companies, products, or standards are the trademarks or registered trademarks of their respective owners.
EXR-46 OR
Using the unit safely
Used for instructions intended to alert
the user to the risk of death or severe
injury should the unit be used
improperly.
Used for instructions intended to alert
the user to the risk of injury or material
damage should the unit be used
improperly.
* Material damage refers
other adverse effects
respect to the home
furnishings, as well
animals or pets.
• Before using this instrument, make sure to read the instructions
below, and the Owner’s Manual.
......................................................................................................................................
• Do not open or perform any internal modifications on the unit.
......................................................................................................................................
• Do not attempt to repair the EXR-46 OR, or replace parts within it
(except when this manual provides specific instructions directing
you to do so). Refer all servicing to your retailer, the nearest Roland
Service Center, or an authorized Roland distributor, as listed on the
“Information” page.
......................................................................................................................................
• Never use or store the EXR-46 OR in places that are:
• Subject to temperature extremes (e.g., direct sunlight in an
enclosed vehicle, near a heating duct, on top of heat-generating
equipment); or are
• Damp (e.g., baths, washrooms, on wet floors); or are
• Humid; or are
• Exposed to rain; or are
• Dusty; or are
• Subject to high levels of vibration.
to damage or
caused with
and all its
to domestic
The
symbol alerts the user to important instructions
or warnings.The specific meaning of the symbol is
determined by the design contained within the
triangle. In the case of the symbol at left, it is used for
general cautions, warnings, or alerts to danger.
The
symbol alerts the user to items that must never
be carried out (are forbidden). The specific thing that
must not be done is indicated by the design contained
within the circle. In the case of the symbol at left, it
means that the unit must never be disassembled.
The ● symbol alerts the user to things that must be
carried out. The specific thing that must be done is
indicated by the design contained within the circle. In
the case of the symbol at left, it means that the powercord plug must be unplugged from the outlet.
• This unit should be used only with a rack or stand that is recommended by Roland.
......................................................................................................................................
007
• Make sure you always have the unit placed in such a way that it is
level and sure to remain stable. Never place it on stands that could
wobble, or on inclined surfaces.
......................................................................................................................................
• This instrument, either alone or in combination with an amplifier
and headphones or speakers, may be capable of producing sound
levels that could cause permanent hearing loss. Do not operate for
a long period of time at a high volume level, or at a level that is
uncomfortable. If you experience any hearing loss or ringing in the
ears, you should immediately stop using the unit, and consult an
audiologist.
......................................................................................................................................
• Do not allow any objects (e.g., flammable material, coins, pins); or
liquids of any kind (water, soft drinks, etc.) to penetrate the unit.
• The instrument should only be connected to a power supply of the
type described in the operating instructions, or as marked on the
adapter supplied with the EXR-46 OR.
......................................................................................................................................
......................................................................................................................................
• Do not excessively twist or bend the adapter’s power cord, nor place
heavy objects on it. Doing so can damage the cord, producing severed elements and short circuits. Damaged cords are fire and shock
hazards!
......................................................................................................................................
• In households with small children, an adult should provide supervision until the child is capable of following all rules essential for the
safe operation of the EXR-46 OR.
......................................................................................................................................
• Protect the unit from strong impact.
(Do not drop it!)
......................................................................................................................................
......................................................................................................................................
3
r EXR-46 OR
• Do not force the EXR-46 OR’s adapter to share an outlet with an
unreasonable number of other devices. Be especially careful when
using extension cords—the total power used by all devices you have
connected to the extension cord’s outlet must never exceed the
power rating (watts/amperes) for the extension cord. Excessive
loads can cause the insulation on the cord to heat up and eventually melt through.
......................................................................................................................................
• Whenever you suspect the possibility of lightning in your area, disconnect the adapter from the outlet.
.....................................................................................................................................
• Should you remove screws, make sure to put them in a safe place
out of children’s reach, so there is no chance of them being swallowed accidentally.
.....................................................................................................................................
• Before using the EXR-46 OR in a foreign country, consult with your
retailer, the nearest Roland Service Center, or an authorized Roland
distributor, as listed on the “Information” page.
......................................................................................................................................
• The EXR-46 OR should be located so that its location or position
does not interfere with its proper ventilation.
......................................................................................................................................
• This unit for use only with Roland keyboard stand KS-12. Use with
other stands is capable of resulting in instability causing possible
injury.
......................................................................................................................................
• Always grasp only the plug on the adapter when plugging into, or
unplugging from, an outlet or this unit.
......................................................................................................................................
• Try to prevent cords and cables from becoming entangled. Also, all
cords and cables should be placed out of the reach of children.
......................................................................................................................................
• Never climb on top of, nor place heavy objects on the unit.
......................................................................................................................................
• Never handle the adapter’s power cord or its plugs with wet hands
when plugging into, or unplugging from, an outlet or this unit.
......................................................................................................................................
• If you need to move the instrument, take note of the precautions
listed below. Make sure to have a firm grip, to protect yourself from
injury and the instrument from damage.
• Disconnect the adapter.
• Disconnect all cords coming from external devices.
• Remove the music stand.
......................................................................................................................................
• Before cleaning the unit, turn off the power and unplug the
adapter from the outlet.
......................................................................................................................................
4
This product must be disposed of separately at
your local waste recycling centre.
Do not dispose of in household waste bin.
EXR-46 OR
Contents
1. Features . . . . . . . . . . . . . . . . . . . . . . . . . . . . . . . . . . . . . . . . . .2
2. Important notes . . . . . . . . . . . . . . . . . . . . . . . . . . . . . . . . . . .7
3. Panel descriptions. . . . . . . . . . . . . . . . . . . . . . . . . . . . . . . . . .9
Front panel . . . . . . . . . . . . . . . . . . . . . . . . . . . . . . . . . . . . . . . . . . . 9
Rear panel . . . . . . . . . . . . . . . . . . . . . . . . . . . . . . . . . . . . . . . . . . . 11
4. First steps. . . . . . . . . . . . . . . . . . . . . . . . . . . . . . . . . . . . . . . .12
Setting up . . . . . . . . . . . . . . . . . . . . . . . . . . . . . . . . . . . . . . . . . . . 12
Demo songs . . . . . . . . . . . . . . . . . . . . . . . . . . . . . . . . . . . . . . . . . 12
More about ALL mode . . . . . . . . . . . . . . . . . . . . . . . . . . . . . . . . . . . . .24
Keyboard recording mode . . . . . . . . . . . . . . . . . . . . . . . . . . . . . . . . . .24
Single recording mode . . . . . . . . . . . . . . . . . . . . . . . . . . . . . . . . . . . . .24
Punch I/O . . . . . . . . . . . . . . . . . . . . . . . . . . . . . . . . . . . . . . . . . . . . . . . .25
8. Additional Music Style functions. . . . . . . . . . . . . . . . . . . . 26
One Touch . . . . . . . . . . . . . . . . . . . . . . . . . . . . . . . . . . . . . . . . . . . 26
Using the Music Assistant . . . . . . . . . . . . . . . . . . . . . . . . . . . . . 26
Melody Intelligence. . . . . . . . . . . . . . . . . . . . . . . . . . . . . . . . . . . 27
Reverb. . . . . . . . . . . . . . . . . . . . . . . . . . . . . . . . . . . . . . . . . . . . . . . . . . . 36
Chorus . . . . . . . . . . . . . . . . . . . . . . . . . . . . . . . . . . . . . . . . . . . . . . . . . . 37
V-LINK function . . . . . . . . . . . . . . . . . . . . . . . . . . . . . . . . . . . . . . 38
V-LINK functions that the EXR-46 OR can control (and
corresponding MIDI messages) . . . . . . . . . . . . . . . . . . . . . . . . . . . . . 38
12. Function menu . . . . . . . . . . . . . . . . . . . . . . . . . . . . . . . . . . . 39
Editing parameters (general procedure) . . . . . . . . . . . . . . . . . 39
Tuning individual notes a quarter tone down . . . . . . . . . . . . . . . . .29
Using other tuning values . . . . . . . . . . . . . . . . . . . . . . . . . . . . . . . . . .29
Saving and loading your tunings (SCALE MEMORY). . . . . . . . . . . .29
KB SET parameters . . . . . . . . . . . . . . . . . . . . . . . . . . . . . . . . . . . . . . . . 39
DRUM PAD parameters . . . . . . . . . . . . . . . . . . . . . . . . . . . . . . . . . . . . 41
METRONOM parameters . . . . . . . . . . . . . . . . . . . . . . . . . . . . . . . . . . . 41
OCTAVE parameters . . . . . . . . . . . . . . . . . . . . . . . . . . . . . . . . . . . . . . . 41
VOLUME parameters . . . . . . . . . . . . . . . . . . . . . . . . . . . . . . . . . . . . . . 41
ARR SET parameters. . . . . . . . . . . . . . . . . . . . . . . . . . . . . . . . . . . . . . . 42
EFFECTS parameters . . . . . . . . . . . . . . . . . . . . . . . . . . . . . . . . . . . . . . . 42
KB SCALE parameters. . . . . . . . . . . . . . . . . . . . . . . . . . . . . . . . . . . . . . 43
MIDI parameters . . . . . . . . . . . . . . . . . . . . . . . . . . . . . . . . . . . . . . . . . . 43
UTILITY parameters. . . . . . . . . . . . . . . . . . . . . . . . . . . . . . . . . . . . . . . . 44
5. Playing with accompaniment (Arranger) . . . . . . . . . . . . . .15
Starting/using the Arranger. . . . . . . . . . . . . . . . . . . . . . . . . . . . 15
10. Keyboard part functions. . . . . . . . . . . . . . . . . . . . . . . . . . . 30
Selecting sounds for the Main, Split and Dual parts . . . . . . . 30
Changing the tempo . . . . . . . . . . . . . . . . . . . . . . . . . . . . . . . . . . . . . . 16
Automatic playback start (Sync Start & Stop) . . . . . . . . . . . . . . . . 16
Stopping Arranger playback . . . . . . . . . . . . . . . . . . . . . . . . . . . . . . . 16
Selecting any of the available sounds . . . . . . . . . . . . . . . . . . . . . . . .30
Using the USER TONES buttons . . . . . . . . . . . . . . . . . . . . . . . . . . . . .30
Assigning another Tone to a USER TONES button . . . . . . . . . . . . .30
13. Working with User Programs . . . . . . . . . . . . . . . . . . . . . . . 45
Writing your settings to a User Program. . . . . . . . . . . . . . . . . 45
Playing back a Tone demo song . . . . . . . . . . . . . . . . . . . . . . . . . . . . 12
Playback of a Style demo song . . . . . . . . . . . . . . . . . . . . . . . . . . . . . 12
Leaving Demo mode . . . . . . . . . . . . . . . . . . . . . . . . . . . . . . . . . . . . . . 12
Playing without accompaniment . . . . . . . . . . . . . . . . . . . . . . . 13
Using the Main part . . . . . . . . . . . . . . . . . . . . . . . . . . . . . . . . . . . . . .
Using the Main and Split parts . . . . . . . . . . . . . . . . . . . . . . . . . . . . .
Using the Main and Dual parts . . . . . . . . . . . . . . . . . . . . . . . . . . . . .
Using the metronome. . . . . . . . . . . . . . . . . . . . . . . . . . . . . . . . . . . . .
13
13
14
14
Selecting Music Styles. . . . . . . . . . . . . . . . . . . . . . . . . . . . . . . . . 16
Using the Band Orchestrator function. . . . . . . . . . . . . . . . . . . 17
Balance . . . . . . . . . . . . . . . . . . . . . . . . . . . . . . . . . . . . . . . . . . . . . 18
6. Playing back songs . . . . . . . . . . . . . . . . . . . . . . . . . . . . . . . .19
Basic song playback. . . . . . . . . . . . . . . . . . . . . . . . . . . . . . . . . . . 19
Additional playback functions . . . . . . . . . . . . . . . . . . . . . . . . . . 20
Selecting Song mode . . . . . . . . . . . . . . . . . . . . . . . . . . . . . . . . . . . . .
Fast Forward, Rewind, and Reset . . . . . . . . . . . . . . . . . . . . . . . . . . .
Loop playback (Repeat). . . . . . . . . . . . . . . . . . . . . . . . . . . . . . . . . . . .
Live performance with song backing (Minus One). . . . . . . . . . . . .
Changing the track assignments. . . . . . . . . . . . . . . . . . . . . . . . . . . .
Changing the Melody Intelligence harmony type . . . . . . . . . . . . . .27
PIANO Mode . . . . . . . . . . . . . . . . . . . . . . . . . . . . . . . . . . . . . . . . . 27
Bass Inversion (Bass Inv). . . . . . . . . . . . . . . . . . . . . . . . . . . . . . . 28
More Music Style functions . . . . . . . . . . . . . . . . . . . . . . . . . . . . 28
9. Using oriental tunings . . . . . . . . . . . . . . . . . . . . . . . . . . . . 29
Drum sounds and sound effects (“SFX”) . . . . . . . . . . . . . . . . . 31
Drum Kits . . . . . . . . . . . . . . . . . . . . . . . . . . . . . . . . . . . . . . . . . . . . . . . .31
Sound effects (“SFX”) . . . . . . . . . . . . . . . . . . . . . . . . . . . . . . . . . . . . . .31
Using DRUM PAD mode . . . . . . . . . . . . . . . . . . . . . . . . . . . . . . . 32
Using the Drum Pad function . . . . . . . . . . . . . . . . . . . . . . . . . . . . . . .32
Transpose . . . . . . . . . . . . . . . . . . . . . . . . . . . . . . . . . . . . . . . . . . . 32
Global transpose function (“GLB”) . . . . . . . . . . . . . . . . . . . . . . . . . . .33
20
20
21
21
22
Octave settings. . . . . . . . . . . . . . . . . . . . . . . . . . . . . . . . . . . . . . . 33
Other Keyboard part functions . . . . . . . . . . . . . . . . . . . . . . . . . 33
11. Performance functions and effects. . . . . . . . . . . . . . . . . . 34
Performance functions . . . . . . . . . . . . . . . . . . . . . . . . . . . . . . . . 34
7. Recording your music. . . . . . . . . . . . . . . . . . . . . . . . . . . . . .23
Basic song recording . . . . . . . . . . . . . . . . . . . . . . . . . . . . . . . . . . 23
Keyboard Touch (velocity sensitivity). . . . . . . . . . . . . . . . . . . . . . . . .34
Pitch Bend and Modulation . . . . . . . . . . . . . . . . . . . . . . . . . . . . . . . .34
Footswitch . . . . . . . . . . . . . . . . . . . . . . . . . . . . . . . . . . . . . . . . . . . . . . .34
Listening to your song . . . . . . . . . . . . . . . . . . . . . . . . . . . . . . . . . . . . 23
Other recording functions . . . . . . . . . . . . . . . . . . . . . . . . . . . . . 24
About the recording modes . . . . . . . . . . . . . . . . . . . . . . . . . . . . . . . . 24
Using effects. . . . . . . . . . . . . . . . . . . . . . . . . . . . . . . . . . . . . . . . . 35
Using the multi-effects processor (MFX) . . . . . . . . . . . . . . . . . . . . .35
Notes about writing User Programs . . . . . . . . . . . . . . . . . . . . . . . . . 45
Selecting a User Program. . . . . . . . . . . . . . . . . . . . . . . . . . . . . . 45
Lock: filtering certain User Program settings . . . . . . . . . . . . . 46
14. MIDI functions . . . . . . . . . . . . . . . . . . . . . . . . . . . . . . . . . . . 47
Channels . . . . . . . . . . . . . . . . . . . . . . . . . . . . . . . . . . . . . . . . . . . . . . . . 47
MIDI Function parameters . . . . . . . . . . . . . . . . . . . . . . . . . . . . . . . . . 47
15. Data management . . . . . . . . . . . . . . . . . . . . . . . . . . . . . . . . 49
Working with the Flash memory. . . . . . . . . . . . . . . . . . . . . . . . 49
Saving songs to a Flash memory . . . . . . . . . . . . . . . . . . . . . . . . . . . . 49
Archiving User Programs in the Flash area . . . . . . . . . . . . . . . . . . . 49
Saving Styles to a Flash memory . . . . . . . . . . . . . . . . . . . . . . . . . . . . 50
Loading a User Program set from the Flash memory. . . . . . . . . . . 50
Removing songs from the Flash memory. . . . . . . . . . . . . . . . . . . . . 50
Removing Styles from the Flash memory . . . . . . . . . . . . . . . . . . . . 51
Removing a User Program set from the Flash memory . . . . . . . . . 51
Archiving data using a computer (USB) . . . . . . . . . . . . . . . . . 52
Disk functions. . . . . . . . . . . . . . . . . . . . . . . . . . . . . . . . . . . . . . . . 53
Loading User Programs from disk . . . . . . . . . . . . . . . . . . . . . . . . . . . 53
Loading songs from disk . . . . . . . . . . . . . . . . . . . . . . . . . . . . . . . . . . . 54
5
r EXR-46 OR
Loading Music Styles from disk . . . . . . . . . . . . . . . . . . . . . . . . . . . . . 54
Saving files to disk . . . . . . . . . . . . . . . . . . . . . . . . . . . . . . . . . . . . . . . . 54
Deleting files on disk . . . . . . . . . . . . . . . . . . . . . . . . . . . . . . . . . . . . . . 55
Format . . . . . . . . . . . . . . . . . . . . . . . . . . . . . . . . . . . . . . . . . . . . . . . . . . 56
16. Using the outputs and an optional footswitch. . . . . . . . . 57
17. Miscellaneous . . . . . . . . . . . . . . . . . . . . . . . . . . . . . . . . . . . . 58
Functions for educational purposes . . . . . . . . . . . . . . . . . . . . 58
Deactivating or activating the Demo function . . . . . . . . . . . . . . . . 58
Deactivating or activating the Arranger . . . . . . . . . . . . . . . . . . . . . 58
Deactivating or activating the Arranger and Demo functions. . . 58
Initializing your EXR-46 OR (Factory) . . . . . . . . . . . . . . . . . . . 58
18. Specifications . . . . . . . . . . . . . . . . . . . . . . . . . . . . . . . . . . . . 59
Thanks . . . . . . . . . . . . . . . . . . . . . . . . . . . . . . . . . . . . . . . . . . . . . . . . . . 59
19. Lists . . . . . . . . . . . . . . . . . . . . . . . . . . . . . . . . . . . . . . . . . . . 120
Tones selectable via the front panel . . . . . . . . . . . . . . . . . . . 120
Drum Kits . . . . . . . . . . . . . . . . . . . . . . . . . . . . . . . . . . . . . . . . . . 123
Music Styles. . . . . . . . . . . . . . . . . . . . . . . . . . . . . . . . . . . . . . . . 130
Chord Intelligence (“Md1” setting) . . . . . . . . . . . . . . . . . . . . 131
MIDI Implementation Chart . . . . . . . . . . . . . . . . . . . . . . . . . . 133
6
EXR-46 OR
]
2. Important notes
In addition to the items listed under “Using the unit safely” (p. 3), please read and observe the following:
Power supply
Maintenance
• Do not use this instrument on the same power circuit with any
device that will generate line noise (such as an electric motor or
variable lighting system).
• Before connecting the EXR-46 OR to other devices, turn off the
power to all units. This will help prevent malfunctions and/or damage to speakers or other devices.
• For everyday cleaning wipe the EXR-46 OR with a soft, dry cloth or
one that has been slightly dampened with water. To remove stubborn dirt, use a mild, non-abrasive detergent. Afterwards, be sure to
wipe the instrument thoroughly with a soft, dry cloth.
• Never use benzene, thinner, alcohol or solvents of any kind, to avoid
the possibility of discoloration and/or deformation.
Placement
Repairs and data
• Using the EXR-46 OR near power amplifiers (or other equipment
containing large power transformers) may induce hum. To alleviate
the problem, change the orientation of this instrument or move it
further away from the source of interference.
• This instrument may interfere with radio and television reception.
Do not use it in the vicinity of such receivers.
• Observe the following when using the unit’s floppy disk drive. For
further details, refer to “Before using floppy disks (handling the
floppy disk drive)”.
• Do not place the unit near devices that produce a strong magnetic field (e.g., loudspeakers).
• Install the EXR-46 OR on a solid, level surface.
• Do not move the unit or subject it to vibration while the drive is
operating.
• Do not expose the EXR-46 OR to direct sunlight, place it near
devices that radiate heat, leave it inside an enclosed vehicle, or otherwise subject it to temperature extremes. Excessive heat can
deform or discolor the instrument.
• To avoid possible breakdown, do not use the unit in a wet area, such
as an area exposed to rain or other moisture.
• Do not allow objects to remain on top of the EXR-46 OR. This can be
the cause of malfunction.
• Please be aware that all data contained in the instrument’s memory
may be lost when it is sent for repairs. In certain cases (such as when
circuitry related to memory itself is out of order), we regret that it
may not be possible to restore the data. Roland assumes no liability
concerning such loss of data.
Additional precautions
• Please be aware that the memory contents can be irretrievably lost
as a result of a malfunction, or the improper operation of the
instrument.
• Use a reasonable amount of care when using the instrument’s buttons, other controls, and jacks/connectors. Rough handling can lead
to malfunctions.
• Never strike or apply strong pressure to the display.
• When connecting/disconnecting cables, grasp the connector itself—
never pull on the cable. This way you will avoid causing shorts, or
damage to the cable’s internal elements.
• A small amount of heat will radiate from the instrument during normal operation. This is perfectly normal.
• To avoid disturbing your neighbors, try to keep the instrument’s volume at reasonable levels. You may prefer to use headphones, so you
do not need to be concerned about those around you (especially late
at night).
• When you need to transport the instrument, package it in the box
(including padding) that it came in. Otherwise, you will need to use
equivalent packaging materials, or a flightcase.
• Use only a recommended footswitch (DP-2, DP-6, sold separately).
By connecting any other footswitch, you risk causing malfunction
and/or damage to the EXR-46 OR.
• When the EXR-46 OR is used at excessive volumes, the protection
system of its power amplifier stage may come on and mute the
speakers. In that case, reduce the volume setting and wait a few
seconds.
Before using floppy disks (handling the floppy disk
drive)
• Install the unit on a solid, level surface in an area free from vibration. If the unit must be installed at an angle, be sure the installation
does not exceed the permissible range: upward, 2°; downward, 18°.
• Avoid using the EXR-46 OR immediately after it has been moved to
a location with a level of humidity that is greatly different than its
former location. Rapid changes in the environment can cause condensation to form inside the drive, which will adversely affect the
operation of the drive and/or damage floppy disks. When the
EXR-46 OR has been moved, allow it to become accustomed to the
new environment (allow a few hours) before operating it.
• To insert a disk, push it gently but firmly into the drive—it will click
into place. To remove a disk, press the EJECT button firmly. Do not
use excessive force to remove a disk which is lodged in the drive.
• Never attempt to remove a floppy disk from the drive while the
drive is operating (the indicator is lit); damage could result to both
the disk and the drive.
• Remove any disk from the drive before switching the instrument on
or off.
• To prevent damage to the disk drive’s heads, always try to hold the
floppy disk in a level position (not tilted in any direction) while
inserting it into the drive. Push it in firmly, but gently. Never use
excessive force.
• To avoid the risk of malfunction and/or damage, insert only floppy
disks into the disk drive. Never insert any other type of disk. Avoid
getting paper clips, coins, or any other foreign objects inside the
drive.
7
r EXR-46 OR
Handling floppy disks
Liability and copyright
• Floppy disks contain a plastic disk with a thin magnetic coating.
Microscopic precision is required to enable storage of large amounts
of data on such a small surface area. To preserve their integrity,
please observe the following when handling floppy disks:
• Never touch the magnetic medium inside the disk.
• Do not use or store floppy disks in dirty or dusty areas.
• Do not subject floppy disks to temperature extremes (e.g., direct
sunlight in an enclosed vehicle). Recommended temperature
range: 10°~50°C (50°~122°F).
• Do not expose floppy disks to strong magnetic fields, such as
those generated by loudspeakers.
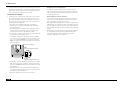
• Floppy disks have a “WRITE” tab which can protect the disk from
accidental erasure. It is recommended that the tab be kept in the
PROTECT position, and moved to the WRITE position only when
you wish to write new data onto the disk.
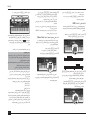
Rear side of the disk
WRITE
(you can save data to the disk)
Protect tab
PROTECT
(you cannot save data)
• Disks containing important performance data for this instrument
should always be locked (have their write protect tab slid to the
PROTECT position) before you insert them into the drive of
another instrument.
• The identification label should be firmly affixed to the disk. If the
label comes loose while the disk is in the drive, it may be difficult
to remove the disk.
• Put the disk back into its case for storage.
Electromagnetic radiations
• Electromagnetic radiations may cause a deterioration of audio performances. Such possible deterioration consists in an audio signal
being emitted. On ceasing the electromagnetic noise, the emission
of the audio signal will simultaneously stop.
8
• Should data contained and stored on a floppy disk be lost, it is
unfortunately impossible to restore them. Roland Europe S.p.a.
assumes no liability concerning such loss of data.
• Unauthorized recording, distribution, sale, lending, public performance, broadcasting, or the like in whole or in part, of a work (musical composition, video, broadcast, public performance, or the like)
whose copyright is held by a third party is prohibited by law.
• Do not use this unit for purposes that could infringe on a copyright
held by a third party. Roland assumes no responsibility whatsoever
with regard to any infringements of third-party copyrights arising
through your use of this unit.
EXR-46 OR
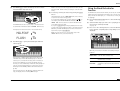
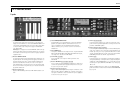
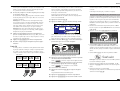
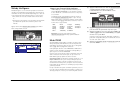
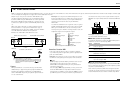
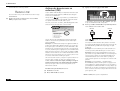
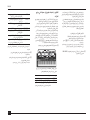
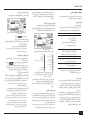
3. Panel descriptions
Front panel
A
B
H
K L M
W
S
F
C
D
G
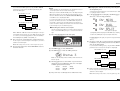
A SCALE MEMORY buttons
These three buttons allow you to save and recall the tuning
settings carried out with the ORIENTAL SCALE buttons. When
the EXR-46 OR is shipped, these memories already contain
useful settings (that will be recalled whenever you initialize
your EXR-46 OR).
Note: The settings of the ORIENTAL SCALE buttons are also
saved to a User Program, so that you can use these three memories for more “general” settings.
B ORIENTAL SCALE buttons
These buttons allow you to change the tuning of each note
of the scale. By default, pressing one of these buttons will
lower the corresponding notes in all octaves by a quarter
tone (–50 cents). Other tunings can also be selected and
saved to one of the three scale memories (see above) or a
User Program.
C [POWER¥ON] button
Press this button to switch the EXR-46 OR on and off.
N
J
O
X
T
Y
U
Q
V
P
E
I
R
Z
a
b
D BENDER/MODULATION lever
By performing left/right movements, you can bend your solo
notes down (left) or up (right). Press this lever towards the
rear of the instrument to add modulation (usually vibrato) to
the notes you are playing.
E PHONES 1/2 sockets
This is where you can connect two pairs of optional headphones (Roland RH-25, RH-50, RH-200, or RH-300). By
doing so, you switch off the EXR-46 OR’s speakers.
F [VOLUME] knob
Use this knob to set the global volume of your EXR-46 OR.
G BALANCE [ACCOMP] [KEYBOARD] buttons
Use the BALANCE buttons to change the volume of the corresponding section (accompaniment/song, or the parts you
play on the keyboard).
H [KEYBOARD¥TOUCH] button
Press this button to switch the keyboard’s velocity sensitivity
on or off. When it is switched off, you can specify the fixed
velocity value that should be used for all notes you play.
I [METRONOME] button
This button allows you switch the metronome on and off.
Holding it for more than one second calls up a FUNCTION
parameter you can set.
J [MELODY¥INTELLIGENCE] button
This button allows you to switch the Melody Intelligence
function on/off. This function adds a harmony part to your
melody playing. See p. 27. Holding it for more than one second calls up a FUNCTION parameter you can set for selecting
the harmony type.
K [USB] button
This button allows you to select the function of the USB port
should perform: (i) mass storage (archiving and retrieving
settings to/from a computer) or (ii) USB/MIDI (whereby the
USB port has the same function as the MIDI IN and MIDI OUT
connectors). See pages 47 and 52 for details.
Press it together with [ONE¥TOUCH] to select the
EXR-46 OR’s demo function (see p. 12).
9
r EXR-46 OR
L [ONE¥TOUCH] button
Press this button to select the desired One Touch settings.
One Touch memories contain a number of settings that
complement the currently selected Music Style. There are
two One Touch memories per Music Style. See p. 26.
M [V-LINK] button
Press this button to take advantage of the EXR-46 OR’s
V-LINK functionality for controlling video material via certain performance functions and the right-most keys on the
EXR-46 OR’s keyboard. By using V-LINK-compatible video
equipment, visual effects can be easily linked to, and made
part of the expressive elements of a performance. By connecting the EXR-46 OR to an optional Edirol DV-7PR or V-4,
you can switch images in synchronization with music, or use
the EXR-46 OR’s performance functions or right-most keys
to switch clips, control playback speed, etc.
During song and Music Style playback, this button flashes to
indicate the tempo and beats (BEAT function).
N KEYBOARD CONTROL section
Press the [SPLIT] button to play different sounds with your
left and right hands. Press the [DUAL] button to play two
sounds simultaneously. Press [SPLIT] and [DUAL] simultaneously to activate the EXR-46 OR‘s Drum Pad mode
(page 32).
Use the [TRANSPOSE] button to transpose the keyboard (see
p. 32).
O BAND ORCHESTRATOR section
Press one of these buttons to choose the desired orchestration for the selected Music Style. See page 17.
P ARRANGER & SONG -CONTROLS section
[TAP¥TEMPO] button: Press this button at least twice to set
the Arranger’s or Recorder’s playback tempo.
[SYNC¥START/STOP] button: This button performs two functions: In Arranger mode (while using the automatic accompaniment), it allows you to switch the SYNC START and SYNC
STOP function on and off.
In Song mode, it can be used to specify the beginning (“A”)
and end (“B”) of the passage that should be repeated.
The remaining buttons in this section allow you to control
Arranger or Recorder playback. See pages 15 and 19.
10
Q LOCK section
The buttons in this section allow you to filter (ignore) certain
settings that are usually recalled when you select a User Program. This allows for a more flexible use of your registrations. See page 46.
When the Minus One function is on, these buttons allow you
to quickly mute several Standard MIDI File parts (these mute
functions are not available while you are using the Arranger
function).
R KEYBOARD MODE section
These two buttons allow you to quickly configure the
EXR-46 OR for use with ([ARRANGER¥BAND]) or without
([PIANO÷SOLO]) automatic accompaniment. At power-on,
the EXR-46 OR selects the PIANO SOLO mode.
Press them simultaneously to activate the PIANO MODE,
which allows you to use the EXR-46 OR’s Arranger (automatic accompaniment) without splitting the keyboard (see
p. 27).
S [MUSIC¥ASSISTANT] button
This button allows you to work with pre-programmed registrations (additional User Programs). See p. 26.
T [SONG] button
This button allows you to select the EXR-46 OR’s Song mode
and to specify that the [INTRO], [ORIGINAL], etc., buttons
should be used to operate the on-board Recorder.
U [STYLE] button
Press this button if you want to select Music Styles. By activating this button, you also specify that the [INTRO],
[ORIGINAL], etc., buttons are used for selecting a Style Division, while the numeric buttons can be used to select the
desired Style memory.
V [TONE] button
Press this button if you want to use the [FAMILY] and
numeric buttons for assigning a sound (“Tone”) or Drum Kit
to the Main, Split or Dual part. See p. 30.
W DATA ENTRY buttons
FAMILY and SELECT [√][®] buttons: The FAMILY and SELECT
[√][®] buttons are used to select Tones, Styles, Music Assistant registrations, Songs, and Function parameters. The
FAMILY [√][®] buttons allow you to select a group. You can
press them, hold them, or press one while holding the other
to change the scrolling speed.
The SELECT [√][®] buttons allow you to choose items within
the selected group or family. You can press them, hold them,
or press one while holding the other to change the scrolling
speed. After selecting the last item of the currently selected
group, pressing [®] again takes you to the first entry of the
following group. Conversely, pressing [√] again after selecting the first entry of a group takes you to the last entry of
the preceding group.
Numeric key pad: These buttons allow you to enter numbers (for Tone, Style, Music Assistant memory, song, track
selection), values and characters (for entering names).
The TEMPO/DATA [–][+] buttons allow you to set the arranger
or Song tempo and the value of the selected FUNCTION
parameter.
X [FUNCTION] button
This button provides access to the FUNCTION menu. You can
use the FAMILY and SELECT [√][®] buttons to select the
desired function.
Y [DISK] button
Press this button to access the Disk functions. They are used
for loading data from floppy, saving data to disk, and managing floppy disks. See p. 53.
Note: You can also save and load data via USB.
Z [USER¥PROGRAM÷WRITE] button
Press this button whenever you want to select a User Program (a set of registrations). Press and hold it to save the
current panel and parameter settings to a User Program. See
page 45.
a USER TONES section
These buttons allow you to select the “best” sound of the
indicated family (i.e. the “best” piano, organ, guitar/bass, etc.
sound). After pressing one of these buttons, you can use
FAMILY [√][®] and SELECT [√][®] to select other families and
other Tones within the active family. (At a later stage, these
can be recalled by “double-clicking” these buttons.) You can
also assign your favorite sounds to these buttons. See “Using
the USER TONES buttons” (p. 30) for details.
b Disk drive, in the middle below the keyboard (not pictured)
This is where you insert floppy disks with Standard MIDI Files
or Music Styles you may already own. The drive accepts 2DD
(720k) and 2HD (1.44MB) floppy disks.
EXR-46 OR
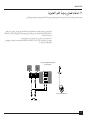
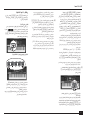
Rear panel
A
A OUTPUT R, L/MONO sockets
These sockets allow you to connect the EXR-46 OR to your
HiFi amplifier, a mixer, a cassette deck, a keyboard amplifier,
etc. If the external amplifier is mono, be sure to connect it to
the OUTPUT L/MONO socket.
B DC IN socket
This is where you need to connect the supplied adapter
(PSB-4U).
Note: Be sure to only use the adapter supplied with your
EXR-46 OR. Other adapters may damage your Interactive
Arranger.
C Cord hook
After connecting the adapter cable, wind it around the cord
hook to the socket’s right to prevent accidental power failures.
D FOOTSWITCH socket
This is where you can connect an optional DP-2, DP-6, or
BOSS FS-5U footswitch that allows you to hold (“sustain”)
the notes you play with your right hand. It can also be used
for controlling other parameters (see “FSW° (Footswitch
Assign)” (p. 40)).
B
C
D
E
F
E MIDI OUT/IN sockets
Connect the MIDI OUT socket to the MIDI IN jack of your
computer (or MIDI instrument) to transfer MIDI data from
the EXR-46 OR to the computer or external MIDI instrument.
Connect the MIDI IN socket of the EXR-46 OR to the computer’s MIDI OUT jack to receive data from the computer.
Note: The EXR-46 OR can also transmit/receive MIDI data via its
USB port. To do so, you need to install the appropriate USB drivers from the supplied CD-ROM.
F USB port
The USB port can be used for transmitting/receiving MIDI
messages or for archiving purposes with a computer.
11
r EXR-46 OR
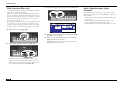
4. First steps
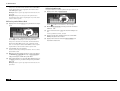
Demo songs
Setting up
The first thing you need to do is connect the supplied PSB-4U
adapter to a suitable wall outlet.
(1) Unpack the EXR-46 OR and place it on a stable surface.
(2) Connect the small end of the adapter cable to the
EXR-46 OR’s DC IN jack, and the other end to a suitable
wall outlet.
(3) Press the [POWER¥ON] button to switch on the
EXR-46 OR.
Your EXR-46 OR comes with 1 song demo, 8 Tone demos, and
various Style demos.
• The song demo illustrates the possibilities of the EXR-46 OR
as a whole.
• Tone demos show off the EXR-46 OR’s amazing sound
quality.
• Style demos give you an impression of the quality of the
on-board Music Styles.
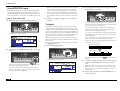
(1) Hold down the [USB] button while pressing [ONE¥TOUCH].
You can now press [START÷STOP] to stop playback of the
currently selected Tone song. If you press this button again,
the next Tone demo song will be played back.
(2) Press [START÷STOP] to stop Tone demo song playback.
Playback of a Style demo song
(1) Press the [STYLE] button.
STYLE
POWER ON
DemStyle 146
=
(4) Use the [VOLUME] knob to set the EXR-46 OR’s output
volume.
VOLUME
DemoSong 120 001
=
(2) If necessary, use the [VOLUME] knob to change the playback volume.
(3) Press [START÷STOP] to stop playback.
Playing back a Tone demo song
(1) Press the [TONE] button.
Note: When the EXR-46 OR is used at excessive volumes, the
protection system of its power amplifier stage may come on and
mute the speakers. In that case, reduce the volume setting and
wait a few seconds.
(5) Press [POWER¥ON] again to switch the EXR-46 OR back
off again.
If you wish to connect the EXR-46 OR to a keyboard or HiFi
amplifier, do so before performing step (3) and switch on the
amp before performing step (4).
12
TONE
Playback of the Tone demo song starts automatically.
Playback of the Style demo song starts automatically.
You can now press [START÷STOP] to stop playback of the
currently selected Style demo song. If you press this button
again, the next Style demo song will be played back.
(2) Press [START÷STOP] to stop Style demo song playback.
Leaving Demo mode
(1) Hold down the [USB] button while pressing [ONE¥TOUCH]
to leave the Demo mode.
EXR-46 OR
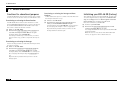
Playing without accompaniment
When you switch on the EXR-46 OR, it selects the PIANO SOLO
mode. This means that you can use the EXR-46 OR like a digital
piano, or a synthesizer.
The accompaniment function (called “Arranger”) and
[ONE¥TOUCH] button are not available in PIANO SOLO mode,
while only the Main part is active.
The EXR-46 OR provides three parts for your live playing (and
many more for Arranger backing and Song playback):
Main
As its name suggests, this is the most important
part. As long as the Split part is off, the Main part is
assigned to the entire keyboard.
Split
When you switch on this part, it is assigned to the
left half of the keyboard, while the Main part can
be played with your right hand.
Dual
This part can be added to the Main part and is also
assigned to the entire keyboard. This allows you to
play two sounds simultaneously.
(3) If necessary, select another sound by pressing one of the 8
USER TONES buttons. See p. 30 for details.
Using the Main and Split parts
(1) If you wish to play different sounds with your left and
right hands, press the [SPLIT] button.
3
SPLIT
GUITAR/
BASS
(4) If necessary, you can hold down the [TONE] button and
use BALANCE [ACCOMP] (softer) or [KEYBOARD] (louder)
to change the Main part’s volume.
TONE
The SPLIT icon appears and the EXR-46 OR now automatically selects a sound for the Split part that complements the
sound assigned to the Main part.
(2) Play a few notes on the keyboard.
At first, the keyboard is split at the G3 (note number “55”). If
necessary, you can select a different split point. See
“KeySplit* (Split point)” (p. 40).
BALANCE
ACCOMP
KEYBOARD
Using the Main part
(1) To activate the Main part and assign it to the entire keyboard, press the [PIANO¥SOLO] button.
PIANO
SOLO
The ARRANGER icon disappears, the Arranger stops (if it
was playing), and the EXR-46 OR automatically selects a
piano sound for you.
(2) Play a few notes on the keyboard.
Split
Note: Unlike previous Roland arranger instruments, the
EXR-46 OR no longer distinguishes between “melodic” parts and
a Manual Drums part. You can therefore also play a Drum Kit
with the Main part.
Note: You can also press the [START÷STOP] button to add a
rhythm accompaniment to your playing. This is based on the
currently selected Music Style. See p. 16 for how to select a different one.
Note: See p. 15 and “Automatic playback start (Sync Start &
Stop)” (p. 16) for other ways to start Music Style playback (the
drums, that is).
Main
To change the balance between the Main and Split sounds,
proceed as follows:
(3) Hold down the [SPLIT] button and use BALANCE [ACCOMP]
(decrease) or [KEYBOARD] (increase) to change the Split
part’s volume.
SPLIT
BALANCE
ACCOMP
KEYBOARD
(4) To assign another sound to the Split part, hold down the
[SPLIT] button and proceed like for the Main part
(page 13).
13
r EXR-46 OR
Alternatively, press and hold one of the eight USER TONES
buttons (Main part) while pressing another USER TONES
button (Split part).
Using the metronome
You can switch on the metronome when practising a new song.
(1) Press the [METRONOME] button.
Note: You cannot assign Drum Kits to the Split part.
Note: You can also add a monophonic bass part (“Auto Bass”) to
the Split part. See “Auto Bass*: status and volume” (p. 41).
METRONOME
Using the Main and Dual parts
(1) To play two sounds simultaneously, press the [DUAL] button.
DUAL
(2)
(3)
The DUAL icon appears and the EXR-46 OR now automatically selects a sound for the Dual part that complements the
sound assigned to the Main part.
You can also activate the Dual mode by holding down one of
the eight USER TONES buttons while pressing another. The
first USER TONES button’s sound is then assigned to the
Main part, while the second sound is assigned to the Dual
part.
(2) Play a few notes on the keyboard.
To change the balance between the Main and Dual sounds,
proceed as follows:
(3) Hold down the [DUAL] button and use BALANCE
[ACCOMP] (decrease) or [KEYBOARD] (increase) to change
the Dual part’s volume.
(4) To assign another sound to the Dual part, hold down the
[DUAL] button and proceed like for the Main part
(page 13).
Note: You cannot assign Drum Kits to the Dual part.
14
(4)
(5)
The
icon appears in the display and you hear the metronome sound.
Press and hold [METRONOME] to select the Metro TS
function.
Use the [–][+] buttons to set another time signature.
The possibilities are: 1/4~9/4, 1/8~9/8.
Press another “big” button in the DATA ENTRY section to
leave this function.
Press the [METRONOME] button again to switch the metronome off.
EXR-46 OR
5. Playing with accompaniment (Arranger)
Let us now take advantage of the EXR-46 OR’s accompaniment function. This function is called “Arranger”.
Starting/using the Arranger
(1) Press the [ARRANGER¥BAND] button.
(3) Play a chord (or just one note) with your left hand.
ARRANGER
BAND
ARRANGER
The
icon appears in the display and the keyboard is split into two halves. The keys you press in the left
half are used to specify the key of the accompaniment. The
right half of the keyboard allows you to play a tune to the
accompaniment.
(2) Press the [START÷STOP] button to start Arranger playback.
(4) Play another chord (or note) to change the Arranger’s key.
(5) To quickly return to the beginning of the accompaniment
pattern (RE-START function), press the [REC¥∏] button
while the accompaniment is running.
RE-START
(6) Press the following buttons to use other patterns of the
currently selected Music Style:
ARRANGER
Note: If the
icon is displayed, playing in the left
half of the keyboard while the Arranger is stopped, will sound a
stereo string sound (to which you can add a monophonic bass
sound, see “Auto Bass*: status and volume” (p. 41)). The left half
of the keyboard is thus not muted (like on previous Roland
arranger instruments). This “EP Chord” function can be switched
off, however (page 42).
Function
INTRO
Selects an introduction. Press this button
before activating [START÷STOP].
ORIGINAL
Simple accompaniment version.
FILL
Transition (“Fill In”) to VARIATION or ORIGINAL.
VARIATION Slightly more complex accompaniment version.
ENDING
● REC
The [V-LINK] button now flashes to indicate the tempo and
beats (BEAT function).
Button
Phrase that indicates the end of the song. Use
this button instead of [START÷STOP] to stop
playback.
These buttons select Music Style “patterns”. The icon corresponding to the button you press appears in the display.
Also, the ARRANGER chord field in the display indicates the
name of the chord you played last. This chord is used by the
accompaniment.
ARRANGER
M
As soon as you feel comfortable with the Arranger, you
should try to play a melody with your right hand while using
your left for specifying Arranger chords.
15
r EXR-46 OR
Changing the tempo
(7) Use the TEMPO/DATA buttons to decrease ([–]) or increase
([+]) the tempo (if necessary).
stop as soon as you release all keys in the chord recognition
area. This is great for songs where you need breaks (i.e. one
or several beats of silence).
Note: The behavior of the SYNC STOP function can be changed
(see p. 42) by pressing and holding the [SYNC¥START÷STOP] button.
NO
YES
Stopping Arranger playback
To return to the Music Style’s default tempo, simultaneously
press [–] and [+].
You can also press the [TAP¥TEMPO] button several times at
the desired tempo.
TAP TEMPO
Automatic playback start (Sync Start & Stop)
Press [SYNC¥START÷STOP] (the SYNC START icon appears).
“Sync Start” means that the Arranger starts playing back the
selected Music Style as you play a note or a chord with your
left hand (to the left of the split point).
(8) Press [START÷STOP] again to stop playback.
You can also press [ENDING]. In that case, you first hear an
ending phrase. When it is finished, Arranger playback stops
automatically.
Alternatively, you can press the [SYNC¥START÷STOP] button
twice in succession to activate the SYNC STOP function. If
you then release all keys in the left half of the keyboard,
playback stops at the same time.
Selecting Music Styles
The EXR-46 OR provides three memory areas for Music Styles:
USER STL: (Memory 000) This is where a Music Style loaded
from the Flash memory or floppy disk (MSA, MSD and MSE
series, optional) is temporarily stored. The data in this RAM
memory are erased when you switch off the EXR-46 OR.
MAKSOUM (001~008), SAIDI (009~013), MASRI (014~
025), MALFOUF (026~028), ARABI (029~035), TRADIT
(036~049), OR-WORLD (050~066), KHALIGI (067~088),
TURKISH (089~099): These are the Style families in the
EXR-46 OR’s internal ROM memory. These Styles cannot be
erased (but you can modify them in realtime using the Band
Orchestrator function, see page 17).
FLASH: (Memories 101~150) This is a Flash area inside the
EXR-46 OR that already contains 50 Styles when the EXR-46 OR
is shipped. You can expand the number of Styles in this area by
copying more Styles from your computer (via USB) or by saving
the Styles loaded from disk. There are 99 Flash memory slots in
all, but the actual number of Styles you can save there depends
on the data size of the Styles.
DISK: (Memories 201~…) This area refers to a floppy disk you
inserted into the EXR-46 OR’s drive. The number of available
Styles depends on the floppy disk, of course. The Style you select
is transferred to the EXR-46 OR’s USER STL memory (see
above), which is why it takes a little longer before you can use
it. (You could, however, save it to a Flash memory, see p. 49.)
(1) Press the [ARRANGER¥BAND] button.
ARRANGER
Check whether the
and a
INTRO ORIGINAL FILL VARIATION ENDING icon are displayed.
(2) Press the [STYLE] button.
SYNC
START/STOP
STYLE
In PIANO mode, Arranger playback will start when you press
any note.
The EXR-46 OR also provides a SYNC STOP option: quickly
press [SYNC¥START÷STOP] twice (“double-click”) so that the
SYNC START icon starts to flash. This will cause the Arranger to
16
(3) If you want to use a style on floppy disk, insert the disk
into the drive.
EXR-46 OR
(4) Use FAMILY [√][®] to select the memory area that contains
the desired Music Style (see above).
FAMILY
The FAMILY buttons allow you to jump to the desired “family” (which also include the Flash and USER STL areas).
The display now shows the name of the selected family.
MALFOUF
=
FLASH
=
73
Note: If you forgot to insert a floppy disk into the drive, the display shows “No Disk” when you attempt to select the “disk
family”.
(6) If necessary, confirm your selection by pressing the [+/YES]
button.
The display briefly shows “LOADING” (only after selecting
a Style from the inserted floppy disk).
If you selected a Music Style on floppy disk, the
icon
now flashes, and the EXR-46 OR automatically selects the
USER STL memory that now contains the Music Style
you loaded from floppy disk.
If you press [+/YES] during Arranger playback, the new Style
is used at the next downbeat (1st beat of the next measure).
Otherwise, the EXR-46 OR displays its name and uses that
Style when you press [START÷STOP].
Using the Band Orchestrator
function
The Band Orchestrator function allows you to vary the accompaniment patterns played by the Arranger. You can leave out
parts, thin out the drum part, etc. – in real-time (i.e. while you
are playing).
(1) Press the [ARRANGER¥BAND] button to select the Arranger
mode.
(2) Select the Music Style you wish to use for playing (or use
the one that is currently selected).
See page 16.
(3) Press one of the following buttons to select the desired
level of musical “complexity” (the corresponding icon is
displayed):
Note: See page 50 for how to save the Music Style in the
USER STL memory to the Flash memory.
132
(5) Use SELECT [√][®] to specify the desired Style within the
selected group.
SELECT
Obviously, these buttons should be used during Arranger
playback.
The first press of SELECT [®] (or [√]) shows the name of the
first Music Style within the selected group. It is already
selected, so if you need the first Style, there is actually no
need to press SELECT [®]. You must use SELECT [√] or [®],
however, to select another Style within the same group. You
can also use the numeric buttons to select Styles. See also
“Working with the FAMILY, SELECT and numeric buttons”
(p. 20).
After selecting memory 101 (Flash) or 201 (first disk memory), the display shows a flashing Yes message.
DRUM & BASS
The simplest accompaniment that only contains the drum and bass lines.
COMBO
Accompaniment pattern with only a few
instruments (i.e. a band).
FULL BAND
Accompaniment pattern with a lush
arrangement (several melodic instrument
lines).
17
r EXR-46 OR
The corresponding icon appears in the display (only
one of them can be displayed at any one time).
Note: Immediately after switching on the EXR-46 OR, the
Orchestrator selects the “FULL BAND” level.
Note: The effect of these three levels also depends on whether
the [VARIATION] or [ORIGINAL] button was pressed. In effect, the
combination of the [ORIGINAL]/[VARIATION] and [DRUM&BASS]/
[COMBO]/[FULL¥BAND] buttons provides 6 accompaniment patterns per Music Style (3 x 2).
Balance
The BALANCE [√][®] buttons allow you to change the volume
balance between the Arranger (or Song) parts and the Keyboard
parts (the ones you can play yourself).
(1) Press BALANCE [ACCOMP] if the Arranger (or Song parts)
are too soft.
BALANCE
ACCOMP
KEYBOARD
The last selection you make can be saved to a User Program.
See p. 45.
a10
Balance
=
80
(2) Press BALANCE [KEYBOARD] if you think your solo playing
should be louder.
By holding down [SPLIT] (or [DUAL]) while pressing these
buttons, you can modify the volume of those Keyboard
parts.
Note: See p. 41 for setting the volume of individual parts.
18
EXR-46 OR
6. Playing back songs
The EXR-46 OR allows you to play back commercially available music data files (called Standard MIDI Files) or your own songs you saved to disk or to the EXR-46 OR’s Flash memory. Your own songs are saved as
Standard MIDI Format 0 files and can also be played back using any other SMF compatible sequencer (or software).
SYNC
TAP TEMPO START/STOP
Basic song playback
(1) Press the [SONG] button (it lights) to switch to Song
mode.
INTRO
ORIGINAL
FILL
VARIATION
ENDING
(3) Use FAMILY [√][®] to select the memory area that contains
the song you wish to play back.
(4) Use SELECT [√][®] or the numeric buttons to specify the
desired song within the selected group.
SELECT
FAMILY
SONG
This is necessary because, otherwise, pressing the
[START÷STOP] button will start Arranger playback. So be sure
to check whether the [SONG] button lights and whether the
ARRANGER
and INTRO ORIGINAL FILL VARIATION ENDING icons are no
longer displayed. Only then will the ARRANGER & SONG
CONTROLS buttons allow you to control song playback (see
above).
(2) If you want to play back a song from floppy disk, insert
the disk into the drive (front right).
The EXR-46 OR provides three memory areas for songs:
USERSONG: (Memory 000) This where the song data you
record are temporarily stored. The data in this RAM memory
are erased when you switch off the EXR-46 OR.
FLASH: (Memories 101~199) This is the Flash area inside
the EXR-46 OR that already contains several songs when the
EXR-46 OR is shipped. You can expand the number of songs
in this area by copying more songs from your computer (via
USB). There are 99 Flash memory slots in all, but the actual
number of songs you can save there depends on the data
size of the songs.
DISK: (Memories 201~…) This area refers to a floppy disk
you insert into the EXR-46 OR’s drive. The number of available songs depends on the floppy disk, of course.
This is only necessary for the Flash memory or a floppy disk
(there is only one USERSONG memory).
The first press of SELECT [®] (or [√]) shows the name of the
first song within the selected group. It is already selected, so
if you need the first song, there is actually no need to press
SELECT [®]. You must use SELECT [√] or [®], however, to select
another song within the same group. After selecting memory 101 (the first Flash memory), the display looks as follows.
101
SongName
=
You can also use numeric buttons to select songs.
19
r EXR-46 OR
Working with the FAMILY, SELECT and numeric
buttons
You can press FAMILY [√] or [®] either repeatedly (brief
presses) to go back or advance, or hold down [√] or [®] to
quickly select another family. The fastest way to scroll
through the available families is by holding down [√] while
pressing [®] (go backwards), or by holding down [®] while
pressing [√] (advance). The same methods are available for
the SELECT [√][®] buttons. As a reminder: the FAMILY buttons
are used for selecting groups, while the SELECT buttons
allow you to select items within a group.
If you prefer to use the numeric buttons, enter three figures (e.g. “001” for entry “1”). If you only enter two figures
(or only one), the EXR-46 OR takes slightly longer to accept
your entry.
Note: If the number you enter lies beyond the last available
entry, the EXR-46 OR does not change.
Note: Enter “000” (or “0”) to select the USERSONG memory.
After selecting memory 101 (Flash) or 201 (first disk memory), the display shows a flashing Yes message. You can
ignore this if you like, and proceed with the next step (or you
can press [YES/+] and then proceed).
[START÷STOP], then press that button again. Otherwise, wait
until the current song is finished, then press the
[START÷STOP] button to start playback of the new song.
Note: Please bear in mind that starting playback of the selected
song on disk will erase the song in the USERSONG memory.
Be sure to save it to disk before proceeding (see p. 54).
(6) You can change the song tempo with the [–][+] buttons or
[TAP¥TEMPO].
Doing so, however, means that the tempo will still change if
the song you are playing back contains tempo change messages. Furthermore, every time you jump back to the beginning or another position of the song using [|√], [º] or [‰], the
programmed song tempo is reset.
Note: In Song mode, the EXR-46 OR automatically selects the
PIANO SOLO keyboard mode. If you like, you can play along with
the song (and even use the Split or Dual part).
Note: In certain cases, the display may show the message XG
Light or GM2 rather than a Tone name. Such a message
means that the EXR-46 OR is using a Tone that cannot be
selected via the front panel. There are 798 such “hidden” Tones
whose sole purpose is to ensure XG/GM2 playback compatibility.
Additional playback functions
The [INTRO], [ORIGINAL], etc. buttons have two functions: one in
Style mode (printed above the buttons), and another one in
Song mode (printed below the buttons).
Selecting Song mode
The ARRANGER & SONG CONTROLS buttons have two functions: they can be used for selecting Music Style patterns (when
ARRANGER
the
icon is displayed), or for Song navigation
(when the [SONG] button lights).
To select Song mode (and the SONG CONTROL functions), you
need to press the [SONG] button. Only then will the following
functions be available.
SONG
Fast Forward, Rewind, and Reset
Note: If you forgot to insert a floppy disk into the drive, the display shows “No Disk” when you attempt to select a file on
disk.
(5) After making sure that the correct song has been
selected, you can press [START÷STOP] (now called [®÷ª]) to
load it and immediately start playback.
The [V-LINK] button now flashes to indicate the tempo and
beats (BEAT function).
You can already select a new song while the current one is
still playing back. If you want to listen to it before the current song is finished, stop playback by pressing
20
• To fast forward (jump to a measure later in the song), press
[‰].
• To rewind (return to a measure that lies before the current
position), press [º].
The measure indication in the upper right corner of the display will help you locate the measure you need.
• Press [|√] (Reset) to jump back to the first measure of the
song. You need to stop playback before using the [|√] button.
EXR-46 OR
Note: In certain cases, [‰] and [º] may not be available. This is
only the case for very large songs, however.
Note: By pressing [|√], [º] or [‰], you also recall the song’s preprogrammed tempo value.
Loop playback (Repeat)
Another clever feature of the EXR-46 OR’s Recorder is that you
can program playback loops. You can do so during playback or
while the Recorder is stopped.
(1) Press [MARKER¥A–B] where you want the loop to begin
(the A icon appears in the bottom right corner of the
display).
SYNC
START/STOP
MARKER
A–B
This button allows you to switch the EXR-46 OR’s Repeat
function on and off.
(4) To play back the loop, press the [START÷STOP] button (now
called [®÷ª]).
The Recorder jumps to measure “A” and starts playing. At the
end of measure “B”, the Recorder immediately jumps back to
the beginning of measure “A” and continues playing back
the passage.
If necessary, repeat steps (1) and (2) to set other marker
positions.
Note: The playback tempo is reset every time the Recorder
reaches the “A” measure.
Note: In certain cases, the Marker function may not be available. This only happens with very large songs, however.
Live performance with song backing (Minus One)
Your EXR-46 OR allows you to mute parts you wish to play
yourself or don’t need in a given situation. This is called “Minus
One” playback.
(1) Press the [SONG] button if it doesn’t light.
You can now select a Song, if you like (see p. 19).
(2) Press the [MINUS¥ONE] button (the “MinusOne” message appears in the display).
ENDING
(2) Fast forward to the measure where you want the loop to
end and press [MARKER¥A–B] again (the B icon appears).
You can also program loops on the fly. Remember, however,
that the Recorder always memorizes the beginning (downbeat) of the next measure.
(3) If the icon isn’t already displayed, press the [REPEAT¥A–B]
button to activate the loop you have just programmed.
INTRO
REPEAT
A–B
MINUS
ONE
The 5 LOCK buttons light to indicate that all tracks will be
played back.
(3) Press one of the LOCK buttons to switch off the corresponding track(s). The assigned track icon flashes.
(Example: if you switch off the [DRUMS] button, the [10] icon
starts flashing.)
When a button lights, the corresponding track(s) is/are audible (i.e. not muted). You can also mute several tracks by
switching off the corresponding LOCK buttons.
The MINUS ONE icon appears and the selected part is muted.
Note: The Main part does not automatically adopt the Tone and
related settings of the melody part.
If you like, you can also mute several parts.
What are tracks?
The term “track” is used only for your convenience. We borrowed it from tape recorders that allow for recording several musical parts by the same person (one part after the
other).
In the case of the EXR-46 OR, the term is only used to indicate that we are dealing with separate musical parts. Here
indeed (like with computer-based sequencers) what really
counts are the MIDI channels.
Songs you record with the EXR-46 OR, and the Standard
MIDI Files you play back can consist of up to 16 tracks (i.e.
MIDI channels). In many instances, only certain tracks are
used, but the following are almost certainly present in every
Standard MIDI File:
Track 2: bass
Track 4: melody
Track 10: drums
The LOCK buttons allow you to mute the following tracks:
[RIGHT]–Refers to track “4” of the selected Standard MIDI
File. Music data for educational purposes (especially piano
music) use this track for the right-hand part. Mute this track
21
r EXR-46 OR
to play the right hand yourself while listening to the lefthand part of the Standard MIDI File. The EXR-46 OR contains
an excellent stereo piano Tone you could use.
[LEFT]–Refers to track “3” of the selected Standard MIDI File.
Music data for educational purposes (especially piano music)
use this track for the left-hand part. See also above.
[OTHERS]–Mutes all tracks that cannot be muted with the
remaining LOCK buttons, more specifically: 1, 3, 6~9, 12~16.
[BASS]–Mutes track “2”, which is assigned to the bass part of
a Standard MIDI File.
[DRUMS]–Mutes track “10”, which is assigned to the drum
part of a Standard MIDI File.
Note: You also switch off several buttons simultaneously.
(4) Press [|√] and [®÷ª] to start playback.
(5) Press [®÷ª] again to stop playback.
(6) Press [MINUS¥ONE] again (or one of the “big” DATA ENTRY
buttons) to switch the function of the same name back
off again.
Note: The Minus One setting can be saved along with the
selected song. See page 49.
22
Changing the track assignments
If the song files you are using do not conform to the GM system
(and therefore do not correspond to the RIGHT, LEFT, BASS or
DRUM assignments of the Minus One function), you can proceed as follows to assign other tracks (MIDI channels) to the
LOCK [RIGHT], [LEFT], [BASS] and [DRUMS] buttons:
(1) Press the [MINUS¥ONE] button to activate the function of
the same name.
(2) Press and hold the [RIGHT], [LEFT], [BASS] or [DRUM] button.
(3) While holding that button, use the [–][+] buttons to assign
the desired MIDI channel to the button you are holding.
Example: To assign MIDI channel “10” to the [RIGHT] button,
press DATA ENTRY [+] until the display looks as follows:
RIGHT
(4) Press [MINUS¥ONE] again (or one of the “big” DATA ENTRY
buttons) to switch the function of the same name back
off again.
Note: The Minus One setting can be saved along with the
selected song. See page 49.
EXR-46 OR
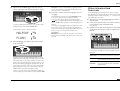
7. Recording your music
Your EXR-46 OR contains a 16-track Recorder you can use for recording your own songs.
Basic song recording
Let us first look at the most straight-forward way of recording
your renditions with Arranger backing.
(1) Press the [ARRANGER¥BAND] button.
ARRANGER
The display should look as shown above (if it doesn’t, use the
FAMILY [√][®] buttons (“REC MODE”) to select REC ALL):
(The [RECORD≈∏] and [1]~[16] icons flash.) You are now in ALL
mode, which means that everything you and the
EXR-46 OR’s Arranger play will be recorded.
ALL
120
001
=
ORCHESTRATOR
• Press [START÷STOP].
BEAT
FULL
BAND
BAND
INTRO
1
9
(2)
(3)
(4)
(5)
(6)
(7)
(8)
ARRANGER
The
icon appears. You can now use your left
hand for transposing the Arranger’s key in realtime.
Press the [STYLE] button and select a Music Style (or select
a Music Assistant memory).
Select the desired Arranger division by pressing [INTRO],
[ORIGINAL] or [VARIATION].
Press the [START÷STOP] button.
Use [TAP¥TEMPO] or the [–][+] buttons to set desired tempo.
Press [START÷STOP] again to stop Arranger playback.
Assign the desired Tone to the right half of the keyboard.
Press [TONE] and use the FAMILY & SELECT [√][®] buttons, the
numeric buttons or the buttons in the USER TONES section.
See also page 30.
Press the [REC¥∏] button.
2
10
3
11
4
12
5
13
6
14
7
15
8
16
• Press the [ENDING] button to start the Ending phrase. As
soon as it ends, Arranger playback and song recording stop.
Note: If you select “REC ALL” with the FAMILY buttons, the song
in the EXR-46 OR’s USERSONG memory is erased. You may
want to save the current song first (see p. 49). If you only
pressed [REC¥∏], the EXR-46 OR selects the Single mode if the
USERSONG memory already contains data. See page 24 for
details about that mode.
(9) Start recording in one of the following ways:
• Press the [START÷STOP] button to start Arranger playback
with the selected Division.
The [V-LINK] button now flashes to indicate the tempo and
beats (BEAT function).
Note: If you start recording without the Arranger and want to
bring it in at a later stage, it would be a good idea to switch on
the metronome by pressing the [METRONOME] button.
ENDING
MINUS
ONE
Listening to your song
(1)
(2)
(3)
(4)
Press the [SONG] button.
Press [START÷STOP] to start playback.
Press [START÷STOP] once again to stop playback.
Press [|√] to return to the beginning of the song.
• Activate the [SYNC¥START] function and press one or several
keys to the left of the Split point.
RE-START
● REC
Note: It is also possible to record in PIANO SOLO mode (after
pressing the button of the same name). In that case, you should
definitely use the metronome. The song’s time signature can be
set with the MetroTS function. See page 14.
(10) Stop recording in one of the following ways:
23
r EXR-46 OR
Other recording functions
The EXR-46 OR’s 16-track Recorder can be used in several ways.
Let us therefore have a look at the other recording modes.
About the recording modes
●Modes
The EXR-46 OR provides two modes for recording new
music, and two for adding parts or correcting passages of
existing music:
Recording a new song
ALL
Keyboard
In this mode, you can record using the Keyboard parts. The track can be freely selected.
• Main and Split or Dual
In this mode you can record onto one track at a
time. The track can be freely selected.
Punch I/O This mode allows you to re-record a short section of an otherwise perfect part.
Note: Each time you select ALL or Keyboard mode, the data in
the USERSONG memory are erased.
●Recorder memory
The EXR-46 OR provides one “live” song memory, which can
contain one song at a time. After completing a song, you
should save it (see p. 54).
To keep you from accidentally erasing the song in the
EXR-46 OR’s internal memory, the EXR-46 OR automatically
selects Single after your first recording. Bear in mind
that selecting “ALL” or “Keyboard” will erase the song in
the USERSONG memory. Do not select “ALL” or “Keyboard” for adding parts to an existing song – use “Single” or
“Punch I/O” instead.
Conversely, you cannot select “Single” or “Punch I/O” if the
USERSONG memory doesn’t yet contain data.
24
More about ALL mode
In addition to what you learned on p. 23, here are a few considerations:
After pressing the [REC¥∏] button, the 16 track and [RECORD∏]
icons start flashing, signalling that all 16 tracks are available for
recording.
Dual) or two parts (Split to the left, Main to the right). If you
select a Drum Kit for the Main part, you can only record a drum
part.
Note: When you select the Keyboard mode, song data in the
EXR-46 OR’s internal memory will be overwritten by your new
recording.
(1) Press the [REC¥∏] button.
(2) Press FAMILY [√][®] to make the display look as follows:
Keyboard 120 001
=
ORCHESTRATOR
In this mode, you can record everything you
and the EXR-46 OR can play simultaneously:
• Arranger (accompaniment).
• Keyboard parts (Main and Split or Dual).
Adding parts to an existing song
Single
And finally: playing back a Standard MIDI File erases the
song in the EXR-46 OR’s memory. In return, the SMF data
will be available (and can be supplemented with your own
renditions in “Single” or “Punch I/O” mode).
BEAT
FULL
BAND
ALL
120
001
=
ORCHESTRATOR
INTRO
BEAT
1
9
FULL
BAND
2
10
3
11
4
12
5
13
6
14
7
15
8
16
INTRO
1
9
2
10
3
11
4
12
5
13
6
14
7
15
8
16
Here is what the tracks correspond to (after recording a song
with Arranger backing):
1
2
3
4
5
6
7
8
Accomp 1
Arranger bass
Accomp 2
kMain
Accomp 3
kDual*
Accomp 4
Accomp 5
9
10
11
12
13
14
15
16
Accomp 6
Arranger drums
kSplit*
kAuto Bass* (see p. 41)
The RECORD
and track icons flash.
(3) To create a split, press the [SPLIT] button.
(4) Activate the metronome (if necessary), and set the desired
tempo with the [TAP¥TEMPO] button or [–][+].
You can also record without metronome if you like.
Note: If you assign a Drum Kit to the Main part, your drum performance is recorded onto track 16.
Single recording mode
Melody Intell. (see p. 27)
(kMain**)
(*) Only one of these can be used alongside the Main part.
(**) If you assign a Drum Kit to the Main part. In that case, track 4 is
not used.
For your convenience, the Keyboard parts are flagged with a
“k” symbol in the above graphic.
Parts you do not hear during recording are not recorded. The
track icons [1]~[16] thus do not show you what will be
recorded, but rather what can be recorded.
Keyboard recording mode
In Keyboard mode, you can record the Keyboard parts. The
Arranger is not available. Essentially, this mode allows you to
record either one layered part using up to two sounds (Main +
This mode is only available if the EXR-46 OR’s song memory
already contains data. When you press [REC¥∏], the RECORD
icon and the icon of the first empty track flash. You could
therefore record a new part straight away. (If all tracks already
contain data, Track 1 will be selected.)
You can, however, also substitute an already recorded part with
a new version.
(1) Press the [REC¥∏] button.
(2) Press FAMILY [√][®] to select “Single”.
(3) Use the SELECT [√][®] or numeric buttons to select the
track you wish to record to.
You can only select one track at a time (hence the name
“Single”). If you select a track that already contains data,
your new version will overwrite the existing one.
(4) If necessary, assign the desired Tone to the part you are
about to record (see p. 30).
EXR-46 OR
If you select track [10], you can select Drum Kits rather than
Tones. Track 10 is reserved for drum parts.
Note: If you use the Single recording mode for adding parts to a
Standard MIDI File recorded with another instrument or
sequencer, track 16 (or any other track defined as “second drum
track”) may also use a Drum Kit that can be changed.
Note: Even though the Main part can be used for recording all
tracks in Single mode, the MFX only applies to track/MIDI channel 4.
(5) Press [START÷STOP] to start recording.
After a two-measure count-in (see p. 41), you will hear all
parts that have already been recorded. Start playing (and
recording) your new part.
(6) Press [START÷STOP] to stop recording.
(7) Return to step (3) to record additional parts.
(1) Press the [REC¥∏] button.
(2) Press FAMILY [√][®] to make the display look as follows:
PunchI/O 120 001
=
ORCHESTRATOR
BEAT
FULL
BAND
INTRO
1
You can also use an optional footswitch for starting and
stopping recording. Doing so has the advantage that you can
use both hands for playing (or the left hand for Pitch Bend/
Modulation effects and the right for playing the melody.)
• Connect an optional DP-2, DP-6, or BOSS FS-5U footswitch
to the FOOTSWITCH socket on the EXR-46 OR’s rear panel.
• Press the [FUNCTION] button (it must light).
The flashing track icon (only one) depends on the first track
that already contains data. In the above example, track 1
contains data, which is why its icon flashes.
(3) Use the SELECT [√][®] or numeric buttons to select the
track you wish to record to.
Punch I/O
In this mode, you can re-record part of a track (the second
chorus, for example). The important aspect of this mode is
that newly recorded material does not erase the material
before or after the passage you redo.
Using a footswitch for punching in/out
SELECT
FUNCTION
• Use FAMILY [√][®] to select “KB SET”.
The EXR-46 OR’s Function parameters are divided into 9 logical “families”. For the following, we need to select the group
that contains the global keyboard settings.
• Use SELECT [√][®] to select the “FSW” parameter.
Original track
SELECT
This passage is redone
RE-START
RE-START
● REC
● REC
By contrast, in Single mode, the entire track you record is
replaced by your new material. (So if you don’t play anything
during recording, the entire track will be empty afterwards.)
Like the Single mode, Punch I/O can only be selected if the
EXR-46 OR’s memory already contains song data.
You can only select one track at a time.
(4) Press [START÷STOP] to start playback of the (old) song
data.
The RECORD
icon and the icon of the selected track flash.
(5) When the Recorder reaches the measure where you wish
to start recording, press [REC¥∏] again.
The RECORD
icon now lights steadily.
(6) Play the passage you want to redo.
(7) Press [REC¥∏] again to deactivate recording.
Song playback still continues, so…
(8) Press [START÷STOP] to stop playback.
(9) Press [START÷STOP] to listen to the new version.
If you are not satisfied, return to step (3) above.
Return to step (3) to correct another track.
Sustain
Note: See also “Working with the FAMILY, SELECT and numeric
buttons” (p. 20).
• Use the [–][+] buttons to select “Punch I/O”.
• Press [SONG] to return to the recording function.
• Continue with step (1) under “Punch I/O”.
In steps (5) and (7), press the footswitch (rather than the
[REC¥∏] button).
25
r EXR-46 OR
8. Additional Music Style functions
Apart from the basic Music Style functions covered on page 15 and following, your EXR-46 OR also provides the following functions. Most of the following functions are only available after pressing the
ARRANGER
[ARRANGER¥BAND] button (the
icon must be displayed).
One Touch
Using the Music Assistant
The One Touch function automates quite a few tasks:
• The Arranger selects the preset Style tempo.
• Suitable Reverb and Chorus settings.
• The EXR-46 OR selects sounds for the Main, Split and Dual
parts that are is suitable for the selected Style.
There are 2 One Touch memories per Style with different
settings for the above parameters. Here is how to select one:
(1) Select the desired Music Style (see p. 16).
(2) Press the [ONE¥TOUCH] button.
ONE
TOUCH
Another practical function for quickly making the right settings
for a song you want to play is to take advantage of the
EXR-46 OR’s novel MUSIC ASSISTANT function. It prepares
everything for working with the Arranger (Style, Tones, effects,
etc.). The Music Assistant is not available for song playback.
The following parameters are changed automatically when you
select a Music Assistant memory:
• Music Style
• Tempo
• Sounds for the Main, Split
and Dual parts
• Effect settings
• Band Orchestrator
• Keyboard Touch
(1) Press the [MUSIC¥ASSISTANT] button.
MUSIC
ASSISTANT
The number field in the upper left corner reads “OT”, followed by the number of the selected One Touch memory.
Piano 2
If the DATA ENTRY [TONE] button lights, the display now
shows a Tone name (“Piano 2” in the example above).
(3) Press the [ONE¥TOUCH] button again if you need “OT2”.
One Touch needs to be activated again every time you select
a new Music Style.
Note: One Touch is also available for USB and disk Styles, but it
is less meaningful.
26
It lights and the display shows the name of the last Music
Assistant setting you selected (or of the first Music Assistant
memory).
(2) Use FAMILY [√][®] to select the “family” (i.e. genre) that
contains the desired Music Assistant settings.
FAMILY
MALFOUF 102
=
The following families are available: MAKSOUM, SAIDI,
MASRI, MALFOUF, ARABI, TRADITIONAL, OR-WORLD,
KHALIGI, TURKISH.
(3) Use SELECT [√][®] to specify the desired Music Assistant
memory within the selected family.
The first press of SELECT [®] (or [√]) shows the name of the
first Music Assistant setting within the selected group. It is
already selected, so if you need the first setting, there is
actually no need to press SELECT [®]. You must use SELECT [√]
or [®], however, to select another Music Assistant setting
within the same group. You can also use the numeric buttons. See also “Working with the FAMILY, SELECT and
numeric buttons” (p. 20).
Note: If necessary, you can now change the settings you do not
like (e.g. select another sound for the Main part, etc.) and then
save your new version to a User Program (see p. 45).
EXR-46 OR
Melody Intelligence
Changing the Melody Intelligence harmony type
The Melody Intelligence function adds a second voice (harmony
notes) to the melodies you play with your right hand. In fact,
the Melody Intelligence function uses both halves of the keyboard to determine which notes to play:
• It looks at the melody notes in the right half; and…
• It analyzes the chords you play in the left half to see which
notes it must add to your melody.
Press the [MELODY¥INTELLIGENCE] button so that the corresponding icon appears in the display.
MELODY
INTELLIGENCE
The EXR-46 OR contains 18 different voicings (harmony
types) for the MELODY INTELLIGENCE function. These voicings specify the number of harmony notes and the way in
which they are added to your melody.
To select a different harmony type, press an hold the
[MELODY¥INTELLIGENCE] button until the “MI” message
appears in the upper left corner of the display. Then use the
[–][+] buttons to select the desired voicing. The available
types are:
1 Duet
2 Organ
3 Combo
4 Strings
5 Choir
6 Block
7 BigBand
8 Country
9 Traditnl
10 Broadway
11 Gospel
12 Romance
13 Latin
14 CntrGuit
15 CntrBald
16 WltzOrg
17 OctvTpe1
18 OctvTpe2
Note: The [MELODY¥INTELLIGENCE] setting can be saved to a
User Program memory.
00 Traditnl 120
=
ORCHESTRATOR
FULL
BAND
M
BEAT
001
PIANO Mode
In PIANO mode, the Main part is assigned to the entire keyboard. Though the EXR-46 OR initially assigns a piano sound to
the Main part, you can select any other one and save your setting to a User Program.
The main difference between PIANO SOLO and PIANIST mode is
that the Arranger’s melodic parts are available here, which is
not the case in PIANO SOLO mode.
But there is no split for chord recognition (you may remember
that the EXR-46 OR’s keyboard is split when you switch on the
[ARRANGER¥BAND] button): the Arranger decodes every chord
you play – no matter where you play it. Causing the Arranger to
play another chord requires that you play at least a triad (i.e. the
three notes that make up a chord). Feel free to play more than
three chord notes but remember that two notes won’t cause the
Arranger to play another chord.
When you use an optional sustain pedal, all notes you play
simultaneously are recognized as a chord – irrespective of
whether you play them with you left or right hand.
(1) Simultaneously press the [ARRANGER¥BAND] and
[PIANO¥SOLO] buttons (both buttons light).
The display briefly shows “PianoMod” and the
ARRANGER
icon flashes.
INTRO
(2) Press [STYLE] and use the SELECT [√][®] buttons to select a
Music Style. See also p. 16.
(3) Press [TONE] and use FAMILY [√][®] and SELECT [√][®] (or the
USER TONES buttons) to assign a different sound to the
Main part.
You can also add the DUAL part (page 14). Even the SPLIT
part could be used, yet chord recognition remains active for
the entire keyboard.
(4) Press [ARRANGER¥BAND] or [PIANO¥SOLO] to leave PIANIST
mode.
27
r EXR-46 OR
Bass Inversion (Bass Inv)
Use this function to change the way in which the Arranger
reads the chords you play.
When this function is off (default), the Acc Bass part plays the
root of the chords that feed the Arranger. If you play a “C” (or C
chord), the bass sounds a “C”; if you play an A minor chord (or if
you press “A” and the “C” to its right), the bass sounds an A, etc.
By activating Bass Inversion, you can specify the note played by
the A. Bass part (the lowest note of your chords). Switch on Bass
Inversion for songs that rely on bass rather than on chord patterns (for example C – C/B – C/Bb, etc.).
(1) Press the [FUNCTION] button.
(3) Use SELECT [√][®] to select the “BassInv” parameter.
Here are yet other functions related to Music Styles. These can
be set via the FUNCTION menu, or are covered elsewhere:
• Balance between the Keyboard parts and the Music Style
parts (see p. 18)
• Volume of certain Music Style parts (see p. 41)
• Arranger split point (see p. 40)
• Hold function for the Arranger notes (see p. 42).
SELECT
00 BassInv
120
=
ORCHESTRATOR
001
BEAT
FULL
BAND
M
INTRO
FUNCTION
(4) Press the [+] button to select “ON” for “VALUE”.
Note: See also “Working with the FAMILY, SELECT and numeric
buttons” (p. 20).
(2) Use FAMILY [√][®] to select “ARR SET”.
(5) Press another “big” button in the DATA ENTRY section to
leave this function.
Note: This setting can be saved to a User Program (see p. 45).
FAMILY
The EXR-46 OR’s Function parameters are divided into 9 logical “families”. As the Bass Inversion parameter is an
Arranger function, you need to select the Arranger settings
(hence ARR SET).
28
More Music Style functions
EXR-46 OR
9. Using oriental tunings
Your EXR-46 OR allows you to change the tuning of the keys, which then applies to all notes of the same name. Here’s an example: If you press the ORIENTAL SCALE [Bƒ] button (indicator lights), that note’s tuning
is lowered by a quarter tone (–50 cents). This setting applies to all B-flat keys on the keyboard.
Tuning individual notes a quarter tone down
(1) Press an ORIENTAL SCALE button to tune the corresponding notes a quarter tone down (the button must light).
E
(2) If you also want to tune down other notes, press the corresponding button(s).
If you pressed the wrong button (indicator lights), press it
again so that its indicator goes dark again. The pitch of the
corresponding notes returns to normal.
Note: To return to the default value, press [+] and [–] simultaneously.
Saving and loading your tunings (SCALE MEMORY)
After setting the desired tunings, you can save them to one of
the three Scale Memories and recall them whenever you need
them. Here’s what you need to do:
(1) Tune the notes to your liking (see above).
(2) Press and hold the SCALE MEMORY button ([1]~[3]) that
corresponds to the memory where you wish to save your
tuning settings.
E
E
Using other tuning values
E
Pressing an ORIENTAL SCALE button toggles between the western tuning of the corresponding notes and a setting that is a
quarter tone below western tuning (–50 cents).
However, you can also select other tuning values.
(1) Press and hold the ORIENTAL SCALE button of the note
whose tuning you wish to change until the display reads
Scale, followed by the note name.
You can also select this page and parameter via the Function
menu. See page 43.
(2) Use the DATA ENTRY [–][+] buttons to modify the tuning of
the selected note.
NO
whose scale settings differ from the ones of the last memory
you selected, the corresponding button ([1]~[3]) starts flashing.
YES
(3) Wait until all three SCALE MEMORY indicators briefly
light, and release the button you pressed.
If necessary, you can select another, scale memory by briefly
pressing the SCALE MEMORY button assigned to the settings
you wish to use.
To return to the western tuning, press the SCALE MEMORY
button in question again so that its indicator goes dark, and/
or switch off all ORIENTAL SCALE buttons whose indicators
light.
In the second case, the SCALE MEMORY indicator of the last
memory you selected starts flashing to signal that the current ORIENTAL SCALE settings no longer correspond to the
ones contained in the currently selected memory.
The ORIENTAL SCALE settings are also saved to a User Program and therefore do not need to be saved to one of the
SCALE MEMORY areas. Whenever you select a User Program
Note: When shipped, the EXR-46 OR already contains frequently used Scale Memory settings (see above).
Note: See also “Scl Mode*” (p. 43) for deciding which sections
should be affected by the Scale Tune settings.
Setting range: –64~63 cents.
29
r EXR-46 OR
10. Keyboard part functions
Selecting sounds for the Main, Split and
Dual parts
The EXR-46 OR contains about 524 melodic sounds you can use
for playing melodies (others are more like sound effects). Those
sounds need to be assigned to a Keyboard part, of which there
are three: Main, Split and Dual (see also p. 13).
Selecting any of the available sounds
Unlike previous arranger-type instruments, the EXR-46 OR no
longer works with banks, numbers and variations: all available
sounds can be selected via the same streamlined procedure.
(1) Press the DATA ENTRY [TONE] button (it must light).
See below for the available families. By selecting another
family, you immediately jump to the first sound of that
group.
•
•
•
•
•
•
•
•
•
•
•
•
PIANO (001~011)
E.PIANO (012~026)
KEYBOARD (027~033)
CHR PERC (034~063)
ORGAN (064~097)
ACCORDN (098~111)
A.GUITAR (112~129)
E.GUITAR (130~163)
BASS (164~217)
STRINGS (218~263)
VOCAL (264~275)
SAX (276~287)
•
•
•
•
•
•
•
•
•
•
•
WIND (288~301)
AC BRASS (302~329)
SYNBRASS (330~343)
SYNLEAD (344~380)
POLY SYN (381~391)
PAD (392~426)
ETHNIC1 (427~499)
ETHNIC2 (500~550)
PERCUSSION (551~575)
SFX (576~617)
DRUM KIT (618~650)
Note: See page 118 for a list of the available sounds.
TONE
(2) To assign another sound to the Split or Dual part, hold
down the [SPLIT] or [DUAL] button while performing the
following steps.
Note: Now skip to step (5) if you prefer to enter the Tone number using the numeric key pad ([0]~[9]). That is indeed the only
way to select any available Tone.
(3) Use FAMILY [√][®] to select the desired Tone family.
(4) Use SELECT [√][®] to specify a sound within the selected
family.
The first press of SELECT [®] (or [√]) shows the name of the
first Tone within the selected group. It is already selected, so
if you need the first sound, there is actually no need to press
SELECT [®]. You must use SELECT [√] or [®], however, to select
another Tone within the same group.
(5) Use the numeric buttons [0]~[9] to select other sounds
within the current family that are skipped by the SELECT
buttons.
Note: This setting can be saved to a User Program (see p. 45).
You can also use the numeric buttons. See also “Working
with the FAMILY, SELECT and numeric buttons” (p. 20) and
replace “song” with “sound” in the explanations.
FAMILY
Using the USER TONES buttons
The USER TONES buttons allow you to select 8 melodic sounds
or Drum Kits directly (without using [TONE], the FAMILY, SELECT
and/or numeric buttons). At first, these buttons recall sounds
assigned to them at the factory (but you can change that).
1
2
3
4
5
6
7
8
PIANO
ORGAN
GUITAR/
BASS
STRINGS
VOCAL
SAX/
BRASS
SYNTH/
ETHNIC
DRUMS
These buttons are assigned to our “favorite” sounds for the indicated categories, thus allowing you to quickly select “a piano”,
“a string sound”, etc. The assignments to these buttons can be
changed.
Note: The TONE [DRUMS] button is only available for the Main part.
Assigning another Tone to a USER TONES button
To assign another sound to one of the 8 USER TONES buttons:
(1) Select the sound you want to assign using the procedure
described above.
(2) Press and hold the desired USER TONES button. The display briefly shows the message “Memrized”.
You can assign whichever sound (or Drum Kit) you like to
any of the USER TONES buttons and select it by pressing that
button once.
Note: The assignments can be saved to a User Program (see
p. 45). This allows to work with up to 1600 different assignments (because there are 200 User Programs).
To select the sound, which has been assigned to a USER
TONES button at the factory, press the corresponding button
twice in rapid succession (“double-click”).
30
EXR-46 OR
Drum sounds and sound effects
(“SFX”)
Drum Kits
IPopKik36
IPopCStk37st
IPopSn38st
IPopGstS39st
IPopSn40st
IPopTomLFl41
IPopHat1_42
IPopTomL43
IPopHat2_44
IPopTomMFl45
IPopHat3_46
IPopTomM47
IPopTomHFl48
IPopCyml2_52
IPopTomH50
The last 33 “sounds” (618~650) are so-called “Drum Kits”. When
you select such a Kit, each key is assigned to a different sound.
With the left-most key, you can play a bass drum sound (also
called “kick”). The white key next to it triggers a snare drum
sound, etc. Try it out by pressing several keys, either in succession or simultaneously.
C2
C3
Drum Kits are collections of over 90 sounds, each assigned to a
different key.
Split part (sound effect/percussion
sound)
Note: Drum Kits can only be assigned to the Main part (so neither
to the Split, nor the Dual part).
Note: One Kit (592) is actually a sound effects (SFX) kit that cannot
be used for “drumming” but rather for triggering various sound
effects.
Note: This setting can be saved to a User Program (see p. 45).
Sound effects (“SFX”)
The EXR-46 OR also contains individual sound effects (like
“Train, “Kitty”, “HrseGllp”, etc.) and individual drum and percussion sounds (576~617) that are assigned to the entire range of
the part you select them for (Main, Split or Dual).
Note that those sounds do not work like the Drum Kits: only one
sound is assigned to the keyboard – and can be played melodically (though “Train” melodies are probably “interesting” at
best).
It might therefore be a good idea to proceed as follows:
(1) Press the [SPLIT] button.
(2) Decide whether you want to play the sound effect or percussion sound with your left or right hand.
If you want to use your left hand, assign a sound between
“576” and “617” to the Split part. To play the effect with your
right hand, assign it to the Main part.
(3) Change the split point (page 40) in such a way that only a
few keys are assigned to the percussion sound/sound
effect (“C6” for right-hand effect playing, “C3” for lefthand effect playing).
(4) To obtain a meaningful effect, you may also have to
change the MAIN Oct or SPLT Oct setting
(page 41).
If you assign a sound effect/percussion sound to the Split
part, the key ranges could be set as shown below.
Main part (melodic sound)
31
r EXR-46 OR
Using DRUM PAD mode
Drum Pad mode allows you to assign the desired drum/percussion sounds or sound effects to the highest 8 keys (the ones
labeled “DRUM PAD”) and to play those sounds in realtime. This
function is available even when while the V-LINK function is on.
Using the Drum Pad function
(1) Simultaneously press the [SPLIT] and [DUAL] buttons.
Note: If you select Drum Pad mode after assigning a Drum Kit
to the Main part, the Main part reverts to the last “melodic”
sound you selected (or the default sound). You cannot play a
drum or percussion part with the Main part while Drum Pad
mode is active. Conversely, assigning a Drum Kit to the Main
part while Drum Pad mode is active will switch off Drum Pad
mode.
dp Piano
2 120 001
=
ORCHESTRATOR
BEAT
FULL
BAND
M
INTRO
The Transpose function changes the pitch of the notes and
chords you play. Instead of figuring out what other keys you
need to press to accommodate the singer or an instrumentalist,
you can set the required Transpose value and go on playing the
song the way you practised it, while sounding in a different key.
There are two transpose functions: one (“USRTrnsp”) whose setting can be saved to a User Program, and a second one
(“GLBTrnsp”) that applies to all sections and whose setting is
added to (or subtracted from) the “USRTrnsp”) value. Its setting
is never saved.
Let us begin with the “USRTrnsp” function, which is assigned to
the [TRANSPOSE] button:
(1) Press the [TRANSPOSE] button.
The “dP” message means that Drum Pad mode is active.
(2) Press the keys in the DRUM PAD area (1~8) to try out the
sounds.
00 USRTrnsp 120
=
32
YES
ORCHESTRATOR
FULL
BAND
M
INTRO
BEAT
The setting range is –12~12 semitones. A “semitone” is one
step between a white and a black key (or two adjacent white
keys, i.e. between “E”/“F” and “B”/“C”).
Press [+] or [–] repeatedly to transpose the keyboard up or
down. You can also directly enter the desired interval by
pressing the corresponding numeric key.
To transpose the keyboard down, hold down [–] while pressing [0]~[9] (in that case, you can transpose the pitch down by
up to 9 semitones)
Here’s an example: to hear an “E” each time you play a “C”,
select “4”. All other notes will be shifted by the same
amount, so that you end up sounding in E major when you
actually play in C major, etc.
No transposition (C major)
Transpos= 4 (E major)
TRANSPOSE
The display now looks as follows:
Those keys are no longer available for melody playing: they
control the 8 drum/percussion sounds.
You can also assign other drum and percussion sounds to
these keys. See page 41 for details. Those assignments can be
saved to a User Program (page 45).
NO
(3) Again press the [SPLIT] + [DUAL] buttons to leave Drum
Pad mode.
Transpose
The display now looks as follows:
(2) Use the [–][+] and/or numeric buttons ([0]~[9]) to set the
desired transposition interval.
001
The corresponding value and the TRANSPOSE icon appear in the
display.
(3) To switch the Transpose function back off, repeat steps (1)
and (2), this time entering the value “0” (no transposition).
Note: This setting can be saved to a User Program (see p. 45).
Note: There is also a function that allows you to specify which
section(s) the Transpose function should apply to. See “TransMod*” (p. 40).
(4) Press another “big” button in the DATA ENTRY section to
leave this function.
EXR-46 OR
Global transpose function (“GLB”)
There is also a “master transpose control” that alters the pitch of
all sections of the EXR-46 OR. Its value is added to the current
transposition interval until you reset it to “0” or until you switch
off your EXR-46 OR.
(1) Press the [TRANSPOSE] button.
The display now shows the “USR Trnsp” message.
(2) Press the SELECT [®] button once to select the following
parameter:
Octave settings
Other Keyboard part functions
The EXR-46 OR allows you to transpose the Keyboard parts
(Main, Split, Dual) up or down by 4 octaves.
To change the octave transposition of a part, hold down [TONE]
(Main part), [SPLIT] (Split part) or [DUAL] (Dual part), while pressing [–] (down) or [+] (up).
Here are yet other functions related to the Keyboard parts.
These can be set via the FUNCTION menu, or are covered elsewhere:
• Keyboard velocity (see p. 34)
• Master Tune (see p. 39)
• Volume of the Keyboard parts (see p. 41)
• Intelligence function for the Split part (see p. 40)
• Hold function for the Split part (see p. 40).
NO
YES
GLBTrnsp
(3) Use the [–][+] and/or numeric buttons ([0]~[9]) to set the
desired transposition interval.
The setting range is –6~0~5 semitones. This setting is added
to (or subtracted from) the “USRTrnsp” value of all sections
and all User Programs.
Press [+] or [–] repeatedly to transpose the keyboard up or
down. You can also directly enter the desired interval by
pressing the corresponding numeric key.
To transpose the keyboard down, hold down [–] while pressing [0]~[6] (in that case, you can transpose the pitch down by
up to 6 semitones).
As soon a you select a value other than “0”, the TRANSPOSE icon
starts flashing to signal that the EXR-46 OR is applying global transposition to all sections.
(4) To switch the global transposition back off, repeat step
(3), this time entering the value “0” (no transposition).
The TRANSPOSE icon stops flashing (and disappears if the
“USRTrnsp” function is off).
Note: This setting is not saved to a User Program and will be
cancelled when you switch off the EXR-46 OR.
(5) Press another “big” button in the DATA ENTRY section to
leave this function.
33
r EXR-46 OR
11. Performance functions and effects
Performance functions
Keyboard Touch (velocity sensitivity)
The EXR-46 OR is velocity sensitive, which means that the volume and brightness of the Main, Split and Dual notes depend
on the force/speed with which you strike the keys.
All acoustic instruments (piano, violin, flute, drums, etc.) are
velocity sensitive. The harder you play, the louder and brighter
the resulting notes will be, which creates a perfectly natural
effect. (That explains why the KEYBOARD TOUCH function is on
when you power on the EXR-46 OR.)
If the EXR-46 OR is your first musical instrument ever, you may
feel distracted by the volume and timbre variations of the notes
you play.
(1) If the KEY TOUCH icon is not displayed, press the
[KEYBOARD¥TOUCH] button to activate the EXR-46 OR’s
velocity sensitivity.
KEYBOARD
TOUCH
“1” is very low (usually inaudible), while “127” corresponds to
maximum striking force (loud, bright notes). The value is
only used when the KEY TOUCH icon is not displayed (otherwise,
all notes use the velocity values that correspond to the force
with which you strike the keys).
(5) Press another “big” button in the DATA ENTRY section to
leave this function.
Note: Some sounds use “velocity switching”. This means that by
hitting the keys harder and softer, you alternate between two
sounds. So only switch off this parameter if doing so makes you
feel more comfortable.
Note: This setting can be saved to a User Program (see p. 45).
Note: Keyboard Touch applies to all parts you can play yourself
(the “Keyboard parts”): Main, Split, and Dual.
Pitch Bend and Modulation
The BENDER/MODULATION lever to the left of the keyboard can
be used to add two kinds of effects to the Keyboard-part notes.
You can even use these effects simultaneously if you like.
(1) Press the lever towards the rear of the EXR-46 OR to add
a vibrato effect (“wobble”) to the notes you are playing.
MODULATION
(2) Press the button again to switch the KEYBOARD TOUCH
function off, if you don’t need it.
(3) To set a fixed velocity value, press and hold the
[KEYBOARD¥TOUCH] button until the “KbdTouch” message is displayed.
KbdTouch
(4) Use the numeric buttons and/or [–][+] to set the velocity
value that should be used for all notes you play (1~127).
34
Note: If necessary, you can change the Pitch Bend interval. See
“PB Range° (Pitch Bend Range)” (p. 40).
Note: Modulation is not available when the MFX type=
“Rotary”. In that case, the modulation axis of the lever is used
for switching between the fast and slow speeds.
Footswitch
The EXR-46 OR’s FOOTSWITCH socket (rear panel) allows you to
connect optional DP-2, DP-6, or BOSS FS-5U footswitch.
The footswitch can be used for sustaining the notes you are
playing (default), as Soft or Sostenuto pedal, to change the
Rotary effect speed (MFX), and more. See “FSW° (Footswitch
Assign)” (p. 40) and “Using the outputs and an optional footswitch” (p. 57).
To use it for holding the notes you are playing, proceed as follows:
(1) Connect a DP-2, DP-6, or BOSS FS-5U footswitch to the
FOOTSWITCH jack.
(2) Play a note with your right hand.
(3) Press the footswitch.
Raises the pitch
Lowers the pitch
(3) In either case, you can release the lever if you no longer
need the effect.
BENDER
The Modulation axis can also be used for switching between
the slow and fast Rotary speeds (if the “Rotary” effect is
assigned to the MFX).
(2) Turn the lever to the left to temporarily lower the pitch of
the notes you are playing. Turn it to the right to raise the
pitch of your notes.
(4) Release the key.
The note(s) you played keep on sounding after you release
the corresponding keys.
(5) To stop the note(s) from sounding, release the footswitch.
EXR-46 OR
Using effects
The EXR-46 OR contains digital Reverb and Chorus effects processors. You can switch them on/off and select other types. You
can also set the Send level (the amount of reverb or chorus) to
be applied to the various Keyboard parts. Please bear in mind
that the chorus effect cannot be combined with the MFX (so
you need to choose between chorus or MFX for the Main part).
Using the multi-effects processor (MFX)
The multi-effects (MFX) processor can be used for processing
the Main part. It can generate various effects (47), some of
which are combinations of two effects, while the Reverb and
Chorus processors only generate effects that are somehow
related to ambiance (REV) or modulation (CHR).
(1) Press the [FUNCTION] button (it must light).
FUNCTION
(2) Use FAMILY [√][®] to select “EFFECTS”.
The EXR-46 OR’s function parameters are divided into 9 logical “families”. For the following, we need to select the
effects group.
(3) Use SELECT [√][®] to select the “MFX” parameter.
00 Off
Note: See also “Working with the FAMILY, SELECT and numeric
buttons” (p. 20).
The “Off” message means that the MFX is not being used.
(4) To switch on the MFX, select one of the remaining 47
types using the [–][+] buttons.
Off: The MFX is off.
Enhancer: An Enhancer controls the overtone structure of
the high frequencies, adding sparkle and tightness to the
sound.
Overdrv1~4: Overdrive creates a soft distortion similar to
that produced by tube amplifiers. Several types of overdrive
are available: (1) Small combo amp, (2) Combo amp, (3) Large
double-stack amp (2 cabinets), (4) Large double-stack amp (3
cabinets).
Distort1~4: This effect produces a more intense distortion
than Overdrive. The numbers refer to different kinds of distortion.
Phaser: Adds a phase-shifted sound to the original sound,
producing a twisting modulation that creates spaciousness
and depth.
AutoWah: The Auto Wah cyclically controls a filter to create
cyclic change in timbre.
Rotary: Simulates the sound of a classic rotary speaker. This
effect is most suitable for electric organ. If you select this
type, you can use the MODULATION axis of the BENDER/
MODULATION lever for switching between the slow and fast
modulation speeds: press the lever towards the back of the
EXR-46 OR to alternate between slow and fast undulations.
StFlangr: This is a stereo Flanger. It produces a metallic resonance that rises and falls like a jet airplane taking off or
landing.
SpFlangr: A Step Flanger is a Flanger effect with clearly
noticeable steps rather than continuous pitch changes.
Compress: A compressor reduces signal peaks and boosts
low levels, smoothing out unevenness in volume.
Limiter: A limiter prevents the volume from exceeding a certain level without boosting low levels.
HexaCho: Hexa Chorus uses six layers of chorused sound to
give richness and spatial spread to the sound.
Trem Cho: Tremolo Chorus is a chorus effect with added
Tremolo (cyclic modulation of the volume).
StChorus: This is a stereo chorus.
Space-D: A multiple Chorus that gives no impression of
modulation, but produces a transparent Chorus effect (the
perfect “stereo maker”).
StDelay: Delay is an effect that allows you repeat the input
signal, thus creating echoes (repetition).
Mod Dly: This effect adds modulation to the delayed sound,
producing an effect similar to a Flanger.
3Tap Dly: The Triple Tap Delay produces three delay sounds;
center, left and right.
4Tap Dly: Delay with four repetition lines.
TmCtrDly: This effect controls the delay time in realtime.
Reverb: A nice Reverb effect.
GteRevNr: Gate Reverb is a special type of Reverb in which
the reverberant sound is suddenly cut off (and does not
gradually decrease).
GteRevRv: A gated Reverb effect that sounds “backwards”.
GteRevS1: The reverberant sound moves from right to left.
GteRevS2: The reverberant sound moves from left to right.
2PtchShf: A Pitch Shifter changes the pitch of the original
sound. This 2-voice effect has two pitch shifters, and adds
two transposed copies to the original sound.
FbPtchShf: Pitch Shifter with several echoes.
OD®Chors: This effect connects an Overdrive and a Chorus
in series. (“Series” means that the first effect is also processed by the second.)
OD®Flger: This effect connects an Overdrive and a Flanger
in series.
OD®Delay: This effect connects an Overdrive and a Delay in
series.
DS®Chors: This effect connects distortion and a Chorus in
series.
DS®Flger: This effect connects distortion and a Flanger in
series.
DS®Delay: This effect connects distortion and a Delay in
series.
EH®Chors: This effect connects an Enhancer and a Chorus
in series.
EH®Flger: This effect connects an Enhancer and a Flanger
in series.
EH®Delay: This effect connects an Enhancer and a Delay in
series.
Cho®Dly: This effect connects a Chorus and a Delay in
series.
FL®Delay: This effect connects a Flanger and a Delay in
series.
Cho®Flgr: This effect connects a Chorus and a Flanger in
series.
Cho/Dly: This effect connects a Chorus and a Delay in parallel. (“Parallel” means that the input signal is processed by
two effects that do not interact.)
35
r EXR-46 OR
FL/Delay: This effect connects a Flanger and a Delay in parallel.
Cho/Flgr: This effect connects a Chorus and a Flanger in
parallel.
Note: This setting can be saved to a User Program (see p. 45).
Note: By default, MFX type selection is linked to Tone selection
for the Main part. This can be switched off, however, see “Tone
MFX°” (p. 43). Note that this does not apply to all Tones.
(5) While selecting an MFX type, play a few notes on the keyboard to audition the effect.
(6) Press another “big” button in the DATA ENTRY section to
leave this function.
Note: If the MFX is on, the Main part is no longer processed by
the Chorus effect. But the MFX also contains Chorus algorithms
(either in isolation or in combination with other effects).
Reverb
Reverb is an effect that gives you the impression of playing in a
concert hall, a room or another acoustic environment that
reflects the sounds that are being produced.
When you switch on the EXR-46 OR, all three Keyboard parts
(Main, Dual, Split) as well as the Arranger and Song parts are
processed by the internal Reverb effect.
If you don’t need that, you can either switch off the Reverb processor (in which case none of the EXR-46 OR’s 19 parts are processed) or prevent just one Keyboard part from being processed.
You cannot change the amount of reverb that is added to the
Arranger or pre-recorded Song parts.
(4) Use the [–][+] buttons to select “Off” if you don’t need
the Reverb processor. Otherwise, select one of the eight
available types:
Type
Explanation
Room 1~3
These types simulate the Reverb characteristics of a room. The higher the number (1, 2, or
3), the “bigger” the room becomes.
Hall 1, 2
These types simulate the Reverb of a small (1)
or large (2) concert hall and thus sound far
“bigger” than the Room types above.
Plate
Digital simulation of a metal plate that is
sometimes used for creating Reverb effects.
Works well for percussive sounds.
Delay
A Delay effect (no Reverb). Works a lot like an
echo effect and thus repeats the sounds.
Pan Delay
This is a stereo version of the preceding Delay
effect. It creates repetitions that alternate
between the left and right channels.
●Switching the Reverb on/off
Use the following procedure if you want no reverb at all (for
none of the EXR-46 OR’s parts), or to select another Reverb
type.
(1) Press the [FUNCTION] button (it must light).
FUNCTION
(5) Play a few notes on the keyboard to audition the effect.
●Changing the amount of reverb processing for
the Keyboard parts
(2) Use FAMILY [√][®] to select “EFFECTS”.
The EXR-46 OR’s function parameters are divided into 9 logical “families”. For the following, we need to select the
effects group.
(3) Use SELECT [√][®] to select the “REV” parameter.
To change the reverb depth (i.e. how much reverb is added to
a part), proceed as follows:
(6) If the [FUNCTION] button still lights, use SELECT [√][®] to
select one of the following parameters.
Rev MAIN
Reverb depth of the Main part.
00 Hall
2
Rev DUAL
Reverb depth of the Dual part.
Note: See also “Working with the FAMILY, SELECT and numeric
buttons” (p. 20).
Rev SPLIT
Reverb depth of the Split part.
(If [FUNCTION] doesn’t light, first perform steps (1) and (2)
above.)
(7) Use [–][+] to select “0” if you don’t want the selected Keyboard part to be processed by the reverb effect. Otherwise, set the desired value.
36
EXR-46 OR
If you selected an MFX type (see p. 35), the Rev MAIN
parameter no longer affects the Main part directly, but
rather the MFX signal.
When the MFX is set to “Off”
Main
Reverb
MFX “Off”
Rev MAIN=
Reverb for Main
When the MFX is set to any other type
Main
Reverb
MFX
Rev MAIN=
Reverb for Main + MFX
“Rev Main= 100” then means: Reverb depth of the processed Main signal coming out of the MFX. This can be used
for a variety of interesting applications: Distortion (MFX) +
Reverb (REV), Rotary (MFX) + Plate (REV), etc.
(8) Play a few notes on the keyboard to audition the effect.
Do not forget to activate the Split or Dual part if you wish to
audition its Reverb depth.
Chorus
Chorus broadens the spatial image of the sound and creates a
stereo impression. You can choose from 8 types.
When you switch on the EXR-46 OR, none of the Keyboard parts
(Main, Dual, Split) are processed by the internal chorus effect.
Note also that the Chorus effect doesn’t affect the Main part
if the MFX is set to anything but “Off”.
If you don’t need Chorus, you can either switch off the Chorus
processor (in which case none of the EXR-46 OR’s 19 parts are
processed) or prevent just one Keyboard part from being processed. You cannot change the amount of Chorus that is added
to the Arranger or pre-recorded Song parts.
To change the Chorus depth (i.e. how much Chorus is added
to a part), proceed as follows:
(6) If the [FUNCTION] button still lights, use SELECT [√][®] to
select one of the following parameters.
Chr MAIN
Chorus depth of the Main part*.
Chr DUAL
Chorus depth of the Dual part.
●Switching the Chorus effect on/off
Use the following procedure if you want no Chorus at all (for
none of the EXR-46 OR’s parts), or to select another Chorus
type.
(1) Press the [FUNCTION] button (it must light).
FUNCTION
Note: This setting can be saved to a User Program (see p. 45).
(9) Press another “big” button in the DATA ENTRY section to
leave this function.
●Changing the amount of Chorus processing for
the Keyboard parts
(2) Use FAMILY [√][®] to select “EFFECTS”.
(3) Use SELECT [√][®] to select the “CHR” parameter:
Chr SPLIT
Chorus depth of the Split part.
(*) Though this parameter is displayed even when MFX is set to something
else than “Off”, the Main part is not processed by the Chorus effect.
(If [FUNCTION] doesn’t light, first perform steps (1) and (2)
above.)
(7) Use [–][+] to select “0” if you don’t want the selected Keyboard part to be processed by the Chorus effect. Otherwise, set the desired value.
If you selected an MFX type (see p. 35), the Chr MAIN
parameter has no effect (even though it is displayed).
When the MFX is set to “Off”
Reverb
Main
00 Chorus
3
Note: See also “Working with the FAMILY, SELECT and numeric
buttons” (p. 20).
(4) Use the [–][+] buttons to select “Off” if you don’t need
the Chorus processor. Otherwise, select one of the eight
available types (see the list below).
Chorus 1
Chorus 2
Chorus 3
Chorus 4
FB Chorus
Flanger
S-Delay
SDelayFb
(5) Play a few notes on the keyboard to audition the effect.
Chorus
MFX “Off”
When the MFX is set to any other type
Main
MFX
Reverb
Chorus
(8) Play a few notes on the keyboard to audition the effect.
Do not forget to activate the Split or Dual part if you wish to
audition its Chorus depth.
Note: This setting can be saved to a User Program (see p. 45).
37
r EXR-46 OR
(9) Press another “big” button in the DATA ENTRY section to
leave this function.
(2) Press the [V-LINK] button (it lights blue).
V-LINK function
V-LINK is a function that provides for the integration of music
and visual material. By using V-LINK-compatible video devices
(i.e. an Edirol DV-7PR), visual effects can be easily linked to, and
made part of the expressive elements of a performance.
By using the EXR-46 OR with an Edirol DV-7PR, you can:
• Use the EXR-46 OR’s keyboard (highest octave) to switch
images (clips). Press and hold a key for longer transition
(“fade”). Briefly press a key for fast transitions.
• The numeric buttons [0]~[9] are used for switching palettes
(only if the [USER¥PROGRAM] button lights).
• Use the BENDER axis of the BENDER/MODULATION lever to
change the playback speed of the picture material or to
select a different color.
• Use the LOCK buttons to change the effect (VFX1~4).
V-Link signals can be transmitted via MIDI OUT.
(1) Connect the EXR-46 OR’s MIDI OUT socket to the MIDI IN
socket of the external video processor (or to a UM-1
interface).
REMOTE
Edirol UM-1
MIDI OUT
38
Edirol DV-7PR
BEAT
(3) Use the BENDER, the assigned buttons or “V-LINK” keys
(highest octave) to manipulate the video pictures in sync
with your music (see below).
(4) Press [V-LINK] again to switch off this function (the button
goes dark).
V-LINK functions that the EXR-46 OR can control
(and corresponding MIDI messages)
The EXR-46 OR provides the following functions for controlling
V-LINK compatible video equipment.
• Keyboard: Clip 1~8→ Program Change: 00H~08H
Press the keys in the highest octave to switch clips.
• Keyboard velocity: Dissolve Time→ CC23
The velocity of the keys in the highest octave controls the
speed of transition between images.
• [1]~[0] buttons (if the [USER¥PROGRAM] button lights): Palette 1~10→ CC00 (Bank Select)/00H~09H
While the [V-LINK] button lights, press buttons [1]~[0] to
switch palettes 1~10. (The numeric buttons also perform
their “normal” functions.)
• BENDER axis of the BENDER/MODULATION lever: Playback
Speed→ Pitch Bend
Moving the lever toward the right will speed up playback,
and moving it toward the left will slow down playback. At
the center position, playback speed will be normal.
• MODULATION axis of the BENDER/MODULATION lever: Clip
color→ CC24 (Color CB), CC25 (Color CR)
Press the lever towards the rear of the EXR-46 OR to change
the color. There are five steps that can be selected by pressing the lever several times: green, violet, blue, red, original
clip color.
• LOCK buttons: VFX1~4, None (ACOUSTIC= None,
POP= V-FX 1, ROCK= V-FX 2, DANCE= V-F1h
• X 3, ETHNIC= V-FX 4)
Use these buttons to change the video effects. This function
is not available if the receiving video processor is already set
to “Off”.
Note: VFX2 is not supported by the DV-7.
Note: All V-LINK messages are transmitted on MIDI channels 13
and 14.
EXR-46 OR
12. Function menu
The EXR-46 OR’s Function mode contains more advanced settings you may not need every day. They allow you to fine-tune your instrument’s response. It would therefore be a good idea to familiarize yourself
with these parameters. Most settings (“*”) can be written to a User Program (see p. 45). Other parameters (“°”) are saved to the Flash memory when you leave the Function mode.
Editing parameters (general
procedure)
You can edit the EXR-46 OR’s Function parameters via the display. Here is a general outline of the procedure for all parameters discussed below:
(1) Press [FUNCTION].
FUNCTION
(2) Use FAMILY [√][®] to select the Function group that contains the desired parameter:
■ EFFECTS: REV (Reverb), CHR (Chorus), MFX, Tone MFX, Rev
MAIN, Chr MAIN, Pan MAIN, Rev DUAL, Chr DUAL, Pan DUAL,
RevSPLIT, ChrSPLIT, PanSPLIT
■ KB SCALE: Scale C/C#/D/Eb/E/F/F#/G/Ab/A/Bb/B, Scale
Mode
■ MIDI: Local, MidiTxRx, Sync Rx, Style PC, LyricsTx,
NTARx14, PitchBnd, Modulatn, ProgChng, Velo Rx, Clock Tx,
StartStp, SongPosP
■ UTILITY: LockInit, InitFLASH, Resume
■ WriteSNG (see p. 49)
■ WriteSTL (see p. 50)
■ RemoveSNG (see p. 50)
■ Remove STL (see p. 51)
■ WriteUPG (see p. 50)
■ ReadUPG (see p. 50)
■ RemovUPG (see p. 51)
(3) Use SELECT [√][®] to select the parameter you wish to edit
(see below).
FAMILY
■ KB SET: KbdTouch, MsterTune, USRTrnsp, GLB Trnsp,
TransMod, PB Range, KeySplit, SpltHold, SpltInt, FSW, Port
Main, Port Dual, Mode Main, Mode Dual
■ DRUM PAD: DK1/DrumPad1~DK8/DrumPad8
■ METRONOM: Mtro TS, MetroVol, Count-In
■ OCTAVE: MAIN Oct, DUAL Oct, SPLT Oct
■ VOLUME: Main Vol, Dual Vol, SplitVol, Auto Bass,
AccDrums, AccBass, Accomp1~Accomp6, Song1~Song16
■ ARR SET: ArrChord, Arr Hold, EP Chord, Bass Inv, MI (Melody Intelligence), InEnCHRD, Sync Stop
Note: To return to the default value of the currently selected
parameter, press [+] and [–] simultaneously.
(5) Use FAMILY [√][®] to select another Function parameter.
(6) Continue with step (3).
(7) Press another “big” button in the DATA ENTRY section to
leave this function.
KB SET parameters
■ Kbd Touch*
(1~127, Default setting: 110) Use this parameter to set the
EXR-46 OR’s fixed velocity value that will be used when the
KEY TOUCH icon is not displayed. See p. 34.
Note: This parameter can also be selected by pressing and holding
[KEYBOARD¥TOUCH].
■ MstrTune° (Master Tune)
(427.4~452.6, Default setting: 440.0) This parameter allows you
to change the EXR-46 OR’s overall tuning, which may be necessary when you accompany a singer, an acoustic instrument,
or when you play to a recording on CD or cassette.
■ USRTrnsp*
SELECT
(–12~12, Default setting: 0) Use this parameter to transpose
the EXR-46 OR in semitones. If you’re not sure what transposition is, see p. 32. This parameter can also be selected by pressing the [TRANSPOSE] button.
■ GLBTrnsp
Note: In FUNCTION mode, SELECT [√][®] do not allow you to
jump from one family to the next.
The “VALUE” message and a setting appear to signal that you
can change (“edit”) the selected parameter.
(4) Use the DATA ENTRY [–][+] or numeric buttons (only for
values) to modify the setting of the selected parameter.
(–6~5, Default setting: 0) Use this parameter to temporarily
transpose the EXR-46 OR in semitones. If you’re not sure what
transposition is, see (see p. 33). This parameter can also be
selected by pressing the [TRANSPOSE] button and pressing
SELECT [®] once.
Note: See also page 20.
39
r EXR-46 OR
■ TransMod*
(Default setting: Int+Song) This parameter allows you to specify which parts should be affected by the Transpose setting:
Int: The Keyboard and Arranger parts will be transposed. Notes
received via MIDI, however, will be played without change.
Song: Only the Song parts will be transposed. This is only
meaningful when you play back a Standard MIDI File or one of
your own songs with the EXR-46 OR’s Recorder.
MIDI: Only the notes received via MIDI will be transposed.
Int+Sng, Int+MIDI, Sng+MIDI, All: These are combinations of
the above. Int could be useful to transpose only the Keyboard
parts so that you can play to a Recorder song in “your” key but
sound in the song’s key.
■ PB Range° (Pitch Bend Range)
(0~24, Default setting: 2) This parameter allows you to set the
interval that will be used when you push the BENDER/MODULATION lever fully to the left or to the right (Pitch Bend effect).
You can set this parameter in semitone steps, with a maximum
of 24 semitones (2 octaves), the default value being “2”, which
should be OK in most situations.
Note: Pitch Bend is only available for the Main, Dual and Split
parts. See also p. 34.
■ KeySplit* (Split point)
(48~84, Default setting: 60) Use this parameter to set the split
point for the Arranger mode and the Split part. The note you
set here is the lowest note you can play with the Main part. The
number refers to a note. “60” corresponds to the note “C4”.
Note: You can also select this parameter by pressing and holding
the [ARRANGER¥BAND] button.
■ SpltHold* (Hold function for the Split part)
(On/Off, Default setting: Off) The SpltHold function memorizes
the chords you play while the Split part is on and holds the
corresponding notes until you play another chord.
40
■ SpltInt* (Split Chord Intelligence)
(On/Off, Default setting: Off) When you activate the [SPLIT]
button, the EXR-46 OR’s Split Chord Intelligence function
allows you to play major chords by pressing just one key, minor
chords by pressing two keys, and more complex chords by
pressing three keys. This system thus follows Arranger control,
which is why it would be a good idea to select “On” whenever
ARRANGER
you are using the Split part while the
icon is displayed.
■ FSW° (Footswitch Assign)
Sustain
(Default setting: Sustain) After connecting an optional DP-2,
DP-6, or BOSS FS-5U to the FOOTSWITCH socket on the rear
panel, you can use this parameter for assigning a function to
the footswitch.
Sustain: Also called “Hold” or “Damper”, this function allows
you to use the footswitch to hold the notes you play on the
keyboard in much the same way as on an acoustic piano.
Sostenut: In this case, the footswitch functions as Sostenuto
pedal (another pedal found on grand and digital pianos that
allows you to sustain only those notes you played at the time
you pressed the pedal).
Note: This function only applies to the Keyboard parts.
Soft: In this case, the footswitch functions as Soft pedal (a
pedal found on grand and digital pianos that reduces the volume).
Note: This function only applies to the Keyboard parts.
Rotary S/F: Allows you to select the slow or fast speed of the
Rotary effect. This only works, if the “Rotary” type is assigned
to the MFX (see p. 35).
UsrPrgUp: Selects the next User Program (i.e. “10” if “9” is currently active).
UsrPrgDw: Selects the previous User Program (i.e. “1” if “10” is
currently active).
Start/Stop: Starts and stops Arranger or Song playback. Same
function as the [START÷STOP] button.
Bass Inv: Switches the Bass Inversion function on and off (see
p. 28).
Punch I/O: The footswitch can be used to activate and switch
off punch in/out recording (see p. 25).
■ Port Main
(Off, 1~127, Default setting: Off) Portamento is an effect that
produces gradual pitch changes between the notes you play.
The higher the value, the longer it takes before the pitch of the
newly played note is reached.
This parameter allows you to set two parameters simultaneously for the Main part (there is a second parameter for the
Dual part): the Portamento switch and the Portamento time.
When you select a value between “1” and “127”, the Portamento switch is automatically set to “on” (127).
■ Port Dual
(Off, 1~127, Default setting: Off) This parameter allows you to
set two parameters simultaneously for the Dual part: the Portamento switch and the Portamento time. See above for an
explanation.
■ Mode Main
Mode Main
(Mon/Pol, Default setting: Pol) This parameter allows you to
specify whether the Main part can be played polyphonically
(“Pol”) or monophonically (“Mon”). “Polyphonic” means that
you can play chords, while “monophonic” means that you can
only play one note at a time. This may be useful for violin,
woodwind and similar sounds, because the acoustic instrument
in question cannot (or usually doesn’t) play chords. If you press
two keys after selecting “Mon”, only the note of the last key
you pressed sounds (nobody actually presses two keys at
exactly the same time).
■ Mode Dual
(Mon/Pol, Default setting: Pol) This parameter allows you to
specify whether the Dual part can be played polyphonically
(“Pol”) or monophonically (“Mon”). See also above.
EXR-46 OR
METRONOM parameters
DRUM PAD parameters
The parameters of this group allow you to assign the desired
drum/percussion sounds to the eight DRUM PAD keys. These
assignments are used when you activate DRUM PAD mode (see
p. 32).
• Use the SELECT [√][®] buttons to select the parameter you
want to change.
The message to the right of the “dK” parameters (dK1~dK8)
refers to the Drum Kit that contains the sound which is currently assigned to the DRUM PAD key (1~8, highest octave).
When you select a “dK” parameter, the display looks as follows:
STANDARD1
(This illustration means that you can select another Drum Kit
for the lowest DRUM PAD key, i.e. the one labeled “1”.) See
“Drum Kits” (p. 121) for the available Drum Kits.
• Use the DATA ENTRY [–][+] buttons to select the Drum Kit
that contains the sound you wish to use.
• Press SELECT [®] to select the “DrumPad” parameter
(DrumPad1~8) that has the same number as the “dK”
parameter you have just changed.
In our example, that would be “DrumPad1”.
DrumPad1
You may remember that each Drum Kit contains up to 128
different drum/percussion sounds. Only one of those sounds
can be assigned to each DRUM PAD key. (Just as a reminder:
you are going to assign a sound to DRUM PAD key “1” here.)
The number to the left refers to the note number. “036” represents the “Kick 2” sound. See the tables on page 121 and
following.
• Use the DATA ENTRY [–][+] buttons to select the number of
the sound you wish to assign.
• Use the SELECT [√][®] buttons to select the next DRUM PAD
parameter you want to change and repeat the above.
■ Metro TS° (metronome time signature)
(1/4~9/4, 1/8~9/8, Default setting: 4/4) This parameter allows
you to set the metronome’s time signature (number of beats
per bar). Please bear in mind that this setting changes whenever you select a Music Style with a different time signature.
See also p. 14 for how to use the metronome. This parameter
can also be selected by holding down the [METRONOME] button.
VOLUME parameters
■ Main Vol*, Dual Vol*, SpltVol*: volume
Main Vol
■ Metro Vol° (metronome volume)
(0~127, Default setting: 127 Main/110 Dual/100 Split) These
three parameters allow you to set the volume of the Main,
Dual, and Split parts respectively. Please note that the settings
you make here have no effect if you used BALANCE [ACCOMP]
to set the maximum volume for the Arranger/Song parts.
(0~127, Default setting: 100) Use this parameter whenever you
think the metronome is too loud/soft with respect to the
music. The default value is usually an appropriate setting.
Note: The volume of the Dual part can also be set by holding down
[DUAL] while pressing [ACCOMP] or [KEYBOARD]. The same is true
of the Split part, except that you need to press and hold [SPLIT].
■ Count-In
■ Auto Bass*: status and volume
(On/Off, Default setting: Off) This parameter allows you to
switch the count-in function for punch-in and normal recording (see p. 25) on or off. When on, the metronome will count
down two measures (8 beats for a song with a 4/4 time signature).
OCTAVE parameters
■ MAIN Oct*, DUAL Oct*, SPLIT Oct* (octave transposition)
(–4~0~4, Default setting: 0) These three parameters allow you
to shift the octave of the part in question (Main, Split, or Dual)
up or down by up to four octaves. This can be useful for
Techno/Dance songs where you need a piano sound that plays
in two different octaves.
To achieve this, assign two different (or the same) piano sounds
to Main and Dual, activate the [DUAL] button, and set DUAL
Octv to “–1” (or “1”).
Note: When a Drum Kit is assigned to the Main part, the pitch of
the drum/percussion sounds is not transposed. Instead, the keys are
assigned to other drum/percussion sounds (“shifted”). Example:
after setting “MAIN Oct” to “–1”, the bass drum can be played with
the C3 key (rather than the C2), while other sounds are available to
the left of the C3.
(OFF, 0~127, Default setting: OFF) Whenever the Split part is
active, this parameter allows you to set the volume of the Auto
Bass part (in which case the Auto Bass part is switched on). This
part sounds monophonic bass notes based on the chords you
play. If the Bass Inversion function (see p. 28) is off, the Auto
Bass part sounds the root notes (fundamentals) of the chords
you play with your left hand (using the Split part).
The Auto Bass part can also be added to the EP Chord part (see
below), and then follows the same rules as that part. The Auto
Bass’ volume and status can be set independently for “Split
use” and “EP Chord use”.
In either case, select off if you don’t need the Auto Bass part.
■ AccDrums*, AccBass*, Accomp1*~Accomp6*: volume
(0~127, Default setting: 100 AccDrums/100 AccBass/
100 Accomp1~6) These three parameters allow you to set the
volume of three Music Style sections: the drums, the bass and
the Accomp parts (1~6). You can use these parameters if you
think the original “mix” of the selected Music Style is not quite
right.
Note: These settings can be saved to a User Program, so that
you could (at least in theory) program 200 different assignments.
41
r EXR-46 OR
■ Song1~Song16: volume
(–64~0~63) These volume parameters apply to the respective
tracks of the song you are currently playing back. In most
cases, you may want to change the volume of track 4 (melody),
2 (bass) or 10 (drums). Finding another track (1, 5~9, 11~16)
that’s too loud or too soft may take some time, because their
usage is more or less free. Be aware, however, that not all Standard MIDI Files use all 16 tracks that are available (so that
changing the volume of track 16 may produce no audible
change at all, for example).
These are relative parameters: the value you set here is subtracted from (negative values) or added to (positive values) the
song parts’ volume. Note that the upper limit (defined by the
MIDI standard) is “127”. It may thus be impossible to increase
the volume of a track (because it already uses “127”). Select “0”
if you like a track’s volume the way it is.
Be aware that the changes you make here must be saved
along with the song data. They are not written to a User Program. See pages 49 and 54 for how to save songs.
ARR SET parameters
■ ChordInt* (Arranger Chord intelligence)
(Md1, Md2, Off, Default setting: Md1) This parameter allows
you to select the chord intelligence system to be used by the
EXR-46 OR: the Roland system (“Md1”, which makes more
sense from an educational point of view, see page 129), or the
“Md2” system, which can be used in the following way:
Major chords Press the key that corresponds to the chord’s
fundamental.
Minor chords Fundamental + any black key to the left of the
fundamental.
Seventh
chords
Fundamental + any white key to the left of the
fundamental.
Minor seventh chords
Fundamental + any black key to the left + any
white key to the left.
In either case, pressing just a few keys is therefore enough for
obtaining full chords. If you are used to playing full chords, you
can switch this function off.
■ ArrHold* (Arranger Hold)
(On/Off, Default setting: On) The Arranger Hold function memorizes the chords you play with your left hand and keeps playing the corresponding notes until you play another chord.
If you switch off ArrHold, the melodic Arranger parts (A.Bass,
Accomp) stop playing as soon as you release the key(s) in the
left half of the keyboard, leaving you only with the drum
accompaniment.
For your convenience, this function is switched on every time
you power on the EXR-46 OR.
■ EP Chord° (left-hand St. Strings + bass)
(On/Off, Default setting: On) The EP Chord function (for “Educational Purposes”) activates a stereo string sound and monophonic bass (if Auto Bass is set to “on”) whenever (a) the
ARRANGER
icon is displayed and (b) the Arranger is stopped.
This allows you to play chords (and a bass line) with your left
hand in Arranger mode – without using the EXR-46 OR’s
accompaniment function.
If you select “Off”, however, the left half of the keyboard will be
muted when conditions (a) and (b) are met and if the SPLIT icon
is not displayed.
42
■ Bass Inv*
(On/Off) Use this parameter to change the way in which the
Arranger reads the chords you play. See p. 28.
■ MI* (Melody Intelligence harmony type)
(Default setting: Traditnl) This parameter allows you to select
the desired harmony type for the Melody Intelligence function.
Note: This parameter can also be selected by pressing and holding
the [MELODY¥INTELLIGENCE] button. See p. 27.
■ InEnCHRD* (Intro/Ending chord recognition)
(On/Off, Default setting: Off) This parameter allows you to
block chord recognition during playback of the Intro or Ending
pattern of the selected Music Style in PIANIST mode. Unlike the
“normal” patterns (Original, Variation), Intro and Ending patterns usually contain chord changes. If you select “Off”,
chord recognition is active during Intro/Ending playback, so
that the accompaniment may jump from one key to another.
To avoid this, select “On”.
■ Sync Stop* (system used for automatic stops)
(Int/Nor, Default setting: Nor) This parameter allows you to
specify how the SYNC STOP function (see p. 16) should work.
Select “Nor” if you want the Arranger to stop as soon as you
release all keys in the chord recognition area (left side in
ARRANGER mode, entire keyboard in PIANIST mode). When you
play another chord, Arranger playback resumes from the
beginning of the selected Style pattern.
If you select “Int”, switch on the SYNC STOP (see p. 16) function
and then release all keys in the chord recognition area, the
Arranger stops on the next downbeat – and all notes that are
on at that time keep sounding (only if the “ArrHold” function is
on). When you play another chord, Arranger playback resumes
from the point it had reached when you released all keys in the
chord recognition area.
Note: This parameter can also be selected by pressing and holding
the [SYNC¥START/STOP] button.
EFFECTS parameters
■ Rev* (Reverb Type)
(Default setting: Hall 2) Use this parameter to select the kind of
Reverb that best suits your musical purposes, or to switch the
Reverb processor “Off”. See p. 36.
EXR-46 OR
■ Chr* (Chorus Type)
(Default setting: Chorus 3) This parameter allows you to specify
the type of Chorus effect, or to switch the Chorus processor
“Off”. See p. 37.
■ MFX* (MFX type)
(Default setting: Rotary) This parameter allows you to select
the desired MFX type and to switch the MFX processor off. See
p. 35 for details about the MFX. Selecting “Off” means that the
MFX is off.
■ Rev DUAL*
(0~127, Default setting: 100) This parameter allows you to set
the Reverb Send Level for Dual part (i.e. how much Reverb
should be added to the Dual notes). Select “0” if the Dual part
may not be processed by this effect.
■ Chr DUAL*
Note: MFX type selection can also be linked to Tone selection for
the Main part.
(0~127, Default setting: 0) This parameter allows you to set the
Chorus Send Level for the Dual part (i.e. how much Chorus
should be added to the Dual notes). If you want this part to be
processed by the Chorus effect, you need to select a value different from “0”.
■ Tone MFX°
■ Pan DUAL*
(On/Off, Default setting: On) This parameter allows you to link
the selection of an MFX type to the Tone you assign to the
Main part. That way, a Distortion/Overdrive effect will be
selected for a rock guitar sound, Rotary for an organ, etc.
■ Rev MAIN*
(0~127, Default setting: 100) This parameter allows you to set
the Reverb Send Level for the Main part (i.e. how much Reverb
should be added to the Main notes). Select “0” if the Main part
may not be processed by this effect.
■ Chr MAIN*
(0~127, Default setting: 0) This parameter allows you to set the
Chorus Send Level for the Main part (i.e. how much Chorus
should be added to the Main notes). If you want this part to be
processed by the Chorus effect, you need to select a value different from “0”. This parameter is only used when the MFX
parameter is set to “Off”.
■ Pan MAIN*
(Rnd, R63~0~L63, Default setting: 0) This parameter allows you
to set the stereo position of the Main part (i.e. its placement
between the left and right speakers). “Rnd” means that the stereo position changes randomly for each note you play. Values
starting with “L” correspond to the left speaker. “0” refers to
the center, and values starting with “R” correspond to the right
speaker.
(Rnd, R63~0~L63, Default setting: 0) This parameter allows you
to set the stereo position of the Dual part (i.e. its placement
between the left and right speakers). “Rnd” means that the stereo position changes randomly for each note you play. Values
starting with “L” correspond to the left speaker. “0” refers to
the center, and values starting with “R” correspond to the right
speaker.
■ Rev SPLIT*
(0~127, Default setting: 100) This parameter allows you to set
the Reverb Send Level for the Split part. Select “0” if the Split
part may not be processed by this effect.
KB SCALE parameters
■ Scale C*~Scale B* (Scale Tune)
(–64~63, Default setting: 0 for all notes) These parameters
allow you to stray away from the usual semitone-interval scale
(used in western music) by changing the pitch of the notes so
as to accommodate other musical cultures or tuning methods
(oriental, baroque music, etc.). These settings are assigned to
the ORIENTAL SCALE buttons.
As you will notice, you can change the pitch of every note of
one octave (C, C#, D, Eb, E…). The settings you make here apply
to all notes of the same name (i.e. to every “C”, every “C#”, etc.).
Most of the time, you will probably select the value “50” or “–
50” as they correspond exactly to half a semitone up or down
(quarter tone). Other settings may also be interesting, though.
■ Scl Mode*
(MN, ALL, Default setting: MN) This parameter allows you to
specify which parts the Scale settings (see above) should apply
to: only the Main part (“MN”) or all parts (“ALL”). In some cases,
choosing “ALL” may produce a more satisfactory result.
MIDI parameters
See page 47.
■ Chr SPLIT*
(0~127, Default setting: 0) This parameter allows you to set the
Chorus Send Level for the Split part. If you want this part to be
processed by the Chorus effect, you need to select a value different from “0”.
■ Pan SPLIT*
(Rnd, R63~0~L63, Default setting: 0) This parameter allows you
to set the stereo position of the Split part (i.e. its placement
between the left and right speakers). “Rnd” means that the stereo position changes randomly for each note you play. Values
starting with “L” correspond to the left speaker. “0” refers to
the center, and values starting with “R” correspond to the right
speaker.
43
r EXR-46 OR
UTILITY parameters
■ LockInit
(On/Off, Default setting: On) This function allows you to protect the EXR-46 OR’s Flash area from accidentally initializing it
(see the next parameter). Select “Off” only before using the
“InitFLSH” parameter. For safety reasons, this parameter is reset
to “On” when you switch off the EXR-46 OR.
If you want to initialize the Flash area without first selecting
this FUNCTION parameter, hold down the [KEYBOARD¥TOUCH]
button while switching the EXR-46 OR on. The display then
briefly shows the “UNLCKFLS” message.
■ InitFLSH (Flash initialization)
This function initializes (formats) the EXR-46 OR’s Flash memory, which is only necessary if the data in the Flash memory
become unreadable.
Note: Executing this function erases all Standard MIDI Files and
Music Styles in the EXR-46 OR’s Flash area.
Press [YES/+] in response to the flashing Yes message. The
“Sure?” message appears and the Yes message starts flashing. Press [YES÷+] to initialize the Flash area (or [NO/–] if you
changed you mind).
After showing the “Complete” message, the EXR-46 OR
leaves this function.
■ Resume
Select this function to recall the EXR-46 OR’s factory Function
settings.
Note: Resume does not reset the MIDI parameters of the FUNCTION mode (see p. 47).
Press [YES/+] in response to the flashing Yes message. After
showing the “Complete” message, the EXR-46 OR leaves
this function.
Note: There is no “Sure?” question that gives you time to think.
Only press [YES/+] if you are certain you want to recall ALL factory
Function settings.
44
EXR-46 OR
13. Working with User Programs
The EXR-46 OR is equipped with 200 User Program memories that allow you to store almost all settings (or registrations) you make on the front panel and via the Function menu (see p. 39).
Note: MIDI settings (see p. 47) are not saved to a User Program
because the EXR-46 OR memorizes them automatically.
Writing your settings to a User
Program
It is a good idea to write your settings frequently, even if you
still need to do some editing afterwards. Those intermediary
saves allow you to return to the previous stage whenever you
do not like your last modifications.
(1) Press and hold the [USER¥PROGRAM÷WRITE] button.
USER
PROGRAM
The available characters are:
_ ! # $ % & ’ - @ ^ ‘
0 1 2 3 4 5 6 7 8 9
A B C D E F G H I J K L M
N O P Q R S T U V W X Y Z
Note: Each time you press another numeric button (for entering
characters), the cursor advances automatically to the next position. This works like a mobile phone.
(5) Press the [YES/+] button to save your settings to the
selected memory. (Press [NO/–] if you don’t want to save
them after all.)
The display now responds with the “Complete” message.
Notes about writing User Programs
Leaving the User Program environment
Press any other “big” DATA ENTRY button to leave the User
Program environment.
The EXR-46 OR now displays “-Write ?”.
(2) Enter the number of the memory where you wish to save
your settings using the numeric buttons [0]~[9].
The “Yes” message starts flashing.
(3) Press [YES÷+] to confirm the number.
(4) Now use the numeric buttons [0]~[9] to name your User
Program.
User Programs and the USER STL memory
The last Music Style you selected before writing a User Program is also memorized. This even applies to the USER
STL memory that may contain a Style loaded from floppy
disk or the Flash memory (see p. 19).
The 200 User Programs can be saved the Flash memory (see
p. 49) or a floppy disk as a set (see p. 54).
Selecting a User Program
Though the User Program memory you specified above is
already selected, there will be times when you need to select
another memory. In that case, here is what you need to do:
(1) Briefly press [USER¥PROGRAM÷WRITE] (it lights). Do not
hold this button down because doing so will start the
Write procedure (see above).
Meaning of the flashing number
At some stage, you may notice that the User Program number flashes.
It means that the last User Program you selected is still in
effect but that the current settings no longer correspond to
the ones in that memory. Such changes may include the status of the Reverb or Chorus effect, a changed volume value,
etc.
Before selecting another User Program or switching off the
EXR-46 OR, you should therefore write these settings to the
same (or a different) User Program if you want to keep them.
Otherwise, you lose these changes.
Mode selection
The mode (Arranger, p. 15, Piano Solo, p. 13, Pianist, p. 27) is
also memorized when you write a User Program.
USER
PROGRAM
The display now shows the number of the User Program you
selected last, or “1” if you have not yet selected a User Program since switching on the EXR-46 OR.
The flashing number indicates that the EXR-46 OR is still
using the last manual changes you may have made before
selecting the User Program function. It only means “this is
the last memory you selected”.
None of its settings are being used for the time being. By
pressing another “big” button in the DATA ENTRY section,
you can leave the User Program mode without changing
your manual settings. This may be important to remember if
45
r EXR-46 OR
you were about to write your settings and accidentally
pressed the wrong button (or didn’t press it long enough).
To actually select a User Program…
(2) Use the numeric buttons [0]~[9] to select the memory (00~
199).
The settings of the selected User Program will be recalled.
Note: You can also use the FAMILY and SELECT [√][®] buttons to
select User Programs.
Note: As soon as you modify any setting (on the front panel or
in the Function menu), the User Program number starts flashing.
(3) Press any other “big” button in the DATA ENTRY section to
leave this mode.
Lock: filtering certain User Program
settings
Your EXR-46 OR provides five LOCK buttons with two functions
each that allow you to filter certain settings of the User Programs you recall.
These filters (or “locks”) will help you use your User Program
settings more efficiently, because you can leave out settings
that may be fine for one song (the one you prepared the User
Program for) but not for another.
Here is an example: suppose you saved a User Program for song
“A” with the Main part’s “Mode” function set to “Mon”. All other
settings are just perfect for song “B”. Without the LOCK parameter, you would have to use a second User Program (where the
“Main Mode” parameter is set to “Pol”). On the EXR-46 OR, however, you just need to switch on the [MONO÷PORT] button to be
able to use User Program originally prepared for song “A”.
(1) Press the LOCK button that corresponds to the settings
you want to ignore.
Button
Function
TEMPO (x1) The current tempo value remains unchanged.
TEMPO (x2) The current tempo value and the status of the
SYNC START function remain as they are.
TRANSPOSE The “USRTrnsp” setting remains as it is.
(x1)
TRANSPOSE The “USRTrnsp” setting and the status of the
(x2)
ORIENTAL SCALE buttons remain unchanged.
MONO/PORT The “Mode” and “Port” settings of the Main
(x1)
part (see p. 40) remain unchanged.
MONO/PORT The “Mode” and “Port” settings of the Main
(x2)
and Dual parts (see p. 40) remain unchanged.
(*) The assignments of the USER TONES buttons (see p. 30)
are also saved to a User Program.
You can also activate several buttons at once.
(2) Select the User Program whose registration (with the
exception of the unnecessary settings) settings you want
to use.
(3) Switch the LOCK buttons off again before recalling yet
another User Program if you need all of its settings.
Note: The status of the LOCK buttons is not saved to a User Program.
Each button has two functions. Press it either once (it lights)
or twice in rapid succession (it flashes) to activate the
desired filter:
46
Button
Function
STYLE (x1)
The Music Style does not change when you
select a different User Program.
STYLE (x2)
The Music Style and BAND ORCHESTRATOR
setting remain as they are.
TONE (x1)
The Main and Dual parts do not select the
sounds stored in the User Program you select.
TONE (x2)
The Main and Dual parts as well as the USER
TONES assignments remain unchanged.*
EXR-46 OR
14. MIDI functions
MIDI is short for “Musical Instrument Digital Interface”. The word refers to many things, the most obvious being a connector type that is used by musical instruments and other devices to exchange messages
relating to the act of making music.
Note: All EXR-46 OR parts are set to receive MIDI messages. If
MIDI messages are no longer sent to the internal tone generaEach time you play on the EXR-46 OR’s keyboard or start the
they do not seem to respond to the messages you send from the
tor – but they are still transmitted to the MIDI OUT or USB port
Arranger (or Song), your instrument transmits MIDI data to its
external controller, you should check whether the external conand hence to external MIDI instruments.
MIDI OUT. If you connect the MIDI OUT socket to the MIDI IN
troller’s MIDI OUT is connected to the MIDI INput of your
socket of another instrument, that instrument may play the
Sound source
Sound source
EXR-46 OR.
same notes as one of the EXR-46 OR’s parts, select sounds, etc.
MIDI is a universal standard, which means that musical data can
The EXR-46 OR’s transmit and receive channels of all parts
be sent to and received by instruments of different types and
have been set in keeping with a tacit Roland standard and
manufacturers. Furthermore, MIDI allows you to connect your
are therefore shared by all recent EM, E, G, and RA series
EXR-46 OR to a computer or hardware sequencer.
instruments. You cannot change them. They also correspond
to the track assignments of the 16-track Recorder:
Connect your EXR-46 OR as shown below.
The EXR-46 OR receives data
External MIDI instrument/computer
1
2
3
4
5
6
7
8
EXR-46 OR
The EXR-46 OR transmits data
—OR—
EXR-46 OR
(using the supplied USB cable)
Accomp 1
Arranger bass
Accomp 2
kMain
Accomp 3
kDual
Accomp 4
Accomp 5
9
10
11
12
13
14
15
16
Accomp 6
Arranger drums
kSplit
kAuto Bass
V-Link
V-Link
Melody Intell. (see p. 27)
(kMain*)
(*) If you assign a Drum Kit to the Main part.
Computer
MIDI Function parameters
See “Editing parameters (general procedure)” (p. 39) for how to
select and set these Function parameters (they belong to the
“MIDI” family).
The EXR-46 OR transmits and receives data
(*) If you connect the EXR-46 OR’s USB port to a computer, etc., the
MIDI IN and OUT ports are no longer used. This only works when
the
icon is NOT displayed.
Channels
MIDI can simultaneously transmit and receive messages on 16
channels, so that up to 16 instruments can be controlled. Nowadays, most instruments –like your EXR-46 OR– are multitimbral, which means that they can play several musical parts with
different sounds.
Note: With the exception of “Local”, all MIDI parameter settings are
saved as soon as you leave the Function mode.
■ Local
(On/Off, Default setting: On) The Local parameter allows you to
establish or remove the connection between the EXR-46 OR’s
keyboard/Recorder and the internal tone generator.
When set to “ON” (default), playing on the EXR-46 OR’s keyboard or playing back a Recorder song will cause the corresponding notes to sound. If you select “OFF”, the corresponding
Note: The setting of this parameter is not memorized when you
switch off the EXR-46 OR.
■ MIDI TxRx° (MIDI transmission and reception)
This parameter allows you to specify which EXR-46 OR parts
should transmit and receive MIDI messages:
Option
Meaning
ALL
All parts.
KBD
Only the Keyboard parts (see “k” in the table above).
STL
Only the Arranger parts (AccDrums~Accomp 6).
SNG
Only the Song parts (1~16).
OFF
None of the EXR-46 OR’s parts transmits/receives
MIDI messages.
■ Sync Rx° (MIDI synchronization)
Use this parameter to specify how the EXR-46 OR should be
synchronized (as slave) to an external MIDI sequencer, computer, drum machine, etc.
“Synchronization” is a learned term for the fact that one device
(or function) is set to start and stop at the same time as
another device (or function), and to run at the same tempo
(BPM).
47
r EXR-46 OR
Please note that synchronization is only possible when you
connect the external device’s MIDI OUT socket to the
EXR-46 OR’s MIDI IN socket (though you can also work the
other way around; in that case, see the sequencer’s manual for
details).
Off
On
In this case, the EXR-46 OR is not synchronized with
other MIDI devices. It is thus impossible to start/stop it
via MIDI.
Arranger playback and Song recording/playback are
synchronized if the EXR-46 OR receives MIDI Start and
Stop messages followed by MIDI Clock signals. If the
EXR-46 OR receives only a Start message, it will wait a
moment to see if there are also MIDI Clock messages
coming.
If there are, it will synchronize to them. If there are no
MIDI Clock messages, it will follow its own tempo. In
either case, you can stop playback or recording with a
MIDI Stop message.
■ Style PC° (Style Select TxRx Channel)
(OFF, 1~16, Default setting: 10) As its name implies, the Style
Select channel is used to receive and transmit program
changes that cause the EXR-46 OR or the external instrument
to select another Music Style.
■ Lyrics Tx° (Transmit Lyrics messages)
(On/Off, Default setting: Off) The EXR-46 OR can transmit Lyrics messages contained in Format 0 Standard MIDI Files you
play back. It cannot display them, but it allows you to transmit
them to a device capable of displaying Lyrics messages (such as
the Roland LVC-1). This filter allows you to enable (On) or disable (Off) the transmission of Lyrics data.
■ NTA Rx14° (Note-to-Arranger reception on/off)
(On/Off, Default setting: On) NTA is short for “Note-toArranger”, or the notes you play in the left half of the keyboard
to feed the Arranger with chord information. These notes can
also be received via MIDI (from an accordion, a digital piano, an
organ, for example). If you want to use the Arranger without
playing on the EXR-46 OR’s keyboard, you must transmit these
notes on MIDI channel 14 (from your computer or external
MIDI instrument to the EXR-46 OR) and select “On” here.
48
NTA notes can only be received (they are not transmitted). The
notes you play on the EXR-46 OR’s keyboard are indeed transmitted to the Arranger, from there to the Arranger parts, and
used to play the accompaniment in the right key. Since all
Music Style notes are transmitted via MIDI, there is no need to
send the NTA notes separately.
■ PitchBnd° (Pitch Bend)
(On/Off, Default setting: On) This filter allows you to enable
(On) or disable (Off) the transmission and reception of Pitch
Bend messages. These messages are used to temporarily
increase or decrease the pitch of the Keyboard-part notes
(Main, Dual, Split).
■ Modulatn° (Modulation)
(On/Off, Default setting: On) This filter allows you to enable
(On) or disable (Off) the transmission and reception of Modulation messages. These messages are used to add vibrato to the
notes you play (control change CC01).
■ ProgChng° (Program Change)
(On/Off, Default setting: On) This filter allows you to enable
(On) or disable (Off) the transmission and reception of Program
Change messages. These messages are used to select Tones,
Styles, or User Programs.
■ Velo Rx° (Receive Velocity)
(On, 1~127, Default setting: On) This filter allows you to enable
(On) or disable the reception of velocity messages. This only
applies to note messages received via MIDI. Choose the velocity
value to be substituted for the actual values the EXR-46 OR
receives (1~127), or select “On” to use the velocity values as is.
■ Clock Tx° (synchronization)
(On/Off, Default setting: On) This parameter allows you to
determine whether (On) or not (Off) the Arranger and Recorder
send MIDI Clock messages when you start them. These messages are necessary for synchronizing external MIDI instruments/sequencers/software to the EXR-46 OR.
■ StartStp° (Start/Stop/Continue)
(On/Off, Default setting: On) This option allows you to specify
whether or not the Arranger and Recorder send Start/Stop/
Continue messages when you start or stop them. Select “Off”
when you wish to control the tone generator of a MIDI organ,
etc., without starting or stopping its automatic accompaniment.
■ Song PosP° (Song Position Pointer)
(On/Off, Default setting: On) The EXR-46 OR’s Recorder also
sends and receives Song Position Pointer messages that indicate the exact location of the notes that are being played back.
Select “OFF” if you don’t want the Recorder to send or receive
these messages.
EXR-46 OR
15. Data management
Working with the Flash memory
Let us first have a look at the remaining Function parameters. They allow you to save newly recorded songs and Styles loaded from a floppy disk to the EXR-46 OR’s Flash memory, and to remove such files.
Saving songs to a Flash memory
Songs you record or edit with the EXR-46 OR’s Recorder can be
saved to its Flash memory or floppy disk. See page 54 for how to
save them to floppy and page 19 for how to select songs in the
Flash memory.
(1) Press [FUNCTION].
(4) Use the numeric buttons to assign a character to that
position.
Archiving User Programs in the Flash area
This function allows you to save the contents of the internal
User Programs (all 200 of them) to the Flash area. User Programs are always archived as a set.
Use this function if all 200 User Programs contain settings you
don’t want to overwrite (by saving other registrations) or lose
(in the unlikely event of a memory failure). There is also a function that allows you to load archived User Programs (page 50).
Note: The User Program set data also contain the TONE button
assignments (page 30).
FUNCTION
The available characters are:
(2) Use FAMILY [√][®] to select the “WriteSNG” parameter.
Wait until the display looks as shown below, then proceed
with the following step.
SONG 001 yes
=
The EXR-46 OR automatically selects a Flash memory that
doesn’t yet contain data. (The first character, “S”, flashes.)
Note: If no vacant Flash memory remains or if the memory
capacity is exhausted, the display shows the “Mem Full”
message when you select this function. In that case, it will be
impossible to save your song. You can, however, delete another
song (“Remove”) and repeat step (2) and following.
Note: The “No Song” message means that there are no song
data that could be saved.
(3) If necessary, use the SELECT [√][®] buttons to move the
cursor to another character position (that character
flashes).
_ ! # $ % & ’ - @ ^ ‘
0 1 2 3 4 5 6 7 8 9
A B C D E F G H I J K L M
N O P Q R S T U V W X Y Z
Note: Each time you press another numeric button (for entering
characters), the cursor advances automatically to the next position. This works like a mobile phone.
(5) Repeat steps (3) and (4) to assign the desired characters to
the remaining positions.
(6) After entering the name, press the [YES/+] button to save
the song to the EXR-46 OR’s Flash memory.
The display now counts down:
Writing
At the end of the saving operation, the display briefly shows
the “Complete” message.
Note: Press [NO/–] if you do not wish to save the song after all.
(7) Press another “big” button in the DATA ENTRY section to
leave this function.
(1) Press [FUNCTION].
(2) Use FAMILY [√][®] to select the “WriteUPG” parameter.
Wait until the display looks as follows, then proceed with the
next step:
USPR_000 yes
=
Though you could save the file with the current default
name (“USPR_000”), a proper name will help you identify
the file at all times. We therefore suggest you take the time
to specify a meaningful name.
The first character of the default name (“UserPrg”) flashes.
Note: If the memory capacity is exhausted, the display shows
the “Mem Full” message when you select this function. In
that case, it will be impossible to archive the User Program set.
You can, however, delete another set (“Remove”) and repeat
steps (2) and following.
(3) If necessary, use the SELECT [√][®] buttons to move the
cursor to another character position (that character
flashes).
(4) Use the numeric buttons to assign a character to that
position.
49
r EXR-46 OR
The available characters are:
_ ! # $ % & ’ - @ ^ ‘
0 1 2 3 4 5 6 7 8 9
A B C D E F G H I J K L M
N O P Q R S T U V W X Y Z
(5) Repeat steps (3) and (4) to assign the desired characters to
the remaining positions.
Note: Each time you press another numeric button (for entering
characters), the cursor advances automatically to the next position. This works like a mobile phone.
(6) After entering the name, press the [YES/+] button to save
the User Program set to the EXR-46 OR’s Flash memory.
The display first shows the “Writing” message. At the
end of the saving operation, the display briefly shows the
“Complete” message.
Note: Press [NO/–] if you do not wish to archive the User Program Set after all.
(7) Press another “big” button in the DATA ENTRY section to
leave this function.
Music Styles you load from floppy disk (and which are copied to
the USER STL memory at that time) can be saved to a Flash
memory.
(1) Press [FUNCTION].
(2) Use FAMILY [√][®] to select the “WriteSTL” parameter.
Wait until the display looks as follows, then proceed with the
next step:
=
yes
The EXR-46 OR automatically selects a Flash destination
memory that doesn’t yet contain data. (The first character
flashes.)
Note: If no vacant Flash memory remains or if the memory
capacity is exhausted, the display shows the “Mem Full”
message when you select this function. In that case, it will be
impossible to save the Music Style. You can, however, delete
another Style (“Remove”) and repeat step (2) and following.
Note: The “No Style” message means that there are no
Style data that could be saved.
50
_ ! # $ % & ’ - @ ^ ‘
0 1 2 3 4 5 6 7 8 9
A B C D E F G H I J K L M
N O P Q R S T U V W X Y Z
(5) Repeat steps (3) and (4) to assign the desired characters to
the remaining positions.
Note: Each time you press another numeric button (for entering
characters), the cursor advances automatically to the next position. This works like a mobile phone.
(6) After entering the name, press the [YES/+] button to save
the Style to the EXR-46 OR’s Flash memory.
The display now counts down:
Writing
Saving Styles to a Flash memory
TANGO
(3) If necessary, use the SELECT [√][®] buttons to move the
cursor to another character position (that character
flashes).
(4) Use the numeric buttons to assign a character to that
position.
The available characters are:
(4) Use the SELECT [√][®] buttons to select the set you wish to
load.
(5) Press the [YES/+] button.
The display now shows the “Sure?” message, while Yes
starts flashing.
(6) Press the [YES/+] button again to load the User Program
set (or [NO÷–] if you do not want to load it after all).
While the data are being loaded, the display shows the
“Reading” message. Once the file has been loaded, the
display briefly shows the “Complete” message.
(7) Press another “big” button in the DATA ENTRY section to
leave this function.
Removing songs from the Flash memory
Songs you no longer need can be deleted (which is called
“Remov” here) to make room for new songs.
(1) Press [FUNCTION].
FUNCTION
At the end of the saving operation, the display briefly shows
the “Complete” message.
Note: Press [NO/–] if you do not wish to save the Music Style
after all.
(2) Use FAMILY [√][®] to select the “RemovSNG” parameter.
(7) Press another “big” button in the DATA ENTRY section to
leave this function.
Loading a User Program set from the Flash memory
This “ReadUPG” function allows you to transfer a set of 200
User Programs (i.e. for all memories) to the EXR-46 OR’s internal
memory. This will overwrite the User Programs that currently
reside in the internal memories. You cannot load individual User
Programs from an archived set.
Note: If you wish to use the User Programs in the internal memory
at a later stage, first archive them (page 49) or save them to disk
before proceeding. See p. 54.
(1) Press [FUNCTION].
(2) Use FAMILY [√][®] to select the “ReadUPG” parameter.
(3) Wait until the display shows the name of the first User
Program set, then proceed with the following step.
FAMILY
Wait until the display shows the name of the first song
memory (101), then proceed with the following step.
Note: The “No Song” message means that there are no song
data that could be deleted.
EXR-46 OR
(3) Use the SELECT [√][®] buttons to select the song you wish
to delete.
SELECT
Removing Styles from the Flash memory
Styles you no longer need can be deleted (which is called
“Remov” here) to make room for new Styles.
(1) Press [FUNCTION].
(2) Use FAMILY [√][®] to select the “RemovSTL” parameter.
Wait until the display shows the name of the first Style
memory (101), then proceed with the following step.
Note: The “No Style” message means that there are no
Music Style data that could be deleted.
(4) Press the [YES/+] button.
The display now shows the “Sure?” message, while Yes
starts flashing.
(5) Press the [YES/+] button again to delete the song (or
[NO÷–] if you do not want to delete it after all).
The display now shows the following message:
Removing
Once the file has been deleted, the display briefly shows the
“Complete” message.
(6) Press another “big” button in the DATA ENTRY section to
leave this function.
(3) Use the SELECT [√][®] buttons to select the Music Style you
wish to delete.
(4) Press the [YES/+] button.
The display now shows the “Sure?” message, while Yes
starts flashing.
(5) Press the [YES/+] button again to delete the Style (or
[NO÷–] if you do not want to delete it after all).
The display now shows the following message:
Removing
Once the file has been deleted, the display briefly shows the
“Complete” message.
(6) Press another “big” button in the DATA ENTRY section to
leave this function.
Removing a User Program set from the Flash memory
The “RemovUPG” function allows you to erase User Program
sets from the EXR-46 OR’s Flash memory. This may be necessary
to make room for new files (e.g. when the “Memory Full” message appears). Be careful, though, to only delete files you are
absolutely (positively) sure you will never need again. Once a file
has been deleted, it is gone forever.
Note: As a rule, you should first make a backup copy of your disk on
your computer. After all, most files really only become indispensable
once they are no longer available…
(1) Press [FUNCTION].
FUNCTION
(2) Use FAMILY [√][®] to select the “RemovUPG” parameter.
Wait until the display shows the name of the first User Program set, then proceed with the following step.
Note: The “No Files” message means that there are no set
data that could be deleted.
(3) Use the SELECT [√][®] buttons to select the User Program
set you wish to delete.
SELECT
(4) Press the [YES/+] button.
The display now shows the “Sure?” message, while Yes
starts flashing.
(5) Press the [YES/+] button again to delete the User Program
(or [NO÷–] if you do not want to delete it after all).
51
r EXR-46 OR
The display now shows the following message:
Removing
Once the file has been deleted, the display briefly shows the
“Complete” message.
(6) Press another “big” button in the DATA ENTRY section to
leave this function.
Archiving data using a
computer (USB)
The EXR-46 OR’s USB port can be used for two purposes: (a) for
transmitting/receiving MIDI data or (b) for exchanging files
with a computer.
As long as the
icon is not displayed, the USB port
transmits and receives MIDI data (the MIDI IN and OUT sockets
are bypassed if you connect a USB cable to this port).
If the icon is displayed, however, your EXR-46 OR will appear as
an external drive on your PC’s or Mac’s desktop:
(3) Press the EXR-46 OR’s [USB] button.
The display shows the error message “No Cable” to signal that USB communication is impossible.
(4) Connect the EXR-46 OR’s USB port to a free USB port of
your computer using the supplied cable.
EXR-46 OR
The drive letter (“F:” in the above illustration) depends on the
number of drives recognized by Windows (and is of no importance for MacOS).
Note: USB communication (i.e. for MIDI applications) is possible
between the EXR-46 OR and Windows Me/XP or later (for Windows
users), or between the EXR-46 OR and Mac OS 9.0.4 or later (for
Macintosh users). This requires that you install the appropriate drivers from the supplied CD-ROM.
Data transfer, on the other hand, is possible with Windows 2000/
Me/XP or later/Mac OS 9.04 or later. If you encounter problems with
your system, please contact your nearest Roland service center for
details.
Once recognized, you can copy files to the “Song”, “UserPrg” or
“Style” folder by dragging and dropping them using the usual
routines. The “Style”, “UserPrg” and “Song” folders cannot
be deleted and must not be renamed. You can empty them
by dragging all files they contain to the trash, though.
Proceed as follows (Windows XP):
(1) Restart your PC.
(2) Switch on your EXR-46 OR.
52
Computer
The
icon appears and the display shows
“PC<->EXR”.
If you prefer to use another cable, choose one with the correct USB jack types: a “square” one (“type B”) for the
EXR-46 OR and probably a “flat” one (type “A”) for your
computer)
Note: If you do not connect a USB cable within 15 seconds, the
EXR-46 OR returns to its normal mode.
Note: Never switch off the EXR-46 OR while the “Writing”
message is displayed, because doing so would damage all data in
the EXR-46 OR’s Flash area. (See “InitFLSH (Flash initialization)”
(p. 44) if you need to repair the Flash area after an erroneous
operation.)
Note: The “Wait… Connection Proceding” message may appear when you press the [USB] button. This only
happens after using the USB port for MIDI communication. It
means that Windows XP is reconfiguring the USB port for data
transfer use. This may take a while, so please be patient.
Proceed as follows (other operating systems):
(1) Switch on your Mac or PC if it isn’t on already.
(2) Switch on your EXR-46 OR if it isn’t on already.
(3) Press the EXR-46 OR’s [USB] button.
EXR-46 OR
The display shows the error message “No Cable” to signal that USB communication is impossible.
Note: If you do not connect a USB cable within 15 seconds, the
EXR-46 OR returns to its normal mode.
(4) Connect the EXR-46 OR’s USB port to a free USB port of
your computer using the supplied cable.
The
icon appears and the display shows
“PC<->EXR”.
If you prefer to use another cable, choose one with the correct USB jack types: a “square” one (“type B”) for the
EXR-46 OR and probably a “flat” one (type “A”) for your computer).
Note: Do not connect the EXR-46 OR to a USB hub. Always connect it directly to your computer.
Note: Never switch off the EXR-46 OR while the “Writing”
message is displayed, because doing so would damage all data in
the EXR-46 OR’s Flash area. (See “InitFLSH (Flash initialization)”
(p. 44) if you need to repair the Flash area after an erroneous
operation.)
• Copy the desired songs from your computer’s hard disk to
the “Song” folder using drag & drop.
• Copy the desired User Program sets from your computer’s
hard disk to the “UserPrg” folder using drag & drop.
• Rename the desired files in the “Style”, “UserPrg” or “Song”
folder.
• Delete the files you no longer need.
Note: While the “PC<->EXR” message is displayed, all of the
EXR-46 OR’s buttons and keys are blocked.
(9) To disconnect the EXR-46 OR from your computer:
• Macintosh: Drag the “EXR_DRV” (or “Removable Disk”) icon
to the trash.
—OR—
• Windows: Click on the removal icon on the task bar. Wait
until a drop-down menu appears and select the entry that
says something to the effect of “Stop USB disk EXR_DRV”.
You should now see a window that says something to the
effect of “The USB device XX can now be safely removed
from the system”. Click on the [OK] button.
For all operating systems:
Note: If you press the [USB] button without connecting the USB
cable, the display shows the error message “No Cable” to
signal that USB communication is impossible. Connect a cable to
cause this message to disappear.
(5) Open the “My Computer” window (Windows) and check
whether your computer has found an “EXR_DRV” (or just
“Removable Disk”).
(6) Open that drive by double-clicking on its icon.
(7) Open either the “Style”, “UserPrg” or “Song” folder.
This depends on whether you want to delete/rename/add
Music Styles or Standard MIDI Files.
(8) Do one of the following:
• Copy the desired Music Styles from the “Style” folder to your
computer’s hard disk using drag & drop.
• Copy the desired songs from the “Song” folder to your computer’s hard disk using drag & drop.
• Copy the desired User Program sets from the “UserPrg”
folder to your computer’s hard disk using drag & drop.
• Copy the desired Music Styles from your computer’s hard
disk to the “Style” folder using drag & drop. (See also the
explanation below step (10).)
—THEN—
• Disconnect the USB cable from your computer and the
EXR-46 OR.
(10) Press the [USB] button again.
The display shows the “Sure?” message.
(11) Press [YES/+] (the
icon disappears).
(Press [NO/–] to remain in USB mode.)
If you copied Music Styles from your computer to the Flash
area, the display now shows “Wait… Converting
Styles” to indicate that files with the extension “.STL”
are converted to the EXR-46 OR’s Music Style format
(“.STH”).
Note that this conversion is only necessary for Music Styles
in the EXR-46 OR’s Flash area that do not yet have the “.STH”
extension.
Disk functions
The EXR-46 OR’s Disk functions allow you to save the Recorder
Song in the USER SNG memory to disk, to save and load
your files to and from disk, to delete files on a floppy disk, and
to format disks.
Though you can use 2DD or 2HD floppies, 2HD disks have twice
the capacity of 2DD disks, so use 2HDs whenever you can.
Whenever the disk drive writes data to or reads data from disk,
the Disk icon (
) flashes in the display. Do not remove
the floppy disk while this icon is displayed as that may
damage both the disk drive and the disk (so that it becomes
unreadable).
Loading User Programs from disk
This load function is called LOAD Upr. It allows you to transfer a set of 200 User Programs (i.e. for all memories) to the
EXR-46 OR’s internal memory. This will overwrite the User Programs that currently reside in the internal memories.
Note: If you wish to use the User Programs in the internal memory
at a later stage, first save them to disk before proceeding. See p. 54.
Note: The User Program set data also contain the TONE button
assignments (page 30). After loading a User Program set, the eight
TONE buttons may therefore select other sounds than before.
(1) Insert a disk into the drive.
(2) Press [DISK] to select the Disk mode.
DISK
The “LOAD Upr” function is already selected, so there is
nothing else you need to do. (Otherwise, use FAMILY [√][®] to
select this parameter.)
Note: This operation adds a few bytes to every converted Music
Style. In rare circumstances (when the Flash area is nearly full),
this may lead to the impossibility to convert all Styles that still
have the extension “.STL”. The EXR-46 OR then displays the
“MemFull” message to signal that the conversion was
aborted before reaching the last “.STL” file. All Styles up to that
point have been converted, though, and can be used.
53
r EXR-46 OR
(3) Use SELECT [√][®] to select the User Program Set you wish
to load.
SELECT
Possible error messages
No Disk
You forgot to insert a floppy disk into the drive.
No Files
The disk you inserted contains no User Program
data.
NoFormat The floppy disk is either not formatted or uses a
format the EXR-46 OR doesn’t recognize. Press
[YES÷+] to format it now (careful: this will erase
all data on disk).
The Yes message next to it starts flashing.
(4) Press the [YES÷+] button to load the selected file.
YES
Note: Press [NO÷–] if you do not want to load the selected file
after all.
If you pressed [YES÷+], the display now shows the message
“Loading”. Once the data have been loaded, the
“Complete” message briefly appears.
(5) Press another “big” button in the DATA ENTRY section to
leave this function.
Disk Err
The disk is probably damaged and cannot be
used.
File Err
The file you selected is damaged and cannot be
loaded.
Loading songs from disk
LOAD Sng allows you to load a song on floppy disk into the
EXR-46 OR’s User memory.
(1) Insert a disk into the drive.
(2) Press [DISK] to select the Disk mode.
(3) Select the “LOAD Sng” function using FAMILY [√][®].
(4) Use SELECT [√][®] to select the song you wish to load.
The Yes message next to it starts flashing.
(5) Press the [YES÷+] button to load the selected file.
Note: Press [NO÷–] if you do not want to load the selected file
after all.
If you pressed [YES÷+], the display now shows the message
“Loading”. Once the data have been loaded, the
“Complete” message briefly appears.
(6) Press another “big” button in the DATA ENTRY section to
leave this function.
Note: See also “Possible error messages” above.
54
Loading Music Styles from disk
LOAD Stl allows you to load a Music Style on floppy disk
into the EXR-46 OR’s User memory.
(1) Insert a disk into the drive.
(2) Press [DISK] to select the Disk mode.
(3) Select the “LOAD Stl” function using FAMILY [√][®].
(4) Use SELECT [√][®] to select the Music Style you wish to
load.
The Yes message next to it starts flashing.
(5) Press the [YES÷+] button to load the selected file.
Note: Press [NO÷–] if you do not want to load the selected file
after all.
If you pressed [YES÷+], the display now shows the message
“Loading”. Once the data have been loaded, the
“Complete” message briefly appears.
(6) Press another “big” button in the DATA ENTRY section to
leave this function.
Note: See also “Possible error messages” (p. 54).
Saving files to disk
The EXR-46 OR provides the following Save functions:
SAVE Upr: Use this function to save the contents of the
internal User Program memories (all 200 of them) to a floppy
disk.
Note: The User Program set data also contain the USER TONES button assignments (page 30).
SAVE Sng: This allows you to save the song in the
USERSONG memory to a floppy disk. A song saved to disk
becomes a Standard MIDI File.
(1) Insert a disk into the drive.
Every floppy contains a square tab that allows you to “close”
a little window. With the tab in that position, you can save
data to the disk. Do not forget to write-enable the disk by
closing this little window prior to inserting the floppy disk.
(2) Press [DISK] and use FAMILY [√][®] to select “SAVE Upr”
or “SAVE Sng”.
(3) If necessary, use the SELECT [√][®] buttons to move the
cursor to another character position (that character
flashes).
EXR-46 OR
Note: Each time you press another numeric button (for entering
characters), the cursor advances automatically to the next position.
(4) Use the numeric buttons to assign a character to that
position.
The display now counts down (“Saving”).
Saving
At the end of the saving operation, the display briefly shows
the “Complete” message.
Note: If the message “Protect” appears, you forgot to
switch off the disk’s Write protection. Press the EJECT button of
the disk drive, remove the floppy and close the tab, insert the
disk again and press [YES÷+].
Note: Press [NO/–] if you do not want to save the selected file
after all.
(7) Press another “big” button in the DATA ENTRY section to
leave this function.
The available characters are:
_ ! # $ % & ’ - @ ^ ‘
0 1 2 3 4 5 6 7 8 9
A B C D E F G H I J K L M
N O P Q R S T U V W X Y Z
(5) Repeat steps (3) and (4) to assign the desired characters to
the remaining positions.
Though you could save the file with the current default
name (“SONG_001”, or “USPR_000”), a proper name
will help you identify the file at all times. We therefore suggest you take the time to specify a meaningful name.
Note: If you select “SPACE” ([0] button), the display will insert a
“_”. That’s because MS-DOS® does not allow you to use spaces.
(6) After entering the name, press the [YES/+] button to save
the data to floppy disk.
YES
Possible error messages
No Disk
You forgot to insert a floppy disk into the drive.
Protect
See above.
Disk Full
The remaining disk capacity does not allow to
save your data to this disk.
NoFormat
The floppy disk is either not formatted or uses
a format the EXR-46 OR doesn’t recognize.
Press [YES÷+] to format it now (careful: this will
erase all data on disk).
Disk Err
The disk is probably damaged and cannot be
used.
OverWrt?
The name you assigned to the data already
exists on the floppy disk you inserted. If you
press [YES÷+] to continue, the file on disk will
be overwritten (and the corresponding data
will be erased). Either insert another floppy
disk, or press [DISK] and enter another name for
the data you want to save.
Deleting files on disk
The Delete functions allow you to erase files from the inserted
floppy disk. This may be necessary to make room for new files
(e.g. when the “Disk Full” message appears). Be careful, though,
to only delete files you are absolutely (positively) sure you will
never need again. Once a file has been deleted, it is gone forever.
Note: As a rule, you should first make a backup copy of your disk on
your computer. After all, most files really only become indispensable
once they are no longer available…
DEL Upr: Use this function to delete a User Program Set
from disk. Be aware that by doing so, you actually erase 200
User Program settings.
DEL Sng: This allows you to delete a song file on disk.
(1) Insert the disk with the file you want to delete into the
drive.
(2) Press [DISK] to select the Disk mode.
(3) Use FAMILY [√][®] to select “DEL Upr” or “DEL Sng”.
(4) Use SELECT [√][®] to select the file you wish to delete
(example: “USPR_005”). The Yes message starts flashing.
(5) Press the [YES÷+] button.
To be on the safe side, the EXR-46 OR now asks you whether
you really want to delete the file (“Sure?”).
(6) Press [YES÷+] to delete the file, or [NO÷–] to abort the operation.
If you pressed [YES÷+], the display now shows the message
“Deleting”. Once the data have been deleted, the
“Complete” message briefly appears.
(7) Press another “big” button in the DATA ENTRY section to
leave this function.
55
r EXR-46 OR
Possible error messages
No Disk
You forgot to insert a floppy disk into the drive.
Protect
You forgot to switch off the disk’s Write protection. Press the EJECT button of the disk
drive, remove the floppy and close the tab,
insert the disk again and press [YES÷+].
NoFormat
The floppy disk is either not formatted or uses a
format the EXR-46 OR doesn’t recognize. Press
[YES÷+] to format it now (careful: this will erase
all data on disk).
Disk Err
The disk is probably damaged and cannot be
used.
No Files
The disk contains no files of the selected type.
Insert another disk.
Format
Before being able to save files to a disk, you need to prepare a
floppy disk. This is called “formatting”. If the floppy you are
about to use is IBM PC formatted, there is no need to format it,
though disk access is faster with disks formatted on the
EXR-46 OR. Otherwise proceed as follows:
(1) Insert a disk into the drive.
Every floppy contains a square tab that allows you to “close”
a little window. With the tab in that position, you can format the disk. Do not forget to write-enable the disk by closing this little window prior to inserting the floppy disk.
(2) Press [DISK] to select the Disk mode.
(3) Use FAMILY [√][®] to select “FORMAT”. The “Sure?”
message appears and the Yes message starts flashing.
(4) Press [YES÷+] to format the disk.
Note: If you do not want to format your floppy, press [NO÷–].
Note: By formatting a disk, you erase all files it contains. It
would be a good idea to first check what it contains (e.g. on
your PC).
The value to the left of the “Formatng” message now
counts from “1” to “100” while the disk icon flashes to indicate that the disk is being accessed. When the disk is formatted, the message “Complete” is briefly displayed.
56
EXR-46 OR
16. Using the outputs and an optional footswitch
If you like, you can also record your performance (or a Recorder songs) to cassette, MD, etc. To this end, you need to connect the EXR-46 OR’s OUTPUT sockets to the external device’s REC IN jacks.
Use a standard 1/4” phone cable for doing so. Another use for
these outputs is to connect the EXR-46 OR to your HiFi or keyboard amplifier (such as the Roland KC-550/350/150). Using a
HiFi amplifier requires the use of an adapter plug (RCA/phono→
1/4” jack). If you like, you can also purchase two Roland PJ-1M
cables.
Note: By connecting the OUTPUT jacks, you do not switch off the
EXR-46 OR’s amplification system.
You can connect an optional DP-2, DP-6, or BOSS FS-5U foot
switch to the FOOTSWITCH jack in order to hold the notes even
after releasing the keys, or to perform other functions (see
p. 40).
Cassette deck, power amplifier, HiFi amplifier, MA series active
speakers, etc.
DP-2, DP-6, or BOSS FS-5U footswitch
57
r EXR-46 OR
17. Miscellaneous
Functions for educational purposes
The EXR-46 OR provides two functions that may come in handy
for music teachers or for those who use the EXR-46 OR in class:
Deactivating or activating the Demo function
The EXR-46 OR’s Demo function can be switched off so that
pressing [USB]+[ONE¥TOUCH] will have no effect at all. This may
be useful in situations where the EXR-46 OR is used in class.
Here is how to deactivate the Demo function:
(1) Switch off the EXR-46 OR.
(2) Hold down the [USB], [ONE¥TOUCH] and [ACOUSTIC] buttons while switching the EXR-46 OR back on again.
The display briefly shows “DISABLED”.
This setting is remembered, so that next time you want to
listen to a demo song, you have to repeat the above procedure.
Deactivating or activating the Arranger
Use the following procedure to ensure that the Arranger cannot
be started or stopped:
(1) Switch off the EXR-46 OR.
(2) Hold down the [ACOUSTIC] and [ARRANGER¥BAND] buttons while you switch the EXR-46 OR back on again.
The display briefly shows “DISABLED”. It is now impossible to start/stop the Arranger using the [START÷STOP] button.
Repeat the above procedure when you want to use the
Arranger again.
58
Deactivating or activating the Arranger and Demo
functions
A third “educational” option is to switch off both the Demo and
the Arranger functions in one go:
(1) Switch off the EXR-46 OR.
(2) Hold down the [ACOUSTIC] and [START÷STOP] buttons
while you switch the EXR-46 OR back on again.
The display briefly shows “DISABLED”. It is now impossible to start/stop the Arranger or demo song playback.
Repeat the above procedure when you want to use the
Arranger and Demo function again.
Initializing your EXR-46 OR (Factory)
After working extensively with your EXR-46 OR, you may want
to recall the original factory settings. Note that the Recorder
song will be empty and that the User Programs contain the
factory settings after initializing your EXR-46 OR.
Here is how to initialize your EXR-46 OR:
(1) Power off your EXR-46 OR.
(2) Hold down the [USER¥PROGRAM÷WRITE] button while
turning your EXR-46 OR back on again.
The message “Factory” informs you that the EXR-46 OR
has been initialized.
Note: This does not affect the data in the EXR-46 OR’s Flash
memory. See page 44 for how to initialize that area.
EXR-46 OR
18. Specifications
EXR-46 OR Interactive Arranger
Keyboard: 61 keys, velocity sensitive
Sound source: PCM samples
Max polyphony: 64 voices
Tones: 650 panel sounds, of which 107 oriental sounds (542 XG
compatible voices/256 GM2 compatible sounds)
Drum Kits: 33 Drum Kits, of which 13 oriental kits (11 XG compatible + 9 GM2 compatible)
Multitimbral parts: 19
Compatibility: GM2, GS, XG Lite
Display type: New large backlit custom display
Panel controls: VOLUME knob, ACCOMP/KEYBOARD BALANCE buttons, TEMPO/DATA buttons, BENDER/MODULATION lever, FAMILY
buttons, SELECT buttons, numeric buttons [0]~[9], 8 assignable TONE
buttons, 12 ORIENTAL SCALE buttons, 3 SCALE MEMORY buttons
Music Styles: 149 Styles in Flash memory (99 factory + 50 changeable)
One Touch: 2 x 99
Orchestrator: 3 levels: Drum&Bass, Combo, Full Band
LOCK functions (setting filters x10): STYLE, TONE, TEMPO,
TRANSPOSE, MONO/PORTAMENTO
Songs: Realtime SMF player
16-track Recorder: 4 easy modes (ALL, Keyboard, Single, Punch In/
Out)
Flash Memory: For Music Styles, User Program sets and songs
User Programs: 200
Effects: Reverb: 8 types, Chorus: 8 types, Multi-FX: 47 types
Data storage: FDD 3.5” 2HD/2DD (Styles, Songs/SMF,
User Programs), File save & load from PC via USB (Styles, Songs,
User Programs)
Metronome: Time Signature setting (1/4~9/4, 1/8~9/8), Volume
setting
Other functions: 3 easy modes (Piano/Solo, Arranger/Band, Pianist), Drum Pad mode, Music Assistant: 100 settings, Split (2 Tones:
Split [L] + Main [R]), Dual (2 Tones: Main + Dual), Melody Intelligence: 18 types, Octave (–4~4), User Transpose (–12~12)/Glbl
Transpose (–6~5), V-Link
System updates: Yes
Connections: USB: MIDI communication and file transfer, MIDI IN,
OUT
Outputs: L/Mono, Right (1/4” phone jacks), Phones 1/2, DC IN
(adapter)
Others: Output Power: 10W+10W with “Digital Bass Enhancer”,
Stereo Speakers: 2x ø13cm, Bass Reflex
Power supply: 12V/3.5A
Dimensions: 1020 x 355 x 132 mm
Weight: 8kg
Supplied accessories: Owner’s Manual, PSB-4U adapter, music
rest, USB cable, CD-ROM with USB driver files
Note: Specifications are subject to change without prior notice.
Thanks
Roland Corporation wishes to express gratitude and thanks to
all persons who have been involved in the preparation of the
Oriental Drum Kits, Oriental Music Styles and Demo Songs for
the EXR-46 OR Interactive Arranger.
Special thanks go to:
Mr. Cherif Cotta, Mr. Emmanuel G. Chnarakis and
Mr. Mehmet Dogdu
for their important and valuable co-operation and enthusiasm
for the development of the EXR-46 OR
Mr. Abdallah George, Mr. Ahmed Mustafa, and
Mr. Alp Selim
for their precious advice and support
Mr. Mohamed Raheem
for authorizing Roland Corporation to use his famous composition “Leh Bey Dari” as demo song in the EXR-46 OR
59
r EXR-46 OR
60
r
Mode d’emploi
Merci d’avoir porté votre choix sur l’EXR-46 OR Interactive Arranger Roland. Ce clavier arrangeur réunit un générateur de sons Roland de qualité exceptionnelle, une interface utilisateur intuitive, un port USB, la compatibilité V-LINK et bien d’autres atouts.
Pour tirer parti de toutes les fonctions de votre EXR-46 OR et lui assurer de nombreuses années de bons et loyaux services, lisez entièrement le présent Mode d’emploi.
Pour éviter toute confusion, convenons d’utiliser le mot “bouton” pour désigner les commandes en face avant et de réserver le mot “touche” au clavier de l’EXR-46 OR.
Avant d’utiliser cet instrument, lisez attentivement la section “Remarques importantes” (p. 67). Elle contient des informations importantes pour une utilisation correcte de
l’EXR-46 OR. Rangez ce mode d’emploi en lieu sûr car il vous sera utile pour toute référence ultérieure.
Copyright ©2006 ROLAND EUROPE. Tous droits réservés. Toute reproduction intégrale ou partielle de cette publication est interdite sous quelque forme que ce soit sans l’autorisation écrite de Roland Europe S.p.a.
r EXR-46 OR
1. Caractéristiques
Générateur de sons exceptionnel
L’EXR-46 OR propose des sons basés sur des formes d’onde
non comprimées, ce qui est inédit pour un instrument de
cette gamme de prix. Ses sonorités sont vivantes, réalistes et
dépassent largement tout ce que vous pourriez attendre
d’un clavier arrangeur abordable. Le générateur de sons de
l’EXR-46 OR est polyphonique à 64 voix.
Combiné au nouveau système d’amplification et à la fonction Digital Bass Enhancer, le générateur de l’EXR-46 OR
produit des sonorités superbes aux aigus limpides et aux
graves puissants.
Mode ‘Drum Pad’
L’EXR-46 OR propose un mode “Drum Pad” qui vous permet
d’assigner les sons de batterie aux 8 touches les plus hautes
(côté droit du clavier). Vous pouvez utiliser cette fonction
pour jouer en live des parties de batterie ou de percussion en
accompagnant un style ou un morceau de l’EXR-46 OR.
Fonctions de filtrage (Lock)
L’EXR-46 OR est doté de cinq boutons vous permettant de
filtrer divers réglages des programmes utilisateur que vous
chargez. L’utilisation des réglages devient ainsi plus souple et
plus efficace car vous pouvez ignorer les paramètres dont
vous n’avez pas besoin dans une situation donnée.
Mémoire Flash et USB
L’EXR-46 OR est livré avec 99 styles musicaux orientaux, 50
styles musicaux supplémentaires ainsi que plusieurs fichiers
Standard MIDI. Ces styles et fichiers SMF supplémentaires
résident dans la mémoire Flash de l’EXR-46 OR. Vous pouvez
étendre la capacité de cette mémoire et en gérer le contenu
avec un PC ou Macintosh via une connexion USB.
Nouveau concept
L’EXR-46 OR est multitimbral à 19 parties, dont 3 (Main,
Split et Dual) peuvent être jouées sur le clavier. Vous pouvez
utiliser la partie Main pour jouer des mélodies ou de la batterie et les parties Split et Dual pour ajouter rapidement un
deuxième son à votre jeu solo.
De plus, l’EXR-46 OR propose une nouvelle méthode de
sélection des styles musicaux, des sons, des morceaux et des
programmes utilisateur: les boutons FAMILY [√][®] servent à
sélectionner des groupes, tandis que les boutons SELECT
[√][®] permettent de choisir une entrée au sein d’un groupe.
Bon amusement!
Arrangeur hors pair
L’EXR-46 OR contient 149 styles musicaux flambant neufs,
issus du célèbre atelier de styles de Roland. Comme d’habitude, vous disposez de plusieurs motifs (INTRO, ORIGINAL,
VARIATION, FILL et ENDING) et d’options supplémentaires
accessibles via les boutons BAND ORCHESTRATOR.
3 mémoires de gamme et des réglages d’accord propres aux programmes utilisateur
L’EXR-46 OR est le premier clavier arrangeur Roland à proposer 3 mémoires de gammes (orientales) et la possibilité de
sauvegarder le système d’accord utilisé dans un programme
utilisateur. De cette manière, chacun des 200 programmes
utilisateur peut utiliser un système d’accord différent.
Et ce n’est pas tout…
L’instrument propose un métronome et plusieurs fonctions
pédagogiques; trois processeurs d’effets numériques (réverb,
chorus et MFX) permettent d’affiner la qualité sonore exceptionnelle.
L’EXR-46 OR peut lire les morceaux GM, GM2, GS et XG.
Vous pouvez donc utiliser n’importe quel fichier Standard
MIDI disponible chez votre revendeur Roland ou sur internet.
Remarque: Compatible XG Light, l’EXR-46 OR n’exécute que les
fonctions de base.
62
L’EXR-46 OR est également équipé d’un lecteur de disquettes (2DD/2HD) permettant de gérer les données et d’importer
des styles musicaux conçus pour d’anciens instruments
Roland disposant d’un arrangeur.
Microsoft et Windows sont des marques déposées de Microsoft Corporation
USA aux Etats-Unis et dans d’autres pays.
Apple et Macintosh sont des marques déposées de Apple Computer Corporation USA aux Etats-Unis et dans d’autres pays.
MacOS est une marque déposée de Apple Computer Corporation.
Les autres noms de sociétés, de produits ou de formats sont des marques
commerciales ou déposées des détenteurs respectifs.
EXR-46 OR
CONSIGNES DE SECURITÉ
INSTRUCTIONS POUR LA PREVENTION D'INCENDIE, CHOC ÉLECTRIQUE OU BLESSURE
Consignes de sécurité
A propos des symboles
Avertissement et
Précaution
Sert aux instructions destinées à alerter
l'utilisateur d'un risque mortel ou de
AVERTISSEMENT blessure grave en cas d'utilisation
incorrecte de l'unité.
Sert aux instructions destinées à alerter
l'utilisateur d'un risque de blessure ou
de dommage matériel en cas d'emploi
incorrect de l'unité.
PRUDENCE
* Les dommages matériels se réfèrent
aux dommages ou autres effets
négatifs causés au lieu d'utilisation et
à tous ses éléments, ainsi qu'aux
animaux domestiques.
A propos des symboles
Le symbole
alerte l'utilisateur d'instructions importantes
ou de mise en garde. La signification du symbole est
déterminée par ce que contient le triangle. Dans le cas du
symbole de gauche, il sert pour des précautions générales,
des mises en garde ou alertes vis-à-vis d'un danger.
Le symbole
prévient l'utilisateur des interdits. Ce
qui ne doit spécifiquement pas être fait est indiqué
dans le cercle. Dans le cas du symbole de gauche, cela
signifie que l'unité ne doit jamais être démontée.
Le symbole ● alerte l'utilisateur de ce qui doit être
fait. Ce qui doit être fait est indiqué par l'icône
contenue dans le cercle. Dans le cas du symbole de
gauche, cela signifie que le cordon d'alimentation doit
être débranché de la prise murale.
OBSERVEZ TOUJOURS CE QUI SUIT
AVERTISSEMENT
• Avant d’utiliser cet instrument, lisez les instructions données cidessous et dans le mode d’emploi.
......................................................................................................................................
• N’ouvrez (et ne modifiez) pas le produit.
......................................................................................................................................
• N’essayez pas de réparer l’EXR-46 OR ou d’en remplacer des éléments (sauf si ce manuel vous donne des instructions spécifiques
pour le faire). Confiez tout entretien ou réparation à votre revendeur, au service de maintenance Roland le plus proche ou à un distributeur Roland agréé (vous en trouverez la liste à la page “Information”).
......................................................................................................................................
• N’utilisez et ne rangez jamais l’EXR-46 OR dans des endroits:
• soumis à des températures extrêmes (en plein soleil dans un
véhicule fermé, à proximité d’une conduite de chauffage, audessus de matériel générateur de chaleur),
• humides (salles de bain, toilettes, sur des sols ou supports
mouillés),
• à l’humidité ambiante élevée,
• exposés aux précipitations,
• poussiéreux,
• soumis à de fortes vibrations.
......................................................................................................................................
• Utilisez ce produit uniquement avec un support ou un stand
recommandé par Roland.
• Évitez que des objets (du matériel inflammable, de la monnaie, des
trombones) ou des liquides (eau, limonades, etc.) ne pénètrent à
l’intérieur de ce produit.
......................................................................................................................................
007
• Veillez à placer l’instrument sur une surface horizontale plane pour
lui assurer une stabilité optimale. Évitez les supports qui vacillent
ou les surfaces inclinées.
......................................................................................................................................
• Branchez l’instrument à un adaptateur secteur répondant aux spécifications énoncées dans le mode d’emploi ou imprimées sur
l’adaptateur fourni avec l’EXR-46 OR.
......................................................................................................................................
AVERTISSEMENT
• Evitez de tordre le cordon de l’adaptateur et de placer des objets
lourds dessus. Vous risquez de l’endommager, ce qui provoquerait
des courts-circuits et couperait l’alimentation de certains éléments.
Un cordon endommagé peut provoquer une électrocution ou un
incendie!
......................................................................................................................................
• Cet instrument, utilisé seul ou avec un amplificateur/des enceintes
ou un casque, peut produire des signaux à des niveaux qui pourraient endommager l’ouïe de façon irréversible. Ne l’utilisez donc
pas trop longtemps à volume élevé ou inconfortable. Si vous pensez
avoir endommagé votre ouïe ou si vos oreilles bourdonnent, arrêtez
immédiatement l’écoute et consultez un spécialiste.
......................................................................................................................................
• En présence de jeunes enfants, un adulte doit être présent jusqu’à
ce que l’enfant puisse respecter les précautions nécessaires au
maniement de l’EXR-46 OR.
......................................................................................................................................
• Protégez ce produit contre tout coup ou impact important.
(Ne le laissez pas tomber!)
......................................................................................................................................
• Ne faites pas partager à l’adaptateur de l’EXR-46 OR une prise
murale avec un nombre excessif d’autres appareils. Soyez
particulièrement vigilant avec des multiprises. La puissance totale
utilisée par tous les appareils connectés ne doit jamais excéder la
puissance (watts/ampères) de la rallonge. Une charge excessive
peut augmenter la température du câble et, éventuellement, entraîner une fusion.
......................................................................................................................................
......................................................................................................................................
63
r EXR-46 OR
AVERTISSEMENT
• Avant d’utiliser l’EXR-46 OR dans un pays étranger, contactez votre
revendeur, le service de maintenance Roland le plus proche ou un
distributeur Roland agréé (vous en trouverez la liste à la page
“Information”).
......................................................................................................................................
• S’il y a risque d’orage, débranchez l’adaptateur de la prise murale.
.....................................................................................................................................
• Si vous devez retirer des vis, gardez-les en lieu sûr et hors de portée
des enfants, pour éviter que ces derniers ne les avalent accidentellement.
.....................................................................................................................................
PRUDENCE
• Placez l’EXR-46 OR de sorte à lui assurer une ventilation appropriée.
......................................................................................................................................
• Cet instrument ne peut être utilisé qu’avec le support pour clavier
KS-12 de Roland. L’utilisation de tout autre support pourrait entraîner une instabilité et provoquer d’éventuelles blessures en cas de
chute.
......................................................................................................................................
• Saisissez toujours la fiche de l’adaptateur lors du branchement ou
débranchement au secteur ou au produit.
......................................................................................................................................
• Évitez que les cordons d’alimentation et les câbles ne s’emmêlent.
De plus, tous les cordons et câbles doivent être placés hors de portée des enfants.
......................................................................................................................................
• Ne montez jamais sur ce produit et évitez d’y déposer des objets
lourds.
......................................................................................................................................
• Ne saisissez jamais le cordon de l’adaptateur ni ses fiches avec des
mains humides lorsque vous le branchez ou débranchez d’une prise
murale ou de l’instrument.
......................................................................................................................................
• Lorsque vous déplacez l’instrument, veuillez observer les précautions suivantes. Veillez à saisir fermement l’instrument afin d’éviter
tout risque de blessures et d’endommagement de l’instrument en
cas de chute.
• Débranchez l’adaptateur secteur.
• Débranchez tous les câbles reliant l’instrument à des appareils
périphériques.
• Enlevez le pupitre.
......................................................................................................................................
• Avant de nettoyer l’instrument, éteignez-le et débranchez l’adaptateur secteur de la prise murale.
......................................................................................................................................
64
Ne jetez pas le produit avec vos ordures
ménagères.
Portez-le dans un centre de recyclage des
déchets..
EXR-46 OR
Sommaire
1. Caractéristiques . . . . . . . . . . . . . . . . . . . . . . . . . . . . . . . . . .62
2. Remarques importantes . . . . . . . . . . . . . . . . . . . . . . . . . . . .67
3. Présentation . . . . . . . . . . . . . . . . . . . . . . . . . . . . . . . . . . . . .69
Façade . . . . . . . . . . . . . . . . . . . . . . . . . . . . . . . . . . . . . . . . . . . . . . 69
Face arrière . . . . . . . . . . . . . . . . . . . . . . . . . . . . . . . . . . . . . . . . . . 71
4. Prise en main. . . . . . . . . . . . . . . . . . . . . . . . . . . . . . . . . . . . .72
Prise en main . . . . . . . . . . . . . . . . . . . . . . . . . . . . . . . . . . . . . . . . 72
Morceaux de démonstration . . . . . . . . . . . . . . . . . . . . . . . . . . . 72
Toujours à propos du mode ALL . . . . . . . . . . . . . . . . . . . . . . . . . . . . .84
Mode d’enregistrement Keyboard . . . . . . . . . . . . . . . . . . . . . . . . . . .84
Mode d’enregistrement Single . . . . . . . . . . . . . . . . . . . . . . . . . . . . . .84
Punch I/O . . . . . . . . . . . . . . . . . . . . . . . . . . . . . . . . . . . . . . . . . . . . . . . .85
8. Fonctions arrangeur supplémentaires. . . . . . . . . . . . . . . . 86
One Touch . . . . . . . . . . . . . . . . . . . . . . . . . . . . . . . . . . . . . . . . . . . 86
Utiliser le Music Assistant . . . . . . . . . . . . . . . . . . . . . . . . . . . . . 86
Melody Intelligence. . . . . . . . . . . . . . . . . . . . . . . . . . . . . . . . . . . 87
Reverb. . . . . . . . . . . . . . . . . . . . . . . . . . . . . . . . . . . . . . . . . . . . . . . . . . . 96
Chorus . . . . . . . . . . . . . . . . . . . . . . . . . . . . . . . . . . . . . . . . . . . . . . . . . . 97
Fonction V-LINK. . . . . . . . . . . . . . . . . . . . . . . . . . . . . . . . . . . . . . 97
Fonctions V-LINK pilotables par l’EXR-46 OR (et messages MIDI
correspondants) . . . . . . . . . . . . . . . . . . . . . . . . . . . . . . . . . . . . . . . . . . 98
12. Menu Function . . . . . . . . . . . . . . . . . . . . . . . . . . . . . . . . . . . 99
Edition de paramètres (procédure générale). . . . . . . . . . . . . . 99
Diminuer la hauteur de certaines notes d’un quart de ton . . . . . .89
Travailler avec d’autres accords . . . . . . . . . . . . . . . . . . . . . . . . . . . . .89
Sauvegarder et charger les réglages d’accord (SCALE MEMORY) .89
Paramètres KB SET . . . . . . . . . . . . . . . . . . . . . . . . . . . . . . . . . . . . . . . . 99
Paramètres DRUM PAD . . . . . . . . . . . . . . . . . . . . . . . . . . . . . . . . . . . 101
Paramètres METRONOM . . . . . . . . . . . . . . . . . . . . . . . . . . . . . . . . . . 101
Paramètres OCTAVE . . . . . . . . . . . . . . . . . . . . . . . . . . . . . . . . . . . . . . 101
Paramètres VOLUME . . . . . . . . . . . . . . . . . . . . . . . . . . . . . . . . . . . . . 101
Paramètres ARR SET. . . . . . . . . . . . . . . . . . . . . . . . . . . . . . . . . . . . . . 102
Paramètres EFFECTS . . . . . . . . . . . . . . . . . . . . . . . . . . . . . . . . . . . . . . 103
Paramètres KB SCALE. . . . . . . . . . . . . . . . . . . . . . . . . . . . . . . . . . . . . 103
Paramètres MIDI . . . . . . . . . . . . . . . . . . . . . . . . . . . . . . . . . . . . . . . . . 103
Paramètres UTILITY. . . . . . . . . . . . . . . . . . . . . . . . . . . . . . . . . . . . . . . 104
5. Jeu avec accompagnement (arrangeur) . . . . . . . . . . . . . . .75
Activation/utilisation de l’arrangeur. . . . . . . . . . . . . . . . . . . . . 75
10. Fonctions des parties clavier . . . . . . . . . . . . . . . . . . . . . . . 90
Choix des sons pour les parties Main, Split et Dual . . . . . . . . 90
Changer le tempo . . . . . . . . . . . . . . . . . . . . . . . . . . . . . . . . . . . . . . . . 76
Démarrage automatique de la reproduction (Sync Start & Stop) 76
Arrêter l’arrangeur. . . . . . . . . . . . . . . . . . . . . . . . . . . . . . . . . . . . . . . . 76
Sélection d’un des sons disponibles . . . . . . . . . . . . . . . . . . . . . . . . . .90
Utiliser les boutons USER TONES . . . . . . . . . . . . . . . . . . . . . . . . . . . .90
Assigner un autre son à un bouton USER TONES . . . . . . . . . . . . . .90
13. Tirer parti des programmes utilisateur. . . . . . . . . . . . . . . 105
Enregistrer les réglages dans un programme utilisateur . . 105
Ecouter une démonstration de sons. . . . . . . . . . . . . . . . . . . . . . . . . 72
Reproduire une démo de styles. . . . . . . . . . . . . . . . . . . . . . . . . . . . . 72
Quitter le mode de démonstration . . . . . . . . . . . . . . . . . . . . . . . . . . 72
Jouer sans accompagnement . . . . . . . . . . . . . . . . . . . . . . . . . . 73
Utiliser la partie Main . . . . . . . . . . . . . . . . . . . . . . . . . . . . . . . . . . . . .
Utiliser les parties Main et Split . . . . . . . . . . . . . . . . . . . . . . . . . . . .
Utiliser les parties Main et Dual . . . . . . . . . . . . . . . . . . . . . . . . . . . .
Utilisation du métronome . . . . . . . . . . . . . . . . . . . . . . . . . . . . . . . . .
73
73
74
74
Sélection de styles musicaux . . . . . . . . . . . . . . . . . . . . . . . . . . . 76
Utiliser la fonction Band Orchestrator . . . . . . . . . . . . . . . . . . . 77
Balance . . . . . . . . . . . . . . . . . . . . . . . . . . . . . . . . . . . . . . . . . . . . . 78
6. Reproduire des morceaux . . . . . . . . . . . . . . . . . . . . . . . . . .79
Fonctions élémentaires de reproduction . . . . . . . . . . . . . . . . . 79
Fonctions supplémentaires de reproduction. . . . . . . . . . . . . . 80
Activer le mode Song . . . . . . . . . . . . . . . . . . . . . . . . . . . . . . . . . . . . .
Avance, recul et retour au début . . . . . . . . . . . . . . . . . . . . . . . . . . .
Reproduction en boucle (Repeat) . . . . . . . . . . . . . . . . . . . . . . . . . . .
Jeu “live” avec accompagnement de morceau (Minus One). . . . .
Changer les assignations de pistes . . . . . . . . . . . . . . . . . . . . . . . . . .
Changer le type d’harmonie Melody Intelligence . . . . . . . . . . . . . .87
Mode PIANO . . . . . . . . . . . . . . . . . . . . . . . . . . . . . . . . . . . . . . . . . 87
Bass Inversion (Bass Inv). . . . . . . . . . . . . . . . . . . . . . . . . . . . . . . 88
Autres fonctions pour styles musicaux . . . . . . . . . . . . . . . . . . 88
9. Travailler avec des gammes orientales . . . . . . . . . . . . . . . 89
Sons de batterie et effets sonores (“SFX”) . . . . . . . . . . . . . . . . 91
Kits de batterie . . . . . . . . . . . . . . . . . . . . . . . . . . . . . . . . . . . . . . . . . . .91
Effets sonores (“SFX”) . . . . . . . . . . . . . . . . . . . . . . . . . . . . . . . . . . . . . .91
Utiliser le mode DRUM PAD. . . . . . . . . . . . . . . . . . . . . . . . . . . . 92
Utiliser la fonction Drum Pad . . . . . . . . . . . . . . . . . . . . . . . . . . . . . . .92
Transpose . . . . . . . . . . . . . . . . . . . . . . . . . . . . . . . . . . . . . . . . . . . 92
Transposition globale (“GLB”) . . . . . . . . . . . . . . . . . . . . . . . . . . . . . . .93
80
80
81
81
82
Réglages d’octave . . . . . . . . . . . . . . . . . . . . . . . . . . . . . . . . . . . . 93
Autres fonctions liées aux parties clavier . . . . . . . . . . . . . . . . 93
11. Fonctions de jeu et effets. . . . . . . . . . . . . . . . . . . . . . . . . . 94
Fonctions de jeu. . . . . . . . . . . . . . . . . . . . . . . . . . . . . . . . . . . . . . 94
7. Enregistrer votre jeu. . . . . . . . . . . . . . . . . . . . . . . . . . . . . . .83
Fonctions de base d’enregistrement. . . . . . . . . . . . . . . . . . . . . 83
Sensibilité au toucher (Keyboard Touch) . . . . . . . . . . . . . . . . . . . . . . .94
Pitch Bend et Modulation . . . . . . . . . . . . . . . . . . . . . . . . . . . . . . . . . .94
Commutateur au pied . . . . . . . . . . . . . . . . . . . . . . . . . . . . . . . . . . . . .94
Ecouter votre morceau . . . . . . . . . . . . . . . . . . . . . . . . . . . . . . . . . . . . 83
Autres fonctions d’enregistrement . . . . . . . . . . . . . . . . . . . . . . 84
A propos des modes d’enregistrement. . . . . . . . . . . . . . . . . . . . . . . 84
Utilisation des effets . . . . . . . . . . . . . . . . . . . . . . . . . . . . . . . . . . 95
Utiliser le processeur multi-effet (MFX) . . . . . . . . . . . . . . . . . . . . . .95
Remarques sur la sauvegarde des programmes utilisateur. . . . . 105
Sélection d’un programme utilisateur . . . . . . . . . . . . . . . . . . 105
Lock: filtrer certains réglages des programmes utilisateur. 106
14. Fonctions MIDI . . . . . . . . . . . . . . . . . . . . . . . . . . . . . . . . . . 107
Canaux . . . . . . . . . . . . . . . . . . . . . . . . . . . . . . . . . . . . . . . . . . . . . . . . . 107
Paramètres Function MIDI . . . . . . . . . . . . . . . . . . . . . . . . . . . . . . . . 107
15. Gestion des données . . . . . . . . . . . . . . . . . . . . . . . . . . . . . 109
Utilisation de la mémoire Flash. . . . . . . . . . . . . . . . . . . . . . . . 109
Sauvegarder un morceau en mémoire Flash . . . . . . . . . . . . . . . . . 109
Archiver des programmes utilisateur dans la mémoire Flash . . .109
Sauvegarder des styles en mémoire Flash . . . . . . . . . . . . . . . . . . . 110
Charger un set de programmes utilisateur de la mémoire Flash 110
Supprimer des morceaux de la mémoire Flash . . . . . . . . . . . . . . . 110
Supprimer des styles de la mémoire Flash . . . . . . . . . . . . . . . . . . . 111
Effacer un set de programmes utilisateur de la mémoire Flash .111
Archiver des données avec un ordinateur (USB) . . . . . . . . . 112
Fonctions Disk . . . . . . . . . . . . . . . . . . . . . . . . . . . . . . . . . . . . . . 113
Charger des programmes utilisateur de la disquette . . . . . . . . . . 113
Charger des morceaux d’une disquette . . . . . . . . . . . . . . . . . . . . . 114
65
r EXR-46 OR
Charger des styles musicaux d’une disquette . . . . . . . . . . . . . . . . 114
Sauvegarde de fichiers sur disquette . . . . . . . . . . . . . . . . . . . . . . . 114
Effacer des fichiers sur disquette . . . . . . . . . . . . . . . . . . . . . . . . . . 115
Formater une disquette. . . . . . . . . . . . . . . . . . . . . . . . . . . . . . . . . . . 116
16. Utiliser les sorties et un commutateur au pied. . . . . . . . 117
17. Divers. . . . . . . . . . . . . . . . . . . . . . . . . . . . . . . . . . . . . . . . . . 118
Fonctions à caractère pédagogique. . . . . . . . . . . . . . . . . . . . 118
Couper ou activer la fonction de démonstration . . . . . . . . . . . . . 118
Couper ou activer l’arrangeur . . . . . . . . . . . . . . . . . . . . . . . . . . . . . 118
Couper ou activer l’arrangeur et la fonction Demo . . . . . . . . . . . 118
Initialiser l’EXR-46 OR (Factory) . . . . . . . . . . . . . . . . . . . . . . . 118
18. Fiche technique . . . . . . . . . . . . . . . . . . . . . . . . . . . . . . . . . 119
Remerciements. . . . . . . . . . . . . . . . . . . . . . . . . . . . . . . . . . . . . . . . . . 119
19. Listes . . . . . . . . . . . . . . . . . . . . . . . . . . . . . . . . . . . . . . . . . . 120
Sons sélectionnables en façade . . . . . . . . . . . . . . . . . . . . . . . 120
Kits de batterie . . . . . . . . . . . . . . . . . . . . . . . . . . . . . . . . . . . . . 123
Styles musicaux. . . . . . . . . . . . . . . . . . . . . . . . . . . . . . . . . . . . . 130
Chord Intelligence (réglage “Md1”) . . . . . . . . . . . . . . . . . . . . 131
MIDI Implementation Chart . . . . . . . . . . . . . . . . . . . . . . . . . . 133
66
EXR-46 OR
2. Remarques importantes
Outre les informations de la section “Consignes de sécurité” (p. 63), veuillez lire et suivre les conseils suivants:
Alimentation
Entretien
• Ne vous servez pas de cet instrument sur le même circuit qu’un
appareil générateur de parasites (tel qu’un moteur électrique ou un
système d’éclairage avec variateur).
• Avant de brancher l’EXR-46 OR à d’autres appareils, coupez l’alimentation de tous les appareils. Le non-respect de cette précaution
pourrait entraîner des dysfonctionnements et/ou l’endommagement
de vos enceintes ou d’autres appareils.
• Pour nettoyer l’EXR-46 OR, utilisez un chiffon sec et doux ou à la
rigueur légèrement humidifié avec de l’eau. Pour enlever des taches
plus tenaces, servez-vous d’un détergent doux et non abrasif.
Ensuite, essuyez soigneusement l’instrument avec un chiffon doux
et sec.
• N’utilisez jamais de benzène, de diluant, de solvant ou d’alcool
d’aucune sorte pour éviter le risque de décoloration et/ou de déformation.
Emplacement
• L’usage de l’EXR-46 OR à proximité d’amplificateurs (ou de tout
autre matériel contenant de grands transformateurs électriques)
peut être source de bruit. Pour résoudre le problème, changez
l’orientation de l’instrument ou éloignez-le de la source d’interférence.
• Cet instrument peut causer des interférences lors de la réception
radio ou télévisée. Ne vous en servez pas à proximité de tels
récepteurs.
• Observez les consignes suivantes quand vous utilisez le lecteur de
disquettes de l’instrument. Pour en savoir plus, voyez “Avant d’utiliser des disquettes (maniement du lecteur de disquettes)”.
• Ne placez pas l’instrument à proximité d’appareils générant un
puissant champ magnétique (comme des enceintes, par exemple).
• Installez l’EXR-46 OR sur une surface stable et plane.
• Ne déplacez pas l’instrument et évitez toute vibration pendant
l’utilisation du lecteur de disquettes.
• N’exposez pas l’EXR-46 OR directement au soleil, ne le laissez pas
près d’appareils irradiant de la chaleur, dans un véhicule fermé ou
dans un endroit le soumettant à des températures excessives. Une
chaleur excessive peut déformer ou décolorer l’instrument.
• Pour éviter les risques de dysfonctionnement, n’utilisez pas l’instrument dans des endroits exposés à la pluie ou à d’autres sources
d’humidité.
• Ne posez jamais d’objet sur l’EXR-46 OR. Cela pourrait provoquer
des dysfonctionnements.
Réparations et données
• Songez que toutes les données contenues dans l’instrument sont
perdues s’il doit subir une réparation. Il peut être impossible de
récupérer des données dans certains cas (notamment lorsque les circuits touchant à la mémoire elle-même sont endommagés). Roland
rejette toute responsabilité concernant la perte de ces données.
Précautions supplémentaires
• N’oubliez jamais que le contenu de la mémoire peut être irrémédiablement perdu suite à un mauvais fonctionnement ou un mauvais
maniement de l’instrument.
• Maniez les boutons, les autres commandes et les prises avec un
minimum d’attention. Un maniement trop brutal peut entraîner des
dysfonctionnements.
• Evitez les coups ou les pressions trop fortes sur l’écran.
• Lorsque vous branchez/débranchez des câbles, prenez la fiche en
main, jamais le câble. Vous éviterez ainsi d’endommager le câble ou
de provoquer des court-circuits.
• Cet instrument dégage une faible quantité de chaleur durant son
fonctionnement. C’est tout à fait normal.
• Pour ne pas déranger vos voisins, maintenez le volume à un niveau
raisonnable. Il peut parfois être préférable d’utiliser un casque (surtout quand vous jouez la nuit).
• Si vous devez transporter l’instrument, emballez-le dans son emballage d’origine (avec les protections). A défaut, utilisez un emballage
équivalent ou un flightcase.
• Utilisez uniquement un commutateur au pied du type recommandé
(DP-2, DP-6, disponible en option). En branchant un autre commutateur au pied, vous risquez de provoquer un dysfonctionnement et/
ou d’endommager l’EXR-46 OR.
• Quand vous jouez sur l’EXR-46 OR à un volume excessif, le système
de protection de son amplificateur de puissance peut entrer en
action, coupant le son des enceintes. Dans ce cas, diminuez le
volume et attendez quelques secondes.
Avant d’utiliser des disquettes (maniement du lecteur de
disquettes)
• Placez le produit sur une surface stable et plane, à l’abri de toute
vibration. Si vous devez incliner le produit, veillez à respecter les
limites de la plage d’inclinaison suivante: 2° vers le haut; 18° vers le
bas.
• N’utilisez pas l’EXR-46 OR directement lorsque vous le déplacez
dans un lieu dont le degré d’humidité diffère considérablement de
l’endroit où il se trouvait précédemment. Ces brusques changements
d’humidité ambiante pourraient être source de condensation à
l’intérieur du lecteur et compromettre son bon fonctionnement et/
ou endommager les disquettes. Après avoir déplacé l’EXR-46 OR,
attendez (quelques heures) qu’il s’accoutume aux nouvelles conditions ambiantes avant de l’utiliser.
• Pour insérer une disquette, poussez-la doucement mais fermement
dans le lecteur, jusqu’à ce qu’un déclic indique qu’elle est en place.
Pour l’éjecter, appuyez fermement sur le bouton d’éjection. N’utilisez jamais de force excessive pour retirer une disquette qui se trouve
dans le lecteur.
• N’essayez jamais d’éjecter une disquette quand le lecteur fonctionne
(tant que son témoin clignote). Cela risquerait d’endommager la disquette et le lecteur.
• Avant de mettre l’instrument sous tension/hors tension, veillez toujours à éjecter la disquette du lecteur.
• Pour éviter d’endommager les têtes du lecteur de disquette, maintenez toujours la disquette de la façon la plus droite possible pour
l’insérer dans le lecteur. Poussez-la fermement mais en douceur.
N’utilisez jamais de force excessive.
67
r EXR-46 OR
• Pour éviter tout dysfonctionnement et/ou endommagement, insérez
uniquement des disquettes dans le lecteur de disquettes. N’insérez
jamais d’autre type de disque. Evitez que des trombones, de la monnaie ou tout autre objet ne pénètre dans le lecteur.
Maniement des disquettes
• Les disquettes sont constituées d’un disque plastic recouvert d’une
fine couche magnétique. Une précision microscopique est nécessaire pour pouvoir sauvegarder de larges quantités de données sur
une surface si petite. Pour les garder en bon état, veuillez suivre les
conseils suivants de manipulation:
• Ne touchez jamais le support magnétique de la disquette.
• N’utilisez et ne conservez pas les disquettes dans des endroits
sales ou poussiéreux.
• Ne soumettez jamais vos disquettes à des températures extrêmes
(dans un véhicule fermé en plein soleil, par exemple). Plage de
températures recommandée: 10°~50°C (50°~122°F).
• N’exposez pas vos disquettes à de forts champs magnétiques tels
que ceux générés par des haut-parleurs.
• Les disquettes sont pourvues d’un volet de protection “WRITE”
contre tout effacement accidentel. Nous vous conseillons de laisser ce volet en position PROTECT et de ne le placer en position
WRITE que lorsque vous souhaitez sauvegarder de nouvelles données sur la disquette.
Face arrière de la disquette
WRITE
(permet la sauvegarde de données)
Volet de protection
PROTECT
(empêche la sauvegarde de données)
• Les disquettes contenant d’importantes données pour cet instrument doivent toujours être verrouillées (en glissant leur volet de
protection sur PROTECT) avant d’être insérées dans le lecteur d’un
autre instrument.
• L’étiquette doit être collée convenablement sur la disquette. Si
elle se décolle lorsque la disquette est dans le lecteur, l’extraction
de la disquette risque d’être difficile.
• Remettez la disquette dans sa boîte pour la conserver.
68
Radiations électromagnétiques
• Les radiations électromagnétiques peuvent entraver les performances . Une telle interférence peut causer l’émission d’un signal
audio. Il suffit d’arrêter le bruit électromagnétique pour faire cesser
l’émission du signal audio.
Responsabilités et droits d’auteur
• Il est malheureusement impossible de récupérer des données que
vous avez effacées d’une disquette. Roland Europe S.p.a. décline
toute responsabilité en cas de perte de données.
• Tout enregistrement, distribution, vente, location, interprétation en
public, diffusion, etc. d’une œuvre (entière ou partielle) protégée par
des droits d’auteur (composition musicale, vidéo, diffusion, interprétation en public, etc.) est illégal sans l’accord du détenteur des droits
d’auteur.
• N’utilisez jamais cet instrument à des fins qui risqueraient d’enfreindre les législations relatives aux droits d’auteur. Roland décline
toute responsabilité pour toute violation de droits d’auteur
résultant de l’utilisation de cet instrument.
EXR-46 OR
3. Présentation
Façade
A
B
H
K L M
W
S
F
C
D
G
A Boutons SCALE MEMORY
Ces trois boutons permettent de mémoriser et de rappeler les
réglages d’accord définis avec les boutons ORIENTAL SCALE. A la
sortie d’usine, l’EXR-46 OR propose déjà des réglages utiles dans
ces trois mémoires (que vous pouvez rappeler en initialisant
votre EXR-46 OR).
Remarque: Les réglages des boutons ORIENTAL SCALE sont également sauvegardés dans le programme utilisateur; vous pouvez
donc utiliser ces mémoires pour effectuer des réglages “globaux”
supplémentaires.
B Boutons ORIENTAL SCALE
Ces boutons permettent de définir la hauteur de chaque note de
la gamme (Scale). Par défaut, quand vous appuyez sur un de ces
boutons, la hauteur des notes correspondantes diminue d’un
quart de ton (–50 cents) sur toutes les octaves. Vous pouvez
aussi définir d’autres systèmes d’accord et les sauvegarder dans
une des trois mémoires de gamme (voyez ci-dessus) ou dans un
programme utilisateur.
C Bouton [POWER¥ON]
Appuyez sur ce bouton pour mettre l’EXR-46 OR sous/hors tension.
N
J
O
X
T
Y
U
Q
V
P
E
I
R
Z
a
b
D Levier BENDER/MODULATION
En actionnant le levier à gauche/droite, vous pouvez diminuer
(gauche) ou augmenter (droite) la hauteur des notes de vos
solos. Pour appliquer de la modulation (généralement un
vibrato) aux notes jouées, enfoncez ce levier vers l’arrière de
l’instrument.
E Prises PHONES 1/2
Vous pouvez brancher deux casques d’écoute en option (Roland
RH-25, RH-50, RH-200 ou RH-300). En branchant un casque,
vous coupez les enceintes de l’EXR-46 OR.
F Commande [VOLUME]
Cette commande sert à régler le volume général de votre
EXR-46 OR.
G Boutons BALANCE [ACCOMP][KEYBOARD]
Servez-vous des boutons BALANCE pour changer le volume de la
section correspondante (accompagnement/morceau ou les parties que vous jouez sur le clavier).
H Bouton [KEYBOARD¥TOUCH]
Appuyez sur ce bouton pour activer/couper la fonction de sensibilité au toucher du clavier. Quand cette fonction est désactivée,
vous pouvez définir une valeur de toucher fixe qui est appliquée
à toutes les notes que vous jouez.
I Bouton [METRONOME]
Ce bouton permet d’activer et de couper le métronome. Vous
pouvez l’enfoncer pendant plus d’une seconde pour activer un
paramètre FUNCTION réglable.
J Bouton [MELODY¥INTELLIGENCE]
Ce bouton permet d’activer/de couper la fonction Melody Intelligence. Cette dernière sert à ajouter une partie d’harmonie à la
mélodie que vous jouez. Voyez p. 87. En maintenant ce bouton
enfoncé pendant plus d’une seconde, vous activez un paramètre
FUNCTION permettant de choisir le type d’harmonie.
K Bouton [USB]
Ce bouton permet de sélectionner la fonction du port USB: (i)
sauvegarde (archivage et chargement de réglages sur/depuis un
ordinateur) ou (ii) USB/MIDI (dans ce cas, le port USB a la même
fonction que les prises MIDI IN et MIDI OUT). Voyez aussi pages
107 et 112.
Appuyez simultanément sur ce bouton et sur [ONE¥TOUCH]
pour sélectionner la fonction de démonstration de l’EXR-46 OR
(voyez p. 72).
69
r EXR-46 OR
L Bouton [ONE¥TOUCH]
Appuyez sur ce bouton pour choisir la mémoire One Touch voulue. Les mémoires One Touch contiennent un nombre de réglages qui sont complémentaires au style musical en question. Vous
disposez de deux mémoires One Touch par style musical. Voyez
p. 86.
M Bouton [V-LINK]
Appuyez sur ce bouton pour exploiter la fonction V-LINK de
l’EXR-46 OR. Elle permet de piloter du matériel vidéo avec certaines fonctions de jeu et les touches les plus hautes du clavier
de l’EXR-46 OR. Si vous utilisez du matériel vidéo compatible VLINK, vous pouvez facilement lier des effets visuels aux effets
sonores et conférer plus d’expression encore à votre exécution.
En branchant l’EXR-46 OR au DV-7PR ou V-4 Edirol, vous pouvez synchroniser le changement d’images avec la musique ou
vous servir des fonctions de jeu ou des touches les plus hautes
du clavier de l’EXR-46 OR pour changer de clips, contrôler la
vitesse de défilement des images, etc.
Pendant la reproduction de morceaux et de styles musicaux, ce
bouton clignote pour indiquer le tempo et les battements (fonction BEAT).
N Section KEYBOARD CONTROL
Appuyez sur le bouton [SPLIT] pour jouer des sons différents de
la main droite et de la main gauche. Appuyez sur le bouton
[DUAL] pour jouer deux sons superposés. Appuyez simultanément sur [SPLIT] et [DUAL] pour activer le mode “Drum Pad”
de l’EXR-46 OR (page 92).
Utilisez le bouton [TRANSPOSE] pour transposer le clavier
(voyez p. 92).
O Section BAND ORCHESTRATOR
Appuyez sur un de ces boutons afin de choisir le type d’orchestration voulue pour le style musical en question. Voyez page 77.
P Section ARRANGER & SONG -CONTROLS
Bouton [TAP¥TEMPO]: Appuyez au moins deux fois sur ce bouton pour régler le tempo de reproduction de l’arrangeur ou de
l’enregistreur.
Bouton [SYNC¥START/STOP]: Ce bouton a deux fonctions: en
mode Arranger (quand vous utilisez l’accompagnement automatique), il permet d’activer/de couper les fonctions SYNC START et
SYNC STOP. En mode Song, il sert à définir le début (“A”) et la fin
(“B”) du passage à répéter.
70
Les autres boutons de cette section servent à piloter la reproduction de l’arrangeur ou de l’enregistreur. Voyez pages 75 et
79.
Q Section LOCK
Les boutons de cette section vous permettent de filtrer (d’ignorer) certains réglages généralement chargés lorsque vous sélectionnez un programme utilisateur. Vous bénéficiez ainsi d’une
flexibilité accrue pour exploiter vos réglages. Voyez page 106.
Quand la fonction Minus One est active, ces boutons permettent
de couper rapidement plusieurs parties d’un fichier Standard
MIDI (cette fonction n’est pas disponible quand vous utilisez la
fonction arrangeur).
R Section KEYBOARD MODE
Ces deux boutons permettent de configurer rapidement
l’EXR-46 OR en vue de l’utiliser avec ([ARRANGER¥BAND]) ou
sans ([PIANO÷SOLO]) accompagnement automatique. A la mise
sous tension, l’EXR-46 OR passe en mode PIANO SOLO.
Enfoncez simultanément ces boutons pour activer la fonction
PIANO MODE. Elle permet d’utiliser l’arrangeur (accompagnement automatique) de l’EXR-46 OR sans partager le clavier
(voyez p. 87).
S Bouton [MUSIC¥ASSISTANT]
Ce bouton permet de travailler avec des réglages préprogrammés (des programmes utilisateur supplémentaires). Voyez p. 86.
T Bouton [SONG]
Ce bouton sert à choisir le mode Song de l’EXR-46 OR et à affecter les boutons [INTRO], [ORIGINAL] etc. au pilotage de l’enregistreur (Recorder) incorporé.
U Bouton [STYLE]
Sert à choisir les styles musicaux (Music Styles). En activant ce
bouton, vous affectez les boutons [INTRO], [ORIGINAL], etc. au
choix d’une division de style, tandis que les boutons numériques
permettent de sélectionner la mémoire de style voulue.
V Bouton [TONE]
Appuyez sur ce bouton afin d’utiliser les boutons [FAMILY] et les
boutons numériques pour assigner un son (“Tone”) ou un kit de
batterie à la partie Main, Split ou Dual. Voyez p. 90.
W Boutons DATA ENTRY
Boutons FAMILY et SELECT [√][®]: Les boutons FAMILY et SELECT
[√][®] servent au choix des sons, styles, mémoires Music Assistant, morceaux et paramètres Function. Les boutons FAMILY
[√][®] permettent de choisir un groupe. Vous pouvez les presser,
les maintenir enfoncés ou en maintenir un enfoncé tout en
appuyant sur l’autre pour changer la vitesse de défilement.
Les boutons SELECT [√][®] servent à sélectionner les éléments
voulus au sein de la famille ou du groupe choisi. Vous pouvez les
actionner, les maintenir enfoncés ou en maintenir un enfoncé
tout en appuyant sur l’autre pour changer la vitesse de
défilement. Quand vous êtes arrivé à la dernière entrée du
groupe actuel, une nouvelle pression sur [®] active la première
entrée du groupe suivant. D’autre part, si vous appuyez sur [√]
lorsque vous vous trouvez à la première entrée d’un groupe,
vous activez la dernière entrée du groupe précédent.
Pavé numérique: Ces boutons servent à entrer des numéros
(pour le choix des sons, styles, de la mémoire Music Assistant,
des morceaux, pistes), des valeurs et des caractères (pour
l’entrée de noms).
Les boutons TEMPO/DATA [–][+] servent à régler le tempo de
l’arrangeur ou du morceau et la valeur du paramètre FUNCTION
choisi.
X Bouton [FUNCTION]
Ce bouton vous permet d’accéder au menu FUNCTION. Servezvous des boutons FAMILY et SELECT [√][®] pour choisir le paramètre voulu.
Y Bouton [DISK]
Appuyez sur ce bouton pour accéder aux fonctions Disk. Elles
servent à charger des données d’une disquette, à sauvegarder
des données et à gérer les données d’une disquette. Voyez
p. 113.
Remarque: Vous pouvez aussi archiver et charger des données
via USB.
Z Bouton [USER¥PROGRAM÷WRITE]
Ce bouton sert à choisir un programme utilisateur (alias User,
désignant un ensemble de réglages). Maintenez-le enfoncé pour
mémoriser les réglages en face avant et les réglages de paramètres dans un programme utilisateur. Voyez page 105.
a Section USER TONES
Ces boutons permettent de choisir le “meilleur” son de la famille
en question (c.-à-d. le “meilleur” son de piano, d’orgue, de guitare/basse, etc.). Après avoir actionné un de ces boutons, vous
pouvez utiliser les boutons FAMILY [√][®] et SELECT [√][®] pour
choisir d’autres familles et d’autres sons au sein de la famille
active. (A un stade ultérieur, ceux-ci peuvent être rappelés en
EXR-46 OR
“double-cliquant” sur ces boutons.) Vous pouvez assigner vos
sons favoris à ces boutons. Voyez “Utiliser les boutons USER
TONES” (p. 90) pour en savoir plus.
b Lecteur de disquette, au centre et en dessous du clavier (n’est
pas repris sur l’illustration)
Ce lecteur permet de charger une disquette contenant des
fichiers Standard MIDI ou des styles musicaux (que vous possédez peut-être déjà). Ce lecteur accepte les disquettes de formats
2DD (720k) et 2HD (1.44Mo).
Face arrière
A
A Prises OUTPUT R, L/MONO
Ces prises servent à brancher l’EXR-46 OR à un ampli HiFi, un
mélangeur, une platine à cassette, un ampli clavier etc. Dans le
cas d’un ampli mono, veillez à le brancher à la prise OUTPUT L/
MONO.
B Prise DC IN
C’est ici que vous branchez l’adaptateur secteur fourni (PSB-4U).
Remarque: Utilisez exclusivement l’adaptateur secteur fourni
avec votre EXR-46 OR. D’autres adaptateurs risquent d’endommager votre Interactive Arranger.
C Crochet pour cordon
Après avoir branché le câble de l’adaptateur, enroulez-le autour
de la pince pour câble à droite de la prise pour éviter tout
débranchement accidentel.
D Prise FOOTSWITCH
Cette prise permet de brancher un commutateur au pied DP-2,
DP-6 ou BOSS FS-5U en option afin de maintenir les notes
jouées de la main droite (“pédale forte”). Il peut aussi piloter
d’autres paramètres (voyez “FSW° (Footswitch Assign)” (p. 100)).
B
C
D
E
F
E Prises MIDI OUT/IN
Branchez la prise MIDI OUT à la prise MIDI IN de votre ordinateur
(ou instrument MIDI) pour transférer des données MIDI de
l’EXR-46 OR à l’ordinateur ou à l’instrument MIDI externe. Pour
recevoir des données de l’ordinateur, branchez la prise MIDI IN
de l’EXR-46 OR à la prise MIDI OUT de l’ordinateur.
Remarque: L’EXR-46 OR peut aussi transmettre/recevoir des
données MIDI via son port USB. Pour cela, il faut installer les
pilotes USB appropriés (voyez le CD-ROM fourni).
F Prise USB
Le port USB peut transmettre/recevoir des messages MIDI ou
être utilisé pour archiver des données sur un ordinateur.
71
r EXR-46 OR
4. Prise en main
Morceaux de démonstration
Prise en main
Avant tout, il faut brancher l’adaptateur PSB-4U fourni à une
prise de courant adéquate.
(1) Déballez l’EXR-46 OR et posez-le sur une surface stable.
(2) Branchez la petite fiche de l’adaptateur à la prise DC IN de
l’EXR-46 OR et l’autre extrémité à une prise de courant de
tension appropriée.
(3) Appuyez sur le bouton [POWER¥ON] pour mettre l’EXR-46 OR
sous tension.
Votre EXR-46 OR contient 1 morceau de démonstration, 8
démos de sons et une série de démos de styles.
• Le morceau de démonstration général illustre l’ensemble
des possibilités offertes par l’EXR-46 OR.
• Les démonstrations de sons mettent en exergue la qualité
sonore de l’EXR-46 OR.
• Les démos de styles donnent une idée de l’extraordinaire
qualité des styles musicaux de l’instrument.
(1) Maintenez le bouton [USB] enfoncé et appuyez sur
[ONE¥TOUCH].
Appuyez sur le bouton [START÷STOP] pour arrêter la reproduction de la démo de sons actuelle. Appuyez à nouveau sur ce bouton pour lancer la reproduction de la démo de sons suivante.
(2) Appuyez sur [START÷STOP] pour arrêter la démonstration de
sons.
Reproduire une démo de styles
(1) Appuyez sur le bouton [STYLE].
STYLE
POWER ON
DemStyle 146
=
(4) Réglez le volume de sortie de l’EXR-46 OR avec sa commande
[VOLUME].
DemoSong 120 001
=
VOLUME
(2) Si nécessaire, servez-vous de la commande [VOLUME] pour
régler le volume de reproduction.
(3) Appuyez sur [START÷STOP] pour arrêter la reproduction.
Ecouter une démonstration de sons
(1) Appuyez sur le bouton [TONE].
Remarque: Quand vous jouez sur l’EXR-46 OR à un volume
excessif, le système de protection de son amplificateur de puissance peut entrer en action, coupant le son des enceintes. Dans
ce cas, diminuez le volume et attendez quelques secondes.
(5) Appuyez de nouveau sur [POWER¥ON] pour mettre
l’EXR-46 OR hors tension.
Si vous branchez l’EXR-46 OR à une chaîne HiFi ou un amplificateur clavier, faites-le avant d’effectuer l’étape (3) et mettez
l’amplificateur sous tension avant d’effectuer l’étape (4).
72
La reproduction du morceau de démonstration de styles
démarre automatiquement.
Appuyez sur le bouton [START÷STOP] pour arrêter la démonstration de styles en cours. Appuyez à nouveau sur ce bouton
pour lancer la reproduction de la démonstration de styles suivante.
(2) Appuyez sur [START÷STOP] pour arrêter la démonstration de
styles.
Quitter le mode de démonstration
(1) Maintenez le bouton [USB] enfoncé tout en appuyant sur
[ONE¥TOUCH] pour quitter le mode de démonstration.
TONE
La reproduction du morceau de démo de sons démarre aussitôt.
EXR-46 OR
Jouer sans accompagnement
A la mise sous tension, l’EXR-46 OR passe en mode PIANO SOLO.
Vous pouvez alors utiliser l’EXR-46 OR comme piano numérique
ou synthétiseur.
La fonction d’accompagnement (“Arranger”) et le bouton
[ONE¥TOUCH] ne sont pas disponibles en mode PIANO SOLO. En
outre, seule la partie Main est active.
L’EXR-46 OR propose trois parties pour jouer en direct (et de nombreuses autres pour l’accompagnement de l’arrangeur ou d’un morceau):
Main
Il s’agit de la partie principale. Tant que la partie
Split est désactivée, la partie Main est assignée au
clavier entier.
Split
Quand vous l’activez, la partie Split est assignée à la
moitié gauche du clavier, tandis que la partie Main
reste disponible pour votre main droite.
Dual
Vous pouvez superposer cette partie à la partie
Main et l’assigner également au clavier entier. Cela
permet de jouer simultanément deux sons superposés.
(3) Si nécessaire, choisissez un autre son en appuyant sur un des
8 boutons USER TONES. Voyez p. 90 pour en savoir plus.
Utiliser les parties Main et Split
(1) Appuyez sur le bouton [SPLIT] pour jouer des sons différents de la main droite et de la main gauche.
3
SPLIT
GUITAR/
BASS
(4) En cas de besoin, maintenez le bouton [TONE] enfoncé et servez-vous du bouton BALANCE [ACCOMP] (moins fort) ou
[KEYBOARD] (plus fort) pour changer le volume de la partie
Main.
L’icône SPLIT s’affiche et l’EXR-46 OR affecte automatiquement
un son (adapté à celui de la partie Main) à la partie Split.
(2) Jouez quelques notes sur le clavier.
Au départ, la touche G3 (numéro de note “55”) constitue le point
de partage du clavier. Vous pouvez changer le point de partage.
Voyez “KeySplit* (Point de partage)” (p. 100).
TONE
BALANCE
ACCOMP
KEYBOARD
Split
Utiliser la partie Main
(1) Pour activer la partie Main et l’assigner au clavier entier,
appuyez sur le bouton [PIANO¥SOLO].
PIANO
SOLO
L’icône ARRANGER disparaît, l’arrangeur s’arrête (s’il était
activé) et l’EXR-46 OR choisit un son de piano.
(2) Jouez quelques notes sur le clavier.
Remarque: Contrairement aux instruments arrangeurs Roland
plus anciens, l’EXR-46 OR ne distingue plus entre les parties
“mélodiques” et une partie Manual Drums. Vous pouvez aussi
jouer un kit de batterie avec la partie Main.
Remarque: Si vous le voulez, vous pouvez appuyer sur
[START÷STOP] pour ajouter un accompagnement rythmique à
votre jeu. Cet accompagnement est basé sur le style musical en
vigueur. Voyez p. 76 pour savoir comment choisir un autre style
musical.
Remarque: D’autres méthodes de lancement de la reproduction
du style musical (à savoir la batterie) sont décrites à la p. 75 et
sous “Démarrage automatique de la reproduction (Sync Start &
Stop)” (p. 76).
Main
Pour changer la balance entre les parties Main et Split, procédez
comme suit:
(3) Maintenez le bouton [SPLIT] enfoncé et servez-vous du bouton BALANCE [ACCOMP] (moins fort) ou [KEYBOARD] (plus
fort) pour changer le volume de la partie Split.
SPLIT
BALANCE
ACCOMP
KEYBOARD
(4) Pour assigner un autre son à la partie Split, maintenez le bouton [SPLIT] enfoncé et procédez comme pour la partie Main
(page 73).
73
r EXR-46 OR
Vous pouvez aussi maintenir un des huit boutons USER TONES
enfoncé (partie Main) tout en appuyant sur un autre bouton
USER TONES (partie Split).
Remarque: Vous ne pouvez pas assigner de kit de batterie à la
partie Split.
Remarque: Vous pouvez aussi ajouter une partie de basse
monophonique (“Auto Bass”) à la partie Split. Voyez “Auto Bass*:
statut et volume” (p. 101).
Utilisation du métronome
Vous pouvez utiliser le métronome quand vous répétez un morceau.
(1) Appuyez sur le bouton [METRONOME].
METRONOME
Utiliser les parties Main et Dual
(1) Appuyez sur le bouton [DUAL] pour jouer deux sons superposés.
DUAL
L’icône DUAL s’affiche et l’EXR-46 OR affecte automatiquement
un son à la partie Dual (adapté à celui de la partie Main).
Vous pouvez aussi activer le mode Dual en maintenant un des
huit boutons USER TONES enfoncé tout en appuyant sur un
autre. Le son du premier bouton USER TONES est alors assigné à
la partie Main et celui de l’autre bouton à la partie Dual.
(2) Jouez quelques notes sur le clavier.
Procédez comme suit pour changer la balance entre les sons des
parties Main et Dual:
(3) Maintenez le bouton [DUAL] enfoncé et servez-vous du bouton BALANCE [ACCOMP] (moins fort) ou [KEYBOARD] (plus
fort) pour changer le volume de la partie Dual.
(4) Pour assigner un autre son à la partie Dual, maintenez le bouton [DUAL] enfoncé et procédez comme pour la partie Main
(page 73).
Remarque: Vous ne pouvez pas assigner de kit de batterie à la
partie Dual.
74
L’icône
s’affiche et le métronome se met à compter.
(2) Maintenez [METRONOME] enfoncé pour choisir la fonction
“Metro TS”.
(3) Servez-vous des boutons [–][+] pour choisir la métrique voulue.
Voici les possibilités: 1/4~9/4, 1/8~9/8.
(4) Appuyez sur un autre “grand” bouton de la section DATA
ENTRY pour quitter cette fonction.
(5) Appuyez de nouveau sur le bouton [METRONOME] pour
désactiver le métronome.
EXR-46 OR
5. Jeu avec accompagnement (arrangeur)
Voyons à présent comment exploiter la fonction d’accompagnement de l’EXR-46 OR. Cette fonction s’appelle “Arranger”.
Activation/utilisation de l’arrangeur
(1) Appuyez sur le bouton [ARRANGER¥BAND].
(3) Jouez un accord (ou juste une note) de la main gauche.
ARRANGER
BAND
ARRANGER
L’icône
s’affiche et le clavier est partagé en deux
moitiés. Les touches de la moitié gauche permettent de spécifier
la tonalité de l’accompagnement. La moitié droite du clavier
permet de jouer une mélodie sur l’accompagnement.
(2) Appuyez sur le bouton [START÷STOP] pour lancer l’arrangeur.
(4) Jouez un autre accord (ou une autre note) pour changer la
tonalité de l’arrangeur.
(5) Pour retourner au début du motif d’accompagnement (fonction “RE-START”), appuyez sur le bouton [REC¥∏] pendant la
reproduction de l’accompagnement.
RE-START
● REC
Bouton
Fonction
INTRO
Choisit une introduction. Appuyez sur ce bouton avant d’activer [START÷STOP].
ORIGINAL
Version simple d’accompagnement.
FILL
Transition (“Fill In”) pour passer à VARIATION
ou ORIGINAL.
VARIATION Version d’accompagnement un peu plus
sophistiquée.
ENDING
Phrase indiquant la fin du morceau. Vous pouvez utiliser ce bouton au lieu de [START÷STOP]
pour arrêter le jeu.
Ces boutons servent à choisir les “motifs” de style musical.
L’écran affiche l’icône correspondant au bouton enfoncé.
En outre, la zone d’accord ARRANGER de l’écran indique le nom
du dernier accord joué. C’est là l’accord utilisé par l’accompagnement.
ARRANGER
(6) Appuyez sur les boutons suivants pour choisir d’autres motifs
(“pattern”) du style musical en cours:
M
Le bouton [V-LINK] clignote alors pour indiquer le tempo et les
battements (fonction BEAT).
ARRANGER
Remarque: Quand l’icône
est affichée, tandis que
l’arrangeur est à l’arrêt, vous entendrez un son de cordes stéréo
(auquel vous pouvez ajouter une basse monophonique) lorsque
vous jouez dans la moitié gauche du clavier. Voyez “Auto Bass*:
statut et volume” (p. 101). La moitié gauche n’est donc pas coupée (comme c’était le cas sur les anciens instruments Roland disposant d’un arrangeur. Vous pouvez toutefois désactiver cette
fonction “EP Chord” (page 102).
Dès que vous maîtrisez l’arrangeur, essayez de jouer une mélodie
de la main droite en y ajoutant les accords pour l’arrangeur de la
main gauche.
75
r EXR-46 OR
Changer le tempo
(7) Les boutons TEMPO/DATA permettent de diminuer ([–]) ou
d’augmenter ([+]) le tempo (si nécessaire).
NO
YES
ce cas, l’arrangeur s’arrête dès que vous relâchez toutes les touches de la zone de reconnaissance d’accords du clavier. Cette
fonction permet d’insérer un “arrêt” (c.-à-d. un silence d’un ou
plusieurs temps).
Remarque: Vous pouvez changer le comportement de la fonction SYNC STOP (voyez p. 102) en maintenant le bouton
[SYNC¥START÷STOP] enfoncé.
Arrêter l’arrangeur
Pour retourner au tempo par défaut du style musical, enfoncez
simultanément les boutons [–] et [+].
Vous pouvez aussi appuyer plusieurs fois sur le bouton
[TAP¥TEMPO] au tempo voulu.
TAP TEMPO
Démarrage automatique de la reproduction (Sync
Start & Stop)
Appuyez sur [SYNC¥START÷STOP] (l’icône SYNC START s’affiche).
“Sync Start” signifie que l’arrangeur fait démarrer le style musical choisi dès que vous jouez une note ou un accord de la main
gauche (à gauche du point de partage).
(8) Appuyez à nouveau sur [START÷STOP] pour arrêter la reproduction.
Vous pouvez aussi appuyer sur [ENDING]. Dans ce cas, vous
entendez d’abord la phrase finale. Quand elle est terminée,
l’arrangeur s’arrête automatiquement.
Vous pouvez aussi appuyer deux fois sur le bouton
[SYNC¥START÷STOP] afin d’activer la fonction SYNC STOP. Dans
ce cas, la reproduction s’arrête dès que vous relâchez les touches
dans la moitié gauche du clavier.
Sélection de styles musicaux
L’EXR-46 OR a trois zones de mémoire pour les styles musicaux:
USER STL: (Mémoire 000) Cette mémoire accueille temporairement le style musical chargé de la mémoire Flash ou d’une disquette
(séries MSA, MSD et MSE en option ). Les données de cette mémoire
RAM sont effacées quand vous mettez l’EXR-46 OR hors tension.
MAKSOUM (001~008), SAIDI (009~013), MASRI
(014~025), MALFOUF (026~028), ARABI (029~035),
TRADIT (036~049), OR-WORLD (050~066), KHALIGI
(067~088), TURKISH (089~099): Voici les familles de styles
résidant en mémoire ROM interne de l’EXR-46 OR. Ces styles ne
peuvent pas être supprimés (en revanche, vous pouvez les modifier
en temps réel avec la fonction Band Orchestrator; voyez page 77).
FLASH: (Mémoires 101~150) Cette zone de mémoire Flash de
l’EXR-46 OR contient déjà 50 styles quand l’EXR-46 OR sort d’usine.
Vous pouvez accroître le nombre de styles de cette zone en copiant
d’autres styles depuis votre ordinateur (via USB) ou en sauvegardant des styles chargés d’une disquette. Bien que la mémoire Flash
offre un total de 99 emplacements, le nombre de styles que vous
pouvez y sauvegarder dépend du volume des styles musicaux.
DISK: (Mémoires 201~…) Cette zone correspond à la disquette
chargée dans le lecteur de l’EXR-46 OR. Le nombre de styles disponibles dépend bien entendu de la disquette. Le style choisi est transféré dans la mémoire USER STL (voyez ci-dessus) de
l’EXR-46 OR. Il faut donc attendre un peu plus longtemps avant que
le style soit prêt à l’emploi. (Vous pouvez cependant le sauvegarder
en mémoire Flash; voyez p. 109.)
(1) Appuyez sur le bouton [ARRANGER¥BAND].
ARRANGER
Vérifiez que l’écran affiche l’icône
et une icône
INTRO ORIGINAL FILL VARIATION ENDING .
(2) Appuyez sur le bouton [STYLE].
SYNC
START/STOP
STYLE
En mode PIANIST, l’arrangeur commence à jouer dès que vous
enfoncez une touche.
L’EXR-46 OR propose aussi une fonction SYNC STOP: appuyez
deux fois rapidement (“double-cliquez”) sur
[SYNC¥START÷STOP] pour que l’icône SYNC START clignote. Dans
76
(3) Si vous voulez utiliser un style d’une disquette, insérez cette
dernière dans le lecteur.
EXR-46 OR
(4) Utilisez les boutons FAMILY [√][®] pour choisir la zone de
mémoire contenant le style musical voulu (voyez ci-dessus).
FAMILY
Les boutons FAMILY permettent de passer à la “famille” voulue
(englobant aussi les zones Flash et USER STL).
L’écran affiche le nom de la famille sélectionnée.
MALFOUF
=
FLASH
=
73
132
Remarque: Si vous avez oublié d’insérer une disquette dans le
lecteur, l’écran affiche le message “No Disk” quand vous
tentez de choisir la “famille disquette”.
(6) Si nécessaire, confirmez votre choix en appuyant sur le bouton [+/YES].
L’écran affiche brièvement le message “LOADING” (uniquement après le choix d’un style de la disquette chargée).
Si vous avez choisi un style musical de la disquette, l’icône
clignote et l’EXR-46 OR sélectionne automatiquement la
mémoire USER STL contenant le style musical chargé de la
disquette.
Si vous appuyez sur [+/YES] pendant la reproduction de l’arrangeur, le nouveau style est activé au temps fort suivant (le 1er
temps de la mesure suivante). Sinon, l’EXR-46 OR affiche le nom
du style et active ce dernier quand vous appuyez sur
[START÷STOP].
Utiliser la fonction Band
Orchestrator
La fonction Band Orchestrator permet de varier les motifs
d’accompagnement joués par l’arrangeur. Vous pouvez omettre
des parties, élaguer la partie de batterie, etc. – en temps réel (c.à-d. pendant que vous jouez).
(1) Appuyez sur le bouton [ARRANGER¥BAND] pour choisir le
mode Arrangeur.
(2) Sélectionnez le style musical que vous souhaitez utiliser pour
jouer (ou utilisez le style actuellement choisi).
Voyez page 76.
(3) Appuyez sur un des boutons suivants (l’icône correspondante
s’affiche) pour choisir le degré souhaité de “sophistication”
musicale:
Remarque: Pour savoir comment sauvegarder le style musical
résidant en mémoire USER STL dans la mémoire Flash, voyez
page 110.
(5) Utilisez SELECT [√][®] pour définir le style voulu au sein du
groupe sélectionné.
SELECT
Il va de soi que vous utiliserez ces boutons pendant le jeu de
l’arrangeur.
La première pression sur SELECT [®] (ou [√]) affiche le nom du
premier style musical du groupe sélectionné. Comme le premier
style est déjà choisi, si vous comptez l’utiliser, vous ne devez pas
appuyer sur le bouton SELECT [®]. En revanche, il faut devez utiliser le bouton SELECT [√] ou [®] pour choisir un autre style du
même groupe. Vous pouvez aussi vous servir des boutons numériques pour choisir les styles. Voyez aussi “Utiliser les boutons
FAMILY, SELECT et les boutons numériques” (p. 80).
Lorsque vous avez choisi la mémoire 101 (Flash) ou 201 (la première de la disquette), l’écran affiche le message clignotant Yes.
DRUM & BASS
La forme d’accompagnement la plus simple
ne comprenant que la batterie et la basse.
COMBO
Motif d’accompagnement comprenant seulement quelques instruments (un groupe).
FULL BAND
Motif d’accompagnement avec un arrangement étoffé (plusieurs lignes mélodiques
d’instruments).
77
r EXR-46 OR
L’icône correspondante apparaît à l’écran (l’écran
n’affiche qu’une icône à la fois).
Remarque: A la mise sous tension, l’EXR-46 OR choisit le niveau
d’orchestration “FULL BAND”.
Remarque: L’effet de ces trois niveaux dépend aussi du bouton
actionné: [VARIATION] ou [ORIGINAL]. La combinaison des boutons [ORIGINAL]/[VARIATION] et [DRUM&BASS]/[COMBO]/
[FULL¥BAND] offre en réalité 6 motifs d’accompagnement par
style musical (3 x 2).
Balance
Les boutons BALANCE [√][®] permettent de changer la balance
de volume entre les parties de l’arrangeur (ou parties du morceau) et les parties Keyboard (celles que vous jouez vousmême).
(1) Appuyez sur le bouton BALANCE [ACCOMP] si le volume
de l’arrangeur (ou des parties du morceau) est trop bas.
BALANCE
ACCOMP
KEYBOARD
Vous pouvez mémoriser la dernière sélection effectuée dans un
programme utilisateur. Voyez p. 105.
a10
Balance
=
80
(2) Appuyez sur BALANCE [KEYBOARD] si vous souhaitez augmenter le niveau de votre jeu solo.
Maintenez [SPLIT] (ou [DUAL]) enfoncé tout en appuyant sur ces
boutons pour modifier la balance entre ces parties Keyboard.
Remarque: Pour en savoir plus sur le réglage de volume des
parties individuelles, voyez p. 101.
78
EXR-46 OR
6. Reproduire des morceaux
L’EXR-46 OR peut reproduire des données musicales disponibles dans le commerce (les fichiers Standard MIDI) ou vos morceaux sauvegardés sur disquette ou dans la mémoire Flash de l’EXR-46 OR. Vos morceaux
sont sauvegardés sous forme de fichiers Standard MIDI de format 0 et peuvent être joués par tout séquenceur (ou logiciel) compatible SMF.
SYNC
TAP TEMPO START/STOP
Fonctions élémentaires de reproduction
(1) Appuyez sur le bouton [SONG] (il s’allume) pour passer en
mode Song.
INTRO
ORIGINAL
FILL
VARIATION
ENDING
(3) Utilisez les boutons FAMILY [√][®] pour choisir la zone de
mémoire contenant le morceau voulu.
(4) Utilisez SELECT [√][®] ou les boutons numériques pour choisir
le morceau voulu au sein du groupe sélectionné.
SELECT
FAMILY
SONG
Effectuez cette étape car sinon, quand vous appuyez sur
[START÷STOP], vous lancez la reproduction de l’arrangeur. Assurez-vous dès lors que le bouton [SONG] s’allume et que les icôARRANGER
nes
et INTRO ORIGINAL FILL VARIATION ENDING ne sont plus
affichées. Ce n’est qu’alors que les boutons ARRANGER & SONG
CONTROLS permettent de piloter la reproduction (voyez ci-dessus).
(2) Si vous voulez reproduire un morceau d’une disquette, insérez
cette dernière dans le lecteur (côté avant droit).
L’EXR-46 OR comporte trois zones de mémoire pour morceaux:
USERSONG: (Mémoire 000) Cette zone héberge temporairement les données de morceau que vous enregistrez. Les données
de cette mémoire RAM sont effacées quand vous mettez
l’EXR-46 OR hors tension.
FLASH: (Mémoires 101~199) Cette zone de mémoire Flash de
l’EXR-46 OR contient déjà plusieurs morceaux à la livraison de
l’EXR-46 OR. Vous pouvez accroître le nombre de morceaux de
cette zone en copiant d’autres morceaux depuis votre ordinateur
(via USB). Bien que la mémoire Flash offre 99 emplacements, la
capacité réelle dépend du volume des fichiers musicaux.
DISK: (Mémoires 201~…) Cette zone correspond à la disquette insérée dans le lecteur de l’EXR-46 OR. Le total de morceaux disponibles dépend bien entendu de la disquette.
Cette étape est uniquement nécessaire pour les morceaux de la
mémoire Flash ou de la disquette (il n’y a qu’une mémoire
USERSONG).
La première pression sur SELECT [®] (ou [√]) affiche le nom du
premier morceau du groupe choisi. Le premier morceau étant
déjà choisi, si vous comptez l’utiliser, vous ne devez pas appuyer
sur le bouton SELECT [®]. En revanche, utilisez le bouton SELECT
[√] ou [®] pour choisir un autre morceau du même groupe. Une
fois que vous avez choisi la mémoire 101 (la première de la zone
Flash), l’écran se présente comme suit.
101
SongName
=
Vous pouvez aussi vous servir des boutons numériques pour
choisir les morceaux.
79
r EXR-46 OR
Utiliser les boutons FAMILY, SELECT et les boutons
numériques
Procédez soit en appuyant plusieurs fois (par pressions brèves)
sur le bouton FAMILY [√] ou [®] pour passer à l’entrée précédente
ou suivante, soit en maintenant [√] ou [®] enfoncé pour choisir
une autre famille. La manière la plus rapide de parcourir les
familles disponibles consiste à maintenir [√] pendant que vous
appuyez sur [®] (reculer); maintenez [®] et appuyez sur [√] pour
avancer. Ces méthodes sont aussi disponibles pour les boutons
SELECT [√][®]. Comme vous le savez, les boutons FAMILY servent
à sélectionner des groupes, tandis que les boutons SELECT permettent de choisir une entrée d’un groupe.
Si vous préférez utiliser les boutons numériques, entrez trois
chiffres: par exemple, “001” pour l’entrée “1”). Si vous n’entrez
que deux chiffres (voire un seul), l’EXR-46 OR met plus de temps
à “digérer” votre entrée.
Remarque: Si le nombre défini dépasse la dernière entrée disponible, l’EXR-46 OR ne change pas le réglage.
Remarque: Entrez “000” (ou “0”) pour choisir la mémoire
USERSONG.
Lorsque vous avez choisi la mémoire 101 (Flash) ou 201 (la première de la disquette), l’écran affiche le message clignotant
Yes. Vous pouvez l’ignorer et passer à l’étape suivante (ou
appuyer sur [YES/+] avant de continuer).
Remarque: Si vous avez oublié d’insérer une disquette dans le
lecteur, l’écran affiche le message “No Disk” quand vous
tentez de choisir un fichier de la disquette.
Vous pouvez déjà choisir le morceau suivant pendant la reproduction du morceau actuel. Pour écouter le nouveau morceau
sans attendre la fin du précédent, arrêtez la reproduction en
appuyant sur [START÷STOP], puis appuyez de nouveau sur ce
bouton. Sinon, attendez la fin du morceau en cours puis
appuyez sur le bouton [START÷STOP] pour lancer la reproduction du nouveau morceau.
Remarque: N’oubliez pas que le fait de lancer la reproduction
d’un morceau sur disquette efface le morceau dans la mémoire
USERSONG. Veillez donc à le sauvegarder sur disquette avant
de poursuivre (voyez p. 114).
(6) Vous pouvez changer le tempo du morceau avec les boutons
[–][+] ou [TAP¥TEMPO].
Si vous modifiez le tempo et si le morceau contient des changements de tempo, le tempo change toujours pendant la reproduction. En outre, chaque fois que vous retournez au début du
morceau ou à une autre position avec [|√], [º] ou [‰], le tempo
préprogrammé est rétabli.
Remarque: En mode Song, l’EXR-46 OR choisit automatiquement le mode de clavier PIANO SOLO. Vous pouvez utiliser le
morceau comme accompagnement (et même faire appel à la
partie Split ou Dual).
Remarque: Dans certains cas, l’écran peut afficher le message
XG Light ou GM2 au lieu d’un nom de son. Ce message
signifie que l’EXR-46 OR utilise un son que vous ne pouvez pas
choisir avec les commandes en face avant. L’instrument comporte 798 de ces sons “cachés” dont le seul but est d’assurer la
compatibilité de reproduction XG/GM2.
Fonctions supplémentaires de
reproduction
Les boutons [INTRO], [ORIGINAL], etc. ont deux fonctions: une en
mode Style (imprimée au-dessus des boutons) et une autre en
mode Song (imprimée en dessous des boutons).
Activer le mode Song
Les boutons ARRANGER & SONG CONTROLS ont deux fonctions: le
ARRANGER
choix de motifs des styles musicaux (quand l’icône
est affichée) ou la navigation au sein d’un morceau (quand le bouton [SONG] est allumé).
Pour choisir le mode Song (et les fonctions SONG CONTROL), vous
devez appuyer sur le bouton [SONG]. Ce n’est qu’alors que les fonctions suivantes sont disponibles.
SONG
Avance, recul et retour au début
(5) Après avoir vérifié que le morceau voulu est choisi, appuyez
sur [START÷STOP] (qui s’appelle maintenant [®÷ª]) pour charger le morceau et lancer directement la reproduction.
Le bouton [V-LINK] clignote alors pour indiquer le tempo et les
battements (fonction BEAT).
80
• Pour avancer (sauter à une mesure ultérieure du morceau),
appuyez sur [‰].
• Pour reculer (retourner à une mesure antérieure), appuyez
sur [º].
L’affichage de mesure dans le coin supérieur droit de l’écran
vous aidera à trouver la mesure voulue.
EXR-46 OR
• Appuyez sur [|√] (Reset) pour retourner à la première
mesure du morceau. Il faut arrêter la reproduction pour
pouvoir utiliser le bouton [|√].
Remarque: Dans certains cas, [‰] et [º] ne sont pas disponibles.
Cela ne se produit cependant que pour de très longs morceaux.
Remarque: L’utilisation du bouton [|√], [º] ou [‰] rappelle aussi
le tempo préprogrammé du morceau.
(3) Si l’icône n’est pas déjà affichée, appuyez sur le bouton
[REPEAT¥A–B] pour activer la boucle que vous venez de programmer.
ENDING
INTRO
Reproduction en boucle (Repeat)
L’enregistreur de l’EXR-46 OR propose une autre fonction intéressante: la programmation de boucles de reproduction. Vous pouvez
programmer ces boucles pendant la reproduction ou quand l’enregistreur est à l’arrêt.
(1) Appuyez sur [MARKER¥A–B] à l’endroit où vous voulez
démarrer la boucle (l’icône A s’affiche dans le coin inférieur droit de l’écran).
SYNC
START/STOP
MARKER
A–B
REPEAT
A–B
Ce bouton permet d’activer et de couper la fonction “Repeat” de
l’EXR-46 OR.
(4) Pour reproduire la boucle, appuyez sur le bouton
[START÷STOP] (qui s’appelle maintenant [®÷ª]).
L’enregistreur passe à la mesure “A” et lance la reproduction. A la
fin de la mesure “B”, l’enregistreur retourne immédiatement au
début de la mesure “A” et continue la reproduction du passage
en boucle.
Si nécessaire, définissez d’autres repères en effectuant à nouveau les étapes (1) et (2).
Remarque: Le tempo est initialisé chaque fois que l’enregistreur
retourne à la mesure “A”.
Remarque: Dans certains cas, la fonction Marker peut être
indisponible. Cela ne se produit cependant que pour de très
longs morceaux.
Jeu “live” avec accompagnement de morceau
(Minus One)
(2) Avancez jusqu’à l’endroit où doit s’arrêter la boucle et
appuyez à nouveau sur [MARKER¥A–B] (l’icône B s’affiche).
Vous pouvez aussi programmer des boucles sur le vif. Songez
cependant que l’enregistreur mémorise toujours le début (temps
fort) de la mesure suivante.
(2) Appuyez sur le bouton [MINUS¥ONE] (le message
“MinusOne” s’affiche).
L’EXR-46 OR permet de couper la partie que vous voulez jouer vousmême ou qui ne vous sert pas dans un contexte donné. C’est ce
qu’on appelle la reproduction “Minus One”.
(1) S’il n’est pas allumé, appuyez sur le bouton [SONG].
Si vous le voulez, vous pouvez alors choisir un morceau (voyez
p. 79).
MINUS
ONE
Les 5 boutons LOCK s’allument pour indiquer que toutes les pistes seront reproduites.
(3) Appuyez sur un des boutons LOCK pour couper la ou les pistes
correspondantes. L’icône de la piste en question clignote.
(Exemple: si vous éteignez le bouton [DRUMS], l’icône [10] se
met à clignoter.)
Un bouton allumé indique que la ou les pistes en question sont
audibles (et ne sont donc pas coupées). Vous pouvez aussi couper plusieurs pistes en éteignant les boutons LOCK correspondants.
L’icône MINUS ONE apparaît et la partie choisie est coupée.
Remarque: La partie Main n’adopte pas automatiquement le
son et les réglages liés de la partie mélodique.
Vous pouvez aussi étouffer plusieurs parties.
81
r EXR-46 OR
Que sont les pistes?
Nous avons choisi d’utiliser le terme “piste” pour plus de
facilité. Nous l’avons emprunté aux enregistreurs multipiste,
qui permettent d’enregistrer plusieurs parties jouées par un
même musicien (une partie après l’autre).
Dans le cas de l’EXR-46 OR, ce terme sert uniquement à
indiquer que vous avez affaire à des parties musicales distinctes. Ce qui compte ici (comme sur les logiciels de
séquenceur), ce sont les canaux MIDI.
Les morceaux que vous enregistrez avec l’EXR-46 OR et les
fichiers Standard MIDI que vous reproduisez peuvent contenir
jusqu’à 16 pistes (c.-à-d. des canaux MIDI). Très souvent, seules
certaines pistes sont utilisées. Toutefois, les pistes suivantes
figurent dans pratiquement chaque fichier Standard MIDI:
Piste 2: Basse
Piste 4: Mélodie
Piste 10: Batterie
Les boutons LOCK permettent de couper les pistes suivantes:
[RIGHT]–Correspond à la piste “4” du fichier Standard MIDI
choisi. Les données musicales à vocation pédagogique (surtout
pour le piano) utilisent cette piste pour la partie de main droite.
Coupez cette piste pour jouer vous-même la partie de main
droite, tout en écoutant la partie de main gauche du fichier
Standard MIDI. L’EXR-46 OR propose un superbe son de piano
stéréo que vous pourriez utiliser.
[LEFT]–Correspond à la piste “3” du fichier Standard MIDI choisi.
Les données musicales à vocation pédagogique (surtout pour le
piano) utilisent cette piste pour la partie de main gauche. Lisez
aussi ci-dessus.
[OTHERS]–Etouffe toutes les pistes que vous ne pouvez pas couper avec les boutons LOCK restants, à savoir: 1, 3, 6~9, 12~16.
[BASS]–Coupe la piste “2”, assignée à la partie de basse du
fichier Standard MIDI.
[DRUMS]–Coupe la piste “10”, assignée à la partie de batterie du
fichier Standard MIDI.
Remarque: Vous pouvez aussi éteindre plusieurs boutons
simultanément.
(4) Utilisez [|√] et [®÷ª] pour lancer la reproduction.
(5) Appuyez à nouveau sur [®÷ª] pour arrêter la reproduction.
82
(6) Appuyez de nouveau sur [MINUS¥ONE] (ou sur un des
“grands” boutons DATA ENTRY) pour désactiver la fonction du
même nom.
Remarque: Vous pouvez sauvegarder le réglage Minus One avec
le morceau sélectionné. Voyez page 109.
Changer les assignations de pistes
Si les fichiers de morceau n’utilisent pas le système GM (et ne correspondent donc pas aux assignations RIGHT, LEFT, BASS ou DRUM
de la fonction Minus One), vous pouvez procéder comme suit pour
assigner d’autres pistes (canaux MIDI) aux boutons LOCK [RIGHT],
[LEFT], [BASS] et [DRUMS]:
(1) Appuyez sur le bouton [MINUS¥ONE] pour activer la fonction
du même nom.
(2) Maintenez le bouton [RIGHT], [LEFT], [BASS] ou [DRUM]
enfoncé.
(3) Gardez ce bouton enfoncé et utilisez les boutons [–][+] pour
lui assigner le canal MIDI voulu.
Exemple: Pour assigner le canal MIDI “10” au bouton [RIGHT],
appuyez sur DATA ENTRY [+] jusqu’à ce que l’écran se présente
comme ceci:
RIGHT
(4) Appuyez de nouveau sur [MINUS¥ONE] (ou sur un des “grand”
boutons DATA ENTRY) pour désactiver la fonction du même
nom.
Remarque: Vous pouvez sauvegarder le réglage Minus One avec
le morceau sélectionné. Voyez page 109.
EXR-46 OR
7. Enregistrer votre jeu
L’EXR-46 OR comporte une fonction Recorder 16 pistes qui vous permet d’enregistrer vos propres morceaux.
Fonctions de base d’enregistrement
Voyons d’abord la méthode la plus directe pour enregistrer
votre jeu avec l’accompagnement de l’arrangeur.
(1) Appuyez sur le bouton [ARRANGER¥BAND].
(8) Appuyez sur le bouton [REC¥∏].
Remarque: Si vous lancez l’enregistrement sans l’arrangeur et si
vous comptez lancer ce dernier plus tard, il vaut mieux activer le
métronome en appuyant sur le bouton [METRONOME].
• Activez la fonction [SYNC¥START] et enfoncez une ou plusieurs touches à gauche du point de partage.
RE-START
Remarque: Vous pouvez aussi enregistrer en mode PIANO SOLO
(après avoir enfoncé le bouton du même nom). Il est alors impératif d’utiliser le métronome. Vous pouvez régler la métrique du
morceau avec la fonction MetroTS. Voyez page 74.
ARRANGER
● REC
BAND
(2)
(3)
(4)
(5)
(6)
(7)
ARRANGER
L’icône
apparaît. Vous pouvez à présent transposer la tonalité de l’arrangeur en temps réel avec votre main gauche.
Appuyez sur le bouton [STYLE] et choisissez un style musical
(ou sélectionnez une mémoire Music Assistant).
Choisissez la division voulue de l’arrangeur en appuyant sur
[INTRO], [ORIGINAL] ou [VARIATION].
Appuyez sur le bouton [START÷STOP].
Utilisez [TAP¥TEMPO] ou les boutons [–][+] pour régler le
tempo voulu.
Appuyez à nouveau sur [START÷STOP] pour arrêter la reproduction de l’arrangeur.
Assignez le son voulu à la moitié droite du clavier.
Appuyez sur [TONE] et utilisez les boutons FAMILY & SELECT
[√][®], les boutons numériques ou les boutons de la section USER
TONES. Voyez aussi page 90.
Voici à quoi devrait ressembler l’écran (si ce n’est pas le cas, utilisez les boutons FAMILY [√][®] (“REC MODE”) pour choisir REC
ALL):
(Les icônes [RECORD≈∏] et [1]~[16] clignotent.) Vous voilà en
mode ALL: l’EXR-46 OR enregistre tout ce que vous et son arrangeur jouez.
ALL
120
001
=
ORCHESTRATOR
(10) Arrêtez l’enregistrement en suivant une des méthodes ci-dessous:
• Appuyez sur [START÷STOP].
BEAT
FULL
BAND
INTRO
1
9
2
10
3
11
4
12
5
13
6
14
7
15
8
16
Remarque: Si vous choisissez “REC ALL” avec les boutons
FAMILY, le morceau dans la mémoire USERSONG de
l’EXR-46 OR est effacé. Sauvegardez d’abord ce morceau si vous
y tenez (voyez p. 109). Si vous avez appuyé uniquement sur
[REC¥∏], l’EXR-46 OR choisit le mode Single (si la mémoire
USERSONG contient déjà des données). Pour en savoir plus
sur ce mode, voyez page 84.
(9) Lancez l’enregistrement avec une des méthodes suivantes:
• Appuyez sur [START÷STOP] pour déclencher le jeu de l’arrangeur avec la division spécifiée.
Le bouton [V-LINK] clignote alors pour indiquer le tempo et les
battements (fonction BEAT).
• Appuyez sur le bouton [ENDING] pour lancer la phrase de fin
(Ending). Le jeu de l’arrangeur et l’enregistrement s’arrêtent
dès que la phrase finale se termine.
ENDING
MINUS
ONE
Ecouter votre morceau
(1) Appuyez sur le bouton [SONG].
(2) Appuyez sur [START÷STOP] pour lancer la reproduction.
83
r EXR-46 OR
(3) Appuyez à nouveau sur [START÷STOP] pour arrêter la reproduction.
(4) Appuyez sur [|√] pour retourner au début du morceau.
Autres fonctions d’enregistrement
Vous pouvez exploiter l’enregistreur 16 pistes de l’EXR-46 OR de
diverses manières. Voyons à présent les autres méthodes
d’enregistrement.
A propos des modes d’enregistrement
●Modes
L’EXR-46 OR propose deux modes pour enregistrer de nouveaux
morceaux et deux autres modes pour ajouter des parties ou corriger des passages existants.
Enregistrer un nouveau morceau
ALL
Keyboard
Ici, vous pouvez enregistrer simultanément
tout ce que vous et l’EXR-46 OR jouez:
• Arrangeur (accompagnement).
• Parties clavier (Main et Split ou Dual).
mémoire USERSONG. Ne sélectionnez jamais “ALL” ni “Keyboard” pour ajouter des parties à un morceau existant – utilisez
plutôt “Single” ou “Punch I/O”.
D’autre part, vous ne pouvez pas choisir “Single” ni “Punch I/O”
si la mémoire USERSONG ne contient pas encore de données.
Une dernière chose: la reproduction d’un fichier Standard MIDI
efface le morceau contenu dans la mémoire de l’EXR-46 OR.
Une fois le fichier SMF lu, ses données sont cependant disponibles (et peuvent être complétées en mode “Single” ou “Punch I/
O”).
Toujours à propos du mode ALL
Voici quelques remarques en complément à ce que nous avons vu à
la p. 83:
Quand vous appuyez sur [REC¥∏], les 16 icônes de pistes et
[RECORD∏] se mettent à clignoter, signalant que les 16 pistes sont
disponibles pour l’enregistrement.
ALL
120
Punch I/O Ce mode sert à corriger une partie d’un passage
parfait pour le reste.
Remarque: Chaque fois que vous choisissez le mode ALL ou
Keyboard, la mémoire USERSONG est effacée.
●Mémoire de l’enregistreur
L’EXR-46 OR offre une mémoire de morceau qui peut contenir
un morceau à la fois. Une fois votre morceau terminé, n’oubliez
pas de le sauvegarder (voyez p. 114).
Pour éviter l’effacement accidentel du Song contenu dans sa
mémoire interne, l’EXR-46 OR choisit automatiquement le mode
Single après votre premier enregistrement. Songez que le
fait de choisir “ALL” ou “Keyboard” efface le morceau dans la
84
Remarque: Le choix du mode Keyboard signifie que les données de
morceau dans la mémoire interne de l’EXR-46 OR sont écrasées par
votre nouvel enregistrement.
(1) Appuyez sur le bouton [REC¥∏].
(2) Appuyez sur FAMILY [√][®] pour obtenir l’affichage suivant:
Keyboard 120 001
=
ORCHESTRATOR
BEAT
FULL
BAND
INTRO
1
9
2
10
3
11
4
12
5
13
6
14
7
15
8
16
Voici à quoi correspondent les pistes (après l’enregistrement
d’un morceau avec accompagnement de l’arrangeur):
1
2
3
4
5
6
7
8
Accomp 1
Basse de l’arrangeur
Accomp 2
kMain
Accomp 3
kDual*
Accomp 4
Accomp 5
9
10
11
12
13
14
15
16
BEAT
FULL
BAND
INTRO
2
10
3
11
4
12
5
13
6
14
7
15
8
16
001
=
ORCHESTRATOR
Ce mode permet d’enregistrer avec les parties
clavier. Vous pouvez choisir la piste voulue.
• Main et Split ou Dual
Ce mode permet d’enregistrer sur une seule
piste à la fois. Vous pouvez choisir la piste voulue.
Le mode Keyboard permet d’enregistrer les parties clavier. L’arrangeur n’est pas disponible. Ce mode est surtout utile pour enregistrer
une partie superposée et composée de maximum deux sons (Main +
Dual) ou deux parties (Split à gauche, Main à droite). Si vous assignez un kit de batterie à la partie Main, vous pouvez enregistrer une
partie de batterie.
1
9
Ajout de parties à un morceau existant
Single
Mode d’enregistrement Keyboard
Accomp 6
Batterie de l’arrangeur
kSplit*
kAuto Bass* (voyez p. 101)
Melody Intell. (voyez p. 87)
(kMain**)
(*) Une seule de ces parties peut être utilisée avec la partie Main.
(**) Si vous assignez un kit de batterie à la partie Main. Dans ce cas, la
piste 4 n’est pas utilisée.
Par souci de facilité, nous avons indiqué les parties clavier avec
le symbole “k” dans la liste ci-dessus.
Les parties inaudibles pendant l’enregistrement ne sont pas
enregistrées. Les icônes de pistes [1]~[16] n’indiquent donc pas
ce qui est enregistré mais ce que vous pouvez enregistrer.
L’icône RECORD
et les icônes de pistes clignotent.
(3) Pour créer un partage, appuyez sur le bouton [SPLIT].
(4) Activez le métronome (si nécessaire) et réglez le tempo comme
bon vous semble avec le bouton [TAP¥TEMPO] ou [–][+].
Si vous le voulez, vous pouvez aussi enregistrer sans métronome.
Remarque: Si vous assignez un kit de batterie à la partie Main,
votre partie de batterie est enregistrée sur la piste 16.
Mode d’enregistrement Single
Ce mode n’est disponible que si la mémoire de morceau de
l’EXR-46 OR contient déjà des données. Quand vous appuyez sur
[REC¥∏], l’icône RECORD
et l’icône de la première piste vide se
mettent à clignoter. Vous pouvez donc enregistrer directement une
nouvelle partie. (Si toutes les pistes contiennent déjà des données,
la piste 1 est choisie.)
Toutefois, vous pouvez aussi remplacer une partie déjà enregistrée
par une nouvelle version:
(1) Appuyez sur le bouton [REC¥∏].
(2) Appuyez sur FAMILY [√][®] pour sélectionner “Single”.
(3) Utilisez les boutons SELECT [√][®] ou les boutons numériques
pour choisir la piste où vous voulez enregistrer.
EXR-46 OR
Vous ne pouvez choisir qu’une seule piste à la fois (d’où le nom
“Single”). Si vous choisissez une piste contenant déjà des données, la nouvelle version écrase l’ancienne.
(4) Si nécessaire, assignez le son voulu à la partie que vous comptez enregistrer (voyez p. 90).
Si vous choisissez la piste [10], vous pourrez sélectionner des kits
de batterie plutôt que des sons. La piste 10 est en effet réservée
aux parties de batterie.
Remarque: Si vous utilisez le mode d’enregistrement Single
pour ajouter des parties à un fichier Standard MIDI enregistré
sur un autre instrument ou séquenceur, la piste 16 (ou toute
autre piste définie comme “deuxième piste de batterie”) peut
aussi utiliser un kit de batterie que vous pouvez changer.
Remarque: Bien que la partie Main puisse être utilisée pour
enregistrer toutes les pistes en mode Single, le MFX s’applique
uniquement à la piste/au canal MIDI 4.
(5) Appuyez sur [START÷STOP] pour lancer l’enregistrement.
Après un décompte de deux mesures (voyez p. 101), vous entendez toutes les parties que vous avez déjà enregistrées. Jouez (et
enregistrez) votre nouvelle partie.
(6) Appuyez sur [START÷STOP] pour arrêter l’enregistrement.
(7) Retournez à l’étape (3) pour enregistrer des parties supplémentaires.
En revanche, en mode Single, toutes les données contenues dans
la piste enregistrée sont remplacées par le nouvel extrait. (Si
vous ne jouez rien pendant l’enregistrement, vous obtenez à la
fin une piste entièrement vide.)
Comme pour le mode Single, il faut que la mémoire de
l’EXR-46 OR contienne des données de morceau pour pouvoir
activer le mode Punch I/O.
(1) Appuyez sur le bouton [REC¥∏].
(2) Appuyez sur FAMILY [√][®] pour obtenir l’affichage suivant:
PunchI/O 120 001
=
ORCHESTRATOR
BEAT
FULL
BAND
INTRO
1
L’icône de piste clignotante (une seule) est celle de la première
piste contenant déjà des données. Dans l’exemple ci-dessus,
l’icône de la piste 1 clignote car celle-ci contient des données.
(3) Utilisez les boutons SELECT [√][®] ou les boutons numériques
pour choisir la piste où vous voulez enregistrer.
SELECT
Punch I/O
Ce mode permet de recommencer l’enregistrement d’un extrait
de piste (le deuxième refrain, par exemple). L’aspect important
de ce mode est que les nouvelles données enregistrées n’effacent pas les données situées avant et après l’extrait réenregistré:
Partie originale
Passage réenregistré
RE-START
RE-START
● REC
● REC
Vous ne pouvez choisir qu’une seule piste à la fois.
(4) Appuyez sur le bouton [START÷STOP] pour lancer la reproduction des (vieilles) données de morceau.
L’icône RECORD
et l’icône de la piste choisie clignotent alors.
(5) Quand l’enregistreur atteint la mesure où vous voulez lancer
l’enregistrement, appuyez de nouveau sur [REC¥∏].
L’icône RECORD
cesse de clignoter et reste affichée.
(6) Jouez l’extrait à recommencer.
(7) Appuyez de nouveau sur [REC¥∏] pour couper l’enregistrement.
La reproduction du morceau continue, donc…
(8) Appuyez sur [START÷STOP] pour arrêter la reproduction.
(9) Appuyez sur [START÷STOP] pour écouter la nouvelle version.
Si vous n’êtes pas satisfait, recommencez à partir de l’étape (3)
ci-dessus.
Pour corriger une autre piste, retournez à l’étape (3).
Enregistrement Punch I/O avec un commutateur au pied
Vous pouvez aussi utiliser un commutateur au pied en option
pour lancer et arrêter l’enregistrement. Cette méthode est avantageuse car elle vous permet de garder les deux mains libres
pour jouer sur le clavier (ou de piloter les effets Pitch Bend/
Modulation de la main gauche tout en jouant la mélodie de la
main droite.)
• Branchez un commutateur au pied DP-2, DP-6 ou BOSS
FS-5U. en option à la prise FOOTSWITCH en face arrière de
l’EXR-46 OR.
• Appuyez sur le bouton [FUNCTION] (il doit s’allumer).
FUNCTION
• Utilisez FAMILY [√][®] pour sélectionner “KB SET”.
Les paramètres Function de l’EXR-46 OR sont divisés en 9
“familles” selon une répartition logique. Dans le cas présent, il
suffit de choisir le groupe contenant les réglages d’ensemble du
clavier.
• Utilisez SELECT [√][®] pour choisir le paramètre “FSW”.
Sustain
Remarque: Voyez aussi “Utiliser les boutons FAMILY, SELECT et
les boutons numériques” (p. 80).
• Utilisez les boutons [–][+] pour choisir “Punch I/O”.
• Appuyez sur [SONG] pour retourner au mode d’enregistrement.
• Reprenez l’étape (1) sous “Punch I/O”.
Aux étapes (5) et (7), actionnez le commutateur au pied (au lieu
d’enfoncer le bouton [REC¥∏]).
85
r EXR-46 OR
8. Fonctions arrangeur supplémentaires
Outre les fonctions Music Style élémentaires présentées aux pages page 75 et suivantes, l’EXR-46 OR propose les fonctions décrites dans cette section. La plupart de ces fonctions ne sont disponibles que si vous
ARRANGER
appuyez sur le bouton [ARRANGER¥BAND] (l’icône
doit être affichée).
One Touch
Utiliser le Music Assistant
La fonction One Touch automatise plusieurs tâches:
• L’arrangeur choisit le tempo préprogrammé du style musical.
• Les effets Reverb et Chorus sont réglés de façon appropriée.
• L’EXR-46 OR choisit des sons pour les parties Main, Split et
Dual appropriés au style en vigueur.
Chaque style comporte 2 mémoires One Touch offrant des
réglages différents pour les paramètres ci-dessus. Voici comment choisir une de ces mémoires:
(1) Choisissez le style musical voulu (voyez p. 76).
(2) Appuyez sur le bouton [ONE¥TOUCH].
ONE
TOUCH
L’EXR-46 OR propose une fonction pratique baptisée MUSIC
ASSISTANT. Elle permet d’effectuer rapidement les réglages
appropriés du morceau que vous voulez jouer. Elle prépare tout
pour le travail avec l’arrangeur (style, sons, effets, etc.). La fonction Music Assistant n’est pas disponible pour la reproduction
de morceau.
Les paramètres suivants sont automatiquement modifiés quand
vous choisissez une mémoire Music Assistant:
• Style musical
• Tempo
• Sons des parties Main, Split
et Dual
• Réglages d’effets
• Band Orchestrator
• Dynamique
(1) Appuyez sur le bouton [MUSIC¥ASSISTANT].
MUSIC
ASSISTANT
La plage numérique dans le coin supérieur gauche de l’écran
indique “OT”, suivi du numéro de la mémoire One Touch choisie.
Piano 2
Si le bouton DATA ENTRY [TONE] s’allume, l’écran affiche un
nom de son (“Piano 2” dans l’exemple ci-dessus).
(3) Appuyez à nouveau sur le bouton [ONE¥TOUCH] pour choisir
“OT2”.
La fonction One Touch doit être activée après chaque sélection
d’un nouveau style musical.
Remarque: Vous pouvez aussi utiliser la fonction One Touch
pour les styles sur disquette et disponibles via USB mais elle a
moins d’utilité.
86
Il s’allume et l’écran affiche le nom du dernier réglage Music
Assistant que vous avez sélectionné (ou de la première mémoire
Music Assistant).
(2) Utilisez FAMILY [√][®] pour choisir la “famille” (c.-à-d. le
genre) contenant les réglages Music Assistant voulus.
FAMILY
MALFOUF 102
=
Voici les familles disponibles: The following families are available: MAKSOUM, SAIDI, MASRI, MALFOUF, ARABI, TRADITIONAL, OR-WORLD, KHALIGI, TURKISH.
(3) Utilisez SELECT [√][®] pour sélectionner la mémoire Music
Assistant voulue dans la famille choisie.
La première pression sur SELECT [®] (ou [√]) affiche le nom du
premier paramètre Music Assistant du groupe sélectionné.
Comme le premier paramètre est déjà choisi, si vous comptez
l’utiliser, vous ne devez pas appuyer sur le bouton SELECT [®]. En
revanche, vous devez utiliser le bouton SELECT [√] ou [®] pour
choisir un autre paramètre Music Assistant du même groupe.
Vous pouvez aussi utiliser les boutons numériques. Voyez aussi
(p. 80).
Remarque: Si nécessaire, vous pouvez alors modifier les réglages qui ne vous plaisent pas (choisir un autre son pour la partie
Main, par exemple) et sauvegarder votre nouvelle version dans
un programme utilisateur (voyez p. 105).
EXR-46 OR
Melody Intelligence
Changer le type d’harmonie Melody Intelligence
Melody Intelligence est une fonction qui ajoute une deuxième
voix (des notes d’harmonie) aux mélodies que vous jouez de la
main droite. En fait, la fonction Melody Intelligence se base sur
les deux moitiés du clavier pour déterminer les notes à jouer:
• Elle examine les notes de la mélodie dans la moitié droite
et…
• Elle analyse les accords que vous jouez dans la moitié gauche
pour déterminer quelles notes elle doit ajouter à votre
mélodie.
Appuyez sur le bouton [MELODY¥INTELLIGENCE] pour afficher
l’icône correspondante à l’écran.
L’EXR-46 OR propose 18 types d’harmonie différents pour la
fonction MELODY INTELLIGENCE. Ces voix spécifient le nombre
de notes d’harmonie et la manière dont ces notes sont ajoutées
à votre mélodie.
Pour choisir un autre type d’harmonie, maintenez enfoncé le
bouton [MELODY¥INTELLIGENCE] jusqu’à ce que le message
“MI” s’affiche dans le coin supérieur gauche de l’écran. Utilisez
ensuite les boutons [–][+] pour choisir les voix désirées. Vous avez
le choix entre les types suivants:
1 Duet
2 Organ
3 Combo
4 Strings
5 Choir
6 Block
7 BigBand
8 Country
9 Traditnl
10 Broadway
11 Gospel
12 Romance
13 Latin
14 CntrGuit
15 CntrBald
16 WltzOrg
17 OctvTpe1
18 OctvTpe2
Remarque: Vous pouvez sauvegarder les réglages
[MELODY¥INTELLIGENCE] dans un programme utilisateur.
MELODY
INTELLIGENCE
Mode PIANO
00 Traditnl 120
=
ORCHESTRATOR
FULL
BAND
M
INTRO
BEAT
001
En mode PIANO, la partie Main est assignée au clavier entier.
Bien qu’au départ, l’EXR-46 OR affecte un son de piano à la
partie Main, vous pouvez choisir un autre son et sauvegarder
votre réglage dans un programme utilisateur.
Voici la principale différence entre PIANO SOLO et PIANO: dans ce
dernier, les parties mélodiques de l’arrangeur sont disponibles, ce
qui n’est pas le cas en mode PIANO SOLO.
Toutefois, il n’y a pas de partage pour la reconnaissance d’accords
dans ce mode (vous vous souvenez peut-être que le clavier de
l’EXR-46 OR est partagé quand vous activez le bouton
[ARRANGER¥BAND]): l’arrangeur décode chaque accord joué – peu
importe l’endroit où vous le jouez. Pour que l’arrangeur joue un
autre accord, il faut que vous jouiez au moins les trois notes qui
constituent l’accord. Vous pouvez jouer plus de trois notes d’accord
mais n’oubliez pas que deux notes ne suffiront pas pour que l’arrangeur change d’accord.
Lorsque vous utilisez une pédale de maintien optionnelle, toutes les
notes que vous jouez simultanément sont considérées comme notes
d’accord, peu importe si vous les jouez de la main gauche ou droite.
(1) Appuyez simultanément sur les boutons [ARRANGER¥BAND]
et [PIANO¥SOLO] (ils s’allument tous les deux).
L’écran affiche brièvement “PianoMod” et l’icône
ARRANGER
clignote.
(2) Appuyez sur [STYLE] et servez-vous des boutons SELECT [√][®]
pour sélectionner un style musical. Voyez aussi p. 76.
(3) Appuyez sur [TONE] et servez-vous des boutons FAMILY [√][®]
et SELECT [√][®] (ou des boutons USER TONES) pour assigner
un autre son à la partie Main.
Vous pouvez aussi ajouter la partie DUAL (page 74). Même la
partie SPLIT est disponible (bien que la reconnaissance d’accords
soit active sur le clavier entier).
(4) Appuyez sur [ARRANGER¥BAND] ou [PIANO¥SOLO] pour quitter le mode PIANO.
87
r EXR-46 OR
Bass Inversion (Bass Inv)
Cette fonction permet de changer la manière dont l’arrangeur
interprète les accords que vous jouez.
Quand cette fonction est coupée (réglage par défaut), la partie Acc
Bass joue la tonique des accords pilotant l’arrangeur. Si vous jouez
un Do (C; ou un accord de Do), la basse joue un Do (C); si vous jouez
un accord La mineur (ou si vous appuyez sur le La et le Do à sa
droite), la basse joue un La, etc.
En activant la fonction Bass Inversion, vous pouvez spécifier la note
jouée par la note La. Partie de basse (la note la plus basse de vos
accords). Activez Bass Inversion pour des morceaux reposant plus
sur la basse que sur des motifs d’accord (exemple: C – C/B – C/Bb,
etc.).
(1) Appuyez sur le bouton [FUNCTION].
(3) Utilisez SELECT [√][®] pour choisir le paramètre “BassInv”.
SELECT
00 BassInv
120
=
ORCHESTRATOR
001
BEAT
FULL
BAND
M
INTRO
(4) Appuyez sur le bouton [+] afin de choisir “ON” pour “VALUE”.
FUNCTION
Remarque: Voyez aussi (p. 80).
(5) Appuyez sur un autre “grand” bouton de la section DATA
ENTRY pour quitter cette fonction.
(2) Utilisez FAMILY [√][®] pour sélectionner “ARR SET”.
FAMILY
Les paramètres Function de l’EXR-46 OR sont divisés en 9
“familles” selon une répartition logique. Comme le paramètre
Bass Inversion est une fonction de l’arrangeur, vous devez choisir les réglages de l’arrangeur (et donc ARR SET).
88
Remarque: Vous pouvez sauvegarder ce réglage dans un programme utilisateur (voyez p. 105).
Autres fonctions pour styles
musicaux
Vous disposez d’autres fonctions liées aux styles musicaux.
Vous pouvez les régler avec le menu FUNCTION; certaines sont
décrites ailleurs:
• Balance entre les parties Keyboard et les parties Music Style
(voyez p. 78)
• Volume de certaines parties Music Style (voyez p. 101)
• Point de partage de l’arrangeur (voyez p. 100)
• Fonction Hold pour les notes de l’arrangeur (voyez p. 102).
EXR-46 OR
9. Travailler avec des gammes orientales
L’EXR-46 OR permet de changer la façon dont toutes les notes du même nom sont accordées. Exemple: Si vous appuyez sur le bouton ORIENTAL SCALE [Bƒ] (son témoin s’allume), l’accord de cette note diminue
d’un quart de ton (–50 cents). Cette modification vaut alors pour tous les Si bémol du clavier.
Diminuer la hauteur de certaines notes d’un quart
de ton
(1) Appuyez sur un bouton ORIENTAL SCALE pour diminuer la
hauteur des notes correspondantes d’un quart de ton (le
témoin du bouton doit s’allumer).
(2) Modifiez l’accord de la note choisie avec les boutons DATA
ENTRY [–][+].
NO
YES
E
Plage de réglage: –64~63 cents.
(2) Si vous souhaitez diminuer la hauteur d’autres notes, appuyez
sur le ou les boutons ad hoc.
Si vous vous êtes trompé de bouton (que son témoin est allumé),
appuyez de nouveau sur le bouton en question de sorte que son
témoin s’éteigne. Les notes correspondantes retrouvent alors
leur hauteur normale.
Travailler avec d’autres accords
Les boutons ORIENTAL SCALE permettent d’alterner la hauteur des
notes correspondantes entre l’accord occidental et un réglage un
quart de ton (–50 cents) plus bas.
Vous disposez toutefois d’autres valeurs d’accord.
(1) Maintenez enfoncé le bouton ORIENTAL SCALE de la note
dont vous voulez modifier l’accord, jusqu’à ce que l’écran
indique Scale, suivi du nom de la note.
Vous pouvez aussi choisir cette page et ce paramètre avec le
menu Function. Voyez page 103.
Remarque: Pour retrouver la valeur par défaut, appuyez simultanément sur [+] et [–].
Sauvegarder et charger les réglages d’accord (SCALE
MEMORY)
Une fois que vous avez trouvé des réglages d’accord qui vous plaisent, vous pouvez les sauvegarder dans une des trois mémoires
Scale Memories. Cela vous permettra de les charger dès que vous en
avez besoin. Voici la marche à suivre:
(1) Accordez les notes comme bon vous semble (voyez ci-dessus).
(2) Maintenez enfoncé le bouton SCALE MEMORY ([1]~[3]) correspondant à la mémoire où vous voulez sauvegarder vos
réglages.
Si nécessaire, vous pouvez choisir une autre mémoire Scale en
appuyant brièvement sur le bouton SCALE MEMORY de la
mémoire contenant les réglages voulus.
Pour retourner à l’accord occidental, appuyez de nouveau sur le
bouton SCALE MEMORY pour éteindre son témoin et/ou désactivez tous les boutons ORIENTAL SCALE dont le témoin est
allumé.
Dans le second cas, le témoin SCALE MEMORY de la dernière
mémoire choisie se met à clignoter pour indiquer que les réglages ORIENTAL SCALE actuels ne correspondent plus à ceux contenus dans la mémoire actuellement sélectionnée.
Les réglages ORIENTAL SCALE sont également sauvegardés dans
le programme utilisateur et ne doivent pas nécessairement être
sauvegardés dans une des mémoires SCALE MEMORY. Quand
vous sélectionnez un programme utilisateur dont les réglages
d’accord sont différents de ceux de la dernière mémoire sélectionnée, le bouton correspondant ([1]~[3]) se met à clignoter.
E
E
E
(3) Attendez que les trois témoins SCALE MEMORY s’allument
brièvement, puis relâchez le bouton enfoncé.
Remarque: A la sortie d’usine, les mémoires Scale Memory de
l’EXR-46 OR contiennent déjà des réglages courants (voyez cidessus).
Remarque: Pour savoir comment définir les sections touchées
par les réglages Scale Tune, voyez “Scl Mode*” (p. 103).
89
r EXR-46 OR
10. Fonctions des parties clavier
Choix des sons pour les parties Main, Split
et Dual
L’EXR-46 OR offre environ 524 sons pour le jeu de mélodies (les
autres correspondent plus à des effets sonores). Ces sons doivent être assignés à une partie clavier (qui sont au nombre de
trois): Main, Split et Dual (voyez aussi p. 73).
Sélection d’un des sons disponibles
Contrairement aux instruments de type arrangeur plus anciens,
l’EXR-46 OR n’utilise plus de banques, numéros et variations: une
seule et même procédure logique permet de sélectionner tous les
sons disponibles.
(1) Appuyez sur le bouton DATA ENTRY [TONE] (il doit s’allumer).
Voyez les familles disponibles ci-dessous. Quand vous sélectionnez une autre famille, le premier son du groupe en question
est automatiquement choisi.
•
•
•
•
•
•
•
•
•
•
•
•
PIANO (001~011)
E.PIANO (012~026)
KEYBOARD (027~033)
CHR PERC (034~063)
ORGAN (064~097)
ACCORDN (098~111)
A.GUITAR (112~129)
E.GUITAR (130~163)
BASS (164~217)
STRINGS (218~263)
VOCAL (264~275)
SAX (276~287)
•
•
•
•
•
•
•
•
•
•
•
WIND (288~301)
AC BRASS (302~329)
SYNBRASS (330~343)
SYNLEAD (344~380)
POLY SYN (381~391)
PAD (392~426)
ETHNIC1 (427~499)
ETHNIC2 (500~550)
PERCUSSION (551~575)
SFX (576~617)
DRUM KIT (618~650)
Remarque: La liste des sons disponibles figure à la page 120.
TONE
(2) Pour assigner un autre son à la partie Split ou Dual, maintenez le bouton [SPLIT] ou [DUAL] enfoncé et effectuez les opérations suivantes.
Remarque: Passez à l’étape (5) si vous préférez entrer le
numéro du son avec le pavé numérique ([0]~[9]). C’est en fait la
seule méthode pour choisir un des sons disponibles.
(3) Utilisez FAMILY [√][®] pour choisir la famille de sons.
(4) Utilisez SELECT [√][®] pour choisir un son dans la famille sélectionnée.
La première pression sur SELECT [®] (ou [√]) affiche le nom du
premier son du groupe choisi. Le premier son étant déjà choisi, si
vous comptez l’utiliser, vous ne devez pas appuyer sur le bouton
SELECT [®]. En revanche, utilisez le bouton SELECT [√] ou [®] pour
choisir un autre son du même groupe.
(5) Utilisez les boutons numériques [0]~[9] pour choisir d’autres
sons de la famille actuelle qui sont “sautés” par les boutons
SELECT.
Remarque: Vous pouvez sauvegarder ce réglage dans un programme utilisateur (voyez p. 105).
Vous pouvez aussi utiliser les boutons numériques. Voyez aussi
“Utiliser les boutons FAMILY, SELECT et les boutons numériques”
(p. 80) et remplacez “morceau” par “son” dans les explications.
FAMILY
Utiliser les boutons USER TONES
Les boutons USER TONES permettent de choisir directement 8 sons
mélodiques ou kits de batterie (sans utiliser les boutons [TONE],
FAMILY, SELECT et/ou les boutons numériques). Ces boutons commencent par charger les sons qui leur sont assignés à l’usine (mais
vous pouvez le changer).
1
2
3
4
5
6
7
8
PIANO
ORGAN
GUITAR/
BASS
STRINGS
VOCAL
SAX/
BRASS
SYNTH/
ETHNIC
DRUMS
Nos sons “favoris” sont assignés aux catégories en question, ce qui
vous permet de choisir rapidement un son de piano, de cordes, etc.
Vous pouvez toutefois changer les assignations de ces boutons.
Remarque: Le bouton TONE [DRUMS] est uniquement disponible
pour la partie Main.
Assigner un autre son à un bouton USER TONES
Pour changer le son assigné à un des 8 boutons USER TONES:
(1) Sélectionnez le son à assigner en suivant la procédure décrite
ci-dessus.
(2) Maintenez le bouton USER TONES voulu enfoncé. L’écran
affiche brièvement le message “Memrized”.
Vous pouvez assigner le son (ou kit de batterie) de votre choix à
n’importe quel bouton USER TONES pour le sélectionner ultérieurement d’une simple pression sur ce bouton.
Remarque: Vous pouvez sauvegarder les assignations dans un
programme utilisateur (voyez p. 105). Ce bouton permet d’effectuer jusqu’à 1600 assignations différentes (car il y a 200 programmes utilisateur).
Pour sélectionner le son assigné en usine à un des boutons USER
TONES, appuyez deux fois rapidement (“double-cliquez”) sur ce
bouton.
90
EXR-46 OR
Sons de batterie et effets sonores
(“SFX”)
Kits de batterie
IPopKik36
IPopCStk37st
IPopSn38st
IPopGstS39st
IPopSn40st
IPopTomLFl41
IPopHat1_42
IPopTomL43
IPopHat2_44
IPopTomMFl45
IPopHat3_46
IPopTomM47
IPopTomHFl48
IPopCyml2_52
IPopTomH50
Les 33 derniers “sons” (618~650) sont des kits de batterie (“Drum
Sets”). Quand vous choisissez un de ces kits, un son différent est
assigné à chaque touche du clavier. La dernière touche à gauche
pilote un son de grosse caisse (alias “Kick”). La touche blanche juste
à côté pilote un son de caisse claire, etc. Essayez de jouer un rythme
de batterie en actionnant plusieurs touches simultanément ou tour
à tour.
C2
Remarque: Vous ne pouvez assigner les kits de batterie qu’à la partie Main (et non aux parties Split et Dual).
Remarque: Un kit (592) propose des effets sonores (SFX) qui ne servent pas à “jouer de la batterie” mais plutôt à produire divers bruitages.
Remarque: Vous pouvez sauvegarder ce réglage dans un programme utilisateur (voyez p. 105).
Effets sonores (“SFX”)
L’EXR-46 OR contient aussi des effets sonores individuels (comme
“Train, “Kitty”, “HrseGllp”, etc.) plus des sons de batterie et de percussion individuels 576~617. Ils sont affectés à la tessiture entière
de la partie pour laquelle vous les choisissez (Main, Split ou Dual).
Notez que ces sons ne fonctionnent pas comme les kits de batterie:
ici, un seul son est assigné au clavier – et peut servir à jouer une
mélodie (même si les mélodies “de train” ne produisent sans doute
que des effets tout au plus “intéressants”).
Nous vous conseillons donc de procéder comme suit:
(1) Appuyez sur le bouton [SPLIT].
(2) Déterminez si vous voulez jouer l’effet sonore ou le son de
percussion de la main gauche ou de la main droite.
Pour le jouer de la main gauche, assignez un son entre “576” et
“617” à la partie Split. Pour piloter l’effet de la main droite, assignez-le à la partie Main.
(3) Changez le point de partage (page 100) de sorte que seules
quelques touches soient assignées au pilotage du son de percussion/de l’effet sonore (“C6” pour jouer l’effet de la main
droite et “C3” pour le jouer de la main gauche).
(4) Pour produire un effet convaincant, vous devrez peut-être
aussi modifier le réglage MAIN Oct ou SPLT Oct
(page 101).
Si vous assignez un effet sonore/son de percussion à la partie
Split, voici les plages de clavier que vous pourriez obtenir.
C3
Les kits de batterie sont des ensembles comprenant plus de 90 sons
affectés chacun à une note du clavier.
Partie Split (effet sonore/son de
percussion)
Partie Main (son mélodique)
91
r EXR-46 OR
Utiliser le mode DRUM PAD
Le mode Drum Pad vous permet d’assigner des sons de batterie/
percussion ou des effets spéciaux aux 8 touches les plus hautes
(étiquetées “DRUM PAD”) afin de les utiliser en temps réel. Cette
fonction reste disponible même quand la fonction V-LINK est
active.
Utiliser la fonction Drum Pad
(1) Appuyez simultanément sur les boutons [SPLIT] et [DUAL].
Note: Si vous sélectionnez le mode Drum Pad après avoir
assigné un kit de batterie à la partie Main, la partie Main reprend
le dernier son “mélodique” utilisé (ou le son par défaut). Vous ne
pouvez pas jouer une partie de batterie ou de percussion avec la
partie Main quand le mode Drum Pad est actif. Inversement,
l’assignation d’un kit de batterie à la partie Main quand le mode
Drum Pad est actif coupe le mode Drum Pad.
dp Piano
2 120 001
=
ORCHESTRATOR
BEAT
FULL
BAND
M
INTRO
NO
YES
(3) Appuyez de nouveau sur les boutons [SPLIT] + [DUAL] pour
quitter le mode Drum Pad.
Transpose
L’écran prend l’aspect suivant:
(2) Utilisez [–][+] et/ou les boutons numériques ([0]~[9]) pour
régler l’intervalle de transposition voulu.
La fonction Transpose change la hauteur des notes et des
accords joués. Si vous devez changer de tonalité pour un chanteur ou un autre instrument, vous n’aurez aucun mal à trouver
les notes à jouer: il suffit de définir la valeur Transpose et de
jouer votre morceau comme d’habitude pour obtenir la tonalité
spécifiée.
Il existe en fait deux fonctions de transposition, une (“USRTrnsp”)
dont le réglage peut être sauvegardé dans un programme utilisateur et une autre (“GLBTrnsp”) qui s’applique à toutes les sections.
Son réglage est ajouté (ou soustrait) à la valeur “USRTransp”. Ce
réglage n’est pas sauvegardé.
Commençons par la fonction “USRTrnsp”, assignée au bouton
[TRANSPOSE]:
(1) Appuyez sur le bouton [TRANSPOSE].
Le message “dP” signifie que le mode “Drum Pad” est actif.
(2) Appuyez sur les touches de la zone DRUM PAD (1~8) pour
écouter les sons.
Plage de réglage: –12~12 demi-tons. Un “demi-ton” correspond
à l’écart entre une touche blanche et une touche noire (ou entre
deux touches blanches adjacentes, à savoir “Mi”/“Fa” et “Si”/
“Do”).
Appuyez plusieurs fois sur [+] ou [–] pour transposer le clavier
vers le haut ou vers le bas. Vous pouvez aussi définir directement l’intervalle de transposition voulu en appuyant sur le bouton numérique correspondant.
Pour transposer le clavier vers le bas, maintenez le bouton [–]
enfoncé en appuyant sur un bouton [0]~[9] (cela permet de
transposer le clavier de maximum 9 demi-tons vers le bas).
Exemple: Si vous voulez entendre un “E” (Mi) chaque fois que
vous jouez un “C” (Do), choisissez “4”. Toutes les autres notes
sont décalées du même intervalle, de sorte que vous sonnez en
Mi majeur alors que vous jouez en fait en Do majeur.
Pas de transposition (Do majeur)
TRANSPOSE
Transpos= 4 (Mi majeur)
L’écran se présente maintenant comme ceci:
00 USRTrnsp 120
=
Ces touches ne sont plus disponibles pour jouer la mélodie:
elles pilotent les 8 sons de batterie/percussion.
Vous pouvez aussi assigner d’autres sons de batterie et de
percussion à ces touches. Voyez page 101 pour en savoir
plus. Vous pouvez sauvegarder ces assignations dans un programme utilisateur (page 105).
92
ORCHESTRATOR
FULL
BAND
M
INTRO
BEAT
001
La valeur correspondante et l’icône TRANSPOSE apparaissent à
l’écran.
(3) Pour désactiver la fonction Transpose, répétez les étapes (1)
et (2) en entrant la valeur “0” (pas de transposition).
Remarque: Vous pouvez sauvegarder ce réglage dans un programme utilisateur (voyez p. 105).
Remarque: Vous disposez aussi d’une fonction permettant de
spécifier quelle(s) section(s) est/sont affectée(s) par la fonction
Transpose. Voyez “TransMod*” (p. 100).
EXR-46 OR
(4) Appuyez sur un autre “grand” bouton de la section DATA
ENTRY pour quitter cette fonction.
Transposition globale (“GLB”)
Il existe une commande de transposition permettant de changer la
hauteur de toutes les sections de l’EXR-46 OR. Sa valeur s’ajoute à
l’intervalle de transposition actuel jusqu’à ce que vous la régliez de
nouveau sur “0” ou que vous mettiez l’EXR-46 OR hors tension.
(1) Appuyez sur le bouton [TRANSPOSE].
L’écran affiche alors le message “USR Trnsp”.
(2) Appuyez une fois sur le bouton SELECT [®] pour sélectionner
le paramètre suivant:
Réglages d’octave
L’EXR-46 OR vous permet de transposer les parties Keyboard
(Main, Split, Dual) 4 octaves vers le haut ou vers le bas.
Pour changer la transposition d’octave d’une partie, maintenez
enfoncé [TONE] (partie Main), [SPLIT] (partie Split) ou [DUAL] (partie
Dual) en appuyant sur [–] (vers le bas) ou [+] (vers le haut).
NO
YES
Autres fonctions liées aux parties
clavier
Voici d’autres fonctions concernant les parties Keyboard, c.-à-d.
les parties que vous jouez. Vous pouvez les régler avec le menu
FUNCTION; certaines sont décrites ailleurs:
• Dynamique du clavier (voyez p. 94)
• Master Tune (voyez p. 99)
• Volume des parties Keyboard (voyez p. 101)
• Fonction Intelligence de la partie Split (voyez p. 100)
• Fonction Hold de la partie Split (voyez p. 100)
GLBTrnsp
(3) Utilisez [–][+] et/ou les boutons numériques ([0]~[9]) pour
régler l’intervalle de transposition voulu.
Plage de réglage: –6~0~5 demi-tons. Ce réglage est ajouté à (ou
soustrait de) la valeur “USRTrnsp” pour toutes les sections et
tous les programmes utilisateur.
Appuyez plusieurs fois sur [+] ou [–] pour transposer le clavier
vers le haut ou vers le bas. Vous pouvez aussi définir directement
l’intervalle de transposition voulu en appuyant sur le bouton
numérique correspondant.
Pour transposer le clavier vers le bas, maintenez le bouton [–]
enfoncé en appuyant sur un bouton [0]~[6] (cela permet de
transposer le clavier de maximum 6 demi-tons vers le bas).
Dès que vous sélectionnez une autre valeur que “0”, l’icône
TRANSPOSE se met à clignoter pour signaler que l’EXR-46 OR transpose toutes les sections.
(4) Pour désactiver la transposition globale, répétez l’étape (3) en
entrant toutefois la valeur “0” (pas de transposition).
L’icône TRANSPOSE cesse de clignoter (et disparaît si la fonction
“USRTrnsp” n’est pas active).
Remarque: Ce réglage n’est pas sauvegardé dans un programme utilisateur et est initialisé lorsque vous mettez
l’EXR-46 OR hors tension.
(5) Appuyez sur un autre “grand” bouton de la section DATA
ENTRY pour quitter cette fonction.
93
r EXR-46 OR
11. Fonctions de jeu et effets
Fonctions de jeu
Sensibilité au toucher (Keyboard Touch)
L’EXR-46 OR est sensible au toucher: le volume et la brillance des
notes Main, Split et Dual dépendent de la force/de la vitesse avec
lesquelles vous enfoncez les touches.
Tous les instruments acoustiques (piano, violon, flûte, batterie, etc.)
sont sensibles au toucher. Plus vous jouez fort, plus le volume et la
brillance des notes produites augmentent, recréant un effet entièrement naturel. (C’est pourquoi la fonction KEYBOARD TOUCH est
activée à la mise sous tension de l’EXR-46 OR.)
Si l’EXR-46 OR est votre tout premier instrument de musique, vous
serez peut-être un peu distrait par les variations de volume et de
timbre des notes jouées.
(1) Si l’icône KEY TOUCH n’est pas affichée, appuyez sur le bouton
[KEYBOARD¥TOUCH] pour activer la sensibilité au toucher de
l’EXR-46 OR.
KEYBOARD
TOUCH
KEY TOUCH n’est pas affichée (sinon, toutes les notes ont les
valeurs de toucher correspondant à la force avec laquelle vous
enfoncez les touches).
(5) Appuyez sur un autre “grand” bouton de la section DATA
ENTRY pour quitter cette fonction.
Remarque: Certains sons bénéficient de la “commutation par
toucher”. Dans ce cas, vous pouvez alterner entre deux sons en
jouant plus ou moins fort sur le clavier. Ne désactivez donc ce
paramètre que si cela permet d’augmenter votre confort de jeu.
Remarque: Vous pouvez sauvegarder ce réglage dans un programme utilisateur (voyez p. 105).
Remarque: La fonction Keyboard Touch concerne toutes les
parties que vous pouvez jouer vous-même (les “parties Keyboard”): Main, Split et Dual.
Pitch Bend et Modulation
Le levier BENDER/MODULATION à gauche du clavier permet d’ajouter deux types d’effets aux notes des parties Keyboard. Vous pouvez
même utiliser ces effets simultanément si vous le voulez.
(1) Poussez le levier vers l’arrière de l’EXR-46 OR pour ajouter un
effet de vibrato (“tremblotement”) aux notes jouées.
MODULATION
(2) Appuyez à nouveau sur ce bouton pour désactiver la fonction
KEYBOARD TOUCH une fois que vous n’en avez plus besoin.
(3) Pour définir une valeur de toucher fixe, maintenez enfoncé le
bouton [KEYBOARD¥TOUCH] jusqu’à ce que le message
“KbdTouch” s’affiche.
KbdTouch
(4) Servez-vous des boutons numériques et/ou [–][+] pour définir
la valeur de toucher qui sera utilisée pour toutes les notes
que vous jouez (1~127).
“1” produit un niveau très bas (souvent inaudible), tandis que
“127” correspond au toucher maximum (produisant des notes
fortes et brillantes). Cette valeur sert seulement quand l’icône
94
(3) Pour chacun de ces types d’effets, vous pouvez relâcher le
levier quand vous n’avez plus besoin de l’effet.
Remarque: Si nécessaire, vous pouvez changer l’intervalle de
Pitch Bend. Voyez “PB Range° (Plage de Pitch Bend)” (p. 100).
Remarque: La modulation n’est pas disponible quand le type
“Rotary” est assigné au MFX. Dans ce cas, l’axe de modulation du
levier sert à alterner entre les vitesses lente et rapide de l’effet.
Commutateur au pied
La prise FOOTSWITCH de l’EXR-46 OR (sur le panneau arrière) permet de brancher un commutateur au pied DP-2, DP-6 ou BOSS
FS-5U. en option.
Vous pouvez utiliser ce commutateur au pied pour maintenir les
notes jouées (fonction par défaut), comme pédale douce ou pédale
tonale (sostenuto), pour changer la vitesse de l’effet Rotary (MFX) et
pour d’autres fonctions encore. Voyez “FSW° (Footswitch Assign)”
(p. 100) et “Utiliser les sorties et un commutateur au pied” (p. 117).
Pour utiliser le commutateur au pied afin de maintenir les notes
jouées, procédez comme suit:
(1) Branchez un commutateur au pied DP-2, DP-6 ou BOSS
FS-5U. à la prise FOOTSWITCH.
(2) Jouez une note de la main droite.
(3) Appuyez sur le commutateur au pied.
Augmente la
hauteur
Diminue la
hauteur
BENDER
L’axe de modulation permet aussi d’alterner entre les vitesses
lente et rapide de l’effet Rotary (si le type “Rotary” est assigné au
MFX).
(2) Poussez le levier à gauche pour diminuer temporairement la
hauteur des notes jouées. Poussez-le à droite pour augmenter
la hauteur des notes.
(4) Relâchez la touche.
Le son de la note ou des notes jouées continue après le relâchement des touches en question.
(5) Pour couper le son de la note ou des notes, relâchez le commutateur au pied.
EXR-46 OR
Utilisation des effets
L’EXR-46 OR contient des processeurs d’effets numériques
Reverb et Chorus. Vous pouvez activer/couper ces effets et choisir d’autres types. En outre, vous pouvez régler le niveau d’envoi
Send (la quantité de Reverb ou de Chorus) appliqué aux différentes parties Keyboard. Retenez que l’effet Chorus ne peut pas
être combiné avec le MFX (vous devez donc choisir entre Chorus
et MFX pour la partie Main).
Utiliser le processeur multi-effet (MFX)
Vous pouvez appliquer le processeur multi-effet (MFX) à la partie Main. Contrairement aux processeurs Reverb et Chorus, qui
produisent uniquement des effets liés à l’ambiance (REV) et à la
modulation (CHR), le processeur MFX génère divers effets (47),
dont certains sont des combinaisons de deux effets.
(1) Appuyez sur le bouton [FUNCTION] (il doit s’allumer).
FUNCTION
(2) Utilisez FAMILY [√][®] pour sélectionner “EFFECTS”.
Les paramètres Function de l’EXR-46 OR sont divisés en 9
“familles” selon une répartition logique. Pour effectuer cette
procédure, il faut choisir le groupe des effets.
(3) Utilisez SELECT [√][®] pour choisir le paramètre “MFX”.
00 Off
Remarque: Voyez aussi “Utiliser les boutons FAMILY, SELECT et
les boutons numériques” (p. 80).
Le message “Off” indique que le MFX n’est pas actif.
(4) Pour activer le MFX, choisissez un des 47 types avec les boutons [–][+].
Off: Le MFX est désactivé.
Enhancer: L’effet Enhancer contrôle la structure des harmoniques des hautes fréquences, rendant le son plus pétillant et
serré.
Overdrv1~4: L’Overdrive crée une légère distorsion semblable à celle produite par les amplis à lampes. Divers types
d’overdrive sont disponibles: Divers types d’overdrive sont
disponibles: (1) petit combo, (2) combo, (3) tour d’amplification (2 enceintes), (4) tour d’amplification (3 enceintes).
Distort1~4: Cet effet produit une distorsion plus intense
que l’effet overdrive. Les numéros correspondent à des types
de distorsion.
Phaser: Ajoute un son déphasé par rapport au son original
et produit une modulation tournante créant une impression
d’espace et de profondeur.
AutoWah: L’effet Auto Wah module un filtre pour créer des
changements cycliques du timbre.
Rotary: L’effet Rotary simule l’effet d’un haut-parleur rotatif
classique. Effet idéal pour orgue électrique. Dans ce cas, l’axe
MODULATION du levier BENDER/MODULATION sert à alterner
entre les vitesses lente et rapide de l’effet: poussez le levier
vers l’arrière de l’EXR-46 OR pour alterner entre les vitesses
des ondulations.
StFlangr: Voici un flanger stéréo produisant une résonance
métallique qui rappelle quelque peu un avion décollant ou
atterrissant.
SpFlangr: Voici “Step Flanger” avec des paliers bien audibles
au lieu d’un changement de hauteur continu.
Compress: Un compresseur atténue les crêtes de signal,
accentue les bas niveaux et aplanit le volume global.
Limiter: Un limiteur empêche le volume de dépasser un certain niveau seuil (Threshold) sans accentuer les bas niveaux.
HexaCho: Hexa Chorus se sert d’un chorus à 6 phases (six
couches de son avec chorus) pour rendre le son plus riche et
plus vaste.
Trem Cho: Tremolo Chorus est un chorus avec du trémolo
(modulation cyclique du volume).
StChorus: Chorus stéréo.
Space-D: Un chorus multiple qui ne donne pas une impression de modulation mais produit un chorus transparent (un
parfait “faiseur de stéréo”).
StDelay: Cet effet répète le signal d’entrée, créant ainsi des
échos (répétitions de signal).
Mod Dly: Cet effet ajoute de la modulation au son retardé et
produit un effet semblable à celui d’un flanger.
3Tap Dly: Le Triple Tap Delay produit trois sons retardés;
centre, gauche, droite.
4Tap Dly: Effet delay avec quatre lignes de retard.
TmCtrDly: Cet effet permet de contrôler le temps de retard
en temps réel.
Reverb: Un superbe effet de réverbération.
GteRevNr: Gate Reverb est un type spécial de réverbération
qui coupe brutalement le son réverbéré (au lieu de le faire
diminuer progressivement).
GteRevRv: Un effet Gate Reverb inversé.
GteRevS1: Le son réverbéré passe de droite à gauche.
GteRevS2: Le son réverbéré passe de gauche à droite.
2PtchShf: Un effet pitch shifter change la hauteur du signal
entrant. Cet effet à 2 voix a deux pitch shifters et permet
donc d’ajouter deux copies transposées au signal original.
FbPtchShf: Voici un effet pitch shift avec plusieurs répétitions.
OD®Chors: Overdrive et chorus branchés en série. (“En
série” signifie que le premier effet est aussi traité par le
second.)
OD®Flger: Overdrive et Flanger branchés en série.
OD®Delay: Overdrive et Delay branchés en série.
DS®Chors: Distorsion et Chorus branchés en série.
DS®Flger: Distorsion et Flanger branchés en série.
DS®Delay: Distorsion et Delay branchés en série.
EH®Chors: Enhancer et Chorus branchés en série.
EH®Flger: Enhancer et Flanger branchés en série.
EH®Delay: Voici un enhancer et un delay branchés en série.
Cho®Dly: Chorus et Delay branchés en série.
FL®Delay: Flanger et Delay branchés en série.
Cho®Flgr: Chorus et flanger branchés en série.
Cho/Dly: Chorus et delay branchés en parallèle. (“En parallèle” signifie que le signal d’entrée est traité par deux effets
qui n’ont aucune interaction.)
FL/Delay: Flanger et Delay branchés en parallèle.
Cho/Flgr: Chorus et Flanger branchés en parallèle.
Remarque: Vous pouvez sauvegarder ce réglage dans un programme utilisateur (voyez p. 105).
95
r EXR-46 OR
Remarque: Par défaut, le choix du type MFX est lié à la sélection de son pour la partie Main. Vous pouvez cependant désactiver ce lien. Voyez “Tone MFX°” (p. 103). Notez que cette remarque ne s’applique pas à tous les sons.
Les paramètres Function de l’EXR-46 OR sont divisés en 9
“familles” selon une répartition logique. Pour effectuer cette
procédure, il faut choisir le groupe des effets.
(3) Utilisez SELECT [√][®] pour choisir le paramètre “REV”.
(6) Si le bouton [FUNCTION] est toujours allumé, utilisez SELECT
[√][®] pour choisir un des paramètres suivants.
Rev MAIN
Intensité de réverbération de la partie Main.
(5) Choisissez un type MFX, jouez quelques notes sur le clavier et
écoutez l’effet.
(6) Appuyez sur un autre “grand” bouton de la section DATA
ENTRY pour quitter cette fonction.
Remarque: Quand le MFX est actif, la partie Main n’est plus
traitée par l’effet Chorus. Toutefois, le MFX a aussi des algorithmes de chorus (indépendants ou combinés à d’autres effets).
Reverb
La réverbération (Reverb) est un effet qui donne l’impression
que vous jouez dans une salle de concert, une pièce ou un autre
décor acoustique réfléchissant les sons.
A la mise sous tension de l’EXR-46 OR, les trois parties Keyboard
(Main, Dual, Split) ainsi que les parties de l’arrangeur et de morceau
sont traitées par l’effet Reverb.
Si vous ne comptez pas utiliser cet effet, vous pouvez couper le processeur Reverb (il ne traite alors plus aucune des 19 parties de
l’EXR-46 OR) ou désactiver son traitement seulement pour la partie
Keyboard voulue. Vous ne pouvez pas modifier la quantité de
réverbération ajoutée aux parties de l’arrangeur ou de morceaux
préenregistrés.
●Activer/couper l’effet Reverb
Pour couper complètement la réverbération (pour toutes les
parties de l’EXR-46 OR) ou choisir un autre type de réverbération, procédez comme suit.
(1) Appuyez sur le bouton [FUNCTION] (il doit s’allumer).
00 Hall
2
Intensité de réverbération de la partie Dual.
Remarque: Voyez aussi “Utiliser les boutons FAMILY, SELECT et
les boutons numériques” (p. 80).
(4) Utilisez les boutons [–][+] pour choisir “Off” si vous ne
comptez pas travailler avec le processeur Reverb. Sinon, choisissez un des huit types disponibles:
Type
Explication
Room 1~3
Ces types simulent la réverbération d’une
pièce. Plus le numéro est élevé (1, 2 ou 3), plus
la pièce est “grande”.
Hall 1, 2
Ces types simulent la réverbération d’une
petite (1) ou grande (2) salle de concert et
produisent un espace nettement plus vaste
que les types Room ci-dessus.
Plate
Simulation numérique d’une plaque métallique parfois utilisée pour créer des effets de
réverbération. Bons résultats avec les sons de
percussion.
Delay
Effet Delay (pas de réverb). Fonctionne un peu
comme un écho et répète les sons.
Pan Delay
Version stéréo de l’effet précédent. Crée des
répétitions qui alternent entre les canaux
gauche et droit.
(5) Jouez quelques notes sur le clavier et écoutez l’effet.
FUNCTION
●Changer la quantité de réverbération appliquée
aux parties clavier
Pour changer l’intensité de la réverbération (c.-à-d. la quantité
de réverbération ajoutée à une partie), procédez comme suit:
(2) Utilisez FAMILY [√][®] pour sélectionner “EFFECTS”.
96
Rev DUAL
Rev SPLIT
Intensité de réverbération de la partie Split.
(Si [FUNCTION] n’est pas allumé, effectuez d’abord les opérations (1) et (2) ci-dessus.)
(7) Choisissez “0” avec [–][+] si vous ne voulez pas traiter la partie
Keyboard sélectionnée avec l’effet Reverb. Sinon, choisissez la
valeur voulue.
Si vous avez choisi un type MFX (voyez p. 95), le paramètre
Rev MAIN n’affecte pas directement la partie Main mais le
signal du MFX.
Quand le MFX est réglé sur “Off”
Main
Reverb
MFX “Off”
Rev MAIN=
Réverb pour Main
Quand vous avez choisi un autre type MFX
Main
Reverb
MFX
Rev MAIN=
Réverb pour Main + MFX
“Rev Main= 100” désigne alors: l’intensité de réverbération
du signal Main traité sortant du processeur MFX. Vous pouvez
utiliser ce réglage pour une palette d’applications intéressantes:
Distorsion (MFX) + Réverb (REV), Rotary (MFX) + Plate (REV), etc.
(8) Jouez quelques notes sur le clavier et écoutez l’effet.
N’oubliez pas d’activer la partie Split ou Dual si vous voulez
vérifier l’intensité de son effet Reverb.
Remarque: Vous pouvez sauvegarder ce réglage dans un programme utilisateur (voyez p. 105).
EXR-46 OR
(9) Appuyez sur un autre “grand” bouton de la section DATA
ENTRY pour quitter cette fonction.
Chorus
Le chorus élargit la dimension spatiale du son et produit une
impression stéréo. Vous avez le choix entre 8 types.
A la mise sous tension de l’EXR-46 OR, aucune des trois parties Keyboard (Main, Dual, Split) n’est traitée par l’effet Chorus interne.
Notez en outre que l’effet Chorus n’affecte pas la partie Main si
le MFX est réglé sur tout type autre que “Off”.
Si vous n’avez pas besoin de chorus, vous pouvez couper le processeur Chorus (il ne traite alors plus aucune des 19 parties de
l’EXR-46 OR) ou désactiver son traitement seulement pour la partie
Keyboard voulue. Vous ne pouvez pas modifier la quantité de Chorus ajoutée aux parties de l’arrangeur ou de morceaux préenregistrés.
●Activer/couper l’effet Chorus
Pour couper complètement le chorus (pour toutes les parties de
l’EXR-46 OR) ou choisir un autre type de chorus, procédez
comme suit.
(1) Appuyez sur le bouton [FUNCTION] (il doit s’allumer).
(4) Utilisez les boutons [–][+] pour choisir “Off” si vous ne
comptez pas travailler avec le processeur Chorus. Sinon, choisissez un des huit types disponibles (voyez la liste ci-dessous).
Chorus 1
Chorus 2
Chorus 3
Chorus 4
FB Chorus
Flanger
S-Delay
SDelayFb
Si vous avez choisi un type MFX (voyez p. 95), le paramètre Chr
MAIN n’a aucun effet (même s’il est affiché).
Quand le MFX est réglé sur “Off”
Reverb
Main
Chorus
MFX “Off”
(5) Jouez quelques notes sur le clavier et écoutez l’effet.
●Changer la quantité de Chorus appliquée aux parties keyboard
Pour changer l’intensité du Chorus (c.-à-d. la quantité de Chorus
ajoutée à une partie), procédez comme suit:
(6) Si le bouton [FUNCTION] est toujours allumé, utilisez SELECT
[√][®] pour choisir un des paramètres suivants.
Chr MAIN
Intensité de Chorus de la partie Main*.
Chr DUAL
Intensité de Chorus de la partie Dual.
Chr SPLIT
Quand vous avez choisi un autre type MFX
Main
MFX
Reverb
Chorus
(8) Jouez quelques notes sur le clavier et écoutez l’effet.
N’oubliez pas d’activer la partie Split ou Dual si vous voulez
vérifier l’intensité de son effet Chorus.
Remarque: Vous pouvez sauvegarder ce réglage dans un programme utilisateur (voyez p. 105).
(9) Appuyez sur un autre “grand” bouton de la section DATA
ENTRY pour quitter cette fonction.
Intensité de Chorus de la partie Split.
(*) Bien que ce paramètre soit aussi affiché quand le MFX a un autre réglage
que “Off”, la partie Main n’est dans ce cas pas traitée par l’effet chorus.
FUNCTION
(2) Utilisez FAMILY [√][®] pour sélectionner “EFFECTS”.
(3) Utilisez SELECT [√][®] pour sélectionner le paramètre “CHR”:
00 Chorus
3
Remarque: Voyez aussi “Utiliser les boutons FAMILY, SELECT et
les boutons numériques” (p. 80).
(Si [FUNCTION] n’est pas allumé, effectuez d’abord les opérations (1) et (2) ci-dessus.)
(7) Choisissez “0” avec [–][+] si vous ne voulez pas traiter la partie
Keyboard sélectionnée avec l’effet chorus. Sinon, choisissez la
valeur voulue.
Fonction V-LINK
V-LINK est une fonction qui permet de relier musique et vidéo.
Si vous utilisez du matériel vidéo compatible V-LINK (c.-à-d. un
Edirol DV-7PR), vous pouvez facilement lier des effets visuels
aux effets sonores et conférer plus d’expression encore à votre
exécution.
Grâce à l’utilisation combinée de l’EXR-46 OR et d’un Edirol DV-7PR,
vous pouvez:
• Déclencher des changements d’images (clips) avec le clavier
(l’octave la plus haute) de l’EXR-46 OR. Maintenez une touche enfoncée pour allonger la transition (“fondu”). Enfoncez
brièvement une touche pour produire une transition rapide.
• Les boutons numériques [0]~[9] servent à changer de palettes
(à condition que le bouton [USER¥PROGRAM] soit allumé).
• Utiliser l’axe BENDER du levier BENDER/MODULATION pour
changer la vitesse de défilement des images ou choisir une
couleur différente.
• Utiliser les boutons LOCK pour changer d’effet (VFX1~4).
Les signaux V-Link peuvent être transmis via la prise MIDI OUT.
97
r EXR-46 OR
(1) Reliez la prise MIDI OUT de l’EXR-46 OR à la prise MIDI IN
du processeur vidéo externe (ou à une interface UM-1).
REMOTE
Edirol UM-1
Edirol DV-7PR
MIDI OUT
(2) Appuyez sur le bouton [V-LINK] (il s’allume en bleu).
BEAT
(3) Servez-vous de l’axe BENDER, des boutons assignés ou des
touches “V-LINK” (l’octave la plus haute) pour manipuler les
images vidéo en synchronisation avec votre musique (voyez
ci-dessous).
(4) Appuyez à nouveau sur [V-LINK] pour désactiver cette fonction (le bouton s’éteint).
Fonctions V-LINK pilotables par l’EXR-46 OR (et
messages MIDI correspondants)
L’EXR-46 OR propose les fonctions suivantes pour piloter du matériel vidéo compatible V-LINK.
• Clavier: Clip 1~8→ No. de programme: 00H~08H
Enfoncez les touches de l’octave la plus haute pour changer
de clip.
98
• Dynamique: Dissolve Time→ CC23
Le toucher appliqué aux touches de l’octave la plus haute
pilote la vitesse de transition entre les images.
• Boutons [1]~[0] (si le bouton [USER¥PROGRAM] s’allume):
Palette 1~10→ CC00 (Sélection de banque)/00H~09H
Quand le bouton [V-LINK] est allumé, vous pouvez choisir les
palettes 1~10 en appuyant sur les boutons [1]~[0]. (Les boutons numériques conservent leurs fonctions “normales”.)
• Axe BENDER du levier BENDER/MODULATION: Vitesse de
défilement→ Pitch Bend
Déplacez le levier vers la droite pour accélérer le défilement
des images ou vers la gauche pour le ralentir. En position
centrale, la vitesse de défilement est normale.
• Axe MODULATION du levier BENDER/MODULATION: Clip
color→ CC24 (Color CB), CC25 (Color CR)
Poussez le levier vers l’arrière de l’EXR-46 OR pour changer
la couleur. Chaque manipulation du levier sélectionne une
des cinq couleurs disponibles: vert, violet, bleu, rouge, couleur originale du clip.
• Boutons LOCK: VFX1~4, Aucun (ACOUSTIC= Aucun,
POP= V-FX 1, ROCK= V-FX 2, DANCE= V-F1h
• X 3, ETHNIC= V-FX 4)
Utilisez ces boutons pour changer d’effet vidéo. Cette fonction n’est pas disponible si le processeur vidéo récepteur est
déjà réglé sur “Off”.
Remarque: VFX2 n’est pas reconnu par le DV-7.
Remarque: Les messages V-LINK sont transmis sur les canaux
MIDI 13 et 14.
EXR-46 OR
12. Menu Function
Le mode Function de l’EXR-46 OR contient des paramètres plus sophistiqués dont vous n’aurez sans doute pas besoin tous les jours. Ces paramètres servent à affiner la réponse de votre instrument. Nous vous
recommandons donc de vous familiariser avec leur utilisation. Vous pouvez mémoriser la plupart des réglages (“*”) dans un programme utilisateur (voyez p. 105). D’autres paramètres (“°”) sont sauvegardés en
mémoire Flash interne quand vous quittez le mode Function.
Edition de paramètres (procédure
générale)
Vous pouvez éditer les paramètres Function de l’EXR-46 OR à
l’écran. Voici la procédure générale que vous appliquerez à tous les
paramètres dont il est question ici:
(1) Appuyez sur [FUNCTION].
FUNCTION
(2) Utilisez FAMILY [√][®] pour choisir le groupe Function contenant le paramètre voulu:
■ EFFECTS: REV (Reverb), CHR (Chorus), MFX, Tone MFX, Rev
MAIN, Chr MAIN, Pan MAIN, Rev DUAL, Chr DUAL, Pan DUAL,
RevSPLIT, ChrSPLIT, PanSPLIT
■ KB SCALE: Scale C/C#/D/Eb/E/F/F#/G/Ab/A/Bb/B, Scale
Mode
■ MIDI: Local, MidiTxRx, Sync Rx, Style PC, LyricsTx,
NTARx14, PitchBnd, Modulatn, ProgChng, Velo Rx, Clock Tx,
StartStp, SongPosP
■ UTILITY: LockInit, InitFLASH, Resume
■ WriteSNG (voyez p. 109)
■ WriteSTL (voyez p. 110)
■ RemoveSNG (voyez p. 110)
■ Remove STL (voyez p. 111)
■ WriteUPG (voyez p. 110)
■ ReadUPG (voyez p. 110)
■ RemovUPG (voyez p. 111)
(3) Utilisez SELECT [√][®] pour choisir le paramètre à éditer (voyez
ci-dessous).
FAMILY
SELECT
Remarque: Pour retrouver la valeur par défaut du paramètre
choisi, appuyez simultanément sur [+] et [–].
(5) Utilisez les boutons FAMILY [√][®] pour sélectionner un autre
paramètre Function.
(6) Poursuivez avec l’étape (3).
(7) Appuyez sur un autre “grand” bouton de la section DATA
ENTRY pour quitter cette fonction.
Paramètres KB SET
■ Kbd Touch*
(1~127, Réglage par défaut: 110) Ce paramètre permet de
régler la valeur de toucher fixe de l’EXR-46 OR utilisée quand
l’icône KEY TOUCH n’est pas affichée. Voyez p. 94.
Remarque: Vous pouvez aussi choisir ce paramètre en maintenant
enfoncé [KEYBOARD¥TOUCH].
■ MstrTune° (accord global)
(427.4~452.6, Réglage par défaut: 440.0) Ce paramètre permet
de changer l’accord global de l’EXR-46 OR, ce qui peut se révéler nécessaire quand vous accompagnez un chanteur, un instrument acoustique ou quand vous jouez en accompagnant
une cassette ou un CD.
■ USRTrnsp*
■ KB SET: KbdTouch, MsterTune, USRTrnsp, GLB Trnsp,
TransMod, PB Range, KeySplit, SpltHold, SpltInt, FSW, Port
Main, Port Dual, Mode Main, Mode Dual
■ DRUM PAD: DK1/DrumPad1~DK8/DrumPad8
■ METRONOM: Mtro TS, MetroVol, Count-In
■ OCTAVE: MAIN Oct, DUAL Oct, SPLT Oct
■ VOLUME: Main Vol, Dual Vol, SplitVol, Auto Bass,
AccDrums, AccBass, Accomp1~Accomp6, Song1~Song16
■ ARR SET: ArrChord, Arr Hold, EP Chord, Bass Inv, MI
(Melody Intelligence), InEnCHRD, Sync Stop
(–12~12, Réglage par défaut: 0) Utilisez ce paramètre pour
transposer l’EXR-46 OR par demi-tons. Pour en savoir plus sur
la transposition, voyez p. 92. Vous pouvez aussi choisir ce paramètre en appuyant sur le bouton [TRANSPOSE].
Remarque: En mode FUNCTION, SELECT [√][®] ne permettent pas
de passer d’une famille à l’autre.
Le message “VALUE” et un réglage s’affichent, indiquant que
vous pouvez modifier (“éditer”) le paramètre en question.
(4) Utilisez DATA ENTRY [–][+] ou les boutons numériques (uniquement pour des valeurs) pour modifier le réglage du paramètre choisi.
■ GLBTrnsp
(–6~5, Réglage par défaut: 0) Utilisez ce paramètre pour transposer l’EXR-46 OR par demi-tons. Pour en savoir plus sur la
transposition, voyez (voyez p. 93). Vous pouvez aussi choisir ce
paramètre en appuyant sur [TRANSPOSE] et une fois sur SELECT
[®].
Remarque: Voyez aussi page 80.
99
r EXR-46 OR
■ TransMod*
(Réglage par défaut: Int+Song) Ce paramètre permet de spécifier les parties affectées par le réglage de transposition:
Int: Les parties Keyboard et Arranger sont transposées. Les
notes reçues via MIDI, par contre, sont jouées sans changement.
Song: Seules les parties de morceau sont transposées. Ce
réglage n’a de sens que si vous reproduisez un fichier Standard
MIDI ou un de vos propres morceaux avec l’enregistreur de
l’EXR-46 OR.
MIDI: Seules les notes reçues via MIDI sont transposées.
Int+Sng, Int+MIDI, Sng+MIDI, All: Il s’agit de combinaisons
des réglages précédents. Int peut être utile pour transposer
uniquement les parties Keyboard, de sorte à jouer un morceau
du Recorder dans “votre” tonalité tout en sonnant dans la
tonalité du morceau.
■ PB Range° (Plage de Pitch Bend)
(0~24, Réglage par défaut: 2) Ce paramètre sert à spécifier
l’intervalle obtenu en poussant le levier BENDER/MODULATION
à fond à gauche ou à droite (effet Pitch Bend). Ce réglage
s’effectue par pas de demi-ton, avec un maximum de 24 demitons (soit 2 octaves). Le réglage par défaut est de “2”, ce qui
devrait convenir à la plupart des applications.
Remarque: Le Pitch Bend est uniquement disponible pour les parties Main, Dual et Split. Voyez aussi p. 94.
■ KeySplit* (Point de partage)
(48~84, Réglage par défaut: 60) Ce paramètre sert à régler le
point de partage du mode Arranger et de la partie Split. La note
que vous spécifiez ici est la note la plus grave que vous pouvez
jouer avec la partie Main. Le numéro fait référence à une note.
“60” correspond à la note “C4”.
Remarque: Vous pouvez aussi choisir ce paramètre en appuyant
sur le bouton [ARRANGER¥BAND] et en le maintenant enfoncé.
■ SpltHold* (fonction Hold de la partie Split)
(On/Off, Réglage par défaut: Off) La fonction SpltHold
mémorise les accords que vous jouez quand la partie Split est
active et maintient ces notes jusqu’à ce que vous jouiez un
autre accord.
100
■ SpltInt* (Split Chord Intelligence)
(On/Off, Réglage par défaut: Off) Quand vous activez le bouton
[SPLIT], la fonction Split Chord Intelligence de l’EXR-46 OR permet de jouer des accords majeurs d’une pression sur une seule
touche, des accords mineurs en appuyant sur deux touches et
des accords plus complexes en actionnant trois touches. Ce
système suit donc le pilotage de l’arrangeur; aussi, il serait une
bonne idée de choisir “On” dès que vous vous servez de la parARRANGER
tie Split quand l’icône
est affichée.
■ FSW° (Footswitch Assign)
Sustain
(Réglage par défaut: Sustain) Après avoir branché un commutateur au pied DP-2, DP-6 ou BOSS FS-5U. en option à la prise
FOOTSWITCH du panneau arrière, vous pouvez utiliser ce paramètre pour assigner une fonction au commutateur au pied.
Sustain: Cette fonction, aussi appelée “Hold” or “Damper”, permet d’utiliser le commutateur au pied pour maintenir les notes
jouées sur le clavier, pratiquement comme sur un piano acoustique.
Sostenut: Le commutateur au pied fait office de pédale Sostenuto (autre pédale équipant les pianos à queue et numériques
et qui permet de ne maintenir que les notes jouées quand on
appuie sur la pédale).
Remarque: Cette fonction n’est disponible que pour les parties
Keyboard.
Soft: Dans ce cas, le commutateur au pied fonctionne comme
une pédale Soft (pédale pour pianos à queue et pianos numériques, qui réduit le volume).
Remarque: Cette fonction n’est disponible que pour les parties
Keyboard.
Rotary S/F: Permet de choisir la vitesse lente ou rapide de
l’effet Rotary. Cette fonction n’est disponible que si le type
“Rotary” est assigné au MFX (voyez p. 95).
UsrPrgUp: Sélectionne le programme utilisateur suivant (par
exemple, “20” si “19” est actif).
UsrPrgDw: Sélectionne le programme utilisateur précédent
(par exemple, “1” si “199” est actif).
Start/Stop: Lance et arrête la reproduction de l’arrangeur ou
de morceau. Même fonction que le bouton [START÷STOP].
Bass Inv: Active et coupe la fonction Bass Inversion (voyez
p. 88).
Punch I/O: Le commutateur au pied peut activer et arrêter
l’enregistrement Punch in/out (voyez p. 85).
■ Port Main
(Off, 1~127, Réglage par défaut: 0ff) Le portamento est un
effet qui produit un glissement de hauteur progressif entre les
notes que vous jouez. Plus la valeur est élevée, plus il faut longtemps pour que la hauteur de la nouvelle note soit atteinte.
Ce paramètre permet de régler deux paramètres simultanément pour la partie Main (il y a un autre paramètre pour la
partie Dual): le commutateur de portamento et le temps de
portamento. Quand vous choisissez une valeur comprise entre
“1” et “127”, le commutateur de portamento est automatiquement activé: “On” (127).
■ Port Dual
(Off, 1~127, Réglage par défaut: 0ff) Ce paramètre permet de
régler deux paramètres simultanément pour la partie Dual: le
commutateur de portamento et le temps de portamento. Voyez
l’explication ci-dessus.
■ Mode Main
Mode Main
(Mon/Pol, Réglage par défaut: Pol) Ce paramètre permet de
préciser si la partie Main doit être polyphonique (“Pol”) ou
monophonique (“Mon”). “Polyphonique” permet de jouer des
accords tandis que “monophonique” ne permet de jouer qu’une
seule note à la fois. Cela peut être utile pour le violon, des bois
ou d’autres sons semblables car l’instrument acoustique correspondant ne produit pas d’accords. Si vous enfoncez deux touches après avoir choisi “Mon”, seule la note jouée en dernier
lieu résonne (la simultanéité du jeu n’est jamais parfaite).
■ Mode Dual
(Mon/Pol, Réglage par défaut: Pol) Ce paramètre permet de
préciser si la partie Dual doit être polyphonique (“Pol”) ou
monophonique (“Mon”). Lisez aussi ci-dessus.
EXR-46 OR
Paramètres DRUM PAD
Les paramètres de ce groupe vous permettent d’assigner les
sons de batterie/percussion voulus aux huit touches DRUM
PAD. Ces assignations sont utilisées en mode DRUM PAD (voyez
p. 92).
• Utilisez les boutons SELECT [√][®] pour sélectionner le
paramètre à changer.
Le message à droite des paramètres “dK” (dK1~dK8) indique
le kit de batterie (“Drum Kit”) auquel appartient le son
assigné à la touche DRUM PAD (1~8, octave la plus aiguë).
Quand vous choisisisez un paramètre “dK”, l’écran a l’aspect
suivant:
STANDARD1
(Cette illustration signifie que vous pouvez sélectionner un
autre kit de batterie pour la touche DRUM PAD la plus grave,
étiquetée “1”). Découvrez les kits de batterie disponibles sous
“Drum Kits” (p. 123).
• Avec les boutons DATA ENTRY [–][+], sélectionnez le kit de
batterie contenant le son voulu.
• Appuyez sur SELECT [®] pour sélectionner le paramètre
“DrumPad” (DrumPad1~8) ayant le même numéro que le
paramètre “dK” que vous venez de changer.
Pour notre exemple, il s’agit de “DrumPad1”.
DrumPad1
Rappelez-vous: chaque kit de batterie dispose de 128 sons
de batterie/perucssion . Vous ne pouvez assigner qu’un de
ces sons à chaque touche DRUM PAD. (Rappel: ici, vous allez
assigner un son à la touche DRUM PAD “1”.)
Le numéro de gauche est le numéro de note. “036”
représente le son “Kick 2”. Voyez les tableaux de la page 123
et suivantes.
• Utilisez les boutons DATA ENTRY [–][+] pour choisir le numéro
du son à assigner.
• Utilisez les boutons SELECT [√][®] pour sélectionner le
paramètre DRUM PAD suivant et recommencez les opérations ci-dessus pour le régler.
Note: Ces réglages peuvent être sauvegardés dans un programme utilisateur, ce qui vous permet (en théorie) de programmer 200 assignations différentes.
Paramètres METRONOM
■ Metro TS° (métrique du métronome)
(1/4~9/4, 1/8~9/8, Réglage par défaut: 4/4) Ce paramètre sert à
régler la métrique du métronome (le nombre de temps par
mesure). Songez que ce réglage change chaque fois que vous
choisissez un style musical d’une métrique différente. Voyez
p. 74 la manière d’utiliser le métronome. Vous pouvez aussi
activer ce paramètre en maintenant enfoncé le bouton
[METRONOME].
■ Metro Vol° (volume du métronome)
(0~127, Réglage par défaut: 100) Servez-vous de ce paramètre
s’il vous semble que le son du métronome est trop fort/faible
par rapport à la musique. Le réglage par défaut convient dans
la plupart des cas.
■ Décompte
(On/Off, Réglage par défaut: Off) Ce paramètre sert à activer/
couper la fonction de décompte pour l’enregistrement normal
et Punch I/O (voyez p. 85). Quand ce paramètre est sur “On”, le
métronome décompte deux mesures (8 temps pour un morceau d’une métrique en 4/4).
Paramètres OCTAVE
■ MAIN Oct*, DUAL Oct*, SPLIT Oct* (transposition par octave)
(–4~0~4, Réglage par défaut: 0) Ces trois paramètres vous permettent de changer l’octave de la partie en question (Main,
Split ou Dual) d’un maximum de quatre octaves vers le haut ou
vers le bas. Cette fonction peut être utile pour les morceaux
Techno/Dance, quand vous voulez un son de piano qui joue
dans deux octaves différentes.
Pour ce faire, assignez deux sons de piano différents (ou un
même son) aux parties Main et Dual, activez le bouton [DUAL]
et réglez DUAL Octv sur “–1” (ou “1”).
Remarque: Si un kit de batterie est assigné à la partie Main, la
hauteur des sons de batterie/de percussion n’est pas transposée.
Les touches sont simplement assignées à d’autres sons de batterie/
de percussion (elles sont “décalées”). Exemple: si vous réglez “MAIN
Oct” sur “–1”, la touche C3 pilote la grosse caisse (au lieu de la touche C2) et les autres sons sont disponibles à gauche de la touche
C3.
Paramètres VOLUME
■ Main Vol*, Dual Vol*, SpltVol*: Volume
Main Vol
(0~127, Réglage par défaut: 127 Main/110 Dual/100 Split) Ces
trois paramètres permettent de régler respectivement le
volume des parties Main, Dual et Split. Notez que les réglages
effectués ici n’ont aucun effet si vous avez utilisé BALANCE
[ACCOMP] pour régler au maximum le volume des parties de
l’arrangeur/du morceau.
Remarque: Vous pouvez aussi régler le volume de la partie Dual en
maintenant [DUAL] enfoncé tout en appuyant sur [ACCOMP] ou
[KEYBOARD]. Cette méthode s’applique aussi à la partie Split, sauf
que dans ce cas, vous maintenez [SPLIT] enfoncé.
■ Auto Bass*: statut et volume
(OFF, 0~127, Réglage par défaut: OFF) Quand la partie Split est
active, ce paramètre permet de régler le volume de la partie
Auto Bass (qui est alors activée). Cette partie sonne des notes
de basse monophoniques en se basant sur les accords que vous
jouez. Si la fonction Bass Inversion (voyez p. 88) est coupée, la
partie Auto Bass produit les toniques (fondamentales) des
accords que vous jouez de la main gauche (avec la partie Split).
La partie Auto Bass peut aussi être ajoutée à la partie EP Chord
(voyez ci-dessous); elle obéit alors aux mêmes règles que cette
partie. Vous pouvez régler le volume et le statut d’Auto Bass
indépendamment pour “l’utilisation Split” et “l’utilisation EP
Chord”.
Dans les deux cas, choisissez off si vous n’avez pas besoin de
la partie Auto Bass.
■ AccDrums*, AccBass*, Accomp1*~Accomp6*: Volume
(0~127, Réglage par défaut: 100 AccDrums/100 AccBass/
100 Accomp1~6) Ces trois paramètres permettent de régler le
volume des trois sections d’un style musical: la partie de batterie, de basse et celles d’accompagnement (1~6). Vous pouvez
recourir à ces paramètres si le “mix” original du style musical en
question ne vous semble pas parfait.
101
r EXR-46 OR
■ Song1~Song16: Volume
(–64~0~63) Ces paramètres de volume s’appliquent aux pistes
correspondantes du morceau actuellement reproduit. Dans la
majorité des cas, vous souhaiterez sans doute changer le
volume de la piste 4 (mélodie), 2 (basse) ou 10 (batterie). Notez
que pour les autres pistes (1, 5~9, 11~16), il est possible qu’il
vous faille plus longtemps pour localiser la piste à corriger, car
l’affectation des parties est plus ou moins libre. Retenez cependant que tous les fichiers Standard MIDI n’exploitent pas les 16
pistes disponibles (il se peut donc très bien qu’un changement
de volume de la piste 16, par exemple, ne produise aucun effet
audible).
Le réglage de ces paramètres est relatif et défini par rapport au
volume des parties du morceau: la valeur spécifiée ici est ainsi
soustraite (si elle est négative) ou ajoutée (si elle est positive)
au volume de ces parties. “127” correspond à la limite maximum (définie par la norme MIDI). Il peut arriver que vous ne
puissiez pas augmenter le volume d’une piste (car il est déjà sur
“127”). Si le volume d’une piste vous semble parfait, choisissez
“0”.
N’oubliez pas que les changements effectués ici doivent impérativement être sauvegardés avec les données de morceau. Ils ne sont pas sauvegardés dans un programme utilisateur. Pour savoir comment sauvegarder les morceaux, voyez
pages 109 et 114.
Paramètres ARR SET
■ ChordInt* (Arranger Chord Intelligence)
(Md1, Md2, Off, Réglage par défaut: Md1) Ce paramètre permet de choisir le système Chord Intelligence de l’EXR-46 OR: le
système Roland (“Md1”, plus adapté au contexte pédagogique,
voyez page 131) ou le système “Md2”, qui fonctionne comme
suit:
Accords majeurs Appuyez sur la touche correspondant à la fondamentale de
l’accord.
Accords mineurs Fondamentale + n’importe quelle touche noire à gauche de
la fondamentale.
Accords de
septième
Fondamentale + n’importe quelle touche blanche à gauche
de la fondamentale.
Accords de
Fondamentale + n’importe quelle touche noire à sa gauche
septième mineure + n’importe quelle touche blanche à sa gauche.
Dans les deux cas, il suffit donc d’enfoncer quelques touches
pour produire des accords complets. Si vous avez l’habitude de
jouer des accords complets, vous pouvez couper cette fonction.
■ ArrHold* (Arranger Hold)
(On/Off, Réglage par défaut: On) La fonction Arranger Hold
mémorise les accords joués de la main gauche et continue à
produire les notes correspondantes jusqu’à ce que vous jouiez
un autre accord.
Si vous coupez la fonction ArrHold, les parties mélodiques de
l’arrangeur (A.Bass, Accomp) s’arrêtent de jouer dès que vous
relâchez la ou les touche(s) dans la moitié gauche du clavier, ce
qui ne vous laisse plus que l’accompagnement de batterie.
Pour vous simplifier la vie, cette fonction est activée à la mise
sous tension de l’EXR-46 OR.
■ EP Chord° (cordes stéréo main gauche + basse)
(On/Off, Réglage par défaut: On) La fonction EP Chord (“Educational Purposes”) active un son de cordes stéréo et un son de
basse monophonique (à condition qu’Auto Bass soit réglé sur
ARRANGER
“on”) quand (a) l’icône
est affichée et (b) l’arrangeur est à l’arrêt. Cela vous permet de jouer des accords (et une
ligne de basse) de la main gauche en mode Arrangeur – sans
utiliser la fonction d’accompagnement de l’EXR-46 OR.
Par contre, si vous choisissez “Off”, la moitié gauche du clavier
est coupée si les conditions (a) et (b) sont remplies et si l’icône
SPLIT n’est pas affichée.
102
■ Bass Inv*
(On/Off) Cette fonction permet de changer la manière dont
l’arrangeur interprète les accords que vous jouez. Voyez p. 88.
■ MI* (type d’harmonie Melody Intelligence)
(Réglage par défaut: Traditnl) Ce paramètre permet d’assigner
le type d’harmonie voulu à la fonction Melody Intelligence.
Remarque: Vous pouvez aussi choisir ce paramètre en maintenant
enfoncé le bouton [MELODY¥INTELLIGENCE]. Voyez p. 87.
■ InEnCHRD* (reconnaissance d’accords pour les motifs Intro/
Ending)
(On/Off, Réglage par défaut: Off) Ce paramètre permet de
désactiver la reconnaissance d’accords pendant le jeu du motif
d’introduction ou de finale du style musical choisi en mode
PIANIST. Contrairement aux motifs “normaux” (Original, Variation), les motifs Intro et Ending contiennent généralement des
changements d’accords. Si vous choisissez “Off”, la reconnaissance d’accords est active pendant le jeu de l’introduction/
du motif de fin. Dans ce cas, il se peut que l’accompagnement
change de tonalité. Pour éviter ces changements, choisissez
“On”.
■ Sync Stop* (système utilisé pour les arrêts automatiques)
(Int/Nor, Réglage par défaut: Nor) Ce paramètre permet de
spécifier le mode de fonctionnement de SYNC STOP (voyez
p. 76). Sélectionnez “Nor” pour que l’arrangeur s’arrête dès que
vous relâchez les touches dans la zone de reconnaissance
d’accords (côté gauche du clavier en mode ARRANGER et clavier entier en mode PIANIST). Lorsque vous jouez un nouvel
accord, l’arrangeur redémarre au début du style sélectionné.
Si vous sélectionnez “Int”, activez la fonction SYNC STOP (voyez
p. 76) puis relâchez toutes les touches dans la zone de reconnaissance d’accords; l’arrangeur s’arrête au début de la mesure
suivante et toutes les notes jouées à ce moment continuent à
résonner (à condition que la fonction “ArrHold” soit activée).
Lorsque vous jouez un nouvel accord, l’arrangeur redémarre à
l’endroit où il s’était arrêté quand vous avez relâché toutes les
touches de la zone de reconnaissance d’accords.
Remarque: Vous pouvez aussi choisir ce paramètre en maintenant
le bouton [SYNC¥START/STOP] enfoncé.
EXR-46 OR
Paramètres EFFECTS
■ Rev* (Type de réverbération)
(Réglage par défaut: Hall 2) Utilisez ce paramètre pour choisir
le type de réverbération le mieux adapté à vos besoins ou pour
désactiver (“Off”) le processeur Reverb. Voyez p. 96.
■ Chr* (type de chorus)
(Réglage par défaut: Chorus 3) Ce paramètre permet de spécifier le type d’effet Chorus ou de désactiver (“Off”) le processeur
Chorus. Voyez p. 97.
■ MFX* (type MFX)
commençant par “L” correspondent à l’enceinte gauche. “0”
correspond au centre et les valeurs commençant par “R” à
l’enceinte droite.
■ Rev DUAL*
(0~127, Réglage par défaut: 100) Ce paramètre règle le niveau
d’envoi de réverb (Reverb Send) pour la partie Dual (c.-à-d.
combien de réverb est ajoutée aux notes Dual). Choisissez “0” si
vous ne voulez pas traiter la partie Dual avec cet effet.
■ Chr DUAL*
(Réglage par défaut: Rotary) Ce paramètre permet de choisir le
type MFX voulu et de désactiver le processeur MFX. Voyez p. 95
pour en savoir plus sur le MFX. “Off” signifie que le MFX est
coupé.
(0~127, Réglage par défaut: 0) Ce paramètre règle le niveau
d’envoi de chorus (Chorus Send) pour la partie Dual (c.-à-d.
combien de chorus est ajouté aux notes Dual). Si vous voulez
traiter cette partie avec l’effet Chorus, veillez à choisir une
valeur autre que “0”.
Remarque: Vous pouvez en outre lier le choix du type MFX au
choix du son pour la partie Main.
■ Pan DUAL*
■ Tone MFX°
(On/Off, Réglage par défaut: On) Ce paramètre permet de lier le
choix d’un type MFX au son assigné à la partie Main. Vous pouvez ainsi choisir un effet Distortion/Overdrive pour un son de
guitare rock, un effet Rotary pour un son d’orgue, etc.
■ Rev MAIN*
(0~127, Réglage par défaut: 100) Ce paramètre règle le niveau
d’envoi de réverb (Reverb Send) pour la partie Main (c.-à-d.
combien de réverb est ajoutée aux notes Main). Choisissez “0” si
vous ne voulez pas traiter la partie Main avec cet effet.
■ Chr MAIN*
(0~127, Réglage par défaut: 0) Ce paramètre règle le niveau
d’envoi de chorus (Chorus Send) pour la partie Main (c.-à-d.
combien de chorus est ajouté aux notes Main). Si vous voulez
traiter cette partie avec l’effet Chorus, veillez à choisir une
valeur autre que “0”. Ce paramètre est uniquement utilisé
quand MFX est réglé sur “Off”.
■ Pan MAIN*
(Rnd, R63~0~L63, Réglage par défaut: 0) Ce paramètre détermine le panoramique de la partie Dual (sa position entre les
enceintes gauche et droite). Pour “Rnd”, la position stéréo
change de manière aléatoire à chaque note jouée. Les valeurs
commençant par “L” correspondent à l’enceinte gauche. “0”
correspond au centre et les valeurs commençant par “R” à
l’enceinte droite.
■ Rev SPLIT*
(0~127, Réglage par défaut: 100) Ce paramètre sert à régler le
niveau d’envoi de réverb (Reverb Send) pour la partie Split.
Choisissez “0” si vous ne voulez pas traiter la partie Split avec
cet effet.
■ Chr SPLIT*
(0~127, Réglage par défaut: 0) Ce paramètre sert à régler le
niveau d’envoi de chorus (Chorus Send) pour la partie Split. Si
vous voulez traiter cette partie avec l’effet Chorus, veillez à
choisir une valeur autre que “0”.
■ Pan SPLIT*
(Rnd, R63~0~L63, Réglage par défaut: 0) Ce paramètre détermine le panoramique de la partie Split (sa position entre les
enceintes gauche et droite). Pour “Rnd”, la position stéréo
change de manière aléatoire à chaque note jouée. Les valeurs
commençant par “L” correspondent à l’enceinte gauche. “0”
correspond au centre et les valeurs commençant par “R” à
l’enceinte droite.
Paramètres KB SCALE
■ Scale C*~Scale B* (Gamme)
(–64~63, Réglage par défaut: 0 pour toutes les notes) Ces paramètres vous permettent de vous écarter de la gamme habituelle à intervalles de demi-ton (utilisée dans la musique occidentale) en changeant la hauteur des notes, pour adapter votre
musique à d’autres cultures musicales ou méthodes d’accord
(musique orientale, baroque, etc.). Ces réglages sont assignés
aux boutons ORIENTAL SCALE.
Vous pouvez changer la hauteur de toutes les notes d’une
octave (Do, Do#, Ré, Mib, Mi…). Les réglages que vous effectuez
ici s’appliquent à toutes les notes du même nom (c.-à-d. à chaque Do, chaque Do#, etc.). La plupart du temps, vous choisirez
sans doute les valeurs “50” ou “–50” car elles correspondent
exactement à un quart de ton vers le haut ou vers le bas. Notez
que d’autres réglages peuvent aussi produire des résultats intéressants.
■ Scl Mode*
(MN, ALL, Réglage par défaut: MN) Ce paramètre permet de
spécifier les parties auxquelles s’appliquent les réglages Scale
(voyez ci-dessus): uniquement la partie Main (“MN”) ou toutes
les parties (“ALL”). Parfois, le choix de “ALL” peut produire de
meilleurs résultats.
Paramètres MIDI
Voyez page 107.
(Rnd, R63~0~L63, Réglage par défaut: 0) Ce paramètre détermine le panoramique de la partie Main (sa position entre les
enceintes gauche et droite). Pour “Rnd”, la position stéréo
change de manière aléatoire à chaque note jouée. Les valeurs
103
r EXR-46 OR
Paramètres UTILITY
■ LockInit
(On/Off, Réglage par défaut: On) Cette fonction permet de protéger la mémoire Flash de l’EXR-46 OR et d’éviter de l’initialiser
par inadvertance (voyez le paramètre suivant). Coupez la protection (“Off”) uniquement pour utiliser le paramètre “InitFLSH”. Par sécurité, la protection est activée (“On”) lors de la
mise sous tension de l’EXR-46 OR.
Vous pouvez aussi initialiser la mémoire Flash sans sélectionner
ce paramètre FUNCTION au préalable: maintenez le bouton
[KEYBOARD¥TOUCH] enfoncé et mettez l’EXR-46 OR sous tension. L’écran affiche brièvement le message “UNLCKFLS”.
■ InitFLSH (Initialisation de la mémoire Flash)
Cette fonction initialise (formate) la mémoire Flash de
l’EXR-46 OR. Cette opération n’est nécessaire que si les données de la mémoire Flash deviennent illisibles.
Remarque: L’exécution de cette fonction efface tous les fichiers
Standard MIDI et les styles musicaux dans la zone Flash de
l’EXR-46 OR.
Appuyez sur [YES/+] en réponse au message clignotant “Yes”.
Le message “Sure?” apparaît et Yes se met à clignoter.
Appuyez sur [YES÷+] pour initialiser la mémoire Flash (ou sur
[NO/–] si vous changez d’avis).
L’EXR-46 OR affiche le message “Complete” puis quitte
cette fonction.
■ Resume
Choisissez cette fonction pour rappeler les réglages Function
d’usine de l’EXR-46 OR.
Remarque: La fonction Resume n’initialise pas les paramètres
MIDI du mode FUNCTION (voyez p. 107).
Appuyez sur [YES/+] en réponse au message clignotant “Yes”.
L’EXR-46 OR affiche le message “Complete” puis quitte
cette fonction.
Remarque: Il n’y a pas de demande de confirmation “Sure?” vous
donnant l’occasion de réfléchir. N’appuyez donc sur [YES/+] que si
vous êtes sûr de vouloir rappeler TOUS les réglages Function
d’usine.
104
EXR-46 OR
13. Tirer parti des programmes utilisateur
L’EXR-46 OR est doté de 200 mémoires de programme utilisateur permettant de conserver pratiquement tous les réglages que vous effectuez en face avant et avec le menu Function (voyez p. 99).
Remarque: Les réglages MIDI (voyez p. 107) ne sont pas sauvegardés dans un programme utilisateur car l’EXR-46 OR les mémorise
automatiquement.
Enregistrer les réglages dans un
programme utilisateur
Nous vous recommandons de mémoriser souvent vos réglages,
même s’il vous reste des changements à faire par la suite. Ces
sauvegardes intermédiaires permettent notamment de revenir à
un stade préalable si vous n’aimez pas vos dernières modifications.
(1) Maintenez le bouton [USER¥PROGRAM÷WRITE] enfoncé.
USER
PROGRAM
Voici les caractères disponibles:
_ ! # $ % & ’ - @ ^ ‘
0 1 2 3 4 5 6 7 8 9
A B C D E F G H I J K L M
N O P Q R S T U V W X Y Z
Remarque: Chaque fois que vous appuyez sur un autre bouton
numérique (pour entrer un caractère), le curseur avance automatiquement jusqu’à la position suivante. Cette procédure est
semblable à l’entrée de caractères sur un téléphone portable.
(5) Appuyez sur le bouton [YES/+] pour sauvegarder vos réglages
dans la mémoire choisie. (Appuyez sur [NO/–] si vous avez
changé d’avis et ne voulez plus sauvegarder.)
L’écran affiche alors le message “Complete”.
Remarques sur la sauvegarde des programmes utilisateur
Quitter l’environnement User Program
Appuyez sur tout autre “grand” bouton DATA ENTRY pour quitter l’environnement User Program.
L’EXR-46 OR affiche maintenant “-Write ?”.
(2) Entrez le numéro de la mémoire où vous voulez sauvegarder
vos réglages avec les boutons numériques [0]~[9].
Le message “Yes” se met à clignoter.
(3) Appuyez sur [YES÷+] pour confirmer le numéro.
(4) Donnez ensuite un nom à votre programme utilisateur avec
les boutons numériques [0]~[9].
Programmes utilisateur et mémoire USER STL
Le dernier style musical sélectionné avant la sauvegarde d’un
programme utilisateur est aussi mémorisé. C’est aussi le cas de la
mémoire USER STL, qui peut contenir un style chargé d’une
disquette ou de la mémoire Flash (voyez p. 79).
Ces 200 programmes utilisateur sont alors sauvegardés en
mémoire Flash (voyez p. 109) ou sur disquette (voyez p. 114)
sous forme de set.
Sélection d’un programme
utilisateur
Bien que le programme utilisateur spécifié plus haut soit déjà
sélectionné, il faut parfois en changer. Dans ce cas, voici comment procéder:
(1) Appuyez brièvement sur [USER¥PROGRAM÷WRITE] (le bouton s’allume). Ne maintenez pas ce bouton enfoncé car
vous entameriez la procédure de sauvegarde (Write) dont
il était question plus haut.
Signification du numéro clignotant
Vous constaterz sans doute que numéro du programme utilisateur se met parfois à clignoter.
Cela signifie que le dernier programme utilisateur sélectionné
est toujours en vigueur mais que les réglages actuels ne correspondent plus à ceux contenus dans cette mémoire. De tels changements peuvent concerner l’état des effets Reverb et Chorus,
une valeur Balance modifiée, etc.
Avant de sélectionner un autre programme utilisateur ou de
couper l’alimentation de l’EXR-46 OR, sauvegardez ces réglages
dans le programme utilisateur (ou dans un autre) si vous voulez
les conserver. Sinon, vous perdez ces modifications.
Sélection de mode
USER
PROGRAM
L’écran indique alors le numéro du programme utilisateur
sélectionné en dernier lieu ou “1” si vous n’avez pas encore
sélectionné de programme utilisateur depuis la mise sous tension de l’EXR-46 OR.
USERPROG
Le mode (Arranger, p. 75, Piano Solo, p. 73, Pianist, p. 87) est
aussi mémorisé dans le programme utilisateur.
105
r EXR-46 OR
Le numéro clignotant vous avertit que l’EXR-46 OR se sert toujours des derniers changements manuels que vous avez peutêtre effectués avant de sélectionner la fonction User Program. Il
ne signifie donc rien de plus que “ceci est la dernière mémoire
sélectionnée”.
Aucun de ses réglages n’est utilisé pour l’instant. En appuyant
sur un autre “grand” bouton de la section DATA ENTRY, vous
pouvez quitter le mode User Program sans changer vos réglages
manuels. Cela peut être important si vous étiez sur le point
d’enregistrer vos réglages et si vous avez appuyé accidentellement sur le mauvais bouton (ou que vous n’avez pas appuyé
assez longtemps).
Pour choisir un programme utilisateur…
(2) Utilisez les boutons numériques [0]~[9] pour choisir la
mémoire (00~199).
Les réglages du programme utilisateur choisi sont alors rappelés.
Remarque: Vous pouvez aussi utiliser les boutons FAMILY et
SELECT [√][®] pour choisir les programmes utilisateur.
Remarque: Dès que vous modifiez le moindre réglage (en face
avant ou dans le menu FUNCTION), le numéro de programme
utilisateur commence à clignoter.
Lock: filtrer certains réglages des
programmes utilisateur
L’EXR-46 OR est doté de cinq boutons LOCK dotés chacun de
deux fonctions permettant de filtrer divers réglages des programmes utilisateur que vous chargez.
Ces filtres (“locks”) vous permettent d’utiliser les réglages de vos
programmes utilisateur plus efficacement car ils empêchent le rappel de certains réglages idéaux pour un ancien morceau mais indésirables pour le nouveau.
Voici un exemple: imaginez que vous avez sauvegardé un programme utilisateur pour le morceau “A” en réglant la fonction
“Mode” de la partie Main sur “Mon”. Tous les autres réglages du programme sont parfaits pour le morceau “B”. Sans le paramètre LOCK,
vous seriez obligé de créer un second programme utilisateur (pour
régler le paramètre “Main Mode” sur “Pol”). Sur l’EXR-46 OR toutefois, il suffit d’activer le bouton [MONO÷PORT] pour pouvoir utiliser
le programme utilisateur préparé pour le morceau “A”.
(1) Appuyez sur le bouton LOCK correspondant au réglage à
ignorer.
(3) Appuyez sur tout autre “grand” bouton de la section DATA
ENTRY pour quitter ce mode.
Bouton
Fonction
TONE (x2)
Les parties Main et Dual et les assignations
USER TONES ne changent pas.*
TEMPO (x1) Le réglage de tempo en vigueur ne change
pas.
TEMPO (x2) La valeur de tempo et le réglage de la fonction SYNC START ne changent pas.
TRANSPOSE Le réglage “USRTrnsp” ne change pas.
(x1)
TRANSPOSE Le réglage “USRTrnsp” et l’état des boutons
(x2)
ORIENTAL SCALE ne changent pas.
MONO/PORT Les réglages “Mode” et “Port” de la partie
(x1)
Main (voyez p. 100) ne changent pas.
MONO/PORT Les réglages “Mode” et “Port” des parties Main
(x2)
et Dual (voyez p. 100) ne changent pas.
(*) Les assignations des boutons USER TONES (voyez p. 90) sont
sauvegardées dans un programme utilisateur.
Vous pouvez aussi activer plusieurs boutons simultanément.
(2) Sélectionnez le programme utilisateur dont vous voulez utiliser les réglages (à l’exception de certains).
(3) Coupez les boutons LOCK activés avant de charger encore un
autre programme utilisateur si vous avez besoin de tous ses
réglages.
Remarque: L’état des boutons LOCK n’est pas sauvegardé dans
un programme utilisateur.
Chaque bouton a deux fonctions. Appuyez soit une fois sur le
bouton (il s’allume) ou deux fois rapidement (il clignote) pour
activer le filtre voulu:
106
Bouton
Fonction
STYLE (x1)
Le style musical ne change pas quand vous
sélectionnez un autre programme utilisateur.
STYLE (x2)
Le style musical et le réglage BAND ORCHESTRATOR ne changent pas.
TONE (x1)
Les parties Main et Dual ne sélectionnent pas
les sons sauvegardés dans le programme utilisateur choisi.
EXR-46 OR
14. Fonctions MIDI
MIDI est l’acronyme de “Musical Instrument Digital Interface”. Le terme fait référence à de nombreuses choses mais avant tout à un type de connexion permettant à des instruments de musique et d’autres appareils électroniques d’échanger des messages concernant l’élaboration musicale.
Remarque: Toutes les parties de l’EXR-46 OR peuvent recevoir
sons interne. Par contre, ils sont toujours transmis à la prise
Chaque fois que vous jouez sur le clavier de l’EXR-46 OR ou que
des messages MIDI. Si elles ne semblent pas réagir aux messages
MIDI OUT ou au port USB (et donc aux instruments MIDI extervous lancez l’arrangeur (ou un morceau), votre instrument transmet
venant d’un contrôleur externe, voyez si la prise MIDI OUT du
nes).
des données MIDI via sa prise MIDI OUT. Si vous reliez la prise MIDI
contrôleur est correctement reliée à la prise MIDI IN de
OUT à la prise MIDI IN d’un autre instrument, ce dernier peut jouer
Générateur
Générateur
l’EXR-46 OR.
les mêmes notes qu’une des parties de l’EXR-46 OR, choisir des sons,
de sons
etc.
Les canaux de transmission et de réception de toutes les parties
MIDI est une norme universelle: les données musicales peuvent
qu’utilise l’EXR-46 OR répondent à une norme tacite de Roland
donc être transmises et reçues par des instruments de types et
utilisée par les instruments récents des séries EM, E, G et RA.
fabricants différents. En outre, grâce au MIDI, vous pouvez brancher
Vous ne pouvez pas les modifier. Ils correspondent en outre aux
votre EXR-46 OR à un ordinateur ou un séquenceur.
assignations de pistes de l’enregistreur 16 pistes.
Branchez votre EXR-46 OR comme illustré ci-dessous.
L’EXR-46 OR reçoit des données
1
2
3
4
5
6
7
8
Instrument MIDI externe/ordinateur
EXR-46 OR
Accomp 1
Basse de l’arrangeur
Accomp 2
kMain
Accomp 3
kDual
Accomp 4
9
10
11
12
13
14
15
16
Accomp 6
Batterie de l’arrangeur
kSplit
kAuto Bass
V-Link
V-Link
Melody Intell. (voyez p. 87)
ALL
Toutes les parties.
KBD
Uniquement les parties Keyboard (voyez k dans le
tableau ci-dessus).
Pour savoir comment choisir et régler ces paramètres Function,
voyez “Edition de paramètres (procédure générale)” (p. 99) (ils font
partie de la famille “MIDI”).
STL
Uniquement les parties Arranger
(AccDrums~Accomp 6).
Remarque: A l’exception de “Local”, tous les réglages des paramètres MIDI sont sauvegardés quand vous quittez le mode Function.
SNG
Uniquement les parties du morceau (1~16).
OFF
Aucune partie de l’EXR-46 OR ne transmet ni ne
reçoit de messages MIDI.
(kMain*)
(*) Si vous assignez un kit de batterie à la partie Main.
Ordinateur
L’EXR-46 OR transmet et reçoit des données
(*) Si vous branchez la prise USB de l’EXR-46 OR à un ordinateur ou autre
appareil, les prises MIDI IN et OUT ne sont plus utilisables. Cette communication fonctionne uniquement quand l’icône
n’est
PAS affichée.
Canaux
MIDI peut transmettre et recevoir des messages sur 16 canaux
simultanément, ce qui permet de piloter jusqu’à 16 instruments.
Actuellement, la plupart des instruments sont multitimbraux
comme l’EXR-46 OR: ils peuvent jouer plusieurs parties musicales
avec des sons différents.
Ce paramètre détermine les parties de l’EXR-46 OR pouvant
transmettre et recevoir des messages MIDI:
Signification
Accomp 5
—ou—
(en utilisant le câble USB fourni)
■ MIDI TxRx° (transfert et réception MIDI)
Option
L’EXR-46 OR transmet des données
EXR-46 OR
Remarque: Le réglage de ce paramètre n’est pas mémorisé quand
vous mettez l’EXR-46 OR hors tension.
Paramètres Function MIDI
■ Local
(On/Off, Réglage par défaut: On) Le paramètre Local vous permet d’établir ou de couper le lien entre le clavier de
l’EXR-46 OR et l’enregistreur d’une part et le générateur de
sons interne d’autre part.
Avec un réglage “ON” (réglage d’usine), les notes jouées sur le
clavier de l’EXR-46 OR ou la reproduction d’un morceau de
l’enregistreur sont audibles. Si vous choisissez “OFF”, les messages MIDI en question ne sont plus transmis au générateur de
■ Sync Rx° (synchronisation MIDI)
Ce paramètre permet de spécifier la façon dont l’EXR-46 OR
doit se synchroniser (comme esclave) à un séquenceur, ordinateur, boîte à rythmes MIDI, etc.
Cette fonction permet de synchroniser un appareil (ou une
fonction) sur un autre appareil (ou fonction) pour les lancer/
arrêter simultanément et les utiliser au même tempo BPM.
107
r EXR-46 OR
Notez qu’il ne peut y avoir synchronisation que si vous avez
branché la prise MIDI OUT de l’appareil externe à la prise MIDI
IN de l’EXR-46 OR (vous pouvez aussi faire l’inverse; voyez alors
le manuel de l’appareil externe pour en savoir plus).
Off
Dans ce cas, l’EXR-46 OR n’est pas synchronisé avec
d’autres appareils MIDI. Il est donc impossible de le faire
démarrer/de l’arrêter via MIDI.
On
Ce réglage synchronise la reproduction de l’arrangeur et
l’enregistrement/la reproduction de morceau en
réponse à des messages MIDI Start et Stop suivis d’un
signal d’horloge MIDI. Si l’EXR-46 OR ne reçoit qu’un
message Start, il attend un peu pour voir si des messages MIDI Clock ne suivent pas.
Si c’est le cas, il se synchronise sur ces messages. S’il n’y
a pas de message MIDI Clock, l’instrument utilise son
propre tempo. Dans les deux cas, vous pouvez arrêter la
reproduction ou l’enregistrement avec un message MIDI
Stop.
■ Style PC° (canal TxRx de sélection de style)
(OFF, 1~16, Réglage par défaut: 10) Comme son nom l’indique,
le canal de sélection de style sert à la réception et à la transmission de changements de programme produisant un changement de style sur l’EXR-46 OR ou l’instrument externe.
■ Lyrics Tx° (transmission de paroles)
(On/Off, Réglage par défaut: Off) L’EXR-46 OR peut transmettre
des données de paroles (Lyrics) contenues dans des fichiers
Standard MIDI de Format 0. Il ne peut pas les afficher mais
peut les transmettre à un appareil capable d’afficher des paroles (comme le Roland LVC-1). Ce filtre vous permet d’activer
(On) et de couper (Off) la transmission de données de paroles.
■ NTA Rx14° (activation/coupure de réception)
(On/Off, Réglage par défaut: On) NTA est l’abréviation de
“Note-to-Arranger” et représente les notes jouées dans la moitié gauche du clavier pour alimenter l’arrangeur avec des informations d’accords. Ces notes peuvent aussi être transmises à
l’instrument via MIDI (d’un accordéon, un piano numérique ou
un orgue, par exemple). Si vous voulez utiliser l’arrangeur sans
jouer sur le clavier de l’EXR-46 OR, transmettez ces notes sur le
canal MIDI 14 (de votre ordinateur ou instrument MIDI externe
à l’EXR-46 OR) et choisir “On” ici.
108
Les notes NTA peuvent uniquement être reçues (elles ne sont
pas transmises). Les notes jouées sur le clavier de l’EXR-46 OR
sont effectivement transmises à l’arrangeur et de là aux parties
Arranger; elles sont utilisées pour produire l’accompagnement
dans la bonne tonalité. Comme toutes les notes des styles
musicaux sont transmises via MIDI, il est inutile de transmettre
les notes NTA séparément.
■ PitchBnd° (Pitch Bend).
(On/Off, Réglage par défaut: On) Sert à activer (On) ou couper
(Off) la transmission et la réception des messages de pitch
bend. Ceux-ci servent à augmenter ou diminuer temporairement la hauteur des notes des parties Keyboard (Main, Dual,
Split).
■ Modulatn° (Modulation)
(On/Off, Réglage par défaut: On) Sert à activer (On) ou couper
(Off) la transmission et la réception des messages de modulation. Ceux-ci ajoutent un effet de vibrato aux notes jouées
(commande de contrôle CC01).
■ ProgChng° (Changement de programme)
(On/Off, Réglage par défaut: On) Ce filtre sert à activer (On) ou
couper (Off) la transmission et la réception des messages de
changement de programme. Ceux-ci servent à la sélection des
sons, des styles ou des programmes utilisateur.
■ Velo Rx° (réception des messages de toucher)
(On, 1~127, Réglage par défaut: On) Ce filtre sert à activer (On)
ou couper la réception des messages Velocity (de toucher). Ce
paramètre porte uniquement sur les messages de notes reçus
via MIDI. Spécifiez la valeur de toucher à substituer aux valeurs
reçues par l’EXR-46 OR (1~127), ou choisissez “On” pour utiliser
les valeurs de toucher telles quelles.
■ Clock Tx° (synchronisation)
(On/Off, Réglage par défaut: On) Ce paramètre définit si
l’arrangeur et l’enregistreur envoient (On) ou non (Off) des
signaux d’horloge MIDI quand vous les démarrez. Ces signaux
sont indispensables pour synchroniser des instruments MIDI,
séquenceurs ou logiciels externes avec l’EXR-46 OR.
■ StartStp° (Start/Stop/Continue)
(On/Off, Réglage par défaut: On) Cette option permet de déterminer si l’arrangeur et l’enregistreur envoient des messages
Start/Stop/ Continue lorsqu’ils fonctionnent. Sélectionnez “Off”
si vous souhaitez piloter le générateur de sons d’un orgue MIDI,
etc. sans démarrer son accompagnement automatique chaque
fois que vous lancez la reproduction de l’arrangeur ou de
l’enregistreur.
■ Song PosP° (Song Position Pointer)
(On/Off, Réglage par défaut: On) L’enregistreur de l’EXR-46 OR
envoie et reçoit aussi des messages “Song Position Pointer”
indiquant la position exacte dans le morceau des notes reproduites. Sélectionnez “OFF” si vous ne voulez pas que l’enregistreur envoie ou reçoive ces messages.
EXR-46 OR
15. Gestion des données
Utilisation de la mémoire Flash
Examinons d’abord les paramètres Function restants. Ils permettent de sauvegarder des morceaux nouvellement enregistrés ou des styles chargés d’une disquette dans la mémoire Flash de l’EXR-46 OR et de supprimer ces fichiers.
Sauvegarder un morceau en mémoire Flash
Vous pouvez sauvegarder les morceaux que vous enregistrez ou éditez avec l’enregistreur de l’EXR-46 OR en mémoire Flash ou sur disquette. Voyez page 114 pour savoir comment sauvegarder les morceaux sur disquette et page 79 pour savoir comment choisir un
morceau en mémoire Flash.
(1) Appuyez sur [FUNCTION].
(4) Utilisez les boutons numériques pour assigner un caractère à
cet emplacement.
(7) Appuyez sur un autre “grand” bouton de la section DATA
ENTRY pour quitter cette fonction.
Archiver des programmes utilisateur dans la
mémoire Flash
FUNCTION
Voici les caractères disponibles:
(2) Utilisez FAMILY [√][®] pour choisir le paramètre
“WriteSNG”.
Attendez que l’écran se présente comme sur l’illustration ci-dessous avant de passer à l’étape suivante.
SONG 001 yes
=
L’EXR-46 OR choisit automatiquement une mémoire Flash vide.
(“S”, le premier caractère, clignote.)
Remarque: S’il ne reste aucune mémoire Flash disponible ou si
la capacité de la mémoire est épuisée, l’écran affiche le message
“Mem Full” quand vous choisissez cette fonction. Dans ce
cas, vous ne pouvez pas sauvegarder votre morceau. En revanche, vous pouvez effacer un autre morceau (“Remove”) et
reprendre cette procédure à partir de l’étape (2).
Remarque: Le message “No Song” signifie qu’il n’y a pas de
données de morceau à sauvegarder.
(3) Si nécessaire, utilisez les boutons SELECT [√][®] pour amener le
curseur à l’emplacement d’un autre caractère (ce dernier clignote).
Remarque: Appuyez sur [NO/–] si vous renoncez à sauvegarder
le morceau.
_ ! # $ % & ’ - @ ^ ‘
0 1 2 3 4 5 6 7 8 9
A B C D E F G H I J K L M
N O P Q R S T U V W X Y Z
Remarque: Chaque fois que vous appuyez sur un autre bouton
numérique (pour entrer un caractère), le curseur avance automatiquement jusqu’à la position suivante. Cette procédure est
semblable à l’entrée de caractères sur un téléphone portable.
(5) Répétez les étapes (3) et (4) pour assigner les caractères voulus aux autres emplacements.
(6) Après avoir entré le nom, appuyez sur le bouton [YES/+] pour
sauvegarder le morceau dans la mémoire Flash de
l’EXR-46 OR.
L’écran affiche un décompte:
Writing
Cette fonction permet de sauvegarder le contenu de TOUS les programmes utilisateur internes (200) en mémoire Flash. Les programmes utilisateur sont toujours archivés sous forme de set.
Utilisez cette fonction si tous les 200 programmes utilisateur contiennent des réglages que vous ne voulez pas perdre (en les écrasant
par d’autres données ou en cas de problème technique). Il existe évidemment une fonction permettant de charger des programmes utilisateur archivés (page 110).
Remarque: Les données du set de programmes utilisateur contiennent aussi les assignations des boutons TONE (page 90).
(1) Appuyez sur [FUNCTION].
(2) Utilisez FAMILY [√][®] pour choisir le paramètre
“WriteUPG”.
Attendez que l’écran se présente comme suit avant de passer à
l’étape suivante:
USPR_000 yes
=
Bien que vous puissiez sauvegarder le fichier avec le nom attribué par défaut (“USPR_000”), il vaut mieux lui donner un
nom qui vous permette d’en identifier immédiatement le contenu. Choisissez donc un nom évocateur.
Le premier caractère du nom par défaut (“UserPrg”) clignote.
A la fin de la sauvegarde, l’écran affiche brièvement le message
“Complete”.
109
r EXR-46 OR
Remarque: Si la capacité de la mémoire est épuisée, l’écran
affiche le message “Mem Full” quand vous choisissez cette
fonction. Dans ce cas, il est impossible d’archiver le set de programmes utilisateur. En revanche, vous pouvez effacer un autre
set (“Remove”) et reprendre cette procédure à partir de l’étape
(2).
(3) Si nécessaire, utilisez les boutons SELECT [√][®] pour amener le
curseur à l’emplacement d’un autre caractère (ce dernier clignote).
(4) Utilisez les boutons numériques pour assigner un caractère à
cet emplacement.
(5) Répétez les étapes (3) et (4) pour assigner les caractères voulus aux autres emplacements.
Remarque: Chaque fois que vous appuyez sur un autre bouton
numérique (pour entrer un caractère), le curseur avance automatiquement jusqu’à la position suivante. Cette procédure est
semblable à l’entrée de caractères sur un téléphone portable.
(6) Après avoir entré le nom, appuyez sur le bouton [YES/+] pour
sauvegarder le set de programmes utilisateur dans la
mémoire Flash de l’EXR-46 OR.
L’écran affiche alors le message “Writing”. A la fin de la
sauvegarde, l’écran affiche brièvement le message
“Complete”.
Remarque: Appuyez sur [NO/–] pour renoncer à archiver le set
de programmes utilisateur.
(7) Appuyez sur un autre “grand” bouton de la section DATA
ENTRY pour quitter cette fonction.
Sauvegarder des styles en mémoire Flash
Les styles musicaux que vous chargez d’une disquette (et qui sont
alors copiés vers la mémoire USER STL) peuvent être sauvegardés dans une mémoire Flash.
(1) Appuyez sur [FUNCTION].
(2) Utilisez FAMILY [√][®] pour choisir le paramètre
“WriteSTL”.
Attendez que l’écran se présente comme suit avant de passer à
l’étape suivante:
TANGO
(3) Si nécessaire, utilisez les boutons SELECT [√][®] pour amener le
curseur à l’emplacement d’un autre caractère (ce dernier clignote).
(4) Utilisez les boutons numériques pour assigner un caractère à
cet emplacement.
Voici les caractères disponibles:
_ ! # $ % & ’ - @ ^ ‘
0 1 2 3 4 5 6 7 8 9
A B C D E F G H I J K L M
N O P Q R S T U V W X Y Z
(5) Répétez les étapes (3) et (4) pour assigner les caractères voulus aux autres emplacements.
Remarque: Chaque fois que vous appuyez sur un autre bouton
numérique (pour entrer un caractère), le curseur avance automatiquement jusqu’à la position suivante. Cette procédure est
semblable à l’entrée de caractères sur un téléphone portable.
(6) Après avoir entré le nom, appuyez sur le bouton [YES/+] pour
sauvegarder le style dans la mémoire Flash de l’EXR-46 OR.
L’écran affiche un décompte:
Writing
A la fin de la sauvegarde, l’écran affiche brièvement le message
“Complete”.
Remarque: Appuyez sur [NO/–] si vous renoncez à sauvegarder
le style musical.
Charger un set de programmes utilisateur de la
mémoire Flash
La fonction “ReadUPG” permet de transférer un set de 200 programmes utilisateur (pour toutes les mémoires) de la mémoire
interne de l’EXR-46 OR. Ce transfert écrase les données qui s’y trouvent au profit des nouveaux programmes utilisateur. Vous ne pouvez pas charger de programmes utilisateur individuels d’un set
archivé.
Remarque: Si vous voulez conserver les programmes utilisateur se
trouvant dans la mémoire interne, archivez-les (page 109) ou sauvegardez-les sur disquette au préalable. Voyez p. 114.
(1) Appuyez sur [FUNCTION].
(2) Utilisez FAMILY [√][®] pour choisir le paramètre
“ReadUPG”.
(3) Attendez que l’écran affiche le nom du premier set de programmes utilisateur avant de passer à l’étape suivante.
(4) Utilisez les boutons SELECT [√][®] pour choisir le set à charger.
(5) Appuyez sur le bouton [YES/+].
L’écran affiche alors le message “Sure?” et Yes se met à clignoter.
(6) Appuyez une fois de plus sur [YES/+] pour charger le set de
programmes utilisateur (ou sur [NO÷–] pour renoncer à le
charger).
Durant le chargement des données, l’écran affiche le message
“Reading”. Une fois le fichier chargé, l’écran affiche brièvement le message “Complete”.
(7) Appuyez sur un autre “grand” bouton de la section DATA
ENTRY pour quitter cette fonction.
Supprimer des morceaux de la mémoire Flash
Vous pouvez effacer (cette opération s’appelle “Remov”) des morceaux dont vous n’avez plus besoin afin de libérer de la place pour
de nouveaux morceaux.
(1) Appuyez sur [FUNCTION].
(7) Appuyez sur un autre “grand” bouton de la section DATA
ENTRY pour quitter cette fonction.
FUNCTION
=
yes
L’EXR-46 OR choisit automatiquement une mémoire Flash vide
comme destination. (Le premier caractère clignote.)
110
Remarque: S’il ne reste aucune mémoire Flash disponible ou si
la capacité de la mémoire est épuisée, l’écran affiche le message
“Mem Full” quand vous choisissez cette fonction. Dans ce
cas, vous ne pourrez pas sauvegarder le style musical. En revanche, vous pouvez effacer un autre style (“Remove”) et reprendre cette procédure à partir de l’étape (2).
Remarque: Le message “No Style” signifie qu’il n’y a pas
de données de style à sauvegarder.
EXR-46 OR
(2) Utilisez FAMILY [√][®] pour choisir le paramètre
“RemovSNG”.
FAMILY
Attendez que l’écran affiche le nom de la première mémoire de
morceau (101) avant de passer à l’étape suivante.
Remarque: Le message “No Song” signifie qu’il n’y a pas de
données de morceau à effacer.
(3) Utilisez les boutons SELECT [√][®] pour choisir le morceau à
effacer.
SELECT
Supprimer des styles de la mémoire Flash
Vous pouvez effacer (cette opération s’appelle “Remov”) des styles dont vous n’avez plus besoin afin de libérer de la place pour de
nouveaux styles.
(1) Appuyez sur [FUNCTION].
(2) Utilisez FAMILY [√][®] pour choisir le paramètre
“RemovSTL”.
Attendez que l’écran affiche le nom de la première mémoire de
style (101) avant de passer à l’étape suivante.
Remarque: Le message “No Style” signifie qu’il n’y a pas
de données de style à effacer.
(3) Utilisez SELECT [√][®] pour choisir le style musical à effacer.
(4) Appuyez sur le bouton [YES/+].
L’écran affiche alors le message “Sure?” et Yes se met à clignoter.
(5) Pour effacer le style, appuyez à nouveau sur le bouton [YES/+]
(ou
sur [NO÷–] si vous décidez de ne pas l’effacer).
L’écran affiche alors le message suivant:
Removing
(4) Appuyez sur le bouton [YES/+].
L’écran affiche alors le message “Sure?” et Yes se met à clignoter.
(5) Pour effacer le morceau, appuyez à nouveau sur le bouton
[YES/+] (ou
sur [NO÷–] si vous décidez de ne pas l’effacer).
L’écran affiche alors le message suivant:
Une fois le fichier effacé, l’écran affiche brièvement le message
“Complete”.
(6) Appuyez sur un autre “grand” bouton de la section DATA
ENTRY pour quitter cette fonction.
Effacer un set de programmes utilisateur de la
mémoire Flash
La fonction “RemovUPG” vous permet d’effacer des sets de programmes utilisateur de la mémoire Flash de l’EXR-46 OR. Cela permet de libérer de la place pour de nouveaux fichiers (notamment
après un message “Memory Full”). Veillez toutefois à n’effacer que
des fichiers dont vous êtes absolument sûr de ne plus avoir besoin.
Un fichier effacé est irrémédiablement perdu.
Remarque: Nous vous conseillons de toujours faire une copie de la
disquette sur l’ordinateur au préalable. Certains fichiers ont une
fâcheuse tendance à devenir indispensables une fois effacés…
(1) Appuyez sur [FUNCTION].
FUNCTION
(2) Utilisez FAMILY [√][®] pour choisir le paramètre
“RemovUPG”.
Attendez que l’écran affiche le nom du premier set de programmes utilisateur avant de passer à l’étape suivante.
Remarque: Le message “No Files” signifie qu’il n’y a pas
de set à effacer.
(3) Choisissez le set de programmes utilisateur à effacer avec
SELECT [√][®].
SELECT
Removing
Une fois le fichier effacé, l’écran affiche brièvement le message
“Complete”.
(6) Appuyez sur un autre “grand” bouton de la section DATA
ENTRY pour quitter cette fonction.
(4) Appuyez sur le bouton [YES/+].
L’écran affiche alors le message “Sure?” et Yes se met à clignoter.
(5) Appuyez une fois de plus sur [YES/+] pour effacer le set de
programmes utilisateur (ou sur [NO÷–] pour renoncer à l’effacer).
111
r EXR-46 OR
L’écran affiche alors le message suivant:
Removing
Une fois le fichier effacé, l’écran affiche brièvement le message
“Complete”.
(6) Appuyez sur un autre “grand” bouton de la section DATA
ENTRY pour quitter cette fonction.
Archiver des données avec un
ordinateur (USB)
La prise USB de l’EXR-46 OR peut remplir deux fonctions: (a) la
transmission/réception de données MIDI ou (b) l’échange de
fichiers avec un ordinateur.
Tant que l’icône
n’est pas affichée, le port USB transmet
et reçoit les données MIDI (les prises MIDI IN et OUT sont contournées quand vous branchez un câble USB à ce port).
Par contre, si cette icône est affichée, l’EXR-46 OR apparaît comme
un lecteur externe sur le bureau de votre PC ou Mac:
(3) Appuyez sur le bouton [USB] de l’EXR-46 OR.
L’écran affiche le message d’erreur “No Cable” pour signaler que la communication USB est impossible.
(4) Reliez le port USB de l’EXR-46 OR à un port USB disponible de
votre ordinateur avec le câble fourni.
EXR-46 OR
La lettre du lecteur (“F:” dans l’illustration ci-dessus) dépend du
nombre de lecteurs détectés par Windows (et n’a aucune importance pour MacOS).
Remarque: La communication USB (pour les applications MIDI) est
possible entre l’EXR-46 OR et Windows Me/XP ou une version ultérieure (pour la plate-forme Windows) ou entre l’EXR-46 OR et Mac
OS 9.0.4 ou une version ultérieure (pour la plate-forme Macintosh).
A cette fin, installez les pilotes appropriés (voyez le CD-ROM fourni).
Quant au transfert de données, il est possible avec Windows 2000/
Me/XP (ou version ultérieure) ou avec Mac Mac OS 9.04 (ou version
plus récente). En cas de problème avec votre système, adressez-vous
au service de maintenance Roland le plus proche.
Une fois la détection effectuée, vous pouvez copier des fichiers vers
le dossier “Song”, “UserPrg” ou “Style” en les glissant selon la
méthode habituelle. Les dossiers “Style”, “UserPrg” et “Song” ne
peuvent pas être effacés et ne doivent jamais être renommés.
Toutefois, vous pouvez vider leur contenu en glissant tous les
fichiers dans la corbeille.
Procédez de la façon suivante (Windows XP):
(1) Redémarrez votre PC.
(2) Mettez l’EXR-46 OR sous tension.
Ordinateur
L’icône
apparaît et l’écran affiche le message
“PC<->EXR”.
Si vous préférez utiliser un autre câble, choisissez-en un doté
des connecteurs USB adéquats: un connecteur “carré” (“type B”)
pour l’EXR-46 OR et probablement un “plat” (type “A”) pour
l’ordinateur.
Remarque: Si vous ne branchez pas de câble USB dans les 15
secondes qui suivent, l’EXR-46 OR repasse en mode normal.
Remarque: Ne mettez jamais l’EXR-46 OR hors tension tant
qu’il affiche le message “Writing” car cela endommagerait
toutes les données dans la zone Flash de l’EXR-46 OR. (Voyez
“InitFLSH (Initialisation de la mémoire Flash)” (p. 104) pour
savoir comment réparer la zone Flash après une erreur de manipulation.)
Remarque: Le message “Wait… Connection
Proceding” pourrait s’afficher quand vous appuyez sur le
bouton [USB]. Cela se produit uniquement si vous avez utilisé le
port USB pour la communication MIDI. Ce message indique que
Windows XP est en train de reconfigurer le port USB afin de permettre le transfert de données. Cela peut durer un moment. Un
peu de patience, donc.
Marche à suivre (autres systèmes d’exploitation):
112
EXR-46 OR
(1) Démarrez votre Mac ou PC s’il est hors tension.
(2) Si vous ne l’avez pas encore fait, mettez l’EXR-46 OR sous
tension.
(3) Appuyez sur le bouton [USB] de l’EXR-46 OR.
L’écran affiche le message d’erreur “No Cable” pour signaler que la communication USB est impossible.
Remarque: Si vous ne branchez pas de câble USB dans les 15
secondes qui suivent, l’EXR-46 OR repasse en mode normal.
(4) Reliez le port USB de l’EXR-46 OR à un port USB disponible de
votre ordinateur avec le câble fourni.
L’icône
apparaît et l’écran affiche le message
“PC<->EXR”.
Si vous préférez utiliser un autre câble, choisissez-en un doté
des connecteurs USB adéquats: un connecteur “carré” (“type B”)
pour l’EXR-46 OR et probablement un “plat” (type “A”) pour
l’ordinateur.
Remarque: Ne branchez pas l’EXR-46 OR à un hub USB. Reliezle toujours directement à votre ordinateur.
Remarque: Ne mettez jamais l’EXR-46 OR hors tension tant
qu’il affiche le message “Writing” car cela endommagerait
toutes les données dans la zone Flash de l’EXR-46 OR. (Voyez
“InitFLSH (Initialisation de la mémoire Flash)” (p. 104) pour savoir
comment réparer la zone Flash après une erreur de manipulation.)
Pour tous les systèmes d’exploitation:
Remarque: Si vous appuyez sur le bouton [USB] sans avoir branché le câble USB, l’écran affiche le message d’erreur “No
Cable” pour signaler que la communication USB est impossible. Branchez un câble pour faire disparaître ce message de
l’écran.
(5) Ouvrez la fenêtre “Poste de travail” (Windows) et vérifiez si
l’ordinateur a détecté un lecteur “EXR_DRV” (ou simplement
“Disque amovible”).
(6) Ouvrez ce lecteur en double-cliquant sur son icône.
(7) Ouvrez le dossier “Style”, “UserPrg” ou “Song”.
Ce choix dépend de l’opération visée: supprimer/renommer/
ajouter des styles musicaux ou des fichiers Standard MIDI.
(8) Effectuez une des opérations suivantes:
• Copiez les styles musicaux voulus du dossier “Style” sur le
disque dur de l’ordinateur (glisser-déposer).
• Copiez les morceaux voulus du dossier “Song” sur le disque
dur de l’ordinateur par glisser-déposer.
• Copiez les sets de programmes utilisateur voulus du dossier
“UserPrg” sur le disque dur de l’ordinateur en les faisant glisser.
• Copiez les styles musicaux voulus du disque dur de l’ordinateur en les glissant-déposant dans le dossier “Style”. (Lisez
aussi l’explication en dessous de l’étape (10).)
• Copiez les morceaux voulus du disque dur de l’ordinateur en
les glissant-déposant dans le dossier “Song”.
• Copiez les sets de programmes utilisateur voulus du disque
dur de l’ordinateur dans le dossier “UserPrg” en les faisant
glisser.
• Renommez les fichiers voulus du dossier “Style”, “UserPrg”
ou “Song”.
• Effacez les fichiers dont vous n’avez plus besoin.
Remarque: Tant que le message “PC<->EXR” est affiché,
tous les boutons et commandes de l’EXR-46 OR sont verrouillés.
(9) Pour débrancher l’EXR-46 OR de l’ordinateur:
• Macintosh: Glissez l’icône “EXR_DRV” (ou “Disque amovible”) dans la corbeille.
—ou—
• Windows: Cliquez sur l’icône Supprimer dans la barre des
tâches. Attendez qu’un menu déroulant s’affiche et choisissez-y l’option similaire à ceci: “Cesser d’utiliser le disque USB
EXR_DRV”. En principe, une fenêtre devrait alors afficher un
message similaire à ceci: “Le périphérique USB XX peut maintenant être enlevé du système en toute sécurité”. Cliquez sur
le bouton [OK].
—PUIS—
• Débranchez le câble USB de l’ordinateur et de l’EXR-46 OR.
(10) Appuyez à nouveau sur le bouton [USB].
L’écran affiche alors le message “Sure?”.
(11) Appuyez sur [YES/+] (l’icône
disparaît).
(Appuyez sur [NO/–] pour rester en mode USB.)
Si vous avez copié des styles musicaux de l’ordinateur vers la
zone Flash, l’écran affiche à présent “Wait…
Converting Styles”, vous signalant que les fichiers
portant l’extension “.STL” sont convertis dans le format de style
musical de l’EXR-46 OR (“.STH”).
Notez que cette conversion n’est requise que pour les styles
musicaux en zone Flash de l’EXR-46 OR qui ne portent pas
encore l’extension “.STH”.
Remarque: Cette opération ajoute quelques octets à chaque
style musical converti. Dans des cas exceptionnels (quand la
mémoire Flash est presque remplie), cela pourrait empêcher la
conversion de tous les styles portant toujours l’extension “.STL”.
Dans ce cas, l’EXR-46 OR affiche le message “MemFull” pour
vous signaler que l’opération a été interrompue avant la conversion du dernier fichier “.STL”. En revanche, tous les styles ont été
convertis avant l’apparition de ce message et sont donc utilisables.
Fonctions Disk
Les fonctions Disk de l’EXR-46 OR permettent de sauvegarder
sur disquette le morceau Recorder (de l’enregistreur) contenu
dans la mémoire USER SNG, de sauvegarder et charger vos
fichiers sur/depuis une disquette, d’effacer des fichiers résidant
sur disquette et de formater des disquettes.
Vous avez le choix entre des disquettes 2DD ou 2HD. Comme la
capacité des disquettes 2HD est le double de celle des disquettes 2DD, nous vous recommandons donc l’utilisation de disquettes 2HD.
Quand le lecteur écrit ou lit des données sur la disquette, l’icône
de disquette (
) clignote à l’écran. N’éjectez pas la disquette tant que cette icône est affichée car vous endommageriez le lecteur de disquette et la disquette (qui deviendrait illisible).
Charger des programmes utilisateur de la disquette
Cette fonction s’appelle LOAD Upr. Cette fonction permet de
transférer un set de 200 programmes utilisateur (pour toutes les
mémoires) dans la mémoire interne de l’EXR-46 OR. Ce transfert
écrase les données qui s’y trouvent au profit des nouveaux programmes utilisateur.
Remarque: Si vous voulez conserver les programmes utilisateur se
trouvant dans la mémoire interne, sauvegardez-les sur disquette au
préalable. Voyez p. 114.
Remarque: Les données du set de programmes utilisateur contiennent aussi les assignations des boutons TONE (page 90). Aussi, après
le transfert d’un set de programmes utilisateur, les huit boutons
TONE pourraient choisir d’autres sons.
(1) Insérez une disquette dans le lecteur.
113
r EXR-46 OR
(2) Appuyez sur [DISK] pour choisir le mode Disk.
DISK
Comme la fonction “LOAD Upr” est déjà sélectionnée, vous
ne devez rien faire de plus. (Sinon, utilisez FAMILY [√][®] pour
choisir ce paramètre.)
(3) Choisissez le set de programmes utilisateur à rappeler avec
SELECT [√][®].
SELECT
Messages d’erreur éventuels
No Disk
Vous avez oublié d’insérer une disquette dans le
lecteur.
No Files
La disquette insérée ne contient pas de données
de programme utilisateur.
NoFormat La disquette en question n’est pas formatée ou
utilise un format que l’EXR-46 OR ne reconnaît
pas. Appuyez sur [YES÷+] pour la formater
(attention: cette opération efface toutes les
données de la disquette).
Disk Err
La disquette est probablement endommagée et
ne peut pas être utilisée.
File Err
Le fichier sélectionné est endommagé et ne
peut pas être chargé.
Charger des morceaux d’une disquette
Le message Yes à côté de celui-ci se met à clignoter.
(4) Appuyez sur le bouton [YES÷+] pour charger le fichier choisi.
YES
Remarque: Appuyez sur [NO÷–] pour renoncer à charger le
fichier choisi.
Si vous avez appuyé sur [YES÷+], l’écran affiche le message
“Loading”. Une fois les données chargées, le message
“Complete” s’affiche brièvement.
(5) Appuyez sur un autre “grand” bouton de la section DATA
ENTRY pour quitter cette fonction.
LOAD Sng permet de charger un morceau d’une disquette dans
la mémoire User de l’EXR-46 OR.
(1) Insérez une disquette dans le lecteur.
(2) Appuyez sur [DISK] pour choisir le mode Disk.
(3) Sélectionnez la fonction “LOAD Sng” avec FAMILY [√][®].
(4) Utilisez SELECT [√][®] pour choisir le morceau à charger.
Le message Yes à côté de celui-ci se met à clignoter.
(5) Appuyez sur le bouton [YES÷+] pour charger le fichier choisi.
Remarque: Appuyez sur [NO÷–] pour renoncer à charger le
fichier choisi.
Si vous avez appuyé sur [YES÷+], l’écran affiche le message
“Loading”. Une fois les données chargées, le message
“Complete” s’affiche brièvement.
(6) Appuyez sur un autre “grand” bouton de la section DATA
ENTRY pour quitter cette fonction.
Remarque: Lisez aussi “Messages d’erreur éventuels” ci-dessus.
Charger des styles musicaux d’une disquette
LOAD Stl permet de charger un style musical d’une disquette
dans la mémoire User de l’EXR-46 OR.
(1) Insérez une disquette dans le lecteur.
(2) Appuyez sur [DISK] pour choisir le mode Disk.
(3) Sélectionnez la fonction “LOAD Stl” avec FAMILY [√][®].
(4) Utilisez SELECT [√][®] pour choisir le style musical à charger.
Le message Yes à côté de celui-ci se met à clignoter.
(5) Appuyez sur le bouton [YES÷+] pour charger le fichier choisi.
Remarque: Appuyez sur [NO÷–] pour renoncer à charger le
fichier choisi.
Si vous avez appuyé sur [YES÷+], l’écran affiche le message
“Loading”. Une fois les données chargées, le message
“Complete” s’affiche brièvement.
(6) Appuyez sur un autre “grand” bouton de la section DATA
ENTRY pour quitter cette fonction.
Remarque: Voyez aussi “Messages d’erreur éventuels” (p. 114).
Sauvegarde de fichiers sur disquette
L’EXR-46 OR propose les fonctions de sauvegarde suivantes:
SAVE Upr: Cette fonction sert à sauvegarder le contenu de
toutes les mémoires User Program (200) sur disquette.
Remarque: Les données du set de programmes utilisateur contiennent aussi les assignations des boutons USER TONES (page 90).
SAVE Sng: Cette fonction permet de sauvegarder le morceau
se trouvant en mémoire USERSONG sur disquette. Un morceau
sauvegardé sur disquette devient un fichier Standard MIDI.
(1) Insérez une disquette dans le lecteur.
Chaque disquette comporte un onglet carré servant à “fermer”
une petite fenêtre. Quand l’onglet est dans cette position, vous
pouvez sauvegarder des données sur la disquette. Avant de
charger la disquette, veillez à désactiver sa protection contre
l’écriture en refermant la petite fenêtre.
(2) Appuyez sur [DISK] et utilisez FAMILY [√][®] pour choisir
SAVE Upr” ou “SAVE Sng”.
(3) Si nécessaire, utilisez les boutons SELECT [√][®] pour amener le
curseur à l’emplacement d’un autre caractère (ce dernier clignote).
Remarque: Chaque fois que vous appuyez sur un autre bouton
numérique (pour entrer un caractère), le curseur avance automatiquement jusqu’à la position suivante.
114
EXR-46 OR
(4) Utilisez les boutons numériques pour assigner un caractère à
cet emplacement.
Remarque: Si le message “Protect” apparaît, vous avez
oublié d’enlever la protection de la disquette. Appuyez sur le
bouton d’éjection du lecteur de disquettes, enlevez la disquette
et fermez son onglet. Réinsérez ensuite la disquette et appuyez
sur [YES÷+].
Remarque: Si, après tout, vous ne voulez pas charger le fichier
choisi, appuyez sur [NO/–].
(7) Appuyez sur un autre “grand” bouton de la section DATA
ENTRY pour quitter cette fonction.
Messages d’erreur éventuels
No Disk
Vous avez oublié d’insérer une disquette dans
le lecteur.
Protect
Voyez ci-dessus.
Disk Full
La capacité restante de la disquette ne permet
plus de sauvegarder vos données.
NoFormat
La disquette en question n’est pas formatée ou
utilise un format que l’EXR-46 OR ne reconnaît
pas. Appuyez sur [YES÷+] pour la formater
(attention: cette opération efface toutes les
données de la disquette).
Disk Err
La disquette est probablement endommagée et
ne peut pas être utilisée.
OverWrt?
Le nom attribué aux données existe déjà sur la
disquette. Si vous appuyez sur [YES÷+], le fichier
se trouvant sur la disquette est écrasé par le
nouveau (et ses données sont effacées). Insérez
une autre disquette ou appuyez sur [DISK] et
renommez les données à sauvegarder.
Voici les caractères disponibles:
_ ! # $ % & ’ - @ ^ ‘
0 1 2 3 4 5 6 7 8 9
A B C D E F G H I J K L M
N O P Q R S T U V W X Y Z
(5) Répétez les étapes (3) et (4) pour assigner les caractères voulus aux autres emplacements.
Bien que vous puissiez sauvegarder le fichier avec le nom attribué par défaut (“SONG_001” ou “USPR_000”), il vaut
mieux lui donner un nom qui vous permette d’en identifier
immédiatement le contenu. Choisissez donc un nom évocateur.
Remarque: Si vous choisissez “SPACE” (bouton [0]), l’instrument
insère “_” à l’écran. Ceci est dû au fait que MS-DOS® ne permet
pas l’utilisation d’espaces.
(6) Après avoir entré le nom, appuyez sur le bouton [YES/+] pour
sauvegarder les données sur disquette.
Effacer des fichiers sur disquette
Les fonctions Delete permettent d’effacer des fichiers sur la disquette insérée. Cela permet de libérer de la place pour de nouveaux
fichiers (notamment après un message “Disk Full”). Veillez toutefois
à n’effacer que des fichiers dont vous êtes absolument sûr de ne
plus avoir besoin. Un fichier effacé est irrémédiablement perdu.
Remarque: Nous vous conseillons de toujours faire une copie de la
disquette sur l’ordinateur au préalable. Certains fichiers ont une
fâcheuse tendance à devenir indispensables une fois effacés…
DEL Upr: Utilisez cette fonction pour effacer un set de programmes utilisateur sur disquette. Sachez que cette opération
efface toute la série de 200 programmes utilisateur.
DEL Sng: Permet d’effacer un fichier de morceau sur disquette.
(1) Insérez la disquette contenant le fichier à effacer dans le lecteur.
(2) Appuyez sur [DISK] pour choisir le mode Disk.
(3) Utilisez FAMILY [√][®] pour sélectionner “DEL Upr” ou
“DEL Sng”.
(4) Utilisez SELECT [√][®] pour choisir le fichier à effacer (exemple: “USPR_005”). Le message Yes se met à clignoter.
(5) Appuyez sur le bouton [YES÷+].
Par mesure de sécurité, l’EXR-46 OR vous demande si vous voulez vraiment effacer le fichier (“Sure?”).
(6) Appuyez sur [YES÷+] pour effacer le fichier ou sur [NO÷–] pour
annuler l’opération.
Si vous avez appuyé sur [YES÷+], l’écran affiche le message
“Deleting”. Une fois les données effacées, le message
“Complete” s’affiche brièvement.
(7) Appuyez sur un autre “grand” bouton de la section DATA
ENTRY pour quitter cette fonction.
YES
L’écran affiche un décompte (“Saving”).
Saving
A la fin de la sauvegarde, l’écran affiche brièvement le message
“Complete”.
115
r EXR-46 OR
Messages d’erreur éventuels
No Disk
Vous avez oublié d’insérer une disquette dans le
lecteur.
Protect
Vous avez oublié d’ôter la protection de la disquette. Appuyez sur le bouton d’éjection du
lecteur de disquettes, enlevez la disquette et
fermez son onglet. Réinsérez ensuite la disquette et appuyez sur [YES÷+].
NoFormat
La disquette en question n’est pas formatée ou
utilise un format que l’EXR-46 OR ne reconnaît
pas. Appuyez sur [YES÷+] pour la formater
(attention: cette opération efface toutes les
données de la disquette).
Disk Err
La disquette est probablement endommagée et
ne peut pas être utilisée.
No Files
La disquette ne contient pas de fichier du type
sélectionné. Insérez une autre disquette.
Formater une disquette
Avant de pouvoir sauvegarder des fichiers, il faut préparer la disquette. C’est ce qu’on appelle le “formatage”. Si la disquette que
vous voulez utiliser est formatée pour IBM PC, il est inutile de la formater – quoique l’accès est plus rapide avec des disquettes formatées avec l’EXR-46 OR. Sinon, procédez comme suit:
(1) Insérez une disquette dans le lecteur.
Chaque disquette comporte un onglet carré servant à “fermer”
une petite fenêtre. Quand l’onglet est dans cette position, vous
pouvez formater la disquette. Avant de charger la disquette,
veillez à désactiver sa protection contre l’écriture en refermant
la petite fenêtre.
(2) Appuyez sur [DISK] pour choisir le mode Disk.
(3) Utilisez FAMILY [√][®] pour sélectionner “FORMAT”. Le message “Sure?” apparaît et Yes se met à clignoter.
(4) Appuyez sur [YES÷+] pour formater la disquette.
Remarque: Si vous renoncez à formater la disquette, appuyez
sur [NO÷–].
Remarque: En formatant une disquette, vous effacez tous les
fichiers qu’elle contient. Vérifiez cependant d’abord son contenu (sur votre PC, par exemple).
La valeur à gauche du message “Formatng” change de “1” à
“100” tandis que l’icône de disquette clignote pour indiquer que
l’instrument lit la disquette. Lorsque la disquette est formatée, le
message “Complete” s’affiche brièvement.
116
EXR-46 OR
16. Utiliser les sorties et un commutateur au pied
Vous pouvez aussi enregistrer votre jeu (ou un morceau de l’enregistreur) sur cassette, MD, etc. Branchez les prises OUTPUT de l’EXR-46 OR aux prises REC IN de l’appareil externe.
Effectuez cette connexion avec un câble standard muni de fiches
jack 1/4”. Ces sorties permettent aussi de brancher l’EXR-46 OR à
votre amplificateur HiFi ou de clavier (comme un Roland KC-550/
350/150). L’utilisation d’un ampli HiFi requiert un adaptateur (prise
RCA(cinch)/jack → 1/4). Si vous le voulez, vous pouvez aussi vous
procurer deux câbles PJ-1M de Roland.
Remarque: Le fait de brancher un câble aux prises OUTPUT ne
désactive pas le système d’amplification de l’EXR-46 OR.
Un commutateur au pied DP-2, DP-6 ou BOSS FS-5U. en option
relié à la prise FOOTSWITCH permet de maintenir le son des notes
après le relâchement des touches, voire d’exécuter d’autres fonctions (voyez p. 100).
Platine à cassette, ampli de puissance, ampli HiFi, enceintes
actives de la série MA etc.
Commutateur au pied DP-2, DP-6 ou BOSS FS-5U.
117
r EXR-46 OR
17. Divers
Fonctions à caractère pédagogique
L’EXR-46 OR propose deux fonctions pratiques pour les professeurs de musique et les utilisateurs de l’EXR-46 OR en classe.
Couper ou activer la fonction de démonstration
La fonction Demo de l’EXR-46 OR peut être coupée de sorte qu’une
pression sur [USB]+[ONE¥TOUCH] ne produise rien. Cela peut être
utile quand l’EXR-46 OR est utilisé en classe. Voici comment couper
la fonction de démonstration:
(1) Mettez l’EXR-46 OR hors tension.
(2) Maintenez les boutons [USB], [ONE¥TOUCH] et [ACOUSTIC]
enfoncés tout en remettant l’EXR-46 OR sous tension.
L’écran affiche brièvement “DISABLED”.
Comme ce réglage est mémorisé, vous devrez répéter cette procédure pour pouvoir écouter la démonstration.
Couper ou activer l’arrangeur
La procédure suivante empêche de faire démarrer et d’arrêter
l’arrangeur:
(1) Mettez l’EXR-46 OR hors tension.
(2) Maintenez les boutons [ACOUSTIC] et [ARRANGER¥BAND]
enfoncés tout en remettant l’EXR-46 OR sous tension.
L’écran affiche brièvement “DISABLED”. Le bouton
[START÷STOP] ne permet plus de lancer/d’arrêter l’arrangeur.
Répétez cette procédure pour réactiver l’arrangeur.
118
Couper ou activer l’arrangeur et la fonction Demo
Une troisième option “pédagogique” consiste à couper aussi bien la
fonction Demo que l’arrangeur:
(1) Mettez l’EXR-46 OR hors tension.
(2) Maintenez les boutons [ACOUSTIC] et [START÷STOP] enfoncés
tout en remettant l’EXR-46 OR sous tension.
L’écran affiche brièvement “DISABLED”. Vous ne pouvez
plus lancer/arrêter l’arrangeur ni les morceaux de démonstration.
Répétez cette procédure pour réactiver l’arrangeur et la fonction
Demo.
Initialiser l’EXR-46 OR (Factory)
Après avoir travaillé intensivement avec l’EXR-46 OR, vous
aurez peut-être envie de retrouver ses réglages d’usine. Notez
que lemorceau Recorder sera vidé et que les programmes
utilisateur auront les réglages d’usine après l’initialisation
de l’EXR-46 OR.
Voici comment initialiser l’EXR-46 OR:
(1) Mettez l’EXR-46 OR hors tension.
(2) Maintenez le bouton [USER¥PROGRAM÷WRITE] enfoncé tout
en remettant l’EXR-46 OR sous tension.
Le message “Factory” vous informe que le EXR-46 OR est
initialisé et a retrouvé ses réglages d’usine.
Remarque: Cette opération n’affecte pas les données dans la
mémoire Flash de l’EXR-46 OR. Pour savoir comment initialiser
les données de cette zone, voyez page 104.
EXR-46 OR
18. Fiche technique
EXR-46 OR Interactive Arranger
Clavier: 61 touches sensibles au toucher
Générateur de sons: Echantillons PCM
Polyphonie maximale: 64 voix
Sons: 650 sons en face avant, dont 107 sons orientaux (542 sons
compatibles XG/256 sons compatibles GM2)
Kits de batterie: 33 kits, dont 13 kits orientaux (11 kits compatibles XG + 9 kits compatibles GM2)
Parties multitimbrales: 19
Compatibilité: GM2, GS, XG Lite
Ecran: Grand écran rétroéclairé, nouveau concept
Commandes en façade: Commande VOLUME, Boutons ACCOMP/
KEYBOARD BALANCE, Boutons TEMPO/DATA, Levier BENDER/
MODULATION, Boutons FAMILY, Boutons SELECT, boutons numériques [0]~[9], 8 boutons TONE assignables 12 boutons ORIENTAL
SCALE, 3 boutons SCALE MEMORY
Styles musicaux: 149 styles en mémoire Flash (99 d’usine + 50
modifiables)
One Touch (fonction monotouche): 2x99
Orchestrator: 3 niveaux: Drum&Bass, Combo, Full Band
Fonctions LOCK (filtres de réglages x10): STYLE, TONE, TEMPO,
TRANSPOSE, MONO/PORTAMENTO
Morceaux: Lecteur SMF en temps réel
Enregistreur 16 pistes: 4 modes simples (ALL, Keyboard, Single,
Punch In/Out)
Mémoire Flash: Pour styles musicaux, sets de programmes utilisateur et morceaux
Programmes utilisateur: 200
Effets: Réverb: 8 types, Chorus: 8 types, Multi-FX: 47 types
Archivage des données: Disquette 2HD/2DD 3.5” (styles, morceaux/SMF, programmes utilisateur), sauvegarde sur & chargement
d’un PC via USB (styles, morceaux, programmes utilisateur)
Métronome: Métrique (1/4~9/4, 1/8~9/8), volume réglable
Autres fonctions: 3 modes simples (Piano/Solo, Arranger/Band,
Pianist), Mode Drum Pad, Music Assistant: 100 réglages, Partage du
clavier (2 sons: Split [L] + Main [R]), Superposition (2 sons: Main +
Dual), Melody Intelligence: 18 types, Octave (–4~4), Transposition
“User” (–12~12)/Transposition “Glbl” (–6~5), V-Link
Mise à jour du système: Oui
Connectique: USB: Communication MIDI et transfert de fichiers,
MIDI IN, OUT
Sorties: Prises L/Mono, R (jacks 1/4”), Phones 1/2, DC IN (pour
l’adaptateur)
Divers: Puissance de sortie: 10W+10W avec “Digital Bass Enhancer”, haut-parleurs stéréo: 2x ø13cm, Bass Reflex
Alimentation: 12V/3.5A
Dimensions: 1020 x 355 x 132mm
Poids: 8kg
Accessoires fournis: Mode d’emploi, adaptateur PSB-4U, pupitre,
câble USB, CD-ROM avec fichiers du pilote USB
Remarque: Les données techniques sont susceptibles d’être modifiées sans préavis.
Remerciements
Roland Corporation tient à exprimer toute sa gratitude aux personnes ayant contribué à la préparation des kits de batterie et des styles
musicaux orientaux ainsi que des morceaux de démonstration pour
l’EXR-46 OR Interactive Arranger.
Nous remercions particulièrement:
M. Cherif Cotta, M. Emmanuel G. Chnarakis et
M. Mehmet Dogdu
pour leur inestimable coopération et leur enthousiasme indéfectible
lors du développement de l’EXR-46 OR
M. Abdallah George, M. Ahmed Mustafa et M. Alp Selim
pour leur soutien et leurs précieux conseils
M. Mohamed Raheem
pour avoir autorisé Roland Corporation à utiliser sa célèbre composition “Leh Bey Dari” comme morceau de démonstration pour
l’EXR-46 OR
119
120
Tone no. PC CC00 CC32
1
1
8
2
2
1
16 2
3
2
0
2
4
4
0
2
5
1
0
2
6
2
8
2
7
3
0
2
8
3
1
2
9
3
2
2
10
3
8
2
11
4
8
2
12
5
0
2
13
5
8
2
14
5
47 2
15
5
48 2
16
6
10 2
17
6
24 2
18
6
32 2
19
5
16 2
20
5
24 2
21
5
25 2
22
5
26 2
23
6
0
2
24
6
8
2
25
6
16 2
26 100 5
2
27
7
24 2
28
7
16 2
29
8
0
2
30
8
8
2
31
7
0
2
32
7
8
2
33
8
39 2
34
9
0
2
35 11
0
2
36 12
0
2
37 13
0
2
38 14
0
2
39 15
0
2
40 99
2
2
41 99
4
2
42 99 16 2
43 113 0
2
44 10
0
2
45 12
1
2
46 12
8
2
47 13
8
2
48 13 16 2
49 13 17 2
50 13 24 2
51 15
8
2
52 15
9
2
53 99
0
2
54 99
1
2
55 99
3
2
56 99
5
2
57 99
6
2
58 99
7
2
59 99
8
2
60 99
9
2
61 99 17 2
62 99 18 2
63 99 19 2
64 17 116 2
65 21 116 2
66 18
0
2
67 17
0
2
68 17 10 2
69 17 34 2
70 17 16 2
71 17 24 2
72 18
9
2
73 19
0
2
74 19
8
2
75 19 16 2
76 19 24 2
77 20
0
2
78 20
8
2
79 20 24 2
80 20 32 2
81 21
0
2
Name
StPiano1
EuropnPf
Piano 2
Honkytnk
Piano 1
StPiano2
Piano 3
MIDI EP1
MIDI EP2
StPiano3
OldUprgt
E.Piano1
StSoftEP
Pro EP 3
Wurly
EPLegend
HardFMEP
EP Phase
FM+SA EP
60sEPno
Hard EP
MellowEP
E.Piano2
Dtnd EP2
St.FM EP
Nylon+EP
Harpsi 2
StHarpsi
Clav.
CompClav
Harpschr
Cpld Hps
PulsClav
Celesta
MusicBox
Vibraphn
Marimba
Xylphone
TublBell
SftCryst
LoudGlock
ChrlBell
TnklBell
Glcknspl
HardVibe
StVibrap
StMarimb
Barafon
Barafon2
Log drum
ChrchBll
Carillon
Crystal
SynMallt
RndGlock
GlcknChm
ClrBells
XmasBell
VbrBells
DigiBell
AirBells
BellHarp
Gamelimb
OrOrgn1
OrOrgn2
Organ 2
Organ 1
R&Borgan
CoolOrgn
60sOrgn1
ChseOrgn
PercOrg1
Organ 3
RotryOrg
RotryOrS
RotryOrF
ChrchOr1
ChrchOr2
OrgnFlte
TrmFlute
ReedOrgn
Family
PIANO
PIANO
PIANO
PIANO
PIANO
PIANO
PIANO
PIANO
PIANO
PIANO
PIANO
E. PIANO
E. PIANO
E. PIANO
E. PIANO
E. PIANO
E. PIANO
E. PIANO
E. PIANO
E. PIANO
E. PIANO
E. PIANO
E. PIANO
E. PIANO
E. PIANO
E. PIANO
KEYBOARD
KEYBOARD
KEYBOARD
KEYBOARD
KEYBOARD
KEYBOARD
KEYBOARD
CHR PERC
CHR PERC
CHR PERC
CHR PERC
CHR PERC
CHR PERC
CHR PERC
CHR PERC
CHR PERC
CHR PERC
CHR PERC
CHR PERC
CHR PERC
CHR PERC
CHR PERC
CHR PERC
CHR PERC
CHR PERC
CHR PERC
CHR PERC
CHR PERC
CHR PERC
CHR PERC
CHR PERC
CHR PERC
CHR PERC
CHR PERC
CHR PERC
CHR PERC
CHR PERC
ORGAN
ORGAN
ORGAN
ORGAN
ORGAN
ORGAN
ORGAN
ORGAN
ORGAN
ORGAN
ORGAN
ORGAN
ORGAN
ORGAN
ORGAN
ORGAN
ORGAN
ORGAN
Tone no. PC
82 17
83 17
84 17
85 17
86 17
87 17
88 17
89 17
90 17
91 17
92 18
93 18
94 18
95 18
96 20
97 21
98 83
99 83
100 83
101 83
102 83
103 85
104 86
105 22
106 22
107 24
108 23
109 23
110 22
111 22
112 25
113 25
114 26
115 25
116 25
117 26
118 26
119 26
120 25
121 25
122 25
123 26
124 26
125 32
126 32
127 100
128 100
129 121
130 27
131 27
132 28
133 28
134 28
135 29
136 30
137 31
138 31
139 27
140 27
141 28
142 28
143 28
144 28
145 29
146 29
147 29
148 29
149 30
150 31
151 31
152 31
153 31
154 31
155 31
156 31
157 31
158 31
159 32
160 121
161 121
162 121
CC00 CC32
1
2
7
2
8
2
9
2
17 2
18 2
31 2
32 2
33 2
40 2
1
2
8
2
10 2
32 2
16 2
16 2
112 2
113 2
114 2
115 2
116 2
116 2
116 2
0
2
8
2
0
2
0
2
1
2
16 2
17 2
0
2
24 2
9
2
40 2
49 2
0
2
8
2
16 2
8
2
16 2
32 2
32 2
33 2
0
2
16 2
0
2
2
2
0
2
0
2
8
2
1
2
4
2
23 2
0
2
0
2
0
2
16 2
1
2
2
2
0
2
3
2
8
2
48 2
1
2
8
2
16 2
24 2
4
2
1
2
2
2
8
2
9
2
17 2
18 2
24 2
25 2
26 2
8
2
1
2
3
2
4
2
Tones selectable via the front panel
19. Lists
Name
Organ101
Dtnd Or1
TrmOrgan
Organ109
60sOrgn2
60sOrgn3
PopOrgan
RockOrgn
Even Bar
OrganBss
Organ201
ChorsOr2
Dtnd Or2
PercOrg2
ChrchOr3
PuffOrgn
AccrdnC1
AccrdnC2
Accrdn3L
Accrdn4L
Accordn1
Accordn2
JVAccord
AccrdnFr
AccrdnIt
Bandneon
Harmonic
Harmonc2
JV-Acc1
JV-Acc2
NylStrGt
VeloHrmx
Nyln+Stl
Reqnt Gt
FlmncoGt
StlStrGt
12-strGt
Mandolin
Ukulele
NylonGto
NylonGt2
SteelGt2
Stl+Body
GtHrmncs
AcGtHrmx
Atmspher
NylnHarp
GtFrtNoz
Jazz Gt.
PedalStl
CleanGt2
JCClnGt.
MidTneGT
Muted Gt
OvrdrvGt
Dist Gt
Power Gt
MellowGt
JazzGt.2
CleanGt.
OpenHrd1
ChorusGt
CleanGt3
Mt DstBs
Funk Pop
Funk Gt2
Jazz Man
Gt Pinch
Dist.Gt2
Dazed Gt
Fdbck Gt
FdbckGt2
PowerGt2
5th Dist
RockRhyt
RockRhy2
DstRtmGT
GtFdback
GtCtNoiz
GtCtNoz2
DstCutNz
Family
ORGAN
ORGAN
ORGAN
ORGAN
ORGAN
ORGAN
ORGAN
ORGAN
ORGAN
ORGAN
ORGAN
ORGAN
ORGAN
ORGAN
ORGAN
ORGAN
ACCORDION
ACCORDION
ACCORDION
ACCORDION
ACCORDION
ACCORDION
ACCORDION
ACCORDION
ACCORDION
ACCORDION
ACCORDION
ACCORDION
ACCORDION
ACCORDION
A. GUITAR
A. GUITAR
A. GUITAR
A. GUITAR
A. GUITAR
A. GUITAR
A. GUITAR
A. GUITAR
A. GUITAR
A. GUITAR
A. GUITAR
A. GUITAR
A. GUITAR
A. GUITAR
A. GUITAR
A. GUITAR
A. GUITAR
A. GUITAR
E. GUITAR
E. GUITAR
E. GUITAR
E. GUITAR
E. GUITAR
E. GUITAR
E. GUITAR
E. GUITAR
E. GUITAR
E. GUITAR
E. GUITAR
E. GUITAR
E. GUITAR
E. GUITAR
E. GUITAR
E. GUITAR
E. GUITAR
E. GUITAR
E. GUITAR
E. GUITAR
E. GUITAR
E. GUITAR
E. GUITAR
E. GUITAR
E. GUITAR
E. GUITAR
E. GUITAR
E. GUITAR
E. GUITAR
E. GUITAR
E. GUITAR
E. GUITAR
E. GUITAR
Tone no. PC
163 121
164 33
165 33
166 34
167 34
168 34
169 35
170 36
171 37
172 39
173 39
174 39
175 33
176 33
177 34
178 34
179 34
180 35
181 35
182 36
183 36
184 36
185 36
186 36
187 36
188 36
189 37
190 38
191 39
192 39
193 39
194 39
195 39
196 39
197 39
198 39
199 39
200 39
201 39
202 39
203 40
204 40
205 40
206 40
207 40
208 40
209 40
210 40
211 40
212 40
213 40
214 40
215 40
216 121
217 121
218 11
219 49
220 50
221 50
222 51
223 45
224 46
225 40
226 41
227 41
228 41
229 42
230 43
231 44
232 56
233 41
234 41
235 42
236 43
237 45
238 45
239 49
240 49
241 49
242 49
243 49
CC00 CC32
6
2
0
2
1
2
0
2
2
2
3
2
0
2
0
2
0
2
0
2
16 2
22 2
2
2
3
2
1
2
4
2
7
2
3
2
8
2
1
2
2
2
3
2
4
2
5
2
8
2
48 2
8
2
0
2
1
2
2
2
3
2
8
2
9
2
10 2
19 2
20 2
21 2
23 2
24 2
25 2
0
2
1
2
2
2
3
2
8
2
9
2
16 2
17 2
18 2
19 2
20 2
21 2
29 2
2
2
5
2
116 2
16 2
10 2
8
2
0
2
9
2
0
2
116 2
116 2
0
2
8
2
0
2
0
2
0
2
10 2
1
2
9
2
1
2
1
2
0
2
8
2
0
2
1
2
8
2
9
2
10 2
Name
PickScrp
AcsticBs
Ac.Bass1
FingrdBs
JazzBass
FngrdBs3
PckdBass
FrtlssBs
SlpBass1
SynBass1
ResoSHBs
Sqr Bass
Ac.Bass2
Ac.Bass3
FngrdBs2
FngrdBs4
FingrSlp
Pckd Bs2
Mt PckBs
FrtlsBs2
FrtlsBs3
FrtlsBs4
SnFrtlss
MrSmooth
FrtlsBs5
FtFrtlss
ResoSlap
SlpBass2
SynBs101
JunoBass
106Bass
AcidBass
TB303Bss
TeknBass
ClaviBss
Hammer
JnglBass
PopSynBs
LghtSnBs
FatTBBss
SynBass2
SynBs201
Mod Bass
Seq Bass
BeefFMBs
XWr Bass
RubbrBss
SH101Bs1
SH101Bs2
SmthBass
MildBass
DetunBss
AttckPls
Str Slap
BassSld
StrngOct
StStrngs
StSlwStr
LegtoStr
SynStrng
SuspnStr
PzzctStr
FlViolVb
FolkViol
Violin
SlwVioln
Viola
Cello
Contrbss
DoublHit
Violin2
SlVioln2
Viola2
Cello2
Trem Str
SlwTrmol
Strings
Strings2
Orchstra
Orchstr2
TremOrch
Family
E. GUITAR
BASS
BASS
BASS
BASS
BASS
BASS
BASS
BASS
BASS
BASS
BASS
BASS
BASS
BASS
BASS
BASS
BASS
BASS
BASS
BASS
BASS
BASS
BASS
BASS
BASS
BASS
BASS
BASS
BASS
BASS
BASS
BASS
BASS
BASS
BASS
BASS
BASS
BASS
BASS
BASS
BASS
BASS
BASS
BASS
BASS
BASS
BASS
BASS
BASS
BASS
BASS
BASS
BASS
BASS
STRINGS
STRINGS
STRINGS
STRINGS
STRINGS
STRINGS
STRINGS
STRINGS
STRINGS
STRINGS
STRINGS
STRINGS
STRINGS
STRINGS
STRINGS
STRINGS
STRINGS
STRINGS
STRINGS
STRINGS
STRINGS
STRINGS
STRINGS
STRINGS
STRINGS
STRINGS
r EXR-46 OR
Tone no. PC CC00 CC32
244 49 11 2
245 49 24 2
246 49 40 2
247 50
0
2
248 50
1
2
249 50
9
2
250 51
1
2
251 51
2
2
252 51
8
2
253 51
9
2
254 52
0
2
255 52
1
2
256 56
0
2
257 56
1
2
258 56
2
2
259 56
3
2
260 56
4
2
261 56
8
2
262 56
9
2
263 56 16 2
264 53
8
2
265 54 40 2
266 54
0
2
267 55
0
2
268 86
0
2
269 53
0
2
270 53
9
2
271 53 32 2
272 55
8
2
273 55 19 2
274 100 3
2
275 100 4
2
276 66 116 2
277 67
8
2
278 67
7
2
279 65
0
2
280 66
0
2
281 67
0
2
282 68
0
2
283 65
8
2
284 66
1
2
285 66
8
2
286 67
1
2
287 67
9
2
288 74 48 2
289 73
0
2
290 69
0
2
291 71
0
2
292 72
1
2
293 76
0
2
294 79
0
2
295 70
0
2
296 72
0
2
297 72
8
2
298 74
0
2
299 75
0
2
300 77
0
2
301 80
0
2
302 57
0
2
303 57
8
2
304 58
0
2
305 59
0
2
306 60
0
2
307 61
0
2
308 42 116 2
309 62
0
2
310 62 16 2
311 62 24 2
312 62 26 2
313 57
1
2
314 57
2
2
315 57
3
2
316 57 24 2
317 57 25 2
318 58
1
2
319 58
2
2
320 58
4
2
321 59
1
2
322 60
2
2
323 61
1
2
324 61
8
2
325 61 16 2
326 62
1
2
327 62
8
2
328 62 25 2
329 62 27 2
330 63
0
2
331 63
5
2
332 63 16 2
Name
ChoirStr
VeloStrn
60String
SlwStrng
SlwStrn2
WarmStrn
OBStrngs
SynStrn1
70s Str1
70s Str2
SynStrn2
SynStrn3
Orch Hit
Bass Hit
6th Hit
Euro Hit
TechnHit
ImpctHit
PhllyHit
LoFiRave
St.Choir
Humming
VoiceOoh
SynVox
Solo Vox
ChoirAah
MelloChr
ChrAahs2
SynVoice
AnaVoice
Harpvox
HllwRels
OrienSax
BlwTenor
BrthyTnr
SoprnSax
Alto Sax
TenorSax
BartnSax
SoprSax2
AltoSax2
HyprAlto
TenrSax2
SprTenor
FluteVib
Piccolo
Oboe
Bassoon
Clarinet
PanFlute
Whistle
EnglHorn
JzClrint
BsClarnt
Flute
Recorder
BottlBlw
Ocarina
Trumpet
FlglHorn
Trombone
Tuba
MtdTrump
FrnchHrns
BrassOct
Brass 1
BrssFall
TwnTrmpt
TrombnSc
Trumpet2
Trumpet3
DrkTrmpt
BrightTp
Warm Tp.
Trombne2
Trombne3
BrightTb
Tuba 2
MtTrmpt2
Fr.Horn2
FrHornSl
HornOrch
Brass 2
Brass 3
TwinBons
TrmbnSc2
SynBrss1
JmpBrass
OctSnBrs
Family
STRINGS
STRINGS
STRINGS
STRINGS
STRINGS
STRINGS
STRINGS
STRINGS
STRINGS
STRINGS
STRINGS
STRINGS
STRINGS
STRINGS
STRINGS
STRINGS
STRINGS
STRINGS
STRINGS
STRINGS
VOCAL
VOCAL
VOCAL
VOCAL
VOCAL
VOCAL
VOCAL
VOCAL
VOCAL
VOCAL
VOCAL
VOCAL
SAX
SAX
SAX
SAX
SAX
SAX
SAX
SAX
SAX
SAX
SAX
SAX
WIND
WIND
WIND
WIND
WIND
WIND
WIND
WIND
WIND
WIND
WIND
WIND
WIND
WIND
AC BRASS
AC BRASS
AC BRASS
AC BRASS
AC BRASS
AC BRASS
AC BRASS
AC BRASS
AC BRASS
AC BRASS
AC BRASS
AC BRASS
AC BRASS
AC BRASS
AC BRASS
AC BRASS
AC BRASS
AC BRASS
AC BRASS
AC BRASS
AC BRASS
AC BRASS
AC BRASS
AC BRASS
AC BRASS
AC BRASS
AC BRASS
AC BRASS
SYNBRASS
SYNBRASS
SYNBRASS
Tone no. PC CC00 CC32
333 64 17 2
334 63
1
2
335 63
3
2
336 63
4
2
337 63
8
2
338 63
9
2
339 63 18 2
340 64
0
2
341 64
1
2
342 64
8
2
343 64 16 2
344 82
4
2
345 81
0
2
346 81
3
2
347 81
4
2
348 81 17 2
349 82
0
2
350 82
2
2
351 82
6
2
352 82 16 2
353 82 46 2
354 83
0
2
355 83
2
2
356 85
0
2
357 85
1
2
358 85
8
2
359 81
1
2
360 81
2
2
361 81
5
2
362 81
6
2
363 81
8
2
364 81 16 2
365 82
1
2
366 82
3
2
367 82
5
2
368 82
7
2
369 82
8
2
370 82
9
2
371 82 10 2
372 82 36 2
373 83
1
2
374 84
0
2
375 87
0
2
376 87
1
2
377 88
0
2
378 88
1
2
379 88
2
2
380 88
7
2
381 91
0
2
382 91
1
2
383 97
0
2
384 100 1
2
385 101 0
2
386 89
0
2
387 89
1
2
388 97
1
2
389 97
2
2
390 97
8
2
391 98
8
2
392 90
0
2
393 90
1
2
394 90
3
2
395 90
4
2
396 92
0
2
397 92
1
2
398 92
3
2
399 94
1
2
400 94
2
2
401 96
0
2
402 96
1
2
403 96
9
2
404 98
0
2
405 100 6
2
406 102 1
2
407 103 5
2
408 104 0
2
409 90
2
2
410 90
5
2
411 93
0
2
412 94
0
2
413 95
0
2
414 96
8
2
415 96 10 2
416 98
1
2
417 98
2
2
418 102 0
2
419 102 2
2
420 103 0
2
421 103 1
2
Name
VeloBrs2
PolyBrss
SYBrass
JunoBrss
SynBrss3
QuakBrss
Octv Brs
SynBrss2
SoftBrss
SynBrss4
VeloBrs1
Big Lead
Sqr Wave
MellowFM
CC Solo
260 Sync
Saw Wave
PulseSaw
GR-300
WaspySyn
SeqncdSw
SnCallpe
PurPanLd
Charang
WireLead
DistLead
Square
HollwMin
Shmoog
LMSquare
SineWave
DistSqre
P5 Saw
FelineGR
VeloLead
LA Saw
Dr. Solo
SawWave2
Saw
NatrLead
VentSyn
ChiffrLd
5thSawWv
BigFives
Bss&Lead
Big&Raw
Fat&Prky
DlydLead
Polysyn
80sPlySn
Ice Rain
WarmAtms
Brightns
Fantasia
Fantsia2
HarmRain
Africnwd
ClaviPad
Rave
Warm Pad
ThickPad
RotryStr
Soft Pad
SpcVoice
HeavenII
Itopia
Tine Pad
PannrPad
SweepPad
PolarPad
Shwimmer
Sndtrack
AmbntPad
Goblinsn
ResoPnnr
StarThme
Horn Pad
Sine Pad
BowdGlss
MetalPad
Halo Pad
Converge
CelstlPd
Ancestrl
Prologue
Goblin
50sSciFi
EchDrops
EchoBell
Family
SYNBRASS
SYNBRASS
SYNBRASS
SYNBRASS
SYNBRASS
SYNBRASS
SYNBRASS
SYNBRASS
SYNBRASS
SYNBRASS
SYNBRASS
SYN LEAD
SYN LEAD
SYN LEAD
SYN LEAD
SYN LEAD
SYN LEAD
SYN LEAD
SYN LEAD
SYN LEAD
SYN LEAD
SYN LEAD
SYN LEAD
SYN LEAD
SYN LEAD
SYN LEAD
SYN LEAD
SYN LEAD
SYN LEAD
SYN LEAD
SYN LEAD
SYN LEAD
SYN LEAD
SYN LEAD
SYN LEAD
SYN LEAD
SYN LEAD
SYN LEAD
SYN LEAD
SYN LEAD
SYN LEAD
SYN LEAD
SYN LEAD
SYN LEAD
SYN LEAD
SYN LEAD
SYN LEAD
SYN LEAD
POLY SYN
POLY SYN
POLY SYN
POLY SYN
POLY SYN
POLY SYN
POLY SYN
POLY SYN
POLY SYN
POLY SYN
POLY SYN
PAD
PAD
PAD
PAD
PAD
PAD
PAD
PAD
PAD
PAD
PAD
PAD
PAD
PAD
PAD
PAD
PAD
PAD
PAD
PAD
PAD
PAD
PAD
PAD
PAD
PAD
PAD
PAD
PAD
PAD
Tone no. PC
422 103
423 103
424 103
425 103
426 104
427 106
428 106
429 106
430 106
431 106
432 106
433 106
434 107
435 108
436 16
437 47
438 76
439 100
440 101
441 102
442 103
443 111
444 118
445 119
446 120
447 122
448 123
449 124
450 126
451 127
452 78
453 105
454 106
455 106
456 106
457 110
458 112
459 113
460 114
461 115
462 116
463 117
464 107
465 108
466 108
467 87
468 87
469 93
470 93
471 94
472 95
473 95
474 96
475 97
476 99
477 99
478 110
479 111
480 112
481 16
482 16
483 47
484 105
485 105
486 105
487 105
488 106
489 106
490 107
491 108
492 109
493 112
494 112
495 112
496 113
497 113
498 113
499 113
500 127
501 127
502 112
503 112
504 106
505 106
506 106
507 106
508 106
509 106
510 106
CC00 CC32
2
2
3
2
4
2
6
2
1
2
17 2
18 2
19 2
20 2
21 2
22 2
116 2
116 2
116 2
0
2
0
2
8
2
116 2
116 2
116 2
116 2
116 2
116 2
116 2
116 2
116 2
116 2
116 2
116 2
116 2
0
2
0
2
0
2
8
2
24 2
116 2
116 2
116 2
116 2
116 2
116 2
116 2
0
2
0
2
16 2
115 2
116 2
115 2
116 2
116 2
115 2
116 2
116 2
116 2
115 2
116 2
0
2
0
2
1
2
1
2
8
2
24 2
1
2
2
2
8
2
16 2
1
2
16 2
1
2
8
2
0
2
0
2
8
2
16 2
8
2
9
2
10 2
11 2
117 2
118 2
43 2
2
2
26 2
27 2
30 2
42 2
32 2
29 2
31 2
Name
Echo Pan
EchoPan2
BigPannr
WtrPiano
StrThme2
JV-Bouz1
JV-Bouz2
JV-Bouz3
JV-Bouz4
BouzBag1
BouzBag2
Bouzouki
BzkiTrm
BzkiTrVm
Santur
Harp
Kawala
Kawala2
Kawala1
KawlaOct
KwlOctVm
Rababa
Nay
NayOct
NayOctVm
Mizmar
MizmrOct
MizmrTrV
MizmarDu
Arghool1
Shakuhch
Sitar
Banjo
Rabab
Oud
Oud1Trem
Oud1
Oud2
Oud2Trem
Oud1TrVm
Oud2TrVm
OudOct
Shamisen
Koto
Kanoon
Knoun3St
KanounSt
Kn3TrVmx
Kn1TrVmx
Kn2TrVmx
Kanoun3
Kanoun1
Kanoun2
KanounTr
Knoun3Oc
KnounOct
Bagpipe
Fiddle
Shanai 2
Santur 2
Cimbalom
Yang Qin
Sitar 2
DtnSitar
Tambra
Tamboura
MtdBanjo
Gopichnt
Tsugaru
TaishoKt
Kalimba
Shanai
Pungi
Hichriki
Bonang
Gender
GamlnGng
StGameln
Arghool2
Habban
Jerba
Shernay
OudSadda
Oud Verd
Oud SdVr
Oud SRV
OudSdSld
Oud Taf
OudSdTaf
Family
PAD
PAD
PAD
PAD
PAD
ETHNIC 1
ETHNIC 1
ETHNIC 1
ETHNIC 1
ETHNIC 1
ETHNIC 1
ETHNIC 1
ETHNIC 1
ETHNIC 1
ETHNIC 1
ETHNIC 1
ETHNIC 1
ETHNIC 1
ETHNIC 1
ETHNIC 1
ETHNIC 1
ETHNIC 1
ETHNIC 1
ETHNIC 1
ETHNIC 1
ETHNIC 1
ETHNIC 1
ETHNIC 1
ETHNIC 1
ETHNIC 1
ETHNIC 1
ETHNIC 1
ETHNIC 1
ETHNIC 1
ETHNIC 1
ETHNIC 1
ETHNIC 1
ETHNIC 1
ETHNIC 1
ETHNIC 1
ETHNIC 1
ETHNIC 1
ETHNIC 1
ETHNIC 1
ETHNIC 1
ETHNIC 1
ETHNIC 1
ETHNIC 1
ETHNIC 1
ETHNIC 1
ETHNIC 1
ETHNIC 1
ETHNIC 1
ETHNIC 1
ETHNIC 1
ETHNIC 1
ETHNIC 1
ETHNIC 1
ETHNIC 1
ETHNIC 1
ETHNIC 1
ETHNIC 1
ETHNIC 1
ETHNIC 1
ETHNIC 1
ETHNIC 1
ETHNIC 1
ETHNIC 1
ETHNIC 1
ETHNIC 1
ETHNIC 1
ETHNIC 1
ETHNIC 1
ETHNIC 1
ETHNIC 1
ETHNIC 1
ETHNIC 1
ETHNIC 1
ETHNIC 2
ETHNIC 2
ETHNIC 2
ETHNIC 2
ETHNIC 2
ETHNIC 2
ETHNIC 2
ETHNIC 2
ETHNIC 2
ETHNIC 2
ETHNIC 2
EXR-46 OR
121
Tone no. PC
511 106
512 106
513 106
514 106
515 106
516 106
517 106
518 106
519 106
520 106
521 106
522 106
523 95
524 96
525 97
526 111
527 111
528 111
529 111
530 111
531 111
532 111
533 118
534 118
535 118
536 118
537 118
538 112
539 113
540 114
541 115
542 11
543 11
544 11
545 11
546 106
547 112
548 112
549 112
550 112
551 48
552 115
553 116
554 117
555 113
556 114
557 114
558 116
559 117
560 117
561 118
562 118
563 118
564 118
565 119
566 119
567 119
568 120
569 120
570 120
571 120
572 120
573 120
574 120
575 120
576 123
577 123
578 124
579 124
580 124
581 125
582 126
583 126
584 126
585 126
586 126
587 127
588 127
589 127
590 128
591 122
592 122
593 123
594 123
595 123
596 123
597 124
598 124
599 124
CC00 CC32
33 2
13 2
15 2
14 2
41 2
34 2
43 2
35 2
36 2
37 2
38 2
39 2
117 2
117 2
117 2
118 2
117 2
119 2
124 2
125 2
122 2
123 2
117 2
118 2
119 2
124 2
125 2
117 2
117 2
117 2
117 2
117 2
118 2
119 2
124 2
40 2
3
2
42 2
44 2
45 2
0
2
0
2
8
2
0
2
16 2
0
2
8
2
0
2
8
2
9
2
0
2
1
2
8
2
9
2
0
2
8
2
9
2
0
2
1
2
8
2
9
2
16 2
17 2
24 2
25 2
2
2
3
2
0
2
2
2
3
2
1
2
0
2
1
2
3
2
5
2
6
2
0
2
1
2
2
2
3
2
0
2
1
2
0
2
1
2
4
2
5
2
1
2
4
2
5
2
Name
Oud SRT
Baglama
BglmaGld
BglmTrm
Cumbus
Divan
DivanGld
DivnOrn1
DivnOrn2
DivanTrm
EleBglma
ElBglmTr
Kanun1TK
Kanun2TK
KanTrmTK
KdzKmnce
Kemance
KmnceVib
Kemane
KmaneVib
Klarnet
KlrnetVb
Ney
NeyVib
NeyPizz
NeyLa
NeyLaVib
Oud1 TK
Oud2 TK
OudTrmTK
OudOrnTK
StrSect
StrSctTr
StrSctST
StrSctPZ
Tambur
Tulum
Zurna1
Zurna2
ZurnaVib
Timpani
StlDrums
Castnets
Taiko
RAMACybl
Agogo
Atarigan
Woodblck
ConcrtBD
CncrBDMt
MeloTom1
Real Tom
MeloTom2
Rock Tom
SyntDrum
808 Tom
ElecPerc
Rev Cym
Rev Cym2
Rev Snr1
RevSnr 2
RevKick1
RevConBD
RevTom 1
RevTom 2
Thunder
Wind
Bird
HrseGllp
Bird 2
Telphn 2
Helicptr
CarEngne
Car-Pass
Siren
Train
Applause
Laughing
Screamng
Xplosion
BrtNoise
FlKClick
Seashore
Rain
Stream
Bubble
Dog
Kitty
Growl
Family
ETHNIC 2
ETHNIC 2
ETHNIC 2
ETHNIC 2
ETHNIC 2
ETHNIC 2
ETHNIC 2
ETHNIC 2
ETHNIC 2
ETHNIC 2
ETHNIC 2
ETHNIC 2
ETHNIC 2
ETHNIC 2
ETHNIC 2
ETHNIC 2
ETHNIC 2
ETHNIC 2
ETHNIC 2
ETHNIC 2
ETHNIC 2
ETHNIC 2
ETHNIC 2
ETHNIC 2
ETHNIC 2
ETHNIC 2
ETHNIC 2
ETHNIC 2
ETHNIC 2
ETHNIC 2
ETHNIC 2
ETHNIC 2
ETHNIC 2
ETHNIC 2
ETHNIC 2
ETHNIC 2
ETHNIC 2
ETHNIC 2
ETHNIC 2
ETHNIC 2
PERCUSSION
PERCUSSION
PERCUSSION
PERCUSSION
PERCUSSION
PERCUSSION
PERCUSSION
PERCUSSION
PERCUSSION
PERCUSSION
PERCUSSION
PERCUSSION
PERCUSSION
PERCUSSION
PERCUSSION
PERCUSSION
PERCUSSION
PERCUSSION
PERCUSSION
PERCUSSION
PERCUSSION
PERCUSSION
PERCUSSION
PERCUSSION
PERCUSSION
SFX
SFX
SFX
SFX
SFX
SFX
SFX
SFX
SFX
SFX
SFX
SFX
SFX
SFX
SFX
SFX
SFX
SFX
SFX
SFX
SFX
SFX
SFX
SFX
Tone no. PC CC00 CC32
600 125 0
2
601 125 2
2
602 125 3
2
603 125 4
2
604 125 5
2
605 125 7
2
606 126 2
2
607 126 4
2
608 126 7
2
609 126 8
2
610 126 9
2
611 127 3
2
612 127 4
2
613 127 5
2
614 127 6
2
615 128 0
2
616 128 1
2
617 128 2
2
618 1
0
2
619 2
0
2
620 9
0
2
621 10
0
2
622 11
0
2
623 12
0
2
624 14
0
2
625 17
0
2
626 26
0
2
627 27
0
2
628 31
0
2
629 33
0
2
630 41
0
2
631 49
0
2
632 50
0
2
633 117 0
4
634 117 0
1
635 117 0
2
636 117 0
3
637 118 0
4
638 119 0
4
639 120 0
2
640 121 0
2
641 122 0
2
642 123 0
2
643 124 0
2
644 125 0
2
645 126 0
2
646 3
0
2
647 25
0
2
648 34
0
2
649 51
0
2
650 57
0
2
(*) See below for details.
Name
Telphn 1
DoorCrk
Door
Scratch
WndChims
Scratch2
Car-Stop
CarCrash
Jetplane
Starship
BurstNs
Punch
HeartBt
Footstps
Applaus2
Gun Shot
MachnGun
Lasergun
STNDARD1
STNDARD2
ROOM
Hip Hop
Drum'Bss
TechHous
R&B
POWER
TR808909
DANCE
NewTR909
Jazz Kit
BRUSH
ORCHSTRA
ETHNIC
E-40
Orient 1
Orient 2
Orient 3
OrMix 1
OrMix 2
Khaligi1
Khaligi2
Khaligi3
Mix
TrkOrMix
Turkish 1
Turkish 2
STNDARD3
ELECTRNC
JAZZ
KICK&SNR
SFX
Family
SFX
SFX
SFX
SFX
SFX
SFX
SFX
SFX
SFX
SFX
SFX
SFX
SFX
SFX
SFX
SFX
SFX
SFX
DRUMS
DRUMS
DRUMS
DRUMS
DRUMS
DRUMS
DRUMS
DRUMS
DRUMS
DRUMS
DRUMS
DRUMS
DRUMS
DRUMS
DRUMS
DRUMS
DRUMS
DRUMS
DRUMS
DRUMS
DRUMS
DRUMS
DRUMS
DRUMS
DRUMS
DRUMS
DRUMS
DRUMS
DRUMS
DRUMS
DRUMS
DRUMS
DRUMS
r EXR-46 OR
122
C7 96
95
93
91
89
88
86
C6 84
83
81
79
77
76
74
C5 72
71
69
67
65
64
62
C4 60
59
57
55
53
52
50
C3 48
47
45
43
41
40
38
C2 36
35
33
31
29
28
26
C1 24
23
21
19
17
16
14
C0 12
11
9
7
5
4
2
C–1 0
------------
------------
-----------------------
-----------------------
94
92
90
87
85
82
80
78
75
73
70
68
66
63
61
58
56
54
51
49
46
44
42
39
37
34
32
30
27
25
22
Finger Snap
Finger Snap
Sticks
SquareClick
Mtrnm.Click
Sticks
SquareClick
Mtrnm.Click
Ride Cymbal
China Cymbal
Ride Bell
Tambourine
Splash Cym.
Cowbell
Crash Cym.2
Vibraslap
Ride Cymbal
Bongo High
Bongo Lo
Mute H.Conga
Conga Hi Opn
Conga Lo Opn
High Timbale
Low Timbale
Agogo
Agogo
Cabasa
Maracas
ShrtWhistle
LongWhistle
Short Guiro
Long Guiro
Claves
Woodblock
Woodblock
Mute Cuica
Open Cuica
Mute Triangl
Open Triangl
Shaker
Jingle Bell
Bar Chimes
Castanets
Mute Surdo
Open Surdo
----------------------------------------------------------------------------------------------------
Real Tom 1
Crash Cym.1
Real Tom 1
Real Tom 1
Crash Cym.1
Real Tom 1
Ride Cymbal
China Cymbal
Jazz Open HH
Real Tom 4
Open HiHat
Real Tom 4
Pedal HiHat
Real Tom 4
Real Tom 6
Jazz Clsd.HH
Real Tom 6
Pedal HiHat
Real Tom 4
Std.2 Snare2
Real Tom 6
Close HiHat
Real Tom 6
Std.2 Snare1
808clap
Snare 2
909Clap
Snare 1
Std2 Kick2
Std.2 Kick1
Side Stick
Kick 1
Kick 2
Side Stick
Mtrnm. Bell
ScratchPush
ScratchPull
ScratchPush
ScratchPull
Mtrnm. Bell
Slap
Slap
High-Q
-----------Snare Roll
High-Q
------------
-----------Snare Roll
-----------------------
------------
-----------------------
------------
-----------------------
------------
------------
20
------------
-----------------------
-----------------------
----------------------------------
------------
------------
------------
-----------------------
------------
-----------------------
------------
------------
------------
------------
------------
-----------------------
-----------------------
------------
-----------------------
----------------------------------
STANDRD 2
STANDRD 1
18
15
13
10
8
6
3
1
PC: 2 [CC32: 2]
PC: 1 [CC32: 2]
Drum Kits
High Timbale
Low Timbale
Agogo
Agogo
Cabasa
Maracas
ShrtWhistle
LongWhistle
Short Guiro
Long Guiro
Claves
Woodblock
Woodblock
Mute Cuica
Open Cuica
Mute Triangl
Open Triangl
Shaker
Jingle Bell
Bell Tree
Castanets
Mute Surdo
Open Surdo
----------------------------------------------------------------------------------------------------
Mute H.Conga
Conga Hi Opn
Conga Lo Opn
Splash Cym.
Cowbell
Crash Cym.2
Vibraslap
Ride Cymbal
Bongo High
Bongo Lo
Ride Bell
Tambourine
Ride Cymbal
China Cymbal
Real Tom 1
Crash Cym.1
Real Tom 1
Open Hi Hat
Real Tom 4
Pedal HiHat
Real Tom 4
Real Tom 6
Close HiHat
Real Tom 6
Std.1 Snare2
Std.1 Snare1
808clap
Std.1 Kick2
Std.1 Kick1
Side Stick
Mtrnm. Bell
Sticks
SquareClick
Mtrnm.Click
ScratchPush
ScratchPull
Slap
High-Q
Finger Snap
-----------Snare Roll
------------
-----------------------
------------
-----------------------
------------
------------
-----------------------
------------
-----------------------
------------
------------
-----------------------
------------
-----------------------
------------
------------
-----------------------
STANDARD 3
PC: 3 [CC32: 2]
High Timbale
Low Timbale
Agogo
Agogo
Cabasa
Maracas
ShrtWhistle
LongWhistle
Short Guiro
Long Guiro
Claves
Woodblock
Woodblock
Mute Cuica
Open Cuica
Mute Triangl
Open Triangl
Shaker
Jingle Bell
Bell Tree
Castanets
Mute Surdo
Open Surdo
----------------------------------------------------------------------------------------------------
Mute H.Conga
Conga Hi Opn
Conga Lo Opn
Splash Cym.
Cowbell
Crash Cym.2
Vibraslap
Ride Cymbal
Bongo High
Bongo Lo
Ride Bell
Tambourine
Ride Cymbal
China Cymbal
Room Tom 2
Crash Cym.1
Room Tom 2
R8 Ohh2
Room Tom 2
Pedal HiHat
Room Tom 2
Room Tom 5
Room Chh
Room Tom 5
Room Snare 2
Room Snare 1
808clap
Room Kick 2
Room Kick 1
Side Stick
Mtrnm. Bell
Sticks
SquareClick
Mtrnm.Click
ScratchPush
ScratchPull
Slap
High-Q
Finger Snap
-----------Snare Roll
------------
-----------------------
------------
-----------------------
------------
------------
-----------------------
------------
-----------------------
------------
------------
-----------------------
------------
-----------------------
------------
------------
-----------------------
ROOM
PC: 9 [CC32: 2]
High Timbale
Low Timbale
Agogo
Agogo
Cabasa
Maracas
ShrtWhistle
LongWhistle
Short Guiro
Long Guiro
Claves
Woodblock
Woodblock
Hoo
Hoo
Mute Triangl
Open Triangl
Shaker
Jingle Bell
Bell Tree
Castanets
Mute Surdo
Open Surdo
----------------------------------------------------------------------------------------------------
Mute H.Conga
Conga Hi Opn
Conga Lo Opn
Splash Cym.
Cowbell
Crash Cym.2
Vibraslap
Ride Cymbal
Bongo High
Bongo Lo
Ride Bell
Tambourine
Ride Cymbal
ReverseCymbl
Real Tom 1
Crash Cym.1
Real Tom 1
HipHopOHH
Real Tom 4
HipHopCHH
Real Tom 4
Real Tom 6
HipHopCHH
Real Tom 6
HipHopSnare2
HipHop Snare
FunkClap
HipHop Kick
SimpleKick
Side Stick
Mtrnm. Bell
Sticks
SquareClick
Mtrnm.Click
Scrtch Push2
Scrtch Pull2
Slap
High-Q
Snap
Four
Snare Roll
Three
One
Two
ShutHi
Ha
ShutHa
Ah
TR-909 OHH
909 Kick2
TR-909 OHHsh
909 Kick
House Kick
TR-808 Kick
909 Kick 3
------------
-----------------------
------------
-----------------------
------------
------------
-----------------------
HIP HOP
PC: 10 [CC32: 2]
High Timbale
Low Timbale
Agogo
Agogo
Cabasa
808marac
ShrtWhistle
LongWhistle
Short Guiro
Long Guiro
808clave
Woodblock
Woodblock
Mute Cuica
Open Cuica
Mute Triangl
Open Triangl
Shaker
Jingle Bell
Bell Tree
Castanets
Mute Surdo
Open Surdo
----------------------------------------------------------------------------------------------------
808 Conga
808 Conga
808 Conga
Splash Cym.
808cowbe
Crash Cym.2
Vibraslap
Ride Cymbal
Bongo High
Bongo Lo
Ride Bell
Tambourine
Ride Cymbal
China Cymbal
808 Tom 2
909 Crash
808 Tom 2
HipHopOHH
808 Tom 2
R&B CHH
808 Tom 2
808 Tom 2
R&B CHH
808 Tom 2
Ps Snare
Jungle Snare
909Clap
TR-808 Kick
909 Kick2
Side Stick
Mtrnm. Bell
Sticks
SquareClick
Mtrnm.Click
Scrtch Push2
Scrtch Pull2
Slap
High-Q
Snap
Four
Snare Roll
Three
One
Two
ShutHi
Ha
ShutHa
Ah
TR-909 OHH
SimpleKick
TR-909 OHHsh
HipHop Kick
House Kick
909 Kick
909 Kick 3
------------
-----------------------
------------
-----------------------
------------
------------
-----------------------
DRUM'BSS
PC: 11 [CC32: 2]
High Timbale
Low Timbale
Agogo
Agogo
Cabasa
Maracas
ShrtWhistle
LongWhistle
Short Guiro
Long Guiro
Claves
Woodblock
Woodblock
Hoo
Hoo
Mute Triangl
Open Triangl
Shaker
Jingle Bell
Bell Tree
Castanets
Mute Surdo
Open Surdo
----------------------------------------------------------------------------------------------------
Mute H.Conga
Conga Hi Opn
Conga Lo Opn
Splash Cym.
Cowbell
Crash Cym.2
Vibraslap
Ride Cymbal
Bongo High
Bongo Lo
Ride Bell
Tambourine
Ride Cymbal
ReverseCymbl
Synth Drum 2
909 Crash
Synth Drum 2
TR-909 OHH
Synth Drum 2
TR-909 CHH
Synth Drum 2
Synth Drum 2
TR-909 CHH
Synth Drum 2
House Snare
Techno Snare
909Clap
909 Kick
House Kick
Side Stick
Mtrnm. Bell
Sticks
SquareClick
Mtrnm.Click
Scrtch Push2
Scrtch Pull2
Slap
High-Q
Snap
Four
Snare Roll
Three
One
Two
ShutHi
Ha
ShutHa
Ah
TR-909 OHH
SimpleKick
TR-909 OHHsh
HipHop Kick
909 Kick2
TR-808 Kick
909 Kick 3
------------
-----------------------
------------
-----------------------
------------
------------
-----------------------
TECHHOUS
PC: 12 [CC32: 2]
High Timbale
Low Timbale
Agogo
Agogo
Cabasa
Maracas
ShrtWhistle
LongWhistle
Short Guiro
Long Guiro
Claves
Woodblock
Woodblock
Hoo
Hoo
Mute Triangl
Open Triangl
Shaker
Jingle Bell
Bell Tree
Castanets
Mute Surdo
Open Surdo
----------------------------------------------------------------------------------------------------
Mute H.Conga
Conga Hi Opn
Conga Lo Opn
Splash Cym.
Cowbell
Crash Cym.2
Vibraslap
Ride Cymbal
Bongo High
Bongo Lo
Ride Bell
Tambourine
Ride Cymbal
ReverseCymbl
Real Tom 1
909 Crash
Real Tom 1
R&B OHH
Real Tom 4
R&B CHH
Real Tom 4
Real Tom 6
R&B CHH
Real Tom 6
909Snare2
R&B Snare
R&B Clap
909 Kick 3
SimpleKick
Side Stick
Mtrnm. Bell
Sticks
SquareClick
Mtrnm.Click
Scrtch Push2
Scrtch Pull2
Slap
High-Q
Snap
Four
Snare Roll
Three
One
Two
ShutHi
Ha
ShutHa
Ah
R&B OHH
909 Kick2
R&B OHHsh
HipHop Kick
House Kick
TR-808 Kick
909 Kick
------------
-----------------------
------------
-----------------------
------------
------------
-----------------------
R&B
PC: 14 [CC32: 2]
High Timbale
Low Timbale
Agogo
Agogo
Cabasa
Maracas
ShrtWhistle
LongWhistle
Short Guiro
Long Guiro
Claves
Woodblock
Woodblock
Mute Cuica
Open Cuica
Mute Triangl
Open Triangl
Shaker
Jingle Bell
Bell Tree
Castanets
Mute Surdo
Open Surdo
----------------------------------------------------------------------------------------------------
Mute H.Conga
Conga Hi Opn
Conga Lo Opn
Splash Cym.
Cowbell
Crash Cym.2
Vibraslap
Ride Cymbal
Bongo High
Bongo Lo
Ride Bell
Tambourine
Ride Cymbal
China Cymbal
Rock Tom 1
Crash Cym.1
Rock Tom 1
R8 Ohh2
Rock Tom 4
Pedal HiHat
Rock Tom 4
Rock Tom 4
Room Chh
Rock Tom 4
Power Snare1
Dance Snare1
808clap
Power Kick2
Power Kick1
Side Stick
Mtrnm. Bell
Sticks
SquareClick
Mtrnm.Click
ScratchPush
ScratchPull
Slap
High-Q
Finger Snap
-----------Snare Roll
------------
-----------------------
------------
-----------------------
------------
------------
-----------------------
------------
Kick 2
------------
Kick 1
------------
-----------------------
------------
-----------------------
------------
------------
-----------------------
POWER
PC: 17 [CC32: 2]
High Timbale
Low Timbale
Agogo
Agogo
Cabasa
Maracas
ShrtWhistle
LongWhistle
Short Guiro
Long Guiro
Claves
Woodblock
Woodblock
Mute Cuica
Open Cuica
Mute Triangl
Open Triangl
Shaker
Jingle Bell
Bell Tree
Castanets
Mute Surdo
Open Surdo
----------------------------------------------------------------------------------------------------
Mute H.Conga
Conga Hi Opn
Conga Lo Opn
Splash Cym.
Cowbell
Crash Cym.2
Vibraslap
Ride Cymbal
Bongo High
Bongo Lo
Ride Bell
Tambourine
Ride Cymbal
ReverseCymbl
Synth Drum 2
Crash Cym.1
Synth Drum 2
Jazz Open HH
Synth Drum 2
Pedal HiHat
Synth Drum 2
Synth Drum 2
Jazz Clsd.HH
Synth Drum 2
Elec Snare 2
Elec. Snare
808clap
Elec Kick 2
Elec Kick 1
Side Stick
Mtrnm. Bell
Sticks
SquareClick
Mtrnm.Click
Scrtch Push2
Scrtch Pull2
Slap
High-Q
Finger Snap
-----------Snare Roll
------------
-----------------------
------------
-----------------------
------------
------------
-----------------------
------------
-----------------------
------------
------------
-----------------------
------------
-----------------------
------------
------------
-----------------------
ELECTRONIC
PC: 25 [CC32: 2]
EXR-46 OR
123
124
C7 96
95
93
91
89
88
86
C6 84
83
81
79
77
76
74
C5 72
71
69
67
65
64
62
C4 60
59
57
55
53
52
50
C3 48
47
45
43
41
40
38
C2 36
35
33
31
29
28
26
C1 24
23
21
19
17
16
14
C0 12
11
9
7
5
4
2
C–1 0
------------
------------
-----------------------
-----------------------
High-Q
27
94
92
90
87
85
82
80
78
75
73
70
68
66
63
61
58
56
54
51
49
46
44
42
39
37
34
32
30
Snare Roll
Finger Snap
Snare Roll
Finger Snap
25
Sticks
SquareClick
Sticks
SquareClick
LongWhistle
Short Guiro
Long Guiro
Claves
Woodblock
Woodblock
Hoo
Hoo
Mute Triangl
Open Triangl
Shaker
Jingle Bell
Bell Tree
Castanets
Mute Surdo
Open Surdo
----------------------------------------------------------------------------------------------------
LongWhistle
Short Guiro
Long Guiro
808clave
Woodblock
Woodblock
Mute Cuica
Open Cuica
Mute Triangl
Open Triangl
Shaker
Jingle Bell
Bell Tree
Castanets
Mute Surdo
Open Surdo
----------------------------------------------------------------------------------------------------
High Timbale
Low Timbale
Agogo
Agogo
High Timbale
Low Timbale
Agogo
Agogo
Cabasa
Maracas
ShrtWhistle
Mute H.Conga
Conga Hi Opn
Conga Lo Opn
808 Conga
808 Conga
808 Conga
Cabasa
808marac
ShrtWhistle
Bongo High
Bongo Lo
Bongo High
Bongo Lo
Splash Cym.
Cowbell
Crash Cym.2
Splash Cym.
808cowbe
Crash Cym.2
Vibraslap
Ride Cymbal
Ride Bell
Tambourine
Ride Bell
Tambourine
Vibraslap
Ride Cymbal
Ride Cymbal
ReverseCymbl
Synth Drum 2
Crash Cym.1
Synth Drum 2
Ride Cymbal
China Cymbal
CR-78 ohh
Synth Drum 2
808 Tom 2
808 Crash
808 Tom 2
808__chh
Synth Drum 2
808__ohh
808 Tom 2
808__chh
808 Tom 2
Synth Drum 2
CR-78 chh
Synth Drum 2
808 Tom 2
808__chh
808 Tom 2
Power Snare2
808 Snare 1
808clap
Elec Snare 1
Elec Kick 2
Side Stick
TR-808 Kick
808 Rimshot
808clap
909 Snare 1
Dance Kick 2
Mtrnm. Bell
TR-909 Kick
Mtrnm. Bell
Mtrnm.Click
Scrtch Pull2
Scrtch Pull2
Mtrnm.Click
Slap
Scrtch Push2
Slap
Scrtch Push2
High-Q
------------
------------
----------------------------------
------------
------------
------------
-----------------------
-----------------------
-----------------------
-----------------------
----------------------------------
------------
------------
------------
-----------------------
------------
-----------------------
------------
------------
------------
------------
------------
-----------------------
-----------------------
------------
-----------------------
----------------------------------
DANCE
TR-808/909
-----------------------
22
20
18
15
13
10
8
6
3
1
PC: 27 [CC32: 2]
PC: 26 [CC32: 2]
LongWhistle
Short Guiro
Long Guiro
808clave
Woodblock
Woodblock
Mute Cuica
Open Cuica
Mute Triangl
Open Triangl
Shaker
Jingle Bell
Bell Tree
Castanets
Mute Surdo
Open Surdo
----------------------------------------------------------------------------------------------------
Cabasa
808marac
ShrtWhistle
High Timbale
Low Timbale
Agogo
Agogo
808 Conga
808 Conga
808 Conga
Bongo High
Bongo Lo
Vibraslap
Ride Cymbal
Splash Cym.
808cowbe
Crash Cym.2
Ride Bell
Tambourine
Ride Cymbal
China Cymbal
808 Tom 2
909 Crash
808 Tom 2
TR-909 OHH
808 Tom 2
TR-909 CHH
808 Tom 2
808 Tom 2
TR-909 CHH
808 Tom 2
909Clap
909Snare2
909 Snare
909 Kick2
Side Stick
909 Kick
Mtrnm. Bell
Mtrnm.Click
Sticks
SquareClick
Scrtch Pull2
Slap
Scrtch Push2
High-Q
Snare Roll
Snap
Four
Two
Three
One
ShutHi
ShutHa
Ah
Ha
TR-909 OHH
SimpleKick
TR-909 OHHsh
HipHop Kick
House Kick
TR-808 Kick
909 Kick 3
------------
-----------------------
------------
-----------------------
------------
------------
-----------------------
New TR-909
PC: 31 [CC32: 2]
LongWhistle
Short Guiro
Long Guiro
Claves
Woodblock
Woodblock
Mute Cuica
Open Cuica
Mute Triangl
Open Triangl
Shaker
Jingle Bell
Bell Tree
Castanets
Mute Surdo
Open Surdo
----------------------------------------------------------------------------------------------------
Cabasa
Maracas
ShrtWhistle
High Timbale
Low Timbale
Agogo
Agogo
Mute H.Conga
Conga Hi Opn
Conga Lo Opn
Bongo High
Bongo Lo
Vibraslap
Ride Cymbal
Splash Cym.
Cowbell
Crash Cym.2
Ride Bell
Tambourine
Ride Cymbal
China Cymbal
Real Tom 1
Crash Cym.1
Real Tom 1
Jazz Open HH
Real Tom 4
Jazz Pedl.HH
Real Tom 4
Real Tom 6
Jazz Clsd.HH
Real Tom 6
Hand clap2
Jazz Snare
Jazz Snare 1
Jazz Kick 1
Side Stick
Jazz Kick 2
Mtrnm. Bell
Mtrnm.Click
Sticks
SquareClick
ScratchPull
Slap
ScratchPush
High-Q
Snare Roll
Finger Snap
------------
-----------------------
------------
------------
------------
-----------------------
------------
-----------------------
------------
-----------------------
------------
------------
-----------------------
------------
-----------------------
------------
------------
-----------------------
Jazz Kit
PC: 33 [CC32: 2]
LongWhistle
Short Guiro
Long Guiro
Claves
Woodblock
Woodblock
Mute Cuica
Open Cuica
Mute Triangl
Open Triangl
Shaker
Jingle Bell
Bell Tree
Castanets
Mute Surdo
Open Surdo
----------------------------------------------------------------------------------------------------
Cabasa
Maracas
ShrtWhistle
High Timbale
Low Timbale
Agogo
Agogo
Mute H.Conga
Conga Hi Opn
Conga Lo Opn
Bongo High
Bongo Lo
Vibraslap
Ride Cymbal
Splash Cym.
Cowbell
Crash Cym.2
Ride Bell
Tambourine
Ride Cymbal
China Cymbal
Real Tom 1
Crash Cym.1
Real Tom 1
Jazz Open HH
Real Tom 4
Pedal HiHat
Real Tom 4
Real Tom 6
Jazz Clsd.HH
Real Tom 6
Hand clap2
Jazz Snare 2
Jazz Snare 1
Jazz Kick 1
Side Stick
Jazz Kick 2
Mtrnm. Bell
Mtrnm.Click
Sticks
SquareClick
ScratchPull
Slap
ScratchPush
High-Q
Snare Roll
Finger Snap
------------
-----------------------
------------
------------
------------
-----------------------
------------
-----------------------
------------
-----------------------
------------
------------
-----------------------
------------
-----------------------
------------
------------
-----------------------
JAZZ
PC: 34 [CC32: 2]
LongWhistle
Short Guiro
Long Guiro
Claves
Woodblock
Woodblock
Mute Cuica
Open Cuica
Mute Triangl
Open Triangl
Shaker
Jingle Bell
Bell Tree
Castanets
Mute Surdo
Open Surdo
----------------------------------------------------------------------------------------------------
Cabasa
Maracas
ShrtWhistle
High Timbale
Low Timbale
Agogo
Agogo
Mute H.Conga
Conga Hi Opn
Conga Lo Opn
Bongo High
Bongo Lo
Vibraslap
Ride Cymbal
Splash Cym.
Cowbell
Crash Cym.2
Brush RideBL
Tambourine
Brush Ride
China Cymbal
Lite Tom 4
Brush Crash
Lite Tom 4
Brush Ohh
Lite Tom 4
Pedal HiHat
Lite Tom 4
Lite Tom 4
Brs Chh
Lite Tom 4
Brush Slap1
Brush Swirl
Brush Swirl
Jazz Kick 1
Side Stick
Jazz Kick 2
Mtrnm. Bell
Mtrnm.Click
Sticks
SquareClick
ScratchPull
Slap
ScratchPush
High-Q
Snare Roll
Finger Snap
------------
-----------------------
------------
------------
------------
-----------------------
------------
-----------------------
------------
-----------------------
------------
------------
-----------------------
------------
-----------------------
------------
------------
-----------------------
BRUSH
PC: 41 [CC32: 2]
LongWhistle
Short Guiro
Long Guiro
Claves
Woodblock
Woodblock
Mute Cuica
Open Cuica
Mute Triangl
Open Triangl
Shaker
Jingle Bell
Bell Tree
Castanets
Mute Surdo
Open Surdo
Applause
-----------------------------------------------------------------------------------------
Cabasa
Maracas
ShrtWhistle
High Timbale
Low Timbale
Agogo
Agogo
Mute H.Conga
Conga Hi Opn
Conga Lo Opn
Bongo High
Bongo Lo
Vibraslap
Concert Cym.
Splash Cym.
Cowbell
Con.Cymbal2
Timpani
Tambourine
Timpani
Timpani
Timpani
Timpani
Timpani
Timpani
Timpani
Timpani
Timpani
Timpani
Timpani
Timpani
Castanets
Concert Snr
Concert Snr
Concert BD
Side Stick
Jazz Kick 1
Mtrnm. Bell
Mtrnm.Click
Sticks
SquareClick
Ride Cymbal
Pedal HiHat
Jazz Open HH
Jazz Clsd.HH
Snare Roll
Finger Snap
------------
-----------------------
------------
------------
------------
-----------------------
------------
-----------------------
------------
-----------------------
------------
------------
-----------------------
------------
-----------------------
------------
------------
-----------------------
ORCHESTRA
PC: 49 [CC32: 2]
Bongo Lo
Mute H.Conga
Conga Hi Opn
Conga MtLow
Conga Slap
Conga Lo Opn
Conga Slide
Mut Pandiero
Opn Pandiero
Open Surdo
Mute Surdo
Tamborim
Agogo
Agogo
Shaker
Low Whistle
Low Whistle
Mute Cuica
Open Cuica
Mute Triangl
Open Triangl
Short Guiro
Long Guiro
Cabasa Up
Cabasa Down
High Timbale
Cowbell
Bongo High
DJembe
Djembe_rim
Low Timbale
Timbl Paila
Talking Drum
Bend tlk_drm
Caxixi
Tabla_Ge
Tabla Ge Hi
Tabla_Na
Tabla_Tun
Req_Dum
Req_tik
Tabla_Te
Udo_slap
Bendir
Udo_Short
Udo_Long
RAMA Cymbal
RAMA Cymbal
Gamelan Gong
Small Gong
Bend Gong
Ban_Gu
Big Gong
Ohkawa
H kotsuzumi
L Kotsuzumi
Atarigane
Hyoushigi
Shimedaiko
Wadaiko
Wadaiko Rim
Bar Chimes
Bell Tree
Jingle Bell
Concert Cym.
Concert BD
Concert Snr
Crash Cym.1
Snare Roll
Castanets
Finger Snap
Tambourine
------------
-----------------------
------------
------------
------------
-----------------------
------------
-----------------------
------------
-----------------------
------------
------------
-----------------------
------------
-----------------------
------------
------------
-----------------------
ETHNIC
PC: 50 [CC32: 2]
Rev.Snare
Power Snare2
Elec Snare 1
Dance Snare2
Elec Snare 2
House Snare
Elec. Snare
Elec Snare 3
808 Snare 1
808 Snare 2
909 Snare 1
909 Snare 2
Brush Swirl
Brush Tap
Brush Slap1
Brush Slap2
Brush Slap
Brush Swirl
Brush Swirl
Long Swirl
--------------------------------------------------------
Room Snare 2
Dance Snare1
Power Snare1
Concert Snr
Jazz Snare 1
Jazz Snare 2
Room Snare 1
Std.2 Snare1
Std.2 Snare2
Tight Snare
Std.1 Snare1
Std.1 Snare2
TR-909 Kick
Dance Kick 2
Elec Kick 1
Elec. Kick
TR-808 Kick
Power Kick2
Elec Kick 2
Room Kick 2
Power Kick1
Jazz Kick 2
Concert BD
Room Kick 1
Soft Kick
Jazz Kick 1
Kick 1
Kick 2
Std.1 Kick2
Std.2 Kick1
Std2 Kick2
-----------Std.1 Kick1
------------
-----------------------
------------
------------
------------
-----------------------
------------
-----------------------
------------
-----------------------
------------
-----------------------
------------
------------
------------
-----------------------
------------
-----------------------
------------
-----------------------
------------
------------
-----------------------
------------
-----------------------
------------
------------
-----------------------
KICK & SNARE
PC: 51 [CC32: 2]
Gun Shot
Machine Gun
Lasergun
Explosion
Dog
Horse-Gallop
Bird
Rain
Thunder
Wind
Seashore
Stream
Bubble
Kitty
Bird 2
Growl
Applause 2
Telephone 1
Telephone 2
-------------------------------------------------------------------
Jetplane
Helicopter
Starship
Car-Pass
Car-Crash
Siren
Train
Wind Chimes
Car-Engine
Car-Stop
Door
Scratch
Applause
DoorCreaking
Heart Beat
Footsteps
Footsteps
Screaming
Punch
Fl.KeyClick
Laughing
Gt.Cut Noise
Gt.Cut Noise
String Slap
Mtrnm. Bell
Gt.FretNoise
SquareClick
Mtrnm.Click
ScratchPush
ScratchPull
Sticks
High-Q
Slap
Pick Scrape
Dist.CutNoiz
Bass Slide
Dist.CutNoiz
Gt.CutNoise2
Gt.CutNoise2
Scrtch Push2
Scrtch Pull2
------------
-----------------------
------------
-----------------------
------------
-----------------------
------------
------------
------------
-----------------------
------------
-----------------------
------------
-----------------------
------------
------------
-----------------------
------------
-----------------------
------------
------------
-----------------------
SFX
PC: 57 [CC32: 2]
r EXR-46 OR
-----------------------
------------
G9 127
-----------126
------------
125
-----------------------
123
------------
-----------------------
------------
-----------------------
------------
-----------------------
------------
------------
-----------------------
------------
------------
-----------------------
121
118
116
114
111
109
106
------------
124
122
C9 120
119
117
115
113
112
110
C8 108
107
105
104
-----------------------
103
-----------102
Woodblock
99
101
Claves
Woodblock
97
(Cabasa Down)
ETHNIC
100
98
(C7) (96)
PC: 50 [CC32: 2]
EXR-46 OR
125
126
C7 96
95
93
91
89
88
86
C6 84
83
81
79
77
76
74
C5 72
71
69
67
65
64
62
C4 60
59
57
55
53
52
50
C3 48
47
45
43
41
40
38
C2 36
35
33
31
29
28
26
C1 24
23
21
19
17
16
14
C0 12
11
9
7
5
4
2
C–1 0
94
92
90
87
85
82
80
78
75
73
70
68
66
63
61
58
56
54
51
49
46
44
42
39
37
34
32
30
Tom 1 (from Standard)
Closed Hi-Hat (TR-707)
Tom 2 (from Standard)
Closed Hi-Hat (TR-707)
Tom 2 (from Standard)
Closed Hi-Hat (TR-707)
Tom 2 (from Standard)
Closed Hi-Hat (TR-707)
Dof 2 Rim
Tabla 2 Dom
Tabla Roll
Tabla 2 Sak
Tabla (FX) (Roll End)
Tabla 2 Tak
Tabla 2 Tik
Tabla 2 Rim
Rek 2 Dom Open
Rek 2 Rim
Rek 2 Dom Closed
Rek 2 Tak 1
Rek 2 Tak 2
Rek 2 Sak
Hager
Rek 2 Khana Closed
Zir
Rek 2 Khana Open
Rek 2 (Roll)
Rek 2 Sak
Sagat Mid
Sagat High
Sagat Sak
Shaker (from Standard)
Zaghrouta A
Zaghrouta B
Tabl Noueri Dom
Nakrazan A
Tabl Noueri Rim
Nakrazan B
Tabl Noueri Tak
Bass Drum (TR-707)
Hand Clap 2 Mono (E-40)
Bongos Dom (from E-40)
Dof 2 Sak 2
Bongos Tak (from E-40)
Dof 2 Dom
Dof 2 Sak 1
Doholla 2 Rim 2
Cabasha (from Standard)
Tamborin (from Standard)
Doholla 2 Rim 1
Cowbell (from Standard)
Tabla 2 Tak 1
Tabla 2 Tak 2
Tabla Roll
Tabla 2 Dom
Tabla (FX) (Roll End)
Tabla 2 Tak 3
Tabla 2 Sak
Tabla 2 Rim
Rek Trill
Rek 2 Sak
Rek 2 Dom Closed
Rek 2 Rim
Rek 2 Dom Open
Rek 2 Tak 1
Rek 2 Khana Open
Rek 2 Tak 2
Rek 2 Roll
Rek 2 Khana Closed
Tabl Noueri Rim
Rek 2 Tak 3
Sagat Mid
Tabl Noueri Dom 2
Sagat High
Tabl Noueri Tak 2
Sagat Sak
Bongos Dom
Nakrazan A
Bongos Tak
Zaghrouta 1 Loop
Bongos Rim
Zaghrouta 1 End
Zaghrouta 2 Loop
Zaghrouta 2 End
Dof 2 Rim 2
Dof 2 Sak 2
Dof 1 Rim 2
Dof 1 Sak 2
Tabla 1 Tak 1
Tabla 1 Tak 2
Tabla Roll
Tabla 1 Dom
Tabla (FX) (Roll End)
Tabla 1 Tak 3
Tabla 1 Sak
Tabla 1 Rim
Rek Trill
Rek 1 Sak
Rek 1 Tak 1
Rek 1 Rim
Rek 1 Dom
Rek 1 Tak 2
Rek 1 Brass
Rek 1 Tak 3
Rek 1 Roll
Rek 1 Khana Closed
Tabl Noueri Rim
Rek 1 Khana Open
Sagat Mid
Tabl Noueri Dom 1
Sagat High
Tabl Noueri Tak 1
Sagat Sak
Hager
Zir
Nakrazan A
Zaghrouta 1 Loop
Nakrazan B
Zaghrouta 2 End
Zaghrouta 2 Loop
Zaghrouta 2 End
Dof 2 Rim 1
Dof 2 Dom
Dof 2 Sak 1
Dof 1 Rim 1
Dof 1 Dom
Dof 1 Sak 1
Doholla 2 Sak
Zir
Doholla 2 Rim 2
Cowbell (from Standard)
Doholla 1 Rim 2
Cowbell (from Standard)
Doholla 1 Sak
Dof 2 Dom
Doholla 2 Rim 1
Doholla 2 Dom
Hager
Tom 6 (from Standard)
Ride Cymbal (from
Tom 6 (from Standard)
Ride Cymbal (from
Tom 6 (from Standard)
Ride Cymbal (from
Doholla 1 Rim 1
Doholla 1 Dom
Finger Doff A
Tom 5 (from Standard)
Crash Cymbal (TR-707)
Tom 5 (from Standard)
Crash Cymbal (TR-707)
Tom 4 (from Standard)
Tom 5 (from Standard)
Crash Cymbal (TR-707)
Doholla 2 Dom
Doholla 2 Sak
Tom 3 (from Standard)
Open Hi-Hat (TR-707)
Tom 4 (from Standard)
Tom 3 (from Standard)
Open Hi-Hat (TR-707)
Tom 4 (from Standard)
Tom 3 (from Standard)
Open Hi-Hat (TR-707)
Hand Clap 2 (Mono)
Tom 1 (from Standard)
Closed Hi-Hat (TR-707)
Rim Shot (TR-707)
Snare Drum (TR-707)
Hand Clap 1 (Stereo)
Rim Shot (TR-707)
Snare Drum (TR-707)
Hand Clap 1 (Stereo)
Hand Clap 2 (Mono)
--Bass Drum (TR-707)
---
--Bass Drum (TR-707)
---
-----
---
-------
-----
-----
Hand Clap 1 Stereo (E-40)
Snare Drum (TR-707)
Tom 1 (from Standard)
Closed Hi-Hat (TR-707)
Snare Drum (TR-707)
Bass Drum (TR-707)
Rim Shot (TR-707)
---
---
---
-----
---
---
-----
-----
---
27
---
---
---
-----
25
-----
---
---
---
-------
-------
---
-------
-----
-----
-----
---
---
-----
---
---
---------
---
---
-------
-----
---
-----
---
-----
---
---
-----
-----
-----
---
---
-------
-----
-----
-----
---
---
-----
-------
---
---
-------
ORIENT. 2
PC: 116 [CC32: 2]
ORIENT. 1
PC: 117 [CC32: 1]
E-40 MODIFIED
PC: 117 [CC32: 4]
-----
22
20
18
15
13
10
8
6
3
1
ORIENTAL
DofTak 1
DofTak 2
DofSak 1
DofRim 1
DofSak 2
DofRim 2
DofSak 3
DofFinger 1
DofFinger 2
Tabla Raka 1
Tabla Tak 1
Tabla Tik 1
Tabla Dom
Tabla Sak
Tabla Roll
Tabla Tak 2
Tabla Raka 2
Tabla Rim 1
Tabla Toks
Tabla Rim 2
Tabla Tik 2
Rek Raka
Rek Dom
Rek Trill
Rek Tak 1
Rek Rim
Rek Brass 1
Rek Tok
Rek Brass 2
Rek Tak 2
Rek Sak
Rek Tik
Mazhar Dom
DofDom 2
DofDom 3
Dholla Tak 1
Dholla Tak 2
DofDom 1
Dholla Rim
Dholla Raka
Dholla Sak 2
Dholla Sak 3
IPopRd2_55
Dholla Dom
Dholla Sak 1
IPopTomM47
NewRkRdCym1
IPopTomL43
Crash Cym.1
Real Tom 4
Jazz Open HH
Real Tom 4
Real Tom 6
Pedal HiHat
TR-707 SD
Jazz Clsd.HH
Hand Clap 21
IPopCStk37_1
IPopSn38_1
HandClap1st
TR-909 BD2
Std.2 Kick1
Elec Kick 2
909 Snare 2
909 Snare 1
Elec Snare 2
NewShaker1
IPopSn40_1
NewShaker2
Agogo
Agogo
ChaChaCBell
Tambourine
909 HandClap
Udo_Long
Djembe_rim
Tabla_Tun
Tabla_Na
Tabla_Te
Tabla_Ge
H kotsuzumi
L Kotsuzumi
Shimedaiko
Ohkawa
--Wadaiko
---
---
-----
---
-----
---
-----
---
ORIENT. 3
PC: 117 [CC32: 3]
Jingle Bell
Bell Tree
82JzBsDrum2
Side Stick
Tabla Dom
Tabla Sak
Tabla Roll
Tabla Tak 2
Tabla Raka 2
Tabla Rim 1
Tabla Toks
Tabla Rim 2
Tabla Tik 2
Rek Raka
Rek Dom
Rek Trill
Rek Tak 1
Rek Rim
Rek Brass 1
Rek Tok
Rek Brass 2
Rek Tak 2
Rek Sak
Rek Tik
Mazhar Dom
Mazhar Tak
Mazhar Sak
Mazhar Brass
Sagat Mid
Sagat Hi
Sagat Closed
Sagat Sak
Dofs Tak
Dofs Dom
Dofs Sak
Dofs Rim 1
Dofs Rim 2
DofTak 1
DofTak 2
DofSak 1
DofRim 1
DofSak 2
DofRim 2
DofSak 3
DofFinger 1
DofFinger 2
NewClaves
NewShaker2
NewShaker1
Tabla1 Tak 1
Tabla1 Dom 1
Tabla Roll
Tabla1 Tak 2
Tabla Fx
Tabla1 Tak 3
Tabla 1 Sak
Tabla 1 Rim
Rek Trill
Rek 1 Sak
L Rek Tak 1
Rek 1 Rim
L Rek Dom
L Rek Tak 2
Rek 1 Brass
L Rek Tak 3
Rek 1 Roll
Rek 1 Khan A
TablaNurRim1
Rek 1 Khan B
Sagat Mid
DofDom 2
DofDom 3
Dholla Tak 2
DofDom 1
Doff2 Sak 1B
Tabla Raka 1
Tabla Tak 1
Tabla Tik 1
Dholla Rim
Dholla Raka
Dholla Tak 1
Dholla2 RimC
Rek 2 Sak 1
Doff 2 Dom 2
Dholla Sak 2
Dholla Sak 3
Dholla Dom
Dholla Sak 1
Dholla 2 Sak
808clave
Dholla2 Rim1
Rek 2 Roll
NewRkTomHi
Ride Cymbal
ReverseCymbl
NewRkTomHiFl
909 Crash
R8 Ohh2
NewRkTomM
Pedal HiHat
NewRkTomMFl
NewRkTomL1Fl
Room Chh
NewRkTomL1
909 HandClap
House SD
808 Rimshot
Rap Snare
RideCym Edge
TR-909 BD2
Vibraslap
Cowbell
Crash Cym.2
Splash Cym.
Ridbl_c B
Tambourine
ChinaCymbal
Real Tom 1
Ride_i B
Crash1c B
Real Tom 4
Real Tom 1
82JzOpenHatB
Real Tom 4
Pedal HiHat
82JzClsHatB
Real Tom 6
Real Tom 6
Hand clap2
82JzSnare2
Real Tom 1
ReverseCymbl
Dholla2 Dom2
Real Tom 1
Crash Cym.1
909 OH
Real Tom 4
CR-78 chh
Real Tom 4
Elec Snare 2
Real Tom 6
TR-707 HH-c
Real Tom 6
909 HandClap
Side Stick
House SD
TR-909 BD2
626 Shaker
NewRkRdCym1
NewRkCrCym2
Splash Cym.
ChaChaCBell
Tambourine
IPopRd2_55
IPopCym1_49
IPopTomH50
IPopRd1_51
IPopCyml2_52
IPopTomM47
IPopTomHFl48
IPopHat3_46
IPopHat2_44
IPopTomMFl45
IPopTomL43
IPopTomLFl41
IPopHat1_42
IPopSn40_1
IPopGstS39_1
82JzSnare1
Udo_Long
IPopCStk37_1
IPopSn38_1
IPopKik36
Small Gong
Gamelan Gong
Wadaiko
IPopKik35
Tabla_Tun
Djembe_rim
Tabla_Te
Bar Chimes
Concert BD
Tabla_Ge
Tabla_Na
Rek 2 Sak 1
Concert Snr
Timpani
Snare Roll
Timpani
OR. MIX 2
PC: 119 [CC32: 4]
Rek 2 Tak 2C
Rek Dom 1
Rek 2 Tak 1
Rek 2 Rim 2
HipHop BD2
OR. MIX 1
PC: 118 [CC32: 4]
r EXR-46 OR
---
---
G9 127
-----
-----
---
125
-----
126
-----
-------
---
---
---
-----
-----
---
---
123
121
118
---
116
124
122
C9 120
119
117
115
-----
113
-----
---
114
---
-----
---
-----
---
---
-----
-----
-----
---
-----
---
---
-----
-----
---
---
---
-----
---
---
Zaghrouta 2 End
---
Hand Clap 2 Mono (E-40)
---
---
111
109
106
104
102
99
97
ORIENTAL PERC. 1
PC: 116 [CC32: 2]
E-40 MODIFIED
PC: 116 [CC32: 1]
112
110
C8 108
107
105
103
101
100
98
(C7) (96)
ORIENTAL
---
-----
---
---
---
-----
---
-----
---
-----
---
---
-----
---
---
-----
---
-----
---
-----
---
---
Zaghrouta 2 End
---
ORIENTAL PERC. 2
PC: 116 [CC32: 3]
Hager 1
NewTmblHi
NewTmblLo
NewLoConga
NewCongaOp
NewCongaSlp
NewHiBongo
NewLoBongo
ZaghroutaEd2
ZaghroutaSm2
Zir 1
BassSlapFX
TablaNurSak
BassSlideFX
TablaNurTak
TablaNurRim
TablaNurDom
Dofs Sak st.
Dofs Dom st.
Dofs Rim 2
Dofs Sak
Dofs Rim 1
Dofs Dom
Sagat Sak
Dofs Tak
Sagat Closed
Sagat Mid
Sagat Hi
Mazhar Brass
Mazhar Sak
Mazhar Dom
Mazhar Tak
ORIENTAL 3
PC: 116 [CC32: 4]
Agogo
Low Timbale
High Timbale
Conga Lo Opn
Mute H.Conga
Conga Hi Opn
Bongo Lo
Bell Tree
Bongo High
Jingle Bell
Hager 1
NewTmblHi
NewTmblLo
NewLoConga
NewCongaOp
NewLoBongo
NewCongaSlp
NewHiBongo
ZaghroutaEd2
ZaghroutaSm2
Zir 1
BassSlapFX
Rev.Snare
82JzSnare1
House SD
82StSnare1
82RmBsDrum1
Mix Kick
TR-707 BD
TR-909 BD2
ZaghroutaEd2
ZaghroutaEd1
ZaghroutaSm2
Nakrazhan 2
Nakrazhan 1
ZaghroutaSm1
Zir 1
Hager 1
TablaNurTak
TablaNurSak
BassSlideFX
TablaNurTak1
Sagat Sak
Sagat Hi
Sagat Mid
TablaNurDom1
ORIENTAL MIX 2
PC: 116 [CC32: 4]
Dofs Sak st.
TablaNurRim
TablaNurDom
Dofs Dom st.
Dofs Rim 2
ORIENTAL MIX 1
PC: 116 [CC32: 4]
EXR-46 OR
127
128
C7 96
95
93
91
89
88
86
C6 84
83
81
79
77
76
74
C5 72
71
69
67
65
64
62
C4 60
59
57
55
53
52
50
C3 48
47
45
43
41
40
38
C2 36
35
33
31
29
28
26
C1 24
23
21
19
17
16
14
C0 12
11
9
7
5
4
2
C–1 0
94
92
90
87
85
82
80
78
75
73
70
68
66
63
61
58
56
54
51
49
46
44
Manjoor
Yebab Open
Yebab Close
Zeer Tak 1
Zeer Rim 1
Zeer Tak 2
Zeer Dom 2
Zeer Rim 2
Zeer Fx
Yehal Dom 1
Yehal Tak 1
Yehal Dom 2
Yehal Tak 2
Yehal GroupDom
Yehal Group Tak
Merjaf Sak
Merjaf Dom
Merjaf Tak
Tabel Bahri Dom 1
Tabel Bahri Sak 1
Tabel Bahri Tak 1
Tabel Bahri Dom 2
Tabel Bahri Sak 2
Tabel Bahri Tak 2
Tar Sagool Sak 2
Zeer Dom 1
Tar Sagool Dom 2
Tar Sagool Tak 2
Tar Sagool Tak 1
Tar Sagool Sak 1
Kasoor Dom 2
Tar Sagool Dom 1
Merwas Dom 1
Merwas Tak 1
Merwas Dom 2
Merwas Tak 2
Merwas Tak 3
Merwas Dom 3
Kasoor Sak
Kasoor Dom 1
Duff Sak 2
Tar Low Dom
Tar Low Sak
Tar Low Rim
Tar Hi Dom
Tar Hi Sak
Tar Hi Rim
Merwas Finger
Drenka Small Rim
Drenka Small Fx
Drenka Small Tak
Duff Dish
Duff Dom 1
Duff Sak 1
Duff Tak
Duff Dom 2
Drenka Small Sak
Drenka Small Dom
39
42
Drenka Big Sak
Drenka Big Rim
yallah
Drenka Big Dom
37
34
32
30
27
25
Aashoo
Ahaa
ahaa2
ay walla 2
ayaba
halaa boys
halaa girls
heya group
heya group low
khamoosh
laughing
way
yalla
shhh
hayy
20
22
-----------------------
----------------------------------------------------------------------------------------------------------------------------------------------------------------------
Merwas Dom 3
Kasoor Sak
Kasoor Dom 1
Kasoor Dom 2
Tar Sagool Dom 1
Tar Sagool Tak 1
Tar Sagool Sak 1
Tar Sagool Dom 2
Tar Sagool Tak 2
Tar Sagool Sak 2
Zeer Dom 1
Zeer Tak 1
Zeer Rim 1
Zeer Tak 2
Zeer Dom 2
Zeer Rim 2
Zeer Fx
Yehal Dom 1
Yehal Tak 1
Yehal Dom 2
Yehal Tak 2
Yehal GroupDom
Yehal Group Tak
Merwas Dom 2
Merwas Tak 2
Merwas Tak 3
Drenka Big Rim
Drenka Small Sak
Drenka Small Dom
Drenka Small Rim
Drenka Small Fx
Drenka Small Tak
Merwas Finger
Merwas Dom 1
Merwas Tak 1
Tabel Bahri Tak 1
Tabel Bahri Dom 2
Tabel Bahri Sak 2
Tabel Bahri Tak 2
Duff Dom 1
Duff Brass 1
Drenka Big Dom
Drenka Big Sak
Jazz Open HH
Real Tom 4
IPopTomL43
Crash Cym.1
IPopTomM47
NewRkRdCym1
Tabel Bahri Dom 1
Tabel Bahri Sak 1
HandClap1st
HandClap21
TR-707 SD
Jazz Clsd. HH
Real Tom 6
Pedal Hi Hat
Real Tom 4
halaa girls
heya group
heya group low
khamoosh
laughing
way
yalla
yallah
Std.2Kick1
IPopCStk37_1
IPopSn38_1
ayaba
halaa boys
ahaa2
ay walla 2
-----------------------------------------------------------------------------------------------------------------------------------------------shhh
hayy
Aashoo
Ahaa
------------------------------------------------------------------------------
----------------------------------
18
15
13
10
8
6
3
1
PC: 121 [CC32: 2]
Khaligi2
PC: 120 [CC32: 2]
Khaligi1
OR Bongo Hi
Tabla Ge 1
Tabla Ge 2
Tabla Dom
Tabla Ge Hi
Tabla Roll
Tabla Tak
Tabla Flam
Tabla Rim1
Tabla Rim2
Twesat 3
Yehal dom
Yehal tak
OR Conga Lo
OR Conga LoMt
OR Conga FX
OR Conga Hi
OR Bongo Lo1
OR Bongo Lo2
Kasoor dom2
Kasoor sak
Tabel1 dom
Tabel1 sak
Tabel1 tak
Tabel2 dom
Tabel2 sak
Tabel2 tak
Merwas dom
Merwas sak1
Merwas sak2
Merwas tak
Nagroos1 dom
Nagroos1 tak
Nagroos1 roll
Nagroos2 dom
Nagroos2 side
Nagroos2 roll
Twesat 1
Twesat 2
Duff sak 1
Duff sak 2
Duff tak
Duff dish
Doholla dom
Doholla sak
Doholla tak
Kasoor dom1
Tar1 dom
Tar1 sak
Tar1 tak
Tar2 dom
Tar2 sak
Tar2 tak
Duff dom1
Duff dom2
laughing
way
yalla
yallah
Merjaf dom
Merjaf sak
Merjaf tak
TarMag dom
TarMag sak
TarMag tak
heya group low
khamoosh
halaa girls
heya group
-----------------------------------------------------------------------------Sshhh
hayy
Aashoo
Ahaa
ahaa2
ay walla 2
ayaba
halaa boys
-----------------------
--------------------------------------------------------------------------------------------------------------------------
Khaligi3
PC: 122 [CC32: 2]
DofRim 2
DofSak 3
Tabla Tik 1
Tabla Dom
Tabla Sak
Dholla Tak 2
DofDom 1
DofDom 2
DofDom 3
DofTak 1
DofTak 2
DofSak 1
DofRim 1
DofSak 2
Yehal Tak 2
Yehal GroupDom
Yehal Group Tak
Merjaf Sak
Merjaf Dom
Merjaf Tak
Dholla Dom
Dholla Sak 1
Dholla Sak 2
Dholla Sak 3
Dholla Rim
Dholla Raka
Dholla Tak 1
Yehal Tak 1
Yehal Dom 2
Zeer Tak 2
Zeer Dom 2
Zeer Rim 2
Zeer Fx
Yehal Dom 1
Tar Brashim Rim 1
Tar Brashim Tak
Tar Brashim Rim 2
Tar Brashim Sak 1
Tar Brashim Sak 2
Zeer Dom 1
Zeer Tak 1
Zeer Rim 1
Merwas Dom 2
Merwas Tak 2
Merwas Tak 3
Merwas Dom 3
Kasoor Sak
Kasoor Dom 1
Kasoor Dom 2
Tar Brashim Dom
IPopSn38_1
HandClap1st
Hand Clap 21
TR-707 SD
Jazz Clsd.HH
Kajun Tırak.2
Dofs Dom
Dofs Sak
Dofs Rim 1
Dofs Rim 2
Dofs Dom st.
Dofs Sak st.
Darbuka-Trm
Darbuka-Gum
Darbuka-Tırak
Darbuka-Tek
Darbuka-Tirdum
Darbuka-Tokat.5
Darbuka-Tokat.1
Darbuka-Tokat.2
Darbuka-Tokat.3
Darbuka-Tokat.4
Darbuka-Trm1
Sagat Mid
Sagat Hi
Sagat Closed
Sagat Sak
Kajun Tokat
Kajun Gum
Kajun Tırak.1
Bendir Rak
Dofs Tak
Bendir Trm
Bendir Tek
Dholla Tak 1
Dholla Tak 2
BasBendir Gum
BasBendir Tok
BasBendir Gum.2
BasBendir Tek
BasBendir Trm
Bendir Tek
Bendir Tırak
NewRkRdCym1
IPopRd2_55
Dholla Dom
Dholla Sak 1
Dholla Sak 2
Dholla Sak 3
Dholla Rim
Dholla Raka
Real Tom 6
Pedal HiHat
Real Tom 4
Jazz Open HH
Real Tom 4
IPopTomL43
Crash Cym.1
IPopTomM47
Std.2 Kick1
IPopCStk37_1
Popsnare
Drenka Small Sak
Drenka Small Dom
Drenka Small Rim
Jazz Clsd.HH
Drenka Small Tak
Pedal HiHat
Merwas Dom 1
Jazz Open HH
TizBendir Rimtak
TizBendir Trm
TizBendir Rak
NewShaker2
NewShaker1
IPopSn40_1
Elec Snare 2
909 Snare 2
909 Snare 1
Elec Kick 2
TR-909 BD2
TizBendir Tok
TizBendir Gum
Manjoor2
Manjoor1
Hand Clap 1
Hand Clap 2
----------------------------------------------------------------------------------------Djembe_rim
Tambourine
ChaChaCBell
Agogo
Agogo
909 HandClap
Khaligi Clap
---------------------------------------------
PC: 124 [CC32: 2]
TrkOrMix
Std.2 Kick1
Drenka Big Sak
Tar Hi Sak
Tar Hi Rim
Sagat Hi
Sagat Closed
Sagat Sak
Duff Dish
Duff Dom 1
Duff Sak 1
Duff Tak
Duff Dom 2
Duff Sak 2
Tar Low Dom
Tar Low Sak
Tar Low Rim
Tar Hi Dom
Khaligi Clap
Hand Clap 1
Hand Clap 2
Sagat Mid
-----------------------
-----------------------------------------------------------------------------------------------------------------------------------------------------------
------------
PC: 123 [CC32: 2]
Mix
Tef Tek
Tef Sar
Tef Tak
Tef Gum2
Tef Sar Uzun
Darbuka Gum
Darbuka Tok
Darbuka Tek
Darbuka Tak1
Darbuka Trm
Darbuka Gum Trm
Darbuka Taka Trm
DofRim2
Tabla Rim2
Tef Gum1
Tef Cıt1
Tef Cıt2
Tef Cıt3
Tef Cıs
Tef Cırk
Tef Tokat
Tabla Dom
Tabla Tak2
Tabla Rim1
Tabla Roll
Tar2 Sak
Surdo 1
Surdo 2
AsmaDavul Gum1
AsmaDavul Trm
AsmaDavul Tek1
AsmaDavul Gum3
AsmaDavul Tek
Udo Long
Timbl Paila
Merjaf Dom
Merjaf Sak
Merjaf Tak
Tar2 Dom
Tar1 Sak
Tar2 Tak
Real Tom1
Crash Cym 1
Real Tom1
Ride Cymbal
China Cymbal
Udo Slap
Ceng Ceng
Udo Short
Snare1
Real Tom6
Close HiHat
Real Tom6
Pedal HiHat
Real Tom4
Open HiHat
Real Tom4
heya group
heya group low
khamoosh
laughing
way
yalla
yallah
Kick2
Side Stick
Snare2
808 Clap
halaa boys
halaa girls
--------------------------------------------------------------------------------------------------------------shhh
hayy
Aashoo
Ahaa
ahaa2
ay walla 2
ayaba
-----------------------
-----------------------------------------------------------------------------------------
PC: 125 [CC32: 2]
Turkish 1
Darbuka Takataka
Comlek Gum.1
Comlek Tak
Comlek Trm
Comlek Tık.1
Comlek Gum.2
Comlek Tık.2
Comlek Tık.3
Bendir Tak
Bendir Tok
Bendir Trık
Darbuka Gum
Darbuka Tok
Darbuka Tek
Darbuka Trm.1
Darbuka Trm.2
Darbuka TrmGum
AsmaDavul Gum.2
Asma Kpl Gum.2
AsmaDavul Tek
Asma Davul Ksn
Asma Davul Trm
Asma Davul Trm.2
AsmaDavul Tek.2
BasBendir Tok.1
BasBendir Gum
BasBendir Tek
BasBendir Trm
Bendir Gum
Bendir Trm
Drenka Small Rim
Drenka Small Sak
Drenka Small Tak
Alkıs1
Alkıs2
Alkıs3
AsmaDavul Gum.1
China Cymbal
Ride Bell
Drenka Big Dom
Drenka Big Rim
Drenka Big Sak
Drenka Small Dom
Drenka Small Fl1
Drenka Small Fl2
Hi Hat
Real Tom 4
Open Hi Hat
Real Tom 4
Real Tom 1
Crash Cym 1
Real Tom 1
Ride Cymbal
laughing
yallah
yebab
Kik
Side Stick
Snare 2
909 Clap
Snare 1
Real Tom 6
Close Hi Hat
Real Tom 6
halaa girls
heya group
--------------------------------------------------------------------------------------------------------------Bongo Tek.1
Bongo Gum
Bongo Tak.2
Bongo Tak.3
aashoo
ahaa
ay walla 2
-----------------------------------------------------------------------------------------------------------------------------------------------------------
PC: 126 [CC32: 2]
Turkish 2
r EXR-46 OR
G9 127
125
124
122
C9 120
119
117
115
113
112
110
C8 108
107
105
103
101
100
98
(C7) (96)
126
123
121
118
116
114
111
109
106
104
102
99
97
Bongo Tak 1
Bongo Dom 1
Bongo Tak 2
Bongo Sak
Bongo Rim
Bongo Dom 2
Tar Brashim Dom
Tar Brashim Rim 1
Tar Brashim Tak
Tar Brashim Rim 2
Tar Brashim Sak 1
Tar Brashim Sak 2
(Yehal Group Tak)
Yebab Open
Yebab Close
Manjoor
Tanaka 1
Tanaka 2
Twaisat Close
Twaisat Open 1
Twaisat Open 2
(Yebab Close)
Khaligi Clap
Hand Clap 1
Hand Clap 2
Twaisat Close
Twaisat Open 1
Twaisat Open 2
Bongo Tak 1
Bongo Dom 1
Bongo Tak 2
Bongo Sak
Bongo Rim
Bongo Dom 2
Tar Brashim Dom
Tar Brashim Rim 1
Tar Brashim Tak
Tar Brashim Rim 2
Tar Brashim Sak 1
Tar Brashim Sak 2
Tanaka 1
Tanaka 2
PC: 121 [CC32: 2]
Khaligi2
PC: 120 [CC32: 2]
Khaligi1
Sherbaka clap 2
Sherbaka clap 3
Sherbaka clap 4
Sherbaka clap 5
Sherbaka clap 6
(Tabla Rim2)
Tabla Rim3
Tabla Te
Tabla Na
Tabla Tun
Yebab
ZaghrutaStop
Or Clap
Sherbaka clap 1
PC: 122 [CC32: 2]
Khaligi3
Rek Tak 1
Rek Brass 1
Rek Tok
Rek Brass 2
Rek Tak 2
Rek Sak
Rek Tik
Dofs Tak
Dofs Dom
Dofs Sak
Dofs Rim 1
Dofs Rim 2
(Tabla Sak)
Tabla Roll
Tabla Tak 2
Tabla Raka 2
Tabla Rim 1
Tabla Toks
Tabla RekTraka
Rek Dom
Rek Trill
PC: 123 [CC32: 2]
Mix
Asma Davul Gum.3
Asma Davul Trm
Asma Davul Tek.1
Asma Davul Tek.2
Asma Davul Gum.4
Asma Davul Tek.2
Asma Davul Gum.1
Asma Davul Gum.2
Rek Sak
Rek Tik
TablaNurDom
TablaNurRim
TablaNurTak
TablaNurSak
Rek Raka
Rek Dom
Rek Trill
Rek Tak 1
Rek Rim
Rek Brass 1
Rek Tok
Rek Brass 2
Rek Tak 2
(Kajun Tırak.2)
Kajun Tırak.3
Mazhar Dom
Mazhar Tak
Mazhar Sak
Mazhar Brass
BassSlideFX
Zaghrouta
BassSlapFX
PC: 124 [CC32: 2]
TrkOrMix
Darbuka Trm1
Darbuka Tak
(Darbuka Taka Trm)
Darbuka Tak2
Darbuka Gum
Darbuka Tak
Darbuka Tek1
Darbuka Tek2
Darbuka Gum
Darbuka Tek1
Darbuka Tek2
PC: 125 [CC32: 2]
Turkish 1
Tef Tırak.2
Tef Tok
Tef Tıng
TizBendir Tok
TizBendir Gum
TizBendir Rak
TizBendir Tırak
TizBendir Trm
Kajun Tak
Kajun Tok
Kajun Trm
(Comlek Tık.3)
Tef Kpl Gum
Tef Cıt1
Tef Cıt2
Tef Sır
Tef Sar
Tef Krak
Tef Cas
Tef Tıs
PC: 126 [CC32: 2]
Turkish 2
EXR-46 OR
129
130
175
94
120
100
95
95
108
120
140
85
120
85
115
110
100
105
99
100
105
105
100
100
120
110
75
80
120
125
122
100
110
150
145
90
106
175
145
115
110
95
95
120
88
120
110
110
80
140
120
88
110
100
110
MASRI
014 Fallaha
015 Fallahi
016 Baladak
017 BaladiFa
018 Ibrahimi
019 Ruby
020 Samba-Eg
021 Guaracha
022 Noubi 2
023 DaregMsr
024 Conga
025 Zaffa
MALFOUF
026 Malfoufi
027 Malfoufa
028 Malfouf
ARABI
029 Ayoub
030 Karatshi
031 Choby
032 Katkofti
033 Laff
034 Leebi
035 Dabka
TRADITIONAL
036 WehdaOld
037 WehdaNew
038 Vahde 1
039 Vahde 2
040 SamaiDar
041 SamaiTei
042 Masmoudi
043 Hajaa
044 Fox 1
045 Walz Or1
046 Walz Or2
047 Zar 1
048 Zekr
049 Sombati
OR-WORLD
050 Rai
051 Grigi
052 Yonani
053 Azeri6/8
054 Irani6/8
055 Bayon
056 Ciftelli
057 DupArap
058 Halay 1
059 Halay 2
060 Misket
061 Oryantal
062 Sebari
063 TarsusCt
064 GipsyOr1
065 Funk Or
066 Latin Or
4/4
4/4
4/4
6/8
6/8
4/4
4/4
4/4
4/4
4/4
2/4
4/4
4/4
4/4
4/4
4/4
4/4
4/4
4/4
4/4
4/4
3/4
5/4
8/4
4/4
4/4
3/4
3/4
2/4
4/4
8/4
2/4
4/4
4/4
4/4
4/4
4/4
4/4
4/4
4/4
4/4
4/4
2/4
4/4
4/4
4/4
4/4
4/4
4/4
4/4
4/4
4/4
4/4
4/4
4/4
4/4
4/4
4/4
120
95
95
135
98
SAIDI
009
010
011
012
013
Saidi-A
Saidi-B
Saidi-Eg
Saidi-M2
Masrahi
4/4
4/4
4/4
4/4
4/4
4/4
4/4
4/4
Time Sign.
No. Name
Tempo
MAKSOUM
001 MaksFast
130
002 Maksoumi
95
003 Maksoms
85
004 Maksoum2 100
005 Maks-Mlf
105
006 Maks!Bal
180
007 Maksoum1 120
008 ProgMksm
119
Music Styles
140
140
145
160
175
165
153
150
155
200
165
190
155
160
95
105
110
150
140
159
90
100
88
120
70
135
140
130
80
150
70
70
100
TURKISH
089 Turk 2/4
090 Turk 5/8
091 Turk 6/8
092 Turk 7/8
093 Turk 9/8
094 TurkPop
095 Zeybek
096 Krdnz7/8
097 THM 9/8
098 TSM 9/8
099 Roman9/8
Tempo
No. Name
KHALIGI
067 Rumba 1
068 Rumba 2
069 ShakShak
070 Araby
071 Thefah
072 Khatwah
073 Khebeity
074 Khbty3/4
075 Emarati
076 Mizmar
077 Bastah
078 Dazzah
079 Sharh
080 Dosary
081 Samri
082 Mallaya1
083 Mallaya2
084 Liwa
085 Sout
086 Adany
087 Adani
088 ZaffahKh
2/4
5/8
6/8
7/8
9/8
4/4
9/8
7/8
9/8
9/8
9/8
4/4
4/4
4/4
4/4
4/4
4/4
4/4
3/4
4/4
4/4
4/4
3/4
3/4
3/4
6/8
4/4
4/4
3/4
4/4
4/4
4/4
4/4
Time Sign.
No. Name
Tempo
FLASH
101 6_8POP
66
102 30BIGBND
120
103 60RK'N_R
181
104 70SDANCE
108
105 70SDISCO
126
106 70'POP
112
107 ALCLAPBL
80
108 BACHATA
128
109 BALLAD
75
110 BARRYDNC 132
111 BEGUINE
110
112 BGBNDMED 125
113 BIGBNDSL
61
114 BIGHOUSE
130
115 BIGSAMBA 116
116 BLUES
61
117 BRGHTPOP
93
118 BUSY_POP
98
119 CHA-CHA
130
120 COOL_RAP
94
121 CUTE_POP
108
122 DJTECHNO 140
123 EASYHOP
88
124 ENGWLTZ
91
125 FEELGOOD
98
126 GOSPEL
60
127 GOSPLPOP
143
128 GROOVY_P 100
129 GUITAR_P
86
130 HAPPYBAL
78
131 HAWAIIAN 109
132 HIP'NHOP
102
133 IRISH
131
134 LATINPOP
92
135 LOVEBEAT
66
136 LUVBOSSA 136
137 MAMBO
102
138 MERENGUE 124
139 MIDBOSSA 150
140 MUSETTE
175
141 NEWCNTRY 113
142 PARTYSLG
124
143 PASDOBLE
122
144 R&B
105
145 REGGAE
140
146 RHUMBA
100
147 SALSA
100
148 SKA
125
149 TANGO
120
150 TWIST
162
6/8
4/4
4/4
4/4
4/4
4/4
4/4
2/4
4/4
4/4
4/4
4/4
4/4
4/4
4/4
4/4
4/4
4/4
4/4
4/4
4/4
4/4
4/4
3/4
4/4
6/8
4/4
4/4
4/4
4/4
4/4
4/4
4/4
4/4
4/4
4/4
4/4
4/4
4/4
3/4
4/4
4/4
4/4
4/4
4/4
4/4
4/4
4/4
4/4
4/4
Time Sign.
r EXR-46 OR
C#M7
C#7
C#m
C#m7
C#mM7
C#dim
C#m7 ( 5 )
C#aug
C#sus4
C#7sus4
CM7
C7
Cm
Cm7
CmM7
Cdim
Cm7 ( 5 )
Caug
Csus4
C7sus4
✭= Keys you need to press to hear this chord.
●= Constituent notes of this chord.
C#
C
D7sus4
Dsus4
Daug
Dm7 ( 5 )
Ddim
DmM7
Dm7
Dm
D7
DM7
D
Chord Intelligence (“Md1” setting)
E 7sus4
E sus4
E aug
E m7 ( 5 )
E dim
E mM7
E m7
E m
E 7
E M7
E
E7sus4
Esus4
Eaug
Em7 ( 5 )
Edim
EmM7
Em7
Em
E7
EM7
E
F7sus4
Fsus4
Faug
Fm7 ( 5 )
Fdim
FmM7
Fm7
Fm
F7
FM7
F
EXR-46 OR
131
132
GM7
G7
Gm
Gm7
GmM7
Gdim
Gm7 ( 5 )
Gaug
Gsus4
G7sus4
F#M7
F#7
F#m
F#m7
F#mM7
F#dim
F#m7 ( 5 )
F#aug
F#sus4
F#7sus4
✭= Keys you need to press to hear this chord.
●= Constituent notes of this chord.
G
F#
A 7sus4
A sus4
A aug
A m7 ( 5 )
A dim
A mM7
A m7
A m
A 7
A M7
A
A7sus4
Asus4
Aaug
Am7 ( 5 )
Adim
AmM7
Am7
Am
A7
AM7
A
B 7sus4
B sus4
B aug
B m7 ( 5 )
B dim
B mM7
B m7
B m
B 7
B M7
B
B7sus4
Bsus4
Baug
Bm7 ( 5 )
Bdim
BmM7
Bm7
Bm
B7
BM7
B
r EXR-46 OR
0,32
1
5
6, 38
7
10
11
22, 23, 24, 25
64
65
66
67
84
91
93
98, 99
100, 101
Mode 2: OMNI ON, MONO
Mode 4: OMNI OFF, MONO
*1
Mode 1: OMNI ON, POLY
Mode 3: OMNI OFF, POLY
Aux
Messages
O (120, 126, 127)
O (121)
O
O (123-125)
O
X
O
O
X
X
X
O
O
0~127
O
O
O
O
O
O
O
X
O
O
O
O
O
O (Reverb)
O (Chorus)
O
O
O
*1 O X is selectable
*2 Recognized as M=1 even if M≠1
X
X
O
X
O
X
All Sounds Off
Reset All Controllers
Local On/Off
All Notes Off
Active Sense
Reset
*1
*1
*1
*1
*1
*1
*1
O
O
O
X
0~127
0~127
Mode 3
Mode 3, 4 (M=1)
1~16
1~16, Off
Recognized
Notes
O
O
Clock
Commands
System
Real Time
O
X
X
Song Position Pointer
Song Sel
Tune
O
O
*****
O
O
O
O
O
O
O
O
O
X
O
O
X
O
O
O
O
O
System
Common
System Exclusive
Program
Change
Control
Change
True #
Key’s
Ch’s
After
Touch
Pitch Bend
O
X
Note ON
Note OFF
Velocity
X
X
0~127
*****
True Voice
Mode 3
Mode 3, 4 (M=1)
*****
Default
Message
Altered
Mode
Note
Number
1~16
1~16, Off
Default
Changed
Transmitted
Basic
Channel
Function...
[Interactive Arranger]
Model: EXR-46 OR
MIDI Implementation Chart
*1
*1
*1
*1
O: Yes
X: No
Program Number 1~128
Bank Select
Modulation
Portamento Time
Data Entry
Volume
Panpot
Expression
V-Link control
Hold 1
Portamento
Sostenuto
Soft
Portamento Control
Effect 1 Depth
Effect 3 Depth
NRPN LSB, MSB
RPN LSB, MSB
*2
32 Parts
2 Logical Parts
Remarks
Date: September 2006
Version: 1.01
EXR-46 OR
133
134
Roland Asia Pacific Sdn. Bhd.
45-1, Block C2, Jalan PJU 1/39,
Dataran Prima, 47301 Petaling
Jaya, Selangor, MALAYSIA
TEL: (03) 7805-3263
MALAYSIA
Cosmos Corporation
1461-9, Seocho-Dong,
Seocho Ku, Seoul, KOREA
TEL: (02) 3486-8855
KOREA
PT Citra IntiRama
J1. Cideng Timur No. 15J-150
Jakarta Pusat
INDONESIA
TEL: (021) 6324170
INDONESIA
Rivera Digitec (India) Pvt. Ltd.
409, Nirman Kendra
Mahalaxmi Flats Compound
Off. Dr. Edwin Moses Road,
Mumbai-400011, INDIA
TEL: (022) 2493 9051
INDIA
Parsons Music Ltd.
8th Floor, Railway Plaza, 39
Chatham Road South, T.S.T,
Kowloon, HONG KONG
TEL: 2333 1863
Tom Lee Music Co., Ltd.
Service Division
22-32 Pun Shan Street, Tsuen
Wan, New Territories,
HONG KONG
TEL: 2415 0911
HONG KONG
Roland Shanghai Electronics
Co.,Ltd.
(BEIJING OFFICE)
10F. No.18 3 Section Anhuaxili
Chaoyang District Beijing
100011 CHINA
TEL: (010) 6426-5050
Roland Shanghai Electronics
Co.,Ltd.
5F. No.1500 Pingliang Road
Shanghai 200090, CHINA
TEL: (021) 5580-0800
CHINA
ASIA
Paul Bothner(PTY)Ltd.
Royal Cape Park, Unit 24
Londonderry Road, Ottery 7800
Cape Town, SOUTH AFRICA
TEL: (021) 799 4900
T.O.M.S. Sound & Music
(Pty)Ltd.
11 Melle St., Braamfontein,
Johannesbourg,
SOUTH AFRICA
TEL: (011) 403 4105
FAX: (011) 403 1234
SOUTH AFRICA
Maison FO - YAM Marcel
25 Rue Jules Hermann,
Chaudron - BP79 97 491
Ste Clotilde Cedex,
REUNION ISLAND
TEL: (0262) 218-429
REUNION
Al Fanny Trading Office
9, EBN Hagar A1 Askalany
Street,
ARD E1 Golf, Heliopolis,
Cairo 11341, EGYPT
TEL: 20-2-417-1828
EGYPT
AFRICA
Information
Mas Musika
Rumichaca 822 y Zaruma
Guayaquil - Ecuador
TEL:(593-4)2302364
ROLAND TAIWAN
ENTERPRISE CO., LTD.
Room 5, 9fl. No. 112 Chung
Shan N.Road Sec.2, Taipei,
TAIWAN, R.O.C.
TEL: (02) 2561 3339
CENTRAL/LATIN
AMERICA
JUAN Bansbach Instrumentos
Musicales
Ave.1. Calle 11, Apartado
10237,
San Jose, COSTA RICA
TEL: 258-0211
COSTA RICA
Centro Musical Ltda.
Cra 43 B No 25 A 41 Bododega 9
Medellin, Colombia
TEL: (574)3812529
COLOMBIA
Comercial Fancy II S.A.
Rut.: 96.919.420-1
Nataniel Cox #739, 4th Floor
Santiago - Centro, CHILE
TEL: (02) 688-9540
CHILE
Roland Brasil Ltda.
Rua San Jose, 780 Sala B
Parque Industrial San Jose
Cotia - Sao Paulo - SP, BRAZIL
TEL: (011) 4615 5666
BRAZIL
A&B Music Supplies LTD
12 Webster Industrial Park
Wildey, St.Michael, Barbados
TEL: (246)430-1100
BARBADOS
Instrumentos Musicales S.A.
Av.Santa Fe 2055
(1123) Buenos Aires
ARGENTINA
TEL: (011) 4508-2700
Audionet
Distribuciones Musicales SAC
Juan Fanning 530
Miraflores
Lima - Peru
TEL: (511) 4461388
PERU
Distribuidora De
Instrumentos Musicales
J.E. Olear y ESQ. Manduvira
Asuncion PARAGUAY
TEL: (595) 21 492147
PARAGUAY
SUPRO MUNDIAL, S.A.
Boulevard Andrews, Albrook,
Panama City, REP. DE
PANAMA
TEL: 315-0101
PANAMA
Bansbach Instrumentos
Musicales Nicaragua
Altamira D'Este Calle Principal
de la Farmacia 5ta.Avenida
1 Cuadra al Lago.#503
Managua, Nicaragua
TEL: (505)277-2557
NICARAGUA
Casa Veerkamp, s.a. de c.v.
Av. Toluca No. 323, Col. Olivar
de los Padres 01780 Mexico
D.F. MEXICO
TEL: (55) 5668-6699
MEXICO
Gigamusic SARL
10 Rte De La Folie
97200 Fort De France
Martinique F.W.I.
TEL: 596 596 715222
ARGENTINA
Musique & Son
Z.I.Les Mangle
97232 Le Lamantin
Martinique F.W.I.
TEL: 596 596 426860
MARTINIQUE
Almacen Pajaro Azul S.A. de C.V.
BO.Paz Barahona
3 Ave.11 Calle S.O
San Pedro Sula, Honduras
TEL: (504) 553-2029
HONDURAS
Casa Instrumental
Calzada Roosevelt 34-01,zona 11
Ciudad de Guatemala
Guatemala
TEL:(502) 599-2888
GUATEMALA
For Australia
Tel: (02) 9982 8266
For New Zealand
Tel: (09) 3098 715
38 Campbell Avenue
Dee Why West. NSW 2099
AUSTRALIA
AUSTRALIA/
NEW ZEALAND
Roland Corporation
Australia Pty.,Ltd.
AUSTRALIA/
NEW ZEALAND
Theera Music Co. , Ltd.
330 Soi Verng NakornKasem,
New Road, Sumpantawongse,
Bangkok 10100, THAILAND
TEL: (02) 224-8821
OMNI MUSIC
75 Avenida Norte y Final
Alameda Juan Pablo II,
Edificio No.4010 San Salvador,
EL SALVADOR
TEL: 262-0788
EL SALVADOR
ECUADOR
TAIWAN
THAILAND
Instrumentos Fernando Giraldez
Calle Proyecto Central No.3
Ens.La Esperilla
Santo Domingo,
Dominican Republic
TEL:(809) 683 0305
SWEE LEE MUSIC
COMPANY PTE. LTD.
150 Sims Drive,
SINGAPORE 387381
TEL: 6846-3676
DOMINICAN REPUBLIC
Zeelandia Music Center Inc.
Orionweg 30
Curacao, Netherland Antilles
TEL:(305)5926866
G.A. Yupangco & Co. Inc.
339 Gil J. Puyat Avenue
Makati, Metro Manila 1200,
PHILIPPINES
TEL: (02) 899 9801
SINGAPORE
CURACAO
PHILIPPINES
Roland Italy S. p. A.
Viale delle Industrie 8,
20020 Arese, Milano, ITALY
TEL: (02) 937-78300
ITALY
Roland Ireland
G2 Calmount Park, Calmount
Avenue, Dublin 12
Republic of IRELAND
TEL: (01) 4294444
IRELAND
Roland East Europe Ltd.
Warehouse Area ‘DEPO’ Pf.83
H-2046 Torokbalint,
HUNGARY
TEL: (23) 511011
HUNGARY
STOLLAS S.A.
Music Sound Light
155, New National Road
Patras 26442, GREECE
TEL: 2610 435400
GREECE/CYPRUS
Roland Elektronische
Musikinstrumente HmbH.
Oststrasse 96, 22844
Norderstedt, GERMANY
TEL: (040) 52 60090
GERMANY
Roland Scandinavia As, Filial
Finland
Elannontie 5
FIN-01510 Vantaa, FINLAND
TEL: (0)9 68 24 020
FINLAND
Roland Scandinavia A/S
Nordhavnsvej 7, Postbox 880,
DK-2100 Copenhagen
DENMARK
TEL: 3916 6200
DENMARK
K-AUDIO
Kardasovska 626.
CZ-198 00 Praha 9,
CZECH REP.
TEL: (2) 666 10529
CZECH REP.
Roland Central Europe N.V.
Houtstraat 3, B-2260, Oevel
(Westerlo) BELGIUM
TEL: (014) 575811
BELGIUM/FRANCE/
HOLLAND/
LUXEMBOURG
Roland Elektronische
Musikinstrumente HmbH.
Austrian Office
Eduard-Bodem-Gasse 8,
A-6020 Innsbruck, AUSTRIA
TEL: (0512) 26 44 260
AUSTRIA
EUROPE
Instrumentos Musicales
Allegro,C.A.
Av.las industrias edf.Guitar
import
#7 zona Industrial de Turumo
Caracas, Venezuela
TEL: (212) 244-1122
VENEZUELA
JORDAN
Roland Corporation U.S.
5100 S. Eastern Avenue
Los Angeles, CA 90040-2938,
U. S. A.
TEL: (323) 890 3700
As of August 1, 2006 (ROLAND)
U. S. A.
ISRAEL
Roland Canada Ltd.
(Toronto Office)
170 Admiral Boulevard
Mississauga On L5T 2N6
CANADA
TEL: (905) 362 9707
Roland Canada Ltd.
(Head Office)
5480 Parkwood Way
Richmond B. C., V6V 2M4
CANADA
TEL: (604) 270 6626
CANADA
NORTH AMERICA
Zak Electronics & Musical
Instruments Co. L.L.C.
Zabeel Road, Al Sherooq Bldg.,
No. 14, Grand Floor, Dubai,
U.A.E.
TEL: (04) 3360715
U.A.E.
ZUHAL DIS TICARET A.S.
Galip Dede Cad. No.37
Beyoglu - Istanbul / TURKEY
TEL: (0212) 249 85 10
TURKEY
Technical Light & Sound
Center
Rawda, Abdul Qader Jazairi St.
Bldg. No. 21, P.O.BOX 13520,
Damascus, SYRIA
TEL: (011) 223-5384
SYRIA
P.O.Box 2154, Alkhobar 31952
SAUDI ARABIA
TEL: (03) 898 2081
aDawliah Universal
Electronics APL
Corniche Road, Aldossary
Bldg., 1st Floor, Alkhobar,
SAUDI ARABIA
SAUDI ARABIA
Al Emadi Co. (Badie Studio &
Stores)
P.O. Box 62, Doha, QATAR
TEL: 4423-554
QATAR
TALENTZ CENTRE L.L.C.
Malatan House No.1
Al Noor Street, Ruwi
SULTANATE OF OMAN
TEL: 2478 3443
OMAN
Chahine S.A.L.
Gerge Zeidan St., Chahine
Bldg., Achrafieh, P.O.Box: 165857
Beirut, LEBANON
TEL: (01) 20-1441
LEBANON
EASA HUSAIN AL-YOUSIFI
& SONS CO.
Abdullah Salem Street,
Safat, KUWAIT
TEL: 243-6399
KUWAIT
MUSIC HOUSE CO. LTD.
FREDDY FOR MUSIC
P. O. Box 922846
Amman 11192 JORDAN
TEL: (06) 5692696
Halilit P. Greenspoon & Sons
Ltd.
8 Retzif Ha'aliya Hashnya St.
Tel-Aviv-Yafo ISRAEL
TEL: (03) 6823666
MOCO INC.
No.41 Nike St., Dr.Shariyati Ave.,
Roberoye Cerahe Mirdamad
Tehran, IRAN
TEL: (021) 285-4169
IRAN
Moon Stores
No.16, Bab Al Bahrain Avenue,
P.O.Box 247, Manama 304,
State of BAHRAIN
TEL: 17 211 005
BAHRAIN
MIDDLE EAST
Roland (U.K.) Ltd.
Atlantic Close, Swansea
Enterprise Park, SWANSEA
SA7 9FJ,
UNITED KINGDOM
TEL: (01792) 702701
UNITED KINGDOM
TIC-TAC
Mira Str. 19/108
P.O. Box 180
295400 Munkachevo,
UKRAINE
TEL: (03131) 414-40
UKRAINE
Roland (Switzerland) AG
Landstrasse 5, Postfach,
CH-4452 Itingen,
SWITZERLAND
TEL: (061) 927-8383
SWITZERLAND
Roland Scandinavia A/S
SWEDISH SALES OFFICE
Danvik Center 28, 2 tr.
S-131 30 Nacka SWEDEN
TEL: (0)8 702 00 20
SWEDEN
Roland Iberia, S.L.
Paseo García Faria, 33-35
08005 Barcelona SPAIN
TEL: 93 493 91 00
SPAIN
MuTek
Dorozhnaya ul.3,korp.6
117 545 Moscow, RUSSIA
TEL: (095) 981-4967
RUSSIA
FBS LINES
Piata Libertatii 1,
535500 Gheorgheni,
ROMANIA
TEL: (266) 364 609
ROMANIA
Roland Iberia, S.L.
Portugal Office
Cais das Pedras, 8/9-1 Dto
4050-465, Porto, PORTUGAL
TEL: 22 608 00 60
PORTUGAL
MX MUSIC SP.Z.O.O.
UL. Gibraltarska 4.
PL-03664 Warszawa POLAND
TEL: (022) 679 44 19
POLAND
Todo Musica S.A.
Francisco Acuna de Figueroa
1771
C.P.: 11.800
Montevideo, URUGUAY
TEL: (02) 924-2335
URUGUAY
Roland Scandinavia Avd.
Kontor Norge
Lilleakerveien 2 Postboks 95
Lilleaker N-0216 Oslo
NORWAY
TEL: 2273 0074
NORWAY
AMR Ltd
Ground Floor
Maritime Plaza
Barataria Trinidad W.I.
TEL: (868) 638 6385
TRINIDAD
When you need repair service, call your nearest Roland Service Center or authorized Roland
distributor in your country as shown below.
r EXR-46 OR
r EXR–46 OR
á«æØdG äÉØ°UGƒŸG .18
¢UÉN ôµ°T
É¡fÉæàeGh Égôµ°T øY È©J ¿CG Roland Corporation óf’hQ ácô°T OƒJ
,á«bô°ûdG ∫ƒÑ£dG äÉYƒª› OGóYEG ‘ GƒcQÉ°T øjòdG áaÉc ¤G
»≤«°SƒŸG ´Rƒª∏d ¢Vô©dG ¿É◊CGh ,á«bô°ûdG á«≤«°SƒŸG äÉYÉ≤jE’Gh
.EXR-46 OR »còdG
:øe πc ¤G ¢UÉÿG ôµ°ûdÉH ácô°ûdG Ωó≤àJ ɪc
,¢ù«cGQÉæN .ê πjƒfÉÁEG ó«°ùdG ,ÉJƒc ∞jô°T ó«°ùdG
‘ ᪫≤dG ºgOƒ¡Lh ™FGôdG º¡fhÉ©àd hóZhO âªfi ó«°ùdGh
.EXR-46 OR RÉ¡L RÉ‚EG
ÖdCG ó«°ùdGh ,≈Ø£°üe óªMCG ó«°ùdG ,êQƒL ¬∏dGóÑY ó«°ùdG
.᪫≤dG º¡JQƒ°ûeh ™FGôdG º¡ªYód º«∏°S
º«MQ óªfi ó«°ùdG
''…QGó«H ¬«d'' IÒ¡°ûdG ¬àYƒ£≤e ΩGóîà°SEG óf’hQ ácô°T ¬°†jƒØàd
.EXR-46 OR RÉ¡L ‘ ¢Vô©dG ÊÉZCG øe á«æZCÉc
V-Link á∏«°UƒJ ,(5~6-) »eƒª©dG πjƒëàdG
.øµ‡ :ΩɶædG åjó–
êhôNh ∫ƒNO …ó«eh ,äÉØ∏ŸG π≤fh …ó«e ä’É°üJG :USB :äÓ°UƒŸG
¢SCGôdG äÉYɪ°S ,(¢SCGôdG äÉYɪ°ùd á°UƒH 4/1) Right ,L/Mono :êQÉıG
(∫ƒÙG) AÉHô¡µdG êôfl ,2/1
ø°ùfi'' ™e •Gh 10+•Gh10 :á«Jƒ°üdG IQó≤dG §°Sƒàe :iôNCG äÉØ°UGƒe
''¢UÉÑ∏d »ªbQ
Bass ¢UÉÑdG º«î°†àd ∞jhÉŒ ™e º°S 12 ô£b ƒjÒà°S äÉYɪ°S
(ÒÑeCG 3,5 ,âdƒa 12) »FÉHô¡µdG QÉ«àdG ∫ƒfi :á«FÉHô¡µdG ábÉ£dG
· (´ÉØJQG)132 x (≥ªY)355 x (¢VôY)1020 :OÉ©HC’G
º¨c 8 :¿RƒdG
áJƒæ∏d πeÉM ,PSB-4U »FÉHô¡µdG QÉ«àdG ∫ƒfi ,𫨰ûàdG π«dO :äÉ≤ë∏ŸG
USB πHÉch ,á«≤«°SƒŸG
.≥Ñ°ùe QÉ©°TEG ¿hóH Ò«¨à∏d á°VôY äÉØ°UGƒŸG :á¶MÓe
»còdG »≤«°SƒŸG ´RƒŸG EXR-46 OR
±õ©dG Ió°ûd ¢SÉ°ùM ,ìÉàØe 61 :OQƒÑ«µdG
PCM á∏é°ùe äGƒ°UCG :»Jƒ°üdG Qó°üŸG
.kÉJƒ°U 64 :äGƒ°UC’G Oó©àd ≈∏YC’G ó◊G
䃰U 542) »bô°T 䃰U 107 É¡æe 䃰U 650 :äGƒ°UC’G
.(GM2 Ωɶf ™e ≥aGƒàe 䃰U 256 ,XG ™e ≥aGƒàe
á«bô°T äÉYƒª› 13 É¡æe ∫ƒÑW áYƒª› 33 :∫ƒÑ£dG äÉYƒª›
.(GM2 Ωɶf ™e á≤aGƒàe 9 h ,XG ™e á≤aGƒàe 11)
19 :IOó©àŸG ä’B’G ΩÉ°ùbCG
GM2, GS, XG Lite :≥aGƒàdG
.á«Ø∏N IAÉ°VEG äGP áãjóM IÒÑc :á°TÉ°ûdG ´ƒf
,OQƒÑ«µdG ¿RGƒJ/áÑMÉ°üŸG QGQRCG ,䃰üdG §Ñ°V ìÉàØe :ºµëàdG äGhOCG
QGQRCG ,᪨ædG »æKh/ꃪàdG ´GQP ,äÉeƒ∏©ŸG/´É≤jE’G áYô°S QGQRCG
QÉ«àNC’ QGQRCG 8 ,([9] ~ [0]) ᫪bôdG QGQRC’G ,QÉ«àNC’G QGQRCG ,äÉYƒªÛG
.á«Jƒ°U äÉYƒª›
øe áàHÉK 50) á«°†eƒdG IôcGòdG ‘ ´É≤jEG 149 :áÑMÉ°üŸG äGP äÉYÉ≤jE’G
(Ò«¨à∏d á∏HÉb 50 + ™æ°üŸG
99x2 :IóMGƒdG á°ùª∏dG
á∏eÉc ábôa ,ƒÑeƒc,¢UÉH ™e ∫ƒÑW :äÉjƒà°ùe 3 :»≤«°SƒŸG ≥°ùæŸG
SMF »≤«≤M π¨°ûe :ÊÉZC’G
í«ë°üJ ,óMGh ∑GôJ ,OQƒÑ«µdG ,πµdG) á∏¡°S ´É°VhCG 4 :∑GôJ 16 hP πé°ùe
(π«é°ùàdG
,±RÉ©dG èeGôH äÉYƒª›h ,á«≤«°SƒŸG äÉYÉ≤jEÓd :á«°†eƒdG IôcGòdG
ÊÉZC’Gh
200 :±RÉ©dG èeGôH
,πjƒëàdG ,´É≤jE’G áYô°S ,䃰üdG ,´É≤jE’G :(äGÎ∏a 10) â«ÑãàdG ∞FÉXh
ƒfƒª∏d êQóàŸG ∫É≤àf’Gh
.Oó©àe ´ƒf 47h ,¢SQƒc ´GƒfCG 8 ,ÜÒØjQ ´GƒfCG 8 :äGôKDƒŸG
(2HD/2DD) á°UƒH 3,5 ºéM äɵ°ùjó∏d π¨°ûe :äÉeƒ∏©ŸG øjõîJ
.ÊÉZC’G ßØMh ,äÉYÉ≤jE’Gh ±õ©dG èeGôH 𫪖h ßØM
äÉYÉ≤jE’G) USB á∏«°UƒJ ᣰSGƒH ôJƒ«ÑªµdG øe èeGÈdG 𫪖h ßØM
(ÊÉZC’Gh
§Ñ°Vh ,(8/9~8/4,9/1~4/1) »æeõdG ¿Gõ«ŸG §Ñ°V á«fɵeEG ™e :ΩƒfhΟG
䃰üdG Ió°T
≥°ùæe ,ƒfÉ«ÑdG ≈∏Y OôØæŸG ±õ©dG :á∏¡°S ´É°VhCG 3 :iôNCG ∞FÉXh
OQƒÑ«µdG º«°ù≤J ,õ«¡Œ 126 :»≤«°Sƒe óYÉ°ùe ,ábôØdG
,(Main+Dual :¿ÉJƒ°U) »FÉæãdG ,(Split [L] +Main [R] :¿ÉJƒ°U)
,(12~12-)±RÉ©dG πjƒ– ,(4~4-) ±ÉàchCG ,´ƒf 18 :»æë∏dG AÉcòdG
58
EXR–46 OR
äÉYƒæàe .17
Initializing ™æ°üŸG ™°Vh ¤G RÉ¡÷G IOÉYEG
»≤«°SƒŸG ´RƒŸGh ¢Vô©dG »àØ«Xh 𫨰ûJ/AɨdEG
᫪«∏©àdG ¢VGôZCÓd ∞FÉXh
äGõ«¡Œ IOÉ©à°SEG ‘ ÖZôJ ób ,EXR-46 OR RÉ¡L ≈∏Y ∫ƒ£ŸG πª©dG ó©H
¿CGh ,≈ëªà°S πé°ùŸG á«æZCG ¿G »æ©j Gòg ¿G ôcòJ øµd ,á«∏°UC’G ™æ°üŸG
¤G RÉ¡÷G IOÉYEG á«∏ªY ó©H ™æ°üŸG äGõ«¡Œ ≈∏Y …ƒàëà°S ±RÉ©dG èeGôH
.™æ°üŸG ™°Vh
:™æ°üŸG ™°Vh ¤G RÉ¡÷G IOÉYEG á«Ø«c »∏j ɪ«a
.EXR-46 OR RÉ¡L ≥∏ZCG (1)
.RÉ¡÷G 𫨰ûJ ó«©J ɪæ«H [USER¥PROGRAM/WRITE] QGQRCG §¨°VG (2)
RÉ¡÷G IOÉYCG ” ób ¬fCG ∂eÓYE’ ''Factory'' IQÉÑY á°TÉ°ûdG ≈∏Y ô¡¶J
.™æ°üŸG ™°Vh ¤G
¢Vô©dG »àØ«Xh AɨdEG ∂æµÁ å«M ,∑ó«ØJ ób áãdÉK ''᫪«∏©J'' áØ«Xh √òg
:‹ÉàdÉc IóMGh Iƒ£N ‘ kÉ©e »≤«°SƒŸG ´RƒŸGh
.EXR-46 OR RÉ¡L ≥∏ZCG (1)
ó«©J ɪæ«H [START/STOP] h [ACOUSTIC] QGQRCG §¨°VG (2)
.RÉ¡÷G 𫨰ûJ
.''DISABLED'' IQÉÑY á°TÉ°ûdG ≈∏Y ô¡¶J
.¢Vô©dG áØ«Xh hCG ´RƒŸG ±É≤jEG hCG 𫨰ûJ ¿B’G π«ëà°ùj
áØ«Xhh ´RƒŸG ΩGóîà°SÉH ÖZôJ ÉeóæY √ÓYCG AGôL’G IOÉYEÉH ºb
.á«fÉK ¢Vô©dG
hCG ≈≤«°SƒŸG »°SQóe ¿Gó«ØJ ób ÚàØ«Xh EXR-46 OR RÉ¡L …ƒëj
.á«°SGQódG ∫ƒ°üØdG ‘ EXR-46 OR »eóîà°ùe
RÉ¡é∏d á«°†eƒdG IôcGòdG ‘ IOƒLƒŸG äÉeƒ∏©ŸG ≈∏Y ôKDƒj ’ AGôL’G Gòg :á¶MÓe
.(™æ°üŸG ™°Vh ¤G á«°†eƒdG IôcGòdG IOÉYEG á«Ø«c ≈∏Y ±ô©à∏d 44 ¢U ô¶fCG)
¢Vô©dG ¿É◊CG áØ«Xh 𫨰ûJ/AɨdEG
§¨°†∏d ÒKCÉJ …CG ∑Éæg Oƒ©j ’ å«ëH (DEMO) ¢Vô©dG áØ«Xh AɨdEG ∂æµÁ
ΩGóîà°SG óæY kGó«Øe Gòg ¿ƒµj ób .[USB]+[ONE¥TOUCH] QR ≈∏Y
.á«°SGQódG ∫ƒ°üØdG ‘ EXR-46 OR
:á«dÉàdG äGƒ£ÿG ™ÑJEG ,DEMO áØ«Xh AɨdE’
.EXR-46 OR RÉ¡L ≥∏ZCG (1)
ó«©J ɪæ«H [ACOUSTIC] h [USB] [ONE¥TOUCH] QGQRCG §¨°VEG (2)
.RÉ¡÷G 𫨰ûJ
.''DISABLED'' IQÉÑY á°TÉ°ûdG ≈∏Y ô¡¶J
¿É◊CG ¤G ´Éªà°S’G äOQCG GPEG Gòd ,™°VƒdG Gòg RÉ¡÷G ôcòàj ±ƒ°S
.É¡∏«¨°ûàd äGƒ£ÿG ¢ùØf IOÉYEG Ωõ∏«°S ¢Vô©dG
´RƒŸG 𫨰ûJ/AɨdCG
:´RƒŸG ±É≤jEG hCG 𫨰ûJ øµÁ ’ ¬fCG øe ócCÉà∏d ‹ÉàdG AGôL’G ™ÑJEG
.EXR-46 OR RÉ¡L ≥∏ZCG (1)
ó«©J ɪæ«H [ARRANGER¥BAND] h [ACOUSTIC] QGQRCG §¨°VG (2)
.RÉ¡÷G 𫨰ûJ
hCG 𫨰ûJ ¿B’G π«ëà°ùj .''DISABLED'' IQÉÑY á°TÉ°ûdG ≈∏Y ô¡¶J
.[START/STOP] QR ΩGóîà°SÉH ´RƒŸG ±É≤jEG
.á«fÉK ´RƒŸG ΩGóîà°SÉH ÖZôJ ÉeóæY √ÓYCG AGôL’G IOÉYEÉH ºb
57
r EXR–46 OR
ájQÉ«àN’G Ωó≤dG á°SGhOh êQÉıG ΩGóîà°SG .16
.»LQÉÿG RÉ¡÷G ‘ π«é°ùàdG πNGóà ƒjÒà°ùdG »Jƒ°üdG EXR-46 OR êôfl π«°UƒJ ¢Vô¨dG Gò¡d êÉàëà°S .ïdG ,∂°ùjO »æ«e hCG CD hCG â«°SÉc ≈∏Y ∑É≤«°Sƒe π«é°ùJ âÄ°T ¿G ∂æµÁ
OQƒÑ«µdÉH ¢UÉN 䃰U ȵe hCG ,‹õæŸG …Éa …É¡dG RÉ¡éH EXR-46 OR π«°UƒJ nÉ°†jCG ∂æµÁ ɪc .¢Vô¨dG Gò¡d áahô©ŸG á°UƒH 4/1äÉcÉL Ωóîà°SG
∂æµÁ ɪc ,(á°UƒH 1/4 RCA) …Éa …É¡dG RÉ¡L 䃰U ȵà RÉ¡÷G π«°UƒJ øe øµªààd π«°UƒJ ∫ƒfi ¤G êÉàëà°S (Roland KC-550/350/150 πãe)
.Roland PJ-IM äÓ°Uh AGô°T
.á«∏NGódG RÉ¡÷G äÉYɪ°Sh ȵe πªY »¨∏j ’ EXR-46 OR ‘ 䃰üdG êQÉîà äÓHÉc ájCG π«°UƒJ :á¶MÓe
,OQƒÑ«µdG í«JÉØe øY ∂©HÉ°UCG ™aQ ó©H äɪ¨ædG QGôªà°S’ FOOTSWITCH πNóà BOSS FS-5U hCG DP-6 hCG DP-2 πãe á«aÉ°VEG á°SGhO π«°UƒJ ∂æµÁ
.(41 ¢U ô¶fCG) .iôNCG ∞FÉXƒH ΩÉ«≤∏d hCG
Cassette deck, power amplifier, HiFi amplifier, MA
series active speakers, etc.
DP-2, DP-6, or BOSS FS-5U footswitch
56
EXR–46 OR
FORMAT áÄ«¡àdG
á∏ªàÙG ÉC £ÿG πFÉ°SQ
áÄ«¡J hCG õ«¡éàH Ωƒ≤J ¿G Öéj ,∂°ùjódG ≈∏Y äÉØ∏e ájCG ßØM ∂æµÁ ¿G πÑb
ôJƒ«Ñªc ᣰSGƒH ∫ɪ©à°SEÓd kÓ°UCG CÉ«¡e ójó÷G ∂°ùjódG ¿Éc ¿EG .∂°ùjódG Gòg
RÉ¡÷ CÉ«¡ŸG ∂°ùjódG ¿CG ƒdh ,¬àÄ«¡J IOÉYE’ áLÉM Óa ,IBM
.IAGô≤dG ‘ ´ô°SCG ¿ƒµ«°S EXR-46 OR
:∂°ùjódG áÄ«¡àd ‹ÉàdG AGôLE’G ™ÑJEG
π¨°ûŸG ‘ ∂°ùjódG πNOCG (1)
ßØM ∂æµÁ É¡bÓZEG óæY ,IÒ¨°U áëàa ≥∏¨j ™Hôe ≥dÉZ ∂°ùjO πµd
¬dÉNOEG πÑb √òg ∂°ùjódG ''íàa'' á«∏ªY ¢ùæJ ’ ,∂°ùjódG ≈∏Y äÉeƒ∏©e
.π¨°ûŸG ¤G
.∂°ùjódG ™°Vh QÉ«àN’ [DISK] §¨°VG (2)
ádÉ°SQ ô¡¶à°S .''FORMAT'' QÉ«àN’ [√][®] FAMILY QGQRCG Ωóîà°SG (3)
.YES IQÉ°TEG ¢†eƒJh ,á°TÉ°ûdG ≈∏Y ''Sure?''
.∂°ùjódG áÄ«¡àd [YES/+] QR §¨°VG (4)
.π¨°ûŸG ¤G ∂°ùjódG ∫ÉNOEG â«°ùf ó≤a ∂°ùjO óLƒj ’
:No Disk
QR §¨°VG ,∂°ùjódG ájɪM áëàa ≥∏¨J ¿G â«°ùf ó≤d
:Protect
.≥dɨdG ≥∏ZCG ºK ∂°ùjódG êôNCGh ,EJECT êGôNE’G
.[YES/+] QR §¨°VGh á«fÉK ∂°ùjódG πNOCG
øµªàj ’ äÉeQƒa Ωóîà°ùj hCG ,CÉ«¡e ¢ù«d ∂°ùjódG
:No Format
áÄ«¡àd [YES/+] §¨°VG :É¡«dG ±ô©àdG øe RÉ¡÷G
äÉeƒ∏©ŸG áaÉc ƒëª«°S Gò¡a ,¬ÑàfG) ¿B’G ∂°ùjódG
.(∂°ùjódG ≈∏Y IOƒLƒŸG
.∫ɪ©à°SEÓd ídÉ°U ÒZh ∞dÉJ ∂°ùjódG
:Disk Err
.QÉàıG ´ƒædG øe äÉØ∏e …ƒëj ’ ∂°ùjódG Gòg
:No Files
[NO/–] QR §¨°VG ,∂°ùjódG áÄ«¡àH ÖZôJ ’ âæc GPEG :á¶MÓe
»àdG äÉØ∏ŸG πc ƒfi ºàj ±ƒ°ùa ,∂°ùjódG áÄ«¡àH Ωƒ≤J ÉeóæY :á¶MÓe
.¬àÄ«¡J πÑb ∂°ùjódG äÉjƒàfi øe ócCÉàdG π°†Øj Gòd ,É¡jƒàëj
"100" ¤G "1" øe ''Formating'' ádÉ°SQ QÉ°ùj ≈∏Y ᪫≤dG ìhGÎJ
AÉ¡àfEG iódh ,áÄ«¡àdG ó«b ∂°ùjódG ¿G ÚÑ«d ∂°ùjódG ô°TDƒe ¢†eƒj ɪæ«H
.á°TÉ°ûdG ≈∏Y ''Complete'' ádÉ°SQ ô¡¶J á«∏ª©dG √òg
55
r EXR–46 OR
∂°ùjódG øe äÉØ∏ŸG ƒfi
∂°ùjódG øe ¬«a ܃Zôe ÒZ kÉØ∏e ƒë“ ¿G Delete ƒÙG áØ«Xh ∂d í«àJ
∞∏Ÿ ∂°ùjódG ≈∏Y ÈcCG áMÉ°ùe Òaƒàd Gò¡d êÉà– ób ,π¨°ûŸG ‘ OƒLƒŸG
»àdG äÉØ∏ŸG §≤a ƒë“ ¿G ´GQ (kÓãe "Full Disk" ádÉ°SQ ô¡¶J ÚM) ójóL
∞∏ŸG ƒfi OôéªÑa ,kÉ«FÉ¡f É¡æY AÉæ¨à°SE’G ∂fɵeÉH ¿CG kÉeÉ“ ócCÉàe âfCG
.kÉ«FÉ¡f √ó≤Øà°S
óFGƒa ô¡¶J kÉeƒª©a ,k’hCG ∂°ùjódG øe á«WÉ«àMEG áî°ùf πªYEG ,IóYÉ≤c :á¶MÓe
.ΩÉàdG Égó≤a ó©H äÉØ∏ŸG
äÉØ∏e óMCG ƒÙ áØ«XƒdG √òg Ωóîà°SG : DEL Upr ±RÉ©dG èeGôH ƒfi
.kÉ©e èeÉfôH 200 ƒëªà°S Gòµg ∂fCG ôcòJ ,∂°ùjódG øe ±RÉ©dG èeGôH
øe ÊÉZC’G äÉØ∏e óMCG ƒfi ∂d í«àj Gòg : DEL Sng á«æZCG ƒfi
.∂°ùjódG
.äɵ°ùjódG π¨°ûe ‘ ∂°ùjódG πNOCG (1)
.∂°ùjódG ™°Vh QÉ«àN’ [DISK] §¨°VG (2)
hCG ''DEL Upr'' QÉ«àN’ [√][®] FAMILY QGQRCG Ωóîà°SG (3)
.''DEL Sng''
√ƒëà ÖZôJ …òdG ∞∏ŸG QÉ«àN’ [√][®] SELECT QGQRCG Ωóîà°SG (4)
.YES IQÉ°TEG ¢†eƒJ .(''USPR_005'' :Óãe)
[YES/+] QR §¨°VG (5)
.á°TÉ°ûdG ≈∏Y ''Sure?'' ádÉ°SôdG ô¡¶à°S
.¬FÉ≤HE’ [NO/–] hCG ,∞∏ŸG Ö£°ûd [YES/+] QR §¨°VG (6)
ádÉ°SQ á°TÉ°ûdG ≈∏Y ô¡¶à°S ,[YES/+] QõdG ⣨°V GPEG
ádÉ°SQ ô¡¶J äÉeƒ∏©ŸG Ö£°T øe AÉ¡àf’G ó©Hh ,''Deleting''
.''Complete''
DATA ENTRY äÉeƒ∏©ŸG ∫ÉNOEG º°ùb ‘ ''ÒÑc'' ôNBG QR §¨°VG (7)
.áØ«XƒdG √òg øe êhôî∏d
»æ©j Gò¡a á°TÉ°ûdG ≈∏Y "Protect" IQÉ°TEG äô¡X GPEG :á¶MÓe
QR §¨°VEG ádÉ◊G √òg ‘ ,∂°ùjódG ájɪM áëàa ≥∏¨J ¿G â«°ùf ∂fCG
Égó©H .≥dɨdG ≥∏ZCG ºK ∂°ùjódG êôNCG ,äɵ°ùjódG π¨°ûŸ EJEECT êGôNE’G
[YES/+] . §¨°VGh kGOó› ∂°ùjódG πNOCG
.QÉàıG ∞∏ŸG π«ªëàH ÖZôJ ’ âæc GPEG [NO/–] §¨°VG :á¶MÓe
DATA ENTRY äÉeƒ∏©ŸG ∫ÉNOEG º°ùb ‘ ''ÒÑc'' ôNBG QR §¨°VG (7)
.áØ«XƒdG √òg øe êhôî∏d
ô°TDƒŸG π≤àæj (RƒeôdG ∫ÉNOE’) ᫪bôdG QGQRC’G óMCG É¡«a §¨°†J Iôe πc :á¶MÓe
.á«dÉàdG áfÉÿG ¤G kÉ«FÉ≤∏J
.áfÉÿG ∂∏J ‘ õeôdG ójóëàd ᫪bôdG QGQRC’G Ωóîà°SG (4)
á∏ªàÙG ÉC £ÿG πFÉ°SQ
.π¨°ûŸG ¤G ∂°ùjódG ∫ÉNOEG â«°ùf ó≤a ∂°ùjO óLƒj ’
.√ÓYCG ô¶fCG
»ØµJ ’ ∂°ùjódG øe á«≤ÑàŸG á©°ùdG ,Å∏à‡ ∂°ùjódG
.äÉeƒ∏©ŸG ßØ◊
øµªàj ’ äÉeQƒa Ωóîà°ùj hCG ,CÉ«¡e ¢ù«d ∂°ùjódG
áÄ«¡àd [YES/+] §¨°VG :É¡«dG ±ô©àdG øe RÉ¡÷G
äÉeƒ∏©ŸG áaÉc ƒëª«°S Gò¡a ,¬ÑàfG) ¿B’G ∂°ùjódG
.(∂°ùjódG ≈∏Y IOƒLƒŸG
.∫ɪ©à°SEÓd ídÉ°U ÒZh ∞dÉJ ∂°ùjódG
OƒLƒe ∞∏ª∏d ¬JÎNG …òdG º°S’G -∫GóÑà°S’G ó«cCÉàd
⣨°V ¿G ¿B’Éa ,¬à∏NOCG …òdG ∂°ùjódG ≈∏Y π©ØdÉH
äÉjƒàfi ∫GóÑà°SG ºà«°S ,QGôªà°SÓd [YES/+] QR
πNóJ ¿G ÉeEÉa .Iójó÷G äÉjƒàÙÉH ∂°ùjódG ∞∏e
ôNBG kɪ°SG ÖàµJh [DISK] QR §¨°†J hCG ,ôNBG ∂°ùjO
.¬¶ØM ܃∏£ŸG ∞∏ª∏d
No Disk:
Protect:
Disk Full:
No Format:
Disk Err:
OverWrt?:
:á«dÉàdG »g IôaƒàŸG RƒeôdG
_ ! # $ % & ’ - @ ^ ‘
0 1 2 3 4 5 6 7 8 9
A B C D E F G H I J K L M
N O P Q R S T U V W X Y Z
äÉfÉÿG ‘ áHƒ∏£ŸG RƒeôdG ójóëàd (4) h (3) äGƒ£ÿG IOÉYEÉH ºb (5)
.á«≤ÑàŸG
èeÈŸG ‹É◊G ¬ª°SEÉH ∞∏ŸG ßØM ∂æµÁ ¬fCG øe ºZôdÉH
º°SEG ΩGóîà°SG ∂æµÁ ,("USPR-000" hCG "SONG-001")
π¡ªàdG ìÎ≤f Gòd ,âbh …CG ‘ ∞∏ŸG ≈∏Y ±ô©àdG ∂d í«àj Ö°SÉæe
.á«≤£æe ᫪°ùJ ∞∏ŸG AÉ£YE’
.RƒeôdG ÚH äÉZGôa ™°VƒH ∂d íª°ùJ ’ MS-DOS :á¶MÓe
.∂°ùjódG ¤G äÉeƒ∏©ŸG ßØ◊ [YES/+] QR §¨°VG ,º°S’G ∫ÉNOEG ó©H (6)
øe AÉ¡àf’G ó©Hh ,''Saving'' ô°TDƒe ™e ‹RÉæàdG ó©dÉH á°TÉ°ûdG CGóÑJ
Saving
."Complete" ádÉ°SQ ô¡¶J ßØ◊G á«∏ªY
54
EXR–46 OR
∂°ùjódG øe á«≤«°SƒŸG äÉYÉ≤jE’G 𫪖
User IôcGP ¤G ∂°ùjódG øe »≤«°Sƒe ´É≤jEG 𫪖 áØ«XƒdG √òg ∂d í«àJ
EXR-46 OR RÉ¡L ‘
.äɵ°ùjódG π¨°ûe ‘ ∂°ùjódG πNOCG (1)
.∂°ùjódG ™°Vh QÉ«àN’ [DISK] QõdG §¨°VG (2)
[√][®] FAMILY QGQRCG ΩGóîà°SÉH "LOAD Stl" áØ«Xh ÎNEG (3)
.¬∏«ª– OƒJ …òdG ´É≤jE’G QÉ«àN’ [√][®] SELECT QGQRCG Ωóîà°SG (4)
.¬ÑfÉéH yes IQÉ°TEG ¢†eƒJ
.QÉàıG ∞∏ŸG π«ªëàd [YES/+] QR §¨°VG (5)
.QÉàıG ∞∏ŸG π«ªëàH ÖZôJ ’ âæc GPEG [NO/–] §¨°VG :á¶MÓe
ádÉ°SQ ¿B’G á°TÉ°ûdG ≈∏Y ô¡¶à°S [YES/+] äÎNG ∂fCG ádÉM ‘
ádÉ°SQ ô¡¶J äÉeƒ∏©ŸG 𫪖 øe AÉ¡àf’G ó©Hh ,"Loading"
."Complete"
DATA ENTRY äÉeƒ∏©ŸG ∫ÉNOEG º°ùb ‘ ''ÒÑc'' ôNBG QR §¨°VG (6)
.áØ«XƒdG √òg øe êhôî∏d
.(53 ¢U) ''á∏ªàÙG CÉ£ÿG πFÉ°SQ'' kÉ°†jCG ô¶fCG :á¶MÓe
∂°ùjódG ‘ äÉØ∏ŸG ßØM
:á«dÉàdG ßØ◊G ∞FÉXh EXR-46 OR RÉ¡L øª°†àj
èeGôH ßØ◊ áØ«XƒdG √òg Ωóîà°ùJ SAVE Upr: ±RÉ©dG èeGôH ßØM
≈∏Y á«∏NGódG RÉ¡÷G IôcGP π¨°ûJ »àdG (èeÉfôH 200 ÉgOóYh) ±RÉ©dG
.∂°ùjO
äGƒ°UCG QGQRCG äÉæ««©J ≈∏Y kÉ°†jCG ±RÉ©dG èeGôH õ«¡Œ äÉeƒ∏©e …ƒà– :á¶MÓe
.±RÉ©dG
‘ IOƒLƒŸG á«æZC’G ßØ◊ áØ«XƒdG √òg SAVE Sng: á«æZC’G ßØM
.»°SÉ«b …ó«e ∞∏e ¤G á«æZC’G ∫ƒëàJ Éægh ,∂°ùjO ≈∏Y á«∏NGódG IôcGòdG
.äɵ°ùjódG π¨°ûe ¤G ∂°ùjO πNOCG (1)
ßØM ∂æµÁ É¡bÓZEG óæY ,IÒ¨°U áëàa ≥∏¨j ™Hôe ≥dÉZ ∂°ùjO πµd
¬dÉNOEG πÑb √òg ∂°ùjódG ''íàa'' á«∏ªY ¢ùæJ ’ ,∂°ùjódG ≈∏Y äÉeƒ∏©e
.π¨°ûŸG ¤G
Sng" QÉ«àN’ [√][®] SELECT QGQRCG Ωóîà°SG ºK [DISK] QR §¨°VG (2)
."SAVE Upr" hCG "SAVE
¤G ô°TDƒŸG ∂jôëàd [√][®] SELECT QGQRCG Ωóîà°SG ,ôeC’G ≈°†àbEG GPEG (3)
.(õeôdG Å°†j) ôNBG õeQ áfÉN
53
á∏ªàÙG CÉ£ÿG πFÉ°SQ
.π¨°ûŸG ¤G ∂°ùjódG ∫ÉNOEG â«°ùf ó≤a ∂°ùjO óLƒj ’
:No Disk
.±RÉ©dG èeGôH äÉØ∏e …ƒëj ’ ∂°ùjódG Gòg
:No Files
øµªàj ’ äÉeQƒa Ωóîà°ùj hCG ,CÉ«¡e ¢ù«d ∂°ùjódG
:No Format
áÄ«¡àd [YES/+] §¨°VG :É¡«dG ±ô©àdG øe RÉ¡÷G
äÉeƒ∏©ŸG áaÉc ƒëª«°S Gò¡a ,¬ÑàfG) ¿B’G ∂°ùjódG
.(∂°ùjódG ≈∏Y IOƒLƒŸG
.∫ɪ©à°SEÓd ídÉ°U ÒZh ∞dÉJ ∂°ùjódG
:Disk Err
.¬JAGôb øµÁ ’h ∞dÉJ ∞∏ŸG
:File Err
∂°ùjódG øe ÊÉZC’G 𫪖
‘ User IôcGP ¤G ∂°ùjódG øe á«æZCG 𫪖 áØ«XƒdG √òg ∂d í«àJ
EXR-46 OR RÉ¡L
.äɵ°ùjódG π¨°ûe ‘ ∂°ùjódG πNOCG (1)
.∂°ùjódG ™°Vh QÉ«àN’ [DISK] QõdG §¨°VG (2)
[√][®] FAMILY QGQRCG ΩGóîà°SÉH "LOAD Sng" áØ«Xh ÎNEG (3)
.É¡∏«ª– OƒJ »àdG á«æZC’G QÉ«àN’ [√][®] SELECT QGQRCG Ωóîà°SG (4)
.É¡ÑfÉéH yes IQÉ°TEG ¢†eƒJ
.QÉàıG ∞∏ŸG π«ªëàd [YES/+] QR §¨°VG (5)
.QÉàıG ∞∏ŸG π«ªëàH ÖZôJ ’ âæc GPEG [NO/–] §¨°VG :áßMÓe
ádÉ°SQ ¿B’G á°TÉ°ûdG ≈∏Y ô¡¶à°S [YES/+] äÎNG ∂fCG ádÉM ‘
ádÉ°SQ ô¡¶J äÉeƒ∏©ŸG 𫪖 øe AÉ¡àf’G ó©Hh ,"Loading"
."Complete"
DATA ENTRY äÉeƒ∏©ŸG ∫ÉNOEG º°ùb ‘ ''ÒÑc'' ôNBG QR §¨°VG (6)
.áØ«XƒdG √òg øe êhôî∏d
.√ÓYCG ''á∏ªàÙG CÉ£ÿG πFÉ°SQ'' kÉ°†jCG ô¶fCG :á¶MÓe
OƒJ …òdG ±RÉ©dG èeÉfôH QÉ«àN’ [√][®] SELECT QGQRCG Ωóîà°SG (3)
.¬∏«ª–
.¬ÑfÉéH yes IQÉ°TEG ¢†eƒJ
.QÉàıG ∞∏ŸG π«ªëàd [YES/+] QR §¨°VG (4)
.QÉàıG ∞∏ŸG π«ªëàH ÖZôJ ’ âæc GPEG [NO/-] §¨°VG :áßMÓe
ádÉ°SQ ¿B’G á°TÉ°ûdG ≈∏Y ô¡¶à°S [YES/+] äÎNG ∂fCG ádÉM ‘
ádÉ°SQ ô¡¶J äÉeƒ∏©ŸG 𫪖 øe AÉ¡àf’G ó©Hh ,"Loading"
."Complete"
DATA ENTRY äÉeƒ∏©ŸG ∫ÉNOEG º°ùb ‘ ''ÒÑc'' ôNBG QR §¨°VG (5)
.áØ«XƒdG √òg øe êhôî∏d
r EXR–46 OR
∂°ùjódG ∞FÉXh
USER SNG IôcGP ‘ πé°ùŸG á«æZCG ßØ– ¿G ∂°ùjódG ™°Vh ∂d í«àj
ƒë“ ¿CGh ,∂°ùjódG øeh ¤G ∂JÉØ∏e πª– ºK øeh ßØ– ¿CGh ,∂°ùjO ≈∏Y
.kÉ°†jCG äɵ°ùjódG ï°ùæJ ¿CGh ,∂°ùjódG øe äÉØ∏ŸG ¢†©H
™e ,2HD áaÉãµdG á«dÉY hCG 2DD áaÉãµdG áLhOõe äɵ°ùjO ΩGóîà°SG ∂æµÁ
áLhOõe äɵ°ùjódG á©°S ∞©°V É¡d áaÉãµdG á«dÉY äɵ°ùjódG ¿G IÉYGôe
.¿Éµe’G Qó≤H 2HD Ωóîà°SG Gòd ,áaÉãµdG
-áHÉàc hCG IAGôb øe- ∂°ùjódG ≈∏Y äÉ«∏ªY äɵ°ùjódG π¨°ûe iôLCG ɪ∏c
√òg ¢†«eh AÉæKCG ∂°ùjódG êôîJ ’ ,á°TÉ°ûdG ≈∏Y ∂°ùjódG áeÓY ¢†eƒà°S
.kÉ©e ÚæKC’G hCG ∂°ùjódG hCG π¨°ûŸG …PDƒJ ó≤a ’EGh ,áeÓ©dG
∂°ùjódG øe ±RÉ©dG èeGôH 𫪖
øe á∏eÉc áYƒª› π≤f ∂d í«àJh ,LOAD Upr áØ«XƒdG √òg ≈ª°ùJ
RÉ¡÷ á«∏NGódG IôcGòdG ¤G (±RÉ©dG èeGôH πc) ±RÉ©∏d èeÉfôH 200
.RÉ¡÷G ‘ IOƒLƒŸG ±RÉ©dG èeGôH πc ádóÑà°ùe ,EXR-46 OR
∂d óH Óa ,ó©H ɪ«a RÉ¡÷G ≈∏Y IOƒLƒŸG ±RÉ©dG èeGôH ΩGóîà°SG äOQCG GPEG :á¶MÓe
.(53 ¢U) á«dÉàdG äGƒ£ÿÉH ΩÉ«≤dG πÑb ∂°ùjO ≈∏Y É¡¶Ø– ¿G
á«Jƒ°üdG QGQRC’G äÉæ««©J ≈∏Y kÉ°†jCG ±RÉ©dG èeGôH õ«¡Œ äÉeƒ∏©e …ƒà– :á¶MÓe
á«fɪãdG 䃰üdG QGQRCG Ωƒ≤J ó≤a ,±RÉ©∏d èeGôH áYƒª› 𫪖 ó©Ña ,(30 ¢U)
.á≤HÉ°ùdG ÒZ iôNCG äGƒ°UCG QÉ«àNÉH
.äɵ°ùjódG π¨°ûe ‘ ∂°ùjódG πNOCG (1)
.∂°ùjódG ™°Vh QÉ«àN’ [DISK] §¨°VG (2)
ó∏› ¤G ôJƒ«ÑªµdG ‘ ∂°ùjO OQÉ¡dG øe áHƒZôŸG ÊÉZC’G ï°ùfEG
''Song''
ó∏› ¤G ôJƒ«ÑªµdG ‘ ∂°ùjO OQÉ¡dG øe áHƒZôŸG ±RÉ©dG èeGôH ï°ùfEG
.''UserPrg''
''UserPrg'' h ''Style'' äGó∏› ‘ áHƒZôŸG äÉØ∏ŸG ᫪°ùJ IOÉYEÉH ºb
''Song''h
.É¡d áLÉëH ó©J ⁄ »àdG äÉØ∏ŸG Ö£°TCG
¿EÉa ,á°TÉ°ûdG ≈∏Y "PC<->EXR" IQÉÑY ô¡¶J ɪæ«H :á¶MÓe
øY áØbƒàe ¿ƒµJ EXR-46 OR ''RÉ¡L ‘ í«JÉØŸGh QGQRC’G áaÉc
.πª©dG
•
•
•
•
:ôJƒ«ÑªµdG øY EXR-46 OR RÉ¡L π°üØd (9)
hCG EXR-46 OR áfƒ≤jCG AÉ≤dEÉH ºb :¢TƒàæcÉe Ωɶf •
.äÓª¡ŸG á∏°S ‘ ''Removable Stick"
ô¶àfGh ,äGhOC’G §jô°T ≈∏Y ádGRE’G áfƒ≤jCG ≈∏Y §¨°VG :Rhóæjh Ωɶf •
USB ∂°ùjO ±É≤jEG'' ≈∏Y ∫ój …òdG πNóŸG ÎNEGh ,AÉ≤dE’G áªFÉb Qƒ¡X
ádGREG ¿B’G øµÁ'' ÉgOÉØe IQÉÑY òFóæY ô¡¶à°ùa ,''EXR-46 OR RÉ¡÷
.[OK] ô°TDƒŸG §¨°VG ÉgóæY ,''¿ÉeCÉH ΩɶædG øe USB AõL
∂dP ó©Hh
EXR-46 OR RÉ¡L øeh ôJƒ«ÑªµdG øe USB πHÉc π°üaEG •
iôNCG Iôe [USB] QR §¨°VG (10)
."Sure?" ádÉ°SQ á°TÉ°ûdG ≈∏Y ô¡¶J
QR §¨°VG) á°TÉ°ûdG øY
ô°TDƒe »Øàî«a [YES/+] QR §¨°VG (11)
.(USB ™°Vh ‘ QGôªà°SEÓd [NO/-]
,á«°†eƒdG á≤£æŸG ¤G ôJƒ«ÑªµdG øe á«≤«°Sƒe äÉYÉ≤jEG ï°ùæH âªb GPEG
IQÉÑY ¿B’G á°TÉ°ûdG ≈∏Y ô¡¶à°ùa
äÉØ∏ŸG ¿G ÚÑàd "Wait ...Converting Styles"
RÉ¡L ‘ »≤«°SƒŸG ´É≤jE’G èdÉ©e ¤G ¤G É¡∏≤f ºàj ''.STL'' õeôdG äGP
.(''.STH'') EXR-46 OR
ôNBG Å°ûH ΩÉ«≤∏d áLÉM Óa "LOAD Upr" áØ«Xh QÉ«àNG ƒà∏d ”
.(Ò¨àŸG Gòg QÉ«àN’ [√][®] FAMILY QGQRCG ΩGóîà°SÉH º≤a ’EGh)
•
á≤£æŸG ‘ á«≤«°SƒŸG äÉYÉ≤jEÓd §≤a …Qhô°V πjƒëàdG Gòg ¿G ßM’
.(''.STH'') ´ƒæ∏d ó©H ∫ƒëàJ ⁄ »àdGh RÉ¡é∏d á«°†eƒdG
.¬∏jƒ– ºàj »≤«°Sƒe ´É≤jEG πµd äÉàjÉÑdG øe OóY ∞«°†J á«∏ª©dG √òg :á¶MÓe
¤G Gòg Oƒ≤j ób ,(áÄ∏à‡ á«°†eƒdG á≤£æŸG ¿ƒµJ ÉeóæY) IQOÉf ä’ÉM ‘h
RÉ¡L Ωƒ≤j ÉgóæYh ,''.STL'' ´ƒf øe äÉYÉ≤jE’G áaÉc πjƒ– ádÉëà°SEG
¢†¡LCG ób πjƒëàdG ¿G ÚÑ«d "Mem Full" IQÉ°TEG åÑH EXR-46 OR
á¶ë∏dG ∂∏J ≈àM iôNC’G äÉØ∏ŸG áaÉc ¿CG ’EG ,ÒNC’G ''.STL'' ∞∏e ¤G ∫ƒ°UƒdG πÑb
.É¡eGóîà°SG øµÁh É¡∏jƒ– ” ób
á∏«°UƒJ ¿G ≈∏Y ∫óàd "No Cable" ádÉ°SQ á°TÉ°ûdG ≈∏Y ô¡¶J
.á浇 ÒZ USB
RÉ¡L Oƒ©j ,á«fÉK 15 ∫ÓN USB πHÉc π«°UƒàH º≤J ⁄ GPEG :á¶MÓe
.»©«Ñ£dG ™°VƒdG ¤G EXR-46 OR
USB áëàa ¤G EXR-46 OR RÉ¡L ‘ USB áëàa π«°UƒàH ºb (4)
.≥aôŸG πHɵdG ΩGóîà°SÉH ôJƒ«ÑªµdG RÉ¡L ‘ IôZÉ°T
.á°TÉ°ûdG ≈∏Y ''PC<->EXR'' IQÉÑYh
IQÉ°TEG ô¡¶J
óMGh :USB äÉcÉ÷ kɪFÓe kGóMGh ÎNEG ,ôNBG πHÉc ΩGóîà°SÉH âÑZQ GPEG
RÉ¡÷ (A ´ƒf) í£°ùe óMGhh ,EXR-46 OR RÉ¡÷ (B ´ƒf) ''™Hôe''
.ôJƒ«ÑªµdG
RÉ¡éH kɪFGO ¬∏°Uh .(hub) USB Qƒfi ¤G EXR-46 OR RÉ¡L π°UƒJ ’ :áßMÓe
.Iô°TÉÑe ôJƒ«ÑªµdG
ádÉ°SQ ¿ƒµJ ɪæ«M EXR-46 OR RÉ¡L ¥ÓZEÉH kGóHCG º≤J ’ :áßMÓe
áaÉc ‘ Qô°V çGóMEG ¤G …ODƒ«°S Gòg ¿C’ ,á°TÉ°ûdG ≈∏Y "Writing"
43 ¢U ô¶fCG) EXR-46 OR RÉ¡÷ á«°†eƒdG IôcGòdG ‘ IOƒLƒŸG äÉeƒ∏©ŸG
.(IôcGòdG πªY ‘ CÉ£N ó©H á«°†eƒdG IôcGòdG á÷É©e á«Ø«c ≈∏Y ±ô©à∏d
:𫨰ûàdG ᪶fCG áaɵd
≈∏Y ô¡¶J ,¢UÉÿG πHɵdG π«°UƒJ ¿hóH [USB] QR ≈∏Y §¨°†dÉH âªb GPEG :áßMÓe
ºb .á浇 ÒZ USB á∏«°UƒJ ¿G ≈∏Y ∫óàd "No Cable" ádÉ°SQ á°TÉ°ûdG
.ádÉ°SôdG »Øàîàd πHɵdG π«°UƒàH
ôJƒ«ÑªµdG ¿G ócCÉJh ,Rhóæjh èeÉfôH ‘ "My Computer" IòaÉf íàaG
.(Removable Disk Oô› hCG) EXR-46 OR RÉ¡L ≈∏Y ÌY ób
.ô°TDƒŸG ≈∏Y ‹GƒàdG ≈∏Y ÚJôe §¨°†dÉH π¨°ûŸG íàaG
."Song" hCG "Userprg" hCG "Style" ó∏› íàaG
áaÉ°VEG hCG ᫪°ùJ IOÉYEG hCG Ö£°T ójôJ âæc Ée GPEG ≈∏Y óªà©j Gòg
.á«≤«°Sƒe …ó«e äÉØ∏e hCG á«≤«°Sƒe äÉYÉ≤jEG
:á«dÉàdG äGƒ£ÿG óMCÉH ºb
∂°ùjO OQÉ¡dG ¤G ''Style'' ó∏› øe áHƒ∏£ŸG á«≤«°SƒŸG äÉYÉ≤jE’G ï°ùfEG
ôJƒ«ÑªµdG RÉ¡L ‘
RÉ¡L ‘ ∂°ùjO OQÉ¡dG ¤G ''Song'' ó∏› øe áHƒZôŸG ÊÉZC’G ï°ùfEG
.ôJƒ«ÑªµdG
∂°ùjO OQÉ¡dG ¤G ''UserPrg'' ó∏› øe áHƒZôŸG ±RÉ©dG èeGôH ï°ùfEG
.ôJƒ«ÑªµdG RÉ¡L ‘
ó∏› ¤G ôJƒ«ÑªµdG ‘ ∂°ùjO OQÉ¡dG øe áHƒZôŸG äÉYÉ≤jE’G ï°ùfEG
.((10) ºbQ Iƒ£ÿG ó©H ìô°ûdG kÉ°†jCG ô¶fCG) ''Style''
(5)
(6)
(7)
(8)
•
•
•
•
52
EXR–46 OR
.EXR-46 OR RÉ¡L ‘ [USB] QR §¨°VG (3)
á∏«°UƒJ ¿G ≈∏Y ∫óàd "No Cable" ádÉ°SQ á°TÉ°ûdG ≈∏Y ô¡¶J
.á浇 ÒZ USB
IôZÉ°T USB áëàa ¤G EXR-46 OR RÉ¡L ‘ USB áëàa π«°UƒàH ºb (4)
.≥aôŸG πHɵdG ΩGóîà°SÉH ôJƒ«ÑªµdG RÉ¡L ‘
EXR-40 OR
USB ôJƒ«ÑªµdG ΩGóîà°SÉH äÉeƒ∏©ŸG ßØM
:Ú°Vô¨d EXR-46 OR RÉ¡L ‘ USB á∏°Uh ΩGóîà°SG øµÁ
.ôJƒ«ÑªµdG ™e äÉØ∏ŸG ∫OÉÑàd hCG ,…ó«ŸG äÉeƒ∏©e ∫ÉÑ≤à°SGh/π≤æd
ô°TDƒe ¿G ÉŸÉWh
USB πNóe Ωƒ≤j ,á°TÉ°ûdG ≈∏Y ôgÉX ÒZ
OUT h MIDI IN äÉëàa RhÉŒ ºàjh) …ó«ŸG äÉeƒ∏©e ∫ÉÑ≤à°SGh π≤æH
.(áëàØdG √òg ¤G USB πHÉc π«°UƒàH Ωƒ≤J ÉeóæY MIDI
EXR-46 OR ∑RÉ¡L hóÑj ±ƒ°ùa ,á°TÉ°ûdG ≈∏Y ô¡¶j ô°TDƒŸG ¿Éc Ée GPEGh
:»LQÉN èdÉ©ªc ôJƒ«ÑªµdG RÉ¡L ‘ ÖൟG í£°S ≈∏Y
Computer
ºàj »àdG äÓ¨°ûŸG OóY ≈∏Y (√ÓYCG ™°VƒdG ‘ ''F'') π¨°ûŸG ±ôM óªà©jh
.RhóæjƒdG πÑb øe É¡«∏Y ±ô©àdG
Windows Me/XP
IQÉ°TEG ô¡¶J
.á°TÉ°ûdG ≈∏Y ”PC<–>EXR“ IQÉÑYh
óMGh USB :äÉcÉ÷ kɪFÓe kGóMGh ÎNEG ,ôNBG πHÉc ΩGóîà°SÉH âÑZQ GPEG
RÉ¡÷ (A) ´ƒkf ''í£°ùe'' óMGhh ,EXR-46 OR RÉ¡÷ (B) ´ƒf''™Hôe''
.ôJƒ«ÑªµdG
EXR-46 OR RÉ¡L Oƒ©j ,á«fÉK 15 ∫ÓN USB πHÉc π«°UƒàH º≤J ⁄ GPEG
:á¶MÓe
.»©«Ñ£dG ™°VƒdG ¤G
ádÉ°SQ ¿ƒµJ ɪæ«M EXR-46 OR RÉ¡L ¥ÓZEÉH kGóHCG º≤J ’ :á¶MÓe
áaÉc ‘ Qô°V çGóMEG ¤G …ODƒ«°S Gòg ¿C’ ,á°TÉ°ûdG ≈∏Y "Writing"
43 ¢U ô¶fCG) EXR-46 OR RÉ¡÷ á«°†eƒdG IôcGòdG ‘ IOƒLƒŸG äÉeƒ∏©ŸG
.(IôcGòdG πªY ‘ CÉ£N ó©H á«°†eƒdG IôcGòdG á÷É©e á«Ø«c ≈∏Y ±ô©à∏d
ádÉ°SQ ô¡¶J ¿G øµªŸG øe :á¶MÓe
QR ≈∏Y §¨°†J ÉeóæY "Wait...Connection Proceding"
¥ô¨à°ùj óbh ,äÉeƒ∏©ŸG π≤æd USB áëàa ΩGóîà°SG óæY §≤a çóëj Gògh .[USB]
.Qɶàf’G ≈Lôj , âbƒdG ¢†©H Gòg
:(iôNCG 𫨰ûJ ᪶fCG) ‹ÉàdG AGôL’G ™ÑJEG
.ôJƒ«ÑªµdG RÉ¡L 𫨰ûàH ºb (1)
.EXR-46 OR RÉ¡L π¨°T (2)
.EXR-46 OR RÉ¡L ‘ [USB] QR §¨°VG (3)
51
èeGôHh EXR-46 OR RÉ¡L ÚH á浇 USB á∏«°UƒJ ¿G :á¶MÓe
π«ªëàH Ωƒ≤J ¿G Ö∏£àj Gògh ,Égó©H Éeh OS 9.0.4 ¢TƒàæcÉe èeGôHh ,Égó©H Éeh
.CD-ROM ¢Uô≤dG øe áÑ°SÉæŸG äÓ¨°ûŸG
èeGôHh ,Égó©H Éeh Windows 2000/Me/XP èeGÈd áMÉàe äÉeƒ∏©ŸG π≤f á«∏ªYh
™e ∫É°üJ’G ≈Lôj ,∂eɶf ™e ÖYÉàe â¡LGh GPEGh ,Égó©H Éeh OS 9.0.4 ¢TƒàæcÉe
.áfÉ«°ü∏d óf’hQ õcôe ÜôbCG
ó∏› ¤G äÉØ∏ŸG ï°ùf ÉgóæY ∂æµÁ ,π¨°ûŸG ≈∏Y ±ô©àdG ºàj ÉeóæYh
.OÉà©ŸG AGôL’G ΩGóîà°SÉH ´É≤jE’G hCG ±RÉ©dG èeÉfôH hCG á«æZC’G
»¨Ñæj ’h á«æZC’Gh ±RÉ©dG èeGôHh ´É≤jE’G øe πc äGó∏› Ö£°T øµÁ ’h
á∏°S ‘ É¡jƒà– »àdG äÉØ∏ŸG AÉ≤dEÉH É¡¨jôØJ ∂æµÁ øµdh ,É¡JÉ«ª°ùJ Ò«¨J
.äÓª¡ŸG
(Windows XP) :‹ÉàdG AGôLE’G ™ÑJEG
.Restart ôJƒ«ÑªµdG RÉ¡L 𫨰ûJ óYCG (1)
.EXR-46 OR RÉ¡L π¨°T (2)
:á«dÉàdG ádÉ°SôdG á°TÉ°ûdG ≈∏Y ¿B’G ô¡¶J
Removing
ádÉ°SQ á°TÉ°ûdG ≈∏Y ô¡¶J ∞∏ŸG Ö£°T á«∏ªY πªàµJ ÉeóæYh
."Complete"
DATA ENTRY äÉeƒ∏©ŸG ∫ÉNOEG º°ùb ‘ ''ÒÑc'' ôNBG QR §¨°VG (5)
.áØ«XƒdG √òg øe êhôî∏d
r EXR–46 OR
á«°†eƒdG IôcGòdG øe ±RÉ©dG èeGôH øe áYƒª› ádGREG
øe ±RÉ©dG èeGôH äÉYƒª› ƒfi "RemovUPG" áØ«Xh ∂d í«àJ
IójóL äÉØ∏Ÿ õ«M Òaƒàd kÉjQhô°V Gòg ¿ƒµj óbh .RÉ¡é∏d á«°†eƒdG IôcGòdG
§≤a Ö£°ûJ ¿CG øe ócCÉJ øµdh .(''Memory Full'' ádÉ°SQ ô¡¶J ÉeóæY kÓãe)
,¥ÓWE’G ≈∏Y á«fÉK É¡d êÉà– ød ∂fCG øe kÉeÉ“ ≥KGh âfCG »àdG äÉØ∏ŸG
.kGóHCG ¬JOÉ©à°SEG øµÁ ’ ,äÉØ∏ŸG óMCG Ö£°ûJ Éeóæ©a
ôJƒ«ÑªµdG RÉ¡L ¤G äÉØ∏ŸG øe áî°ùf π≤æJ ¿G Öéj ,IóYÉ≤c :á¶MÓe
.É¡«dG kÉeƒj âéàMEG ∂fCG ádÉM ‘ ,(Backup)
[FUNCTION] QR §¨°VG (1)
á«°†eƒdG IôcGòdG øe äÉYÉ≤jE’G ádGREG
äÉeƒ∏©e ∑Éæg ¢ù«d ¬fCG »æ©J "No Style" ádÉ°SQ :á¶MÓe
.É¡Ñ£°T øµÁ ´É≤jEÓd
.¬Ñ£°ûH ÖZôJ …òdG ´É≤jE’G QÉ«àN’ [√][®] SELECT QGQRCG Ωóîà°SG (3)
[YES/+] QõdG §¨°VG (4)
yes IQÉ°TEG CGóÑJ ɪæ«H ”Sure?“ ádÉ°SQ á°TÉ°ûdG ≈∏Y ô¡¶J
.¢†«eƒdÉH
øµJ ⁄ GPEG [NO/–] hCG) ´É≤jE’G Ö£°ûd iôNCG Iôe [YES/+] QR §¨°VG (5)
.(É¡Ñ£°ûH ÖZôJ
."RemovUPG" Ò¨àŸG QÉ«àN’ [√][®] FAMILY QGQRCG Ωóîà°SG (2)
ºK ,±RÉ©dG èeGÈd áYƒª› ∫hCG º°SG á°TÉ°ûdG ≈∏Y ô¡¶j ≈àM ô¶àfG
á«dÉàdG Iƒ£ÿG ™HÉJ
øµÁ äÉeƒ∏©e áYƒª› ∑Éæg ¢ù«d ¬fCG »æ©J ''No Files'' ádÉ°SQ :á¶MÓe
.É¡Ñ£°T
ÖZôJ …òdG ±RÉ©dG èeÉfôH QÉ«àN’ [√][®] SELECT QGQRCG Ωóîà°SG (3)
.¬Ñ£°ûH
.É¡Ñ£°ûH ÖZôJ »àdG á«æZC’G QÉ«àN’ [√][®] SELECT QGQRCG Ωóîà°SG (3)
õ«M Òaƒàd "Remov" É¡«dG áLÉëH ó©J ⁄ »àdG äÉYÉ≤jE’G Ö£°T øµÁ
IójóL äÉYÉ≤jE’
[FUNCTION] QR §¨°VG (1)
."RemovSTL" Ò¨àŸG QÉ«àN’ [√][®] FAMILY QGQRCG Ωóîà°SG (2)
™HÉJ ºK ,(101) ´É≤jEÓd IôcGP ∫hCG º°SG á°TÉ°ûdG ≈∏Y ô¡¶j ≈àM ô¶àfG
á«dÉàdG Iƒ£ÿG
Removing
:á«dÉàdG ádÉ°SôdG á°TÉ°ûdG ≈∏Y ¿B’G ô¡¶J
ádÉ°SQ á°TÉ°ûdG ≈∏Y ô¡¶J ´É≤jE’G Ö£°T á«∏ªY πªàµJ ÉeóæYh
."Complete"
DATA ENTRY äÉeƒ∏©ŸG ∫ÉNOEG º°ùb ‘ ''ÒÑc'' ôNBG QR §¨°VG (6)
.áØ«XƒdG √òg øe êhôî∏d
[YES/+] QõdG §¨°VG (4)
.¢†«eƒdÉH yes IQÉ°TEG CGóÑJ ɪæ«H ”Sure?“ ádÉ°SQ á°TÉ°ûdG ≈∏Y ô¡¶J
øµJ ⁄ GPEG [NO/–] hCG) á«æZC’G Ö£°ûd iôNCG Iôe [YES/+] QR §¨°VG (5)
.(É¡Ñ£°ûH ÖZôJ
:á«dÉàdG ádÉ°SôdG á°TÉ°ûdG ≈∏Y ¿B’G ô¡¶J
Removing
ádÉ°SQ á°TÉ°ûdG ≈∏Y ô¡¶J á«æZC’G Ö£°T á«∏ªY πªàµJ ÉeóæYh
."Complete"
DATA ENTRY äÉeƒ∏©ŸG ∫ÉNOEG º°ùb ‘ ''ÒÑc'' ôNBG QR §¨°VG (6)
.áØ«XƒdG √òg øe êhôî∏d
[YES/+] QõdG §¨°VG (4)
.¢†«eƒdÉH yes IQÉ°TEG CGóÑJ ɪæ«H "Sure?" ádÉ°SQ á°TÉ°ûdG ≈∏Y ô¡¶J
GPEG [NO/–] hCG) ±RÉ©dG èeÉfôH Ö£°ûd iôNCG Iôe [YES/+] QR §¨°VG (5)
.(É¡Ñ£°ûH ÖZôJ øµJ ⁄
50
EXR–46 OR
.É¡∏«ªëàH ÖZôJ »àdG áYƒªÛG QÉ«àN’ [√][®] SELECT QGQRCG Ωóîà°SG
[YES/+] QõdG §¨°VG
YES IQÉ°TEG CGóÑJ ɪæ«H "Sure?" ádÉ°SQ á°TÉ°ûdG ≈∏Y ô¡¶J
.¢†«eƒdÉH
hCG ) ±RÉ©dG èeGôH áYƒª› π«ªëàd iôNCG Iôe [YES/+] QR §¨°VG
.(É¡∏«ªëàH ÖZôJ øµJ ⁄ GPEG [NO/–]
ádÉ°SQ á°TÉ°ûdG ≈∏Y ô¡¶J ,äÉeƒ∏©ŸG 𫪖 ºàj ɪæ«Hh
≈∏Y ô¡¶J ∞∏ŸG 𫪖 á«∏ªY πªàµJ ÉeóæYh ,"Reading"
."Complete" ádÉ°SQ á°TÉ°ûdG
DATA ENTRY äÉeƒ∏©ŸG ∫ÉNOEG º°ùb ‘ ''ÒÑc'' ôNBG QR §¨°VG
.áØ«XƒdG √òg øe êhôî∏d
(4)
(5)
(6)
(7)
á«°†eƒdG IôcGòdG øe ¿É◊C’G ádGREG
Òaƒàd "Remov" É¡«dG áLÉëH ó©J ⁄ »àdG ÊÉZC’G ¿É◊C’G Ö£°T øµÁ
IójóL ÊÉZC’ õ«M
[FUNCTION] QR §¨°VG (1)
¤G ô°TDƒŸG ∂jôëàd [√][®] SELECT QGQRCG Ωóîà°SG ,áLÉ◊G â°†àbEG GPEG (3)
.(õeôdG ¢†eƒj) ôNBG õeQ áfÉN
.áfÉÿG ∂∏J ‘ õeôdG ójóëàd ᫪bôdG QGQRC’G Ωóîà°SG (4)
:á«dÉàdG »g IôaƒàŸG RƒeôdG
_ ! # $ % & ’ - @ ^ ‘
0 1 2 3 4 5 6 7 8 9
A B C D E F G H I J K L M
N O P Q R S T U V W X Y Z
äÉfÉÿG ‘ áHƒ∏£ŸG RƒeôdG ójóëàd (4) h (3) äGƒ£ÿG IOÉYEÉH ºb (5)
.á«≤ÑàŸG
π≤àæj (RƒeôdG ∫ÉNOE’) ᫪bôdG QGQRC’G óMCG É¡«a §¨°†J Iôe πc :á¶MÓe
.…ƒ∏ÿG ∞JÉ¡dG πª©j ɪc kÉeÉ“ ,á«dÉàdG áfÉÿG ¤G kÉ«FÉ≤∏J ô°TDƒŸG
IôcGòdG ‘ ´É≤jE’G ßØ◊ [YES/+] QR ≈∏Y §¨°VG ,º°SE’G ∫ÉNOEG ó©H (6)
.RÉ¡é∏d á«°†eƒdG
.‹RÉæàdG ó©dÉH á°TÉ°ûdG CGóÑJ
Writing
:á«dÉàdG »g IôaƒàŸG RƒeôdG
_ ! # $ % & ’ - @ ^ ‘
0 1 2 3 4 5 6 7 8 9
A B C D E F G H I J K L M
N O P Q R S T U V W X Y Z
äÉfÉÿG ‘ áHƒ∏£ŸG RƒeôdG ójóëàd (4) h (3) äGƒ£ÿG IOÉYEÉH ºb (5)
.á«≤ÑàŸG
π≤àæj (RƒeôdG ∫ÉNOE’) ᫪bôdG QGQRC’G óMCG É¡«a §¨°†J Iôe πc :á¶MÓe
.…ƒ∏ÿG ∞JÉ¡dG πª©j ɪc kÉeÉ“ ,á«dÉàdG áfÉÿG ¤G kÉ«FÉ≤∏J ô°TDƒŸG
‘ ±RÉ©dG èeÉfôH ßØ◊ [YES/+] QR ≈∏Y §¨°VG ,º°SE’G ∫ÉNOEG ó©H (6)
.RÉ¡é∏d á«°†eƒdG IôcGòdG
ô¡¶J ,ßØ◊G á«∏ªY AÉ¡àfG óæYh ,”Writing“ ádÉ°SQ á°TÉ°ûdG ô¡¶J
.”Complete“ ádÉ°SQ á°TÉ°ûdG ≈∏Y
‘ ±RÉ©dG èeÉfôH ßØëH ÖZôJ øµJ ⁄ GPEG [NO/–] QR §¨°VG :á¶MÓe
.∞«°TQC’G
DATA ENTRY äÉeƒ∏©ŸG ∫ÉNOEG º°ùb ‘ ''ÒÑc'' ôNBG QR §¨°VG (7)
.áØ«XƒdG √òg øe êhôî∏d
."Complete" ádÉ°SQ á°TÉ°ûdG ≈∏Y ô¡¶J ,ßØ◊G á«∏ªY AÉ¡àfG óæY
.´É≤jE’G ßØëH ÖZôJ øµJ ⁄ GPEG [NO/–] QR §¨°VG :á¶MÓe
DATA ENTRY äÉeƒ∏©ŸG ∫ÉNOEG º°ùb ‘ ''ÒÑc'' ôNBG QR §¨°VG (8)
.áØ«XƒdG √òg øe êhôî∏d
."RemovSNG" Ò¨àŸG QÉ«àN’ [√][®] FAMILY QGQRCG Ωóîà°SG (2)
á«°†eƒdG IôcGòdG øe ±RÉ©dG èeGôH øe áYƒª› 𫪖
¤G ±RÉ©∏d èeÉfôH 200 π≤f √òg "ReadUPG" áØ«Xh ∂d í«àJ
IOƒLƒŸG ±RÉ©dG èeGôH Ö£°T ¤G …ODƒ«°S Gògh ,RÉ¡é∏d á«∏NGódG IôcGòdG
.á«∏NGódG äGôcGòdG ‘ kÉ«dÉM
.∞«°TQC’G áYƒª› øe á∏°üØæe ±RÉY èeGôH 𫪖 ∂æµÁ ’h
‘ á«∏NGódG IôcGòdG ‘ IOƒLƒŸG ±RÉ©dG èeGôH ΩGóîà°SÉH âÑZQ GPEG :á¶MÓe
πÑb ∂°ùjO ≈∏Y É¡¶ØMG hCG ,(48 ¢U)∞«°TQC’G ‘ É¡©°VƒH k’hCG ºb ,á≤M’ á∏Môe
(53) á©HÉàŸG
™HÉJ ºK ,(101) á«æZCÓd IôcGP ∫hCG º°SG á°TÉ°ûdG ≈∏Y ô¡¶j ≈àM ô¶àfG
á«dÉàdG Iƒ£ÿG
á«æZCÓd äÉeƒ∏©e ∑Éæg ¢ù«d ¬fCG »æ©J "No Song" ádÉ°SQ :á¶MÓe
.É¡Ñ£°T øµÁ
49
.[FUNCTION] QR §¨°VG (1)
."ReadUPG" Ò¨àŸG QÉ«àN’ [√][®] FAMILY QGQRCG Ωóîà°SG (2)
™HÉJ ºK ,±õ©dG èeGôH áYƒª› ∫hCG º°SG á°TÉ°ûdG ≈∏Y ô¡¶j ≈àM ô¶àfG (3)
.á«dÉàdG Iƒ£ÿG
á«°†eƒdG IôcGòdG ‘ äÉYÉ≤jE’G ßØM
‘ ï°ùæJ »àdGh) ∂°ùjódG øe É¡∏«ªëàH Ωƒ≤J »àdG á«≤«°SƒŸG äÉYÉ≤jE’G
IôcGòdG ‘ É¡¶ØM øµÁ (á¶ë∏dG ∂∏J ‘ USER STL IôcGP
.á«°†eƒdG
.[FUNCTION] QR §¨°VG (1)
."WriteSTL" Ò¨àŸG QÉ«àN’ [√][®] FAMILY QGQRCG Ωóîà°SG (2)
á«dÉàdG Iƒ£ÿG ™HÉJ ºK ,√ÉfOCG πµ°ûdG ‘ ɪc á°TÉ°ûdG hóÑJ ≈àM ô¶àfEG
’ »àdG á«°†eƒdG IôcGòdG QÉ«àNÉH kÉ«FÉ≤∏J EXR-46 OR RÉ¡L Ωƒ≤j
.(∫hC’G õeôdG ¢†eƒj) .äÉeƒ∏©e ≈∏Y ó©H …ƒà–
,áÄ∏à‡ IôcGòdG á©°S âfÉc hCG IôZÉ°T á«°†eh IôcGP ∑Éæg øµj ⁄ GPEG :á¶MÓe
√òg ‘h ,áØ«XƒdG √ò¡d ∑QÉ«àNG óæY ''Mem Full'' ádÉ°SQ á°TÉ°ûdG ≈∏Y ô¡¶J
ôNBG ´É≤jEG Ö£°T ∂fɵeÉH øµd , ,»≤«°SƒŸG ´É≤jE’G ßØM Qò©àj ádÉ◊G
.É¡©Ñàj Éeh (2) ºbQ Iƒ£ÿG IOÉYEGh (''Remove'')
äÉeƒ∏©e ∑Éæg ¢ù«d ¬fCG »æ©J "No Stlyle" ádÉ°SQ :á¶MÓe
.É¡¶ØM øµÁ ´É≤jEÓd
r EXR–46 OR
äÉeƒ∏©ŸG º«¶æJ .15
á«°†eƒdG IôcGòdG ΩGóîà°SG
.kÉ°†jCG äÉØ∏ŸG √òg ádGREGh ,EXR-46 OR RÉ¡÷ á«°†eƒdG IôcGòdG ¤G ∂°ùjódG øe á∏ªfi äÉYÉ≤jEGh kÉãjóM á∏é°ùŸG ÊÉZC’G ßØëH ∂d íª°ùJ »¡a ,á«Ø«XƒdG äGÒ¨àŸG á«≤H ≈∏Y ±ô©àf ÉæYO
á«°†eƒdG á≤£æŸG ‘ ±RÉ©dG èeGôH (áØ°TQCG) ßØM
.áfÉÿG ∂∏J ‘ õeôdG ójóëàd ᫪bôdG QGQRC’G Ωóîà°SG (4)
á«°†eƒdG IôcGòdG ‘ ÊÉZC’Gh ¿É◊C’G ßØM
‘ EXR-46 OR ᣰSGƒH É¡dó©J hCG É¡∏é°ùJ »àdG ÊÉZC’G ßØM ¿ÉµeC’ÉH
É¡¶ØM á«Ø«c ≈∏Y ±ô©à∏d 54 ¢U ô¶fCG) .∂°ùjO ≈∏Y hCG á«°†eƒdG IôcGòdG
IôcGòdG ‘ ÊÉZC’G QÉ«àNG á«Ø«c ≈∏Y ±ô©à∏d 19 ¢Uh ,(∂°ùjO ≈∏Y
.á«°†eƒdG
.[FUNCTION] QR §¨°VG (1)
É¡Yƒª›h) á«∏NGódG ±RÉ©dG èeGôH äÉjƒàfi ßØM áØ«XƒdG √òg ∂d í«àJ
.áYƒªéªc ±RÉ©dG èeGôH ßØM kɪFGO ºàjh ,á«°†eƒdG á≤£æŸG ‘ (200
≈∏Y …ƒà– É¡©«ªL ±RÉ©dG èeGôH âfÉc GPEG áØ«XƒdG √òg Ωóîà°SG
É¡fGó≤a hCG (iôNCG äGõ«¡Œ ßØM ≥jôW øY) É¡Ñ£°T ‘ ÖZôJ ’ äGõ«¡Œ
.(…ôcGP π°ûa OƒLh ádÉM ‘)
.(50 ¢U) áØ°TQDƒŸG ±RÉ©dG èeGôH 𫪖 ∂d í«àJ iôNCG áØ«Xh kÉ°†jCG ∑Éæg
.äGƒ°UC’G QR äGójó– ≈∏Y kÉ°†jCG …ƒà– ±RÉ©dG èeGÈd õ«¡éàdG äÉeƒ∏©e :á¶MÓe
:á«dÉàdG »g IôaƒàŸG RƒeôdG
.[FUNCTION] QR §¨°VG (1)
.''WriteUPG'' Ò¨àŸG QÉ«àN’ [√][®] FAMILY QGQRCG Ωóîà°SG (2)
á«dÉàdG Iƒ£ÿG ™HÉJ ºK ,√ÉfOCG πµ°ûdG ‘ ɪc á°TÉ°ûdG hóÑJ ≈àM ô¶àfEG
_ ! # $ % & ’ - @ ^ ‘
0 1 2 3 4 5 6 7 8 9
A B C D E F G H I J K L M
N O P Q R S T U V W X Y Z
.''WriteSNG'' Ò¨àŸG QÉ«àN’ [√][®] FAMILY QGQRCG Ωóîà°SG (2)
.á«dÉàdG Iƒ£ÿG ™HÉJ ºK ,√ÉfOCG πµ°ûdG ‘ ɪc á°TÉ°ûdG hóÑJ ≈àM ô¶àfEG
π≤àæj (RƒeôdG ∫ÉNOE’) ᫪bôdG QGQRC’G óMCG É¡«a §¨°†J Iôe πc :á¶MÓe
.…ƒ∏ÿG ∞JÉ¡dG πª©j ɪc kÉeÉ“ ,á«dÉàdG áfÉÿG ¤G kÉ«FÉ≤∏J ô°TDƒŸG
èeÈŸG ‹É◊G ¬ª°SEÉH ∞∏ŸG ßØM ∂æµÁ ¬fCG øe ºZôdÉH
≈∏Y ±ô©àdG ∂d í«àj ≥F’ º°SEG ΩGóîà°SG ∂æµÁ ,(''USPR_000'')
.á«≤£æe ᫪°ùJ ∞∏ŸG AÉ£YE’ π¡ªàdG ìÎ≤f Gòd ,âbh …CG ‘ ∞∏ŸG
.èeÈŸG º°S’G øe ∫hC’G ±ô◊G Å°†j
ádÉ°SQ á°TÉ°ûdG ≈∏Y ô¡¶J ,áÄ∏à‡ IôcGòdG á©°S âfÉc GPEG :á¶MÓe
ßØM Qò©àj ádÉ◊G √òg ‘h ,áØ«XƒdG √ò¡d ∑QÉ«àNG óæY ''Mem Full''
iôNCG áYƒª› Ö£°T ∂fɵeÉH øµd , ,∞«°TQC’G ‘ ±RÉ©dG èeGôH áYƒª›
.É¡©Ñàj Éeh (2) ºbQ Iƒ£ÿG IOÉYEGh (''Remove'')
¤G ô°TDƒŸG ∂jôëàd [√][®] SELECT QGQRCG Ωóîà°SG ,áLÉ◊G â°†àbEG GPEG (3)
.(õeôdG ¢†eƒj) ôNBG õeQ áfÉN
.áfÉÿG ∂∏J ‘ õeôdG ójóëàd ᫪bôdG QGQRC’G Ωóîà°SG (4)
‘ áHƒ∏£ŸG RƒeôdG ójóëàd (4) h (3) äGƒ£ÿG IOÉYEÉH ºb (5)
.á«≤ÑàŸG äÉfÉÿG
IôcGòdG ‘ á«æZC’G ßØ◊ [YES/+] QR ≈∏Y §¨°VG ,º°SE’G ∫ÉNOEG ó©H (6)
.RÉ¡é∏d á«°†eƒdG
.‹RÉæàdG ó©dÉH á°TÉ°ûdG CGóÑJ
Writing
.''Complete'' ádÉ°SQ á°TÉ°ûdG ≈∏Y ô¡¶J ,ßØ◊G á«∏ªY AÉ¡àfG óæY
.á«æZC’G ßØëH ÖZôJ øµJ ⁄ GPEG [NO/–] QR §¨°VG :á¶MÓe
DATA ENTRY äÉeƒ∏©ŸG ∫ÉNOEG º°ùb ‘ ''ÒÑc'' ôNBG QR §¨°VG
(7)
’ »àdG á«°†eƒdG IôcGòdG QÉ«àNÉH kÉ«FÉ≤∏J EXR-46 OR RÉ¡L Ωƒ≤j
(''S'' ∫hC’G õeôdG ¢†eƒj) .äÉeƒ∏©e ≈∏Y ó©H …ƒà–
IôcGòdG á©°S âfÉc GPEG hCG IôZÉ°T á«°†eh IôcGP ∑Éæg øµj ⁄ GPEG :á¶MÓe
√ò¡d ∑QÉ«àNG iód ''Mem Full'' IQÉÑY á°TÉ°ûdG ≈∏Y ô¡¶J ,ICÉÑ©e
Ö£°T ∂fɵeÉH øµd ,∂à«æZCG ßØM øµªŸG øe ¿ƒµj ød ádÉ◊G √òg ‘ .áØ«XƒdG
.É¡©Ñàj Éeh (2) ºbQ Iƒ£ÿG IOÉYEGh (''Remove'') iôNCG á«æZCG
øµÁ á«æZCÓd äÉeƒ∏©e ∑Éæg ¢ù«d ¬fCG »æ©J ''No Song'' ádÉ°SQ :á¶MÓe
.É¡¶ØM
¤G ô°TDƒŸG ∂jôëàd [√][®] SELECT QGQRCG Ωóîà°SG ,áLÉ◊G â°†àbEG GPEG (3)
.(õeôdG ¢†eƒj) ôNBG õeQ áfÉN
.áØ«XƒdG √òg øe êhôî∏d
48
EXR–46 OR
StartStp QGôªà°S’G/±É≤jE’G/𫨰ûàdG πFÉ°SQ ∫É°SQEG ■
ôjô“ hCG ™æe á«°UÉÿG √òg ∂d í«àJ (§°ûf :™æ°üŸG ™°Vh ,CÉØ£e/§°ûf)
´RƒŸG ±É≤jEG hCG 𫨰ûJ óæY ,QGôªà°S’G /±É≤jE’G/𫨰ûàdG πFÉ°SQ
.πé°ùŸG hCG
øZQC’ 䃰üdG ≥∏fl ‘ ºµëàJ ¿G ójôJ ÉeóæY ''Off'' ™°Vh ÎNG kÓãe
𫨰ûàH âªb ɪ∏c á«FÉ≤∏àdG ¬àÑMÉ°üe CGóÑJ ¿G ¿hóH ,»LQÉN …ó«e
.ERX-40 OR πé°ùe øe á«æZC’G áYGPEG hCG ´RƒŸG
Song PosP á«æZC’G ™bƒe ô°TDƒe ■
Ék °†jCG ERX-40 OR πé°ùe Ωƒ≤j (§°ûf :™æ°üŸG ™°Vh ,CÉØ£e/§°ûf)
√ójôJ ’ ÉeóæY ''Off'' ÎNG .á«æZC’G ™bƒe ô°TDƒe πFÉ°SQ ∫ÉÑ≤à°SGh ∫É°SQEÉH
.πFÉ°SôdG √òg πÑ≤à°ùj hCG π°Sôj ¿G
PitchBnd äɪ¨ædG »æK ■
(Off) ™æÁ hCG (On) íª°ùj Î∏ØdG Gòg (§°ûf :™æ°üŸG ™°Vh ,CÉØ£e/§°ûf)
äɪ¨ædG OOôJ ¢†ØN hCG ™aQ øY ádhDƒ°ùŸG »gh ,᪨ædG »æK πFÉ°SQ ∫É≤àfEG
.(áfÉ£ÑdGh ,ô°ùjC’Gh ,»°SÉ°SC’G 䃰üdG) OQƒÑ«µdG ΩÉ°ùbC’ áàbDƒe IQƒ°üH
Modulation ꃪàdG ■
πFÉ°SQ Qhôe ™æÁ hCG QôÁ Î∏ØdG Gòg (§°ûf :™æ°üŸG ™°Vh ,CÉØ£e/§°ûf)
»àdG äɪ¨æ∏d Vibrato …RGõàgG ôKDƒe áaÉ°VE’ Ωóîà°ùJ »àdGh ,ꃪàdG
.(Control Change CC01) É¡aõ©J
ProgChng 䃰üdG Ò«¨J πFÉ°SQ ■
πFÉ°SQ Qhôe ™æÁ hCG QôÁ Î∏ØdG Gòg (§°ûf :™æ°üŸG ™°Vh ,CÉØ£e/§°ûf)
QÉàîJ πFÉ°SôdG √òg ,¬«dEGh ERX-40 OR RÉ¡L øe èeÉfÈdG Ò«¨J
.±RÉ©dG èeGôHh äÉYÉ≤jE’Gh äGƒ°UC’G
Velo Rx ±õ©dG Ió°T QGó≤e ∫ÉÑ≤à°SG ■
πFÉ°SQ Qhôe ™æÁ hCG QôÁ Î∏ØdG Gòg (§°ûf :™æ°üŸG ™°Vh ,127~1 ,§°ûf)
.Velocity ±õ©dG Ió°Th Iƒb
ERX-40 OR RÉ¡L ¤G áeOÉ≤dG äɪ¨ædG πFÉ°SQ ≈∏Y §≤a Gòg ≥Ñ£æjh
á«∏°UC’G º«≤dG øY kÓjóH ¿ƒµà°S »àdG ±õ©dG Ió°T ÎNG .…ó«ŸG ᣰSGƒH
πNóàd ''On'' ™°VƒdG ÎNG hCG ,(127~1) ERX-40 OR É¡∏Ñ≤à°ùj »àdG
.»g ɪc πFÉ°SôdG
Clock Tx …ó«ŸG áYÉ°S ∫É°SQEG ■
™æe hCG ∫É°SQEG á«°UÉÿG √òg ∂d í«àJ (§°ûf :™æ°üŸG ™°Vh ,CÉØ£e/§°ûf)
»gh .πé°ùŸG hCG ´RƒŸG 𫨰ûJ óæY …ó«ŸG áYÉ°S äGQÉ°TEG ∫É°SQEG
èeGôH ,ô°ùfƒµ«°S πãe) á«LQÉÿG …ó«ŸG Iõ¡LCG øeGõJ ‘ ºµëà∏d ájQhô°V
.ERX-40 OR RÉ¡L ™e (ïdG ,ôJƒ«ÑªµdG
47
»LQÉN RÉ¡L øe …ó«ŸG êôfl π«°UƒJ óæY §≤a πª©j øeGõàdG ¿G ßM’
π«dO ô¶fCG ádÉ◊G √òg ‘h ,¢ùµ©dG hCG) ERX-40 OR ‘ …ó«ŸG πNóÃ
.(ô°ùfƒµ«°ùdG RÉ¡÷ 𫨰ûàdG
øµÁ ødh ,iôNCG …ó«e Iõ¡LCG ájCG ™e ERX-40 OR RÉ¡L øeGõàj ød :Off
.…ó«ŸG ᣰSGƒH ¬aÉ≤jEG hCG ¬∏«¨°ûJ
GPEG πé°ùŸG ‘ á«æZC’G π«é°ùJ hCG áYGPEGh ,´RƒŸG 𫨰ûJ øeGõà«°S :On
äGQÉ°TEG É¡©ÑàJ ±É≤jEG hCG 𫨰ûJ ádÉ°SQ ERX-40 OR RÉ¡L πÑ≤à°SG
.…ó«ŸG áYÉ°S
,á¶ë∏d …ó«ŸG áYÉ°S äGQÉ°TEG ∫ƒ°Uh ô¶àæ«°S ,§≤a 𫨰ûJ IQÉ°TEG ¬à∏°Uh GPEÉa
øµdh .á°UÉÿG ¬àYô°ùH 𪩫°ùa π°üJ ⁄ GPEG ÉeCG ,É¡©e øeGõà«°S â∏°Uh GPEÉa
.…ó«ŸG ±É≤jEG IQÉ°TEG ᣰSGƒH 𫨰ûàdG ±É≤jEG ∫ÉM ájCG ≈∏Y ∂浪«°S
Style PC ´É≤jE’G QÉ«àNG IÉæb ■
∫É°SQEGh ∫ÉÑ≤à°S’ IÉæ≤dG √òg ¢ü°üîJ (10 :™æ°üŸG ™°Vh ,16~1 ,ôØ°U)
hCG ERX-40 OR π©Œ »àdG Program Change 䃰üdG Ò«¨J πFÉ°SQ
.ôNBG kÉYÉ≤jEG QÉàîj »LQÉÿG RÉ¡÷G
Lyrics Tx ÊÉZC’G ¢Uƒ°üf ∫É°SQEG ■
π≤f ≈∏Y QOÉb ERX-40 OR RÉ¡L ¿G (§°ûf :™æ°üŸG ™°Vh ,CÉØ£e/§°ûf)
ôØ°U π«µ°ûJ - …ó«ŸG äÉØ∏e πNGO IOƒLƒŸG ÊÉZC’G ¢Uƒ°üf πFÉ°SQ
∂d í«àj πH ,ÉgQÉ¡XEG ¬æµÁ ’ øµdh ,É¡àYGPEÉH Ωƒ≤J ÚM (Format 0)
.(Roland LVC1 πãe) ÊÉZC’G ¢Uƒ°üf QÉ¡XEG ≈∏Y QOÉb RÉ¡L ¤G É¡∏≤f
.ÊÉZC’G ¢Uƒ°üf ∫É°SQEG ΩÉeCG ÜÉÑdG ¥ÓZEG hCG íàa Î∏ØdG Gòg ∂d í«àjh
NTA Rx14 ´RƒŸG ¤G äÉØdBÉàdG π≤f IÉæb ■
IQÉÑ©d QÉ°üàNG »g NTA (§°ûf :™æ°üŸG ™°Vh ,CÉØ£e/§°ûf)
ô°ùjC’G ∞°üædG ≈∏Y É¡aõ©J »àdG äɪ¨ædG »gh ,''Note-to-Arranger''
√òg ∫ÉÑ≤à°SG øµÁ .äÉØdBÉàdG äÉeƒ∏©Ã ´RƒŸG …ò¨àd OQƒÑ«µdG øe
,(kÓãe øZQCG hCG »ªbQ ƒfÉ«H hCG ¿ƒjOQƒcCG øe) …ó«ŸG ᣰSGƒH äÉeƒ∏©ŸG
OQƒÑ«c ±õ©J ¿G ¿hóH äÉeƒ∏©ŸG √òg ´RƒŸG Ωóîà°ùj ¿G äOQCG GPEÉa
hCG ôJƒ«ÑªµdG øe) 14 …ó«ŸG IÉæb ≈∏Y É¡∏≤æJ ¿G Öéj ,ERX-40 OR
.''On'' ìɪ°ùdG ™°Vh QÉ«àNG ™e (ERX-40 OR RÉ¡L ¤G ô°ùfƒµ«°ùdG
≈∏Y É¡aõ©J »àdG äɪ¨ædÉa ,…ó«ŸG ᣰSGƒH NTA äɪ¨f ∫É°SQEG øµÁ ’
±õ©àa ,´RƒŸG äÉcGôJ ¤G ¬æeh ,´RƒŸG ¤G øµdh kÓ©a π≤àæJ OQƒÑ«µdG
áÑMÉ°üŸGh ´É≤jE’G äɪ¨f πc ¿CG ÉÃh .í«ë°üdG ΩÉ≤ŸG ‘ áÑMÉ°üŸG
.IóM ≈∏Y NTA äÉeƒ∏©e π≤æd ´GO Óa ,…ó«ŸG ᣰSGƒH π≤àæJ
r EXR–46 OR
…ó«ŸG ∞FÉXh .14
.≈≤«°SƒŸG ™æ°U á«∏ªY π«°UÉØàH á°UÉÿG πFÉ°SôdG ∫OÉÑàd ,äGôKDƒŸG Iõ¡LCGh á«≤«°SƒŸG Iõ¡LC’G ¬eóîà°ùJ π°Uƒe É¡fCG Égô¡°TCG áØ∏àfl ÊÉ©e πª–h ,"Musical Instrument Digital Interface" á«≤«°SƒŸG Iõ¡LCÓd ᫪bQ ∫É°üJG á¡LGh »g MIDI
™æÁ ’ ¬æµd RÉ¡÷G øe 䃰U êGôNEG ™æÁ ¬fCG …CG ''»©°Vƒe'' ºµëàdG
.á«LQÉN Iõ¡LC’ 䃰üdG ¢ùØæd …ó«ŸG πFÉ°SQ ∫É°SQEG
Sound source
É¡fG âjCGQ GPEG .…ó«ŸG πFÉ°SQ ∫ÉÑ≤à°SE’ Ió©e EXR-46 OR ΩÉ°ùbCG πc :áßMÓe
»àdG …ó«ŸG á∏°Uh ¢üëaG ,ôNBG RÉ¡L øe áeOÉ≤dG πFÉ°SôdG ™e ÜhÉéàJ ’
.EXR-46 OR ‘ …ó«ŸG πNóà ôNB’G RÉ¡÷G ‘ …ó«ŸG êôfl π°üJ
Sound source
™e ≥aGƒààd RÉ¡÷G ΩÉ°ùbCG πµd …ó«ŸG ∫ÉÑ≤à°SGh ∫É°SQEG äGƒæb OGóYEG ”
äÉYƒª› ™e kÉ≤aGƒàe ¬∏©éj ɇ ,á≤«bódGh á«æª°†dG óf’hQ ¢ù«jÉ≤e
ΩÉbQCG Ò«¨J øµÁ ’h EM, E, G, RA á∏°ù∏°S πãe áãjó◊G óf’hQ OQƒÑ«c
:∑GôJ 16 hP πé°ùŸG äÉcGôJ ™jRƒJ πKÉ“ É¡fCG ɪc ,äGƒæ≤dG √òg
Accomp 1
Arranger bass
.¬bÓZEG ó©H äɣѰ†dG √òg RÉ¡÷G ôcòàj ød :áßMÓe
MIDI TxRx …ó«ŸG ∫ÉÑ≤à°SGh ∫É°SQEG ■
πFÉ°SQ πÑ≤à°ùJh π°SΰS »àdG RÉ¡÷G ΩÉ°ùbCG ójó– Ò¨àŸG Gòg ∂d í«àj
.…ó«ŸG
√Éæ©e
QÉ«ÿG
.ΩÉ°ùbC’G πc
:ALL
.(√ÓYCG ∫hó÷G ‘ K ô¶fCG) §≤a OQƒÑ«µdG ΩÉ°ùbCG
:KBD
.(6 áÑMÉ°üŸG~∫ƒÑ£dG áÑMÉ°üe) §≤a ´RƒŸG ΩÉ°ùbCG
:STL
.(1~16) §≤a ÊÉZC’G ΩÉ°ùbCG
:SNG
.…ó«ŸG πFÉ°SQ ∫ÉÑ≤à°SG hCG ∫É°SQEG øe RÉ¡÷G ΩÉ°ùbCG áaÉc ™æe
:OFF
Sync Rx …ó«ŸÉH øeGõàdG ∫ÉÑ≤à°SG ■
ô°ùfƒµ«°ùd (Slave) ™HÉàc ERX-40 OR RÉ¡L π©éàd Ò¨àŸG Gòg Ωóîà°SG
.ïdG ,´É≤jEG áæ«cÉe hCG ôJƒ«Ñªc hCG »LQÉN
,ôNBG RÉ¡L ™e (áØ«Xh hCG) ÓªY CGóÑ«d Ée RÉ¡L OGóYEG ''øeGõàdG'' ßØd »æ©j
¢ùØæH ɪ¡cô– ™e ,âbƒdG ¢ùØf ‘ (áØ«XƒdG hCG) RÉ¡÷G Gòg ™e ∞bƒàjh
.´É≤jE’G áYô°S
Accomp 6
Arranger drums
π°Sôj ,´RƒŸG 𫨰ûJ äCGóH hCG EXR-46 OR OQƒÑ«c ≈∏Y âaõY ɪ∏µa
Gòg π°üJG GPEÉa .MIDI OUT êôfl ∫ÓN øe MIDI äÉeƒ∏©e ∑RÉ¡L
¢ùØf iôNC’G ádB’G ∂∏J ±õ©J ó≤a ,ôNBG RÉ¡L ‘ MIDI πNóÃ êôıG
.EXR-46 OR ΩÉ°ùbCG É¡aõ©J »àdG äɪ¨ædG
É¡dÉ°SQEG øµÁ á«≤«°SƒŸG äÉeƒ∏©ŸG ¿G …CG ,kÉ«ŸÉY IóMƒe …ó«e á¨d ¿G
∂d í«àJ É¡fCG ɪc ,äÓjOƒŸGh äÉcQÉŸG áØ∏àfl Iõ¡LCG ÚH É¡dÉÑ≤à°SEGh
.»LQÉN ô°ùfƒµ«°S hCG ôJƒ«ÑªµH EXR-46 OR RÉ¡L π«°UƒJ
.√ÉfOCG ÚÑe ƒg ɪc EXR-46 OR π«°UƒàH ºb
The EXR-46 OR receives data
External MIDI instrument/computer
EXR-46 OR
Split
Auto Bass
Accomp 2
Main
Accomp 3
Dual
Accomp 4
V-Link
V-Link
Melody Intell. (see p. 27)
Accomp 5
(
The EXR-46 OR transmits data
Main*)
(*) If you assign a Drum Set to the Main part.
—OR—
EXR-46 OR
(using the supplied USB cable)
Computer
…ó«ŸG áØ«Xh äGÒ¨àe
¢U ''(ΩÉY) äGõ«¡éàdG πjó©J'' ô¶fCG ,äGÒ¨àŸG √òg §Ñ°Vh QÉ«àNG π«°UÉØàd
.''MIDI'' áYƒª› ™e êQóæJ »¡a ,39
øe ∂LhôN Qƒa …ó«ŸG äGÒ¨àe áaÉc ßØM ºàj ,''Local'' AÉæãà°SÉH :á¶MÓe
.∞FÉXƒdG ™°Vh
Local »©°VƒŸG ºµëàdG ■
hCG π°Uh Ò¨àŸG Gòg ∂d í«àj (∫É°üJG :™æ°üŸG ™°Vh ,∫É°üØfG hCG ∫É°üJG)
IóMh ÚHh ,á¡L øe ¬∏é°ùeh EXR-46 OR OQƒÑ«c ÚH ábÓ©dG π°üa
.iôNCG á¡L øe á«∏NGódG 䃰üdG ≥«∏îJ
𫨰ûJ hCG OQƒÑ«µdG ±õY …ODƒj (™æ°üŸG ™°Vh) ''∫É°üJE’G'' ™°Vh ‘
''∫É°üØfE’G'' ™°Vh ‘ ÉeCG .áahõ©ŸG äɪ¨ædG äGƒ°UCG ´Éª°S ¤G πé°ùŸG
Gòg ¿CG ≈∏Y .»∏NGódG äGƒ°UC’G ≥∏fl ¤G …ó«ŸG πFÉ°SQ ∫É°SQEG ºàj Óa
The EXR-46 OR transmits and receives data
(*) If you connect the EXR-46 OR’s USB port to a computer, etc., the MIDI IN and
OUT ports are no longer used. This only works when the
icon is NOT
displayed.
Channels äGƒæ≤dG
,óMGh ¿BG ‘ IÉæb 16 ÈY äÉeƒ∏©ŸG ∫ÉÑ≤à°SGh ∫É°SQEG …ó«ŸÉH øµÁ
áãjó◊G ä’B’G º¶©eh ,óMGh âbh ‘ ádBG 16 ¤G π°üJ ä’BG ‘ ºµëà«a
áØ∏àfl á«æ◊ •ƒ£N ±õY É¡æµÁ …CG ä’B’G IOó©àe EXR-46 OR πãe
.(Multitimbral) kÉ©e áØ∏àfl äGƒ°UCG ΩGóîà°SÉH
46
EXR–46 OR
áfÉ£ÑdG 䃰Uh »°SÉ°SC’G 䃰ü∏G äGójó– ≈≤ÑJ
:TONE (x2)
*Ò«¨J ¿hóH »g ɪc ±RÉ©dG äGƒ°UCGh
»g ɪc á«dÉ◊G ´É≤jE’G áYô°S ᪫b ≈≤ÑJ
:TEMPO (x1)
Ò«¨J ¿hóH
START áØ«Xhh ´É≤jE’G áYô°S ᪫b ≈≤ÑJ
:TEMPO (x2)
.»g ɪc SYNC
.»g ɪc USRTrnsp πjƒëàdG äGõ«¡Œ ≈≤ÑJ :TRANSPOSE (x1)
ΩÉ≤ŸG QGQRCG ™°Vhh ,USRTrnsp äGõ«¡Œ ≈≤ÑJ :TRANSPOSE (x2)
.»g ɪc »bô°ûdG
䃰ü∏d ''Port'' h ''Mode'' äGõ«¡Œ ≈≤ÑJ :MONO/PORT (x1)
(41 ¢U) »g ɪc »°SÉ°SC’G
䃰ü∏d ''Port'' h ''Mode'' äGõ«¡Œ ≈≤ÑJ :MONO/PORT (x2)
.(41 ¢U) »g ɪc áfÉ£ÑdG 䃰Uh »°SÉ°SC’G
èeGôH óMCG ‘ kÉ°†jCG ßØ– (30 ¢U) ±RÉ©dG äGƒ°UCG QGQRCG äÉæ««©J (*)
.±RÉ©dG
ÖZôJ »àdG äGõ«¡éàdG ≈∏Y …ƒàëj …òdG ±RÉ©dG èeÉfôH ÎNG (2)
.É¡eGóîà°SÉH
âæc GPEG ôNBG ±RÉY èeÉfÈd ∑AÉYóà°SEG πÑb á«fÉK LOCK QR ÅØWCG (3)
.¬JGõ«¡Œ áaÉc ¤G áLÉëH
èeGôH ‘ áæ«©e äGõ«¡Œ OÉ©Ñà°SEG :â«ÑãàdG
±RÉ©dG
í«àJ ¿ÉàØ«Xh É¡æe πµd â«Ñãà∏d QGQRCG 5 ≈∏Y EXR-46 OR RÉ¡L …ƒàëj
.É¡«Yóà°ùJ »àdG ±RÉ©dG èeGôH øe áæ«©e äGõ«¡Œ OÉ©Ñà°SEG ∂d
èeÉfôH äGõ«¡Œ ΩGóîà°SG ≈∏Y ∑óYÉ°ùJ (''â«ÑãàdG'' hCG) äGÎ∏ØdG √òg
ióMC’ áªFÓe ¿ƒµJ ób äGõ«¡Œ ∫ɪgEG ∂æµÁ ¬fC’ ,ÈcCG á«∏YÉØH ±RÉ©dG
.ÉgÒ¨d áÑ°SÉæe ÒZ øµdh ÊÉZC’G
‘ ''A'' á«æZCÓd ±RÉY èeÉfôH ßØëH âªb ∂fG ¢VôaEG :∫ÉãŸG Gòg ∂«dEG
áªFÓe iôNC’G äGõ«¡éàdG πc ɪæ«H ,»°SÉ°SC’G 䃰ü∏d ''Mon'' ™°Vh
ΩGóîà°SG ∂«∏Y ÖLƒà«°S LOCK â«ÑãàdG Ò¨àe ¿hóH .''B'' á«æZCÓd kÉeÉ“
‘ øµdh ,''Pol'' ™°VƒdG ‘ »°SÉ°SC’G 䃰ü∏G ¬«a ¿ƒµj ôNBG ±RÉY èeÉfôH
øe øµªààd [MONO/PORT] QR 𫨰ûàd §≤a êÉà– EXR-46 OR RÉ¡L
.''A'' á«æZCÓd kÓ°UCG ó©ŸG ±RÉ©dG èeÉfôH ΩGóîà°SG
.É¡dɪgEÉH ÖZôJ »àdG äGõ«¡éà∏d ≥HÉ£ŸG LOCK QR §¨°VG (1)
...±RÉ©dG èeGôH óMC’ »∏©ØdG QÉ«àNCÓd
.(199~00) IôcGòdG QÉ«àN’ ᫪bôdG QGQRC’G Ωóîà°SG (2)
.QÉàıG ±RÉ©dG èeÉfôH äGõ«¡Œ AÉYóà°SEG ºà«°S
QÉ«àN’ [√][®] SELECT h FAMILY QGQRCG ΩGóîà°SG kÉ°†jCG ∂æµÁ :áßMÓe
.±RÉ©dG èeGôH
á«eÉeC’G áMƒ∏dG ‘) äGõ«¡éàdG óMCG ≈∏Y πjó©J AGôLÉH ∂eÉ«b Qƒa :áßMÓe
.¢†«eƒdÉH ±RÉ©dG èeÉfôH ºbQ CGóÑ«°S ,(∞FÉXƒdG áªFÉb ‘ hCG
DATA ENTRY äÉeƒ∏©ŸG ∫ÉNOEG º°ùb ‘ ''ÒÑc'' ôNBG QR …CG §¨°VG (3)
.™°VƒdG Gòg øe êhôî∏d
.±RÉ©dG èeÉfôH ‘ LOCK QGQRCG ™°Vh ßØM ºàj ’ :áßMÓe
≈∏Y ÚJôe hCG ,(Å°†«°S) IóMGh Iôe ÉeG ¬à£¨°VG ,¿ÉàØ«Xh QR πµd
:܃∏£ŸG Î∏ØdG §«°ûæàd (¢†eƒ«°S) áYô°ùHh ‹GƒàdG
áØ«XƒdG
±RÉ©∏d ôNBG èeÉfôH QÉàîJ ÉeóæY ´É≤jE’G Ò¨àj ’
¬«∏Y »g ɪc ábôØdG ≥°ùæeh ´É≤jE’G äGõ«¡Œ ≈≤ÑJ
QÉ«àNÉH áfÉ£ÑdG 䃰Uh »°SÉ°SC’G 䃰ü∏G Ωƒ≤j ’
.¬JÎNG …òdG ±RÉ©dG èeÉfôH ‘ áfõıG äGƒ°UC’G
45
çóMCG Ωóîà°ùj ∫GR Ée EXR-46 OR RÉ¡L ¿G ≈∏Y Å°†ŸG ºbôdG ∫ój
»æ©j Gòg,±RÉ©dG èeGôH áØ«Xƒd ∑QÉ«àNG πÑb É¡àjôLCG ájhój äÓjó©J
.É¡JÎNG IôcGP ôNBG »g √òg ¿CG §≤a
QR ≈∏Y ∂£¨°†Ña Gòd ,¬JGõ«¡Œ øe …CG ΩGóîà°SG kÉ«dÉM ºàj ’ ¬fCG ɪc
™°Vh øe êhôÿG ™«£à°ùJ ,äÉeƒ∏©ŸG ∫ÉNOEG º°ùb ‘ ''ÒÑc'' ôNBG
∂dP ôcòàJ ¿G ∂ª¡j óbh ,ájhó«dG ∂JGõ«¡Œ Ò«¨J ¿hO ±RÉ©dG èeGôH
⁄ hCG) CÉ£ÿG QõdG §¨°†H âªbh äGõ«¡éàdG √òg π«é°ùJ …ƒæJ âæc GPEG
.(±Éc âbƒd QõdG §¨°†J
QõdG
:STYLE (x1)
:STYLE (x2)
:TONE(x1)
r EXR–46 OR
±RÉ©dG èeGôH ΩGóîà°SG.13
.(39 ¢U) ∞FÉXƒdG áªFÉb ᣰSGƒHh RÉ¡é∏d á«eÉeC’G áMƒ∏dG ≈∏Y Égó©J »àdG kÉÑjô≤J äGõ«¡éàdG πc É¡«a ¿õîJ ¿G ∂æµÁ ,èeÉfôH 200 ÉgOóY ±RÉY èeGÈd ™°ùàJ IôcGP EXR-46 OR RÉ¡L …ƒëj
™°VƒdG QÉ«àNG
,13 ¢U OôØæŸG ƒfÉ«ÑdG ,15 ¢U ´RƒŸG) ™°Vƒ∏d ∑QÉ«àNG ßØM ºàj
.±RÉ©dG èeGôH óMCG πé°ùJ ÉeóæY (27 ¢U ƒfÉ«ÑdG ±RÉY
USER STL ±RÉ©dG IôcGPh ,±RÉ©dG èeGôH
,±RÉ©dG èeÉfôH áHÉàc πÑb ¬JÎNG »≤«°Sƒe ´É≤jEG ôNBG ßØM kÉ°†jCG ºàj
¿G øµÁ »àdGh USER STL IôcGP ≈∏Y kÉ°†jCG Gòg ≥Ñ£æjh
¢U) á«°†eƒdG IôcGòdG øe hCG ∂°ùjO øe ¬∏«ª– ” ´É≤jEG ≈∏Y …ƒà–
.(19
IôcGòdG ‘ 200 ÉgOóY ≠dÉÑdGh É¡∏c ±RÉ©dG èeGôH ßØM øµÁ
.áYƒªéªc floppy ∂°ùjO ≈∏Y hCG ,(49 ¢U) á«°†eƒdG
±RÉ©dG èeGôH óMCG QÉ«àNG
,IQÉàfl âdGR Ée ≥Ñ°S ɪ«a É¡JOóM »àdG ±RÉ©dG èeÉfôH IôcGP ¿G ™e
ádÉ◊G √òg ‘ ,iôNCG IôcGP QÉ«àNG ¤G äÉbhC’G ¢†©H ‘ êÉàëà°S ∂æµd
:áeRÓdG äGƒ£ÿG ∂«dEG
ádÉWEG ¿hO OÉà©ŸG §¨°†dÉH [USER¥PROGRAM/WRITE] QR §¨°VG (1)
.(≥Ñ°S Ée ô¶fCG) áHÉàµdG ™°Vh ¤G πNóà°S ’EGh
ƒd ''1'' ºbQ hCG ,¬JÎNG ±RÉY èeÉfôH ôNBG ºbQ ¿B’G á°TÉ°ûdG ≈∏Y ô¡¶j
.RÉ¡÷G 𫨰ûJ òæe kÉ›ÉfôH ÎîJ ⁄ âæc
:á«dÉàdG »g IôaƒàŸG RƒeôdG
_ ! # $ % & ’ - @ ^ ‘
0 1 2 3 4 5 6 7 8 9
A B C D E F G H I J K L M
N O P Q R S T U V W X Y Z
π≤àæj (RƒeôdG ∫ÉNOE’) ᫪bôdG QGQRC’G óMCG É¡«a §¨°†J Iôe πc :áßMÓe
.…ƒ∏ÿG ∞JÉ¡dG πª©j ɪc kÉeÉ“ ,á«dÉàdG áfÉÿG ¤G kÉ«FÉ≤∏J ô°TDƒŸG
RÉ¡L ¿C’ ±RÉ©dG èeGôH øª°V (46 ¢U) …ó«ŸG äGõ«¡Œ øjõîJ ºàj ’ :áßMÓe
.kÉ«FÉ≤∏J Égôcòàj EXR-46 OR
±RÉ©dG èeGôH ‘ ∂JGõ«¡Œ øjõîJ
øµJ ⁄ ƒd ≈àM á°UÉÿG ∂JGõ«¡Œ QGôªà°SÉH ßØ– ¿G ø°ùëà°ùŸG øe
’ ÉeóæY á≤HÉ°ùdG á∏MôŸG ¤G IOƒ©dG ∂d í«à«°S »∏MôŸG ßØ◊Éa ,á«FÉ¡f
.á≤MÓdG äÓjó©àdG ∂Ñé©J
[USER¥PROGRAM/WRITE] ±RÉ©dG èeGôH ≈∏Y øjõîàdG QR IÎØd §¨°VG (1)
."-Write'' ∫GDƒ°ùdG á°TÉ°ûdG ≈∏Y ô¡¶j
‘ ∂JGõ«¡Œ ßØ◊ [YES/+] QR ≈∏Y §¨°VG ,º°SE’G ∫ÉNOEG ó©H (5)
.IQÉàıG IôcGòdG
.(äGõ«¡éàdG √òg ßØëH ÖZôJ øµJ ⁄ GPEG [NO/–] QR §¨°VG)
.''Complete'' ádÉ°SQ ¿B’G á°TÉ°ûdG ≈∏Y ô¡¶J
±RÉ©dG èeGôH øjõîJ ∫ƒM äɶMÓe
±RÉ©dG èeGôH øe êhôÿG
DATA ENTRY äÉeƒ∏©ŸG ∫ÉNOEG º°ùb ‘ ''ÒÑc'' ôNBG QR …CG §¨°VG
.±RÉ©dG èeGôH øe êhôî∏d
Å°†ŸG ºbôdG ≈æ©e
»æ©j Gòg ,¢†eƒj ±RÉ©dG èeÉfôH ºbQ ¿G ßMÓJ ób ¿É«MC’G ¢†©H ‘
⁄ á«dÉ◊G äGõ«¡éàdG øµd ,kÉ£°ûf ∫GR Ée ¬JÎNEG ±RÉY èeÉfôH ôNBG ¿G
ÜÒØjôdG ôKDƒe ádÉM É¡æ«H øeh ,IôcGòdG ‘ áHƒàµŸG ∂∏àd á≤HÉ£e ó©J
.ïdG ,ΩÉ°ùbC’G óMC’ 䃰üdG Ió°T Ò«¨J ,¢SQƒµdG hCG
√òg π«é°ùàH í°üæf RÉ¡÷G ¥ÓZEG hCG ±RÉ©∏d ôNBG èeÉfôH QÉ«àNG πÑb
ó≤Øà°S ’EGh ,âÑZQ GPEG (√ÒZ hCG) ±RÉ©dG èeÉfôH ¢ùØf ‘ äGõ«¡éàdG
.äÓjó©àdG √òg
ßØëH ÖZôJ »àdG IôcGòdG ºbQ ∫ÉNOE’ [9]~[0] ᫪bôdG QGQRC’G Ωóîà°SG (2)
.á°TÉ°ûdG ≈∏Y YES IQÉ°TEG ¢†eƒJ É¡«a ∂JGõ«¡Œ
.ºbôdG ó«cCÉàd [YES/+] QR ≈∏Y §¨°VG (3)
.±RÉ©dG èeÉfôH ᫪°ùàd ᫪bôdG QGQRC’G Ωóîà°SG (4)
44
EXR–46 OR
Init FLASH á«°†eƒdG IôcGòdG π«µ°ûJ IOÉYEG ■
,EXR-46 OR RÉ¡÷ á«°†eƒdG IôcGòdG π«µ°ûJ IOÉYEÉH Ωƒ≤J áØ«XƒdG √òg
ÒZ á«°†eƒdG IôcGòdG ‘ äÉeƒ∏©ŸG íÑ°üJ ÉeóæY §≤a …Qhô°V Gògh
.IAhô≤e
äÉYÉ≤jE’Gh …ó«e äÉØ∏e áaÉc ƒfi ¤G …ODƒ«°S áØ«XƒdG √òg ò«ØæJ :á¶MÓe
.RÉ¡é∏d á«°†eƒdG á≤£æŸG ‘ á«≤«°SƒŸG
ádÉ°SQ ô¡¶J ,á«°†eƒdG YES ádÉ°Sôd áHÉéà°SCÓd [YES/+] QR §¨°VG
IOÉYEÉH AóÑ∏d [YES/+] QõdG §¨°VG .¢†«eƒdÉH YES ádÉ°SQ CGóÑJh Sure?
.(∂jCGQ Ò«¨àH âªb GPEG [NO/–] hCG) á«°†eƒdG IôcGòdG π«µ°ûJ
.áØ«XƒdG √òg øe êhôÿÉH RÉ¡÷G Ωƒ≤j Complete ádÉ°SQ Qƒ¡X ó©H
Resume ™æ°üŸG ™°Vh IOÉ©à°SG ■
EXR-46 OR RÉ¡÷ ™æ°üŸG äGõ«¡Œ IOÉ©à°S’ áØ«XƒdG √òg ÎNEG
™°Vh ‘ IOƒLƒŸG …ó«ŸG äGõ«¡Œ IOÉ©à°S’G áØ«Xh Ò¨J ød :á¶MÓe
.(47 ¢U) ∞FÉXƒdG
ô°TDƒe Qƒ¡X ó©Hh ,á«°†eƒdG YES ádÉ°Sôd áHÉéà°SCÓd [YES/+] QR §¨°VG
.áØ«XƒdG √òg IQOɨà RÉ¡÷G Ωƒ≤j Complete
’ Gòd ,ÒµØà∏d kÉàbh ∂∏¡Á ?''ócCÉàe âfCG πg'' kÉjó«cCÉJ k’GDƒ°S óŒ ød :á¶MÓe
RÉ¡÷G äGõ«¡Œ IOÉ©à°SG ójôJ ∂fCG kÉeÉ“ kÉ≤KGh âæc GPEG ’EG [YES/+] QR §¨°†J
.á«∏°UC’G
Pan SPLIT ô°ùjC’G º°ù≤dG 䃰U √ÉŒG ■
º°ù≤∏d ƒjΰùdG ™°Vh QÉ«àN’ (ôØ°U :™æ°üŸG ™°Vh ,Rnd,R63~0~L63)
kÉ«FGƒ°ûY Ò¨àj ƒjÒà°ùdG ™°Vh ¿G »æ©J ''Rnd'' ,(ÚàYɪ°ùdG ÚH) ô°ùjC’G
áYɪ°ùdÉH ¢üàîJ ''L'' ±ôëH CGóÑJ »àdG º«≤dGh ,É¡aõ©J ᪨f πc ™bƒŸ
áYɪ°ùdG ¢üîJ ''R'' ±ôëH CGóÑJ »àdG º«≤dGh ,∞°üàæŸG »æ©J "0" ,iô°ù«dG
.≈檫dG
ΩÉ≤ŸG äGÒ¨àe
Scale Tune ΩÉ≤ŸG áfRhO ■
∂d í«àJ áØ«XƒdG √òg (äɪ¨ædG áaɵd ôØ°U :™æ°üŸG ™°Vh ,63~64-)
,¿ƒàdG ±É°üfCG ≈∏Y á«æÑŸG (á«Hô¨dG) á«©«Ñ£dG äÉeÉ≤ŸG øY OÉ©àHC’G
áfRhO Ö«dÉ°SCG hCG á«≤«°Sƒe äÉaÉ≤K ™e ≥aGƒààd äɪ¨ædG OOôJ Ò«¨àH ∂dPh
QGQRCG ‘ áæ«©e äGõ«¡éàdG √ògh ,(ïdG ,∑hQÉÑdG ,á«bô°ûdG) iôNCG
.»bô°ûdG ΩÉ≤ŸG
, óMGh ±ÉàchCG ∫ÓN äɪ¨ædG πc OOôJ Ò«¨J ∂浪«°S ¬fCG ßMÓà°S
.º°SE’G ¢ùØf øe äɪ¨ædG áaÉc ≈∏Y ≥Ñ£J Éæg É¡H Ωƒ≤J »àdG äGõ«¡éàdGh
áLQO ™HQ kÉeÉ“ …hÉ°ùJ »àdG "50-" hCG "50" ᪫≤dG kÉÑdÉZ Ωóîà°ùà°S
IÒãe iôNCG äɣѰV óŒ óbh ,¢†ØÿG hCG ™aôdÉH (¿ƒJ 4/1) á«æ◊
.kÉ°†jCG
Scl Mode áfRhódG ™°Vh ■
√òg ∂d í«àJ (»°SÉ°SC’G :™æ°üŸG ™°Vh ,πµdG hCG »°SÉ°SC’G 䃰üdG)
ÉeEG »gh ,(√ÓYCG ô¶fCG) ΩÉ≤ŸG áfRhóH ôKCÉàà°S »àdG ΩÉ°ùbC’G ójó– áØ«XƒdG
.(''ALL'') ΩÉ°ùbC’G πc hCG (''MN'') »°SÉ°SC’G 䃰üdG
.''πµdG'' ™°Vh ΩGóîà°SG π°†aC’G øe ¿ƒµ«°S kÉfÉ«MCG
Pan MAIN »°SÉ°SC’G 䃰üdG º°ùb 䃰U √ÉŒG ■
ƒjΰùdG ™°Vh QÉ«àN’ (ôØ°U :™æ°üŸG ™°Vh ,R63~0~L63,Rnd)
Ò¨àj ƒjΰùdG ™°Vh ¿G »æ©J ''Rnd'' ,(ÚàYɪ°ùdG ÚH) »°SÉ°SC’G 䃰ü∏d
¢üàîJ ''L'' ±ôëH CGóÑJ »àdG º«≤dGh ,É¡aõ©J ᪨f πc ™bƒŸ kÉ«FGƒ°ûY
''R'' ±ôëH CGóÑJ »àdG º«≤dGh ,∞°üàæŸG »æ©J "0" ,iô°ù«dG áYɪ°ùdÉH
.≈檫dG áYɪ°ùdG ¢üîJ
Rev DUAL áfÉ£ÑdG 䃰U ÜÒØjQ ■
iƒà°ùe ójó– áØ«XƒdG √òg ∂d í«àJ (100 :™æ°üŸG ™°Vh ,127~ôØ°U)
äɪ¨f ≈∏Y áHƒ∏£ŸG ÜÒØjôdG ᫪c) áfÉ£ÑdG 䃰Ud ÜÒØjôdG ∫É°SQEG
.(áfÉ£ÑdG 䃰U
.ôKDƒŸG Gò¡H áfÉ£ÑdG 䃰U ôKCÉàj ’ »µd "0" ™°VƒdG ÎNEG
Chr DUAL áfÉ£ÑdG 䃰U ¢SQƒc ■
iƒà°ùe ójó– áØ«XƒdG √òg ∂d í«àJ (ôØ°U :™æ°üŸG ™°Vh ,127~ôØ°U)
äɪ¨f ≈∏Y áHƒ∏£ŸG ¢SQƒµdG ᫪c) áfÉ£ÑdG 䃰Ud ¢SQƒµdG ∫É°SQEG
.(áfÉ£ÑdG 䃰U
."0" ÒZ iôNCG ᪫b QÉ«àNEG ∂«∏Y ,ôKDƒŸG Gò¡H áfÉ£ÑdG 䃰U ôKCÉàj ¿CG äOQCG GPEG
Pan DUAL áfÉ£ÑdG º°ùb 䃰U √ÉŒG ■
䃰UdƒjÒà°ùdG ™°Vh QÉ«àN’ (ôØ°U :™æ°üŸG ™°Vh ,Rnd,R63~0~L63)
kÉ«FGƒ°ûY Ò¨àj ƒjÒà°ùdG ™°Vh ¿G »æ©J ''Rnd'' ,(ÚàYɪ°ùdG ÚH) áfÉ£ÑdG
áYɪ°ùdÉH ¢üàîJ ''L'' ±ôëH CGóÑJ »àdG º«≤dGh ,É¡aõ©J ᪨f πc ™bƒŸ
áYɪ°ùdG ¢üîJ ''R'' ±ôëH CGóÑJ »àdG º«≤dGh ,∞°üàæŸG »æ©J "0" ,iô°ù«dG
.≈檫dG
…ó«ŸG äGÒ¨àe
.46 ¢U ô¶fCG
ΩGóîà°SC’G äGÒ¨àe
LockInit ■
ájɪM áØ«XƒdG √òg ∂d í«àJ .(¢S On R ™æ°üŸG ™°Vh , On/Off)
≥jôW øY É¡∏«µ°ûJ IOÉYEG øe EXR-46 OR RÉ¡L ‘ á«°†eƒdG á≤£æŸG
ΩGóîà°SEG πÑb §≤a ¢S "Off" R ™°Vh ÎNEG .(‹ÉàdG Ò¨àŸG ô¶fCG) CÉ£ÿG
¤G Oƒ©j Ò¨àŸG Gòg ¿Éa ájRGÎMEG ÜÉÑ°SC’h .¢S "InitFLSH" R Ò¨àe
.RÉ¡÷G ¥ÓZEG iód ¢S "On" R ™°Vh
Ò¨àe kÉ≤Ñ°ùe QÉàîJ ¿G ¿hóH á«°†eƒdG á≤£æŸG π«µ°ûJ IOÉYÉH âÑZQ GPEG
𫨰ûàH Ωƒ≤J ɪæ«H [KEYBOARD¥TOUCH] QR §¨°VEG ,Gòg ΩGóîà°S’G
.¢S ”UNLCKFLS“ R ádÉ°SQ á°TÉ°ûdG ≈∏Y hóÑJ ÉgóæYh ,RÉ¡÷G
43
Rev SPLIT ô°ùjC’G º°ù≤dG ÜÒØjQ ■
iƒà°ùe ójó– áØ«XƒdG √òg ∂d í«àJ (100 :™æ°üŸG ™°Vh ,127~ôØ°U)
äɪ¨f ≈∏Y áHƒ∏£ŸG ÜÒØjôdG ᫪c) ô°ùjC’G º°ù≤∏d ÜÒØjôdG ∫É°SQEG
.(ô°ùjC’G º°ù≤dG
.ôKDƒŸG Gò¡H ô°ùjC’G º°ù≤dG ôKCÉàj ’ »µd "0" ™°VƒdG ÎNEG
Chr SPLIT ô°ùjC
C ’G º°ù≤dG ¢SQƒc ■
iƒà°ùe ójó– áØ«XƒdG √òg ∂d í«àJ (ôØ°U :™æ°üŸG ™°Vh ,127~ôØ°U)
äɪ¨f ≈∏Y áHƒ∏£ŸG ¢SQƒµdG ᫪c) ô°ùjC’G º°ù≤∏d ¢SQƒµdG ∫É°SQEG
.(ô°ùjC’G º°ù≤dG
."0" ÒZ iôNCG ᪫b QÉ«àNEG ∂«∏Y ,ôKDƒŸG Gò¡H ô°ùjC’G º°ù≤dG ôKCÉàj ¿CG äOQCG GPEG
r EXR–46 OR
á¶ë∏dG ∂∏J ‘ áahõ©ŸG äɪ¨ædG áaÉc 䃰U ôªà°ùjh á«dÉàdG á°†ÑædG
.(ᣰûf ''ArrHold'' áØ«Xh âfÉc GPEG §≤a)
ÉgóæY âªb »àdG á£≤ædG ¤G ´RƒŸG áYGPEG Oƒ©J ,ôNBG ∞dBÉJ ∂aõY óæYh
.∞dBÉàdG õ««“ á≤£æe ‘ í«JÉØŸG áaÉc ôjôëàH
QR ≈∏Y IÎØd §¨°†dG ∫ÓN øe Ò¨àŸG Gòg QÉ«àNG kÉ°†jCG øµÁ :á¶MÓe
.[SYNC¥START/STOP]
äGôKDƒŸG äGÒ¨àe
Rev ÜÒØjôdG ´ƒf ■
ɪc ÜÒØjôdG ´ƒf Ò«¨àd áØ«XƒdG √òg Ωóîà°SG (2 áYÉb :™æ°üŸG QÉ«àNG)
.(36 ¢U) ÜÒØjôdG èdÉ©e ¥ÓZE’ hCG ,∑É≤«°Sƒe ºFÓj
Chr ¢SQƒµdG ´ƒf ■
hCG ,¢SQƒµdG 䃰U Ò«¨àd áØ«XƒdG √òg Ωóîà°SG (3 ¢SQƒc :™æ°üŸG ™°Vh)
.(37 ¢U) ¢SQƒµdG èdÉ©e ¥ÓZC’
MFX á«Jƒ°üdG äGôKDƒŸG ´ƒf ■
´ƒf Ò«¨àd Ωóîà°ùJ áØ«XƒdG √òg (IQGhódG áYɪ°ùdG :™æ°üŸG ™°Vh)
QÉ«àNEG (.35 ¢U ô¶fCG ,π«°UÉØàdG øe ójõŸ) IOó©àŸG á«Jƒ°üdG äGôKDƒŸG
.≥∏¨e á«Jƒ°üdG äGôKDƒŸG èdÉ©e ¿G »æ©j ''Off'' ™°VƒdG
øë∏dG QÉ«àNÉH »Jƒ°üdG ôKDƒŸG ´ƒf QÉ«àNG §HQ ¿Éµe’ÉH :á¶MÓe
.»°SÉ°SC’G 䃰ü∏d
Tone MFX 䃰üdÉH IOó©àŸG äGôKDƒŸG §HQ ■
∑QÉ«àNG §HQ áØ«XƒdG √òg ∂d í«àJ (§°ûf :™æ°üŸG ™°Vh ,CÉØ£e/§°ûf)
ôKDƒe §ÑJÒa ,√QÉàîJ …òdG »°SÉ°SC’G 䃰üdÉH IOó©àŸG äGôKDƒŸG øe ´ƒæd
,øZQC’G ™e IQGhódG áYɪ°ùdG ôKDƒeh ,∑hôdG QÉà«L 䃰U ™e ¬jƒ°ûàdG
.Gòµgh
Rev MAIN »°SÉ°SC’G 䃰üdG ÜÒØjQ ■
iƒà°ùe ójó– áØ«XƒdG √òg ∂d í«àJ (100 :™æ°üŸG ™°Vh ,127~0 ôØ°U)
äɪ¨f ≈∏Y áHƒ∏£ŸG ÜÒØjôdG ᫪c) »°SÉ°SC’G 䃰ü∏d ÜÒØjôdG ∫É°SQEG
Gò¡H »°SÉ°SC’G 䃰üdG ôKCÉàj ’ »µd "0" ™°VƒdG ÎNEG .(»°SÉ°SC’G 䃰üdG
.ôKDƒŸG
Chr MAIN »°SÉ°SC’G 䃰üdG ¢SQƒc ■
iƒà°ùe ójó– áØ«XƒdG √òg ∂d í«àJ (ôØ°U :™æ°üŸG ™°Vh ,127~0 ôØ°U)
äɪ¨f ≈∏Y áHƒ∏£ŸG ¢SQƒµdG ᫪c) »°SÉ°SC’G 䃰ü∏d ¢SQƒµdG ∫É°SQEG
∂«∏Y ,ôKDƒŸG Gò¡H »°SÉ°SC’G 䃰üdG ôKCÉàj ¿CG äOQCG GPEG .(»°SÉ°SC’G 䃰üdG
èdÉ©e ¿ƒµj ÉeóæY §≤a Ò¨àŸG Gòg Ωóîà°ùj ."0" ÒZ iôNCG ᪫b QÉ«àNEG
.''Off'' kÉ≤∏¨e äGôKDƒŸG
á©bGƒdG (í«JÉØŸG hCG) ìÉàت∏d ∑ôjô– Qƒa ±õ©dG øY ∞bƒàJ (ÖMÉ°üŸG
.∫ƒÑ£dG áÑMÉ°üe ™e §≤a ∂cÎj ɇ ,OQƒÑ«µdG øe ô°ùjC’G ∞°üædG ‘
.EXR-46 OR RÉ¡L π¨°ûJ ɪ∏c §°ûæJ áØ«XƒdG √òg ¿CÉa ,∂àMGQ πLCG øeh
EP Chord ¢UÉÑdGh äÉjôJƒdG ∞dBÉJ ■
(᫪«∏©àdG ¢VGôZÓd) áØ«XƒdG √òg (§°ûf :™æ°üŸG ™°Vh - ÉØ£e hG §°ûf)
´RƒŸG ô°TDƒe AÉ°VG ɪ∏c (᪨ædG …OÉMCG) ¢UÉH +äÉjôJh 䃰U π¨°ûJ
. §≤a ´RƒŸG ±É≤jG AÉæKG øµd ,
™°Vh ‘ iô°ù«dG ∑ó«H ¢UÉÑdG ™e äÉØdÉJ ±õ©àd RÉ¡÷G Å«¡j Gòg
√òg äCÉØWG ƒd ,EXR-46 0R øe äÉÑMÉ°üe ΩGóîà°SG ¿hóH ,´RƒŸG
ƒd OQƒÑ«µdG øe ô°ùj’G ∞°üædG 䃰U »¨∏J (ádÉ◊G √òg ‘) âfÉa áØ«XƒdG
.kÉ°†jG CÉØ£e ΩÉ°ù≤f’G ô°TDƒe ¿Éc
Bass Inv ¢UÉÑdG ÜÓ≤fEG ■
´RƒŸG É¡«a CGô≤j »àdG á≤jô£dG Ò«¨àd áØ«XƒdG √òg Ωóîà°SG (§°ûf/CÉØ£e)
.(28 ¢U ô¶fCG) É¡aõ©J »àdG äÉØdBÉàdG
MI »æë∏dG AÉcò∏d Ωóîà°ùŸG ʃeQÉ¡dG ´ƒf ■
ʃeQÉ¡dG ´ƒf Ò«¨àd áØ«XƒdG Ωóîà°SG (…ó«∏≤àdG :™æ°üŸG ™°Vh)
.»æë∏dG AÉcòdG ‘ Ωóîà°ùŸG
QR ≈∏Y IÎØd §¨°†dÉH áØ«XƒdG √òg QÉ«àNG øµÁ :á¶MÓe
.(27 ¢U ô¶fCG) [MELODY¥INTELLIGENCE]
InEnCHRD äÉØdBÉàdG ≈∏Y ±ô©àdG ■
áØ«Xh ¥ÓZEÉH Ò¨àŸG Gòg ∂d íª°ùj (CÉØ£e :™æ°üŸG ™°Vh ,CÉØ£e/§°ûf)
™°Vh ‘ QÉàıG ´É≤jE’G á“ÉNh áeó≤e ‘ äÉØdBÉàdG ≈∏Y ±ô©àdG
.''ƒfÉ«ÑdG ±RÉY''
áeó≤ŸG ΩÉ°ùbCG ¿Éa ,(á©jƒæàdGh ,»∏°UC’G) á«©«Ñ£dG ΩÉ°ùbC’G ±ÓîHh
äÎNG GPEGh ,á«fƒeQÉg äGÒ¨J ≈∏Y …ƒà– (Ending h Intro) á“ÉÿGh
áYGPEG ∫ÓN ᣰûf ∞dBÉàdG ≈∏Y ±ô©àdG áØ«Xh ¿ƒµà°ùa ''Off'' ™°VƒdG
,ôNBG ¤G ìÉàØe øe õØ≤J áÑMÉ°üŸG π©éj ób ɇ ,ájÉ¡ædGh áeó≤ŸG º°ùb
.''On'' ™°VƒdG ÎNEG ∂dP Öæéàdh
Sync Stop »FÉ≤∏àdG ∞bƒdG Ωɶf ■
∞«c ójó– Ò¨àŸG Gòg ∂d í«àH (CÉØ£e :™æ°üŸG ™°Vh ,CÉØ£e /§°ûf)
äOQCG GPEG ''Nor'' ™°VƒdG ÎNEG ,»FÉ≤∏àdG ∞bƒ∏d SYNC ATOP áØ«Xh πª©J
äÉØdBÉàdG õ««“ á≤£æe ‘ í«JÉØŸG áaɵd ∑ôjô– Qƒa ´RƒŸG ∞bƒàj ¿CG
±RÉY'' ™°Vh ‘ ¬∏ªcCÉH OQƒÑ«µdGh ,''´RƒŸG'' ™°Vh ‘ ô°ùjC’G ÖfÉ÷G)
‘ É¡©°Vh ó«©à°ùJ ´RƒŸG áYGPEG ¿CÉa ,ôNBG ∞dBÉàd ∂aõY óæYh .(''ƒfÉ«ÑdG
.QÉàıG ´É≤jE’G º°ùb ájGóH
QôM ºK ,(16¢U) SYNC STOP áØ«Xh 𫨰ûàH ºb ,''Int'' ™°Vh äÎNEG GPEG
óæY ´RƒŸG ∞bƒàj ÉgóæY ,äÉØdBÉàdG õ««“ á≤£æe ‘ í«JÉØŸG áaÉc
䃰üdG Ió°T :16~1 á«æZC’G ■
á°UÉÿG äÉcGÎdG ‘ √òg 䃰üdG Ió°T äGÒ¨àe Ωóîà°ùJ (63~0~64-)
Ò«¨àH ÖZôJ ób ä’É◊G º¶©e ‘h ,É¡àYGPEÉH kÉ«dÉM Ωƒ≤J »àdG á«æZCÓd
.(∫ƒÑ£dG) 10 hCG ,(¢UÉÑdG) 2 ,(øë∏dG) 4 ∑GÎ∏d 䃰üdG Ió°T
hCG ájɨ∏d ™ØJôe ¿ƒµj (16~9,11~1,5) ôNBG ∑GôJ OÉéjCG ¥ô¨à°ùj óbh
¢ù«d ¿G ôcòJh ,kÉ«Ñ°ùf ähÉØàe º¡eGóîà°SG ¿C’ ,âbƒdG ¢†©H ájɨ∏d ºYÉf
IôaƒàŸG ô°ûY áà°ùdG äÉcGÎdG ™«ªL Ωóîà°ùJ á«°SÉ«≤dG …ó«e äÉØ∏e πc
…ODƒj ’ ób 16 ∑GÎ∏d 䃰üdG Ió°T Ò«¨J ¿CÉa ∫ÉãŸG π«Ñ°S ≈∏Yh Gòµgh)
.(´ƒª°ùe Ò¨J …CG ¤G
hCG (á«Ñ∏°ùdG º«≤dG) É¡MôW ºàj Éæg Égõ¡Œ »àdG ᪫≤dÉa :á«Ñ°ùf äGÒ¨àe √ògh
.á«æZC’G ΩÉ°ùbCG 䃰U Ió°T ¤G (á«HÉéjE’G º«≤dG) É¡àaÉ°VEG
Gòd ,''127'' ƒg (á«°SÉ«≤dG …ó«e äÉØ∏e √Oó– …òdGh) ≈∏YC’G ó◊G ¿G ßM’
™bGƒdG ‘ ¬fC’) äÉcGÎdG óMC’ 䃰üdG Ió°T IOÉjR π«ëà°ùŸG øe ¿ƒµj ó≤a
.(''127'' ó◊G Ωóîà°ùj
.¬«∏Y »g Ée ≈∏Y ∑GÎdG 䃰U Ió°T AÉ≤HEG äOQCG GPEG ''0'' ÎNEG
,á«æZC’G äÉeƒ∏©e ™e Éæg É¡H Ωƒ≤J »àdG äGÒ«¨àdG ßØM ∂«∏Y ¿CG ßM’
±ô©à∏d 54,49 ¢U ô¶fCG) ±RÉ©dG èeGôH óMCG ‘ É¡¶ØM ºàj ’ ¬fCG å«M
.(ÊÉZC’G ßØM á«Ø«c ≈∏Y
´RƒŸG äGõ«¡Œ äGÒ¨àe
ChordInt ´RƒŸG ∞dBÉJ AÉcP ■
QÉ«àNÉH Ò¨àŸG Gòg ∂d íª°ùj (Md1 :™æ°üŸG ™°Vh ,Off ,Md2 ,Md1)
óf’hQ Ωɶf :EXR-46 OR RÉ¡L ¬eóîà°ù«°S …òdG »ØdBÉàdG AÉcòdG Ωɶf
hCG ,(??? ¢U ô¶fCG) ,᫪«∏©àdG á«MÉædG øe á°UÉN ᫪gCG ¬d …òdGh ''Md1''
:»∏j ɪc ¬eGóîà°SG øµÁ …òdGh ''Md2'' Ωɶf
.∞dBÉàdG π°UC’ ≥HÉ£ŸG QõdG §¨°VG
.π°UC’G QÉ°ùj ¤G Oƒ°SCG ìÉàØe …CG + π°UC’G
.π°UC’G QÉ°ùj ¤G ¢†«HCG ìÉàØe …CG + π°UC’G
…CG + QÉ°ù«dG ¤G Oƒ°SCG ìÉàØe …CG + π°UC’G
.QÉ°ù«dG ¤G ¢†«HCG ìÉàØe
:ÒÑc ∞dBÉJ
:Ò¨°U ∞dBÉJ
:™HÉ°S ∞dBÉJ
:Ò¨°U ™HÉ°S ∞dBÉJ
∫ƒ°üë∏d »Øµj §≤a í«JÉØe á©°†H ≈∏Y §¨°†dG ¿CÉa ,∫GƒMC’G áaÉc ‘h
∂æµÁ ,á∏eɵdG äÉØdBÉàdG ±õY ≈∏Y kGOÉà©e âæc GPEGh .á∏eÉc äÉØdBÉJ ≈∏Y
.áØ«XƒdG √òg ¥ÓZEG
ArrHold ´RƒŸG QGôªà°SG ■
äÉØdBÉàdG ´RƒŸG QGôªà°SG áØ«Xh ßØ– (§°ûf :™æ°üŸG ™°Vh ,§°ûf/CÉØ£e)
≈àM á≤HÉ£ŸG äɪ¨ædG ±õY ‘ ôªà°ùJh ,iô°ù«dG ∑ó«H É¡aõ©J »àdG
.ôNBG ∞dBÉJ ±õ©J
»FÉ≤∏àdG ¢UÉÑdG) ´Rƒª∏d á«æë∏dG ΩÉ°ùbC’G ¿CÉa ,áØ«XƒdG √òg äCÉØWCG GPEGh
42
EXR–46 OR
䃰üdG Ió°T äGÒ¨àe
Volume ájhó«dG ΩÉ°ùb’G 䃰U Ió°T ■
(100 ô°ùjC’G º°ù≤dG ,110 áfÉ£ÑdG ,127 »°SÉ°SC’G :™æ°üŸG ™°Vh ,127~0)
ôKDƒJ ød âfÉc ¿Gh , ΩÉ°ùb’G √òg 䃰U Ió°T §Ñ°†d áØ«XƒdG √òg Ωóîà°SG
á«æZ’G hCG ´RƒŸG ΩÉ°ùbCG äGƒ°UCG Ió°T ™aôd [ACCOMP] QR âeóîà°SG ƒd
. ≈°üb’G óë∏d
QR ≈∏Y §¨°†dG ∫ÓN øe áfÉ£ÑdG 䃰U Ió°ûH ºµëàdG É°†jG ∂æµÁ :á¶MÓe
[KEYBOARD] hCG [ACCOMP] QR ≈∏Y ¬°ùØf âbƒdG ‘ §¨°†dGh IÎØd [DUAL]
.[SPLIT] Cô°ùjC’G º°ù≤dG ≈∏Y ¬°ùØf Å°ûdG ≥Ñ£æjh
:¬Jƒ°U Ió°Th ¬àdÉM Auto Bass »µ«JÉeƒJh’G ¢UÉÑdG ■
OQƒÑ«µdG º«°ù≤J §«°ûæàH âªb ɪ∏c (CÉØ£e :™æ°üŸG ™°Vh ,127~0 ,CÉØ£e)
…òdGh »µ«JÉeƒJh’G ¢UÉÑdG 䃰U Ió°T §Ñ°V áØ«XƒdG √òg ∂d í«àà°S
áØ«Xh âfÉc ƒd ,É¡aõ©J »àdG äÉØdBÉàdG ≈∏Y AÉæH ¢UÉÑdG äɪ¨f ±õ©j
᪨ædG »µ«JÉeƒJ’G ¢UÉÑdG º°ùb ±õ©«°ùa (28¢U) ICÉØ£e ¢UÉÑdG ÜÓ≤fG
ΩGóîà°SÉH) OQƒÑ«µdG øe ô°ùj’G ∞°üædG ≈∏Y ¬aõ©J. ∞dBÉJ πµd ájQò÷G
º°ùb ¤G »µ«JÉeƒJh’G ¢UÉÑdG º°ùb áaÉ°VG øµÁh .(OQƒÑ«µdG º«°ù≤J
øµÁh . º°ù≤dG Gò¡d óYGƒ≤dG ¢ùØf ´ÉÑJÉH Ωƒ≤j ºK , (πØ°S’G ô¶fG) äÉØdBÉàdG
ΩGóîà°S’ IóM ≈∏Y »µ«JÉeƒJh’G ¢UÉÑdG ádÉMh 䃰U øe πc OGóYG
oFF ÎNG ÚàdÉ◊G Éà∏c ‘h ,Chord äÉØdBÉàdGh ,SPLIT OQƒÑ«µdG º«°ù≤J
. »µ«JÉeƒJ’G ¢UÉÑdG º°ùb ¤G áLÉëH øµJ ⁄ GPG
áÑMÉ°üŸGh ¢UÉÑdGh ´É≤j’G äÉcGôJ 䃰U Ió°T ■
:AccDrums ,AccBass ,Accomp 1~Accomp6:volume
= áÑMÉ°üŸGh ,100 = ¢UÉÑdG ,100 = ∫ƒÑ£dG :™æ°üŸG ™°Vh ,127~0)
. ¬KÓãdG ¬YhôØH ´É≤j’G 䃰U Ió°T §Ñ°†d áØ«XƒdG √òg Ωóîà°SG (100
.(πµc) áÑMÉ°üŸGh ¢UÉÑdGh ∫ƒÑ£dG
´É≤jÓd »∏°U’G èjõŸG ¿G âjCÉJQG GPG áØ«XƒdG √òg ΩGóîà°SG ∂æµÁ
.ΩGôjÉe ≈∏Y ¢ù«d QÉàıG
41
ΩƒfhΟG äGÒ¨àe
Metro TS ΩƒfhΪ∏d »æeõdG ¿Gõ«ŸG ■
¿Gõ«ŸG Ò«¨àd áØ«XƒdG √òg (4/4 ™æ°üŸG ™°Vh 8/9~8/1 ,4/9~4/1)
¿Gõ«ŸG Gòg ¿G ¢ùæJ ’h ,(IQhRÉŸG ‘ äGô≤ædG OóY) ΩƒfhΪ∏d »æeõdG
ΩƒfhΟG ΩGóîà°SG á«Ø«µd .∞∏àfl ¿Gõ«e hP ÉYÉ≤jG äÎNG ɪ∏c Ò¨àj
§¨°†H É°†jG áØ«XƒdG √òg QÉ«àNG ∂æµÁ ɪc .(14 ¢U ô¶fG)
.IÎØd [METRONOME]
MetroVol ΩƒfhΟG 䃰U Ió°T ■
Ió°T §Ñ°†d áØ«XƒdG √òg Ωóîà°SG (100: ™æ°üŸG ™°Vh ,127~ ôØ°U)
. GóL áªFÓe á›ÈŸG ᪫≤dG ¿G ≈∏Y ≈≤«°Sƒª∏d áÑ°ùædÉH ΩƒfhΟG 䃰U
Count-In …󫡪àdG ó©dG ■
óY AÉØWEG hCG 𫨰ûàd áØ«XƒdG √òg (CÉØ£e :™æ°üŸG ™°Vh ,CÉØ£e/§°ûf)
.(25 ¢U) π«é°ùàdG í«ë°üJ hCG π«é°ùàdG πÑb ΩƒfhΟG
8 …CG) Úàjó«¡“ ÚJQhRÉe ΩƒfhΟG ™jò«°S Ò¨àŸG Gòg 𫨰ûJ óæYh
.(4/4 »æeõdG É¡fGõ«e á«æZCG ‘ äGô≤f
±ÉàchC’G äGÒ¨àe
ájhó«dG OQƒÑ«µdG ΩÉ°ùbCG ±ÉàchCG §Ñ°V ■
áKÓãdG äGÒ¨àŸG √òg ∂d í«àJ (ôØ°U : ™æ°üŸG ™°Vh ,4 ~ ôØ°U ~4-)
ó«Øj ób ɇ .±ÉàchG 4 ≈°übG óëH QÉàıG º°ù≤dG ±ÉàchG ¢†ØN hG ™aQ
Gòg ≥«≤ëàd . É©e ÚØ∏àfl ÚaÉàchG ≈∏Y ±õ©j ƒfÉ«H 䃰üd êÉà– ÚM
ºK áfÉ£ÑdGh »°SÉ°SC’G 䃰ü∏d (䃰üdG ¢ùØf hG) ƒfÉ«ÑdG ád’ ÚJƒ°U ÎNG
.1 hCG 1- ¤G DUAL Octv §Ñ°VGh áfÉ£ÑdG 䃰U π¨°T
áLQO ∫ƒëàJ ’ ,»°SÉ°SC’G 䃰ü∏G ‘ ∫ƒÑW áYƒª› Ú«©J óæY: á¶MÓe
ô≤f/∫ƒÑW äGƒ°UC’ í«JÉØŸG ΩGóîà°SG ºàj ∂dP øe k’óHh ,ô≤ædG/∫ƒÑ£dG
.(IÒ¨àe) iôNCG
…Qƒ¡÷G πÑ£dG ±õY øµÁ ,"1-" ᪫b ≈∏Y »°ù«FôdG ±ÉàchC’G Ò«©J ó©H :∫Éãe
iôNC’G äGƒ°UC’G ¿ƒµJ ɪæ«H ,(C2 øe k’óH) C3 ìÉàØŸG ᣰSGƒH (Bass Drum)
.C3 ìÉàØŸG QÉ°ùj ¤G áMÉàe
∫ƒÑ£dG áMƒd äGÒ¨àe
í«JÉØŸ ô≤ædG/∫ƒÑ£dG äGƒ°UCG QÉ«àNEG áYƒªÛG √òg ‘ äGÒ¨àŸG ∂d í«àJ
™°Vh 𫨰ûJ óæY äGQÉ«àN’G √òg ΩGóîà°SEG ºàjh ,á«fɪãdG ∫ƒÑ£dG áMƒd
.(32 áëØ°U ô¶fCG) ∫ƒÑ£dG áMƒd
ádÉ°SôdG ∫óJ ,¬ÑZôJ …òdG Ò¨àŸG QÉ«àN’ SELECT [√][®] QGQRCG Ωóîà°SEG •
áYƒª› ¤G (dK1~dK8) ¢S ”dK“ R äGÒ¨àe ÚÁ ≈∏Y ô¡¶J »àdG
áMƒd ìÉàØe ‘ ‘ kÉ«dÉM Ωóîà°ùŸG 䃰üdG ≈∏Y …ƒà– »àdG ∫ƒÑ£dG
.(±ÉàchCG ≈∏YCG 1~8) ∫ƒÑ£dG
:‹ÉàdG ƒëædG ≈∏Y á°TÉ°ûdG hóÑJ ¢S ”dK“ R äGÒ¨àe óMC’ ∑QÉ«àNEG óæYh
≈fOC’ iôNCG ∫ƒÑW áYƒª› QÉ«àNEG ∂fɵeÉH ¿G »æ©J IQÉ°T’G √òg)
äÉYƒª›R ô¶fCG .(”1“ ºbQ ìÉàØŸG …CG ,∫ƒÑ£dG áMƒd ‘ ìÉàØe
.IôaƒàŸG ∫ƒÑ£dG äÉYƒª› ≈∏Y ±ô©à∏d (120 ¢U) ¢ùdƒÑ£dG
áYƒª› QÉ«àN’ DATA ENTRY [–][+] äÉfÉ«ÑdG ∫ÉNOEG QGQRCG Ωóîà°SEG •
.¬eGóîà°SÉH ÖZôJ …òdG 䃰üdG …ƒ– »àdG ∫ƒÑ£dG
πªëj …òdG (1~8) ∫ƒÑ£dG áMƒd Ò¨àe QÉ«àN’ SELECT [®] QR §¨°VEG •
.ƒà∏d ¬JÒZ …òdG ¢S ”dK“ R Ò¨àŸG ºbQ ¢ùØf
.¢S1 ∫ƒÑ£dG áMƒdR ¿ƒµ«°S Ò¨àŸG √ÓYCG ∫ÉãŸG ‘
DrumPad1
kÉØ∏àfl kÉJƒ°U 128 ≈∏Y …ƒà– ∫ƒÑ£dG øe áYƒª› πc ¿G ôcòJ óbh
äGƒ°UC’G √òg øe §≤a óMGh 䃰U Ú«©J øµÁh ,ô≤ædG/∫ƒÑ£dG øe
¿B’G Ωƒ≤à°S âfCÉa ÒcòàdG πLCG øeh) ∫ƒÑ£dG áMƒd ‘ ìÉàØe πµd
ºbôdG ∫ój .(∫ƒÑ£dG áMƒd ‘ ¢S1R ºbQ ìÉàت∏d äGƒ°UC’G óMCG QÉ«àNÉH
¢S ”036“ R ºbôdG πãÁ å«M ,áJƒædG ºbQ ≈∏Y QÉ°ù«dG ≈∏Y OƒLƒŸG
.É¡©Ñàj Éeh 120.¢U ºFGƒ≤dG ô¶fCG ,¢S ”Kick 2“ R 䃰üdG
ÖZôJ …òdG 䃰üdG ºbQ QÉ«àN’ DATA ENTRY [–][+] QGQRCG Ωóîà°SEG •
.¬æ««©àH
…òdG ‹ÉàdG ∫ƒÑ£dG áMƒd Ò¨àe QÉ«àN’ SELECT [√][®] QGQRCG Ωóîà°SEG •
.á≤HÉ°ùdG äGƒ£ÿG óYCGh √Ò«¨àH ÖZôJ
™«£à°ùJ å«ëH ±RÉ©dG èeÉfôH ‘ äGõ«¡éàdG √òg ßØM øµÁ :á¶MÓe
.∞∏àfl QÉ«àNEG 200 á›ôH (πbC’G ≈∏Y kÉjô¶f)
r EXR–46 OR
hCG 𫨰ûàd Ωó≤dG á°SGhO ΩGóîà°SG øµÁ :Punch I/O π«é°ùàdG í«ë°üJ
.(25 ¢U ô¶fCG) πé°ùŸG πNGO π«é°ùàdG í«ë°üJ áØ«Xh ¥ÓZEG
Port Main »°SÉ°SC’G 䃰ü∏d »éjQóàdG ∫É≤àf’G ■
Portamento »éjQóàdG ∫É≤àfE’G (CÉØ£e:™æ°üŸG ™°Vh ,127~1 , CÉØ£e)
,É¡aõ©J »àdG ΩɨfC’G ÚH øë∏dG áLQO ‘ á«éjQóJ äGÒ¨J Qó°üj ôKDƒe ƒg
᪨ædG áLQO ¤G ∫ƒ°Uƒ∏d ܃∏£ŸG âbƒdG OGOREG ɪ∏c ᪫≤dG äOGOREG ɪ∏ch
.Iójó÷G
∑Éæg) »°SÉ°SC’G 䃰ü∏d kÉ©e øjÒ¨àe õ«¡éàH Ò¨àŸG Gòg ∂d íª°ùjh
∫É≤àfE’G øeRh »éjQóàdG ∫É≤àfE’G ìÉàØe :(»FÉæãdG ±õ©∏d ¿ÉK Ò¨àe
.»éjQóàdG
õ¡› ¿ƒµj ∫É≤àfE’G ìÉàØe ¿CÉa ,"127" h "1" ÚH ᪫b QÉàîJ ÉeóæYh
.(127) "on" ™°VƒdG ≈∏Y kÉ«FÉ≤∏J
Port Dual
áfÉ£ÑdG 䃰üd »éjQóàdG ∫É≤àf’G ■
øjÒ¨àe õ«¡Œ Ò¨àŸG Gòg ∂d í«àj (CÉØ£e :™æ°üŸG ™°Vh ,127~1 ,CÉØ£e)
∫É≤àfE’G øeRh »éjQóàdG ∫É≤àfE’G ìÉàØe :óMGh ¿BG ‘ áfÉ£ÑdG 䃰üd
.(ìô°û∏d √ÓYCG ô¶fCG) »éjQóàdG
Mode Main
»°SÉ°SC’G 䃰üdG ™°Vh ■
SpltInt ´RƒŸG ∞dÉJ AÉcP ■
∂浪«°S áØ«XƒdG √òg §«°ûæJ óæY (CÉØ£e : ™æ°üŸG ™°Vh , §°ûf hCG CÉØ£e)
§¨°†dÉH Ò¨°üdG ∞dBÉàdGh óMGh ìÉàØe ≈∏Y §¨°†dÉH »°ù«FôdG ∞dBÉàdG ±õY
.í«JÉØe 3 ≈∏Y §¨°†dÉH Gó«≤©J Ìc’G äÉØdBÉàdGh ÚMÉàØe ≈∏Y
∂eGóîà°SG iód "On" QÉ«àNG Öëà°ùj Gòd ,´RƒŸG ºµëàd ΩɶædG Gòg ™Ñàjh
.á°TÉ°ûdG ≈∏Y
ô°TDƒŸG ô¡¶j ɪæ«Hh OQƒÑ«µdG º«°ù≤àd
Ωó≤dG á°SGhO ∞FÉXh ójó– ■
(Sustain QGôªà°SC’G :™æ°üŸG ™°Vh)
πNóe ¤G (BOSS FS-5U,DP-6,DP-2) á«aÉ°VEG Ωób á°SGhO π«°UƒJ ó©H
Ò¨àŸG Gòg ΩGóîà°SG ∂æµÁ ,RÉ¡é∏d á«Ø∏ÿG áMƒ∏dG ≈∏Y Ωó≤dG á°SGhO
.Ωó≤dG á°SGhO áØ«Xh Ú«©àd
áØ«XƒdG √òg ∂d í«àJh ,''AÉ≤HE’G'' kÉ°†jCG ≈ª°ùJh :Sustain QGôªà°SC’G
ɪ∏ãe ,OQƒÑ«µdG ≈∏Y É¡aõ©J »àdG äɪ¨ædG ádÉWE’ Ωó≤dG á°SGhO ΩGóîà°SG
.ƒfÉ«ÑdG á°SGhO ‘ çóëj
ÒѵdG ƒfÉ«ÑdG á°SGhóc á°SGhódG πª©à°S :Sostenut »FÉ≤àfE’G QGôªà°SE’G
§¨°V á¶◊ É¡àaõY »àdG äɪ¨ædG ∂∏J §≤a π«£J ∂∏©Œ »àdG ,≈£°SƒdG
.á°SGhódG
.ájhó«dG OQƒÑ«µdG ΩÉ°ùbCG ™e §≤a áØ«XƒdG √òg πª©J :á¶MÓe
Ò¨àŸG Gòg ∂d í«àj (Oó©àe :™æ°üŸG ™°Vh ,(äGƒ°UC’G) Oó©àe/…OÉMCG)
hCG (Mon) ájOÉMCG äɪ¨f ±õ©«°S »°SÉ°SC’G 䃰üdG ¿Éc GPEG ɪ«a ójó–
∂fɵeÉH ¿G »æ©J äGƒ°UC’G IOó©àŸG äɪ¨ædG .äGƒ°UC’G (Pol) IOó©àe
á¶ë∏dG ‘ IóMGh ᪨f ±õY ∂fɵeÉH ¿G ájOÉMC’G ɪæ«H ,äÉØdBÉàdG ±õY
.IóMGƒdG
,á¡HÉ°ûŸG äGƒ°UC’Gh ,ïØædG ä’BGh ,¿ÉªµdG ä’BG ‘ CÉ©aÉf Gòg ¿ƒµj óbh
§¨°†dÉH âªb GPEGh .äÉØdBÉàdG ±õY É¡æµÁ ’ IQƒcòŸG á«Jƒ°üdG ádB’G ¿C’
᪨f §≤a ™ª°ùà°S "Mon" …OÉMC’G ™°VƒdG QÉ«àNG ó©H ÚMÉàØe ≈∏Y
‘ kÉ©e ÚMÉàØe §¨°†j ™bGƒdG ‘ óMCG ’) ¬à£¨°V …òdG ÒNC’G ìÉàØŸG
.(§Ñ°†dÉH á¶ë∏dG ¢ùØf
Mode Dual áfÉ£ÑdG 䃰U ™°Vh ■
äɪ¨f ±õ©«°S áfÉ£ÑdG 䃰U ¿Éc GPEG ɪ«a ójó– Ò¨àŸG Gòg ∂d í«àj
.(√ÓYCG kÉ°†jCG ô¶fCG) äGƒ°UC’G (Pol) IOó©àe hCG (Mon) ájOÉMCG
‘ iô°ù«dG) Ahó¡dG á°SGhóc IôŸG √òg á°SGhódG πª©à°S :Soft Ahó¡dG
.䃰üdG Çó¡J »àdG (ƒfÉ«ÑdG
.ájhó«dG OQƒÑ«µdG ΩÉ°ùbCG ™e §≤a áØ«XƒdG √òg πª©J :á¶MÓe
á©jô°ùdG hCG áÄ«£ÑdG áYô°ùdG QÉ«àN’ :Rotary S/F IQGhódG áYɪ°ùdG áYô°S
ôKDƒe QÉ«àNG ó©H ’EG áØ«XƒdG √òg πª©J ’h ,IQGhódG áYɪ°ùdG ¿GQhód
.(35 ¢U ô¶fCG) IOó©àŸG äGôKDƒŸG IóMh ‘ IQGhódG áYɪ°ùdG
±RÉ©dG èeÉfôH QÉ«àN’ :UsrPrgUp ΩÉeC’G ¤G ±RÉ©dG èeGôH Ò«¨J
.(10 á°SGhódG QÉàîà°S 9 ‹É◊G èeÉfÈdG ¿Éc ƒ∏a) ‹ÉàdG
±RÉ©dG èeÉfôH QÉ«àN’ :UsrPrgDw ∞∏ÿG ¤G ±RÉ©dG èeGôH Ò«¨J
.(1 á°SGhódG QÉàîà°S 10 ‹É◊G èeÉfÈdG ¿Éc ƒ∏a) ≥HÉ°ùdG
,á«æZC’G hCG ´RƒŸG ±É≤jEG hCG áYGPEG AóÑd :START/STOP ±É≤jE’Gh 𫨰ûàdG
[START/STOP] .(±É≤jE’G/𫨰ûàdG) QR áØ«Xh ¢ùØf »gh
ô¶fCG) ¢UÉÑdG ÜÓ≤fEG áØ«Xh AÉØWEG hCG 𫨰ûàd :Bass Inv ¢UÉÑdG ÜÓ≤fEG
.(28 ¢U
TransMod »ª¨ædG πjƒëàdG ™°Vh ■
áØ«XƒdG √òg ∂d í«àJ (á«æZ’G+»∏NGódG äGƒ°U’G ≥∏fl : ™æ°üŸG ™°Vh)
:»ª¨ædG πjƒëàdG äGõ«¡éàH ôKCÉàà°S »àdG ΩÉ°ùb’G ójó–
OQƒÑ«µdG ΩÉ°ùb’ »ª¨ædG πjƒëàdG ºà«°S :Int »∏NGódG äGƒ°U’G ≥∏fl
.ôKCÉàJ ød …ó«ŸG ᣰSGƒH á∏Ñ≤à°ùŸG äɪ¨ædG øµd ´RƒŸG áÑMÉ°üeh
óæY §≤a Gòg ∑ó«Ø«°S , §≤a á«æZ’G äÉcGôJ ΩÉ≤e ∫ƒëà«°S :Song á«æZ’G
. …ó«e äÉØ∏e óMCG hCG »∏NGódG πé°ùŸG øe á«æZG áYGPG
É¡eÉ≤e ∫ƒëà«°S »àdG »g §≤a …ó«ŸÉH áeOÉ≤dG äɪ¨ædG :MIDI …ó«ŸG
.»æë∏dG
√òg :ALL hCG ,…ó«ŸG + á«æZ’G hG ,…ó«ŸG + »∏NGódG , á«æZ’G + »∏NGódG
∂浪«d §≤a OQƒÑ«µdG ΩÉ°ùbG ΩÉ≤e Ò¨J ¿G ∑ó«Øj ób .≥Ñ°S ɇ äÉ©«ªŒ
.π°†ØŸG ∂eÉ≤e ‘ øµdh á«°SÉ«≤dG …ó«ŸG äÉØ∏e óMG áÑMÉ°üà ±õ©dG
PB Range ᪨ædG »æK ióe ■
á«æë∏dG áaÉ°ùŸG QGó≤e ójóëàd áØ«XƒdG √òg (2: ™æ°üŸG ™°Vh ,24~ôØ°U)
. Úª«dG hCG QÉ°ù«dG ≈°übCG ¤G ᪨ædG »æK ´GQP ∑ô– ÉeóæY ᪨ædG »æãd
∞°üf 24 ≈°übG óëH , ¿ƒàdG ∞°üf äÉØYÉ°†Ã áaÉ°ùŸG √òg Ò«¨J ∂æµÁ
.IÒãc äÉeGóîà°SG Ö°SÉæJh "2" »g á›ÈŸG ᪫≤dG .(±ÉàchG 2) ¿ƒJ
,ô°ùjC’Gh ,»°SÉ°SC’G 䃰üdG ΩÉ°ùbC’ §≤a áMÉàe áØ«XƒdG √òg :á¶MÓe
.(34 ¢U kÉ°†jCG ô¶fCG) áfÉ£ÑdGh
Keysplit ´RƒŸG ΩÉ°ù≤fG á£≤f ■
OQƒÑ«µdG ΩÉ°ù≤fG á£≤f ójóëàd áØ«XƒdG √òg (:60 ™æ°üŸG ™°Vh ,84~48)
ß∏ZG »g Éæg ÉgOó– »àdG ᪨ædG .OQƒÑ«µdG º«°ù≤J ‘h ´RƒŸG ™°Vh ‘
.4hO =60 å«M , ᪨ædG ºbQ ¤G Ò°ûj ºbôdGh , »°SÉ°SC’G 䃰üdG ¬aõ©«°S Ée
QR ≈∏Y §¨°†dG ∫ÓN øe É°†jG áØ«XƒdG √òg QÉ«àNG ∂æµÁ : á¶MÓe
.IÎØd [ARRANGER¥BAND]
Splt Hold ô°ùjC’G º°ù≤dG 䃰U QGôªà°SG áØ«Xh ■
äÉØdÉàdÉH ßØà– áØ«XƒdG √òg (ᣰûf :™æ°üŸG ™°Vh - ICÉØ£e hG ᣰûf)
¤G äɪ¨ædG ≈∏Y »≤ÑJh , É£°ûf OQƒÑ«µdG º«°ù≤J ¿ƒµj ÉeóæY É¡aõ©J »àdG
.ôNG ∞dÉJ ±õ©H Ωƒ≤J ¿G
∫ƒÑ£dG áMƒd äGÒ¨àe
í«JÉØŸ ô≤ædG/∫ƒÑ£dG äGƒ°UCG QÉ«àNEG áYƒªÛG √òg ‘ äGÒ¨àŸG ∂d í«àJ
áMƒd ™°Vh 𫨰ûJ óæY äGQÉ«àN’G √òg ΩGóîà°SEG ºàjh ,á«fɪãdG ∫ƒÑ£dG áMƒd
.32 áëØ°U ô¶fCG( ∫ƒÑ£dG
40
EXR–46 OR
∞FÉXƒdG áªFÉb .12
∂LhôN óæY á«°†eƒdG IôcGòdG ‘ É¡¶ØM ºàj iôNG äGõ«¡Œ ∑Éægh .(45¢U) ±RÉ©dG èeGôH øª°V É¡æjõîJ øµÁ Éæg äGÒ¨àŸG º¶©eh .É¡H º∏J ¿G π°†Øj Gòd , ∂d ƒ∏ëj ɪc RÉ¡÷G ™jƒ£J ∂d í«àJ áeó≤àe äGõ«¡Œ EXR-46 0R ∞FÉXh áªFÉb …ƒ–
.∞FÉXƒdG ™°Vh øe
äÉeƒ∏©ŸG ∫ÉNOG º°ùb ‘ ''ÒÑc'' ôNG QR ≈∏Y §¨°VG áØ«XƒdG √òg ∑Îd (7)
DATA ENTRY.
OQƒÑ«µdG äGõ«¡Œ äGÒ¨àe
Kbd Touch ¢ùª∏d OQƒÑ«µdG á«°SÉ°ùM ■
áàÑãŸG ᪫≤dG Ò«¨àd Ò¨àŸG Gòg Ωóîà°SG (110 ™æ°üŸG ™°Vh ,(127~1)
ÉeóæY É¡eóîà°ùà°S »àdGh ,±õ©dG Iƒ≤d EXR-46 OR RÉ¡L á«°SÉ°ù◊
.(34 ¢U ô¶fCG) á°TÉ°ûdG ≈∏Y ôgÉX ÒZ
ô°TDƒe ¿ƒµj
QR ≈∏Y IÎØd §¨°†dG ᣰSGƒH kÉ°†jCG Ò¨àŸG Gòg QÉ«àNG øµÁ :á¶MÓe
.[KEYBOARDTOUCH]
Mstr Tune áeÉ©dG áfRhódG ■
áfRhódG Ò«¨àd áØ«XƒdG √òg (440,0 ™æ°üŸG ™°Vh - 452,6~427,4)
ádG hG , »æ¨Ÿ ∂àÑMÉ°üe óæY ¬«dG ô£°†J ób …òdG ôe’G , RÉ¡é∏d áeÉ©dG
.CD hCG â«°SÉc øe ≈≤«°Sƒe áÑMÉ°üe óæY hG , á«M
USRT »ª¨ædG πjƒëàdG QGó≤e ■
EXR-46 OR ΩÉ≤e πjƒëàd áØ«XƒdG √òg (ôØ°U : ™æ°üŸG ™°Vh 12~12-)
πjƒëàdG''™LGQ ,πjƒëàdG ƒg Ée kGócCÉàe øµJ ⁄ GPEG ,¿ƒàdG ±É°üfG øe Oó©H
QR §¨°†H kÉ°†jG áØ«XƒdG √òg QÉ«àNG øµÁ 32 ¢U ''»ª¨ædG
.[TRANSPOSE]
GLBT âbDƒŸG »ª¨ædG πjƒëàdG ■
EXR-46 OR ΩÉ≤e πjƒëàd áØ«XƒdG √òg (ôØ°U : ™æ°üŸG ™°Vh 5~6-)
,πjƒëàdG ƒg Ée kGócCÉàe øµJ ⁄ GPEG ,áàbDƒe IQƒ°üH ¿ƒàdG ±É°üfG øe Oó©H
§¨°†H kÉ°†jG áØ«XƒdG √òg QÉ«àNG øµÁ 32 ¢U ''»ª¨ædG πjƒëàdG'' ™LGQ
.[®] [SELECT] QR ≈∏Y IóMGh Iôe §¨°†dG ºK [TRANSPOSE] QR
■ KB SCALE: Scale C/C#/D/Eb/E/F/F#/G/Ab/A/Bb/B, Scale
Mode
■ MIDI: Local, MidiTxRx, Sync Rx, Style PC, LyricsTx,
NTARx14, PicthBnd, Modulatn, ProgChng, Velo Rx, Clock
Tx, StartStp, SongPosP
UTILITY:“LockInit”,
Resume
''LockInit''InitFLASH,
õ«¡éàdG ¥ÓZE
G , InitFLASH, Resume
■ UTILITY:
■ WriteSNG (49 ¢U ô¶fCG)
■ WriteSTL (50 ¢U ô¶fCG)
■ RemoveSNG (50 ¢U ô¶fCG)
■ Remove STL (51 ¢U ô¶fCG)
■ WriteUPG (50 ¢U ô¶fCG)
■ ReadUPG (50 ¢U ô¶fCG)
■ RemovUPG (51 ¢U ô¶fCG)
iƒà– »àdG á«Ø«XƒdG áYƒªÛG QÉ«àN’ [√][®] FAMILY QGQRCG Ωóîà°SG (2)
.܃∏£ŸG Ò¨àŸG ≈∏Y
.¬∏jó©àH ÖZôJ …òdG Ò¨àŸG QÉ«àN’ [√][®] SELECT QGQRCG Ωóîà°SG (3)
[√][®] SELECT QGQRG ∂d íª°ùJ’ ∞FÉXƒdG ™°Vh ‘ ¿ƒµJ ÉeóæY :á¶MÓe
. á«dÉàdG ¤G áYƒª› øe õØ≤dÉH
âªb …òdG Ò¨àŸG πjó©J ∂fɵeÉH ¬fCG ø∏©àd ¢S "VALUE" R ádÉ°SQ ô¡¶J
.√QÉ«àNÉH
᪫b πjó©àd ᫪bôdG QGQR’G hCG [–][+] DATA ENTRY QGQRCG Ωóîà°SG (4)
.QÉàıG Ò¨àŸG
.20 ¢U É°†jG ô¶fG : á¶MÓe
‘ É©e [–] h [+] …QR §¨°VG Ò¨àe …’ ¬›ÈŸG ᪫≤dG ¤G IOƒ©∏d : á¶MÓe
.á¶ë∏dG ¢ùØf
.¬∏jó©àd ôNG Ò¨àe QÉ«àN’ [√][®] FAMILY QGQRG Ωóîà°SG (5)
(3) ºbQ Iƒ£ÿG ™HÉJ (6)
39
(ΩÉ©dG AGôLE’G) äGÒ¨àŸG πjó©J
. á°TÉ°ûdG ᣰSGƒH EXR-46 0R RÉ¡÷ á«Ø«XƒdG äGÒ¨àŸG πjó©J ∂æµÁ
.áeÉ©dG πjó©àdG äGƒ£N ∂«dG
[FUNCTION] ∞FÉXƒdG QR §¨°VG (1)
■ KB SET: KbdTouch, MsterTune, USRTrnsp, GLB Trnsp,
TransMod, PB Range, KeySplit, SpltHold, SpltInt, FSW,
Port Main, Port Dual, Mode Main, Mode Dual
■ DRUM PAD: DK1/DrumPad1~DK8/DrumPad8
■ METRONOM: Mtro TS, MetroVol, Count-In
■ OCTAVE: MAIN Oct, DUAL Oct, SPLT Oct
■ VOLUME: Main Vol, Dual Vol, SplitVol, Auto Bass,
AccDrums, AccBass, Accomp1~Accomp6,
Song1~Song16
■ ARR SET: ArrChord, Arr Hold, EP Chord, Bass Inv, MI
(Melody Intelligence), InEnCHRD, Sync Stop
■ EFFECTS: REV (Reverb), CHR (Chorus), MFX, Tone
MFX, Rev MAIN, Chr MAIN, Pan MAIN, Rev DUAL, Chr
DUAL, Pan DUAL, RevSPLIT, ChrSPLIT, PanSPLIT
r EXR–46 OR
,P OP=V–XF 1 ,ACOUSTIC= None) None ,VFX1~4 :LOCK QGQRCG •
(ETHNIC=V–XF 4 ,DANCE=V–XF 3 ,ROCK=V–XF 2
.(¥QRCG ¿ƒ∏H Å°†«a) [V-LINK] QR §¨°VG (2)
áMÉàe ÒZ áØ«XƒdG √ògh ,ƒjó«ØdG äGôKDƒe Ò«¨àd QGQRC’G √òg Ωóîà°SG
."Off" ™°VƒdG ≈∏Y õ¡› πÑ≤à°ùŸG ƒjó«ØdG èdÉ©e ¿ƒµj ÚM
.DV-7 RÉ¡L øe ºYóe ÒZ VFX2 ôKDƒe :á¶MÓe
.14h13 …ó«e äGƒæb ¤G π≤æJ V-LINK πFÉ°SQ πc :á¶MÓe
BEAT
í«JÉØe hCG ,IOóÙG QGQRC’G hCG BENDER ᪨ædG »æK Qƒfi Ωóîà°SG (3)
™e øeGõàdÉH ƒjó«ØdG Qƒ°üH ÖYÓà∏d (≈∏YC’G ±ÉàchC’G) V-LINK
.(√ÉfOCG ô¶fCG) ∑É≤«°Sƒe
QõdG Aƒ°V íÑ°üj) áØ«XƒdG √òg ¥ÓZE’ iôNCG Iôe [V-LINK] QR §¨°VG (4)
.(kÉàaÉN
É¡H ºµëàdG EXR-46 OR RÉ¡L ™«£à°ùj »àdG V-LINK ∞FÉXh
(á≤HÉ£ŸG …ó«e πFÉ°SQh)
á≤aGƒàŸG ƒjó«ØdG ä’BÉH ºµëà∏d á«dÉàdG ∞FÉXƒdG EXR-46 OR RÉ¡L ôaƒj
:V-LINK ™e
H~08H00 :(PC) èeÉfÈdG Ò«¨J πFÉ°SQ 8~1 Ö«∏c :OQƒÑ«µdG •
.äÉ£≤∏dG Ò«¨àd ≈∏YC’G ±ÉàchC’G ‘ QGQRC’G §¨°VG
CC23 â«¡ÑàdG øeR :±õ©dG Iƒ≤d OQƒÑ«µdG á«°SÉ°ùM •
.äÉ£≤∏dG ÚH πjƒëàdG áYô°ùH ≈∏YC’G ±ÉàchC’G ‘ ±õ©dG Iƒb ºµëàJ
:(AÉ°†e [USER¥PROGRAM] QR ¿Éc GPEG) [0]~[1] QGQRC’CG •
H~09H00/(áfÉÿG QÉ«àNG) CC00 10~1 ¿GƒdC’G áMƒd
QGQRC’G …ODƒJ) 1~0 QGQRC’G §¨°VG ,Ak É°†e [V-LINK] QR ¿ƒµj ɪæ«
(''á«©«Ñ£dG'' É¡ØFÉXh kÉ°†jCG ᫪bôdG
¢Vô©dG áYô°S :BENDER/MODULATION ´GQP ‘ ᪨ædG »æK Qƒfi •
ɪæ«H ,¢Vô©dG áYô°S øe ójõ«°S Úª«dG ƒëf ´GQòdG ∂jô– áLQódG »æK
™°VƒdG ‘ ¿ƒµj ÉeóæYh ,¢Vô©dG áYô°S øe ţѫ°S QÉ°ù«dG ¤G ¬µjô–
.á«©«ÑW ¢Vô©dG áYô°S ¿ƒµJ (õcôŸG ‘) §°SƒdG
CC24) Ö«∏µdG ¿ƒd :BENDER/MODULATION ´GQP ‘ ꃪàdG Qƒfi •
.(CR ¿ƒ∏dG) CC25 ,((CB ¿ƒ∏dG)
äÉLQO ¢ùªN ∑Éægh .¿ƒ∏dG Ò«¨àd RÉ¡÷G IôNDƒe ƒëf ´GQòdG §¨°VG
√ògh ,äGôe IóY ´GQòdG §¨°V ∫ÓN øe Ö«∏µdG ¿ƒ∏d ÉgQÉ«àNG øµÁ
Ö«∏µdG ¿ƒdh ,ôªMC’G ,¥QRC’G ,»é°ùØæÑdG ,ô°†NC’G :»g äÉLQódG
.»∏°UC’G
V-LINK
áØ«Xh
.á«FôŸGh á«≤«°SƒŸG IOÉŸG ÚH πeɵàdG ≥«≤ëàd V-LINK áØ«Xh Ωóîà°ùJ
V-LINK áØ«Xh ™e á≤aGƒàŸG Iõ¡LC’G óMCG ΩGóîà°SÉHh
,á«FôŸG äGôKDƒŸG §HQ π¡°ùdG øe ¿ƒµ«°S (Óãe Edirol DV-7PR RÉ¡L)
.AGOCÓd ájÒÑ©àdG ô°UÉæ©dG øe AõL É¡∏©Lh
:»∏j Éà ΩÉ«≤dG ∂æµÁ ,DV-7PR ∫hôjOCG ™e EXR-46 OR RÉ¡L ΩGóîà°SÉHh
Ò«¨àd (≈∏YC’G ±ÉàchC’G) EXR-46 OR RÉ¡÷ OQƒÑ«µdG ΩGóîà°SG •
IÎa ≈∏Y ∫ƒ°üë∏d kÉWƒ¨°†e ¬≤HCGh QGQRC’G óMCG §¨°VG ,(clips) Qƒ°üdG
πµ°ûH QGQRC’G óMCG §¨°VGh ,("fade" »«éjQóàdG ∫DhÉ°†àdG) ∫ƒWCG ∫ƒ–
.á©jô°S ä’ƒ– ≈∏Y ∫ƒ°üë∏d ™jô°S
QõdG Å°†j ÉeóæY §≤a) ¿GƒdC’G Ò«¨àd [0]~[9] ᫪bôdG QGQRC’G Ωóîà°ùJ •
.([USER¥PROGRAM]
᪨ædG »æKh ꃪàdG ´GQP ‘ ᪨ædG »æK Qƒfi Ωóîà°SG •
hCG ájQƒ°üdG IOɪ∏d ¢Vô©dG áYô°S Ò«¨àd BENDER/MODULATION
.ôNBG ¿ƒd QÉ«àN’
.(VFX1~4) ôKDƒŸG Ò«¨àd LOCK QGQRCG Ωóîà°SG •
.MIDI OUT êôfl ᣰSGƒH V-Link äGQÉ°TEG ∫É°SQEG øµÁh
MIDI IN πNóÃ EXR-46 OR RÉ¡L ‘ MIDI OUT êôfl π°U (1)
.(UM-1 RÉ¡éH hCG) »LQÉÿG ƒjó«ØdG èdÉ©Ÿ
REMOTE
Edirol UM-1
Edirol DV-7PR
MIDI OUT
38
EXR–46 OR
OQƒÑ«µdG ΩÉ°ùbCG ¤G ±É°†ŸG ¢SQƒµdG QGó≤e Ò«¨J ●
óMCG ¤G ¬àaÉ°VEG ºàà°S …òdG ¢SQƒµdG QGó≤e) ¢SQƒµdG ≥ªY Ò«¨àd
:‹ÉàdG AGôLE’G ™ÑJEG ,(ΩÉ°ùbC’G
[√][®] SELECT QGQRCG Ωóîà°SG ,Ak É°†e ∫GR Ée [FUNCTION] QR ¿Éc GPEG (6)
.á«dÉàdG äGÒ¨àŸG óMCG QÉ«àN’
Chorus depth of the Main part*.
Chorus depth of the Dual part.
¢SQƒµdG
´ÉÑ£fG ≥∏îjh ,䃰ü∏d á«fɵŸG IQƒ°üdG ™«°SƒàH ¢SQƒµdG ôKDƒe Ωƒ≤j
.É¡æe QÉ«àNEÓd ´GƒfCG á«fɪK ∂jódh .™FGQ ƒjΰS
OQƒÑ«µdG ΩÉ°ùbCG øe …CG ¿ƒµj Óa ,EXR-46 OR RÉ¡L 𫨰ûàH Ωƒ≤J ÉeóæY
kÉ°†jCG ßM’h ,»∏NGódG ¢SQƒµdG ôKDƒÃ kGôKCÉàe (áfÉ£ÑdGh ,ô°ùjC’Gh ,»°SÉ°SC’G)
‘ OƒLƒe MFX èdÉ©ŸG ¿Éc GPEG »°SÉ°SC’G 䃰üdG ‘ ôKDƒj ’ ¢SQƒµdG ¿CG
."Off'' AÉæãà°SÉH ôNBG ™°Vh …CG
‘h) ¢SQƒµdG èdÉ©e AÉØWEG ÉeEG ∂æµÁ ,¢SQƒµdG ôKDƒe ¤G áLÉëH øµJ ⁄ GPEG
º°ùb ™æeEG hCG ,(RÉ¡÷G AGõLCG øe …CG ¤G ôKDƒŸG Gòg áaÉ°VEG ºàj ’ ádÉ◊G √òg
.¢SQƒµdÉH ôKCÉàdG øe OQƒÑ«µdG ΩÉ°ùbCG øe §≤a óMGh
á«æZC’G ΩÉ°ùbCG ¤G hCG ´RƒŸG ¤G ±É°†j …òdG ¢SQƒµdG QGó≤e Ò«¨J ∂æµÁ ’
.á∏é°ùŸG
When the MFX is set to “Off”
Reverb for Main
When the MFX is set to any other type
¢SQƒµdG ôKDƒe ¥ÓZEGh 𫨰ûJ
Chorus depth of the Split part.
(2) h (1) äGƒ£ÿG ´ÉÑJÉH k’hCG º≤a ,CÉØ£e [FUNCTION] QR ¿Éc GPEG)
.(√ÓYCG
¢SQƒµdG ôKDƒe áaÉ°VEG ójôJ ’ âæc GPEG "0" QÉ«àN’ [+][-] QGQRC’G Ωóîà°SG (7)
.¢SQƒµ∏d áHƒ∏£ŸG ᪫≤dG QÉ«àNÉH º≤a ’EGh ,QÉàıG OQƒÑ«µdG º°ùb ¤G
Chr MAIN Ò¨àe ¿Éa ,(35 ¢U ô¶fCG) MFX ´GƒfCG óMCG äÎNG GPEG
.(á°TÉ°ûdG ≈∏Y ô¡¶j ô°TDƒŸG ¿Éc ƒd ≈àM) ÒKCÉJ ¬d ¿ƒµj ød
ÜÒØjQ ôKDƒe áaÉ°VEG ójôJ ’ âæc GPEG ''0'' QÉ«àN’ [+][–] QGQRC’G Ωóîà°SG (7)
.ÜÒØjô∏d áHƒ∏£ŸG ᪫≤dG QÉ«àNÉH º≤a ’EGh ,QÉàıG OQƒÑ«µdG º°ùb ¤G
Rev Main Ò¨àe ¿Éa ,(35 ¢U ô¶fCG) MFX ´GƒfCG óMCG äÎNG GPEG
.MFX IQÉ°TEG ≈∏Y ɉEGh ,Iô°TÉÑe »°SÉ°SC’G 䃰üdG ≈∏Y ôKDƒj ød
¥ÓWE’G ≈∏Y ¢SQƒµdG ôKDƒe ΩGóîà°SÉH ÖZôJ ’ âæc GPEG ‹ÉàdG AGôLE’G ™ÑJEG
.¢SQƒµdG øe ôNBG ´ƒf QÉ«àN’ hCG ,(RÉ¡÷G AGõLCG øe …C’)
.(ô°TDƒŸG Å°†j ¿G Öéj) [FUNCTION] QR §¨°VG (1)
When the MFX is set to “Of
Reverb for Main + MFX
IQÉ°TEÓd ÜÒØjôdG ≥ªY :"Rev Main=100" IQÉÑY »æ©J
IóY ‘ ∂dP ΩGóîà°SG øµÁh .MFX èdÉ©ŸG øe áã©ÑæŸG á«°ù«FôdG
áYɪ°ùdG ,ÜÒØjôdG + (MFX) ¬jƒ°ûàdG :Ωɪàg’G ≥ëà°ùJ äÉ≤«Ñ£J
.ïdG ,(REV) Plate ìƒ∏dG + (MFX) IQGhódG
.ôKDƒŸG ¤G ´Éªà°SCÓd OQƒÑ«µdG ≈∏Y äɪ¨ædG ¢†©H ±õYEG (8)
âÑZQ GPEG áfÉ£ÑdG 䃰Uh ô°ùjC’G º°ù≤dG 䃰U §°ûæJ ¿G ≈°ùæJ ’
.ɪ¡«a ÜÒØjôdG ≥ªY ¤G ´Éªà°SC’ÉH
.(45 ¢U ô¶fCG) ±RÉ©dG èeGôH óMCG ‘ õ«¡éàdG Gòg ßØM ¿ÉµeE’ÉH :á¶MÓe
.áØ«XƒdG √òg øe êhôî∏d DATA ENTRY º°ùb ‘ ''ÒÑc'' ôNBG QR §¨°VG (9)
."EFFECTS" QÉ«àN’ [√][®] FAMILY QGQRCG Ωóîà°SG (2)
."CHR" Ò¨àŸG QÉ«àN’ [√][®] SELECT QGQRCG Ωóîà°SG (3)
When the MFX is set to any other type
''᫪bôdG QGQRC’Gh SELECT h FAMILY QGQRCG ΩGóîà°SG'' kÉ°†jCG ô¶fCG :á¶MÓe
.(20 ¢U)
.ôKDƒŸG ¤G ´Éªà°SCÓd OQƒÑ«µdG ≈∏Y äɪ¨ædG ¢†©H ±õYEG (8)
¤G ´Éªà°SC’ÉH âÑZQ GPEG áfÉ£ÑdG 䃰Uh ô°ùjC’G º°ù≤dG §°ûæJ ¿G ≈°ùæJ ’
.ɪ¡«a ¢SQƒµdG ≥ªY
èdÉ©Ÿ áLÉëH øµJ ⁄ GPEG "Off" QÉ«àN’ [+][–] QGQRC’G Ωóîà°SG (4)
áªFÉ≤dG ô¶fCG) IôaƒàŸG á«fɪãdG ´GƒfC’G óMCG QÉ«àNÉH º≤a ’EGh ,¢SQƒµdG
.(ÃfOCG
.(45 ¢U ô¶fCG) ±RÉ©dG èeGôH óMCG ‘ õ«¡éàdG Gòg ßØM ¿ÉµeE’ÉH :á¶MÓe
√òg øe êhôî∏d DATA ENTRY º°ùb ‘ ''ÒÑc'' ôNBG QR §¨°VG (9)
.áØ«XƒdG
Chorus 1
Chorus 2
Chorus 3
Chorus 4
FB Chorus
Flanger
S-Delay
SDelayFb
.ôKDƒŸG ¤G ´Éªà°SCÓd OQƒÑ«µdG ≈∏Y äɪ¨ædG ¢†©H ±õYEG (5)
37
r EXR–46 OR
èdÉ©e ¤G áLÉëH øµJ ⁄ GPEG ''Off'' QÉ«àN’ [--] [+] QGQRCG Ωóîà°SG (4)
:á«dÉàdG áMÉàŸG ´GƒfC’G óMCG ÎNÉa ’EGh ,ÜÒØjôdG
ìô°ûdG
´ƒædG
Room 1~3
»àdGh ,Iôé◊ á«Jƒ°üdG ¢UGƒÿG »cÉ– ´GƒfC’G √òg 3~1 IôéM
.3,2,1 ºbôdG IOÉjõH kÉYÉ°ùJEG OGOõJ
.áYÉ≤d á«Jƒ°üdG ¢UGƒÿG ¿É«cÉëj ¿ÉYƒædG ¿Gòg
Hall 1,2
»§©j ɇ ,(2) IÒÑc hCG (1) IÒ¨°U á«≤«°Sƒe
2,1 áYÉb
.áaô¨dG ÜÒØjQ øe ÒãµH ÈcCG ¿ÉµŸ kÉYÉÑ£fEG
䃰ü∏d ¢ùcÉY Êó©e ìƒd ™°Vh ÒKCÉJ »cÉëj
Plate
äGƒ°UCÓd ∞«£d ƒgh ,ÜÒØjQ èàæ«d Ωóîà°ùj ¢ùcÉ©dG ìƒ∏dG
.á«YÉ≤jE’G
(ÜÒØjQ ¿hóH) 䃰üdG ió°U ¬Ñ°ûj ôKDƒŸG Gòg
Delay
.䃰üdG Qôµj ƒ¡a Gòd
ÒNCÉJ
.ƒjÒà°S ¬æµd ≥HÉ°ùdG ÒNCÉàdG ôKDƒe ¢ùØf Pan Delay
≈檫dG áYɪ°ùdG ÚH OOÎJ 䃰üdG äGQGôµJ π©éjh ƒjΰS ÒNCÉJ
.iô°ù«dGh
Reverb ÜÒØjôdG
‘ ,á«≤«°Sƒe äÓØM áYÉb ‘ ±õ©J ∂fCÉH ´ÉÑ£fC’G ÜÒØjQ ôKDƒe ∂«£©j
.É¡aõ©J »àdG äGƒ°UC’G ¢ùµ©j ∞∏àfl »Jƒ°U §«fi
´RƒŸG ¤G áaÉ°VEG OQƒÑ«µdG ΩÉ°ùbCG πc ,EXR-46 OR RÉ¡L π¨°ûJ ÉeóæY
.»∏NGódG ÜÒØjQ ôKDƒe πÑb øe É¡à÷É©e ºàj á«æZC’G ΩÉ°ùbCGh
ádÉ◊G √òg ‘h) ÜÒØjôdG èdÉ©e AÉØWEG ÉeEG ∂æµÁ ,∂dòd áLÉëH øµJ ⁄ GPEG
.¬H ôKCÉàdG øe §≤a óMGh º°ùb ™æeEG hCG ,(¬H RÉ¡÷G ΩÉ°ùbCG øe …CG ôKCÉàJ ’
π«é°ùJ ΩÉ°ùbC’ hCG ´Rƒª∏d É¡àaÉ°VEG ºàJ »àdG ÜÒØjôdG ᫪c Ò«¨J ∂æµÁ ’
.á«æZC’G
ÓµH á«∏NGódG IQÉ°TE’G ôKCÉàJ) …RGƒàdG ≈∏Y ÒNCÉJh ¢SQƒc :Cho/Dly
.(ɪ¡æ«H ábÓY ɉhO øjôKDƒŸG
.…RGƒàdG ≈∏Y ÒNCÉJh ô‚Óa
:FL/Delay
.…RGƒàdG ≈∏Y ô‚Óah ¢SQƒc
:Cho/Flgr
.(45 ¢U ô¶fCG) ±RÉ©dG èeGôH óMCG ‘ õ«¡éàdG Gòg ßØM ¿ÉµeE’ÉH :á¶MÓe
䃰üdG QÉ«àNÉH §ÑJôe äGôKDƒŸG ´ƒf QÉ«àNG ¿CÉa ,™æ°üŸG ™°Vh ‘ :á¶MÓe
äGôKDƒŸG'' ô¶fCG .∫ÉM ájCG ≈∏Y ™°VƒdG Gòg ¥ÓZEG øµÁh ,»°SÉ°SC’G 䃰ü∏d
.(43 ¢U) ''á«Jƒ°üdG
.äGƒ°UC’G áaÉc ≈∏Y ≥Ñ£æj ’ Gòg ¿G ßM’
ÜÒØjôdG ¥ÓZEGh 𫨰ûJ
¥ÓWE’G ≈∏Y ÜÒØjôdG ΩGóîà°SÉH ÖZôJ ’ âæc GPEG ‹ÉàdG AGôLE’G ™ÑJEG
.ÜÒØjôdG øe ôNBG ´ƒf QÉ«àN’ hCG ,(RÉ¡÷G ΩÉ°ùbCG øe …C’
.(ô°TDƒŸG Å°†j ¿G Öéj) [FUNCTION] QR §¨°VG (1)
OQƒÑ«µdG ≈∏Y äɪ¨ædG ¢†©H ±õYEG ,MFX ´GƒfCG óMC’ ∑QÉ«àNG iód (5)
.ôKDƒª∏d ´Éªà°SEÓd
√òg øe êhôî∏d DATA ENTRY º°ùb ‘ ''ÒÑc'' ôNBG QR §¨°VG (6)
.áØ«XƒdG
.ôKDƒŸG ´Éª°ùd OQƒÑ«µdG ≈∏Y äɪ¨ædG ¢†©H ±õYEG (5)
OQƒÑ«µdG ΩÉ°ùbC’ ÜÒØjôdG QGó≤e Ò«¨J ●
óMCG ¤G ¬àaÉ°VEG ºàà°S …òdG ÜÒØjôdG QGó≤e) ÜÒØjôdG ≥ªY Ò«¨àd
:‹ÉàdG AGôLE’G ™ÑJEG ,(ΩÉ°ùbC’G
[√][®] SELECT QGQRCG Ωóîà°SG ,kAÉ°†e ∫GR Ée [FUNCTION] QR ¿Éc GPEG (6)
:á«dÉàdG äGÒ¨àŸG óMCG QÉ«àN’
.''EFFECTS'' QÉ«àN’ [®][√] FAMILY QGQRCG Ωóîà°SG (2)
äÉYƒª› 9 ¤G EXR-46 OR RÉ¡÷ á«Ø«XƒdG äGÒ¨àŸG º°ù≤æJ
.äGôKDƒŸG áYƒª› QÉ«àN’ »∏j ɪ«a êÉàëæ°Sh ,á«≤£æe
.''REV'' Ò¨àŸG QÉ«àN’ [®][√] SELECT QGQRCG Ωóîà°SG (3)
Reverb depth of the Main part.
''᫪bôdG QGQRC’Gh SELECT h FAMILY QGQRCG ΩGóîà°SG'' kÉ°†jCG ô¶fCG :á¶MÓe
.(20 ¢U)
Reverb depth of the Dual part.
Reverb depth of the Split part.
.(√ÓYCG (2) h (1) äGƒ£ÿG ´ÉÑJÉH k’hCG º≤a ,CÉØ£e [FUNCTION] QR ¿Éc GPEG)
36
EXR–46 OR
:Mod Dly ꃓ ™e ÒNCÉJ
.ô‚ÓØdG ¬Ñ°ûj kGÒKCÉJ kÉéàæe ,ôNCÉàŸG 䃰ü∏d kÉLƒ“ ∞«°†j ôKDƒŸG Gòg
:3Tap Dly »KÓK 䃰U ió°U
.QÉ°ù«dGh Úª«dGh §°SƒdG ‘ IôNCÉàe äGƒ°UCG 3 èàæj
:4Tap Dly »YÉHQ 䃰U ió°U
.IQôµàeh IôNCÉàe äGƒ°UCG 4 èàæj
:TmCtrDly ¬æeR ‘ ºµ– ™e ÒNCÉJ
…ODƒàa :ÉgOOôJh ᪨ædG ÒNCÉJ øeõH ±õ©dG AÉæKCG ôKDƒŸG Gòg ºµëàj
.É¡©aQ ¤G √QÉ°üàNEG …ODƒjh ,᪨ædG OOôJ ¢†ØN ¤G ÒNCÉàdG øeR ádÉWEG
:Reverb ÜÒØjQ
.ó«L ÜÒØjQ ôKDƒe
:GteRevNr ´ƒ£≤e ÜÒØjQ
ICÉéa á«fɵŸG äGOOÎdG 䃰U ¬«a ™£≤æj ÜÒØjôdG øe ¢UÉN ´ƒf Gòg
.»éjQóàdG äƒØÿG øe k’óH
:GteRevRv ¢Sƒµ©eh ´ƒ£≤e ÜÒØjQ
.∞∏ÿG ¤G Oƒ©j ¬fCÉch ´ƒ£≤e ÜÒØjQ
:GteRevS1 1ƒjΰS ´ƒ£≤e ÜÒØjQ
.iô°ù«dG ¤G ≈檫dG áYɪ°ùdG øe ∑ôëàj ´ƒ£≤e ÜÒØjQ
:GteRevS2 2ƒjΰS ´ƒ£≤e ÜÒØjQ
.≈檫dG ¤G iô°ù«dG áYɪ°ùdG øe ∑ôëàj ´ƒ£≤e ÜÒØjQ
:2PtchShf áLhOõe á«æ◊ áMGREG
ÚJƒ°üdG hP ôKDƒŸG Gòg .»∏°UC’G 䃰üdG OOôJ Ò¨j OOÎdG áMGREG ôKDƒe
䃰üdG ¤G OOÎdG »JÒ¨àe Úàî°ùf ∞«°†jh ,OOÎ∏d Úëjõe …ƒëj
.»∏°UC’G
:FbPtchShf á©Œôe á«æ◊ áMGREG
.AGó°UC’G Oó©àe OOÎ∏d íjõe
‹GƒàdG ≈∏Y ¢SQƒc ¬©Ñàj 䃰üdG ™Ñ°ûJ ôKDƒe
:OD®Chors
.(ÊÉãdG ‘ ôÁ ∫hC’G ôKDƒŸG øe œÉædG 䃰üdG)
.ô‚Óa ¬©Ñàj 䃰üdG ™Ñ°ûJ
:OD®Flger
.ÒNCÉJ ¬©Ñàj 䃰üdG ™Ñ°ûJ
:OD®Delay
.¢SQƒc ¬©Ñàj ¬jƒ°ûJ
:DS®Chors
.ô‚Óa ¬©Ñàj ¬jƒ°ûJ
:DS®Flger
.ÒNCÉJ ¬©Ñàj ¬jƒ°ûJ
:DS®Delay
.¢SQƒc ¬©Ñàj Ú°ù–
:EH®Chors
.ô‚Óa ¬©Ñàj Ú°ù–
:EH®Flger
.ÒNCÉJ ¬©Ñàj Ú°ù–
:EH®Delay
.ÒNCÉJ ¬©Ñàj ¢SQƒc
:Cho®Dly
.ÒNCÉJ ¬©Ñàj ô‚Óa
:FL®Delay
.ô‚Óa ¬©Ñàj ¢SQƒc
:Cho®Flgr
35
:Overdrv 1~4 »Jƒ°üdG ™Ñ°ûàdG
ôaƒàJh ,äÉeɪ°üdG äGP äGȵŸG »cÉëj ,䃰ü∏d kɪYÉf kÉ¡jƒ°ûJ èàæj
(3) ,ƒÑeƒc ȵe (2) ,Ò¨°U combo ƒÑeƒc ȵe (1) :´GƒfCG IóY ¬æe
.≥jOÉæ°U 3 hP ºî°V ȵe (4) ,Úbhóæ°U hP ºî°V ȵe
:Distort 1~4 ¬jƒ°ûàdG
.áØ∏àfl äÉ©jƒæJ 4 ≈∏Y ¬æe π°ü–h ,䃰ü∏d ÈcCG kÉ¡jƒ°ûJ èàæj
:Phaser »LƒŸG πNGóàdG
äÉLƒ“ kÉéàæe ,áHƒ∏≤e ¬JÉLƒe 䃰U »∏°UC’G 䃰ü∏d ∞«°†j
.kÉ≤ªYh kÉYÉ°ùJEG ≥∏îJ á«fhõ∏M
:AutoWah GhGƒdG
.䃰üdG ™HÉW ‘ IQôµàe äGÒ¨J kÉéàæe »≤∏M ܃∏°SCG hP Î∏ØH ºµëàj
:Rotary IQGhódG áYɪ°ùdG
™e Ωóîà°ùJ âfÉc »àdG ∂∏J ,IÒ¡°ûdG IQGhódG áYɪ°ùdG 䃰U »cÉëj
.»FÉHô¡µdG øZQC’G Iõ¡LCG
ꃪàdG ´GQP ‘ ꃪàdG Qƒfi ΩGóîà°SG ∂浪«a ,´ƒædG Gòg äÎNG GPEG
ꃪàdG »àYô°S ÚH π≤æà∏d BENDER/MODULATION ᪨ædG »æKh
ÚH QÉ«àNCÓd RÉ¡÷G IôNDƒe ƒëf ´GQòdG §¨°VG ,á«dÉ©dGh áÄ«£ÑdG
.™jô°ùdG hCG Å£ÑdG ꃪàdG
:StFlanger ƒjΰS ô‚Óa
.É¡WƒÑg hCG É¡YÓbEG iód áKÉØf IôFÉW ¬fCÉc §Ñ¡jh ƒ∏©j kÉ«fó©e kÉæ«fQ Qó°üj
:SpFlanger êQóàe ô‚Óa
.áªYÉædG OOÎdG äGÒ¨J øe k’óH êQóàdG í°VGh kGÒKCÉJ èàæj
:Compressor §ZÉ°†dG
…ƒ≤jh …ƒ≤dG 䃰üdG ¢†Øî«a ,ád’G 䃰U Ió°T äGÒ¨J øe óëj
.䃰üdG Ió°T äGÒ¨J øe Üò¡j ɇ ,∞«©°†dG
:Limiter íHɵdG
…ƒ≤j ’ ¬æµd ,Ú©e iƒà°ùe ió©àj ¿G øe 䃰üdG íHɵdG ™æÁ
.áØ«©°†dG á«Jƒ°üdG äÉLƒŸG
:HexaCho »°SGó°ùdG ¢SQƒµdG
䃰üdG …Ìj ƒ¡a Gòd ,¢SQƒµdG øe äÉ≤ÑW 6 ¢SQƒµdG Gòg ºîà°ùj
.kÉ≤ªYh kÉYÉ°ùJEG √ójõjh
:TremCho ƒdƒÁôJ ¢SQƒc
.(䃰üdG Ió°ûd ájQhO äÉLƒ“) ƒdƒÁÎdÉH èdÉ©e ¢SQƒc
:StChorus ƒjΰS ¢SQƒc
.ƒjΰS ¢SQƒc ôKDƒe Gòg
:Space-D º°ù› ¢SQƒc
¢SQƒc ôKDƒe Qó°üj ¬æµd ꃪàdÉH kÉYÉÑ£fG »£©j ’ ,Oó©àe ¢SQƒc Gòg
.RÉà‡ ƒjΰS 䃰U èàæj ±ÉØ°T
:StDelay ƒjΰS ÒNCÉJ
䃰ü∏d ió°U ≥∏î«a ,¬«dG á∏NGódG IQÉ°TE’G QGôµJ ÒNCÉàdG ôKDƒe ∂d í«àj
.(䃰üdG QGôµJ)
äGôKDƒŸG ΩGóîà°SG
∂æµÁ ,᫪bQ ¢SQƒch ÜÒØjQ äGôKDƒe ≈∏Y EXR-46 OR RÉ¡L …ƒàëj
.܃∏£ŸG ´ƒædG QÉ«àNGh É¡FÉØWEG hCG É¡∏«¨°ûJ
ΩÉ°ùbC’G äGƒ°UCG (∫É°SQEG) QGó≤e ójó– kÉ°†jCG ∂æµÁ ∞FÉXƒdG áªFÉb øeh
.''send level'' ôKCÉààd áØ∏àıG
(MFX) á«Jƒ°üdG äGôKDƒŸG èdÉ©e ™e ¬∏«¨°ûJ øµÁ ’ ¢SQƒµdG ôKDƒe ¿G ôcòJ
.(»°SÉ°SC’G 䃰üdG MFX hCG ¢SQƒµdG ÚH QÉ«àN’G ∂«∏Y Gòd) âbƒdG ¢ùØf ‘
(MFX) IOó©àŸG äGôKDƒŸG èdÉ©e ΩGóîà°SG
å«M ,»°SÉ°SC’G 䃰üdG ‘ (MFX) IOó©àŸG äGôKDƒŸG èdÉ©e ΩGóîà°SG øµÁ
¿G ÚM ‘ ,øjôKDƒe øe Öcôe É¡°†©H ,(47) áØ∏àfl äGôKDƒe ó«dƒàH Ωƒ≤j
Ée kÉYƒf á£ÑJôŸG äGôKDƒŸG ó«dƒàH §≤a Ωƒ≤j ¢SQƒµdGh ÜÒØjôdG èdÉ©e
.(¢SQƒµdG) ꃪàdÉH hCG (ÜÒaôdG) ¿ÉµŸÉH Qƒ©°ûdÉH
.(ô°TDƒŸG Å°†j ¿G Öéj) [FUNCTION] QR §¨°VG (1)
.'' EFFECTS'' QÉ«àN’ [√] [®] FAMILY QGQRCG Ωóîà°SG (2)
,äÉYƒª› ™°ùJ ¤G EXR-46 OR RÉ¡L ‘ á«Ø«XƒdG äGÒ¨àŸG º°ù≤æJ
.äGôKDƒŸG áYƒª› QÉ«àN’ »∏j ɪ«a êÉàëæ°Sh
.''MFX'' Ò¨àŸG QÉ«àN’ [√] [®] SELECT QGQRCG Ωóîà°SG (3)
''᫪bôdG QGQRC’Gh SELECT h FAMILY QGQRCG ΩGóîà°SG'' kÉ°†jCG ô¶fCG :á¶MÓe
.(20 ¢U)
.Ωóîà°ùe ÒZ MFX äGôKDƒŸG èdÉ©e ¿G ≈∏Y '' Off'' ádÉ°SQ ∫óJ
,47 ÉgOóYh á«≤ÑàŸG ´GƒfC’G øe kGóMGh ÎNEG ,MFX èdÉ©ŸG 𫨰ûàd (4)
.≥∏¨e MFX èdÉ©ŸG ¿G »æ©J Off IQÉ°TEG [+] [–] QGQRCG ΩGóîà°SÉH
ɇ ,á«dÉ©dG äGOOÎ∏d ʃeQÉ¡dG Ö«cÎdÉH ºµëàj Enhancer ø°ùÙG
.kÉbGÎNGh kÉYƒ£°S 䃰ü∏d ∞«°†j
r EXR–46 OR
äGôKDƒŸGh AGOC’G ∞FÉXh .11
.ôKDƒŸG øe ∂FÉ¡àfG óæY ´GQòdG ∑ôJ ∂æµÁ ä’É◊G πc ‘ (3)
ô¶fCG .äɪ¨ædG »æãd á«æë∏dG áaÉ°ùŸG Ò«¨J ∂æµÁ ,ôeC’G ≈°†àbEG GPEG :á¶MÓe
.40 ¢U PB Range ''᪨ædG »æK ióe'' Iô≤a
ôKDƒŸ kÉjhÉ°ùe MFX IóMh ´ƒf ¿ƒµj ÉeóæY ìÉàe ÒZ ꃪàdG :á¶MÓe
áYô°ùdG ÚH Ò«¨à∏d Ωóîà°ùj á≤Ñ£dG ꃓ ´GQP ¿CÉa ,ádÉ◊G √òg ‘h .Rotary
.á«dÉ©dGh áÄ«£ÑdG
Ωó≤dG á°SGhO
RÉ¡÷ á«Ø∏ÿG áMƒ∏dG ≈∏Y FOOTSWITCH Ωó≤dG á°SGhO πNóe ∂d í«àj
hCG DP-6 hCG DP-2 πãe á«aÉ°VEG Ωób á°SGhO π«°UƒJ EXR-46 OR
.FS-5U BOSS
™°VƒdG) É¡aõ©J »àdG äɪ¨ædG ádÉWE’ Ωó≤dG á°SGhO ΩGóîà°SG øµÁ
±É≤jEGh 𫨰ûàd hCG ,Sostenuto äɪ¨ædG ¢†©Ñd á«FõL ádÉWEG hCG ,(»°SÉ°SC’G
.∂dP ÒZh ,MFX IQGhódG áYɪ°ùdG ôKDƒe
á°SGhOh êQÉıG ΩGóîà°SEG''h ,(40 ¢U) ''Ωó≤dG á°SGhO ∞FÉXh ójó–'' ô¶fCG
.(57 ¢U) ''á«aÉ°VEG Ωób
:‹ÉàdG AGôLC’G ™ÑJEG ,É¡aõ©J »àdG äɪ¨ædG ádÉWE’ á°SGhódG ΩGóîà°S’
.FOOTSWITCH πNóÃ á°SGhódG π°U (1)
.≈檫dG ∑ó«H ᪨f ±õYEG (2)
.á°SGhódG ≈∏Y §¨°VG (3)
.¬£¨°†J …òdG ìÉàØŸG QôM (4)
.ìÉàØŸG øY ∑ój ™aQ ó©H ≈àM É¡àaõY »àdG äɪ¨ædG hCG ᪨ædG ôªà°ùJ
.á°SGhódG øY ∂eób ™aQEG ,äɪ¨ædG hCG ᪨ædG 䃰U ∞bƒd (5)
''127'' ᪫≤dG ɪæ«H ,(áYƒª°ùe ÒZh) ájɨ∏d á«fóàe ''1'' ᪫≤dG Èà©J
᪫≤dG Ωóîà°ùJh .(IOÉMh ájƒb äɪ¨f) ±õ©∏d Iƒb ≈∏YCG ™e ≥aGƒàJ
¿CÉa ’EGh) á°TÉ°ûdG ≈∏Y Å°†e ÒZ
ô°TDƒe ¿ƒµj ÉeóæY §≤a
∂aõY Ió°ûd á≤HÉ£ŸG á«°SÉ°ù◊G áLQO Ωóîà°ùJ ±ƒ°S äɪ¨ædG áaÉc
.(í«JÉØŸG ≈∏Y
øe êhôî∏d DATA ENTRY º°ùb ‘ ''ÒÑc'' ôNBG QR §¨°VG (5)
.áØ«XƒdG √òg
''á«°SÉ°ù◊G Ö°ùëH äGƒ°UC’G πjóÑJ'' Ò¨àe Ωóîà°ùJ äGƒ°UC’G ¢†©H :á¶MÓe
áeƒ©æH hCG Iƒ≤H í«JÉØŸG ≈∏Y Üô°†dÉH ¬fG »æ©j Gògh ,(Velocity Switching)
ô©°ûJ ∂∏©éj ∂dP ¿Éc GPEG §≤a Ò¨àŸG Gòg ÅØWCG Gòd ,ÚJƒ°U ÚH ∫óÑJ ∂fCÉa
.ÈcCG ìÉ«JQÉH
.(45 ¢U ô¶fCG) ±RÉ©dG èeGôH óMCG ‘ õ«¡éàdG Gòg ßØM øµÁ :áßMÓe
ΩÉ°ùbC’G áaÉc ‘ ¢ùª∏d OQƒÑ«µdG á«°SÉ°ùM áØ«Xh ΩGóîà°SG øµÁ :á¶MÓe
.áfÉ£ÑdG 䃰Uh ,ô°ùjC’G º°ù≤dG 䃰Uh ,»°SÉ°SC’G 䃰üdG :OQƒÑ«µ∏d ''ájhó«dG''
AGOC’G ∞FÉXh
¢ùª∏d OQƒÑ«µdG á«°SÉ°ùM
Ió°Th á©«ÑW ¿G …CG ,±õ©dG Ió°Th áYô°ùd ¢SÉ°ùM EXR-46 OR RÉ¡L ¿G
hCG Ió°T ≈∏Y óªà©J áfÉ£ÑdG 䃰Uh ,ô°ùjC’G º°ù≤dG 䃰Uh ,»°SÉ°SC’G 䃰üdG
.í«JÉØŸG ≈∏Y ∂aõY áYô°S
á°SÉ°ùM ∫ƒÑ£dGh äƒ∏ØdGh ¿ÉªµdGh ƒfÉ«ÑdÉc á«◊G á«≤«°SƒŸG ä’B’G πc
ɇ ,kÉMƒ°Vhh Iƒb äɪ¨ædG äOGOREG ±õ©dG ܃∏°SCG óà°TG ɪ∏µa ,±õ©dG Ió°ûd
ᣰûf ¢ùª∏d OQƒÑ«µdG á«°SÉ°ùM áØ«Xh Éæ∏©L Gòd ,kGóL kÉ«©«ÑW kGÒKCÉJ ≥∏îj
.RÉ¡÷G 𫨰ûJ óæY kɪFGO
ÜòŒ ó≤a ,¥ÓWE’G ≈∏Y ∫hC’G »≤«°SƒŸG ∑RÉ¡L ƒg EXR-46 OR ¿Éc GPEG
.É¡aõ©J »àdG äɪ¨ædG IóMh Ió°T äGÒ¨J ∂gÉÑàfG
QR §¨°VÉa ,á°TÉ°ûdG ≈∏Y
ô°TDƒe ô¡¶j ⁄ GPEG (1)
.±õ©dG Ió°Th áYô°ùd RÉ¡÷G á«°SÉ°ùM π«©Øàd [KEYBOARD¥TOUCH]
᪨ædG áLQO ꃓh »æK
OQƒÑ«µdG QÉ°ùj ≈∏Y OƒLƒŸG ᪨ædG »æKh ꃪàdG ´GQP ΩGóîà°SG ∂æµÁ
∂æµÁ ɪc ,OQƒÑ«µdG ΩÉ°ùbCG äɪ¨f ¤G äGôKDƒŸG øe ÚYƒf áaÉ°VE’
.âÄ°T ¿EG kÉ©e øjôKDƒŸG ΩGóîà°SG
.É¡aõ©J »àdG äɪ¨ædG ¤G ꃪàdG áaÉ°VE’ ΩÉeCÓd ´GQòdG ™aOEG (1)
MODULATION
Raises the pitch
Lowers the pitch
BENDER
IQGhódG áYɪ°ùdG ôKDƒe áYô°S Ò«¨àd kÉ°†jCG ꃪàdG Qƒfi ΩGóîà°SG øµÁ
‘ kGQÉàfl Rotary ôKDƒe ¿Éc GPEG Gòg) ™jô°ùdGh Å£ÑdG ÚH
.(MFX IóMh
äɪ¨æ∏d á«æë∏dG áLQódG kÉàbDƒe ¢†Øîàd QÉ°ù«dG á¡L ¤G ´GQòdG QOCG (2)
.äɪ¨æ∏d á«æë∏dG áLQódG ™aôd Úª«dG á¡L ¤G ÉgQOCGh .É¡aõ©J »àdG
⁄ GPEG ¢ùª∏d OQƒÑ«µdG á«°SÉ°ùM áØ«Xh ¥ÓZ’ á«fÉK Iôe QõdG §¨°VG (2)
.É¡«dG áLÉëH øµJ
QR §¨°VG ,±õ©dG á«°SÉ°ù◊ áàHÉK áLQO ójóëàd (3)
ádÉ°SQ ô¡¶J ≈àM kÉWƒ¨°†e ¬≤HCGh [KEYBOARD¥TOUCH]
.á°TÉ°ûdG ≈∏Y '' KbdTouch''
KbdTouch
á«°SÉ°ù◊G áLQO ójóëàd - + QGQRCG hCG ᫪bôdG QGQRC’G Ωóîà°SG (4)
.(127~1) É¡aõ©J »àdG äɪ¨ædG áaɵd É¡eGóîà°SG »¨Ñæj »àdG
34
EXR–46 OR
OQƒÑ«µdG ΩÉ°ùbC’ iôNCG ∞FÉXh
ÉgOGóYEG ∂æµÁ ,OQƒÑ«µdG ΩÉ°ùbCÉH ≥∏©àJ iôNCG ∞FÉXh Éæg Éæjód âdGR Ée
:iôNCG ™bGƒe ‘ É¡à«£¨J â“ hCG ,∞FÉXƒdG áªFÉb ᣰSGƒH
(34 ¢U ô¶fCG) ±õ©dG áYô°ùd OQƒÑ«µdG á«°SÉ°ùM •
(39 ¢U ô¶fCG) áeÉ©dG RÉ¡÷G áfRhO •
(41 ¢U ô¶fCG) OQƒÑ«µdG ΩÉ°ùbCG 䃰U Ió°T •
(40 ¢U ô¶fCG) ô°ùjC’G º°ù≤dG AÉcP áØ«Xh •
(40 ¢U ô¶fCG) ô°ùjC’G º°ù≤dG äɪ¨f QGôªà°SEG •
±ÉàchC’G äGõ«¡Œ
''GLB'' á∏eÉ°ûdG πjƒëàdG áØ«Xh
,»°SÉ°SC’G 䃰üdG) OQƒÑ«µdG ΩÉ°ùbCG πjƒ– EXR-46 OR RÉ¡L ∂d í«àj
.πØ°SCÓd hCG ≈∏YCÓd äÉaÉàchCG ™HQCG QGó≤à (áfÉ£ÑdG 䃰U ,ô°ùjC’G º°ù≤dG
䃰üdG) [TONE] QR §¨°VG ,ΩÉ°ùbC’G óMC’ ±ÉàchC’G πjƒ– Ò«¨àd
¬≤HCGh ,(áfÉ£ÑdG 䃰U) [DUAL] hCG ,(Cô°ùjC’G º°ù≤dG) [SPLIT] hCG,(»°SÉ°SC’G
.(≈∏YC’G) [+] QR hCG (πØ°SC’G) [–] QR §¨°†J ɪæ«H kÉWƒ¨°†e
áLQódG Ò«¨àH Ωƒ≤J »àdGh ''πjƒëà∏d »°ù«FôdG §Ñ°†dG'' áØ«Xh kÉ°†jCG ∑Éæg
ΩÉ≤ŸG πjƒ– áaÉ°ùe ¤G ɡફb ±É°†Jh .EXR-46 OR RÉ¡L ΩÉ°ùbCG πµd
.RÉ¡÷G ≥∏¨J hCG ''ôØ°U'' ™°VƒdG ¤G É¡JOÉYEÉH Ωƒ≤J ¿G ¤G á«dÉ◊G
.[TRANSPOSE] QR §¨°VG (1)
.'' USR Trnsp'' ádÉ°SQ á°TÉ°ûdG ≈∏Y ô¡¶J
GLBTrnsp
:‹ÉàdG Ò¨àŸG QÉ«àN’ IóMGh Iôe [®] SELECT QR §¨°VG (2)
áaÉ°ùe QÉ«àN’ ([9] ~[0] ) ᫪bôdG QGQRC’G hCG [+] [–] QGQRCG Ωóîà°SG (3)
.áHƒZôŸG ΩÉ≤ŸG πjƒ–
Gòg áaÉ°VEG ºàjh ,áLQódG ±É°üfCG 5~0~6- õ«¡éàdG Gòg ióe ≠∏Ñjh
áaÉch ΩÉ°ùbC’G áaɵd ''USRTrnsp'' ᪫b (øe ¬aòM hCG) ¤G õ«¡éàdG
.±RÉ©dG èeGôH
¤G hCG ≈∏YC’G ¤G OQƒÑ«µdG ΩÉ≤e πjƒëàd kGQGôµJ [–] hCG [+] QR §¨°VG
≈∏Y §¨°†dÉH Iô°TÉÑe áHƒ∏£ŸG πjƒëàdG áaÉ°ùe ∫ÉNOEG ∂æµÁh ,πØ°SC’G
.áaÉ°ùŸG √ò¡d ≥HÉ£ŸG »ªbôdG QõdG
ɪæ«H kÉWƒ¨°†e ¬≤HCGh [–] QR §¨°VG ,πØ°SC’G ¤G OQƒÑ«µdG ΩÉ≤e πjƒëàd
áLQO ¢†«ØîJ ∂æµÁ ádÉ◊G √òg ‘h) [6] ~[0] QGRC’G ≈∏Y §¨°†J
.(áLQódG ±É°üfCG 6 ájɨd πjƒëàdG
¿G ÚÑàd
IQÉ°TEG ¢†eƒJ ,ôØ°üdG GóY ᪫b ájC’ ∑QÉ«àNEG Qƒah
.ΩÉ°ùbC’G áaÉc ‘ πeÉ°T πjƒ– ≥«Ñ£àH Ωƒ≤j EXR-46 OR RÉ¡L
∫ÉNOEG ™e ,(3) ºbQ Iƒ£ÿG IOÉYEÉH ºb ,πeÉ°ûdG πjƒëàdG áØ«Xh ¥ÓZC’ (4)
.''ôØ°U'' ᪫≤dG
áØ«Xh ¥ÓZEG iód »ØàîJh) ¢†«eƒdG øY
IQÉ°TCG ∞bƒàJ
.(''USRTrnsp''
ºà«°Sh ,±RÉ©dG èeGôH óMCG ‘ õ«¡éàdG Gòg ßØM øµÁ ’ :á¶MÓe
.RÉ¡÷G ¥ÓZEG óæY √DhɨdG
êhôî∏d ''DATA ENTRY'' º°ùb ‘ ''ÒÑc'' ôNBG QR §¨°VG (5)
.áØ«XƒdG √òg øe
33
r EXR–46 OR
áaÉ°ùe ójóëàd (9~0) ᫪bôdG QGQRC’G hCG [+][–] QGQRCG Ωóîà°SG (2)
.ΩÉ≤ŸG πjƒ–
‘ ∫ƒÑW áYƒª› Ú«©J ó©H ∫ƒÑ£dG áMƒd ™°Vh QÉ«àNÉH âªb GPEG :áßMÓe
√QÉ«àNÉH âªb »æ◊ 䃰U ôNBG ™Lΰùj »°ù«FôdG º°ù≤dG ¿Éa ,»°ù«FôdG º°ù≤dG
‘ ô≤ædG hCG ∫ƒÑ£dG øe ™£≤e ±õY ∂æµÁ ’h .(¬«a OóÙG 䃰üdG ¤G hCG)
Ú«©J ¿Éa ,¢ùµ©dÉHh .kÉ£°ûf ∫ƒÑ£dG áMƒd ™°Vh ¿ƒµj ÉeóæY »°ù«FôdG º°ù≤dG
…ODƒ«°S kÉ£°ûf ∫ƒÑ£dG áMƒd ™°Vh ¿ƒµj ÉeóæY »°ù«FôdG º°ù≤∏d ∫ƒÑW áYƒª›
.∫ƒÑ£dG áMƒd áØ«Xh ¥ÓZEG ¤G
∫ƒÑ£dG áMƒd ™°Vh ΩGóîà°SEG
äGôKDƒŸG hCG ô≤ædG/∫ƒÑ£dG äGƒ°UCG Ú«©J ∫ƒÑ£dG áMƒd ™°Vh ∂d í«àj
R áeÓY πª– »àdGh) É«∏©dG á«fɪãdG í«JÉت∏d É¡ÑZôJ »àdG á«Jƒ°üdG
√ògh .»°SÉ«b øeR ‘ äGƒ°UC’G √òg ±õ©J ¿CGh ,(¢S DRUM PAD
.ᣰûf V-LINK áØ«Xh ¿ƒµJ ÉeóæY ≈àM Iôaƒàe ¿ƒµJ áØ«XƒdG
.∫ƒÑ£dG áMƒd ™°Vh øe êhôî∏d [SPLIT] + [DUAL] QGQRCG §¨°VEG (3)
∫ƒÑ£dG áMƒd áØ«Xh ΩGóîà°SEG
.á¶ë∏dG ¢ùØf ‘ kÉ©e [DUAL] h [SPLIT] QGQRCG §¨°VEG (1)
.á«æ◊ áLQO ∞°üf 12+ ¤G 12- øe ΩÉ≤ŸG πjƒ– ióe ìhGÎjh
Oƒ°SC’G ìÉàØŸGh ¢†«HC’G ìÉàØŸG ÚH IóMGh Iƒ£N »g áLQódG ∞°üfh
.(''B/C'' h ''E/F'' ÚMÉàØŸG ÚH kÓãe ,øjQhÉéàe Ú°†«HCG ÚMÉàØe ÚH hCG)
¤G hCG ≈∏YC’G ¤G OQƒÑ«µdG ΩÉ≤e πjƒëàd kGQGôµJ [–] hCG [+] QR §¨°VG
≈∏Y §¨°†dÉH Iô°TÉÑe ΩÉ≤ŸG πjƒ– áaÉ°ùe ∫ÉNOEG ∂æµÁ ɪc ,πØ°SC’G
.áaÉ°ùŸG √ò¡d ≥HÉ£ŸG »ªbôdG QõdG
ɪæ«H kÉWƒ¨°†e ¬≤HCGh [–] QR §¨°VG ,πØ°SC’G ¤G OQƒÑ«µdG ΩÉ≤e πjƒëàd
áLQO ¢†«ØîJ ∂æµÁ ádÉ◊G √òg ‘h) [9]~[0] QGRC’G ≈∏Y §¨°†J
.(áLQódG ±É°üfCG 9 ájɨd πjƒëàdG
''C'' ìÉàØe âaõY ɪ∏c ''E'' ᪨f ™ª°ùJ ¿G äOQCG ƒd :∫ÉãŸG Gòg ∂«dEG
»¡àæàa ,QGó≤ŸG ¢ùØæH ∂Jɪ¨f áaÉc ∫ƒëàà°Sh ''4'' QõdG ÎNÉa
ΩÉ≤e øe É¡aõ©J âfCG ɪæ«H ''ÒѵdG E'' ΩÉ≤e øe É¡©ª°ùJ ≈≤«°SƒÃ
.ïdG ,''ÒѵdG C''
No transposition (C major)
Transpose (ΩÉ≤ŸG Ò«¨J) »ª¨ædG πjƒëàdG
äÉØdBÉàdGh äɪ¨æ∏d á«æë∏dG áLQódG Ò«¨àH »ª¨ædG πjƒëàdG áØ«Xh Ωƒ≤J
É¡«a ±õ©dG ∂eõ∏j IójóL äÉeÉ≤e ≈∏Y ÜQóàJ ¿CG øe k’óÑa ,É¡aõ©J »àdG
᪫b ójó– ∂æµÁ ,áÑMÉ°üŸG á«≤«°SƒŸG ádB’G hCG »æ¨ŸG ™e ≈°Tɪààd
™ª°ùà°S ɪæ«H ,π°†ØŸG ∂eÉ≤e øe ∂à«æZCG ±õ©H ôªà°ùJh ,»ª¨ædG πjƒëàdG
.∞∏àfl ΩÉ≤e øe ≈≤«°SƒŸG
øµÁ »àdGh (''USRTrnsp'') »g ¤hC’G :»ª¨ædG πjƒëà∏d ¿ÉàØ«Xh ∑Éæg
(''GLBTrnsp'') »g á«fÉãdGh ,±RÉ©dG èeGôH óMCG ‘ É¡JGõ«¡Œ ßØM
᪫b (øe ±ò– hCG) ¤G É¡JGõ«¡Œ ±É°†Jh ΩÉ°ùbC’G áaÉc ‘ πª©J »àdGh
.É¡JGõ«¡Œ ßØM kGóHCG ºàj ’h , ''USRTrnsp''
QR ᣰSGƒH πª©J »àdGh ''USRTrnsp'' áØ«XƒH CGóÑf ÉæYO
:[TRANSPOSE]
.[TRANSPOSE] QR §¨°VG (1)
øe êhôî∏d DATA ENTRY º°ùb ‘ ''ÒÑc'' ôNBG QR §¨°VG (4)
.áØ«XƒdG √òg
2 120 001
=
ORCHESTRATOR
BEAT
FULL
BAND
M
INTRO
:‹ÉàdG πµ°ûdG ‘ ɪc á°TÉ°ûdG hóÑà°S
.
(45 ¢U ô¶fCG) ±RÉ©dG èeGôH óMCG ‘ õ«¡éàdG Gòg ßØM øµÁ :á¶MÓe
áØ«Xh É¡«a ≥Ñ£à°S »àdG ΩÉ°ùbC’G ójó– ∂d í«àJ áØ«Xh kÉ°†jCG ∑Éæg :á¶MÓe
.(40 ¢U TransMod Iô≤a ô¶fCG) ''»ª¨ædG πjƒëàdG''
dp Piano
.§°ûf ∫ƒÑ£dG áMƒd ™°Vh ¿G ¢S "dp" R IQÉ°TEG »æ©J
.äGƒ°UC’G áHôéàd (1~8) ∫ƒÑ£dG áMƒd á≤£æe ‘ í«JÉØŸG ≈∏Y §¨°VEG (2)
Transpos= 4 (E major)
ô°TDƒeh »ª¨ædG πjƒëàdG ᪫b á°TÉ°ûdG ≈∏Y ô¡¶J
(2) h (1) äGƒ£ÿG IOÉYÉH ºb ,»ª¨ædG πjƒëàdG áØ«Xh ¥ÓZC’ (3)
.''ôØ°U'' ᪫≤dG ∫ÉNOEG ™e
:‹ÉàdG ƒëædG ≈∏Y ¿B’G á°TÉ°ûdG hóÑJ
00 USRTrnsp 120
=
ORCHESTRATOR
001
BEAT
FULL
BAND
M
INTRO
ºµëà∏d ɉEGh ,äɪ¨ædG ±õ©d á°ü°üfl í«JÉØŸG √òg ó©J ⁄ ¿B’G
.ô≤ædG/∫ƒÑ£∏d äGƒ°UCG 8 ‘
,í«JÉØŸG √ò¡d ô≤ædGh ∫ƒÑ£dG øe iôNCG äGƒ°UCG QÉ«àNEG kÉ°†jCG ∂æµÁ
.π«°UÉØà∏d 41 ¢U ô¶fCG
.(45 ¢U) ±RÉ©dG èeÉfôH ‘ äGQÉ«àN’G √òg ßØM ¿Éµe’ÉH
32
EXR–46 OR
óMCG ÎNEG ,»Jƒ°üdG ôKDƒŸG ±õ©d iô°ù«dG ∑ój ΩGóîà°SÉH âÑZQ GPEG
ôKDƒŸG ±õ©dh ,ô°ùjC’G º°ù≤dG ¤G ¬∏NOCGh ''576'' ¤G ''762'' øe äGƒ°UC’G
.»°SÉ°SC’G 䃰üdG º°ùb ¤G 䃰üdG πNOCG ≈檫dG ó«dÉH »Jƒ°üdG
øe Ohófi OóY ¢ü«°üîJ ºàj å«ëH (4 ¢U) ΩÉ°ù≤f’G á£≤f ÒZ (3)
,≈檫dG ó«dÉH ±õ©∏d ''C6'' ìÉàØŸG) »Jƒ°üdG ôKDƒŸG ±õ©d í«JÉØŸG
.(iô°ù«dG ó«dÉH ±õ©∏d ''C3''
oct äGõ«¡Œ Ò«¨J ¤G êÉà– ób ,ºFÓe ôKDƒe ≈∏Y ∫ƒ°üë∏d (4)
.(42 ¢U) SPLT oct hCG MAIN
ióe ¿CÉa ,Cô°ùjC’G º°ù≤dG ‘ á«Jƒ°üdG äGôKDƒŸG óMCG Ú«©àH âªb GPEG
.√ÉfOCG πµ°ûdG ‘ ô¡¶j ɪc ¿ƒµ«°S í«JÉØŸG
Split part (sound effect/percussion
sound)
31
øµÁ ’h ,»°SÉ°SC’G 䃰üdG ‘ §≤a ∫ƒÑ£dG äÉYƒª› ∫ÉNOEG øµÁ :áßMÓe
.áfÉ£ÑdG 䃰Uh ô°ùjC’G º°ù≤dG ‘ É¡dÉNOEG
øµÁ ’ á«Jƒ°U äGôKDƒe áYƒª› ™bGƒdG ‘ »g (650) áYƒªÛG ¿G :á¶MÓe
.á«Jƒ°U äGôKDƒe áYGPC’ Ωóîà°ùJ øµd ,∫ƒÑ£dG ±õ©d É¡eGóîà°SG
(45 ¢U ô¶fCG) ±RÉ©dG èeGôH óMCG ‘ õ«¡éàdG Gòg ßØM øµÁ :á¶MÓe
(SFX) á«Jƒ°üdG äGôKDƒŸG
h ''Train'') πãe á°UÉN á«Jƒ°U äGôKDƒe ≈∏Y EXR-46 OR RÉ¡L …ƒàëj
” (617~576) á°UÉN ∫ƒÑW äGƒ°UCGh ,(ÉgÒZh ''HrseGLLP'' h ''Kitty''
ô°ùjC’G º°ù≤dG ,»°SÉ°SC’G 䃰üdG) √QÉàîJ …òdG º°ù≤∏d πeɵdG ióª∏d Égójó–
.(áfÉ£ÑdG 䃰Uh
䃰U §≤a ∑Éæ¡a :∫ƒÑ£dG äÉYƒª› πãe πª©J ’ äGƒ°UC’G √òg ¿G ßM’
.ø◊ πµ°T ≈∏Y ¬aõY øµÁh OQƒÑ«µ∏d √ójó– ºàj óMGh
:á«dÉàdG äGƒ£ÿG ´ÉÑJEG π°†aC’G øe ¿ƒµj ób Gòd
.[SPLIT] QR §¨°VEG (1)
ᣰSGƒH á«YÉ≤jE’G ä’B’G hCG »Jƒ°üdG ôKDƒŸG ±õ©à°S âæc GPEG ɪ«a Qôb (2)
.iô°ù«dG ΩCG ≈檫dG ∑ój
Main part (melodic sound)
(SFX) á«Jƒ°üdG äGôKDƒŸGh ∫ƒÑ£dG äGƒ°UCG
∫ƒÑ£dG äÉYƒª›
äÉYƒª›'' `H (650~618) IÒNC’G ¿ƒKÓãdGh çÓãdG äGƒ°UC’G ≈ª°ùJ
OQƒÑ«µdG ‘ ìÉàØe πc ¿CÉa äÉYƒªÛG √òg ióMEG ∑QÉ«àNG óæYh ,''∫ƒÑ£dG
∂æµÁ QÉ°ù«dG ≈°übCG ‘ ™bGƒdG ìÉàØŸG ᣰSGƒÑa ,∞∏àfl 䃰U …ODƒj
¢†«HC’G ìÉàØŸG ±õ©j ɪæ«H ,(Bass Drum) ¢UÉÑdG á∏ÑW 䃰U ±õY
≈∏Y §¨°†dG ∫ÓN øe ∂dP ÜôL .ïdG ,QÉJhC’G äGP á∏Ñ£dG 䃰U ¬ÑfÉéH
.óMGh ¿BG ‘ hCG ‹GƒàdÉH ÉeEG í«JÉØe IóY
ìÉàØe ‘ É¡æe πc ,kÉJƒ°U 90 øe ÌcCG ≈∏Y …ƒà– ∫ƒÑ£dG äÉYƒª›
.∞∏àfl
r EXR–46 OR
OQƒÑ«µdG ΩÉ°ùbCG ∞FÉXh .10
USER TONES
±RÉ©dG äGƒ°UCG QGQRCG ΩGóîà°SG
äÉYƒª› hCG á«æ◊ äGƒ°UCG á«fɪK QÉ«àNG ''±RÉ©dG äGƒ°UCG'' QGQRCG ∂d í«àJ
hCG FAMILY hCG [TONE] QGQRCG ΩGóîà°SG ¿hóHh) Iô°TÉÑe IQƒ°üH ∫ƒÑW
AÉYóà°SÉH QGQRC’G √òg Ωƒ≤J ájGóÑdG ‘ .(᫪bôdG QGQRC’G hCG SELECT
.(ÉgÒ«¨J ∂æµÁ øµdh) ™æ°üŸG øe É¡d IOóÙG äGƒ°UC’G
∂d í«àj ɇ ,IOóÙG äÉÄØ∏d ''á∏°†ØŸG'' ÉæJGƒ°UCÉH á°UÉN QGQRC’G √ògh
Ò«¨J øµÁh .ïdG ,''…ôJh 䃰U'' hCG ''ƒfÉ«H'' 䃰üd ™jô°ùdG QÉ«àN’G
.QGQRC’G √ò¡H áWƒæŸG äGƒ°UC’G
.»°SÉ°SC’G 䃰ü∏d §≤a ìÉàe TONE [DRUMS] QR ¿G :á¶MÓe
±RÉ©dG äGƒ°UCG QGQRC’ ôNBG 䃰U ójó–
:»∏j Éà ºb ,á«fɪãdG ±RÉ©dG äGƒ°UCG QGQRCG óMC’ ôNBG 䃰U Ú«©àd
.√ÓYCG AGôL’G kÉ©Ñàe √ójóëàH ÖZôJ …òdG 䃰üdG QÉ«àNÉH ºb (1)
ádÉ°SQ á°TÉ°ûdG ≈∏Y ô¡¶àa ,܃∏£ŸG ±RÉ©dG äGƒ°UCG QR IÎØd §¨°VEG (2)
”Memrized“
äGƒ°UCG QGQRCG øe …CG ‘ (∫ƒÑW áYƒª› hCG) 䃰U …CG Ú«©J ∂æµÁ
.QõdG ∂dP ≈∏Y IóMGh IôŸ §¨°†dG ∫ÓN øe √QÉ«àNGh ±RÉ©dG
Gògh ,(45 ¢U ô¶fCG) ±RÉ©dG èeGôH óMCG ‘ ∂JGQÉ«àNG ßØM øµÁ :á¶MÓe
èeÉfôH 200 ∑Éæg ¿C’) QÉ«N 1600 ¤G π°üJ äGQÉ«àNG ΩGóîà°SG ∂d í«àj
.(±RÉ©∏d
äGƒ°UCG QGQRCG óMCG ‘ ™æ°üŸG ™°Vh øe ¬æ««©J ” …òdG 䃰üdG QÉ«àN’
.("double click") Úà«dÉààe ÚJôe 䃰ü∏d πHÉ≤ŸG QõdG §¨°VG ,±RÉ©dG
áYƒª› ∑QÉ«àNG iódh ,IôaƒàŸG á«Jƒ°üdG äÉYƒªÛG áªFÉb »∏j ɪ«a
.áYƒªÛG ∂∏J øe ∫hC’G 䃰üdG ¤G kGQƒa õØ≤J ∂fCÉa iôNCG
(001~011) PIANO •
(012~026) E.PIANO •
(027~033) KEYBOARD •
(034~063) CHR PERC •
(064~097) ORGAN •
(098~111) ACCORDN •
(112~129) GUITAR •
(130~163) E.GUITAR •
(164~217) BASS •
(218~263) STRINGS •
(264~275) VOCAL •
(276~287) SAX •
(288~301) WIND •
(302~329) AC BRASS •
(330~343) SYNBRASS •
(344~380) SYNLEAD •
(381~391) POLY SYN •
(392~426) PAD •
(427~499) ETHNIC1 •
(500-550) ETHNIC2 •
(551-575) PERCUSSION •
(576-617) SFX •
(618-650) DRUM KIT •
º°ù≤dG 䃰Uh ,»°SÉ°SC’G 䃰üdG QÉ«àNG
.áfÉ£ÑdG 䃰Uh ,ô°ùjC’G
É¡eGóîà°SG ∂æµÁ »æ◊ 䃰U 524 ‹GƒM EXR-46 OR RÉ¡L …ƒëj
.(á«Jƒ°U äGôKDƒªc πª©j É¡°†©Hh) ¿É◊C’G ±õ©d
:ΩÉ°ùbCG áKÓK øe ∞dDƒŸGh OQƒÑ«µdG ¤G äGƒ°UC’G √òg ∫ÉNOEG Öéjh
.(13 ¢U kÉ°†jCG ô¶fCG) áfÉ£ÑdGh ,ô°ùjC’Gh ,»°SÉ°SC’G
IôaƒàŸG äGƒ°UC’G øe …CG QÉ«àNG
QGQRC’ÉH πª©j ’ EXR-46 OR RÉ¡L ¿CÉa ,á≤HÉ°ùdG äÉYRƒŸG ´GƒfCG ¢ùµ©H
ᣰSGƒH ÉgQÉ«àNG øµÁ IôaƒàŸG äGƒ°UC’G áaɵa ,äGÒ¨àŸG hCG ΩÉbQC’G hCG
:‹ÉàdG §«°ùÑdG AGôLC’G ¢ùØf
.(ô°TDƒŸG Å°†j ¿G Öéj) DATA ENTRY [TONE] QR §¨°VG (1)
.IôaƒàŸG äGƒ°UC’G áªFÉb ≈∏Y ±ô©à∏d ???? áëØ°U ô¶fCG :áßMÓe
πNGO øe ܃∏£ŸG 䃰üdG ójóëàd [√] [®] SELECT QGQRCG Ωóîà°SG (4)
.IQÉàıG áYƒªÛG
䃰üdG º°SG ô¡¶j ([√] hCG) [®] SELECT QR ≈∏Y ¤hC’G Iôª∏d §¨°†dÉHh
áLÉëH âæc GPG Gòd ,ƒà∏d √QÉ«àNG ” óbh ,IQÉàıG áYƒªÛG øe ∫hC’G
øµd [√] [®] SELECT QR ≈∏Y §¨°†∏d ™bGƒdG ‘ »YGO Óa 䃰üdG Gòg ¤G
øe ôNBG 䃰U QÉ«àN’ [√] hCG [®] SELECT QGQRCG ΩGóîà°SG ∂«∏Y
.É¡°ùØf áYƒªÛG
áYƒªÛG øe iôNCG äGƒ°UCG QÉ«àN’ [9]~[0] ᫪bôdG QGQRC’G Ωóîà°SG (5)
.SELECT QGQRCG πÑb øe ÉgRhÉŒ ” »àdGh á«dÉ◊G
.(45 ¢U ô¶fCG) .±RÉ©dG èeGôH óMCG ‘ õ«¡éàdG Gòg ßØM øµÁ :á¶MÓe
TONE
hCG [SPLIT] QR IÎØd §¨°VG ,áfÉ£ÑdG hCG ô°ùjC’G º°ù≤∏d ôNBG 䃰U QÉ«àN’ (2)
.á«dÉàdG äGƒ£ÿÉH Ωƒ≤J ɪæ«H kÉWƒ¨°†e ¬≤HCGh [DUAL]
䃰üdG ºbQ ∫ÉNOÉH âÑZQ GPEG (5) ºbQ Iƒ£ÿG ¤G ¿B’G π≤àfG :á¶MÓe
Ió«MƒdG á≤jô£dG »g √ògh ([0]~[9]). ᫪bôdG QGQRC’G áMƒd ΩGóîà°SÉH ܃∏£ŸG
.ôaƒàe 䃰U …CG QÉ«àN’
.áHƒ∏£ŸG äGƒ°UC’G áYƒª› QÉ«àN’ [√] [®] FAMILY QGQRCG Ωóîà°SG (3)
QGQRCG ΩGóîà°SG'' Iô≤a ô¶fCG .᫪bôdG QGQRC’G ΩGóîà°SG kÉ°†jCG ∂æµÁ
IQÉÑY k’óÑà°ùe (20 ¢U) ''᫪bôdG QGQRC’Gh SELECT h FAMILY
.''䃰U'' IQÉÑ©H ''á«æZCG''
30
EXR–46 OR
á«bô°ûdG áfRhódG ΩGóîà°SG .9
äɪ¨f πc ≈∏Y ¢VÉØîf’G Gòg ≥ѣ櫰Sh .(âæ°S 50-) ¿ƒJ 4/1 QGó≤à ᪨ædG √òg OOôJ ¢†Øîæ«°S ,(ô°TDƒŸG Å°†j) »°S [Bƒ] »bô°ûdG ΩÉ≤ŸG QR kÓãe ⣨°V ƒ∏a ,äÉaÉàchC’G πc ≈∏Y ôKDƒJ »àdGh ¬ë«JÉØe áfRhO Ò«¨J EXR-46 OR RÉ¡L ∂d í«àj
.OQƒÑ«µdG ‘ b »°S
Gòd ,±RÉ©dG èeGôH óMCG ‘ »bô°ûdG ΩÉ≤ŸG äGõ«¡Œ ßØM kÉ°†jCG ºàjh
Ωƒ≤J ÉeóæYh ,ΩÉ≤ŸG IôcGP ΩÉ°ùbCG óMCG ‘ É¡¶Ø◊ áLÉM ∑Éæg ¢ù«d
∂∏J øY ¬«a ΩÉ≤ŸG äGõ«¡Œ ∞∏àîJ …òdG ±RÉ©dG èeGôH óMCG QÉ«àNÉH
([3]~[1]) É¡d πHÉ≤ŸG QõdG CGóÑj ,É¡JÎNG IôcGP ôNBG ‘ IOƒLƒŸG
.¢†«eƒdÉH
.óMGh ¿BG ‘ [–] h [+] …QR §¨°VG ,á«∏°UC’G ᪫≤dG ¤G IOƒ©∏d :áßMÓe
SCALE MEMORY ∂JÉfRhO 𫪖h ßØM
¿ƒJ 4/1 QGó≤à áæ«©e äɪ¨f ¢†ØN
ÉgOOôJ ¢†ØN ‘ ÖZôJ »àdG ᪨æ∏d πHÉ≤ŸG ''»bô°ûdG ΩÉ≤ŸG'' QR §¨°VEG (1)
.(QõdG ô°TDƒe Å°†j ¿G óH ’) ¿ƒJ 4/1 QGó≤Ã
ΩÉ≤ŸG äGôcGP ióMEG ‘ É¡¶ØM ∂æµÁ ,áHƒ∏£ŸG äÉfRhódG §Ñ°V ó©H
:äGƒ£ÿG ∂«dEG .äOQCG ɪ∏c É¡FÉYóà°SGh ,çÓãdG »bô°ûdG
.(√ÓYCG ô¶fCG) ∂d ƒ∏ëj ɪc ᪨ædG OOôJ §Ñ°VG (1)
SCALE MEMORY ([1]~[3]) ''ΩÉ≤ŸG IôcGP'' QGQRCG óMCG IÎØd §¨°VG (2)
.áfRhó∏d ∂JGõ«¡Œ ßØ◊ √QÉàîJ …òdG
.É¡d á∏HÉ≤ŸG QGQRC’G §¨°VEG ,iôNCG äɪ¨f OOôJ Ò«¨J äOQCG ƒd (2)
,ÅØ£æ«a á«fÉK ¬£¨°VG ,√ô°TDƒe AÉ°VCGh CÉ£ÿG ≥jôW øY kGQR ⣨°V GPEG
.»©«Ñ£dG ™°VƒdG ¤G ᪨ædG OOôJ Oƒ©«°Sh
iôNCG äÉfRhO ΩGóîà°SG
ô¶fCG) »bô°ûdG ΩÉ≤ª∏d Ió«Øe äGõ«¡Œ π©ØdÉH …ƒëj ™æ°üŸG ™°Vh :á¶MÓe
.(√ÓYCG
ôKCÉàà°S »àdG ΩÉ°ùbC’G ójóëàd (43 ¢U) áfRhódG ™°Vh kÉ°†jCG ô¶fCG :á¶MÓe
.»bô°ûdG ΩÉ≤ŸG äÉfRhóH
∑ôJG ºK ,áKÓãdG ΩÉ≤ŸG IôcGP QGQRCG äGô°TDƒe á¶ë∏d Å°†J ≈àM ô¶àfG (3)
.QõdG
§¨°†dÉH ,áKÓãdG ΩÉ≤ŸG äGôcGP øe iôNCG IôcGP QÉ«àNG äOQCG ¿EG ∂æµÁ
.É¡H ¢UÉÿG QõdG ≈∏Y (ádÉWEG ¿hO) OÉà©ŸG
á«fÉK Iôe á«dÉ◊G ΩÉ≤ŸG IôcGP QR §¨°VG ,á«∏°UC’G áfRhódG ¤G IOƒ©∏d
äGô°TDƒŸG äGP »bô°ûdG ΩÉ≤ŸG QGQRCG πc ÅØWCG hCG ,ô°TDƒŸG ÅØ£æ«a
É¡JÎNG ΩÉ≤e IôcGP ôNBG ô°TDƒe ¢†eƒ«°S ádÉ◊G √òg ‘h ,áÄ«°†ŸG
‘ IOƒLƒŸG πKÉ“ ó©J ⁄ á«dÉ◊G »bô°ûdG ΩÉ≤ŸG äGõ«¡Œ ¿G kÉæ∏©e
.IôcGòdG ∂∏J
á∏HÉ≤ŸG ᪨æ∏d á«∏°UC’G áfRhódG ÚH QÉàîJ »bô°ûdG ΩÉ≤ŸG QGQRCG óMCG §¨°†H
.áØ∏àfl iôNCG ᪫b QÉ«àNG ∂æµÁ ¬fCG ’EG ,É¡æY ¿ƒJ 4/1 É¡°†ØN ÚHh ¬d
áfRhódG áª∏c ô¡¶J ≈àM áæ«©ŸG ᪨æ∏d »bô°ûdG ΩÉ≤ŸG QR IÎØd §¨°VG (1)
.᪨ædG º°SG É¡©Ñàj á°TÉ°ûdG ≈∏Y ''Scale''
.(44 ¢U) ∞FÉXƒdG áªFÉb øe É¡JGÒ¨àeh áØ«XƒdG √òg AÉYóà°SG ∂æµÁ ɪc
.IQÉàıG ᪨ædG OOôJ πjó©àd DATA ENTRY [–][+] QGQRCG Ωóîà°SG (2)
.âæ°S 63~64- øe §Ñ°†dG ióe
29
r EXR–46 OR
äÉYÉ≤jE’G ∞FÉXh øe ójõŸG
.'' Bass Inv'' Ò¨àŸG QÉ«àN’ [√] [®] SELECT QGQRCG Ωóîà°SEG (3)
ÉgOGóYEG ∂æµÁ ,äÉYÉ≤jE’ÉH ≥∏©àJ iôNCG ∞FÉXh Éæg Éæjód âdGR Ée
:iôNCG ™°VGƒe ‘ É¡à«£¨J â“ hCG ,∞FÉXƒdG áªFÉb ᣰSGƒH
áÑMÉ°üŸGh ´É≤jE’G äÉcGôJh OQƒÑ«µdG ΩÉ°ùbCG ÚH 䃰üdG Ió°T ¿RGƒJ •
.(18 ¢U ô¶fCG)
.(41 ¢U ô¶fCG) áÑMÉ°üŸG äÉcGôJ ¢†©H 䃰U Ió°T •
.(40 ¢U ô¶fCG) ´RƒŸG ΩÉ°ù≤fEG á£≤f •
.(42 ¢U ô¶fCG) ´RƒŸG äɪ¨f QGôªà°SEG áØ«Xh •
00 BassInv
120
=
ORCHESTRATOR
001
BEAT
FULL
BAND
M
Bass Inv ¢UÉÑdG ÜÓ≤fEG
»àdG äÉØdBÉà∏d ´RƒŸG IAGôb ܃∏°SCG Ò«¨àd áØ«XƒdG √òg Ωóîà°SEG
.É¡aõ©J
´RƒŸG ¢UÉH ±õ©«°ùa ,(á∏©Øe ÒZ) á≤∏¨e áØ«XƒdG √òg ¿ƒµJ ÉeóæY
''hO'' ∞dBÉJ hCG ''hO'' ᪨f âaõY ƒ∏a ,¬aõ©J …òdG ∞dBÉàdG QòL ᪨f
™e ''’'' ᪨f hCG) Ò¨°üdG ''’'' ∞dBÉJ âaõY ƒdh ,''hO'' ¢UÉÑdG ±õ©«°S
.(ïdG ,''’'' ¢UÉÑdG ±õ©«°S ,É¡æ«Á ¤G »àdG ''hO''
¢UÉH É¡aõ©j »àdG ᪨ædG ójó– ∂æµÁ ''¢UÉÑdG ÜÓ≤fEG'' áØ«Xh §«°ûæàH
.(É¡aõ©J ᪨f ß∏ZCG ¿ƒµà°S) ´RƒŸG
ÌcCG ¢UÉÑdG ≈∏Y kÉ°SÉ°SCG óªà©J »àdG ≈≤«°SƒŸG ™e áØ«XƒdG √òg Ωóîà°SEG
.(ïdG ,b »°S/hO-»°S/hO-hO kÓãe) äÉØdBÉàdG øe
.[FUNCTION] QR §¨°VEG (1)
INTRO
.''VALUE'' ᪫≤dG ô°TDƒŸ ''ON'' QÉ«àN’ [+] QR §¨°VEG (4)
QGQRC’Gh SELECT h FAMILY QGQRCG ΩGóîà°SEG'' Iô≤a kÉ°†jCG ô¶fCG :á¶MÓe
.(19¢U) ''᫪bôdG
DATA ENTRY äÉeƒ∏©ŸG ∫ÉNOEG º°ùb ‘ ''ÒÑc'' ôNBG QR §¨°VEG (5)
'' AR SET'' QÉ«àN’ [√] [®] FAMILY QGQRCG Ωóîà°SEG (2)
.áØ«XƒdG √òg øe êhôî∏d
.(45 ¢U ô¶fCG) ±RÉ©dG èeGôH óMCG ‘ õ«¡éàdG Gòg ßØM øµÁ :á¶MÓe
äÉYƒª› ™°ùJ ¤G EXR-46 OR RÉ¡L ‘ á«Ø«XƒdG äGÒ¨àŸG º°ù≤æJ
.á«∏«∏–
QÉ«àNEG ∂«∏©a ,´RƒŸG ∞FÉXh øe ƒg ''¢UÉÑdG ÜÓ≤fEG'' Ò¨àe ¿CG å«Mh
.(AR SET) ´RƒŸG äGõ«¡Œ
28
EXR–46 OR
»æë∏dG AÉcòdG ´ƒf Ò«¨J
ƒfÉ«ÑdG ™°Vh
¿G øe ºZôdÉHh ,¬∏ªcCÉH OQƒÑ«µdG »°SÉ°SC’G 䃰üdG »£¨j ƒfÉ«ÑdG ™°Vh ‘
’EG ƒfÉ«ÑdG 䃰üH »°SÉ°SC’G 䃰üdG πªY kÉ«FóÑe Oóëj EXR-46 OR RÉ¡L
.±RÉ©dG èeGôH óMCG ‘ ∂JGõ«¡Œ ßØMh ôNBG 䃰U QÉ«àNEG ∂æµÁ ¬fCG
¿CG ƒg ''ƒfÉ«ÑdG ±RÉY'' ™°Vhh ''OôØæŸG ƒfÉ«ÑdG'' ™°Vh ÚH »°ù«FôdG ¥ôØdGh
»g ɪæ«H ,''ƒfÉ«ÑdG ±RÉY'' ™°Vh ‘ áMÉàe ¿ƒµJ ´Rƒª∏d á«æë∏dG ΩÉ°ùbC’G
.''OôØæŸG ƒfÉ«ÑdG'' ™°Vh ‘ áMÉàe ÒZ
‘ OQƒÑ«µdG ¿G ôcòJ óbh) äÉØdBÉàdG IAGô≤d ΩÉ°ù≤fEG á£≤f óLƒJ ’ øµdh
(''ábôØdG ≥°ùæe'' QR π¨°ûJ ÉeóæY º°ù≤æj EXR-46 OR RÉ¡L
.[ARRANGER¥BAND]
øjCG ô¶ædG ¢†¨Hh- É¡aõ©J »àdG äÉØdBÉàdG áaÉc IAGô≤H ´RƒŸG Ωƒ≤jh
.-É¡aõ©J
çÓK πbC’G ≈∏Y ±õ©J ¿G ∂d óH ’ ôNBG ∞dBÉJ ±õ©H ´RƒŸG Ωƒ≤j »µdh
ÈcCG OóY øe ¿ƒµàj ∞dBÉJ ±õY ∂fɵeÉHh ,kÉ«≤«°Sƒe kÉØdBÉJ πµ°ûàd äÉJƒf
±õ©j ´RƒŸG π©éj ød §≤a ÚàJƒf ±õY ¿G ôcòJ øµdh ,äÉJƒædG øe
.ôNBG ÉØdBÉJ
äÉJƒædG áaÉc ¿Éa ,(á∏°üØæe ´ÉÑJ) ᪨ædG ádÉWG á°SGhO Ωóîà°ùJ ÉeóæY
GPEG ɪY ô¶ædG ¢†¨Hh- ∞dBÉJ É¡fCG ≈∏Y É¡JAGôb ºàj óMGh ¿BG ‘ É¡aõ©J »àdG
.-iô°ù«dG hCG ≈檫dG ∑ó«H É¡aõ©J âæc
óMGh ¿BG ‘ [PIANO¥SOLO] h [ARRANGER¥BAND] …QR §¨°VEG (1)
IQÉÑY á°TÉ°ûdG ≈∏Y ô¡¶Jh ,(øjQõdG øe πc ô°TDƒe Å°†j)
.
ô°TDƒe ¢†eƒjh '' PianoMod''
´É≤jEG QÉ«àN’ [√] [®] SELECT QGQRCG Ωóîà°SGh [STYLE] QR §¨°VEG (2)
.(kÉ°†jCG 16 ¢U ô¶fCG) »≤«°Sƒe
[√] [®] SELECT h [√] [®] FAMILY QGQRCG Ωóîà°SGh [TONE] QR §¨°VEG (3)
.»°SÉ°SC’G 䃰üdG Ò«¨àd (USER TONES QGQRCG hCG)
≈àM ¿ÉµeE’ÉHh ,(14¢U) DUAL áfÉ£ÑdG 䃰U áaÉ°VEG kÉ°†jCG ∂æµÁ
∞dBÉàdG IAGôb á«∏ªY ≈≤ÑJ ÚM ‘ ,SPLIT ô°ùjC’G º°ù≤dG 䃰U ΩGóîà°SEG
.¬∏ªcCÉH OQƒÑ«µ∏d ᣰûf
øe êhôî∏d [PIANO¥SOLO] hCG [ARRANGER¥BAND] QR §¨°VEG (4)
.''ƒfÉ«ÑdG ±RÉY'' ™°Vh
27
AÉcòdG áØ«Xƒd ʃeQÉ¡dG øe kÉYƒf 18 EXR-46 OR RÉ¡L …ƒëj
É¡àaÉ°VEG ܃∏°SCGh á«fƒeQÉ¡dG äɪ¨ædG OóY Oó– ´GƒfC’G √òg .»æë∏dG
.øë∏dG ¤G
IÎØd [MELODY¥INTELLIGENCE] QR §¨°VEG ʃeQÉ¡dG ´ƒf Ò«¨àd
QGQRCG Ωóîà°SEG Égó©H ,á°TÉ°ûdG QÉ°ùj ≈∏YCG ‘ '' MI'' ádÉ°SQ ô¡¶J ≈àM
´GƒfC’ÉH áªFÉb »∏j ɪ«ah .܃∏£ŸG ʃeQÉ¡dG ´ƒf QÉ«àN’ [–][+]
:áMÉàŸG
WltzOrg 16
OctvTpe1 17
OctvTpe2 18
Gospel 11
Romance 12
Latin 13
CntrGuit 14
CntrBald 15
Block 6
BigBand 7
Country 8
Traditnl 9
Broadway 10
Duet 1
Organ 2
Compo 3
Strings 4
Choir 5
.±RÉ©dG èeGôH óMCG IôcGP ‘ ''»æë∏dG AÉcòdG'' äGõ«¡Œ ßØM øµÁ :áßMÓe
»æë∏dG AÉcòdG
…òdG øë∏dG ™e kɪZÉæàe kÉ«fÉK kÉJƒ°U ∞«°†J √òg ''»æë∏dG AÉcòdG'' áØ«Xh
ójóëàd kÉ©e OQƒÑ«µdG »Ø°üf ≈∏Y ™bGƒdG ‘ óªà©J »gh ,≈檫dG ∑ó«H ¬aõ©J
.É¡aõ©J »àdG äɪ¨ædG
ºK ,≈檫dG ó«dG äɪ¨f »æë∏dG AÉcòdG ™HÉàj •
¿G Öéj »àdG äɪ¨ædG Oóëjh iô°ù«dG ∑ó«H ¬aõ©J …òdG ∞dBÉàdG π∏ëj •
.≈≤«°SƒŸG ¤G É¡Ø«°†j
»æë∏dG AÉcòdG áeÓY ô¡¶J ≈àM [MELODY¥INTELLIGENCE] QR §¨°VEG
.á°TÉ°ûdG ≈∏Y
r EXR–46 OR
á«aÉ°VEG ´É≤jEG ∞FÉXh .8
.(
ô°TDƒe Å°†j) [ARRANGER¥BAND] QR §¨°V ó©H §≤a áMÉàe á«dÉàdG ∞FÉXƒdG º¶©e .á«dÉàdG ∞FÉXƒdG EXR-46 OR RÉ¡L ‘ ôaƒàJ ,É¡©Ñàj Éeh (15 ¢U) á«°ù«FôdG »≤«°SƒŸG ´É≤jE’G ∞FÉXh ¤G áaÉ°VEG
≈∏Y …ƒà– »àdG áYƒªÛG QÉ«àN’ [√] [®] FAMILY QGQRCG Ωóîà°SEG (2)
.áHƒ∏£ŸG »≤«°SƒŸG óYÉ°ùŸG äGõ«¡Œ
»≤«°SƒŸG óYÉ°ùŸG ΩGóîà°SEG
¿CG OƒJ á«æZC’ ™jô°ùdG Ö°SÉæŸG OGóYEÓd iôNC’G á«∏ª©dG ∞FÉXƒdG øe
∂d ó©j …òdG ,çóëà°ùŸG EXR-46 OR RÉ¡÷ »≤«°SƒŸG óYÉ°ùŸG ƒg É¡aõ©J
.ïdEG ,äGôKDƒŸGh äGƒ°UC’Gh ´É≤jE’Éc ,Å°T πc
.á«æZC’G áYGPE’ Ωóîà°ùj ’ »≤«°SƒŸG óYÉ°ùŸG
:»≤«°SƒŸG óYÉ°ùŸG IôcGòd ∑QÉ«àNEG iód kÉ«FÉ≤∏J Ò¨àJ á«dÉàdG ∞FÉXƒdG
äGôKDƒŸG äGõ«¡Œ •
´É≤jE’G •
ábôØdG ≥°ùæe •
´É≤jE’G áYô°S •
OQƒÑ«µdG á«°SÉ°ùM •
,ô°ùjC’G º°ù≤dG 䃰Uh ,»°SÉ°SC’G 䃰üdG •
¢ùª∏d
áfÉ£ÑdG 䃰Uh
MALFOUF 102
=
:á«dÉàdG »g IôaƒàŸG äÉYƒªÛG
,ARABI ,MALFOUF ,MASRI ,SAIDI ,MAKSOUM
.TURKISH ,KHALIGI ,OR-WORLD ,TRADITIONAL
»≤«°SƒŸG óYÉ°ùŸG IôcGP ójóëàd [√] [®] SELECT QGQRCG Ωóîà°SEG (3)
.IQÉàıG áYƒªÛG πNGO áHƒ∏£ŸG
º°SEG ô¡¶j [√] hCG [®] SELECT QR ≈∏Y ¤hC’G Iôª∏d §¨°†dG ∫ÓN øeh
ºàj …òdGh IQÉàıG áYƒªÛG πNGO »≤«°SƒŸG óYÉ°ùª∏d õ«¡Œ ∫hCG
™bGƒdG ‘ »YGO Óa õ«¡éàdG Gòg ¤G áLÉëH âæc GPEG Gòd ,ƒà∏d √QÉ«àNEG
.SELECT QR ≈∏Y §¨°†∏d
iôNCG äGõ«¡Œ QÉ«àN’ [√] hCG [®] SELECT QGQRCG ΩGóîà°SEG ∂«∏Y øµd
ΩGóîà°SEG kÉ°†jCG ∂fɵeÉHh ,É¡°ùØf áYƒªÛG πNGO »≤«°SƒŸG óYÉ°ùª∏d
.¬°ùØf ¢Vô¨∏d ᫪bôdG QGQRC’G
''᫪bôdG QGQRC’Gh ,SELECT ,FAMILY QGQRCG ΩGóîà°SEG'' Iô≤a kÉ°†jCG ô¶fCG
.(20 ¢U)
É¡ÑZôJ ’ »àdG äGõ«¡éàdG Ò«¨J ¿B’G ∂fɵeÉH ,áLÉ◊G â°†àbEG GPEG :á¶MÓe
óMCG ‘ Iójó÷G ∂àî°ùæH ®ÉØàME’G ºK øeh ,(»°SÉ°SC’G 䃰üdG Ò«¨J kÓãe)
.(45 ¢U ô¶fCG) ±RÉ©dG èeGôH
IóMGƒdG á°ùª∏dG
:kÉ«µ«JÉeƒJhCG ∞FÉXƒdG øe ójó©dG ∂d §Ñ°†J IóMGƒdG á°ùª∏dG áØ«Xh
.á«∏°UC’G ´É≤jE’G áYô°S ´RƒŸG QÉàîj •
.¢SQƒµdGh ÜÒØjôdG …ôKDƒŸ áÑ°SÉæe äɣѰV õ«¡Œ ºàj •
,ô°ùjC’G º°ù≤dG 䃰Uh ,»°SÉ°SC’G 䃰üdG EXR-46 OR RÉ¡L QÉàîj •
.QÉàıG ´É≤jE’G Ö°SÉæàd áfÉ£ÑdG 䃰Uh
áØ∏àfl äGõ«¡Œ ≈∏Y ¿Éjƒà– ,IóMGƒdG á°ùª∏d ¿ÉJôcGP ´É≤jEG πµd
:ÉgQÉ«àNG äGƒ£N ∂«dEG .√ÓYCG IQƒcòŸG äGÒ¨àª∏d
.(16 ¢U ô¶fCG) ,܃∏£ŸG ´É≤jE’G ÎNG (1)
.[ONE¥TOUCH] IóMGƒdG á°ùª∏dG QR §¨°VEG (2)
.''»≤«°SƒŸG óYÉ°ùŸG'' [MUSIC¥ASSISTANT] QR §¨°VEG (1)
√QÉ«àNÉH âªb õ«¡Œ ôNBG º°SEG á°TÉ°ûdG ≈∏Y ô¡¶jh ,QõdG Å°†«°S
.(»≤«°SƒŸG óYÉ°ùª∏d IôcGP ∫hCG hCG) »≤«°SƒŸG óYÉ°ùª∏d
ºbQ É¡©Ñàj ,á°TÉ°ûdG QÉ°ùj ≈∏YCG ºbôdG áfÉN ‘ ''OT'' ádÉ°SQ ô¡¶à°S
.IQÉàıG IóMGƒdG á°ùª∏dG IôcGP
º°SEG á°TÉ°ûdG ≈∏Y ô¡¶j ±ƒ°ùa ,DATA ENTRY [TONE] QR AÉ°VCG GPEG
.(√ÓYCG ∫ÉãŸG ‘ 2 ƒfÉ«H) 䃰üdG
.''OT2'' á«fÉãdG á£Ñ°†dG QÉ«àN’ á«fÉK Iôe QõdG ¢ùØf §¨°VEG (3)
äÎNEG ɪ∏c ójóL øe IóMGƒdG á°ùª∏dG áØ«Xh 𫨰ûJ ∂«∏Y Öéj
.kGójóL kÉYÉ≤jEG
,USB h ∂°ùjódG äÉYÉ≤jE’ kÉ°†jCG áMÉàe IóMGƒdG á°ùª∏dG áØ«Xh :á¶MÓe
.πbCG IQƒ°üH øµd
26
EXR–46 OR
π«é°ùàdG í«ë°üàd Ωó≤dG á°SGhO ΩGóîà°SCG
,π«é°ùàdG ±É≤jEGh AóÑd á«aÉ°VEG Ωób á°SGhO ΩGóîà°SEG kÉ°†jCG ∂æµÁ
iô°ù«dG ∑ój Ωóîà°ùJ hCG ,±õ©∏d ∑Gój Éà∏c Ωóîà°ùJ ∂fCG É¡Jõ«eh
.øë∏dG ±õ©d ≈檫dG ∑ój ÆôØJh ,᪨ædG »æKh ꃪàdG ´GQP 𫨰ûàd
πNóà BOSS FS-5U hCG DP-6 hCG DP-2 πãe Ωób á°SGhO π«°UƒàH ºb •
.RÉ¡é∏d á«Ø∏ÿG áMƒ∏dG ≈∏Y Ωó≤dG á°SGhO
.ô°TDƒŸG Å°†«a [FUNCTION] ∞FÉXƒdG QR §¨°VEG •
.[REC¥∏] π«é°ùàdG QR §¨°VEG (1)
:‹ÉàdG ƒëædG ≈∏Y á°TÉ°ûdG hóÑàd [√] [®] FAMILY QGQRCG §¨°VEG (2)
.π«é°ùàdG AóÑd [START/STOP] QR §¨°VEG (5)
≈≤«°SƒŸG ™ª°ùà°S ,(41¢U ô¶fCG) ÚàfhRÉe IóŸ …ó«¡ªàdG ó©dG ó©H
.ójó÷G ∑GÎdG π«é°ùJh ±õY ¿PEG CGóHEG .äÉcGÎdG πc ≈∏Y á∏é°ùŸG
.π«é°ùàdG ∞bƒd iôNCG Iôe [START/STOP] QR §¨°VEG (6)
.iôNCG äÉcGôJ π«é°ùàd (3) Iƒ£ÿG óYCG (7)
PUNCH π«é°ùàdG í«ë°üJ
≈∏Y ÊÉãdG ™£≤ŸG) ∑GôJ øe AõL π«é°ùJ IOÉYEG ™°VƒdG Gòg ‘ ∂æµÁ
ƒëÁ ød ójó÷G π«é°ùàdG ¿CG ƒg ™°VƒdG Gòg ‘ Ée ºgCG .(∫ÉãŸG π«Ñ°S
.IOÉYE’G á≤£æe ó©H hCG πÑb Ëó≤dG
.äÉeƒ∏©ŸG ≈∏Y …ƒàëj ∑GôJ ∫hCG ≈∏Y Å°†ŸG ∑GÎdG ô°TDƒe óªà©j
.Å°†e ƒ¡a Gòd ,äÉeƒ∏©e ≈∏Y …ƒàëj 1∑GÎdG ¿EÉa √ÓYCG ∫ÉãŸG ‘h
∑GôJ QÉ«àN’ ᫪bôdG QGQRC’G hCG [√] [®] SELECT QGQRCG Ωóîà°SEG (3)
.π«é°ùà∏d
.''KB SET'' QÉ«àN’ [√] [®] FAMILY QGQRCG Ωóîà°SEG •
äÉYƒª› á©°ùJ ¤G EXR-46 OR RÉ¡÷ á«Ø«XƒdG äGÒ¨àŸG º°ù≤æJ
…ƒà– »àdG áYƒªÛG QÉ«àNEG ¤G »∏j ɪ«a êÉàëf ±ƒ°Sh .á«≤£æe
.OQƒÑ«µ∏d á«∏µdG äGõ«¡éàdG ≈∏Y
.''FSW'' Ò¨àŸG QÉ«àN’ [√] [®] SELECT QGQRCG Ωóîà°SEG •
QGQRC’Gh SELECT h FAMILY QGQRCG ΩGóîà°SEG'' Iô≤a kÉ°†jCG ô¶fCG :á¶MÓe •
.(20 ¢U) ''᫪bôdG
.Punch
I/O ''π«é°ùàdG í«ë°üJ'' ™°Vh QÉ«àN’ [–][+] QGQRCG Ωóîà°SEG •
.π«é°ùàdG áØ«Xh ¤G IOƒ©∏d [SONG] QR §¨°VEG •
.''π«é°ùàdG í«ë°üJ'' ™°Vh â– (1) ºbQ Iƒ£ÿÉH ôªà°SEG •
.[REC¥∏] QR øe k’óH Ωó≤dG á°SGhO §¨°VEG ,(7) h (5) äGƒ£ÿG ‘h
25
Original track
This passage is redone
.Iôe πc ‘ óMGh ∑GôJ QÉ«àNEG ∂æµÁ
.(áÁó≤dG) á«æZC’G äÉeƒ∏©e áYGPEG ‘ AóÑ∏d [START/STOP] QR §¨°VEG
.QÉàıG ∑GÎdG IQÉ°TEGh
IQÉ°TEG á°TÉ°ûdG ≈∏Y ¢†eƒJ
π«é°ùàdG AóÑH ÖZôJ »àdG IQhRÉŸG ¤G πé°ùŸG π°üj ÉeóæY (5)
ô°TDƒe Å°†«°S ,iôNCG Iôe [REC¥∏] QR §¨°VEG ,ÉgóæY
.ôªà°ùe πµ°ûH
.¬ë«ë°üJ OƒJ …òdG Aõ÷G ±õYEG
ôªà°ùJ ɪæ«H π«é°ùàdG ∞bƒd iôNCG Iôe [REC¥∏] QR §¨°VEG
.á«æZC’G áYGPEG
.áYGPE’G ∞bƒd [START/STOP] QR §¨°VEG
. ójó÷G π«é°ùàdG ¤G ´Éªà°SCÓd [START/STOP] QR §¨°VEG
.√ÓYCG (3) Iƒ£î∏d óY ,ó©H ¢VGQ ÒZ âæc GPEG
.iôNCG äÉcGôJ í«ë°üàd (3) Iƒ£ÿG óYCG
RE-START
RE-START
● REC
● REC
(4)
(6)
(7)
(8)
(9)
∑GÎdG ≈≤«°Sƒe πc ∫óÑà°ùJ PEG ,óMGƒdG ∑GÎdG ™°Vh ‘ í«ë°U ¢ùµ©dG
∑GÎdG íÑ°ü«°S ,π«é°ùàdG AÉæKCG kÉÄ«°T ±õ©J ⁄ ¿EÉa .ójó÷G π«é°ùàdÉH
.πeɵdÉH ¬JÉjƒàfi ƒfi ºà«°S å«M ,∂dP ó©H kÉZQÉa ¬∏ªcCÉH
™°Vh QÉ«àNEG ¿ÉµeE’ÉH ¿ƒµj ød ,''óMGƒdG ∑GÎdG'' ™°Vh πãe øµd
IôcGP πNGO π©ØdÉH ''π«é°ùJ'' ∑Éæg ¿Éc GPEG ’EG ''π«é°ùàdG í«ë°üJ''
.RÉ¡÷G
r EXR–46 OR
[REC¥∏] π«é°ùàdG QR §¨°VEG (1)
:πµ°ûdG ‘ ɪc á°TÉ°ûdG ô¡¶àd [√] [®] FAMILY QGQRCG §¨°VEG (2)
‘ IOƒLƒŸG á«æZC’G kÉ°†jCG ƒëª«°S …ó«ŸG äÉØ∏e áYGPEG ¿CG kGÒNCG ßM’
∂æµÁ »àdGh ,…ó«ŸG ∞∏e äÉcGôJ É¡æe k’óH óéà°Sh ,RÉ¡÷G IôcGP
í«ë°üJ'' hCG ''óMGƒdG ∑GÎdG'' ™°Vh QÉ«àNEG ó©H É¡«dG ∂JÉ°ùŸ áaÉ°VEG
.''π«é°ùàdG
ALL ''πµdG'' ™°Vh øY ójõŸG
:äGQÉÑàYC’G ¢†©H √òg ,23 áëØ°U ≈∏Y √ÉfôcP ÉŸ áaÉ°VEG
äÉcGÎdGh [RECORD¥∏] áeÓY ¢†eƒà°S [REC¥∏] π«é°ùàdG QR §¨°V ó©H
.π«é°ùà∏d áMÉàe ô°ûY áà°ùdG äÉcGÎdG πc ¿G áæ∏©e 16~1
''óMGƒdG ∑GÎdG'' π«é°ùJ ™°Vh
‘ á«æZC’G IôcGP ‘ äÉeƒ∏©e ∑Éæg ¿ƒµj ÚM §≤a ™°VƒdG Gòg ìÉàj
.EXR-46 OR RÉ¡L
∫hCG ô°TDƒeh
áeÓY ¢†eƒà°S [REC¥∏] QR ≈∏Y §¨°†J ÉeóæY
GPEG ÉeCG .QƒØdG ≈∏Y ójóL ∑GôJ π«é°ùJ ∂æµÁ ¬fCG »æ©j ɇ ,‹ÉN ∑GôJ
,1 ∑GÎdG ô°TDƒe ¢†eƒj ±ƒ°ùa ,äÉeƒ∏©e …ƒ– äÉcGÎdG ™«ªL âfÉc
.ójóL π«é°ùàH √QÉàîJ ∑GôJ …CG ≈≤«°Sƒe ∫GóÑà°SEG ∂æµÁ øµdh
.[REC¥∏] π«é°ùàdG QR §¨°VEG (1)
.SINGLE ''óMGƒdG ∑GÎdG'' ™°Vh QÉ«àN’ [√] [®] FAMILY QGQRCG §¨°VEG (2)
.π«é°ùà∏d ∑GôJ QÉ«àÿ ᫪bôdG QGQRC’G hCG [√] [®] SELECT QGQRCG Ωóîà°SEG (3)
GPEGh .Iôe πc ‘ (''óMGƒdG ∑GÎdG'' ™°Vh) §≤a óMGh ∑GôJ QÉ«àNG ∂æµÁ
Égƒfi ºàj ±ƒ°ùa äÉeƒ∏©e ≈∏Y …ƒàëj ∑GôJ QÉ«àNÉH âªb
.ójó÷G π«é°ùàdÉH É¡dGóÑà°SGh
.(30 ¢U ô¶fCG) ¬∏«é°ùàH Ωƒ≤à°S …òdG ∑GÎ∏d Ö°SÉæŸG 䃰üdG ÎNG (4)
øe k’óH ∫ƒÑ£dG äÉYƒª› Ò«¨J ∂d ìÉà«°ùa ,[10] ∑GôJ äÎNEG GPEG
.∫ƒÑ£dG ΩÉ°ùbCG ¢üîj ∑GÎdG Gò¡a ,ä’B’G äGƒ°UCG
¤G AGõLCG áaÉ°VE’ ''óMGƒdG ∑GÎdG'' π«é°ùJ ™°Vh Ωóîà°ùJ âæc GPEG :á¶MÓe
…CG hCG) 16 ∑GôJ Ωƒ≤j ó≤a ,ôNBG ô°ùæjƒµ«°S hCG iôNCG ádBÉH ¬∏«é°ùJ ” …ó«e ∞∏e
.Ò«¨à∏d á∏HÉb ∫ƒÑW áYƒª› ΩGóîà°SÉH (ôNBG ''ÊÉK ∫ƒÑW ∑GôJ''
áaÉc π«é°ùàd »°SÉ°SC’G 䃰üdG ΩGóîà°SEG øµÁ ¬fCG øe ºZôdÉH :á¶MÓe
IOó©àŸG á«Jƒ°üdG äGÒKCÉàdG IóMh ¿CÉa ,''óMGƒdG ∑GÎdG'' ™°Vh ‘ äÉcGÎdG
.4 IÉæb/…ó«e ∑GôJ ™e ™e §≤a ≥aGƒàJ MFX
,IójóY äÉeGóîà°SEG ¬d ∑GôJ 16 ¬eGƒb kÓé°ùe EXR-46 OR RÉ¡L …ƒëj
.π«é°ùàdG ´É°VhCG á«≤H ≈∏Y ±ô©àf ÉæYO Gòd
π«é°ùàdG ´É°VhCG
π«é°ùà∏d ¿É©°Vh●
,ájGóÑdG øe ≈≤«°SƒŸG π«é°ùàd EXR-46 OR RÉ¡L ‘ ¿É©°Vh ∑Éæg
:π©ØdÉH á∏é°ùŸG ≈≤«°Sƒª∏d äÉë«ë°üJ hCG äÉcGôJ áaÉ°VE’ ¿É©°Vhh
IójóL á«æZCG π«é°ùJ
Ée ™e ¬aõ©J Ée π«é°ùJ ∂æµÁ ™°VƒdG Gòg ‘ :(πµdG)
ALL
.óMGh ¿BG ‘ RÉ¡÷G ¬©jòj
´RƒŸG áÑMÉ°üe •
,»°SÉ°SC’G 䃰üdG) OQƒÑ«µdG ΩÉ°ùbCG ≈∏Y ∂aõY •
(áfÉ£ÑdG 䃰U ,ô°ùjC’G º°ù≤dG
.∑GÎdGh
IQÉ°TEG ¢†eƒà°S
.[SPLIT] QR §¨°VEG ,ΩÉ°ù≤fEG á£≤f ≥∏ÿ (3)
QGQRCG ᣰSGƒH áHƒ∏£ŸG ´É≤jE’G áYô°S §Ñ°VCGh ,âÄ°T ¿EG ΩƒfhΟG π¨°T (4)
.[–][+] hCG [TAP¥TEMPO]
.âÄ°T GPEG ΩƒfhΟG ¿hóH π«é°ùàdG kÉ°†jCG ∂æµÁ
ºà«°S ,»°SÉ°SC’G 䃰üdG ¤G ∫ƒÑW áYƒª› ∫ÉNOEÉH âªb GPEG :á¶MÓe
.16 ∑GÎdG ≈∏Y ∫ƒÑ£∏d ∂FGOCG π«é°ùJ
iôNCG π«é°ùJ ∞FÉXh
:(´RƒŸG áÑMÉ°üà á«æZCG π«é°ùJ ó©H) ∑GôJ πc ¬∏é°ùj Ée Gògh
6 áÑMÉ°üŸG
´RƒŸG ∫ƒÑW
*Cô°ùjC’G º°ù≤dGo
.42 ¢U ô¶fCG ,(Auto Bass) »FÉ≤∏àdG ¢UÉÑdGo
9
10
11
12
13
14
»æë∏dG AÉcòdG 15
**»°SÉ°SC’G 䃰üdGo 16
1 áÑMÉ°üŸG
´RƒŸG ¢UÉH
2 áÑMÉ°üŸG
»°SÉ°SC’G 䃰üdGo
3 áÑMÉ°üŸG
*áfÉ£ÑdG 䃰Uo
4 áÑMÉ°üŸG
5 áÑMÉ°üŸG
(bass)
1
2
3
4
5
6
7
8
»°SÉ°SC’G 䃰üdG ™e §≤a √òg øe IóMGh ΩGóîà°SEG øµÁ (*)
,»°SÉ°SC’G 䃰üdG ¤G ∫ƒÑW áYƒª› ∫ÉNOEÉH âªb GPEG (**)
.Ωóîà°ùj ød 4 ∑GÎdG ¿CÉa
.OQƒÑ«µdG ΩÉ°ùbCG ÖfÉéH ”k“ áeÓY ≥HÉ°ùdG ∫hó÷G ‘ óŒ ìÉ°†jEÓd
.É¡∏«é°ùJ ºàj ød π«é°ùàdG AÉæKCG É¡©ª°ùJ ’ »àdG äÉcGÎdG
''øµÁ'' GPÉe πH ,¬∏«é°ùJ ºà«°S Ée ∂jôJ ’ [16]~[1] äÉcGÎdG äGô°TDƒeh
.¬∏«é°ùJ
''OQƒÑ«µdG'' π«é°ùJ ™°Vh
´RƒŸG ¿ƒµj ’h ,ájhó«dG OQƒÑ«µdG ΩÉ°ùbCG π«é°ùJ ∂æµÁ OQƒÑ«µdG ™°Vh ‘
ÚJƒ°U ájɨd kÉeóîà°ùe óMGh ∑GôJ π«é°ùJ ™°VƒdG Gòg ∂d í«àjh .kÉMÉàe
䃰Uh ,»°SÉ°SC’G 䃰üdG) Úª°ùb hCG (áfÉ£ÑdG 䃰U ,»°SÉ°SC’G 䃰üdG)
∂浪«°ùa »°SÉ°SC’G 䃰ü∏d ∫ƒÑ£dG áYƒª› äÎNEG GPEG ÉeCG ,(ô°ùjC’G º°ù≤dG
.ájhó«dG ∫ƒÑ£dG ∑GôJ π«é°ùJ §≤a
á«æZC’G äÉeƒ∏©e ƒfi ¤G …ODƒ«°S ,π«é°ùà∏d ''OQƒÑ«µdG'' ™°Vh QÉ«àNEG :á¶MÓe
.Iójó÷G ∂JÓ«é°ùàH É¡dGóÑà°SEGh RÉ¡é∏d á«∏NGódG IôcGòdG ‘ IOƒLƒŸG
ΩGóîà°SÉH π«é°ùàdG ∂æµÁ ™°VƒdG Gòg ‘ :(OQƒÑ«µdG) Keyboard
.ájôëH ∑GÎdG QÉ«àNEG ∂æµÁh ,OQƒÑ«µdG ΩÉ°ùbCG
.áfÉ£ÑdG 䃰U ,ô°ùjC’G º°ù≤dG ,»°SÉ°SC’G 䃰üdG •
á∏é°ùe ≈≤«°SƒŸ äÉcGôJ áaÉ°VEG
,IóMGƒdG IôŸG ‘ óMGh ∑GôJ ≈∏Y π«é°ùà∏d :(óMGh ∑GôJ)
Single
.√ójôJ ∑GôJ …CG QÉ«àNEG ájôëH ∂æµÁh
∑GôJ øe Ò°üb AõL π«é°ùJ IOÉY’ :(π«é°ùàdG í«ë°üJ) Punch I/O
.áë«ë°U ¬à«≤Hh π©ØdÉH πé°ùe
äÉeƒ∏©ŸG ƒfi ºà«°S ,''OQƒÑ«µdG'' hCG ''πµdG'' ™°Vh äÎNEG ɪ∏c :á¶MÓe
.USERSONG IôcGP ‘ IOƒLƒŸG
π«é°ùàdG IôcGP●
Gòd ,Iôe πc ‘ IóMGh á«æZC’ EXR-46 OR RÉ¡÷ ''á«◊G'' IôcGòdG ™°ùàJ
.(54 ¢U ô¶fCG) É¡¶Ø– ¿CG ∑É≤«°Sƒe π«é°ùJ øe ∂FÉ¡àfG ó©H Ωõ∏j
≥jô£H ƒÙG øe EXR-46 OR IôcGP ‘ IOƒLƒŸG á«æZC’G ájɪ◊
∂eÉ«b ó©H ''óMGƒdG ∑GÎdG'' ™°Vh ¤G kÉ«FÉ≤∏J ∫ƒëàj RÉ¡÷G ¿CÉa ,CÉ£ÿG
.π«é°ùJ ∫hCÉH
≈≤«°SƒŸG kÉ«FÉ≤∏J ƒëª«°S ''OQƒÑ«µdG'' hCG ''πµdG'' ™°Vh QÉ«àNEG ¿G ¢ùæJ ’
Ú©°VƒdG øjòg QÉàîJ ’ Gòd ,USERSONG IôcGP ‘ kÉ«dÉM IOƒLƒŸG
™°Vh Ωóîà°SG πH ,IôcGòdG ‘ IOƒLƒe ≈≤«°Sƒe ¤G äÉcGôJ áaÉ°VE’
."PUNCH I/O" ''π«é°ùàdG í«ë°üJ'' hCG "SINGLE" ''óMGƒdG ∑GÎdG''
GPEG "PUNCH I/O" h "SINGLE" »©°Vh QÉ«àNG ∂æµÁ ’ ¢ùµ©dG ≈∏Yh
.äÉeƒ∏©ŸG øe á«dÉN á«æZC’G IôcGP âfÉc
24
EXR–46 OR
∑É≤«°Sƒe π«é°ùJ .7
.á°UÉÿG ∑É≤«°Sƒe π«é°ùàd ∑GôJ 16 ¬JQób ô°ùfƒµ«°S EXR-46 OR …ƒëj
[START/STOP] QR §¨°VG •
QGQRCG Ωóîà°SÉa ’Gh ,√ÉfOCG ÚÑe ƒg ɪc á°TÉ°ûdG ô¡¶J ¿G Öéj
:REC ALL ™°Vh QÉ«àN’ ''REC MODE'' [√] [®] FAMILY
.([1]~[16] h ,[RECORD¥∏] áeÓY ¢†eƒà°S)
´Rƒe ¬©jòj Éeh ¬aõ©à°SÉe πµa ''πµdG'' ™°Vh ‘ ¿’G âfCG
.¬∏«é°ùJ ºà«°S EXR-46 OR
ALL
120
Oôéà π«é°ùàdG ∞bƒà«°Sh , ΩÉàÿG á∏ªL áYGP’ [ENDING] QR §¨°VG •
. É¡FÉ¡àfG
BEAT
FULL
BAND
INTRO
1
9
2
10
3
11
4
12
5
13
6
14
7
15
8
16
ƒëª«°S Gò¡a FAMILY QGQRCG ᣰSGƒH ''REC ALL'' QÉ«àNÉH âªb GPEG :á¶MÓe
Gòd ,EXR-46 OR RÉ¡L ‘ USERSONG IôcGP ‘ É«dÉM IOƒLƒŸG á«æZ’G
QR §¨°†J ÉeóæYh .(49 ¢U ô¶fCG) âÑZQ GPEG á«dÉ◊G á«æZ’G ßØëH k’hCG ºb
âfÉc Ée GPEG Single ™°VƒdG QÉ«àNÉH EXR-46 OR RÉ¡L Ωƒ≤j ,§≤a [REC¥∏]
ójõŸ 24 ¢U ô¶fCG) .π°UC’G øe äÉeƒ∏©e ≈∏Y …ƒà– USERSONG IôcGP
.(™°VƒdG ∂dP øY π«°UÉØàdG øe
∂à«æZ’ ´Éªà°S’G
.[SONG] á«æZ’G QR §¨°VG
.áYGP’G AóÑd [START/STOP] QR §¨°VG
áYGP’G ∞bƒd á«fÉK [START/STOP] QR §¨°VG
.á«æZ’G ájGóÑd ´ƒLô∏d [|√] QR §¨°VG
(1)
(2)
(3)
(4)
:á«J’G ¥ô£dG ióMÉH π«é°ùàdG CGóHEG (9)
¢†eƒ«°S , ´RƒŸG øe √QÉàîJ ɪ°ùb π¨°ûàd [START/STOP] §¨°VG •
(BEAT) äÉ°†ÑædGh ´É≤j’G áYô°S ÚÑ«d [V-LINK] ô°TDƒe
¿G π°†Ø«a ,∂dP ó©H ¬∏¨°ûJ ¿G ≈∏Y ,´RƒŸG ¿hóH π«é°ùàdG äCGóH ƒd :á¶MÓe
.[METRONOME] QR §¨°†J ¿ÉH ∂dPh ΩƒfhΟG ≈∏Y óªà©J
ÌcG hCG ÉMÉàØe ±õYGh [SYNC¥START] øeGõàŸG AóÑdG áØ«Xh π¨°T •
.OQƒÑ«µdG ΩÉ°ù≤fG á£≤f QÉ°ùj ≈∏Y
¢UÉÿG QõdG §¨°V ó©H OôØæŸG ƒfÉ«ÑdG ™°Vh ‘ π«é°ùàdG É°†jG øµÁ :¬¶MÓe
¿Gõ«ŸG ójó– ∂æµÁ ,ádÉ◊G √òg ‘ ΩƒfhΟG 𫨰ûJ øe óH ’h ™°Vh πµH
.14 ¢U ô¶fG MetroTS áØ«XƒH á«æZÓd »æeõdG
:á«J’G ¥ô£dG ióMÉH π«é°ùàdG ∞bhG (10)
23
[ARRANGER¥BAND] ´RƒŸG QR §¨°VG (1)
001
=
ORCHESTRATOR
á«°ù«FôdG á«æZC’G π«é°ùJ
.´RƒŸG IóYÉ°ùà ∂fÉ◊G π«é°ùàd Iô°TÉÑŸG á≤jô£dG ¢üëØàf ’hG ÉæYO
áÑMÉ°üŸG ΩÉ≤e Ò«¨J iô°ù«dG ∑ó«H ∂æµÁh ,ô°TDƒŸG Å°†«°S
.áßë∏H á¶◊
óYÉ°ùŸG IôcGP hG ܃∏£ŸG ´É≤j’G QÉ«àN’ [STYLE] QR §¨°VG (2)
.»≤«°SƒŸG
QGQRG ≈∏Y §¨°†dG ᣰSGƒH ܃∏£ŸG ´RƒŸG º°ùb ÎNG (3)
.[VARIATION] hCG [ORIGINAL] hCG [INTRO]
.[START/STOP] QR §¨°VG (4)
áYô°S ójóëàd [–][+] hCG [TAP¥TEMPO] QGQRG Ωóîà°SG (5)
.áHƒZôŸG ´É≤j’G
.´RƒŸG ±É≤j’ iôNG Iôe [START/STOP] §¨°VG (6)
OQƒÑ«µdG øe øÁ’G º°ù≤∏d ܃∏£ŸG 䃰üdG ÎNG (7)
hCG [√] [®] SELECT h FAMILY QGQRCG Ωóîà°SGh [TONE] QR §¨°VG
.(30 ¢U kÉ°†jCG ô¶fG) USER TONES º°ùb ‘ QGQRC’G hCG ᫪bôdG QGQRC’G
[REC¥∏] π«é°ùàdG QR §¨°VG (8)
r EXR–46 OR
∑GÎdG äGójó– Ò«¨J
‹ÉàdÉHh) GM Ωɶf ™e ºFÓàJ ’ É¡eóîà°ùJ »àdG á«æZC’G äÉØ∏e âfÉc GPEG
One áØ«Xh ‘ RIGHT ,LEFT ,BASS ,DRUM äGójó– ™e ≥aGƒàJ ’
QGQRC’ iôNCG äÉcGôJ ójóëàd á«dÉàdG äGƒ£ÿG ´ÉÑJEG ∂æµÁ ,(Minus
:LOCK ([RIGHT] ,[LEFT] ,[BASS] ,[DRUMS])
.¬°ùØf º°SC’G äGP áØ«XƒdG π«©Øàd [MINUS¥ONE] QR §¨°VEG (1)
¬≤HCGh [DRUMS] hCG [BASS] hCG [LEFT] hCG [RIGHT] QR §¨°VEG (2)
.kÉWƒ¨°†e
IÉæb ójóëàd [–][+] QGQRCG Ωóîà°SEG ,√ÓYCG QõdG ≈∏Y §¨°†dÉH ôªà°ùJ ɪæ«H (3)
.¬£¨°†J …òdG Qõ∏d áHƒ∏£ŸG …ó«e
ENTRY [+] §¨°VEG ,[RIGHT] QR ‘ ''10'' …ó«e IÉæb ójóëàd :∫Éãe
:»∏j ɪc á°TÉ°ûdG hóÑJ ≈àM DATA
.QÉàıG …ó«e ∞∏Ÿ ''3'' ∑GÎdÉH ≥∏©àjh-[LEFT]
á°UÉNh) ᫪«∏©àdG ¢VGôZC’ÉH á°UÉÿG á«≤«°SƒŸG äÉeƒ∏©ŸG Ωóîà°ùJ
.(√ÓYCG kÉ°†jCG ô¶fCG) iô°ù«dG ó«dG Aõ÷ ∑GÎdG Gòg (ƒfÉ«ÑdG
øY É¡bÓZEG øµÁ ’ »àdG äÉcGÎdG áaÉc âѵH Ωƒ≤J -iôNCG äGójó–
.16~12 ,9~6 ,3,1 ójóëàdÉHh ,á«≤ÑàŸG LOCK QGQRCG ≥jôW
‘ bass ¢UÉÑdG º°ù≤H ¢UÉÿG ''2'' ∑GÎdG âѵH Ωƒ≤j-[BASS]
.…ó«e ∞∏e
.…ó«e ∞∏e ‘ ∫ƒÑ£dG º°ù≤H ¢UÉÿG ''10'' ∑GÎdG âѵH Ωƒ≤j -[DRUMS]
.óMGh ¿BG ‘ QGQRCG IóY ¥ÓZEG kÉ°†jCG ∂æµÁ :á¶MÓe
.áYGPE’G AóÑd [®÷ª] h [|√] QR §¨°VEG (4)
.áYGPE’G ∞bƒd iôNCG Iôe [®÷ª] QR §¨°VEG (5)
DATA ENTRY QGQRCG óMCG hCG) iôNCG Iôe [MINUS¥ONE] §¨°VCG (6)
.¬°ùØf º°SE’G äGP áØ«XƒdG ¥ÓZE’ (''IÒѵdG''
RIGHT
.(49 ¢U ô¶fCG) IQÉàıG á«æZC’G ™e MINUS ONE õ«¡Œ ßØM øµÁ :á¶MÓe
DATA ENTRY QGQRCG óMCG hCG) iôNCG Iôe [MINUS¥ONE] §¨°VEG (4)
.¬°ùØf º°SC’G äGP áØ«XƒdG ¥ÓZC’ (''IÒѵdG''
.(49 ¢U ô¶fCG) IQÉàıG á«æZC’G ™e MINUS ONE õ«¡Œ ßØM øµÁ :á¶MÓe
22
EXR–46 OR
.(10 ô°TDƒŸG Å°†j ±ƒ°ùa ,[DRUM] QR â≤∏ZCG GPEG :∫Éãe)
¿’G ≈ª°ùj …òdGh) [START/STOP] QR §¨°VG ,QGôµàdG áYGP’ (4)
‘h .áYGP’ÉH CGóÑjh ''A'' IQhRÉŸG ¤G ∫É≤àf’ÉH πé°ùŸG Ωƒ≤j .([®÷ª]
ájGóH ¤G ´ƒLôdÉH QƒØdG ≈∏Y πé°ùŸG Ωƒ≤j ''B'' IQhRÉŸG ájÉ¡f
.Iô≤ØdG √òg áYGPG ‘ ôªà°ùjh ''A'' IQhRÉŸG
iôNG ´É°VhG OGóY’ (2) h (1)äGƒ£ÿG QGôµàH ºb ,áLÉ◊G â°†àbG GPG
.äÉeÓ©∏d
É¡«a π°üj Iôe πc ‘ »∏°UC’G ¬©°Vh ¤G áYGPE’G ´É≤jEG IOÉYEG ºàj :á¶MÓe
.''A'' IQhRÉŸG ¤G πé°ùŸG
MARKERS äÉeÓ©dG áØ«Xh ΩGóîà°SG øe ÉfÉ«MG øµªàJ ød ÉÃQ :áXƒë∏e
.áªî°†dG ÊÉZ’G ‘ çóëj Gòg øµd
OÉ©Ñà°SG kÉ°†jCG ∂æµÁh ,á≤HÉ£ŸG äÉcGÎdG ´Éª°S øµÁ ,QõdG Å°†j ÉeóæY
.É¡d á≤HÉ£ŸG LOCK QGQRCG ¥ÓZEG ∫ÓN øe äÉcGÎdG øe OóY 䃰U
.QÉàıG º°ù≤dG 䃰U OÉ©Ñà°SG ºàjh á°TÉ°ûdG ≈∏Y
IQÉ°TEG ô¡¶J
º°ù≤∏d äGõ«¡éàdGh 䃰üdG πÑ≤àH kÉ«FÉ≤∏J »°ù«FôdG º°ù≤dG Ωƒ≤j ’ :á¶MÓe
.»æë∏dG
.AÉ°†e øµj ⁄ GPG [SONG] QR §¨°VG (1)
.(19 ¢U ô¶fG) äOQG GPG á«æZG QÉ«àNG ¿’G ∂æµÁ
?äÉcGÎdG »g Ée
.á°TÉ°ûdG ≈∏Y ô°TDƒŸG ô¡¶«a [MINUS¥ONE] QR §¨°VG (2)
…ó«e äÉØ∏eh ,EXR-46 OR ᣰSGƒH É¡∏é°ùJ »àdG ÊÉZC’G …ƒà–
…CG) ∑GôJ 16 ¤G ÉgOóY π°üj äÉcGôJ ≈∏Y ,É¡©jòJ »àdG á«°SÉ«≤dG
.(…ó«e äGƒæb
äÉcGÎdG ¿CG ’EG ,§≤a áæ«©e äÉcGôJ ΩGóîà°SEG ºàj ä’É◊G øe Òãc ‘h
:á«°SÉ«≤dG …ó«e äÉØ∏e øe πc ‘ ó«cCÉàdÉH ô¡¶J á«dÉàdG
¢UÉÑdG :Track 2
øë∏dG :Track 4
∫ƒÑ£dG :Track 10
:á«dÉàdG äÉcGÎdG OÉ©Ñà°SG LOCK QGQRCG ∂d í«àJ
äÉeƒ∏©ŸG Ωóîà°ùJ .QÉàıG …ó«e ∞∏Ÿ ''4'' ∑GÎdÉH ≥∏©àjh-[RIGHT]
∑GÎdG Gòg (ƒfÉ«ÑdG á°UÉNh) ᫪«∏©àdG ¢VGôZC’ÉH á°UÉÿG á«≤«°SƒŸG
∑ó«H ∑óMƒd ±õ©dG øe øµªààd ∑GÎdG Gòg ≥∏ZCG .≈檫dG ó«dG Aõ÷
RÉ¡L ™àªàjh .…ó«e ∞∏Ÿ iô°ù«dG ó«dG ±õY ¤G ™ªà°ùJ ɪæ«H ≈檫dG
.¬eGóîà°SEG ∂æµÁ ™FGQ ƒjÒà°S ƒfÉ«H 䃰üH EXR-46 OR
LOOP (IOÉY’G) IQôµàŸG áYGP’G
•É≤f á›ôH á«fɵeG EXP-400R RÉ¡L ‘ iôN’G á«còdG ÉjGõŸG øe
∞bƒJ AÉæKG hG áYGP’G AÉæKG ∂dP π©a ∂æµÁ .(á«≤∏◊G) IQôµàŸG áYGPÓd
.πé°ùŸG
,á≤∏◊G AóH ójôJ å«M [MARKER¥A-B] ''äÉeÓ©dG'' QR §¨°VG (1)
.á°TÉ°ûdG øe ≈∏Ø°ùdG ájhGõdG ‘ QõdG ô°TDƒe ¢†eƒ«a
’ hG ∂°ùØæH É¡aõ©H ÖZôJ äÉcGôJ OÉ©Ñà°SG EXR-46 OR ∂d í«àj
äÉcGôJ óMG ¿’ , óMGh ¢übÉf áYGP’G ≈ª°ùj ɇ Ée á¶◊ ‘ É¡LÉà–
.´Gòj ød á«∏°U’G á«æZ’G
.ΩÉ°ùbC’G øe OóY 䃰U OÉ©Ñà°SG kÉ°†jCG ∂æµÁ ,âÑZQ GPEG
øe √Éfô©à°SEG óbh ,∂àMGQ πLCG øe §≤a ''track'' ∑GôJ í∏£°üe Ωóîà°ùj
πÑb øe á«≤«°Sƒe •ƒ£N IóY π«é°ùJ í«àJ »àdG áWô°TC’G äÓé°ùe
.(ôNB’G ƒ∏J §ÿG)¬°ùØf ¢üî°ûdG
≈∏Y ád’ó∏d §≤a í∏£°üŸG Gòg Ωóîà°ùj ,EXR-46 OR RÉ¡÷ áÑ°ùædÉHh
.á∏°üØæe á«≤«°Sƒe •ƒ£N ™e πeÉ©àf ÉæfCG
.…ó«ŸG äGƒæb ‘ ™bGƒdG ‘ ᫪gC’G øªµJ Éægh
21
(Mimus One) á∏é°ùe á«Ø∏N áÑMÉ°üà »◊G AGO’G
‘ Gòg çóëj óbh [‰] h [º] …QR ΩGóîà°SG øe ÉfÉ«MG øµªàJ ’ ób :¬¶MÓe
.áªî°†dG ÊÉZ’G
áYô°S AÉYóà°SÉH Ωƒ≤J ∂fÉa [‰] hCG [º], [|√] QR ≈∏Y §¨°†dÉH :á¶MÓe
.á«æZÓd á›ÈŸG ´É≤j’G
[MARKER¥A-B] §¨°VGh á≤∏◊G ÉgóæY »¡æà°S »àdG IQhRÉŸG ¤G Ωó≤J (2)
.äÉcGÎdG áaÉc áYGPEG ºà«°S ¬fCG ≈∏Y ∫ó«d LOCK 5 ô°TDƒe Å°†«°S
ô°TDƒŸG Å°†«°Sh ,áÑMÉ°üŸG äÉcGÎdG ¥ÓZC’ LOCK QGQRCG óMCG §¨°VG (3)
.OóÙG ∑GÎ∏d ≥HÉ£ŸG
.(äÉÑãH ô°TDƒŸG Å°†«°S) iôNG Iôe
πé°ùŸG ¿G ôcòJ øµd .AGƒ¡dG ≈∏Y á∏°üàŸG áYGP’G á›ôH É°†jG ∂æµÁ
.(á«°SÉ°S’G á°†ÑædG) IQhRÉŸG ájGóH §≤a ôcòà«°S
QGôµàdG π«©Øàd [REPEAT¥A-B] QR ≈∏Y §¨°VG ,ô°TDƒŸG Å°†j ⁄ GPG (3)
áØ«Xh ¥ÓZGh 𫨰ûJ QõdG Gòg ∂d í«àjh ,¬à›ôH â“ …òdG LOOP
.EXR-460R RÉ¡L ‘ IOÉY’G
r EXR–46 OR
á«aÉ°VG á«YGPG ∞FÉXh
‘ ¤h’G :¿ÉàØ«Xh [ORIGINAL] »∏°U’Gh , [INTRO] á«MÉààa’G QGQR’
á«æZ’G ™°Vh ‘ á«fÉãdGh , QGQR’G ¥ƒa áYƒÑ£ŸG »gh ,´É≤j’G ™°Vh
.(QGQR’G πØ°SG áYƒÑ£e)
á«æZ’G ™°Vh QÉ«àNG
iƒà°ùe QÉ«àNG ɪgGóMG :¿ÉàØ«Xh É¡d á«æZ’ÉH ºµëàdGh ´RƒŸG QGQRG
á«fÉãdGh ,(
´RƒŸGô°TDƒe Å°†j ÉeóæY) ,áÑMÉ°üŸGh ´É≤j’G
.([SONG] á«æZ’G ô°TDƒe Å°†j ÉeóæY) Gògh ,á«æZ’G πNGO ∑ôëà∏d
,[SONG] QR §¨°VG ,(á«æZ’G ‘ ºµëàdG ∞FÉXhh) á«æZ’G ™°Vh QÉ«àN’
.¬«dÉàdG ∞FÉXƒdG ìÉàà°S §≤a Éægh
ájGóÑdG á£≤æd IOƒ©dGh ™«LÎdGh Ëó≤àdG
∂°ùjódG øe IQÉàfl á«æZCG áYGPEG AóH ¿G QÉÑàYC’ÉH òNC’G ≈Lôj :á¶MÓe
øe ócCÉJ Gòd .USERSONG IôcGP ‘ IOƒLƒŸG á«æZC’G í°ùe ¤G …ODƒ«°S
.(54 ¢U ô¶fCG) QGôªà°SC’G πÑb ∂°ùjO ≈∏Y É¡¶ØM
.[TAP¥TEMPO] hCG [–][+] QGQRCG ∫ÓN øe á«æZC’G ´É≤jEG áYô°S Ò«¨J ∂æµÁ (6)
Ωƒ≤J »àdG á«æZC’G âfÉc GPEG Ò¨àJ ±ƒ°S ´É≤jE’G áYô°S ¿G »æ©j Gògh
.´É≤jE’G áYô°S Ò«¨J πFÉ°SQ ≈∏Y …ƒà– É¡àYGPEÉH
øe iôNCG á£≤f hCG ájGóÑdG á£≤f ¤G É¡H õØ≤J Iôe πµa ,∂dP ¤G áaÉ°VEG
´É≤jE’G áYô°S IOÉYEG ºà«a ,[‰] hCG [|√], [º] QGQRCG ΩGóîà°SÉH á«æZC’G
.»∏°UC’G É¡©°Vh ¤G á«æZCÓd á›ÈŸG
™°Vh QÉ«àNÉH kÉ«FÉ≤∏J EXR-46 OR RÉ¡L Ωƒ≤j ,á«æZC’G ™°Vh ‘ :á¶MÓe
º°ù≤dG ΩGóîà°SEG ≈àM hCG ,á«æZC’G ™e ±õ©dG âÑZQ GPEG ∂fɵeÉHh ,OôØæŸG ƒfÉ«ÑdG
.áfÉ£ÑdG 䃰U hCG ô°ùjC’G
hCG XG Light ádÉ°SQ á°TÉ°ûdG ≈∏Y ô¡¶J ób ,áæ«©e ä’ÉM ‘ :á¶MÓe
RÉ¡L ¿G »æ©J ádÉ°SôdG √òg .»≤«°SƒŸG 䃰üdG º°SEG øe k’óH GM2
,áMƒ∏dG øe ÉgQÉ«àNEG øµÁ ’ »àdG äGƒ°UC’G óMCG Ωóîà°ùj EXR-46 OR
.XG/GM2 `d á«YGPE’G IAÉصdG ¿Éª°V º¡àª¡e ''»Øfl'' 䃰U 798 ∑Éægh
᫪bôdG QGQRC’Gh SELECT h FAMILY QGQRCG ΩGóîà°SEG
™HÉààe πµ°ûH ÉeEG [√] hCG [®] FAMILY QGQRCG ≈∏Y §¨°†dG ∂æµÁ
hCG [®] QR §¨°VG hCG ,ΩÉeCÓd Ωó≤à∏d hCG ∞∏î∏d ´ƒLô∏d (á©jô°S äÉ£¨°V)
á≤jôW ´ô°SCG .áYô°ùH iôNCG áYƒª› QÉ«àNC’ kÉWƒ¨°†e ¬≤HCGh [√]
§¨°†dG ™e [√] QR ≈∏Y ôªà°ùŸG §¨°†dG »g äÉYƒªÛG ÚH π≤æà∏d
QR ≈∏Yôªà°ùŸG §¨°†dG hCG ,(∞∏ÿG ¤G ´ƒLô∏d) [®] QR ≈∏Y ™£≤àŸG
Å°ûdG ≥Ñ£æjh .(ΩÉeC’G ¤G Ωó≤à∏d) [√] QR ≈∏Y ™£≤àŸG §¨°†dG ™e [®]
FAMILY QGQRCG ¿CÉH ÒcòàdG ƒLôf [√] [®] SELECT QGQRCG ≈∏Y ¬°ùØf
QÉ«àN’ SELECT QGQRCG Ωóîà°ùJ ɪæ«H ,äÉYƒªÛG QÉ«àN’ Ωóîà°ùJ
.IóMGƒdG áYƒªÛG πNGO øe AGõLCG
OGóYCG áKÓK ∫ÉNOEÉH º≤a ,᫪bôdG QGQRC’G ΩGóîà°SEG π°†ØJ âæc GPEG
,(1 ºbôdG ≈∏Y ád’ó∏d 001 πNOCG ∫ÉãŸG π«Ñ°S ≈∏Y) ºbôdG ≈∏Y ád’ó∏d
EXR-46 OR RÉ¡L ¿CÉa ,§≤a óMGh OóY hCG øjOóY ∫ÉNOÉH âªb GPEGh
.܃∏£ŸG ºbôdG ∫ƒÑ≤d âbƒdG ¢†©H ¥ô¨à°ù«°S
…CG çóëj ø∏a ,ôaƒàe QÉ«N ôNBG øe ó©HCG ¬à∏NOCG …òdG ºbôdG ¿Éc GPEG :á¶MÓe
.RÉ¡÷G ‘ Ò«¨J
.USERSONG IôcGP QÉ«àN’ (''0'' hCG) ''000'' πNOCG :á¶MÓe
,(∂°ùjó∏d ¤hC’G IôcGòdG) 201 hCG (á«°†eƒdG) 101 IôcGòdG QÉ«àNEG ó©H
,äOQCG GPEG É¡∏gÉŒ ∂fɵeÉH »àdGh YES IQÉ°TEG á°TÉ°ûdG ≈∏Y ¢†eƒJ
ºK øeh [YES/+] ≈∏Y §¨°†dG ∂fɵeÉH hCG) á«dÉàdG Iƒ£ÿG ‘ »°†ŸGh
.(QGôªà°SC’G
IQÉ°TCG á°TÉ°ûdG ≈∏Y ô¡¶J ±ƒ°ùa ,π¨°ûŸG ‘ ∂°ùjódG ∫ÉNOEG â«°ùf GPEG :á¶MÓe
.∂°ùjódG øe ∞∏e QÉ«àNEG ∂àdhÉfi óæY ''No Disk''
QR ≈∏Y §¨°†dG ∂fɵeÉH ,áHƒ∏£ŸG á«æZC’G QÉ«àNEG øe ócCÉàdG ó©H (5)
AóHh á«æZC’G π«ªëàd ([®÷ª] ¿B’G ≈Yój …òdGh) [START/STOP]
.∫É◊G ‘ É¡àYGPEG
[‰] §¨°VG á«æZ’G ‘ á«dÉJ IQhRÉe ¤G ,ΩÉe’G ¤G Ëó≤à∏d •
[º] §¨°VG ,‹É◊G ™bƒŸG ≥Ñ°ùJ IQhRÉe ¤G ,∞∏ÿG ¤G ™«LÎ∏d •
≈∏Y á°TÉ°ûdG øe øÁ’G ≈∏Y’G øcôdG ‘ ôjRGƒŸG ô°TDƒe ∑óYÉ°ù«°S
.áHƒ∏£ŸG IQhRÉŸG ójó–
∞bƒJ ¿G Ωõ∏j øµd [|√] §¨°VG á«æZÓd ¤h’G IQhRÉŸG ájGóH ¤G IOƒ©∏d •
.QõdG ΩGóîà°SG πÑb á«æZ’G áYGPG
äÉ°†ÑædGh ´É≤jE’G áYô°S ÚÑàd ¿É©ª∏dÉH [V-LINK] IQÉ°TEG CGóÑJ
.(BEAT áØ«Xh)
âÑZQ GPEGh ,á«dÉ◊G á«æZC’G áYGPEG ∫ÓN IójóL á«æZCG QÉ«àNEG ∂fɵeÉH
§¨°†dÉH áYGPE’G ∞bhCÉa ,á«dÉ◊G á«æZC’G AÉ¡àfEG πÑb É¡«dG ´Éªà°SC’ÉH
á«æZC’G AÉ¡àfEG ô¶àfÉa ’EGh ,á«fÉK Iôe ¬£¨°VEG ºK ,[START/STOP] QR ≈∏Y
.Iójó÷G á«æZC’G áYGPEG ‘ AóÑ∏d [START/STOP] QR §¨°VEG ºK á«dÉ◊G
20
EXR–46 OR
ÊÉZC’Gh ¿É◊C’G áYGPEG .6
äÉØ∏ªc ∂fÉ◊CG ßØM ºàjh .RÉ¡é∏d á«°†eƒdG IôcGòdG ‘ hCG ∂°ùjO ≈∏Y áXƒØÙG á°UÉÿG ∂«fÉZCG hCG ,(Standard MIDI FILES á«°SÉ«≤dG …ó«e äÉØ∏e ≈ª°ùJ »àdGh) kÉjQÉŒ IôaƒàŸG á«≤«°SƒŸG äÉeƒ∏©ŸG äÉØ∏e áYGPEG EXR-46 OR RÉ¡L ∂d í«àj
.(ôJƒ«Ñªc èeÉfôH ∫ÓN øe hCG) ôNBG SMF ô°ùæjƒµ°S ∫ÓN øe É¡àYGPEG kÉ°†jCG øµÁh ,(O format files) á«°SÉ«b …ó«e
SYNC
TAP TEMPO START/STOP
á«æZC’G ójóëàd ᫪bôdG QGQRC’G hCG [√][®] SELECT QGQRCG Ωóîà°SEG (4)
.IQÉàıG áYƒªÛG πNGO áHƒ∏£ŸG
INTRO
ORIGINAL
FILL
VARIATION
ENDING
≈∏Y …ƒà– »àdG IôcGòdG á≤£æe QÉ«àNC’ [√][®] FAMILY QGQRCG Ωóîà°SEG (3)
.É¡àYGPEG OƒJ »àdG á«æZC’G
á«°ù«FôdG á«æZC’G áYGPEG
(ô°TDƒŸG Å°†j) á«æZC’G ™°Vh 𫨰ûàd [SONG] QR §¨°VEG (1)
IôcGP ∑Éæg) ∂°ùjó∏d hCG á«°†eƒdG IôcGò∏d §≤a ájQhô°V Iƒ£ÿG √òg
.(§≤a IóMGh USERSONG
∫hCG º°SEG ô¡¶j [√] hCG [®] SELECT QGQRCG ≈∏Y ¤hC’G Iôª∏d §¨°†J ÉeóæY
áLÉëH âæc GPEG Gòd ,ƒà∏d ÉgQÉ«àNEG ” óbh IQÉàıG áYƒªÛG øe á«æZCG
.[®] SELECT QR ≈∏Y §¨°†∏d ™bGƒdG ‘ »YGO Óa ¤hC’G á«æZCÓd
QÉ«àNG äOQCG GPEG [√] hCG [®] SELECT QGQRCG ΩGóîà°SEG ∂«∏Y ÖLƒàj øµdh
.IQÉàıG áYƒªÛG πNGO øe iôNCG á«æZCG
≈∏Y á°TÉ°ûdG hóÑJ ,(¤hC’G á«°†eƒdG IôcGòdG) 101 IôcGòdG QÉ«àNEG ó©H
.‹ÉàdG ƒëædG
.ÊÉZC’G QÉ«àN’ ᫪bôdG QGQRC’G ΩGóîà°SEG kÉ°†jCG ∂æµÁ
101
19
SongName
=
:ÊÉZCÓd IôcGP ≥WÉæe áKÓK EXR-46 OR RÉ¡L ôaƒj
øjõîJ âbDƒe πµ°ûHh ºàj Éæg (000 IôcGòdG) :USERSONG
√òg øe äÉeƒ∏©ŸG í°ùe ºàjh .É¡∏«é°ùàH âªb »àdG á«æZC’G äÉeƒ∏©e
.RÉ¡÷G ¥ÓZCG iód IôcGòdG
RÉ¡L πNGO á«°†eƒdG á≤£æŸG »g √òg (101~199) :FLASH
OóY IOÉjR ∂fɵeCÉHh ,ÊÉZC’G øe OóY ≈∏Y …ƒà– »àdGh EXR-46 OR
RÉ¡L øe ÊÉZC’G øe ójõŸG ï°ùf ∫ÓN øe á≤£æŸG √òg ‘ ÊÉZC’G
OóY ¿CG ’EG ,á«°†eƒdG IôcGò∏d kGõ«M 99 ∑Éæg .(USB ᣰSGƒH) ôJƒ«ÑªµdG
√ò¡d äÉeƒ∏©ŸG ºéM ≈∏Y óªà©j ∑Éæg É¡¶ØM ∂æµÁ »àdG ÊÉZC’G
.Data Size äÉYÉ≤jE’G
É¡dÉNOEG ºàj »àdG äɵ°ùjódÉH á°UÉN á≤£æŸG √òg (201~...) :DISK
.¬°ùØf ∂°ùjódG ≈∏Y óªà©j IôaƒàŸG ÊÉZC’G OóY ¿EÉa ™Ñ£dÉHh ,π¨°ûŸG ‘
¤G …ODƒ«°S [START/STOP] QR ≈∏Y §¨°†dG ¿C’ ájQhô°V Iƒ£ÿG √ògh
,AÉ°†e [SONG] ô°TDƒe ¿G øe ócCÉàdG ≈Lôj Gòd ,´RƒŸG áYGPEG 𫨰ûJ
ÒZ
h
äGQÉ°TCG ¿CGh
™jRƒàdG ‘ ºµëàdG QGQRCG ∂d í«àà°S §≤a ÉgóæY ,á°TÉ°ûdG ≈∏Y IôgÉX
øë∏dG áYGPEÉH ºµëàdG SONG CONTROLS h ARRANGER á«æZC’Gh
.(√ÓYCG ô¶fCG)
π¨°ûŸG ‘ ∂°ùjódG πNOCG ,∂°ùjódG øe á«æZCG áYGPEG äOQCG GPCG (2)
.(Úª«dG ≈∏Y RÉ¡÷G áeó≤e ‘)
r EXR–46 OR
BALANCE 䃰üdG ¿RGƒJ
¢Vô©dG á°TÉ°T ≈∏Y √QÉ«àNG ” …òdG º°ù≤dG ô°TDƒe ô¡¶«°S
.(á¶ë∏dG ¢ùØf ‘ óMGh ô°TDƒe iƒ°S ô¡¶j’)
´RƒŸG ΩÉ°ùbG ÚH 䃰üdG ¿RGƒJ ≥«≤– øe [√][®] QGQRG ∂浓
.∂jó«H É¡aõ©J »àdG OQƒÑ«µdG ΩÉ°ùbG ÚHh ,(á«æZ’G hCG)
´RƒŸG ≈≤«°Sƒe 䃰U ¿Éc ƒd [ACCOMP] ¿RGƒàdG QR §¨°VG (1)
.Öéj ɇ É°VÉØîfG ÌcG (á«æZ’G hCG)
iƒà°ùŸG áÑMÉ°üŸG ≥°ùæe QÉàîj EXR-46 OR 𫨰ûJ Oôéà :á¶MÓe
.''FULL BAND'' ≈∏Y’G
´É≤j’G º°ùb ∑QÉ«àNG ≈∏Y áKÓãdG äÉjƒà°ùŸG √òg ÒKCÉJ óªà©j :á¶MÓe
øe πc ™e á©jƒæàdG / π°U’G QÉ«àNÉH ∂fG ™bGƒdG ‘h ,á©jƒæàdG hG »∏°U’G
πµd áÑMÉ°üŸG øe êPɉ áà°S óéà°S á≤HÉ°ùdG áKÓãdG ó«≤©àdG äÉjƒà°ùe
.(3x 2) ´É≤jG
,±RÉ©dG èeGôH óMG ‘ ¬«∏Y ô≤à°ùJ …òdG »FÉ¡ædG ™°VƒdG ßØM øµÁ
.(45 ¢U ô¶fG)
É¡aõ©J »àdG ≈≤«°SƒŸG 䃰U ¿Éc ƒd [KEYBOARD] ¿RGƒàdG QR §¨°VG (2)
.Öéj ɇ É°VÉØîfG ÌcG
É¡«a §¨°†J »àdG á¶ë∏dG ‘ QGQR’G √òg ≈∏Y §¨°†dG ∫ÓN øe ∂æµÁ
ΩÉ°ùb’ 䃰üdG Ió°T πjó©J [DUAL] hCG [SPLIT] QR ≈∏Y QGôªà°SÉH
.Øg OQĄǵdG
.41 ¢U ô¶fG IóM ≈∏Y ∑GôJ πc 䃰U Ió°T ‘ ºµëà∏d :á¶MÓe
18
EXR–46 OR
BAND ábôØdG ≥°ùæe áØ«Xh ΩGóîà°SEG
ORCHESTRATOR
,´RƒŸG É¡aõ©j »àdG áÑMÉ°üŸG êPɉ Ò«¨J ábôØdG ≥°ùæe áØ«Xh ∂d í«àJ
Iô°TÉÑe AGƒ¡dG ≈∏Y ∫ƒÑ£dG ∑GôJ ∞«ØîJ hG ,äÉcGôJ AÉØWG ∂浪«a
.(±õ©dG AÉæKG …CG)
´RƒŸG ™°Vh QÉ«àN’ [ARRANGER¥BAND] QR §¨°VG (1)
(OƒLƒŸG ´É≤j’G Ωóîà°SG hCG) ¬eGóîà°SG ‘ ÖZôJ …òdG ´É≤j’G ÎNG (2)
.16 ¢U ô¶fG
≈≤«°SƒŸG ó«≤©J iƒà°ùe QÉ«àN’ ¬«dÉàdG QGQR’G óMCG §¨°VG (3)
:(äGô°TDƒŸG Å°†J)
§¨°†dG ∫ÓN øe ∑QÉ«àNEG ócDƒJ ¿G ∂æµÁ ,áLÉ◊G â°†àbEG GPEG (6)
.[+/YES] QR ≈∏Y
øe ´É≤jEG QÉ«àNG ó©H §≤a) '' LOADING'' IQÉÑY á°TÉ°ûdG ≈∏Y ô¡¶J
ô°TDƒe Å°†j ,∂°ùjódG øe ´É≤jE’ ∑QÉ«àNG óæYh ,(π¨°ûŸG πNGO ∂°ùjódG
IôcGP QÉ«àNÉH kÉ«FÉ≤∏J EXR-46 OR RÉ¡L Ωƒ≤jh DISK
¬∏«ªëàH âªb …òdG ´É≤jE’G ≈∏Y ¿B’G …ƒà– »àdGh USER STL
.∂°ùjódG øe
ºàj ,´RƒŸG áYGPEG ∫ÓN [+/YES] QR ≈∏Y §¨°†dÉH Ωƒ≤J ÉeóæY
¿Gõ«ŸG øe ¤hC’G á°†ÑædG) á«dÉàdG á°†ÑædG ‘ ójó÷G ´É≤jE’G ΩGóîà°SG
´É≤jE’G º°SEG ¢Vô©H EXR-46 OR RÉ¡L Ωƒ≤«a ’EGh ,(‹ÉàdG »≤«°SƒŸG
.[START/STOP] QR §¨°†J ÉeóæY ¬eóîà°ùjh
IôcGP øe »≤«°Sƒe ´É≤jEG ßØM á«Ø«c ≈∏Y ±ô©à∏d 50 ¢U ô¶fCG :á¶MÓe
.á«°†eƒdG IôcGòdG ‘ USER STL
É¡«a óLƒj »àdG á≤£æŸG QÉ«àNE’ [√][®] FAMILY QGQRCG Ωóîà°SEG (4)
.(á≤HÉ°ùdG äGô≤ØdG ô¶fCG) ܃∏£ŸG »≤«°SƒŸG ´É≤jE’G
≥WÉæe É¡«a Éà áHƒ∏£ŸG áYƒªÛG ¤G õØ≤dG FAMILY QGQRCG ∂d í«àJ
.USER STL h Flash
áHƒ∏£ŸG áYƒªÛG º°SEG á°TÉ°ûdG ≈∏Y ô¡¶jh
MALFOUF
=
FLASH
=
.IQÉàıG áYƒªÛG πNGO ܃∏£ŸG ´É≤jE’G ójóëàd (5)
,áÑMÉ°üŸG øe §°ùH’G áî°ùædG ™jòj
.§≤a ¢UÉÑdGh ∫ƒÑ£dG øe áfƒµŸGh
.§≤a á∏«∏b ä’BÉH áÑMÉ°üe
IóY …ƒàëj »æZ ™jRƒàH äÉÑMÉ°üe
.á«fƒeQÉgh á«æ◊ •ƒ£N
DRUMS&BASS
COMBO
FULL BAND
´RƒŸG áYGPG ∫ÓN QGQR’G √òg ΩGóîà°SG Öéj ¬fG í°VGƒdG øe
∫hC’G ´É≤jE’G º°SEG ô¡¶j ,¤hC’G Iôª∏d SELECT QR ≈∏Y §¨°†dG iód
Gòg ójôJ âæc GPEÉa Gòd ,ƒà∏d √QÉ«àNEG ” …òdGh IQÉàıG áYƒªÛG πNGO
.[®] SELECT QR ≈∏Y §¨°†∏d ™bGƒdG ‘ »YGO Óa ´É≤jE’G
´É≤jEG QÉ«àNE’ [√] hCG [®] SELECT QGQRCG ΩGóîà°SEG ∂«∏Y ÖLƒàj øµdh
᫪bôdG QGQRC’G ΩGóîà°SEG kÉ°†jCG ∂fɵeÉHh ,É¡°ùØf áYƒªÛG πNGO ôNBG
,SELECT ,FAMILY QGQRCG ΩGóîà°SEG'' Iô≤a ô¶fCG .äÉYÉ≤jE’G QÉ«àN’
.(20 ¢U) ''᫪bôdG QGQRC’Gh
,(∂°ùjó∏d ¤hC’G IôcGòdG) 201 hCG (FLASH) 101 IôcGòdG QÉ«àNG ó©H
.YES ádÉ°SQ á°TÉ°ûdG ≈∏Y ô¡¶J
IQÉÑY á°TÉ°ûdG ≈∏Y ô¡¶J ,π¨°ûŸG ‘ ∂°ùjódG ∫ÉNOEG â«°ùf GPEG :á¶MÓe
."disk family" QÉ«àNG ∂àdhÉfi iód " NO DISK"
17
r EXR–46 OR
á«≤«°SƒŸG äÉYÉ≤jC’G QÉ«àNEG
á°†Ñf ∫ÉãŸG π«Ñ°S ≈∏Y) äÉØbh ¤G É¡«a êÉà– »àdG ¿É◊Ód áÑ°ùædÉH
.(⪰üdG øe äÉ°†Ñf IóY hG
´É≤j’G áYô°S Ò«¨J
:»≤«°SƒŸG ´É≤jEÓd äGôcGP çÓK ≈∏Y EXR-46 OR RÉ¡L …ƒàëj
πªÙG »≤«°SƒŸG ´É≤jE’G øjõîJ ºàj Éæg :(000 IôcGòdG) USER STL
MSE h MSD h MSA äÉYƒª›) ∂°ùjódG øe hCG á«°†eƒdG IôcGòdG øe
IôcGòdG √òg ‘ áfõıG äÉeƒ∏©ŸG í°ùe ºàjh ,áàbDƒe IQƒ°üH (ájQÉ«àNC’G
.RÉ¡÷G ¥ÓZEG óæY
MASRI ,(009~013) SAIDI ,(001~008) MAKSUM
,(029~035) ARABI ,(026~028) MALFOUF ,(014~025)
,(050~066) OR-WORLD ,(036~049) TRADIT
»g √òg :(089~099) TURKISH ,(067~088) KHALIGI
,EXR-46 OR RÉ¡÷ á«∏NGódG IôcGòdG ‘ IOƒLƒŸG äÉYÉ≤jE’G äÉYƒª›
ΩGóîà°SÉH áYô°ùH É¡∏jó©J ∂fɵeEÉH øµdh äÉYÉ≤jE’G √òg í°ùe øµÁ ’h
.(17¢U ô¶fCG) ''ábôØdG ≥°ùæe'' áØ«Xh
RÉ¡L πNGO á«°†eƒdG á≤£æŸG »g √òg :(101~150) FLASH
™«°SƒJ ∂fɵeCÉHh ,kÉ«≤«°Sƒe kÉYÉ≤jEG 50 ≈∏Y …ƒà– »àdGh EXR-46 OR
ôJƒ«ÑªµdG RÉ¡L øe äÉYÉ≤jE’G øe ójõŸG ï°ùf ∫ÓN øe á≤£æŸG √òg
.∂°ùjódG øe á∏ªÙG äÉYÉ≤jE’G ßØM ∫ÓN øe hCG ,(USB ᣰSGƒH)
É¡¶ØM ∂æµÁ »àdG äÉYÉ≤jE’G OóY ¿CG ’EG ,á«°†eƒdG IôcGò∏d kGõ«M 99 ∑Éæg
.Data Size äÉYÉ≤jE’G √ò¡d äÉeƒ∏©ŸG ºéM ≈∏Y óªà©j ∑Éæg
‘ É¡dÉNOEG ºàj »àdG äɵ°ùjódÉH á°UÉN á≤£æŸG √òg (201~...) DISK
.¬°ùØf ∂°ùjódG ≈∏Y óªà©j IôaƒàŸG äÉYÉ≤jE’G OóY ¿EÉa ™Ñ£dÉHh ,π¨°ûŸG
,RÉ¡÷G ‘ USER STL IôcGP ¤G √QÉàîJ …òdG ´É≤jE’G π≤f ºàjh
∫ÉM ájCG ≈∏Yh ,´É≤jE’G ΩGóîà°SEG ∂æµÁ ¿G πÑb âbƒdG ¢†©H ¥ô¨à°ùj Gògh
.(49 ¢U ô¶fCG) á«°†eƒdG äGôcGòdG ióMEG ‘ ´É≤jE’G ßØM ∂æµÁ
,(42¢U ô¶fCG) SYNC STOP áØ«Xh ∑ƒ∏°S §‰ Ò«¨J ¿ÉµeC’ÉH :á¶MÓe
.[SYNC¥START/STOP] QR ≈∏Y IÎØd §¨°†dG ∫ÓN øe ∂dPh
´É≤j’G áYô°S ¢†«ØîJh IOÉjõd TEMPO/DATA QR Ωóîà°SG (7)
,(áLÉ◊G â°†àbG GPG)
[ARRANGER¥BAND] QR §¨°VEG (1)
IQÉ°TEGh
´RƒŸG áYGPG ±É≤jG
QR §¨°V ∂æµÁ hG ,áYGP’G ∞bƒàd á«fÉK [START/STOP] QR §¨°VG (8)
∞bƒà«°S Égó©Hh , ’hG á«eÉàN á«≤«°Sƒe á∏ªL ™ª°ùàd [ENDING]
.É«FÉ≤∏J ´RƒŸG
≈∏Y ÚJôe [SYNC¥START/STOP] QR ≈∏Y §¨°†dG kÉ°†jCG ∂æµÁh
áaÉc ôjôëàH ÉgóæY âªb GPEGh SYNC STOP áØ«Xh π«©Øàd ‹GƒàdG
¢ùØf ‘ áYGPC’G ∞bƒàà°ùa ,OQƒÑ«µdG øe ô°ùjC’G ∞°üædG ≈∏Y í«JÉØŸG
.âbƒdG
[+] h [–] QGQR’CG §¨°VG á«∏°U’G ´É≤j’G áYô°S ¤G IOƒ©∏d
.âbƒdG ¢ùØf ‘
áYô°S ‘ äGôe IóY [TAP¥TEMPO] QR ≈∏Y §¨°†dG ∂fɵeÉH
. áHƒ∏£ŸG ´É≤j’G
(SYNC START) áÑMÉ°üª∏d øeGõàŸG 𫨰ûàdG
´RƒŸG 𫨰ûJ CGóÑ«°S .ô°TDƒŸG Å°†«a [SYNC¥START/STOP] QR §¨°VG
.OQƒÑ«µdG øe ô°ùj’G ∞°üædG ≈∏Y ÉØdBÉJ ±õ©J ¿G OôéÃ
IQÉ°TEG Qƒ¡X øe ócCÉJ
.á°TÉ°ûdG ≈∏Y
.[STYLE] QR §¨°VEG (2)
∂°ùjódG πNOCG ,∂°ùjO ≈∏Y á∏é°ùŸG äÉYÉ≤jE’G óMCG ΩGóîà°SEG äOQCG GPEG (3)
.äɵ°ùjódG π¨°ûe ‘
ÉeóæY áYGP’ÉH ´RƒŸG CGóÑ«°S ,ƒfÉ«ÑdG ™°Vh ‘h
.áJƒf ájG ≈∏Y §¨°†J
§¨°VG :SYNC STOP QÉ«N ≈∏Y EXR-46 OR RÉ¡L …ƒàëj ɪc
CGóÑJ ≈àM (double click)ÚJôe [SYNC¥START/STOP] QR áYô°ùH
πª©dG øY ´RƒŸG ∞bƒà«°S ádÉ◊G √òg ‘ .¿É©ª∏dÉH
IQÉ°TG
™FGQ Å°T Gògh ,äÉØdBÉàdG ójó– á≤£æe ‘ í«JÉØŸG áaɵd ∑ôjô– Qƒa
16
EXR–46 OR
(´RƒŸG) áÑMÉ°üŸG ™e ±õ©dG .5
ARRANGER »≤«°SƒŸG ´RƒŸG ≈YóJ »àdGh EXR-46 OR ‘ áÑMÉ°üŸG áØ«Xh øe ¿’G ó«Øà°ùæ°S
áØ«XƒdG
πÑb ¬£¨°VG ,´É≤jÓd á«MÉààaG QÉ«àNG
[START/STOP] QR
ᣫ°ùÑdG áÑMÉ°üŸG áî°ùf
VARIATION á©jƒæàdG ¤G ∫É≤àf’G
ORIGINAL ᣫ°ùÑdG áÑMÉ°üŸG ¤G hCG
ᣫ°ùÑdG áÑMÉ°üŸG øe kGó«≤©J ÌcC’G áî°ùædG
Ωóîà°SG ,á«æZ’G ájÉ¡f ≈∏Y ∫óJ IQÉÑY
[START/STOP] QR øe ’óH ∞bƒà∏d QõdG Gòg
QõdG
.OQƒÑ«µdG øe iô°ù«dG á¡÷G ≈∏Y (IóMGh ᪨f ≈àM) hG ÉØdBÉJ ±õYG (3)
INTRO
ô°TDƒŸG Å°†«a [ARRANGER¥BAND] QR §¨°VG (1)
.á°TÉ°ûdG ≈∏Y
ORIGINAL
FILL
VARIATION
ENDING
QõdG ô°TDƒe Å°†«°S .áÑMÉ°üŸGh ´É≤j’G ó«≤©J πMGôe QGQR’G √òg Oó–
∞dBÉJ ôNG ´ƒfh º°SG ´RƒŸG ∞dBÉJ áfÉN ‘ ô¡¶«°S ɪc ,¬£¨°†J …òdG
.᫵«JÉeƒJC’G áÑMÉ°üŸG ¬eóîà°ùJ …òdG ƒgh , ¬aõ©J
≈檫dG ∑ó«H ø◊ ±õY ÜôL ,»≤«°SƒŸG ´RƒŸG ≈∏Y âaô©J ¿G ó©H
.´RƒŸG äÉØdBÉJ ójóëàd iô°ù«dG Éeóîà°ùe
ARRANGER ´RƒŸG ±É≤jGh 𫨰ûJ
.áÑMÉ°üŸG ΩÉ≤e Ò«¨àd iôNCG ᪨f hCG ôNG ÉØdBÉJ ±õYG (4)
,(RE-START áØ«Xh) áÑMÉ°üŸG áYƒ£≤e ájGóH ¤G áYô°ùH IOƒ©∏d (5)
.Iôªà°ùe áÑMÉ°üŸG ɪæ«H [REC∏] QR §¨°VEG
º°ù≤dG ≈∏Y ¬aõ©J Ée Ωóîà°ù«°Sh .Úª°ùb ¤G ¿’G OQƒÑ«µdG º°ù≤fG
±õY øÁ’G º°ù≤dG ≈∏Y ∂æµÁ ɪæ«H ,áÑMÉ°üŸG ΩÉ≤e ójóëàd ô°ùj’G
.áÑMÉ°üŸG √òg ™e ∂fÉ◊G
.´RƒŸG 𫨰ûàd [START/STOP] §¨°VG (2)
:QÉàıG ´É≤j’G ΩÉ°ùbCG ÚH πjóÑà∏d á«dÉàdG QGQR’G §¨°VG (6)
äÉHô°†dGh ´É≤j’G áYô°S ≈∏Y ∫ó«d ¿É©ª∏dÉH [V–LINK] ô°TDƒe CGóÑ«a
.(BEAT FUNCTION)
iô°ù«dG á¡÷G ≈∏Y ±õ©dÉa ,
QR ô°TDƒe AÉ°VCG ƒd : á¶MÓe
∞«°†J ¿G ∂æµÁ ƒjÒà°S …ôJh 䃰üH ¿ƒµ«°S ∞bƒàe ´RƒŸGh OQƒÑ«µdG øe
"AUTO BASS-status and volume" Iô≤a ô¶fG) , …OÉMCG ¢UÉH 䃰U ¬«dG
‘ ∫É◊G ¿Éc ɪc ÉàeÉ°U OQƒÑ«µdG øe ô°ùj’G ∞°üædG ¿ƒµj ød …CG ,((41) ¢U
ô¶fG π«°UÉØà∏d .âÄ°T ¿G √AÉØWG ∂æµÁ øµd . á≤HÉ°ùdG á«còdG óf’hQ äGOQƒÑ«c
.42 ¢U
15
r EXR–46 OR
ΩƒfhΟG ΩGóîà°SEG
.ójóL øë∏d ∂aõY ∫ÓN ΩƒfhΟG 𫨰ûJ ∂æµÁ
.[METRONOME] QR §¨°VEG (1)
á«fɪãdG USER TONES QGQRCG óMCG ≈∏Y §¨°†dG kÉ°†jCG ∂æµÁ
øe ôNBG QR ≈∏Y §¨°†J ɪæ«H kÉWƒ¨°†e √AÉ≤HEGh (»°SÉ°SC’G º°ù≤dG)
.(ô°ùjC’G º°ù≤dG) USER TONES
.Cô°ùjC’G º°ù≤dG ‘ ∫ƒÑ£dG äÉYƒª› ∫ÉNOEG ∂æµÁ ’ :á¶MÓe
¤G (''Auto Bass'') »µ«JÉeƒJhCG ¢UÉH º°ùb áaÉ°VEG ∂fɵeCÉH :á¶MÓe
.(41 ¢U) ''Volume'' h ''Auto bass'' äGô≤ØdG ô¶fCG ô°ùjC’G º°ù≤dG
»FÉæãdG ±õ©dG
.[DUAL] QR §¨°VEG ,óMGh ¿BG ‘ ÚJƒ°U ±õ©d (1)
.ΩƒfhΟG 䃰U ™ª°ùJh ,
IQÉ°TG á°TÉ°ûdG ≈∏Y ô¡¶J
áØ«Xh QÉ«àN’ kÉWƒ¨°†e ¬≤HCGh [METRONOME] QR §¨°VEG
.Metro TS
.iôNCG á«æeR IQÉ°TEG QÉ«àN’ - + QGQRCG Ωóîà°SEG
.8/9~8/1 ,4/9~4/1 :»g ä’ɪàMC’G
êhôî∏d DATA ENTRY º°ùb ‘ ôNBG ''ÒÑc'' QR §¨°VEG
.á∞«XƒdG √òg øe
.ΩƒfhΟG ¥ÓZC’ kGOó› [METRONOME] QR §¨°VEG
DUAL
(2)
(3)
(4)
(5)
䃰U QÉ«àNÉH kÉ«FÉ≤∏J RÉ¡÷G Ωƒ≤jh ,
IQÉÑY á°TÉ°ûdG ≈∏Y ô¡¶J
.QÉàıG »°SÉ°SC’G 䃰üdG ™e ºFÓàj áfÉ£ÑdG º°ù≤d
QGQRCG óMCG ≈∏Y §¨°†dG ∫ÓN øe Dual ™°Vh π«©ØJ kÉ°†jCG ∂fɵeÉH
ôNBG QR ≈∏Y §¨°†dG ºK øeh kÉWƒ¨°†e √AÉ≤HEGh á«fɪãdG USER TONES
.QGQRC’G √òg øe
º°ù≤dG ¤G USER TONES QGQRCG øe ∫hC’G QõdG 䃰U ∫ÉNOEG ÉgóæY ºàjh
.áfÉ£ÑdG º°ùb ¤G ÊÉãdG 䃰üdG ∫ÉNOEG ºàj ɪæ«H ,»°SÉ°SC’G
.OQƒÑ«µdG ≈∏Y äÉJƒædG ¢†©H ±õYEG (2)
äGƒ£ÿG ™ÑJEG ,áfÉ£ÑdG 䃰Uh »°SÉ°SC’G 䃰üdG ÚH ¿RGƒàdG Ò«¨àd
:á«dÉàdG
kÉWƒ¨°†e ¬≤HCGh [DUAL] QR §¨°VEG ,áfÉ£ÑdG 䃰U Ió°T Ò«¨àd (3)
hCG (䃰üdG ¢†Øÿ) [ACCOMP] BALANCE Ωóîà°SGh
.(䃰üdG ™aôd) [KEYBOARD]
¬≤HCGh [DUAL] QR §¨°VEG ,∞∏àfl áfÉ£H 䃰U QÉ«àN’ (4)
.(13¢U) »°SÉ°SC’G 䃰ü∏d Ωóîà°ùŸG AGôLC’G ¢ùØf ™ÑJEG ºK kÉWƒ¨°†e
.áfÉ£ÑdG º°ùb ¤G ∫ƒÑ£dG äÉYƒª› ∫ÉNOEG ∂æµÁ ’ :á¶MÓe
14
EXR–46 OR
OQƒÑ«µdG º«°ù≤J
,≈檫dGh iô°ù«dG ∂jó«H áØ∏àfl äGƒ°UCG ±õ©H âÑZQ GPEG (1)
.[SPLIT] QR §¨°VEG
䃰U QÉ«àNÉH kÉ«FÉ≤∏J RÉ¡÷G Ωƒ≤jh
IQÉ°TCG á°TÉ°ûdG ≈∏Y ô¡¶J
.QÉàıG »°SÉ°SC’G 䃰üdG ™e ºFÓàj ô°ùjC’G º°ù≤∏d
OQƒÑ«µdG ≈∏Y äÉJƒædG ¢†©H ±õYEG (2)
Split
Main
,(''55'' ºbQ áJƒædG) G3 á£≤f óæY kɪ°ù≤æe OQƒÑ«µdG ¿ƒµj ájGóÑdG ‘
ΩÉ°ù≤fEG Iô≤a ô¶fCG .iôNCG ΩÉ°ù≤fEG á£≤f QÉ«àNEG ∂æµÁ ôeC’G ≈°†àbEG GPEG
.41 ¢U (ΩÉ°ù≤fC’G á£≤f)''KeySplit'' í«JÉØŸG
™ÑJEG ,ô°ùjC’G º°ù≤dG 䃰U h »°SÉ°SC’G 䃰üdG ÚH ¿RGƒàdG Ò«¨àd
:á«dÉàdG äGƒ£ÿG
¬≤HCGh [SPLIT] QR §¨°VEG ,ô°ùjC’G º°ù≤∏d 䃰üdG Ió°T Ò«¨àd (3)
(䃰üdG ¢†Øÿ) [ACCOMP] BALANCE Ωóîà°SEG ºK kÉWƒ¨°†e
.(䃰üdG ™aôd) [KEYBOARD] hCG
SPLIT
BALANCE
ACCOMP
KEYBOARD
ºK kÉWƒ¨°†e ¬≤HCGh [SPLIT] QR §¨°VEG ,ô°ùjC’G º°ù≤∏d ôNBG 䃰U ójóëàd (4)
.(13 ¢U) »°SÉ°SC’G 䃰ü∏d Ωóîà°ùŸG AGôLC’G ¢ùØf ™ÑJEG
13
[TONE] QR ≈∏Y §¨°VEG ,»°SÉ°SC’G 䃰üdG Ió°T Ò«¨àd âéàMEG GPEG (4)
hCG (䃰üdG ¢†Øÿ) BALANCE [ACCOMP] Ωóîà°SGh IÎØd
.(䃰üdG ™aôd) [KEYBOARD]
RÉ¡L ¿CÉa ,á≤HÉ°ùdG óf’hQ ´Rƒe ä’BG ¢ùµY ≈∏Y :áßMÓe
Gòµgh ,…hó«dG ∫ƒÑ£dG º°ùbh á«æë∏dG ΩÉ°ùbC’G ÚH õ«Á ’ EXR-46 OR
.»°SÉ°SC’G 䃰üdG ΩGóîà°SÉH ∫ƒÑW áYƒª› ±õ©J ¿G kÉ°†jCG ∂fɵeÉÑa
´É≤jEG áaÉ°VC’ [START/STOP] QR ΩGóîà°SEG kÉ°†jCG ∂æµÁ :áßMÓe
ô¶fCG ,kÉ«dÉM QÉàıG »≤«°SƒŸG ´É≤jE’G ≈∏Y Gòg óªà©jh,∂aõ©d ÖMÉ°üe
.ôNBG ´É≤jEG QÉ«àNEG á«Ø«c ≈∏Y ±ô©à∏d 16 ¢U
áÑMÉ°üª∏d øeGõàŸG 𫨰ûàdG'' Iô≤ah ,15 ¢U ô¶fCG :áßMÓe
𫨰ûàd iôNCG Ö«dÉ°SCG ≈∏Y ±ô©à∏d .16¢U ''(Sync Start&Stop)
.´É≤jE’G áYGPEG
áÑMÉ°üe ¿hóH ±õ©dG
™°Vh QÉ«àNÉH RÉ¡÷G Ωƒ≤j ,EXR-46 OR RÉ¡L 𫨰ûàH Ωƒ≤J ÉeóæY
hCG ,ÊhεdCG ƒfÉ«Ñc RÉ¡÷G ΩGóîà°SEG ∂fɵeÉH ¿CG »æ©j Gògh ,OôØæŸG ƒfÉ«ÑdG
.QõjÉ°ù«ãæ«°S
(''´RƒŸG'' ≈ª°ùJ »àdG) áÑMÉ°üŸG áØ«Xh ¿CÉa ,OôØæŸG ƒfÉ«ÑdG ™°Vh ‘h
‘ »°SÉ°SC’G 䃰üdG §≤a πª©j ɪæ«H ,Iôaƒàe ÒZ [ONE¥TOUCH] QGQRCGh
.RÉ¡÷G
IÒãc iôNCG ΩÉ°ùbCGh) »◊G ∂aõ©d ΩÉ°ùbCG áKÓK EXR-46 OR RÉ¡L ôaƒjh
:(ÊÉZC’Gh ¿É◊C’G áYGPEGh ´RƒŸG á«Ø∏ÿ
Main »°SÉ°SC’G 䃰üdG
.RÉ¡÷G ‘ ºgC’G º°ù≤dG Gòg Èà©j ,᫪°ùàdG øe ÚÑàj ɪc
OQƒÑ«µdG »£¨j »°SÉ°SC’G 䃰üdG ¿CÉa ,kÉ≤∏¨e OQƒÑ«µdG º«°ù≤J ¿ƒµj ÉeóæYh
.¬∏ªcCÉH
Split ô°ùjC’G º°ù≤dG
,OQƒÑ«µdG øe ô°ùjC’G ∞°üædG »£¨j ƒ¡a ,º°ù≤dG Gòg 𫨰ûàH Ωƒ≤J ÉeóæY
.≈檫dG ó«dG ᣰSGƒH »°SÉ°SC’G 䃰üdG ±õY øµÁ ɪæ«H
Dual áfÉ£ÑdG º°ùb
.¬∏ªcCÉH OQƒÑ«µdG »£¨j ƒgh ,»°SÉ°SC’G 䃰üdG ¤G º°ù≤dG Gòg áaÉ°VEG øµÁ
.óMGh ¿BG ‘ ÚJƒ°U ±õY ∂d í«àj Gògh
»°SÉ°SC’G 䃰üdG ΩGóîà°SEG
QR §¨°VEG ,¬∏ªcCÉH OQƒÑ«µdG πªY ¤ƒà«d »°SÉ°SC’G 䃰üdG 𫨰ûàd (1)
.[PIANO¥SOLO]
PIANO
SOLO
GPEG) πª©dG øY ´RƒŸG ∞bƒàjh ,
IQÉÑY á°TÉ°ûdG øY »ØàîJ
.ƒfÉ«H 䃰U QÉ«àNÉH kÉ«FÉ≤∏J EXR-46 OR RÉ¡L Ωƒ≤jh ,(Ó¨°ûe ¿Éc
.OQƒÑ«µdG ≈∏Y äÉJƒædG ¢†©H ±õYEG (2)
óMCG ≈∏Y §¨°†dG ∫ÓN øe ôNBG 䃰U QÉ«àNÉH ºb ,áLÉ◊G â°†àbEG GPEG (3)
.π«°UÉØà∏d 30 ¢U ô¶fCG .á«fɪãdG USER TONES QGQRCG
r EXR–46 OR
¤h’G äGƒ£ÿG .4
øë∏dG áYGPG ±É≤j’ [START/STOP] QR ≈∏Y §¨°†dG ¿’G ∂fɵeÉH
.‹ÉàdG øë∏dG áYGP’ á«fÉK Iôe QõdG Gòg §¨°VG , ‹É◊G
.¢Vô©dG ø◊ áYGPEG ∞bƒd [START/STOP] QR §¨°VEG (2)
:äÉYÉ≤j’G ¢VhôY áYGPG
.É«FÉ≤∏J QÉàıG »YÉ≤j’G ¢Vô©dG áYGPG CGóÑà°S [STYLE] QR §¨°VG (1)
¢Vô©dG ¿É◊CG
RÉ¡÷G OGóYG
¢VGô©à°S’ ¿É◊G 8 ,IóMGh ¢VôY á«æZCG EXR-46 OR RÉ¡L …ƒëj
. ´É≤j’G äÉ°VGô©à°SG øe OóYh ,äGƒ°U’G
RÉ¡L É¡H ™àªàj »àdG äÉ«fɵeC’G RÈJ á«æZC’G äÉ°VGô©à°SEG •
.πµc EXR-46 OR
‘ IOƒLƒŸG á∏gòŸG äGƒ°U’G IOƒL ióe RÈJ äGƒ°U’G äÉ°VGô©à°SG •
AÉHô¡c Qó°üà PSB-4U »FÉHô¡µdG ∫ƒÙG π«°UƒJ »g ¤h’G Iƒ£ÿG
. Ö°SÉæe
.Ö°SÉæe í£°S ¥ƒa ¬©°Vh ¬àØ∏ZG øe EXR-46 OR RÉ¡L êôNCG (1)
.EXR-46 OR
IOƒLƒŸG äÉYÉ≤j’G IOƒL øY ÉYÉÑ£fG ∂«£©J äÉYÉ≤j’G äÉ°VGô©à°SG •
.RÉ¡÷G ‘
.[ONE¥TOUCH] QR §¨°VG ºK , ÉWƒ¨°†e ¬≤HGh [USB] QR §¨°VG (1)
EXR-46 OR ≈∏Y ¬∏Nóe ‘ »Hô¡µdG ∫ƒëª∏d ™«aôdG ±ô£dG πNOG (2)
.AÉHô¡µdG Qó°üà ôN’G ±ô£dGh
.RÉ¡÷G 𫨰ûàd [POWER¥ON] QR §¨°VG (3)
POWER ON
ƒd .‹É◊G ¢Vô©dG áYGPG ±É≤j’ [START/STOP] §¨°V ¿’G ∂æµÁ
.‹ÉàdG ¢Vô©dG ´Gò«°S á«fÉK QõdG Gòg ⣨°V
.‹É◊G ¢Vô©dG áYGPG ∞bƒd [START/STOP] §¨°VG (2)
.¢Vô©dG ¿É◊G ™°Vh øe êhôÿG
[ONE¥TOUCH] QR §¨°VG ºK ,ÉWƒ¨°†e ¬≤HGh [USB] QR §¨°VG (1)
.䃰üdG Ió°T §Ñ°†d [VOLUME] 䃰üdG IôµH Ωóîà°SG (4)
.âÄ°T ¿G [VOLUME] ᣰSGƒH 䃰üdG Ió°T §Ñ°VG (2)
.øë∏dG áYGPG ∞bƒd [START/STOP] QR §¨°VG (3)
.¢Vô©dG ¿É◊G áØ«Xh øe êhôî∏d
¢Vô©dG ¿É◊CG óMCG áYGPG
. [TONE] QR §¨°VG (1)
‘ ájɪ◊G Ωɶf Ωƒ≤j , ™ØJôe 䃰U ≈∏Y RÉ¡÷G ΩGóîà°SG óæY : ¬¶MÓe
¢†ØNG ádÉ◊G √òg ‘ ,äÉYɪ°ùdG 䃰U ¢†«ØîJ ≈∏Y πª©dÉH 䃰üdG ºî°†e
.äɶ◊ á©°†Ñd ô¶àfGh 䃰üdG Ió°T
TONE
.É«FÉ≤∏J QÉàıG ¢Vô©dG ø◊ áYGPG CGóÑà°S
.RÉ¡÷G ¥ÓZE’ á«fÉK Iôe [POWER¥ON] QR §¨°VEG (5)
䃰U ºî°†e ™e hCG OQƒÑ«c ™e EXR-46 OR RÉ¡L π«°UƒàH âÑZQ GPEG
䃰üdG ºî°†e π¨°Th (3) ºbQ Iƒ£ÿG ò«ØæJ πÑb ∂dòH º≤a ,HiFi RÉ¡÷
.(4) ºbQ Iƒ£ÿG ò«ØæJ πÑb
12
EXR–46 OR
á«Ø∏ÿG áMƒ∏dG
A
B
C
D
E
F
USB áëàa F
¢VGôZC’ hCG …ó«ŸG πFÉ°SQ ∫ÉÑ≤à°SEGh π≤æd USB áëàa ΩGóîà°SEG øµÁ
.ôJƒ«ÑªµdG ™e ∞«°TQC’G
OUTPUT R, L/MONO ƒfƒe/ƒjΰS
䃰üdG êôfl
A
ȵe πNóà EXR-46 OR RÉ¡L π«°UƒJ êôıG Gòg ∫ÓN øe ∂æµÁ
hCG ,»LQÉN Mixer RÉ¡L ¤G hCG ,HiFi ‹õæe ´Éªà°SEG RÉ¡÷ 䃰üdG
.OQƒÑ«µdÉH ¢UÉN 䃰U ȵe hCG â«°SÉc RÉ¡L
øe ócCÉJ ,(ƒfƒe) kÉjOÉMCG (Amplifier) »LQÉÿG 䃰üdG ȵe ¿Éc GPEG
.§≤a OUTPUT L/MONO ô°ùjC’G πNóŸÉH ¬∏«°UƒJ
DC IN ôªà°ùŸG
»FÉHô¡µdG QÉ«àdG πNóe
B
.(PSP-4U) RÉ¡÷G ™e ≥aôŸG »FÉHô¡µdG QÉ«àdG ∫ƒfi π«°UƒJ ºàj Éæg
RÉ¡L ™e ≥aôŸG »FÉHô¡µdG ∫ƒÙG §≤a Ωóîà°SCG :á¶MÓe
.∑RÉ¡éH ô°†j ób iôNCG ä’ƒfi ΩGóîà°SÉa ,EXR-46 OR
Cord Hook »FÉHô¡µdG
§jô°ûdG ábÓY
C
ÚÁ ≈∏Y §jô°ûdG ábÓY ∫ƒM ¬Ød ,»FÉHô¡µdG ∫ƒÙG πHÉc π«°UƒJ ó©H
.á«FÉHô¡µdG ábÉ£dG ‘ Qƒ°üb çhóM Öæéàd QÉ«àdG πNóe
FOOTSWITCH Ωó≤dG
á°SGhO πNóe
D
,DP-6 ,DP-2) á«aÉ°VEG á°SGhO π«°Uƒàd πNóŸG Gòg Ωóîà°ùj
ó«dÉH É¡aõ©J »àdG äɪ¨ædG ≈∏Y AÉ≤HC’G øe ∂浓 (BOSS FS-5U hCG
Iô≤a ô¶fCG) iôNCG äGÒ¨àà ºµëà∏d É¡eGóîà°SEG øµÁ ɪc ,≈檫dG
.(41 áëØ°U ''FSW''
MIDI OUT/IN …ó«ŸG
πNóeh êôfl
ádBG hCG) ôJƒ«ÑªµdG RÉ¡÷ …ó«ŸG πNóe ¤G …ó«ŸG êôfl π«°UƒàH ºb
hCG ôJƒ«ÑªµdG ¤G EXR-46 OR øe …ó«ŸG äÉeƒ∏©e π≤æd (iôNCG …ó«e
EXR-46 OR RÉ¡L ‘ …ó«e πNóe π«°UƒàH ºb ∂dòc ,iôNC’G ádB’G
.¬æe …ó«ŸG äÉeƒ∏©e πÑ≤à°ùàd ôJƒ«Ñªµ∏d …ó«e êôfl ¤G :áßMÓe
áëàa ÈY …ó«ŸG äÉeƒ∏©e ∫ÉÑ≤à°SEGh ∫É°SQEG EXR-46 OR RÉ¡L ¿ÉµeÉH
USB äGõ«¡Œ 𫪖 ÖLƒàj ¬fÉa ∂dP ≥«≤ëàd .¬«a IOƒLƒŸG USB
.∂dòd ¢ü°üıG CD-ROM ¢Uôb øe áÑ°SÉæŸG
11
E
r EXR–46 OR
¿CÉa Ée á¶◊ ‘ IQÉàıG áYƒªÛG øe IÒNC’G IOÉŸG AÉ≤àfEG ó©Hh
øe ¤hC’G IOÉŸG ¤G ∂∏≤æj iôNCG Iôe SELECT QR ≈∏Y §¨°†dG
ó©H iôNCG Iôe SELECT QR ≈∏Y §¨°†dG ¿CÉa ¢ùµ©dÉHh ,á«dÉàdG áYƒª÷G
øe IÒNC’G IOÉŸG ¤G ∂∏≤æj ,Ée áYƒª› øe ¤hC’G IOɪ∏d ∑QÉ«àNEG
.á≤HÉ°ùdG áYƒªÛG
,䃰ü∏d) ΩÉbQC’G ∫ÉNOEG QGQRC’G √òg ∂d í«àJ :᫪bôdG QGQRC’G áMƒd
áaÉ°VEG ,(áYƒ£≤ŸG QÉ«àNEGh ,á«æZC’Gh ,»≤«°SƒŸG óYÉ°ùŸG IôcGPh ,´É≤jE’Gh
.(Aɪ°SC’G ∫ÉNOE’) ±ôMC’Gh º«≤dG ¤G
´RƒŸG ´É≤jEG áYô°S õ«¡éàH TEMPO/DATA [+][–] QGQRCG ∂d íª°ùJh
.QÉàıG »Ø«XƒdG Ò¨àŸG ᪫bh á«æZC’G hCG
[FUNCTION] ∞FÉXƒdG
QR X
QGQRCG ΩGóîà°SEG ∂æµÁh ,∞FÉXƒdG áªFÉb QõdG Gòg íàØj
.áHƒ∏£ŸG áØ«XƒdG QÉ«àNE’ [√] [®] SELECT h FAMILY
[DISK] ∂°ùjódG
QR Y
äÉeƒ∏©e π«ªëàd Ωóîà°ùJ »àdGh ∂°ùjódG ∞FÉXh ¤G ∫ƒNó∏d QõdG Gòg §¨°VEG
.(53 ¢U ô¶fCG) äɵ°ùjódG º«¶æJh ,¬«∏Y É¡¶ØMh ,∂°ùjódG øe
.USB á∏«°UƒJ ∫ÓN øe äÉeƒ∏©ŸG 𫪖h øjõîJ kÉ°†jCG ∂æµÁ :áßMÓe
[USER¥PROGRAM/WRITE] øjõîàdG
/ ±RÉ©dG èeGôH QGQRCG Z
á∏°UGƒÃh ,(á°UÉÿG ∂JGõ«¡Œ) ±RÉ©dG èeGôH óMCG QÉ«àNE’ QõdG Gòg §¨°VEG
√òg óMCG ‘ ¬JɣѰVh RÉ¡÷G äGõ«¡Œ øjõîJ ∂æµÁ QõdG ≈∏Y ∂£¨°V
.(45 ¢U ô¶fCG) èeGÈdG
USER TONES ±RÉ©dG
äGƒ°UCG º°ùb a
πãe) áæ«ÑŸG á∏FÉ©dG øe äGƒ°UC’G ''π°†aCG'' QÉ«àNEG QGQRC’G √òg ∂d í«àJ
.(ïdEG ,¢UÉH/QÉà«L ,øZQCG ,ƒfÉ«H 䃰U ''π°†aCG''
QGQRCG ΩGóîà°SEG ∂fɵeEÉH ,QGQRC’G √òg óMCG ≈∏Y §¨°†dG ó©H
á∏FÉ©dG πNGO iôNCG äGƒ°UCGh äÓFÉY QÉ«àNC’ [√] [®] SELECT h [√] [®] FAMILY
øe äGƒ°UC’Gh äÓFÉ©dG √òg IOÉ©à°SEG øµÁ ,á≤M’ á∏Môe ‘h) ,á∏©ØŸG
.(QGQRC’G √òg ≈∏Y Úà≤MÓàe ÚJôe §¨°†dG ∫ÓN
.QGQRC’G √òg ¤G á∏°†ØŸG ∂JGƒ°UCG π≤æJ ¿CG kÉ°†jCG ∂æµÁ
.π«°UÉØàdG øe ójõŸ (30 ¢U) ''±RÉ©dG äGƒ°UCG QGQRCG ΩGóîà°SEG'' Iô≤a ô¶fCG
¤G OQƒÑ«µdG ∞°üàæe ‘ óLƒjh ,DISK DRIVE äɵ°ùjódG π¨°ûe b
.(IQƒ°üdG ‘ ôgÉX ÒZ) πØ°SC’G
hCG á«°SÉ«≤dG MIDI äÉØ∏e ≈∏Y …ƒà– floppy äɵ°ùjO ∫ÉNOEG ∂æµÁ Éæg
áLhOõe äɵ°ùjO π¨°ûŸG πÑ≤àjh ,∂jód IOƒLƒe ¿ƒµJ ób á«≤«°Sƒe äÉYÉ≤jEG
.(âjÉHɨ«e1Q44) HD2 áaÉãµdG á«dÉY hCG ,(âjÉHƒ∏«c 720) DD2 áaÉãµdG
LOCK â«ÑãàdG
º°ùb Q
ºàj áæ«©e äGõ«¡Œ πgÉŒ º°ù≤dG Gòg ‘ IOƒLƒŸG QGQRC’G ∂d í«àJ
ΩGóîà°SEÉH íª°ùj Gògh ,±RÉ©dG èeGôH óMC’ ∑QÉ«àNEG óæY IOÉY É¡FÉYóà°SEG
.(46 ¢U ô¶fCG) ∂JÓ«é°ùàd áfhôe ÌcCG
ΩÉ«≤dG QGQRC’G √òg ∂d í«àJ ,á∏¨°ûe Minus One áØ«Xh ¿ƒµJ ÉeóæYh
√òg â«ÑãàdG ∞FÉXh) MIDI äÉØ∏e óMCG äÉcGôJ ¢†©H OÉ©Ñà°SÉH áYô°ùHh
.(´RƒŸG áØ«Xh ΩGóîà°SCG ∫ÓN áMÉàe â°ù«d
KEYBOARD MODE OQĄǵdG
™°Vh ójó– º°ùb R
¬eGóîà°SE’ EXR-46 OR õ«¡Œ áYô°ùHh QGQRC’G øe êhõdG Gòg ∂d íª°ùj
áÑMÉ°üŸG ¿hóH hCG ([ARRANGER¥BAND]) ábôØdG ´Rƒe ™e
.([PIANO/SOLO]) ᫵«JÉeƒJhC’G
™°Vh QÉ«àNEÉH kÉ«FÉ≤∏J RÉ¡÷G Ωƒ≤j ,EXR-46 OR RÉ¡L 𫨰ûJ iódh
.PIANO/SOLO
∂d í«àj …òdG ôeC’G ,ƒfÉ«ÑdG ™°Vh 𫨰ûàd óMGh ¿BG ‘ øjQõdG ≈∏Y §¨°VEG
º«°ù≤J ¿hóH (᫵«JÉeƒJhC’G áÑMÉ°üŸG) EXR-46 OR ´Rƒe ΩGóîà°SEG
.(27 ¢U ô¶fCG) OQƒÑ«µdG
[MUSIC¥ASSISTANT] »≤«°SƒŸG
óYÉ°ùŸG QR S
èeGôH) RÉ¡÷G ‘ kÉ≤Ñ°ùe á›ÈŸG äGõ«¡éàdG ΩGóîà°SEG QõdG Gòg ∂d í«àj
.26 ¢U ô¶fCG (á«aÉ°VEG ±RÉY
[SONG] á«æZC’G
QR V
᫪bôdG QGQRC’Gh [FAMILY] á∏FÉ©dG QR ΩGóîà°SÉH âÑZQ GPEG QõdG Gòg §¨°VEG
OQƒÑ«µdG º«°ù≤J hCG »°SÉ°SC’G 䃰üdG øe πÑ£dG hCG á«≤«°Sƒe ádBG 䃰U QÉ«àNC’
.»FÉæãdG º°ù≤dG hCG
DATA ENTRY äÉeƒ∏©ŸG
[V-LINK] á∏«°UƒJ
QR M
RÉ¡L É¡H OhõŸG V-LINK áØ«Xh øe IOÉØà°SCÓd QõdG Gòg ≈∏Y §¨°VEG
áæ«©e á«FGOCG ∞FÉXh ᣰSGƒH ƒjó«ØdG IOÉe ‘ ºµëà∏d EXR-46 OR
.EXR-46 OR OQƒÑ«c øe Úª«dG ≈°übCG ≈∏Y IOƒLƒŸG í«JÉØŸG ᣰSGƒHh
π«°UƒJ π¡°ùdG øªa ƒjó«ØdG Iõ¡LCG ™e ≥aGƒàdÉH V-LINK ΩGóîà°SEG ∫ÓN øeh
.»≤«°SƒŸG ¢Vô©dG ‘ IÈ©ŸG ô°UÉæ©dG øe AõL É¡∏©Lh á«FôŸG äGÒKCÉàdG
V-4 hCG DV-7PR Edirol ¤G EXR-46 OR RÉ¡L π«°UƒJ ∫ÓN øeh
¢Vô©dG ∞FÉXh Ωóîà°SEG hCG ,≈≤«°SƒŸG ™e øeGõàdÉH Qƒ°üdG πjƒ– ∂fɵeEÉÑa
Ò«¨àd Úª«dG ≈°übCG ‘ IOƒLƒŸG í«JÉØŸG hCG EXR-46 OR RÉ¡L ‘
.ÉgÒZh ,¢Vô©dG áYô°S ‘ ºµëàdGh ,äÉ£≤∏dG
¢†«eh QõdG Gòg øY Qó°üj ,»≤«°Sƒe ´É≤jEGh á«æZCG ¤G ´Éªà°SE’G ∫ÓNh
.(BEAT áØ«Xh) beats äÉbódGh ´É≤jE’G áYô°S ÚÑj »Fƒ°V
KEYBOARD CONTROL OQĄǵdG
‘ ºµëàdG º°ùb N
.≈檫dGh iô°ù«dG ∑ó«H áØ∏àfl äGƒ°UG ±õ©d [SPLIT] QR ≈∏Y §¨°VEG
.kÉ©e »FÉæãc ÚJƒ°U ±õ©d [DUAL] QR ≈∏Y §¨°VEG
.(32 ¢U ô¶fCG) OQƒÑ«µdG ΩÉ≤e Ò«¨àd [TRANSPOSE] QR Ωóîà°SEG
BAND ORCHESTRATOR ábôØdG
≥°ùæe QGQRCG O
áHƒZôŸG á«Ø∏ÿG áÑMÉ°üŸG ó«≤©J iƒà°ùe QÉ«àNE’ QGQRC’G √òg óMCG §¨°VEG
.(17 ¢U ô¶fCG) ¬eóîà°ùJ …òdG ´É≤jEÓd
QR U
QGQRCG ¢ü«°üîJ ºàj ¬£¨°†Hh ,äÉYÉ≤jE’G QÉ«àNC’ QõdG Gòg §¨°VEG
,(Divisions) ´RƒŸG ΩÉ°ùbCG óMCG QÉ«àNC’ ÉgÒZh [ORIGINAL] h [INTRO]
.áHƒ∏£ŸG ´É≤jE’G IôcGP QÉ«àNC’ ᫪bôdG QGQRC’G Ωóîà°ùJ ÚM ‘
[TONE] 䃰üdG
á°ùª∏dG QR L
QR T
QGQRCG ¢ü«°üîJh ,''á«æZC’G ™°Vh'' QÉ«àNEÉH QõdG Gòg ∂d íª°ùj
.πé°ùŸG 𫨰ûàd ÉgÒZh [ORIGINAL] h [INTRO]
[STYLE] ´É≤jE’G
[ONE¥TOUCH] IóMGƒdG
IôcGP …ƒà– .áHƒZôŸG IóMGƒdG á°ùª∏dG äGõ«¡Œ QÉ«àNC’ QõdG Gòg §¨°VEG
,√QÉ«àNEG ” …òdG ´É≤jE’G πªµJ »àdG äGõ«¡éàdG øe OóY ≈∏Y IóMGƒdG á°ùª∏dG
.(26 ¢U ô¶fCG) »≤«°Sƒe ´É≤jEG πµd ´ƒædG Gòg øe ¿ÉJôcGP ∑Éægh
∫ÉNOEG QGQRCG W
ARRANGER &SONG CONTROLS á«æZC’ÉH
ºµëàdG º°ùbh ´RƒŸG P
hCG ´Rƒª∏d ´É≤jC’G §Ñ°†d πbC’G ≈∏Y ÚJôe [TAP¥TEMPO] QR ≈∏Y §¨°VEG
.πé°ùŸG ‘ ´Éªà°SC’G RÉ¡÷
´RƒŸG ™°Vh »Øa :ÚàØ«Xh AGOCÉH [SYNC¥START/STOP] QR Ωƒ≤jh
𫨰ûàH QõdG Gòg ∂d íª°ùj (᫵«JÉeƒJhC’G áÑMÉ°üŸG ΩGóîà°SEG ∫ÓNh)
.SYNC STOP h SYNC START áØ«Xh ¥ÓZEGh
(''A'') ájGóÑdG á£≤f ójóëàd QõdG Gòg ΩGóîà°SEG øµÁ ,á«æZC’G ™°Vh ‘h
.É¡JOÉYEG ܃∏£ŸG Iô≤Ø∏d (''B'') ájÉ¡ædG á£≤fh
´Éªà°SC’G á«∏ª©H ºµëàdG ∂d í«àJ »¡a º°ù≤dG Gòg ‘ QGQRC’G á«≤H ÉeCG
.(19 h 15 äÉëØ°üdG ô¶fCG) πé°ùŸG hCG ´Rƒª∏d
,䃰üdG QÉ«àNC’ QGQRC’G √òg Ωóîà°ùJ :[√] [®] SELECT h FAMILY QGQRCG
ÒjÉ©ŸGh ,á«æZC’Gh ,»≤«°SƒŸG óYÉ°ùª∏d ∫ƒNódG π«é°ùJh ,´É≤jE’Gh
,äÉYƒªÛG ióMEG QÉ«àNG FAMILY á∏FÉ©dG QGQRCG ∂d í«àJh .á«Ø«XƒdG
ɪæ«H ÉgóMCG ≈∏Y §¨°†dG hCG ,áWƒ¨°†e É¡FÉ≤HEG hCG ,É¡«∏Y §¨°†dG ∂fɵeEÉHh
.¢Vô©dG áYô°S Ò«¨àd ,kÉWƒ¨°†e ôNB’G ¿ƒµj
hCG áYƒªÛG πNGO øe AGõLCG AÉ≤àfEG SELECT AÉ≤àfC’G QGQRCG ∂d í«àJ ɪæ«H
§¨°†dG hCG ,áWƒ¨°†e É¡FÉ≤HEG hCG ,É¡«∏Y §¨°†dG ∂fɵeEÉHh ,IQÉàıG á∏FÉ©dG
.¢Vô©dG áYô°S Ò«¨àd ,kÉWƒ¨°†e ôNB’G ¿ƒµj ɪæ«H ÉgóMCG ≈∏Y
10
EXR–46 OR
RÉ¡÷G äÉMƒd ∞°Uh .3
á«eÉeC’G áMƒ∏dG
A
B
H
K L M
I
N
J
O
W
S
F
C
G
D
T
Y
U
Q
V
P
R
E
Z
a
b
áàHÉãdG ᪫≤dG ójó– ∂fɵeEÉH kÉ≤∏¨e QõdG Gòg ¿ƒµj ÉeóæY
.É¡aõ©J »àdG äÉJƒædG áaɵd É¡eGóîà°SEG »¨Ñæj »àdG á«°SÉ°ùë∏d
[METRONOME] ΩƒfhΟG
BENDER/MODULATION ᪨ædG
QR I
§¨°†dG QGôªà°SCG .ΩƒfhΟG ±É≤jEG hCG 𫨰ûàd QõdG Gòg Ωóîà°ùj
.á«Ø«XƒdG äGÒ¨àŸG ¢†©H §Ñ°V ∂d í«àj á«fÉK øe ÌcC’ QõdG ≈∏Y
[MELODY¥INTELLIGENCE] »æë∏dG
[USB] QR
(1) áëàa É¡jODƒà°S »àdG áØ«XƒdG QÉ«àNEÉH QõdG Gòg ∂d íª°ùj
RÉ¡L ¤EGh øe äGõ«¡éàdG IOÉ©à°SEGh ßØM) »YɪL øjõîJ :USB
USB áëàa ¬à£°SGƒH πª©J …òdGh) USB/MIDI (2) hCG (ôJƒ«ÑªµdG
äÉëØ°üdG ô¶fCG .(MIDI OUT h MIDI IN äÓ«°UƒJ áØ«Xh ¢ùØæH
.π«°UÉØàdG øe ójõŸ 52¤G 47 øe
IóMGƒdG á°ùª∏dG QR ™e âbƒdG ¢ùØæH QõdG Gòg §¨°VEG
.(12 ¢U ô¶fCG) RÉ¡é∏d ¢Vô©dG ¿É◊CG áØ«Xh QÉ«àNC’ [ONE¥TOUCH]
ꃓh »æK ´GQP D
Gòg ∂jô– ∫ÓN øe ≈∏YC’G hCG πØ°SC’G ¤G ∂Jɪ¨f Ò«¨J ∂æµÁ
∞«°†«a ΩÉeC’G ¤G ´GQòdG ™aO ÉeCG ,Úª«∏d hCG QÉ°ù«∏d ´GQòdG
.É¡aõ©J »àdG äɪ¨æ∏d kÉLƒ“
2/1 ¢SCGôdG äÉYɪ°S êôfl E
AÉcòdG QR J
…òdGh ,''»æë∏dG AÉcòdG'' ±É≤jEG hCG 𫨰ûJ ≈∏Y QõdG Gòg πª©j
.(27 ¢U ô¶fCG) ¬aõ©J …òdG øë∏dG ¤G kÉ«fƒeQÉg kÉ£N ∞«°†j
á«Ø«Xh äGÒ¨àe AÉYóà°SCÉH Ωƒ≤j á«fÉK øe ÌcC’ §¨°†dG QGôªà°SEG
.ʃeQÉ¡dG ´ƒf QÉ«àNC’ É¡£Ñ°V ∂æµÁ
9
X
¢SCGôdG äÉYɪ°S øe ÚLhR π«°UƒJ ™bƒe Gòg
䃰üdG ȵe ÅØ£J Gòµgh ,(RH-120 hCG Roland RH-25)
.EXR-46 OR äÉYɪ°Sh »∏NGódG
[VOLUME] 䃰üdG
Ió°T IôµH F
.EXR-46 OR RÉ¡÷ 䃰üdG Ió°T §Ñ°†d IôµÑdG √òg Ωóîà°SEG
K
[ACCOMP] [KEYBOARD] 䃰üdG
¿RGƒJ QGQRCG G
≈∏Y º°ùb πµd 䃰üdG Ió°T Ò«¨àd 䃰üdG ¿RGƒJ QGQRCG Ωóîà°SEG
É¡aõ©J »àdG AGõLC’Gh ,á¡L øe á«æZC’G hCG áÑMÉ°üŸG »gh ,IóM
.iôNCG á¡L øe OQƒÑ«µdG ≈∏Y
[KEYBOARD¥TOUCH] ¢ùª∏d
SCALE MEMORY ΩÉ≤ŸG
IôcGP QGQRCG A
»àdG áfRhódG äGõ«¡Œ AÉYóà°SGh ßØM QGQRC’G √òg ∂d í«àJ
EXR-46 OR RÉ¡÷ ∂FGô°T óæYh ,»bô°ûdG ΩÉ≤ŸG QGQRCÉH É¡JOóYCG
É¡YÉLΰSEG ∂æµÁ Ió«Øe äGõ«¡Œ ≈∏Y äGôcGòdG √òg …ƒà–
.™æ°üŸG ™°Vh ¤G RÉ¡÷G äóYCG ɪ∏c
áXƒØfi kÉ°†jCG »g »bô°ûdG ΩÉ≤ŸG QGQRCG äGõ«¡Œ ¿G :áßMÓe
∂d ≈æ°ùàj ≈àM ∂dPh ,User Program ±RÉ©dG èeÉfôH ‘
.áeÉ©dG äGõ«¡éàdG øe ójõŸ √òg çÓãdG äGôcGòdG ΩGóîà°SEG
ORIENTAL SCALE »bô°ûdG
ΩÉ≤ŸG QGQRCG B
.»≤«°SƒŸG º∏°ùdG äɪ¨f øe …CG áfRhO Ò«¨J QGQRC’G √ò¡H ∂æµÁ
øe ¢†Øî«°S ÉgóMCG §¨°V ¿CG ƒg QGQRC’G √ò¡d »©«Ñ£dG ™°VƒdG
4/1 QGó≤à OQƒÑ«µdG äÉaÉàchCG áaÉc ‘ ¬d á∏HÉ≤ŸG ᪨ædG OOôJ
É¡æjõîJh áØ∏àfl äÉfRhO QÉ«àNEG ∂æµÁ øµd ,(âæ°S50-) ¿ƒJ
(√ÓYCG ô¶fCG) ΩÉ≤ŸG IôcGòd áKÓãdG QGQRC’G óMCG ‘
.±RÉ©dG èeÉfôH ‘ hCG
OQƒÑ«µdG á«°SÉ°ùM H
OQƒÑ«µdG í«JÉØe á«°SÉ°ùM ¥ÓZEGh 𫨰ûàd QõdG Gòg ≈∏Y §¨°VEG
.¢ùª∏d
[POWER¥ON] 𫨰ûàdG
QR C
.EXR-46 OR RÉ¡L ¥ÓZEG hCG 𫨰ûàd QõdG Gòg §¨°VEG
r EXR–46 OR
OƒLƒa ,∂°ùjódG ≈∏Y ΩɵMCÉH äÉfÉ«ÑdG ≥°ü∏e â«ÑãJ Öéj
.π¨°ûŸG øe ∂°ùjódG êGôNEG ≥«©J ób á«bQh óFGhR ájCG
•
.¬à¶aÉM ¤G ∂°ùjódG óYCG ΩGóîà°SC’G ó©H
•
AGOC’G ‘ kGQƒ°üb á«°ù«WÉæ¨ehô¡µdG äÉYÉ©°T’G ÖÑ°ùJ ób
∫ÓN á«Jƒ°U IQÉ°TEG ‘ Qƒ°ü≤dG Gòg πãe øªµjh .»™ª°ùdG
±ƒ°ùa á«°ù«WÉæ¨ehô¡µdG AÉ°Vƒ°†dG ¢†ØN iódh .ɬKÉ©ÑfEG
.¬°ùØf âbƒdG ‘ á«Jƒ°üdG IQÉ°T’G çÉ©ÑfG ∞bƒàj
äɵ°ùjódG ™e πeÉ©àdG
á≤Ñ£H ∞∏¨e »µ«à°SÓH ¢Uôb ≈∏Y ∂°ùjódG …ƒàëj
᫪c øjõîJ øe ¬æµ“ ájô¡› ábóH á≤«bQ á«°ù«WÉæ¨e
®ÉØë∏dh ,IOhóÙG áMÉ°ùŸG √òg ≈∏Y äÉeƒ∏©ŸG øe IÒÑc
:É¡d ∂eGóîà°SEG AÉæKCG »∏j Ée IÉYGôe ≈Lôj äɵ°ùjódG áeÓ°S ≈∏Y
•
•
.∂°ùjódG πNGO á«°ù«WÉ樟G IOÉŸG kÉ≤∏£e ¢ùª∏J ’
•
Rear side of the disk
™Ñ£dG ¥ƒ≤Mh á«fƒfÉ≤dG á«dhDƒ°ùŸG
∂°ùjO ≈∏Y áfõıG äÉeƒ∏©ŸGh äÉfÉ«ÑdG ¿Gó≤a ádÉM ‘
ácô°Th ,É¡JOÉ©à°SEG π«ëà°ùŸG øe ∞°SCÓdh ¬fCÉa , Floppy
√òg πãe ¿Gó≤a á«dhDƒ°ùe πªëàJ ’ Roland Europe S.p.a
.äÉfÉ«ÑdGh äÉeƒ∏©ŸG
•
™«Hh ™jRƒJh π«é°ùàH íjô°üJ ¿hóHh ΩÉ«≤dG ¿ƒfÉ≤dG ô¶ëj
¢VôY ,áYGPEG ,ƒjó«a ,»≤«°Sƒe ø◊) πªY …CG áYGPEGh ÒLCÉJh
¥ƒ≤ëH ådÉK ±ôW ®ÉØàMEG ádÉM ‘ (∂dP ¬HÉ°T Éeh ,ΩÉY
.∫ɪYC’G √ò¡d ™Ñ£dG
•
¥ƒ≤◊ áØdÉfl πµ°ûJ ób ¢VGôZC’ RÉ¡÷G Gòg Ωóîà°ùJ ’
ájCG øY ádhDƒ°ùe ÒZ óf’hQ ácô°Th ,ådÉK ±ô£d ™Ñ£dG
∫ÓN øe çó– ób ådÉK ±ô£d ™Ñ£dG ¥ƒ≤◊ áØdÉfl
.RÉ¡é∏d ∂eGóîà°SEG
•
WRITE
(you can save data to the disk)
Protect tab
PROTECT
(you cannot save data)
.IȨe hCG áî°Sh øcÉeCG ‘ É¡¶Ø– hCG äɵ°ùjódG Ωóîà°ùJ ’
•
IQGô◊G äÉLQO ‘ IÒÑc äÉÑ∏≤àd äɵ°ùjódG ¢Vô©J ’
IQÉ«°S πNGO Iô°TÉÑŸG ¢ùª°ûdG á©°TC’ kÓãe É¡°†jô©àc)
10 øe ìhGÎJ É¡H í°üæj »àdG IQGô◊G äÉLQO .(á≤∏¨e
.ájƒÄe áLQO 50 ¤G
•
»àdG ∂∏àc ájƒb á«°ù«WÉæ¨e ä’ÉÛ äɵ°ùjódG ¢Vô©J ’
.䃰üdG äÉYɪ°S ÉgódƒJ
•
»fi øe ∂°ùjódG »ªëj ¢UÉN ≥dÉZ ≈∏Y äɵ°ùjódG …ƒà–
‘ ≥dɨdG Gòg AÉ≤HCÉH í°üæf ,CÉ£ÿG ≥jôW øY äÉeƒ∏©ŸG
π«é°ùàdG ™°Vh ¤G ¬∏jƒ–h ,PROTECT ájɪ◊G ™°Vh
≈∏Y IójóL äÉeƒ∏©e ∫ÉNOEG ‘ ÖZôJ ÉeóæY §≤a WRITE
.∂°ùjódG
•
AGOCG äÉeƒ∏©e ≈∏Y …ƒà– »àdG äɵ°ùjódG ÚeCÉJ Öéj
™°Vh ‘ ≥dɨdG ™°Vh ∫ÓN øe ∂dPh) RÉ¡÷G Gò¡d áeÉg
.ôNBG RÉ¡÷ äɵ°ùjódG π¨°ûe ‘ É¡dÉNOEG πÑb PROTECT (ÚeCÉàdG
•
8
EXR–46 OR
áeÉg äɶMÓe.2
ÖÑ°ùj ób iôNCG äÉ°SGhO ájC’ ∂eGóîà°SÉa ,(á∏°üØæe ´ÉÑJ,
.RÉ¡÷G ‘ π£Y hCG AGOC’G ‘ Qƒ°üb
…ODƒj ó≤a ™ØJôe 䃰üH EXR-46 OR RÉ¡L ΩGóîà°SEG óæY
RÉ¡÷G ‘ 䃰üdG ºî°†Ÿ ájɪ◊G Ωɶf 𫨰ûJ ¤G ∂dP
ádÉ◊G √òg ‘h ,äÉYɪ°ùdG 䃰U ¢†«ØîàH Ωƒ≤j …òdGh
.äɶ◊ á©°†H ô¶àfCGh 䃰üdG iƒà°ùe ¢†ØNCG
áfÉ«°üdG
•
(äɵ°ùjódG π¨°ûe ™e πeÉ©àdG) äɵ°ùjódG ΩGóîà°SEG πÑb
¢Vô©e ÒZ ¿Éµe ‘ …ƒà°ùeh Ö∏°U í£°S ≈∏Y RÉ¡÷G ™°V
áæ«©e ájhGõH RÉ¡÷G ™°Vh øe óH ’ ¿Éc GPEGh ,RGõàgCÓd
:¬H 샪°ùŸG ó◊G ájhGõdG RhÉéàJ ’ ¿G øe ócCÉàdG ≈LÒa
.πØ°SC’G ¤G áLQO 18 h ≈∏YC’G ¤G ÚàLQO
¤G Iô°TÉÑe ¬∏≤f ó©H EXR-46 OR RÉ¡L ΩGóîà°SEG ÖæŒ
ÖÑ°ùàJ ó≤a ,áHƒWôdG áLQO ‘ kÉë°VGh kÉaÓàNEG ∞∏àîj ¿Éµe
,π¨°ûŸG πNGO äÉØãµJ øjƒµJ ‘ á©jô°ùdG á«Ä«ÑdG äGÒ«¨àdG
ó©Ña Gòd .äɵ°ùjó∏d kGQô°V ÖÑ°ùj hCG ¬∏ªY ≈∏Y kÉ«Ñ∏°S ôKDƒj ɇ
,Iójó÷G áÄ«ÑdG ™e ∞«µà∏d âbƒdG ¢†©H ¬£YCG RÉ¡÷G π≤f
.¬∏«¨°ûJ πÑb äÉYÉ°S á©°†H ô¶àfCGh
±ƒ°Sh ,π¨°ûŸG πNGO äÉÑKh ∞£∏H ¬©aOEG ,∂°ùjódG ∫ÉNOC’
∂°ùjódG êGôNE’ .¬©°Vƒe ‘ √QGô≤à°SG óæY áØ«ØN áµJ Qó°üJ
êGôNC’ Iƒ≤dG Ωóîà°ùJ ’ .(EJECT) Oô£dG QR ≈∏Y §¨°VEG
.äɵ°ùjódG π¨°ûe øe ∂°ùjódG
π¨°ûŸG πªY AÉæKCG π¨°ûŸG øe ∂°ùjódG êGôNEG kGóHCG ∫hÉ– ’
‘ kÓ£Y ∂dP ÖÑ°ùj ó≤a ,(kÉÄ«°†e π¨°ûŸG ô°TDƒe ¿ƒµj å«M)
.π¨°ûŸGh ∂°ùjódG
.¬bÓZEG hCG RÉ¡÷G 𫨰ûJ πÑb π¨°ûŸG øe ∂°ùjódG êôNCG
¢UôMEG ,äɵ°ùjódG π¨°ûe ¢ShDhQ ‘ Qô°V çhóM Öæéàd
¬àdÉeEG ¿hóHh …ƒà°ùe ™°Vh ‘ ∂°ùjódÉH ∑É°ùeE’G ≈∏Y kɪFGO
äÉÑãH ¬©aOEG ,äɵ°ùjódG π¨°ûe ‘ ¬dÉNOEG AÉæKCG á¡L ájCG ¤G
.Iƒ≤dG ΩGóîà°SCG ¿hóH π¨°ûŸG πNGO ∞£dh
Floppy äɵ°ùjO §≤a πNOCG ,π£Y hCG Qƒ°üb ´ƒbh Öæéàd
,äɵ°ùjódG øe ôNBG ´ƒf …CG kGóHCG πNóJ ’h äɵ°ùjódG π¨°ûe ‘
hCG á«fó©ŸG ó≤ædG ™£bh ¥QƒdG ∂HÉ°ûe ∫ÉNOEG ÖæŒ Éªc
.äɵ°ùjódG π¨°ûe ‘ áÑjô¨dG äGhOC’G øe ÉgÒZ
7
hCG áaÉLh áªYÉf ¢Tɪb á©£≤H RÉ¡÷G í°ùeEG »eƒ«dG ∞«¶æà∏d
Ωóîà°SCÉa á≤dÉ©dG ñÉ°ShC’G ádGRC’ ÉeCG ,AÉŸÉH kÓ«∏b áÑWôe
RÉ¡÷G í°ùe øe ócCÉJ ∂dP ó©H .QÉ°V ÒZ kÉØ«ØN kÉضæe
.áaÉLh áªYÉf ¢Tɪb á©£≤H ájÉæ©H
hCG ,(Ô«àdG) äɨѰüdG Öjòe hCG ,øjõæÑdG kÉ≤∏£e Ωóîà°ùJ ’
√ƒ°ûJ çhóM …OÉØàd ∂dPh ,ájƒ°†Y äÉÑjòe ájCG hCG ,∫ƒëµdG
.¬fƒd Ò¨J hCG RÉ¡÷G ‘
•
á«FÉHô¡µdG ájò¨àdG
•
•
äÉeƒ∏©ŸG ßØMh äÉMÓ°UC’G
•
‘ IOƒLƒŸG äÉeƒ∏©ŸG áaÉc ¿G QÉÑàYC’G Ú©H òNC’G ≈Lôj
,áfÉ«°ü∏d RÉ¡÷G ∫É°SQEG óæY ƒëª∏d á°VôY »g RÉ¡÷G IôcGP
á≤∏©àŸG ôFGhódG ióMCG π£©J πãe) áæ«©e ä’ÉM ‘h
’h .äÉeƒ∏©ŸG ´ÉLΰSEG ∞°SCÓd Qò©àj ¬fCÉa (IôcGòdÉH
.äÉeƒ∏©ŸG ¿Gó≤a ¢Uƒ°üîH á«dhDƒ°ùe ájCG óf’hQ ácô°T πªëàJ
•
•
•
•
•
™e »FÉHô¡µdG Qó°üŸG ¢ùØf ≈∏Y EXR-46 OR Ωóîà°ùJ ’
á«FÉHô¡µdG äÉcôÙÉc) »Hô¡c ¢ûjƒ°ûJ Qó°üj ôNBG RÉ¡L …CG
.(IÒ¨àŸG IAÉ°VC’G ᪶fCG hCG
øe ócCÉJ ,iôNCG Iõ¡LCÉH EXR-46 OR π«°UƒJ πÑb
‘ ∫É£YCG hCG Qƒ°üb çhó◊ kÉÑæŒ Iõ¡LC’G áaÉc ≥∏Z
.iôNC’G Iõ¡LC’G hCG äÉYɪ°ùdG
•
•
•
RÉ¡÷G ¿Éµe
á«aÉ°VEG äGôjò–
IôcGòdG äÉjƒàfi ¿Gó≤a á«fɵeEG QÉÑàYC’G Ú©H òNC’G AÉLôdG
.RÉ¡÷G ΩGóîà°SEG Aƒ°ùd áé«àf hCG Ée π£Y ÖÑ°ùH RÉ¡÷G ‘
πNGóeh iôNC’G ¬Jɪµ–h RÉ¡÷G í«JÉØeh QGQRCG πª©à°SG
∫ɪgCÓd áé«àf ∫É£YCG çó– ó≤a ,¢UôMh ájÉæ©H π«°UƒàdG
.∫ɪ©à°SC’G Aƒ°S hCG
.É¡«∏Y §¨°†dG hCG á°TÉ°ûdG ≈∏Y ¥ô£dG kÉbÓWCG Rƒéj ’
≈∏Y ¢†Ñ≤dG IÉYGôe ≈Lôj ,äÓHÉc ájCG π°üa hCG π«°UƒJ óæY
Öæéàd ∂dPh ,kGóHCG πHɵdG ÜòŒ ’h ¬JGP (á°û«ØdG) π°UƒŸG
.πHɵ∏d á«∏NGódG ∑Ó°SC’G ¥õ“ hCG á«FÉHô¡c áeó°U çhóM
,𫨰ûàdG AÉæKCG IQGô◊G øe á∏«Ä°V ᫪c RÉ¡÷G øe å©Ñæà°S
.kÉeÉ“ »©«ÑW ôeCG Gògh
RÉ¡÷G 䃰U Ió°T AÉ≤HEG ∫hÉM ,øjôNB’G êÉYREG Öæéàd
¢SCGôdG äÉYɪ°S ΩGóîà°SEG π°†ØJ ÉÃQh ,áÑ°SÉæeh ᣰSƒàe
.π«∏dG øe IôNCÉàe äÉYÉ°S ‘ á°UÉNh ,∂dƒM óMCG êÉYREG ≈°ûîJ ’ ≈àM
¬bhóæ°U ¢ùØf ‘ ¬Ø«∏¨J ≈Lôj ,RÉ¡÷G π≤æd êÉà– ÉeóæY
.ájƒbh áªYÉf π≤f áÑ«≤M hCG á¡HÉ°ûe áÑ∏Y Ωóîà°SG hCG ,¢UÉÿG
DP-2,DP-6) É¡H í°üæj »àdG Ωó≤dG á°SGhO §≤a Ωóîà°SG
''¿ÉeCÉH RÉ¡÷G ΩGóîà°SEG'' óæH ‘ IOQGƒdG äɪ«∏©àdG ¤G áaÉ°VEG
:»∏j Ée á¶MÓe ≈Lôj ,(3¢U)
•
•
•
•
•
•
•
•
äGȵe øe Üô≤dÉH EXR-46 OR RÉ¡L ΩGóîà°SEG ¿EG
á«FÉHô¡c ä’ƒfi ≈∏Y …ƒà– iôNCG ä’BG ájCG hCG) 䃰üdG
ºb ∂dP øe ¢ü∏îà∏dh .ÚæW çhóM ‘ ÖÑ°ùàj ób (IÒÑc
.¢ûjƒ°ûàdG QOÉ°üe øY √ó©HCG hCG RÉ¡÷G √ÉŒEG Ò«¨àH
»YGPC’G ∫ÉÑ≤à°SC’G Iõ¡LCG ™e RÉ¡÷G Gòg πNGóàj ób
.Iõ¡LC’G √òg πãe ¥É£f ‘ ¬eóîà°ùJ ’ òFóæY ,ʃjõØ∏àdGh
,RÉ¡÷G ‘ äɵ°ùjódG π¨°ûe ΩGóîà°SEG óæY »∏j Ée ßM’
¿GƒæY â– óæÑdG ¤G ´ƒLôdG ≈Lôj π«°UÉØàdG øe ójõŸh
.''(äɵ°ùjódG π¨°ûe ™e πeÉ©àdG) äɵ°ùjódG ΩGóîà°SEG πÑb''
π≤M Qó°üJ Iõ¡LCG Üôb EXR-46 OR Ωóîà°ùJ ’ .(kÓãe äÉYɪ°ùdÉc) …ƒb »°ù«WÉæ¨e
.…ƒà°ùeh Ö∏°U í£°S ≈∏Y EXR-46 OR RÉ¡L ™°V .äɵ°ùjódG π¨°ûe πªY AÉæKCG RGõàgCÓd ¬°Vô©J hCG RÉ¡÷G ∑ô– ’ hCG ,Iô°TÉÑŸG ¢ùª°ûdG á©°TC’ EXR-46 OR RÉ¡L ¢Vô©J ’
IQÉ«°S πNGO ¬cÎJ ’h ,IQGô◊G ódƒJ Iõ¡LCG Üô≤H ¬©°†J
äÉLQO ‘ IOÉM äÉÑ∏≤àd πµ°T …CÉH ¬°Vô©J hCG ,á≤∏¨e
.¬fƒd Ò¨J hCG RÉ¡÷G √ƒ°ûJ ‘ ÖÑ°ùàJ ób á©ØJôŸG IQGô◊Éa ,IQGô◊G
á°VôY ¿Éµe ‘ ¬eóîà°ùJ ’ ,RÉ¡÷G ‘ π£Y ∫ƒ°ü◊ kÉÑæŒ
.áHƒWôdG hCG ô£ŸG hCG Aɪ∏d
,EXR-46 OR RÉ¡L í£°S ≈∏Y ¢VGôZCG hCG äGhOCG ájCG ∑ÎJ ’
.RÉ¡÷G AGOCG ‘ Qƒ°üb ÖÑ°ùj ób Gò¡a
•
•
•
•
•
•
r EXR–46 OR
117.............................................................................................. ºFGƒb .19
117...........á«eÉeC’G áMƒ∏dG ∫ÓN øe ÉgQÉ«àNEG øµÁ »àdG äGƒ°UC’G
120.......................................................................... ∫ƒÑ£dG äÉYƒª›
125..................................................................... á«≤«°SƒŸG äÉYÉ≤jE’G
126............................................. "Md1" »≤«°SƒŸG ∞dBÉàdG AÉcP
128................................................... MIDI äÉØ∏e ≥«Ñ£J ∫hóL
44................................................ ±RÉ©dG èeGôH ‘ ∂JGõ«¡Œ øjõîJ
44................................................±RÉ©dG èeGôH øjõîJ ∫ƒM äɶMÓe
44................................................................ ±RÉ©dG èeGôH óMCG QÉ«àNEG
45................... ±RÉ©dG èeÉfôH ‘ áæ«©e äGõ«¡Œ OÉ©Ñà°SEG :â«ÑãàdG
46................................................................................. …ó«ŸG ∞FÉXh .14
46............................................................................................. äGƒæ≤dG
46..................................................................... …ó«ŸG áØ«Xh äGÒ¨àe
48.............................................................................. äÉeƒ∏©ŸG º«¶æJ .15
48................................................................ á«°†eƒdG IôcGòdG ΩGóîà°SEG
48........................................ á«°†eƒdG IôcGòdG ‘ ÊÉZC’Gh ¿É◊C’G ßØM
48............................. á«°†eƒdG IôcGòdG ‘ ±RÉ©dG èeGôH äÓé°S º«¶æJ
49..................................................á«°†eƒdG IôcGòdG ‘ äÉYÉ≤jE’G ßØM
49..................... á«°†eƒdG IôcGòdG øe ±RÉ©dG èeGôH øe áYƒª› 𫪖
49..................................................... á«°†eƒdG IôcGòdG øe ¿É◊C’G ádGREG
50..................................................á«°†eƒdG IôcGòdG øe äÉYÉ≤j’G ádGREG
50........................ á«°†eƒdG IôcGòdG øe ±RÉ©dG èeGôH øe áYƒª› ádGREG
51.................................. (USB) ôJƒ«ÑªµdG ΩGóîà°SÉH äÉeƒ∏©ŸG ßØM
52................................................................................. ∂°ùjódG ∞FÉXh
52....................................................... ∂°ùjódG øe ±RÉ©dG èeGôH 𫪖
53.................................................................∂°ùjódG øe ¿É◊C’G 𫪖
53............................................. ∂°ùjódG øe á«≤«°SƒŸG äÉYÉ≤jE’G 𫪖
53....................................................................∂°ùjódG ‘ äÉØ∏ŸG ßØM
54.................................................................... ∂°ùjódG øe äÉØ∏ŸG ƒfi
55................................................................................Format áÄ«¡àdG
56.................................... ájQÉ«àNC’G Ωó≤dG á°SGhOh êQÉıG ΩGóîà°SEG .16
57........................................................................................... äÉYƒæàe .17
57............................................................. ᫪«∏©àdG ¢VGôZCÓd ∞FÉXh
57......................................... Demo ¢Vô©dG ¿É◊G áØ«Xh 𫨰ûJ/AɨdEG
57.......................................................................... ´RƒŸG 𫨰ûJ/AɨdEG
57................................................. ¢Vô©dG áØ«Xhh ´RƒŸG 𫨰ûJ/AɨdEG
57................................. Initializing ™æ°üŸG ™°Vh ¤G RÉ¡÷G IOÉYEG
58............................................................................. á«æØdG äÉØ°UGƒŸG .18
6
EXR–46 OR
äÉjƒàÙG
31............................................................................. ∫ƒÑ£dG äÉYƒª›
31................................................................ (''SFX'') á«Jƒ°üdG äGôKDƒŸG
32.......................................................... (ΩÉ≤ŸG Ò«¨J) »ª¨ædG πjƒëàdG
32....................................................... (''GLB'') á∏eÉ°ûdG πjƒëàdG áØ«Xh
33............................................................ Octave ±ÉàchC’G äGõ«¡Œ
33........................................................ OQƒÑ«µdG ΩÉ°ùbC’ iôNCG ∞FÉXh
34................................................................. äGôKDƒŸGh AGOC’G ∞FÉXh .11
34.................................................................................... AGOC’G ∞FÉXh
34.................................................................... ¢ùª∏d OQƒÑ«µdG á«°SÉ°ùM
34................................................................... ᪨ædG áLQO ꃓh »æK
34...................................................................................... Ωó≤dG á°SGhO
35............................................................................. äGôKDƒŸG ΩGóîà°SEG
35.......................................... (MFX) IOó©àŸG äGôKDƒŸG èdÉ©e ΩGóîà°SEG
36........................................................................... (Reverb) ÜÒØjôdG
37............................................................................................ ¢SQƒµdG
38................................................................................. V-LINK áØ«Xh
πFÉ°SQh) É¡H ºµëàdG EX-40 OR RÉ¡L ™«£à°ùj »àdG V-LINK ∞FÉXh
38...............................................................................(á≤HÉ£ŸG …ó«ŸG
39................................................................................. ∞FÉXƒdG áªFÉb .12
39..................................................... (ΩÉ©dG AGôLE’G) äGÒ¨àŸG πjó©J
39............................................................... OQƒÑ«µdG äGõ«¡Œ äGÒ¨àe
41............................................................................ΩƒfhΟG äGÒ¨àe
41............................................................. OCTAVE ±ÉàchC’G äGÒ¨àe
41........................................................................ 䃰üdG Ió°T äGÒ¨àe
42..................................................................´RƒŸG äGõ«¡Œ äGÒ¨àe
42............................................................................. äGôKDƒŸG äGÒ¨àe
43................................................................................. ΩÉ≤ŸG äGÒ¨àe
43................................................................................ …ó«ŸG äGÒ¨àe
43........................................................................... ΩGóîà°SE’G äGÒ¨àe
44.................................................................... ±RÉ©dG èeGôH ΩGóîà°SEG .13
5
21................................................................. (IOÉYE’G) IQôµàŸG áYGPE’G
21..............................Minus One á∏é°ùe á«Ø∏N áÑMÉ°üà »◊G AGOC’G
22........................................................................ ∑GÎdG äGójó– Ò«¨J
23.............................................................................. ∑É≤«°Sƒe π«é°ùJ .7
23...................................................................á«°ù«FôdG á«æZC’G π«é°ùJ
23............................................................................. ∂à«æZC’ ´Éªà°SC’G
24....................................................................... iôNCG π«é°ùJ ∞FÉXh
24....................................................................... π«é°ùàdG ´É°VhCG ∫ƒM
24................................................................. ALL πµdG ™°Vh øY ójõŸG
24.................................................................... ''OQƒÑ«µdG'' π«é°ùJ ™°Vh
24............................................................. ''óMGƒdG ∑GÎdG'' π«é°ùJ ™°Vh
25.................................................................. Punch π«é°ùàdG í«ë°üJ
26...................................................................... á«aÉ°VEG ´É≤jEG ∞FÉXh .8
26.................................................................................. IóMGƒdG á°ùª∏dG
26..............................................................»≤«°SƒŸG óYÉ°ùŸG ΩGóîà°SEG
27.................................................................................... »æë∏dG AÉcòdG
27................................................................... »æë∏dG AÉcòdG ´ƒf Ò«¨J
2................................................................................................... ÉjGõŸG
7................................................................................... áeÉg äɶMÓe
9...........................................................................RÉ¡÷G äÉMƒd ∞°Uh
9.................................................................................... á«eÉeC’G áMƒ∏dG
11...................................................................................á«Ø∏ÿG áMƒ∏dG
12................................................................................. ¤hC’G äGƒ£ÿG
12...................................................................................... RÉ¡÷G OGóYEG
12...................................................................... DEMO ¢Vô©dG ¿É◊CG
.1
.2
.3
.4
12.................................................................... ¢Vô©dG ¿É◊CG óMCG áYGPEG
12....................................................................äÉYÉ≤j’G ¢VhôY áYGPEG
12........................................................ ¢Vô©dG ¿É◊CG ™°Vh øe êhôÿG
13...................................................................... áÑMÉ°üe ¿hóH ±õ©dG
13................................................................. »°SÉ°SC’G 䃰üdG ΩGóîà°SEG
13................................................................................. OQƒÑ«µdG º«°ù≤J
14.................................................................................. »FÉæãdG ±õ©dG
14............................................................................ ΩƒfhΟG ΩGóîà°SEG
15.........................................................(´RƒŸG) áÑMÉ°üŸG ™e ±õ©dG .5
27.......................................................................... ƒfÉ«ÑdG ±RÉY ™°Vh
28............................................................... (Bass Inv) ¢UÉÑdG ÜÓ≤fEG
28........................................................... äÉYÉ≤jE’G ∞FÉXh øe ójõŸG
29................................................................. á«bô°ûdG áfRhódG ΩGóîà°SEG .9
15...................................................................... ´RƒŸG ±É≤jEGh 𫨰ûJ
29............................................... ¿ƒJ 4/1 QGó≤à áæ«©e äɪ¨f ¢†ØN
29..................................................................... iôNCG äÉfRhO ΩGóîà°SEG
29........................................ SCALE MEMORY ∂JÉfRhO 𫪖h ßØM
16............................................................ á«≤«°SƒŸG äÉYÉ≤jE’G QÉ«àNEG
17............. BAND ORCHESTRATOR ábôØdG ≥°ùæe áØ«Xh ΩGóîà°SEG
18................................................................BALANCE 䃰üdG ¿RGƒJ
19..................................................................... ÊÉZC’Gh ¿É◊C’G áYGPEG .6
19......................................................................á«°ù«FôdG á«æZC’G áYGPEG
20..................................................................... á«aÉ°VEG á«YGPEG ∞FÉXh
30.................................................................... OQƒÑ«µdG ΩÉ°ùbCG ∞FÉXh .10
30.... áfÉ£ÑdG 䃰Uh ,ô°ùjC’G º°ù≤dG 䃰U h ,»°SÉ°SC’G 䃰üdG QÉ«àNEG
30....................................................... IôaƒàŸG äGƒ°UC’G øe …CG QÉ«àNEG
30........................................................... ±RÉ©dG äGƒ°UCG QGQRCG ΩGóîà°SEG
30.............................................±RÉ©dG äGƒ°UCG QGQRC’ ôNBG 䃰U ójó–
31................................... (''SFX'') á«Jƒ°üdG äGôKDƒŸGh ∫ƒÑ£dG äGƒ°UCG
16.......................................................................... ´É≤jE’G áYô°S Ò«¨J
16.............................(Sync Start&Stop) áÑMÉ°üª∏d øeGõàŸG 𫨰ûàdG
16.......................................................................... ´RƒŸG áYGPEG ±É≤jEG
20......................................................................... á«æZC’G ™°Vh QÉ«àNEG
20................................................ ájGóÑdG á£≤æd IOƒ©dGh ™«LÎdGh Ëó≤àdG
r EXR–46 OR
øe ∫ƒÙG ´õfEG ,∂à≤£æe ‘ ¥ôH çhóM á«fɵeEÉH ¬Ñà°ûJ ɪæ«M
.AÉHô¡µdG êôfl
•
¿Éµe ‘ É¡©°Vh øe ócCÉJ ,RÉ¡÷G øe ÒeÉ°ùe ∂ØH ∂eÉ«b ∫ÉM ‘
.CÉ£ÿG ≥jôW øY Égƒ©∏àÑj ’ ≈àM ∫ÉØWC’G ∫hÉæàe øY kGó«©H øeBG
•
êôfl ¢ùØf ∑QÉ°ûj EXR-46 OR RÉ¡÷ »FÉHô¡µdG ∫ƒÙG ´óJ ’
,iôNC’G Iõ¡LC’G äÓ«°UƒJ øe »≤£æe ÒZh ÒÑc OóY ™e AÉHô¡µdG
äÓ°UƒdG ΩGóîà°SEG óæY ¢UÉN πµ°ûH ¢Uô◊G »NƒJ ≈Lôjh
É¡µ∏¡à°ùJ »àdG á«FÉHô¡µdG Iƒ≤dG RhÉéàJ ¿G »¨Ñæj ’ PEG ,á«FÉHô¡µdG
Iƒ≤dG ióe πµ°T …CÉHh á∏°UƒdG êôîà á∏°üàŸG ™£≤dG áaÉc
‘ ÖÑ°ùàj ób ójGõàŸG π«ªëàdÉa ,á∏°Uƒ∏d (ÒÑeCG/•Gh) á«FÉHô¡µdG
.ÉgQÉ¡°üfEG ‹ÉàdÉHh á«FÉHô¡µdG á∏°UƒdG ‘ ádRÉ©dG IOÉŸG áfƒî°S
•
ôjò–
≈Lôj ,iôNCG ádhO ‘ EXR-46 OR RÉ¡L ΩGóîà°SEG πÑb
óªà©e π«ch hCG ,óf’hQ ácô°ûd áfÉ«°U õcôe ÜôbCG hCG ,™FÉÑdG IQÉ°ûà°SEG
.''äÉeƒ∏©ŸG'' áëØ°U áëØ°U ‘ ÚÑe ƒg ɪ∏ãe ,ácô°û∏d
•
ôjò–
ájƒ¡àdG ≈∏Y ôKDƒj ’ ¿Éµe ‘
EXR-46 OR RÉ¡L ™°Vh Öéj •
.RÉ¡é∏d ᪫∏°ùdG
,óf’hQ øe KS-12 OQƒÑ«µdG IóYÉb ™e §≤a RÉ¡÷G Gòg Ωóîà°ùj
ób ɇ âHÉK ÒZ ™°Vh ‘ ¬∏©éj ób iôNCG IóYÉb ™e ¬eGóîà°SEGh
.iPCG hCG Qô°V çhóM ‘ ÖÑ°ùàj
•
∫ƒëª∏d ¬JGP (á°û«ØdG) π°UƒŸG ≈∏Y ¢†Ñ≤dG ≈∏Y kɪFGO ¢UôMEG
.RÉ¡÷G øe hCG AÉHô¡µdG êôfl øe ¬LGôNEG hCG ¬dÉNOEG óæY »FÉHô¡µdG
•
∫hÉæàe øY kGó«©H É¡≤HCGh ,äÓHɵdGh ∑Ó°SC’G ∂HÉ°ûJ ÖæŒ ∫hÉM
.∫ÉØWC’G
•
.á∏«≤K kÉeÉ°ùLCG ¬«∏Y ™°†J hCG ,RÉ¡÷G í£°S ¥ƒa kGóHCG ≥∏°ùàJ ’
•
ójCÉH (á°û«ØdG) ¬à∏«°UƒJ hCG »FÉHô¡µdG ∫ƒÙG §jô°T kGóHCG ¢ùª∏J ’
.RÉ¡÷G øe hCG AÉHô¡µdG êôfl øe ¬LGôNEG hCG ¬dÉNOEG óæY á∏àÑe
•
,á«dÉàdG äÉ¡«ÑæàdG IÉYGôe ≈Lôj ,RÉ¡÷G π≤æd áLÉ◊G â°†àbEG GPEG
ájɪMh iPC’G øe ∂°ùØf ájɪ◊ ΩɵMEÉH RÉ¡÷ÉH ∑É°ùeC’G øe ócCÉJh
:Qô°†dG øe RÉ¡÷G
.AÉHô¡µdG øY ∫ƒÙG π°üaEG +
.iôNC’G á«LQÉÿG ™£≤dG øe áeOÉ≤dG ∑Ó°SC’G áaÉc π°üaEG +
.RÉ¡÷G IóYÉb ´õfCG +
•
.AÉHô¡µdG êôfl øe ∫ƒÙG ´õfEGh RÉ¡÷G ÅØWCG ,RÉ¡÷G ∞«¶æàH ΩÉ«≤dG πÑb
•
4
EXR–46 OR
¿ÉeCÉH RÉ¡÷G ΩGóîà°SEG
iPCÉH ¢UÉî°TCG áHÉ°UEG hCG ,á«FÉHô¡µdG áeó°üdGh ,≥jô◊G Öæéàd äɪ«∏©J
¬«ÑæàdGh ôjòëàdG
¬«ÑæàdGhäÉàa’
ôjòëàdG∫ƒM
äÉàa’ ∫ƒM
ôjò–
¬«ÑæJ
RƒeôdG ∫ƒM
The,áeÉgsymbol
the user
to important
äGôjò–alerts
hCG äÉeƒ∏©e
¤G Ωóîà°ùŸG
¬«Ñæàd instructions
õeôdG Ωóîà°ùj
or
specific
meaning
of the
symbolºàjh
is
πNGOwarnings.The
OƒLƒŸG º°SôdG ∫ÓN
øe Oƒ°ü≤ŸG
ôjòëàdG
≈∏Y ±ô©àdG
determined by the design contained within the
Ωóîà°ùj
≈∏YtheÉægsymbol
OƒLƒŸGatõeôdG
,å∏ãŸG
triangle.
In ƒ¡a
the QÉ°ù«dG
case of
left,ádÉM
it is‘h
used
for
.ΩÉY or
πµ°ûH
ô£ÿG
¬«ÑæàdGh ôjòëà∏d
general cautions, warnings,
alerts
to øe
danger.
UsedQò–
for ȈdG
instructions
intended
alert
äɪ«∏©à∏d IQÉ°TC
’G √ògtoΩóîà°ùJ
the user to the risk of death or severe
‘ iPCÉH áHÉ°UC’G hCG 䃟G ô£N øe Ωóîà°ùŸG
injury should the unit be used
.º«∏°S ÒZ πµ°ûH RÉ¡÷G ΩGóîà°SEG ádÉM
improperly.
UsedQò–
for ȈdG
instructions
alert
äɪ«∏©à∏d intended
IQÉ°TC’G √ògtoΩóîà°ùJ
the
user
of ’
injury
or material
ô£N
øetohCG the
,iPCÉrisk
H áHÉ°UC
G ô£N øe
Ωóîà°ùŸG
damage should the unit be used
RÉ¡÷G ΩGóîà°SEG ádÉM ‘ …OÉe π£Y ´ƒbh
improperly.
,IQƒ¶ÙG
äGƒ£ÿGh
äGhOC
’Guser
¤G Ωóîà°ùŸG
The
symbol
alerts
the
to items¬«Ñæàd
that õeôdG
mustΩóîà°ùj
never
be carried
forbidden).
specific
OƒLƒŸGout
º°SôdG(are
∫ÓN
øe äGƒ£ÿGThe
hCG äGhOC
’G √ògthing
ójó– that
ºàjh
must
not
be
done
isÉæg
indicated
by the
design
contained
»æ©j
ƒ¡a
QÉ°ù«dG
≈∏Y
OƒLƒŸG
õeôdG
ádÉM
‘h
,IôFGódG
πNGO
within the circle. In the case of the symbol at left, it
∂a kÉbÓWEG »¨Ñæj ’ ¬fCG
means that the unit must never.RÉ¡÷G
be disassembled.
.º«∏°S ÒZ πµ°ûH
* Material damage refers to damage or
other adverse effects caused with
≥ë∏J
ób »àdGtoQGô°VC
’G ájOÉŸG
ó°ü≤jits*
respect
the
home ∫É£YC
and’ÉHall
furnishings,
as well çÉKC
to ’Ghdomestic
.áØ«dC’G äÉfGƒ«◊Gh
∫õæŸÉH
animals or pets.
øe óHalerts
’ äGƒ£N
Ωóîà°ùŸG
¬«Ñæàdthat
õeôdGmust
Ωóîà°ùj
The,É¡H
●ΩÉ«≤dG
symbol
the ¤G
user
to things
be
carried
Theº°SôdG
specific
thing
that √òg
must
doneºàjh
is
πNGO out.
OƒLƒŸG
∫ÓN øe
äGƒ£ÿG
≈∏Ybe±ô©àdG
indicated
by
the
design
contained
within
the‘h
circle.
In
¬fC
G
»æ©j
ƒ¡a
QÉ°ù«dG
≈∏Y
Éæg
OƒLƒŸG
õeôdG
ádÉM
,IôFGódG
the case of the symbol at left, it means that the power.AÉHô¡µdG
øe »FÉHô¡µdG
πHɵdG
êGôNEG ÖLƒàj
cord plug
must êôfl
be unplugged
from
the á°û«a
outlet.
»∏j Ée ¤G kɪFGO ¬ÑàfEG
äÉYɪ°S hCG 䃰ü∏d ºî°†e ™e ≥aGƒàdÉH hCG √óMƒd AGƒ°S RÉ¡÷G Gòg
á«Jƒ°U äÉ≤ÑW QGó°UEG ≈∏Y kGQOÉb ¿ƒµj ób 䃰ü∏d äGȵe hCG ¢SCGôdG
≈∏Y á∏jƒW IÎØd ¬eóîà°ùJ ’ Gòd ,™ª°ù∏d ºFGO ¿Gó≤a ‘ ÖÑ°ùàJ
øe ´ƒf …CÉH äô©°T GPEGh ,™ª°ù∏d íjôe ÒZ hCG ™ØJôe »Jƒ°U iƒà°ùe
ºbh RÉ¡÷G ΩGóîà°SEG øY kGQƒa ∞bƒJ ,¿PC’G ‘ ÚæW hCG ™ª°ùdG ¿Gó≤a
.¢üàfl Ö«ÑW IQÉ°ûà°SCÉH
,(á«fó©ŸG ó≤ædG ™£bh ,á∏©à°ûŸG OGƒŸG πãe) äGhOCG ájC’ íª°ùJ ’
(ÉgÒZh äÉÑWôŸGh AÉŸG πãe) πFGƒ°ùdG øe ´ƒf …CG hCG ,¢ù«HÉHódGh
.RÉ¡÷G πNGO ¤G ∫ƒ°UƒdÉH
•
±Gô°TC’G Ú¨dÉÑdG óMCG ≈∏Y ÖLƒà«a ,∫õæŸG ‘ ∫ÉØWCG OƒLh ádÉM ‘
áaÉc ´ÉÑJG øe πØ£dG øµªàj ¿CG ¤EG ,RÉ¡÷G ΩGóîà°SEG iód º¡«∏Y
.¿ÉeCÉH EXR-46 OR RÉ¡L 𫨰ûàd áeRÓdG äɪ«∏©àdG
•
.•ƒ≤°ù∏d ¬°Vô©J ’h ,ájƒ≤dG äÉeó°üdG øe RÉ¡÷G »ªMEG
3
•
•
ácô°T É¡H í°üæJ IóYÉb hCG πeÉM ™e §≤a RÉ¡÷G Gòg ΩGóîà°SEG Öéj
.óf’hQ
•
≈∏Y kGóHCG ¬©°†J ’h ,âHÉKh …ƒà°ùe í£°S ≈∏Y kɪFGO RÉ¡÷G ™°V
.á∏FÉe 샣°S ¥ƒa hCG á∏jɪàe IóYÉb
•
äɪ«∏©J ‘ ÚÑŸG ´ƒædG øe AÉHô¡c Qó°üà RÉ¡÷G π«°UƒJ Öéj
.RÉ¡÷G ™e OhõŸG »FÉHô¡µdG ∫ƒÙG ≈∏Y ÚÑe ƒg ɪc hCG ,𫨰ûàdG
•
ôjò–
π«dOh √ÉfOCG äɪ«∏©àdG IAGôb øe ócCÉJ ,RÉ¡÷G ΩGóîà°SEG πÑb
.𫨰ûàdG
•
.¬«a á«∏NGO äGÒ«¨J ájCG AGôLEÉH Ωƒ≤J hCG RÉ¡÷G íàØJ ’
•
™£≤dG Ò«¨J hCG EXR-46 OR RÉ¡L ìÓ°UEG ∫hÉ– ’
¢VGôZC’h ,(∂dP ≈∏Y ¢üæJ 𫨰ûàdG äɪ«∏©J âfÉc GPEG ’EG) á«∏NGódG
ácô°ûd áfÉ«°U õcôe ÜôbCG ¤G hCG ,™FÉÑdG ¤G kɪFGO ™LQEG áfÉ«°üdG
‘ ÚÑe ƒg ɪ∏ãe ,óf’hQ ácô°T øe óªà©e π«ch ¤G hCG ,óf’hQ
.''äÉeƒ∏©ŸG'' áëØ°U
•
:á«dÉàdG øcÉeC’G ‘ ¬¶Ø– hCG EXR-46 OR RÉ¡L Ωóîà°ùJ ’
πNGO Iô°TÉÑŸG ¢ùª°ûdG á©°TCG πãe)á«dÉ©dG IQGô◊G äGP øcÉeC’G +
.(IQGô◊G ódƒJ Iõ¡LCG ¥ƒa hCG ,áÄaóJ ܃ÑfCG hCG ,á≤∏¨e IQÉ«°S
.(á∏àÑe ¢VQCG hCG ,π«°ù¨dG ±ôZh ,äÉeɪ◊G πãe) á∏àÑŸG øcÉeC’G +
.áÑWôdG øcÉeC’G +
.ô£ŸG √É«Ÿ á°Vô©ŸG øcÉeC’G +
.QÉѨ∏d á°Vô©ŸG øcÉeC’G +
.ájƒ≤dG äGRGõàgCÓd á°Vô©ŸG øcÉeC’G +
•
ôjò–
¬bƒa ™°†J ’h ,Ió°ûH »FGô¡µdG ∫ƒÙG πHÉc »æãJ hCG …ƒ∏J ’
∑Ó°SC’G ¥õ“ πãe πHɵdG ‘ Ö£Y ‘ ÖÑ°ùàj ób ∂dòa ,á∏«≤K ΩÉ°ùLCG
á°VôY »g ábõªŸG ∑Ó°SC’Gh ,á«FÉHô¡µdG IôFGódG ¢ü∏≤Jh á«∏NGódG
.á«FÉHô¡µdG áeó°üdGh ∫É©à°TCÓd
•
r EXR–46 OR
ÉjGõŸG
IójóL á≤jôW EXR-46 OR RÉ¡L ∂d ôaƒj ,∂dP ¤G áaÉ°VEG
å«M :±RÉ©dG èeÉfôHh á«æZC’Gh 䃰üdGh ´É≤jC’G QÉ«àNE’
äÉYƒª› QÉ«àNC’ FAMILY á∏FÉ©dG QGQRCG ΩGóîà°SEG ∂fɵeEÉH
óMCG QÉ«àNEG øe SELECT AÉ≤àfC’G QGQRCG ∂浓 ɪæ«H ,IOófi
.IÉ≤àæŸG áYƒªÛG πNGO äGõ«¡éàdG
RÉà‡ ´Rƒe
É¡JóYCG ≈≤«°Sƒe ´É≤jEG 198 ≈∏Y EXR-46 OR RÉ¡L …ƒàëj
IóY IOÉ©dÉc ∑Éægh ,äÉYÉ≤jEÓd ájQƒ£°SC’G óf’hQ áÑàµe
(INTRO, ORIGINAL, VARIATION, FILL, ENDING) Iôaƒàe äÉ©jƒæJ
.ábôØdG ≥°ùæe QGQRCG ≥jôW øY á«aÉ°VEG äGQÉ«àNEG ™e
¥ƒØàe »Jƒ°U RÉ¡L
á∏eÉc á«Jƒ°U äÉLƒe ≈∏Y EXR-46 OR RÉ¡L äGƒ°UCG õµJôJ
,RÉ¡÷G ô©°S ¤G ô¶ædÉH ójôa ôeCG ƒgh ,(ᕃ¨°†e ÒZ) ∫ƒ£dG
á°†HÉfh áfÉfQ á«≤«≤M äGƒ°UCG QGó°UEG øe RÉ¡÷G øµÁ Gògh
ΩGóîà°S’G π¡°S OQƒÑ«c øe ¬©bƒàJ Ée ¢ùµ©H ∂dPh ,IÉ«◊ÉH
EXR-46 OR RÉ¡L ‘ äGƒ°UC’G ≥∏fl ¿CG ɪc ,øªãdG …OÉ°üàbEGh
.óMGh âbh ‘ ᪨f 64 QGó°UEG ¬æµÁ
ÊhεdC’G »ªbôdG ¢UÉÑdG áØ«Xhh 䃰üdG º«î°†J Ωɶf π°†ØHh
á©FGQ äɪ¨fh kÉJGƒ°UCG Qó°üj EXR-46 OR RÉ¡L ¿CÉa ,ádó©ŸG
.ájƒb ᶫ∏Z äɪ¨fh á«aÉ°U á«dÉY äGOOôJ äGP ájɨ∏d
∫ƒÑ£dG áMƒd ™°Vh
™ÑàJ ΩÉ≤ª∏d äGõ«¡Œh »bô°ûdG ΩÉ≤ŸG IôcGP 3
±RÉ©dG èeÉfôH
-∂d ôaƒj óf’hQ ácô°T øe RÉ¡L ∫hCG ƒg EXR-46 OR RÉ¡L ¿G
ßØM á«fɵeEG -»bô°ûdG ΩÉ≤Ÿ áfRhód äGôcGP 3 ¤EG áaÉ°VE’ÉH
èeÉfôH ‘ Ée á¶◊ ‘ áeóîà°ùŸG áfRhódG äGõ«¡Œ
¿G ±RÉ©dG èeÉfôH ‘ IôcGP »àFÉŸG øe πµd øµÁ Gòµgh ,±RÉ©dG
.∞∏àfl áfRhO Ωɶf Ωóîà°ùJ
iôNC’G äGõ«ŸG øe ÒãµdG
,(ΩƒfhÎe) áYô°ù∏d §HÉ°V ≈∏Y EXR-46 OR RÉ¡L …ƒàëj
äÉ÷É©e çÓK ∑Éæg ɪæ«H ,᫪«∏©àdG ∞FÉXƒdG øe ójó©dGh
™aôd Ωóîà°ùJ (MFX h ,¢SQƒch ,ÜÒØjQ) á«fhεdC’G äGÒKCÉà∏d
.á©FGôdG 䃰üdG IOƒL
øe ÊÉZC’G ≈≤«°Sƒe ¤G ´Éªà°SE’G øe EXR-46 OR RÉ¡L ∂æµÁh
øe …C’ kÉ«∏©a kÉeGóîà°SEG ∂d í«àj ɇ ,GM,GM2,GS,XG ´ƒf
hCG ∂æe Öjô≤dG óf’hQ ´Rƒe iód IôaƒàŸG á«°SÉ«≤dG MIDI äÉØ∏e
.âfÎfC’G áµÑ°T ≈∏Y
ôaƒj ƒ¡a ‹ÉàdÉHh ,GX light ºYój EXR-46 OR RÉ¡L :áßMÓe
.∂dòH á£ÑJôŸG ∞FÉXƒ∏d á«°SÉ°SC’G áYƒªÛG §≤a
Microsoft and Windows are registered trademarks of Microsoft Corporation
USA in the United States and other countries.
Apple and Macintosh are registered trademarks of Apple Computer Corporation USA in the United states and other countries.
Mac OS is a registered trademark of Apple Computer Corporation.
Other names of companies, products, or standards are the trademarks or registered trademarks of their respective owners.
floppyäɵ°ùjO π¨°ûà Ohõe EXR-46 OR RÉ¡L ¿G ɪc
á«≤«°SƒŸG äÉYÉ≤jE’G ∫ÉNOEGh äÉeƒ∏©ŸG º«¶æàd (2DD,2HD)
.ΩóbC’G á«≤«°SƒŸG óf’hQ äÉYRƒŸ Ió©ŸG
.∑RÉ¡éH ™àªà°SCG
»àdGh ∫ƒÑ£dG áMƒd áØ«Xh ≈∏Y EXR-46 OR RÉ¡L …ƒàëj
Aõ÷G) É«∏©dG á«fɪãdG í«JÉت∏d ∫ƒÑ£dG äGƒ°UCG QÉ«àNG ∂d í«àJ
.(OQƒÑ«µdG øe øÁC’G
AGõLCG hCG ∫ƒÑ£dG ≈∏Y »◊G ±õ©∏d áØ«XƒdG √òg ΩGóîà°SEG ∂æµÁ
.EXR-46 OR RÉ¡L ¬Ñ©∏j …òdG º¨ædG hCG á«æZC’G áÑMÉ°üà ô≤ædG
â«ÑãàdG ∞FÉXh
¢†©H â«ÑãJ øe ∂浓 QGQRCG á°ùªîH Ohõe EXR-46 OR RÉ¡L ¿G
∂d íª°ùj Gògh ,É¡«Yóà°ùJ »àdG ±RÉ©dG èeGôH øe äGõ«¡éàdG
∂dòH øµÁ ¬fC’ ,á«dÉ©ah áfhôe ÌcCG πµ°ûH ∂JÓ«é°ùJ ΩGóîà°SCÉH
.Ée á¶◊ ‘ É¡«dG êÉà– ’ ób »àdG äGõ«¡éàdG πgÉŒ
USB á∏«°UƒJ h á«°†eƒdG IôcGòdG
»bô°T »≤«°Sƒe ´É≤jCG 99 ≈∏Y EXR-46 OR RÉ¡L …ƒàëj
øe OóYh ‘É°VEG ´É≤jEG 50 ÖfÉL ¤G ,ROM
.á«°SÉ«≤dG MIDI äÉØ∏e
IôcGòdG º°ùb ‘ MIDI äÉØ∏eh á«aÉ°VC’G äÉYÉ≤jC’G óLƒJh
∫ÓN øe É¡JÉjƒàfi º«¶æJh ™«°SƒJ øµÁ »àdGh á«°†eƒdG
RÉ¡L ™e hCG ,(PC) ∂H ¢UÉÿG ôJƒ«ÑªµdG RÉ¡L ™e USB á∏«°UƒJ
.Macintosh ôJƒ«Ñªc
ójóL Ωƒ¡Øe
øµÁ ä’BG 3 É¡æe ,kÉ©e ádBG 19 QGó°UEÉH EXR-46 OR RÉ¡L íª°ùj
,ô°ùjC’G º°ù≤dG ,»°SÉ°SC’G 䃰üdG) OQƒÑ«µdG ≥jôW øY É¡aõY
±õ©d »°SÉ°SC’G 䃰üdG ΩGóîà°SEG øµÁ å«M ,(áfÉ£ÑdG 䃰U
±õ©dGh ,OQƒÑ«µdG º«°ù≤J ™°Vh ∂æµÁ ɪæ«H ,∫ƒÑ£dG hCG ¿É◊C’G
.OôØæŸG ∂aõY ¤G iôNCG kÉJGƒ°UCG áYô°ùH ∞«°†J ¿CG »FÉæãdG
2
r®
™e ≥aGƒJh ,USB á∏«°Uƒàd áëàah ,IôµàÑe ΩGóîà°SG á¡LGhh ,ábƒØàŸG ¬JGƒ°UCG á«YƒæH óf’hQ øe ójó÷G OQƒÑ«µdG ,óf’hQ øe EXR-46 OR »còdG »≤«°SƒŸG ´RƒŸG ∑QÉ«àNC’ ∑ôµ°ûf
.Ió«ØŸG iôNC’G ∞FÉXƒdG øe IÒÑc áYƒª›h ,V-LINK ΩGóîà°SEG
.πeɵdÉH π«dódG Gòg ájÉæ©Hh CGô≤J ¿CG í°üæf ,ÖYÉàe ÓH á°ù∏°ùdG áeóÿG øe IójóY äGƒæ°S øª°†Jh EXR-46 OR øe IóFÉa ≈°übCG ≈∏Y π°üëàd
.EXR-46 OR OQƒÑ«c ™HÉ°UCG ó°ü≤f ÉeóæY §≤a ''ìÉàØe'' áª∏c ΩGóîà°SEGh ,á«eÉeC’G áMƒ∏dG ≈∏Y IOƒLƒŸG í«JÉØŸG áaɵd ''QR'' áª∏c ΩGóîà°SEG ≈∏Y ≥Øàf ÉæYO ,äÉë∏£°üŸG ÚH §∏î∏d kÉÑæŒ
.EXR-46 OR RÉ¡÷ í«ë°üdG 𫨰ûàdG ∫ƒM áeÉg äÉeƒ∏©Ã ∑ó“ äɶMÓŸG √ò¡a ,(7¢U) ''áeÉg äɶMÓe'' óæH ájÉæ©H CGô≤J ¿G ƒLôf RÉ¡÷G Gòg ΩGóîà°SEG πÑb
.áLÉ◊G óæY ¬«dEG ´ƒLô∏d øeBG ¿Éµe ‘ π«dódG Gòg ßØM øe ócCÉJ
Roland Europe S.p.a. ácô°T øe »£N íjô°üJ ¿hóH Qƒ°ûæŸG Gòg øe AõL …CG QGó°UEG IOÉYEG πµ°T …CÉH íª°ùj ’ ROLAND EUROPE 2006 ácô°ûd áXƒØfi ™Ñ£dG ¥ƒ≤M