1
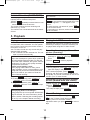
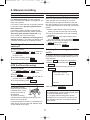
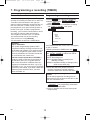
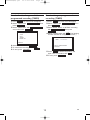
T6410EZ(EN).qx3
03.3.22 14:18
Page 1
TVCR
MODEL NO.:
14PV125/01, 14PV225/01
14PV422/01
Thank you for buying a Philips TV-Video combi. This TV-Video combi is one of the most sophisticated and easy-to-use TV-Video combi on the market. Please take the time to read this operating manual before using your TV-Video combi. It contains important information and notes regarding operation.
The TV-Video combi should not be turned on immediately after transportation from a cold to a
hot area or vice versa, or in conditions of extreme humidity. Wait at least three hours after transporting the device. The TV-Video combi needs this time in order to become acclimatised to its new environment (temperature, air humidity, etc.).
This TV-Video combi is used for the recording and playback of VHS videocassettes.
Cassettes with the VHS-C label (VHS cassettes for camcorders) may only be used
with a suitable adapter.
PAL
We hope you enjoy your new TV-Video combi.
Important notes regarding operation
These operating instructions have been
printed on non-polluting paper.
High voltage!
" Danger:
There is a risk of an electrical shock!
Deposit old batteries at the appropriate collection points.
" The TV-Video combi does not contain any
Please make use of the facilities available in
your country for disposing of the packaging
of the TV-Video combi in a way that helps to
protect the environment.
components that can be repaired by the
customer. Please leave all maintenance
work for qualified personnel.
" As soon as the TV-Video combi is connected to the power supply, some components
are in constant operation. To-switch off the
TV-Video combi completely you must disconnect it from the mains or switch it off with
the main switch.
sure that air can circulate freely
! Make
through the ventilation slots on the TV-Video
combi. Do not place the device on an
unsteady base.
! Make sure that no objects or liquids enter
the TV-Video combi. Do not place vases or
the like on the TV-Video combi. If liquid is
spilt into it, immediately disconnect the TVVideo combi from the power supply and call
After-sales Service for advice.
! Do not place any combustible objects on the
device (candles, etc.).
! Make sure that children do not place any
foreign objects within the openings or ventilation slots.
This electronic device contains many materials that can be recycled. Please enquire
about the possibilities for recycling your old
device.
So that you can identify your machine for service
questions or in the event of theft, enter the serial
number here. The serial number (PROD.NO.) is
printed on the type plate fixed at the back of the
device.
MODEL NO. : 14PV125/01, 14PV225/01
14PV422/01
PROD. NO.
...........................
This product complies with the requirements of
Directive 73/23/EEC +89/336/EEC +93/68 EEC.
T6410EZ(EN).qx3
03.3.22 14:18
Page 2
IN BRIEF
The remote control
CLEAR To delete last entry/Clear programmed recording (TIMER).
REC
STANDBY/ON
REC I To record the TV channel selected at this moment or press repeatedly to
start a One-Touch Recording.
STILL
1
2
3
4
5
6
7
8
MUTE
SLEEP
0
PLAY
To stop the tape and show a still picture.
To eliminate the sound. Press again to restore the volume.
9
SYSTEM
STATUS/EXIT
2
PROG P+ PROG P– To select the programme number. During normal or slow
motion playback, press to adjust the tracking or vertical jitter.
CLEAR
VOL5+ VOL5– To adjust the volume.
SYSTEM Doesn’t work on these models.
SLEEP To select the switch-off time in 30 minutes intervals.
REW
FWD
MENU
P
VOL
STILL
STANDBY/ON y To switch TVCR on or off, interrupt menu function.
MENU To call up main menu of TVCR.
STOP
PROG
P
STATUS/EXIT To access or remove the TVCR’s on-screen status display. To exit onscreen menus.
0..9 Press to select channels.
MUTE
p
l
o
o
l
p
FWD 1- B When tape playback is stopped, press to fast forward the tape at hight
speed. During playback, press to fast forward the tape while the picture stay on the
screen. To store or confirm entry in the menu. Press to adjust the controls of TVCR
menu.
REW0- s When tape playback is stoped, press to rewind the tape at high speed.
During playback, press to rewind the tape while the picture stay on the screen.To return
the cursor in the menu. Press to adjust the controls of TVCR menu.
PLAY B- K To play a tape, select an item in the menu of TVCR.
STOP C- L To stop the tape, select an item in the menu of TVCR.
Red button / Green button / Yellow button/ Blue button / Doesn’t work on these
models.
<14PV225>
: To switch TELETEXT on or off, or transparent mode.
: enlarge font
: select TELETEXT sub-page
: recall hidden information
p
l
o : stop page changes
: go back to start page.
o
l
p
EN
2
T6410EZ(EN).qx3
03.3.22 14:18
Page 3
Front of the device
VIDEO
AUDIO
P
STANDBY
y Standby/on: To switch TVCR on or off, interrupt menu function.
5 Volume: In connection with the button + , – to adjust the volume.
P-
Programme number minus: previous programme number
P+
Programme number plus: next programme number
I Record: To record the programme currently selected.
B
Playback: To play a recorded cassette.
C/A
A Pause/Stop, eject cassette: To stop the tape; If this key is depressed while in STOP, the cassette is then
ejected from the machine.
1 When tape playback is stopped, press to fast forward the tape at hight speed.
0 When tape playback is stoped, press to rewind the tape at hight speed.
Sockets on the front:
White socket / AUDIO input socket: To connect a camcorder or video games (audio).
Yellow socket / VIDEO input socket: To connect a camcorder or video games (video).
Small socket /
socket for headphones: To connect headphones.
Back of the set
EXT/AV1
Aerial input socket: To connect the aerial cable
EXT1/AV1 Scart socket :To connect a satellite receiver, decoder, video recorder, etc
Power switch: To switch the TV-Video Combi off.
Caution: If you switch off using the power switch, TIMER-recordings are impossible!
The control lights at the front of machine
STANDBY
switch.
Standby light: lights up when the TV-Video Combi has been switched on by means of the main
RECORD
Recording light: lights up during recording.
Fast blink: recording pause; timer recording not stand-by.
Slow blink: timer recording is stored in a timer block.
3
EN
T6410EZ(EN).qx3
03.3.22 14:18
Page 4
Specifications
Supplied accessories
Voltage: 220-240V/50Hz
Power consumption (Standby): less than 5W
Rewind time: less than 260 seconds (cassette E-180)
Number of video heads : 2
Recording/playback time: 3 hours (SP)
(cassette E-180), 6 hours (LP) (cassette E-180)
Weight without packing in kg: 11.5
Dimensions in cm (HxWxD):40.0x37.3x38.0
Power consumption : 52W
• Operating instructions
• Remote control and batteries
1. Connecting the TV-Video Combi
3.If
3. the little red standby light (STANDBY ) at
the front panel of the set is not lit, please
switch on the set using the main power
switch. The power switch
is located on the
left side panel of the set.
4.Language
setting picture will appear on the
4.
screen.
Preparing the remote control for
operation
The remote control and its batteries are packed
separately in the original TV-Video Combi packaging. You must install the batteries in the
remote control before use.
WÄHLEN K L
→DEUTSCH
ENGLISH
ESPAÑOL
FRANÇAIS
ITALIANO
NEDERLANDS
SVENSKA
FORTSETZEN=MENU
1.Take
the remote control and the enclosed bat1.
teries (2 batteries).
2.Open
the remote control's battery compart2.
ment and place the batteries in it as shown in
the picture and close the battery compartment.
The remote control is now ready to use.
Its range is approximately 7 metres.
I do not see a Language setting picture
* Check the cable connections.
You can find more details in chapter 'Preparation
for use'.
Connecting additional devices
Connecting the cable
You can connect additional devices such as
decoders, satellite receivers, camcorders, etc. to
the EXT1 socket.
1.Insert
the aerial cable plug into the AERIAL at
1.
the back of the TV-Video Combi.
2.Connect
the mains cable to the wall socket.
2.
EN
The respective scart socket is usually marked
'AV' or 'TV' on the decoder or satellite receiver.
4
T6410EZ(EN).qx3
03.3.22 14:18
Page 5
2. Important notes for operation
Navigation in the screen menu
Switching on
You can switch on the TV-Video Combi with
STANDBY/ON y .
If you press PLAY B-K , STOP C-L , PROG P+ ,
PROG P– , FWD 1- B , REW0- s or 0..9 while
the set is in Stand-by, the power will be automatically turned on.
Note that the keys 0..9 will be inactive for
about 5 seconds just after having switched the
TV-Video combi off.
Power outage/no power
Channel information remains saved for up to 10
year, the time and timer information is saved for
up to 1 minute.
You can check/change many functions and settings of your TV-Video Combi via on-screen
menu. The individual functions are selected, via
the remote control as follows:
Call up the menu: with
MENU
.
To select: with PLAY B-K STOP C-L .
To enter or change your selection: with the
number buttons 0..9 or with PLAY B-K STOP C-L .
To save or confirm: with
To cancel: with CLEAR .
To end: with
STATUS/EXIT
FWD 1- B
.
.
SELECT K L CHOOSE B
→TIMER
PICTURE CONTROL
RECORD SET UP
VCR SET UP
TUNER SET UP
GENERAL SET UP
END=EXIT
5
EN
T6410EZ(EN).qx3
03.3.22 14:18
Page 6
3. Installing your TV-Video Combi
Preparation for use
Decoder allocation
This chapter shows you how to prepare your TVVideo Combi for use. The TV-Video Combi automatically seeks out and stores all available TV
channels.
Connecting additional devices
After you have connected additional devices
(satellite receiver, etc.) through the aerial cable,
switch them on. The automatic channel search
will recognise them and save them.
Some TV channels transmit encoded TV signals
which can only be viewed with a commercially
purchased or hired decoder without disturbances. You can connect such a decoder to this
TV-Video Combi. The following function will automatically activate the connected decoder for the
desired TV channel.
1. Use PROG P+ , PROG P– or 0..9 to select the
TV channel which you would like to allocate
the decoder to.
2. Press MENU . The main menu will appear.
3. Use PLAY B-K STOP C-L to select 'TUNER
SET UP'. Then press FWD 1- B .
4. Use PLAY B-K STOP C-L to select 'MANUAL
TUNING'. Then press FWD 1- B .
5. Use PLAY B-K STOP C-L to select
'DECODER'.
1. Select the desired language for the on-screen
menu by pressing
PLAY B-K
STOP C-L
.
2. Press MENU .
3. Confirm with PROG P+ .
The automatic TV channel search starts.
PLEASE WAIT
MANUAL TUNING
START
FINISH
PROG.
CHANNEL
→DECODER
SKIP
❚❚❚❚❚❚❚❚❚❚❚❚❚❚❚❚❚❚❚❚❚❚❚
<14PV 225>
4. 'TIME' and 'DATE' will appear on the TV
P55
055
[OFF]
[OFF]
SELECT K L CHOOSE B
END=EXIT
screen.
6. Use
FWD 1- B to select 'ON'
(Decoder switched on).
TIME --:-DATE --/--/--
How can I switch off the decoder?
Use FWD 1- B to select 'OFF' (Decoder
switched off).
SMART CLOCK [ON]
END=EXIT
7. To end, press STATUS/EXIT .
The decoder has now been allocated to this TV
channel.
5. Check 'TIME'. If required, please change the
time with the number buttons
0..9
.
6. Check if the displayed settings for 'DAY',
'MONTH' and 'YEAR' are correct.
7. When all information is correct, save by
pressing STATUS/EXIT .
The preparation for use is now complete.
Satellite receiver
If you are connecting a satellite receiver, please
read the section 'Using the satellite receiver'.
Decoder
If you are connecting a decoder, you must
install it as described in the next section.
EN
6
T6410EZ(EN).qx3
03.3.22 14:18
Page 7
Manual TV channel search
Using the satellite receiver
In some cases it can occur that all TV channels
are not found and saved during the first installation. In this case, the missing TV channels must
be searched for and stored manually.
You can receive channels from the satellite
receiver via the scart socket AV1/EXT1 .
To do this, select the channel number 'AV1' by
pressing 0,0,1, with the keys 0..9 on the remote
control.You will have to select the channel you
want to receive on the satellite receiver itself.
1. Press MENU . The main menu will appear.
2. Select 'TUNER SET UP' with PLAY B-K
STOP C-L
and confirm with
FWD 1- B
3. Select 'MANUAL TUNING' with
.
Automatic Tuning
PLAY B-K
and confirm with FWD 1- B .
4. Select 'PROG.' with PLAY B-K STOP C-L . Then
press FWD 1- B .
STOP C-L
During installation, all available TV channels are
searched for and saved. If the channel assignments of your cable or satellite TV provider
change or if you are reinstalling the TV-Video
Combi, e.g. after moving house, you can start
this procedure again. This will replace the TV
channels already saved with the new ones.
MENU . The main menu will appear.
1.Press
1.
2.Select
'TUNER SET UP' with PLAY B-K
2.
STOP C-L and confirm with FWD 1- B .
3.Select
'AUTO TUNING' with PLAY B-K
3.
STOP C-L , and confirm with FWD 1- B .
MANUAL TUNING
→PROG.
CHANNEL
DECODER
SKIP
P55
055
[OFF]
[OFF]
SELECT K L CHOOSE B
END=EXIT
5. With
PLAY B-K STOP C-L or 0..9 , select the
desired programme number that you want to
use for the TV channel, e.g. 'P01'. Then press
FWD 1- B .
PLEASE WAIT
What is a special channel?
TV channels are transmitted in certain pre-defined
frequency ranges. These ranges are divided into
channels.
A specific frequency/channel is assigned to each
TV station.
Certain frequency ranges are specified as special
channels (hyperband channels).
START
FINISH
❚❚❚❚❚❚❚❚❚❚❚❚❚❚❚❚❚❚❚❚❚❚❚
4.The
automatic TV channel search starts. This
4.
allows the TV-Video Combi to save all available TV channels. This procedure may take
several minutes.
5.When
the TV channel search is complete,
5.
'AUTO TUNING COMPLETED' will briefly
appear on the TV screen.
6. Select 'CHANNEL' with
PLAY B-K STOP C-L ,
and confirm with FWD 1- B . Then enter the
desired channel with 0..9 .
When a channel is found,it will stop searching. If
this is the channel you want, press FWD 1- B . If
you set 'SKIP' on for a channel, this channel will
be ignored when going through the channels
with PROG P+ or PROG P– .
To search for other TV channels, begin again at
step 4.
I don't know the channels for my TV stations
In this case, press PLAY B-K STOP C-L in 'CHANNEL' to start the automatic channel search. A
changing channel number will appear on the TV
screen. Continue the automatic search until you
have found the desired TV channel.
7. To end, press
STATUS/EXIT
.
7
EN
T6410EZ(EN).qx3
03.3.22 14:18
Page 8
3. Select 'LANGUAGE' with
Sorting and clearing TV channels
manually
and confirm with
PLAY B-K
FWD 1- B
SELECT K L
You can use this function to individually sort the
TV channels already saved or to delete unwanted TV channels or those with poor reception.
DEUTSCH
→ENGLISH
ESPAÑOL
FRANÇAIS
ITALIANO
NEDERLANDS
SVENSKA
END=EXIT
The clock resets automatically
If you save a TV channel that transmits TXT/PDC
on programme number ‘P01’, date and time will
and constantly be updated. As a result, time
changes, i.e. daylight savings time, will be set
automatically.
4. Select the desired language with
.
5. To end, press
PLAY B-K
STOP C-L
1. Press MENU . The main menu will appear.
2. Select 'TUNER SET UP' with PLAY B-K
STATUS/EXIT
.
Setting the clock
and confirm with FWD 1- B .
3. Select 'MOVE' with PLAY B-K STOP C-L , and
confirm with FWD 1- B .
STOP C-L
If the display shows an incorrect time or ' --:-- '
the time and date must be reset manually.
1. Press MENU . The main menu will appear.
MOVE
2. Select 'GENERAL SET UP' with
→P01: 02
P06:
P02: 03
P07:
P03: 05
P08:
P04: 10
P09:
P05: 74
P10:
SELECT K L CHOOSE
END=EXIT
STOP C-L
.
90
99
121
124
130
B
PLAY B-K
and confirm with FWD 1- B .
3. Select 'CLOCK' with PLAY B-K STOP C-L and
confirm with FWD 1- B .
STOP C-L
TIME --:-DATE --/--/--
4. With
PLAY B-K STOP C-L , select the saved TV
channel that you want to move.
5. Confirm with FWD 1- B .
6. Move the selected channel with PLAY B-K
STOP C-L to the programme number you want
to assign.
Then pless FWD 1- B . The programme number will change to '_ _'
7. Confirm with FWD 1- B .
8. To assign other TV channels to a programme
number, repeat steps 4 to 7.
9. Confirm the assignment of the TV channel
with MOVE menu.
10. To exit the MOVE menu, press STATUS/EXIT .
SMART CLOCK [ON]
END=EXIT
4. Check the time in 'TIME'. If required, please
change the time with
Time/date is displayed incorrectly despite
manual setting
* With Smart Clock, if you save a TV channel
that transmits TXT/PDC on programme number 'P01', date and time will automatically be
You have the option of setting one of the displayed languages for the on-screen menu (OSD).
MENU
STOP C-L
EN
updated when the TV-Video Combi is in Standby.
If you wish to switch this automatic time correction off, select 'OFF' for Smart Clock. You
can reactivate this function at any time by
selecting Smart Clock 'ON'.
. The main menu will appear.
2. Select 'GENERAL SET UP' with
and confirm with
PLAY B-K
FWD 1- B
.
same way.
(Choose 'SMART CLOCK' ON or OFF with
FWD 1- B . [14PV225])
6. To end, press STATUS/EXIT .
Setting the language
1. Press
0..9
5. Check 'DAY', 'MONTH' and 'YEAR' in the
.
8
T6410EZ(EN).qx3
03.3.22 14:18
Page 9
4. TV SET FUNCTIONS
3. Select an item using
Selecting a TV channel
then modify with
Select the desired TV channel (= the programme
number) with PROG P+ , PROG P– or with 0..9
on the remote control.
BRIGHTNESS
CONTRAST
COLOUR
SHARPNESS
TINT
To select the Scart socket, please enter 0,0,1,
with the keys 0..9 on the remote control. AV1
appears on the screen.
, and
.
<
<
<
<
<
>
>
>
>
>
END=EXIT
4. To end, press STATUS/EXIT .
'TINT' appears only when receiving NTSC signals from another source.
Selection of the front A/V sockets
To select the front A/V sockets, please enter
0,0,2, with the keys 0..9 on the remote control.
'AV2' appears on the screen.
How do I read TELETEXT? [14PV225]
Many TV channels transmit TELETEXT information along with their TV channels. With this TVVideo Combi you can retrieve this information
and display it on the screen using the built-in
TELETEXT decoder.
1. Press
to switch the TELETEXT decoder
on. Your TV-Video Combi will now show
TELETEXT for the TV channel you have
selected. Press
again to show TELETEXT in transparent mode.
2. If you want to select another page, type in the
number of the page with the number buttons
0..9 on the remote control.
Volume control
VOL5+
STOP C-L
FWD 1- B
SELECT K L ADJUSTE s/ B
Selection of the scart socket
You can adjust the volume using
VOL5– on the remote control.
PLAY B-K
REW0- s
,
If you would like to change the volume on the
machine, press 5– or 5+ on the TV-Video
Combi.
If you want to mute the sound temporarily
(e.g.:during a telephone call), press MUTE on
the remote control. When you press MUTE
again, the sound will return at its original volume level.
With the colour buttons on your remote control
you can directly select the page numbers
shown at the bottom of the TV screen.
The button
takes you back to the start
page.
Picture settings
3. Press
The picture can be adjusted according to your
personal preferences.
These settings are automatically stored after
exiting the main menu.
1. Press the MENU . The main menu will appear.
2. Select 'PICTURE CONTROL' with PLAY B-K
STOP C-L and confirm with FWD 1- B ..
to switch the TELETEXT decoder
off.
Special TELETEXT functions [14PV225]
In TELETEXT mode you can use the special
TELETEXT functions.
o
l
p
: enlarge font
: select TELETEXT sub-page
: recall hidden information
p
l
o
: stop page changes
: go back to start page
9
EN
T6410EZ(EN).qx3
03.3.22 14:18
Page 10
Switch-off function (SLEEP TIMER)
The maximum time period to be set until switchoff is 2 hours.
You can programme your set to switch-off automatically after a predetermined period.
SLEEP .
1.Press
1.
SLEEP repeatedly to extend the time until
2.Press
2.
switch-off in 30 minute increments.
The screen will show the time remaining until
switch-off, e.g.: '+0:30'.
The machine now counts backwards to the switchoff time.
If you would like to turn this function off, press
SLEEP on the remote control several times until
switch-off appears. '--:--' will appear on the
screen.
To check the time until switch-off, press SLEEP
on the remote control.
If a recording is in process, switch-off function
will be cancelled.
5. Playback
Playing cassettes
Playing back NTSC cassettes
You can use this TV-Video Combi to playback
recorded VHS video cassettes. You can operate
the TV-Video Combi using the remote control or
the buttons on the set.
Your TV-Video Combi can only record and play
standard VHS cassettes.
1. Put a cassette into the cassette slot. The cassette is inserted automatically.
Cassettes that have been recorded in the NTSC
standard (for example, American cassettes) can
be played back using this TV-Video Combi.
DIGITAL STUDIO PICTURE CONTROL
Philips has developed a system which produces
the best possible playback quality. For old and
often-used video cassettes, this system reduces
interference. For new or high quality cassettes,
it emphasises the details.
Picture/ sound quality is poor
When playing rental videos or older, poorer
quality cassettes, it may not be possible to completely filter out picture and sound interference.
This is not a fault in your machine. Read the
section 'Manual tracking'.
2. Press PLAY B-K to view the tape.
3. To stop the playback, press STOP C-L or
on the TV-Video Combi.
4. To eject the cassette, press EJECT A or
STOP/EJECT when the TV-Video Combi stops
the playback.
STOP/EJECT
Do I need to change the playback speed
when playing back LP recordings?
During playback, the correct speed will automatically be selected. For more information, please
read the section 'Selecting the recording speed
(SP or LP)' in the chapter 'Manual recording'.
EN
Searching for a tape position with
picture (scanning)
1. While a cassette is playing, press
REW0- s
(reverse) or FWD 1- B (forward) one or more
times.
2. Press PLAY B-K to resume playback.
Still picture
1. During playback, press
STILL 2 to stop the
tape and display a still picture.
2. To continue playback, press PLAY B-K .
Scanning and still motion interferes with the picture quality. The sound is switched off. This is not
a fault in your TV-Video Combi.
Searching for tape position without
picture (forward wind and rewind)
1. Stop the tape with STOP C-L .
2. Press REW0- s (reverse) or
(forward).
3. To stop the tape, press
FWD 1- B
STOP C-L
.
Manual Tracking
To adjust the tracking manually, press P+ or
P- on the TV-Video Combi during playback.
Tracking returns to Automatic Tracking
Adjustment when you press STOP C-L or insert a
tape.
10
T6410EZ(EN).qx3
03.3.22 14:18
Page 11
6. Manual recording
General information
Lining up recordings (assemble cut)
Use 'Manual Recording' to make a spontaneous recording (for example, a programme currently being shown).
If you want to start and stop a recording manually, read the section 'Recording without automatic switch-off'.
If you want to start a recording manually but
have it stopped automatically, read the section
'Recording with automatic switch-off'. (e.g.
not to record to the end of the tape)
Read the section 'Automatic recording from a
satellite receiver', if you want a recording to be
controlled automatically by a satellite receiver.
When you add a further recording to a cassette,
which already has a recording on it, a short
blank (flicker) can appear between the old and
the new recording or the picture itself can flicker.
To help reduce these from occurring, proceed as
follows:
1. Find the tape position of the old recording
where you want to insert the new recording.
2. Look at the last minute of the old recording
(playback).
3. Press STILL 2 at the tape position where
the new recording is to go and press REC I .
4. Now start recording as usual by pressing
REC I on the remote control.
5. Stop recording with STOP C-L .
Recording without automatic
switch-off
1. Insert a cassette.
2. Use PROG P+ PROG P– or
to select the
programme number you want to record, for
example, 'P01'.
3. To start recording, press REC I .
4. To stop recording, press STOP C-L .
0..9
Recording with automatic switch-off
(OTR One-Touch-Recording)
1. Insert a cassette.
2. Use PROG P+ PROG P– or
Selecting the recording speed (SP
or LP)
LP allows to double the recording duration on tape
(for example six hours instead of three hours on a
E180 cassette).
1. Press MENU . The main menu will appear.
2. Select 'RECORD SETUP' with PLAY B-K
STOP C-L .
3. Select the required recording speed with
FWD 1- B
to select the
programme number you want to record.
3. Press REC I .
4. Each time you press REC I you will add 30
minutes to the recording time.
5. To stop recording, press STOP C-L .
.
0..9
SELECT K L CHOOSE B
→RECORD SPEED
[SP]
END=EXIT
Preventing accidental erasing
4. To end, press
All cassettes (except
rental and pre-recorded
cassettes) have a security tab on the back of
the cassette.
To prevent recording
over important recordings (erasing), you can
remove this security tab.
If you later decide to record on a protected cassette, simply cover the hole with adhesive tape
or slide the tab to the right.
STATUS/EXIT
.
'SP'/'LP'
'SP': StandardPlay (normal recording speed) offers
the usual first-class picture quality.
'LP': LongPlay (half recording speed, double
recording time). 6 hours can be recorded on a 3hour cassette (E180) with a somewhat reduced
picture quality.
11
EN
T6410EZ(EN).qx3
03.3.22 14:18
Page 12
7. Programming a recording (TIMER)
General information
Programming a recording
Use a TIMER programming to automatically start
and stop a recording at a later time or date. The
TV-Video Combi will switch to the right programme number and begin recording at the correct time. With this TV-Video Combi, you can
pre-programme up to eight recordings within a
period of one year. To make a programmed
recording, your TV-Video Combi needs to know:
*the date you want to make the recording
*the programme number of the TV channel
*the start and stop time of the recording
*VPS or PDC on or off [14PV225]
This information is saved in a TIMER block.
MENU . The main menu will appear.
1.Press
1.
2.Select
'TIMER' with PLAY B-K STOP C-L . Then
2.
press FWD 1- B .
3.Select
ONCE, DAILY, or WEEKLY recording
3.
with PLAY B-K STOP C-L . Then press
FWD 1- B .
SELECT K L CHOOSE B
→ONCE
DAILY
WEEKLY
TIMER LIST
END=EXIT
[14PV225]
What is 'VPS/PDC'?
'VPS' (Video Programming System)/ 'PDC'
(Programme Delivery Control) are used to control the start and duration of TV channel recordings. If a TV programme starts earlier or ends
later than scheduled, the TV-Video Combi will
turn on and off at the correct time.
What do I need to know about 'VPS/PDC'?
Usually the VPS or PDC time is the same as
the start time. But if your TV guide shows a
VPS or PDC time which is different from the
programme’s scheduled start time, e.g. 20.10
(VPS/PDC 20.14), you must enter the VPS/PDC
time exact to the minute. If you want a start time
different from the VPS/PDC time, you must
switch VPS/PDC off.
If all TIMER blocks are in use, 'FULL' will appear
on the TV screen.
4. Select the desired TIMER block with 0..9 .
Selecting once/daily/weekly recordings
Use PLAY B-K STOP C-L to select from the following options:
'ONCE': Recording once
'DAILY': Repeated daily recordings from
Monday to Friday
'WEEKLY': Repeated weekly recordings (every
week on the same day)
5.Enter
the Start time (START) End time
5.
(STOP), Programme number (PROG.),
VPS/PDC information and the Date with
0..9
Programming a recording from the external
sources
You can also programme recording from an
external source via the Scart socket AV1 or the
front A/V connectors AV2.
6.When
all inputs are correct, press
6.
STATUS/EXIT . The programming information
is stored in a TIMER block.
7.Insert
a cassette with an intact security tab
7.
(unprotected).
EN
12
.
T6410EZ(EN).qx3
03.3.22 14:18
Page 13
How to check, change or delete a
programmed recording (TIMER)
How to change a programmed
recording (TIMER)
1. Press MENU . The main menu will appear.
2. Select 'TIMER' with PLAY B-K STOP C-L . Then
press
FWD 1- B
.
press
3. Select 'TIMER LIST' with
and confirm with
1. Press MENU . The main menu will appear.
2. Select 'TIMER' with PLAY B-K STOP C-L . Then
PLAY B-K
FWD 1- B
STOP C-L
FWD 1- B
.
3. Select ONCE, DAILY, or WEEKLY recording
,
with
STOP C-L . Then press
.
4. Select a TIMER block with 0..9 . (The flashing
number indicates an empty TIMER block.)
.
PLAY B-K
FWD 1- B
SELECT K L CHOOSE B
ONCE
DAILY
WEEKLY
→TIMER LIST
ONCE
TIMER - 1 2 3 4 5 6 7 8 -
END=EXIT
SELECT TIMER NUMBER
END=EXIT
4. Select timer block with FWD 1- B .
5. To cancel the recording, press CLEAR .
6. To end, press STATUS/EXIT .
5. Press
CLEAR to delete information, and
input correct information with 0..9 .
6. To end, press STATUS/EXIT .
13
EN
T6410EZ(EN).qx3
03.3.22 14:18
Page 14
8. Other functions
Switching the status display off or
on
Along with the on screen menu, the status display also displays information on the current
operating status (counter, playback, recording,
TV channel, etc.) on the TV screen.
1. Press MENU . The main menu will appear.
2. Select 'VCR SET UP' using PLAY B-K
and confrim with FWD 1- B .
3. Select 'STATUS DISPLAY' with PLAY B-K
STOP C-L .
STOP C-L
SELECT K L CHOOSE B
REPEAT PLAY
[ON]
→STATUS DISPLAY
[ON]
BLUE BACKGROUND[ON]
END=EXIT
5. To end, press STATUS/EXIT .
6. Insert a cassette.
7. Start the continuous playback with
PLAY B-K .
Your TV-Video Combi will automatically rewind and
start playing the tape from the begining when it recognizes a non-recorded part longer 10 seconds.
Blue Background on or off
If you want the TV screen to be solid blue when
a weak signal is received, set BLUE BACKGROUND to ‘ON’. The screen will be blue and
the sound will be muted. Or, if you want to
receive the weak signal, set BLUE BACKGROUND to ‘OFF’.
1. Press MENU . The main menu will appear.
2. Select 'VCR SET UP' using PLAY B-K
STOP C-L and confrim with FWD 1- B .
3. Select 'BLUE BACKGROUND' with PLAY B-K
STOP C-L .
4. Select 'ON' or 'OFF' with FWD 1- B .
Which settings can I choose?
'ON': Shows the status display for a few seconds only.
'OFF': Switches off the status display.
5. To end, press
STATUS/EXIT
SELECT K L CHOOSE B
REPEAT PLAY
[ON]
STATUS DISPLAY
[ON]
→BLUE BACKGROUND [ON]
.
END=EXIT
Continuous playback
4. Select 'OFF' (no blue background) or 'ON'
This function can be used to play a cassette
over and over again. When the end of the cassette is reached, it will rewind and start from the
beginning again. This function is activated or
deactivated as follows.
1. Press MENU . The main menu will appear.
2. Select 'VCR SET UP' using PLAY B-K
and confirm with
STOP C-L
3. Select 'REPEAT PLAY' with
STOP C-L
FWD 1- B
.
PLAY B-K
.
(blue background on) with
5. To end, press
STATUS/EXIT
FWD 1- B
.
.
Parental control (Child lock)
This function protects your TV-Video Combi from
unwanted use. All button functions on the front of
the machine are blocked.
Programmed recordings will still be recorded (in
spite of the parental control) and cannot be
interrupted.
1. Press MENU . The main menu will appear.
2. Use PLAY B-K STOP C-L to select 'GENERAL
SELECT K L CHOOSE B
→REPEAT PLAY
[ON]
STATUS DISPLAY
[ON]
BLUE BACKGROUND[ON]
SET UP'. Then press
3. Use
PLAY B-K
.
to select 'CHILD
FWD 1- B
STOP C-L
LOCK'.
4. Use
END=EXIT
4. Select 'ON' with
to select 'ON'.
'If a button at the front of the machine is pressed
while parental control is active, ’CHILD LOCK
ACTIVE’ will appear on the screen for a few seconds.
.
If you select 'OFF', continuous playback will be
switched off.
EN
FWD 1- B
FWD 1- B
14
T6410EZ(EN).qx3
03.3.22 14:18
Page 15
9. Before you call an engineer
If, contrary to expectation, you have any problems using this TV-Video Combi, it may be
caused one of the following reasons.
No recording possible
*The TV channel you want to record is not
stored or you have selected the wrong programme number: check TV channels stored.
*A cassette was inserted that does not have the
security tab (cannot be used to record): Insert
a cassette with an intact security tab or
change cassette. For more information, please
see the section ‘Preventing accidental erasing’
in chapter ‘Manual Recording’.
Your TV-Video Combi does not respond to
any button being pressed:
*There is no power supply: check the power
supply.
*Parental control is on:switch the parental control off.
*There is a technical problem: disconnect from
the mains power supply for 5 minutes, then
power-up again.
If this doesn't help, you can reset your TV-Video
Combi to the default factory settings.
[14PV225]
*’VPS/PDC’ switched on but ‘VPS/PDC time’
wrong: enter ‘VPS/PDC time’ exactly to the
minute. Check your aerial connection.
Resetting devices to default factory settings
*Warning: All the information stored (TV channels, time and date, TIMER) will be cleared.
1.Switch the TV-Video Combi to stand-by.
2.Press and hold REC I and PROG P+ at the
same time for 2 seconds or more.
Smart Clock does not work
*You have stored on programme number ‘P01’ a
TV channel that does not transmit TELETEXT.
Store on ‘P01’ a TV channel that transmits
TELETEXT.
*Poor TELETEXT reception. Store a TV channel
on ‘P01’ with good TELETEXT reception.
*You have not activated the Smart Clock function. Switch the function ‘ON’.
A cassette is jammed in the TV-Video Combi
*Don’t use force. Disconnect the set from the
mains and reconnect it again after a few seconds.
You can also call the customer service centre
in your country.The telephone numbers can be
found on the back of this instruction manual.
Have the model number (MODEL NO) and the
production number (PROD.NO.) of your TVVideo Combi ready.
Remote control does not work
*Remote control is not pointed at the TV-Video
Combi.
*Take out the batteries, wait for 10 seconds and
place them back in the remote control.
*Batteries have run out. Change the batteries.
No picture when you play a cassette
*There is no recording on the cassette.
Poor picture quality when you play a cassette
*The cassette is badly worn-out or of poor quality. Use a new cassette.
*Tracking is not properly adjusted. Turn to section ‘Manual Tracking’.
*Magnetism from nearby appliances and geomagnetism might affect the colour of the TV
picture. Move the TV-Video combi away from
such sources. The TV-Video combi will readjust
itself automatically. If you want to initiate an
immediate readjustment, unplug the TV-Video
combi from the mains and plug it in again
approximately 30 minutes later.
15
EN
T6410EZ(EN).qx3
03.3.22 14:18
Page 16
PHILIPS NORGE AS
Sandstuveien 70,
PO Box 1, Manglerud
N-0612 Oslo
NORWAY
Phone: 2274 8250
PHILIPS AUSTRIA GMBH
Triesterstrasse 64
1101 Wien
AUSTRIA
Tel: 0810 001 203
PHILIPS PORTUGUESA, S.A.
Consumer Information Centre
Rua Dr. António Loureiro Borge, nr. 5
Arquiparque, Miraflores
P-2795 L-A-VEHLA
PORTUGAL
Phone: 021-4163063
OY PHILIPS AB
Sinikalliontie 3,
02630 Espoo
FINLAND
puh. 09 615 80 250
PHILIPS INFO CENTER
Alexanderstrasse 1
20099 Hamburg
GERMANY
Tel: 0180-53 56 767
PHILIPS CE, The Philips Centre,
420 - 430 London Road,
Croydon, Surrey
CR9 3 QR
UNITED KINGDOM
Phone: 0208-665-6350
PHILIPS KUNDTJÄNST
Knarrarnäsgatan 7
Kista
164 85 Stockholm
SWEDEN
Tel: (0)8 598 52 250
SERVICE CONSOMMATEURS PHILIPS
BP 0101
75622 Paris Cédex 13
FRANCE
Phone: 0825-889 789
PHILIPS KUNDECENTER
Frederikskaj 6,
1780 København V
DANMARK
Tlf.: 80 88 28 14
PHILIPS POLSKA
Al. Jerozolimskie 195B
02-222 Warszawa
POLSKA
TEL.: (022)-571-0-571
PHILIPS ELECTRONICS IRELAND LIMITED
Consumer Information Centre
Newstead, Clonskeagh
DUBLIN 14
Phone: 01-7640292
PHILIPS REPRESENTATION OFFICE
Ul. Usacheva 35a
119048 MOSCOW
RUSSIA
Phone: 095-937 9300
PHILIPS CONSUMER ELECTRONICS
Servizio Consumatori
Via Casati 23
20052 Monza - Milano
ITALY
Phone: 800 820026
PHILIPS INFO CENTER
Fegistrasse 5
8957 Spreitenbach
SUISSE
Tel.: 0844-800 544
PHILIPS MAGYARORSZÁG KFT.
Fehérvári út 84/a.
Budapest 1119
HUNGARY
Phone: (01)-382-1700
PHILIPS CUSTOMER CARE CENTER
Twee Stationsstraat 80/
80 Rue des Deux Gares
1070 BRUSSEL/BRUXELLES
BELGIUM (for BENELUX)
Tel: 070-222303
PHILIPS Iberia, S.A.
C/Martinez Villergas, 49
28027 MADRID
SPAIN
Phone: 902-11 33 84
PHILIPS CONSUMENTENLIJN
Postbus 102 5600 AC Eindhoven
NEDERLAND
Tel.: 0900-8406
310? ??? ????
0EMN0---- / T6410/T6510EZ*****