1
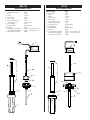
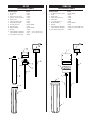
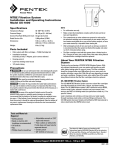
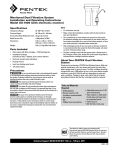
UV Systems
Installation and Operating Instructions
Models UVS-110, UV-110, UV-120, UVBB-120
Model
Part #
(120v/60Hz)
Part #
(220v/50Hz)
UVS-110
UV-110
UV-120
UVBB-120
163003
163005
163007
163009
163004
163006
163008
163010
APPLICATION
Ultraviolet Water Disinfection
SPECIFICATIONS
Models
UVS-110 UV-110
UV-120 UVBB-120
Maximum Operating Pressure 65 psi
65 psi
65 psi
65 psi
(4.5 bar)
(4.5 bar)
(4.5 bar)
(4.5 bar)
Temperature Range
40–100° F 40–100° F 40–100° F 40–100° F
(4.4–37.8° C) (4.4–37.8° C) (4.4–37.8° C) (4.4–37.8° C)
Flow Rate @ 60 psi (4.1 bar) 1 gpm
2 gpm
8 gpm
15 gpm
(3.8 Lpm)
(7.6 Lpm)
(30 Lpm)
(56 Lpm)
Voltage (Domestic)
120v/60Hz 120v/60Hz 120v/60Hz 120v/60Hz
Voltage (International)
220v/50Hz 220v/50Hz 220v/50Hz 220v/50Hz
CBU Cartridge
The UVS-110 and the UV-110 are supplied with a carbon block filter
cartridge which reduces sediment, bad taste and odor.
GENERAL PRECAUTIONS
WARNING: Always disconnect the UV from the power source. Follow
the procedures provided in this manual. Improper handling can result in
death or serious injury.
WARNING: Do not look directly at the UV lamp. This can cause
retina/eye damage.
WARNING: Do not touch the UV bulb. Any fingerprints or dirt will
reduce the efficiency of the bulb and may cause it to explode.
WARNING: Observe caution when inserting quartz sleeve to prevent
breakage and cracking, which may result in injury and damage to unit.
NOTE: When handling the UV bulb hold only the plastic-covered ends of
the bulb. If the bulb has been touched, remove bulb and clean with
alcohol before reinserting
CAUTION: If water pressure exceeds 65 psi, a pressure regulator, set at
less than 65 psi, must be installed before the Ultraviolet system.
CAUTION: Install on cold water lines only.
CAUTION: Do not install where system is exposed to direct sunlight.
CAUTION: Do not use wicking or sealing agents for fitting connections.
Teflon® tape is recommended.
CAUTION: This system must be protected from freezing which can cause
cracking of the filter housing and water leakage.
CAUTION: Because of the product’s limited service life, and to prevent
costly repairs or possible water damage, we strongly recommend that
the bottom of all opaque housings be replaced every ten years. If the
bottom of your housing has been in use for more than this period, it
should be replaced immediately. Date the bottom of any new or replacement housing to indicate the next recommended replacement date.
NOTE: Filter cartridge life varies depending on filter type, usage and
water conditions.
For the UVS-110 and UV-110
Allow a minimum of 12 inches clearance under the filter for changing the
cartridge, and above the system to allow the UV bulb to be changed.
For the UV-120 and UVBB-120
Allow a minimum of 20 inches clearance under the filter for changing the
cartridge, and above the system to allow the UV bulb to be changed.
ASSEMBLY INSTRUCTIONS
See exploded assembly drawings on pages 2 and 3.
CARTRIDGE REPLACEMENT
(for UVS-110 and UV-110 only)
Your cartridge should be replaced when there is a noticeable drop in
water flow at the faucet or tap, and/or when unpleasant odors return
(approximately every 6-9 months).
1. Turn off water supply to the system.
2. Open faucet to relieve water pressure to the housing.
3. Unscrew housing from cap. If housing sticks or is difficult to open
use an Pentek spanner wrench.
4. Remove used cartridge from housing, remove Teflon® sleeve and discard cartridge.
5. Remove O-ring from groove below the threads of the housing and
wipe groove and O-ring clean. Lubricate O-ring with silicone grease.
Place O-ring back into the groove. With two fingers wipe or press Oring down into the groove. NOTE: This step is important to ensure a
proper filter seal. Make sure that the O-ring is seated level in the
groove.
6. Insert a new cartridge into the sump making sure that it slips down
over the sump standpipe.
7 Remove gasket from cartridge end and slide Teflon® sleeve into center of cartridge then replace gasket on top of cartridge.
8. Screw the sump onto the cap and hand-tighten. Do not over-tighten. Make sure that the cap slips over the cap standpipe.
9. Turn on the water supply to allow the unit to slowly fill with water.
10. Check for leaks before leaving installation.
Each time that you use water from your unit for drinking or cooking purposes, it is recommended that you run (flush) the tap for at least 10 seconds prior to using water. This is particularly important if the water tap is
not used daily.
UV LAMP REPLACEMENT
1. Turn off all electrical power to the system by unplugging or throwing
the circuit.
2. Unscrew the UV control module from the mounting bracket (4 screws)
for Models UV-110, UV-120 and UVBB-120.
For Model UVS-100, slide mounting bracket retainer to allow access to
the UV bulb.
3. Slide the old bulb out and unplug from the control module.
NOTE: Hold the UV lamp only by the plastic covered ends of the bulb.
4. Carefully discard the old UV lamp.
5. Holding the new UV lamp only by the plastic covered ends of the bulb,
plug the new UV lamp into the control module or power cord. Slide the
new bulb into the cartridge housing and reattach UV control module or
secure mounting bracket retainer (depending on model).
6. Restore electrical power to unit.
7. Check for leaks.
UVS-110
UV-110
REPLACEMENT PARTS
REPLACEMENT PARTS
Part Description
1. 10” SlimLine™ Housing
2. O-ring
3. CBU-10
4. Teflon® Sleeve
5. Quartz Sleeve
6. O-rings for Quartz Sleeve
7. 1/2” Blk Cap w/o pr
8. Spacer Bushing
9. Mounting bracket
10. UV lamp
11. Control Module (120v/60Hz)
Control Module (220v/50Hz)
12. SW-1 Wrench (not shown)
Part #
153017
143026
155271-03
163518
163504
163538
SPECIAL ORDER
163517
SPECIAL ORDER
163503
163501 for use with UVS-110-1
163502 for use with UVS-110-2
150539
Part Description
1. 10” Housing
2. O-ring
3. CBU-10
4. Teflon® Sleeve
5. Quartz Sleeve
6. O-rings for Quartz sleeve
7. Plunger Rod w/retainer
8. 3/4” blk cap w/o pr
9. Spacer Bushing
10. Mounting bracket
11. UV Lamp
12. Control Module (120v/60Hz)
Control Module (220v/50Hz)
13. SW-2 Wrench (not shown)
Part #
153001
143011
155271-03
163518
163509
163516
163519
SPECIAL ORDER
163517
SPECIAL ORDER
163508
163506 for use with UV-110-1
163507 for use with UV-110-2
150295
UV-120
UVBB-120
REPLACEMENT PARTS
REPLACEMENT PARTS
Part Description:
1. 20” Housing
2. O-ring
3. Gasket for Insert Sleeve
4. Stainless Steel Insert Sleeve
5. Quartz Sleeve
6. O-rings for Quartz sleeve
7. Plunger Rod w/retainer
8. 3/4” blk cap w/o pr
9. Spacer Bushing
10. Mounting bracket
11. UV Lamp
12. Control Module (120v/60Hz)
Control Module (220v/50Hz)
13. SW-2 Wrench (not shown)
Part #
153013
143011
163515
163514
163513
163516
163519
SPECIAL ORDER
163517
SPECIAL ORDER
163512
163510 for use with UV-120-1
163511 for use with UV-120-2
150295
Part Description:
1. 20” BB Housing w/SS sleeve
2. O-ring
3. Quartz Sleeve
4. Plastic Holder w/O-rings
5. Teflon® tube
6. 1–1/2” blk cap w/o pr
7. Mounting bracket
8. UV Lamp
9. Control Module (120v/60Hz)
Control Module (220v/50Hz)
10. SW-3 Wrench (not shown)
Part #
SPECIAL ORDER
143273
163548
163543
163545
163541
SPECIAL ORDER
163512
163542 for use with UVBB-120-1
163547 for use with UVBB-120-2
150296
9
7
8
6
4
2
3
5
1
MAINTENANCE
WARRANTY
The quartz sleeve should be cleaned with warm soap and water every
three months.
UV bulb should be replaced every 9-12 months. The bulb does not
normally burn out, however the efficiency of the bulb decreases after one
year.
Contact your local water treatment professional for replacement
cartridge and bulb pricing or call 1-800-645-0267 for a dealer near you.
Pentek warrants to the original owner (under normal use): Ultra Violet
Systems to be free from defects in material and/or workmanship one (1)
year from the date of purchase. Any replacement products furnished will
be free from defects in material and/or workmanship for the remainder of
the original warranty period, or 30 days, whichever is longer. This warranty does not cover: (1) cartridges, UV bulbs, and accessories (2) defects not
reported within the above time period, (3) items manufactured by other
companies, (4) problems arising from failure to comply with Pentek instructions, (5) problems and/or damage arising from acts of nature, abuse, misuse, negligence or accident by any party other than Pentek, (6) problems
and/or damage resulting in whole or in part from alteration, modification,
repair or attempted alteration, modification or repair by any party other
than Pentek, (7) noncompliance with applicable codes/ordinances.
If a defect in workmanship and/or material in a product or part covered by
the warranty should arise, Pentek, at its sole discretion, will repair or
replace the defective product or part (Pentek may consider, in good faith,
the customer’s preference).
All claimed defective product must: (1) be authorized for return by Pentek
with an RGA number (2) include proof of the purchase date of the product
or part (3) returned to Pentek prior to the expiration of the warranty date,
at the customer’s expense, shipment pre-paid, (4) be accompanied by a letter detailing the Model Number, Serial Number (if any), and a brief description of the problem.
TO THE MAXIMUM EXTENT PERMITTED BY APPLICABLE LAW, PENTEK
DISCLAIMS ALL OTHER WARRANTIES, WHETHER EXPRESS OR IMPLIED,
INCLUDING, BUT NOT LIMITED TO, THE IMPLIED WARRANTY OF MERCHANTABILITY AND FITNESS FOR A PARTICULAR PURPOSE, WITH
REGARD TO THE PRODUCTS, PARTS AND ANY ACCOMPANYING WRITTEN MATERIALS.
To the maximum extent permitted by applicable law, Pentek shall not be
liable for any damages whatsoever (including, but not limited to, loss of
time, inconvenience, expenses, labor or material charges incurred in connection with the removal or replacement of the Ultra Violet Systems, special, incidental, consequential, or indirect damages for personal injury, loss
of business profits, business interruption, loss of business information, or
any other pecuniary loss) arising out of the use of or inability to use the
defective products or parts, even if Pentek has been advised of the possibility of such damages.
Pentek's’ maximum liability under any provision of this Limited Warranty
shall be limited to the amount actually paid for the Ultra Violet System.
NOTE: Because some states do not allow the exclusion or limitation of
incidental or consequential damages, the above limitations or exclusions
may not apply.
THIS WARRANTY GRANTS SPECIFIC LEGAL RIGHTS, AND OTHER RIGHTS
MAY APPLY. SUCH RIGHTS VARY FROM STATE TO STATE.
Leaks…
At inlet/outlet connections:
• Use Teflon® tape.
Between cap and housing:
• Make sure that the O-ring is clean, lubricated and properly seated.
• Hand-tighten the housing.
• Check cartridge length. If cartridge is too long, replace with proper
length cartridge.
At UV quartz sleeve
• Turn off all electrical power to the unit by unplugging or
throwing the circuit.
• Remove UV lamp and unscrew housing (See UV lamp replacement).
• Check quartz sleeve for cracks, leaks and loose fittings.
• Check that O-rings between quartz sleeve and cap are secure and
have not been cut or damaged.
• If the sleeve is broken replace with a new quartz sleeve and new
O-rings.
TECHNICAL SUPPORT
Call our technical support staff to have any question answered: 1-800861-8758. Outside of the United States, call (920) 457-9435.
502 INDIANA AVE, SHEBOYGAN WI 53081 USA
Toll Free Technical Support: 800-861-8758 • Technical Support: 920-451-9301
E-mail: [email protected]
Phone: 920-457-9435 • International Fax: 920-457-2417
E-mail: [email protected] • www.pentekfiltration.com
Mfg. by Pentair Water Treatment ©2003
Made in USA
145453 Rev B 07/03
Form IBUVP-00 – P/N 36101326