1
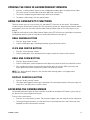
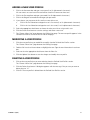
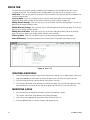
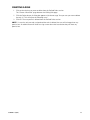
OPERATION/CONFIGURATION
Spectra® IV IP Series
Dome System
C3444M-A (7/09)
Contents
Important Notices. . . . . . . . . . . . . . . . . . . . . . . . . . . . . . . . . . . . . . . . . . . . . . . . . . . . . . . . . . . . . . . . . . . . . .
Legal Notice . . . . . . . . . . . . . . . . . . . . . . . . . . . . . . . . . . . . . . . . . . . . . . . . . . . . . . . . . . . . . . . . . . . . .
Video Quality Caution. . . . . . . . . . . . . . . . . . . . . . . . . . . . . . . . . . . . . . . . . . . . . . . . . . . . . . . . . . . . . .
Open Source Software Notice . . . . . . . . . . . . . . . . . . . . . . . . . . . . . . . . . . . . . . . . . . . . . . . . . . . . . . .
5
5
5
5
Welcome. . . . . . . . . . . . . . . . . . . . . . . . . . . . . . . . . . . . . . . . . . . . . . . . . . . . . . . . . . . . . . . . . . . . . . . . . . . . . 6
Getting Started. . . . . . . . . . . . . . . . . . . . . . . . . . . . . . . . . . . . . . . . . . . . . . . . . . . . . . . . . . . . . . . . . . . 6
Using a Web Browser. . . . . . . . . . . . . . . . . . . . . . . . . . . . . . . . . . . . . . . . . . . . . . . . . . . . . . . . . . . . . . . . . . . 7
Accessing the Dome System . . . . . . . . . . . . . . . . . . . . . . . . . . . . . . . . . . . . . . . . . . . . . . . . . . . . . . . . 7
Home Page . . . . . . . . . . . . . . . . . . . . . . . . . . . . . . . . . . . . . . . . . . . . . . . . . . . . . . . . . . . . . . . . . . . . . . . . . . . 8
Live Video Page Icons. . . . . . . . . . . . . . . . . . . . . . . . . . . . . . . . . . . . . . . . . . . . . . . . . . . . . . . . . . . . . . 8
Changing the Video Format . . . . . . . . . . . . . . . . . . . . . . . . . . . . . . . . . . . . . . . . . . . . . . . . . . . . . . . . 10
Changing the Image Rate/Quality . . . . . . . . . . . . . . . . . . . . . . . . . . . . . . . . . . . . . . . . . . . . . . . . . . . 10
MJPEG Image Rate . . . . . . . . . . . . . . . . . . . . . . . . . . . . . . . . . . . . . . . . . . . . . . . . . . . . . . . . . 10
MPEG-4 Image Quality . . . . . . . . . . . . . . . . . . . . . . . . . . . . . . . . . . . . . . . . . . . . . . . . . . . . . . . 10
Managing Presets . . . . . . . . . . . . . . . . . . . . . . . . . . . . . . . . . . . . . . . . . . . . . . . . . . . . . . . . . . . . . . . 11
Managing Patterns. . . . . . . . . . . . . . . . . . . . . . . . . . . . . . . . . . . . . . . . . . . . . . . . . . . . . . . . . . . . . . . 12
Managing Auxiliary Controls . . . . . . . . . . . . . . . . . . . . . . . . . . . . . . . . . . . . . . . . . . . . . . . . . . . . . . . 12
Capturing a Still Image. . . . . . . . . . . . . . . . . . . . . . . . . . . . . . . . . . . . . . . . . . . . . . . . . . . . . . . . . . . . 12
Expanding the Video to Full Page. . . . . . . . . . . . . . . . . . . . . . . . . . . . . . . . . . . . . . . . . . . . . . . . . . . . 12
Opening the Video in an Independent Window . . . . . . . . . . . . . . . . . . . . . . . . . . . . . . . . . . . . . . . . . 13
Using the Camera’s PTZ Functions . . . . . . . . . . . . . . . . . . . . . . . . . . . . . . . . . . . . . . . . . . . . . . . . . . . 13
Drag Camera Button. . . . . . . . . . . . . . . . . . . . . . . . . . . . . . . . . . . . . . . . . . . . . . . . . . . . . . . . . 13
Click and Center Button . . . . . . . . . . . . . . . . . . . . . . . . . . . . . . . . . . . . . . . . . . . . . . . . . . . . . . 13
Drag and Zoom Button . . . . . . . . . . . . . . . . . . . . . . . . . . . . . . . . . . . . . . . . . . . . . . . . . . . . . . . 13
Display Controls Button . . . . . . . . . . . . . . . . . . . . . . . . . . . . . . . . . . . . . . . . . . . . . . . . . . . . . . 13
Accessing the Camera Menus . . . . . . . . . . . . . . . . . . . . . . . . . . . . . . . . . . . . . . . . . . . . . . . . . . . . . . 13
Using Mouse and Keyboard Shortcuts. . . . . . . . . . . . . . . . . . . . . . . . . . . . . . . . . . . . . . . . . . . . . . . . 14
Receiving Audio . . . . . . . . . . . . . . . . . . . . . . . . . . . . . . . . . . . . . . . . . . . . . . . . . . . . . . . . . . . . . . . . . 15
Transmitting Audio . . . . . . . . . . . . . . . . . . . . . . . . . . . . . . . . . . . . . . . . . . . . . . . . . . . . . . . . . . . . . . . 15
Configuring Camera Settings . . . . . . . . . . . . . . . . . . . . . . . . . . . . . . . . . . . . . . . . . . . . . . . . . . . . . . . 16
Settings Page . . . . . . . . . . . . . . . . . . . . . . . . . . . . . . . . . . . . . . . . . . . . . . . . . . . . . . . . . . . . . . . . . . . . . . . .
General Tab. . . . . . . . . . . . . . . . . . . . . . . . . . . . . . . . . . . . . . . . . . . . . . . . . . . . . . . . . . . . . . . . . . . . .
Changing the Device Name . . . . . . . . . . . . . . . . . . . . . . . . . . . . . . . . . . . . . . . . . . . . . . . . . . .
Changing the Language . . . . . . . . . . . . . . . . . . . . . . . . . . . . . . . . . . . . . . . . . . . . . . . . . . . . . .
Audio Settings . . . . . . . . . . . . . . . . . . . . . . . . . . . . . . . . . . . . . . . . . . . . . . . . . . . . . . . . . . . . .
Reset to Factory Defaults. . . . . . . . . . . . . . . . . . . . . . . . . . . . . . . . . . . . . . . . . . . . . . . . . . . . .
Network Tab . . . . . . . . . . . . . . . . . . . . . . . . . . . . . . . . . . . . . . . . . . . . . . . . . . . . . . . . . . . . . . . . . . . .
Changing the Host Name . . . . . . . . . . . . . . . . . . . . . . . . . . . . . . . . . . . . . . . . . . . . . . . . . . . . .
Network Settings . . . . . . . . . . . . . . . . . . . . . . . . . . . . . . . . . . . . . . . . . . . . . . . . . . . . . . . . . . .
Users Tab . . . . . . . . . . . . . . . . . . . . . . . . . . . . . . . . . . . . . . . . . . . . . . . . . . . . . . . . . . . . . . . . . . . . . .
Adding a New User Profile. . . . . . . . . . . . . . . . . . . . . . . . . . . . . . . . . . . . . . . . . . . . . . . . . . . .
Modifying a User Profile . . . . . . . . . . . . . . . . . . . . . . . . . . . . . . . . . . . . . . . . . . . . . . . . . . . . .
Deleting a User Profile . . . . . . . . . . . . . . . . . . . . . . . . . . . . . . . . . . . . . . . . . . . . . . . . . . . . . . .
C3444M-A (7/09)
17
17
17
17
18
18
19
19
19
20
21
21
21
3
Roles Tab . . . . . . . . . . . . . . . . . . . . . . . . . . . . . . . . . . . . . . . . . . . . . . . . . . . . . . . . . . . . . . . . . . . . . .
Creating a New Role . . . . . . . . . . . . . . . . . . . . . . . . . . . . . . . . . . . . . . . . . . . . . . . . . . . . . . . .
Modifying a Role . . . . . . . . . . . . . . . . . . . . . . . . . . . . . . . . . . . . . . . . . . . . . . . . . . . . . . . . . . .
Deleting a Role. . . . . . . . . . . . . . . . . . . . . . . . . . . . . . . . . . . . . . . . . . . . . . . . . . . . . . . . . . . . .
22
22
22
23
Edit Profile Page . . . . . . . . . . . . . . . . . . . . . . . . . . . . . . . . . . . . . . . . . . . . . . . . . . . . . . . . . . . . . . . . . . . . . . 24
Help Page . . . . . . . . . . . . . . . . . . . . . . . . . . . . . . . . . . . . . . . . . . . . . . . . . . . . . . . . . . . . . . . . . . . . . . . . . . . 25
Log Off . . . . . . . . . . . . . . . . . . . . . . . . . . . . . . . . . . . . . . . . . . . . . . . . . . . . . . . . . . . . . . . . . . . . . . . . . . . . . 25
Troubleshooting . . . . . . . . . . . . . . . . . . . . . . . . . . . . . . . . . . . . . . . . . . . . . . . . . . . . . . . . . . . . . . . . . . . . . . 25
List of Illustrations
1
2
3
4
5
6
7
4
Spectra IV IP Login Dialog Box. . . . . . . . . . . . . . . . . . . . . . . . . . . . . . . . . . . . . . . . . . . . . . . . . . . . . . . 7
Home Page . . . . . . . . . . . . . . . . . . . . . . . . . . . . . . . . . . . . . . . . . . . . . . . . . . . . . . . . . . . . . . . . . . . . . . 8
General Tab. . . . . . . . . . . . . . . . . . . . . . . . . . . . . . . . . . . . . . . . . . . . . . . . . . . . . . . . . . . . . . . . . . . . . 17
Network Tab . . . . . . . . . . . . . . . . . . . . . . . . . . . . . . . . . . . . . . . . . . . . . . . . . . . . . . . . . . . . . . . . . . . . 19
Users Tab . . . . . . . . . . . . . . . . . . . . . . . . . . . . . . . . . . . . . . . . . . . . . . . . . . . . . . . . . . . . . . . . . . . . . . 20
Roles Tab . . . . . . . . . . . . . . . . . . . . . . . . . . . . . . . . . . . . . . . . . . . . . . . . . . . . . . . . . . . . . . . . . . . . . . 22
Edit Profile Page . . . . . . . . . . . . . . . . . . . . . . . . . . . . . . . . . . . . . . . . . . . . . . . . . . . . . . . . . . . . . . . . . 24
C3444M-A (7/09)
Important Notices
LEGAL NOTICE
SOME PELCO EQUIPMENT CONTAINS, AND THE SOFTWARE ENABLES, AUDIO/VISUAL AND RECORDING
CAPABILITIES, THE IMPROPER USE OF WHICH MAY SUBJECT YOU TO CIVIL AND CRIMINAL PENALTIES.
APPLICABLE LAWS REGARDING THE USE OF SUCH CAPABILITIES VARY BETWEEN JURISDICTIONS AND
MAY REQUIRE, AMONG OTHER THINGS, EXPRESS WRITTEN CONSENT FROM RECORDED SUBJECTS.
YOU ARE SOLELY RESPONSIBLE FOR INSURING STRICT COMPLIANCE WITH SUCH LAWS AND FOR
STRICT ADHERENCE TO ANY/ALL RIGHTS OF PRIVACY AND PERSONALTY. USE OF THIS EQUIPMENT
AND/OR SOFTWARE FOR ILLEGAL SURVEILLANCE OR MONITORING SHALL BE DEEMED UNAUTHORIZED
USE IN VIOLATION OF THE END USER SOFTWARE AGREEMENT AND RESULT IN THE IMMEDIATE
TERMINATION OF YOUR LICENSE RIGHTS THEREUNDER.
VIDEO QUALITY CAUTION
Frame Rate Notice Regarding User-Selected Options
Pelco systems are capable of providing high quality video for both live viewing and playback. However, the
systems can be used in lower quality modes, which can degrade picture quality, to allow for a slower rate
of data transfer and to reduce the amount of video data stored. The picture quality can be degraded by
either lowering the resolution, reducing the picture rate, or both. A picture degraded by having a reduced
resolution may result in an image that is less clear or even indiscernible. A picture degraded by reducing
the picture rate has fewer frames per second, which can result in images that appear to jump or move
more quickly than normal during playback. Lower frame rates may result in a key event not being recorded
by the system.
Judgment as to the suitability of the products for users’ purposes is solely the users’ responsibility. Users
shall determine the suitability of the products for their own intended application, picture rate and picture
quality. In the event users intend to use the video for evidentiary purposes in a judicial proceeding or
otherwise, users should consult with their attorney regarding any particular requirements for such use.
OPEN SOURCE SOFTWARE NOTICE
This product includes certain open source or other software originated from third parties that is subject to
the GNU General Public License (GPL), GNU Library/Lesser General Public License (LGPL) and different
and/or additional copyright licenses, disclaimers and notices.
The exact terms of GPL, LGPL and some other licenses are provided to you with this product. Please refer
to the exact terms of the GPL and LGPL at www.fsf.org (Free Software Foundation) and
www.opensource.org (Open Source Initiative) regarding your rights under said license. You may obtain a
complete corresponding machine-readable copy of the source code of such software under the GPL or
LGPL by sending your request to [email protected] and the subject line should read Source Code
Request. You will then receive a link in the e-mail for you to download the source code.
This offer is valid for a period of three (3) years from the date of the distribution of this product by Pelco.
C3444M-A (7/09)
5
Welcome
This manual explains how to interface with the Spectra® IV IP dome system using a standard Web browser.
The IP dome system can also be used with an Endura® system as an Endura Enabled™ device or a thirdparty system with Pelco’s API interface. If you are using one of these systems refer to the following:
NOTES:
•
Only use a cable modem router or a switch with a DHCP server when installing the Spectra IV IP
dome system on a network. Refer to the installation manual shipped with the dome system for
installation instructions.
•
Do not use a hub in the network setup of the dome system.
•
To secure access to the Spectra IV IP dome system, place the dome behind a firewall when it is
connected to a network.
•
For optimum image quality and bandwidth efficiency, use the dome system as an Endura Enabled
device or with an approved Pelco API interface.
•
If the dome system is part of an Endura system, the graphical user interface will automatically
discover the device and display it as a camera within the system manager. Refer to the
documentation for the Endura System Manager.
•
For a list of compatible API interfaces go to xdn.pelco.com and register as a new user by following
the on-screen instructions.
•
Network and processor bandwidth limitations may cause the video stream to pause or appear pixilated
when an increased number of Web-interface users connect to the camera. Decrease the images per
second (IPS) of the Web-interface video streams to compensate for network/processor limitations.
For detailed instructions on configuring the dome system using WS5000 Advanced System Software, refer
to Cameras in the Configuring Devices section of the Endura WS5000 Advanced System Software manual.
GETTING STARTED
You will need to install your Spectra IV IP dome system before using this manual (refer to the installation
manual supplied with the dome system). Once installed, apply power to the system. The system will
complete a configuration sequence.
6
C3444M-A (7/09)
Using a Web Browser
The following are the minimum system requirements to use a Web browser with the Spectra IV IP dome
system:
Processor: Intel® Pentium® 4 microprocessor, 1.6 GHz
Operating system: Microsoft® Windows® 98, Windows 2000, Windows XP (or later), or
Mac® OS X 10.3.9 (or later)
Memory: 512 MB
Network interface card: 100 megabits (or greater)
Monitor: Minimum of 1024 x 768 resolution, 16- or 32-bit pixel color resolution
Web browser: Internet Explorer® 5.5 (or later) or Mozilla® Firefox® 1.5 (or later)
ACCESSING THE DOME SYSTEM
1. Open the Web browser.
2. Enter the IP address of the dome system in the browser’s address bar. A login dialog box opens.
If you do not know the IP address of the dome system, refer to the Pelco Device Utility Operation/
Configuration manual.
3. Type admin (all lowercase) in the User ID and Password boxes (admin is the default value for these
boxes).
4. Open the Language drop-down box by clicking the down arrow.
5. Select a language from the drop-down box. The text in the window is displayed in the selected
language.
Figure 1. Spectra IV IP Login Dialog Box
6. Click Log In.
NOTE: For security purposes, be sure to change the password after you log on for the first time. Refer
to Edit Profile Page on page 24.
7. When you log on to view video for the first time using Internet Explorer, you will need to install the
ActiveX® control. Follow the instructions displayed in the browser window to install the ActiveX
control.
C3444M-A (7/09)
7
Home Page
Use the Home page to manage the way you view live video, control audio transmission, access dome
system menus, and call up presets, patterns, and auxiliary controls.
Figure 2. Home Page
LIVE VIDEO PAGE ICONS
Image Rate: Select the speed at which images are transmitted.
Video Format: Select the format in which the video is displayed.
Alarm Panel: Lights indicate the status of the alarms set for the Spectra IV unit. A red light
indicates that the alarm is active, a green light indicates that the alarm is inactive.
Presets, Patterns, and Auxiliary Controls Panel: Program and call up presets and
patterns, and turn on and off auxiliary controls.
8
C3444M-A (7/09)
Video Settings Toolbar: Access the buttons to adjust and control video settings.
Full Page Button: Scale the video to the full page and hide all other controls.
Scalable Window Button: Open the video in a scalable, independent window.
Drag Camera Button: Control the pan and tilt functions by clicking in the video pane
and dragging the mouse.
Click and Center Button: Center the camera by clicking the mouse in the video
pane.
Drag and Zoom Button: Zoom in on a particular area by clicking and dragging the
mouse.
Capture Button: Capture the image displayed in the video pane.
On-Screen Display Button: Display the dome systems menu in the video pane.
Camera Configuration Menu Button: Display the camera configuration menu.
Display Controls Button: Display the control panel.
Listen Button: Adjust the volume and listen to audio sent to your PC from a
microphone attached to the dome.
Talk Button: Transmit audio from your PC microphone to speakers connected to the
dome. This button can be used in two modes: push-to-talk and hands-free (refer to
Transmitting Audio on page 15).
Control Panel: Access the pan, tilt, zoom, focus, and brightness controls.
Camera Configuration Menu: Adjust brightness, saturation, hue, and contrast.
Live Video Pane: Live video is displayed in the pane on the left side of the page.
C3444M-A (7/09)
9
CHANGING THE VIDEO FORMAT
This feature allows you to switch between MJPEG and MPEG-4 video formats. If you are using Firefox, this
feature is not available and you will not see the Video Format drop-down box. You must use Internet
Explorer in order to use the MPEG-4 video format.
To change the video format:
1. Open the Video Format drop-down box by clicking the down arrow.
2. Select a video format from the drop-down box.
3. The video in the live video pane is updated. The Image Rate drop-down box or the Quality drop-down
box is displayed to the left depending on the selected video format.
CHANGING THE IMAGE RATE/QUALITY
Depending on the video format selected, the drop-down box to the left changes from Image Rate to
Quality. If MJPEG is selected, the Image Rate drop-down box is displayed. If MPEG-4 is selected (available
only if using Internet Explorer), the Quality drop-down box is displayed.
MJPEG IMAGE RATE
The available MJPEG image rate settings are 15 ips, 10 ips, 5 ips, 2 ips, 1 ips, or Auto. The default MJPEG
image rate is Auto. The Auto setting allows the system to maintain the highest image rate possible for the
number of users logged on to the device. When set to Auto, the image rate will decrease as the number of
users increases.
To change the image rate:
1. Open the Image Rate drop-down box by clicking the down arrow.
2. Select an image rate from the drop-down box.
3. The selected image rate is now listed in the Image Rate box.
NOTES:
•
An image rate of 15 ips may not be obtainable due to network bandwidth, network latency, or
processor limitations. To obtain a maximum rate of 30 ips, use the Spectra IV IP dome system as an
Endura Enabled device or with Pelco’s API interface. Refer to Picture Quality in the WS5000
Advanced System Software manual shipped with the Endura system.
•
If you are not using the Auto image rate setting, network and processor bandwidth limitations may
cause the video stream to pause or slow when an increased number of web-interface users connect
to the camera. Decrease the ips of the web-interface video streams to compensate for network/
processor limitations.
MPEG-4 IMAGE QUALITY
The following are the available MPEG-4 image quality settings:
HIGH-Multicast (default): 30 ips, 4CIF resolution video stream that can be sent to many users.
LOW-Multicast: 30 ips, CIF resolution video stream that can be sent to many users.
HIGH-Unicast: 30 ips, 4CIF resolution video stream that can be sent to up to five users.
LOW-Unicast: 30 ips, CIF resolution video stream that can be sent to up to five users.
10
C3444M-A (7/09)
To change the image quality:
1. Open the Quality drop-down box by clicking the down arrow.
2. Select an image quality from the drop-down box.
3. The video in the live video pane is updated and the selected image quality is now listed in the
Quality box.
NOTES:
•
Setting the image quality to LOW may improve latency. If you are experiencing issues with latency,
try using one of the LOW settings.
•
If your computer is on a different subnet than the camera to which you wish to connect, you must
use a unicast setting. Multicast video streams are not allowed to pass through subnets.
MANAGING PRESETS
The Spectra IV dome system, which includes 16X and 18X models, has 128 preset positions. The
programmable presets are numbered 1-32, 35-82, and 100-150.
The Spectra IV SE dome system, which includes 22X, 23X, and 35X models, has 255 preset positions. The
programmable presets are numbered 1-32, 35-82, and 100-255.
For more information, refer to Presets in the Spectra IV Installation/Operation manual.
To call up a programmed preset:
1. Click the Presets tab in the “presets, patterns, and auxiliary controls panel.”
2. Click the Preset box and type the preset number.
3. Click the Go button. The camera moves to the preset location and displays it in the live video pane.
To program a preset:
1. Click the Presets tab in the “presets, patterns, and auxiliary controls panel.”
2. Click the Preset box and type a number that you wish to assign to the preset you are creating.
NOTE: Be careful that you assign a number to the new preset that is not already assigned to another
programmed preset. If you assign the new preset with the number of an existing preset, the previously
programmed preset will be replaced by the new preset.
3. Move the camera to the desired location of the live video pane.
4. Click the Set button. The preset with the number you assigned is now programmed to the location
displayed in the live video pane.
To program the home preset:
1. Click the Presets tab in the “presets, patterns, and auxiliary controls panel.”
2. Move the camera to the desired location of the live video pane.
3. Click the home button to the left of the Set button. The home preset is now programmed to the
location displayed in the live video pane.
NOTE: The home preset is called up by pressing the home key on your computer’s keyboard while viewing
live video (refer to Using Mouse and Keyboard Shortcuts on page 14).
C3444M-A (7/09)
11
MANAGING PATTERNS
To call up a programmed pattern:
1. Click the Patterns tab in the “presets, patterns, and auxiliary controls panel.”
2. Open the Pattern drop-down box by clicking the down arrow.
3. Select a pattern number from the drop-down box.
4. Click Run. The pattern is displayed in the live video pane.
To program a pattern:
1. Click the Patterns tab in the “presets, patterns, and auxiliary controls panel.”
2. Open the Pattern drop-down box by clicking the down arrow.
3. Select a pattern number from the drop-down box that you wish to assign to the pattern you are
creating.
NOTE: Be careful that you assign a number to the new pattern that is not already assigned to another
programmed pattern. If you assign the new pattern with the number of an existing pattern, the
previously programmed pattern will be replaced by the new pattern.
4. Click Start.
5. In the live video pane, move the camera to the desired series of locations.
6. Click End.
MANAGING AUXILIARY CONTROLS
1. Click the Aux tab in the “presets, patterns, and auxiliary controls panel.”
2. Click either the On or Off button for Aux 1 or Aux 2 to perform the desired function.
For auxiliary configuration instructions, refer to Aux in the Spectra IV Installation/Operation manual.
CAPTURING A STILL IMAGE
1. Click the capture button.
2. The File Download dialog box opens, and the following massage appears: “Do you want to open or
save this file?”
3. Select one of the following options:
Open: Your computer’s photo editing program opens and displays the screen image. This function is
available only when using Internet Explorer version 7.0 or later. This function is not available if you are
using Internet Explorer version 5.5 or 6.0.
Save: The image is saved as a JPEG file on your computer.
Cancel: The the captured image is not saved or displayed and the dialog box closes.
EXPANDING THE VIDEO TO FULL PAGE
1. Click the “full page” button. The live video pane expands to the full size of the page, and all other
controls are hidden.
2. To capture a video image, click the capture button.
3. To return to the Home page, click the back button.
12
C3444M-A (7/09)
OPENING THE VIDEO IN AN INDEPENDENT WINDOW
1. Click the “scalable window” button. A new, independent window opens to display the live video.
This allows you to view the video while other applications are running.
2. To resize the window, drag the bottom-right corner of the window.
3. To capture a video image, click the capture button.
USING THE CAMERA’S PTZ FUNCTIONS
There are several ways to access the pan, tilt, and zoom (PTZ) functions for the camera. These options
include using the “drag camera” button, the “click and center” button, the “drag and zoom” button, and the
control panel, which are accessible from the Video Settings Toolbar (refer to Live Video Page Icons on
page 8).
In addition to the buttons on the Video Settings Toolbar, many PTZ functions are controllable using mouse
and keyboard shortcuts (refer to Using Mouse and Keyboard Shortcuts on page 14).
DRAG CAMERA BUTTON
1. Click the “drag camera” button.
2. In the live video pane, press and drag the pointer to pan and tilt the camera.
CLICK AND CENTER BUTTON
1. Click the “click and center” button.
2. In the live video pane, click anywhere on the image to center the camera to that location.
DRAG AND ZOOM BUTTON
1. Click the “drag and zoom” button.
2. In the live video pane, center the pointer on the object or location to which you would like to zoom.
3. Press and drag the pointer to create a box around the object or location. When you release the
mouse button, the camera automatically zooms to the box you created.
NOTE: The “drag and zoom” feature is also available while viewing video in a full page and an
independent window.
DISPLAY CONTROLS BUTTON
1. Click the “display controls” button.
2. The control panel appears to the right of the button. The control panel buttons allow you to pan, tilt,
zoom, focus, and adjust the iris for the camera.
ACCESSING THE CAMERA MENUS
For detailed information about the menu selections available for the Spectra IV IP dome system, refer to
the Spectra IV Installation/Operation manual.
To access the camera menus:
1. Click the “on-screen display” button. The main menu appears over the image in the live video pane.
2. To navigate through the menus, use the arrow keys on your keyboard. Press the Enter key on your
keyboard to make a desired menu selection.
C3444M-A (7/09)
13
USING MOUSE AND KEYBOARD SHORTCUTS
Whether you are viewing video from the live video pane, full-page view, or in an independent window,
many functions can be controlled using mouse and keyboard shortcuts (refer to Table A).
Table A. Mouse and Keyboard Shortcuts
14
Shortcut
Action
Mouse wheel
With the mouse pointer over the video pane, rotate the mouse wheel forward to
zoom in; rotate the mouse wheel backward to zoom out.
Plus sign (+)
Press this key to zoom in.
Minus sign (-)
Press this key to zoom out.
w
Press this key to zoom out completely.
m
Press this key to open the on-screen menus.
Enter
Press this key to make a menu selection while navigating through the on-screen
menus.
Esc
Press this key to Exit while navigating through the on-screen menus.
Up arrow
Press this key to:
• Tilt the camera up.
• Move up through the on-screen menus.
Down arrow
Press this key to:
• Tilt the camera down.
• Move down through the on-screen menus.
Left arrow
Press this key to pan the camera to the left.
Right arrow
Press this key to pan the camera to the right.
Number keys
Press keys 1 through 9 to call up the corresponding presets; press the 0 (zero) key
to call up preset 10.
NOTE: Presets 11 and higher cannot be called up using number key shortcuts
(refer to Managing Presets on page 11).
Home
Press this key to call up the home preset (refer to Managing Presets on page 11).
C3444M-A (7/09)
RECEIVING AUDIO
The Listen button allows you to adjust the volume of the audio coming to your PC’s speakers from a
microphone connected to the dome. This button is hidden by default; it is only displayed if the audio
settings on the General tab are properly configured (refer to Audio Settings on page 18) and the user has
“Listen to Audio” permission (refer to Roles Tab on page 22).
To receive audio from the dome:
1. Click the Listen button. The background behind the button changes from gray to blue indicating that
audio is being received. A volume slider also appears next to the button.
2. Move the slider to the right to increase the volume of the audio being received from the dome; move
the slider to the left to decrease the volume.
3. Click the Listen button to stop receiving audio. The background behind the button returns to gray.
To adjust your PC’s volume and balance settings using Windows XP:
1. Click Start > Programs > Accessories > Entertainment > Volume Control. The Volume Control window
opens.
2. Adjust the appropriate settings as necessary.
TRANSMITTING AUDIO
The Talk button allows you to transmit audio from your PC to speakers connected to the dome. This button
is hidden by default; it is only displayed if the audio settings on the General tab are properly configured
(refer to Audio Settings on page 18) and the user has “Listen to Audio” permission (refer to Roles Tab on
page 22).
To transmit audio from your PC, use either the push-to-talk mode or the hands-free mode:
Push-to-Talk Mode
1. Click and hold the Talk button. The background behind the button changes from gray to blue
indicating that audio is transmitting.
2. Speak into your PC’s microphone. The audio from your PC broadcasts to the speakers connected to
the dome.
3. Release the Talk button. The background behind the button returns to gray indicating that audio
transmission to the dome stops.
Hands-Free Mode
1. Click and quickly release the Talk button. The background behind the button changes from gray to
blue indicating that audio is transmitting.
2. Speak into you PC’s microphone. The audio from your PC broadcasts to the speakers connected to
the dome.
3. Click and quickly release the Talk button to stop audio transmission. The background behind the
button returns to gray.
C3444M-A (7/09)
15
To adjust your PC’s microphone sensitivity using Windows XP:
1. Click Start > Programs > Accessories > Entertainment > Volume Control. The Volume Control window
opens.
2. From the Options menu, click Properties. Under “Adjust volume for,” select Recording. Under “Show
the following volume controls:” select Microphone. Click OK. The Recording Control window opens.
3. From the Options menu, click Advanced Controls. The Advanced button appears in the Microphone
area.
4. Click the Advanced button. The “Advanced Controls for Microphone” window opens. Under Other
Controls, select Microphone Boost. Click the Close button.
CONFIGURING CAMERA SETTINGS
The Camera Configuration Menu allows you to adjust the camera’s brightness, saturation, hue, and
contrast. Each of these functions can be set to Auto or Manual.
To change the camera settings:
1. Click the Camera Configuration Menu button. The Camera Configuration Menu appears below the
live video pane.
2. Open the Mode drop-down box for each setting by clicking the down arrow.
3. Select either Manual or Auto.
•
•
If you select Manual, move the slider left or right to change the setting. The number displayed
to the right of the slider displays the setting level.
If you select Auto, the slider disappears. The camera will adjust the settings automatically.
4. After changing the settings, click Save to save the changes, or click Cancel to restore the previously
saved settings.
16
C3444M-A (7/09)
Settings Page
Use the various tabs on the Settings page to change the name of the dome system on the network;
configure network settings; and add, change, or delete users and roles.
GENERAL TAB
Use the General tab to view the device’s current firmware version, change the device name, and change
the language setting.
Figure 3. General Tab
CHANGING THE DEVICE NAME
The default device name is Pelco Device. To change the device name:
1. Click the Device Name box and highlight the text.
2. Type a user-friendly name into the Device Name box (2 to 64 characters). A user-friendly name
makes it easier to recognize the device on the network. Examples of user-friendly names are Front
Door, Lobby, or Parking Lot.
3. Click Save to save the new device name. Click Reset to revert to the previously saved device name.
CHANGING THE LANGUAGE
You can change the language in which the entire Spectra IV IP interface is displayed. This setting can,
however, be overridden using the Language drop-down box that is located in the Login dialog box.
The default language is English. To change the language:
1. Open the Language drop-down box by clicking the down arrow.
2. Select a language from the drop-down box. The text in the window is displayed in the selected
language.
3. Click Save to save the selected language setting. Click Reset to revert to the previously saved
language.
C3444M-A (7/09)
17
AUDIO SETTINGS
There are several options for transmitting and receiving audio between your PC and speakers and a
microphone connected to the dome. The default setting for Audio is Off, which means that no audio is
transmitted or received between your PC and the dome. When Audio is off, the Talk and Volume Control
buttons are not displayed on the Home page.
To enable audio transmission and receipt:
1. Go to Audio and select On.
2. Select one of the following combinations using the Mode check boxes:
Bidirectional Full-Duplex Audio: Select Listen and Talk to enable audio transmission and receipt
between your PC and the dome. This is achieved by installing both a microphone and a speaker at both
your PC and the dome location.
Listen: Select Listen to enable audio transmission from the dome to your PC without the ability to
transmit audio in the opposite direction (from your PC to the dome). This allows you to listen to any
activity occurring at the dome location. This is achieved with a speaker at your PC and a microphone
at the dome location.
NOTES:
•
•
Improper use of audio/visual recording equipment may subject you to civil and criminal
penalties. Applicable laws regarding the use of such capabilities vary between jurisdictions
and may require, among other things, express written consent from the recorded subjects. You
are solely responsible for insuring strict compliance with such laws and for strict adherence to
any/all rights of privacy and personalty.
In Listen mode, the Talk button is not displayed on the Home page.
Talk: Select Talk to enable audio transmission from your PC to the dome without the ability to
transmit audio in the opposite direction (from the dome to your PC). This is achieved with a
microphone at your PC and a speaker at the dome location.
NOTE: In Talk mode, the Volume Control button is not displayed on the Home page.
3. Click Save to save the settings. Click Reset to revert to the previously saved settings.
RESET TO FACTORY DEFAULTS
1. To reset groups of settings to the factory defaults, select one or more of the following check boxes:
Reset Endura System Manager Settings: Resets the internal camera settings that relate to an
Endura system manager. This option should be used when moving the dome from one network with
an Endura system manager to another network with an Endura system manager. This function requires
an automatic dome system reboot.
Reset Network Settings: Resets all settings on the Network tab to the factory defaults, including
IP address settings and DHCP settings. This function requires an automatic dome system reboot.
Reset Encoder Settings: Resets the internal video compression settings that relate to a video
encoder. This function requires an automatic dome system reboot.
Reset Users and Roles: Deletes all user accounts except admin and guest, and deletes all assigned
roles except Manager, Operator, and Viewer.
2. Click Save to save the settings. Click Reset to revert to the previously saved settings.
18
C3444M-A (7/09)
NETWORK TAB
Use the Network tab to view the hardware address, change the host name, turn on/off the Dynamic Host
Configuration Protocol (DHCP), or set a static IP address.
Figure 4. Network Tab
CHANGING THE HOST NAME
1. Click the Host Name box and highlight the text.
2. Type a user-friendly name into the Host Name box (1 to 21 characters) using any combination of
alphanumeric characters. A user-friendly name makes it easier to recognize the device on the
network.
3. Click Save to save the new host name. Click Reset to revert to the previously saved host name.
NETWORK SETTINGS
The network automatically assigns an IP address to the dome system. The following scenarios are how a
DHCP or static network assigns IP settings:
DHCP Network: If the dome system is connected to a DHCP network, the server will automatically
assign an IP address to the device. DHCP On is the default setting for the dome system.
Static IP Network: The IP address 192.168.0.20, on netmask 255.255.255.0, is automatically assigned to
the dome system.
NOTES:
•
Contact your network administrator to avoid any network conflicts before setting/changing the IP
address of the device.
•
If you do not know the IP address of the dome system, install the Pelco Device Utility software
available on the CD shipped with the product. The utility will locate the assigned name, IP address,
and media access control (MAC) address for the device.
•
The Device Utility software is also available at www.pelco.com/software/downloads/.
C3444M-A (7/09)
19
Setting the IP Address Manually
1. Go to DHCP and select Off to turn off the DHCP.
2. Change the following network settings as required:
IP Address: Address of the device connected to the network.
Subnet Mask: Determines the network segment the IP protocol uses.
Gateway: Associated with both a router and a switch. The router determines where packets are
sent, and the switch provides the path for the packet in and out of the gateway.
DNS Server: The address of the dedicated server that translates the names for Web sites and
hostnames into numeric IP addresses.
3. Click Save to save the new settings. Click Reset to revert to the previously saved settings.
USERS TAB
Use the Users tab to create, modify, or delete user accounts. The Users tab includes default accounts for
the following roles:
Administrator: This is the only defined user that cannot be deleted; however, the administrator
password can be changed. For security purposes, it is important that you change your password after you
log on to the device for the first time. This user has access to all permissions.
Manager: This defined user can be modified or deleted. This user has access to all permissions except
the “Modify Users and Roles” permission.
Operator: This defined user can be modified or deleted. This user only has access to the View Live Video
and Allow PTZ Control permissions.
Viewer: This defined user can be modified or deleted. This user only has the View Live Video permission.
Figure 5. Users Tab
20
C3444M-A (7/09)
ADDING A NEW USER PROFILE
1. Click in the Username box and type a user name (2 to 23 alphanumeric characters).
All user names are case insensitive and will be saved in all lowercase characters.
2. Click in the Password box and type a password (4 to 16 alphanumeric characters).
3. Click in the Retype Password box and retype your password.
4. If you choose, you may enter the first and last name of the user.
a.
Click in the First Name box and type the user’s first name (1 to 32 alphanumeric characters).
b.
Click in the Last Name box and type the user’s last name (1 to 32 alphanumeric characters).
5. Select the appropriate check boxes to choose the roles you wish to assign to this user.
6. Click the Create User button to save the settings and create a new user.
7. The “Create a New User” page becomes the Editing User page. The new user profile appears in the
Defined User Profiles section on the left side of the page.
MODIFYING A USER PROFILE
1. Click the user profile that you would like to modify from the Defined User Profiles section.
The “Create a New User” page becomes the Editing User page.
2. Double-click in each of the text boxes to highlight the text. Type the new information in each text
box.
3. Select or clear the appropriate check boxes from the Roles list.
4. Click the Update User button to save the changes and modify the user profile.
DELETING A USER PROFILE
1. Click on the user profile that you want to delete from the Defined User Profiles section.
The “Create a New User” page becomes the Editing User page.
2. Click the Delete User button. A dialog box appears with the message “Are you sure you want to
delete the user ‘x’?”
3. Click OK. The user profile is deleted from the Defined User Profiles section.
C3444M-A (7/09)
21
ROLES TAB
Use the Roles tab to create, change, and delete roles and permissions. Multiple permissions can be
assigned to each role. The following are the available permissions that can be assigned to a role:
Edit Profile: Gives the user permission to edit his/her user profile. This does not give the user permission
to edit any other profile.
Listen to Audio: Gives the user permission to transmit and receive audio to and from the dome
depending on the audio settings on the General tab (refer to Audio Settings on page 18).
Modify General Settings: Gives the user access to the General tab on the Settings page. The user has
permission to change the device name.
Modify Network Settings: Gives the user access to the Network tab on the Settings page. The user has
permission to change network settings.
Modify Users And Roles: Gives the user access to the Users tab and the Roles tab on the Settings
page. The user has permission to add, modify, or delete users and roles.
View Live Video: Gives the user permission to view the streaming video on the Home page.
Allow PTZ Control: Gives the user permission to control the PTZ functions of the dome system.
Figure 6. Roles Tab
CREATING A NEW ROLE
1. Click in the Role box and type a name for the role you are creating (2 to 23 alphanumeric characters).
2. Select the appropriate check boxes to choose the permissions you wish to assign to this role.
3. Click the Create button to save the settings and create a new user.
4. The “Create a New Role” page becomes the Editing Role page. The new role now appears in both
the Defined Roles section on the left side of the page and in the Roles list on the Users tab.
MODIFYING A ROLE
1. Click the role that you would like to modify from the Defined Roles section.
The “Create a New Role” page becomes the Editing Role page.
2. Select or clear the appropriate check boxes from the Permissions list.
3. Click the Update button to save the changes and modify the role.
22
C3444M-A (7/09)
DELETING A ROLE
1. Click on the role that you want to delete from the Defined Roles section.
The “Create a New Role” page becomes the Editing Role page.
2. Click the Delete button. A dialog box appears with the message “Are you sure you want to delete
the role ‘x’? This will effect the following users:”
3. Click OK. The user profile is deleted from the Defined Roles section.
NOTE: If a user has only one role assigned and that role is deleted, the user will no longer have any
permissions. An administrator will have to assign a new role to that user before they will have any
permissions.
C3444M-A (7/09)
23
Edit Profile Page
The Edit Profile page allows a user with appropriate permissions to access and modify the settings for
their profile. The following settings can be changed from this page:
•
First name
•
Last name
•
Password
Figure 7. Edit Profile Page
To change any of the settings on the Edit Profile page:
1. Click in the box that you would like to modify (First Name, Last Name, or Password).
2. Type the new information in each box.
3. When you are finished making changes to your profile, click the Update Profile button to save the
changes.
24
C3444M-A (7/09)
Help Page
Online Help documents the basic instructions for configuring the dome system. Click the Help hyperlink in
the navigation bar to access these instructions.
Log Off
To log off, click the Log Off button in the navigation bar. A login dialog box appears.
Troubleshooting
If the following instructions fail to solve your problem, contact Pelco Product Support at 1-800-289-9100
(USA and Canada) or +1-559-292-1981 (international) for assistance. Be sure to have the serial number
available when calling.
Do not try to repair the unit yourself. Leave maintenance and repairs to qualified technical personnel.
Table B. Troubleshooting the Spectra IV IP Dome System (1 of 2)
Problem
Possible Cause
Suggested Remedy
No video
Power issue (24 VAC)
Verify the 24 VAC power supply connection.
Network connectivity issues
Verify network cable connections.
Replace the network cable with a new cable.
Defective dome system
Use a service connector to verify dome operation.
Connect one end of the service connector to the
BNC of the back box. Then connect the other end of
the service connector to a monitor.
Replace the dome drive.
Image flickering
Flickerless setting
Verify power supply specifications.
Replace the camera module with a new camera.
Image quality
Image not focused
Adjust the field of view and the focus.
15 ips quality bad
In some networks with high latency, the maximum
frame rate may not be attainable.
30 ips not available
The IP camera only supports MJPEG up to 15 ips for
NTSC camera modules, where applicable. For PAL
camera modules, the maximum rate is 12 ips.
UTP wires are incorrectly
installed.
Verify that the UTP cable is wired correctly to the
UTP connector on the back box circuit board. The
blue wire should be connected to the positive
terminal, and the gray wire should be connected to
the negative terminal. Refer to the installation
manual shipped with the TXB-IP.
No dual
streams
Web browser
Not available with Web browser. Only supported by
the Endura system or Pelco’s API Interface solution.
Cannot record a
MJPEG stream
Web browser
Not available with Web browser. Only supported by
the Endura system or Pelco’s API Interface solution.
C3444M-A (7/09)
25
Table B. Troubleshooting the Spectra IV IP Dome System (2 of 2)
MPEG4 not
available
Web browser
Not available with Web browser. Only supported by
the Endura system or Pelco’s API Interface solution.
Camera not
discovered
Network conflict
Verify the camera is physically connected to the
same network as the PC running the Device Utility.
Verify the IP address, subnet mask, and gateway
are correct.
Network not
working
Faulty cable connection
Verify all cable connections and ensure all plugs
are properly plugged in.
Incorrect serial device
configuration
A hub will not work with the available network
bandwidth shared across all ports. Use a Fast
Ethernet switch, Gigabit Ethernet switch, or a cable
modem router with an n-Port switch.
Network connectivity issues
Contact your network administrator.
You are not using the
correct type of transformer.
Be sure you are using a 600-ohm impedance
matching transformer
The wiring distance
connecting the audio
equipment may be too long.
Test the equipment using a shorter wiring distance.
The gain is not properly
adjusted.
If you are using an external amplifier and it has an
adjustable gain, increase the gain until the signal is
acceptable.
The speaker volume is too
high.
Lower the speaker volume.
The microphone and the
speaker are too close
together.
If your call station does not have built-in echo
cancellation, move the microphone and speaker
farther apart.
Your call station does not
have built-in echo
cancellation.
Use a call station with built-in echo cancellation.
The audio
signal is weak.
There is an
echo when
audio is
received.
REVISION HISTORY
Manual #
C3444M
C3444M-A
26
Date
5/08
7/09
Comments
Original version.
Added bidirectional full-duplex audio information.
C3444M-A (7/09)
PRODUCT WARRANTY AND RETURN INFORMATION
WARRANTY
Pelco will repair or replace, without charge, any merchandise proved defective in material or workmanship for a period of one year after the date of
shipment.
Exceptions to this warranty are as noted below:
• Five years:
– Fiber optic products
– TW3000 Series unshielded twisted pair (UTP) transmission products
– CC3701H-2, CC3701H-2X, CC3751H-2, CC3651H-2X, MC3651H-2, and MC3651H-2X camera models
• Three years:
– Pelco-branded fixed camera models (CCC1390H Series, C10DN Series, C10CH Series, IP3701H Series, and IX Series)
– EH1500 Series enclosures
– Spectra® IV products (including Spectra IV IP)
– Camclosure® Series (IS, ICS, IP) integrated camera systems
– DX Series digital video recorders, DVR5100 Series digital video recorders, Digital Sentry® Series hardware products, DVX Series digital video
recorders, and NVR300 Series network video recorders
– Endura® Series distributed network-based video products
– Genex® Series products (multiplexers, server, and keyboard)
– PMCL200/300/400 Series LCD monitors
• Two years:
– Standard varifocal, fixed focal, and motorized zoom lenses.
– DF5/DF8 Series fixed dome products
– Legacy® Series integrated positioning systems
– Spectra III™, Spectra Mini, Spectra Mini IP, Esprit®, ExSite®, and PS20 scanners, including when used in continuous motion applications.
– Esprit Ti and TI2500 Series thermal imaging products
– Esprit and WW5700 Series window wiper (excluding wiper blades).
– CM6700/CM6800/CM9700 Series matrix
– Digital Light Processing (DLP®) displays (except lamp and color wheel). The lamp and color wheel will be covered for a period of 90 days.
The air filter is not covered under warranty.
– Intelli-M® eIDC controllers
• One year:
– Video cassette recorders (VCRs), except video heads. Video heads will be covered for a period of six months.
• Six months:
– All pan and tilts, scanners, or preset lenses used in continuous motion applications (preset scan, tour, and auto scan modes).
Pelco will warrant all replacement parts and repairs for 90 days from the date of Pelco shipment. All goods requiring warranty repair shall be sent
freight prepaid to a Pelco designated location. Repairs made necessary by reason of misuse, alteration, normal wear, or accident are not covered under
this warranty.
Pelco assumes no risk and shall be subject to no liability for damages or loss resulting from the specific use or application made of the Products.
Pelco’s liability for any claim, whether based on breach of contract, negligence, infringement of any rights of any party or product liability, relating to
the Products shall not exceed the price paid by the Dealer to Pelco for such Products. In no event will Pelco be liable for any special, incidental, or
consequential damages (including loss of use, loss of profit, and claims of third parties) however caused, whether by the negligence of Pelco or
otherwise.
The above warranty provides the Dealer with specific legal rights. The Dealer may also have additional rights, which are subject to variation from state
to state.
If a warranty repair is required, the Dealer must contact Pelco at (800) 289-9100 or (559) 292-1981 to obtain a Repair Authorization number (RA), and
provide the following information:
1. Model and serial number
2. Date of shipment, P.O. number, sales order number, or Pelco invoice number
3. Details of the defect or problem
If there is a dispute regarding the warranty of a product that does not fall under the warranty conditions stated above, please include a written
explanation with the product when returned.
Method of return shipment shall be the same or equal to the method by which the item was received by Pelco.
RETURNS
To expedite parts returned for repair or credit, please call Pelco at (800) 289-9100 or (559) 292-1981 to obtain an authorization number (CA number if
returned for credit, and RA number if returned for repair) and designated return location.
All merchandise returned for credit may be subject to a 20 percent restocking and refurbishing charge.
Goods returned for repair or credit should be clearly identified with the assigned CA or RA number and freight should be prepaid
12-23-08
Pelco, the Pelco logo, Camclosure, Digital Sentry, Endura, Esprit, ExSite, Genex, Intelli-M, Legacy, and Spectra are registered trademarks of Pelco, Inc.
Spectra III is a trademark of Pelco, Inc.
DLP is a registered trademark of Texas Instruments Incorporated.
All product names and services identified throughout this document are trademarks or registered trademarks of their respective companies.
The absence of a trademark or registered trademark from this document does not constitute a waiver of intellectual property rights.
© Copyright 2009, Pelco, Inc. All rights reserved.
www.pelco.com
Pelco, Inc. Worldwide Headquarters 3500 Pelco Way Clovis, California 93612 USA
USA & Canada Tel (800) 289-9100 Fax (800) 289-9150
International Tel +1 (559) 292-1981 Fax +1 (559) 348-1120