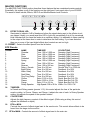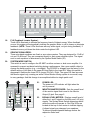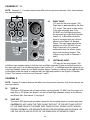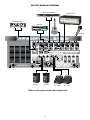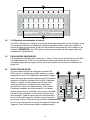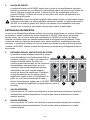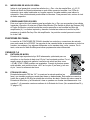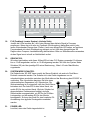
1
XR 800F
™
9 C h a n n e l P ow e r e d C o n s o l e
Operating Guide
Intended to alert the user to the presence of uninsulated “dangerous voltage” within the product’s
enclosure that may be of sufficient magnitude to constitute a risk of electric shock to persons.
Intended to alert the user of the presence of important operating and maintenance (servicing)
instructions in the literature accompanying the product.
CAUTION: Risk of electrical shock — DO NOT OPEN!
CAUTION: To reduce the risk of electric shock, do not remove cover. No user serviceable parts inside. Refer
servicing to qualified service personnel.
WARNING: To prevent electrical shock or fire hazard, do not expose this appliance to rain or moisture. Before
using this appliance, read the operating guide for further warnings.
Este símbolo tiene el propósito, de alertar al usuario de la presencia de “(voltaje) peligroso” sin aislamiento dentro de la caja del producto y que puede tener una magnitud suficiente como para constituir
riesgo de descarga eléctrica.
Este símbolo tiene el propósito de alertar al usario de la presencia de instruccones importantes sobre la
operación y mantenimiento en la información que viene con el producto.
PRECAUCION: Riesgo de descarga eléctrica ¡NO ABRIR!
PRECAUCION: Para disminuír el riesgo de descarga eléctrica, no abra la cubierta. No hay piezas útiles dentro.
Deje todo mantenimiento en manos del personal técnico cualificado.
ADVERTENCIA: Para evitar descargas eléctricas o peligro de incendio, no deje expuesto a la lluvia o humedad
este aparato Antes de usar este aparato, Iea más advertencias en la guía de operación.
Ce symbole est utilisé dans ce manuel pour indiquer à l’utilisateur la présence d’une tension dangereuse
pouvant être d’amplitude suffisante pour constituer un risque de choc électrique.
Ce symbole est utilisé dans ce manuel pour indiquer à l’utilisateur qu’il ou qu’elle trouvera d’importantes
instructions concernant l’utilisation et l’entretien de l’appareil dans le paragraphe signalé.
ATTENTION: Risques de choc électrique — NE PAS OUVRIR!
ATTENTION: Afin de réduire le risque de choc électrique, ne pas enlever le couvercle. Il ne se trouve à l’intérieur
aucune pièce pouvant être reparée par l’utilisateur. Confiez I’entretien et la réparation de l’appareil à un réparateur
Peavey agréé.
AVERTISSEMENT: Afin de prévenir les risques de décharge électrique ou de feu, n’exposez pas cet appareil à la
pluie ou à l’humidité. Avant d’utiliser cet appareil, lisez attentivement les avertissements supplémentaires de ce
manuel.
Dieses Symbol soll den Anwender vor unisolierten gefährlichen Spannungen innerhalb des Gehäuses
warnen, die von Ausreichender Stärke sind, um einen elektrischen Schlag verursachen zu können.
Dieses Symbol soll den Benutzer auf wichtige Instruktionen in der Bedienungsanleitung aufmerksam
machen, die Handhabung und Wartung des Produkts betreffen.
VORSICHT: Risiko — Elektrischer Schlag! Nicht öffnen!
VORSICHT: Um das Risiko eines elektrischen Schlages zu vermeiden, nicht die Abdeckung enfernen. Es befinden
sich keine Teile darin, die vom Anwender repariert werden könnten. Reparaturen nur von qualifiziertem
Fachpersonal durchführen lassen.
ACHTUNG: Um einen elektrischen Schlag oder Feuergefahr zu vermeiden, sollte dieses Gerät nicht dem Regen
oder Feuchtigkeit ausgesetzt werden. Vor Inbetriebnahme unbedingt die Bedienungsanleitung lesen.
2
ENGLISH
XR™ 800F Powered Sound Reinforcement Mixing Console
Congratulations on your purchase of the XR™ 800F powered mixer. Peavey has packed features
from the popular XR 684 into a professional 9-channel, tabletop package. The newest member of
the famous Peavey XR family, the XR 800F, represents years of powered mixer experience
combined with the latest in technology and packaging. Here are several features you will find on
the XR 800F.
• Eight low-noise, low-Z mic preamps (Channels 1-8)
• Six 1/4" line inputs (Channels 1-6)
• Three Stereo line inputs (Channels 7-9)
• 60 mm channel and master faders
• Channel clipping LEDs
• Channel stereo pan controls
• Three-band equalization (Channels 1-8)
• Monitor send (each channel)
• EFX send (each channel)
• 32-bit precision, DSP-based stereo effects processor with 16 presets and two parameter controls
• Two 9-band graphic EQs with FLS® Feedback Locating System®
• Selectable 48 V phantom power
• Dual seven segment master level meters
• Stereo/Main-monitor mode switch
• 2x210 W @ 4 ohms internal power amplifier
• 420 W @ 8 ohms in bridge mode
• DDT™ speaker protection
The standard channels (1-6) feature discrete low noise mic preamps with globally switched
phantom power, line level 1/4" inputs, and three-band EQs. Finally, there are three stereo channels
(7-9) for tape, CD, or synth inputs. Channels 7 and 8 reflect Channels 1 through 6 with added stereo
1/4" input jacks. Channel 9, however, has a two-band EQ, no input gain control, and only stereo
tape input and output jacks.
The master section features a unique graphic equalizer/power amp mode switch. Without patching,
the XR 800F can be used as a full stereo mixer amplifier (default). In the Main/Monitor mode, one
graphic and amplifier can be used for monitor and the other graphic and amplifier for the main L and
R (mono) signal.
Also included in the master section are 16 stereo digital effects from the award winning Deltafex™
digital signal processor. By including separate time/size and color/tone controls, the user can
create many effect settings from the 16 we provided. All channels, including Channel 9, have a
dedicated digital effects send routed directly to the DSP effects processor.
To take advantage of the XR 800F’s powerful features, please read this owner’s manual carefully
and keep it as a reference. This manual includes several sections detailing individual areas of mixer
operation, including: control functions, setup, and applications in sound reinforcement. Before the
channel and master functions are explained, we will begin with connecting AC power and speakers
to the XR 800F.
3
AC POWER SECTION
The AC POWER SECTION explains the proper connections/method to supply AC power to your XR
800F. Please pay close attention to the precaution(s) noted below in order to ensure both personal
and equipment safety.
1.
1
2
3
A/C POWER INLET:
This receptacle is for the IEC line cord
(included), which provides AC power to the
unit. Connect the line cord to this connector
and to a properly grounded AC supply.
Damage to the equipment may occur if an
improper line voltage is used. (See voltage
marking on unit.) Never remove or cut the ground pin of the line cord plug. This unit is
supplied with a properly rated line cord. When lost or damaged, replace this cord with one of
the proper ratings.
2.
POWER:
This is the mixer’s main power switch. The Power LED indicator (21) will illuminate when the
unit is powered.
3.
FUSE:
This is the main safety fuse for the AC line voltage. Only replace the fuse with one of the
exact same type and rating. IF THE FUSE CONTINUES TO OPEN, DO NOT REPLACE
WITH A LARGER FUSE. TAKE THE UNIT TO AN AUTHORIZED PEAVEY SERVICE
CENTER!
WARNING: THE FUSE SHOULD ONLY BE REPLACED WHEN THE POWER CORD HAS
BEEN DISCONNECTED FROM ITS POWER SOURCE.
POWER AMPLIFIER SECTION
The POWER AMPLIFIER SECTION will explain the proper method of connecting your XR 800F
to your speakers. This is a very versatile area of the XR 800F. However, it is important that
you follow the precautions to insure safe operating impedances and avoid improper connections.
4. PARALLEL LEFT/RIGHT SPEAKER OUTPUTS:
4
4
5
These 1/4" jacks are the outputs for the two
internal amplifiers. You will notice that there
are two pairs of jacks with another jack in
the middle. The two pairs are the two (L/R)
amp outputs. Two cabinets can be connected to
each amplifier, as long as the combined impedance of the cabinets is not less than 4 ohms. (i.e.,
two 8 ohms cabinets in parallel = 4 ohms, four 16 ohms speakers in parallel = 4 ohms, etc.) Do not
use the Bridge Output (5) while using these outputs. The outputs from these jacks are
determined by the System Mode Switch (20).
5. BRIDGE OUTPUT:
The bridge output of the XR 800F allows the power of the left and right amplifiers to be
combined into one mono output in applications where only one speaker will be used. To use
the bridge output, the system mode switch must be in the Left/Right position. Connect an 8
ohm minimum impedance speaker to the center bridge output jack.
4
CAUTION: When the bridge outputs are being used, no other speakers should be connected
to the adjacent parallel speaker outputs. In addition, the minimum load for the XR 800F in
bridge mode is 8 ohms. Do not allow the total impedance to drop below 8 ohms or serious damage
to the amplifier may occur.
MASTER IN/OUT
The MASTER IN/OUT section describes the functions related to the input and output patch panel
located on the rear of your XR 800F. This section is often overlooked but adds the most versatility to
the XR 800F. When used to its fullest potential, an extraordinary variety of wiring configurations can
be made. These connections allow for devices such as outboard effects, power amps, monitors, and
virtually any other type of line level audio device to be patched in to the XR 800F. Some of these
configurations are displayed in the hookup diagram found at the end of this manual.
6.
7.
POWER AMP INPUTS:
Plugging into these jacks allows the user to go
directly into the Graphic Equalizers (L and R),
then into its respective power amplifier channel.
The jacks for these inputs are switching jacks.
This means that if you plug into the jack you
will defeat any prior signal from the channel,
master and effects sections of the amp. A
benefit of this feature is that you can then use
the internal stereo EQ and power amp with or
without using the channel and effects sections.
Essentially, you can use the XR 800F as a
slave stereo EQ/power amp when needed.
6
7
9
11
8
10
LEFT OUTPUT:
This 1/4" jack provides an output from the Left Main mix to supply external amp/speaker
combinations. The level of this signal is determined by the Left Master Fader.
8.
RIGHT OUTPUT:
This 1/4" jack provides an output from the Right Main mix to supply external amp/speaker
combinations. The level of this signal is determined by the Right Master Fader.
9.
MONITOR OUTPUT:
This 1/4" jack provides an output from the monitor mix to supply external power amp/monitor
combinations. The level of this signal is determined by the Monitor Master Fader.
10.
EFX OUTPUT:
This 1/4" jack provides an output of the effects mix. (The same signal that goes to the internal
effects processor.) This signal can be used with external effects units or as an additional (post
fader) monitor output.
11.
EFX DEFEAT: This 1/4" (Tip/Sleeve) jack provides a means to defeat the internal effects of
the XR 800F. A standard on/off footswitch, such as the Peavey part number 5100, is
recommended.
5
MASTER FUNCTIONS
The MASTER FUNCTIONS section describes those features that are considered master controls.
Essentially, this makes up all of the functions on the right-hand, front panel side of your XR 800F.
The areas of detail include; Effects, EQ/FLS and Monitor/Master Level Controls.
12
13
14
15
16
17
12.
EFFECTS PEAK LED:
Illuminates to indicate -6 dB of headroom before the signals being sent to the effects circuit
are clipped. Ideally, you would want this LED to light only occasionally if at all. An occasional
blink indicates that you have the levels at an optimum setting. It is advisable to listen carefully
to the output at the same time in order to determine the final setting. If you hear distortion
then one or more of the input digital effects level controls are set too high.
13. PRESET: Selects the effect preset from the list below.
EFX Presets
PRESET
NAME
TIME/SIZE
COLOR/TONE
1
Chamber
Time: 150 to 5,000 ms
Damping (High Frequency)
2
Plate
Time: 100 to 4,000 ms
Damping (High Frequency)
3
Room
Time: 150 to 5,000 ms
Damping (High Frequency)
4
Cathedral
Time: 100 to 8,000 ms
Damping (High Frequency)
5
Spring
Time: 150 to 5,000 ms
Damping (High Frequency)
6
Gate
Time: 150 to 500 ms
Damping (High Frequency)
7
Reverse
Time: 150 to 500 ms
Damping (High Frequency)
8
Delay + Reverb
Time: 0 to 225 ms
Reverb Time: 0 to 5,000 ms
9
Bright Delay
Time: 0 to 500 ms
Feedback: 0 to 99%
10
Warm Delay
Time: 0 to 500 ms
Feedback: 0 to 99%
11
Dark Delay
Time: 0 to 500 ms
Feedback: 0 to 99%
12
Ping Pong Delay Time: 0 to 500 ms
Feedback: 0 to 99%
13
Chorus
Rate: 0.125 to 8 Hz
Depth: Best Set Full CW
14
Phaser
Rate: 0.250 to 16 Hz
Depth: Best Set Full CW
15
Flange
Rate: 0.10 to 2.5 Hz
Depth: Best Set Full CW
16
Rotary Speaker
High Speed: 0.50 to 25 Hz Width: 0 to 100% CW
14.
TIME/SIZE:
In Reverb and Delay presets (presets 1-12), this control adjusts the time of the particular
reverb or delay; in Chorus, Phaser, and Flange, it adjusts the rate of each. In Rotary Speaker
setting, this adjusts the speed of the speaker rotation.
15.
COLOR/TONE:
Adjusts the high frequency content of the effects signal. (While using a delay, this control
adjusts the feedback or depth.)
16.
EFX to MON:
Controls the amount of effects signal sent to the monitor mix. This control allows effects to be
heard from the stage via the monitor.
17. EFX to MAIN: Controls the amount of effects signal sent to the main mix.
6
18
19
18.
FLS (Feedback Locator System):
These LEDs illuminate to indicate the frequency band of highest energy. When feedback
occurs, this system will automatically indicate the graphics slider to use to lessen or eliminate
feedback. (NOTE: These LEDs illuminate with any audio signal, not just during feedback.) If
feedback occurs, pull down the slider under the brightest LED.
19.
GRAPHIC EQUALIZERS:
These nine-band equalizers are fixed on one-octave centers. They are designed for 12 dB of
cut and 12 dB boost. They are connected directly to their power amplifier inputs. The signal
sent to each equalizer is determined by the System Mode Switch (20).
20.
SYSTEM MODE SWITCH:
This switch is used to configure the XR 800F as either a stereo or dual mono amplifier. It is
recessed to prevent accidental switching during a performance. Use a non-metallic object to
change the switch position (e.g., a toothpick). The XR 800F is shipped from the factory in the
default setting of Left Main to the upper EQ and Right to the lower EQ. When this switch is
depressed it switches the lower EQ to (mono) PA Left + Right. The upper EQ then becomes
the Monitor signal only, creating an entire PA and Monitor mixing system in one small, easyto-carry package. And this change is accomplished without a single patch cord!
23
21
22
20
24
21.
POWER LED:
The power on LED indicator will light when the
unit is powered.
22.
MONITOR MASTER FADER: Sets the overall level
of the monitor signal that is sent to the Monitor
Output (9) jack. See page 5.
23.
SIGNAL LEVEL METERS: Displays overall level of
either the L and R signals or the Mon and L+R (mix)
signals. The System Mode Switch determines which
mode the meter will operate in. Red Clip LEDs are
located at the top of each meter to indicate clipping.
A clipped signal may damaged your speakers.
To prevent possible speaker damage reduce the
respective fader level.
7
24.
MASTER L/R FADERS:
This is the master level control for the L and R signals sent to the Left and Right Output
jacks. When in Main/Monitor mode [see System Mode Switch (20)] the Monitor Fader controls
the monitor signal present at the Left/Mon Power Amp Output (4). The Left and Right Faders
would then control the L/R Mix present at the Right/L+R Power Amp Output (4). The nominal
position for this control is the 0 dB position.
CHANNEL FUNCTIONS
The CHANNEL FUNCTIONS section describes the controls and input connections for each channel
of the XR 800F. Most features are found on all channels, however, there are some differences in
channel’s 7, 8 and 9. Therefore, this section is divided to properly indicate those differences.
CHANNELS 1-6
25.
25
26
MIC INPUT:
XLR balanced, low impedance channel input optimized for a microphone
or other low-level source. Pin 2 is the positive input. Because of the wide
range of gain adjustment, signal levels as high as +10 dBV (2.45 V RMS)
can be accommodated. When the phantom power is enabled, this
connector has +48 V on Pins 2 (in phase) and 3 with Pin 1 as the ground
reference.
26.
LINE INPUT:
1/4" balanced TRS line level input. The tip is the positive (in phase) input,
which can also be used for unbalanced inputs. This signal is connected
through a 20 dB pad to the mic input below it. Within the same channel, the Mic Input and the
Line Input cannot be used simultaneously. Channels 7 and 8 feature stereo versions of the
Line Input. (See features 36 and 37 page 10.)
8
27.
GAIN:
Varies the input gain to each channel. Proper adjustment of the
input gain will maximize the signal to noise ratio giving you the
quietest operation. With your Channel Fader (35) set to the “0”
position, set this control so that the Clip LED (34) barely lights at
the highest peaks in your input signal.
28.
HIGH EQ:
A shelving type of active tone control that varies the treble
frequency levels ±15 dB at 12 kHz. It is designed to remove
noise or to add brilliance to the signal, depending on the quality
of the source. (The high control can also be found on Channels 7
through 9.)
29.
MID EQ:
Mid ±15 dB. This control sets the amount of cut or boost at the
mid-frequency (850 Hz). The mid control can also be found on
Channels 7 and 8.
30.
LOW EQ:
A shelving type of active tone control that varies the bass frequency
levels ±15 dB at 70 Hz. It will add depth to thin signals, or clean up
muddy ones. (The low control can also be found on Channels 7
through 9.)
31.
MON:
Adjusts the level of the channel signal (pre-EQ) that is added to the
Monitor mix. (The Monitor control can also be found on Channels 7
through 9.) This control is independent of the Channel Fader
control (35).
32.
DIGITAL EFFECTS:
This control varies the level into the digital effects processor bus by
adjusting the signal level from the particular channel to the digital
processor. The channel Gain (27) control also affects this level. The
digital effects send is after the channel fader and is therefore
affected by the channel fader setting.
33.
PAN:
Sets the channel’s position in the L/R stereo field. In the stereo
Channels (7, 8 and 9) this control acts as a balance control
between the two separate inputs.
34.
CLIP LED:
Indicates when the signal input is too strong and signal clipping is
present. A clipped signal may damage your speakers.
35.
CHANNEL FADER:
Sets the signal level sent to the Left and Right bus. (This feature
can also be found on Channels 7 through 9.)
27
28
29
30
31
32
33
34
35
9
CHANNELS 7 - 8
NOTE: Channels 7 - 8 contain features that differ from the previous channels. Only those features
are mentioned below.
38
36.
39
37
40
36
RIGHT INPUT:
1/4" input for line level signals. The
Right Input is not adjusted by the Gain
(27) control. The signal is then routed
to the internal power amp. If the
XR 800F is in Left/Right mode then
the signal will go to the Right Speaker
Output (4). In Mon/Main mode the
signal is combined with the Left and
placed on the Right/L+R Speaker
Output. The right signal can also be
patched out of the XR 800F via the
Right Output jack (8) to external
components such as effects, power
amps, and recording devices. This
feature is only found on Channels 7
and 8.
37.
LEFT/MONO INPUT:
1/4" input for line level signals. The
Left/Mono input supplies signal to both the Left and Right channels (if there is nothing inserted to
the right input jack). It is not adjusted by the Gain Control (27). In Left/Right mode the signal will go
to the Left Speaker Output (4) and Right Speaker Output if nothing is inserted to the right input jack.
In Mon/Main mode the signal is combined with the Right and placed on the Right/L+R Speaker
Output. This feature is only found on Channels 7 and 8.
CHANNEL 9
NOTE: Channel 9 contains features that differ from the previous channels. Only those features are
mentioned below.
38.
TAPE IN:
This stereo RCA phono jack accepts a stereo input (nominally -10 dBV) from the output of a
tape deck or CD player and places it on the Left and Right channels as well as the Monitor
and Effects Mix. See feature 31 on page 9.
39.
TAPE OUT:
This stereo RCA phono jack provides a signal for the recording inputs of a stereo tape deck.
CAUTION! DO NOT HOOK THE TAPE IN AND TAPE OUT TO THE INPUT AND OUTPUT
OF THE SAME DECK AT THE SAME TIME. DOING SO WILL FORM A LOOP CAUSING
SEVERE FEEDBACK. USE SEPARATE DECKS FOR RECORDING AND PLAYBACK, OR
USE THE INPUTS AND OUTPUTS OF THE SAME DECK AT SEPARATE TIMES.
10
PHANTOM POWER
40.
PHANTOM POWER SWITCH:
Applies 48 V DC voltage to all input XLR connectors to power microphones that require it.
CAUTION! When phantom power is switched on, make sure that any channel you are
plugging a mic into is turned down in both the main and monitor mixes. Otherwise, there will
be a loud pop in the PA. This is normal. It is best to plug all mics into their respective
channels with the phantom power switched off. This reduces noise in the PA and reduces the
chances of the mic being damaged. If phantom power is used, do not connect unbalanced
microphones or other devices that cannot handle this voltage to the XLR inputs. (Some
wireless receivers may be damaged; consult their manuals for compatibility.) The line input
1/4" jacks are not connected to the phantom supply, and are safe for all inputs (balanced or
unbalanced). An unbalanced-to-balanced impedance converter, such as the Peavey 5116 or a
Peavey 1:1 Interface Adapter, can also be used to isolate a mic from phantom voltage.
11
12
MIC GAIN
MIC PREAMP
TAPE/CD
INPUT
LO HI
LO HI
MONTOR
CHANNELS 9 (TAPE)
LO-Z INPUT
RIGHT
+48 PHANTOM
L/MONO
STEREO LINE INPUT
EFX LEVEL
EFX LEVEL
PAN/BALANCE
PAN
BALANCE
BALANCE
MONTOR
PAN/BALANCE
LEVEL
LEVEL
LO MID HI
LO MID HI
Tone Control
Monitor
LEVEL
LO MID HI
Tone Control
Tone Control
Pre Gain
CHANNELS 7-8
20 dB Pad
LINE INPUT
LO-Z INPUT
+48V PHANTOM
CHANNELS 1-6
MONTOR
MASTER
PEAK
LED
TIME
EFFECTS
SELECTOR
COLOR
DIGTAL EFFECTS
MODE SELECT
EFFECTS TO
MONITOR
MONTOR OUTPUT
RIGHT MAIN OUTPUT
RIGHT POWER AMP INPUT
LEFT POWER AMP INPUT
LEFT MAIN OUTPUT
TAPE OUT
EFFECTS TO MAIN
EFFECTS DEFEAT
EFFECTS OUT
XR 800F BLOCK DIAGRAM
MON BUS
EFF BUS
LEFT BUS
RIGHT BUS
2K 4K
2K 4K
9 BAND EQUALIZER WITH FLS
63 125 250 500 1K
RIGHT MON
9 BAND EQUALIZER WITH FLS
63 125 250 500 1K
LEFT/ L-R
8K 16K
8K 16K
RIGHT/L+R
POWER AMP OUT
BRIDGE OUT
LEFT/ MON
POWER AMP OUT
210 WATTS PER CHANNEL • 4 OHMS
150 WATTS PER CHANNEL • 8 OHMS
BRIDGE 420 WATTS • 8 OHMS
POWER AMP
POWER AMP
13
LO-Z MIC
STEREO
LINE
TAPE
INPUTS
LINE
-60
-50
-40
-30
-20
-20
0dBu
+10
+20
+30
-48 dBu
-29 dBu
+5 dBu
+11 dBu
+21 dBu
+16 dBu
2 dBu-0 dBV
-15 dB
+15 dB
10 dB GAIN
L/R FADER
-12 dB
+12 dB
LEFT & RIGHT OUT
MONITOR OUT +21 dBu MAX
GRAPHIC
+21 dBV MAX
EQ
-10 dBV MON
TAPE OUT
-10 dBV MAX
CHANNEL
FADER
0 dB GAIN
CHANNEL EQ
MONITOR OUT
+21 dBu MAX.
XR 800F LEVEL DIAGRAM
TO POWER AMPS
+2 dBu NOMINAL
XR 800F HOOK-UP DIAGRAM
MIDI Sound Module
Firebass 700
L
Out
R
Recording Deck
Line Out
CD Player
L
In
R
L
Out
R
PVM™ 22
SP™2G
SP™2G
SP™112M
SP™112M
*Shown with system mode switch depressed
14
XR 800F
Specifications:
Input Specifications:
Function
Input Z
(ohms)
Min
Low-Z Mic
(150 ohms)
2.2 k
Line Input
Channels 1-6
22 k
Stereo Line
Inputs Chs. 7-8
22 k
Tape
20 k
Input Gains
Min**
Max (48 dB)
Min (10 dB)
Input Levels
Nominal*
Max
-68 dBu
-48 dBu
-27 dBu
-30 dBu
-10 dBu
+11 dBu
Max
(29 dB)
-49 dBu
-29 dBu
-8 dBu
Min
(-10 dB)
-11 dBu
+10 dBu
+31 dBu
Max Gain
(20) dB)
-20 dBu
0 dBu
-26 dBu
-6 dBu
Max. Gain
(26 dB)
+21 dBu
Bal/
Connector
UnBal.
Bal.
XLR: Pin 1 Gnd,
Pin 2 (+),
Pin 3 (-)
Unbal. 1/4" TRS: Tip (+),
Ring (-),
Sleeve Ground
Unbal. 1/4" Phono Tip (+),
Sleeve Ground
+16 dBu Unbal. RCA Jacks
0 dBVu=0.775 V (RMS)
** Min input level (sensitivity) is the smallest signal that will produce nominal output (2 dBu) with channel and master
level controls set for maximum gain.
* Nominal settings are defined as all controls set a 0 dB (or 50% rotation for rotary pots).
XR 800F Output Specifications:
Function
Minimum Load Z
(ohms)
Output Level
Nominal
Max
Bal./Unbal.
Connector
Main L/R
600
+2 dBu
+21 dbu
Unbal.
1/4" Phono Tip (+),
Sleeve Ground
Monitor
600
+2 dBu
+21 dBu
Unbal.
1/4" Phono Tip (+),
Sleeve Ground
Effects
600
+2 dBu
+21 dBu
Unbal.
1/4" Phono Tip (+),
Sleeve Ground
Tape
10 k
-10 dBu
+10 dBu
Unbal.
RCA
+2 dBu = 0 dBV = 1V (RMS)
Gain:
Mic Input Adjustment Range:
Mic Input to L and R Output
Mic Input longest path
10 dB to 48 dB
68 dB (Max Gain)
96 dB (Max Gain) power amp out
Mic Input Adjustment Range:
Line Input to L and R Output
Mic Input longest path
-10 dB to 28 dB
49 dB (Max Gain)
77 dB (Max Gain) power amp out
15
Frequency Response:
Mic Input to L - R Output
Line Input to L - R Output
To Power Amplifier Output
20 Hz — 20 kHz +0 dB/-1 dB
20 Hz — 20 kHz +0 dB/-1 dB
20 Hz — 20 kHz +0 dB/-1 dB
Total Harmonic Distortion (THD):
< 0.01% 20 Hz — 20 kHz mic input to L/R mon. output at nominal level (20 Hz — 80 kHz BW)
< 0.01% 20 Hz — 20 kHz line input to L/R output at output at nominal level (20 Hz — 80 kHz BW)
< .005% Typical at 1 kHz
Graphic Equalizer:
Filter Bandwidth
Filter Frequencies
Maximum Boost and Cut
1 octave
63, 125, 250, 500, 1 k, 2 k, 4 k, 8 k, 16 k
+12 dB Boost, -12 dB Cut
XR 800F Hum and Noise:
Output
Residual Noise
Ref: 0 dBu
S/N Ratio
Ref: 2 dBu
Test Conditions
Main Left
and Right
-100 dBu
100 dB
All faders down
-90 dBu
90 dB
Master fader nominal, channel
faders down
-84 dBu
-84 dB
All controls nominal, mic gain
minimum
-100 dBu
100 dB
All controls down
-89 dBu
89 dB
Master fader nominal, channel
sends down
-81 dBu
-81 dB
Master Fader Nominal,
Channel Send Nominal
-87 dBu
87 dB
All channel sends down
-81 dBu
81 dB
All channel sends nominal
Monitor
Effects
(Hum and noise measurements: 22 Hz to 22 kHz BW)
S/N Ratio:
> 85 dB below rated output (200 W/channel), mic/line to speaker output
Equivalent Input Noise (EIN):
-128.5 dBu (Input terminated with 150 ohms)
Crosstalk:
> 80 dB Adjacent Input Channels (20 Hz — 20 kHz)
> 70 dB Left to right outputs (20 Hz — 20 kHz)
Common Mode Rejection Ratio (Mic Input):
50 dB min. (20 Hz - 20 kHz)
60 dB typical @ 1 kHz
16
POWER SECTION
(400 SC Module with DDT™)
Hum and Noise:
-100 dB below 210 watts
Power and Load:
210 W RMS per channel into 4 ohms
150 W RMS per channel into 8 ohms
420 W RMS Bridge into 8 ohms
Damping Factor:
Greater than 100 @ 1 kHz, 4 ohms
Input Impedance:
2 k ohms
Frequency Response:
20 Hz—20 kHz +0 dB/-1 dB
Power Requirements:
Dom.: 120 V AC 60 Hz
Exp.: 220-230 V AC 50/60 Hz
Total Harmonic Distortion:
<0.02% at rated output @ 1 kHz
360 W Nom.
360 W Nom.
Dimensions (H x W x D):
7.75" x 17.375" x 15.5"
(19.69 cm x 44.13 cm x 3.81 cm)
DDT™ Dynamic Range:
Greater than 26 dB
Weight:
33.6 lbs. (15.24 kg)
DDT™ Maximum Distortion:
Below 0.5% THD for 6 dB overload
Below 1% THD for 20 dB overload
17
FRANÇAIS
MIXEUR AMPLIFIE R™ 800F
Nous vous félicitons pour l’achat de cette table amplifiée XR™ 800F. Ce nouveau mixeur amplifié
constitue une version 9 canaux en un format table de la XR 684. Nous avons regroupé en un même
appareil un nombre impressionnant de fonctionnalités, chacune utilisant les technologies les plus
récentes. Voici certaines d’entre elles:
• Huit entrées micro Jack haute impédance (Canaux 1-8)
• Six entrées ligne Jack (Canaux 1-6)
• trois entrées ligne stéréos (Canaux 7-9)
• Fader canaux et master de 60mm
• LED d’écrêtage sur chaque canal
• Contrôles stéréo pan
• Equalisation 3 bandes (Canaux 1-8)
• Sortie Monitor send (chaque canal)
• Sortie EFX send (chaque canal)
• 16 effets numériques stéréo DSP 32 bit avec 2 paramètres par effet
• Deux EQs graphiques 9 bandes avec FLS® (Système de localisation du Feedback)
• Alimentation phantom 48 V
• Sélecteur de mode Main/Monitor
• 2 VU-mètres master 7 segments
• Amplificateurs de puissance internes 2x210 W @ 4 Ohm
• 420 W @ 8 Ohm en mode bridge
• Protection des haut-parleurs DDT™
Les canaux standards (1-6) possèdent des préamplis faible bruit, une alimentation phantom
générale, des entrées micro haute impédance Jack et des EQ trois bandes. Trois canaux stéréos
(7-9) permettent de connecter des platines cassettes, CD ou des synthétiseurs. Les canaux 7 à 8
sont similaires aux canaux 1 à 6 avec en plus des entrées Jacks stéréos. Le canal 9 possède un
équaliseur 2 bandes, pas de contrôle de gain, et des entrées et sorties stéréos “tape”.
La section master possède 2 EQ graphiques 9 bandes et un unique sélecteur de mode. Sans
réaliser aucun branchement, la XR 800F peut être utilisée comme mixeur et amplificateur pour le
bus Main (mode par défaut). Dans ce mode, les équaliseurs et les amplificateurs affectent le signal
Main aux sorties droite et gauche de la XR800F. En mode Main/Monitor, un équaliseur et un
amplificateur s’occupent du signal Droite+Gauche et l’équaliseur et l’amplificateur restant s’occupent
du signal Monitor (retours).
16 effets numériques issus de notre processeur d’effet Deltafex™ sont par ailleurs intégrés (réverbe
et delay). Grâce aux paramètres Size/Time et Color/Tone, l’utilisateur peut aisément adapter les
différents effets à ses besoins. Tous les canaux, canal 9 inclu, possèdent un réglage Effect Send
déterminant la quantité de signal envoyé au processeur d’effet DSP.
Pour tirer tous les avantages de votre XR 800F, lisez attentivement ce manuel et conserver-le en
guise de référence. Les contrôles, les différents type d’application et les branchements sont tous
expliqués en détails dans les différentes sections qui le composent.
18
ALIMENTATION
1.
2.
3.
CONNECTEUR D’ALIMENTATION:
Prise pour cordon d’alimentation IEC, fournissant l’électricité à la console de mixage/ampli.
Branchez le cordon d’alimentation pour mettre la console sous tension. L’équipement peut
être endommagé si une tension d’alimentation incorrecte est utilisée (voir les spécifications
de tension sur la console).
3
1
2
MARCHE/ARRÊT
Interrupteur d’alimentation principal de la table
de mixage. La LED d’alimentation (n°21)
s’allume lorsque la console est sous tension.
FUSIBLE:
Ce fusible est connecté à l’alimentation principale. Ne remplacez le fusible que par un
modèle du même type et de même valeur. SI LE FUSIBLE GRILLE CONSTAMMENT,
APPORTEZ L’APPAREIL À UN RÉPARATEUR PEAVEY AGRÉÉ.
ATTENTION: NE REMPLACEZ LE FUSIBLE QUE LORSQUE L’APPAREIL EST
DECONNECTE DE TOUTE ALIMENTATION.
SECTION AMPLIFICATEURS DE PUISSANCE
Cette section présente les différentes connections possibles de la XR 800F à vos enceintes
de sonorisation. Respectez les indications suivantes afin d’assurer le bon fonctionnement de
votre système.
4. SORTIES PARALLÈLES DROITE/GAUCHE:
Ces prises sont les sorties des amplificateurs de puissance. Reliez les enceintes à ces
sorties par un câble HP. Deux paires de sorties et une prise
4
4
5
jack Bridge sont fournies. Les deux paires
sont les sorties des deux amplificateurs
(stéréo). Deux enceintes peuvent être
connectées sur chaque canal, leur charge
combinée devant toujours être supérieure à
4 Ohm (par exemple, 2 enceintes de 8 Ohm connectées en parallèle = 4 Ohm, enceintes de
16 Ohm connectées en parallèle = 4 ohms, etc). N’utilisez pas la sortie Bridge (5)
simultanément! Les signaux à ces sorties sont déterminés par le sélecteur de mode (20)
5. SORTIE BRIDGE:
La sortie Bridge du XR 800F permet de combiner les amplificateurs droit et gauche pour une
sortie mono de plus forte puissance. Lors de l’utilisation de la sortie Bridge, l’amplificateur
doit être en mode Left/Right (sélecteur n°24). Connectez une charge d’impédance minimum
de 8 Ohm à cette sortie.
ATTENTION : Lors de l’utilisation de la sortie Bridge, les sorties parallèles adjacentes ne
doivent pas être utilisées. La charge totale acceptable du XR 800F en mode Bridge est de 8
Ohm. Si l’impédance de charge atteint une valeur inférieure, l’amplificateur est susceptible de
subir de sérieux dommages.
19
ENTREES/SORTIES MASTER
Cette section se rapporte aux entrées et sorties situées à l’arrière de la XR 800F. C’est là que
devront être connectés les divers amplis de puissance, retours amplifiés et modules d’effets
que vous utiliserez. Certaines de ces connexions sont expliquées dans le diagramme de
branchements de ce manuel.
6.
7.
ENTRÉES AMPLI DE PUISSANCE:
En se connectant à ces entrées, vous accédez directement aux EQ graphiques et à leur
amplificateur de puissance respectif. Tout signal situé en amont des équaliseurs sera
déconnecté. Vous pouvez ainsi utiliser la XR 800F comme amplificateur/équaliseurs stéréo
esclave.
7
9
11
6
SORTIE GAUCHE:
Sortie Jack fournissant le mix gauche pour un
amplificateur de puissance externe. Le niveau
du signal est déterminé par le fader Master Left.
8.
SORTIE DROITE:
Sortie Jack fournissant le mix droit pour un
amplificateur de puissance externe. Le niveau
du signal est déterminé par le fader Master
Right.
9.
SORTIE MONITOR:
8
10
Sortie Jack destinée à alimenter un ampli de puissance
externe assigné aux retours. Le niveau du signal est déterminé par le fader Monitor Master.
10.
SORTIE EFX:
Sortie Jack fournissant le mix Effet pour un processeur externe. C’est ce même signal qui est
envoyé aux DSP interne. Cette sortie peut aussi être utilisée pour un systéme de retour
(sortie post-fader).
11.
ACTIVATION EFX:
Cette entrée Jack est destinée à un footswitch de type On/Off (Accessoire Peavey
n°00051000) pour engager et désengager les effets.
FONCTIONS MASTER
Cette section s’attache à décrire les contrôles principalement situés sur la droite de la table de
mixage tels les effets, équaliseurs et contrôles Monitor/Master.
20
12
12.
13
14
15
16
17
LED D’ECRETAGE EFFETS:
S’allume à de 6 dB avant écrêtage dans le processeur d’effets numériques. Cette LED ne
doit s’illuminer qu’occasionellement. Si elle ne s’allume que de manière occasionelle, cela
confirme que vos niveaux sont réglés de manière optimum. Il est recommandé d’écouter
attentivement le signal en sortie afin de réaliser les réglages finaux et vérifiez que les niveaux
d’effets des canaux n’ont pas été réglés trop haut.
13. PRESET: Choisissez votre preset dans la liste suivante.
PRESET NOM
PARAMÈTRE 1
PARAMÈTRE 2
1.
Chambre
Durée : 150 à 5.000 ms
Amortissement : 200 Hz à zéro
2.
PlaTe
Durée : 100 à 4.000 ms
Amortissement : 200 Hz à zéro
3.
Salle
Durée : 150 à 5.000 ms
Amortissement : 200 Hz à zéro
4.
Cathédrale
Durée : 100 à 8.000 ms
Amortissement : 200 Hz à zéro
5.
Ressort
Durée : 150 à 5.000 ms
Amortissement : 200 Hz à zéro
6.
Gate
Durée : 150 à 500 ms
Amortissement : 200 Hz à zéro
7.
Inverse
Durée : 150 à 500 ms
Amortissement : 200 Hz à zéro
8.
Écho+ réverb
Durée : 0 à 225 ms
Durée de réverb. : 0 à 5.000 ms
9.
Écho brillant
Durée : 0 à 500 ms
Réinjection : 0 à 99 %
10.
Écho chaud
Durée : 0 à 500 ms
Réinjection : 0 à 99 %
11.
Écho profond
Durée : 0 à 500 ms
Réinjection : 0 à 99 %
12.
Écho ping-pong Durée : 0 à 500 ms
Réinjection : 0 à 99 %
13.
Chorus
Taux : 0,125 à 8 Hz
Profondeur : 0 à 100 %
14.
Phaser
Taux : 0,250 à 16 Hz
Profondeur : 0 à 100 %
15.
Flanger
Taux : 0,10 à 2,5 Hz
Profondeur : 0 à 100 %
16.
HP rotatif
Hi speed: 0,50 à 25 Hz
Amplitude : 0 à 100 %
14.
15.
16.
17.
DURÉE/TAUX:
En modes de réverbération et delay, ce contrôle permet de régler la durée de la réverbération
ou du delay. En mode Chorus, Phaser ou Flanger, il permet de régler le taux de chaque effet.
En mode haut-parleur rotatif, il permet de régler la vitesse de rotation du haut-parleur.
COULEUR/REINJECTION:
Détermine le taux de hautes fréquences de l’effet. Avec les effets de delay et modulation, ce
contrôle détermine le taux de réinjection ou la profondeur de l’effet
EFX to MON:
Détermine la quantité de signal affecté par les effets réinjecté dans le bus Monitor. Cela vous
permet d’entendre les effets dans votre système de retours.
EFX to MAIN:
Détermine la quantité de signal affecté par les effets réinjectée dans le bus principal.
21
18
19
18.
FLS (Système de localisation du larsen):
Ces LED s’allument pour indiquer la bande de fréquences présentant le plus d’énergie, ce qui
non seulement détermine la fréquence à laquelle apparaît le larsen, mais aussi indique le
curseur à utiliser pour diminuer le gain de cette bande de fréquence afin de le réduire ou de
l’éliminer. (REMARQUE: ces LED peuvent s’allumer en présence de tout signal audio, pas
seulement en cas de larsen).
19.
ÉQUALISEURS GRAPHIQUES:
Ces équaliseurs 9 bandes sont centrés sur 1 octave. Conçus pour une réduction de 12 dB et
une augmentation de 12 dB. Ils sont directement reliés aux entrées de leurs amplis de
puissance respectifs et le signal qui leur est envoyé dépend de la position du sélecteur de
mode (20).
20.
SELECTEUR DE MODE:
Ce commutateur permet de configurer la console XR
21
800F comme un amplificateur stéréo unique ou double
amplificateur mono. Sa configuration par défaut (réglage
usine) est: ampli de puissance gauche relié à l’équaliseur
supérieur et ampli de puissance droit relié à l’équaliseur
inférieur. Lorsque ce commutateur est enfoncé (il est
monté en retrait pour empêcher toute commutation
accidentelle en cours de représentation), il fait passer
l’équaliseur supérieur en mode monaural. Les canaux
droit et gauche de la sonorisation sont toujours contrôlés
par leur curseur respectif, ce qui permet d’obtenir deux
sous-mixages. Certains canaux peuvent être réservés à
la voix et envoyés à gauche et d’autres aux instruments
et envoyés à droite. Cela permet de contrôler indépendamment
les voix et les instruments et accroît la souplesse d’emploi de
l’appareil. Cela s’effectue sans câbles supplémentaires !
22
23
22
20
24
21.
LED D’ALIMENTATION:
Cette LED s’allume lorsque l’appareil est sous tension.
22.
FADER MONITOR MASTER:
Détermine le niveau du signal à la sortie Monitor (9).
23.
VU-METRES A LED:
Indique le niveau des signaux droit et gauche ou Monitor et droite+gauche selon la position
du sélecteur de mode du système. Les LEDs rouges au sommet des VU-mètres indiquent
l’écrêtage. Un signal écrêté peut endommager vos haut-parleurs.
24.
FADERS MASTER L/R :
Ces faders permettent de régler les niveaux des mix des sorties droite et gauche. En mode
Main/Monitor (voir le sélecteur de mode n°20), le fader Monitor contrôle le signal à la sortie
Left/Mon (4). Les faders gauche et droit contrôlent le signal à la sortie Right/L+R (4). Le
réglage optimal pour ce contrôle est la position 0 dB (gain unité).
FONCTIONNALITÉS DES CANAUX
Cette section décrit les entrées et les contrôles des canaux de la XR 800F. Les canaux 7, 8
et 9 possèdent des caractéristiques différentes de celles des autres canaux.
CANAUX 1-6
25.
26.
ENTREE MICRO:
Entrée XLR symétrique basse impédance optimisée pour un microphone
ou toute autre source de signal bas niveau. La broche 2 est l’entrée
positive. Étant donné la vaste plage de réglage de gain, des niveaux de
signal allant jusqu’à +10 dBV (2,45 V RMS) peuvent être utilisés. Lorsque
l’alimentation phantom est activée, les broches 2 et 3 de ce connecteur
reçoivent une tension de +48V (la broche 1 étant la masse).
25
26
LINE INPUT:
Entrée symétrique de Jack (TRS) haute impédance. L’extrémité est la
borne positive et peut être utilisée seule pour les connexions asymétriques.
Sur un même canal, cette entrée et l’entrée micro ne peuvent être utilisées simultanément.
Les canaux 7 et 8 possèdent des entrées ligne stéréos (voir n°36 et 37).
23
27.
GAIN:
Permet de modifier le gain d’entrée. Un réglage correct du gain
d’entrée optimise le rapport signal/bruit. Le fader du canal (35) étant
à 0dB, réglez ce contrôle pour que la LED Clip (34) ne s’allume que
furtivement lors des pics du signal.
28.
ÉGALISATION HAUTES FRÉQUENCES:
Réglage de tonalité actif permettant de modifier les niveaux de
hautes fréquences de +/-15 dB à 12 kHz. Cette égalisation est
conçue pour éliminer le bruit ou ajouter de la brillance au signal,
suivant la qualité de la source sonore.
29.
ÉGALISATION MOYENNES FRÉQUENCES:
Moyennes fréquences +/-15 dB à 850Hz. Ce réglage permet de
déterminer le taux d’augmentation ou de coupure de la bande de
moyennes fréquences sélectionnée.
30.
ÉGALISATION BASSES FRÉQUENCES:
Réglage de tonalité actif permettant de modifier les niveaux des
basses fréquences de +/-15 dB à 70 Hz. Elle permet également de
donner de la profondeur aux sons trop fins et d’éclaircir les sons
confus.
31.
MON:
Permet de régler les niveaux (avant égalisation) du signal du canal
ajouté au mix de retour (Monitor). Ce contrôle est indépendant du
fader du canal (35).
32.
EFFETS NUMÉRIQUES:
Ce réglage permet de varier le niveau d’entrée du bus du
processeur d’effets. Il ajuste le niveau du signal d’un canal donné
dans le processeur numérique. Le contrôle de gain du canal (27)
affecte ce niveau ainsi que le réglage du fader du canal.
33.
PAN:
Détermine l’emplacement du canal dans l’image stéréo. Il constitue
un contrôle de balance pour les canaux stéréos (7, 8 et 9).
34.
LED D’ECRETAGE:
Indique la présence d’un signal trop puissant et d’un écrêtage. Un
signal écrêté peut endommager vos haut-parleurs.
35.
FADER:
Réglage du niveau de sortie du canal. Détermine le niveau envoyé
au bus droite/gauche. Le réglage optimal de ce contrôle est la
position 0 dB (gain unitaire).
27
28
29
30
31
32
33
34
35
24
CANAUX 7 ET 8
NOTE: Les canaux 7 et 8 possèdent des
fonctionnalités supplémentaires qui seront
décrites ici.
36.
37.
38
ENTREE DROITE:
Entrée Jack pour signal de niveau Ligne
droit. Cette entrée n’est pas affectée par le
contrôle de gain (27). En mode Left/Right,
le signal est affecté par le contrôle de
pan/balance puis acheminé vers le bus
principal droit. En mode Mon/Main, le signal
est acheminé vers le bus L+R.
ENTRE GAUCHE:
Entrée Jack pour signal de niveau Ligne
gauche. Cette entrée n’est pas affectée par
le contrôle de gain (27). En mode
Left/Right, le signal est affecté par le
contrôle de pan/balance puis acheminé
vers le bus principal gauche. En mode
Mon/Main, le signal est acheminé vers
le bus L+R.
39
37
40
36
CANAL 9
NOTE: Le canal 9 possède des fonctionnalités supplémentaires qui seront décrites ici.
38.
TAPE IN:
Entrée stéréo de type RCA acceptant un signal de niveau nominal de -10 dBV. Connectez ici
une platine cassette ou CD.
39.
TAPE OUT:
Ce connecteur RCA stéréo fournit un signal adapté à l’entrée d’un magnétophone stéréo.
ATTENTION! NE CONNECTEZ PAS UN APPAREIL A L’ENTREE ET A LA SORTIE
SIMULTANEMENT. UNE BOUCLE SERAIT ALORS CREEE ENTRAINANT UN LARSEN
INDESIRABLE. CONNECTEZ TOUJOURS DES APPAREILS DISTINCTS OU NE
CONNECTER QUE L’ENTREE OU LA SORTIE DU MAGNETOPHONE.
ALIMENTATION PHANTOM
40.
COMMUTATEUR D’ALIMENTATION PHANTOM:
Applique une tension de 48 V à tous les connecteurs d’entrée XLR pour alimenter les micros
nécessitant une alimentation phantom.
ATTENTION! Lorsque l’alimentation phantom est activée, veillez à ce que tous les contrôles
de gain des canaux sur lesquels vous branchez un microphone soient à 0 et que tous les
niveaux de retours et auxiliaires soient au minimum. Dans le cas contraire, un important
claquement se fera entendre à travers le système. Ceci est normal. Par ailleurs, il est
préférable de brancher tous les micros sur leurs canaux respectifs avec l’alimentation
25
phantom désactivée afin de réduire les bruits et les risques de dommages aux micros. Si
l’alimentation phantom est utilisée, ne branchez pas de microphones dynamiques
asymétriques ou autres appareils ne pouvant pas supporter cette tension sur les connecteurs
d’entrée XLR (Certains récepteurs sans fils pourraient être endommagés, consultez leurs
manuels). Les jacks d’entrée ligne ne sont pas reliés à l’alimentation phantom et peuvent être
utilisés sans risque pour tous les appareils (symétriques ou asymétriques). Un transformateur
d’impédance symétrique/asymétrique, tel que le Peavey 5116 ou un adaptateur d’interface
Peavey 1:1 peut également être employé pour isoler les microphones d’une alimentation
phantom.
26
ESPAÑOL
IDADES EN TU COMPRA DE LA XR™ 800F.
Peavey ha incluido características de la popular XR™ 684 en una consola profesional de nueve
canales. El miembro más nuevo de la famosa familia XR de Peavey, la XR 800F representa años
de experiencia en consolas de mezcla con poder combinados con lo último en tecnología y
presentación. Aquí hay varias características que encontrarás en la XR 800F.
• Preamplificadores de micrófono de bajo ruido y baja Z (canales 1-8)
• Entradas de línea de 1/4" (canales 1-6)
• Entradas estéreo de línea (canales 7-9)
• Faders maestros y de canal
• Faders maestros y de canal de *mm
• LEDs de saturación
• Controles de paneo estéreo
• Ecualización de banda (canales 1-8)
• Envío en cada canal
• Precisión de *bits
• Procesador de efectos con base de DSP con 16 presets y dos controles de parámetros
• Ecualizadores gráficos de 9 bandas con FLS® (feedback locating system®)
• Phantom power de 48 v
• Medidores de nivel maestro de siete segmentos
• Switch de modo main-monitor
• Amplificador de poder interno de *X210 W@4 ohmios
• *Watts@8ohmios en modo de puente
• Protección de bocinas
Los canales estándar (1-6) presentan preamplificadores de micrófono de bajo ruido con phantom
power activado globalmente, entradas de nivel de línea de 1/4", y ecualizadores de tres bandas.
Finalmente hay tres canales en estéreo (7-9) para cinta, CD, o entradas de sintetizadores. Los
canales 7 y 8 reflejan los canales 1-6 con entradas en estéreo de1/4". El canal 9, sin embargo,
tiene un ecualizador de dos bandas sin control de ganacia y sólo entradas y salidas estéreo para
cinta.
La sección maestra presenta un switch de ecualizador/amplificador de poder único. Sin necesidad
de hacer conexiones, la XR 800F puede ser usada como una mezcladora en estéreo con
amplificación. En el modo Main/monitor, un ecualizador gráfico y un amplificador pueden ser usados
como para monitores y el otro ecualizador gráfico y amplificador pueden ser usados para la señal
mono principal izquierda y derecha.
La sección maestra también incluye 16 efectos digitales en estéreo del premiado procesador de
señal Deltafex*. Incluyendo controles separados para tiempo/tamaño y color/toco, el usuario puede
usar muchas combinaciones de efectos de los 16 que proveemos. Todos los canales, incluyendo el
9, tienen un envío exclusivo que va directo al procesador DSP.
Para sacarle provecho a las poderosas características de la XR 800F por favor lee este manual
cuidadosamente y guárdalo como referencia. Este manual incluye varias secciones que detallan
27
áreas individuales de operación de la mezcladora, incluyendo: funciones de control, instalación y
aplicaciones para sonido en vivo. Antes de explicar las funciones maestras y de cada canal
comenzaremos con la conexión de poder de corriente alteran y bocinas a la XR 800F.
SECCIÓN DE PODER DE CORRIENTE ALTERNA
La SECCIÓN DE PODER DE CORRIENTE ALTERNA explica las conexiones apropiadas/métodos
para suministrar poder de corriente alterna a tu XR 800F. Por favor ponle atención a las
precauciones que siguen para asegurar tanto tu seguiridad como la de la unidad.
1.
ENTRADA DE CORRIENTE ALTERNA
3
1
2
Esta conexión es para el cable de línea IEC
(incluido) que suministra de corriente alterna a
la unidad. Conécta el cable de línea a un
suministro de corriente alterna propiamente
aterrizado. Puede ocurrir daño al equipo si un
voltaje inapropiado es usado (ver marca de
voltaje en la unidad). Nunca quites o cortes el pin de tierra del conector del cable de línea.
Esta unidad incluye un cable propiamente calificado. Si se pierde o se daña. Reemplázalo
con uno de la marcación correcta.
2.
PODER
Este es el switch de poder principal de la mezcladora. El indicador LED de poder (21) se
iluminará cuando la unidad esté prendida.
3.
FUSIBLE
Este es el fusible principal de seguridad para el voltaje de línea de corriente alterna. Sólo
reeplaza el fusible con uno del mismo tipo exactamente. SI EL FUSIBLE SE SIGUE
ABRIENDO, NO LO REEMPLACES CON UNO MÁS GRANDE. ¡LLEVA LA UNIDAD A UN
CENTRO DE SERVICIO AUTORIZADO DE PEAVEY!
PRECAUCIÓN: EL FUSIBLE SOLO DEBE SER REEMPLAZADO CUANDO EL CABLE DE
PODER NO ESTÉ CONECTADO A LA FUENTE DE PODER.
SECCIÓN DEL AMPLIFICADOR DE PODER
La SECCIÓN DEL AMPLIFICADOR DE PODER explicará el método apropiado para conectar tu XR
800F a tus bocinas. Esta es una área muy versátil de la XR 800F. Sin embargo, es importante que
sigas las precauciones para asegurar impedancias de operación seguras y evitar conexiones
inapropiadas.
4.
SALIDAS PARALELAS PARA BOCINAS IZQUIERDA/DERECHA
Estas conexiones de 1/4" son las salidas para los dos
4
4
5
amplificadores internos. Notarás que hay
dos pares de conexiones con otra conexión
en el medio. Los dos pares son las dos
salidas (izquierda, derecha) de amplificador.
Su pueden conectar dos gabinetes a cada
amplificador, siempre y cuando la impedancia combinada de los gabinetes no sea menor de
4 ohmios (por ejemplo, dos gabinetes de 8 ohmios en paralelo = 4 ohmios, 4 bocinas de 16
ohmios en paralelo = 4 ohmios, etc.) No uses la Salida de Puente (5) mientras usas estas
salidas. Las salidas de estas conexiones se determinan por el switch de modo del sistema (20).
28
5.
SALIDA DE PUENTE
La salida de puente de la XR 800F permite que el poder de los amplificadores izquierdo y
derecho se combinen en una salida mono para aplicaciones en las que sólo será usada una
bocina. Para usar la salida de puente, el switch de modo del sistema debe estar en la
posición Left/Right. Conecta una bocina con un mínimo de 8 ohmios de impedancia a la
salida central del puente.
PRECAUCIÓN: Cuando las salidas del puente están siendo usadas, no debe haber ninguna
otra bocina conectada a las salidas paralelas adyacentes. Además, la carga mínima para la
XR 800F en el modo de puente es 8 ohmios. No permitas que la impedancia total caiga
debajo de los 8 ohmios ya que puedes causarle serios daños al amplificados.
ENTRADA/SALIDA MAESTRA
La sección de Entrada/Salida Maestra describe las funciones relacionadas con el panel de parcheo
de entradas y salidas localizado en la parte trasera de tu XR 800F. Esta sección es ignorada
muchas veces, pero es la que añade más versatilidad a la XR 800F. Al usarse a su máximo
potencial, se pueden lograr una variedad extraordinaria de configuraciones de cableado. Estas
conexiones permiten el parcheo de aparatos como efectos periféricos, amplificadores de poder,
monitores, y virtualmente cualquier otro tipo de aparato con salidas de nivel de línea que quieras
conectar a la XR 800F. Algunas de estas configuraciones se muestran en el diagrama al final de
este manual.
6.
ENTRADAS PARA EL AMPLIFICADOR DE PODER.
La conexión a estas entradas le permite al usuario
6
entrar directamente a los Ecualizadores Gráficos
(izquierdo y derecho), y luego a sus respectivos
canales de amplificadores de poder. Las
conexiones de estas entradas son de conectores
intercambiables, esto quiere decir que si te
conectas a esta entrada cancelaras cualquier
señal anterior del canal, sección maestra y
sección de efectos del amplificador. El beneficio
de esta característica es que puedes usar el
amplificador estéreo interno y el amplificador de
poder con o sin usar las secciones de canal y
efectos. Esencialmente, puedes usar la XR 800F
como un ecualizador/amplificador de poder esclavo cuando lo
necesites.
7
9
8
10
7.
SALIDA IZQUIERDA
Esta conexión de 1/4" provee una salida de la mezcla izquierda principal para suministrar
combinaciones externas ampli/bocina. El nivel de esta señal se determina por el fader
maestro izquierdo.
8.
SALIDA IZQUIERDA
Esta conexión de 1/4" provee una salida de la mezcla derecha principal para suministrar
combinaciones externas ampli/bocina. El nivel de esta señal se determina por el fader
maestro derecho.
29
11
9.
SALIDA DE MONITOR
Esta conexión de 1/4" provee una salida de la mezcla de monitor para suministrar poder
externo a la combinación ampli/monitor. El nivel de esta señal se determina por el fader
maestro de monitor.
10.
SALIDA DE EFECTOS
Esta conexión de 1/4" provee una salida de la mezcla de efectos (la misma señal que va al
procesador de efectos interno). Esta señal puede ser usada con unidades externas de
efectos o como una salida de monitor adicional (post-fader).
11.
CANCELACIÓN DE EFECTO (EFFECT DEFEAT)
Esta conexión tipo manga/punta provee un método para cancelar los efectos internos de la
XR 800F. Un pedal encendido/apagado, como lo es el #5100 de Peavey se recomienda.
FUNCIONES MAESTRAS
La sección de FUNCIONES MAESTRAS describe aquellas características que se consideran
controles maestros. Esencialmente, esto incluye todas las funciones del lado frontal derecho de tu
XR 800F. Las áreas de detalle incluyen; efectos, ecualizados FLS® y controles de nivel
monitor/maestro.
12
13
14
15
16
17
12.
LED DE PICO DE EFECTOS
Se ilumina para indicar espacio dinámico de –6 dB antes de que las señales que están
siendo mandadas al circuito de efectos se saturen. Idealmente debes procurar que este LED
se ilumine sólo ocasionalmente. Un parpadeo ocasional indica que tienes los niveles
óptimos. Es recomendable escuchar cuidadosamente la salida al mismo tiempo para poder
determinar los valores finales. Si escuchas distorsión, entonces uno o más de los controles
de nivel están muy altos.
13.
PROGRAMAS DE EFECTOS
Selecciona los efectos de la lista que sigue.
30
EFX Presets
PRESET
1
2
3
4
5
6
7
8
9
10
11
12
13
14
15
16
NAME
Chamber
Plate
Room
Cathedral
Spring
Gate:
Reverse
Delay +
Tiempo de
reverb:
Bright
Tiempo de
Delay
Warm
Tiempo de
Delay
Dark
Tiempo de
Delay
Ping Pong
Tiempo de Delay
Chorus Rate:
Phaser Rate:
Flange Rate:
Rotary Speaker
TIME/SIZE
Time: 150 a 5,000 ms
Time: 100 a 4,000 ms
Time: 150 a 5,000 ms
Time: 100 a 8,000 ms
Time: 150 a 5,000 ms
Time:150 a 500 ms
Tiempo de : 150 a 500 ms
Time: 0 a 225 ms
COLOR/TONE
Damping (Alta frecuencia)
Damping (Alta frecuencia)
Damping (Alta frecuencia)
Damping (Alta frecuencia)
Damping (Alta frecuencia)
Damping (Alta frecuencia)
Damping (Alta frecuencia)
Tiempo de reverb: 0 a
5,000 ms
Time: 0 a 500 ms
Feedback: 0 a 99%
Time: 0 a 500 ms
Feedback: 0 a 99%
Time: 0 a 500 ms
Feedback: 0 a 99%
Time: 0 a 500 ms
Feedback: 0 a 99%
Time: 0.125 a 8 Hz
Time: 0.250 a 16 Hz
Time:0.10 a 2.5 Hz
Velocidad alta: 0.50 a 25 Hz
De profundidad:
De profundidad:
De profundidad:
De Profundidad: 0 a 100%
14.
TIEMPO/TAMAÑO
En los presets de Reverb y Delay (1-12), este control ajusta el tiempo de un reverb o delay
en particular; En Chorus, Phaser y Flange, ajusta la razón de cada uno. En el Rotary
Speaker, ajusta la velocidad de la rotación de la bocina.
15.
COLOR/TONO
Ajusta el contenido de frecuencias agudas de la señal de los efectos. (Al usar un Delay, este
control ajusta la retroalimentación o profundidad,
16.
EFECTOS A MONITOR
Controla la cantidad de señal de efectos enviada a la mezcla de monitores. Este control
permite que los efectos sean escuchados en el escenario a través del monitor.
17.
EFECTOS A MEZCLA PRINCIPAL
Controla la cantidad de efectos enviada a la mezcla principal.
31
18
19
18.
FLS O SISTEM DE LOCALIZACIÓN DE RETROALIMENTACIÓN
Estos LEDs se iluminan para indicar la banda de frecuencia de mayor energía. Cuando
ocurre la retroalimentación, este sistema le indicará al slider de gráficas que disminuya o
elimine la retroalimentación. (NOTA: Estos LEDs se iluminan con cualquier señal de audio,
no sólo durante la retroalimentación). Si ocurre retroalimentación, baja el slider que se
encuentre bajo el LED más brillante rápidamente.
19.
ECUALIZADORE GRÁFICOS
Estos ecualizadores de nueve bandas se fijan en centros de una octava. Están diseñados
para 12 dB de corte y 12 dB de aumento. Se conectan directamente a las entradas del
amplificador de poder. La señal que se manda a cada ecualizador se determina por el switch
de modo de sistema (20).
20.
SWITCH DE MODO DE SISTEMA
21
Este switch se usa para configurar la XR 800F ya sea
como amplificador estéreo o mono dual. Para prevenir
un cambio accidental durante una presentación este
switch es fijo. Para cambiar su posición usa un objeto no
metálico (por ejemplo un palillo de dientes). La XR 800F
trae la configuración de fábrica de izquierda principal al
ecualizador superior y derecha al ecualizador inferior. Al
oprimir este switch, el ecualizador inferior cambia a mono
PA Izq+Der. El ecualizador superior se convierte entonces
en la señal de monitor únicamente, creando un sistema
completo de mezcla de PA y monitoreo en un paquete
pequeño y fácil de transportar. ¡Este cambio se logra sin
un solo cable de parcheo!
23
22
20
24
21.
LED DE PODER
El indicador LED de poder encendido se iluminará cuando la unidad esté prendida.
22.
FADER MAESTRO DE MONITOR
Determina el nivel general de la señal de monitores que es mandada a la Salida de Monitor
(9). Ver página 5.
32
23.
MEDIDORES DE NIVEL DE SEÑAL
Indica el nivel general de ya sea las señales Izq. y Der. o las de mezcla Mon. y L+R. El
Switch de Modo de Sistema determina en qué modo operará el medidor. Los LEDs de
saturación rojos están localizados en la parte superior de cada medidor para indicar la
saturación. Una señal saturada puede dañar tus bocinas. Para prevenir esto, reduce el nivel
de fader respectivo.
24.
FEDERS MAESTROS IZQ./DER.
Este es el control de nivel maestro para las señales Izq. y Der. que se mandan a las salidas
Izquierda y Derecha. Al estar en el Modo Main/Monitor [Ver Switch de Modo de Sistema (20)]
el Fader de Monitor controla la señal de monitor presente en en la salida Izq./Mon del
amplificador.(4). Los faders izquierdo y derecho controlarían entonces la mzcla Izq./Der.
presene en la salida Der/Izq.+Der del amplificador. La posición nominal para este control
es la de 0 dB.
FUNCIONES DE CANAL
La sección de FUNCIONES DE CANAL describe los controles y conecciones de entrada
para cada canal de la XR 800F. La mayoría de las características se encuentran en todos los
canales, sin embargo, hay algunas diferencias es los canales siete, ocho y nueve. Por lo
tanto, esta sección está dividida para indicar propiamente estas diferencias.
CANALES 1-6
25.
26.
ENTRADA DE MICRO:
Entrada de baja impedancia tipo XLR balanceada, optimizada para un
micrófono u otra fuente de bajo nivel. El pin 2 es la entrada positiva. Por el
amplio rango de ajuste de ganacia, losniveles de señal tan altos como
+10 dBV (2.45 V RMS) pueden ser aceptados. Cuando el phantom power
está activado, este conector tiene +48 V en los pins 2 (en fase) y tres con
el pin 1 como la referencia de tierra.
25
26
ETRADA DE LINEA:
Entrada balanceada TRS de 1/4". La punta es la entrada positiva (en
fase), que también puede ser usada para fases no balanceadas. Esta señal se conecta a
través de un pad de 20 dB a la entrada de micrófono de abajo. Dentro del mismo canal la
Entrada de Micrófono y la Entrada de Línea no pueden ser usadas simultáneamente. Los
canales 7 y 8 presentan versiones estéreo de la Entrada de Línea. (Ver características 36 y
37 página 10)
33
27.
GANANCIA:
Varía la ganancia de entrada a cada canal. Un ajuste apropiado de
la ganancia de entrada maximizará la razón de señal a ruido
dándote la operación más callada. Con tu Fader de Canal (35) en la
posición “0”, ajusta este control para que el LED de Saturación (34)
apenas se prenda en los picos más altos de tu señal de entrada.
28.
ECUALIZADOR DE AGUDOS:
Este es un control de tono activo tipo shelving que varía los niveles
de frecuencia aguda +/- 15 dB a 12 kHz. Está diseñado para quitar
ruido o para añadir brillantez a la señal dependiendo de la calidad
de la fuente. (El control de agudos también puede ser encontrado
en los canales 7-9).
29.
ECUALIZADOR DE MEDIOS:
Medios a +/- 15 dB. Este control ajusta la cantidad de corte o
aumento en la frecuencia media (850 Hz). El control de medios
también puede ser encontrados en los canales 7 y 8.
30.
ECUALIZADOR DE BAJO:
Un control de tono activo de tipo shelving que varía losnivele de
frecuencia baja +/- 16 dB a 70 Hz añadirá profundidad a señales
delgadas o limpiará las más “lodosas”. (El control de bajos también
pueden ser encontrados en los canales 7-9).
31.
Mon:
Ajusta el nivel de la señal de canal (pre-EQ) que se añade a la
mezcla de Monitor. (El control de Monitor también puede ser
encontrado en los canales 7-9). Este control es independiente
del control de Fader de Canal (35).
32.
EFECTOS DIGITALES:
Este control varía el nivel que entra al bus del procesador de
efectos digitales ajustando el nivel de la señal de un canal particular
al procesador digital. El control de Ganancia de canal (27) también
afecta este nivel. El envío de efectos digitales está después del
fader de canal y por lo tanto se ve afectado por el nivel del fader de
canal.
33.
PAN:
Ajusta la posición del canal en el campo estéreo Izq.-Der. En los
canales estéreo (7, 8 y 9) este control actúa como un control de
balance entre las dos entradas separadas.
34.
LED DE SATURACION:
Indica cuando la señal de entrada es demaciado fuerte y haya
saturación. Una señal saturada puede dañar tus bocinas.
35.
FADER DE CANAL:
Determina el nivel de señal mandado al bus Izquierdo y Derecho.
(Esta característica también puede ser encontrada en los canales 7-9).
27
28
29
30
31
32
33
34
35
34
CANALES 7-8
38
NOTA: Los canale s7-8 contienen características
que difieren de los canales anteriores. Sólo estas
caracetrísticas son mencionadas a continuación.
36.
37.
ENTRADA DERECHA:
Entrada de 1/4" para señales de nivel de
línea. La Entrada Derecha no es ajustada
por el control de Ganancia (27). La señal
es mandada al amplificador interno de
poder. Si la XR 800F está en el modo
Derecha-Izquierda, entonces la señal se irá
a la Salida de Bocina Derecha (4). En el
modo Mon/Main la señal es combinada con
la Izquierda y mandada a la Salida de
Bocina Derecha/Izq.+Der. La señal derecha
también puede ser sacada de la XR 800F a
través de la Salida Derecha (8) a
componentes externos como efectos,
amplificadores, y grabadoras. Esta
característica sólo se encuentra en los
canales 7 y 8.
39
37
40
36
ENTRADA IZQUIERDA/MONO:
Entrada de 1/4" para señales de nivel de línea. La entrada Izquierda/Mono suministra señal a
los canales Izquierdo y Derecho (si no hay nada insertado en la entrada derecha). No es
ajustada por el Control de Ganancia (27). En el modo Izq./Der. la señal se irá a la salida de
Bocina Izquierda(4) y Salida de Bocina Derecha si nada se inserta a la entrada derecha. En
el modod Mon/Main la señal se combina con la Derecha y se manda a la Salida de Bocina
Derecha/Izq.+Der. Esta característica sólo se encuentra en los canales 7 8.
CANAL9
NOTA: El canal 9 contienen características que difieren de los canales anteriores. Sólo estas
caracetrísticas son mencionadas a continuación.
38.
ENTRADA TAPE:
Esta entrada RCA acepta una entrada estéreo (nominalmente -10 dBV) de la selida de un
deck de cassette o reproductor de CDs y la coloca en los canales Izquierdo y Derecho así
como el la Mezcla de Monitor y Efectos. Ver característica 31 en la página 9.
39.
SALIDA TAPE:
Esta salida RCA estéreo provee una señal para las entradas de grabación de un deck de
cassette estéreo.
¡PRECAUCION! NO CONECTES EL TAPE IN Y EL TAPE OUT A LA ENTRADA Y SALIDA
DEL MISMO DECK AL MISMO TIEMPO. HACERLO FORMARA UN “LOOP” CAUSANDO
RETROALIMENTACION SEVERA. USA DECKS SEPARADOS PARA GRABACION Y
REPRODUCCION O USA LAS ENTRADAS Y SALIDAS DEL MISMO DECK EN
DIFERENTES MOMENTOS.
35
PHANTOM POWER
40.
SWITCH DE PHANTOM POWER:
Aplica 48 V DC de voltage a todas las entradas XLR para dar poder a los micrófonos que lo
requieran.
¡PRECAUCION! Cuando el phantom power esté prendido, asegúrate que cualquier canal al
que estés conectando un micrófono tenga el nivel hasta abajo tanto en las mezclas main
como monitor. De no hacerlo, causarás un fuerte “pop” en el PA. Esto es normal. Lo mejor es
conectar todos los micrófonos a sus respectivos canales con el phantom power apagado.
Esto reduce ruido en el PA y reduce el riesgo de dañar los micrófonos. Si el phantom power
es usado, no conectes micrófonos no balanceados u otros dispositivos que no puedan
manejar este voltage a las entradas XLR. (Algunos receptores inalámbricos pueden ser
dañados. Consulta sus manuales para compatibilidad) Las conecciones para entrada de
línea de 1/4" no están conectadas a la fuente phantom, y son seguras para cualquier tipo de
entrada (balanceadas o no balanceadas). Un convertidor de impedancia balanceado-a-no
balanceado, como el Peavey 5116 o el adaptador de interface Peavey 1:1, también puede
ser usado para aislar un micrófono de voltage phantom.
36
DEUTSCH
XR™ 800F Power Mixer
Herzlichen Glückwunsch zum Kauf des XR™ 800F. Viele Bestandteile des bewährten XR 684
wurden in diesem Gerät wiederverwendet. Jahrelange Erfahrung und die neueste Technologie sind
in dem XR 800F untergebracht.
• Acht low-noise, low-Z Mikro Vorverstärker (Kanäle 1-8)
• Sechst 6.3 mm Klinken Line Eingänge (Kanäle 1-6)
• Drei Stereo Line Eingänge (Kanäle 7-9)
• 60 mm Fader
• Kanal Clipping LEDs
• Pan Controls
• 3-Band EQ (Kanäle 1-8)
• Monitor send (alle Kanäle)
• EFX send (alle Kanäle)
• 32-bit DSP-basierender Stereo Effektprozessor mit 16 Presets und zwei Parameter Kontrollen
• Zwei 9-Band Graphic EQs mit FLS® Feedback Locating System®
• Wahlweise 48 V Phantom Power
• Level Meter Anzeige (7 Segmente)
• Stereo/Main-Monitor Mode Schalter
• 2x210 W @ 4 Ohm interner Leistungsvertärker
• 420 W @ 8 ohms im Bridge-Mode
• DDT™ Lautsprecherschutz
Die Standard Kanäle (1-6) mit den low noise Mikro Vorverstärkern werden global auf Phantom
Power geschaltet. Diese Kanäle verfügen über einen 3 Band EQ und 6.3 mm Line Eingänge. Die
drei Kanäle (7-9) für Tape, CD oder Synth Signale sind Stereo ausgelegt. Kanäle 7 und 8 verfügen
ebenfalls über die Merkmale der Kanäle 1 bis 6 abgesehen von der zusätzlichen 6.3 mm Klinkenbuchse. Kanal 9 besitzt keine Gain Kontrolle, einen 2-Band EQ und ausschließlich Stereo Tape Einund Ausgänge.
Die Master Sektion verfügt über einen einzigartigen Grafik EQ und einen Power Amp Mode Switch.
Der XR 800F wird in erster Linie als Voll-Stereo-Power-Mixer verwendet. Im Main/Monitor Modus
wird je eine Seite des Grafic EQs und eine Seite der Endstufe als Monitor-Ausgang und als MainAusgang (mono) umgeschaltet.
Der Effektprozessor stammt aus dem Deltafex™. Mit den Time/Size und Color/Tone Kontrollen kann
man auf einfache Weise die vorgespeicherten 16 Programme verändern und den eigenen
Bedürfnissen anpassen. ALLE Kanäle können auf den Effektprozessor geroutet werde.
Bitte lesen Sie diese Bedienungsanleitung aufmerksam durch. Die Funktionen des XR 800F werden
hier genauso beschrieben wie auch die Effekt/Signalwege und Anschlußmöglichkeiten.
37
NETZANSCHLUß
Bitte lesen Sie diesen Abschnitt genau durch. Zu Ihrer Sicherheit haben wir einige Vorwarnungen
angebracht.
1.
NETZANSCHLUß:
In diese Buchse wird das Netzkabel gesteckt
Bitte stellen Sie sicher, das das Kabel nicht
gequetscht (Kabelbruchgefahr) eingeschnitten
oder angerissen ist. Sollte dies der Fall sein,
ersetzen Sie bitte das Kabel mit einem neuen
Kabel. Stellen Sie bitte auch vorher sicher, das
die Ihr Stromnetz genügend abgesichert ist.
2
3
1
2.
NETZSCHALTER:
Ein- und Aus- Schalter. LED (21) auf der Vorderseite leuchtet bei eingeschaltetem Gerät.
3.
SICHERUNG:
Dies ist die Hauptsicherung für das Gerät. Sollte die Sicherung einmal durchbrennen,
ersetzen Sie sie bitte nur mit einer gleichen Wertes und Typs. KEINE GRÖßEREN
SICHERUNG VERWENDEN. SOLLTE DIE SICHERUNG ÖFFTER DURCHBRENNEN;
KONTAKTIEREN SIE BITTE DAS NÄCHSTE PEAVEY SERVICE CENTER.
WARNUNG: DIE SICHERUNG NUR BEI GEZOGENEM NETZSTECKER ERSETZEN.
POWER AMP ABSCHNITT
In dieser Sektion werden die verschiedenen Lautsprecher-Anschlußmöglichkeiten beschrieben.
4.
PARALLEL LEFT/RIGHT LAUTSPRECHERAUSGÄNGE:
Diese 6.3 mm Klinkenbuchsen stellen die Ausgänge zu den
Lautsprechern dar. Sie haben die
4
4
5
Möglichkeit zwei Boxen pro Seite
anzuschließen. Allerdings darf die Impedanz
pro Seite nicht 4 Ohm unterschreiten. Sie
können also beruhigt zwei Boxen mit einer
Impedanz von je 8 Ohm anschließen. Die
Buchse in der Mitte ist als Bridge Ausgang ausgelegt. Linkes und Rechtes Signal sind hier
zusammengeführt (MONO), dafür erhalten Sie aber auch die “Kraft” beider Endstufen.
Benutzen Sie den Bridge-Ausgang nicht in Verbindung mit den anderen Ausgängen.
Lesen Sie auch Beschreibung System Mode Schalter (20).
5. BRIDGE OUTPUT:
Dieser Ausgang “kombiniert” beide Seiten und bietet so die doppelte Ausgangsleistung in
Mono. Um diesen Modus zu benutzen, müssen Sie den System Mode Switch auf der
Vorderseite des Gerätes gedrückt haben.
ACHTUNG: Wenn Sie den Bridge-Mode aktiviert haben, darf kein anderer Lautsprecher als
der, der an der Bridge-Ausgangsbuchse angeschlossen ist, mit dem Gerät verbunden
werden! Die Minimallast im Bridge Modus für den XR 800F ist 8 Ohm. Dieser Wert darf nicht
unterschritten werden!
38
MASTER IN/OUT
In dieser Sektion werden die Funktionen, die den MASTER Bereich betreffen, beschrieben. Leider
werden diese Funktionen gerne übersehen, obwohl sie die eigendlichen Vorzüge des XR 800F
darstellen. Durch “patchen” läßt sich noch eine Menge mehr aus diesem Gerät herausholen als es
so und so schon bietet. Hier kann man externe Effekte, Monitore und Endstufen ohne Probleme
anfügen und verbinden. Einige Beispiele finden Sie weiter hinten im Handbuch abgedruckt.
6.
7+8.
POWER AMP INPUT:
Man kann das Gerät direkt mit zB. einem externen
Grafic EQ verbinden und das Signal direkt
zurück in diese Buchsen, zur Endstufe des
XR 800F leiten. Diese 6.3mm Klinkenbuchsen
sind Schaltbuchsen. Das bedeutet, das alle
Signale, Master und Effekt, umgeleitet werden
auf das externe angeschlossene Gerät und von
dort aus erst zurück auf die eingebaute
Endstufe gesendet werden. Der Vorteil ist, das
man so den internen EQ und die Endstufe, in
Verbindung mit oder ohne die Kanäle, nutzen
kann..
6
7
9
11
8
10
LINKS / RECHTS OUTPUT:
Diese Anschlüsse sind zur Ausgabe des Master-Signals an zB. externe Endstufen
angebracht. Sie werden mit den Master Fadern abgemischt.
9.
MONITOR OUTPUT:
Von hier wird das gesamte Monitor-Signal an externe Monitoranlagen abgegeben. Kontrolle
erfolgt über den Monitor Master Fader.
10.
EFX OUTPUT:
Diese 6.3 mm Klinkenbuchse liefert exakt das selbe Signal, das auch an den internen
Effektprozessor anliegt. ZB. für externe Effektgeräte oder als zusätzlicher Monitor-Ausgang.
11.
EFX DEFEAT:
Wenn Sie hier einen On/Off Fußschalter (Peavey Nr. 5100) anschließen, können Sie die
internen Effekte mit einem “Tritt” ab- und wieder anschalten. Dies ist sehr empfehlenswert,
wenn Sie Ansagen und Musikalische Darstellungen zu bewerkstelligen haben. Ansagen sind
ohne Effekte besser verständlich, wohingegen Musik ohne Effekte trocken und steril klingt.
MASTER FUNKTIONEN
Dieser Abschnitt erläutert die Funktionen der sich auf der rechten Vorderseite des Gerätes
befindlichen Bedienungselemente. Effekt-, EQ/FLS-, Monitor- und Master Sektion.
12
13
14
39
15
16
17
12.
EFFEKT PEAK LED:
Die LED beginnt zu leuchten, wenn das an den internen Effektprozessor anliegende Signal
zu stark wird und zu “kratzen” beginnt (-6 dB Headroom). Idealer Weise leuchtet diese LED
nur hin und wieder, will sagen selten, auf.
13. PRESET:
Wählen Sie aus den folgenden Werksvoreinstellungen einen Effekt aus.
EFX Presets
PRESET
1
2
3
4
5
6
7
8
9
10
11
12
13
14
15
16
NAME
Chamber
Plate
Room
Cathedral
Spring
Gate
Reverse
Delay + Reverb
Bright Delay
Warm Delay
Dark Delay
Ping Pong Delay
Chorus
Phaser
Flange
Rotary Speaker
TIME/SIZE
Time: 150 to 5,000 ms
Time: 100 to 4,000 ms
Time: 150 to 5,000 ms
Time: 100 to 8,000 ms
Time: 150 to 5,000 ms
Time: 150 to 500 ms
Time: 150 to 500 ms
Time: 0 to 225 ms
Time: 0 to 500 ms
Time: 0 to 500 ms
Time: 0 to 500 ms
Time: 0 to 500 ms
Rate: 0.125 to 8 Hz
Rate: 0.250 to 16 Hz
Rate: 0.10 to 2.5 Hz
High Speed: 0.50 to 25 Hz
COLOR/TONE
Damping (High Frequency)
Damping (High Frequency)
Damping (High Frequency)
Damping (High Frequency)
Damping (High Frequency)
Damping (High Frequency)
Damping (High Frequency)
Reverb Time: 0 to 5,000 ms
Feedback: 0 to 99%
Feedback: 0 to 99%
Feedback: 0 to 99%
Feedback: 0 to 99%
Depth: Best Set Full CW
Depth: Best Set Full CW
Depth: Best Set Full CW
Width: 0 to 100% CW
14.
TIME/SIZE:
In den Effekten 1-12 Reverb und Delay wird hiermit die Zeit der Effekte eingestellt.
In den Effekten Chorus, Phaser und Flange wird die Stärke und in dem Effekt Rotary Speaker
die Geschwindigkeit des sich virtuell rotierenden Lautsprechers eingestellt.
15.
COLOR/TONE:
Hier kann die Klangfarbe des Effektsignals eingestellt werden. Bei dem Effekt “Delay” wird
die Wiederholrate passend einjustiert.)
16.
EFX to MON:
Sie können mit diesem Regler den Anteil des Effektsignals auf dem Monitorweg einstellen..
17.
EFX to MAIN:
Im Grunde das selbe wie zuvor, nur daß hier der Anteil des Effekts auf das Hauptsignal
einjustiert wird.
40
18
19
18.
FLS (Feedback Locator System): (nächste Seite)
Jeweils die LEDs leuchten auf, die in dem Moment das stärkste Signal je Frequenz
empfangen. Wenn also sich also ein Feedback (Rückkopplung) bemerkbar macht (sehr
lautes, kreischendes Piepsen bzw. Pfeifen), kann man anhand der LED sehen, auf welchem
Frequenzband sich diese Rückkopplung ereignet und mit Hilfe des dazugehörigen EQ
Reglers diese Frequenz Lautstärkemäßig abschwächen. Bitte nur Millimeterweise verwenden,
da das Signal sonst schnell an Natürlichkeit verliert.
19.
GRAPHIC EQ:
Wie eben beschrieben wird dieser 9-Band EQ mit dem FLS System verwendet. Es können
bis zu 12 dB angehoben und bis zu 12 dB abgesengt werden. Mit Hilfe des System Mode
Schalters (20) wird der jeweilige EQ seiner Bestimmung , Main L+R oder Main/Monitor,
zugewiesen.
20.
SYSTEM MODE SCHALTER:
Die Endstufe des XR 800F kann sowohl als Stereo-Endstufe, als auch als Dual-MonoEndstufe verwendet werden. Der Schalter ist in das Gerät eingelassen um ein
unbeabsichtigtes umschalten zwischen den Modi während der Benutzung des XR 800F zu
verhindern. Zum Umschalten benutzen Sie bitte einen
nichtmetallischen Gegenstand, zB. Zahnstocher. Die
23
21
20
Werkseinstellung ist so eingestellt, daß das Gerät Stereo
betrieben wird. Der linke EQ für den linken Kanal, der
rechte EQ für den rechten Kanal. Wird der Schalter bei
abgeschaltetem Gerätezustand betätigt, sind alle
Stereokanäle monogeschaltet, ein EQ für die PA-MainLautsprecher und der andere EQ für den Monitor
bereitgestellt. So kann das Gerät für eine komplette PAAusstattung ohne jegliche Zusatzgeräte verwendet
werden.
21.
POWER LED:
Leuchtet, wenn das Gerät eingeschaltet ist.
41
22
24
22.
MONITOR MASTER FADER:
Hiermit wird das Gesamt-Monitor-Signal eingestellt.
23.
SIGNAL LEVEL ANZEIGE:
Anhand dieser LED Anzeige kînnen Sie die Stärke des Ausgangssignals Überwachen. Die
rote LED zeigt das “clippen” des Signals an. Das bedeutet das Signal ist zu stark und beginnt
zu verzerren. Um Ihre Anlage zu schützen vermindern Sie die Lautstärke des jeweiligen
Kanals.
24.
MASTER L/R FADER:
Über diese Fader wird die Lautstärke des jeweiligen Kanals eingestellt. Wenn der System
Mode Schalter (20) betätigt wurde, kontrolliert man mit dem Monitor-Fader den Monitor-Kanal
und mit den beiden Main L+R-Fadern das Hauptausgangssignal auf den PA-Lautsprechern.
Als Idealeinstellung wird die 0 dB Marke angegeben.
KANAL FUNKTIONEN
Hier werden die Funktionen der Regler der einzelnen Kanäle beschrieben.
Kanäle 1-6
25.
MIK INPUT:
Dies ist ein symetrischer XLR low-z Eingang, optimiert für Mikrofone
(+10 dBV, 2.45V RMS) Pin 2 = +. Wenn Phantom Power eingeschaltet
ist, liegen an Pin 2 (Phase) +48V an. Pin 1= Ground.
26.
LINE INPUT:
Ein 6.3 mm symetrischer Stereoklinken-Anschluß. Spitze = +. Dieser
Anschluß kann ohne Weiteres auch als unsymetrischer Anschluß genutzt
werden. Dieser Anschluß darf AUF KEINEN FALL gleichzeitig mit dem
zuvor beschriebenen XLR-Anschluß genutzt werden.
25
26
42
27.
GAIN:
Mit diesem Regler stellt man die Eingangsempfindlichkeit des
Kanals ein. Eine gute Einstellung deises Reglers zahlt sich durch
minimiertes Rauschen des Signals auf diesem Kanal aus. Stellen
Sie den Kanalfader (35) auf die “0” Position und achten Sie auf die
Clip-Anzeige (34). Diese LED darf nur wenig aufleuchten, wenn
Sie möglichst laut in das Mikrofon sprechen/singen oder zB. in die
Tasten des Keyboards “hauen”.
28.
HIGH EQ:
Hier werden die hohen Frequenzen eingestellt. Die Bandbreite
kann um 15 dB (bei 12 kHz) angehoben oder abgesengt werden.
Es kann rauschen entfernt oder mehr Brillianz hinzugefügt werden.
(Diese Kontrolle ist ebenfalls auf Kanal 7 bis 9 zu finden).
29.
MID EQ:
Ebenfalls ± 15 dB. Hier stellt man die mittleren Frequenzen (um
800 Hz) ein. (Diese Kontrolle ist auch auf den Kanälen 7 und 8).
30.
LOW EQ:
Und nochmals ±15 dB, aber diesmal im Bassbereich (um 70 Hz).
Es kann ein dünnes Signal voluminöser gemacht und ein
baßlastiges Signal ausgedünnt werden. (Diese Kontrolle ist
ebenfalls auf Kanal 7 bis 9 zu finden).
31.
MON:
Hier wird der Anteil des jeweiligen Kanals auf dem Haupt Monitor
Signal eingestellt, wieviel also von jedem Kanal auf der
Monitoranlage zu hören sein wird. (Diese Kontrolle ist ebenfalls
auf Kanal 7 bis 9 zu finden). Dieser Regler ist unabhängig von
dem Kanalfader (35)..
32.
DIGITAL EFFEKTE:
Mit Hilfe deises Reglers wird das Signal des jeweiligen Kanals
anteilmäßig zu dem internen Effektprozessor gesendet. Auch der
Gain-Regler (27) und der Kanalfader (35) haben Einfluß auf das
Signal.
33.
PAN:
Die Einstellung dieses Reglers bestimmt die Position des
jeweiligen Kanals im Stereo-Bild auf den Lautsprechern. Also kann
man das Signal mehr Links oder mehr Rechts erscheinen lassen.
(Diese Kontrolle ist ebenfalls auf Kanal 7 bis 9 zu finden).
34.
CLIP LED:
Ein andauerndes oder häufig aufblinkendes Leuchten dieser LED
bedeutet, daß das Signal zu stark ist. Dies führt zu Verzerrungen,
die Ihrem PA-System, insbesondere den Lautsprechern, schaden
könnte. Ein seltenes Aufleuchten hingegen ist durchaus normal
und bedeutet keine Gefahr.
27
28
29
30
31
32
33
34
35
43
35.
KANALFADER:
Hier wird nun letztendlich die Lautstärke der einzelnen Kanäle eingestellt. (Diese Kontrolle ist
ebenfalls auf Kanal 7 bis 9 zu finden).
KANÄLE 7 und 8
Diese Kanäle unterscheiden sich ein einigen Punkten von den vorange-gangenen Kanälen.
Nur diese Unterschiede werden in diesem Abschnitt erleutert.
36.
37.
INPUT RECHTS:
Ein 6.3 mm Klinkenstecker Eingang für
Line-Level. Der rechte Eingang wird nicht
über die Gain Kontrolle (27) eingestellt.
Wenn der XR 800F sich im Left/Right
Modus befindet, geht das hier anliegende
Signal auf den rechten Lautsprecher
Ausgang (4). Im Main/Monitor Modus wird
das Signal mit dem linken Eingangssignal
auf den Right/L+R Lautsprecher-Ausgang
zusammengeführt.
38
INPUT LINKS/MONO:
39
37
Ebenfalls ein 6.3 mm Klinkenstecker
Eingang. Dieser Eingang ist automatisch
auf Links und Rechts geroutet, wenn sich
40
kein Stecker im rechten Eingang befindet.
Auch dieser Eingang wird nicht über die
Gain Kontrolle (27) reguliert. Wenn der XR
36
800F sich im Left/Right Modus befindet,
geht das hier anliegende Signal auf den
linken UND rechten Lautsprecher Ausgang
(4), solange sich kein Stecker in der rechten Eingangsbuchse befindet. Im Main/Monitor
Modus wird das Signal mit dem rechten Eingangssignal auf den Right/L+R LautsprecherAusgang zusammengeführt.
KANAL 9
Dieser Kanal unterscheidet sich wiederum ein einigen Punkten von den vorangegangenen Kanälen.
Nur diese Unterschiede werden in diesem Abschnitt erleutert.
38.
TAPE IN:
Hier kann ein herkömmliches Tapedeck oder ein CD-Player mit Chinchanschlüssen
angeschlossen werden (nominal -10 dBV). Das Signal liegt dann auch sowohl an dem
Monitor, als auch an dem Effektweg an.
39.
TAPE OUT:
Hier wird der Recording/Input des Tapedecks angeschlossen.
ACHTUNG: Verwenden Sie nicht den Ein- und Ausgang desselben Tapedecks gleichzeitig. Das führt zu heftigen Rückkopplungen und kann so der PA schaden! Verwenden
Sie zwei voneinander getrennte Tapedecks für gleichzeitiges Abspielen und Aufnehmen.
44
PHANTOM POWER
40.
PHANTOM POWER SCHALTER:
Dieser Schalter schaltet den Phantom Power (48V) an allen XLR Eingängen ein.
ACHTUNG: Bitte drehen Sie die Lautstärke des betreffenden Kanals herunter, wenn Sie ein
Mikrofon bei eingeschaltetem Phantom Power anschließen möchten. Anderenfalls führt das
Anschließen zu einem lauten Pop-Geräusch. Am besten schalten Sie erst die
Phantomspeisung aus. Dies verhindert obendrein das Beschädigen eines der
anzuschließenden Mikrofone. Sehen Sie auch vorher in den jeweiligen
Bedienungshandbüchern der anzuschließenden Geräte (Mikrofone,
Mikrofonempfangsanlagen) nach, ob diese auch Phantomspeisung vertragen können. Alle
Klinkeneingänge sind von der Phantomspeisung ausgenommen. Ein unsymetrisch-zusymetrisch Impedanzkonverter (PEAVEY 5116) oder PEAVEY 1:1 Interface Adapter kann
verwendet werden, um ein Mikrofon von dem Phantom Power zu befreien.
45
IMPORTANT SAFETY INSTRUCTIONS
WARNING: When using electric products, basic cautions should always be followed, including the following:
1.
Read these instructions.
2.
Keep these instructions.
3.
Heed all warnings.
4.
Follow all instructions.
5.
Do not use this apparatus near water. For example, near or in a bathtub, swimming pool, sink, wet basement, etc.
6.
Clean only with a damp cloth.
7.
Do not block any of the ventilation openings. Install in accordance with manufacturer’s instructions. It should not be placed flat against a wall
or placed in a built-in enclosure that will impede the flow of cooling air.
8.
Do not install near any heat sources such as radiators, heat registers, stoves or other apparatus (including amplifiers) that produce heat.
9.
Do not defeat the safety purpose of the polarized or grounding-type plug. A polarized plug has two blades with one wider than the other. A
grounding type plug has two blades and a third grounding plug. The wide blade or third prong is provided for your safety. When the provided
plug does not fit into your inlet, consult an electrician for replacement of the obsolete outlet. Never break off the grounding. Write for our free
booklet “Shock Hazard and Grounding”. Connect only to a power supply of the type marked on the unit adjacent to the power supply cord.
10. Protect the power cord from being walked on or pinched, particularly at plugs, convenience receptacles, and the point they exit from the
apparatus.
11. Only use attachments/accessories provided by the manufacturer.
12. Use only with a cart, stand, tripod, bracket, or table specified by the manufacturer, or sold with the apparatus. When a cart is used, use caution
when moving the cart/apparatus combination to avoid injury from tip-over.
13. Unplug this apparatus during lightning storms or when unused for long periods of time.
14. Refer all servicing to qualified service personnel. Servicing is required when the apparatus has been damaged in any way, such as powersupply cord or plug is damaged, liquid has been spilled or objects have fallen into the apparatus, the apparatus has been exposed to rain or
moisture, does not operate normally, or has been dropped.
15. If this product is to be mounted in an equipment rack, rear support should be provided.
16. Exposure to extremely high noise levels may cause a permanent hearing loss. Individuals vary considerably in susceptibility to noise-induced
hearing loss, but nearly everyone will lose some hearing if exposed to sufficiently intense noise for a sufficient time. The U.S. Government’s
Occupational and Health Administration (OSHA) has specified the following permissible noise level exposures:
Duration Per Day In Hours
8
6
4
3
2
1 1/2
1
1/2
1/4 or less
Sound Level dBA, Slow Response
90
92
95
97
100
102
105
110
115
According to OSHA, any exposure in excess of the above permissible limits could result in some hearing loss. Ear plugs or protectors to the ear
canals or over the ears must be worn when operating this amplification system in order to prevent a permanent hearing loss, if exposure is in excess
of the limits as set forth above. To ensure against potentially dangerous exposure to high sound pressure levels, it is recommended that all persons
exposed to equipment capable of producing high sound pressure levels such as this amplification system be protected by hearing protectors while
this unit is in operation.
SAVE THESE INSTRUCTIONS!
46
PEAVEY ELECTRONICS CORPORATION LIMITED WARRANTY
Effective Date: July 1, 1998
What This Warranty Covers
Your Peavey Warranty covers defects in material and workmanship in Peavey products purchased and serviced in the U.S.A. and Canada.
What This Warranty Does Not Cover
The Warranty does not cover: (1) damage caused by accident, misuse, abuse, improper installation or operation, rental, product modification or
neglect; (2) damage occurring during shipment; (3) damage caused by repair or service performed by persons not authorized by Peavey; (4) products
on which the serial number has been altered, defaced or removed; (5) products not purchased from an Authorized Peavey Dealer.
Who This Warranty Protects
This Warranty protects only the original retail purchaser of the product.
How Long This Warranty Lasts
The Warranty begins on the date of purchase by the original retail purchaser. The duration of the Warranty is as follows:
Product Category
Duration
Guitars/Basses, Amplifiers, Pre-Amplifiers, Mixers, Electronic
Crossovers and Equalizers
2 years *(+ 3 years)
Drums
2 years *(+ 1 year)
Enclosures
3 years *(+ 2 years)
Digital Effect Devices and Keyboard and MIDI Controllers
1 year *(+ 1 year)
Microphones
2 years
Speaker Components (incl. speakers, baskets, drivers,
diaphragm replacement kits and passive crossovers)
and all Accessories
1 year
Tubes and Meters
90 days
[*denotes additional warranty period applicable if optional Warranty Registration Card is completed and returned to Peavey by original retail purchaser within 90
days of purchase.]
What Peavey Will Do
We will repair or replace (at Peavey's discretion) products covered by warranty at no charge for labor or materials. If the product or component must
be shipped to Peavey for warranty service, the consumer must pay initial shipping charges. If the repairs are covered by warranty, Peavey will pay the
return shipping charges.
How To Get Warranty Service
(1) Take the defective item and your sales receipt or other proof of date of purchase to your Authorized Peavey Dealer or Authorized Peavey
Service Center.
OR
(2) Ship the defective item, prepaid, to Peavey Electronics Corporation, International Service Center, 412 Highway 11 & 80 East, Meridian, MS 39301
or Peavey Canada Ltd., 95 Shields Court, Markham, Ontario, Canada L3R 9T5. Include a detailed description of the problem, together with a copy of
your sales receipt or other proof of date of purchase as evidence of warranty coverage. Also provide a complete return address.
Limitation of Implied Warranties
ANY IMPLIED WARRANTIES, INCLUDING WARRANTIES OF MERCHANTABILITY AND FITNESS FOR A PARTICULAR PURPOSE, ARE LIMITED
IN DURATION TO THE LENGTH OF THIS WARRANTY.
Some states do not allow limitations on how long an implied warranty lasts, so the above limitation may not apply to you.
Exclusions of Damages
PEAVEY'S LIABILITY FOR ANY DEFECTIVE PRODUCT IS LIMITED TO THE REPAIR OR REPLACEMENT OF THE PRODUCT, AT PEAVEY'S
OPTION. IF WE ELECT TO REPLACE THE PRODUCT, THE REPLACEMENT MAY BE A RECONDITIONED UNIT. PEAVEY SHALL NOT BE
LIABLE FOR DAMAGES BASED ON INCONVENIENCE, LOSS OF USE, LOST PROFITS, LOST SAVINGS, DAMAGE TO ANY OTHER EQUIPMENT
OR OTHER ITEMS AT THE SITE OF USE, OR ANY OTHER DAMAGES WHETHER INCIDENTAL, CONSEQUENTIAL OR OTHERWISE, EVEN IF
PEAVEY HAS BEEN ADVISED OF THE POSSIBILITY OF SUCH DAMAGES
Some states do not allow the exclusion or limitation of incidental or consequential damages, so the above limitation or exclusion may not
apply to you.
This Warranty gives you specific legal rights, and you may also have other rights which vary from state to state.
If you have any questions about this warranty or service received or if you need assistance in locating an Authorized Service Center, please contact
the Peavey International Service Center at (601) 483-5365 / Peavey Canada Ltd. at (905) 475-2578.
Features and specifications subject to change without notice.
47
Features and specifications subject to change without notice.
Peavey Electronics Corporation • 711 A Street • Meridian • MS • 39301
(601) 483-5365 • FAX (601) 486-1278 • www.peavey.com
©1999