1
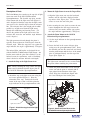
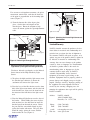
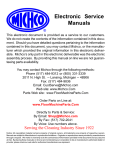
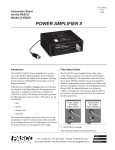
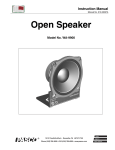
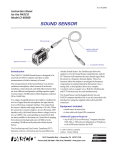
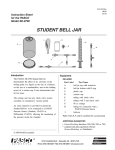
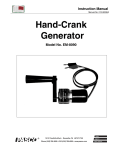
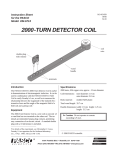
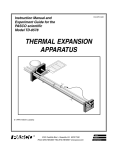
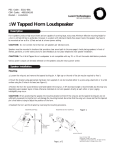
012-07111A 12/99 $1.00 Instruction Sheet for the PASCO Model OS-8543 Prism Mount (with prism included) prism mount bracket flange Accessories included PA BL SCO AC OS K B -8 OD 543 YP RIS thumb screws M prism beveled stop piece for the light sensor arm filter bracket filter base extension side view of prism threaded post Introduction The OS-8543 Prism Mounting attaches to PASCO’s Educational Spectrophotometer (OS-8539). Use the OS-8543 Prism Mount to convert the OS-8539 grating spectrophotometer to a prism spectrophotometer. A prism spectrophotometer has two advantages over a grating spectrophotometer: a) It eliminates overlap of the orders of spectral lines observed with a grating, and b) The spectrum is brighter because it does not spread over several orders or in both directions. EQUIPMENT: Parts Included: 60-degree dense flint glass prism with prism mount and label (OS-8543) Beveled stop piece, for use with the light sensor arm of the OS-8539 Educational Spectrophotometer System Two 6-32 x 1/2 thumbscrews One infrared filter with bracket One washer base of mount side view of filter bracket bracket with infrared filter Additional Equipment Required: OS-8539 Educational Spectrophotometer System Recommended Equipment: Black Body Light Source (OS-8542) Computer-based Optics System II (OS-8548) Specifications: Prism: Material: Flint glass Side dimensions: 20 mm x 20 mm Shape: Equilateral triangle Flatness: One wavelength Mounting Piece: Base length: 3.32'' Base width: .47" Bracket height: 2.50" Flange: .75" x .49" Post length: .75" Post thread: 8-32 x .75UNC 2A © 1999 PASCO scientific Prism Mount 012-07111A 2. Mount the Light Sensor Arm to the DegreePlate Description of Parts The Prism Mount piece attaches to the top side of light sensor arm used in the OS-8539 Educational Spectrophotometer. The beveled stop piece attaches to the bottom side of the light sensor arm (Figure 1) and is designed to limit the range that the light sensor arm travels to less than 90 degrees from the reference line. The reference line is the straight path in which parallel rays of light travel from the light source through the collimating and focusing lenses. ( To observe the position of the light sensor arm at the reference line, move the arm until the angle indicator reads 0 degrees.) a) Align the light sensor arm over the bracketed markers and the edge holes displayed on the top surface of the degree plate. Use the thumb screws to secure the arm to the plate. b) After securing the arm, check to ensure the arm rotates throughout the full range between the reference line (zero mark) and the stop against the angle indicator (approximately 76 degrees). 3. Attach the Prism Mount to the OS-8539 Educational Spectrophotometer a) Set the angle indicator on the spectrophotometer table to zero. The light spectrum refracted through the prism is typically observed between 58-62 degrees from the reference angle. When the stop piece rests against the angle indicator, the angle is approximately 76 degrees. b) Locate the hole in the center of degree plate resting over the spectrophotometer table. Insert the threaded post into the center hole and slowly turn the prism mount until the base of the mount piece is positioned loosely over the top of the degree plate (Figure 2). The infrared filter and bracket are designed for use with the PASCO CI-6628 Infrared Light Sensor. The bracket comes with the glass filter attached. Use the infrared sensor for experiments, such as blackbody, when it desired to measure infrared wavelengths. Note: Do not screw the prism down too tight. The light sensor arm must be free to rotate under the prism without touching the prism mount. 1. Attach the Stop to the Light Sensor Arm Note: Before attaching the stop, remove the light sensor arm (if attached) from the degree plate of the OS-8539 Educational Spectrophotometer. c) Rotate the prism mount until it clears the light sensor arm and the prism is oriented with its apex pointed in the direction of the light source. Keep the tab indicator aligned with the 0 and 180-degree lines on the plate. a) Attach the stop to the light sensor arm using the two screws provided (Figure 1). Note the orientation of the stop. Position the beveled corner of the stop so that it will hit against the angle indicator on the spectrophotometer table. prism mount light sensor IN A G 1 0 1 0 0 1 angle indicator Y IT IV IT R NS SO SE N H T SE 04 H HIG 66 LIG CI- PA BL SCO AC OS K B -854 OD 3 YP RIS M stop piece light sensor arm tab beveled corner 180-degree line light sensor arm 0-degree line Figure 1: Attach the stop piece to the light sensor arm Figure 2: Attach the Prism Mount to the OS-8539 Educational Spectrophotometer 2 012-07111A Prism Mount For accurate wavelength measurements, the prism mount must remain fixed, such that the back face of the prism is perpendicular to the incoming light source (Figure 3). infrared filter light sensor filter bracket INFRARED SENSOR CI-6628 light sensor mount d) From the bottom side of the degree plate, place a lock washer and wingnut on the threaded post. Rotate the wingnut to help secure the mount against the spectrophotometer table. threaded post light sensor arm collimating lens light sensor path of light GA Figure 4: Attaching the Infrared Light Sensor and Filter Bracket 1 IN 10 100 light source Limited Warranty PASCO scientific warrants the product to be free from defects in materials and workmanship for a period of one year from the date of shipment to the customer. PASCO will repair or replace, at its option, any part of the product which is deemed to be defective in material or workmanship. The warranty does not cover damage to the product caused by abuse or improper use. Determination of whether a product failure is the result of a manufacturing defect or improper use by the customer shall be made solely by PASCO scientific. Responsibility for the return of equipment for warranty repair belongs to the customer. Equipment must be properly packed to prevent damage and shipped postage or freight prepaid. (Damage caused by improper packing of the equipment for return shipment will not be covered by the warranty.) Shipping costs for returning the equipment after repair will be paid by PASCO scientific. collimating slits focusing lens prism mount Figure 3: Path of Light Through the Prism 4. Attach the Infrared Filter Bracket to the Infrared Light Sensor (if using the Infrared Light Sensor) To observe infrared wavelengths, use the Infrared Sensor instead of the High Sensitivity Light Sensor. a) To replace the high sensitivity light sensor, rotate the threaded post clockwise to loosen the attachment and remove the light sensor. b) Place the base of the filter bracket over the front hole of the light sensor mount, such that the hole in the bracket base aligns over the front hole on the mount and the front hole of the light sensor arm. c) Place the Infrared Light Sensor over the base of the bracket. While holding the sensor in place with one hand, use the other hand to insert the threaded post from beneath the sensor. Rotate the post until the sensor holds firmly in place against the bracket and mount. The glass filter should fit snugly against the sensor, with the bracket under the case (Figure 4). 3 Address: PASCO scientific 10101 Foothills Blvd. Roseville, CA 95747-7100 Phone: FAX: e-mail: Web site: (916) 786-3800 (916) 786-8905 [email protected] www.pasco.com Prism Mount 012-07111A Copyright The PASCO scientific 012-07111 instruction sheet is copyrighted and all rights reserved. However, permission is granted to non-profit educational institutions for reproduction of any part of the Prism Mount instruction sheet providing the reproductions are used only for their laboratories and are not sold for profit. Reproduction under any other circumstances, without the written consent of PASCO scientific, is prohibited. Feedback If you have any comments about the product or manual, please let us know. If you have any suggestions on alternate experiments or find a problem in the manual, please tell us. PASCO appreciates any customer feedback. Your input helps us evaluate and improve our product. To Reach PASCO For technical support, call us at 1-800-772-8700 (toll-free within the U.S.) or (916) 786-3800. fax: (916) 786-3292 e-mail: [email protected] web: www.pasco.com 4