1
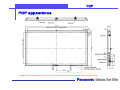
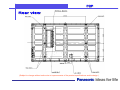
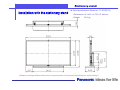
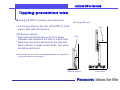
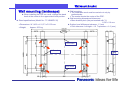
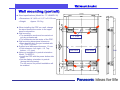
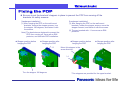
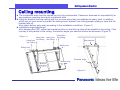
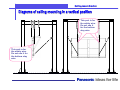
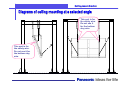
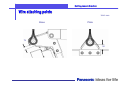
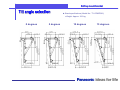
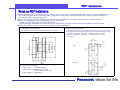
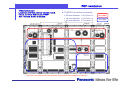
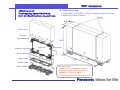
(The ratings and appearance are subject to change without notice.) TH-85PF12U/K/W Dimensions (W x H x D) W 2,015 x H 1,195 x D 99 mm Package size W 2,194 x H 1,480 x D 549 mm Screen size Weight Power consumption 1899/1062/2167 mm PDP: 125 kg / With the package: Approx. 160 kg (*1) 1,250W Display panel Number of pixels (H x V) Contrast 1,920 x 1,080 pixels [1 pixel = 3 cells (RGB)] 40000:1 Dynamic contrast 2,000,000:1 Gray scale levels 6,144 shades of gray (equivalent) Altitude Slot power supply AR coating 0 to 2,800 m 40 W Applied (AGLR finish) Power supply Compliant with the requirements of the destination country Audio output Audio line-out Installation in portrait orientation Environmental requirements Possible (without additional fans, with the power button side up.) Temperature: 0°C to 40°C (Multi-system: 0°C to 35°C) Humidity: 20% to 80% Altitude: 0 to 2,800 m *1: When a plastic pallet is used (The specifications have yet to be determined.) z Install the PDP in accordance with applicable laws and regulations of the destination country/region. z The installation work must be carried out only by professionals. z The power supply for this PDP must meet the requirements of the destination country. The rated power consumption is TBD. It is recommended that the PDP use a dedicated power line. z Provide adequate ventilation in the installation location so that the ambient temperature will not exceed 40°C. Make a clearance of 100 mm or more above and on both sides of the PDP and a clearance of 150 mm or more behind the PDP. z The length of the power cord supplied with the PDP is 3 m. z Position of the center of gravity (Reference) Horizontal and vertical center of gravity: The center of the set Depth from the front to the center of gravity of the set PDP alone: 33 mm With the wall mount bracket: 51 mm z Eye bolt type The size of the eye bolts on the PDP (two on the left and right sides and three on the top) is M12-20 mm. (Subject to change without notice due to improvements of the product specifications and/or design.) (Subject to change without notice due to improvements of the product specifications and/or design.) z Stationary stand The height of the PDP bottom side is 62.5 mm from the stationary stand. The PDP can be set 50 mm higher to avoid interference between the PDP and the stand due to the attachment of a touch panel or for other reasons. At the higher position, the height of the PDP bottom side is 112.5 mm. To prevent the stand from tipping over, fix the stand to the table by four points using the supplied bands. In addition, fix the PDP to the wall by two points using strong wires. The stationary stand weighs 55 kg, and the total weight including the PDP is about 180 kg. Do not install the stand with the PDP in a location that cannot withstand the load. To prevent the PDP from coming off the mounting bracket, fix the PDP with M8 bolts. z Floor stand With the floor stand, the PDP height is adjustable to three different levels. The height of the PDP bottom side is 1,000 mm/900 mm/800 mm from the floor stand. To prevent the stand from tipping over, fix the PDP by four points using adjusters. In addition, fix the PDP to the wall by two points using strong wires. To prevent the PDP from coming off the mounting bracket, fix the PDP with M8 bolts. z Stand specifications (Model No.: TY-ST85PF12) Dimensions: W 1,425 x H 1,413 to 1,606 x D 871 mm Weight: 75.0 kg Height adjustable to three levels A B 800 1,995 900 2,095 1,000 2,195 B A (Subject to change without notice due to improvements of the product specifications and/or design.) z Stand specifications (Model No.: TY-ST85P12) Dimensions: W 1,401 x H 727 x D 443 mm Weight: 55.0 kg (Subject to change without notice due to improvements of the product specifications and/or design.) Fixing the PDP to a wall or post with wires z Fixing with wire Wire / / <Reference values> * Each wire should be have a 4 mm or larger diameter and withstand 0.8 tons or higher load. * Each wire should be anchored to the wall with M10 x 45 mm or larger anchor bolts. Two wires should be anchored. Wire / / / z The installation work must meet applicable laws and regulations of the destination country/region. / / / Stationary stand Floor stand / / / / / / / / / / / / / / / / / / / / Fix the eye bolts on the rear of the PDP to a firm wall or post with strong wires. z When installing the PDP on a wall, change the stand hook at the center to the upper stand hook position. z Stand specifications (Model No.: TY-WK85PV12) Dimensions: W 1,420 x H 1,071 x D 150 mm Weight: Approx. 25.0 kg z Wall mounting The installation work must be carried out only by professionals. The marks denote the center of the PDP. z Wall mounting dimensional tolerances Base bracket pitch (the part marked with *1): 1,230 ± 0.6 mm z Surface level difference tolerance: 1.3 mm Pitch tolerance: Left-right: ±1.0 Top-bottom: ±1.0 (mm) *1 Line mark “H” mark Wall Line mark z Stand specifications (Model No.: TY-WK85PV12) Dimensions: W 1,420 x H 1,071 x D 150 mm Weight: Approx. 25.0 kg z When installing the PDP on a wall, change the stand hook at the center to the upper stand hook position. z Wall mounting The installation work must be carried out only by professionals. The marks denote the center of the PDP. z Wall mounting dimensional tolerances Base bracket pitch (the part marked with *1): 1,230 ± 0.6 mm z Surface level difference tolerance: 1.3 mm Pitch tolerance: Left-right: ±1.0 Topbottom: ±1.0 (mm) z Notes on installation in portrait orientation Model: TH-85PF12 Install the PDP with the power button side down. Set the display orientation to portrait (during the initial setup). The fan control for portrait installation will be enabled. “V” mark *1 Line mark Line mark Wall z Be sure to put the brackets' stoppers in place to prevent the PDP from coming off the brackets for safety reasons. [Landscape installation] (1) After hanging the PDP on the wall mount brackets, remove the stopper screws, turn the stopper 180 degrees, and fasten it with the screws. Note) The brackets are designed to prevent the PDP from coming off, serve as an EMI protector, and facilitate PDP installation. z Stopper position before hanging the PDP [Landscape installation] (1) After hanging the PDP on the wall mount brackets, loosen the stopper screws, move the stopper forward, and fasten it with the screws. (2) The part marked with 1 serves as an EMI protector. z Stopper position after hanging the PDP 1 z Stopper position before hanging the PDP z Stopper position after hanging the PDP Move this stopper in the arrow direction. 1 Turn the stopper 180 degrees. * Two stoppers are provided for the upper bracket. Unit: mm A B C D E 100 100 100 100 150 C B A D E C Unit: mm A 100 B 100 C 100 D 100 E 150 A B D E z The installation work must be carried out only by professionals. Panasonic assumes no responsibility for any problems resulting from faulty installation work. z Hang the bracket from the ceiling with four or more wires that can withstand a heavy load. In addition, attach two or more wires to prevent the ceiling mount bracket from hitting people nearby in case that the bracket falls off. Also attach bottom stay wires according to the installation conditions. (Figure 1) z Installation angle adjustment After hanging the PDP, adjust the bracket position so that the top stay will be parallel to the ceiling. If the top stay is not parallel to the ceiling, the bracket angle you selected cannot be achieved. (Figure 2) <Figure 1> Hang from Hang from the ceiling the ceiling Hang from the ceiling Hang from the ceiling Stay bracket Safety wire Safety wire Bottom stay wire Bottom stay wire Selected angle <Figure 2> This This part part is is for for the safety wire. Do Donot notuse useit it for forthe thebottom bottom stay stay wire. wire. This part is for the safety wire. Do not use it for the bottom stay wire. ///////////////////////////////////////////////// This This part part is is for for the safety wire. Do Donot notuse useit it for forthe thebottom bottom stay stay wire. wire. This part is for the safety wire. Do not use it for the bottom stay wire. ///////////////////////////////////////////////// Unit: mm Base Plate 16 30 z Stand specifications (Model No.: TY-CE85PS12) Weight: Approx. 32.0 kg z Stand specifications (Model No.: TY-CE85PS12) Weight: Approx. 32.0 kg 0 degrees 5 degrees 10 degrees 15 degrees z If the wires used are long, recalculate the load by adding the weights of the wires. z Check with the builder (e.g. the construction JV) as to the strength of the section where the PDP is hung (e.g. steel frames, ceiling slab) to confirm that the section has adequate strength before starting the work. If the strength is not adequate, it is fully expected that the section cannot withstand the load only with external anchors. z Ensure that the wires have been processed with specified parts and tools and maintain the specified strength. z The breaking strength of stainless steel wires varies depending on the manufacturer. Therefore, when using a stainless steel wire, check with the specifications of the wire to confirm that it has the required strength. Drawings and Earthquake Resistance Data (Reference) z Position of the center of gravity TH-85PF12 With the wall mount bracket With the ceiling mount bracket (Tilt: 0 degrees) W (mm) 2,015 Å Å H (mm) 1,195 Å Å D (mm) 99 Å Å Weight (kg) 120 137 152 Position of the center of gravity G (mm) 33 51 45 * The weights and positions of the center of gravity shown above are provisional values currently available. G Position of the center of gravity H W D z When attaching the PDP to the mounting bracket, be sure to use our specified stand hooks. It is not recommendable to use any bracket other than the dedicated ones. The panel or other parts of the PDP may break, leading to screen defects or increasing of the noise emission level. z Be sure to put the brackets' stoppers in place to prevent the PDP from coming off the brackets for safety reasons. z Notes on installation in portrait orientation Model: TH-85PF12 Install the PDP with the power button side down. Set the display orientation to portrait (during the initial setup). The fan control for portrait installation will be enabled. z Stand hook dimensions and wall mount bracket drawing (Reference) Compatible mounting brackets: TY-ST85PF12 /TY-ST85P12 /TY-WK85PV12 /TY-CE85PS12 Stand hook dimensions Wall mount bracket drawing When hanging the PDP on the bracket or removing it, you need to lift the PDP slightly above the final installation position. Ensure that the structural members will not be an obstacle to hanging/removal of the PDP. (Minimum required lift: Landscape -- 75 mm; Portrait -- 35 mm) Landscape [Top] [Bottom] Parts list (Part numbers) Stand hook: TXFMM0101MB Hexagonal socket button head screw: THEA215 (M16 x 50 mm) Spring washer: XWB16BVJ z TH-85PF12 fan airflow and quantity 120-mm diameter: 1.8 m3/min x 4 92-mm diameter: 1.0 m3/min x 4 80-mm diameter: 0.7 m3/min x 2 * The heat vent area and the fan quantity and positions are subject to change. Air outlets Air inlets z Finished package Total weight: 160 kg (PDP: 125 kg Packaging materials: 35 kg) Maximum number of stacks: 1 Bands 549 Carton body Top pad Top cushioning 1,480 Bottom cushioning (Product) Parts box Carton bottom Paper tubes 2,194 Bottom skids Bottom pallet Included items Power cord Hexagonal wrench Remote control M12 eye bolt x 1 Batteries Eye bolt cap x 1 Operating Instructions (Warranty card)