1
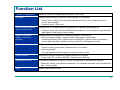
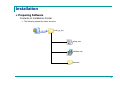
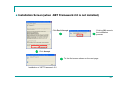
Multi Projector Monitoring and Control Software Setup and Operation Manual June, 2008 1 Contents Software Licensing Agreement 3 Request Regarding Security 4 Operating Environment 5 Function List 6 Preparation 7 Installation 9 Operation Instructions (1) 14 Projector Registration 14 About User Name and Password 15 Operation Instructions (2) Creating a Group 16 16 Operation Instructions (3) 17 Creating a Keyword 17 Operation Instructions (4) 18 Registering a Projector to a Group Relocation/Rearrangement of a Group in the Hierarchical Level Operation Instructions (5) 18 18 19 Assigning a Keyword to a Projector 19 Deleting a Registered Projector/Group/Keyword 20 Operation Instructions (6) 21 Brief Information Display (Monitoring Function) 21 Information Acquisition Interval Setting Change 24 Operation Instructions (7) Detailed Information Display (Monitoring Function) 25 25 Addition/Deletion of Items to/from Detailed Information 27 Operation Instructions (8) 28 Error Display (Monitoring Function) 28 Error Log Storage/File Output 30 Operation Instructions (9) Executing a Control Command 32 32 Operation Instructions (10) 33 Scheduling Function 33 Operation Instructions (11) 36 Opening the Web Control Screen 36 2 Software Licensing Agreement Use of this Software is governed by the terms defined in this Software Licensing Agreement. • Article 1 License Licensee is granted the right to use this software, including the information recorded or described on the CD-ROM and in the instruction manual and any other media provided to the Licensee (collectively “Software”), but all applicable rights to copyright or intellectual property in the Software are not transferable to the Licensee. • Article 2 Use by a Third Party Licensee may not transfer or allow any third party, to use or copy the Software, whether free of charge or not. • Article 3 Restrictions on Copying the Software Licensee may make a single copy of the Software in whole or in part solely for backup purposes. • Article 4 Computer Licensee may install and use the Software on more than one computer owned or managed by Licensee. • Article 5 Reverse Engineering, Decompiling or Disassembly Licensee may not reverse engineer, decompile or disassemble the Software. Matsushita shall not be bound by warranty for any defects in the Software caused by Licensee’s reverse engineering, decompiling or disassembly of the Software. Furthermore, Matsushita or its distributors or dealers will not be responsible for any damage to the Licensee caused by Licensee’s reverse engineering, decompiling or disassembly of the Software. • Article 6 After-sales Service If a problem should occur with the Software while Licensee is using the Software, Licensee should notify Matsushita of the problem by telephone or letter. Matsushita shall undertake to notify Licensee of whether the problem is a known error in the program (“bug”), or whether the way in which the Software is to be used should be modified. Furthermore, the Software is subject to revision without prior notice. • Article 7 Indemnification Matsushita’s liability with respect to this Software is limited to the conditions defined in Article 6 herein. Matsushita or any of its distributors or dealers shall not be liable for any damage suffered by Licensee, either directly or through claims from a third party, arising from or in connection with Licensee’s use of the Software. Furthermore, Matsushita makes absolutely no warranty for the use of this Software for any purpose other than for applications associated with the projector with which this Software is bundled. • Article 8 Export Control Licensee agrees not to export or re-export the Software to any county other than the country of purchase of the projector in any form without the appropriate export licenses under the regulations of the country where Licensee resides or of any other country as may be required by such export or re-export. Please note the following. • Panasonic cannot be held liable for any direct or indirect damages resulting from the use or malfunction of this projector. • Panasonic cannot be held liable for damages arising from data corruption or loss as a result of using this projector. 3 Request Regarding Security When using this product, security breaches of the type described below are conceivable. • Leakage of your private information via this product • Illegal operation of this product by a malicious third-party • Harm to or cessation of operation of this product by a malicious third-party Be sure to implement sufficient security measures. • Make sure the password is as hard to guess as possible. • Change the password periodically. • Matsushita Electric Industrial Co., Ltd. and its affiliated companies never directly ask customers for their password. Do not give out your password even if directly asked by a third-party representing themselves as Matsushita Electric Industrial Co., Ltd. • Always use on a network that has safety protection such as a firewall implemented. • Set passwords, and limit the users that are permitted login access. 4 Operating Environment PC OS Windows 2000 SP4 or later Windows XP Home Edition / Professional SP2 or later Windows Vista Home Basic/Home Premium/Business/Ultimate/Enterprise or later * 64-bit Windows and Mac are not supported. Projector Display resolution 1024 x 768 pixels or higher is recommended Other Wired or wireless LAN connectivity Applicable models • PT-F100NT/FW100NT/F200NT * For network models only • PT-D5600/DW5000/D5700/DW5100/D4000/D3500 • PT-D7700/DW7000 * Optional network board ET-MD77 series required. • PT-D10000/DW10000/DZ12000/D12000 • • Proper operation cannot be guaranteed if the above system requirements are not met or if a self-built computer is used. Proper operation cannot be guaranteed for all computers even if they satisfy the above requirements. 5 Function List Connection/registration Maximum number of registerable projectors: 1,024 units Grouping Categorizes projectors into groups using "groups" or "keywords." Group: Up to 1,024 units, hierarchical arrangement (tree view), drag-and-drop for "move" and "register" Keyword: Up to 1,024 units Brief information display (monitoring function) Displays a list of multiple projectors registered in a selected group/keyword. Projector name, status (power ON/Mute/Warning/Error: Icon indication), input terminal, input signal, model name, serial number Detailed information display (monitoring function) Displays detailed information of a selected projector in text format. Brief information display + lamp selection, lamp output, lamp status, operating/remaining time, intake/exhaust temperature, optical module temperature, module operating time, software version (main/NT), self-diagnosis results Error display Displays a list of projectors that generated warnings/errors. Projector name, group name, detection time, error status Error log storage The log of generated warnings/errors can be output to a file. Control function Executes a control command in multiple projectors in a group. Power ON/OFF, AV Mute ON/OFF, input channel switching Scheduling function Executes the above three types of control commands at a specified day and time Maximum number of scheduled operations: 100, repeated operation (day of week/every day + time) possible Other Opens Web Control screen. 6 Preparation PC Network Setup Set the IP address, subnet mask and gateway according to the operating environment. (Consult your network administrator. Turn off the proxy setting in the browser or register the IP addresses of the projectors to the proxy exceptions list. Projectors Network Setup Set the host name (projector name), IP address, subnet mask, and gateway. (Consult your network administrator.) Set DHCP to OFF and set a fixed IP address, making sure that the entered IP address is not used by any other device on the LAN. If the entered IP address is used by another device, the projector cannot be registered. The host name set for the projector is displayed as the projector name on the software. Enable Web Control, Network Standby and PJLink Control. For models in which the Web port number can be set, set the port number to "80." Others Disable Input Auto Search. 7 Projector Network Setting Screen (F100NT, with wired LAN connection) Select NETWORK. Select WIRED LAN. 1. Set NETWORK STANDBY to ON. 2. Set WEB CONTROL to ON. The projector name can be changed by clicking Name Change. Consult your network administrator for the IP address, subnet mask and gateway to enter. Set DHCP to OFF. After entering all of the settings, click OK to apply them. 8 Installation Preparing Software Contents of Installation Folder The following shows the folder structure multi_pj_ctrl extract setup.exe installer.msi dotnetfx 9 Installation Execute "setup.exe" in the folder of the desired language located in the main program folder to initiate the installation process. If the software is already installed, a screen for repair or uninstallation will appear. When the license agreement screen appears, select I Agree, and click NEXT or OK in all subsequent screens. If Microsoft .NET Framework 2.0 is installed in the PC, an installer will automatically start up. In that case, install the program by following the instructions of the installer. After the software is installed, the following shortcut icon appears on the desktop. 10 Installation Screen (when .NET Framework 2.0 is not installed) Click Don't Accept. Clicking OK cancels the installation process Click Accept. To the first screen shown on the next page Installation of .NET Framework 2.0 11 Installation Screen (when .NET Framework 2.0 is installed) 12 Confirming Program Startup After the software is installed, double-click the shortcut icon on the desktop to make sure that the program starts up properly. If the Japanese-version and/or Chinese-version program is installed in a PC running an OS other than the Japanese/Chinese version, screens may not appear properly. Brief information display pane Group/keyword tree view pane Command execution log pane 13 Operation Instructions (1) Projector Registration 2 1 4 1. 3 Select the desired group icon in the group/keyword tree view pane, and perform either (a) or (b). 5 (a) On the menu bar, select File → Create New Projector (1 in the above diagram). (b) Right-click the selected group icon, and select Create New Projector in the context menu. 2. Enter the IP address of the projector to connect to, user name and password (2 in the above diagram). 3. Select Test (3) to conduct a connection test. 4. → If the connection test does not end successfully, check the IP address, user name and password. Click OK in the connection test success/registration confirmation dialog box (4 in the above diagram). ⇒ A projector icon will be created in the group/keyword tree view pane. It is possible to register a projector without performing the connection test by clicking the Create button (5 in the above diagram). 14 About User Name and Password The default user name and password are shown in the table below. If the password has been changed in the Web Control screen, enter the currently valid password. Model number User Name Default Password F100NT/FW100NT/F200NT user1 None D5600/DW5000/D5700/DW5100/D4000/D3500 D7700/DW7000 D10000/DW10000 user1 panasonic DZ12000/D12000 admin1 panasonic 15 Operation Instructions (2) Creating a Group 1 2 1. 2. Select the desired group icon in the group/keyword tree view pane, and perform either (a) or (b). (a) On the menu bar, select File → Create New Group (1 in the above diagram). (b) Right-click the selected group icon, and select Create New Group in the context menu. Enter a new group name (max. 128 characters) in the Group Name text box (2 in the above diagram), and click OK. (* A memo may be added, if desired.) ⇒ A new group icon will be created in the group/keyword tree view pane. 16 Operation Instructions (3) Creating a Keyword 1 2 1. 2. Select the desired group/projector/keyword icon in the group/keyword tree view pane, and select File → Create New Keyword (1 in the above diagram) on the menu bar. Enter a new keyword (max. 128 characters) in the Keyword text box (2 in the above diagram), and click OK. (* A memo may be added, if desired.) ⇒ A new keyword icon will be created in the group/keyword tree view pane. 17 Operation Instructions (4) Registering a Projector to a Group A projector can be registered to a group or moved from one group to another by dragging the icon of the projector in the group/keyword tree view pane onto the icon of the destination group. Relocation/Rearrangement of a Group in the Hierarchical Level A group can be moved/rearranged in the hierarchical level by dragging the group icon onto another group in the group/keyword tree view pane. The above operation also moves the groups and projectors belonging to that group. The information of the operation schedules (described in a later section) for the relocated projectors and the group will also be moved together. 18 Operation Instructions (5) Assigning a Keyword to a Projector 2 1 3 1. 2. 3. Select the desired projector icon in the group/keyword tree view pane, and perform either (a) or (b). (a) Right-click the selected projector icon, and select Property in the context menu (1 in the above diagram). (b) Select File → Property on the menu bar. Move the keyword to be assigned from Keyword List to Registered Keyword List by using the >> button (2 in the above diagram). Click Update (3 in the above diagram) to assign the keyword. * To cancel the keyword assignment, follow the above procedure in reverse. 19 Deleting a Registered Projector/Group/Keyword Select the projector/group/keyword icon to be deleted in the group/keyword tree view pane, and perform either (a) or (b). When a confirmation dialog (a) Select File → Delete on the menu bar (see the above diagram). box appears, click OK. (b) Right-click the selected icon, and select Delete in the context menu. * A group registered with projectors cannot be deleted. To delete such a group, delete the registered projectors or change the registered location of the projectors (move to another group) first. 20 Operation Instructions (6) Brief Information Display (Monitoring Function) Displayed information will be updated according to the settings. Information will be automatically updated every 10 minutes in the default setting. Information is displayed by group or keyword. Information that cannot be obtained is indicated by "---". The display of the signal name and serial number is dependent on the model. Signal name display is not supported by F100/FW100/F200, D3500, D5600/DW5000 or D7700/DW7000 models. Serial number display is supported on models of the D12000 series and newer. Projector Name Displays the information of all projectors that belong to the selected group/keyword. Status Input Source Signal Model Name Serial Number Contents of Status Display All-time display • Power supply status • AV Mute status OR • Not connected or information update failure • Information acquisition failure Displayed only when detected • • • • Lamp warning or error Temperature warning or error Filter warning or error Other warning or error 21 List of Status Icons Not connected Information update failure Information acquisition failure Power supply status Warning/error Lamp warning Lamp error Power ON Temperature warning Power OFF (Standby) Temperature error Cooling operation Warm-up operation Filter warning Filter error AV mute status AV Mute OFF AV Mute ON Other warning Other error (Fan error, cover open, etc.) 22 To display up-to-date information after the status of a projector has changed due to operations performed with a remote control or control panel, perform either (a) or (b) below. (a) Press the F5 button on the keyboard. (b) Select File → Update Information on the menu bar (1 in the diagram below). The indication on the status bar (2 in the left diagram) changes from Ready to Updating Projector Information and a progress bar appears on the right side. When the status bar indicates Ready again, the displayed information has been updated. 1 2 23 Information Acquisition Interval Setting Change 1 2 3 1. 2. 3. Select Options → Setting on the menu bar (1 in the above diagram). Select the General tab, and enter the desired time (unit: minutes) in the Interval Time text box (2 in the above diagram).The setting range is from 1 to 9,999 minutes, in 1-minute steps. * If the Update Interval of Projector Information checkbox is not selected, information will not be updated automatically. * If the Check Start Up checkbox is selected, information will be updated at each startup of the software. Click Update to apply the new settings (3 in the above diagram). 24 Operation Instructions (7) Detailed Information Display (Monitoring Function) 2 1 1. 2. Select the desired projector icon in the group/keyword tree view pane, and perform (a), (b) or (c). (a) Right-click the selected projector icon, and select Property in the context menu (1 in the above diagram). (b) Select File → Property on the menu bar. (c) Right-click the projector in the brief information display pane, and select Property in the context menu. Select the Details tab (2 in the above diagram) in the displayed window. *Only when step (a) or (b) described in step 1 above is performed. 3. Information that could not be obtained is indicated with "---". 25 Items Indicated in Detailed Information Display The detailed information display shows the information listed in the table below. Item Description Item Description Projector Name Projector name Lamp 3 Status Lamp 3 status Manufacturer Manufacturer's name Lamp 3 Runtime Lamp 3 operating time Model Name Model name Lamp 3 Remain Time Lamp 3 remaining time Power Power supply status Lamp 4 Status Lamp 4 status AV Mute AV Mute status Lamp 4 Runtime Lamp 4 operating time Input Input channel Lamp 4 Remain Time Lamp 4 remaining time Source Signal Input signal Input Air Temperature Intake temperature Lamp Select Lamp selection Output Air Temperature Exhaust temperature Lamp Power Lamp output Optical Module Temperature Optical module temperature Lamp 1 Status Lamp 1 status Projector Runtime Projector operating time Lamp 1 Runtime Lamp 1 operating time Main Version Main microcomputer software version Lamp 1 Remain Time Lamp 1 remaining time Network Version Network microcomputer software version Lamp 2 Status Lamp 2 status Serial Number Serial number Lamp 2 Runtime Lamp 2 operating time Self Test Self-diagnosis results Lamp 2 Remain Time Lamp 2 remaining time 26 Addition/Deletion of Items to/from Detailed Information Display and Change of Display Sequence 1 2 3 6 7 1. 2. 4 5 Select Options → Setting on the menu bar (1 in the above diagram). Select the Projector Detailed Information tab (2 in the above diagram) in the Setting window. i. Select an item in the Display Item list (3 in the above diagram), and move it to the Item of Projector Detailed Information list (5 in the above diagram) by using the << button (bottom button in 4 in the above diagram) to delete it from the detailed information display. Select an item in the Item of Projector Detailed Information list, and move it to the Display Item list by using the >> button (top button in 4 in the above diagram) to add it to the detailed information display. ii. Select an item in the Display Item list, and move it up or down by using the "S“ or "T" button (6 in the above diagram) to change the display sequence in the detailed information display. 3. Click Update (7 in the above diagram) to apply the setting change. 27 Operation Instructions (8) Error Display (Monitoring Function) As soon as a warning or error is generated, the pertinent icon changes. * When a warning and an error occur simultaneously, they are indicated as an error. The icon of the group to which the warning/error generating projector belongs also changes. 警告/エラーのアイコンのみ表示します ※アイコンは簡易情報表示エリアのもの と同じです Projector/group icon Warning generation: appears at the lower right of the icon. Error generation: appears at the lower right of the icon. * Keyword icons will not change. When icons indicating a warning or error are shown, select the Error Projector tab. ⇒ The display changes to a screen that shows a list of all projectors that have generated a warning or error. 28 Warning/Error Generating Conditions When a warning or error is detected, the projector unit will be set to the following status. Detected warning/error Projector status Temperature warning Intake temperature, exhaust temperature or optical module temperature is high. Optical module temperature is low. Temperature error Intake temperature, exhaust temperature or optical module temperature is high. Optical module temperature remained low for a certain time duration. Intake temperature, exhaust temperature or optical module sensor is disconnected. Lamp warning Lamp replacement time has been reached. Lamp error Lamp replacement is overdue, lamp illumination failed, lamp is not installed, or lamp is malfunctioning. Filter warning Low remaining amount of ARF. Filter error Filter is clogged, ACR/ARF is not installed, filter winding failed, or there is no remaining ARF. Other warning — Other error Lamp unit cover remaining open, fan error, shutter error, aperture error, color wheel error, ACR/ARF not installed, filter cleaning process time-out, DC voltage error, lens shift error, internal clock battery replacement required, no response from internal IC, software version check error, microcomputer software error, microcomputer internal error, etc. For further details, refer to the operation manual of the projector. 29 Error Log Storage/File Output The projector error log is stored for the time period specified in the software. The error log can also be output to a file (csv format). • Select File → Save Error Projector Information on the menu bar, and select the location to save the log and enter a file name (see the above diagram). • Select Options → Setting on the menu bar, and click the General tab. Set the error log storage period to 15, 30, 60 or 90 days in the Preservation period of Error Projector Information section. The error log can be cleared by clicking the Clear Error Log button. 30 About Error Log File Contents The error log file describes error information in the following format. Multi Multi Projector Projector Monitoring Monitoring & & Control Control Software Software Version, V.1.0L017 Version, V.1.0L017 Time, Time, 2008/04/07 2008/04/07 13:55:03 13:55:03 ← Software name ← Version ← Date and time of file storage Projector Projector Name, Name, Developer, Developer, Model Model Name, Name, Checked Checked Time, Time, Error Error Status, Status, Self Self Diagnosis Diagnosis F100NT-3, F100NT-3, Panasonic, Panasonic, F100NT, F100NT, 2008/03/10 2008/03/10 12:54:47, 12:54:47, 120000, 120000, 0000000000000000 0000000000000000 D5700-1, D5700-1, Panasonic, Panasonic, D5700, D5700, 2008/03/21 2008/03/21 08:11:47, 08:11:47, 002000, 002000, 0000000000000000 0000000000000000 D10000-1, D10000-1, Panasonic, Panasonic, D10000, D10000, 2008/03/24 2008/03/24 21:31:47, 21:31:47, 000200, 000200, 00000000000000000000000000000000 00000000000000000000000000000000 FW100NT-2, Panasonic, FW100NT, 2008/04/01 14:01:47, 000010, FW100NT-2, Panasonic, FW100NT, 2008/04/01 14:01:47, 000010, 0000000000000000 0000000000000000 [EOF] ← File end indication [EOF] The following information is stored. Projector name Manufacturer's name Model name Time when error generation was confirmed Error status: Acquired error information (6 digits) Self-diagnosis information: Self-diagnosis information (16 or 32 digits) that can be obtained by the selfdiagnosis command Provide this information when contacting the Service Department. 31 Operation Instructions (9) Executing a Control Command 2 3 1 4 5 1. 2. 3. Select a group/keyword/projector icon in the group/keyword tree view pane (1 in the above diagram). Select Control → Control Command on the menu bar to open the control command execution window (2 in the above diagram). After selecting a command, click Start (3 in the above diagram). Executable commands 4. Power ON/OFF, AV Mute ON/OFF (Audio/Video/Video & Audio), input terminal switching (RGB 1-9/Video 1-9/ Digital 1-9/Storage 1-9/Network 1-9) The results of command execution will be shown in the Command Execution Result section (4 in the above diagram) and in the command execution log pane (5 in the above diagram). 32 Operation Instructions (10) Scheduling Function Temporarily disables the scheduled operation. 1 2 1. 2. 3. 4 3 In the group/keyword tree view pane, select the icon of a group/keyword/projector to be programmed for a scheduled operation, and perform either (a) or (b). (a) Right-click the selected icon, and select Schedule in the context menu (1 in the above diagram). (b) Select File → Schedule on the menu bar. To add a new schedule, click Add. To correct or change an existing schedule, select that schedule and click Edit (2 in the above diagram). * Schedules indicated in the Set Position section cannot be modified. Create a schedule and click OK (3 in the above diagram). Setting items 4. Command start time: Specified date/Everyday/Weekly (multiple days of the week can be specified) + Time Control command: Power ON/OFF, AV Mute ON/OFF, input terminal switching (one each, sequence can be changed) The set command is executed at the specified time (PC clock time). The results will be displayed in the command execution log pane (4 in the above diagram). 33 Correcting/Changing Schedules in "Set Position" When a schedule is set from a location other than the selected group/keyword/projector, The "Set Position" indicates the location where the schedule was programmed. If it was set for the group to which the projector belongs, "G: Group Name" is indicated. If it was set for the keyword assigned to the projector, "K: Keyword" is indicated. To correct/change a schedule indicated in "Set Position," close all schedule setting windows, select a group or keyword indicated in "Set Position" in the group/keyword tree view pane, and follow the schedule correction/change procedure described on the previous page. 34 Displaying a Schedule List and Confirming Overlapping Schedules If there are overlapping schedules (with the same start time specified twice or more), proper operation of the projector cannot be guaranteed. Therefore, it is necessary to correct overlapping schedules. Displaying Displaying the the Schedule Schedule "Set "Set Position" Position" K: K: Keyword Keyword P: P: Projector Projector G: G: Group Group 1. 2. Overlapping Overlapping schedules schedules (with (with the the same same start start time time specified twice or more) specified twice or more) are are indicated indicated in in red. red. Select Options → All Schedule List on the menu bar. A list of schedules will be displayed. If there are overlapping schedules for one or more projectors, the lines will be indicated in red. ⇒ In that case, perform the schedule correction/change procedure described in the previous pages to cancel overlapping schedules or check the Invalid checkbox shown at the center of the diagram on page 33 to temporarily disable the schedules. 35 Operation Instructions (11) Opening the Web Control Screen To open the Web Control screen, double-click a projector name in the brief information display pane or right-click it and select Web Control. The Web Control screen can also be opened from a Web browser. 36 Trademarks • Microsoft and its logo as well as Windows, Windows XP® and Windows Vista® are either registered trademarks or trademarks of Microsoft Corporation in the United States and/or other countries. • Other company names, product names or other names noted in this manual are trademarks or registered trademarks of the respective companies. Note that ® and TM marks are not indicated in the text of this manual. Notes: • Unauthorized use or reproduction of part or all of this product software and manuals is strictly prohibited. • Panasonic cannot be held liable for any effects resulting from the use of this product software and manuals. • Panasonic reserves the right to revise this product software specifications and manual contents without notice. Matsushita Electric Industrial Co., Ltd. © 2008 Matsushita Electric Industrial Co., Ltd. All Rights Reserved. 37