1
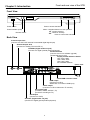
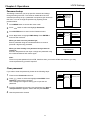
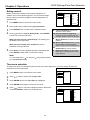
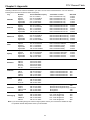
OWNER'S MANUAL
HIGH DEFINITION SET-TOP-BOX
MODEL: HDSTB100
N111
PALSONIC CORPORATION PTY LTD
1 JOYNTON AVENUE
WATERLOO NSW 2017 AUSTRALIA
TEL: (02) 9313 7111
FAX: (02) 9313 7555
www.palsonic.com.au
PALSONIC CUSTOMER SERVICE
TELEPHONE
AUSTRALIA: 1300 657 888
Table of Contents
Set-up and Quick Use Guide ............................ 1
Chapter1:Safety Instructions ........................... 2
Chapter 2: Introduction ..................................... 3
Front and rear view of the STB .................. 3
Remote control functional key list .............. 4
Menu overview............................................ 7
Chapter 3: Getting Started................................ 8
Connection.................................................. 8
Chapter 4: Operation.......................................... 13
Program Search.......................................... 13
Channel and Program Selection................. 14
Channel Banner.......................................... 15
Audio setup/Default setting......................... 16
LOCK Settings............................................ 17
Time Zone Selection................................... 18
Chapter 5: Appendix.......................................... 19
DTV channel Table..................................... 19
Troubleshooting.......................................... 20
Specifications............................................. 21
SET-UP AND QUICK USE GUIDE
Step 1: Connect AC Power Cord
Plug the AC power cord into the AC outlet. Do not turn on any devices until you
have finished making all necessary connections.
Step 2: Antenna Connection
Connect the antenna cable to the RF
details, please refer to page 8).
IN jack on the rear panel of the STB (For
Step 3: Connecting to Monitor
A. If your monitor is an Analog Monitor, please follow the diagram and notes
in page 9 when connecting the STB to your monitor.
B. If your monitor is a HD Monitor (YPbPr type), please follow the diagram
and notes in page 10 when connecting the STB to your monitor.
C. If your monitor is a HD Monitor (RGB type), please follow the diagram
and notes in page 11 when connecting the STB to your monitor.
Step 4: Connecting to a Secondary Display or VCR
Please follow the diagram and notes in page
Secondary Display or VCR.
12 when connecting the STB to the
Step 5: Connecting to an Amplifier
Please follow the diagram and notes in page
Amplifier.
12 when connecting the STB to the
Step 6: Turning STB On
Press the Power Switch on the STB to turn on the STB.
Note: Monitor should also be turned on.
Step 7: Setting Time Zone
To obtain local time, you should first set local time zone. For further details, please
refer to page 18.
1
Chapter 1: Safety Instructions
CAUTION: PLEASE READ AND OBSERVE ALL WARNINGS AND INSTRUCTIONS IN THIS
INSTALLATION AND OPERATING GUIDE AND THOSE MARKED ON THE UNIT. RETAIN THIS
GUIDE FOR FUTURE REFERENCE.
This set has been designed and manufactured to assure personal safety. Improper use can result in electric
shock or fire hazard. The safeguards incorporated in this unit will protect you if you observe the following
procedures for installation, use, and servicing.
This unit does not contain any parts that can be repaired by the user.
DO NOT REMOVE THE CABINET COVER, OR YOU MAY BE EXPOSED TO DANGEROUS VOLTAGE.
REFER SERVICING TO QUALIFIED SERVICE PERSONNEL ONLY.
1. Read these instructions. - All these safety and operating instructions should be read before the product is
operated.
2. Keep these instructions. - The safety, operating and use instructions should be retained for future reference.
3. Heed all warnings. - All warnings on the product and in the operating instructions should be adhered to.
4. Follow all instructions. - All operating and use instructions should be followed.
5. Do not use this apparatus near water. For example: near a bath tub, wash bowl, kitchen sink, laundry tub, in
a wet basement; near a swimming pool; etc.
6. Clean only with dry cloth. Unplug this product from the wall outlet before cleaning. Do not use liquid
cleaners.
7. Do not block any ventilation openings. Install in accordance with the manufacturer's instructions.
Slots and openings in the cabinet are provided for ventilation, to ensure reliable operation of the product, and
to protect it from over- heating. The openings should never be blocked by placing the product on a bed, sofa,
rug or other similar surface. This product should not be placed in a built-in installation such as a bookcase or
rack unless proper ventilation is provided and the manufacturer's instructions have been adhered to.
8. Do not install near any heat sources such as radiators, heat registers, stoves, or other apparatus
(including amplifiers) that produce heat.
9. Do not defeat the safety purpose of the grounding-type plug. A grounding type plug has two blades
and a third grounding prong. The third prong are provided for your safety. If the provided plug does
not fit into your outlet, consult an electrician for replacement of the obsolete outlet.
10. Protect the power cord from being walked on or pinched particularly at plugs, convenience
receptacles, and the point where they exit from the apparatus.
11. Only use attachments/accessories specified by the manufacturer.
12. Use only the cart, stand, tripod, bracket, or table specified by the manufacturer, or sold with
apparatus. When a cart is used, use caution when moving the cart/ apparatus combination to avoid
injury from tip-over.
13. Unplug this apparatus during lightning storms or when unused for long periods of time.
14. Refer all servicing to qualified service personnel. Servicing is required when the apparatus has been
damaged in any way, such as power-supply cord or plug is damaged, liquid has been spilled or
objects have fallen into the apparatus, the apparatus has been exposed to rain or moisture, does not
operate normally, or has been dropped.
2
Front and rear view of the STB
Chapter 2: Introduction
Front View
Press to access the Menu
Power Switch
Menu navigation button in menu operation
: Volume down/up
: Channel down/up
Power Indicator (LED)
Remote Sensor
Press to confirm the selection
Back View
Antenna Input Jack
(Connect it to VHF/UHF antenna for terrestrial digital signal input)
Antenna Output Jack
(Connect it to analog TV tuner's RF in.)
COAXIAL (Digital audio out jack)
(Connect it to digital (coaxial) audio equipment)
RS-232 interface
(Connect it to PC for software upgrade)
(Authorised service only)
Display Format Selection Switch
HD1: 576p, 50Hz
HD2: 1080i, 50Hz
HD3: 720p, 50Hz
SD: standard definition
Power Cord
RS232
Y
YPbPr/RGB selection switch
RGB output
(Connect it to HD or
widescreen TV monitor's RGB input)
YPbPr output
(Connect it to HD or widescreen TV monitor)
AV1 output jacks
(S-VIDEO, VIDEO, AUDIO: L, R)
(Connect it to analogue TV)
AV2 Output
(Connect it to VCR)
OPTICAL (Digital audio out jack)
(Connect it to digital (optical) audio equipment)
3
Remote control function key list
Chapter 2: Introduction
You can operate every function of this STB using the buttons
on the remote control handset. Below is the remote control
functional key list.
Press to turn ON and OFF (in standby).
Press to mute the sound. Press again to restore.
0~9
Press numeric keypad to select any channel.
In menu operation, used to enter numerical values
wherever required, e.g. to enter a password.
DSP
You can quickly check the status of current display
program by pressing the DSP button.
Press DSP button twice to display EPG information if
available.
You can choose different audio outputs in Audio
Setup menu. The STB includes standard audio mode
options such as stereo or mono sound to match the
broadcast signal or your home entertainment stereo
AUDIO system. Other audio mode options may be supported
by your service provider or TV broadcaster, such as
selecting alternate languages, or different
commentators for sport events.
Press AUDIO button, then make use of menu
navigation button ( , ) and ENTER button to
select.
VOLUME +/- Press to increase or decrease the volume.
PROGRAM+/- Select next/previous programs.
Remote control battery installation
Detach the battery cover on the rear of the
remote control, and insert two size AAA
batteries in correct polarity.
Caution
Do not mix old and new batteries. Never
mix different types of batteries (standard,
alkaline, etc.).
Remote Control Operation Range
Point the remote control at the remote
sensor and press the buttons.
Distance: About 5 m from the front of
the remote sensor.
Angle: About 300 in each direction of
the front of the remote sensor.
LIST
When you are watching TV channels, you can press
LIST button to call up the Program List.
MIX
Press to conceal or reveal main picture and (or) PIP
when viewing teletext.
TELETEXT Press to display teletext on the screen if available.
Note: normally it will display teletext index page
P100 when pressing TTX button. If TV station does
not broadcast teletext information but caption, the
unit will switch to Page 801 to display Caption after
15 seconds.
If you are sure that there is no index page, you can
directly enter into page 801 to save time. Whether
there is index page or not, you can consult local
station.
4
Remote control functional key list
Chapter 2: Introduction
Brings up the main menu. Press again to return to
11 MENU normal viewing.
12 EXIT
Press to exit the current menu and return to previous
level menu.
13
Menu navigation buttons.
14 ENTER Press to select the highlighted menu item or enter
into sub-menu.
Press to select picture aspect ratio to match signal
15 ASPECT and monitor format. You can also change the aspect
ratio for your personal viewing preference. Each time
the ASPECT button is pressed, the STB will cycle to
the next available aspect ratio choice.
Note: see following chart for illustrations of the
various aspect ratios.
15
Source
Signal
Pressing ASPECT button
16:9
16:9 FULL 4:3 LETTERBOX
4:3
4:3 FULL 16:9 SIDEBAR
4:3 ZOOM
16:9 ZOOM
Full Aspect (16:9 FULL, 4:3 FULL)
16:9 or 4:3 picture will be displayed in the centre of
the viewing screen at full screen width and height.
Cautions regarding use of remote control
Do not expose the remote control to
shock. In addition, do not expose the
remote control to liquids, and do not
place in an area with high humidity.
Do not install or place the remote
control under direct sunlight. The
heat may cause deformation of the
unit.
The remote control may not work
properly if the remote sensor
window of the main unit is under
direct sunlight or strong lighting. In
such a case, change the angle of the
lighting or STB, or operate the
remote control closer to the remote
sensor window.
Zoom Aspect (4:3 ZOOM, 16:9 ZOOM)
The picture will be expanded uniformly (width and
height) to fill the viewing screen. The picture will be
cropped, either horizontally or vertically to fit the
viewing screen. The cropped portion of the original
picture will be lost from view.
In some cases, in order to properly view Captioning,
you may change the aspect ratio from ZOOM to Full.
4:3 Letterbox Aspect
Video formats with aspect ratios greater than 16:9 will
be displayed at the proper width, so no video
information is lost. Black bars will appear above and
below the picture.
16:9 Sidebar Aspect
4:3 pictures will be viewed on a wide aspect TV
screen with vertical bars on both sides of the picture.
5
Remote control functional key list
Chapter 2: Introduction
16 PIP/VCR
Switch between PIP and VCR for the secondary
program display.
Note: For PIP output or VCR output, you can
only select one output at the same time. If PIP is
selected, then VCR can not be selected; If VCR
is selected, then PIP can not be selected. You
can press PIP/VCR button to toggle and select
one mode you desire.
17 PIP control buttons
ON/OFF: to turn on/off PIP function.
POS.: to select PIP position.
PR+/-: to select next/previous program for PIP.
SWITCH: to swap the main and sub-pictures if
the secondary display is at PIP status. Or to
switch VCR program to main screen display and
main program to VCR if the secondary display is
at VCR status.
16
LIST: to display PIP (or VCR) program list.
Note: when pressing PIP/VCR and PIP control
buttons, within 5 seconds after corresponding
OSD disappear, if you press digit buttons, DSP,
ASPECT, VOLUME+/-, MUTE buttons, it will
affect PIP picture (or VCR picture). After 5
seconds, it will affect main picture.
17
6
Menu Overview
Chapter 2: Introduction
Menu Overview
1
Press MENU button to access the menu mode.
2
Press
3
Press ENTER button to confirm and enter into its sub-menu.
4
In menu operation, press
the selected menu items .
5
button to select and highlight the menu item upward or downward.
and
to navigate in menus, press ENTER to activate
Press EXIT button to exit the current menu and return to previous-level menu while
pressing MENU button will exit the menu mode.
Quick Search
Auto Search
Manual Search
Program
System
Default
Main Menu
Password
Rating Control
Password Setup
Clear Password
Time
Time Zone
7
Connection
Chapter 3: Getting Started
Connect AC power cord
Plug the AC power cord into an AC outlet. Do not turn on any devices until you have finished
making all necessary connections.
Connecting to Antenna
Follow this diagram when connecting.
Antenna
Rear of STB
RS232
Y
Rear of TV
8
Connection
Chapter 3: Getting Started
Display Formats Overview
The HD-STB Tuner offers various display formats and multiple video outputs. When the HD-STB Tuner is
connected to A/V systems, the HD-STB Tuner can provide video signal formats 1080i, 720p, 576p, or 576i.
1080i, 720p and 576p modes are available for component video (YPbPr) and monitor outputs.
576i mode is available for VIDEO and S-VIDEO outputs.
The HD-STB Tuner has two digital audio outputs; Dolby Digital 5.1 and PCM. The HD-STB Tuner sends out
digital audio signal to OPTICAL and COAXIAL audio outputs when a digital broadcast is being received by
the HD-STB Tuner.
Connecting to an Analog monitor
Follow this diagram when connecting.
Antenna
Rear of STB
RS232
Y
OR
Note:
Rear of TV
Connect video (or S-video) cable from the OUTPUT 1 video (or S-video) jack on the STB to the video (or
S-video) input jack on the TV. S-video is recommended to be used because S-video will provide better
picture quality.
These connections are only available when SD (576i display format) is selected by toggling the Display
Format Selection Switch.
Important
After you toggle the Display Format Selection Switch, you must turn off the STB and then turn on
again, then the toggling can effect.
9
Connection
Chapter 3: Getting Started
Connecting to a HD monitor (YPbPr type)
Follow this diagram when connecting.
Antenna
Rear of STB
RS232
YPbPr
Rear of HD Ready TV
Note:
The YPbPr/RGB selection switch must be set to YPbPr.
The component out jacks are available when HD1 (576p), HD2 (1080i), or HD3 (720p) display format is
selected.
Important
After you toggle the Display Format Selection Switch, you must turn off the STB and then turn on
again, then the toggling can effect.
10
RGB
Connection
Chapter 3: Getting Started
Connecting to a HD monitor (RGB type)
Follow this diagram when connecting.
Antenna
Rear of STB
RS232
YPbPr
RGB
Rear of HD Ready TV
Note:
The YPbPr/RGB selection switch must be set to RGB.
The RGB out jack is available when HD1 (576p), HD2 (1080i), or HD3 (720p) display format is selected.
Important
After you toggle the Display Format Selection Switch, you must turn off the STB and then turn on
again, then the toggling can effect.
11
Connections
Chapter 3: Getting Started
Connecting to a VCR
Follow this diagram when connecting.
Rear of STB
Note:
These connections are only available when VCR is selected by
pressing PIP/VCR button.
Rear of VCR
Connecting to an Amplifier
Follow this diagram when connecting.
Rear of STB
RS232
OPTICAL
Amplifier
COAXIAL
DIGITAL INPUT
Connecting to an amplifier equipped with OPTICAL or COAXIAL.
12
Program Search
Chapter 4: Operations
You must perform the program search when using the STB at the first time. There are three ways to search
programs: Quick Search, Auto Search and Manual Search.
Quick Search
If you live in the cities listed on the Quick Search menu, you may go ahead to select your city and start
scanning all digital TV channel Signals.
1
2
3
4
5
6
7
Press MENU button to access the menu mode.
Press
button to select and highlight Program.
Program
System
Password
Time
Quick SRCH
Auto SRCH
Manual SRCH
Program
System
Password
Time
Quick SRCH
Auto SRCH
Manual SRCH
Press ENTER button to enter into the Program menu.
Press
button to highlight Quick SRCH.
Press ENTER button to enter into Quick search sub-menu.
Highlight the first menu bar and use
you live in.
button to select the city
Move the highlight to Begin and press ENTER to start the
searching.
Please Select City
Adelaide
Begin
To cut off the searching during the process, highlight CANCEL and
press ENTER.
Cancel
Searching Ch 11...
Auto Search
Auto search will automatically find all channels (digital) available
through the antenna inputs, and store all the active channels in the
channel list.
1
Enter into Program menu and select Auto SRCH. Press ENTER
button to enter into Auto search sub-menu.
2
Move the cursor to Begin and press ENTER.
Now the auto channel search process begins.
3
When channel scanning is complete, the first channel found
appears on the TV screen.
Program
System
Password
Time
Quick SRCH
Auto SRCH
Manual SRCH
Program
System
Password
Time
Quick SRCH
Auto Search Channels 6-69
Auto SRCH
Manual SRCH
Begin
Cancel
To cut off the searching during the process, highlight CANCEL
and press ENTER.
Searching Ch 27...
13
Chapter 4: Operations
SpeProgram Search/Channel & Program selection
Manual Search
If desired programs can not be searched, you can make use of
Manual Search.
1
2
3
4
5
6
7
Press MENU button to access the menu mode.
Press
Program
System
Password
Time
Quick SRCH
Auto SRCH
Manual SRCH
Program
System
Password
Time
Quick SRCH Manually Enter Channels
Auto SRCH
CH No
08
Manual SRCH
button to select and highlight Program.
Press ENTER button to enter into the Program menu.
Press
button to highlight Manual SRCH.
Press ENTER button to enter into Manual search sub-menu.
Highlight CH NO. and press ENTER. Use
button to move the
cursor rightward or leftward and use
button to select
number (or directly input the number by digit buttons), then press
ENTER. Be sure you know the channel number.
(You can refer to Digital TV channel table on page 19).
Freq.
OK
Searching...
Move the highlight to OK and press ENTER.
Now it starts searching.
Note: Normally it is unnecessary to input the frequency value. However, if you want to input the
frequency, you can highlight Freq., then make use of ENTER,
,
0-9 digit buttons to input.
Channel and Program Selection
Channel and program selection in digital television is very different from current conventional television. In
DTV, multiple programs can exist within a single 7 MHz channel. These programs behave as sub-channels
within the single channel. When tuning to a channel, the STB will also tune to a program. Your STB will
indicate the channel and program through the On-Screen Display.
The STB allows channel and program selection in the following ways:
Direct select (0-9 keys) - Directly selects a channel or program.
Program up/down select (PROGRAM+/PROGRAM- buttons ) - Select the next or previous available
channel or program.
Making use of Program List to select.
Making use of Program List to select program
1
2
Press LIST button to call up Program List.
Press navigation buttons (
selected.
) to select and press ENTER to confirm, then the desired program is
Note: the shown
information is only
served as an illustration
and may differ from the
actual ones.
14
Channel Banner
Chapter 4: Operations
Channel Banner
You can quickly check the status of current display program by pressing the DSP button.
Press DSP button twice to display EPG information if available.
Indicator
if shows MAIN, it means current operation acts to main picture.
if shows PIP, it means current operation acts to PIP sub-picture.
if shows VCR, it means current operation acts to VCR or 2nd TV picture.
The current logical channel number
Program title
Aspect
Program service provider
Teletext information
The local time
Rating control level
MAIN
9
Nine Digital
MPEG2
16:9 FULL
Now
06:00 -- 09:00 Today
Next
09:00 -- 11:00 MORNINGS WITH KERRI-ANNE
Nine Network A
2004-6-17 08:36
Teletext
No Class
Signal
Present event information
The current program audio type
Following event information
Signal intensity indication
EPG (MAIN)
Start
06:00
09:00
Stop
09:00
11:00
Event Name
TODAY
MORNINGS WITH KERRI-ANNE
TODAY
15
Audio Setup/Default Setting
Chapter 4: Operations
Audio Setup
You can choose different audio outputs in Audio Setup menu. The STB includes standard audio mode options
such as stereo or mono sound to match the broadcast signal or your home entertainment stereo system.
Other audio mode options may be supported by your service provider or TV broadcaster, such as selecting
alternate languages, or different commentators for sport events.
1
2
3
Press AUDIO button to access the Audio Setup menu.
Press
button to move the highlight upward or downward.
Audio Setup (MAIN)
Only 1 Audio (MPEG2)
STEREO OUTPUT
Press ENTER button to select sub-audio.
Press enter to set audio Ch.
You can select different audio output systems for Primary Audio
and Secondary Audio.
Default Setup
Making use of Default function, you can restore all settings to the
factory settings.
1
2
Enter into System menu and select Default.
3
If you have set a password in Password Sub-menu, then a
dialogue box appears asking you to input a password.
Program
System
Password
Time
Default
Press ENTER button to enter into the sub-menu and then press
ENTER button to confirm.
4
Input the password correctly. After inputting, a dialogue box
"Sure to restore settings" pops up.
5
Highlight Yes and press ENTER button if you want to restore all
settings to the factory settings.
If not, highlight No and press ENTER.
Program
System
Password
Time
Default
Press Enter Key to restore
the factory settings
Restore Defaults
Input Password
Note: as regards to password information, please refer to page 17
for details.
There is no preset password in this STB.
Sure to restore settings
Yes
16
No
LOCK Settings
Chapter 4: Operations
Password setup
The Rating Control lets you set up specific channels and ratings
through blocking schemes. To activate or disable all of the lock
schemes previously set up, a password is required to gain access to
this menu. You can change the password by inputting a new
password twice.
1
2
3
Press MENU button to access the menu mode.
4
Press
button to highlight PWD Setup. Press ENTER to
enter into the next level.
Press
Program
System
Password
Time
Rating CTRL
PWD Setup
Clear PWD
button to select and highlight Password.
Press ENTER button to enter into the Password menu.
Program
System
Password
Time
Rating CTRL
PWD Setup
Clear PWD
Set Password
Confirm Password
When you have not set a password yet;
Enter a password using the numbered buttons to create a
personal 4-digit security password.
When you have already set a password and you want to
change it;
Enter the old password, then input a 4-digit new password using
the numbered buttons and confirm again.
Input Password
Note:
There is no preset password in this STB, therefore when you use this STB at the first time, you may
create a password by yourself if required.
Clear password
If you want to clear the password, please do the following steps:
1
2
Enter into the Password sub-menu.
3
Input the old password correctly. Now a dialogue box "Sure to
clear password?" appears. Select Yes and press ENTER.
4
Now the password is cleared.
Press
button to select and highlight Clear PWD. Press
ENTER to enter into the next level.
Now a dialogue box appears asking you to input the old
password.
17
Program
System
Password
Time
Rating CTRL
PWD Setup
Clear PWD
Press Enter key to Clear
LOCK Settings/Time Zone Selection
Chapter 4: Operations
Rating control
Program
System
Password
Time
Blocks programs according to the program ratings limit so
children can not view certain programs. You can set the ratings
limit by blocking out all the programs with the ratings above a
specified level.
1
2
3
4
Rating CTRL
PWD Setup
Clear PWD
*G
* PG
*M
* MA
* AV
*R
Press MENU button to access the menu mode.
* Block All
Press
button to select and highlight Password.
Press ENTER button to enter into the Password menu.
G
Press
button to highlight Rating CTRL. Press ENTER
to enter into next level sub-menu.
PG (Parental Guidance Suggested):
Content is such that parents may not
want their children to view the program.
When you have not set a password yet, you directly go to
the Rating Control sub-menu.
M
When you have already set a password, input the
password correctly and enter.
( General Audiences): Content not
offensive to most viewers.
(Mature Audience): Suitable for mature
audience.
MA (Mature Adult Audience): May contain
mature themes, profane language,
graphic violence, and sexual situations.
AV (AdultAudience): Strong violence.
5
Press
to move the highlight upward or downward and
press ENTER to either block or unblock the rating.
R
(Restricted viewing): Not for children
under age 17. Strong elements of sex
and/or violence.
Note:
You can either block ( ) or unblock (
by using Block All setting.
) all programs quickly
Time zone selection
To obtain local time, you should first set local time zone, and it depends on your local station whether has
broadcast time zone information.
1
2
3
4
5
Program
System
Password
Time
Press MENU button to access the menu mode.
Press
button to select and highlight Time.
Time Zone
Press ENTER button. Now Time Zone is highlighted.
Press ENTER button again to enter into next level.
Press
button to move the highlight upward or downward
and press ENTER to select your local time zone.
18
Program
System
Password
Time
Time Zone
NSW/ACT
VIC
QLD
SA
WA
TAS
NT
DTV Channel Table
Chapter 5: Appendix
Following is the list of DTV channels available in your area. You can use it for Manual search. You can check the
following list for channel number and channel frequency.
City
Identifier
Channel & Middle Frequency
Transmitter Location
Start Date
Adelaide
Digital 7
Digital 9
Digital 10
Digital ABC
Digital SBS
VHF 6-177.5MHz
VHF 8-191.625MHz
VHF 11-219.5MHz
VHF 12-226.5MHz
UHF 33-564.5MHz
Main Transmitter-Mt Lofty
Main Transmitter-Mt Lofty
Main Transmitter-Mt Lofty
Main Transmitter-Mt Lofty
Main Transmitter-Mt Lofty
1/1/2001
1/1/2001
1/1/2001
1/1/2001
1/1/2001
Brisbane
Digital 7
Digital 9
Digital 10
Digital ABC
Digital SBS
VHF 6-177.5MHz
VHF 8-191.625MHz
VHF 11-219.5MHz
VHF 12-226.5MHz
UHF 36-585.5MHz
Main Transmitter-Mt Coot-tha
Main Transmitter-Mt Coot-tha
Main Transmitter-Mt Coot-tha
Main Transmitter-Mt Coot-tha
Main Transmitter-Mt Coot-tha
1/1/2001
1/1/2001
1/1/2001
1/1/2001
1/1/2001
Melbourne
Digital 7
Digital 9
Digital 10
Digital ABC
Digital SBS
VHF 6-177.5MHz
VHF 8-191.625MHz
VHF 11-219.5MHz
VHF 12-226.5MHz
UHF 29-536.625MHz
Main Transmitter-Mt Dandenong
Main Transmitter-Mt Dandenong
Main Transmitter-Mt Dandenong
Main Transmitter-Mt Dandenong
Main Transmitter-Mt Dandenong
1/1/2001
1/1/2001
1/1/2001
1/1/2001
1/1/2001
Perth
Digital 7
Digital 9
Digital 10
Digital ABC
Digital SBS
VHF 6-177.5MHz
VHF 8-191.625MHz
VHF 11-219.5MHz
VHF 12-226.5MHz
UHF 29-536.625MHz
Main Transmitter-Bickley
Main Transmitter-Walliston
Main Transmitter-Carmel
Main Transmitter-Bickley
Main Transmitter-Bickley
1/1/2001
1/1/2001
1/1/2001
1/1/2001
1/1/2001
Sydney
Digital 7
Digital 9
Digital 10
Digital ABC
Digital SBS
VHF 6-177.5MHz
VHF 8-191.625MHz
VHF 11-219.5MHz
VHF 12-226.5MHz
UHF 34-571.5MHz
Main TransmitterArtarmon
Main Transmitter Willoughby
Main Transmitter Artarmon
Main Transmitter Gore Hill
Main Transmitter Gore Hill
1/1/2001
1/1/2001
1/1/2001
1/1/2001
1/1/2001
QQQ-51
SBS-54
ABD-69
NTD-60
TN D-63
IMP-66
UHF 50-683.5MHz
UHF 53-704.5MHz
UHF 56-725.5MHz
UHF 59-746.5MHz
UHF 62-767.5MHz
UHF 65-788.5MHz
CTC-7
ABC-9
WIN-31
CBN-34
SBS-28
SBS-28
ABD-6
NTD-8
TN D-34
UHF 6-177.5MHz
UHF 9A-205.5MHz
UHF 11-219.5MHz
UHF 12-226.5MHz
UHF 30-613.5MHz
UHF 29-536.5MHz
UHF 30-543.5MHz
UHF 31-550.5MHz
UHF 32-557.5MHz
Telstra Tower Black Mountain
Telstra Tower Black Mountain
Telstra Tower Black Mountain
Telstra Tower Black Mountain
Telstra Tower Black Mountain
TBA
TBA
TBA
TBA
TBA
Newcastle
NBN-3
NEN-54
NRN-57
ABHN-5A/4B
SBS-45
UHF 36-585.5MHz
UHF 53-704.5MHz
UHF 51-690.5MHz
UHF 37-592.5MHz
UHF 38-599.5MHz
Mt Sugarloaf
Broadcast Site Mt Sugarloaf Range
Broadcast Site Mt Sugarloaf Range
Mt Sugarloaf
Mt Sugarloaf
6/30/2001
TBA
6/30/2001
TBA
TBA
Wollongong
WIN-59
CTC-62
CBN-65
ABWN-56
SBS-53
UHF 36-585.5MHz
UHF 37-592.5MHz
UHF 38-599.5MHz
UHF 51-590.5MHz
UHF 54-711.5MHz
WIN Tower Knights Hill
NTL Tower Knights Hill
WIN Tower Knights Hill
NTL Tower Knights Hill
NTL Tower Knights Hill
TBA
TBA
TBA
TBA
TBA
Batchelor
Canberra
Darwin
Note: If you have trouble getting DTV channel's signal, please contact your local antenna installer for help.
For updated channel table please contact your local dealer.
19
Troubleshooting
Chapter 5: Appendix
Check the following guide for the possible cause of a problem before contacting service.
Symptom
Solutions
No power.
Plug the power cord into the wall outlet securely.
No picture.
Check your antenna input or location.
Make sure the correct video display format is selected.
If the STB is connected to your monitor or TV via VIDEO OUT jack on the back
panel, the display format must be SD. Otherwise, you may not be able to see a
picture.
If STB is connected to your monitor or TV via YPbPr port or RGB on the back panel,
the display format must not be SD. Otherwise, you may not be able to see a picture.
If STB is connected to your monitor or TV via YPbPr port on the back panel, the
YPbPr/RGB selection switch must be flipped to the YPbPr. Otherwise, you may not
be able to see a picture.
If STB is connected to your monitor or TV via RGB port on the back panel, the
YPbPr/RGB selection switch must be flipped to the RGB. Otherwise, you may not
be able to see a picture.
Check to make sure all the cables are installed correctly and that the proper source
is selected on your TV.
The antenna signal strength may be low. Check the signal strength and adjust the
antenna location and direction.
The toggle of Display Format
Selection Switch can not effect.
After you toggle the Display Format Selection Switch, you must turn off the STB and
then turn on again, then the toggling can effect.
Normal picture but no
sound.
Check volume levels.
Make sure the TV is not muted.
Check that the STB is connected properly.
Picture is distorted.
Make sure the proper format is selected.
Make sure the proper aspect ratio is selected.
Make sure the video output is connected to the TV.
Available channels are
missing.
The only way that you can find all the available channels is by running the Auto
search in the Program menu.
No teletext
Make sure the channel you are watching carries teletext information.
Password is forgotten.
If you forget your password, perform the following steps to enter.
When the dialogue box asking you to enter a password appears, press TELETEXT
button, followed by ASPECT button, DSP button and then AUDIO button, and then
you can enter. But make sure not let children know it.
The remote control does
not work properly
Point the remote control at the remote sensor of the STB. Operate the remote
control within 5m.
Remove the obstacle.
Replace the batteries with new ones.
20
Specifications
Chapter 5: Appendix
PAL, DTV standard (1080i, 720p, 576p, 576i)
Channel Coverage
Terrestrial: 6-69
Input/Output
Television System
ANT Input
1
ANT Output
1 (Out to TV)
Component Video Output (YPbPr)
1 group, RCA type
(1080i, 720p, 576p)
S-Video Output
1
AV Output
2 groups, RCA type
Digital Audio Output
Coaxial, Optical
RS-232 Interface
1, 9-pin Serial Port
RGB
1, 15-pin D-sub
350 x 50 x 280 mm
Weight
3.5 kg
Power Requirements
AC 240V, 50Hz
Power Consumption
30W
Environment
Dimension (W x H x D)
Humidity
0 to 99 percent non condensing
Storage Temperature
-20 to 60 degrees Celsius
Operating Temperature
0 to 40 degrees Celsius
Note: Design and specifications are subject to change without notice.
21
PALSONIC CORPORATION PTY LTD
1 JOYNTON AVENUE
WATERLOO NSW 2017 AUSTRALIA
TEL: (02) 9313 7111
FAX: (02) 9313 7555
www.palsonic.com.au
PALSONIC CUSTOMER SERVICE
TELEPHONE
AUSTRALIA: 1300 657 888
604-DHT923-00