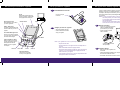
1
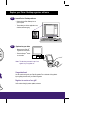
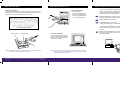
fiti are
.,
wners.
3A
Explore add-on software for your Palm III™ organizer
Enter data three ways (continued)
The onscreen keyboard
Your Palm III™ organizer supports much more than just the applications that come
with it. You can easily expand your organizer’s software capabilities by downloading
any of the thousands of applications available on the Internet including a wide variety
of freeware, shareware, and commercial applications. Just follow these steps:
• Select an application.
• Tap the screen in the application for
editing. You’ll see a blinking cursor.
• Tap “abc” for the alphabetic keyboard
or “123” for the numeric keyboard.
1.
Download applications from www.palm.com (or any add-on software web site)
to the add-on folder in the Palm™ Desktop software folder (e.g., c:\palm\add-on).
2.
Unzip the application if it is a zipped file.
3.
Select the application you want to install by:
READ THIS FIRST
Getting Started
• Opening Palm Desktop software, and clicking Install.
— or —
• Running Instapp.exe from the Palm Desktop software folder,
Next click Add and select the application you want to install, click Open, and then
click Done.
4.
Your computer keyboard
Transfer your new applications to your organizer by placing your organizer in
the cradle and pressing the HotSync® button on the cradle. (This procedure is also
called a HotSync operation.)
Use your computer keyboard to enter text in
your Palm™ Desktop software, and then press
the HotSync® button to synchronize the data
with your Palm III™ organizer.
Hints: Perform a HotSync operation regularly to make sure your data is current on both your
organizer and your computer. Also use the HotSync feature to back up your data before
you change the batteries in your organizer.
Connected Organizers
Get to know your new Palm III™ organizer
Set up your Palm III™ organizer
1.
IR Port
Exchange data and applications with
any Palm Computing® organizer that’s
also equipped with an infrared port.
Contrast Control
Applications Launcher
Tap the Applications icon to see all
your Palm™ applications.
Set up your Palm™ Desktop organizer software
Install AAA batteries as shown.
The Palm™ Desktop software you install on your computer includes the same main
applications as your Palm III™ organizer: Address Book, Date Book, To Do List, Memo
Pad, Expense, and desktop e-mail connectivity. You can use the HotSync® Manager
feature of this software to back up and exchange data between your organizer and
your computer.
Push up on the stylus
to remove it.
Notes: If you are using Microsoft Outlook or other organizer software instead of
Palm Desktop software, you still need to complete the following process
to install HotSync Manager and the connection software (conduit) for the
other organizer software.
NT users must have write privileges to install new software and should
install in their user’s account, not the administrator account.
Stylus
3.
Graffiti®
Writing Area
Use Graffiti® writing software to enter
text and numbers into your Palm III™
organizer.
2.
• Turn off your computer and connect the
cradle to an available COM (serial)
port on the back of your computer.
Configure your Palm III™ organizer.
• Remove the protective screen film.
• Turn the computer on when the
cradle is connected.
• Follow the instructions onscreen to
set up your organizer.
Power Button/Backlight Control
Press to turn your Palm III organizer
on and off. Hold for a few seconds to
activate the screen backlight.
Make the connection.
Scroll Button
Cradle and HotSync® Button
Attach the cradle to your computer
and press the HotSync® button to
exchange data back and forth
between your Palm III organizer
and computer.
Hints: If your organizer does not turn on, try these steps:
• Adjust the contrast control.
• Make sure the batteries are fresh and properly installed.
Date Book
If necessary, use the included
serial port adapter.
• Press the power button. Your organizer turns off automatically when it is
not in use.
Address Book
To Do List
Memo Pad
Applications Buttons
Press buttons to immediately
access your main applications.
• Some models include a reset tip inside the stylus. Simply unscrew the tip
of the stylus, or use an unfolded paperclip, and gently press the reset
button on the back of your organizer.
• If your organizer still does not turn on, hold down the power button while
pressing the reset button and then release it.
4.
Install the software.
• Make sure your Palm III organizer is not
in the cradle.
• Insert the Palm Desktop CD-ROM into your computer
and wait for the Installer Menu screen.
• Click INSTALL and follow the instructions onscreen.
Explore your Palm™ Desktop organizer software
5.
Launch Palm™ Desktop software.
• Double-click the Palm Desktop icon on
your computer.
• To enter data, just click an application icon,
click New, and start typing.
6.
Synchronize your data.
• Make sure your Palm III™
organizer is in the cradle.
• Press the Hotsync® button
on the cradle.
Note: The data that you entered in step 5 now
appears on your organizer too.
Congratulations!
You are up and running with your Palm III organizer. Turn to the back of this guide for
tips on getting the most out of your Palm III organizer.
Register to receive a free gift!
You’ll receive a free gift, product updates, and more.
Enter data three ways
Explore add-on software for your Palm III™ organizer
Enter data three ways (continued)
Graffiti® writing software
The onscreen keyboard
Enter text quickly and easily using Graffiti® writing. Graffiti characters consist mainly of singlestroke block letters. Your writing turns into text wherever the blinking cursor appears on the
organizer screen. It’s fast (up to 30 words per minute), fun, and accurate.
• Select an application.
Your Palm III™ organizer supports much more than just the applications that come
with it. You can easily expand your organizer’s software capabilities by downloading
any of the thousands of applications available on the Internet including a wide variety
of freeware, shareware, and commercial applications. Just follow these steps:
• Tap the screen in the application for
editing. You’ll see a blinking cursor.
• Tap “abc” for the alphabetic keyboard
or “123” for the numeric keyboard.
1.
Download applications from www.palm.com (or any add-on software web site)
to the add-on folder in the Palm™ Desktop software folder (e.g., c:\palm\add-on).
2.
Unzip the application if it is a zipped file.
3.
Select the application you want to install by:
• Opening Palm Desktop software, and clicking Install.
— or —
• Running Instapp.exe from the Palm Desktop software folder,
Next click Add and select the application you want to install, click Open, and then
click Done.
4.
Write letters here
Write numbers here
Your computer keyboard
Use your computer keyboard to enter text in
your Palm™ Desktop software, and then press
the HotSync® button to synchronize the data
with your Palm III™ organizer.
Hints: Write BIG and press firmly. Practice! Play Giraffe to improve your Graffiti writing skills.
For instructions on installing Giraffe, see the Handbook.
Copyright © 1998 3Com Corporation or its subsidiaries. All rights reserved. 3Com, the 3Com logo, Palm Computing, HotSync and Graffiti are
registered trademarks, Palm, Palm III, the Palm Computing Platform logo, and the Palm III logo are trademarks of Palm Computing, Inc.,
3Com Corporation or its subsidiaries. Other product and brand names may be trademarks or registered trademarks of their respective owners.
Printed in U.S.A.
P/N: 405-0443A
Hints: Perform a HotSync operation regularly to make sure your data is current on both your
organizer and your computer. Also use the HotSync feature to back up your data before
you change the batteries in your organizer.
Transfer your new applications to your organizer by placing your organizer in
the cradle and pressing the HotSync® button on the cradle. (This procedure is also
called a HotSync operation.)