1
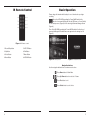
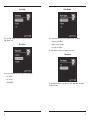
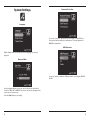
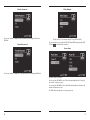
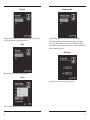
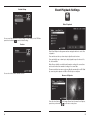
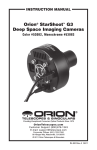
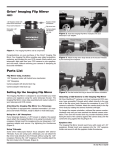
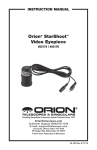
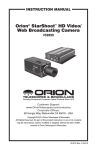
instruction Manual Orion® StarShoot™ LCD-DVR #58125 The Orion StarShoot LCD-DVR is a highly portable viewing and recording device for video cameras (& other devices) with composite output video signals (NTSC or PAL). With this device astronomers can easily attach a video camera to a telescope to view and record color images and movies on its high resolution 2.5" TFT true color LCD screen. Images and movies can be recorded to SD Cards up to 32G (2G SD Card included). Movies and Images can be played back on the device itself, played back through a TV (NTSC or PAL), copied via SD Card or copied directly to computer using the Included USB cable. Please read this instruction manual before attempting to use the device. Providing Exceptional Consumer Optical Products Since 1975 OrionTelescopes.com Customer Support (800) 676-1343 E-mail: [email protected] Corporate Offices (831) 763-7000 89 Hangar Way, Watsonville, CA 95076 © 2011 Orion Telescopes & Binoculars IN 434 Rev. A 12/11 2 Parts List LCD-DVR Figure 1. Included items. Figure 2.The Orion Starshoot LCD-DVR. • StarShoot™ LCD-DVR 1. Power On/Off 11. Reset Button • Leather case 2. Charge LED 12. Lock Switch • IR Remote Control 3. Internal Microphone 13. Internal Speaker • AV Cable 4. AV Input & DC Out jack 14. SD Card Socket • Mains AC->DC Power Adapter 5. Low Power LED 15. IR Sensor • Wired Control Button 6. Record / Stop Button 16. Down Button • Rechargeable Lithium battery 7. Power On/Record LED 17. Up Button • USB Cable 8. DC5V In Jack 18. Select Button • 2G SD card 9. USB Port 19. Esc Button • Velcro strip to optionally attach device to telescope 10. AV Out / Control Button In Jack 20. Menu Button 3 IR Remote Control Basic Operation Please charge the internal mobile battery for over 3 hours before you begin recording. Turn on the LCD-DVR by pushing the Power On/Off switch in the direction of arrow and holding until the red LED turns on. You will briefly see the startup screen (Figure 4) before entering the Camera Manager Screen (Figure 6). Turn off the LCD-DVR by pushing the Power On/Off switch in the direction of arrow and holding until the shutdown screen appears before turning itself off (Figure 5). Figure 3. IR Remote control. 1. Record/Stop button 5. LCD/TV Button 2. Up Button 6. Exit Button 3. Select Button 7. Menu Button 4. Down Button 8. LCD Off Button Figure 4. Startup Screen. Figure 5. Shutdown Screen. Navigation buttons Use the navigation buttons below to make menu selections. Press Menu button for Main Menu Press Up/Down buttons for selection / Volume Press Esc button to exit Press Select button to select choice 4 5 Camera Manager Screen Recording Methods Manual Push the Record / Stop Button on the side of the LCD-DVR to “Rec” to start recording. Push the Record / Stop button to “Stop” to stop recording. IR Remote Control Press the Record / Stop Button on the IR Remote to Start / Stop recording. Figure 6. Camera Manager Screen. 1. Image Size 6. SD card info 2. Resolution 7. Battery Capacity 3. Overwrite On/Off 8. Date and Time Stamp 4. In/Out Microphone 9. MODE 5. Vibration On Push Button Plug the Wired Control Button into the AV Out port on the LCD-DVR. Press and hold Red button to automatically turn on LCD-DVR and start recording. Press and release Red button again to stop recording and turn LCD-DVR off. Motion Automatically start recording when motion is detected according to sensitivity setting. For more information see Recorder Settings Motion Detect. 6 7 Playback Methods USB On Device (LCD) Copy movies, stills and audio from the LCD-DVR directly to computer hard drive for playback on laptop / PC or for further processing. Plug USB cable into computer and LCD-DVR in order for password protection window to appear. Playback movies, stills and audio via the high resolution 2.5", TFT true color LCD screen. For more information see Playback Settings Video Playback section of this manual. TV Out Enter correct password to be able to access recordings directly from computer. Playback movies, stills and audio on a TV (NTSC or PAL) The default password is 00000 for connecting to PC. For more information see System Settings Video Output section of this manual. The LCD-DVR will be powered off automatically when you disconnect the USB from PC. 8 9 SD-Card Connecting External Devices Connect to external cameras Eject SD-Card from LCD-DVR and conveniently place into other devices that include SD-Card port. A 2G SD-Card is included with the LCD-DVR. The LCD-DVR can accept SD-Cards up to 32G. The recording time will vary based upon quality setting of recording. Recording time: 15 minutes~2.5 hours per 1G SD-Card 8 hours~80 hours per 32G SD-Card The included 2G SD-Card comes pre-installed with: • Movies recorded with Orion video cameras • Images that were recorded with Orion Video Cameras and then enhanced using astronomical post processing software such as Registax, MaximDL and Photoshop. • Orion Video camera training Videos Use the included AV cable to connect Video Cameras or other composite Video out devices such as DVD, VCR, DVR and Video Game Consoles to the LCDDVR using the AV-In port. The yellow RCA connector is for video, the white and the red RCA connector are for audio; NOTE: if the video signal and SD card are unavailable the LCD-DVR will alarm by vibration and red warning text will appear on screen. 10 11 Main Menu Screen From the Camera Manager screen Press the Main Menu screen. Recorder Settings Menu button to bring up the Work Mode Select Recorder Settings icon and press Recording settings menu. Select Device Settings icon and press settings menu. Select Playback Settings icon and press Playback settings menu. Select button to enter Select button to enter Device There are three work modes for selection: • Record – Record Movie (AVI file format) Select button to enter • Photo – Record Photo (JPG file format) • Audio – Record Audio (WAV file format) Record Movie mode is the suggested mode for astronomers so that post processing techniques (such as stacking) can be accomplished using hundreds of frames. Motion Detection Select On or Off to enable or disable the Motion detection recording function, When the motion detect record function is on, and the Record / Stop switch is pushed to the “Rec” side, a motion can trigger an automatic recording. 12 13 Sensitivity There are three settings for the motion detection sensitivity: High, Medium, Low Resolution Video Quality There are three video quality options available for video recording • High is about 8-9 Mbps • Medium is about 3.5 Mbps • Low is about 2.5 Mbps The video quality should be set to High for best results. Timestamp You can select the image size for your photo or video capture: • D1: 720*480 • D1: 720*576 • VGA:680*480 14 The timestamp will appear on top right of the video image when Timestamp setting is set to On, 15 File Length Sets the maximum time length of recorded files. FPS Set This option is for setting the amount of frames per second when you record video, such as 30 frames per second, 15 frames per second. Audio Record Volume Microphone Select Select the built in microphone or external microphone as audio source. Overwrite If Overwrite is set to Off the LCD-DVR will stop recording once the SD Card becomes full. If Overwrite is set to On the LCD-DVR will continue to record by writing over the old files once the SD Card becomes full. You can adjust the volume level of the audio input from 1 to 10. If noise is present please adjust the volume to a lower value, otherwise select a higher volume for audio recording. 16 17 System Settings Password Protection Language You can set or cancel the password protection for USB or format SD Disc or files to prevent deletion without your authorization. The default password is 000000 for all passwords. USB Password English, Simple Chinese and Traditional Chinese languages are currently supported. Date and Time You can set, enable or disable the USB password for accessing the LCD-DVR by USB. Use the navigation buttons to move the cursor to the date line and enter the correct the YEAR, DAY or MONTH, Next move to the time line and adjust to the correct time for your time zone. Press the Select button to save setting. 18 19 Delete Password You can set, enable or disable the delete password for deleting the files in the SD Card. Format Password Video Output Set the correct TV out format to match TV set (NTSC or PAL). It is also possible to cycle between PAL, NTSC and LCD by pressing the LCD/ TV button on the IR remote controller; Power Save You can set, enable or disable the Format password for formatting the SD Card. In order to save more power: You can set the LCD-DVR to turn off the Power automatically after 5 seconds, 10 seconds, 1 minute or never. You can set the LCD-DVR to turn off the LCD automatically after 5 minutes, 10 minutes, 20 minutes or never. The LCD will be turned back on if you press any key. 20 21 Vibe Alert When set to On, the LCD-DVR will give a vibration prompt for power on, video loss, SD card invalidation, low power, and power off. Beep Firmware Update Copy the firmware update file to SD card and insert into LCD-DVR. Select Firmware update, then the firmware update dialog block will appear on the screen. When updating it is critical to have enough battery power or connect the AC adapter to AC power outlet and do not operate the LCD-DVR to prevent Firmware update failure. SD Card Info Optionally play a beep sound when pressing buttons. Format You can check the information on the current SD card. You can format the SD card, the default password is 000000. 22 23 Default Setup Event Playback Settings Video Playback You can reset the LCD-DVR to default setting if it is necessary; select YES then press the select button to reset to default setting; Version Enter Event Playback settings menu and use navigation buttons to select files to playback. Press and release the up or down keys to adjust the audio volume. Press and hold the up or down keys to adjust playback speed to values of 1x, 2x, 4x, 8x and 20x. When files are initially recorded they will named according to the current time and located in directories named according to the current date. Filenames and directory names can be modified by renaming files on SD Card by connecting with computer via USB or SD-Cart port on computer. You can check the current Firmware version. Browse still photos Press the select button on the image Viewer item to browse the still photos, press the up or down key to view last or next picture. 24 25 LCD-DVR Specifications Play back the audio files Press the select button on the Voice Player item to play back the audio files. Managing recorded files High Resolution LCD: 2.5" TFT true color High Resolution LCD Recorded Video: MPEG AVI Recorded Photo: JPG Recorded Audio: WAV Video In/Out: RCA Composite NTSC or PAL Storage type: SD card (FAT 32 ,support to 32G) Video size and speed: NTSC: 720x480 (D1) @ 30FPS PAL: 720x576 (D1) @ 25FPS Recording time: 15 minutes~2.5 hours /1G 8 hours~80 hours /32G Power consumption: 200mA 3.7V 1000 mAH Rechargeable Li-ion battery 5.0V 2A AC Adapter Size: 90 mm x 59 mm x23 mm Weight: 100g (including battery) Move the cursor to select a file and press the Menu Button , the file manager menu will pop up on the screen. You can now delete current file or all files. 26 27 One-Year Limited Warranty This Orion StarShoot LCD-DVR is warranted against defects in materials or workmanship for a period of one year from the date of purchase. This warranty is for the benefit of the original retail purchaser only. During this warranty period Orion Telescopes & Binoculars will repair or replace, at Orion’s option, any warranted instrument that proves to be defective, provided it is returned postage paid to: Orion Warranty Repair, 89 Hangar Way, Watsonville, CA 95076. If the product is not registered, proof of purchase (such as a copy of the original invoice) is required. This warranty does not apply if, in Orion’s judgment, the instrument has been abused, mishandled, or modified, nor does it apply to normal wear and tear. This warranty gives you specific legal rights, and you may also have other rights, which vary from state to state. For further warranty service information, contact: Customer Service Department, Orion Telescopes & Binoculars, 89 Hangar Way, Watsonville, CA 95076; (800) 676-1343. OrionTelescopes.com 89 Hangar Way, Watsonville, CA 95076 Customer Support Help Line (800) 676-1343 © 2011 Orion Telescopes & Binoculars