1
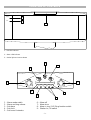
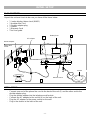
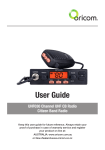
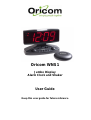
Oricom WNS1
Jumbo Display
Alarm Clock and Shaker
User Guide
Keep this user guide for future reference
WARNINGS
WARNINGS
Before installing or changing the battery make sure that the telephone is not connected to the
telephone network or the mains power supply.
When inserting batteries into this product, observe the proper polarity or direction, failure may result
in leakage or explosion.
Remove the batteries from this product if it will not be used for a long time (several months or more)
since during this time the batteries could leak.
Batteries must be disposed of in accordance with the applicable waste disposal regulations.
AC ADAPTOR
Use only the mains AC adapter supplied with this product. Incorrect adapter polarity or voltage can
seriously damage the unit.
AC Adaptor model number:- MKA91000SA
Input: 240VAC 50Hz 150mA
Output: 9.0VDC 1000mA
CAUTION
Always have a corded phone available to be able to make and receive calls to emergency
services in case of mains power failure.
Do not use any telephone during an electrical thunderstorm as it is possible to get an electric
shock. Refer to information contained in the White pages directory.
BATTERY BACK-UP (Battery not supplied)
It’s not necessary to install a battery for the clock to function. You can install a 9 volt alkaline battery
to keep the time and alarm settings in the event of a power cut or the AC adaptor being unplugged for
any reason.
We recommend you replace the old battery every 12 months. A leaking battery can destroy your
WNS1.
INSTALLING THE 9 VOLT BATTERY
-
Before installing or changing the battery make sure that the telephone is not connected to the
telephone network or the mains power supply.
Remove the battery door screw with a small flat blade screwdriver
Remove the battery door
Install a new 9 volt alkaline battery.
Replace the battery door and screw.
-2-
LOCATION OF CONTROLS
PM
1
AL
2
3
1 – PM LED indicator
2 – Alarm LED indicator
3 – Strobe light and snooze button
9
8
1
2
7
3
6
4
5
1 – Alarm mode switch
2 – Alarm and ring volume
3 – Set alarm
4 – Set clock
5 – Set hours & minutes
6 – Alarm off
7 – Alarm tone
8 – Alarm + ring / Off / Ring function switch
9 – Shaker Lo / Hi switch
-3-
INITIAL SETUP
PACK CONTENTS
Unpack the unit and check to be sure you have all the items below.
•
•
•
•
•
•
1 Jumbo display /alarm clock (WNS1)
1 modular line Cord
1 Double adaptor plug
1 Shaker
1 Warranty Card
This User guide
Battery Door
1
AC Adaptor
4
Double Adaptor
Phone Wall
socket
3
Shaker
Dimmer switch
2
INITIAL SET UP
-
Connect one end of the phone line cord to the back of the unit (1) and the other end to the
double adaptor plug.
- Plug the double adaptor into the telephone wall socket.
- Connect the AC adaptor to the socket (4) on the back of the unit.
- Plug the AC adaptor to the power socket on the wall.
- Plug in the shaker to the back of the unit.
-4-
ALARM AND CLOCK FUNCTION
SETTING THE TIME (
-
)
Press and hold
(set clock) button.
Press H (hour) and M (minute) until correct hour and minutes appear on the display.
Release
(set clock) button.
For p.m. hours, the p.m. indicator will appear on the display near the inscription PM.
SETTING THE ALARM TIME (
-
)
Press and hold
(set alarm) button.
Press H (hour) or M (minute) until correct hour and minutes appear on the display.
Release
(set alarm) button.
Press
, H and M to reset the alarm clock to 12.
SETTING THE ALARM MODE
Put the function switch on A+T position. Choose which alarm mode you wish to be awakened to by
moving the alarm mode switch to one of the following selections:
V
:
only shaker activated
V+S
:
both sound and shaker alarm activated
F+V
:
both strobe light and shaker alarm activated
When the alarm is set to one of the alarm modes, the alarm indicator will appear on the display near
the inscription AL.
The table below shows how the alarm modes indicate an incoming call from the alarm clock.
ALARM MODE
SOUND
SHAKER
STROBE LIGHT
ACTION
Buzzer
Vibrates
Flashes
SNOOZE BUTTON
/ STROBE LIGHT
ALARM CLOCK
Continuous
Continuous
Continuous
INCOMING CALL
With pauses
With pauses
With pauses
When the alarm sounds, you can use the
snooze button to temporarily turn off the alarm. The
alarm will come on again after 9 minutes. This sequence can be carried out for up to 2 hours after
which the alarm mode will be automatically switched off.
SWITCHING THE ALARM OFF
Press the alarm off button (OFF), the alarm will them operate at the same time the next day. The
alarm if not switched off will continue to sound for up to 2 hours and then be automatically switched
off.
-5-
RINGER ON/OFF SWITCH (A+T / OFF / T)
-
A+T (alarm + telephone): for the alarm and telephone ring position.
OFF: alarm and ring off.
T (telephone): for the telephone ring position.
HOW TO USE WITH YOUR TELEPHONE
-
Ensure that your telephone is connected to the WNS1 as shown in the installation section.
Select the ringer On/Off switch on the A+T or T position for the ring.
Choose which of the alarm modes you wish to alert you of your incoming telephone calls (see
page 5: V, V+S, S+F or F+V)
When the alarm mode selected indicates there is an incoming telephone call, lift the telephone
handset and answer the call. When you have finished the call replace the handset and the
alarm will be ready to indicate the next call.
DIMMER SWITCH (
)
Adjust the brightness of the display by moving the
control at the rear of your WNS1.
VOLUME CONTROL
Use this to set the volume of the ringer and the alarm sound.
TONE
This allows you to select the tone of the alarm sound that is best for you.
SHAKER SWITCH (
-/+)
Sets the motion of the shaker to Lo (-) or Hi (+)
-6-
CARE & WARRANTY
CLEANING
The surface of the case can be cleaned with a dry, soft, lint-free cloth. Never use cleaning agents,
particularly aggressive solvents. Apart from occasional cleaning of the case, no other care is
necessary. The rubber feet on the base are not resistant to all cleaning agents. The rubber feet do
not normally leave any marks on the surface. However, on account of the multitude of varnishes and
surface finishes used, surface marks caused by the feet of the unit cannot be ruled out.
This product is covered by a 12 month warranty against defective workmanship or parts. The warranty
does not extend to damage caused by misuse, negligence, water ingress, excessive voltage,
telephone line faults or lightning. This guarantee in no way affects your statutory rights. Full details of
the warranty are contained in the enclosed warranty card.
WARRANTY
If you feel this product is not working correctly please consult the user guide and ensure that you are
using the product in accordance with the instructions. Remove all extra telephone equipment and
connect only this telephone directly to the telephone socket.
If the fault is still present, connect another telephone (if available) to the telephone socket. The
results will show you whether the fault lies with this unit or with the telephone line.
If the product is working correctly the fault is on the telephone line. Please contact your network
operator for assistance.
To order replacement batteries and in case of any technical issues you may have with this
product please consult our website for further information or send us an email for a prompt
response to your enquiry.
In the unlikely event of a fault developing, please contact us for assistance. If the product is then
found to be faulty you will be asked to return it directly to us with a copy of the purchase receipt.
Australia
Oricom International Pty Ltd
Locked Bag 658
South Windsor, NSW 2756
Customer support
Email: [email protected]
Web: www.oricom.com.au
Fax: (02) 4574 8898
Ph: 1300 889 785
-7-